安装说明bf751_END1
OPT 7512 DMX512 套装安装指南说明书
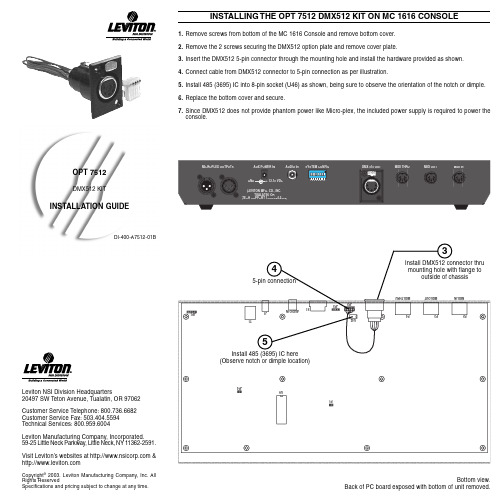
OPT 7512DMX512 KIT INSTALLATION GUIDEDI-400-A7512-01BINSTALLING THE OPT 7512 DMX512 KIT ON MC 1616 CONSOLE1.Remove screws from bottom of the MC 1616 Console and remove bottom cover.2.Remove the 2 screws securing the DMX512 option plate and remove cover plate.3.Insert the DMX512 5-pin connector through the mounting hole and install the hardware provided as shown.4.Connect cable from DMX512 connector to 5-pin connection as per illustration.5.Install 485 (3695) IC into 8-pin socket (U46) as shown, being sure to observe the orientation of the notch or dimple.6.Replace the bottom cover and secure.7.Since DMX512 does not provide phantom power like Micro-plex, the included power supply is required to power theconsole.U9P1JP4JP1T1J1AUD I OI NS1JP3U46JP2MI D I-I NMI D I-OUTMI D I-THRUP4P3P2USHMICROPLEX OUTPUTS AUX POWER IN AUDIO IN SYSTEM CONFIG DMX 515 OUT MIDI THRU MIDI OUT MIDI INLEVITON MFG. CO., INC.TUALATIN, ORTECH SUPPORT 1-800-864-2502GND+ 12-15 VDC5-pin connection4Install DMX512 connector thrumounting hole with flange tooutside of chassis3Install 485 (3695) IC here(Observe notch or dimple location)5Bottom view.Back of PC board exposed with bottom of unit removed.Leviton NSI Division Headquarters20497 SW Teton Avenue, Tualatin, OR 97062 Customer Service Telephone: 800.736.6682 Customer Service Fax: 503.404.5594Technical Services: 800.959.6004Leviton Manufacturing Company, Incorporated.59-25 Little Neck Parkway, Little Neck, NY 11362-2591. Visit Leviton’s websites at & Copyright® 2003. Leviton Manufacturing Company, Inc. All Rights ReservedSpecifications and pricing subject to change at any time.INSTALLING THE OPT 7512 DMX512 KIT ON MC 6300 CONSOLE1.Remove 6 screws from bottom front lip and rear panelof the MC 6300 Console and open top panel.Disconnect data cable from I/O card (JP6) to removetop panel.2.Remove the 2 screws securing the DMX512 optionplate and remove cover plate.3.Insert the DMX512 5-pin connector through themounting hole and install the hardware provided asIN DI-400-A7512-01B。
惠尔兰引擎工程公司无线调试器的安装及使用说明(PDF)说明书

©2020 Whelen Engineering Company Inc.Form No.14D22 (021820)A u t o m o t i v e : S i r e n s /S w i t c h e sInstallation Guide:Howler™ Siren Speaker Mounting Bracket(2019 Dodge Charger)51 Winthrop RoadChester, Connecticut 06412-0684Phone: (860) 526-9504Internet: Sales e-mail: autosale@Customer Service e-mail: custserv@®ENGINEERING COMPANY INC.For warranty information regarding this product, visit /warrantyDANGER! Sirens produce extremely loud emergency warning tones! Exposure to these tones without proper and adequate hearing protection, could cause ear damage and/or hearing loss! The Occupational Safety & Health Administration () provides information necessary to determine safe exposure times in Occupational Noise Exposure Section 1910.95. Until you have determined the safe exposure times for your specific application,operators and anyone else in the immediate vicinity should be required to wear an approved hearing protection device. Failure to follow this recommendation could cause hearing loss!•Proper installation of this product requires the installer to have a good understanding of automotive electronics, systems and procedures.•Whelen Engineering requires the use of waterproof butt splices and/or connectors if that connector could be exposed to moisture.•Any holes, either created or utilized by this product, should be made both air- and watertight using a sealant recommended by your vehicle manufacturer.•Failure to use specified installation parts and/or hardware will void the product warranty.•If mounting this product requires drilling holes, the installer MUST be sure that no vehicle components or other vital parts could be damaged by the drilling process. Check both sides of the mounting surface before drilling begins. Also de-burr the holes and remove any metal shards or remnants. Install grommets into all wire passage holes.•If this manual states that this product may be mounted with suction cups, magnets, tape or Velcro®, clean the mounting surface with a 50/50 mix of isopropyl alcohol and water and dry thoroughly.•Do not install this product or route any wires in the deployment area of your air bag. Equipment mounted or located in the air bag deployment area will damage or reduce the effectiveness of the air bag, or become a projectile that could cause serious personal injury or death. Refer to your vehicle owner’s manual for the air bag deployment area. The User/Installer assumes full responsibility to determine proper mounting location, based on providing ultimate safety to all passengers inside the vehicle.•For this product to operate at optimum efficiency, a good electrical connection to chassis ground must be made. The recommended procedure requires the product ground wire to be connected directly to the NEGATIVE (-) battery post (this does not include products that use cigar power cords).•If this product uses a remote device for activation or control, make sure that this device is located in an area that allows both the vehicle and the device to be operated safely in any driving condition.•It is recommended that these instructions be stored in a safe place and referred to when performing maintenance and/or reinstallation of this product.•FAILURE TO FOLLOW THESE SAFETY PRECAUTIONS AND INSTRUCTIONS COULD RESULT IN DAMAGE TO THE PRODUCT OR VEHICLE AND/OR SERIOUS INJURY TO YOU AND YOUR PASSENGERS!CAUTIONLoud siren noise can cause hearing damage and/or loss.Refer to OSHA Section 1910.95prior to putting ANY siren into service!Wear Protection!ACTIVATION OF THIS SIREN MAY DAMAGE UNPROTECTED EARS!Warnings to InstallersWhelen’s emergency vehicle warning devices must be properly mounted and wired in order to be effective and safe. Read and follow all of Whelen’s written instructions when installing or using this device. Emergency vehicles are often operated under high speed stressful conditions which must be accounted for when installing all emergency warning devices. Controls should be placed within convenient reach of the operator so that they can operate the system without taking their eyes off the roadway. Emergency warning devices can require high electrical voltages and/or currents. Properly protect and use caution around live electrical connections.Grounding or shorting of electrical connections can cause high current arcing, which can cause personal injury and/or vehicle damage, including fire. Many electronic devices used in emergency vehicles can create or be affected by electromagnetic interference. Therefore, after installation of any electronic device it is necessary to test all electronic equipment simultaneously to insure that they operate free of interference from other components within the vehicle. Never power emergency warning equipment from the same circuit or share the same grounding circuit with radio communication equipment. All devices should be mounted in accordance with the manufacturer’s instructions and securely fastened to vehicle elements of sufficient strength to withstand the forces applied to the device. Driver and/or passenger air bags (SRS) will affect the way equipment should be mounted. This device should be mounted by permanent installation and within the zones specified by the vehicle manufacturer, if any. Any device mounted in the deployment area of an air bag will damage or reduce the effectiveness of the air bag and may damage or dislodge the device. Installer must be sure that this device, its mounting hardware and electrical supply wiring does not interfere with the air bag or the SRS wiring or sensors. Mounting the unit inside the vehicle by a method other than permanent installation is not recommended as unit may become dislodged during swerving; sudden braking or collision. Failure to follow instructions can result in personal injury. Whelen assumes no liability for any loss resulting from the use of this warning device. PROPER INSTALLATION COMBINED WITH OPERATOR TRAINING IN THE PROPER USE OF EMERGENCY WARNING DEVICES IS ESSENTIAL TO INSURE THE SAFETY OF EMERGENCY PERSONNEL AND THE PUBLIC.Warnings to UsersWhelen’s emergency vehicle warning devices are intended to alert other operators and pedestrians to the presence and operation of emergency vehicles and personnel. However, the use of this or any other Whelen emergency warning device does not guarantee that you will have the right-of-way or that other drivers and pedestrians will properly heed an emergency warning signal. Never assume you have the right-of-way. It is your responsibility to proceed safely before entering an intersection, driving against traffic, responding at a high rate of speed, or walking on or around traffic lanes. Emergency vehicle warning devices should be tested on a daily basis to ensure that they operate properly. When in actual use, the operator must ensure that both visual and audible warnings are not blocked by vehicle components (i.e.: open trunks or compartment doors), people, vehicles, or other obstructions. It is the user’s responsibility to understand and obey all laws regarding emergency warning devices. The user should be familiar with all applicable laws and regulations prior to the use of any emergency vehicle warning device. Whelen’s audible warning devices are designed to project sound in a forward direction away from the vehicle occupants. However, because sustained periodic exposure to loud sounds can cause hearing loss, all audible warning devices should be installed and operated in accordance with the standards established by the National Fire Protection Association.Safety FirstThis document provides all the necessary information to allow your Whelen product to be properly and safely installed. Before beginning the installation and/or operation of your new product, the installation technician and operator must read this manual completely. Important information is contained herein that could prevent serious injury or damage.IMPORTANT! READ THESE WARNINGS BEFORE CONTINUING!The Howler™ Supplemental Siren was designed for use in high-risk areas such as an intersection. It is not intended to be, nor should be operated as a replacement or alternative to the vehicle’s primary siren.The low-frequency tones of the Howler demonstrate significantly different audio characteristics as compared to those of a traditional higher-frequency siren. While the low-frequency tones are better able to penetrate other vehicles, thus alerting drivers to the presence of the responding emergency vehicle, these tones may also penetrate into the responding vehicle itself. This could potentially expose the operator to increased noise levels.To help eliminate overexposure, the Howler siren has been designed with a built-in timing circuit. The Occupational Safety & Health Administration (OSHA) () provides information necessary to determine safe exposure times in Noise and Hearing Conservation, Section 1910.95 (Occupational Noise Exposure). Until you have determined the safe exposure times for your specific application, this siren should be configured for the minimum operating time and operators should be required to use an approved hearing protection device. FAILURE TO FOLLOW THIS RECOMMENDATION COULD CAUSE HEARING LOSS!IMPORTANT: It is the responsibility of the installation technician to make sure that the installation and operation of this product will not interfere with or compromise the operation or efficiency of any vehicle equipment!Note: The Howler siren speaker may only be installed on the driver-side of a2020 Dodge Charger.1.Remove and discard the existing brackets and hardware (if present) fromyour Howler Siren Speaker (Fig. 1).2.With the bracket and Howler speaker properly oriented (with screened ventopenings facing downwards), route the speaker wires through the wirepassage hole in the bracket and secure the speaker onto the bracket usingthe hardware provided (Fig. 2).3.Following the factory recommended procedure, remove the front bumperfascia.4.Locate and remove the two M8 bumper bolts from the far left end of thebumper. Replace these bolts with the longer M8 bolts included with this kitand tighten to the manufacturers recommended torque value. Note: Theadditional length of these bolts requires the plastic trim panel adjacent tothese bolts to be trimmed as shown in Fig. 3.5.Return this panel to its original, installed location after trimming (Fig. 4).6.Place the bracket/speaker assembly into its mounting location. Whenproperly positioned, the two, outermost bracket mounting holes will bealigned with two vacant holes in the bumper structure. The two innermostbracket mounting holes will fit onto the bolts installed in step 4.7.Locate the two 5/16-18 x 3/4” Hex Head bolts, two 5/16 flat washers andtwo, 5/16-18 Elastic Stop Nuts included with this kit. Install the bolts throughthe bumper structure and through the bracket. Now install a washer andelastic stop nut onto each bolt and tighten firmly (Fig. 5).8.Locate the two, M8 x 1.25 elastic stop nuts. Install the two remaining flatwashers and the M8 Elastic stop nuts onto the two bolts installed in step 4and tighten firmly (Fig. 6).9.Extend the BLACK (-) negative and WHITE (+) positive speaker wires toyour amplifier and connect as outlined in the amplifier instructions.IMPORTANT! When routing wires, it is important to choose a path that willkeep the wires away from any excessive heat or from any vehicle equipmentthat could compromise their integrity such as trunk lids or door jams.10.Be sure to test the siren for proper operation before returning the vehicle toactive service.Refer to your Howler Siren Amplifier manual for detailed operatinginformation and procedures.Fig. 1Fig. 2Fig. 3Fig. 4Fig. 5Fig. 6。
西门子前端巴拉连接器安装说明说明书
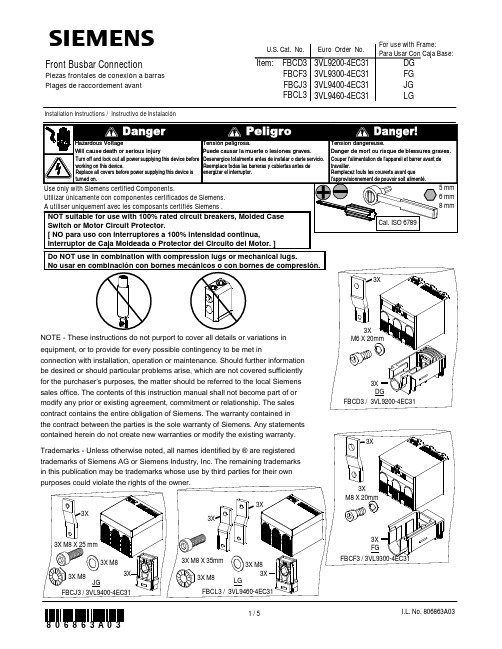
sFront Busbar ConnectionPiezas frontales de conexión a barras Plages de raccordement avantInstallation Instructions / Instructivo de InstalaciónUse only with Siemens certified Components.Utilizar únicamente con componentes certificados de Siemens.A utiliser uniquement avec les composants certifiés Siemens .Turn off and lock out all power supplying this device before Couper Tensión Tension dangereuse.Hazardous Voltageworking on this device.Replace all covers before power supplying this device is turned on.l'alimentation de l'appareil et barrer avant de travailler.Remplacez touts les couverts avant que l'approvisionnement de pouvoir soit alimenté.peligrosa.Puede causar la muerte o lesiones graves.Danger de mort ou risque de blessures graves.Will cause death or serious injury Desenergice totalmente antes de instalar o darle servicio. Reemplace todas las barreras y cubiertas antes de energizar el interruptor.Item: FBCD3FBCF3FBCJ3FBCL3U.S. Cat. No.Euro Order No.3VL9200-4EC313VL9300-4EC313VL9400-4EC313VL9460-4EC31Cal. ISO 67895 mm6 mm 8 mmNOT suitable for use with 100% rated circuit breakers, Molded Case Switch or Motor Circuit Protector.[ NO para uso con interruptores a 100% intensidad continua, Interruptor de Caja Moldeada o Protector del Circuito del Motor. ]DGFBCD3 / 3VL9200-4EC313X M6 X 20mm3X 3XFGFBCF3 / 3VL9300-4EC313X M8 X 20mm3X 3XDo NOT use in combination with compression lugs or mechanical lugs.No usar en combinación con bornes mecánicos o con bornes de compresión.NOTE -These instructions do not purport to cover all details or variations in equipment, or to provide for every possible contingency to be met inconnection with installation, operation or maintenance. Should further information be desired or should particular problems arise, which are not covered sufficiently for the purchaser’s purposes, the matter should be referred to the local Siemens sales office. The contents of this instruction manual shall not become part of or modify any prior or existing agreement, commitment or relationship. The sales contract contains the entire obligation of Siemens. The warranty contained in the contract between the parties is the sole warranty of Siemens. Any statements contained herein do not create new warranties or modify the existing warranty. Trademarks -Unless otherwise noted, all names identified by ®are registered trademarks of Siemens AG or Siemens Industry, Inc. The remaining trademarks in this publication may be trademarks whose use by third parties for their own purposes could violate the rights of the owner.For use with Frame:Para Usar Con Caja Base:DG FG JG LGJGFBCJ3 / 3VL9400-4EC313X3X3X M8 X 25 mm3X M83X M8LGFBCL3 / 3VL9460-4EC313X M8 X 35mm3X3X M83X M83X3X231DG / FGTrip [ Interrumpir ]21OFF / OAssure all electrical clearances are maintained.Tensión peligrosa.Puede causar la muerte o lesiones graves.Tension dangereuse.Danger de mort ou risque de blessures graves.Hazardous VoltageWill cause death or serious injuryAsegure mantener los espacios eléctricos.Assurez que tous les dégagements électriques sont maintenus.The Installer is responsible for the Front Busbar Connector's final qualification for use within their equipment.[El Instalador es responsable de la última calificación de las partes frontales de la conexión a barras para usar en su equipo.]10”[ 254mm ] Max.10”[ 254mm ] Max.Recommended Bracing Information [Información de soporte recomendada]Maintain minimum ground clearances..OKOKTurn off and lock out all power supplying this device before Couper Tensión Tension dangereuse.Hazardous Voltageworking on this device.Replace all covers before power supplying this device is turned on.l'alimentation de l'appareil et barrer avant de travailler.Remplacez touts les couverts avant que l'approvisionnement de pouvoir soit alimenté.peligrosa.Puede causar la muerte o lesiones graves.Danger de mort ou risque de blessures graves.Will cause death or serious injury Desenergice totalmente antes de instalar o darle servicio. Reemplace todas las barreras y cubiertas antes de energizar el interruptor.JG / LG21Trip [ Interrumpir ]45DG 40 lb.in.[ 4.5 Nm ]5 mm FG 89 lb.in.[ 10 Nm ]6 mm 4c li c375OKOK6JGJG 133 lb.in.[ 15 Nm ]6 mm 21OFF / O 3LGLG 133 lb.in.[ 15 Nm ]6 mm 231OFF / OOKOKFor Support in Europe refer to :Bestell-Nr. / Order No.: 3ZX1012-0VL68-4AA2 Internet: www.siemens.de/lowvoltage/technical-assistance GWA 4NEB 179 6863-10 DS 041084X 11 lb.in.[ 1.2 Nm ]9Technical Support:Toll Free: 1-800-241-4453Internet: /powerdistributionOption OpciónJG / LGLG21。
NEC显示解决方案的V754Q C751Q安装指南说明书

V754Q/C751Q
Page 4 of 13
Display Dimensions (with optional ST-801 stand):
NEC Display Solutions of America, Inc.
V754Q/C751Q
Page 5 of 13
Table Top Stand Dimensions (ST-801):
NEC Display Solutions of America, Inc.
V754Q/C751Q
Page 6 of 13
Optional Slim Wall Mount (WMK-3255S):
a step-by step procedure for installation. • Any ceilings or walls must be strong enough to support the monitor and the installation must be in accordance with any local
Page 1 Page 1 Page 2 Page 2
Page 3 Page 4 Page 5 Page 6 Page 7-8 Page 9 Page 10 Page 11 Page 11 Page 12 Page 12 Page 13
Product Description:
Type:
LCD Display
Cable Connection
Communication Protocol:
Interface:
Communication System:
Baud Rate:
Data Length:
(INTEST)终端和天线安装说明
武汉英泰斯特电子技术有限公司
第4页共5页
4. 终端安装要求
天线及终端安装要求
4.1 安装固定方法
通过终端两侧固定孔,用螺钉固定,具体尺寸见三维图。 因为车型位置的不同,终端的下盖板可以进行定制,以适应车辆安装孔位的距离和大小。
4.2 安装位置
车载终端的防护等级为 IP54,建议将终端安装在驾驶室内,可以采用隐蔽安装。常见 的安装位置有: 1) 驾驶室仪表盘内; 2) 后备箱、C 柱下内侧; 3) 驾驶员座椅下等;
武汉英泰斯特电子技术有限公司
第2页共5页
1. 天线安装要求
天线及终端安装要求
1) GPS 天线需安装在较开阔的位置上,需水平放置,上壳部分对天空,保证周围俯仰角 30 度内不能有较大的遮挡物(如树木,铁塔,楼房等)。
2) 为避免反射波的影响,GPS 天线正上面不要有金属周围尽量远离尺寸大于 20CM 的金属 物 2M 以上(具体可根据实际安装环境定)。
天线及终端安装要求
天线及终端安Biblioteka 要求发布日期:2015.4.12
武汉英泰斯特电子技术有限公司
第1页共5页
天线及终端安装要求
目录
1. 天线安装要求............................................................................................................................... 3 2. 天线安装位置建议.......................................................................................................................3 3. 天线规格....................................................................................................................................... 4
ic-751说明书

我收集正理了IC-751A正反面板的操作说明,提供有此机的爱好者使用,如有错误请提出。
第四节操作控制4. 1 前面板1 总电源开关(POWER)电源开关是一个按销式开关,它控制给IC—751A输入电源。
2 自动增益控制开关(AGC)此开关用于改变AGC电路的时间常数。
该开关在OFF时AGC不起作用。
该开关置于SLOW 位置时AGC电压适用于单边带接收。
将开关置于FAST位置时AGC电压控制适用于有衰弱影响和工作于等幅报方式。
3 电表开关(METER)此开关有6种工作方式1.SWR(显示驻波)2 PO(输出功率)3 ALC (自动电平控制指示)4 COMP (音压缩电平) 5 IC (功放集电极电流) 6 VC (功放集电极电压)4 收/发转换开关(TRANSMIT)该开关是用于人工控制接收和发射状态,在(TRANISMIT)上时是发,在(RECEIVE)下时是接收。
在用手咪和台咪时开关要在下挡(RECEIVE)。
5 话筒连接器(MICROPHONE)该位置可连接手咪话筒和台试话筒。
6 耳机插座(PHONES)可插入一个为1/4英寸阻抗为4-16欧姆的标准耳机。
7 音频增益控制(AF GAIN)内旋在接收方式时控制音频输出电平,顺时针旋转时电平增加。
8 射频增益控制(RF GAIN)外旋在接收方式时控制射频部分增益。
顺时针可最大一般都在最大位置。
FM方式不起作用。
9 静噪控制(SQUELCH)调整静噪阀值电平。
反时针不动是关闭静噪功能(一般在此位置),顺时针是调高电平。
10 音调控制(TONE)控制接收机的音频声调,调节此旋可提供舒适的接收音调。
11 话筒增益控制(MIC GAIN)根据话筒的输入来调节调制电平,顺时针旋转可使话筒增益增加。
因为输入的信号由于使用了不同的话筒或声音不同而要变化,所以应当旋动旋使电表指针在ALC方式时慢慢地移动。
在单边带方式使用语音处理器时,将话筒增益控制调到限幅状态。
SEP客户端安装操作手册

SEPM客户端安装操作手册赛门铁克软件(北京)有限公司2010年1月第 1 页共 22 页文档属性属性内容文档主题SEP客户端安装操作手册文档版本V1.0版本日期2009-12-25文档状态作者崔文秀文档变更版本修订日期修订人描述1。
0 2009-12—25 崔文秀创建文档2。
0 2010—01—13 夏雄修改文档3。
0 2010-03-11 夏雄修改文档第 2 页共 22 页第1章客户端安装综述 (4)第2章客户端安装要求 (5)2.1客户端运行系统/硬件要求 (5)2。
2客户端安装软件环境要求 (6)2。
3权限要求 (7)2。
4SEP安装包功能及系统要求 (7)第3章客户端安装步骤(全新安装) (9)3.1检查客户端系统配置状况 (9)3.2获取客户端安装包 (10)3。
3安装客户端 (11)3.4客户端安装验证 (13)第4章客户端安装步骤(替换原非SEP防病毒软件) (15)4.1检查客户端配置状况 (15)4.2卸载第三方防病毒或者防火墙软件 (16)4。
3获取客户端安装包 (17)4。
4安装客户端 (18)4。
5客户端安装验证 (20)第5章问题处理 (22)第 3 页共 22 页由于辽宁移动防病毒系统部署的现状不同,此次 SEP客户端的部署安装方式针对不同情况有不同的安装部署方式。
具体有下面两种方式:➢全新安装o适用于原来没有防病毒系统➢替换原非SEP防病毒软件o适用于原来使用非Symantec防病毒的省份。
下面各个章节将依次阐述客户端的安装过程,请各终端实施技术人员依照实际情况采用相应的客户端安装方式。
第 4 页共 22 页2.1客户端运行系统/硬件要求为保障Symantec Endpoint Protection 11、系统和其他应用程序的顺利运行,建议计算机终端使用较高的配置,下列表格为计算机终端硬件建议配置:编号需求组件32位64位1 处理器安装最小需求1G,推荐1.8G及以上支持64 位CPU2 操作系统■ Windows 2000(带 Service Pack 4)■ Windows XP■ Windows Server 2003■ Windows Vista (x86)■ Windows Server 2008■ Windows 7(x86)■Windows XP Professionalx64 Edition■ Windows Server 2003 x64Edition■ Windows Compute ClusterServer 2003■ Windows Storage Server2003■ Windows Vista x64 Edition■ Windows 7 (x64 )■ Windows Server 2008 x64Edition第 5 页共 22 页3 内存大于等于 512MB 大于等于 512MB4 硬盘剩余安装最小需求 600MB ,推荐1G以上安装最小需求 600MB ,推荐1G以上5 显示器SVGA(分辨率1024*768及以上)SVGA(分辨率1024*768及以上)6 其他要求Internet Explorer 6.0 及以上Internet Explorer 6。
2022新75#底端调测工具使用说明书

集成调测工具(试用)使用说明书(1998/11/2)一.概述集成调测工具是应工程开局需要而设计的针对底层调测的软件件工具。
它可以调测AMS-1,BMS-1,PMC-3,PMC-2,BMC-1等采集器,也可以调测其他智能设备及其动态库。
还集成了仿真终端的功能。
原来的调测工具种类繁多,界面不一,工程员反映,学习困难,使用起来很不方便。
为了从根本上解决这些问题,我们设计了此集成调测工具。
在界面上,统一了各调测工具,使学习变得简单,不必再学习近十种针对单独采集器或智能设备的调测工具。
而是只要学习集成调测工具后,就基本上可以满足底层调测的几乎所有功能。
AMS-1的调测,基本上与原来的AMS-1调测工具PERFECT相同。
而BMS-1,PMC-3,PMC-2,BMC-1以及其他智能设备的界面都与PERFECT相似,使用和学习简单。
二.主界面说明主界面如下图所示:图2.1在此界面上,我们主要来选择所调测的采集设备或智能设备。
通过菜单或工具条,我们选择AMS-1,BMS-1,PMC-3,PMC-2,BMC-1或其他智能设备。
选择后就进入各采集设备或智能设备的调测状态。
三.AMS-1调测说明AMS-1的调测与原来的PERFECT基本相同。
进入AMS-1调测,出现下面的界面:图3.1从上图的界面可以看到,整个工具,基本上是采用菜单和工具条驱动的方式。
其中文件菜单有四项:列文件目录、文件传输、删除文件、从AMS-1读配置文件、AMS-1跳过配置文件和退出。
初始化菜单有三项:查找智能设备处理机配置、改变协议处理机地址和改变串口配置。
通信操作菜单下有智能设备处理机控制命令、开始采集数据命令和停止采集数据命令。
查看操作菜单下有工具栏和状态栏管理命令。
窗口操作菜单下有层叠、平铺、排列图标和设备数据浏览WINDOWS多文档窗口操作命令。
如下图7:图3.2工具条按顺序实现的功能是:返回主界面、开始采集数据、停止采集数据、设备展开[关闭]、与智能设备处理机联络、列文件目录、传输文件到智能设备处理机、从智能设备处理机请求文件、删除智能设备处理机上的文件、AMS-1跳过配置文件、从AMS-1读配置文件、给智能设备处理机复位、退出系统。
鼎立安装以及使用说明书
二、使用说明
1、工程建立: 工程建立: 建立
点击 文件——新建工程。
2、设备连接: 设备连接:
首先安装手机等设备的驱动,在这里以 N85 手机为例加以说明。如图所示:
信宇科技内部资料
2011-03-06
7、测试界面控制: 测试界面控制:
8、定制测试计划: 定制测试计划:
信宇科技内部资料
2011-03-06
9、开始调用测试计划: 开始调用测试计划:
10、测试信息显示: 10、测试信息显示:
信宇科技内部资料
2011-03-06
11、结束测试: 11、结束测试:
设置完之后,点击 OK 就可以了。然后点击 F6 或者下图中的箭头处就可以连接 上设备了。如图所示:
点击完之后,旁边按钮会变灰红色,到此,设备连接就完成了。
信宇科技内部资料
2011-03-06
3、测试模板设置: 测试模板设置:
首先如图 1 所示打开设置——测试模板或者按照图 2 右击 Templates,然后点击编辑。
2011-03-06
然后再点击上图箭头处,就可以查看设备端口,如下图所示:
信宇科技内部资料
2011-03-06
知道端口之后,我们就需要设置设备模板了,如下图:
点击 Append,然后选择 handset,再根据手机型号选择 Device Model。
信宇科技内部资料
2011-03-06
添加完设备之后,就需要设置端口了,根据端口设置原则,N85 手机 Trace Port 选择三个端口中的最高端口号,AT Port 选择比 Trace Port 低的端口。 每种终端不是一样,TD 手机是由低到高设置的。设置完之后如下图所示:
XE5 安装手册

多功能在线测量电子放大器安装使用说明书手册编号:XD2050005CA马波斯电子测量仪(上海)有限公司前言本说明书仅适用于马波斯电子测量仪(上海)有限公司生产的,所有型号的多功能在线测量电箱XE5。
如果您有任何特殊需求请与相关人员联系。
马波斯公司之XE5的型号和产品序列号注明在该仪器的后面板标签上。
制造商:马波斯电子测量仪(上海)有限公司地址:上海市田州路99号12号楼5楼手册编号:XD2050005CA发布日期:2005年3月版本:V1.1部门:电子工程部本公司没有义务通知关于产品在以后的任何改动只有马波斯公司授权的相关人员可以对本仪器进行维修和维护马波斯公司不对由于使用不当或擅自维修的行为负责© Copyright MEGS 2004符号使用说明这个标注说明可能对电箱或者与之连接的设备造成损害,或者可能丢失数据注意这个标注指出对帮助理解和使用本系统非常重要的信息警告这个符号说明根据xxxxxx 所指出的应用下的一个特别操作模式。
xxxxxx标注有“备注”的方框内表述的是特别使用信息和学习手册的帮助信息 在图例中的尺寸标注的单位为mm目录1.XE5系统 (7)2.技术参数 (8)2.1.电源 (8)2.2.环境要求 (8)2.3.通用安全规格 (8)2.4.终检和保修申明 (8)3.电箱的安装 (9)3.1.外型尺寸 (9)3.2.电箱后面板 (10)4.电箱连接 (12)4.1.电源连接和开关 (12)4.1.1.接地连接 (12)4.2.测量头连接 (12)4.3.BCD/二进制码接口 (14)4.4.机床逻辑接口(输入/输出) (14)4.4.1.光电隔离型I/O模块 (15)5.前面板说明 (17)5.1.读数表 (17)5.2.显示区 (17)5.3.键盘区 (18)6.系统设置 (22)6.1.灵敏度调整和新的收张限度获得 (23)6.1.1.灵敏度调整 (23)6.1.2.新收张限度自采集 (25)7.编程 (27)7.1.密码设置 (28)7.1.1.删除和改变密码 (29)7.2.设备数据编程 (30)7.2.1.语言= # / 语言选择 (30)7.2.2.零位迁移类型= # / 多比较器功能 (31)7.2.3.PGR. AUTOM. / 带分级功能单比较器 (32)7.3.工件/加工循环选择 (35)7.4.加工循环数据编程 (37)8.使用方法 (44)8.1.选择操作模式 (44)8.2.工件/加工循环选择说明(PART/CYCLE) (44)8.3.测量显示 (45)8.3.1.测爪值显示 (45)8.4.编程数据显示 (45)8.4.1.编程数据修改 (46)8.5.控制发信点显示 (46)8.5.1.控制发信点数据修改 (46)8.6.编程数据重置 (46)8.6.1.重置所有数据 (47)8.6.2.重置一个工件以及与这个工件关联的所有加工循环 (47)8.6.3.重置一个指定的工件/加工循环 (47)8.7.键盘补偿值设定 (47)8.7.1.补偿值显示和修改 (47)8.7.2.删除补偿值 (47)9.测量系统校零 (48)9.1.机械校零 (49)9.2.电子校零(自校零) (50)9.2.1.删除自校零值 (50)10.测量头机械校零 (51)10.1.测量头摆放 (51)10.1.1.垂直调整 (51)10.1.2.水平调整 (51)10.2.测量头机械校零 (52)10.2.1.用燕尾或螺杆式测子校零 (52)11.故障诊断 (53)11.1.报错信息 (53)11.2.CPU模块诊断指示灯 (58)12.设备维护 (59)12.1.简介 (59)12.2.正常维护 (59)12.2.1.机箱清洁 (59)12.3.非正常维护 (59)12.3.1.更换保险丝 (59)12.4.更换电池 (61)13.应用 (62)13.1.输入输出信号描述 (62)13.1.1.机床逻辑接口(I/O) (62)13.1.2.BCD码接口 (65)13.2.在线单一测量 (66)13.2.1.在线单一测量 (68)13.2.2.断续表面工件检测 (69)13.2.3.带分级功能的单比较器 (69)13.2.4.多比较器 (70)13.2.5.动态测量 (70)13.3.主动对刀 (71)13.3.1.编程 (71)13.3.2.自动操作 (72)13.3.3.断续表面工件检测 (72)13.4.被动对刀 (73)13.4.1.编程 (73)13.4.2.自动操作 (74)13.4.3.断续表面工件检测 (74)图形列表图1。
FC720安装指导
安装到位的示意
安装未到位的示意
10
Cerberus ™ FD720 探测回路现场设备安装及调试指南 v1.1
z
切记注意以下不正确的安装及误操作: 1. 应避免接入底座端子的线头所采用的压线帽的突出,造成阻碍探测器正常旋转 到位,见左下图红色圆圈标记所示;
2. 在探测器位安装到底座之前,应避免吊顶或天花板的涂料覆盖底座端子的金属 连接片,见右上图红色圆圈标记所示; 3. 不允许用手挤压或往外扳底座端子的金属连接片。由于金属材料本质的柔韧性, 金属片受过挤压后不可能恢复到原有角度,继而影响探测器电气节点不能和底 座金属片可靠接触,或探测器不能安装到位造成探测器不能正常工作。见下图 所示:
D75X 超短焦系列安装说明书

INSTALLATION MANUAL English EditionD75X ULTRA SHORT SERIESSAFETY INSTRUCTION For your safety, please read the instruction before using the wall mount bracket. Any improper disposition caused by ignoring this manual may damage the hanger frame and result in personal injury and property damage. Please keep the manual properly for future reference. Please read the installation manual and safety instruction of the projector that matches our wall mount bracket and operate according to the instruction.SYMBOL INSTRUCTION In order to avoid personal injury and property damage, the following warning symbols are used in this setting manual. Please make sure that you have understood all these warning symbols while reading this instruction.SAFETY PROTECTION MEASURES FOR SETTING This instruction introduces how to use customized wall mounted bracket to install D75 ultra short throw projector on walls. The unit of measurement for all sizes mark place in this instruction is in “mm”.1 PACKAGING ITEMS P. 42 SPECIFICATIONS P. 53 PROJECTION DISTANCE CHART P. 74 INSTALLATION STEPS FOR WALL MOUNTED BRACKET P. 9(1):Dismantle parts(2):Verify the strength of walls, installation environment, installationposition and drill holes on the walls.(3):Install hanger frame on walls.(4):Verify the distance of the projector. Move the three axisfine-tuner to proper position according to the projector distancechart.(5):Power cord should pass through the hanger frame.(6):Adjust the slider plate up and down to align to the standard position.(7):Install the projector onto the hanger frame.(8):Connect the power cord and other electrical cables to theprojector.5 ADJUSTING STEPS OF PROJECTOR IMAGE P. 13(1) Switch on the projector(2) Adjust the aspect ratio(3) Display the test image(4) Adjust the left and right alignment position(5) Adjust the up and down rotation(6) Adjust the left and right rotation(7) Adjust the keystone(8) Adjust the image size(9) Adjust the image up and down(10) Switch off the testing image displayPART LIST Screen shot Hardware Specifications Qty Purpose3 (pcs)4 (pcs) D75X INSTALLATION (FRAME 1) SETTINGDRILLING PAPER (1:1)M4*10mm ball head cross head screw (with flat gasket and spring washer)M8*70mm setscrew (with nut, flat gasket and spring washer)Used for connecting wall mounted bracketstructure # 7 with projectorUsed for installing and fixing wall mountedbracket structure #1 onto the wall1:Please follow the instructions in the manual and install with the attached hardwares.2:Please prepare the required tools and hardwares before installationSPECIFICATION Item Spec Description RemarkAbout 4.72kg 30kg ±40mm P. 13±5°P. 14±5°±5°P. 15P. 16P. 17P. 18±40mm D75X INSTALLATION (FRAME 1) SETTING DRILLING PAPER (1:1)Gross mass of hanger frame The three axis fine-tuning components(2.82kg), wall fixturehardwares(0.86kg), independent components packed seperately (0.12kg).Not inclusive of wall mounted bracket’s weight.Frame structure # 3 adjustable by 30mm, frame structure # 7 adjustable by±10mm.The three axis fine-tuner does horizontal scrolling adjustment The three axis fine-tuner does horizontal rotating adjustment The three axis fine-tuner does vertical scrolling adjustment Maximum load capacity The left and right adjusting range The up and downrotation adjusting range The left and rightrotation adjusting range Keystone adjustingrange Forward and backward adjustment by range Up and downadjustment by rangeCan be adjusted120mm forwardSCREENSHOT OF PROJECT DISTANCE2.721D HSCREENPROJECT DISTANCE 929597D755WT WXGA 0.35()Screen size diagonal Screen width Screen height inch mm inch mm inch mm inch mm inch mm 908785233724132464228622102159778081767371198220462089193918741831485051474645123912791306121211711144Projecting distance (D)()Vertical distance H112.73323.313.4014.3815.0115.9816.65340.3365.3381.3405.8422.811.59321.511.8212.1612.3812.7212.95327.4336.1341.6350.2356.18285D751ST XGA 0.43()Screen size diagonal Screen width Screen height inch mm inch mm inch mm inch mm inch mm 80777520832159203219561905656763615916661727162615651524495148464512501295121911731143Projecting distance (D)()Vertical distance H113.83351.414.6215.7216.5117.61371.4399.4419.4447.412.88354.413.1813.6013.9014.32361.4372.6380.2390.968172754138240103611.16283.411.86328.578198761156646117514.62371.413.1836280203267172342107711.11282.311.02307.2100254085215453134617.55445.813.26364.1FRAME 7A:4-M8*70 SETSCREW STEP2SETTING DRILLING PAPEROF ULTRA SHORT SERIES(1:1) TO THE PROPERPOSITION IN UP SCREENFRAME 1 STEP3M:VERTICAL ROTATION ADJUSTMENT FIXING SCREW FRAME 2 STEP4FRAME 3 STEP5FRAME 4E:VERTICAL ROTATIONADJUSTMENT FIXINGNUTG:TRAPEZOID ADJUSTMENT NUTFRAME 6STEP6D:4-M4*10 PARALLELADJUSTMENT FIXINGSCREWB:4-M4*10 VERTICAL ROTATION ADJUSTMENT FIXING SCREW STEP4C:2-M4*10 PARALLEL ADJUSTMENT FIXING SCREW STEP5H:3-M4*10 BRACKET7 TIGHTEN SCREWI:3-M4*10 PROJECTORCONNECTION SCREWSTEP6F:PARALLEL ADJUSTMENTFIXING SCREWFRAME 5ASSEMBLY BREAKDOWN DIAGRAMROTATION ASIXQuick Installation Steps: Step 1: frame #1 setting drilling paper of ultra short series (1:1) to the proper position in up screen (see details please refer to P.9). Perforate the setting wall. (percussion drill and drill 8.5, 60mm depth) Step 2: Install M8*70 setscrew in the wall’s hole. Step 3: Use M8*70 setscrew (4X) fix structure frame # 1 to the wall’s hole. Step 4: Install structure frame # 2 on structure frame # 1 (see P.10), switch it to intermediate position and use screw B (M4*10 up and down adjusting fixing screw) to lock it yet. Step 5: Loosen screw “C”, decline structure frame # 3 by 5 degree to aim at the positioning peg, and position the slider structure into structure frame # 2’s slide-way. Adjust the slide-way tointermediate position and tighten the screw “C” into structure frame # 2 ‘s threaded hole, but do not lock it. When the positioning is in place, tighten the screw “C”. (see details please refer to P.11) Step 6: Use “I” screw to connect structure frame # 7 and projector. Fix them, and install them on structure frame # 6. After adjusting structure frame # 7 to a proper position, lock screw “H”. (see P.12)LWALIGN THE CENTRAL VERTICAL LINE ON THE SCREENSCREEN4-M8*70 SETSCREW M:VERTICAL ADJUSTMENT ROTATION SREWFRAME 1H 1SETTING DRILLING PAPER OFBRACKET 1 PROPER POSITIONALIGN THE CENTRAL VERTICALLINE ON THE SCREENWALL8.560SCREENSHOT 1INSTALLING STEP 1SCREENSHOT 2Installing steps of holder 1: 1: Ensure the projector image allies with the center line of the screen, and determine the corresponding vertical distance value (H1) according to the projector distance chart. 2: Use D79X setting perforating paper of ultra short throw series (1:1) to determine the corresponding vertical distance.(H2) = (H1)-27.2mm 3: Fix the D79X setting perforating paper of ultra short throw series (1:1) and drill the wall according to the hole position on paper.(see picture 1). 4: Drive the attached setscrew (4-M8*70mm) in the corresponding wall’s hole. 5: Loosen screw “B” (4-M4*10), and dismantle the setting wall components. (structure frame # 1 and structure frame # 2) 6: Install the structure frame # 1 and tighten the screw (see picture 2) to ensure that the installation is correct and reliable.Installing steps of structure frame # 2: 1: Place structure frame # 2’s neck into structure frame # 1’s up and down adjusting screwinserts. 2: Screw “B” screw (M4*10mm) into structure frame # 1’s corresponding threaded hole slightly.(2 PCS of both left and right side). 3: Use up and down adjusting screw to adjust structure frame # 2 to proper position, and tighten the screw“B”.(4-M4*10mm)AFTER INSTALLATIONInstalling steps of structure frame # 2:1: Loosen “C” screw. (2-M4*10mm)2: Decline the three axis fine-tuner by 5 degree to aim at the registration mast. As illustrated in the following picture 2, install the slide-way on structure frame # 2’s slide-way, and switch it to intermediate position.3: Tighten screw “C” (2-M4-10mm) into structure frame # 2’s corresponding threaded holeslightly, do not lock it.4: Adjust the screw “C” to proper position and tighten it. (2-M4*10mm)BEFORE INSTALLATIONC:2-M4*10 PARALLELAFTER INSTALLATIONInstalling steps of projector: 1: Loosen screw “H” (4X-M4*10), and remove structure frame # 7. 2: Use “I” screw (3-M4*10mm) to connect structure frame # 7 and projector, and assemble them together. 3: Assemble the connected structure frame # 7 and projector on structure frame # 6. 4: Tighten screw “H”(4-M4*10mm) into structure frame # 6’s corresponding threaded holeslightly, not locked. 5: Slide structure frame # 7 to proper position, and tighten screw “H”. (4-M4*10mm)Y XBZXB Instruction of up and down rotation movement: 1: Tuner “E” does clockwise movements and its function is to adjust structure frame # 6 to drive projector into clockwise (X axis direction) rotation adjustment.(picture A) 2: Tuner “E” does anti-clockwise movements and its function is to adjust structure frame # 6 to drive projector into anti-clockwise (X axis direction) rotation adjustment.(picture B) 3: The maximum adjustable angle is ±5 degree.Instruction of left and right rotation movement: 1: Screw “F” for and rotate axis nut slightly. 2: Take the rotation axis as the axis (Z axis), adjust the setting disc through horizontal left and right rotation so that structure frame # 7 can drive projector towards horizontal rotation.(Z axis direction). 3: When the horizontal rotation position is adjusted to a proper position, tighten the screw “F”. 4: When the three axis are adjusted to proper positions, tighten the rotation axis nut.Instruction of keystone adjustment movement: 1: Tuner “G” does clockwise movements and it’s function is to move structure frame # 6 to drive projector towards a clockwise (Y axis direction) rotation adjustment.(picture D) 2: Tuner “G” does anti-clockwise movements and it’s function is to move structure frame # 6 drive projector towards an anti-clockwise (Y axis direction) rotation adjustment.(picture C) 3: The maximum adjustable angle is ±5 degree.ZY XInstruction of image size adjustment movement:1: Loosen screw “D” (4-M4*10mm) slightly. Move structure frame # 5 forward and backward to adjust its position in Y axis.2: For the distance between screen and projector, please refer to the projector sheet.(P. 7) 3: When the image size is OK, please tighten screw “D”. (4-M4*10mm) 4: The maximum adjustable distance is 120mm.Instruction of image up and down adjustment movement: 1: Loosen screw “B” (4-M4*10mm) slightly. In order to adjust the image’s up and down position, turn “M” (up anddown adjustment rotation screw) to make sliding structure frame #2 up and down, so as to adjust the imageposition up and down (Z axis direction). 2: Please refer to the projector distance sheet.(P.7) for the highest position of screen to the projector’s up and down distance (H1). 3: When the image up and down position is well adjusted, tighten screw. “B” (4-M4*10mm) 4: The maximum adjustable distance is ±40mm.○ Vivitek ChinaNo. 1090 Century Avenue, Pudong New Area, Shanghai CIMIC building 18 F zip code 200120Tel: 86-21-58360088Fax: 86-21-58360099○ Vivitek EMEAZandsteen 152132MZ HoofddorpThe NetherlandsTel: +31 20 655 0960Fax : +31 20 655 0999E-mail:***************Web : www.vivitek.euD79X ultra short series installation instructions - 2nd Edition。
NETGEAR GS752TXS Smart Switch 安装指南说明书
NETGEAR GS752TXS Smart Switch™Start HereVerify Package Contents• NETGEAR Smart Switch• Rubber footpads for tabletop installation• Power cord• Rack-mount kit for installing the switch in a 19-inch rack• Installation Guide• Smart Switch Resource CD that includes the Smart Control Center Utility and GS752TXS Hardware Installation Guide. (A link to the online GS752TXSSoftware Administration User's Manual is on the Resource CD.)Prepare a PC with an Ethernet adapter and a CD ROM drivePrepare a PC with an Ethernet adapter and a CD ROM drive.Install the Smart Control Center Utility on a PC1. Insert the Resource CD into your CD drive.2. Run the Setup program to install the Smart Control Center Utility. TheInstallation Wizard will guide you through the installation.Connect Your Smart Switch in the Correct OrderThese instructions assume you are using DHCP in your network. If you are usingstatic IP addressing in your network, configure the switch IP address beforeconnecting it to your network. In the absence of a DHCP server, the switch willdefault to 192.168.0.239 for its IP address. To configure the switch beforeconnecting it to your network:1. Set up the PC with a Static IP address in the 192.168.0.x subnet, and connectthe PC to the switch. Then, use the Smart Control Center Utility to configurethe switch.2. Connect each PC to an RJ-45 network port on the switch front panel.Use category 5 (Cat5) unshielded twisted-pair (UTP) cable terminated with anRJ-45 connector to make these connections.3. Connect the switch to your network.4. Power on the switch.5. Verify that the PC with the Smart Control Center Utility is on the same subnetas the switch.Configure the Switch with the Smart Control CenterUtility1. Double-click the Smart Control Center Utility icon on your desktop or inWindows Start menu Programs to run the utility and view this screen.2.Click Discover to find your switch in the network.May 2011This symbol was placed in accordance with the European Union Directive 2002/96 on the Waste Electrical and Electronic Equipment (the WEEE Directive). If disposed of within the European Union, this product should be treated and recycled in accordance with the laws of your jurisdiction implementing the WEEE Directive.NETGEAR, the NETGEAR logo, and Connect with Innovation are trademarks and/or registered trademarks of NETGEAR, Inc. and/or its subsidiaries in the United States and/or other countries. Information is subject to change without notice. Other brand and product names are registered trademarks or trademarks of theirrespective holders. © 2011 NETGEAR, Inc. All rights reserved.The Smart Control Center Utility finds the switch and displays its MAC Address, IP Address, and model number. If you cannot configure your switch, verify that the cable connections are secure, that the IP address configuration of the PC is in the same subnet as the switch, and click the Discover button.3. Click to select the line displaying the details of your switch. If there are multipleswitches in your network, be sure to select the one you want to configure.4. Click Web Browser Access to view the switch log in screen.5. Enter the default password of password in lower case letters and click Login.The switch will display the switch settings main page. Configure the switch for your network. Consult the Reference Manual on the Resource CD or the onlinehelp in the switch for assistance with configuration procedures.After you log in to the switch, the main Web Browser Access menu displays.Use the configuration menu options to configure your switch.Troubleshooting TipsHere are some tips for correcting simple problems you may have.• Be sure to power on your PC and switch in the correct sequence.Follow this sequence. Turn off the switch and computer. First, turn on the switch and wait two minutes. Next, turn on the computer.• Make sure the Ethernet cables are securely plugged in.For each powered on computer connected to the switch with a securely plugged in Ethernet cable, the corresponding switch LAN port status light will be lit. • Make sure the network settings of the computer are correct.In most cases, computers should be configured to obtain an IP address via DHCP. For help with this, refer to the Reference Manual; a link to the onlineReference Manual is on the Resource CD.If your network uses static IP addresses, be sure the switch and computer are configured with valid IP addresses.Technical SupportThank you for selecting NETGEAR products.After installing your device, locate the serial number on the label of your product and use it to register your product at /register. Registration is required before you can use the telephone support service. Registration via our website is strongly recommended.Go to for product updates, documentation, and support . For additional information about setting up, configuring, and using your GS752TXS, see the User Manual .For complete DoC please visit the NETGEAR EU Declarations of Conformity website at: /app/answers/detail/a_id/11621/For GNU General Public License (GPL) related information, please visit /app/answers/detail/a_id/2649WARNING!!DO NOT stack equipment, or place equipment in tight spaces, or in drawers. Be sure your equipment is surrounded by at least 2” of air space.。
e-designer752使用教程
e-designer752使用教程感谢您对e-designer752的兴趣!以下是一些使用教程,帮助您开始使用e-designer752:1. 安装e-designer752:首先,您需要下载并安装e-designer752应用程序到您的设备上。
您可以在官方网站或应用商店中找到适用于您设备的版本。
2. 界面介绍:打开e-designer752后,您将看到一个用户友好的界面。
它通常由工具栏、画布、属性栏和图层面板组成。
工具栏上有一些常用的绘图工具,属性栏显示所选图形的属性信息,图层面板用于管理不同图层。
3. 创建新项目:点击菜单栏中的"文件"选项,然后选择"新建"来创建一个新项目。
您可以选择画布尺寸、分辨率和背景颜色等选项。
4. 绘制对象:e-designer752支持多种绘图工具,如铅笔、刷子、橡皮擦等。
您可以使用这些工具在画布上绘制对象,如线条、矩形、圆形等。
5. 图形编辑:选择一个图形对象后,您可以使用属性栏中的选项来编辑其属性,如线条颜色、填充颜色、边框样式等。
您还可以使用变换工具来调整图形的大小、旋转角度等。
6. 图层管理:使用图层面板可以管理不同的图层。
您可以创建、重命名和删除图层,以及调整它们的顺序和可见性。
7. 导入和导出:e-designer752允许您导入和导出各种文件格式,如JPEG、PNG、PDF等。
您可以使用菜单栏中的"文件"选项来执行这些操作。
8. 存储和恢复项目:e-designer752允许您保存项目文件,并在需要时恢复它们。
您可以使用菜单栏中的"文件"选项来执行这些操作。
9. 预览和输出:在项目完成后,您可以通过菜单栏中的"文件"选项来预览和输出项目。
您可以选择打印、导出为PDF或图像等选项。
以上是一些基本的使用教程,帮助您开始使用e-designer752。
祝您绘图愉快!。
ABB智能定位器安装操作说明书

TZID-C 智能定位器安装及操作说明书ABB (中国)自动化有限公司仪器仪表总部Tel: 010 8456 6688 Fax: 010 8456 7650气路连接使用与定位器气源端口处标识的标准接口连接气源连接定位器的输出与气动执行器的气缸电气连接根据下列接线端子图以及设计要求进行相应的配线(一般只需+11,-12,+31,-32) +11-12控制信号输入端子(DC4---20mA,负载电阻欧姆)+31-32位置返馈输出端子(DC4---20Ma,DCS+24V供电)+41-42全关信号输出端子(光电耦合器输出)+51-52全开信号输出端子(光电耦合器输出)+81-82开关信号输入端子(光电耦合器输入)+83-84报警信号输出端子(光电耦合器输出)+41-42低位信号输出端子(干簧管接点输出,5---11VDC, <8 mA)+51-52高位信号输出端子(干簧管接点输出,5---11VDC, <8 mA)调试步骤1.接通气源,检查减压阀后压力是否符合执行器的铭牌参数要求(定位器的最大供气压力为6BAR,但实际供气压力必须参考执行器所容许的最大气源压力)。
2.接通4---20mA输入信号。
(定位器的工作电源取自输入信号,由DCS二线制供电,不能将DC24V直接加至定位器,否则有可能损坏定位器电路)。
3.检查位置返馈杆的安装角度(如定位器与执行器整体供货,则已经由执行器供货商安装调试完毕,只需作检查确认,该步并非必须):按住MODE键。
并同时点击或键,直到操作模式代码显示出来。
松开 MODE键。
使用或键操作,使执行器分别运行到两个终端位置,记录两终端角度两个角度应符合下列推荐角度范围(最小角位移20度,无需严格对称)直行程应用范围在 -28o--- +28o 之内。
角行程应用范围在 -57o--- +57o 之内。
全行程角度应不小于25o4.切换至参数配置菜单同时按住和键点击ENTER键等待3秒钟,计数器从3计数到0松开和键程序自动进入配置菜单。
Optitex15 32位安装说明说课材料

O p t i t e x1532位安装说明首先从58cad下载Optitex15安装包Optitex15 Win7 32位安装说明:安装前建议关闭杀毒软件。
1,安装Optitex15.0.198.0.exe按提安装即可,需要注意的地方如下图:其它的一直next,直到安装完成。
2,安装NestingPack15.0.198.0.exe一直next,按提示安装,直到安装完成。
3,安装虚拟狗打开虚拟狗文件夹,如下图:按提示安装完成。
4,安装Nest++2打开Nest++2文件夹,如下图;按安装提示安装即可,下图只给出需要注意的地方:提示是否重启,选no这里选第一个,再点next再选第三个,点next在弹出的文本框里粘贴入:C:\Windows\System32\drivers\Ytengfen.sys 然后点”ok”最后选exit,点击next。
最后替换一些文件打开32位文件夹将App文件夹的内容全部复制到C:\Program Files\Optitex 15\App文件夹下将32文件夹的内容全部复制到C:\Program Files\Optitex 15\App\LANG\Eastman 文件夹下,然后选中_install,cmd文件-右键-以管理员身份运行。
将License文件夹下的License.lis文件复制到:C:\ProgramData\Optitex\License 文件夹下。
32位安装完毕注:如果找不到ProgramData文件夹,可按如下操作:打开任意一个文件夹,打开菜单-工具,选择“文件夹选项”选中”查看”选项卡,把显示隐藏的文件、文件夹和驱动器选中,然后确定就可以看到ProgramData文件夹了。
CCS5.4超详细版安装教程

安装程序前先说说有可能导致安装失败的原因:1、文件不完整,有可能是拷贝或下载过程中出错,解决的方法当然就是找成功安装的同学再拷一份。
2、电脑的杀毒软件或防火墙可能会干扰安装过程,建议在安装前关闭相关程序。
3、电脑磁盘空间不足,找个大点的盘,即使不安装在C盘,C盘最好剩余足够容量(>1G)。
一、安装首先打开CCS5.4文件夹,打开后如下图所示:打开第一个文件夹出现:双击“ccs_setup_5.4.0.00091.exe”进行安装。
系统可能会问你是否允许更改,选择是。
接着出现如下界面:说是说让你选,其实根本没得选,只能接受,然后下一步,出现安装路径选择:默认是装在C盘的根目录,也可以点击左边的“Browse”自己选择安装路径,但注意路径中不要有中文字符。
例如我选择安装在F盘:但要注意在路径“F:\”后面要加ti,不然会在F盘生成一大堆安装文件,完整路径为“F:\ti”:点击确定,回到:注意不要勾选点击下一步:选择“Custom”模式,点击下一步,进入选择组件界面:由于我们单片机课程只用到了MSP430单片机,所以只需要勾选第一个选项就可以了,点击下一步出现:依照上图进行选择,点击下一步:点击下一步:点击下一步,这时候系统可能会询问你“是否允许修改硬盘”或是“否允许访问网络”之类的权限,通通选择“是”就可以了:程序开始安装,期间出现:这类的是在配置环境,不用理会。
当你看到下面这个界面的时候恭喜你安装成功了!!点击“OK”出现:点击“Finish”完成安装,安装完成后重启下电脑。
二、激活双击打开软件,首次打开会出现如下界面:选择工作区,工作区是用于存放项目的,按个人喜好进行选择,我一般放在磁盘根目录下,如“F:\workspace_msp430”。
点击“ok”后进入软件界面,初始使用会出现:选择第一个,点击下一步:点击右边“Browse”按键,找到你的CCS5.4文件夹,选中里面的license:点击“打开”:点击“Finish”完成激活,激活后重启软件,当软件左下方出现:代表已成功激活。
cc2530下载器安装使用说明
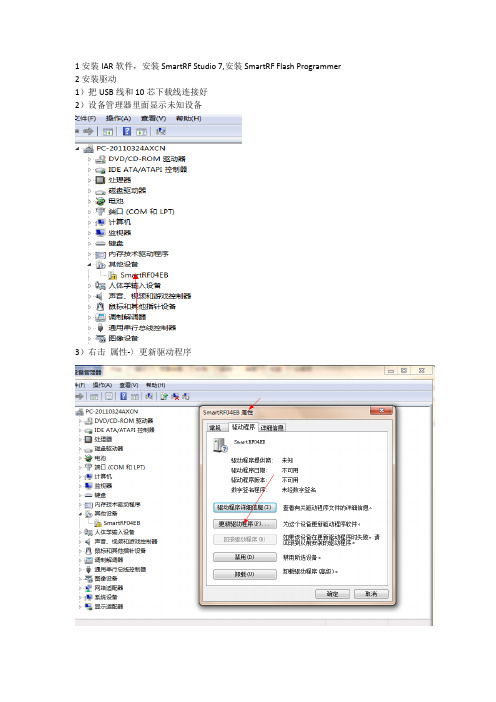
1安装IAR软件,安装SmartRF Studio 7,安装SmartRF Flash Programmer 2安装驱动1)把USB线和10芯下载线连接好2)设备管理器里面显示未知设备3)右击属性-〉更新驱动程序4)点击手动查找驱动程序5)选择从计算机设备驱动程序列表中选择6)点击显示所有设备7)选择从磁盘安装8)弹出下面对话框9)选择浏览,找到IAR软件安装目录D:\Program Files\IAR Systems\Embedded Workbench 5.3\8051\drivers\Texas Instruments(我的安装在D盘,大家根据自己的安装路径选择),选择srf04eb.inf,点击打开10)如下所示,双击Chipcon SRF04EB11)然后弹出对话框,选择始终安装12)安装好之后,显示驱动安装成功13)最终可以在设备管理器里面看到安装好的驱动安装好仿真器的驱动,就可以使用SmartRF Studio7了如下图哦(别忘了连接zigbee模块哦)使用studio时,不要启动IAR 哦,不然会无法使用studio关于下载器zigbee下载器,全球首个低成本兼容cc_debugger的下载器其他的cc_debugger下载器动辄170-500多,现在本店的下载器全部秒杀仅要88元,绝对不是吹的,支持IAR在线调试和SmartRF STUDIO7协议分析功能是zigbee学习爱好者的不二选择本下载器是目前最新的固件版本0045c8051f320主控芯片同时也可以作为c8051f320的核心开发板哦,超实惠此宝贝目前为DIY产品,手工焊接,焊接比较丑,如果介意不要购买后续会推出批量产品此产品详细资料请登陆/bbs/dispbbs.asp?boardid=17&Id=72论坛查看,史无前例的DIYzigbee下载器,大家就不用头疼不知道自己如何自制下载器了DIY爱好者必选产品本产品非人为损坏保修3个月快递自选,本产品不包邮,购买时一定联系卖家本产品发货清单:USB线一条十芯下载器一条下载器一块光盘一张:光盘内容包括说明书,驱动,相应的软件JTAG插座的引脚顺序是这样的上面的接口定义是本下载器连接到目标板的JTAG口定义下面是对应的实物位置,白色丝印有说明下面这个是给C8051F320下载程序的JTAG口定义后面这个接口是目标板上的JTAG接口,也就是自己的cc2530模块要这样连接JTAG,这样本下载器就可以连接到目标板下载,调试,协议分析了以上的接线方法可以使下载器能够DEBUG,能够连接到SmartRF Studio7,但是不能使用packet sniffer,如果要使用packet sniffer ,那么您的zigbee模块的JTAG接口应该如下定义,这样三个工具软件就都可以使用了淘宝:QQ交流群:106485180论坛:。
- 1、下载文档前请自行甄别文档内容的完整性,平台不提供额外的编辑、内容补充、找答案等附加服务。
- 2、"仅部分预览"的文档,不可在线预览部分如存在完整性等问题,可反馈申请退款(可完整预览的文档不适用该条件!)。
- 3、如文档侵犯您的权益,请联系客服反馈,我们会尽快为您处理(人工客服工作时间:9:00-18:30)。
sp_addlogin BFAPP,'DHHZDHHZ' --BFAPP login, 口令:DHHZDHHZ(口令必须),
配置用户口令用
建立业务数据库(例:BFV72_T_JXC)
2. 财务系统
除财务报表和凭证结转外不需要建数据库,直接将表建立在业务数据库中,
先执行CRM建表,crm触发器,再执行SQL_CRM_view.sql,CRM存储过程
四. 执行BFINIDATA.SQL, 插入系统初始化数据,包括系统参数,及其他业务必须的缺省数据
五. setdbuser.exe, 配置用户口令
六. setscxx.exe,加载菜单、打印模板
1. BFSYSTEM.INI中“DATABASE=”项指定需要加载数据的数据库名
sp_addlogin POS_USER,'DHHZDHHZ' --POS login
sp_addlogin BFCRM,'DHHZDHHZ' --卡 login
sp_addlogin BFCW,'DHHZDHHZ' --财务劳资 login
sp_addlogin BFRS,'DHHZDHHZ' --人事系统 login
其他的财务模块需要单独建数据库,将表建立在这个财务专用数据库中。
例:
建立数据库(例:BFV72_T_CWZW)
USE BFV72_T_CWZW
sp_addalias BFCW,dbo 财务选帐套时用
--
grant all on FBHDD.SPXX to GUEST_USER
3.人事劳资
sp_adduser BFRS,BFRS --人事劳资用户
三. 执行"建表文件", 建立表,视图,触发器,存储过程,
业务库SQL执行顺序:
PUB建表,JXC建表,PUB触发器,JXC触发器,JXC存储过程
卡库SQL执行顺序:(先执行CRM,在执行CRM_JC)
不需要单独建数据库,表建立在业务数据库中
二. 在业务数据库中建立USER:
BFPUB、BFBHDD、BFAPP、POS_USER、BFCRM、BFCW、BFRS
例:
USE BFV72_T_JXC
sp_adduser BFPUB,BFPUB --公共用户
sp_adduser BFBHDD,BFBHDD --进销存业务用户
日处理时,BFLOCAL.INI与AutoRCL.EXE或ManuRCL.EXE文件存放在同一个目录下。
2. 自动日处理:AutoRCL.EXE, 启动该程序,每10分钟检测一次,自动执行全部日处理模块
手工日处理:ManuRCL.EXE,单击“执行”按钮,执行所选模块的日处理
在《系统管理》中定义操作员的其他权限-特殊权限:允许作日处理
1. 配置BFLOCAL.INI中 "LOCAL SERVER=BFSYSTEM.INI中配置名称"
例:
BFSYSTEM.INI文件内容
[V750测试库] -----配置名称
master=TCP,198.16.1.4,5000
一. 建立login、数据库
1. login:
BFPUB、BFBHDD、BFAPP、POS_USER、BFCRM、BFCW、BFRS
例:
sp_addlogin BFPUB,'DHHZDHHZ' --公共 login
sp_addlogin BFBHDD,'DHHZDHHZ' --进销存业务 login
2.和菜单文件,放在同一个目录下,加载菜单
和打印单据模板内容,放在同一个目录下,加载打印单据
3.执行setscxx.exe, 程序登录:用户名:具有sa权限的SYBASE用户
七.建立FTP server
八. 日处理
注意:
不要使用“SUPER”做日处理,
query=TCP,198.16.1.4,5000
SYSTEMDB=BF_APP
DATABASE=BFV72_T_JXC
MAKEBASE INTERBAL=5
BFLOCAL.INI文件内容
[LocalSetting]
Select Server =
Local Server = V750测试库 -----BFSYSTEM.INI中配置名称
sp_adduser BFAPP,BFAPP --BFAPP用户,配置用户口令用
sp_adduser POS_USER,POS_USER --POS用户
sp_adduser BFCRM,BFCRM --卡用户
sp_adduser BFCW,BFCW --财务系统用户