商务领航Nav新操作手册
NAV操作手册-采购备课讲稿

软件操作说明--采购模块目录软件操作说明 (1)--采购模块 (1)1启动 Microsoft Navision 程序 (3)2采购申请表 (5)3采购订单 (9)3.1采购订单录入 (9)3.2采购订单审核 (10)4外协采购单 (12)4.1外协采购订单下达 (12)4.2外协采购订单执行 (15)5采购退货 (18)路径:AVT-Purchase→Order Processing→Return Orders (18)附录 (24)工具栏说明 (24)F keys/F功能键说明 (24)Assist Button/辅助功能键说明 (25)1启动 Microsoft Navision 程序一、找到开始-程序,点击Microsoft Dynamics NAV 2009 R2 with Microsoft SQLServer启动该程序,(也可以通过双击桌面快捷图标启动)如下图所示:二、初次登录输入Server Name,然后填写User ID 和Password(密码默认为12345)最后选择Database Name。
三、进入操作界面:密码修改方式:点击Tools→Security→Password2 采购申请表路径:AVT-Purchase→Planning→Requisition Worksheet打开采购申请表时注意批名称的选择●采购申请表里面待采购的物料,数量和金额和需求截至日期都是由计划部门发送过来的。
●对于交期无法满足的物料要及时通知计划部门进行调整●在确定采购计划可以执行之后,首先要在申请工作表的行里的vendor No.字段选择供应商编号,如果供应商不再供应商列表要把供应商的相关资料交给财务由财务新建供应商卡片下图是执行采购申请的步骤:一、在采购申请表行里的Vendor No.点击上箭头二、建立物料和供应商的关系,一个物料可以在下表维护多个供应商下表已经建立了物料和供应商的关系,并且在此表中可以维护供应商的交期Lead time Caculation和供应商的物料编号名称Vendor Item No.三、在供应商物料关系表里选择一个最终确定下达采购订单的供应商到采购申请表四、执行采购申请在采购不执行的采购申请行的Accept Action Massage里把钩点击去掉。
NAVIGATION系统使用指南说明书
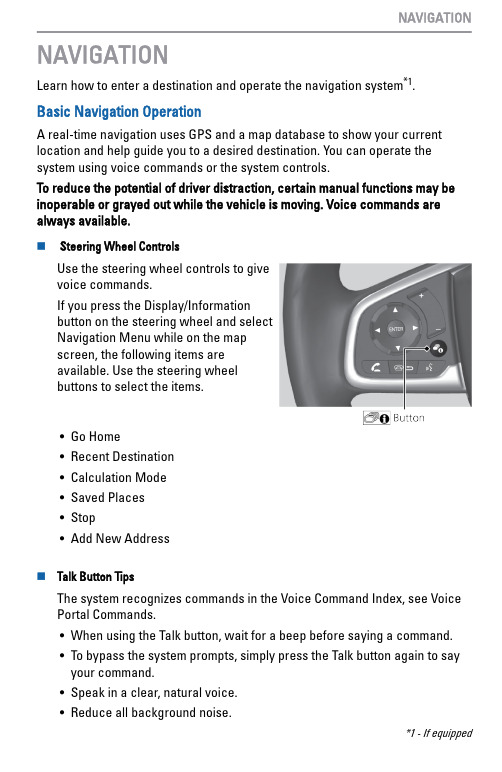
NAVIGATIONLearn how to enter a destination and operate the navigation system*1.Basic Navigation OperationA real-time navigation uses GPS and a map database to show your current location and help guide you to a desired destination. You can operate the system using voice commands or the system controls.To reduce the potential of driver distraction, certain manual functions may be inoperable or grayed out while the vehicle is moving. Voice commands are always available.n Steering Wheel ControlsUse the steering wheel controls to givevoice commands.If you press the Display/Informationbutton on the steering wheel and selectNavigation Menu while on the mapscreen, the following items areavailable. Use the steering wheelbuttons to select the items.•Go Home•Recent Destination•Calculation Mode•Saved Places•Stop•Add New Addressn Talk Button TipsThe system recognizes commands in the Voice Command Index, see Voice Portal Commands.•When using the Talk button, wait for a beep before saying a command.•To bypass the system prompts, simply press the Talk button again to sayyour command.•Speak in a clear, natural voice.•Reduce all background noise.*1 - If equipped•Adjust the dashboard vents away from the microphone in the ceiling.•Close the windows and moonroof*1.n System Guidance VolumeAdjust the navigation system volume.1.From the Home screen, select Settings.2.Select System.3.Select the Sound/Beep tab.4.Adjust the Guidance Volume level.n Navigation Display and ControlsTouch icons on the screen to enter information and make selections.Entering Your DestinationThere are several methods to enter a destination.n Home AddressStore your home address in the system so you can easily route to it.*1 - If equipped1.Press the MAP button.2.Select the Where to button.3.Select Menu and then select SetHome Location.Select Use Current Location to sethome location.If selecting Enter My Address,Recently Found or Saved Place,proceed to steps 4 and 5.4.Select the home location.5.Select Select.n Street Address1.Select Navigation.2.Select the search icon.3.Select Address.4.Enter an address.RoutingAfter a destination is set, you can alter or cancel your route. n Map Legendfrom the road, causing a crash in which you could be seriously injured or。
CiscoNAV10WF功能说明-PPT课件
议程 • • • • • • • • • 概览 主要特点 业务部署 管理维护 市场定位 相关业务 部署模式 Q&A 配置练习
领航者路由器简览
端口形态 安全功能
有线10xGE端口
有线10端口+无线AP
标准安全 (防火墙) 高级安全 (IPS/AV)
2. 应用方式:提供商务领航信息化套餐的标准网络设备。 3. 服务描述:企业级一站式安全上网解决方案,包括上 网线路、网络设备(Navigator)、 24X7网络监控 及维护服务;提供安全宽带上网、无线接入、防火 墙/防病毒等功能。
Navigator的主要技术功能特点
广域网功能 管理运维方面
• 业务指示灯
• 硬件转发 • 自适应双GE上连,主 备或负载均衡 • PPPOE • 静态路由 • OSPF/RIP • 链路探测
• 硬件转发 • 自适应8/9端口GE • VLAN、VLAN Trunk、STP • VLAN间路由静态 /OSPF/RIP • 双天线无线型号, 802.11b/g、4个SSID、多种 认证功能、功率可调 • 802.1x • QoS • DHCP、DDNS、UPnP等
四大 特点
特快排障 放心!
外防内隔 安全!
“领航者”强大的状态硬件防火墙 功能、基于 URL 的网站过滤功能及 802.1x 认证和 VLAN 划分等功能, 让用户外网访问和内网互连都能确 保极好的安全性。
•配有业务指示灯, •配置恢复按钮 •U盘配置管理, •网管协议支持电信营运商远程监 控 •现行跟换服务
NAV10 NAV10ADVSEC
NAV10-WF NAV10ADVSEC-WF
* 10个GE端口(10/100/1000自适应)可以配置为2WAN+8LAN或者1WAN+9LAN
·商务领航“易网行”产品说明书
目录第一部分、产品概述 (2)第二部分、产品功能 (2)2.1产品功能概述 (2)2.2产品功能与操作流程 (2)2.2.1 多语种支持: (2)2.2.2 多功能模块架构: (2)2.2.3 网站会员与购物管理 (18)2.2.4 辅助功能管理 (20)2.3产品优势 (21)2.3.1 成本优势: (21)2.3.2 风险规避 (22)2.3.3 操作便捷 (23)2.3.4个性化解决方案 (23)2.3.5安全性 (23)2.3.6服务保障,价值提升 (24)2.4. 企业运用案例 (24)第三部分、系统支撑 (26)3.1产品域名、地址等相关编码。
(26)3.2商务领航网站平台的操作界面架构 (26)3.3资费系统要求 (26)第四部分、业务管理部门 (26)第五部分故障申告(或FAQ) (26)5.1用户的咨询和投诉方式 (26)5.2系统出现不同的故障时的投诉及处理流程。
(27)第一部分、产品概述易网行是一套自助建站系统。
通过定制框架,企业可以套用专门设计的网页模板,快速建设一个具有自己特色的网站。
易网行的目标是帮助客户快速地建立起一个简单、高效、功能齐全的网站,建立一个展示企业形象及企业产品的信息化平台。
它也是一套功能完备的网站管理系统,具备各种动态管理网站信息的功能。
第二部分、产品功能2.1产品功能概述1)提供丰富的网站模版。
2)客户可以自由增加、修改、删除栏目,也可以隐藏或设定栏目的会员访问级别。
3)网站功能非常丰富,每个栏目可以调用不同类型的功能模块,如:单页图文、新闻列表、图文展示、访客留言、自定链接、文件下载、产品发布、论坛、联系信息等;每个功能模块有各自不同的管理功能。
4)使用代码生成器,可将经常更新的内容生成“插入代码”,插入到首页中,实现首页内容动态更新。
5)支持会员系统,可设置栏目必须会员登录才可以访问。
6)网站辅助功能样样齐全2.2产品功能与操作流程2.2.1 多语种支持:网站具有简、繁、英三种语言版本;简繁自动转换。
“领航者” Navigator业务销售指南V3
9
“领航者” Navigator是企业级路由器,不是家庭网 关
SOHO路由器 领航者Navigator
宽带上网/PPPOE拨号,双上连端口 宽带上网/PPPOE拨号 无路由功能或静态路由 简单的防火墙/NAT 1~4个10/100M端口 性能很低 可能的无线AP 常用的路由功能:静态/OSPF/RIP 故障跟踪功能, SNMP远程管理功能
IT部门的任务
• • • • • • • • • 公司业务数据管理 公司IT资源管理 公司IT资源管理 信息系统开发 对公司员工利用信息系统进行培训 公司网硬件设备维护 办公系统技术支撑 通信线路维护 网络安全控制、病毒防护 …
核心职责
….但职责不能省!
大量开销, 不产生利润
客户和老板都需要定期看看报告才放心!
Presentation_ID
© 2006 Cisco Systems, Inc. All rights reserved.
Cisco Confidential
20
“领航者” Navigator的主要技术功能特点
广域网功能
• 硬件转发 • 自适应双GE上连,主备 或负载均衡 • PPPOE • 静态路由 • OSPF/RIP • 链路探测
Cisco Confidential
4
服务的质变
网络中断
发现故障
用户维护工程师
找网管
找厂商
找集成商
用户维护工程师
运营商
厂商
集成商
线路无故障
设备无故障
配置正常
问题依旧存在
用户维护工程师
Presentation_ID
© 2006 Cisco Systems, Inc. All rights reserved.
·商务领航“企智通”产品说明书

“ 智通” 产品说明书 商务领航 企智通” 产品说明书目录 第一部分 产品概述 ...................................................................................................21.1 . 1.2 . 产品介绍...................................................................................................................2 产品介绍 产品外观...................................................................................................................2 产品外观第二部分 产品功能 .....................................................................................................21 产品功能概述...........................................................................................................2 产品功能概述 2 企智通终端设备系列及处理性能...........................................................................3 企智通终端设备系列及处理性能 3 产品功能模块介绍和操作流程...............................................................................5 产品功能模块介绍和操作流程 2. 2. 1 上网记录模块 上网记录模块...................................................................................................5 2. 2. 2 流量分析模块 流量分析模块...................................................................................................6 2. 2. 3 邮件和聊天记录 邮件和聊天记录...............................................................................................8 2. 2. 4 上网控制 上网控制.........................................................................................................10 2. 2. 5 带宽管理 带宽管理.........................................................................................................11 产品优势.................................................................................................................12 2. 4 产品优势 成本优势......................................................................................................12 2.3.1 成本优势 法律责任规避..............................................................................................12 2.3.2 法律责任规避 操作便捷......................................................................................................12 2.3.3 操作便捷 个性化模块定制..........................................................................................13 2.3.4 个性化模块定制 安全性..........................................................................................................13 2.3.5 安全性 服务保障......................................................................................................13 2.3.6 服务保障 2. 5 企智通接入用户网络.............................................................................................13 企智通接入用户网络 2. 6 企业运用案例.........................................................................................................14 企业运用案例 2. 5. 1 深圳某银行接入实例 深圳某银行接入实例.....................................................................................14 2. 5. 2 深圳某证券通信公司 深圳某证券通信公司.....................................................................................15 2. 2. 2.第三部分 业务管理部门 .........................................................................................16 故障申告( FAQ) 第四部分 故障申告(或 FAQ) ............................................................................174. 1 4. 2 客户服务.....................................................................................................................17 客户服务 常见问题解答 (FAQ) ..........................................................................................17 )1“ 智通” 产品说明书 商务领航 企智通” 产品说明书 第一部分 产品概述 1.1 产品介绍 .企智通产品是针对企业办公网络发展趋势而适时推出的企业网络办公管理服务 产品,是企业的智能办公管家。
江苏电信商务领航企信通用户手册

江苏电信商务领航企信通用户手册1.平台登陆2.企业地址簿2.1地址簿管理2.1.1新增组2.1.2组列表2.2联系人管理2.2.1新增联系人2.2.2联系人列表3 查询统计3.1 下发记录查询4.发送短信4.1收件箱4.2发件箱4.3待发送信息4.4草稿箱4.5回收站4.6新建短信4.7发送短信4.8地址簿4.9文件群发1平台登陆首先登陆商务领航网站,输入用户名、密码、验证码后,点登陆。
点企信通用户第一次使用企信通,要求绑定小灵通或家加E话机,并请在号码前加区号输入绑定号码,并点击“取得验证码按纽”,系统会向用户绑定的小灵通发送验证信息,用户把验证码输入验证码框里,点击确定按钮即完成绑定。
.2、企业地址簿当您再次以管理员用户登陆时会进入以下界面2.1.1新增组分别点击企业地址簿,地址簿组管理,新增组,输入组名称和组的备注信息,点确定,就可以建立一个新的组了2.1.2组列表此功能可以对组进行查看,修改和删除操作在组名框中输入组名可以查找组名点修改可对组的信息进行修改点删除可以删除组2.2联系人管理2.2.1新增联系人填写相关的联系人信息,点确定即可2.2.2 联系人列表输入组名或联系人姓名可对用户进行查询点修改可修改联系人信息点删除可删除联系人3查询统计3.1下发记录查询点下发记录查询,可以查询下发的记录可以按时间和号码,消息内容进行查询4.发送短信4.1收件箱收件箱中存放着用户用小灵通回复的信息4.2发件箱发件箱存放着用户已发送的信息4.3待发送信息待发送信息是用户在发送信息时点了“保存为待发送消息”,系统就会把信息暂存在待发送信息里,此时在选择框中打上勾点选择发送即可把此信息发出去,点“删除”则把这条信息删除,但不能对短信内容进行修改。
4.4草稿箱草稿箱是用户在发送信息时点了“保存到草稿箱”,系统就会把信息暂存在草稿箱里,此时在选择框中打上勾点选择发送即可把此信息发出去,点“删除”则把这条信息删除,点“修改”对短信内容进行修改。
NAV操作手册-财务

软件操作说明--财务模块目录软件操作说明 (1)--财务模块 (1)1启动 Microsoft Navision 程序 (4)2系统基础参数设置 (6)2.1公司基本信息设置 (6)2.2会计期间维护 (6)2.3编号号码串设置 (7)3财务设置 (9)3.1总帐设置 (9)3.2会计科目设置 (9)3.3常规设置 (11)3.4维设置 (11)3.5银行帐目设置 (16)3.6日记帐模板和批设置 (17)4日记账 (19)4.1日记账录入 (19)4.2经常日记账 (21)5固定资产 (22)5.1固定资产卡片 (22)5.2固定资产购置和清理 (23)5.3固定资产计算折旧 (24)6汇率 (26)6.1设置汇率 (26)6.2调整汇兑损益 (26)6.3已汇兑损益记录的查询 (28)7ACIE 调整成本-物料分录 (29)8月结或年结 (30)8.1关闭会计年度 (30)8.2结转损溢类余额--关闭收益报表 (30)8.3期间关帐 (31)9财务应付 (33)9.1采购发票 (33)9.2采购退货红字发票 (36)9.3应付账款-付款日记帐 (37)9.4应付核销 (38)10财务应收 (43)10.1销售发票 (43)10.2销售退货红字发票 (45)10.3应收账款-普通日记账 (48)附录 (50)工具栏说明 (50)F keys/F功能键说明 (50)Assist Button/辅助功能键说明 (51)1启动 Microsoft Navision 程序一、找到开始-程序,点击Microsoft Dynamics NAV 2009 R2 with Microsoft SQLServer启动该程序,(也可以通过双击桌面快捷图标启动)如下图所示:二、初次登录输入Server Name,然后填写User ID 和Password(密码默认为12345)最后选择Database Name。
三、进入操作界面:密码修改方式:点击Tools→Security→Password2 系统基础参数设置2.1 公司基本信息设置路径:管理(Administration)→应用程序设置(Application Setup)→概述(General)→公司信息(Company Information)用于设置公司的基本信息,如下图所示:选项卡‘常规’:‘名称’即公司名称,将会显示在程序中产生的所有的报表中;‘地址’即公司地址,将会作为默认地址显示在所有文件中;,可将公司LOGO导入;‘通信’:填写公司的联系方式,可以输入公司的详细通讯信息;‘付款’:填入公司的银行开户行信息;‘发运’:即公司收货地址,将会作为默认收货地址显示在采购定单上;注意:‘Location Code’当希望有默认的收货仓库时,就可指定此内容。
NAV操作手册采购

软件操作说明--采购模块目录软件操作说明 (1)--采购模块 (1)1启动 Microsoft Navision 程序 (3)2采购申请表 (5)3采购订单 (9)3.1采购订单录入 (9)3.2采购订单审核 (10)4外协采购单 (12)4.1外协采购订单下达 (12)4.2外协采购订单执行 (15)5采购退货 (18)路径:AVT-Purchase→Order Processing→Return Orders (18)附录 (24)工具栏说明 (24)F keys/F功能键说明 (24)Assist Button/辅助功能键说明 (25)1启动 Microsoft Navision 程序一、找到开始-程序,点击Microsoft Dynamics NAV 2009 R2 with Microsoft SQLServer启动该程序,(也可以通过双击桌面快捷图标启动)如下图所示:二、初次登录输入Server Name,然后填写User ID 和Password(密码默认为12345)最后选择Database Name。
三、进入操作界面:密码修改方式:点击Tools→Security→Password2 采购申请表路径:AVT-Purchase→Planning→Requisition Worksheet打开采购申请表时注意批名称的选择●采购申请表里面待采购的物料,数量和金额和需求截至日期都是由计划部门发送过来的。
●对于交期无法满足的物料要及时通知计划部门进行调整●在确定采购计划可以执行之后,首先要在申请工作表的行里的vendor No.字段选择供应商编号,如果供应商不再供应商列表要把供应商的相关资料交给财务由财务新建供应商卡片下图是执行采购申请的步骤:一、在采购申请表行里的Vendor No.点击上箭头二、建立物料和供应商的关系,一个物料可以在下表维护多个供应商下表已经建立了物料和供应商的关系,并且在此表中可以维护供应商的交期Lead time Caculation和供应商的物料编号名称Vendor Item No.三、在供应商物料关系表里选择一个最终确定下达采购订单的供应商到采购申请表四、执行采购申请在采购不执行的采购申请行的Accept Action Massage里把钩点击去掉。
NAV操作手册-采购

软件操作说明--采购模块目录软件操作说明 (1)--采购模块 (1)1启动 Microsoft Navision 程序 (3)2采购申请表 (5)3采购订单 (9)3.1采购订单录入 (9)3.2采购订单审核 (10)4外协采购单 (12)4.1外协采购订单下达 (12)4.2外协采购订单执行 (15)5采购退货 (18)路径:AVT-Purchase→Order Processing→Return Orders (18)附录 (24)工具栏说明 (24)F keys/F功能键说明 (24)Assist Button/辅助功能键说明 (25)1启动 Microsoft Navision 程序一、找到开始-程序,点击Microsoft Dynamics NAV 2009 R2 with Microsoft SQLServer启动该程序,(也可以通过双击桌面快捷图标启动)如下图所示:二、初次登录输入Server Name,然后填写User ID 和Password(密码默认为12345)最后选择Database Name。
三、进入操作界面:密码修改方式:点击Tools→Security→Password2 采购申请表路径:AVT-Purchase→Planning→Requisition Worksheet打开采购申请表时注意批名称的选择●采购申请表里面待采购的物料,数量和金额和需求截至日期都是由计划部门发送过来的。
●对于交期无法满足的物料要及时通知计划部门进行调整●在确定采购计划可以执行之后,首先要在申请工作表的行里的vendor No.字段选择供应商编号,如果供应商不再供应商列表要把供应商的相关资料交给财务由财务新建供应商卡片下图是执行采购申请的步骤:一、在采购申请表行里的Vendor No.点击上箭头二、建立物料和供应商的关系,一个物料可以在下表维护多个供应商下表已经建立了物料和供应商的关系,并且在此表中可以维护供应商的交期Lead time Caculation和供应商的物料编号名称Vendor Item No.三、在供应商物料关系表里选择一个最终确定下达采购订单的供应商到采购申请表四、执行采购申请在采购不执行的采购申请行的Accept Action Massage里把钩点击去掉。
领航者Navigator2-1客户使用手册

8 快速故障定位 ........................................................................................ 31 9 技术规格 ................................................................................................ 33 附录:IPSec VPN客户端配置 ................................................................ 34
商务领航套餐说明
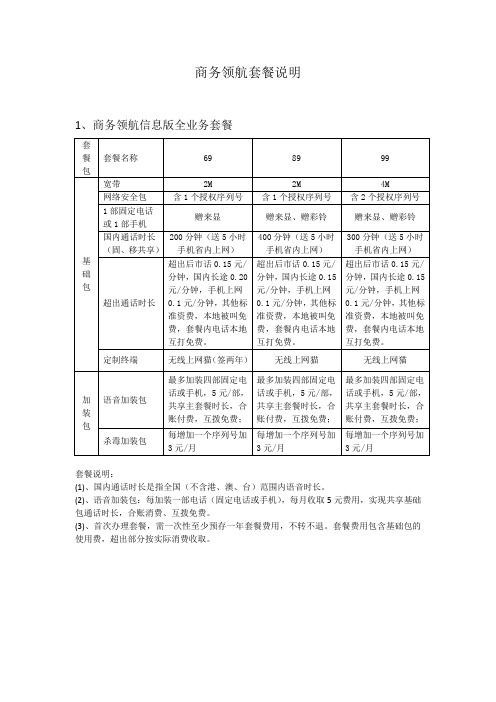
商务领航套餐说明1、商务领航信息版全业务套餐套餐说明:(1)、国内通话时长是指全国(不含港、澳、台)范围内语音时长。
(2)、语音加装包:每加装一部电话(固定电话或手机),每月收取5元费用,实现共享基础包通话时长,合账消费、互拨免费。
(3)、首次办理套餐,需一次性至少预存一年套餐费用,不转不退。
套餐费用包含基础包的使用费,超出部分按实际消费收取。
2、商务领航信息版捆绑套餐(1)、固定电话语音基础包和加装包得包打费用不含区间、国际长途,信息费(2)、固定电话按照标准资费收取(长途按IP标准收取)。
(3)、手机加装包:选择本套餐,每月加1元即可加装一部C网手机,选择天翼T1套餐8折优惠,并实现套内语音终端互拨免费。
(4)、首次办理套餐,需一次性至少预存一年套餐费用,不转不退。
套餐费用包含基础包的使用费,超出部分按实际消费收取。
商务领航信息版全业务套餐操作手册一.新装1.录入客户资料信息。
重点:客户品牌、客户子品牌、战略分群、管控属性、场所类别等信息如=录入。
2.订购组合产品,本图以商务领航信息版69元套餐为例(选择宽带和1部手机):重点注意:在宽带的产品订购页面,一定要订购上‘定制终端1-1’,其他都是套餐默认值即可。
重点注意:在宽带的产品订购页面,一定要订购上‘定制终端1-1’,其他都是套餐默认值即可。
3.填写cdma业务服务信息和宽带服务信息;重点注意:宽带周期价格录入为0,如有固定电话则周期价格也录入为‘0’。
4.点击‘展示产品订购’检查录入的产品信息:意:储值金额选择‘宽带帐号’的那个号码。
6.最后点击‘预算’,进行‘免填单打印’-----‘提交’即可。
二.加装(在原来就是商务领航信息版套餐的基础上加装电话或者手机)选择‘组合加装界面’,继承原客户资料信息后,进入产品加装界面,如图(以加装一部固话为例:)注意:加装是的套餐包中要选择‘加装包’其他操作流程同新装一样。
三.原有非商务领航套餐用户加入商务领航套餐:进入‘组合加装’界面,以原来一个手机用户加入商务领航套餐为例:将此手机原来的套餐订购置为‘0’,将手机和宽带LAN置为‘1’,如下图:检查用户原来套餐订购的公共附属产品和普通附属产品,对于用户不需要的进行取消。
NAV操作手册财务

软件操作说明财务模块目录1启动程序一、找到开始-程序,点击 2009 R2 启动该程序,(也可以通过双击桌面快捷图标启动)如下图所示:二、初次登录输入,然后填写和(密码默认为12345)最后选择。
三、进入操作界面:密码修改方式:点击2 系统基础参数设置2.1 公司基本信息设置路径:管理()→应用程序设置()→概述()→公司信息()用于设置公司的基本信息,如下图所示:选项卡‘常规’:‘名称’即公司名称,将会显示在程序中产生的所有的报表中;‘地址’即公司地址,将会作为默认地址显示在所有文件中;,可将公司导入;‘通信’:填写公司的联系方式,可以输入公司的详细通讯信息;‘付款’:填入公司的银行开户行信息;‘发运’:即公司收货地址,将会作为默认收货地址显示在采购定单上;注意:‘’当希望有默认的收货仓库时,就可指定此内容。
2.2 会计期间维护路径:财务模块()→设置()→会计期间()创建会计年度:点击按钮,执行创建新会计批次,如下图所示:还可以通过手动方式,创建一个新的会计期间会计年度。
即在“会计期间”界面中手工插入会计年度期间开始日期、期间数、长度。
注意:会计期间设为1年,则为年结;会计期间设为1个月,则为月结;期间设置及结转损益有关联。
2.3 编号号码串设置路径:管理模块()→应用程序设置()→概述()→编码系列(. )在此处设置系统中各项业务单据(采购单、销售单等)、过帐事务(采购过帐、销售出货、财务过帐等)的编号,这些编号参及系统全局运行并在各模块的编号设置中被引用,如下图所示:系统编号号码串列表:采购订单编号采购订单编号号码串行:规定了采购单的编码规则包括开始使用日期、结束日期、最后使用编号、递增数等。
注意:通过对编号号码串日期的控制可以设置出不同的期间给出不同的号码串。
点击编号号码串界面下系列关系对两组编号号码串进行组合实现同种单据或卡片不同的编码规则3 财务设置3.1 总帐设置路径:财务模块()→设置()→总账设置()用于设置总帐的基本信息,如下图所示:选项卡‘常规’:‘允许过账从’‘允许过账至’:定义过帐的有效开始和结束日期;‘登记时间’:定义程序是否记录用户使用系统的时间;‘本地地址格式’:定义在打印出的文件中,地址信息的格式;‘本地联系人地址格式’:定义在邮寄地址中的联系人名称的位置;‘允许的最大差额’字段-输入最大的修改金额(本位币)‘编号’:‘银行账目编号’定义银行帐目编号;3.2 会计科目设置路径:财务管理()à总账()à会计科目表()会计科目表是公司的核心。
NAV350操作手册(中文)
NAV350操作手册(中文)操作指南N A V350Laser Positioning SensorNavigating the route to improved productivitySoftware version Operating Instructions软件版本NAV350的软件是加密的. 出厂初始密码为:NAV350适用于工业场合.当用于居民区是会产生无线干扰。
C o p y r i ghtCopyright ? 2011SICK AG WaldkirchAuto Ident, Reute P l a n tNimburger Stra?e 1179276 ReuteG e r m anyT r ad e m ar k sWindows 2000?, Windows X P?, Windows Vist a?and Windows 7?are registered trademarks of Microsoft Corporation in the USA and other countries.Adobe? Reader?is a trademark of Adobe Systems Incorporated.Version of the operating instructionsThe latest version of these operating instructions can be obtained as PDF at .Operating InstructionsTable of contents1 About this document (8)1.1 Function of this document (8)1.2 Target group (8)1.3 Depth of information (8)1.4 Symbology used (9)2 For your safety (10)2.1 Authorised personnel (10)2.2 Correct use (11)2.3 General safety notes and protective measures (12)2.4 Quick stop and Quick restart (13)2.5 Environmental protection (14)3 Product description (15)3.1 Delivery (15)3.2 Construction of the NAV350 (16)3.3 Special features of the NAV350 (18)3.4 Applications (18)3.5 Operating principle of the NAV350 (19)3.6 Landmark detection (23)3.7 Navigation (24)3.8 Output of measured values (31)3.9 Integration of the NAV350 in an AGV’s control system (32)3.10 Planning (36)4 Mounting (44)4.1 Overview of the mounting steps (44)4.2 Preparations for mounting (44)4.3 Mounting and adjustment of the device (44)4.4 Dismantling the NAV350 (45)5 Electrical installation (46)5.1 Overview of the installation steps (46)5.2 Connections of the NAV350 (46)5.3 Preparing the electrical installation (47)5.4 Undertaking electrical installation on the NAV350 (48)6 Commissioning and configuration (51)6.1 Overview of the commissioning steps (51)6.2 SOPAS ET configuration software (51)6.3 Establish communication with the NAV350 (52)6.4 Initial commissioning (54)6.5 Connection and test measurement (56)6.6 Loading reflector data (56)7 Maintenance (57)7.1 Maintenance during operation (57)7.2 Exchanging an NAV350 (58)8 T r o ub l e s ho o t i n g (59)8.1 In the event of faults or errors (59)8.2 Monitoring error and malfunction indications (59)8.3 Troubleshooting and rectification (60)8.4 Detailed error analysis (60)8.5 SICK support (61)9 Technical specifications (62)9.1 Data sheet NAV350 (62)9.2 Dimensional drawings (64)10 Annex (66)10.1 Overview of the annexes (66)10.2 Ordering information (66)10.3 Glossary (67)10.4 EC declaration of conformity (68)Operating Instructions Figures and tablesAbbreviationsAGV Automated guided vehicleCoLa Communication Language = proprietary SOPAS ET communication language(ASCII = C o L a F A or binary = Co L a F B)EEPROM Electrically Erasable Programmable R ea d-o n ly M e m o r yLED Light Emitting DiodeRAM Random Access Memory = volatile memory with direct accessROM R ea d-o n l y Memory (permanent)SOPAS ET SICK OPEN PORTAL for APPLICATION and SYSTEMS ENGINEERING TOOL = configurationsoftware for the configuration of the N A V350Figures and tables Operating InstructionsT ab l esTab. 1: Target groups of this document (8)Tab. 2: Authorised personnel (10)Tab. 3: Delivery (15)Tab. 4: Meaning of the LED status indicators (17)Tab. 5: Special features of the NAV350 (18)Tab. 6: Typical remissions and scanning ranges (22)Tab. 7: Frame for the telegrams with ASCII coding (33)Tab. 8: Beam diameter at different distances from the NAV350 (37)Tab. 9: Pin assignment of the ―Power‖ connection on the NAV350 (47)Tab. 10: Pin assignment of the ―E t h e r n e t‖connection on the NAV350 (47)Tab. 11: Pin assignment of the ―R S F232‖c onnection on the NAV350 (47)Tab. 12: Maximum cable lengths for the supply voltage (48) Tab. 13: Maximum length of cable for the data interface (48) Tab. 14: SOPAS ET default setting (52)Tab. 15: Password NAV350 (55)Tab. 16: Troubleshooting and rectification (60)Tab. 17: Data sheet NAV350 (62)Tab. 18: Consumables (66)Operating Instructions Figures and tablesFiguresFig. 1: Laser output aperture on the NAV350 (13)Fig. 2: Views of device (16)Fig. 3: Measuring principle of the NAV350 (19)Fig. 4: Principle of operation of the NAV350 (20)Fig. 5: Diffuse reflection from objects (21)Fig. 6: Directional reflection from reflectors (21)Fig. 7: Possible sources of errors during the measurement (21) Fig. 8: Beam diameter and distance between measured points at 0 to 100 m (22)Fig. 9: Landmark detection (23)Fig. 10: Determination of the position by the N A V350by means of the detection of reflector placements (24)Fig. 11: Identification of reflectors in the operational status ―continuous positio ning‖25Fig. 12: Radius of the detection window as a function of the distance (26)Fig. 13: Filter N-CLOSEST (27)Fig. 14: Restricted action radius (28)Fig. 15: Example for the definition of muted sectors (29)Fig. 16: Overlapping of two reflectors (30)Fig. 17: Minimum distance from reflectors to other reflecting objects (30)Fig. 18: Output of measured values for truck loading (31)Fig. 19: Requesting an absolute position or landmark positions (32)Fig. 20: Integration of the NAV350 in a navigation system (33) Fig. 21: Pulse for synchronisation (34)Fig. 22: Increase in the size of the beam and safety supplement (37)Fig. 23: Absolute and local coordinate system with angular position of the NAV350 (38)Fig. 24: Reflector height as a function of the distance from 0 to 70 m (39)Fig. 25: Correct, asymmetrical placement andincorrect, symmetrical placement of reflectors (41)Fig. 26: Common usage of the reflectors from two neighbouring layers (43)Fig. 27: Fixing bracket for the NAV350 (45)Fig. 28: Connections of the NAV350 (46)Fig. 29: Connection of the voltage supply (49)Fig. 30: Ethernet connection (49)Fig. 31: Wiring the RS F232 interface (49)Fig. 32: RS F232connection (50)Fig. 33: Principle of data storage (54)Fig. 34: Example text file with reflector data (56)Fig. 35: Window in the scanner head on the NAV350 (57)Fig. 36: Dimensions NAV350 (64)Fig. 37: Dimensions fixing bracket for NAV350 (65)Fig. 38: Illustration containing the EU declaration of conformity (68)Figures and tables Operating Instructions1 About this documentPlease read this chapter carefully before working with this documentation and the laserpositioning sensor N A V350.1.1 Function of this documentThese operating instructions are designed to address the technical personnel in regards tosafe mounting, electrical installation, configuration, commissioning and maintenance of thefollowing laser positioning sensor.1.2 Target groupThe intended target group for this document is people in the following positions:Tab. 1: Target groups of this document1.3 Depth of informationThese operating instructions contain the following information on the N A V350:product descriptionelectrical installationcommissioning and configurationmaintenancetroubleshooting and rectificationordering informationconformity and approvalPlanning and using a laser positioning sensor such as the NAV350 also require specifictechnical skills which are not detailed in this documentation.In addition, an online help is available in the SOPAS ET configuration software supplied; thishelp provides information on the usage of the software user interface, as well as on theconfiguration of the N A V350.Further information on the NAV350 is available from SICK AG, Division Auto Ident, and inthe Internet at .Important In the following the laser positioning sensor is referred to as NAV350 for short.Operating InstructionsChapter 11.4Symbology usedRecommendation Recommendations are designed to give you assistance in the d ec i s ion -m a k ing process with respect to a certain function or a technical measure.Important Sections marked ―Important ‖ provide information about special features of the device. Explanation Explanations provide background knowledge on technical relationships. M ENU COMMAND This typeface indicates a term in the SOPAS ET user interface.Terminal output This typeface indicates messages that the NAV350 outputs via its i n t e r f ace s.Take action … Here you must do something. This symbol indicates an instruction to perform an action thatcontains only one action or actions in warnings where a specific sequence does not need to be followed. Instructions to perform actions that contain several steps in a specific sequence are numbered.This symbol refers to additionally available documentation.Software notes show where you can make the appropriate settings and adjustments in the SOPAS ET configuration software.Note!A note provides indicates potential hazards that could involve damage or degradation of the functionality of the NAV350 or other devices.Warning!A warning indicates an actual or potential hazard. They are designed to help you to prevent accidents.The safety symbol beside the warning indicates the nature of the risk of accident, e.g. due to electricity. The warning category (DANGER, WARNING, CAUTION) indicates the severity of the hazard.Read carefully and follow the warning notices!Chapter 2For your safety Operating Instructions2 For your safetyThis chapter deals with your own safety and the safety of the equipment operators.Please read this chapter carefully before working with the NA V350.2.1 Authorised personnelThe NAV350 must only be installed, commissioned and serviced by adequately qualifiedpersonnel.Repairs to the NAV350 are only allowed to be undertaken by trained and authorised servicepersonnel from SICK AG.The following qualifications are necessary for the various tasks:Tab. 2: Authorised personnelOperating Instructions For your safety Chapter 22.2 Correct useThe NAV350 laser positioning sensor is intended for use in industrial environments. Whenused in residential areas, it can cause radio interferences.The NAV350 is used to determine the position of automated guide vehicles (AGV) at a pointon the programmed route. Fitted to an AGV, the NAV350 continuously measures thepositions of reflectors detected as well as the surrounding contour. Depending on theoperating mode selected, the NAV350 outputs to the AGV’s vehicle computer the positionof the reflectors, or its own position, as well as the distance, the angle and the remission ofthe surrounding contour seen. The vehicle computer can use this information to correct thecourse of the AGV as necessary to keep it to the route.The NAV350 is a sensor for use indoors.Important In case of any other usage as well as in case of modifications to the NAV350, e.g. due toopening the housing during mounting and electrical installation, or to the SICK software, anyclaims against SICK AG under the warranty will be rendered void.The NAV350 is only allowed to be operated in the ambient temperature range allowed (seesection 9.1 “Data sheet NAV350”on page 62).Chapter 2For your safety Operating Instructions2.3 General safety notes and protective measuresSafety notesPlease observe the following items in order to ensure the correct and safe use of theN A V350.The notices in these operating instructions (e.g. on use, mounting, installation orintegration into the existing machine controller) must be observed.When operating the NAV350, the national, local and statutory rules and regulationsmust be observed.N a t iona l/in t e r na t ion a l rules and regulations apply to the installation, commissioning,use and periodic technical inspections of the NAV350, in particular– the work safety r e g u l at i o n s/s afe t y rules– other relevant health and safety regulations.Manufacturers and operators of the m ac h i n e/s y s t e m on which the NAV350 is installedare responsible for obtaining and observing all applicable safety regulations and rules.The tests must be carried out by specialist personnel or specially qualified andauthorised personnel and must be recorded and documented to ensure that the testscan be reconstructed and retraced at any time.The operating instructions must be made available to the operator of the system wherethe NAV350 is used. The operator of the system is to be instructed in the use of thedevice by specialist personnel and must be instructed to read the operatinginstructions.The NAV350 is not a device for the protection of people in the context of the relatedsafety standards for m ac h i n e r y.2.3.1 Electrical installation workOnly authorised personnel are allowed to perform the electrical installation work.Only make and disconnect electrical connections when the device is e l ec t r i ca ll yisolated.Select and implement wire c r oss-sec t io ns and their correct fuse protection as per theapplicable standards.Do not open the housing.Observe the current safety regulations when working on electrical systems.Operating Instructions For your safety Chapter 22.3.2 Laser radiation of the N A V350Laser radiation!The NAV350 complies with laser class 1 (eye safe) in accordance with EN 60825-1.Complies with 21 CFR 1040.10 with the exception of the deviations as per Laser Notice No.50, July 26, 2001. The laser beam cannot be seen with the human e y e.Incorrect usage can result in hazardous exposure to laser radiation.Do not open the housing (opening the housing will not switch off the laser).Pay attention to the laser safety regulations as per EN 60825F1(latest version).Important No maintenance is necessary to ensure compliance with laser class 1.Laser output apertureThe laser output aperture is the view window on the scanner head of the N A V350.Fig. 1: Laser output aperture on the N A V350Laser powerThe laser operates at the wavelength λ= 905 nm (invisible infrared light). The radiationemitted in correct use is not harmful to the eyes and human skin.2.4 Quick stop and Quick restart2.4.1 Switch the NAV350 o ffSwitch off the voltage supply (power supply) for the N A V350.The NAV350 retains parameters stored in the internal, n o n-v o l a t i l e memory. Measuredvalues in the memory are lost.2.4.2 Switch on the N A V350Switch on voltage supply (power supply) for the N A V350.Th e NAV350 restarts operation with the last saved parameters.Chapter 2For your safety Operating Instructions2.5 Environmental protectionThe NAV350 has been designed to minimise environmental impact. It uses only a minimumof power.While working, always act in an environmentally responsible manner. For this reason pleasenote the following information on disposal.2.5.1 Power consumptionThe NAV350 consumes a maximum of 36 W in operation.2.5.2 Disposal after final d e-co mm is s io n in gAlways dispose of unserviceable or irreparable devices in compliance with l oca l/national rules and regulations on waste disposal.Dispose of all electronic assemblies as hazardous waste. The electronic assemblies arestraightforward to dismantle.Important SICK AG does not accept unusable or irreparable devices that are returned.Operating Instructions Product description Chapter 33 产品描述本章提供了NAV350的特点和属性,描述了本设备结构和工作原理,尤其是不同的操作模式。
NAVIGATION实时导航系统操作指南说明书

4. Say “Reroute” to set the new route.
Driver Distraction
To reduce the potential for driver distraction, certain functions may be inoperable or grayed out while the vehicle is moving. You may have to use voice commands, stop or pull over to perform the function. The chart below shows a list of some operations that are restricted while the vehicle is moving.
Function Navigation System Address Place category Place category scroll Place name Go home Previous destination Previous destination scroll Address book Address book scroll Place phone number Coordinate Intersection Map scroll Map point set as destination Destination list edit Route avoid street Route add waypoint
Press and release the Talk button before you say a command.
1. From the map screen, say “Find nearest ATM ”
Navigate系统操作指南说明书
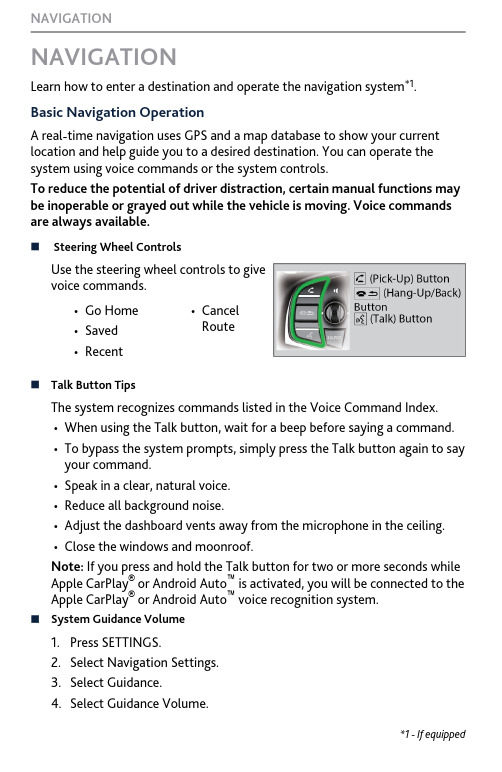
NAVIGATIONLearn how to enter a destination and operate the navigation system *1.Basic Navigation OperationA real-time navigation uses GPS and a map database to show your current location and help guide you to a desired destination. You can operate the system using voice commands or the system controls.To reduce the potential of driver distraction, certain manual functions may be inoperable or grayed out while the vehicle is moving. Voice commands are always available.n Steering Wheel ControlsUse the steering wheel controls to givevoice commands.•Go Home•Saved•Recent•Cancel Routen Talk Button Tips The system recognizes commands listed in the Voice Command Index.•When using the Talk button, wait for a beep before saying a command.•To bypass the system prompts, simply press the Talk button again to say your command.•Speak in a clear, natural voice.•Reduce all background noise.•Adjust the dashboard vents away from the microphone in the ceiling.•Close the windows and moonroof.Note: If you press and hold the Talk button for two or more seconds while Apple CarPlay ® or Android Auto ™ is activated, you will be connected to the Apple CarPlay ® or Android Auto ™ voice recognition system.n System Guidance Volume1.Press SETTINGS.2.Select Navigation Settings.3.Select Guidance.4.Select Guidance Volume.*1 - If equipped NAVIGATIONn Navigation Display and ControlsTouch icons on the screen to enter information and make selections.Entering Your DestinationThere are several methods to enter a destination.n Home AddressStore your home address in the system so you can easily route to it.1.Press the SETTINGS button.2.Select Navigation Settings.3.Select Edit Go Home.4.Edit the name, address, and phonenumber the same way as anaddress in the address book.5.Select Save.n Street AddressEnter an address to use as the destination. The state (U.S.) or province(Canada) in which you are currently located is displayed (e.g., California).NAVIGATION1.From the map screen, press theselector knob.2.Select Address.3.Enter the street number. SelectSearch.RoutingAfter a destination is set, you can alter or cancel your route.nMap LegendUsing the navigation system while driving can take your attention away from the road, causing a crash in which you could be seriously injured or NAVIGATION。
NAV操作手册-财务
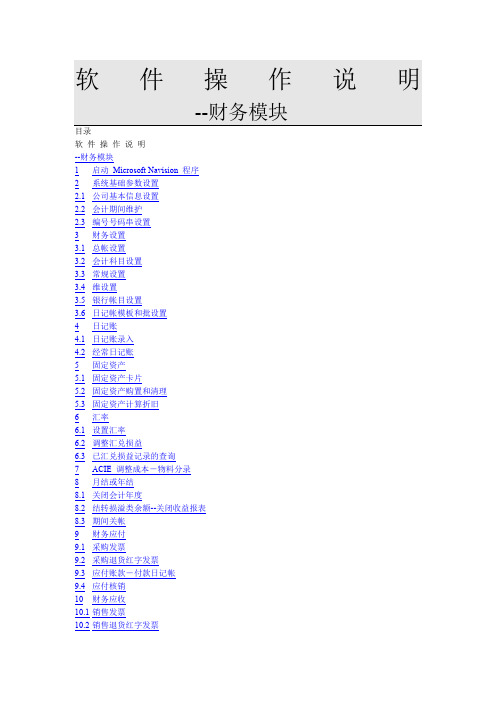
软件操作说明--财务模块目录软件操作说明--财务模块1启动Microsoft Navision 程序2系统基础参数设置2.1公司基本信息设置2.2会计期间维护2.3编号号码串设置3财务设置3.1总帐设置3.2会计科目设置3.3常规设置3.4维设置3.5银行帐目设置3.6日记帐模板和批设置4日记账4.1日记账录入4.2经常日记账5固定资产5.1固定资产卡片5.2固定资产购置和清理5.3固定资产计算折旧6汇率6.1设置汇率6.2调整汇兑损益6.3已汇兑损益记录的查询7ACIE 调整成本-物料分录8月结或年结8.1关闭会计年度8.2结转损溢类余额--关闭收益报表8.3期间关帐9财务应付9.1采购发票9.2采购退货红字发票9.3应付账款-付款日记帐9.4应付核销10财务应收10.1销售发票10.2销售退货红字发票10.3应收账款-普通日记账附录工具栏说明F keys/F功能键说明Assist Button/辅助功能键说明启动 Microsoft Navision 程序一、找到开始-程序,点击Microsoft Dynamics NAV 2009 R2 with Microsoft SQL Server启动该程序,(也可以通过双击桌面快捷图标启动)如下图所示:二、初次登录输入Server Name,然后填写User ID 和Password(密码默认为12345)最后选择Database Name。
三、进入操作界面:密码修改方式:点击Tools✍Security✍Password系统基础参数设置公司基本信息设置路径:管理(Administration)→应用程序设置(Application Setup)→概述(General)→公司信息(Company Information)用于设置公司的基本信息,如下图所示:选项卡‘常规’:‘名称’即公司名称,将会显示在程序中产生的所有的报表中;‘地址’即公司地址,将会作为默认地址显示在所有文件中;,可将公司LOGO导入;‘通信’:填写公司的联系方式,可以输入公司的详细通讯信息;‘付款’:填入公司的银行开户行信息;‘发运’:即公司收货地址,将会作为默认收货地址显示在采购定单上;注意:‘Location Code’当希望有默认的收货仓库时,就可指定此内容。
NAVIGATION系统操作指南.pdf_1702094750.9099534说明书

DItiisstarnecceomtomgeon
mCleoucnraarteionignt vehicle
Entering a Destination Using Voice Commands
You can enter a destination at any time using voice commands. Destinations can also be entered manually, but limitations apply while driving. For information on setting other destination options, see your Navigation Manual.
Entering a Street Address
Press and release the
Talk button before you say a command.
1. From the Voice Portal screen, say “Address.”
2. The system prompts you to say the entire address. For example, say “1-2-3-4 Main Street, Los Angeles, California.”
Incident Icons
Incident Congestion Construction
Road closed
Weather
Traffic ReroutingTM
The system can automatically provide detours around traffic or incidents when a destination is set and Traffic Rerouting is turned on in Navigation Settings, or you can manually reroute.
