ADAPTEC++RAID卡使用说明
磁盘阵列配置全程解

磁盘阵列配置全程解(图) 说到磁盘阵列(RAID,Redundant Array of Independent Disks),现在几乎成了网管员所必须掌握的一门技术之一,特别是中小型企业,因为磁盘阵列应用非常广泛,它是当前数据备份的主要方案之一。
然而,许多网管员只是在各种媒体上看到相关的理论知识介绍,却并没有看到一些实际的磁盘阵列配置方法,所以仍只是一知半解,到自己真正配置时,却无从下手。
本文要以一个具体的磁盘阵列配置方法为例向大家介绍磁盘阵列的一些基本配置方法,给出一些关键界面,使各位对磁盘阵列的配置有一个理性认识。
当然为了使各位对磁盘阵列有一个较全面的介绍,还是先来简要回顾一下有关磁盘阵列的理论知识,这样可以为实际的配置找到理论依据。
一、磁盘阵列实现方式磁盘阵列有两种方式可以实现,那就是“软件阵列”与“硬件阵列”。
软件阵列是指通过网络操作系统自身提供的磁盘管理功能将连接的普通SCSI卡上的多块硬盘配置成逻辑盘,组成阵列。
如微软的Windows NT/2000 Server/Server 2003和NetVoll的NetWare两种操作系统都可以提供软件阵列功能,其中Windows NT/2000 Server/ Server 2003可以提供RAID 0、RAID 1、RAID 5;NetWare操作系统可以实现RAID 1功能。
软件阵列可以提供数据冗余功能,但是磁盘子系统的性能会有所降低,有的降代还比较大,达30%左右。
硬件阵列是使用专门的磁盘阵列卡来实现的,这就是本文要介绍的对象。
现在的非入门级服务器几乎都提供磁盘阵列卡,不管是集成在主板上或非集成的都能轻松实现阵列功能。
硬件阵列能够提供在线扩容、动态修改阵列级别、自动数据恢复、驱动器漫游、超高速缓冲等功能。
它能提供性能、数据保护、可靠性、可用性和可管理性的解决方案。
磁盘阵列卡拥有一个专门的处理器,如Intel的I960芯片,HPT370A/372 、Silicon Image SIL3112A等,还拥有专门的存贮器,用于高速缓冲数据。
adaptec,3ware和LSI raid卡常用命令

Adapter ,3ware和LSI raid卡常命令-------------------------------------------⏹平台信息:此文档适用于爱数备份存储柜。
⏹适用对象:爱数技术人员/代理商/最终用户。
⏹文档类型:FAQ/技术文档。
⏹文档版本:(如20100420V1.0)针对于adaptec,3ware和LIS raid 卡在这里总结一些常用命令,有利于大家对raid故障的处理的排错。
通过lspci查看所使用的raid卡类型,在倒数6、7行能看到。
adaptec卡:1.arcconf getconfig show 获得raid控制器的控制号(1)2.arcconf getconfig 1 ad raid卡的相关信息(raid的状态,raid卡型号,bios 型号等)3.arcconf getconfig 1 ld 逻辑设备的相关信息(逻辑设备名,raid级别、状态,通道和ID)4.arcconf getconfig 1 pd 物理硬盘的相关信息(是否掉线,是否重建,对应的槽位等)5.arcconf getconfig 1 al 查看所有raid相关的信息6.arcconf getstatus 1 查看raid重建的进度7.arcconf getlogs 1 event 控制器的事物日志8.arcconf setstate 1 device 0,0 hsp logicaldrive 1 2 3 创建通道0,ID0的这块盘为全局热备盘9.arcconf setstate 1 device 0,0 rdy logicaldrive 1 删除热备盘10.arcconf delete 1 logicaldrive 1 删除raid阵列11.arcconf getlogs 1 dead 查看日志;LSI卡:1. MegaCli -LDInfo -Lall -aALL 查看raid级别2. MegaCli -AdpAllInfo -aALL 查raid卡信息3. MegaCli -PDList -aALL 察看硬盘信息4. MegaCli -cfgdsply -aALL 显现Raid卡型号,Raid配置,Disk联系信息5. MegaCli -CfgLdAdd -r5 [1:2,1:3,1:4] WB Direct -Hsp[1:5] -a0 创建一个raid5 阵列,由物理盘2,3,4 组成,该阵列的热备盘是物理盘56. MegaCli -CfgLdDel -L1 -a0 删除raid阵列7. MegaCli -PDHSP -Rmv -PhysDrv[1:5] -a0 删除全局热备8. MegaCli -PDRbld -ShowProg -PhysDrv [1:5] -a0 察看物理磁盘重建进度3ware卡:1.进入3ware卡命令行:/sbin/tw_cli/tw_cli 查看控制器号(c6) 控制器号(c6)查看所有的raid(u0) c6 bios 查看控制器BIOS版本 c6 unitstatus 查看raid状态信息 c6 drivestatus 查看磁盘信息 c6 u0 status status 查看raid重建的进度 c6 diag 查看raid日志信息9.Maint rescan 扫描重新加上的raid和磁盘10.M aint createunit c6 rraid5 k256 p0-11 创建raid511.M aint createunit c6 rspare p2 把第二块盘建为热备盘12.M aint deleteunit c6 u0 删除raid阵列。
adaptec Adaptec 6系列和5Z系列 RAID控制卡的零维护缓存保护
零维护缓存保护简报降低数据中心运营成本,最大限度保护缓存数据产品要点低运营成本– 没有电池相关的安装、监控、维护、弃置或者更换成本停电情况下不会丢失数据– 取代锂电池零维护缓存保护– 无需监测电池充电情况– 更换电池过程中不需要关闭系统– 无限期地保护数据 -“在电池电量耗尽之前”不需要急于重启系统– 保存数据长达数年之久RAID缓存即时保护– 充电只需要几分钟时间,而不是几小时– 环境优化RAID性能环保– 无毒电池废弃处理– 配合Adaptec智能电源管理功能打造行业“最绿色”解决方案- 遵从简化的 IATA 规则完全集成在5Z系列RAID控制上并作为6系列的附件套件IDC预计,在四年时间内一步IT设备的运营成本将增长到原始采购成本的4倍。
Adaptec 6系列和5Z系列RAID控制卡采用了零维护缓存保护(Zero-Maintenance CacheProtection,ZMCP)功能,最大限度保护缓存数据,大幅削减成本并减少了复杂、杂乱和昂贵的锂电池对环境的影响,同时提高了缓存保护和缓存性能。
为什么你需要缓存保护随着用户持续关注针对快速增加的数据集进行的容量利用率优化,RAID 5和RAID 6在企业级存储系统中的运用继续增长着。
然而,除非启用了所有可用缓存,否则系统无法实现最佳性能。
不过,启用控制卡缓存之后,数据被保存在控制卡的内存中,并有可能在系统断电的情况下丢失。
防止这种情况发生的最常见保护措施就是使用一个直接安装在控制卡上的电池备份单元(BBU)来备份控制卡缓存。
这种电池是维护板载缓存数据,直到恢复对电池备份单元的供电。
电池备份单元的第二个使用方法就是配合Adaptec 6系列、5Z系列、5系列和2系列RAID控制卡产品系列所提供的Adaptec智能电源管理功能(Intelligent Power Management)。
为了让控制卡降低硬盘转速或者完全停转,硬盘中必须是没有任何I/O活动的。
Adaptec raid卡监控

这俩周配置raid卡监控,小有心得,拿出来分享下目前市面上主流的raid卡,主要是lsi的和adaptecLsi的里边也有分不过目前主流的是megaraid raid卡通过lspci|grepmegaraid 可以发现他的管理主要是通过megaraid storage manage 这个管理软件实现图形化的管理,及邮件监控也有通过安装megacli包,这个包安装完成后,可以通过命令行模式,查出raid 卡监控,可以通过megecli + nagios的方式实现监控。
脚本这些网上很多,我这里就不详细描述了。
下面是重点:adaptec的raid 卡监控我们服务器是文本模式的linux ,通过adaptec storage manager无法完成对这种服务器的邮件监控(图形的可以)。
我们的raid卡,是2130slp 无法通过arcconf 这种方式,没有对linux的支持研究adaptec storage manager 各种文件,发现邮件配置是以2进制写成,本来打算在虚拟机上模拟服务器上的主机,ip 完了,通过图形界面更改了邮件配置,将这种配置文件拷贝出来,覆盖服务器上的文件,最后没有测试。
刚好,我们有台这种服务器出现了问题。
发现RaidEvat.log日志,每15分钟更新一次,记录时间,raid卡的报错信息。
所以写了如下的脚本,用来监控脚本监控.log的增长,raid卡出现问题后,大概1小时发送一次邮件。
不排除误报,服务器重启会增加一条log日志,连续5次重启,会误报一次#!/bin/bashcount=1a=`ls -l /usr/StorMan/RaidEvtA.log |awk -F" " '{print $5}'`while :dob=`ls -l /usr/StorMan/RaidEvtA.log |awk -F" " '{print $5}'`text=`sudo tail -n 5 /usr/StorMan/RaidEvtA.log`IP=`/sbin/ifconfig | awk '{if ( $1 == "inet" && $3 ~ /^Bcast/) print $2}' | cut -f2 -d ":"`#echo $count#echo $a#echo $b#clearif (($b>$a))thencount=$(($count+1));a=$b;fiif (($count>4))thensudo /usr/sbin/sendmail -t <<EOF from: dbauser2@ to:servermonitor@subject: Raid card warning $hostname; something error with raidplease check /usr/StorMan/RaidEvtA.log the machine is $hostname;ip is:$IP;$textEOFsudo /usr/sbin/sendmail -t <<EOF from: dbauser2@ to:yangchunyu@subject: Raid card warning $hostname; something error with raidplease check /usr/StorMan/RaidEvtA.log the machine is $hostname;ip is:$IP;$textEOFcount=1;fisleep 6000done。
adaptec RAID卡Raid 配置

Adaptec Raid 卡Raid 配置步骤进入Raid(阵列) BIOS1.出现下面提示时按<Ctrl><A>2.选择Container Configuration Utility按回车配置一、Initialize Drives(初始化硬盘)硬盘所有数据将丢失,如果硬盘有数据,请不要重配 RAID。
二、Create Container(配置RAID)一、初始化硬盘1.移动光标到第三项(Initialize Drives)。
注意:此项操作仅限于新硬盘(新机器),或没有重要数据,将删除硬盘上所有数据2.您机器上的硬盘将在下面界面的左列显示,按Insert键 <键盘上的插入键 > 依此将要配置RAID硬盘插入到右列。
插入完硬盘后,回车。
3.敲Y键确认。
二、Creating a RAID 5 Container1.移动光标到Create Container按回车。
2.您机器上的硬盘将在下面界面的左列显示,按Insert键 <键盘上的插入键 > 依此将要配置RAID硬盘插入到右列。
插入完硬盘后,回车。
3.选择RAID 5按回车。
4.给阵列起个名!5.回车确认您的RAID容量大小。
否则输入您想设定的尺存。
6.回车选定磁盘空间单位。
7.回车接受默认,或更改后回车继续。
8.按Y或N,建议Y。
9.回车接受默认,或更改后回车继续。
10.回车接受默认,或更改后回车继续。
11.回车保存设置。
12.按任意键继续。
这句话的意识是服务器将几块硬盘条带化成为一块逻辑盘。
观看上面配置结果观看上面配置的结果1.移动光标到Manage Containers回车。
2.选中您刚才配置的阵列,按回车。
(注:您可以重复上面的步骤配置几个RAID逻辑盘。
)3.观看所配RAID的条带化情况,图示为SCRUB 41%,直到这里OK之前,服务器不具有容错功能,此时如果硬盘坏或拔出硬盘,将会破坏RAID信息,导致意想不到的错误。
Mylex Accele352 RAID 卡设置与使用

并且手工将其替换掉,随后计算机可以通过Bus scan 检测到并开始Rebuild,但是,如果在管理员发现之前又有一块硬盘发生了故障,那么
RAID无法进行重建,系统将会崩溃。所以推荐采用热交换(Hot spare)方式,可以使系统得到最为安全可靠的保护。
管理的途径有两种:
1、RAID卡的BIOS配置工具。这种方式的优点在于不需要进行软件安装,方便快捷。但是如果在操作系统中出现了硬盘故障,但是系统正在运行
Loading RAID configuration software…
Starting RAID configuration software…
进入RAID卡的RAID配置工具。
配置步骤:
1)首先屏幕会出现“Welcome to RAID EzAssist Mylex Disk Array Controller Configuration Utility” 的对话框。当光标条落在RAID卡
,选择Physical
Device回车。屏幕出现Physical Device Selection的对话框,光标条落在阵列中的某一物理磁盘上,回车后选择Designate Drive as
Spare/Unused,即可将一个物理磁盘设置为Spare状态,或者将一个Spare硬盘设置成Unconfigured 状态。也可以选择Advance Options回车,
点击“程序”下的Workstation Array Manager子菜单后,会出现Workstation Array Manager的窗口。
窗口中分成上下两个子窗口,上面的窗口标题是“Controller View”,窗口内显示了连接到RAID卡上的所有SCSI设备的图示,左边的图示为
Adaptec 2120s RAID卡说明书

Adaptec 2120S RAID卡用户手册注意:RAID卡对静电非常敏感,必须小心操作。
把RAID卡从包装盒中取出后,应将其元器件面向上,放于防静电表面或绝缘泡沫块上。
不要将RAID卡在任何表面滑动。
在RAID卡整个操作过程中请佩带防静电手环或者使用其他防静电措施。
一、RAID知识介绍RAID的全称是廉价磁盘冗余阵列(Redundant Array of Inexpensive Disks)。
RAID出现的最初目的是将多个容量较小的廉价硬盘合并成为一个大容量的“逻辑盘”或磁盘阵列,实现提高硬盘容量和性能的功能。
随着RAID技术的逐渐普及应用,RAID技术的各方面得到了很大的发展。
现在,RAID从最初的RAID0-RAID5,又增加了RAID 10和RAID 50等不同的阵列组合方式,可以根据不同的需要实现不同的功能,扩大硬盘容量,提供数据冗余,或者是大幅度提高硬盘系统的I/0吞吐能力。
RAID技术主要有三个特点:第一,通过对硬盘上的数据进行条带化,实现对数据成块存取,减少硬盘的机械寻道时间,提高数据存取速度;第二,通过对一阵列中的几块硬盘同时读取,减少硬盘的机械寻道时间,提高数据存取速度;第三,通过镜像或者存储奇偶校验信息的方式,实现对数据的冗余保护。
经常应用的RAID阵列主要分为RAID 0、RAID 1、RAID 5和RAID 10、RAID 50。
1、RAID0通过同时对硬盘进行读写从而提供最大I/O性能的非冗余的磁盘阵列。
RAID0通过对多个硬盘同时存取,减少了由硬盘机械系统引起的时间延迟。
并可以通过对硬盘条块化的调整,实现对不同I/O请求的优化。
但由于没有提供数据冗余功能,所以如果磁盘阵列中的任一个硬盘发生损坏,都会造成阵列所有数据的丢失。
(如图1-1)图1-12、RAID1也被称为磁盘镜像。
系统将数据同时重复的写入两个硬盘,但是在操作系统中表现为一个逻辑盘。
所以如果一个硬盘发生了故障,另一个硬盘中仍然保留了一份完整的数据,系统仍然可以照常工作。
Adaptec_3805_RAID卡用户手册

Adaptec RAID用户手册尊敬的浪潮英信服务器用户:衷心感谢您选用浪潮英信服务器!本手册将为您简单介绍一下Adaptec RAID的特色功能和常用操作系统下的安装使用方法。
浪潮集团有限公司拥有本手册的版权。
未经浪潮集团有限公司许可,任何单位和个人不得以任何形式复制或修改本用户手册。
浪潮集团有限公司拥有随时修改本手册的权利。
本手册内容如有变动,恕不另行通知。
如果您对本手册中内容有任何的疑问和建议,请向浪潮集团有限公司垂询。
浪潮集团有限公司2007年04月“Inspur浪潮”、“英信”为浪潮集团有限公司的注册商标。
其他的商标均属于各自的注册公司。
目录第一章 RAID基础知识 (3)1.1 RAID基本概念与专用术语介绍 (3)1.2 RAID功能介绍 (3)第二章 Adaptec RAID卡配置及使用 (5)2.1 Adaptec RAID configuration(ARC)使用指导 (5)2.1.1 Array Configuration Utility (5)2.1.2 Select Utility (7)2.1.3 Disk Utilities (7)2.2 Adaptec存储管理器(ASM)使用指导 (8)2.2.1 ASM简介 (8)2.2.2 SMBE管理软件的安装与使用 (8)第三章 驱动光盘的使用与操作系统的安装 (11)3.1 Raid卡支持的操作系统 (11)3.2 浪潮Raid卡驱动程序光盘使用 (12)3.3 安装Windows Server 2003 (16)3.3.1 安装前的准备 (16)3.3.2 安装步骤 (17)3.4 RedHat Enterprise Linux AS 4.0 UP2的安装 (18)3.4.1 安装前的准备 (18)3.4.2 安装步骤 (18)3.5 Suse Linux Enterprise Server 9.0 SP2 (21)3.5.1 安装前的准备 (21)3.5.2 安装步骤 (21)第四章 Adaptec 存储管理器浏览版软件安装指导 (23)第一章 RAID基础知识1.1 RAID基本概念与专用术语介绍我们提供的RAID 卡支持各种常用RAID 级别,如0、1、5、10、50、1E、5EE、6、60等,您可以根据数据的重要性来选择。
adaptec7XXX系列maxView阵列管理操作指导
maxview阵列管理操作指导V1.0一、登录web阵列管理软件maxView (1)二、查看阵列卡和硬盘 (2)三、初始化硬盘 (3)四、创建阵列 (5)五、查看阵列 (9)六、删除阵列 (10)七、创建热备盘 (11)八、重建阵列 (14)一、登录web阵列管理软件maxView使用Web方式远程管理阵列前,服务器需安装好阵列驱动和阵列管理软件maxView。
客户端无需安装maxView,可直接使用IE等浏览器访问管理阵列。
1.1、在浏览器地址栏中输入maxView阵列管理软件登录地址,如:https://192.168.0.194:8443/maxview/manager/login.xhtml192.168.0.194为服务器IP地址;8443是端口号。
1.2、出现阵列管理登录界面,输入用户名和密码。
User Name为服务器操作系统的用户名,Password为服务器操作系统用户的密码。
1.3、登录后进入maxView主界面,如图:二、查看阵列卡和硬盘2.1、查看系统信息点击左边树形菜单中的linux-ac60(linux-ac60为服务器的系统主机名),在右边的属性框中可查看系统的信息,如图:2.2、查看阵列卡信息点击左边树形菜单中的Controller 1,在右边的属性框中可查看阵列卡的信息。
在上方的工具栏中,可使用阵列卡属性设置工具对阵列卡的属性进行修改。
如图:阵列卡属性设置2.3、查看硬盘信息点击左边树形菜单中的Physical Devices,在右边的属性框中可查看硬盘的信息。
在上方的工具栏中,可使用硬盘属性设置工具对硬盘的属性进行修改。
如图:三、初始化硬盘创建阵列前必须要先对硬盘进行初始化,确定已初始化的可不用再次初始化。
3.1、点击要初始化的硬盘,在硬盘属性设置工具中点击初始化硬盘按钮,如图:3.2、提示初始化硬盘会清除硬盘中阵列信息,点击Initialize继续。
3.3、初始化完成。
Adaptec
Adaptec™ 39320A/U320 SCSI RAID 0 或 1 用户指南简介硬件安装BIOS RAID 配置与管理Windows 操作系统驱动程序安装SCSI 电缆和连接器Adaptec U320 SCSI RAID 0 或 1 规格Adaptec U320 SCSI RAID 0 或 1 故障排除Adaptec U320 SCSI RAID 管制信息Adaptec U320 SCSI RAID 词汇表注、注意和小心注:“注”表示可以帮助您更好地使用计算机系统的重要信息。
注意: “注意”表示可能会损坏硬件或导致数据丢失,并告诉您如何避免此类问题。
小心: “小心”表示有可能造成财产损失、人身伤害或死亡。
本文件中的信息如有更改,恕不另行通知。
© 2004 Dell Inc. 保留所有权利。
未经 Dell Inc. 书面许可,严禁以任何形式进行复制。
本文中使用的商标:Dell、DELL 徽标和 Dell OpenManage 是 Dell Inc. 的商标;Intel、Pentium 和Celeron 是 Intel Corporation 的注册商标;Microsoft 和 Windows 是 Microsoft Corporation 的注册商标。
Red Hat 是 Red Hat, Inc. 的注册商标。
本文中述及的其他商标和产品名称是指拥有相应商标和名称的公司或其制造的产品。
Dell Inc. 对本公司的商标和产品名称之外的其他商标和产品名称不拥有任何专利权。
型号:Adaptec U320 SCSI RAID 0 或 1March 2005 P/N WC617 Rev. A00达 640 MB/秒(总吞吐量)。
Adaptec U320 SCSI RAID 0 or 1 控制器具有下列特性:两个独立的可启动 SCSI 通道每个通道上各有 15 个多功能设备混合使用 LVD 和 SE 设备,相关性能会降低。
板载Adaptec scsi Raid设置
Adaptec SCSI HOST RAID基本操作:主板集成ADAPTEC790X U320SCSI的系统,支持HOSTRAID,创建及删除HOSTRAID 的操作如下:1. 按<ctrl>+<A>键进入Adaptec管理界面:2. 用光标键选择硬盘所在通道,按“回车”进入:3. 进入到主管理界面:1)Configure/View SCSI Controller Settings (配置/查看SCSI控制器设定)。
2)Disk Utilites (SCSI硬盘管理)。
2.2打开HOST RAID确认HOSTRAID已经打开;如果HOSTRAID是“disable”,请开启HOSTRAID功能;如果HOSTRAID是“enable”,请返回上级菜单。
如图:1.在Configure/View SCSI controller Settings处按回车:2.将光标移至Disable上,按回车键,选择Enabled:3.按<esc>保存退出,并按提示保存刚才的设置:4. 在主界面看到多了一项配置/查看Configure/View HostRAID Settings (HostRAID设定)2.3创建阵列1.主界面选中,Configure/View HostRAID Setting,按回车:2.进入下图界面之后按<ALT>+<C>键来创建阵列:3.选择要做阵列的类型,按回车:4.按空格键选中要做阵列的硬盘:,选中的硬盘后面会有一个:“X” 的符号,按回车完成:5.阵列建立设置:如果你选择建RAID1就有如下选项,(RAID0和0+1则没有)Create new RAID-1 建立一个新的阵列Copy from (1) to (2) 将ID为1号盘的数据保留到2号盘里面去Copy form (2) to (1) 将ID为2号盘的数据保留到1号盘里面去选中你要的设置,按回车:6.给新做的阵列起一个名字:名字可以随便输入,按回车继续:7.询问是否将阵列设置为引导,按Yes继续:8.询问是否创建阵列,按Yes继续:9.询问是否确认创建阵列,按Yes继续:10.见到下面有进度条,表示正在做阵列,当完成100%时候阵列创建完成。
RAID5图解
本文将分两种方法介绍如何做RAID5,其中第一种方法是在Adaptec磁盘阵列控制器上创建Raid(容器),第二种方法是在AIM/LSI磁盘阵列控制器上创建Logical Drive(逻辑磁盘)。
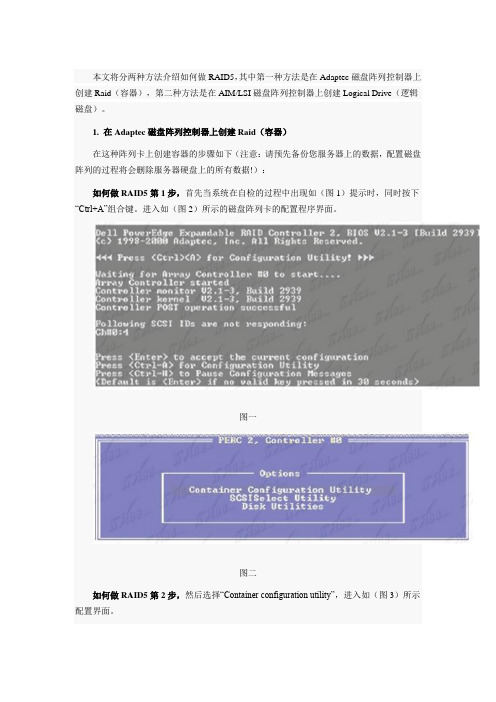
1. 在Adaptec磁盘阵列控制器上创建Raid(容器)在这种阵列卡上创建容器的步骤如下(注意:请预先备份您服务器上的数据,配置磁盘阵列的过程将会删除服务器硬盘上的所有数据!):如何做RAID5第1步,首先当系统在自检的过程中出现如(图1)提示时,同时按下“Ctrl+A”组合键。
进入如(图2)所示的磁盘阵列卡的配置程序界面。
图一图二如何做RAID5第2步,然后选择“Container configuration utility”,进入如(图3)所示配置界面。
图三如何做RAID5第3步,选择“Initialize Drivers“选项去对新的或是需要重新创建容器的硬盘进行初始化(注意: 初始话硬盘将删去当前硬盘上的所有数据),按回车后进入如(图4)所示界面。
在这个界面中出现了RAID卡的通道和连接到该通道上的硬盘,使用“Insert”键选中需要被初始化的硬盘(具体的使用方法参见界面底部的提示,下同)。
图四如何做RAID5第4步,全部选择完成所需加入阵列的磁盘后,按加车键,系统键弹出如(图5)所示警告提示框。
提示框中提示进行初始化操作将全部删除所选硬盘中的数据,并中断所有正在使用这些硬盘的用户。
图五如何做RAID5第5步,按“Y”键确认即可,进入如(图6)所示配置主菜单(Main Menu)界面。
硬盘初始化后就可以根据您的需要,创建相应阵列级别(RAID1,RAID0等)的容器了。
这里我们以RAID5为例进行说明。
在主菜单界面中选择“Create container”选项。
图六如何做RAID5第6步,按回车键后进入如(图7)所示配置界面,用“insert”键选中需要用于创建Container(容器)的硬盘到右边的列表中去。
监控服务器Adaptec-51645操作手册---副本
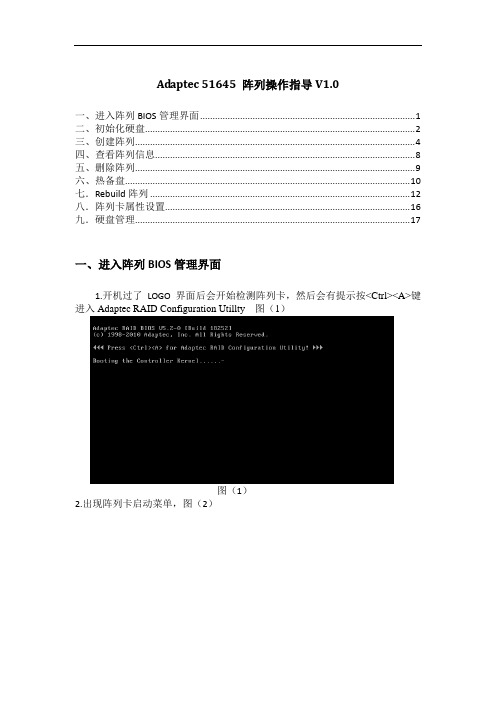
Adaptec 51645 阵列操作指导V1.0一、进入阵列BIOS管理界面 (1)二、初始化硬盘 (2)三、创建阵列 (4)四、查看阵列信息 (8)五、删除阵列 (9)六、热备盘 (10)七.Rebuild阵列 (12)八.阵列卡属性设置 (16)九.硬盘管理 (17)一、进入阵列BIOS管理界面1.开机过了LOGO界面后会开始检测阵列卡,然后会有提示按<Ctrl><A>键进入Adaptec RAID Configuration Utillty 图(1)图(1)2.出现阵列卡启动菜单,图(2)Array Configuration Utility 阵列卡BIOS管理程序Serial Select Utility 阵列卡属性设置Disk Utilities 硬盘管理二、初始化硬盘(创建阵列前必须要初始化硬盘,确定已初始化的可不用初始化) 1.进入Array Configuration Utility界面,图(3)Manage Arrays 阵列信息Create Array 创建阵列Initialize Drives 初始化硬盘Rescan Drives 刷新硬盘Secure Erase Drives 擦写硬盘Global Hotspares 创建热备盘Manage JBOD JBOD信息Create JBOD 创建JBOD(一般单个硬盘使用)Manage MaxIQ Pool 管理固态存储高速缓存连接池2.进入Initialize Drives,图(4)1.用方向盘上下键去选择要格式化的硬盘2.用空格键去确认要格式化的硬盘, 按Del键删除要准备格式化的硬盘3.按回车键确认要格式化的硬盘3.确认要选择的硬盘后按回车,选择Y开始格式化,图(5)图(5)注:初始化硬盘会把原有的阵列信息和数据都会清除干净,使用前请确认三、创建阵列在主菜单中选Create Array项开始做阵列,图(6)图(6)1.用键盘方向盘上下键去选择要做阵列的硬盘2用空格键去确认要做阵列的硬盘,用Del键去删除选错的硬盘3.按回车键确认已经选好做阵列的硬盘并开始做阵列按回车后键后出现阵列性能表,图(7)图(7)Array Type 选择阵列级别(硬盘的数量会自动显示能做的阵列级别)Array Label新建阵列名Array Size阵列的容量(默认是最大值)Stripe Size条带大小,正常情况下默认是256K,可自行调整(16~1024K),RAID 1 不支持Read Caching读缓存策略(打开可提高读的性能)默认是EnableWrite Caching写缓存策略(打开可提高写的性能)默认是Enable alwaysCreate RAID via创建阵列模式(不同创建模式影响阵列的使用)设置Write Caching时提示Enable always(打开)还是Disable(关闭),选择打开图(8)图(8)确认Write Caching打开后会提示确认选择Yes或No ,选Yes确认图(9)图(9)提示在没有电池保护的情况下是否确认使用写缓存,选Yes确认,图(10)图(10)设置Create RAID via时,提示要选的模式,图(11)Build/Verify 建立/校验。
Adaptec&lsi的raid卡设置界面

说到磁盘阵列(RAID,Redundant Array of Independent Disks),现在几乎成了网管员所必须掌握的一门技术之一,特别是中小型企业,因为磁盘阵列应用非常广泛,它是当前数据备份的主要方案之一。
然而,许多网管员只是在各种媒体上看到相关的理论知识介绍,却并没有看到一些实际的磁盘阵列配置方法,所以仍只是一知半解,到自己真正配置时,却无从下手。
本文要以一个具体的磁盘阵列配置方法为例向大家介绍磁盘阵列的一些基本配置方法,给出一些关键界面,使各位对磁盘阵列的配置有一个理性认识。
当然为了使各位对磁盘阵列有一个较全面的介绍,还是先来简要回顾一下有关磁盘阵列的理论知识,这样可以为实际的配置找到理论依据。
一、磁盘阵列实现方式磁盘阵列有两种方式可以实现,那就是“软件阵列”与“硬件阵列”。
软件阵列是指通过网络操作系统自身提供的磁盘管理功能将连接的普通SCSI卡上的多块硬盘配置成逻辑盘,组成阵列。
如微软的Windows NT/2000Server/Server 2003和NetVoll的NetWare两种操作系统都可以提供软件阵列功能,其中Windows NT/2000 Server/Server 2003可以提供RAID 0、RAID 1、RAID 5;NetWare操作系统可以实现RAID 1功能。
软件阵列可以提供数据冗余功能,但是磁盘子系统的性能会有所降低,有的降代还比较大,达30%左右。
硬件阵列是使用专门的磁盘阵列卡来实现的,这就是本文要介绍的对象。
现在的非入门级服务器几乎都提供磁盘阵列卡,不管是集成在主板上或非集成的都能轻松实现阵列功能。
硬件阵列能够提供在线扩容、动态修改阵列级别、自动数据恢复、驱动器漫游、超高速缓冲等功能。
它能提供性能、数据保护、可靠性、可用性和可管理性的解决方案。
磁盘阵列卡拥有一个专门的处理器,如Intel的I960芯片,HPT370A/372 、Silicon Image SIL3112A等,还拥有专门的存贮器,用于高速缓冲数据。
ADAPTEC++RAID卡使用说明
ADAPTEC RAID卡使用说明Adaptec 160 RAID卡的配置基本相同,此文以Adaptec 2110S RAID卡(Adaptec 160单通道RAID 卡),和Adaptec2200S RAID卡(Adaptec320双通道RAID卡)为例,进行配置说明。
其他Adaptec RAID 卡的配置可以参考此文。
1 硬件安装正确安装RAID卡,请注意有关板、卡安装方法及规则。
将SCSI盘连接在RAID卡的SCSI口上,请注意有关SCSI设备安装方法及规则。
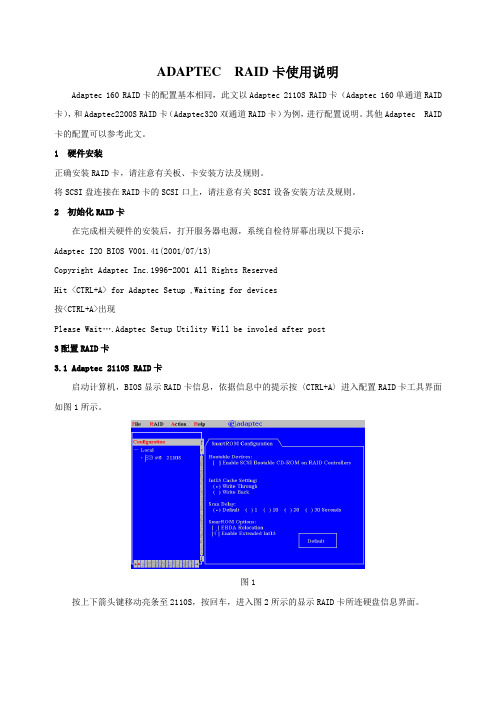
2 初始化RAID卡在完成相关硬件的安装后,打开服务器电源,系统自检待屏幕出现以下提示:Adaptec I2O BIOS V001.41(2001/07/13)Copyright Adaptec Inc.1996-2001 All Rights ReservedHit <CTRL+A> for Adaptec Setup ,Waiting for devices按<CTRL+A>出现Please Wait….Adaptec Setup Utility Will be involed after post3配置RAID卡3.1 Adaptec 2110S RAID卡启动计算机,BIOS显示RAID卡信息,依据信息中的提示按〈CTRL+A〉进入配置RAID卡工具界面如图1所示。
图1按上下箭头键移动亮条至2110S,按回车,进入图2所示的显示RAID卡所连硬盘信息界面。
图23.1.1创建RAID按ALT+R进入配置RAID工具菜单,移动上下箭头键选中Creat功能菜单条进入图3所示的配置界面。
图3在图3中按ENTER键后出现RAID级别,如图4所示.图4在图4中利用TAB键将光标移至OK后回车,进入图5所示的界面.图5图5中显示了RAID卡所连接的硬盘的数量和信息,用户可根据需要利用空格键选择所需硬盘,当选种所需硬盘后进入图6所示的界面.在图6中按TAB键选中Done 后回车,进入图7图7图7中显示RAID已配置完成。
Adaptec 智能存储解决方案产品指南说明书

Data Center Solutions Adaptec ® Product GuideSmart Storage Performance, Power, Security and ReliabilityWith the massive growth of data centers, performance, power and reliability are more important considerations than ever.Performance requirements are driven by both the increased adoption of Flash-based SSDs and the increasing sizes of HDD arrays. Data centers are looking to take advantage of the performance that these Flash-based drives promise and require storage solutions that can deliver manageability and data availability without compromising performance.Power is a significant component of a data center’s operating expenses.Optimizing power for cold storage tiers in the data center, for example, delivers substantial benefits to the bottom line.Data security has become one of the highest priorities for data centers and cloud computing environments as enterprises seek to safeguard customer information, classified company documentation and communications, financial records, employee payroll records and other confidential data.As more mission-critical data finds its way to data centers, end customers insist on reduced downtime, improved response times to issues and a more positive end-user experience overall.The Adaptec ®SmartRAID 3100, SmartHBA 2100 and HBA 1100 product fam -ilies are based on the company’s latest 28 nm SmartROC 3100 and SmartIOC 2100 storage controller Integrated Circuits (ICs). The SmartRAID 3162-8i /e adapter includes maxCrypto™, the industry’s only data-at-rest controller-based encryption solution, that provides a superior solution over self-encrypting drives.Microchip’s unified Smart Storage stack powers the entire family of products,leveraging core IP that has shipped in over 30 million servers, delivering one of the industry’s most reliable and highest-performing storage controller software platforms.Technology Leadership With Data EncryptionSolutions for data-at-rest encryption are now a security requirement in manymarket segments such as health care, finance, e-commerce, federal government branches and insurance—a significant overall percentage of the deployed storage.Data center managers face the challenge of safeguarding data while still meeting continually-increasing performance demands for large-scale applications, such as web serving, file serving, databases, Online Transaction Processing (OLTP), machine learning and High-Performance Computing (HPC).Now available, the SmartRAID 3162-8i/e with maxCrypto, delivers dataprotection with little to no impact on latency or I/O performance. The 3162-8i/e offers superior advantages over Self-Encrypting Drives (SEDs) and integrates seamlessly into existing storage infrastructures, allowing data centers to deploy a uniform, scalable encryption strategy across the enterprise.Controller-Based EncryptionValue Proposition Versus Self-Encrypting DrivesPrevents data snooping between controller and drivesRe-key support for wrapping keys or data volume keys Encrypted controller cacheSuperior Security vs. SEDController Based EncryptionDelivers Superior Security & FlexibilityAllows in-place encryption of existing data (volume remains available)No separate “special” (SED) drives for end-customers to manage64 Logical Drive support for flexible mapping to OS Users and ApplicationsSuperior Flexibility vs. SEDValue Proposition versus Self-Encrypting Drives (SED)4rASATA-SBACK-I-HDmSAS-4SATA-SBACK-E-HDmSAS-HDmSAS ACK-E-HDmSAS-mSASThe Microchip name and logo, the Microchip logo, Adaptec and maxCrypto is a trademark are registered trademarks of Microchip Technology Incorporated in the U.S.A. and other countries. All other trademarks mentioned herein are property of their respective companies.© 2020, Microchip Technology Incorporated. All Rights Reserved. 1/20 DS00003375ASupportMicrochip is committed to supporting its customers in developing products faster and more efficiently. We maintain a worldwide network of field applica -tions engineers and technical support ready to provide product and system assistance. For more information, please visit :• Technical Support: /support • Evaluation samples of any Microchip device:/sample • Knowledge base and peer help:/forums• Sales and Global Distribution: /salesTrainingIf additional training interests you, Microchip offers several resources including in-depth technical training and reference material, self-paced tutorials and significant online resources.• Overview of Technical Training Resources: /training • MASTERs Conferences:/masters • Developer Help Website:/developerhelp • Technical Training Centers:/seminarsMicrochip Technology Inc. | 2355 W. Chandler Blvd. | Chandler AZ, 85224-6199。
Adaptec AACRAID Linux User 说明书

Adaptec AACRAID Linux User GuideTable of ContentsIntroduction (1)Documentation Notes (1)OS Installation (1)Kernel Upgrade Procedure (2)Management Software Installation Guide (3)Using the Adaptec Storage Manager (5)Using the Command line utility (13)Technical Support (15)IntroductionAdaptec provides Linux array management software for the AACRAID series of RAID controllers(2120S,2200S,2130S and2230S).There are two different RAID management interfaces available:•Adaptec Storage Manager(ASM)–This is a Java based application for managing your array with agraphical interface.It also provides a storage agent daemon,which monitors the array and writesevents to a log file.NoteWhen e-mailing technical support,please attach/usr/StorMan/RaidEvtA.log.•arcconf–This is a text based application which provides a command line interface(CLI)for man-aging your array.Documentation NotesDepending on your specific optical drive,you may need to replace/media/cdrom with a differentvalue in the instructions that mon mount points are/mnt/cdrom,/me-dia/cdrecorder and/media/dvdrecorder.The mount point for your system can be found inthe/etc/fstab file.OS InstallationFor the following OSes,the kernel already includes a functional version of the aacraid driver.No driverdisk is necessary:•RHEL3(Update7and higher)•RHEL4(Update3and higher)•RHEL5•CentOS3(Version3.7and higher)•CentOS4(Version4.3and higher)•CentOS5For prior versions of RHEL and CentOS,you must create a driver floppy using the files under images.For example,to create a driver disk for the aacraid controller under RHEL2.6.9-22.EL on an i686sys-tem:#mount-t ext2/dev/cdrom#dd if=/mnt/cdrom/images/2.6.9-22.EL/i686/aacraid-2.6.9-22.EL-i686.img\ of=/dev/fd0#umount/dev/cdromTo install the system using this driver:1.Power on the system2.Insert the RHEL installation CD#1in the cdrom drive3.At the boot:prompt type linux dd and press enter4.When asked if you have a driver disk,select Yes5.You will next be presented with a list of driver e the up/down arrow keys to highlight thefloppy device(typically fd0)and select Ok6.When asked to insert the driver disk,insert the driver floppy in the floppy drive7.Select Ok8.When asked if you wish to load any more drive disks,select No9.The installation will now proceed as usualKernel Upgrade ProcedureRHEL4and CentOS4Kernel2.6.9-34.EL and higher already contain an up to date device driver.For these kernels,this pro-cedure can be skipped.If you use yum or RedHat network to update your kernel,the updated drivers will no longer work.Ifyou are updating your kernel to2.6.9-22.EL,then you can install the provided driver RPMS:#mount-t ext2/dev/cdrom#rpm-ivh/mnt/cdrom/RPMS/aacraid*2.6.9-22*.rpm#umount/dev/cdromThe driver RPMS should be installed prior to installing the corresponding kernel from RedHat.After in-stallation,the drivers can be found under/lib/modules/kernel_version/updates.If you in-stall the kernel packages first,you will need to update the initial ramdisks after installing the drivers.Forexample:#new-kernel-pkg--mkinitrd--depmod--install 2.6.9-22.ELsmp If you are updating to a newer kernel,you can build your own driver RPMS using the supplied sourceRPM and build script:#mount-t ext2/dev/cdrom#rpm-ivh/mnt/cdrom/SRPMS/aacraid*.src.rpm#/mnt/cdrom/SRPMS/builddriver.sh aacraid.spec[arch][version]\ [release]#umount/dev/cdromFor example,to re-build the AACRAID driver RPM for kernel2.6.9-22.EL(x86_64):#/mnt/cdrom/SRPMS/builddriver.sh aacraid.spec x86_64 2.6.922.EL Make sure that the kernel-sources and the development tools are installed before trying to build thepackages.Starting with kernel2.6.9-22.EL,the kernel-source package is no longer provided by RedHat.To install the kernel-sources in this case perform the following steps:#rpm–ivh kernel-2.6.9-22.EL.src.rpm#cd/usr/src/redhat/SPECS#rpmbuild–bp kernel-2.6.spec–target=noarch#cp–R../BUILD/kernel-2.6.9/linux-2.6.9/usr/src/linux-2.6.9-22.EL#ln–s/usr/src/linux-2.6.9-22.EL/usr/src/linuxFor CentOS,the kernel SRPM can be downloaded from a CentOS mirror,ie:Current version:ftp:///centos/version/os/SRPMSOlder versions:/version/os/SRPMSFor RHEL,the kernel SRPM can be downloaded via RedHat Network:Management Software Installation GuideSince the RAID management software is not included in any Linux distribution,the tools must be in-stalled manually if the operating system has been reinstalled.Please note that installation of packagesvia yum requires a functional Internet connection.To install the software:Fedora Core3(32and64-bit)•Log into the console,or open an xterm.•If you are not already logged in as root,use the su command to become root.•If the RPM gpg keys have not already been imported:#rpm–-import/usr/share/doc/fedora-release-3/RPM-GPG-KEY*•Install prerequisite packages:#yum-y install compat-libstdc++•Insert the Fedora Core installation CD#2:#mount/dev/cdrom#rpm-ivh/mnt/cdrom/Fedora/RPMS/xorg-x11-deprecated-libs*arch.rpm#umount/dev/cdromWhere arch is i386for32-bit and x86_64for64-bit.Depending on the options chosen during OS installation,one or both of these packages may already beinstalled.Fedora Core4(32and64-bit)•Log into the console,or open an xterm.•If you are not already logged in as root,use the su command to become root.•If the RPM gpg keys have not already been imported:#rpm–-import/usr/share/doc/fedora-release-4/RPM-GPG-KEY*•Install prerequisite packages:#yum-y install compat-libstdc++-33Depending on the options chosen during OS installation,this package may already be installed. CentOS4(32and64-bit)•Log into the console,or open an xterm.•If you are not already logged in as root,use the su command to become root.•Install the prerequisite packages:#yum–y install compat-libstdc++-33Depending on the options chosen during OS installation,this package may already be installed. CentOS5(32and64-bit)Install the prerequisite packages:#yum-y install libXp compat-libstdc++-33Depending on the options chosen during OS installation,one or both of these packages may already beinstalled.All DistributionsInstall the array management utilities:Insert the ASL driver CD:#mount/dev/cdrom#ARCH=`uname-m`#rpm-ivh/media/cdrom/ASL-packages/asm_linux_$ARCH*.rpm#umount/dev/cdromAfter installation,the storage agent daemon will be started.The agent is configured to start automatic-ally each time the system boots.To stop the daemon:#/etc/rc.d/init.d/stor_agent stopDisk failures and other changes to the array status are logged to/usr/StorMan/RaidEvtA.log Using the Adaptec Storage ManagerUsing Storage Manager,administrators can view,create and delete arrays.Storage Manager can alsoturn off the RAID controller’s audible alarm.To launch Storage Manager,log in as the root user andstart X if necessary.From an xterm:#/usr/StorMan/StorMan.shunch screenIf SELinux is enabled,the following error dialog may be displayed.This will prevent a remote copy of Storage Manager from connecting to this server.However,the array can still be managed locally.Figure2.Error dialogIn the left hand pane,you will see an entry representing the local system.To manage your array,click on this entry.You will then be prompted for a user name and password:Figure3.Error dialogThe user name is root,and the default root password as configured at the factory is asllinux.You will next be given the option of registering you controller with Adaptec.If you choose register later,you will be prompted again the next time you run Storage Manager:Figure4.Registration dialogAfter the registration dialog,you will be presented with a screen showing all the AACRAID controllers in the system:Figure5.Main displayClick on the controller you wish to manage and you will see comprehensive status and configuration in-formation:Figure6.Controller detailsRight click on the controller and select properties to view battery charge status and other controller set-tings:Figure7.Controller propertiesRight click on the controller and select Background consistency check to modify the disk scrubbing op-tions:Figure8.Background consistency checkDetailed information on using the Storage Manager application can be found in the online help. Using the Command line utilityTo get information about the controller run:#/usr/StorMan/arcconf getconfig1ADControllers found:1----------------------------------------------------------------------Controller information----------------------------------------------------------------------Controller Status:OKChannel description:SCSIController Model:2130SController Serial Number:267a69BIOS Version: 5.1-0(8832)Firmware Version: 5.1-0(8832)Driver Version: 1.1-5(2412)Physical Slot:1Copyback enabled:NoBackground consistency check enabled:NoDefunct disk drive count:0Logical devices/Failed/Degraded:1/0/0Command completed successfully.To get information about the disk array(s),run:#/usr/StorMan/arcconf getconfig1LDControllers found:1----------------------------------------------------------------------Logical device information----------------------------------------------------------------------Logical device number1Logical device name:RAID_5Status of logical device:OptimalRAID level:5Size:139948MBRead cache status:EnabledWrite cache status:Write back(WB)Number of chunks:3Stripe-unit size:256KBStripe order(Channel,Device):0,00,10,2Command completed successfully.To get information about the physical drive(s),run:#/usr/StorMan/arcconf getconfig1PDControllers found:1----------------------------------------------------------------------Physical device information----------------------------------------------------------------------Channel#0:Transfer Speed:Ultra320Initiator at SCSI ID7Device#0Device is a Hard driveState:OnlineTransfer Speed:Ultra320Vendor:SEAGATEModel:ST373207LCFirmware:0003Serial number:3KT1ME7TSize:70007MBWrite Cache:UnknownFRU:S.M.A.R.T.:NoDevice#1Device is a Hard driveState:OnlineTransfer Speed:Ultra320Vendor:SEAGATEModel:ST373207LCFirmware:0003Serial number:3KT0DXLBSize:70007MBWrite Cache:UnknownFRU:S.M.A.R.T.:NoDevice#2Device is a Hard driveState:OnlineTransfer Speed:Ultra320Vendor:SEAGATEModel:ST373207LCFirmware:0003Serial number:3KT17G7FSize:70007MBWrite Cache:UnknownFRU:S.M.A.R.T.:NoDevice#6Device is a EnclosureState:StandbyTransfer Speed:Basic SCSIVendor:SUPERModel:GEM318Firmware:0Command completed successfully.To get a list of all controllers in the system:#/usr/StorMan/arcconf getversionControllers found:1Controller#1==============Firmware: 5.1-0(8832)Staged Firmware: 5.1-0(8832)BIOS: 5.1-0(8832)Driver: 1.1-5(2412)Command completed successfullyTo get a complete list of commands:#/usr/StorMan/arcconf helpControllers found:1|UCLI|Adaptec uniform command line interface|UCLI|Version 4.1(B4574)|UCLI|(C)Adaptec2003-2005|UCLI|All Rights ReservedCOPYBACK|changes controller copyback modeCREATE|creates a logical deviceDELETE|deletes a logical deviceSNAPSHOT|creates a copy of a logical deviceGETCONFIG|prints controller informationGETLOGS|gets controller log informationGETSTATUS|displays the status of running background tasksGETVERSION|prints version information for all controllersRESCAN|checks for new or removed drivesROMUPDATE|updates controller firmwareSETALARM|controls the controller alarm,if presentSETCONFIG|restores the default configurationSETCACHE|adjusts logical or physical drive cache modeSETNAME|Renames a logical device given its logical device numberSETSTATE|manually sets the state of a physical deviceTASK|performs a task such as verify on a logical or physical device Full documentation for the arcconf utility can be found on the ASL Driver CD:Docs/AACRaid_CLI_UG.pdfTechnical SupportPrior to contacting technical support,please visit the ASL online FAQ for quick answers to common hardware and software issues.The answers may be searched by keyword or browsed by category.These documents are maintained with up to date information.FAQ[]To request replacement of a defective part(except monitor)on systems under warranty,please send an E-mail to<*********************>with the following information:•Serial number or invoice number of the system•Detailed description of the problem•Shipping addressIf the transaction involves multiple systems,ASL highly recommends creating one ticket per system. This will avoid any mixup when the RMA is processed.Defective monitors will be handled directly by the manufacturer.Here is the contact information:•Viewsonic:8008888583(US)or866-262-1967(Canada)•IIyama:8005947480。
adaptec_raid_

adaptec raid 卡管理软件在windows和linux下的安装使用文档raid卡型号adaptec 3805 系统windows2003和redhat as5.2(不需要添加raid卡linux驱动)1.adaptec raid卡的管理软件在windows下安装后的运行界面如下图:2.单击左栏中的direct attached srorage后会有对应客户端机器的选择提示,双击对应的机器后会有提示你输入用户和密码的界面,如下图:3.默认用的帐号一般的都是administrator,密码是操作系统的密码,点击connect后,便可进入管理软件的主界面,如下图:4.在这个主界面中可以选择要操作的raid卡,例如本例中的5405raid 卡,双击后即可进入,界面中可以清楚的看到raid卡下的physical devices和logical devices,如下图:5.先介绍一下创建阵列的方法,选择菜单栏中的add或create就可以创建,在这里可以选择要创建的阵列级别,如下图:6.以穿件raid5为例说明,选择后的界面如下:7.在上图中可以看出,这里面可以选择创建阵列的参数,包括要创建的阵列的容量,条带大小,读写策略,创建机制等参数,设置好参数后需要选择要创建的物理磁盘,提交后即可创建,如下图:使用情况,如下图:下图:10.下图是硬盘掉线后在主界面下的表现,硬盘掉线后raid卡会报警,此报警音可以选择菜单栏中silence关掉,并且可以双击对应物理磁盘,查看属性中无忧media error之类的报错,如下图:点击左键,选择resacn后即可开始重建,如下图:阵列的属性中可以查看状态,查看进度,如下图:13.后台重建速度选择14.日志查看15.raid卡bios版本查看16.Writeback、readback更改17、报警开关邮件报警功能设置1.进入管理软件界面后,选择Configure——igccapp(Local system)机器名——Email Notifications2.进入Email Notifications界面,选择Actions——SMTP servers settings的电子邮箱,不需要输入邮箱密码。
- 1、下载文档前请自行甄别文档内容的完整性,平台不提供额外的编辑、内容补充、找答案等附加服务。
- 2、"仅部分预览"的文档,不可在线预览部分如存在完整性等问题,可反馈申请退款(可完整预览的文档不适用该条件!)。
- 3、如文档侵犯您的权益,请联系客服反馈,我们会尽快为您处理(人工客服工作时间:9:00-18:30)。
ADAPTEC RAID卡使用说明Adaptec 160 RAID卡的配置基本相同,此文以Adaptec 2110S RAID卡(Adaptec 160单通道RAID 卡),和Adaptec2200S RAID卡(Adaptec320双通道RAID卡)为例,进行配置说明。
其他Adaptec RAID 卡的配置可以参考此文。
1 硬件安装正确安装RAID卡,请注意有关板、卡安装方法及规则。
将SCSI盘连接在RAID卡的SCSI口上,请注意有关SCSI设备安装方法及规则。
2 初始化RAID卡在完成相关硬件的安装后,打开服务器电源,系统自检待屏幕出现以下提示:Adaptec I2O BIOS V001.41(2001/07/13)Copyright Adaptec Inc.1996-2001 All Rights ReservedHit <CTRL+A> for Adaptec Setup ,Waiting for devices按<CTRL+A>出现Please Wait….Adaptec Setup Utility Will be involed after post3配置RAID卡3.1 Adaptec 2110S RAID卡启动计算机,BIOS显示RAID卡信息,依据信息中的提示按〈CTRL+A〉进入配置RAID卡工具界面如图1所示。
图1按上下箭头键移动亮条至2110S,按回车,进入图2所示的显示RAID卡所连硬盘信息界面。
图23.1.1创建RAID按ALT+R进入配置RAID工具菜单,移动上下箭头键选中Creat功能菜单条进入图3所示的配置界面。
图3在图3中按ENTER键后出现RAID级别,如图4所示.图4在图4中利用TAB键将光标移至OK后回车,进入图5所示的界面.图5图5中显示了RAID卡所连接的硬盘的数量和信息,用户可根据需要利用空格键选择所需硬盘,当选种所需硬盘后进入图6所示的界面.在图6中按TAB键选中Done 后回车,进入图7图7图7中显示RAID已配置完成。
3.1.2退出RAID配置界面按ALT+F键进入File菜单,移动光标至Exit,进入图8所示的界面。
图8在图附录C.8中选中Exit后按回车键进入图9中所示的界面。
图9在图9中选中YES,RAID进行初始化,进入图10所示的界面.图10在图10中选种OK进入图11所示的界面。
图11在图11中选中OK, 退出RAID配置界面,如选中Cancel,系统重新进入配置RAID界面,RAID进行初始化,进入图12所示的界面。
图123.1.3 RAID删除按CTRL+A进入配置RAID工具界面,如图7所示,按<ALT+R>打开RAID菜单,移动箭头键选中DELETE进入图13所示的界面。
图13在图13中选中DELETE后按回车键出现如图14所示的界面图14在图14中用TAB键将光标移至YES 后回车,确认删除RAID。
3.2 Adaptec 2110S RAID卡启动计算机,BIOS显示RAID卡信息,依据信息中的提示按〈CTRL+A〉进入配置RAID卡工具界面如下图15所示。
图15用上下键将光标移动到需要的选项上,然后回车进入该功能。
3.2.1 Array Configuration Utility选择Array Configuration Utility选项,进入阵列配置工具。
出现如下图16界面:图16用上下键将光标移动到需要的选项上,然后回车进入该功能。
3.2.1.1选择Rescan Drives选择Rescan Drives功能,进行磁盘扫描。
屏幕出现图17的提示界面:图17扫描磁盘通道上的磁盘信息,然后进行磁盘更新,出现图18的提示信息:图18完成更新磁盘信息之后,自动回到Raid配置界面,如图16所示界面。
3.2.1.2选择Initialize Drives选择Initialize Drives选项,进行硬盘初始化,准备创建阵列的硬盘。
进入图19界面。
图19用上下箭头移动光标至所要选择的磁盘上,用空格键选中此磁盘。
选中的磁盘出现在右侧的图框中。
将所要选的磁盘全部至于右侧图框后,按回车键,进行磁盘初始化。
出现如下的警告界面。
Warning!! Initialization will erase all Arrayinformation from the Selected drives.Any Arrayusing any of these drives as members will beaffected. Do you want to continue?(Yes/No)图20键入Yes,将进行硬盘初始化。
键入No,将退出此菜单,不进行硬盘初始化。
3.2.1.3选择Create Raid选择Creat Raid项,进入创建Raid的磁盘选择界面,如图21所示。
图21将光标至于所选的硬盘上,用空格键选中此硬盘。
选完所需硬盘之后,按回车键后出现如下图22的创建Raid设置界面:图22各项的参数设置参见下表:配置项选项说明选择需要的RAID级别Array Type V olumeRAID 0(Stripe)RAID 1(Mirror)RAID 5(只有超过3块硬盘以上的情况才出所有的选项设置完成之后,将光标置于界面上的Done,回车创建RAID。
3.2.1.4 选择Manage Arrays选择Manage Arrays选项,进行磁盘阵列管理工作。
出现图23所示界面。
图23此界面将显示出所有已经存在的Raid,用上下键来选择需要进行管理的Raid。
当有多个Raid时,<Ctrl+B>用于设置启动顺序,<Ctrl+S>用于分配阵列功能,是否为用于Raid备份。
如果只是查看所选Raid的信息,回车即可。
查看信息界面如图24所示。
图24如果想删除所选的Raid,将光标至于所选Raid上,然后按Delete键,出现图25提示界面。
图25如果确定删除此Raid,将光盘至于Delete选项上按回车键。
3.2.2 SCSI Select Utility在图15所示的界面处,选择SCSI Select Utility选项后回车,进入图26所示界面。
图263.2.2.1 选择Controller Configuration选择Controller Configuration,进入图27所示界面。
图27各选项的参数设置参见下表:配置项选项(带*为缺省项)Drives Write Cache DisabledEnabled*Drive DefaultRuntime BIOS Disabled*EnabledAutomatic Failover Disabled*EnabledArray Background Condidency Check Disabled*EnabledBBS Support Disabled*EnabledArray based BBS Support Disabled*EnabledPhysical Drives Display during POST Disabled*EnabledCD-ROM Boot Support Disabled*EnabledRemovable Media Devices Boot Support Disabled *EnabledAlarm Control Disabled*EnabledSilenceTestNVRM State 系统检测值,不能改变Controller Memory Size 系统检测值,不能改变移动光标置于所要查看的项,回车即可看到此项的设置值,可以设置自己需要的参数。
建议保持缺省。
3.2.2.2 选择SCSI Configuration选择SCSI Configuration,进入图28所示的选择SCSI通道的界面。
图28选择一个需要的通道(通常是安装有SCSI硬盘的通道),移动光标到所选的SCSI通道上,按回车键,出现图29所示界面。
图29SCSI Channel Interface Definitions的各项参数设置如下表所示:配置项选项(带*为缺省项)Controller SCSI Channel ID 0,1,2,3,4,5,6,*7,SCSI Parity Checking *EnabledDisabledController SCSI Channel Termination Disabled*Auto ModeArray Background Condidency Check Disabled *EnabledAdditional Option的SCSI Device Configuration项,选中回车后,出现如下界面。
图30此界面显示当前所有SCSI设备的设置。
3.2.3 DiskUtility在图15所示的界面处,选择Disk Utility选项后回车,进入图31所示界面。
图31选择一个通道后,回车进入图32所示界面。
图32此界面显示每个SCSI ID上的设备。
选择SCSI磁盘工具时,SCSISelect将检查SCSI总线上的SCSI 设备,检查完后,将报告每个设备的描述。
如果设备存在,可选此设备,按回车键对SCSI硬盘进行低级格式化或校验操作。
