XProgrammer7
CX-Programmer v3.1软件安装使用说明
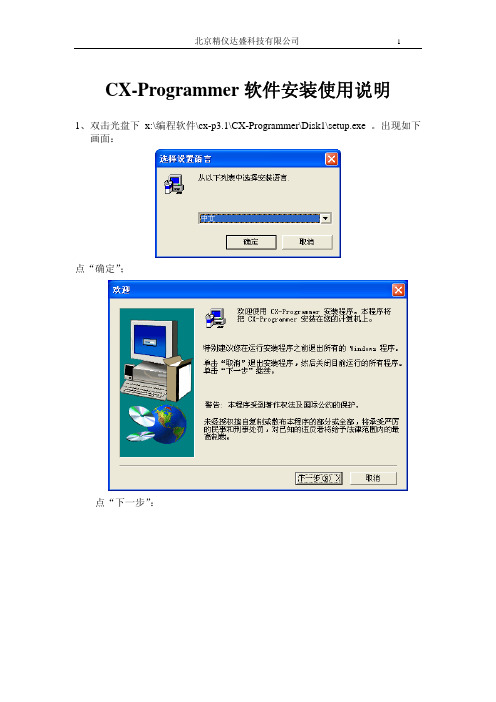
CX-Programmer软件安装使用说明1、双击光盘下x:\编程软件\cx-p3.1\CX-Programmer\Disk1\setup.exe 。
出现如下画面:点“确定”;点“下一步”:点“是”输入“姓名、公司、特许号”后点“继续”点“是”选择安装文件夹后点“下一步”点“下一步”开始安装安装完后出现如下画面:点“是”点“下一步”选择安装文件夹后点“下一步”点“下一步”点击“完成”结束安装;注意:本软件使用的程序文件格式与本公司实验程序不一样,在使用前要进行格式转换;如下:在开始下点“文件转换实用工具”单击“文件”下面的“导入”注意:在“文件类型在选择:LSS数据文件(*.DAT),打开文件选中要转换的实验后点“确定”选择主机CPU类型后点“确定”出现转换完成。
转换之后的文件为*.cxt文件;在打开文件时应注意;在“文件类型”里选取“*.cxt”文件;然后打开转换好的程序,如“T7.CXT”在选中“”后单击鼠标右键;选中上图中的“修改”;在“设备型号”中选中正确的PLC主机型号,如“CPM1(CPM1A)”,然后选第1个“设置”,在“CPU类型”里选取正确的PLC主机CPU类型,如“CPU40”,这在主机上的标签上可以查到;然后点“确定”;然后选取第2个“设置”在“端口名称”里选取正确的计算机串口,如“COM1”及“波特率”,如“9600”然后点“确定”退出;点“是”,设置完成;在将PLC主机与计算机用通讯电缆正确联接后,打开实验箱电源;再做下一步;选取“在线工作”,然后选“PLC-传送-到PLC”注意“如联机成功后,“传送”应为可选状态;上图是在没有联机的情况下的截图;选中“运行”就可以了;注意:本说明只是针对本公司的实验系统所编写的一个简单操作说明,由于时间仓促及本人水平有限,错误之处在所难免,欢迎来信批评指证;E-mail:welcomefu@付少俊2006-3-1。
CX-Programmer-说明书
OMRON CX-Programmer-用户手册CX-Programmer用户手册2.0版OMRON CX-Programmer –用户手册注意OMRON产品要求由合格的操作人员按照正常的程序使用,并且只适用于本手册所描述的目的。
下列约定将指出本手册中的各注意事项并给予分级。
请务必始终注意他们所提供的信息,否则可能导致人身伤害或者产品毁坏。
危险!提示,如果不加注意,极有可能导致死亡或者重伤。
警告提示,如果不加注意,可能导致死亡或者重伤。
注意提示,如果不加注意,可能导致或轻或重的伤害、产品损坏或操作故障。
OMRON 产品附注所有OMRON产品在本手册中均为大写。
当单词“Unit”用于表示OMRON产品时,不管其是否以正式的产品名称出现,也一律采用大写。
缩写“PLC”表示可编程逻辑控制器,不用作其他任何产品的缩写。
iOMRON CX-Programmer –用户手册 ii直观标题和手册约定下列标题出现在手册左列,帮助您区分各种类型的信息。
指出为了方便有效地操作产品的各种特别重要的信息。
1, 2, 3… 用于表示分类列举的标识,例如程序、检查表等。
表示同一窗口的菜单上某一可用选项在工具栏上的快捷按钮。
© OMRON, 2000版权所有。
本出版物的任何部分,未经OMRON 事前书面许可,均不能复制、存储在检索系统中,或者以任何形式传播,或者以任何方法(机械、电子及其他方法)影印、复制。
所有版权和商标得到公认。
使用本手册所包含的资料不必承担专利责任。
由于OMRON 将持续不断地努力改进其高品质的产品,因此本手册所涉及内容可能更改,恕不另行通知。
在编写此手册时已指出了所有注意事项,尽管如此,OMRON 对于其中的错误或遗漏不承担任何责任,对于使用本出版物中所包含的信息所造成的危害也不承担任何责任。
OMRON Script Language – Index6第一章技术规范本章概括的叙述了CX-Programmer 软件,说明了能使CX-Programmer 软件正常工作所要求的操作环境和最小配置的细节。
计算机系统原理13015习题答案

习题解答第1章计算机系统概述1. 给出以下概念的解释说明1. 中央处理器(CPU)通常把控制部件、运算部件和各类寄存器互联组成的电路称为中央处理器(Central Processing Unit,CPU),简称处理器。
2. 算术逻辑部件(ALU)用来进行算术逻辑运算的部件,即算术逻辑部件(Arithmetic Logic Unit)。
3. 通用寄存器临时存放从主存取来的数据或运算的结果。
4. 程序计数器(PC)在执行当前指令的过程中,自动计算出下一条指令的地址并送到PC(Program Counter,PC)中保存。
5. 指令寄存器(IR)从主存取来的指令需要临时保存在指令寄存器(Instruction Register,IR)。
6. 控制器用于自动逐条取出指令并进行译码的部件,即控制元件(Control Unit,CU),也称控制器。
7. 主存储器用来存放指令和数据。
8. 总线CPU为了从主存取指令和存取数据,需要通过传输介质和主存相连,通常把连接不同部件进行信息传输的介质称为总线。
9. 主存地址寄存器(MAR)CPU送到地址线的主存地址应先存放在主存地址寄存器(Memory Address Register, MAR)中。
10. 主存数据寄存器(MDR)CPU发送到或从数据线取来的信息存放在主存数据寄存器(Memory Data Register,MDR)中。
11. 机器指令计算机能理解和执行的程序称为机器代码或机器语言程序,其中的每条指令都由0和1组成,称为机器指令。
12. 存储程序13. 指令操作码操作码字段指出指令的操作类型,如取数、存数、加、减、传送、跳转等。
14. 高级程序设计语言高级程序设计语言简称高级编程语言,是指面向算法设计的、较接近于日常英语书面语言的程序设计语言,如BASIC、C/C++、Java等。
15. 汇编语言通过用简短的英文符号和机器指令建立对应关系,以方便程序员编写和阅读程序。
《可编程控制器及应用》课程实验指导书
《可编程控制器及应用》课程实验指导一、课程基本情况二、课程性质与作用可编程控制器是综合了计算机技术、自动化控制技术和通讯技术的一种以微处理器为核心的新型通用自动控制装置,具有功能强、可靠性高、编程简便、操作灵活、适合于工业环境的特点;在工业自动化、机电一体化、传统产业技术改造等方面得到普遍应用。
是现代工业控制的三大支柱(PLC、机器人、CAD/CAM)之一。
可编程控制器是自动化、测控技术与仪器、电气工程与自动化专业的一门专业必修课。
主要学习可编程控制器方面知识和培养工程综合实践能力。
(1)知识要求:了解PLC的基本原理和结构组成,掌握PLC指令系统、梯形图、PLC 编程的规则和编程的方法,能应用PLC进行控制系统设计。
(2)能力要求:能使用编程软件,能根据控制要求设计出控制软件,能应用PLC进行控制系统设计。
三、实验教学内容与安排实验一定时计数器实验一、实验目的1、掌握CP1H PLC控制系统梯形图设计的一般方法。
2、熟悉CX-Programmer软件的应用。
二、实验设备1、CP1H PLC实验箱一台2、PC机一台三、实验原理根据实验控制要求,分析有几个输入信号,几个输出信号,然后给这些输入/输出信号分配PLC端子号,画出程序流程图,然后画出梯形图,在PC机上用CX-Programmer编程软件将梯形图输入计算机并保存,将梯形图下载到PLC上,调试运行,直到满足控制要求。
四、实验内容及步骤1、实验内容控制要求:有两台交流电动机,按下启动按钮,启动电机1运转,运转时间为10S,10S 后电机1停止,自动启动电机2运转,运转时间为6S,6S后电机2停止,自动启动电机1运转,运转时间为10S ……,周而复始,两台电机定时交替运转。
任何时候按下停止按钮,则两台电机停止运转。
实验中以两个发光二极管代替交流电机控制电路的交流接触器线圈,发光二极管亮表示交流接触器通电,即对应电机运转,发光二极管灭表示交流接触器线圈断电,即电机停止运转。
欧司朗OT Programmer-X OPTOTRONIC P7系列软件配置用户手册说明书
OT Programmer-X OPTOTRONIC®P7 Series Software Configuration User ManualLight is OSRAMOT Programmer-X OPTOTRONIC® P7 Series Software Configuration | User ManualTable of contents1. System requirements 22. Installing software 23. Installing USB drivers 44. Connection to LED driver 54.1 Button functions 65. Programming instructions 6 5.1 Set Iout 6 5.2 Signal dimming mode 6 5.3 AstroDIM mode 7 5.3.1 Traditional timing 7 5.3.2 Time based 8 5.3.3 Astro based 9 5.4 Constant lumen 10 5.5 OTP point 10 5.6 Read function 111 System requirements1.1 Hardware environment— CPU: 2GHz and above (32-bit or more)— RAM: 2GB and above— HD: 20GB and above1.2 Software environment—O perating system: Windows XP, Win7, Win10 or above—C omponent: Framework 4.0 or above2 Installing software2.1 Software packagesFigure 1: List of files2Installation | User Manual2.2 InstallationDouble click setup.exe to install software1. WelcomeFigure 2: Welcome pageClick "Next" button2. Select installation folderFigure 3: Select installation folderAfter installation folder is selected, click "Next" button34Installation | User ManualFigure 4: Confirm installation3. Confirm and complete installationFigure 5: Complete InstallationAfter installation is completed, the shortcut icon will appear onthe desktop.3 Installing USB driversFigure 6: USB Driver filesPlease install CDM20824_Setup (XP).exe if operating system is Windows XP or install CDM21228_Setup.exe if it is Win7 and above.5Connection to LED driver | User Manual4 Connection to LED driverFigure 7: Connection diagramFirst insert the OT Programmer-X into the USB port of the computer, and connect the other end to the LED driver DIM+/- (PURPLE and GRAY).Open the software and click “Connect” to connect the software to the LED driver.Figure 8: Connect to LED driver UIIf the connection is successful, the prompt “Succeed” will be displayed at the top of the interface. Product Model and corresponding default setting will be automatically read by software. At the same time, the U-I curve of the corresponding model is displayed on the left. The curve shows the working area (gray dotted box), programmed working area (orange area), constant power curve (red dotted line), output voltage range (Vmin ~ Vmax), full power voltage range and other information. The programmed working area changes according to the set current.6Programming instructions | User Manual4.1 Button functions5 Programming instructions5.1 Output currentFigure 9: Button functionsRead: Reading driver configuration parameters and display to the UI Default: Restoring the UI parameters to the factory default values Import: Importing the saved parameter values from a file and display them on the UISave: Saving the interface display parameter values to a file Programming: Writing the configured parameters to the driver Download to offline programmer: Write the configured driver parameters to the offline programmerNote: The offline programmer is a programming tool kit that can complete driver programming without relying on a computer. The kit is easy to use and quick to program. For detailed information about this product, please consult your account manager.I Max is fixed and depends on the driver design.I Set can be defined based on customer’s needs. To change the Iout, just input the value and click “Programming”.The blue operation range changes after the Iset is successfully done. The Vout max is shown at the right corner in red.Figure 10: Output current setting5.2 Signal dimming modeSignal dimmingis Analog 1-10V or 0-10.Figure 11: Signal Dimming7Programming instructions | User Manual5.3 AstroDIM modeAstroDIMis a timer based dimming mode that allows the user to configure a custom dimming schedule.5.3.1 Traditional timingIn Traditional Timing mode, after the power supply is powered on, it works according to the set “work step” time and output power. In this mode, the number of steps, steps time, and output powerare always the same. When in use, configure the steps in the orange box as shown below.Figure 12: Traditional timingProgramming instructions | User Manual5.3.2 Time basedClick “Time Based” and select the reference period.Figure 13: Time basedThe Time Based function is used to adapt to changes in night time length due to seasonal changes. To use this function, you need to set the parameters in "Reference period" first. The software will calculate the length of the current day’s night time according to the length of the previous day’s night time. Assuming "reference days" is set to 7 days, the average of the night time for the first 7 days is taken and applied as the night time for tonight. Then it will automatically adjust according to the proportion of steps.ExampleAssume that the parameters of each step are:—Step 1 is 2 hours and 30 minutes and the power is 100%;—Step 2 is 3 hours and 30 minutes and the power is 80%;—Step 3 is 2 hours and 0 minutes and the power is 50%.The total length of the three steps is 8 hours. According to the average of the night time in the previous 7 days, the night time is 10 hours. Then the duration of Step 1 will be automatically adjusted to:(2 hours and 30 minutes) × 10 ÷ 8 = 150 minutes × 10 ÷ 8 = 3 hours and 7.5 minutesSimilar to this calculation, the duration of Step 2 will be automatically adjusted to 4 hours 22.5 minutes, the duration of Step 3 is automatically adjusted to 2 hours and 30 minutes.89Programming instructions | User Manual5.3.3 Astro basedClick "Astro Based" and set the reference period, midnight point, and initial duration.Figure 14: Astro basedAstro Based dimming profile is referenced to the average middle of the night, calculated based on the average operation time over the defined Reference period.Reference period is a self-adapting percentage of the night time of the previous days.Midnight time is the actual calculated center point in the operating period. It is aligned with the time point depicted by the vertical red line.Initial duration is the preset lighting duration, and is shown as the red horizontal line on the time axis.Actual duration is the actual calculated lighting operation time, which is shown as the orange horizontal line on the time axis After the LED driver is turned on, it works according to the adaptive (actual time) step and time and output power. Unlike the other two timing modes, the midpoint alignment steps use relative time settings. The start time of Step 1 is 15:00, and the other steps are arranged in order.10Programming instructions | User Manual5.4 Constant lumenThe Constant Lumen feature accounts for LED depreciation over time. Select “Enable”, configurethe operation time and the corresponding output level, and click “Programming”.Figure 15: Constant lumenOutput level is the set current percentage, maximum 100%.The time unit is 1K hours and the maximum is 100kh, which must be arranged in ascending order.5.5 OTP pointIf the Over-Temperature Protection (OTP Point ) is triggered, the output power will be decreased to lower the temperature and protect the driver. 85°C is the default OTP setting, the user is able to setthe temperature value lower to limit the maximum Tc.Figure 16: OTP settingProgramming instructions | User Manual5.6 Read functionWhen the Read function is performed, the driver log will be displayed.Current Tc: Current driver Tc temperature.Historical Tc_Max: The highest Tc temperature recorded during the driver’s operating lifetime.Previous time Tc_Max: Record of the highest Tc since last Read function was performed.This Time Tc_Max: Record of the highest Tc during this use.Total working time: Record the total working time (operating hours).OTP times: Record of the OTP triggered times.Firmware Version: Driver firmware version.Figure 17: Read function11OSRAM is a registered trademark of OSRAM GmbH. Specifications subject to change without notice.© 2021 OSRAM SYLVANIA Inc.ECS-OT442 2-21OSRAM SYLVANIA Inc.200 Ballardvale StreetWilmington, MA 01887 USA 1-877-636-5267 /ds。
新目标八年级上册英语Unit6基础知识练习题及答案

新目标八年级上册英语Unit6基础知识练习题及答一、根据首字母及汉语意思补全单词(10分)1.My best friend is a good c________ in the big hotel.2.I want to be a p________ like Lang Lang.3.David wants to be an e________ to build more beautiful buildings.4.Her son likes planes very much. To be a p________ is his dream.5.His father is a famous d________.And he works in the hospital.6.Some students decide to go to f countries after finishing high school.7.The answers to the q are not right.8.He promises to make w plans.9.I have decided to go to Shanghai at the b of the month.10.Do you know the m of this word?二、用括号内所给单词的适当形式填空。
(10分)1.Linda is a great ________(violin) and she plays the violin quite beautifully. 2.We should not talk to the ________(drive) when taking a bus.3.Yu Qiuyu is one of my favorite _____(writer).4.Does the ________(science) come from the United States?5.Yi Jianlian is a Chinese basketball ____(play).6.My brother is a great computer (program).7.Mr.Green (driver)his car to the office yesterday.8.Little Bob doesn’t like taking (act)lessons, but his sister does.9.(science) are trying to make robots for people and let them do the same things as us.10.These are (person) letters. You can’t open them.三、单项选择(15分)( )1.—Jimmy, what do you want to be when you grow up?—I want to be engineer.A. aB. anC. the( )2. To be a great like Lang Lang, my cousin practices playing the piano every day.A. pianistB. engineerC. violinistD. pilot( )3.When times are difficult, tell that pain(痛苦) in part of growing.A. youB. yourselfC. yourD. yours( )4.—I tried several ways to work out the math problem, but of them worked.—Never give up. I believe you'll make it.A. allB. eachC. noneD. neither ( )5.Sam is 11 years old. Peter is 16 years old. Peter is 5 years than Sam.A. olderB. shorterC. newerD. longer( )6.— What's your son going to when he grows up?— A movie actor.A. doB. haveC. beD. make( )7. I don't care about that. It has nothing to do me.A. aboutB. withC. forD. from( )8.Li Lei and his cousin made some zongzi by during the Dragon Boat Festival.A. themB. theyC. themselves( )9. This is a newspaper. It comes out every Tuesday.A. quicklyB. earlyC. weeklyD. cheaply( )10.— Can you speak any languages?— Yes. I can speak English and Spanish.A. beautifulB. foreignC. expensiveD. serious( )11.I'm going to be an English teacher and ______ English every day. A.practice B.enter C.do D.keep( )12.He promised his father ______ all subjects at school.A.study B.to study C.studying D.studied( )13.What are you going to do ______ make the Music Festival a great success? A.to help B.helping C.help D.helped( )14.I love music very much,so I'm going to learn how to ______ the piano this term.A.keep B.play C.hold D.build( )15.He may come,but I'm not sure _ that.A.about B.on C.with D.to四、句型转换(10分)1. I want to be a_reporter when I grow up. (对画线部分提问)________ do you want to ________ when you grow up?2. She is going to visit her grandpa when_school_is_over. (对画线部分提问) ________ is she going ________ ________ her grandpa?3. The girl is going to study at_home. (对画线部分提问)________ ________ the girl going to study?4. The students are going to school on_foot. (对画线部分提问)________ ________ the students going to school?5. My father is going to send a dictionary to me. (改为同义句)My father is going to ________ ________ a dictionary.五、补全对话。
plc编程软件有哪些?7款PLC编程软件介绍
plc 编程软件有哪些?7 款PLC 编程软件介绍plc 编程软件有哪些?
1、欧姆龙plc 编程软件
欧姆龙plc 编程软件集成了CX-Programmer V9.5,能够为欧姆龙PLC 编程提供全面的软件支持,本版本为最新版,全面支持32/64 位WIN8 系统,
为多国语言版,支持简体中文。
能为网络、可编程终端及伺服系统、电子温
度控制等进行设置。
适用于已具有电气系统知识(电气工程师或等同者)的
负责安装FA 系统者、负责设计FA 系统者和负责管理和维护FA 系统者使用。
2、三菱PLC 编程软件
三菱PLC 编程软件适用于Q、QnU、QS、QnA、AnS、AnA、FX 等全系列可编程控制器。
三菱PLC 编程软件GX Developer 定位为可编程控制器综合开发平台,支持梯形图、指令表、SFC、ST 及FB、Label 语言程序设计,网络参数设定,可进行程序的线上更改、监控及调试,具有异地读写
PLC 程序功能。
三菱公司目前最新PLC 编程软件。
人教八年级上册英语Unit6(词汇 语法 句型)基础专练(含答案)

八年级上册英语Unit6(词汇+句型+语法)基础专练一、短语翻译。
1.长大;成熟;成长2.确保;查明3.写下;记录下4.能够做5.在.......的开始6.学着做;开始做7.关于;与……有关系8.上…...课9. 确信;对……有把握10.想要成为二、根据句意及首字母提示完成句子。
1. Lang Lang and Li Yundi are both famous p .2. Yuan Longping is a great s in the world.3. His sister is good at violin and she is a v .4. She’s going to study in England for further(更进一步) e .5. What's the m of this word?6. I want to be a computer p .7. I plan to improve the r with my brother.8. Be sure not to miss the b of the party.9. It's a p letter. Please don't open it.10. Parents should encourage(鼓励) children to make decisions t .11. Her (爱好) is listening to music in her free time12. The students always have much (学校作业) to do.13. Our school’s (每周的) meeting is on Monday evenings14. I wanted to watch TV after I finished my homework and my father (同意).15. There are a lot of (different) between American English and British English.三、用括号内所给动词的适当形式填空。
CX-Programmer安装手册

The CD-ROM of CX-One / CX-Programmer has User's Manual of the PDF file.Please read the 'Notice' and the 'Precautions' in the User's Manual before usingCX-Programmer.The 'CX-Programmer Introduction Guide' describes the basic operation procedure of CX-Programmer. Refer to the Help or the User's Manual of the PDF file for detailed descriptions.* You need Acrobat Reader 4.0 or grater versions in your PC to display the PDF file.•••••••••••••••••••••••••••••••••••••••••••••••••••••••••••1-1•••••••••••••••••••••••••••••••••••••••••••1-1•••••••••••••••••••••••••••••••••••••••••••••••••1-5••••••••••••••••••••••••••••••••••••••••••••••••1-7•••••••••••••••••••••••••••••••••1-8••••••••••••••••••••••••••••••••••••••••••••••••••••••••••1-9•••••••••••••••••••••••••••••••••••••••1-10••••••••••••••••••••••••••••••••••••••••••••••••••••••••••1-11••••••••••••••••••••••••••••••1-13•••••••••••••••••••••••••••••••••••••••••••••••••••••1-14••••••••••••••••••••••••••••••••••••••••1-15••••••••••••••••••••••••••••••••••••••••••••••••••••••1-16•••••••••••••••••••••••••••••••••••••••••••••1-18••••••••••••••••••••••••••••••••••••••••••••••1-19•••••••••••••••••••••••••••••••••••••••1-19••••••••••••••••••••••••••••••••••••••••••1-20•••••••••••••••••••••••••••••••••••••••1-21••••••••••••••••••••••••••••••••••••••1-21••••••••••••••••••••••••••••••••••••••••••••••••1-22•••••••••••••••••••••••••••••••••••••••••••••1-22•••••••••••••••••••••••••••1-23••••••••••••••••••••••••••1-24•••••••••••••••••••••••••1-25••••••••••••••••••••••••1-26••••••••••••••••••••••••••••••••••••••••••••••••••1-27••••••••••••••••••••••••••1-28••••••••••••••••••••••••••••••••••••••••••••1-29••••••••••••••••••••••••••••••••••••••••••1-30•••••••••••••••••••••••••••••••••••••••••1-31•••••••••••••••••••••••••••••••••••••••••••••1-31ContentsChapter 2 Online OperationAvailable PCAvailable Device TypesChapter 1 Installation -Startup1. Installation 1-1. Installation of CX-Programmer 1-2. Online Registration 2. Startup of CX-Programmer3. New Project Opening and Device Type Settings4. Main Window 4-1. Compatible SYSWIN Key Allocation 4-2. Section 4-3. Deletion and Display of Unnecessary Windows5. Program Creation 5-1. Entry of Normally Open Contact 5-2. Entry of Coil 5-3. Edit of Symbol Comment 5-4. Entry of Rung Comment 5-5. Entry of Normally Closed Contact 5-6. Entry of Attached Comments 5-7. Entry of Differential Contact…Up 5-8. Entry of Differential Contact…Down 5-9. Entry of Vertical…Up 5-10. Entry of Vertical…Down 5-11. Entry of Advanced Instructions 1 -Entry of Strings 5-12. Entry of Advanced Instructions 1 -Useful Functions 5-13. Entry of Auxiliary Relay -1.0 Second Clock Pulse Bit 5-14. Entry of Advanced Instructions 2 -Entry of Differential 5-15. Entry of OR Rung 5-16. Entry of Advanced Instructions 3 -Entry by Fun No.5-17. Entry of Timer Instructions 5-18. Entry of Counter Instructions 5-19. Edit of Rungs…Copy & Paste 5-20. Entry of END Instruction 1. Program Error Check (Compile)2. Going Online 3. Monitoring 4. Monitoring -2 Monitoring Many Locations in Program at Once 5. Monitoring -3 Monitoring in Hex 6. Monitoring -4 Watch Window 7. Monitoring -5 Present Value Change and Binary Monitoring in Watch Window 8. Useful Functions of Watch Window 9. Monitoring -6 Watch Window -210. Monitoring -7 Rung-wrap of Long Rung on Display 11. Monitoring -8 Differential Monitor 12. Force On/Off 13. Displaying List of Forced-on/off Bits 14. Changing Set Value of Timer 15. Changing Present Value of Timer 16. Find Function -1 Find from Address Reference Tool 17. Find Function -2 Retrace Find of Ladders 18. Find Function -3 Find by Keyword in Comment 19. Find Function -4 Go To Rung Comment 20. Find Function -5 Find Bit Addresses 21. Online Edit Useful Functions ••••••••••••••••••••••••••••••••••••••••••••2-1•••••••••••••••••••••••••••••••••••••••••••••••••••••••••2-2•••••••••••••••••••••••••••••••••••••••••••••••••••••••••••2-3••••••••••••••••••••••2-4•••••••••••••••••••••••••••••••••••••••••••2-4•••••••••••••••••••••••••••••••••••••••••••••2-5•••••••••••2-6••••••••••••••••••••••••••••••••••••••••••2-7•••••••••••••••••••••••••••••••••••••••••••2-8•••••••••••••••••••••••••••••2-9•••••••••••••••••••••••••••••••••••••••••2-10••••••••••••••••••••••••••••••••••••••••••••••••••••••••2-11•••••••••••••••••••••••••••••••••••••••2-11••••••••••••••••••••••••••••••••••••••••••••2-12•••••••••••••••••••••••••••••••••••••••••2-12•••••••••••••••••••••••••••2-13•••••••••••••••••••••••••••••••••••2-14•••••••••••••••••••••••••••••••2-16••••••••••••••••••••••••••••••••••••2-17•••••••••••••••••••••••••••••••••••••••2-18•••••••••••••••••••••••••••••••••••••••••••••••••••••••••2-19••••••••••••••••••••••••••••••••••••••••••••••••••••AppendixAvailable PCHardware RequirementsRequired memory (RAM) size depends on the size of your programs to be created. If the required memory (RAM) size is larger than your PC’s memory (RAM) size, operation of CX-Programmer might be slowed down.*1:For Windows95 and CS/CJ series PLC, you cannot use I/O table and Unit Setup of CX-Programmer (unavailable are parameter setting,dedicated tool activation, consumption current indication, rack width indication, and DIP switch status monitor of advanced unit).*2:Specified program size indicates that for one registered PLC. If more than one PLC is registered for a project, about 1MB of memory isrequired for every 1000 steps of your program.For details of PC in which CX-One can be installed, refer to “CX-One Setup Manual”, Chapter 2 ”Installation and Uninstallation”.Windows95/98/NT4.0 Service Pack6a Windows2000 Service Pack 2 or later/Me Windows XP PC PC/AT CompatiblePC/AT Compatible PC/AT Compatible CPU Pentium-class CPU133MHz or betterPentium III 1GHz or betterRecommendedPentium-class CPU 150MHz or better Pentium III 1GHz or more Recommended Pentium-class CPU 300MHz or better Pentium III 1GHz or better Recommended Memory size (RAM)*2In using CX-Simulator together, values in parentheses 64M bytes or more (96M bytes or more)96M bytes or more (128M bytes or more)128M bytes or more (192M bytes or more)Hard disk space 550M bytes or more free space550M bytes or more free space 550M bytes or more free space Display 800X600 SVGA or grater800X600 SVGA or grater 800X600 SVGA or grater CD-ROM drive At least one drive At least one driveAt least one drive Communications PortAt least one RS-232C Port OSItem128M bytes or more (128M bytes or more)192M bytes or more (192M bytes or more)256M bytes or more (256M bytes or more)Program size30K steps orless192M bytes or more (192M bytes or more)256M bytes or more (256M bytes or more)384M bytes or more (384M bytes or more)Program size120K steps orlessProgram sizeover 120KstepsSeriesCPU Unit Type *1: For WS02-CXPC1-EJ-EV6 (one license (limited to micro PLCs)), only these PLC types are available.*2: CX-Programmer does not support SFC.*3: To connect with SYSMAC Board, specify the PLC types in parentheses. Only when selecting these PLC types,you can select “SYSMAC Board”as a network type.*4: To connect with SYSMAC CS1 Board, specify PLC types in parentheses. Only when selecting these PLC types,you can select “CS1 Board”as a network type.CX-Programmer supports the following PLC (Programmable Logic Controller) types.Available Device TypesCS1CJ1CP1(*1)C1000H C2000H C200H C200HX C200HG C200HE C200HX-Z C200HG-Z C200HE-Z C200HS CPM2* (*1)CPM2*-S* (*1)CPM1/CPM1A (*1)CQM1H CQM1CV1000 (*2)CV2000 (*2)CV500 (*2)CVM1IDSC SRM1 (*1)SYSMAC Board, or SYSMAC CS1 Board (Internal connection of a PC with the SYSMAC board that is built-in the PC where CX-Programmer is installed)FQM1 Series FlexibleMotion ControllerCS1H-CPU67/66/65/64/63 (-V1)CS1G-CPU45/44/43/42 (-V1)CS1G-CPU45H/44H/43H/42HCS1H-CPU67H/66H/65H/64H/63HCS1D-CPU67H/65HCS1D-CPU67S/65S/44S/42SCJ1G-CPU45/44CJ1M-CPU23/22/21/13/12/11CJ1G-CPU45H/44H/43H/42HCJ1H-CPU66H/65HCP1H-X40DR-A/X40DT-D/X40DT1-DCP1H-XA40DR-A/XA40DT-D/XA40DT1-DC1000H-CPU01 (-V1)C2000H-CPU01 (-V1) (Simplex system only)C200H-CPU01/02/03/11/21/22/23/31C200HX-CPU34/44/54/64C200HG-CPU33/43/53/63C200HE-CPU11/32/42C200HX-CPU34-Z/CPU44-Z/CPU54-Z/CPU64-Z/CPU65-Z/CPU85-ZC200HG-CPU33-Z/CPU43-Z/CPU53-Z/CPU63-ZC200HE-CPU11-Z/CPU32-Z/CPU42-ZC200HS-CPU01/03/21/23/31/33CPM2A-20CD/30CD/40CD/60CDCPM2C-10CD/10C1D/20CD/20C1DCPM2C-S100C/110CCPM2C-S110C-DRTCPM1(A)-10CDR/20CDR/30CDR/40CDR (-V1)CQM1H-CPU11/21/51/61CQM1-CPU11/21/41/42/43/44/45CV1000-CPU01 (-V1)CV2000-CPU01 (-V1)CV500-CPU01 (-V1)CVM1-CPU01/11 (-V1) (-V2)/CPU21-V2IDSC-C1DR-A/C1DT-ASRM1-C01/C02 (-V1) (-V2)C200PC-ISA01 (C200HG-CPU43 *3)C200PC-ISA02-DRM (C200HG-CPU43 *3)C200PC-ISA02-SRM (C200HG-CPU43 *3)C200PC-ISA03 (C200HG-CPU43 *3)C200PC-ISA03-DRM (C200HG-CPU43 *3)CS1PC-PCI01H-DRM CS1G-CPU45H *4FQM1-CM001/MMA21 / MMP21C200PC-ISA03-SRM (C200HG-CPU43 *3)C200PC-ISA13-DRM (C200HX-CPU64 *3)C200PC-ISA13-SRM (C200HX-CPU64 *3)CS1PC-PCI01-DRM (CS1G-CPU45 *4)Before installation of CX-Programmer, you must: terminate all Windows programs, anduninstall older version of CX-Programmer and peripheral tools (such as CX-Protocol) if they are already installed.Installation takes about 5 to 20 minutes depending on your PC. (5 minutes for a PC with CPU: Celeron2.2GHz, main memory: 512MB, and CD-ROM drive: 48x)To change/modify/delete CX-Programmer after installation, refer to the PDF manual “CX-Programmer Operation Manual”, Chapter 2 ”Installation and Uninstallation”.Before installation of CX-Programmer, you must: terminate all Windows programs, and uninstall older version of CX-Programmer and peripheral tools (such as CX-Protocol) if they are already installed. Installation takes about 5 to 20 minutes depending on your PC. (5 minutes for a PC with CPU: Celeron2.2GHz, main memory: 512MB, and CD-ROM drive: 48x) To change/modify/delete CX-Programmer after installation, refer to the PDF manual “CX-Programmer Operation Manual”, Chapter 2 ”Installation and Uninstallation”.Insert the CX-Programmer installation disk (CD-ROM) to your PC’s CD-ROM drive.[Choose Setup Language] dialog box is displayed. Default language of the OS on your PC is automatically selected.Check if the language is appropriate, then click [OK].Click [OK].CX-Programmer splash screen is displayed, then CX-Programmer installation is started.1. Installation procedure of CX-Programmer1-1. Installing CX-ProgrammerInstallation to Startup Installation to Startup Opening a new project Opening a new project Device type settings Device type settings Creating a programCreating a programClick [Next].CX-Programmer setup wizard is started.[License Agreement] dialog box is displayed.Read the software license agreement carefully. If you agree with all items, select [I accept the terms of the license agreement] radio button and click [Next] button.Select the radio button.Click [Next].[User information] dialog box is displayed.Enter [User], [Company],[License] (product serialnumber of CX-Programmer).Click [Next].Installation to Startup Installation to Startup Opening a new project Opening a new project Device type settings Device type settings Creating a programCreating a program[Setup Type] dialog box is displayed.Select an installationfolder, then click [Next].By selecting [Custom], you can individually select and install a peripheral tool.[Ready to Install the Program] dialog box is displayed.Read the message andclick [Next].Click [Install].CX-Programmer installation is started.Select the radio button[Complete].Click [Next].[Choose Destination Location] dialog box is displayed.If OMRON FB Library is selected, [Choose Destination Location] dialog box of OMRON FB Library is displayed.Installation to Startup Installation to Startup Opening a new project Opening a new project Device type settings Device type settings Creating a programCreating a programA dialog box (left) is displayed.Click [Finish] button to finish theinstallation wizard.Now installation is completed.By checking [Online registration]check box, you can proceed to Click [Finish].online registration.1-2. Online RegistrationIf you have Internet environment for the installed PC, you can perform online user registration.After installation is completed, [Online Registration] dialog box is displayed.If you click [Register] button, your Web browser is started to connect to “Omron’s CX-One Website”.(*1) (*2)*1: If you click [Exit] button to cancel online registration, [Online Registration] dialog box isdisplayed every time CX-Programmer is started.*2: If you do not have Internet environment, or you do not want to register online, fill and sendthe user registration card that comes with the product.MEMOUse to record license No. etc.MEMO2. Startup of CX-ProgrammerWindows task bar[Start]↓[Programs]↓[Omron]↓[CX-One]↓[CX-Programmer]↓[CX-Programmer]The initial screen when starting up CX-Programmer is displayed.3. New Project Opening and Device Type SettingsClick the toolbar button [New] in CX-Programmer.ClickClick the left mouse button on the “Settings”button to show the [Device Type Settings] dialog.Click the left mousebutton.Click the left mouse button onand select a CPU type.Click [OK] to decide the selected CPU type.4. Main WindowEach function of the main window is explained here.Title Bar Menus Project TreeSectionProject Workspace Ladder Window Output Window ToolbarsStatus BarSymbol BarShows error information in compiling (error check).Shows the results of searching for contacts/coils in the list form.Shows error details when errors occurred while loading a project file.Enables you to divide one program into a given number of blocks.Each can be created and displayed.SectionShows information such as a PLC name, online/offline, location of an active cell.Status BarOutput WindowA screen for creating and editing a ladder program.Ladder Window Controls programs and data. Enables you to copy data by the element by executing Drag and Drop between different projects or within a project.Project Workspace Project Tree Enable you to select functions by clicking icons. Select [View]-> [Toolbars], and you can select toolbars to be displayed. Dragging toolbars enables you to change the display positions by the group.Toolbars Enable you to select menu items.Menus Shows the file name of saved data created in CX-Programmer.Title Bar Contents/FunctionNameDisplays a small window to show the basic shortcut keys used in CX-Programmer.Select [View] -> [Information Window] to show or hide the Information rmation Window Displays the name, address or value, and comment of the symbol presently selected by the cursor.Symbol BarInformation WindowThe keyboard mapping function allows the function keys to operate like SYSWIN.Select the [Tools] -> [Keyboard Mapping...] menu.ClickClickWhen SYSWIN key allocation is selected, a key operation guide will be displayed at the bottom of the display.When SYSWIN key allocation is selected, a key operation guide will be displayed at the bottom of the display.Display in Full ViewRight mouse-clickDisplay in Normal ViewWhen Alt is pressedWhen Shift is pressedWhen Ctrl is pressed4-1. Compatible SYSWIN Key AllocationAfter the above operations, the key allocations will be changed and become compatible with SYSWIN.Click the icon shown inthe task bar on the right-bottom of the display.Function keys will be available for entering ladder programs.Click4-2. SectionSection is a function to create/display a “block”of a program divided per function. It improves not only the visibility of a program but also the development productivity byreusing components if the program consists of similar controls, because copy and paste on the program tree are available.Moreover, program upload by section is possible and it enables you to do online operation smoothly.Giving namesindicating the contents of processing or controls is possible.There is no limit on the number of sections per program.Changing a section nameClick the right button of the mouse on the section whose name is to be changed.Select [Rename].Changing the order of sections and copy & paste are possible by drag & drop with a mouse.ExampleEnter a given name.Addition of a sectionClick the right mouse button on [NewProgram1].Select [Insert Section].It is possible to go to each section (a ladder block) from a section list.Perform the same operation as the previous page to name the inserted section.Double-click a section that you want to check its ladder.As checking the global image (control flow) of a program on the section list, you can go to a specified section.4-3. Deletion and Display of Unnecessary WindowsNormal screenAlt 1Press from a keyboardTo delete Project Workspace,Press [Alt]+[1] to show Project Workspace again.Alt 2Press from a keyboard To delete Output Window,Press [Alt]+[2] to show Output Window again.[ESC] or5. Program Creation Coding of a simple program is explained here.After checking the cursor position at the upper left of Ladder Window, start programming.5-1. Entry of Normally Open ContactPress [C] from a keyboard to open the [New Contact] dialog.C0 of the upperdigit of an address can be omitted.ENTSwitch 1Enter a symbol comment.ENT0 of the upper digit of an address is omitted when shown.[.] (period) is displayed between a channel number and a relay number.Deletion of instructionsz Move the cursor to the instruction and then press the DEL key.z Move the cursor to the right cell of the instruction and press the BS key.Output Window automatically opens.5-2. Entry of CoilPress [O] from a keyboard to open the [New Coil] dialog.O100ENTCoil 0ENTPress [R] to normalize a rung.RUseful Function: Automatic check of duplicated coilsIf a duplicated coil is entered during program creation, the following message is displayed and you can notice that the coil is duplicated right away.Useful Function: Automatic check of duplicated coils If a duplicated coil is entered during program creation, the following message is displayed and you can notice that the coil is duplicated right away.Press the [ESC] key to closethe open Output Window.The place of a duplicated coil in the program is displayed.Double-click by using a mouse (or press F4). The cursor moves to the place of the applicable coil on Ladder Window.Double-clickDouble-click Rungs are also normalized when you move thecursor position to the cell inverted in blue by pressing the arrow keys from a keyboard or using a mouse.[Reference]1. Press [Alt]+[Y]. You can switch showing/hiding of Symbol Comment. Alt Y[Tools] -> [Options]3. Select [Tools] | [Options] from the CX-Programmer menu. You can set hiding of the comment entry dialog.Click the check box to remove the check mark.The comment entry dialog is not displayed anymore.2. Click the toolbar button [Show Program/Section Comments] to switch the display of the comments shown in the head row.Click5-3. Edit of Symbol CommentClickLadder Window isswitched to the Symbol Comment Editing window.Double-click the left mouse button on a bit number that you want to enter a symbol comment, and you will able to enter a symbol comment.Example of copying & pasting comments of two bitsDrag the mouse with theright mouse button pressed to invert the source bits of copy in blue.Click the right mouse button on the range, and select [Copy] from the popup menu.Click the right mouse buttonon the bit number of the copy destination, and select [Paste].The comments of the selected two bits are copied.Copy&Paste of symbolcomments is possible between Excel and CX-Programmer too.Copy&Paste of symbol comments is possible between Excel and CX-Programmer too.Copy&Paste and deletion of one or more comments are possible by the cell.Copy&Paste and deletion of one or more comments are possible by the cell.5-4. Entry of Rung Comment Move the cursor to thisposition. (The rung isinverted in blue.)ENT The entry screen shows up.[Process_at_Startup]Enter a rung comment.ENT5-5. Entry of Normally Closed Contact /1ENTSensor 1ENTPress “/”from a keyboard to show the [New Closed Contact] dialog.O101ENT Coil 1ENT R5-6. Entry of Attached CommentsThis function is very useful for keeping change histories at maintenance and notesof debug bits at startup.Move the cursor tothe contact to whichyou want to write anannotation.Alt ENTOr click the rightmouse button.-> [Properties]The entry screen shows up.Enter [Mar. 2002Added by Tanaka,Maintenance Dept.].ENT Press [Alt] + [A] to switch showing/hiding of attached comments.5-7. Entry of Differential Contact…UpC100ENTClickClick [Up].ENTThis entry method is available only forCS/CJ and CV series PLCs.For the other series PLCs, use DIFU (13).5-8. Entry of Differential Contact…DownC101ENTClickThis entry method is available only for CS/CJ and CV series PLCs.For the other series PLCs, use DIFD (14).Click [Down].5-9. Entry of Vertical…UpCtrl↑OrUO 200ENTCoil 2ENT R5-10. Entry of Vertical…DownC 200ENT ENTENTCoil 3O 300ENT←Ctrl↓OrV5-11. Entry of Advanced Instructions 1 -Entry of StringsIENT R Show the [New Instruction] dialog.++ d0 Products ENT Enter an instruction and its operand.Enter a comment.See the next page forthe contents ofinstructions.Click Click . The reference guide screen of theinstruction shows up.Instruction Help FunctionClick .The list of advanced instructionsper function shows up.Find Instruction FunctionPLCs supporting the applicableinstruction are listed.5-12. Entry of Advanced Instructions 1 -Useful FunctionsC ENT5-13. Entry of Auxiliary Relay -1.0 Second Clock Pulse Bit Show the [New Contact] dialog.ClickSelect [P_1s] from the pull-down menu.ENT5-14. Entry of Advanced Instructions 2-Entry of Differential InstructionsDifferential Instructions…Instructions executedin only one scan when running a program.IShow the [New Instruction] dialog.Attach @ (at mark) before instructions. It makes the instructions differential. Attach @ (at mark) before instructions. It makes the instructions differential. Enter a comment if necessary.ENTRRefer to the formerpages to executecoding.Enter@MOV #0D1005-15. Entry of OR RungENTW 3ENT Refer to the formerpages to executecoding.ENTENT W 4ENT ENTEntry ofcomments isomitted here.Refer to the section 5-6 to enter annotations.Refer to the section 5-6 to enter annotations.↑↑5-16. Entry of Advanced Instructions 3 -Entry by Fun No.Show the [New Instruction] dialog.Show the [New Instruction] dialog.I021ENTEnter#0 D0The instruction corresponding to the entered Fun No. is displayed.The instruction corresponding to the entered Fun No. is displayed.ENTRRefer to the section 5-4 to enter a rung comment.Note:The Fun No. of MOV depends on PLC types.CS-series -> 021CJ-series -> 021CV-series -> 030C-series -> 21Note:The Fun No. of MOV depends on PLC types.CS-series -> 021CJ-series -> 021CV-series -> 030C-series -> 215-17. Entry of Timer Instructions Refer to the formerpages to enterrungs andcomments.Refer to the formerpages to enter rungs and comments./ENTENTT0*T0: Indicates TIM0.Enter a comment.Timer 1Entry of a Timer bit Entry of a Timer instructionITIM 0 #30ENTRC05-18. Entry of Counter Instructions Refer to the formerpages to executecoding.Refer to the formerpages to execute coding.ICNT 0 #5ENTRMove the cursor byusing arrow keys or amouse.Enter a bit for reset.C ENTR 402O ENTEntry of a Counter instruction Entry of a Counter bitENTENT5-19. Edit of Rungs …Copy & Paste Refer to the former sections to enter a rung.Ctrl CMove the cursor to this position. The rung is inverted as shown right.Move the cursor to this position. The rung is inverted as shown right.(Copy a rung)You can copy instructions selected by dragging a mouse.You can also cut selected rungs (instructions) by [Ctrl]+[X].↓Press the ↓key to move the cursor to this position.Press the ↓key to move the cursor to this position.Ctrl V(Paste a copied rung)Click each instruction and then change the bit numbers.Click each instruction and then change the bit numbers. When making a mistake, press or [Ctrl+Z] for Undo(return to the previous operation)press or [Ctrl+Y] for Redo (go to the next operation)5-20. Entry of END InstructionAt the creation of a new project, a section of the END instruction only is automatically generated.You do not need to enter an END instruction.At the creation of a new project, a section of the END instruction only is automatically generated.You do not need to enter an END instruction.Note:The END section is not generated when you load a programcreated with CX-Programmer V2 or the former versions.Online to Transfer Online to Transfer Monitoring Monitoring Force On Force Off Force On Force Off Program Check Program Check Online EditOnline Edit 1. Program Error Check (Compile)Before program transfer, check errors.ClickErrors and addresses are displayed on Output Window.Errors and addresses are displayed on Output Window.Double-click a displayed error, and the cursor in Ladder Diagram will go to the corresponding error location and the error rung will be shown in red.Double-click a displayed error, and the cursor in Ladder Diagram will go to the corresponding error location and the error rung will be shown in red.Modify the error.Modify the error.z Output Window automatically opens at program check.z The cursor moves to an error location by pressing J or F4 key.z Output Window closes by pressing the ESC key.2. Going OnlineNormal online. Enables you to go online with a PLC of the device type and method specified when opening a project.Normal online. Enables you to go online with a PLC of the device type and method specified when opening a project.Auto online. Automatically recognizes the connected PLC and enables you to go online with a PLC with one button.-> Uploads all data such as programs from the PLC.Auto online. Automatically recognizes the connected PLC and enables you to go online with a PLC with one button. -> Uploads all data such as programs from the PLC.Online with Simulator. Enables you to go online with CX-Simulator with one button (You need to install CX-Simulator.)Online with Simulator. Enables you to go online with CX-Simulator with one button (You need to install CX-Simulator.)This time, online/debugfunctions when working online with CX-Simulator are explained in this guide (Install CX-Simulator separately).This time, online/debug functions when working online with CX-Simulator are explained in this guide (Install CX-Simulator separately).Click [OK].Click [OK].The background colorof Ladder Window changes to gray.The background color of Ladder Window changes to gray.Scan time is displayed(except for Program Mode).Scan time is displayed (except for Program Mode).The operating modeof the active PLC is shown.The operating mode of the active PLC is shown.Click The CX-SimulatorConsole box is shown.The CX-Simulator Console box is shown.CX-Programmer provides three kinds of connecting methods depending on usage.Program transfer starts.。
欧姆龙plc编程软件使用手册
???????????????????????????????????????????????????1-18
????????????????????????????????????????????????????1-19
CPU 单元型号
*1: 对于免费版CX-Programmer软件(限于微型PLCs)), 仅这些PLC型号有效。
*2: CX-Programmer 不支持SFC。
*3: 要连接SYSMAC板卡,指定圆括号内的PLC型号。仅选择这些PLC型号时,可以选”SYSMAC Board“作为网络类型。
???????????????????????????????????????1-23
?????????????????????????????????????????1-24
????????????????????????????????????1-25
???????????????????????????????????1-26
C200HX-Z
C200HG-Z
C200HE-Z
C200HS
CP1*1
CPM2* (*1)
CPM2*-S* (*1)
CPM1/CPM1A (*1)
CQM1H
CQM1
CV1000 (*2)
CV2000 (*2)
CV500 (*2)
CVM1
IDSC
硬盘空间
550M 字节或以上
显示
800X600 SVGA 或以上
小学下册F卷英语第4单元期末试卷

小学下册英语第4单元期末试卷英语试题一、综合题(本题有100小题,每小题1分,共100分.每小题不选、错误,均不给分)1.What is the longest river in the world?A. AmazonB. NileC. YangtzeD. Mississippi答案:B2.The _______ (鸟) builds its nest high in the trees.3.The bee is busy collecting ______.4.My mom is a _____ (teacher).5.My brother is playing ________.6.The dog chases the ______ (ball).7.What do we call a scientist who studies animals?A. BotanistB. GeologistC. ZoologistD. Biologist答案:C Zoologist8.________ (植物生态监测) provides critical data.9.My dad runs a ____ (store) in our neighborhood.10. A solution is a homogeneous mixture of a solute and a ______.11.What do we call the study of the distribution and movement of populations?A. DemographyB. SociologyC. AnthropologyD. Geography答案:A12. A ________ (有机农业) avoids chemicals.13.He is a _____ (厨师) who makes delicious food.14.What do you call a baby chicken?A. DucklingB. GoslingC. ChickD. Lamb答案:C15.The __________ (历史资料) are essential for research.16.My sister is my sweet _______ who always helps me.17.The _____ (药草) has many uses in cooking and medicine.18.Which of these is a traditional Asian dish?A. PizzaB. SushiC. HamburgerD. Tacos答案:B19.How many days are there in a week?A. FiveB. SixC. SevenD. Eight20.I want to learn more about ______ (植物) and how they grow. They are very______ (重要).21.My sister is a ______. She loves to organize events.22.The teacher is _____ (kind/mean) to us.23.What do we call the process of water turning into ice?A. MeltingB. FreezingC. EvaporatingD. Condensing24.The _____ (月亮) is full tonight.25.The _____ (相互关系) between plants and animals is vital.26.The ______ (小鲸鱼) breaches the water and splashes down. It is a spectacular______ (景象).27.What do you call a baby giraffe?A. CalfB. KidC. CubD. Pup28.Planting trees can have a positive impact on reducing ______ levels in urban areas. (种树可以对减少城市地区的噪音水平产生积极影响。
组态王与OMRON的连接
操作系统:Windows XP欧姆龙PLC型号:CP1H-X40DA-DPLC 通讯模块:RS232选件板(CP1W-CIF01)PLC编程软件:CX-Programmer 7.3组态王版本:6.53组态王驱动版本:60.3.30.30=========================================================== =================================================系统架构:PC(或工控机)串口(DB9)直连RS232选件板,中间无任何适配器,模块安装在槽位1,即串口1。
=========================================================== =================================================操作说明:组态王推荐通讯参数设置:注:蓝色字体内容摘自组态王《欧姆龙PLC驱动产品规格说明书》在保证硬件接线正确的前提下,对PLC程序和组态王设置如下:1.新建PLC程序选择相应的PLC设备类型,网络类型为SYSMAC WAY说明:SYSMAC WAY表示使用HostLink协议的RS232通讯,SW4或者SW5必须为Off若用USB下载线选择USB,如为ToolBus则自动搜索匹配,此时SW4或者SW5应为On2.HostLink协议设置在左侧栏“设置”中设置串口协议,可以使用默认的,模式为HostLink PLC设置完毕3.组态王中新建设备相应的驱动在CJ1的HostLink,如下图所示4.设置串口参数参数如下:9600,E,7,25.组态王中新建I/O变量,查看效果。
欧姆龙CX-Programmer快捷键
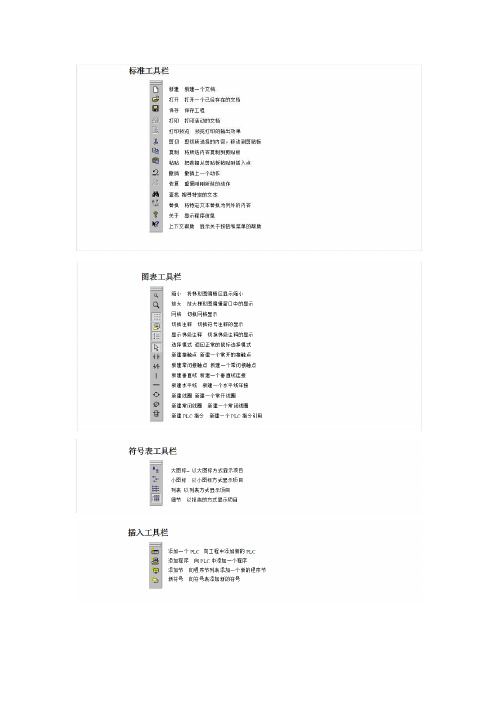
键盘快捷键下面的列表是缺省设置。
可以重新指定快捷键活为某一项功能增加快捷键。
开始在线编辑 Ctrl+E结束在线编辑 Ctrl+U关闭窗口 Ctrl+F4编译所有的PLC 程序 F7编译程序 Ctrl+F7上下文帮助 F1复制 Ctrl+C剪切 Ctrl+X调试模式 Ctrl+2删除Delete删除列Ctrl+Alt+Left 删除行Ctrl+Alt+Up 查找Ctrl+F跳转到输入Alt+Shift+I跳转到下一个地址引用Alt+Shift+N 跳转到输出Alt+Shift+O 返回到上一个跳转点Alt+Shift+P跳转到梯级/步Ctrl+G网格G插入常闭线圈Q插入常闭接触点/插入列 Ctrl+Alt+Right 插入水平线H插入水平线–插入指令I插入常开线圈O插入常开接触点 C插入常开接触点“插入行Ctrl+Alt+Down 在上方插入梯级Shift+R在下方插入梯级R插入向下垂直线V插入向下垂直线|插入向上垂直线U非 (NOT) /以十六进制监视Alt+Shift+H监视(PLC 执行模式) Ctrl+3监视(PLC级别切换) Ctrl+M右移光标Right下移光标Down左移光标Left上移光标Up新建工程Ctrl+N下一个停靠窗口Alt+O下一个域Tab下一个引用F4下一个窗口Ctrl+Tab打开交叉引用报表Alt+X打开梯形图程序Alt+D打开助记符视图Alt+M打开工程Ctrl+O剪贴Ctrl+V上一个停靠窗口Alt+Shift+O 上一个域Shift+Tab 打印Ctrl+P程序模式Ctrl+1属性Alt+Enter 替换Ctrl+H运行模式Ctrl+4保存工程Ctrl+S全部选择Ctrl+A选择梯级Ctrl+Enter 发送在线编辑改变Ctrl+Shift+E 以语句列表方式显示Ctrl+Alt+S 显示梯级注释Alt+A显示符号注释Alt+Y切换分割窗口Tab从PLC传送Ctrl+Shift+T 传送到PLC Ctrl+T显示地址引用窗口Alt+R显示全局符号表Alt+G显示本地符号表Alt+S显示输出窗口Alt+2显示工程工作区Alt+1显示属性Alt+Enter 显示监视窗口Alt+3在线工作Ctrl+W放大Alt+Right 缩小Alt+Left。
CXProgrammer编程软件介绍
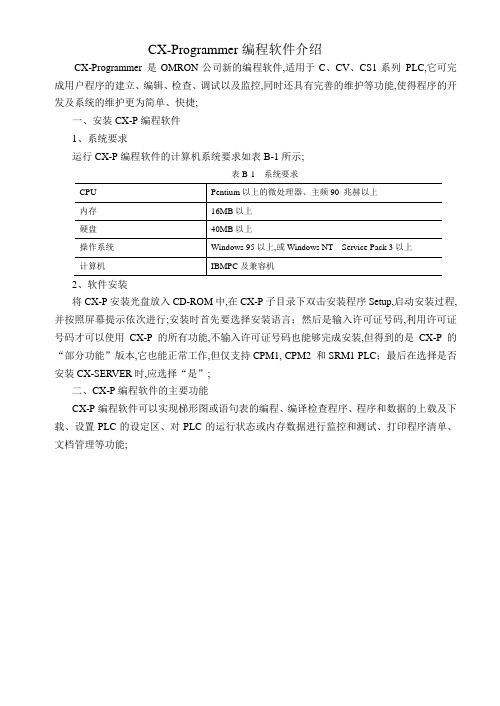
CX-Programmer编程软件介绍CX-Programmer 是OMRON公司新的编程软件,适用于C、CV、CS1系列PLC,它可完成用户程序的建立、编辑、检查、调试以及监控,同时还具有完善的维护等功能,使得程序的开发及系统的维护更为简单、快捷;一、安装CX-P编程软件1、系统要求运行CX-P编程软件的计算机系统要求如表B-1所示;表B-1 系统要求2、软件安装将CX-P安装光盘放入CD-ROM中,在CX-P子目录下双击安装程序Setup,启动安装过程,并按照屏幕提示依次进行;安装时首先要选择安装语言;然后是输入许可证号码,利用许可证号码才可以使用CX-P的所有功能,不输入许可证号码也能够完成安装,但得到的是CX-P的“部分功能”版本,它也能正常工作,但仅支持CPM1, CPM2 和SRM1 PLC;最后在选择是否安装CX-SERVER时,应选择“是”;二、CX-P编程软件的主要功能CX-P编程软件可以实现梯形图或语句表的编程、编译检查程序、程序和数据的上载及下载、设置PLC的设定区、对PLC的运行状态或内存数据进行监控和测试、打印程序清单、文档管理等功能;图B-1 CX-P编程软件界面CX-P编程软件界面的外观如图B-1所示;编程界面包括标题栏、菜单条、工具条、状态栏以及5个窗口可用“视图”菜单中的“窗口”项来选择显示窗口,下面将简单介绍各部分的功能;1、菜单条1文件菜单可完成如新建、打开、关闭、保存文件、文件的页面设置、打印预览和打印设置等操作;2编辑菜单提供编辑程序用的各种工具,如选择、剪切、复制、粘贴程序块或数据块的操作,以及查找、替换、插入、删除和微分等功能;3视图菜单可以设置编程软件的开发环境,如选择梯形图或助记符编程窗口,打开或关闭其他窗口如工程窗口、查看窗口、输出窗口等,显示全局符号表或本地符号表等;4插入菜单可实现在梯形图或助记符程序中插入行、列、指令或触点、线圈等功能;5PLC菜单用于实现与PLC联机时的一些操作,如设置PLC的在线或离线工作方式以及编程、调试、监视和运行4种工作模式;所有程序在线编译;上载或下载程序;查看PLC的信息等;6程序菜单实现梯形图和助记符程序的编译;7工具菜单用于设置PLC的型号和网络配置工具、创建快捷键、以及改变梯形图的显示内容;8窗口菜单用于设置窗口的排放方式;9帮助Help菜单项可以方便地检索各种帮助信息,而且在软件操作过程中,可随时按F1键来显示在线帮助;2、工具条工具条是将CX-P编程软件中最常用的操作以按钮形式显示,提供更加快捷的鼠标操作;可以用“视图”菜单中的“工具栏”选项来显示或隐藏各种按钮;3、工程窗口在工程窗口中,以分层树状结构显示与工程相关的PLC和程序的细节;一个工程可生成多个PLC,每个PLC包含全局符号表、设置、内存、程序等内容,而每个程序又包含本地符号表和程序段;工程窗口可以实现快速编辑符号、设定PLC、以及切换各个程序段的显示;4、图表工作窗口图表工作窗口用于编辑梯形图程序或语句表程序,并可显示全局变量或本地变量等内容;5、输出窗口输出窗口可显示程序编译的结果如有无错误、错误的内容和位置,以及程序传送结果等信息;6、查看窗口在查看窗口中,可以同时显示多个PLC中某个地址编号的继电器的内容,以及它们的在线工作情况;7、地址引用工具窗口地址引用工具窗口用来显示具有相同地址编号的继电器在PLC程序中的位置和使用情况;8、状态栏在编程时,状态栏将提供一些有用的信息,如即时帮助、PLC在线或者离线状态、PLC工作模式、连接的PLC和CPU类型、PLC连接时的循环时间及错误信息等;三、CX-P编程软件的使用用CX-P编程软件编制用户程序可按以下步骤进行:启动CX-P软件、建立新工程文件、绘制梯形图、编译程序、下载程序和监视程序运行等;1、启动CX-P编程软件在开始菜单中找到Omron/CX- Programmer/ CX- Programmer选项即可启动CX-P编程软件,CX- Programmer的启动画面如B-2所示;图B-2 CX-P编程软件启动界面2、建立新工程文件启动CX-P后,单击文件菜单中的“新建”命令,或者直接点击工具条上的“新建”按钮来创建一个新工程;此时,屏幕上出现如图B-3所示的对话框可进行PLC的设置;图B-3 “改变PLC”窗口1在“设备名称”栏中键入新建工程的名称2在“设备型号”栏中选择PLC的系列号,然后再点击其右边的“设置”按钮,设置PLC 型号、程序容量等内容;3在“网络类型”栏中选择PLC的网络类型,一般采用系统的默认值;4在“注释”栏中输入与此PLC有关的注释;在完成以上的设置后,单击“改变PLC”对话框下方的“确定”按钮,则显示如图B-4所示的CX-P编程软件的操作界面,该操作界面为新工程的离线编程状态;图B-4 新建文件后CX-P操作界面在如图B-5的工程窗口中,如果要操作某个项目,可以右击该项目图标,然后在出现的菜单中选择所需的命令;或者在选中该项目后单击菜单栏中的选项,选择相应的命令;还可以利用工具条中的快捷按钮;下面将介绍工程窗口中各个项目及其操作;图B-5 工程窗口1工程在“工程”项目中,可以进行重命名工程、创建新的PLC以及将PLC粘贴到工程中等操作;CX-P软件还提供了多台PLC的联控功能;2PLC 在“PLC”项目中,可实现对PLC修改、改变PLC操作模式、设置PLC为在线工作状态、自动分配符号、编译所有的PLC程序、上载或下载PLC程序等功能;3全局符号表和本地符号表PLC中,符号是地址和数据的标识符,在每个程序中都能使用的符号称为全局符号,而只能在某个程序中使用的符号称为本地符号;利用符号表可以编辑符号的名称、数据类型、地址和注释等内容;使用符号表后,一旦改变符号的地址,程序就会自动启用新地址,简化了编程操作;每个PLC下有一个全局符号表,而每一个程序下有一个本地符号表;每个符号名称在各自的表内必须是唯一的,但在全局符号表和本地符号表内允许出现相同的符号名称,本地符号优于全局符号;双击工程中PLC下的“符号表”图标,将显示如图B-6所示的全局符号表,表中会自动填入一些与PLC型号有关的预先定义好的符号,其中带前缀“P-”的符号不能被用户所修改;图B-6 全局符号表双击工程中任一程序下的“符号表”图标,将显示如图B-7所示的本地符号表;图B-7 本地符号表4设置双击工程中PLC下的“设置”图标,出现如图B-8所示的PLC设置对话框,可设置PLC的系统参数,一般应用只要采用默认值即可;设置完毕,可用该窗口的“选项”菜单中的命令将设置传送到PLC,当然也可从PLC中读出原有的设置内容;图B-8 “PLC设置”窗口5内存双击工程中PLC下的“内存”图标,出现如图B-9所示的PLC内存对话框,其左侧窗口列出了PLC的各继电器区,若双击“IR”图标,则右侧窗口将显示PLC的IR继电器区中各字的工作状态;该窗口可以对PLC的内存数据进行编辑、监视、上载和下载等操作;图B-9 “PLC内存”窗口单击PLC内存窗口中左下方的“地址”标签,会出现一个窗口,该窗口包含“监视”和“强制状态”两个命令,可实现在线状态下地址的监视和强制,以及扫描和处理地址强制状态信息等;6程序在“程序”项目中,可对程序进行打开、插入、编译、重命名等操作,若双击“程序”图标,还可显示程序中各段的名称、起始步、结束步、注释等信息;若一个工程中有多个“新程序”段,PLC将按设定的顺序扫描执行各段程序,当然也可通过“程序属性”中的命令来改变各“新程序”的执行顺序;7程序段一个新程序可以分成多个程序段,可分别对这些段进行编辑、定义和标识;当PLC处于在线状态时,工程窗口还会显示PLC的“错误日志”等图标;3、绘制梯形图下面以“电动机的定时控制”程序为例,简要说明使用CX-P软件编写梯形图的过程;电动机的定时控制要求电动机启动运行2分钟后自动停止;1先用鼠标选取工具条中的“常开触点”按钮,然后在如图B-4所示的梯形图编辑窗口中,单击第一条指令行的开始位置,将弹出如图B-10所示的新接点对话框,输入图中的各项内容后,按“确定”键;图B-10 “输入常开触点”窗口2图B-11显示第一个触点已经输入到第一行的起始位置;触点的上方是该常开触点的名称和地址,下方是注释;触点左侧的红色标记表示该触点所在的指令条存在逻辑错误或者不完整;图B-11 显示常开触点如果想改变触点的显示方式,可利用“工具”菜单中的“选项”命令来实现;图B-12 “选项”窗口梯形图信息3若要在第一个触点的右边串接一个常闭触点,可先用鼠标选取工具条中的“常闭触点”按钮,然后单击第一个触点的右边位置,在弹出的对话框中输入相应的内容,完成第二个触点的输入;4若要在第一行的最后输入一个线圈,可用鼠标选取工具条中的“新线圈”按钮,然后按照上述的方法完成线圈的输入;当光标离开线圈时,软件会自动将该线圈调整到紧靠右母线的位置,如图B-13所示;当线圈输入完毕后,第一个触点左侧的红色标记就会自动消失;图B-13 添加输出线圈如果要改变右母线在梯形图中的显示位置,可以通过“工具”菜单中的“选项”命令来实现;选项窗口如图B-14所示,只要改变图中“初始位置单元格”的数值即可;图B-14 “选项”窗口梯形图5若要在第一个触点的下方并联一个常开触点,可用鼠标选取工具条中的“新的纵线”按钮,再点击第一个触点的右边位置,添加一条纵线,此时软件会在第一个触点的下方自动插入空行,如图B-15所示;然后按照第一步的方法,在第一个触点的下方添加一个常开触点;图B-15 添加纵线6如果要在梯形图第二行的行首输入常开触点01000,可以用复制和粘贴命令来完成;输入定时器线圈时,可用鼠标单击工具条中的“指令盒”按钮,并点击第二行右边的空白处,将出现如图B-16的对话框,在该窗口中输入定时器指令和操作数后,按“确定”键,显示的内容如图B-17所示;图B-16 “输入定时器指令”窗口图B-17 显示定时器指令用鼠标双击上图中定时器“设置值”的左边,将出现如图B-18的对话框,在“操作数”栏的第二行输入定时器的定时常数“1200”后,按“确定”键完成定时器的输入;图B-18 “输入定时器设置值”窗口7如果要在输出线圈01000前插入一个定时器的常闭触点,可依照第三步的方法来完成;8输入程序结束指令“END”;用鼠标选取工具条中的“指令盒”按钮,并点击梯形图中第三行的起始处,在弹出窗口的“指令”栏中输入“END”,按“确定”键后,显示的内容如图B-19所示;至此,全部程序输入完毕;图B-19 添加END指令梯形图程序编辑完成后,可以通过双击工程窗口中“新程序”下的“符号”项,显示本地符号表,查看该程序段中各符号的使用情况;用“视图”菜单中的“助记符”命令来切换梯形图与助记符的显示窗口,显示助记符程序,如图B-20所示;图B-20 助记符程序4、程序的检查和编译可以通过“PLC”菜单中的“程序检查选项”命令来实现程序编辑过程的语法、数据等检查,当出现错误时,会在相应指令条的左母线前出现红色标记,并在输出窗口中显示错误信息;程序编辑完成后,单击工具条中的“编译程序”按钮,或者选择“程序”菜单中的“编译”命令进行程序的编译,检查程序的正确性,编译的结果将显示在输出窗口中;当“错误”的级别较高时,可能会导致程序无法运行,而“警告”的级别较低,程序仍然可以运行;5、下载程序程序编译完成后,要将程序传送到PLC中,可以按照以下3个步骤进行;1使用专用电缆连接PLC与计算机,并在离线的状态下进行PLC的接口设置;2选择“PLC”菜单中的“在线工作”命令,或点击工具条上的“在线工作”按钮,在出现的确认对话框中,选择“是”,建立起PLC与计算机的通信;此时CPU面板上的通信灯不断闪烁,梯形图编辑窗口的背景由白色变为灰色,表明系统已经正常进入在线状态;3开始下载程序;选择“PLC”菜单中的“传送”命令,在弹出的下拉菜单中点击“到PLC”,将出现下载选项对话框,在选项中选取“程序”,并确认,就可以实现程序的下载;也可点击工具条中的“传送到PLC”按钮来实现程序的下载;6、程序的调试及监控1程序监控首先选择“PLC”菜单中“操作模式”下的“运行”或“监视”命令,PLC 开始运行程序;然后选取“PLC”菜单中的“监视”命令,使程序进入监控状态,以上操作也可利用工具条中的快捷按钮实现;进入程序的监控状态后,梯形图窗口中被点亮的元件表示是导通的,否则为断开;通过“查看”窗口也能实现程序的运行监视;将要观察的地址添加到查看窗口中,利用元件值信息就可知道该元件的工作情况,如图B-21所示;图B-21 “查看”窗口2暂停程序监控暂停监视能够将程序的监视冻结在某一时刻,这一功能对程序的调试有很大帮助;触发暂停监视功能可以用手动触发或者触发器触发来实现,步骤如下;1在监视模式下,选择需要暂停监视的梯级;2单击工具条中“以触发器暂停”按钮,在出现的对话框中选择触发类型:手动或触发器;若选择触发器,则在“地址和姓名”栏中键入触发信号地址,并选择“条件”类型;当触发的条件满足时,“暂停监视”将出现在刚才所选择的区域;要恢复完全监视,可再单击“以触发器暂停”按钮;若选择手动,监视开始后,等屏幕中出现所需的内容时,单击工具条中“暂停”按钮,使暂停监视功能发生作用;要恢复完全监视,可再次单击“暂停”按钮;3强制操作强制操作是指对梯形图中的元件进行强制性地赋值,来模拟真实的控制过程,以验证程序的正确性;先选中要操作的元件,再点击“PLC”菜单中的“强制”命令,此时,进行强制操作的元件会出现强制标记;元件的强制操作可通过相同的方法解除;4在线编辑程序下载完成后,程序变成灰色,将无法进行直接修改,但可利用在线编辑功能来修改程序,提高编程效率;先选择要编辑的对象,再点击程序菜单中“在线编辑”命令,在弹出的子菜单中选择“开始”,此时,编辑对象所在的梯级的背景将由灰色变为白色,表示可以对其进行编辑;当编辑完成时,利用程序菜单的“在线编辑”中的“发送修改”命令将修改的内容传送到PLC;传送结束后,梯级的背景又会变成灰色,处于只读状态;。
CX-Programmer说明四(77-89)
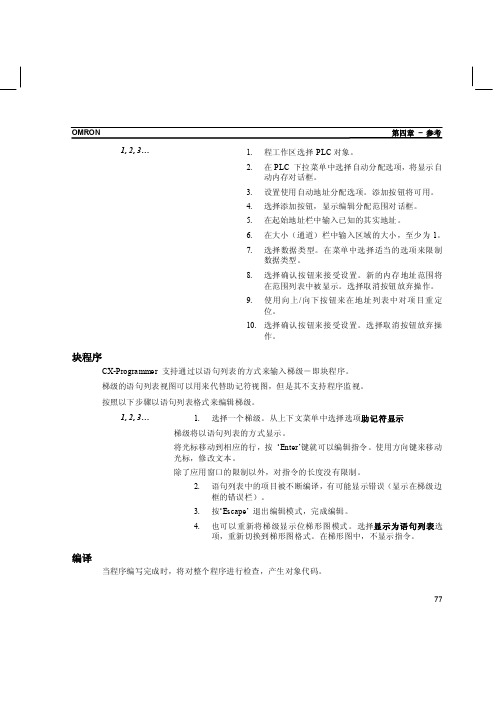
OMRON 第四章–参考1, 2, 3… 1.程工作区选择PLC对象。
2.在PLC 下拉菜单中选择自动分配选项,将显示自动内存对话框。
3.设置使用自动地址分配选项。
添加按钮将可用。
4.选择添加按钮,显示编辑分配范围对话框。
5.在起始地址栏中输入已知的其实地址。
6.在大小(通道)栏中输入区域的大小,至少为1。
7.选择数据类型。
在菜单中选择适当的选项来限制数据类型。
8.选择确认按钮来接受设置。
新的内存地址范围将在范围列表中被显示。
选择取消按钮放弃操作。
9.使用向上/向下按钮来在地址列表中对项目重定位。
10.选择确认按钮来接受设置。
选择取消按钮放弃操作。
块程序CX-Programmer 支持通过以语句列表的方式来输入梯级-即块程序。
梯级的语句列表视图可以用来代替助记符视图,但是其不支持程序监视。
按照以下步骤以语句列表格式来编辑梯级。
1, 2, 3… 1.选择一个梯级。
从上下文菜单中选择选项助记符显示梯级将以语句列表的方式显示。
将光标移动到相应的行,按‘Enter’键就可以编辑指令。
使用方向键来移动光标,修改文本。
除了应用窗口的限制以外,对指令的长度没有限制。
2.语句列表中的项目被不断编译,有可能显示错误(显示在梯级边框的错误栏)。
3.按‘Escape’ 退出编辑模式,完成编辑。
4.也可以重新将梯级显示位梯形图模式。
选择显示为语句列表选项,重新切换到梯形图格式。
在梯形图中,不显示指令。
编译当程序编写完成时,将对整个程序进行检查,产生对象代码。
77OMRON 第四章–参考78 在一个工程内可以包含多个程序,此外,CX-Programmer 允许同时编译多个程序。
也可选择某个程序,单独进行编译。
按照以下步骤来编译程序:1, 2, 3… 1.选择工程工作区中的PLC对象。
2.选择工具栏的编译PLC 程序按钮。
或者选择工具栏中的编译程序按钮来编译一个程序。
将显示一个编译状态的对话框。
结果显示在输出窗口的编译标签下面。
小学上册第15次英语第4单元真题
小学上册英语第4单元真题英语试题一、综合题(本题有100小题,每小题1分,共100分.每小题不选、错误,均不给分)1.I like to go ______ (滑冰) in winter.2.Which of these colors is a secondary color?A. BlueB. GreenC. RedD. Yellow3.The invention of the printing press changed the way information was ________.4.I like to play outside with my ______.5.The library has many _____ (books/chairs).6.There are tall __________ (建筑物) in the city.7.We have a ______ (快乐的) time during family vacations.8.The ______ (小鸭) quacks when it's hungry.9.I want to _______ (学习) about the solar system.10. A ______ (蝙蝠) is a nocturnal animal.11.The ______ helps with the balance of the body.12.I enjoy gardening. Growing plants and flowers brings me joy. I love watching them bloom and taking care of them by __________.13.The chemical formula for calcium phosphate is ______.14.The process of making new substances by combining others is called _____.15.The rabbit hops through the ______.16.The girl loves to ________.17.I like to play with my ______.18.My brother is my best _______ because we play together.19.The ________ is a magical creature in stories.20.What do you call the outer layer of the Earth?A. CrustB. MantleC. CoreD. LithosphereA21.The first man on the moon was __________ (尼尔·阿姆斯特朗) in 1969.22.The _____ (garden) is where I find peace.23.What is 6 x 7?A. 42B. 48C. 36D. 5424.What do you call a person who fixes computers?A. TechnicianB. EngineerC. ProgrammerD. DeveloperA25.The _____ (虎) is a powerful and beautiful animal.26.What do you call a cloud that brings rain?A. CumulusB. StratusC. NimbusD. CirrusC27.She is _____ (writing) a poem.28.My friend is a ______. She loves to paint.29.The _____ (丰收) of crops happens in the fall.30.What do we call the study of weather?A. MeteorologyB. BiologyC. ChemistryD. GeographyA31.The ________ (农业实践变化) reflects innovation.32. A buoyant force causes objects to ______ in a fluid.33.I see a _____ (出租车) on the street.34.What is the largest mammal in the world?A. ElephantB. Blue WhaleC. GiraffeD. Hippo35.What do you call the sound a cat makes?A. BarkB. MeowC. RoarD. Moo36.What do we call the lines on a map that run north to south?A. LatitudeB. LongitudeC. EquatorD. MeridianB37.The wind can make the ______ (树枝) sway.38.The chemical symbol for potassium is _______.39.This student, ______ (这个学生), studies hard every day.40.My friend is very __________ (包容的) towards others.41.What is the square root of 9?A. 2B. 3C. 4D. 5B42.Which season comes after winter?A. AutumnB. SpringC. SummerD. RainyB43.Chemical energy is stored in the _____ of molecules.44. A __________ (环境科学) addresses chemical impacts on ecosystems.45.The antelope is known for its incredible ______ (跳跃).46.Which instrument has keys and is played with fingers?A. GuitarB. PianoC. ViolinD. DrumsB47.What is the capital city of South Korea?A. SeoulB. BusanC. IncheonD. Gwangju48.What do we call a person who studies the effects of population growth?A. DemographerB. SociologistC. AnthropologistD. EconomistA49.The bee collects _______ (蜜蜂采集_______).50. A simple sugar is known as a _____ (monosaccharide).51.What do we call the time when we celebrate Christmas?A. SummerB. SpringC. WinterD. Autumn52.What is the name of the famous artist known for his paintings of water lilies?A. PicassoB. MonetC. Van GoghD. Renoir53.I love to ______ (分享) my toys.54.My dad, ______ (我爸爸), loves to tell jokes.55.What are the small rocky bodies that orbit the Sun called?A. AsteroidsB. CometsC. MeteorsD. Planets56.What do you call the person who studies stars?A. ScientistB. AstronomerC. BiologistD. GeologistB57.Which planet is closest to the sun?A. VenusB. EarthC. MercuryD. Mars58.My _____ (魔方) is colorful and hard to solve.59.My dad is a __________ (建筑师).60.I have a stuffed _______ that is as big as me.61.My brother is very ________.62.What do we call the primary source of energy for living organisms?A. FoodB. WaterC. AirD. SunlightA63.What do we call the story of someone's life?A. FictionB. BiographyC. NovelD. Poem64.The dolphin can jump out of the ______ (水).65.The stars are ___ (twinkling) at night.66.Who is the main character in "Harry Potter"?A. FrodoB. HarryC. PercyD. Luke67.In ________, the Titanic sank after hitting an iceberg.68.The movie was very ________.69. A __________ (催化剂) is not consumed in a reaction.70.I enjoy ______ (探索) the world around me.71.The _____ (狐狸) is a master of stealth.72.What is the capital of Morocco?A. CasablancaB. RabatC. MarrakechD. TangierB Rabat73.The butterfly is ___. (flying)74.The capital of Indonesia is __________.75.World War II ended in __________ (1945).76.The __________ (历史传说) often blend fact and fiction.77.What is the capital city of Germany?A. MunichB. FrankfurtC. BerlinD. HamburgC78.She _____ (reads/writes) a book.79. A lion is a type of ______.80.My friend is __________ (具有影响力).81.How many months are there in a year?A. TenB. TwelveC. ElevenD. Nine82.I enjoy watching ______ (电影) with my family on Friday nights.83.What do we call a baby cow?A. CalfB. FoalC. LambD. Kid84.Which animal is known as the king of the jungle?A. ElephantB. LionC. TigerD. BearB85.My favorite character is ______ (超级英雄).86.She likes to eat _____ (apples/television).87.In summer, I enjoy going to the ________ (海边). We build ________ (沙堡) and swim in the ________ (海水).88.The engineer, ______ (工程师), develops solutions to real-world problems.89.The ________ (学校) teaches us about the world.90.The __________ (原子) is the smallest unit of an element.91.What do you call a baby dog?A. KittenB. CubC. PupD. CalfC92.She enjoys ________ (mentoring) young people.93.Which bird is known for its colorful feathers?A. SparrowB. PeacockC. EagleD. PenguinB94. A thunderstorm can be very ______ (可怕).95. A chemical change can be detected by changes in ______.96.Rabbits are known for their strong ______ (后腿).97.What do you call the study of ancient civilizations?A. ArchaeologyB. HistoryC. AnthropologyD. All of the above98.The country of Italy is shaped like a ________ (靴子).99.The seahorse is unique in that the male carries the ______ (幼崽).100.My brother is a ______. He enjoys building with LEGO.。
欧姆龙ST语言
指数函数
EXPT (底数,指 数)
自变量数据类型 返回值数据类型
底数:REAL, LREAL REAL, LREAL
指数:INT, DINT, LINT, UINT, UDINT, ULINT
a: = EXP (b) (* 存储于变量 a 中的变量 b 自然指数 *)
a: = SIN (b) (* 存储于变量 a 中的变量 b 正弦 *)
a: = COS (b) (* 存储于变量 a 中的变量 b 余弦 *)
a: = TAN (b) (* 存储于变量 a 中的变量 b 正切 *)
a: = ASIN (b) (* 存储于变量 a 中的变量 b 反正弦 *)
• 在以下标识 (用于编辑的最小意义单位)之间不能使用空格、回车和制表符 。在这种情况下,它们 作为标识分隔符。
标识:保留字、变量名、特殊字符、常数 (数值)
保留字 (大写或小写: AND, CASE, DO, ELSE, FOR, IT, NOT, OF, OR, REPEAT, THEN, TO, UNTIL, WHILE, XOR, TRUE, FALSE, ELSIF, BY, EXIT, RETURN
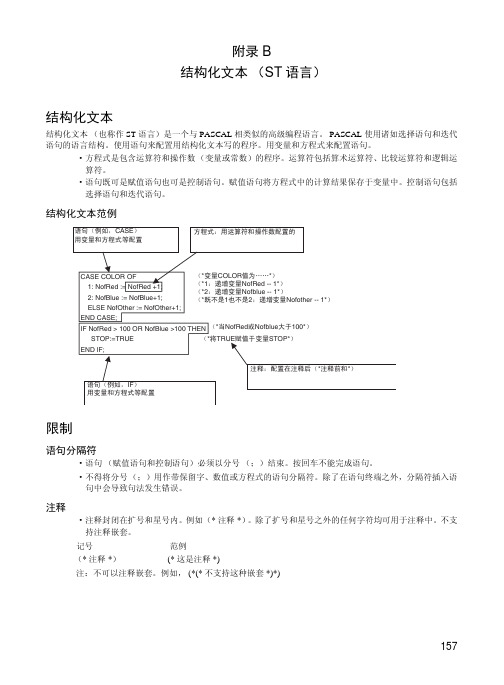
• 语句既可是赋值语句也可是控制语句。赋值语句将方程式中的计算结果保存于变量中。控制语句包括 选择语句和迭代语句。
结构化文本范例
䇁হ˄՟བˈCASE˅ ⫼ব䞣ᮍᓣㄝ䜡㕂
ᮍᓣ˖⫼䖤ㅫヺ᪡᭄䜡㕂ⱘ
CASE COLOR OF 1: NofRed := NofRed +1; 2: NofBlue := NofBlue+1; ELSE NofOther := NofOther+1;
附录 B 结构化文本 (ST 语言)
欧姆龙初学者必看
OMRON PLC常见使用问题1.CP1H的USB驱动怎么安装……………………………………………………2. CP1H的内置USB口能用于与例如触摸屏或是第三方软件通讯吗…………3. 电脑与CP1H的USB口用CX-programmer软件通讯,发现在线不上………4. CP1H-X/XA内置高速计数器的软件复位地址是什么………………………5. CS/CJ/CP1H时钟地址…………………………………………………………6. CP1H的PLC最多可以带多少CPM系列的模块……………………………7. CP1H的扩展模块最多能带7块,样本上写的在四台之内可以用连接电缆是什么意思……8. CP1H-XA40DR-A带CPM1A -40EDR+CPM1A-20EDR +CPM1A-8ER+CPM1A-AD041 + DA0412这样的配置可以吗………………………………………………………………………………9. CP1H配CPM1A-MAD02和CPM1A-20EDT的地址如何分配10. CP1H内置模拟量的规格11. CP1H-XA内置模拟量通道的地址是多少12. CP1H-XA内置模拟量输入的断线检测标志位的地址13. CP1H-XA型PLC内置模拟量输入输出使用注意事项14. 用CX-P的软件和CP1H在线连接上以后,外部输入的是0~10v信号,已经在内置AD/DA选择模拟量输入范围和使能了,并且已经把设置下传到plc中了,但是在对应的转换通道中没有看到转换值15. 使用CP1H的内置输入输入的是0~10V,外部的信号没有接,为什么断线报警位没有置ON16. 设置CP1H的内置模拟量的平均值处理功能的作用是什么17. CP1H的外部模拟量电位器的地址和输入的范围是什么18. CP1H-X40DT-D的外部模拟量输入调整功能的白线和黑线哪个是正,哪个是负19.CP1H带CPM1A模拟量模块,为什么在I/O表里找不到模拟量模块的设置20.CP1H-XA的后面加了CPM1A-AD041模块,现在要使用两路输入,已经设置了AD041 . 921.CP1H-X40CDR-A+CPM1A-DA041,DA041的模块设置了量程控制字已经写了,也在对应通道中设置了输出值,但是到端子上一路输出信号都没有22.CP1H配CJ系列的模拟量模块的地址分配23.CP1H的plc加CJ高功能的模拟量模块是否还要加配件24.CP1H使用PID指令没有输出25.CP1H的PID参数设置和以前CPM的区别26.CP1H的PID指令C+5里设置PV=SV输出操作量是0%或者50%的输出,这样是不是就是说,在PV=SV的时候,要么输出0%,要么输出50%27.CP1H的PID指令能在指令执行的时候修改P,I,D参数并生效吗28.CP1H能否和MPT002来建立通讯,还要配置什么硬件PLC设置要注意什么29.CP1H的RS-422/485适配器CP1W-CIF11的通讯距离是多少30.CP1W-CIF11与电脑RS-422接口连接的编程电缆怎么接线CP1W-CIF11背后开关如何拨31.CP1H用CP1W-CIF11的适配器,通过 RS-485方式连其他设备如OMRON 3G3MZ变频器的485口的接线,CP1W-CIF11背后的DIP开关怎么拨32.CP1H的端口1和端口2中的哪一个口可以做PClink通讯,有没有特殊规定 (14)33.做1:N的PClink通讯时,在主站的设置里面PC链接模式中有全部和主体两种模式,有什么区别34.CP1H的串口支持那几种的通讯协议35.CP1H用Modbus简易主站功能的通讯启动位地址是多少36.CP1H的Modbus-RTU简易主站,固定分配区域D32203-D32249的通讯数据指什么37.CS/CJ/CP1H系列的PLC想要使用其中的TIMX 的指令,为什么在输入指令TIMX后会出现红色38.CP1H的PLC出现809F的报错,硬件版本是的39.CP1H的PLC出现809F的报错,版本是的40.CP1L的时钟通道地址是多少41.CP1L的PLC最多可以扩展多少扩展模块42.CP1L能否带CJ1的特殊模块43.CP1L的输岀漏型和源型分别是怎么接线的44.CP1L与CP1H在串口协议上有什么区别45.CP1L/CP1H能否与CJ1M做PC LINK通讯46.CP1L/CP1H是否支持协议宏功能47.CP1L内置高速计数输入有几路有哪几种计数模式频率分别是多少48.CP1L高速计数器当前值地址是什么49.CP1L高速计数计数器复位的方式是什么软件复位位是什么50.NPN集电极开路输出的编码器怎么接到CP1L高速计数器输入端子51.CP1L-M40DR-A能不能做脉冲输出52.CP1L和CP1H的脉冲输出规格有什么区别53.CP1L的极限输入信号接哪个输入点54.CP1L发绝对脉冲是否必须建立原点55.如何知道原点是否已经建立56.原点搜索的设置中“保持”和“未定义”有什么区别57.原点搜索的设置中“限制输入信号操作”的“只查找”和“始终”有什么区别58.脉冲输出的当前值在哪个通道查看如何复位脉冲输出当前值59.执行ORG指令后,PLC报009B的错误60.CP1L输出连续脉冲速度控制和独立脉冲定位控制分别需要用什么指令停止脉冲输出用什么指令61.PLS2指令中设置的加减速比率单位是什么与实际的加减速时间有何关系62.CP1L使用独立模式输出脉冲,用PULS+SPED指令,指令执行以后伺服电机没有动63.CP1L-M40DR-A扩展CPM1A-40EDR和CPM1A-MAD02,其地址如何分配64. CP1E是否支持仿真65. CP1E的加密操作66. CP1E使用的软件版本67. CP1E支持功能块68. CP1E支持多任务编程吗69. CP1E支持扩展CJ1的特殊模块吗如果CJ1W-AD041的输入和输出地址是多少71 .CP1E-N的串口通信支持哪些协议1.CP1H的USB驱动怎么安装计算机通过USB电缆连接CP1H通电,PC会自动提示找到新硬件,并提示要求安装驱动程序,客户通过浏览,指定USB驱动所在文件夹即可;2.CP1H的内置USB口能用于与例如触摸屏或是第三方软件通讯吗不可以,CP1H的内置USB口只能用于与安装有OMRON软件如CX-programmer的上位机通讯;3.电脑与CP1H的USB口用CX-programmer软件通讯,发现在线不上①CP1H的USB口与电脑通过USB电缆线连接,且CP1H需要上电;②系统会提示发现新硬件,询问是否需要安装驱动,点击确定;③通过浏览,选择到CP1H的USB驱动所在文件夹,点击确定;④安装成功后系统会提示“现在可以正常设备”,如在步骤2中指定了错误文件夹或是驱动文件,系统会提示找不到驱动文件或是驱动文件不匹配,这时需要CP1H断电上电,重新安装;注:如使用网站中下载的驱动文件,需要先将驱动文件解压缩后再安装;4.CP1H-X/XA内置高速计数器的软件复位地址是什么高速计数0:软件复位位高速计数1:软件复位位高速计数2:软件复位位高速计数3:软件复位位5.CS/CJ/CP1H时钟地址注:通过CX-P编程软件,与PLC在线通讯上后,左边工作区中会出现”PLC时钟”用户可以设置时钟或是选择与计算机时钟同步,或者通过DATE指令设定PLC的时钟;6.CP1H的PLC最多可以带多少CPM系列的模块最多可以带7块CPM的模块,其中归类为组B的模块,一块算两块,组A组B分类7.CP1H的扩展模块最多能带7块,样本上写的在四台之内可以用连接电缆是什么意思延长电缆CP1W-CN811长度为80Cm,当只使用CPM系列扩展模块时,若需要将模块延长安装,可以使用这跟延长电缆,但是它只能连接在第1到第4台之前,若不需延长可以不使用这根电缆,模块可以紧凑的连接在一起;当同时使用CJ以及CPM系列扩展模块时,则必须加这根延长电缆,用来连接CJ和CPM的模块;这根延长电缆仅限使用一次;如图,以全为组A模块为例:8.CP1H-XA40DR-A带CPM1A -40EDR+CPM1A-20EDR +CPM1A-8ER+CPM1A-AD041 + DA0412这样的配置可以吗不可以,超过了配置的范围了;CP1H配置CPM1A的扩展模块要求如下:7≧组A+组B2 因此可以这样配置CJ1W-AD041-V1+CP1W-EXT01加上CPM1A-40EDR2+CPM1A-DA0412或者直接选择CJ1M的机型来做这个配置;9.CP1H配CPM1A-MAD02和CPM1A-20EDT的地址如何分配40点的CP1H的CPU本体的输入通道从00开始,占了00和01通道,输出从100开始,占了100和101通道,扩展模块的输入从02开始依次排下去,输出从102开始依次排下去;所以该地址分配如下:CP1H-XA40DR-A+ CPM1A-MAD02+CPM1A-20EDT 输入 00 02 04 03输出 100 102 101 103设置字 10410.CP1H内置模拟量的规格11.CP1H-XA内置模拟量通道的地址是多少模拟量输入1:CIO200通道模拟量输入2:CIO201通道模拟量输入3:CIO202通道模拟量输入4:CIO203通道模拟量输出1:CIO210通道模拟量输出2:CIO211通道12.CP1H-XA内置模拟量输入的断线检测标志位的地址~13.CP1H-XA型PLC内置模拟量输入输出使用注意事项①CP1H的内置模拟量通过CX-P编程软件,CX-Programmer左边工程框中的“设置”—“内建AD/DA”,选择“使用”,以及相应输入/输出范围,最后下载到PLC;注:设置下载到PLC后需要断电上电生效;②内置模拟量输入的电流电压选择,需要通过CPU上的开关选择;开关在模拟量接线端子排右上角,内部有4个开关对应4路输入,当开关设置为on,代表是电流输入;当开关设置为off,代表是电压输入;见下图:14.用CX-P的软件和CP1H在线连接上以后,外部输入的是0~10v信号,已经在内置AD/DA选择模拟量输入范围和使能了,并且已经把设置下传到plc中了,但是在对应的转换通道中没有看到转换值在线连接上以后,下传完设置以后,要把plc断电上电,设置的参数才会生效;15.使用CP1H的内置输入输入的是0~10V,外部的信号没有接,为什么断线报警位没有置ON因为只有在模拟量输入1~5V或4~20mA的时候,才有断线检测功能;在0~10V模拟量输入的时候没有断线检测功能,所以的断线检测标志位是OFF的;16.设置CP1H的内置模拟量的平均值处理功能的作用是什么使用该功能可以把采集到的最近的8次输入转换值作平均值处理后再给到输入通道显示;在输入信号发生微动变化的情况下,该功能可以起到稳定数据的作用;不过使用该功能也会引起输入的响应性变差;17.CP1H的外部模拟量电位器的地址和输入的范围是什么CP1H的外部模拟量电位器的地址:AR643,数据范围00-FF HEX; 输入的范围是0~10v;18. CP1H-X40DT-D的外部模拟量输入调整功能的白线和黑线哪个是正,哪个是负白色线是正极,黑色线是负极,即外部模拟输入的左边端子是负极,右边是正极;19.CP1H带CPM1A模拟量模块,为什么在I/O表里找不到模拟量模块的设置CP1H的IO表是针对CJ系列高功能模块的,CPM系列扩展模块不能在IO表里设置,必须通过程序把设置字传送到特定通道里面进行设置;20.CP1H-XA的后面加了CPM1A-AD041模块,现在要使用两路输入,已经设置了AD041的第一路和第二路输入控制字,但是在对应通道没有读到转换值即使第3、4路不使用的情况下,也需要设置后两路输入的控制字,否则AD041无法正常采集第1、2路的输入转换值, 具体的设置地址在输出通道n+1 n+2中“n” 为分配给CPU 单元或前一个扩展单元的最后一个输出通道;;N+1根据具体使用情况,0-3位和4-5位按照下图表设定每个位的状态;后两路不用的话,N+2就要设置成8000 HEX;注: 确认正确连接端子.“n” 为分配给CPU单元或前一个扩展单元或扩展I/O单元的最后一个输出通道;21.CP1H-X40CDR-A+CPM1A-DA041,DA041的模块设置了量程控制字已经写了,也在对应通道中设置了输出值,但是到端子上一路输出信号都没有①首先要确保参数设置N+1,和N+2 “n” 为分配给CPU单元或前一个扩展单元的最后一个输出通道,在此例中N为101都要如下图所示,例如4路都用-10到10V的输出,那就在N+1102和N+2103通道都设置8088;②然后主要是因为输出通道和设定通道冲突,如果在上电的时候既对输出102通道和103通道设置输出控制字,又对这两个通道赋了输出值,此时模块就不能正常初始化的;所以要用第一次循环标志对102,103通道设置输出控制字,然后用TIM指令做一个1S左右的延时,经过这段延时模块初始化完成后才能对输出通道赋输出值;22.CP1H配CJ系列的模拟量模块的地址分配CJ系列模拟量模块的地址是根据模块上的单元号来分配,分配原则如下:CIO: 2000+10单元号~2000+10单元号+9DM: 20000+100单元号~20000+100单元号+9923.CP1H的plc加CJ高功能的模拟量模块是否还要加配件需要另外加适配器单元 CP1W-EXT01,以及CJ1W-TER01的端板,在购买CP1W-EXT01时CJ1W-TER01端板附带;24.CP1H使用PID指令没有输出主要是检查以下几点:①程序是否下载,并且PID这条指令有没有执行,还有就是程序中其他地方是否有对PID的输出通道赋值;②参数的设置是否符合参数范围:编程手册上的列出的各参数能设置的范围和位要按照这个设置就可以了,主要要检查的是积分参数,因为很多客户认为该参数不用的话就设为0,实际是不可以的,如果不用,就设置270F HEX;然后是C+6的4到7位,如果是CPM或CQM1H的PID指令,这里要设置为0的,而CP1H只能设置为1或9,设置为0就出错了;③参数设置是否合理:首先是正向和反向;反向是PV小于SV时输出,正向是PV大于SV时输出,如果没有符合输出方向,也会引起不输出;然后是输入范围的设置,如果PV和SV给的数据都大于设置的输入范围,指令就认为所使用的PV和SV就是输入范围的最大值,此时也就是说PV=SV了,所以即使PV和SV给的数据是符合方向范围,也会不输出;④相关程序的影响:首先是对于控制字C+9到C+38这些通道是要空出留做系统运算数用的,如果在程序中其他地方对这些通道有操作,会引起不输出;然后是PID指令的执行条件,一定要是一个ON的信号,而不是一个上升沿信号;另外,PID指令开始执行一定要是在PID的控制字都设置好以后;因为PID指令是在条件为ON的时候初始化参数的,此时如果参数没有设置好,之后再给参数也是没有用的;⑤最后是比较常见的,就是PID指令不能用CX-SIMULATOR模拟仿真;25.CP1H的PID参数设置和以前CPM的区别①C+1开始设置参数格式不同,老机型用BCD码,新机型16进制; ②CP1H多出设置PV=SV时的输出值,实时修改PID参数,时间单位,输出限位的功能;26.CP1H的PID指令C+5里设置PV=SV输出操作量是0%或者50%的输出,这样是不是就是说,在PV=SV的时候,要么输出0%,要么输出50%这个设置仅限只用比例控制时有效;如果加入I,D作用该设置是无效的,PV=SV的时候的输出是由之前的过程来决定的;27.CP1H的PID指令能在指令执行的时候修改P,I,D参数并生效吗可以,C+5参数的01位设置为ON就可以在每个采样周期的时候把PID常数的设置反应到PID的运算中去;28.CP1H能否和MPT002来建立通讯,还要配置什么硬件PLC设置要注意什么① 可以,用HOSTLINK协议进行通信;用232方式连接,还要配置CP1W-CIF01232口适配器和连接电缆XW2Z-200T;②CP1H的设置,要注意把PLC设定为上监视模式;29.CP1H的RS-422/485适配器CP1W-CIF11的通讯距离是多少①最大通信距离50米;②客户要较长的通讯距离,可以先配置CP1W-CIF01的232口,再用232转422或485的适配器,比如NS-AL002、NT-AL001,距离就可以达到500米;30.CP1W-CIF11与电脑RS-422接口连接的编程电缆怎么接线CP1W-CIF11背后开关如何拨接线如下:CP1W-CIF11 PC计算机SDA-----------------------R-SDB-----------------------R+RDA-----------------------S-RDB-----------------------S+CP1W-CIF11背后开关设置如下:DIP1-当该台PLC在串口网络的终端时设置为ON,否则设置为OFFDIP2,3,4-设置为OFFDIP5,6-设置为ON通过CP1W-CIF11进行1:N的PClink通讯,使用485方式时,如何接线CP1W-CIF 后面的DIP开关如何设置接线如下:CP1W-CIF11 CP1W-CIF11SDA-----------------------RDASDB-----------------------RDB或者RDA-----------------------RDARDB-----------------------RDB或者SDA-----------------------SDASDB-----------------------SDBCP1W-CIF11背后开关设置如下:DIP1-当该台PLC在串口网络的终端时设置为ON,否则设置为OFF;DIP4-设置为OFFDIP2,3,5,6-设置为ON31.CP1H用CP1W-CIF11的适配器,通过 RS-485方式连其他设备如OMRON 3G3MZ变频器的485口的接线,CP1W-CIF11背后的DIP开关怎么拨接线如下:CP1W-CIF11 modbus-RTU从站设备SDA-----------------------负SDB-----------------------正或者RDA-----------------------负RDB-----------------------正CP1W-CIF11背后开关设置如下:DIP1-当该台PLC在串口网络的终端时设置为ON,否则设置为OFF;DIP4-设置为OFFDIP2,3,5,6-设置为ON32.CP1H的端口1和端口2中的哪一个口可以做PClink通讯,有没有特殊规定可以使用串行端口1或串行端口2中的任何一个,但不能同时使用,因为CP1H的PClink链接区只有一个;33.做1:N的PClink通讯时,在主站的设置里面PC链接模式中有全部和主体两种模式,有什么区别全部链接模式:主站和从站,从站和从站之间都是可以进行数据交换的; 主体链接模式:主站与从站之间进行数据交换,但是从站之间不能够进行数据的交换的;34.CP1H的串口支持那几种的通讯协议①USB口只能够和电脑的CX-Programmer或CX-PROTOCOL欧姆龙软件通讯,内部的协议是不公开的;②CPIW-CIF01支持Hostlink,Toolbus,1:N PC Link,1:N NT Link,无协议,串口网关Modbus-RTU从站,CompoWay/F;③CP1W-CIF11支持Hostlink,Toolbus,1:N PC Link,1:N NT Link,无协议,串口网关Modbus-RTU从站,CompoWay/F;35.CP1H用Modbus简易主站功能的通讯启动位地址是多少串口1是,串口2是;36.CP1H的Modbus-RTU简易主站,固定分配区域D32203-D32249的通讯数据指什么D32203-D32249的通讯数据是指发送内容,内容是按照从站的协议格式来写的;例如,CP1H和OMRON变频器3G3MV通讯,用modbus-RTU简易主站功能设置变频器频率为50HZ正转;此时D32203-D32207中的数据依次写为:0001、0002、0400、0101、F400;各通道设置及含义如下:37.CS/CJ/CP1H系列的PLC想要使用其中的TIMX 的指令,为什么在输入指令TIMX后会出现红色在CX-P软件的工作区中,点击新PLC-右键-属性,在以二进制方式执行定时器/计数器显中打勾就可以了; 此外除了TIMX指令,TIMHX ,TIMHHX, TIMLX,CNTX, CNTRX的指令都需要这样设置一下才可以使用;具体操作如下:注:如果选择了“以二进制形式执行定时器/计数器”后,BCD进制形式的定时器和计数器指令即无效;38.CP1H的PLC出现809F的报错,硬件版本是的出现循环超时,错误代码809F,如果客户使用NT Link或者PC Link,同时扫描周期在10ms以下,有可能会出现809F,这是硬件故障,替换版本可以解决;39.CP1H的PLC出现809F的报错,版本是的如果客户的PLC硬件版本是以后的,要从使用方面找原因,如PLC设置和程序中的问题;例如:发现中断任务中的JMP的操作数不对,导致中断任务执行跳不出来,造成时间过长,出现809F的报错,改变后正常;CP1L40.CP1L的时钟通道地址是多少41.CP1L的PLC最多可以扩展多少扩展模块CP1L-M30/40系列的最多可连接3台CP1W扩展单元或者CPM1A扩展单元,CP1L-L14/20系列的可连接1台CP1W扩展单元或者CPM1A扩展单元,具体模块型号可以参考CP1H扩展CPM/CP1W模块;42.CP1L能否带CJ1的特殊模块不可以,CP1L只能扩展CP1W和CPM1A的模块;43.CP1L的输岀漏型和源型分别是怎么接线的漏型COM点接线如下图:源型COM点接线如下图:44.CP1L与CP1H在串口协议上有什么区别CP1L在CP1H原有支持的串口协议基础上增加了1:1 PC LINK及1:1 NT LINK;使用1:1 PC LINK时,可以与CPM,CQM1H以及C200Ha系列用1:1 PC LINK通信协议做数据交换;45.CP1L/CP1H能否与CJ1M做PC LINK通讯可以的,CP1L/CP1H和CJ1M都是支持1:N PC LINK通讯协议;注:1:N PC LINK和1:1 PC LINK是两种不同的协议,不能相互通讯46.CP1L/CP1H是否支持协议宏功能CP1L/CP1H系列本体的串口不支持协议宏功能;对于CP1H,可以加CJ1W-SCU21/31/41-V1的模块需另外加装扩展适配器CP1W-EXT01;47.CP1L内置高速计数输入有几路有哪几种计数模式频率分别是多少CP1L内置高速计数输入100KHz单相的为四路,50KHz双相的为两路,有四种计数模式:①相位差输入4倍频:50KHz②脉冲+方向输入:100KHz③加减法脉冲输入:100KHz④加法脉冲输入:100KHz另外作为数值范围模式,可选择线性模式和环形模式;作为计数器值的复位方式,可选择Z相信号+软复位软复位Z相信号+软复位比较继续软复位比较继续;48.CP1L高速计数器当前值地址是什么高速计数器0:A271CH高位/A270CH低位;高速计数器1:A273CH高位/A272CH低位;高速计数器2:A317CH高位/A316CH低位;高速计数器3:A319CH高位/A318CH低位;49.CP1L高速计数计数器复位的方式是什么软件复位位是什么①Z相信号+软复位:复位标志位为ON时,通过Z相输入置ON进行复位,复位后停止比较表;②软复位:通过复位标志位置ON,进行复位;复位后停止比较表;③Z相信号+软复位重启比较:复位标志位为ON时,通过Z相输入置ON进行复位;复位后重新启动比较表继续进行比较;④软复位重启比较:通过复位标志置ON,进行复位;复位后重新启动比较表继续进行比较;CP1L四路高速计数输入的软件复位位是;50.NPN集电极开路输出的编码器怎么接到CP1L高速计数器输入端子见下图51.CP1L-M40DR-A能不能做脉冲输出不能;CP1L-M40DR-A中的“R”表示继电器输出型,虽然该机型可以执行脉冲输岀指令,但由于继电器输出型的开关频率低,并且受到继电器机械和电气寿命等因素的影响,不能用来作为脉冲输出功能使用;带有“T”或者“T1”的CP1L晶体管输出型如CP1L-M40DT-D才能够使用脉冲输出功能;52.CP1L和CP1H的脉冲输出规格有什么区别53.CP1L的极限输入信号接哪个输入点CP1L的极限信号输入是通过软件极限位实现的;脉冲输出0:CW极限;CCW极限;脉冲输出1:CW极限;CCW极限;外部输入的极限信号可以任意接PLC的普通输入点,通过程序触发接通设置极限为NO 时或使断开设置极限为NC时, 即PLC接收到极限输入信号;54.CP1L发绝对脉冲是否必须建立原点是的,发绝对脉冲必须要有一个原点作为参考点;一般使用ORG指令,通过外部输入信号来建立原点;如果不使用外部信号来建立原点,可以使用INI指令通过变更脉冲输出当前值为0来建立原点;55.如何知道原点是否已经建立可以查看无原点标志位;脉冲输出0:,脉冲输出1:;无原点标志位为ON则表示原点未确立,为OFF则表示原点已确立;56.原点搜索的设置中“保持”和“未定义”有什么区别保持:当使用SPED,ACC,PLS2指令执行脉冲输出时,如果碰到极限信号,则脉冲输出当前值以及无原点标志位的状态将保持不变;未定义:当使用SPED,ACC,PLS2指令执行脉冲输出时,如果碰到极限信号,则脉冲输出当前值以及无原点标志位的状态将复位;57.原点搜索的设置中“限制输入信号操作”的“只查找”和“始终”有什么区别只查找:极限信号只有在原点搜索时才起作用;始终:极限信号不仅在原点搜索时起作用,在用SPED,ACC,PLS2等指令输出脉冲时极限信号也起作用;58.脉冲输出的当前值在哪个通道查看如何复位脉冲输出当前值脉冲输出0:当前值 A276 A277通道;脉冲输出1:当前值 A278 A279通道;脉冲输出0的复位位:; 脉冲输出1的复位位:;59.执行ORG指令后,PLC报009B的错误如果执行ORG指令后立即报009B错误009B是系统设定异常错误,需要检查原点设置中的参数是否正确;具体可查看A444脉冲输出0或A445脉冲输出1通道中的错误代码;一般容易出现该错误的可能有:①原点搜索高速度小于等于原点搜索附近速度,原点搜索附近速度小于等于原点初始速度;②原点搜索的加减速率没有设置;③原点参数设置完成后没有下传设置到PLC;④PLC设置下传后没有将PLC断电再上电使设置生效;60.CP1L输出连续脉冲速度控制和独立脉冲定位控制分别需要用什么指令停止脉冲输出用什么指令连续脉冲:SPED无加减速或ACC带加减速;独立脉冲:① PULS指定输出脉冲量+ SPED指定脉冲输出频率, 无加减速; ② PULS 指定输出脉冲量+ACC指定脉冲输出频率, 带加减速;③ PLS2既能指定脉冲输出频率也能指定脉冲输出量相当于PULS+ACC; 停止脉冲:可以用INI或者SPED 设置目标频率为0;61.PLS2指令中设置的加减速比率单位是什么与实际的加减速时间有何关系加减速是以1Hz为单位每4ms的频率的改变量,假设加速比率设置为十进制10,则表示脉冲输出频率每4ms增加10Hz62.CP1L使用独立模式输出脉冲,用PULS+SPED指令,指令执行以后伺服电机没有动首先要确认实际对应的脉冲输出点的灯是否亮,如果不亮则说明脉冲没有输出,请按以下步骤检查:①确认程序是否下传,PLC是否处在运行或者监控模式;②PULS指令需要写在SPED指令前面,如下图:③如果脉冲数设置的很小而目标频率设置很高,指令执行以后脉冲输出指示灯闪一下就灭了;此时建议查看脉冲输出0完成标志位来判断脉冲是否输出已经完成;④查看位的状态,如果为ON则表示脉冲输出停止异常,此时可以查看A444通道中的异常代码;如果脉冲输出灯亮了电机却不动则要检查和伺服间接线是否有问题,并观察伺服驱动器是否有错误报警;63.CP1L-M40DR-A扩展CPM1A-40EDR和CPM1A-MAD02,其地址如何分配40点的CP1L的CPU本体的输入为24点,占了00,01CH,输出为16点,占了100,101CH,扩展模块的输入就从02CH开始,输出从103CH开始依次排下去;所以该地址分配如下:CP1L-M40DR-A+CPM1A-40EDR+CPM1A-MAD02输入 00/01 02/03 04/05输出 100/101 102/103 104/105设置字64. CP1E是否支持仿真支持,但需要安装以上版本后才可以仿真;65. CP1E的加密操作在CX-P软件左侧工作区中,鼠标右键点击”新PLC”,选择”属性”中的“保护”,在UM读取保护密码中输入8位密码,然后将程序下载到PLC,最后在软件顶端的菜单PLC中选择”保护”中的“设置密码”;释放密码方法:CX-P软件与PLC在线通讯上后,在”PLC”下拉菜单选择”保护”中的“释放密码”,输入密码确认即可;66. CP1E使用的软件版本CP1E系列编程软件为CXP 及以上版本,单机安装版本CX Programmer欧姆龙工业自动化网站暂不提供免费下载,如有需要请与当地办事处联系;67. CP1E支持功能块不支持;68. CP1E支持多任务编程吗CP1E支持单任务编程,但支持最多16个中断任务;69. CP1E支持扩展CJ1的特殊模块吗如果CJ1W-AD041CP1E不支持扩展CJ1的特殊模块;的输入和输出地址是多少输入地址从CIO 000 开始,输出地址从CIO 100 开始;for CP1E71 .CP1E-N的串口通信支持哪些协议。
程序员岗位职责描述(共7篇)
篇一:程序员岗位职责程序员岗位职责程序员(英文programmer)是从事程序开发、维护的专业人员。
1:团队精神和协作能力团队精神和协作能力是作为一个程序员应具备的最基本的素质。
软件工程已经提了将近三十年了,当今的软件开发已经不是编程了,而是工程。
独行侠可以写一些程序也能赚钱发财,但是进入研发团队,从事商业化和产品化的开发任务,就必须具备这种素质。
2:文档习惯件作坊。
作为代码程序员,必须将30%的工作时间写用于技术文档。
知名软件公司的代码的变量命名、注释格式,甚至嵌套中行缩进的长度和函数间的空行数字都有明确规定,良好的编写习惯,不但有助于代码的移植和纠错,也有助于不同技术人员之间的协作。
4:需求理解能力程序员要能正确理解任务单中描述的需求。
5:模块化思维能力利用,减少重复的劳动,也能是系统结构越趋合理。
6:测试习惯测试是软件工程质量保证的重要环节,但是测试不仅仅是测试工程师的工作,而是每个程序员的一种基本职责。
7:学习和总结的能力程序员是很容易被淘汰的职业,所以要善于学习总结。
己。
作为高级程序员,乃至于设计师而言,除了应该具备上述全部素质之外,还需要具备以下素质:1、需求分析能力2、整体框架能力3、流程处理能力4、模块分解能力5、整体项目评估能力6、团队组织管理能力1,激情我曾经遇到许多“职业程序员”,他们从事it是因为觉得这是一种职业,他们只在工作时间编程,除非送去培训否则他们不会学习新东西,这不是好的程序员。
我认为一个好的程序员总是对编程充满激情,而且好的开发者会做一些编程工作即使这没有报酬。
2,自学好学编程领域始终发展变化着,不出一年有些新技术就变成了老技术,这并不是说好的程序员要对所有新技术跟进,但有些却对学习任何新技术都没有兴趣。
他们通常在学校学习了编程,然后工作后单位安排学什么就学什么。
如果在招聘中你听到“让我培训一个星期我就会胜任这个工作”那不要雇佣他。
3,聪明聪明包括很多因素,情绪和社会交际只是其中之一。
- 1、下载文档前请自行甄别文档内容的完整性,平台不提供额外的编辑、内容补充、找答案等附加服务。
- 2、"仅部分预览"的文档,不可在线预览部分如存在完整性等问题,可反馈申请退款(可完整预览的文档不适用该条件!)。
- 3、如文档侵犯您的权益,请联系客服反馈,我们会尽快为您处理(人工客服工作时间:9:00-18:30)。
Ivar Jacobson & ThinkAlan Cooper 访谈亚玲 译自"要创造一个更好的产品,最重要的事情是在早期引入交互设计。
"第一部分: 定义和介绍交互设计2000年的元旦左右,我正在思考如何最好地超越 中的书评。
与其分析作者所著,还不如直接去问作者--访谈。
那么,"应该首先对谁进行访谈呢?" 新的站点商标和口号,"交互设计师的网上杂志"为我提供了答案--非Alan Cooper 莫属。
作为两本优秀的书籍的作者,《关于脸》("About Face")和去年的,《精神病人管理精神病院》("The Inmates are Running the Asylum")(国内中文译本译作《软件创新之路--冲破高技术营造的牢笼》),他是交互设计之父,甚至可能是交互设计最伟大的倡导者。
使我喜出望外的是他答应约一个月后我对他进行访谈。
终于我和他在星期五的2月11日进行了长达80分钟的电话交谈。
因为不可能访谈Alan Cooper 的交互设计(Cooper Interaction Design)的方方面面,所有的问题必须预先提交以获许可。
令我惊讶的是我们从一开始就偏离了预先安排的问题并且从来没有回到这些问题。
这是非常精彩的80分钟的谈话,这些谈话不仅有助于明确 探讨的内容,还有助于对交互设计涉及到的领域有一个整体框架印象。
在第一部分,Alan花时间准确解释了为什么应该说是交互设计而不是界面设计,以及交互设计在整个以用户为中心的设计领域中的地位。
在访谈之前我还认为我有一些机会和Alan谈论自己的观点。
我本认为我对交互设计有一点认识并且可以问一些聪明的问题。
我们有一个好的访谈计划,并且我们有1个小时的时间。
但是,本来预期的一个访谈立即变成了对大师的拜谒。
当Cooper开始撕掉整个技术产业的规则手册并且抛弃它的时候,很难进入预备的访谈了。
他谈到了为什么交互设计和整个系统结构有关,并且还提到了关系数据库中的漏洞;文件系统的漏洞;为什么交互设计不仅仅是界面设计;为什么他也不喜欢实用性。
我们从介绍开始,并讨论到了读者和信息…。
承认“这里存在问题”的事实AC:的读者可能是可以称作"意识到光凭程序不能解决问题的程序员"。
这种认识是解决问题的必要的第一步。
有些程序员认为解决问题的方案是一种他们还学不会的编程技巧。
这就是一个问题。
它聚焦于单独的技术本身,而单独的技术只能把我们带入混乱。
仅仅聚焦于技术并不能使我们摆脱困境。
这就像是将某个人看作一个和他人毫无关联的个体,治愈这个人的第一步是他们必须承认自己的看法有问题。
DJA:可以毫不夸张地说,我喜欢你书中着重写一个被否认的产业。
很多写出来的东西使我想到,"是的,这些人仍然被否认。
"AC:是的。
在网络世界里,这是普遍性的。
在PC的世界这里有很多机会。
你可能被否认,但仍然有经济上的成功。
在网络的世界里,因为所有扭曲的评价,你可能完全被否认却有巨大的经济上的成功。
隐藏一个坏的用户经验非常容易。
DJA:是的,我确信。
一个已经身价9亿美元的站点,投资者不会看到进一步改善该站点有利可图。
AC:是的,非常正确。
"一点一滴地"第二部分:拯救这个世界---- ""让人做他们胜任的事情,让计算机做他们真正胜任的事情。
"在我对Alan Cooper访谈的第二部分,我们试图回到原先计划好的问题。
如果你还没有读第一部分,你需要读完后在看这一部分。
在第二部分,我们谈到了Cooper的书。
《关于脸》和《精神病人管理精神病院》,我们谈到了Web站点、可携带、无线Web设备和WAP电话的交互设计问题。
我们谈到了旧工业时代市场销售技巧,为什么信息时代不是广播媒体和旧大众市场销售所设想的那样,以及"设计"这个单词的不妥之处。
在整个过程中,Alan Cooper证实了他不仅仅是一个革新人物,具有交付更实用产品的天赋能力。
决不仅仅是。
除了这一点,他对这些问题也有深刻认识,包括:高技术产业的整个框架、为什么你需要看到所有的问题--市场销售,产品设计,决策,商标和技术以及为了打败竞争对手而以用户为核心的角度。
复杂性不是Web交互的症结DJA:我感觉到网络上可以得到信息的数量飞速增长。
商业业主对信息的需求和信息,也是飞速发展的。
所有这些都以比我们能够理解以及解决这些问题更快的速度发生着。
结果是差距越来越大,因为我们不能很快地处理这些问题。
你同意吗?AC:我同意!我谈一下其中的原因。
问题的症结不在于复杂性。
人的大脑在理解和管理复杂的事物方面,是一个糟糕的工具。
但是这也是人的大脑擅长的东西。
人的大脑处理奇妙的复杂的任务。
人的大脑在瞬间看到一张脸,认识它并记住它。
迄今为止,我们还没有任何计算机程序能够做到这一点。
连小孩子都可以做到这一点--记住成千上万的脸。
当你在第二天醒过来,环顾四周,你看到如此多的东西,以致于如果复杂性是一个问题,我们就会昏到过去。
所以复杂性不是问题的症结所在。
记住程序员所做的事情:他们扮演的是一个中央处理器。
如果你正在扮演这个角色,然后让计算机来完成这个识别脸的任务,那么你就太荒诞了。
你说:"天哪,问题的症结在于复杂性。
"人的大脑不是那样工作的,人的大脑和传统的中央处理器是非常不同的,我强烈推荐这本书,Steven Pinker的《人脑如何工作》"How the Mind Works"。
关键在于,让人去做他胜任的事情是一件非常好的事。
让人做人擅长做的事情,而让计算机做计算机真正擅长的事情。
例如,使用任何一种操作系统,比如,Linux, NT, MacOS, 当你创造了一大堆数据,你必须把它放到一个有名字的数据区或者某个文件中。
然后你必须把它放在某个定位的存储层次的某个位置。
所以你必须选择一个名字,选择和指定一个地方,树中的一个结点。
如果你想重新获取那个信息,你必须记住你给它的名字,以及你存储它的位置。
然后你到那个地方,按照它的名字获取它。
你可以找到那个数据。
这是非常逻辑也是非常适合的,但这是为计算机指定的模式。
问题在于人类不擅长记忆名字和位置。
在这种确切性,特别是递归层次中,不管什么层次结点总是类似的。
当然,计算机恰巧擅长于记忆此类东西。
但是,计算机并不有助于记忆。
计算机只是代理人类做"记忆"方面的工作。
这是因为发明计算机操作系统的人…那种方法来自Kernighan 和Plauge,来自Unix. 如果你是一个计算机程序,那么记住某个目录中一个简单的文件名字只是小菜一碟。
他们(操作系统的发明人)却将这个任务分配给了计算机用户。
但是对于人类就不那么容易了。
没有人曾经返回然后说:"啊,这是对的吗?"在我的第一本书《关于脸》("About Face")中,我详细谈论了这个问题。
真正有趣的事情之一是万维网真正减少了记忆的强度--即计算机程序世界要求用户处理递归,层次性文件系统以及记住名字和存储位置的问题。
这就是为什么使用web要比使用桌面软件要容易得多的原因。
问题在于这样做的花费是web的功能要弱得多。
现在我们看到的是web越来越强大,用户不得不做更多的记忆工作,我们倒退到了旧的模式,结果是web也变得越来越难使用。
问题的症结不在于复杂性,在于不合适地分配任务。
如果我告诉你,"这儿有一个你要记住的14位的数字",如果你是一台计算机,让你完成这个任务是合适的;而如果你是一个人,让你做这件事就是不合适的。
无线InternetDJA:如果你要通过一个无线设备进入Internet,并且必须使用电话机数字按键键盘,会更困难。
AC:是的。
你看着电话,看见12个按钮(数字加上*和#)。
这12个按钮非常非常古老了。
从目标导向的观点来看,它们是那么地不堪一击。
即使我一直使用我的电话机,但是我最不想做的事情是根据号码查阅我的电话号码薄。
事实上,我也不想根据名字查阅电话号码薄。
所以比起我记356-xxxxxx等来,1-800-flowers要方便得多。
我真正想做的是能够看一幅花的图或者能够对电话说"花"。
DJA:所以,好的交互设计是要大量削减人必须记忆的东西,注重目标是什么,人类所擅长的以及机器擅长的。
让机器做它擅长的事情。
AC:的确是。
如果你有一个现代的移动电话,那么你可以把50或者100个电话号码记录到存储器中,并且可能有8或10个你经常拨打的电话。
如果你要多次从头想起一个电话号码--区号,前缀,号码(可能是10个中的一个),其它9次,你使用电话已经记住的号码。
但是电话的物理接口是看起来是要你从头到尾拔打这些数字。
你需要转到功能区,并且转到元模式以便拨打电话已经记住的你经常拨打的号码。
这是因为我们并不是从目标导向的角度来思考问题。
我们并没有看到人们做这些事情的方式。
相反,我们看到了技术,然后我们说,"打电话给某个人的方法是拨打某个号码。
"然后我们说,"嘿,我们可以让它记住电话号码以便使我们更方便。
"为什么我们不说,"人们总是打电话给固定的几个人"。
然后你可以象在电话的顶端设置一个象门把一样的东西,它可以旋转到你要经常拨打的20个人。
如果偶尔碰到了一个陌生的号码,再转到拨打号码(数字按键键盘)的模式。
当你使用目标导向的方式思考问题,你可以很容易得到结论。
否则如果你总是从技术或者商业的角度思考问题。
商业总是看到竞争,而技术人员总是倾向于看到昨天的技术,然后扩展它。
告诉我们关于《精神病人管理精神病院》一书DJA:自从《精神病人管理精神病院》一书出版以来,已经有一年了。
它的观点被接受吗?读者是否同意书中的观点?AC:这本书是一个巨大的成功。
它就好比一个小池塘的一条大鱼(他笑了)。
如果你观察,你就会发现大约43种评论。
其中的40种热切赞扬该书,3种说,"这不是编程人员,而是其他人写的",这证实了我的观点。
我绝对感觉到这本书与众不同。
一共花费了20个月来写这本书。
在1999年4月出版。
当我开始这本书时,这个世界包括程序员和管理人员。
我感觉到管理人员逐步降低了他们负责的角色然后把产业的控制权交给程序员。
但是与此同时,程序员尽力地做得最好但是却使用了错误的工具。
这就是我这本书名字的来历,《精神病人管理精神病院》("Inmates are Running the Asylum")。
我正在向管理人员推荐这本书并且告诉他们,把权力下放给程序员是在犯错误。
