派沃烘干机专用控制器说明书
派沃烘干机专用控制器说明书
TXZK-1型密集烤房控制器使用说明书深圳市派沃新能源科技有限公司目录一、密集烤房控制器简介: (1)二、控制器面板功能说明 (3)三、控制器的工作模式 (5)四、按键功能与操作说明 (6)五、高级设置与手动操作 (9)六、安装指导........................................................ 错误!未定义书签。
七、注意事项........................................................ 错误!未定义书签。
八、技术指标........................................................ 错误!未定义书签。
九、售后服务承诺及免责声明.......................................... 错误!未定义书签。
十、环境保护倡议.................................................... 错误!未定义书签。
十一、保修卡.. (18)一、密集烤房控制器简介:密集烤房控制器是为烟叶烘烤设计的一款自动控制产品,适用于各种密集型烤房。
该控制器采用数字温度传感器及高性能单片机设计,内置烘烤曲线,适应不同地区不同种类烟叶的烘烤,具有很大的灵活性和实用性。
控制器具有以下特点:1)使用超大液晶屏显示,简单直观易操作。
2)采用美国原装数字温度传感器,具有测温精确、抗干扰能力强及防潮防水等性能。
3)控制器内置两种工作模式:自设模式(单段或多段工作方式)、曲线模式(3条曲线:上部叶、中部叶、下部叶),满足用户的不同需要。
4)完备的安全保护功能,包括过流保护、防雷击保护、输出短路保护,具有传感器开路报警、循环风机故障报警、电源故障报警、偏温报警等,确保烘烤过程及烘烤设备的安全。
5)具有循环风机电机过载保护功能,在发生缺相、过载的情况下,能自动切断循环风机电源,防止设备损坏。
烘干机操作规程

烘干机操作规程一、引言烘干机是一种常用的工业设备,用于将湿润的物料或者产品通过热空气的作用进行烘干,以达到快速干燥的目的。
为了确保烘干机的安全运行和提高工作效率,制定本操作规程,明确操作流程和注意事项,以保证操作人员的安全和设备的正常运行。
二、适合范围本操作规程适合于所有使用烘干机进行物料或者产品烘干的操作人员。
三、操作流程1. 准备工作a. 确保烘干机周围无杂物,通风良好。
b. 检查烘干机的电源温和源是否正常,并确保烘干机的开关处于关闭状态。
c. 检查烘干机的过滤装置是否清洁,如有需要,进行清理或者更换。
2. 开机操作a. 按照烘干机的电源启动程序,打开电源开关。
b. 检查烘干机的温度控制装置是否正常,设定合适的烘干温度。
c. 按照烘干机的气源启动程序,打开气源开关。
d. 检查烘干机的风机和加热器是否正常运转。
3. 物料或者产品装载a. 将待烘干的物料或者产品按照规定的装载方式放入烘干机内。
b. 注意物料或者产品的均匀分布,避免堆积过高或者过于密集。
4. 烘干过程监控a. 观察烘干机内的物料或者产品的烘干情况,确保烘干效果良好。
b. 定期检查烘干机的温度和湿度,确保设定的烘干条件符合要求。
c. 如发现异常情况,及时停机检修或者报告相关人员。
5. 烘干结束a. 根据烘干时间设定,等待烘干过程结束。
b. 关闭烘干机的电源开关温和源开关。
c. 将烘干机内的物料或者产品取出,进行下一步工艺处理或者包装。
四、注意事项1. 操作人员必须熟悉烘干机的工作原理和操作流程,严禁未经培训的人员操作烘干机。
2. 在操作烘干机时,应穿戴好防护用品,如安全帽、防护眼镜、防护手套等。
3. 禁止在烘干机周围堆放易燃、易爆物品,确保烘干机周围环境的安全。
4. 在烘干机运行过程中,严禁将手或者其他物体伸入烘干机内部,以免发生意外伤害。
5. 定期对烘干机进行维护保养,清理烘干机内部和过滤装置,确保设备的正常运行。
6. 如遇停电、气源中断等突发情况,应即将关闭烘干机的电源温和源开关,并及时报告相关人员。
工业烘干机使用说明书

工业烘干机使用说明书————————————————————————————————作者:————————————————————————————————日期:工业烘干机使用说明书一、工业烘干机使用说明1、打开送取织物活动门,将脱水后的织物松散地旋转在转筒内,然后将活动门关闭锁紧。
2、根据织物种类,设定合适的烘干时间。
3、开启电源开关,按启动键,起动烘干机,根据用户需要,转筒旋转方向可选择单向旋转或双向旋转。
只要将电脑板按键选择为单向或双向,机器即可根据要求执行单向运转或双向运转(正转25秒,停5秒,反转25秒)。
4、使用过程中需要经常从观察窗观看内部织物的翻转状况及机器运行情况,如发现异常情况应及时关闭电源,检查并排除异常情况或故障。
5、烘干机运行至规定时间时,将自动停止运转,此时须由操作人员打开活动门检查内部织物烘干情况,如未达到预期效果,可适当延长时间。
6、打开活动门,取出织物,进入下一轮烘干循环。
二、操作注意事项1、在织物烘干过程中,为方便观察,本机送取物门上配置有经钢化处理之透明玻璃视窗。
该玻璃虽经钢化,具有较强的抗振抗冲击性能,但在操作过程中,仍应避免其遭受猛力冲击及锐器刻划、敲击等,以免损坏。
2、本机所配风机具有单向强力抽取热风性能,进而实现与织物进行热交换的过程,首次使用时,应观察排风口气流情况,若开机后排风口无较强气流逸出,则需要将所接电源三根相线(A、B、C)任意两相予以对调即可。
三、工业烘干机的维护与保养1、经常打扫周围环境,清除散热器上面的杂物和下部风道抽屉内过滤网上的毛绒等杂物。
2、经常检查传动系统及其运转情况,适时调节三角胶带的张力。
3、经常检查各紧固件的紧固情况及查验电气连接线连接件的连接可靠性等情况,如有松动应及时予以紧固。
4、定期检查机器相关电器绝缘情况,确保电机绝缘电阻阻值不小于2MΩ。
5、每周给各传动轴承加注润滑油一次。
6、每半年给设备大保养一次。
四、工业烘干机的安装工业烘干机没有过高的安装要求,只要用户将设备旋转在相对平稳及坚实的地面上即可。
电动烘干机操作说明书

电动烘干机操作说明书一、安全注意事项1. 在使用电动烘干机之前,请务必认真阅读本操作说明书,并遵守以下安全事项。
2. 请将电动烘干机置于平稳的地面上,并确保周围没有障碍物。
3. 使用电动烘干机前,请确保电源插座稳定,并接地良好。
4. 不要将湿漉漉的物品放入烘干机中,以免引发火灾或电击的风险。
5. 请勿在使用过程中将手或其他物体伸入烘干机内部,以防止可能的伤害。
6. 如果出现烘干机异常响声或电源线故障,请立即停止使用并联系维修人员。
二、烘干机操作步骤1. 打开烘干机门,确保烘干室内部干净整洁,没有残留物。
2. 将需要烘干的衣物装入烘干机内,并确保衣物均匀分布。
3. 关闭烘干机门,并调整烘干时间和温度。
4. 按下电源按钮,烘干机即可开始工作。
5. 等待烘干周期结束后,打开烘干机门,取出烘干好的衣物。
6. 关闭电源按钮,将烘干机置于通风良好的地方待机。
三、烘干机控制面板及功能介绍1. 烘干时间调节按钮:用于调节烘干时间的长短,通常以分钟为单位进行设定。
2. 温度调节按钮:用于调节烘干温度的高低,根据衣物材质选择合适的温度。
3. 开始/暂停按钮:用于启动或暂停烘干机的工作。
4. 照明灯:显示烘干室内的照明状态。
5. 故障指示灯:当烘干机遇到故障时,指示灯会亮起,提醒用户检修。
四、衣物烘干建议1. 不同材质的衣物使用不同的烘干温度和时间,建议查阅衣物洗标上的指导信息。
2. 对于易褪色的衣物或者内衣等私密物品,建议选择低温烘干。
3. 在烘干前,将衣物摊开,并仔细检查有无金属、纸片等可能导致火灾的物品,以确保安全。
五、清洁和维护1. 在每次使用后,清理烘干室内的纤维、毛发等杂物,保持烘干机内部干净。
2. 定期清洗烘干机的滤网,并确保其无堵塞和磨损。
3. 不要使用任何酸性、碱性或腐蚀性溶剂来清洁烘干机,以免损坏。
4. 如需进行维修或保养,请联系专业维修人员,并在断电状态下进行操作。
六、常见问题解答1. 为什么衣物在烘干过程中出现起皱或变形?答:这可能是由于衣物材质选择错误或选用了过高的温度导致的。
干燥机说明书
干燥机说明书一、产品介绍干燥机是一种专门用于将物体表面的水分或湿气去除的设备,广泛应用于工业生产和家庭使用。
本说明书将详细介绍本产品的特点、使用方法以及注意事项。
二、产品特点1.高效干燥:本干燥机采用先进的热风循环技术,能够快速有效地将物体表面的水分蒸发,实现快速干燥。
2.大容量设计:本产品采用大容量设计,可同时处理多批次的物品,提高生产效率。
3.温度可调:用户可以根据不同的干燥需求,通过温控面板灵活调节干燥机的温度,以达到最佳效果。
4.功能多样:本产品具有多种干燥模式可供选择,满足不同材料的干燥需求,如低温干燥、中温干燥、高温干燥等。
5.节能环保:本干燥机采用先进的节能技术,能够最大限度地节约能源,减少对环境的影响。
三、使用方法1.连接电源:将干燥机的电源线插入电源插座,并确保电源稳定,电压符合要求。
2.准备待干燥物品:将需要干燥的物品准备妥当,确保物品表面没有显著的水分残留。
3.打开干燥机:按下开关按钮,干燥机即可开始运行。
此时,干燥机会根据预设参数开始工作。
4.设置干燥参数:根据需要,用户可以通过控制面板上的按钮来设置干燥时间和温度,以及选择对应的干燥模式。
5.监控干燥过程:在干燥过程中,用户可以通过观察干燥室的显示屏,了解当前的干燥时间和温度等参数。
6.完成干燥:当干燥时间到达设定值或干燥达到预期效果时,干燥机会自动停止运行。
此时,用户可以关闭干燥机,并取出已经完成干燥的物品。
四、注意事项1.确保通风良好:在使用干燥机时,要确保周围的空气流通良好,避免干燥机因无法散热而过热损坏。
2.避免过干燥:在设置干燥时间和温度时要注意,避免过度干燥物品,以免影响物品的使用效果。
3.定期清洁:根据使用频率和实际情况,定期对干燥机进行清洁和维护,确保干燥效果和设备寿命。
4.防止水激烈挥发:在干燥机工作过程中,要注意打开干燥室门窗,避免水激烈挥发引起压力过高,影响干燥效果和设备安全。
5.子母线排斥放置:干燥机不应与可燃材料直接接触,以防在高温下产生危险。
干燥器操作说明书
当设定完t3时间值后,可按面板上的“启动/代码”按钮,最高位显示4,表示设定均压时间t4。其余位显示均压时间设定值。按“停止/参数”按钮增加延时值。可使设置值从1逐步增加到30秒,然后再重复进行。
每三个月:
10、前置和后置过滤器芯,检查堵塞情况及可能的损坏,根据需要替换。
11、关闭进/出口阀门或将干燥机旁通,彻底将干燥机系统泄压,打开干燥剂充填口,采样检查干燥剂,如果干燥剂被油污染粉碎,请更换干燥剂。
12、拆下并检查进口气动阀和再生排气阀,清洗和替换磨损的阀座和密封圈。
13、检查气动阀门膜片和气缸是否泄漏或密封件是否磨损。
1.干燥剂扩散器滤网堵塞
2.压缩空气处理量超过额定流量
3.再生气动阀保持打开
4.单向止回阀动作失灵
1.通过吸附筒体压力表和干燥机出口压力表检查
2.采用流量计检测
3.通过手动的方法检查控制气动阀是否正常工作
4.拆下单向止回阀检查
1.更换干燥剂扩散器
2.检查进口气量的情况
3.检查导向气路或电磁阀,根据需要更换
设定完毕,将拨位开关拨向右方,则设定值将被写入E2PROM储存起来,即使断电后仍能保留。如果设置值错误,则“停止/参数”按钮上方的指示灯闪烁,请重新设定参数。
2、 动作时序图
时序图说明:
OA段
AB段
BC段
CO’段
O’A’段
A’B’段
B’C’段
C’O’段
A塔
吸附
静止
再生
均压
干衣机说明书
目的:全自动干衣机的操作、维护、维修规程范围:全自动干衣机的操作、维护、维修责任人:二车间设备操作人员负责按照本规程进行操作;设备维修人员负责维修和维护;设备部负责本规程的修订内容:1.设备简介及主要技术参数1.1.2.操作程序2.1开机前准备:1)检查设备状态标示,确认无异常后更换设备状态标识为“运行中”。
2)对照设备点检表对设备进行逐项点检并做好记录,如有异常及时报修,在确认无异常的情况后进行下一步操作。
3)对照设备润滑表对设备进行润滑并做好记录。
3.2开机操作:1)将墙上配电箱内控制全自动干衣机的电源开关打开,设备接通电源。
2)打开自来水及蒸汽管路上的手动阀门。
3)打开旁通阀,放尽加热器和蒸汽管道内的冷凝水,然后关闭旁通阀。
4)烘干温度根据不同的织物,设定不同的值。
对纯棉织物,可设在70℃;对丝绸织物一般设在45~50℃。
同时,是温度优先还是时间优先,对温度设定有一定关系,如果设定温度优先,则设定温度可以稍低一些。
5)根据清洗物品设备程序,程序设定好以后,不需要经常改动,使用过程中sop-sb1002-00 2/2如需要更改某一数据,直接按“←”,使电脑显示在某一状态的反字体,然后按“+”或“-”健进行更改。
6)烘干毛巾、工作服等短小织物时,采用单向运转。
7)程序设定完毕后,将待烘干的衣物放入烘干机滚筒内,关闭滚筒门,按下“启动”按键,设备开始正常运行。
4.3停机操作:1)烘干完毕后,按下“停止”按键,设备停止运转。
2)待设备完全停止转动后,打开滚筒门,取出干燥衣物。
3)关闭滚筒门、进气阀门。
4)关闭墙上控制全自动烘干机的电源开关。
3设备的维护、维修5.1维护1)每天检查蒸汽管道有无泄漏。
2)每月检查设备连接螺栓、螺母是否有松脱。
3)每月检查三角带的松紧度,如有松弛现象,需要张紧。
4)每月检查各导线的连接是否牢固,导线绝缘皮是否有破损,接地是否可靠。
5) 严禁用硬物磕碰操作屏,以免造成设备损坏.6.2维修1)检修设备时一定要切断电源,确认无误后方可进行检修。
智能烘干机使用说明书
智能烘干机使用说明书感谢您购买我们的智能烘干机。
为了使您能够充分了解和正确使用烘干机,我们提供了以下使用说明。
请仔细阅读本说明书,并按照指示正确操作烘干机,以确保您的使用体验和安全。
一、产品概述智能烘干机是一种通过热风将湿衣物蒸发水分并干燥的电器产品。
它配备了先进的智能控制系统,可自动调节烘干温度和时间,提供高效、便捷的衣物干燥体验。
二、安全须知1. 在使用烘干机之前,请确保电源插头已正确接入电源插座,并确保接地可靠。
2. 请将烘干机放置在平稳的地面上,确保其稳定性。
3. 不要将烘干机安装在潮湿或易燃的地方,以免造成故障或安全事故。
4. 使用烘干机时,请勿将湿漉的衣物直接放入烘干机内,以免引发火灾。
5. 请勿用湿手触摸烘干机的电源线或插头,以免触电。
三、操作步骤1. 打开烘干机门,将待烘干的衣物均匀地放入烘干机内。
2. 关闭烘干机门,并合上烘干机门锁。
3. 打开电源开关,启动烘干机。
4. 通过操作面板上的触摸按钮选择适当的烘干模式和设置烘干时间。
5. 此时,烘干机将自动启动,并根据您的设置进行烘干。
6. 在烘干结束后,烘干机会自动停止运行,您可以打开烘干机门取出干燥的衣物。
四、操作技巧1. 您可以根据衣物的不同类型和厚度,选择合适的烘干模式和时间。
通常,厚重的衣物需要更长的烘干时间。
2. 为了更好地保持衣物的柔软和光亮,建议将衣物摊放整齐放入烘干机内,以免出现皱折。
3. 在烘干大件衣物时,如床单、被子等,请确保将其稍微折叠,以促进热风的流通,提高干燥效果。
五、清洁与维护1. 在使用烘干机之前,请务必清空滤网。
定期清洁滤网有助于提高烘干效果并延长机器寿命。
2. 清洁滤网的方法:a) 打开烘干机门,找到滤网位置。
b) 将滤网取出,并用水冲洗,以去除附着的纤维和灰尘。
c) 将滤网晾干后,放回原位即可。
六、故障排除在使用烘干机过程中,如果出现故障或异常情况,请参考以下故障排除方法:1. 烘干机不能启动:a) 检查电源是否正常连接。
干燥机中文说明书
目录安全总则 (2)1.0工作原理及流程 (3)2.0安装 (4)2.1位置 (4)2.2配管 (4)2.3电源及配线 (4)3.0运行 (5)3.1冷冻部分 (5)3.2吸附部分 (7)3.3电器及控制部分 (7)4.0维护 (9)4.1冷冻部分 (9)4.2吸附部分 (10)5.0常见故障及处理方法 (12)5.1冷冻部分 (12)5.2吸附部分 (14)安全总则◆组合式干燥器是带有压力容器的设备,工作压力必须在铭牌上标明的工作压力范围之内。
◆组合式干燥器在电力驱动下运行,请按国家电力标准进行安装。
◆在进行任何电气检修工作前,务必切断总电源。
◆在进行空气管路、阀件(冷凝水系统)检修前,务必泄放完该处空气压力。
◆在进行制冷管路阀件检修前,务必泄放完该处制冷剂。
◆请在安全模式下操作所有设备,并有专人负责。
1.0 工作原理及流程组合式干燥器是合理的将冷冻干燥器和吸附干燥器结合在一起,通过冷干器处理后的压缩空气,压力露点在5℃左右,含水量相当少约5.6 g/m3,温度比进口温度低约10℃,此时进吸附干燥器继续进行深层吸附。
因此组合式干燥器可以达到-60℃稳定的露点。
进吸附干燥器前已经通过冷干器将一部分水除去,减轻了吸附干燥器工作量,因此,吸附干燥器的切换时间可以延长,从而减少耗气量,延长吸附剂的使用寿命。
以上流程图只作参考。
本公司对产品不断研究、改进,保有变更权,流程更改恕不另行通知。
2.0 安装2.1位置1.组合式干燥器应安装在环境温度为2~40℃,四周通风良好、空气洁净的建筑物内。
当室内通风条件不良时,需在机房内安装换气排风设备;2.组合式干燥器与空压机之间应保持一定距离,以防止空压机产生的振动影响组合式压缩空气干燥器的正常运行;3.组合式干燥器应水平安装在平整的水泥地面上; 4.组合式干燥器在压缩空气系统中的布置可参考下图固体尘<μ1m≤./01P P M w w 残余含油量固体尘<μ2m ≤ /P P M w w2残余含油量组合式干燥器2.2 配管1. 注意压缩空气接入口和出口的接口位置是否正确;2. 组合式干燥器串接在气源系统中,最好在空气入口和出口之间并联旁路管道,中间设截止阀以供调试、维修时使用;3. 管径配置不要太小,尽量减少管路弯头,选用全开型阀门等,皆可减少压降,避免引起大的压降;4. 管道安装完毕后,最好能通入压缩空气,检查空气管道、法兰接口和排水器有无空气泄漏,若有泄漏,及时排除故障; 2.3 电源及配线1.应按铭牌上标定之电压、相数、容量配置电源,电源线勿使用太细; 2.电压波动范围不得超过额定电压的10%,其值如下:220V 时,电压的范围208-230V ; 380V 时,电压的范围342-418V 。
PDV556HQWA EN ZH滚筒式干衣机用户手册说明书
PDV556HQWAEN ZH Tumble Dryer滾筒乾衣機User Manual使用指南2152CONTENTSCUSTOMER CARE AND SERVICEIMPORTANT INFORMATION THAT MAY IMPACT YOUR MANUFACTURER’S WARRANTYAdherence to the directions for use in this manual is extremely important for health and safety. Failure to strictly adhere to the requirements in this manual may result in personal injury, property damage and affect your ability to make a claim under the Philco manufacturer’s warranty provided with your product. Products must be used, installed and operated in accordance with this manual. You may not be able to claim on the Philco manufacturer’s warranty in the event that your product fault is due to failure to adhere to this manual.We recommend the use of original spare parts. When contacting Service, ensure that you have the following data available. The information can be found on the rating plate. Model, PNC, Serial Number.Subject to change without notice.Warning / Caution-Safety information.General information and tips.Environmental information.IMPORTANT SAFETY INSTRUCTIONS 3PRODUCT DESCRIPTION 7CONTROL PANEL 7USE 10HINTS 11TROUBLESHOOTING & ACCESSORIES 12TECHNICAL DATA 13INSTALLATION INSTRUCTIONS 14ENGLISH 3WARNING! The appliance must not be supplied through an external switching device, such as timer, or connected to a circuit that is regularly switched on and off by utility.In the interest of your safety and to ensure the correct use, before installing and first using the appliance, read this user manual carefully, including its hints and warnings.To avoid unnecessary mistakes and accidents, it is important to ensure that all people using the appliance are thoroughly familiar with its operation and safety features.Save these instructions and make sure that they remain with the appliance if it is moved or sold, so that everyone using it through its life will be properly informed on appliance use and safety.1. 1.1 Conditions Of Use1.2 Child SafetyThis appliance is intended to be used in household andsimilar applications such as:• staff kitchen areas in shops, offices and other working environment;• farm houses;• by clients in hotels, motels, and other residential type environment;• bed and breakfast type environtments;• areas for communal use in blocks of flats or in launderettes.• This appliance is not intended for use by persons (including children) with reduced physical, sensory or mental capabilities, or lack of experience andknowledge, unless they have been given supervision or instruction concerning use of the appliance by a person responsible for their safety.IMPORTANT SAFETY INSTRUCTIONS4• Children should be supervised to ensure that they do not play with the appliance.• The packaging components (e.g. plastic film,polystyrene) can be dangerous to children - danger of suffocation! Keep them out of children’s reach.• Make sure that children or pets do not climb into the drum.1.3 Dryer Safety1.4 Fire HazardsFailure to follow these safety instructions could damage the dryer or your clothes.You may then not be covered by warranty for this damage.Only plug this appliance directly into an AC power supply, which is properly earthed and has the correct voltage.Some fabrics are not suitable for tumble drying. The following MUST NOT be placed in your dryer due to the risk of a fire or an explosion:• Items that have been spotted orsoaked with vegetable oil, cooking oil, suntan oil, linseed oil, salad oil,lubrication oil or grease. Oil affected items can ignite spontaneously, especially when exposed to heatsources such as in a tumble dryer.The items becomce warm, causing as oxidation reaction in the oil.See the serial number sticker located on the bottom of the door opening for voltage information.For Safety reasons we strongly advise against the use of double adaptor, extension cords or power boards.if this appliance is supplied form a cord extension set or electrical portable outlet device, the cord extension set or electrical portable outlet device must be positioned or that it is not subject to splashing or ingress of moisture.• If the electrical cord of thisappliance is damaged, it must be replaced by the Manufacturer,Authorised Service Agent in order to avoid a hazard.• These dryers are for drying clothes, towels and linen at home. Do not use them for any other purpose.• Lint must not be allowed to accumulate around the tumble dryer.• Do not dry unwashed items in the tumble dryer.Never stop a tumble dryer before the end of the drying cycle unless allitems are quickly removed and spread out so that the heat is dissipated.CAUTIONIMPORTANTWARNINGENGLISH 5Oxidation creates heat. If heat cannotescape, the items can become hot enough to ignite. Pilling, stacking or storing oil-affected items can prevent heat from escaping and create a fire hazard. If it is unavoidable that fabrics that contain vegetable or cooking oil, or have been contaminated by hair care products be placed in a tumble dryer, they should first be washed is hot water with extra detergent - this will reduce, but not eliminate the hazard.The final part of tumble dryer cycle occurs without heat (Cooling cycle) to ensure that the items are left at the temperature that ensures that the items will not be damage.For your safety, and to reduce the risk of fire or an explosion, DO NOT store or use petrol or otherinflammable vapours and liquids near your dryer.• Item that have previously beencleaned in, washed in, or spotted with petrol/gasoline, industrial chemicals used only for cleaning, dry-cleaning solvents or other flammable or explosive substances are highly flammable. Highly flammable orexplosive commonly found around the house include acetone, (nail polish remover) denatured alcohol, petrol/gasoline, kerosene, some spotremovers, turpentine, waxes and wax removers should not be put in the dryer. Items containing foam rubber (also known as latex foam) or similarly textured rubber-like materials. Foam rubber materials can produce fire by spontaneous combustion when heated.• Rubber-backed articles, clothes fitted with foam rubber pads, pillows, rubber boots and rubber-coated sports shoes.1.5 Cleaning The Lint FilterLINT BUILD-UP IS A FIRE HAZARD A clean lint filter reduces drying times, saves energy and avoids overheating. Overheating may also damage your clothes.What happens If I forget to clean the lint filter?The lint filter is located at the front of your dryer at the bottom of the door opening.To remove the lint filter open the doorYou must clean this lint filter after every load.61.6 Drying GuideYour load, when dry must not exceed the rated capacity Always check your labels for the drying symbol which this international Care Labelling Code now uses.• Permanent press and synthetics take out as soon as the dryer stops to reduce wrinkles.• Woollen articlesnot recommended. Pull them to their original shape, then dry them flat.• Woven and loop knit materials may shrink, by varying amount,depending on their quality. Do not use the “Extra” setting for these fabrics, Always stretch them out immediately after drying.• Fibre or leather materialsalways check the manufacturer’s instructions.• Baby clothes and night gownsacrylic clothing or sleepwear use only on the “Iron” setting.• Rubber and plasticsDo not dry any items made from or containing rubber or plastics, such as aprons, bibs, babies’ water proofnapkins, curtains, tablecloths, shower caps, clothes fitted with foam rubber pads, pillows, galoshes, or rubber coated tennis shoes.• Fibreglassnot recommended, glass particles left in the dryer could be picked up by your clothes the next time you use the dryer and irritate your skin.Fabric softeners or similar products should not be used in a tumble dryer to eliminate the effects of static electricity unless this practice is specifically recommended by the manufacturer of the fabric softener or product.May be tumble driedDo not tumble dryDo not tumble dryNormal drying(high temp.)(See page 12 for a table of average weights of laundry items)• 5.5 kgLint filter can only be inserted one way.We strongly advise against the use of fabric conditioners of the sheet type that are added to the clothes in the drum. These products may lead to rapid blockage of the lint filter and inefficient operation of your dryer.Ensure the lint filter “Clicks” when replacing.• Never operate your dryer without the lint filter.• Do not allow lint to build around your dryer.• A torn or damaged lint filter must be replaced immediately.• Overloading can increase lint build-up because the airflow is reduced.To avoid potential fire hazards, we recommend that you pay withauthorized service agent periodically clean your dryer. You must do this also when you change your mounting from upright to inverted, or vice versa.ENGLISH 72. 3.PRODUCT DESCRIPTION CONTROL PANELParts1Program Selector Knob Turn the Program Selector knob to choose a drying program. The table “Program Guide” shown on page 9 will help you in selecting the right program.The Program Selector knob is not a timer. Once you select a drying program, the Program Selector knob will stay at that position for the whole drying cycle.NOTES3.1 Control Panel Description832Start/Pause ButtonEnable/Disable BuzzerIndicatorsThis button allows you to start or pause the dryer to check the contents or perhaps add more clothes.If selector knob is turned while dryer is running or paused mid cycle 3 beeps is heard to indicate operation is not allowed. Cycle will not continue ifselector knob is not returned to original selected program.To Enable/Disable the Buzzer select “Airing 60” then press and hold Start/Pause button for 3 seconds (buzzer is enabled by default).Select program“Airing 60”“Start/Pause” 3 SecondsThe dryer will not start unless the door is closed. (If door is not closed you will hear 6 beeps followed by DRY LED blinking 4 times.)NOTESENGLISH 9 3.2 Program Guide10For best results we recommend to sort out your laundryLoad your dryer loosely until it is no more than TWO THIRD FULL.Clothes must tumble freely in a dryer. Don’t cram them in. Wet clothes fluff up when dry.not operate close.Turn the Program Selector knob to choose the drying program you want.Turn the Program Selector knob to “OFF” When you have finished using the dryer to turn off the power, then switch off at the power point. It is recommended to power off the appliance when not in use.To check the dryness or add clothes during the cycle, simply open the door. The dryer will beep several times indicating the door is open. If further drying is required, close the door and then press the Start/Pause button to continue.For the best drying performance, only add or remove clothes at the beginning of the drying cycle.After every load clean the lint filter to reduce drying time and avoid overheating.Clean Lint FilterChecking the LoadTo start a program, press the Start/Pause button.• Reduce efficiency • Increase drying time• Increases the risk of creasingOverloading will:• Do not select the “Extra Dry” option for delicate fabrics such polyester as shrinking may occur.• To obtain the best drying results with small loads it is recommended to use “Time drying” program.NOTESEOperating Sequence • Step 1• Step 2• Step 3• Step 4• Step 5Do not load clothes or otherarticles which are dripping wet or have sand and grit on them into your dryer.Never stop a tumble dryer before the end of the drying cycle unless all items are quickly removed and spread out so that the heat is dissipated.Switch On CAUTIONWARNINGENGLISH 11 5.HINTS• Never tumble dry the following: Delicate items such as net curtains,woollen, silk, fabric with metal trim,nylon tights, bulky metarials such asanoraks, blankets, eiderdown,sleeping bags, feather quilts and anyitem containing rubber foam ormaterials similar to foam rubber.• Do not place in your dryerundergarments such as bras andcorsets that contain metalreinforcements.Your dryer may bedamaged if metal part were to comeloose for the garment. Place suchitems in a bag designed for thispurpose.• Check and empty pockets. Clip, pens, nails and pins can damage both thedryer and your clothes. Other itemsuch as matches or cigarette lighterswill cause a fire.• Close all press studs, hooks, eyes and zips that may catch on something else. Tie all belts and apron string toprevent tangling.• Drying time will depend on fabric type and construction, load size andwetness. Save time and money andalways spin the load as dry aspossible your washing machine.• Always clean the lint filter-this will reduce drying time and save youmoney.• The laundry must be thoroughly spin before tumble drying.• Easy-care items eg shirt, should be briefly pre-spin before drying(depending on the crease resistanceapproximately 30 seconds).• To avoid static charge when drying is completed, use either a fabric softener when you are washing the laundry ora fabric conditioner specifically fortumble dryers.• Remove the laundry when the dryer has finished drying.• Do not over-dry laundry, this avoids creasing and saves energy.• Clothes or towels containing sand or grit should be washed first.• Due to variations in dryer load fabric texture and thickness it is possiblethat not all items will be dried evenly.It you experience uneven dryness onCupboard program please use eitherExtra Dry or Timer Program but bemindful of the type of fabric beingdried to avoid overdrying certain types of fabric. Always follow dryinginstructions attached to the itemsintended to be dried in a clothes dryer.• Drying time will also be effected by voltage fluctuations,room temperature and humidity. Clothes will dry moreslowly on a cool or humid day.• For best results, sort the loadaccording to fabric. Such as heavyitems which may take longer to dry,eg. towels, flannelette sheets, etc.than ones which dry quickly, eg. poly/cotton shirts and and sheets.• Avoid drying dark clothes with light coloured items such as towels as lintwill show on the dark clothes.• Note: Some fabrics will collect lint from other clothes and items.Separate the lint “gives” and the lint“collectors” to minimise this problem.• Clothes that give lint include towels, nappies, chenille. Clothes that collect lint include corduroy, synthetics andpermanent press garments.• If individual items are still damp after drying, set a 30 minutes post dryingtime. This will be necessaryparticularly for multilayered items (eg.collars, pockets, etc).126.TROUBLESHOOTING & ACCESSORIES• To help you, here is a list of the average weights of some common laundry items.• Sheet• Tablecloth • Kitchen towel • Table napkin • Towelling hand towel • Bathrobe • Men’s shirt • Pillowcase • Men’s pyjamas • Ladies nightdress • Bath towel 700 - 1000 g400 - 500 g 70 - 120 g 50 - 100 g 150 - 250 g 1000 - 1500 g 200 - 300 g 100 - 200 g 400 - 500 g 200 - 250 g 300 - 400 g6.1 Troubleshooting6.2 Possible FailuresCheck the points listed here before you call for help, and make sure that you havefollowed the Important safety Instructions on page 3.Certain problems are due to lack ofsimple maintenance or oversights, which can be solved easily without calling out an engineer.Before contacting your local Service Centre, please check possible cause of malfunction and solution listed.Once the problem has been eliminated, press the Start/Pause button to restart the program. If after all checks, the problem persists, contact your local Service Centre.ENGLISH 13Alarm Code Indicator:Deactivate the appliance before youdo the checks.WARNING!To operate efficiently the clothes dryer must have an unrestricted air supply and exhaust ventilation.Service calls resulting from installation where ventilation is restricted are not covered by warranty.THE COST OF THIS TYPE OF CALL WILL BE CHARGED TO THE CUSTOMERShould you require further instructions in the use and care of your clothes dryer please contact the CUSTOMER CENTER.Dimensions (Height / Width / Depth) 795 mm x 600 mm x 560 mmPower Supply (Voltage / Frequency) 220 - 240 V / 50 HzHeater Power (Watt) 2100 W Fuse Installation 10 AMaximum CapacityIMPORTANT7.TECHNICAL DATAExtra Cottons Dry 5.5 kg Cupboard Cottons Dry 5.5 kg Iron Cottons Dry 5.5 kg Extra Mixed Dry 3 kg Cupboard Mixed Dry 3 kg Iron Mixed Dry 3 kg Airing 30 1 kg - 1.5 kg Airing 60 3 kg Airing 90 4 kg Time dry 30 1 kg - 1.5 kg Time dry 60 3 kg Time dry 90 4 kg Time dry 120 5 kg Time dry 150 5.5 kg14You can choose to put your dryer:The appliance must not be installed behind a lockable door, a sliding door or a door with a hinge on the opposite sideIf you choose to use the optional vent kit, the exhaust grille at the front of the dryer will need to be replaced with the outlet cover from the back of the dryer. Gently prise open the grille, using a thin bladed tool. Next, remove the cover from the back and clip it into the grille space at the front. The exhaust grille is not required when using a vent kit.The exhaust duct must not exceed 2 meters in length at 100 mm diameter. If connecting the dryer to a commonducting system, safety advice should be requested from the manufacturer.Inlet and outlet points need clear airflow to prevent overheating, so ensure there is adequate ventilation. (i.e. open window or external door.)If a venting kit is used and the exhaust is discharged out of the room, there must be adequate ventilation to avoid the backflow of gases into the room from appliances burning other fuels, including open fires, when operating the tumble dryer. This is not applicable where a venting hose is discharged into a flue which is used for exhausting fumes from appliances burning gas or other fuels.You can position the vent kit at the backof the dryer to remove air upwards or sideways.There are 2 VENTING OPTIONS • front• rear-using a venting kit (optional extra)• on the floor• on a work bench• on a wall, upside down or upright, using the included mounting kit.• on top of a front load washing machine using a stacking kit available as an optional extra (not available for all washing machine models).8.INSTALLATION INSTRUCTIONSDo not install your dryer in a cupboard or small un-vented laundry unless you using a venting kit.中文 15 目錄安全信息 16產品圖解 20用途 20使用 23提示 24疑難排解與配件 25技術參數 26安裝說明 27可能會影響製造商保養的重要資訊遵照本使用手冊的指示使用,對您的健康與安全至關重要。
派沃烘干机专用控制器说明书.
TXZK-1型密集烤房控制器使用说明书深圳市派沃新能源科技有限公司目录一、密集烤房控制器简介: (1)二、控制器面板功能说明 (3)三、控制器的工作模式 (5)四、按键功能与操作说明 (6)五、高级设置与手动操作 (9)六、安装指导....................................................... 错误!未定义书签。
七、注意事项....................................................... 错误!未定义书签。
八、技术指标....................................................... 错误!未定义书签。
九、售后服务承诺及免责声明......................................... 错误!未定义书签。
十、环境保护倡议................................................... 错误!未定义书签。
十一、保修卡.. (18)一、密集烤房控制器简介:密集烤房控制器是为烟叶烘烤设计的一款自动控制产品,适用于各种密集型烤房。
该控制器采用数字温度传感器及高性能单片机设计,内置烘烤曲线,适应不同地区不同种类烟叶的烘烤,具有很大的灵活性和实用性。
控制器具有以下特点:1)使用超大液晶屏显示,简单直观易操作。
2)采用美国原装数字温度传感器,具有测温精确、抗干扰能力强及防潮防水等性能。
3)控制器内置两种工作模式:自设模式(单段或多段工作方式)、曲线模式(3条曲线:上部叶、中部叶、下部叶),满足用户的不同需要。
4)完备的安全保护功能,包括过流保护、防雷击保护、输出短路保护,具有传感器开路报警、循环风机故障报警、电源故障报警、偏温报警等,确保烘烤过程及烘烤设备的安全。
5)具有循环风机电机过载保护功能,在发生缺相、过载的情况下,能自动切断循环风机电源,防止设备损坏。
烘干炉操作说明
烘干炉操作说明烘干炉分自动手动两种操作方式,自动方式由PLC程序系统启动停止各个风机及燃烧器,手动方式由人工启动停止每个设备,使烘干炉正常运行1,检查各设备的启动电源(断路器)是否闭合。
2,检查控制电源(控制柜“控制开关”)是否打开,即PLC电源上电和直流电源上电指示灯亮。
3,手动状态:将手动/自动旋钮开关旋转到手动位,依次按下各个风机的启动按钮(绿色),风机启动后相应指示灯亮,停止风机时按下所需停止风机的停止按钮(红色)。
注意:启动各风机时应有一定延迟时间,待启动风机指示灯亮时再启动一下风机,严禁短时间内按下多个风机启动按钮。
4,自动状态:将手动/自动旋钮开关旋转到自动位,按下自动启动按钮(绿色),各风机一定顺序自动启动。
停止时按下自动停止按钮(红色),各风机停止,排废气风机和热循环风机需延时一段时间后停止。
5,燃烧器的启动与停止:风机启动后需一定的吹扫时间后燃烧器才可以启动。
控制柜风机手动启动时燃烧器需本地启动,启动时需手动按下启动按钮,停止时需手动按下停止按钮。
控制柜自动启动时燃烧器需远程启动,不需人工操作。
注意:燃烧器与循环风机设有安全连锁,务必确保先启动热循环风机后启动燃烧器,先关闭燃烧器后关闭热循环风机的开关机顺序。
6,一般问题的解决:1)热循环风机频繁启动会有热过载保护,导致风机不能启动。
解决方法:复位热过载保护按钮,过一段时间后再启动风机。
2)控制电源(钥匙旋钮开关)合上后电源指示灯不亮。
解决方法:控制电源断路器跳闸,重新合闸。
3)风机风压开关报警。
解决方法:因为风压开关动作灵敏易误动作,风压开关报警时需到现场确认是否为误动作,确认风机无皮带断裂停转等故障时,可按下故障复位和该风机的启动按钮,报警可消除。
Whirlpool WTW85480GB 自清洗冷凝器蒸发干衣机说明书
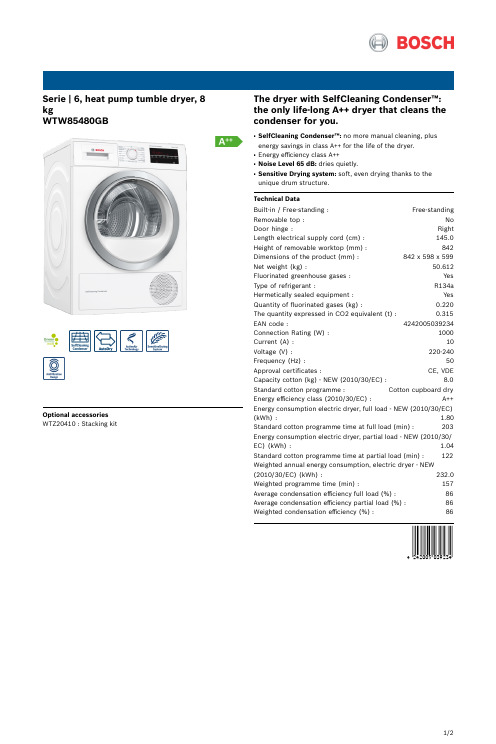
Serie | 6, heat pump tumble dryer, 8 kgWTW85480GBOptional accessoriesWTZ20410 : Stacking kitThe dryer with SelfCleaning Condenser™:the only life-long A++ dryer that cleans thecondenser for you.SelfCleaning Condenser™: no more manual cleaning, plusenergy savings in class A++ for the life of the dryer.Energy efficiency class A++Noise Level 65 dB: dries quietly.Sensitive Drying system: soft, even drying thanks to theunique drum structure.Technical DataBuilt-in / Free-standing : Free-standingRemovable top : NoDoor hinge : RightLength electrical supply cord (cm) : 145.0Height of removable worktop (mm) : 842Dimensions of the product (mm) : 842 x 598 x 599Net weight (kg) : 50.612Fluorinated greenhouse gases : YesType of refrigerant : R134aHermetically sealed equipment : YesQuantity of fluorinated gases (kg) : 0.220The quantity expressed in CO2 equivalent (t) : 0.315EAN code : 4242005039234Connection Rating (W) : 1000Current (A) : 10Voltage (V) : 220-240Frequency (Hz) : 50Approval certificates : CE, VDECapacity cotton (kg) - NEW (2010/30/EC) : 8.0Standard cotton programme : Cotton cupboard dryEnergy efficiency class (2010/30/EC) : A++Energy consumption electric dryer, full load - NEW (2010/30/EC)(kWh) : 1.80Standard cotton programme time at full load (min) : 203Energy consumption electric dryer, partial load - NEW (2010/30/EC) (kWh) : 1.04Standard cotton programme time at partial load (min) : 122Weighted annual energy consumption, electric dryer - NEW(2010/30/EC) (kWh) : 232.0Weighted programme time (min) : 157Average condensation efficiency full load (%) : 86Average condensation efficiency partial load (%) : 86Weighted condensation efficiency (%) : 86'!2E20A F-a d j c d e!1/2Serie | 6, heat pump tumble dryer, 8 kg WTW85480GBThe dryer with SelfCleaning Condenser™:the only life-long A++ dryer that cleans the condenser for you.Performance-Energy Efficiency Class: A++ at a range of energy efficiency classes from A+++ to D-Capacity: 8 kg-Energy consumption 232.0 kWh per year, based on 160drying cycles of the standard cotton programme at full and partial load, and the consumption of the low-power modes.Actual energy consumption per cycle will depend on how the appliance is used-Energy consumption of the standard cotton programme at full load 1.8 kwh and energy consumption of the standard cotton programme at half load 1.04 kwh-The programme Cottons cupboard dry used at full andpartial load is the standard drying programme to which the information in the label and the fiche relates, this programme is suitable for drying normal wet cotton laundry and is the most efficient programme in terms of energy consumption for cotton.-Programme time of the standard cotton programme at full load 203 min and programme time of the standard cotton programme at partial load 122 min.-Weighted programme time of the standard cotton programme at full and partial load: 157 min.-Condensation efficiency class B on a scale from G (least efficient) to A (most efficient).-Average condensation efficiency of the standard cottonprogramme at full load 86 % and average condensationefficiency of the standard cotton programme at partial load 86%.-Weighted condensation efficiency for the standard cotton programme at full and partial load: 86 %.-Power consumption in off-mode 0.1 W and in left-on mode 0.75 W-Duration of left-on mode: NO_FEATURE -Noise level: 65 dB (A) re 1 pWProgrammes/functions-Fully electronic control dial for sensor drying programmes andtimed programmes-Special programmes: Woollens, Mixed Load, Towels, Timed programme warm, Timed programme cold, Sportswear, Down,Super Quick 40, shirts/blouses-Touch control buttons: Low heat, Buzzer, Reduced ironing,Drying time, start/pause, Fine-tuning for drying level, 24 h end Time DelayKey features-ActiveAir Technology-Heat Pump with self cleaning condenser-Sensitive drying: large stainless steel drum with textile careand revolution drying system-AntiVibration design: for greater stability and quietnessAdditional features-Large LED display for remaining time and 24 hours time delay,programme progress indication and special functions-Anti crease cycle 120 minutes at the end of the programme -Full container tank indicator -Child Lock-Buzzer to indicate the end of cycle -Door hinge: right-hand-Container for condensed waterTechnical Information-Dimensions (H x W x D): 84.2 x 59.8 x 59.9 cm -slide-under installation-Glass door, Alu-Look, white2/2。
烘干机使用说明书

烘干机使用说明书摘要:1.烘干机的概述2.烘干机的安装与使用3.烘干机的维护与保养4.安全注意事项5.烘干机的故障处理正文:【烘干机的概述】烘干机是一种家用电器,主要用于将洗涤后的衣物快速干燥。
烘干机在工作时,通过加热空气并循环流动,使衣物中的水分蒸发,从而达到快速干燥的目的。
烘干机具有操作简便、效率高、占地面积小等优点,是现代家庭生活中不可或缺的家电之一。
【烘干机的安装与使用】在安装烘干机时,应选择一个通风良好、电源方便接通的地方。
按照产品说明书的要求,将烘干机摆放在平稳的地面上,并确保烘干机底部的空气进出口畅通无阻。
接下来,将电源插头插入电源插座,打开烘干机上的开关,即可开始使用。
在使用烘干机时,应确保衣物已经过洗涤,并将衣物挂在烘干机的晾衣架上。
关闭烘干机门,选择合适的烘干程序,即可开始烘干。
烘干过程中,请勿打开烘干机门,以免影响烘干效果。
待烘干程序完成后,打开烘干机门,将干燥的衣物取出即可。
【烘干机的维护与保养】为了确保烘干机的正常运行和延长使用寿命,应定期进行维护与保养。
首先,每次使用烘干机后,应清理衣物残留的线头、毛发等杂物,防止堵塞烘干机的通风口。
其次,定期清洁烘干机内部,可采用湿布擦拭或专用清洁剂进行清洁。
最后,定期检查烘干机的电源线、插头等部件,发现损坏及时更换。
【安全注意事项】在使用烘干机时,请务必遵守以下安全注意事项:1.请勿在烘干机上放置未洗涤的衣物,以免污染。
2.请勿将烘干机用于洗涤衣物,以免损坏设备。
3.请勿在烘干机上晾晒非衣物物品,以免损坏设备。
4.请勿让儿童单独操作烘干机,以免发生意外。
5.请勿将烘干机放置在易燃、易爆物品附近,以免发生火灾。
【烘干机的故障处理】在使用烘干机过程中,可能会遇到一些故障。
遇到故障时,请不要自行拆卸维修,以免造成人身伤害。
应立即切断电源,并联系售后服务人员进行处理。
常见的故障及处理方法如下:1.烘干机无法启动:请检查电源线、插头是否正常,或者联系售后服务人员进行检查。
烘干机说明书

烘干机说明书烘干机说明书产品简介烘干机是一种用于快速干燥湿衣物的家用电器设备。
它基于热风循环原理,通过将热风传递给湿衣物,加速水分蒸发,从而将衣物迅速烘干。
烘干机广泛应用于家庭、酒店、餐厅、洗衣店等场所。
产品特点1. 快速烘干:烘干机采用高功率加热元件,能迅速产生大量热风,快速烘干湿衣物,节省用户时间和精力。
2. 大容量设计:烘干机内部空间宽敞,可容纳多件衣物,满足大家庭或多人使用的需求。
3. 多种烘干模式:烘干机内置多种烘干模式,可根据不同衣物材质和湿度选择合适的模式,确保烘干效果和衣物品质。
4. 智能控制系统:烘干机具备智能控制系统,可根据实际情况自动调节温度、烘干时间和风速,保护衣物不受热损坏。
5. 安全可靠:烘干机内置多重安全保护措施,如过热保护、漏电保护等,确保使用过程安全可靠。
使用方法1. 将湿衣物均匀放置在烘干机内。
不要过度堆积,以免影响烘干效果和衣物品质。
2. 选择合适的烘干模式。
根据衣物材质、湿度和需要烘干的衣物数量选择合适的模式。
一般情况下,普通棉质衣物可选择标准模式,毛衣和内衣可选择低温模式。
3. 调节烘干时间。
根据烘干衣物的湿度和数量,调节烘干时间。
一般情况下,20分钟至60分钟为合适的烘干时间。
4. 启动烘干机。
按下开关按钮,烘干机启动工作。
在烘干过程中,可以通过观察衣物状况和调节控制面板上的参数来监控烘干进度。
5. 等待烘干完成。
烘干机会自动关闭,表示烘干完成。
打开烘干机门,取出烘干好的衣物。
维护保养1. 清洁烘干机内部。
定期清理烘干机内部灰尘和纤维,保持烘干机内部清洁,以免影响烘干效果。
2. 定期清洁过滤器。
过滤器是烘干机的重要部件,定期清洁过滤器可确保烘干机正常工作。
清洁方法为,将过滤器取出,用清水冲洗干净后晾干,然后放回原位。
3. 定期检查排气管道。
排气管道是烘干机排出热风和湿气的通道,定期检查排气管道是否畅通,确保正常排气。
4. 避免过度烘干。
过度烘干可能导致衣物损坏和能源浪费,根据衣物材质和需求合理设置烘干时间。
干燥机说明书

干燥机说明书一、产品概述干燥机是一种用于将物料中的水分蒸发掉的设备,广泛应用于化工、制药、食品、建材等行业。
本产品采用先进的干燥技术,能够快速、高效地将物料中的水分蒸发掉,从而达到干燥的目的。
二、产品特点1.高效节能:本产品采用先进的干燥技术,能够在短时间内将物料中的水分蒸发掉,从而达到快速干燥的目的。
同时,本产品还具有节能的特点,能够在干燥过程中最大限度地减少能源的消耗。
2.操作简便:本产品采用先进的控制系统,能够实现自动化控制,操作简便,易于掌握。
3.安全可靠:本产品采用高品质的材料和先进的制造工艺,具有良好的耐用性和稳定性,能够保证设备的安全可靠性。
三、产品使用方法1.准备工作:将需要干燥的物料放入干燥机内,注意物料的数量不要超过设备的承载能力。
2.开机操作:将电源插头插入电源插座,按下开机按钮,设备开始运转。
3.设定参数:根据需要,设定干燥温度、干燥时间等参数。
4.开始干燥:按下启动按钮,设备开始进行干燥操作。
5.结束干燥:当设定的干燥时间到达或者物料已经干燥完成时,按下停止按钮,设备停止运转。
6.清洁保养:在使用完毕后,应及时清洁设备,保持设备的清洁卫生。
四、注意事项1.在使用本产品时,应注意安全,避免发生意外事故。
2.在设定干燥参数时,应根据物料的性质和干燥要求进行合理的设定,避免过度干燥或者干燥不足。
3.在清洁设备时,应注意切断电源,避免发生电击事故。
4.在使用本产品时,应遵守相关的操作规程和安全规定,确保设备的正常运转和使用寿命。
五、维护保养1.定期检查设备的各项部件,确保设备的正常运转。
2.定期清洁设备,保持设备的清洁卫生。
3.定期更换设备的易损件,确保设备的正常运转。
4.在设备长期停用时,应进行防腐处理,避免设备受到腐蚀。
六、故障排除1.设备无法启动:检查电源是否正常,检查设备的保险丝是否烧断。
2.设备无法加热:检查加热器是否正常,检查温度控制器是否故障。
3.设备运转异常:检查设备的传动部件是否正常,检查设备的轴承是否磨损。
干燥机说明书

日常维护要点:Daily maintenance:1.新设备投入运行一个月后,应检查并填补一次吸附剂,视实际情况(6-12月)全部更换吸附剂。
The absorbent should be checked and added after one month operation of the new equipment. The absorbent should be completely changed after 6-12 months, depending on the actual situation of the equipment.2.定期清洗、吹扫电磁切换阀,并检查阀门运动情况。
The electro-magnetic switch should be regularly cleaned, and the valve should be checked.3.前置过滤器上的自动排水器应定期清洗,确保滤筒体内不积液体。
To make sure that liquid will not be trapped in the cylinder, the automatic water drainer on the pre-filter should be regularly cleaned.4.前置过滤器滤芯寿命为8000H,到时(或滤芯压力降达0.07MPa时)就更换滤芯。
The life time of the core of the pre-filter is 8000 hours, the core should be changed after 8000 hours (or when the pressure drop reaches 0.07MPa).5.定期检查管线接头、法兰、阀门有无泄气现象。
Regularly check the joints, flange and valves for leakage.6.干燥器停用期间,请半闭好所有阀门,防止泄漏,以免吸附剂受潮。
冷冻干燥机器的使用方法

冷冻干燥机器的使用方法
确认干燥物质的种类和水分含量,根据物料的不同,选择相应的干燥温度和时间。
将产品放入冷冻干燥机中,并设定所需的温度和时间。
打开侧面板上的总电源开关,让控制系统显示欢迎界面。
按“确认”键,让控制系统自动转入下一屏。
根据需要设定温度和时间,然后进行预冻。
将样品盘放入预冻架上,并置于冷阱中,温度计探头置于上层样品盘上,盖上密封盖。
点击屏幕“制冷机”开关,预冻3小时。
预冻结束后,将样品盘从冷阱中取出,迅速装进干燥架,将干燥架置于冷阱上方,罩上有机玻璃罩,干燥罩与下端“O”型密封圈接触。
检查充气阀门是否拧紧,点击屏幕“真空计”,如显示真空度为110kPa,点击“真空泵”,真空泵开启运行,真空度迅速下降,至20Pa以下为正常。
经过一段时间的干燥运行后,查看样品曲线及视感样品已干燥,慢慢旋开充气阀门,使冷冻干燥机内压强回升至110kPa。
点击“真空泵”,关闭真空泵。
点击“真空计”,关闭真空计。
取下有机玻璃罩,从干燥架上取出样品盘。
点击“制冷剂”,关闭压缩机。
冷阱中的水分融化后,从充气阀门流出,注意接收。
干燥机控制面板说明书
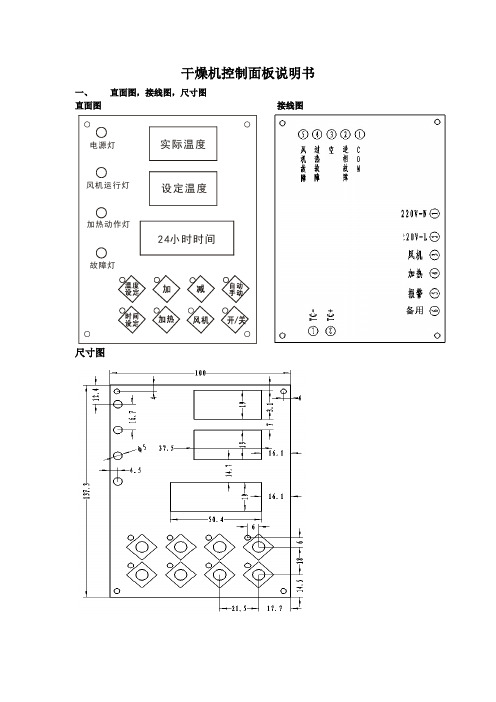
干燥机控制面板说明书一、 直面图,接线图,尺寸图直面图 接线图尺寸图电源灯风机运行灯加热动作灯故障灯实际温度设定温度24小时时间二、功能说明①.测、控温范围:0-400度②.加热、为PID控温方式③.24小时实时时间显示④.九段定时开,关机功能⑤.开机延时和关机延时⑥.一周七天预约时间设定方法:在上电情况下,长按“时间设定键”3S,设定灯亮,则在PV上显示“1ON”星期一开机时间,此时可以通过按“加键”或“减键”和“移位键”可修改当前设定值,再按一下“时间设定键”,则在PV上显示“1OF”星期一关机时间,此时可以通过按“加键”或“减键”和“移位键”可修改当前设定值,如此类推在“1ON-1OFF~7ON-7OFF”之间循环显示,按照上述操作,可设置周一至周七的开、关机的时间。
并且此时在“TIME”显示器上以闪烁方式显示对应的时间,完成设定后再长按“时间设定键”,或不操作10S,退出并保存参数。
⑦.时钟时间校正设定:(设定范:24小时实时时间)在上电状态下,按一下“时间SET”键,设定灯亮,进入设定状态,PV显示器显示“TNE”字样,此时“TIME”显示器闪动,此时按“加键”或“减键”和“移位键”可修改当前实时时间值。
再按一下“时间SET”键,PV显示器显示“DAY”,系统进入星期校正,此时按“加键”或“减键”和“移位键”可调整当前为星期几,范围(1~7)⑧.自动运行方式:当一周预约时间设置好后,按下“手/自动键”此时”手/自灯亮”,系统按设置好的一周预约时间,运行。
⑨.电源未开启时,按“风机”和“加热”键无效,风机未开启时,按“加热”键无效,电源开启后开,关“风机”键有效,风机开启后,开、关“加热”键有效⑩.过温温度:指PV上的测量温度大于此项温度设定时,则系统停止加热并同时输出报警三、操作按键时有风鸣音作提示开、关机过程①.上电时在PV上显示3S倒计时,在SV上显示软件版本号,3S过后,则在PV上显示“OFF”字样(此为关机状态)②.开机过程:在关机状态下,此时,按一下开/关机键,则PV、SV上立即显示出相应参数,电源指示灯亮,此时按一下“风机”键,则风机灯亮,风机继电器吸合,此时按一下“加热”键,则加热灯亮,加热继电器作PID输出,加热输出灯随加热继电器输出亮和灭(此为开机过程)③.关机过程:1.直接通过按开/关键关机时:先关加热,延时完关机风机延时后,再关风机,在延时过程中,PV上以交替方式显示“OFF”和当前温度。
- 1、下载文档前请自行甄别文档内容的完整性,平台不提供额外的编辑、内容补充、找答案等附加服务。
- 2、"仅部分预览"的文档,不可在线预览部分如存在完整性等问题,可反馈申请退款(可完整预览的文档不适用该条件!)。
- 3、如文档侵犯您的权益,请联系客服反馈,我们会尽快为您处理(人工客服工作时间:9:00-18:30)。
.. TXZK-1型密集烤房控制器使用说明书深圳市派沃新能源科技有限公司.. 目录一、密集烤房控制器简介: (1)二、控制器面板功能说明 (3)三、控制器的工作模式 (5)四、按键功能与操作说明 (6)五、高级设置与手动操作 (9)六、安装指导....................................................... 错误!未定义书签。
七、注意事项....................................................... 错误!未定义书签。
八、技术指标....................................................... 错误!未定义书签。
九、售后服务承诺及免责声明......................................... 错误!未定义书签。
十、环境保护倡议................................................... 错误!未定义书签。
十一、保修卡.. (18).一、密集烤房控制器简介:密集烤房控制器是为烟叶烘烤设计的一款自动控制产品,适用于各种密集型烤房。
该控制器采用数字温度传感器及高性能单片机设计,内置烘烤曲线,适应不同地区不同种类烟叶的烘烤,具有很大的灵活性和实用性。
控制器具有以下特点:1)使用超大液晶屏显示,简单直观易操作。
2)采用美国原装数字温度传感器,具有测温精确、抗干扰能力强及防潮防水等性能。
3)控制器内置两种工作模式:自设模式(单段或多段工作方式)、曲线模式(3条曲线:上部叶、中部叶、下部叶),满足用户的不同需要。
4)完备的安全保护功能,包括过流保护、防雷击保护、输出短路保护,具有传感器开路报警、循环风机故障报警、电源故障报警、偏温报警等,确保烘烤过程及烘烤设备的安全。
5)具有循环风机电机过载保护功能,在发生缺相、过载的情况下,能自动切断循环风机电源,防止设备损坏。
6)具有电源电压监测功能,实时显示控制器电源电压。
当电源电压过高或过低时,控制器切断所有外部控制输出信号,以保护外部设备,减少损害。
7)具有RS485组网通信接口,使用工业标准Modbus RTU通讯协议,可以通过计算机读取控制器的工作过程记录,包括烤房内干湿球的温度记录、时间记录、停电记录等,为用户总结烘烤经验提供依据。
.8)具有RS485变频器通信接口,可实现控制器与变频器通信,自动控制循环风机转速。
9)语音报警提示功能,用户可根据需要定购语音报警或者蜂鸣器报警方式,还可以根据需要单独外配一个5V防水声光报警器,以增强报警效果。
10)通过模糊自适应控制算法,自动控制助燃鼓风机开停和排湿风门开度,把烤房内的干湿球温度控制在设定的范围内。
整个烘烤过程仅需要用户选择合适的曲线或根据烟叶变化情况正确设置烘烤参数,并保证燃煤充足即可达到理想的烘烤结果,大大降低劳动力成本并有效提高烤烟质量。
11)具有风门堵转检测功能,实时指示排湿风门打开和关闭状态,增加风门直流电机使用寿命。
12)备用电池方便用户在停电时观察烤房内的干湿球温度。
13)键盘锁功能,在锁定情况下,可以防止他人意外设置数据或误操作。
.二、控制器面板功能说明.1.面板功能说明1) 段码式液晶显示,烘烤时显示上下棚状态、控制棚的干湿球温度、当前目标控制的干湿球温度、阶段时间、总时间、当前控制曲线全部数据、工作模式、输出状态(助燃、排湿、循环风速)、电压测量值、烤次、当前日历时钟。
2) 2个发光管分别用于指示控制器运行状态和参数设置状态。
3) 8个按键,分别为2.按键的功能定义.三、控制器的工作模式控制器内置两种工作模式,分别为曲线模式和自设模式,为了方便操作,在非烘烤过程中按键3秒可以直接进行曲线模式的下部叶工作方式和自设模式之间的转换。
如果要应用上部叶和下部叶的工作方式,应根据曲线模式的操作说明进行设置,具体说明如下:1.曲线模式:根据烟叶烘烤专家的经验,将烟叶部位分为上部叶、中部叶、下部叶。
三条不同烟叶部位对应三条不同的曲线,用户可以根据实际情况选择合适的烘烤曲线,还可以在选定的曲线基础上继续修改。
操作说明:1)在测量显示状态,按进入。
2)反复按动键,设定数据会在“曲线数据、工作模式、日期时钟选择”三组参数中第一个数据之间跳动,形成闭环操作。
3)按键使屏上数据逐个切换激活,被激活的数据会闪动。
4)按键来修改激活后的参数。
4)按键保存本次数据设置。
6)按键不保存。
(注:模式的选择在系统运行状态下无效)在停止烘烤状态下,使用目标选择键选择曲线烘烤阶段,选定后按运行键,此时从当.前选择的阶段位置开始运行。
2.自设模式:该模式的工作方式为多段方式。
多段工作方式操作方法:1) 在测量显示状态,按键3秒进入。
2) 反复按动键,设定数据会在“曲线数据、工作模式、日期时钟选择”三组参数中第一个数据之间跳动,形成闭环操作。
3) 按键使屏上数据逐个切换激活,被激活的数据会闪动。
4) 按键来修改激活后的参数。
5) 按键保存本次数据设置。
6) 按键将取消本次数据设置。
(注:模式的选择在系统烘烤状态下无效)四、按键功能与操作说明1.按键说明1)运行/停止键在系统停止运行时,按该键一次,运行指示灯亮,控制器进入正常的烘烤状态,所有控制正常输出。
在烘烤状态下,按住此键3秒进入停止烘烤状态,运行指示灯灭,除了循环风机正常.运行外,其它输出关闭。
2)设置键在运行状态下,按该键一次,系统进入参数设置状态,设置指示灯亮,此时可对曲线显示部分的各个目标数值以及日期时钟等烘烤参数进行设置。
在设置时,先按键移动选定目标,此时目标出现闪烁,然后按键,完成目标值设定,最后按键保存并按键退出设置状态,此时设置指示灯灭,回到测量状态;不按键时,控制器不保存数据并在30秒后自动退出设置状态。
3)目标选择键目标选择的运行轨迹由曲线目标设定框自上而下、自左向右,至自设、下、中、上部叶目标,至日期时钟目标,再至曲线目标设定框,或反向移动形成一个闭环移动轨迹。
点按时,移动至下一个目标;长按时,可连续迅速移动,直至达到目标位置。
在非设置和烘烤状态,此键可以选择不同的烘烤阶段进行烘烤。
4)目标修改键在设置状态时,点按目标修改键递加或递减一个数字单位;长按目标修改键递加或递减多个数字单位。
在查询状态时,查询显示选定烤次下的不同时段历史数据;同时按下3秒后进入高级参数设置状态。
5)查询记录键短按该键一次,切换到显示非控制棚干、湿球传感器温湿度,并在目标温湿度处显示风机电流;按住该键3秒,进入历史查询状态,并显示当前烤次历史记录,并在显示屏左上侧信息栏.显示本烤次开烤后最后一次记录的数据。
6)确认键在设置状态时,按此键保存数据并退出;在查询状态时,按此键退出查询状态;当循环风机因故障进行保护停止运转后按此键启动循环风机。
2.操作说明1)开始烘烤:在非设置、查询状态下,按待运行指示灯亮即进入烘烤过程,同时液晶屏上显示目标温湿度和阶段时间、总时间;在非设置和查询状态下按移动时间外框所在的阶段后,按可以直接在此阶段开始运行。
2)停止烘烤:运行过程中按住 3秒以上待运行指示灯灭,退出烘烤过程。
3)设置参数:按待设置灯亮进入设置状态,通过移动闪动的目标参数,通过改变目标参数,在设置状态下连续按可以使闪动的目标参数在第一个设定温度值、烘烤曲线和实时时间之间快速切换。
修改完参数后按保存,按退出保存。
4)查询:按可以查看另一棚的温湿度值和风机电流值,长按 3秒以上进入历史烘烤记录查询状态,在此状态下可以通过和浏览烘烤的历史数据。
按退出查询状态。
5)自检:按住键和键给控制器通电,控制器进入自检模式,控制器全部显示“8”,且鼓风机通电,冷风门先开后关;然后进入待机状态。
6)恢复出厂值:按住键和键给控制器通电,内部数据恢复出厂值并进入烘烤过程。
.五、高级设置和手动操作1.拨码开关设置:拨码开关默认状态是1下(关)2下(关),此状态控制器参数可调,把下棚传感器作为主控传感器。
当使用电池时,应该把电池开关拨到开位置。
3.内部参数设置1)在系统正常运行状态下,同时按键3秒进入高级参数设置菜单;2)按键可以在F0-F2菜单之间切换;3)按键选择每个菜单的子选项;4)按键可修改对应参数的设定值。
5)按保存,按退出保存。
. 菜单对应参数如下:..2.手动操作1)冷凤门手动操作开关是自复位开关,推到上面是开,推到下面是关。
2)鼓风机手动开关是非自复位开关,自动控制时应该把开关置于“自动”位置。
3)风机调速开关置于低速时风机在低速运转,高速时风机在高速运转,置于停止时风机停止运转。
4)当循环风机因为电路板或者继电器原因不能运转时,可以通过备用开关应急开启循环风机;此时只需把备用开关闭合风机就能运转,但是将失去电流电压异常保护;应急使用后必须及时排除控制器故障,让风机正常运行。
六、安装指导1.控制器必须安装在雨水淋不到和儿童接触不到的地方,同时避免阳光直晒。
相应的电缆应距离地面1.5米以上高度。
.2.控制器输入输出请选择合适线径进行接线,并确保接线压紧,压实。
循环风机电缆的截面积应当不小于1.5平方毫米,其他电缆截面积不小于1平方毫米,绝缘等级450V以上。
3.传感器线不可以与交流电缆或变频器距离太近,平行走线时,应当距离交流电缆至少20cm,交叉时,应当保持90度的交叉角度。
水壶挂放时必须保证水壶的中心线与地面垂直,烘烤前确保水壶中加满水。
4.安装备用电池时注意电池规格和极性,请使用优质电池。
5.妥善保管控制配件,说明书等,以备以后维修时使用。
.七、注意事项1.使用前请仔细阅读使用说明书。
2.非专业人员,严禁在带电状态下接线、检修线路或检修外部设备。
3.每次烘烤之前,检查每一个接线插座是否连接可靠。
4.切勿使输出短路,否则会烧坏继电器及电路板。
5.检查任何带电设备之前,必须断开控制器电源。
6.烘烤之前,必须正确安装备用电池。
7.不可以新旧电池搭配使用。
8.烘烤之前必须对控制器进行接地处理。
9.长时间不使用时,请取出电池,并妥善放置控制器。
10.控制器掉电后,内部实时时钟将恢复出厂值,在烘烤前请正确设置实时时间。
八、技术指标1.控制器工作电源:AC380V±20%2.温度测量范围:0~99.9℃分辨率0.1℃3.温度测量误差:±0.5℃4.电压测量误差:±5V5.电流测量误差:±0.5A.7.电池规格:5号电池,1.5V,3节8.外型尺寸:415mm×295mm×127mm9.外壳材料:阻燃ABS塑料V-1级10.输出容量:助燃鼓风机AC220V 0.7A ,排湿风门DC12V 0.8A,循环风机AC380V 5A11.控制器功耗:5W12.空气开关容量:AC400V 32A/3A九、售后服务承诺及免责声明我公司系列密集烤房控制器均应在说明书规定或相关行业产品规范许可的条件下使用,仅在承诺或本身质量原因范围内,且在质保期内,提供免费维修服务;如在保质期内属于我方责任而我方无法进行有效维修的产品,可以进行更换;超出质量保证期的,维修、服务时仅收取实际发生成本费用。
