sabine_fbx_2420
Cisco UCS B200 M4 Blade Server 产品概述说明书
Data SheetCisco UCS B200 M4 Blade ServerProduct OverviewThe Cisco Unified Computing System ™ (Cisco UCS ®) combines Cisco UCS B-Series Blade Servers and C-SeriesRack Servers with networking and storage access into a single converged system with simplified managemen t,greater cost efficiency and agility, and increased visibility and control. One of the newest servers in the Cisco UCSportfolio is the Cisco UCS B200 M4 Blade Server.The UCS B200 M4 Blade Server (Figure 1) delivers performance, flexibility and optimiza tion for data centers andremote sites. This enterprise-class server offers market-leading performance, versatility, and density withoutcompromise for workloads ranging from web infrastructure to distributed databases. The Cisco UCS B200 M4server can quickly deploy stateless physical and virtual workloads, with the programmable ease of use of theCisco UCS Manager software and simplified server access with Cisco ®SingleConnect technology. Based on theIntel ® Xeon ® processor E5-2600 v4 and v3 product family, it offers up to 1.5 TB of total memory when using 64 GBDIMMs, up to two drives, and up to 80 Gbps I/O throughput. The Cisco UCS B200 M4 offers exceptional levels ofperformance, flexibility, and I/O throughput to run your most demanding applications.In addition, Cisco UCS has the architectural advantage of not having to power and cool excess switches, NICs andHBAs in each blade server chassis. Having a larger power budget per blade server provides uncompromisedexpandability and capabilities, as in the new Cisco UCS B200 M4 server with its leading memory-slot and drivecapacity.Figure 1.Cisco UCS B200 M4 Blade ServerCisco UCS B200 M4 OverviewThe Cisco UCS B200 M4 provides:●Up to two multicore Intel Xeon processor E5-2600 v4 and v3 series CPUs for up to 44 processing cores. ● 24 DIMM slots for industry-standard DDR4 memory at speeds up to 2400 MHz and it offers up to 1.5 TB oftotal memory when using 64 GB DIMMs.● Two optional, hot-plug, SAS and SATA hard disk drives (HDDs) or solid-state drives (SSDs).●Cisco UCS Virtual Interface Card (VIC) 1340: a 2-port, 40 Gigabit Ethernet, Fibre Channel over Ethernet(FCoE)-capable modular LAN on motherboard (mLOM) mezzanine adapter. ◦ 2x ports - 40 Gbps Unified I/O portsor2 sets of 4 x 10-Gbps unified I/O ports◦ Delivers 80 Gbps to the server◦ Adapts to either 10 Gbps or 40 Gbps fabric connections●Cisco FlexStorage local drive storage subsystem provides flexible boot and local storage capabilities. Itallows you to:◦Support for optional NVIDIA M6 GPU◦Configure the Cisco UCS B200 M4 to meet your local storage requirements without having to buy,power and cool components that you do not need.◦Choose an enterprise-class RAID controller, or go without any controller or drive bays if not utilizing local drives◦Easily add, change, or remove Cisco FlexStorage modules●The Cisco UCS B200 M4 server is a half-width blade. Up to eight can reside in the 6-rack-unit (6RU) CiscoUCS 5108 Blade Server Chassis, offering one of the highest densities of servers per rack unit of bladechassis in the industry.OverviewThe Cisco UCS B200 M4 server is suited for a broad spectrum of IT workloads, including:●IT and web infrastructure●Virtualized workloads●Consolidating applications●Virtual desktops●Middleware●ERP and CRM applications●Single-instance and distributed databasesThe Cisco UCS B200 M4 Blade Server is one member of the Cisco UCS B-Series Blade Servers platform.As part of Cisco UCS, Cisco UCS B-Series servers incorporate many innovative Cisco technologies to help customers handle their most challenging workloads. Cisco UCS B-Series servers within a Cisco UCSmanagement framework incorporate a standards-based unified network fabric, Cisco Data Center VM-FEX virtualization support, Cisco UCS Manager, Cisco UCS Central, Cisco UCS Director software, and Cisco fabric extender architecture (Figure 2)Figure 2. Cisco UCS Server Innovations Change the E conomics of the Data Center by E nabling Customer Workloads to Benefit from Cisco UCS Simplification and Operational E fficienciesFeatures and Benefits of the Cisco UCS B200 M4 ServerTable 1 lists the main features and benefits of the Cisco UCS B200 M4.Table 1. Main Features and BenefitsSpecificationsTable 2 provides specifications for the Cisco UCS B200 M4. Table 2. P roduct SpecificationsTable 3. Regulatory Standards ComplianceWarranty InformationFind warranty information at on the Product Warranties page.Cisco Unified Computing ServicesUsing a unified view of data center res ources, Cisco and our industry-leading partners deliver services that accelerate your transition to a unified computing environment. Cisco Unified Computing Services can help you create an agile infrastructure that accelerates time to value, reduces costs and risks, and maintains availability during deployment and migration. After deployment, our services can help you improve performance, availability, and resiliency as your business needs evolve, and mitigate risk further. Quickly deploy your data center r esources and optimize ongoing operations to better meet your business needs. For more information about these and other Cisco Data Center Services offerings, visit /go/unifiedcomputingservices or/go/dcservices.Cisco CapitalFinancing to Help You Achieve Your ObjectivesCisco Capital can help you acquire the technology you need to achieve your objective s and stay competitive. We can help you reduce CapEx. Accelerate your growth. Optimize your investment dollars and ROI. Cisco Capital financing gives you flexibility in acquiring hardware, software, services, and complementary third-party equipment. And th ere’s just one predictable payment. Cisco Capital is available in more than 100 countries. Learn more.For More InformationFor more information about Cisco UCS B-Series Blade Servers, visit/en/US/products/ps10280/index.html or contact your local Cisco representative.Printed in USA C78-732434-04 11/16。
舞台设备租赁价格
舞台设备租赁价格
(2017.10)
根据舞台设备的实际使用情况,重新修订了《舞台设备租赁价格》,并从2017年11月1日开始执行。
《舞台设备租赁价格》适用于在本中心进行的公益活动、商业演出、演出租场、会议租场。
《舞台设备租赁价格》包含以下几份表格:
一、《舞台配套设备租赁价格》
二、《灯光设备租赁价格》
三、《音响设备租赁价格》
四、《录音收费价格》
一、舞台配套设备租赁价格
2017.10
2017.10
注:表中数量为总数,实际可租数量需减去《灯光基本配置》中提供的数量。
三、音响设备租赁价格
2017.10
四、录音收费价格
2017.10。
塞宾FBX-2420
SABINE FBX—2420反馈抑制器新功能,新效果,新感受一,FBX-2420采用SMART FILTER技术的新颖FBX反馈抑制器使调整装置,测试装置的速度更加强大。
精确地调整滤波器的位置,建立一种带宽极窄,吸收深度足够滤波器,从而自动地消除啸叫声。
FBX全部是自动调整的,它的调整速度比任何其他方法更快。
滤波器的品质可以用它的调整速度,精度,分辨率和声音的一致性来衡量。
(1)速度:在全新的FBX-2420中运行的SMART FILTER算法的数字信号处理器的速度优势明显超过所有其他的自动反馈控制器,提高了系统调整的速度,可在不到30秒的时间内完成FBX的各种参数的自动调整。
而且非常宁静。
(而FBX-2220约需二分多钟)(2)精度:FBX杰出的性能总是能精度地判断音乐信号还是反馈信号。
新的SMART FILTER技术使它更为出色。
不复杂是的反馈控制器把滤波器置于一些大声音的位置上,即使是音乐节目也是如此。
但是,FBX使用的专利技术可以分析节目的谐波分量,因为谐波分量上的反馈是低的,而音乐和语言节目都包含丰富的谐波分量,因此FBX可以正确的回答是音乐还是反馈问题。
(3)分辨率:很多反馈控制器把滤波器一般调到反馈频率的附近,然后依靠增加滤波器的带宽,直至消除反馈。
FBX采用了一种更复杂的解决方法。
它把滤波器的中心频率精确的调到反馈频率上。
使用1HZ的分辨率精确地选择滤波器的位置,使得每次它可在单音反馈频率上直接相遇。
(4)声音的一致性:赛宾对数字滤波器的创新处理是工业系统中独一无二的创举,提供数字滤波器的数量恰好使声音更佳,具有更小的相位失真和平滑的频率响应.赛宾滤波器在所有的吸收深度上维持声音的一致性,提供真正的恒定Q值的特性.有些竞争者用更多滤波器招来顾客,但是为什么要增加比需要数量更多的滤波器呢?如果需要,FBX处理器可容易地制造50个滤波器.但是这些滤波器只能损害音质.实践经验证明,每通道提供情报12个滤波器是正确的数量.更多数量的滤波器只能损害声音质量.二, FBX2420采用三种颜色LED显示:琥珀色为末锁定的固定滤波器红色为已锁定的固定滤波器绿色为活动滤波器三,FBX-2420的体积(48.3X4.5X15.9)CM比FBX-2220(48.3X4.5X21.6)CM的体积是小一些的.面板设计更平滑.按钮的摆设更专业,卖点比起其他的产品确实突出.四,FBX为人声和乐器的主扩声和监听系统提供更大的反馈前增益(1)剧场和音乐厅(2)礼拜堂(3)学校和大礼堂(4)会议室和广播室(5)体育比赛活动场所和电台(6)电视电话会议和公共广播。
YAMAHA REV100效果器使用说明FBX-2420反馈抑制器的使用说明

YAMAHA REV100效果器使用说明鉴于目前很多场所在用YAMAHA REV100的效果器,现把该效果器的简易使用说明奉献给大家!YAMAHA--- REV100简易使用说明一、正确安装和连接YAMAHA--- REV100。
如使用单声道可只接左声道。
INPUT LEVEL:输入电平旋钮,调节此旋钮使峰值指示灯在正常工作时偶尔闪亮。
一直闪亮表示信号过强,声音会削波,过弱又会发生音质下降,因此调节适当的电平输入是使用好效果器的第一步,也是很重要的一步。
MIX BALANCE:效果混合旋钮,用来调节效果声和原声之间的比例。
PROGRAM:用来选择不同的程序,编辑程序存储。
二、改变效果程序:YAMAHA—REV100共有99种效果程序,用上下光标键选择。
混响程序名类型说明01 Vocal rev1 人声适用于人声混响02 Vocal rev2 大厅 3号程序的前期延长,混响时间短03 Vocal rev3 人声04 Room ambience1 盘子 04-08这些效果适用于鼓和打击乐音色,可作用于整个鼓组或某个鼓音色05 Room ambience2盘子06 Room ambience3盘子07 Wood booth1 人声08 Wood booth2 人声09 Acoustic piano plate 用于钢琴的混响10 Club piano 大厅用于钢琴的混响11 Booming kick1大厅用于底鼓的混响,强调低频12 Booming kick2 房间用于底鼓的混响,强调低频13 Loud snare房间用于军鼓的混响14 Acoustec steel guitar1 盘子钢弦原声吉它的混响15 Acoustec steel guitar2 盘子钢弦原声吉它的混响16 String plate 盘子弦乐的混响17 Acoustec gut guitar1 人声尼龙弦原声吉它混响18 Acoustec gut guitar2 人声尼龙弦原声吉它混响19 Btass room1 房间铜管乐器的混响20 Btass room 房间铜管乐器的混响立体声混响程序名类型说明21 Large hall1 大厅 Stage比hall的混响更明亮22 Large hall2 大厅 Stage比hall的混响更明亮23 Stage1 大厅 Stage比hall的混响更明亮24 Stage2 大厅 Stage比hall的混响更明亮25 Chamger1 人声模拟大房间,高顶的混响26 Chamger2 大厅模拟大房间,高顶的混响27 Church1 房间模拟大房间,高顶的混响28 Church2 大厅模拟大房间,高顶的混响29 Old gunnel 大厅模拟长通道中的混响,old暗、new明亮30 New tunnel 人声31 Large room1 房间房间混响,32比31低频更多32 Large room2 房间33 Slide reverb 房间混响的声像在右34 Huge room1 房间比房间混响更有力的混响35 Huge room2 房间比房间混响更有力的混响36 Bathroom 盘子短立体声的混响37 String ensemble 盘子用于弦乐的大混响38 Rude reverb1 人声粗混响39 Rude reverb2 人声粗混响40 Comcert grand piano 人声用于原钢琴的混响门混响程序名类型说明41 Small ambience1 大厅小房间反射混响,42比41的低频少42 Small ambience2 大厅43 Tight poom1 房间比上面两种效果更小的混响44 Tight poom 大厅比上面两种效果更小的混响45 Gate reverb1 盘子各种门混响46 Gate reverb2 人声各种门混响47 Gate reverb3 大厅各种门混响48 Gate reverb4 大厅各种门混响49 Stone room 房间石头房间混响50 Big curve 人声最长的门混响延迟程序名说明51 Analog delay1 软延迟52 Ping pong delay 声像左右变化的延迟53 Eighth note triplet 像8分三连音符的延迟54 Karaoke 用于卡拉OK的回声效果55 Short delay doubler 一次短的延迟56 Stereo long delay 左右声道同长的立体声延迟57 Sgereo medium delay 左右声道不等长的立体声延迟58 Stereo long delay 左右声道同长的短延迟59 Mono long delay 单声道输出的重复延迟60 Mono short delay 单声道输出的重复延迟延迟/混响程序名类型说明61 Electric piano 延迟+大厅常用于钢琴62 String pad 延迟大厅常用于背景音乐63 Synth 延迟人声用于弦乐背景64 Vocal1 64、65是用短延迟的长混响,适用于人声65 Vocal2 延迟大厅 64、65是用短延迟的长混响,适用于人声66 Vocal3 延迟房间 66是强调延迟的短混响67 Btinght vocal 延迟盘子有小延迟的亮混响68 Chorus 延迟+盘子一半混响,一半延迟69 Drum kit1 延迟+ 房间用于鼓和打击乐的混响70 Drum kit2 延迟盘子用于鼓和打击乐的混响混响/调制程序名类型说明71 Soft flange1 大厅+飘忽此效果结合了混响和小音高变化的飘忽,常用于合成音色背景音乐72 Soft flange2 大厅+飘忽此效果结合了混响和小音高变化的飘忽,常用于合成音色背景音乐73 Amgience flange1 房间飘忽短混响加飘忽74 Amgience flange2 房间飘忽短混响加飘忽75 Soft reverb flange 房间飘忽短混响加音高变化更大的飘忽76 Organ cabinet1 盘子飘忽用于风琴的飘忽效果77 Organ cabinet2 房间交响用于风琴的飘忽效果78 Symphonic reverb1 大厅+交响以混响为主的精致效果79 Symphonic reverb2 人声+交响以混响为主的精致效果80 Flange room1 房间+飘忽为鼓和打击乐加特效81 Flange room2 房间+飘忽为鼓和打击乐加特效82 Rolling flange1 盘子+飘忽为鼓和打击乐加特效83 Rolling flange2盘子+飘忽为鼓和打击乐加特效84 Big flange 人声飘忽喷气机效果85 Chorus rererb1 大厅+合唱 85,86是普通的混响+合唱,用途很广如用于钢琴86 Chorus reverb2 盘子+合唱87 Chorus reverb3 大厅+和唱88 Chorus reverb4 人声+合唱89 Tremolo reverb1 大厅+震音震音+混响的各种变化效果90 Tremolo reverb2 大厅震音震音+混响的各种变化效果91 Tremolo reverb3 盘子+震音震音+混响的各种变化效果92 Tremolo reverb4 人声+震音震音+混响的各种变化效果93 Tremolo reverb5 人声+震音震音+混响的各种变化效果94 Tremolo reverb6 大厅+震音震音+混响的各种变化效果95 Tremolo reverb7 大厅+震音震音+混响的各种变化效果96 Ambient slow pan1大厅+震音左右声像变化和短混响97 Ambient slow pan2 房间+震音左右声像变化和短混响98 Sequence pan1房间+震音根据乐曲速度而定的声像变化效果99 Sequence pan2房间+震音根据乐曲速度而定的声像变化效果编辑模式(Edit Mode)REV100的每个效果都具有多个参数,3个主要参数可通过面板上的旋钮控制。
FBX2420操作说明书
SABINE FBX2420+双声道反馈抑制器操作手册一、声反馈产生原因扩声系统中之所以产生声反馈现象是由于传声器将扬声器重放出来的声音反复拾取且音量超过一定限度时,这种同频声信号就会引起放大电路回授,产生啸叫。
出现啸叫现象主要有三方面原因:一是传声器拾音入射角度与扬声器辐射角度接近,直接拾取重放声;二是扬声器与传声器距离较近,传声器间接拾取重放声;第三个原因是室内频响特性不好,存在驻波点,当按额定功率输出时,这一频率的声场就会高出其它频率许多,只要节目频率与其相同时,就会造成传声器间接拾取过多此频率信号,形成啸叫。
二、抑制声反馈的手段早期,人们常利用分段均衡器(EQ)作为声反馈抑制设备。
由于EQ滤波器是固定不可变的,无法将其精确定位到回授点。
另外,由于EQ滤波器的带宽较宽,陷波深度较深,使用过程中将损失不少声功率。
FBX的出现克服均衡器作为声反馈抑制设备的很多不足。
与分段图形均衡器相比,它有三大优势:首先是FBX具有自动功能,设置好后,无须音响师手动调整;其次是FBX能够自动搜索、精确定位回授频点;第三个也是最重要的优点是FBX的宏滤波器不必做得很深或是很宽,它比多段EQ滤波器窄数十倍,这意味着音响师可在保证不发生啸叫情况下将系统增益推得更高。
FBX与31段图形均衡器(EQ)的频响特性比较如图1所示。
图1FBX与EQ频响比较三、FBX的使用方法3.1连接方式FBX最常见的连接位置是在调音台和功放之间。
在这个位置,FBX可感应并消除调音台任何一路产生的回授,如图2所示。
图2典型扩声系统连接框图注意:如果调音台是不平衡输出,你必须用标准的不平衡电缆和连接头连接调音台和FBX。
同样,如果调音台是平衡输出,你也必须用相应类型的接头插件,否则就会损失增益。
FBX被设计成平衡输出。
平衡输出的任一端接地,动态范围内都会有6dB的衰减(不平衡时最大+21dBV,平衡时最大+27dBV)。
3.2理解固定和动态滤波器操作FBX之前,先要理解两种类型的FBX滤波器:固定的和动态的。
桌面云系统扩容方案

用户桌面扩容—— FA区域360个用户桌面扩容
FA区域
服务器
配置需求
存储需求
FA2-1
2路10核,256GB内存
按1期每个虚拟桌面10GB Write Cache盘的规划,共需磁盘空间4TB
FA2-2
2路10核,256GB内存
FA2-3
2路10核,256GB内存
FA2-4
2路10核,256GB内存
新增物理服务器需求
基础架构扩容
新增虚拟服务器需求
服务器名称
配置需求
存储需求
CTXPRDCWI05
2vCPU,4GB
50GB
CTXPRDCWI06
2vCPU,4GB
50GB
CTXPRDDDC05
2vCPU,4GB
50GB
CTXPRDDDC06
2vCPU,4GB
50GB
CTXPRDPVS07
4vCPU,32GB
32GB内存
OA1-10
2路8核,192GB内存
32GB内存
注:现每台服务器均使用了约160GB内存,从系统冗余性考虑,当其中一台服务器出现故障时,可由剩余九台服务器负担其服务。此外,按照Citrix Consultant设计方案,每个CPU承载4个虚拟桌面计算,每台服务器应承载16×4=64个桌面,整个资源池共应承载桌面640个。因此目前OA-1资源池使用情况已大大超出了方案规划(共有虚拟机680个),存在资源超用的风险。
OA2-10
2路8核,192GB内存
32GB内存
注:现每台服务器均使用了约160GB内存,从系统冗余性考虑,当其中一台服务器出现故障时,可由剩余九台服务器负担其服务。此外,按照Citrix Consultant设计方案,每个CPU承载4个虚拟桌面计算,每台服务器应承载16×4=64个桌面,整个资源池共应承载桌面640个。因此目前OA-1资源池使用情况已大大超出了方案规划(共有虚拟机683个),存在资源超用的风险。
学术报告厅设备清单

11 辅助全频音箱功 放 12 返送音箱功放 13 超低音箱功放
14 数字音频处理器 15 16 17 18 效果器 均衡器 反馈抑制器 电源时序器
台 美国/雅士尼 台 日本/YAMAHA 台 美国/DBX
台 美国/SABINE 台 美国源自BE四、中央控制系统(远程视频会议基本配置,实时画面预览及大屏幕画面分割)
2 3 4 5 6 7 8 9
DVD播放机 电脑点歌机 无线话筒 话筒支架 主扩声音箱 辅助全频音箱 返送音箱 超低音箱
1 1 2 4 2 2 2 2
台 套 套 套 只 只 只 只
日本/先锋 中国/雷石 中国/得胜 中国/国产 美国/JBL 美国/JBL 美国/JBL 美国/JBL
824 10,800 940 260 5,220 4,920 3,866 3,760
幅 加拿大/美视 个 台 套 中国/夏普定 制 中国/威光 中国/国产
三、音频扩声系统(本音响系统为会议及多媒体多用途,并且包含电脑点歌系统)
1 调音台 雅马哈MG166CX 调音台-130 dB动态范围,带15dB增益,16声道插入,4路编组,4路 立体声,6路辅助.18dB/oct75Hz低切滤波器,内置电源设计,48V幻像电源 PIONEER DV310-G DVD,支持类型:DVD,DVD-R,DVD-RW,SVCD,VCD,CD,CDR,CD-RW,DVD+R,DVD+RW,DVD-R DL,兼容支持WMA/MP3等格式,JPEG照片浏览 器,支持DivX等,全格式兼容 雷石单机版电脑点歌系统(1000G海量硬盘存储),含操作台,触摸屏,点歌主 机、歌库、软件等 得胜TS-6700发射器:输出功率:20mW 总滤波失真:< 0... 接收器:调制类 型:VHF 接收频率:220MHz-产品特性1失真度:0.5% (1kHz) 话筒坐地支架 美国JBL MDD215专业音箱,承载功率 500(W),阻抗 8(Ω) JBL JRX125 专业全频音箱 500(W),阻抗 8(Ω) JBL JRX112 舞台专业音箱,承载功率 300(W),阻抗 8(Ω) JBL MDD212专业超重低音音箱 承载功率 500(W),阻抗 8(Ω) 1 台 日本/雅马哈 3,800 3,800
手把手教你如何修改inf文件使最新的驱动支持你的显卡
废话不多说,直接开始1.首先第一步,当然是下载显卡驱动啦大家可以直接用nvidia 控制面板的nvidia 更新功能,找到最新的显卡驱动下载地址。
直接去官网或者驱动之家这样的网站也行点击下载,弹出这样的下载页,下载即可解压点击安装,会在C 盘生成一个NVIDIA 文件夹按照以下路径,找到这个Display.Driver 这个文件夹。
按类型排列文件,就可以找到我们要修改的inf 文件了宏碁是nvac.inf华硕是nvam.inf联想是nvlt.inf戴尔是nvdm.inf请找到自己厂商对应的inf 文件进行修改找到需要修改的inf 文件后,我们就可以查找自己显卡的硬件ID 了2.首先打开控制面板,找到设备管理器打开设备管理器后,点击最下方的显示适配器,可以看到,楼主使用的是gt240m 显卡右键属性,点详细信息点中间属性,下拉选择硬件ID 我们找到我们所需要的ID 了,也就是PCIVEN_10DEDEV_0A34SUBSYS_20361043不同种不同显卡的机器对应的ID 是不一样的。
这串ID 我们要特别注意SUBSYS 之前的0A34这四个字符,它代表了你所对应的显卡。
比如0A34 代表gt240m 0DF4 代表gt540m接下来我们就需要修改inf 文件了3.首先先注意一点,打开inf 文件,我们可以看到硬件ID 列表中有的在NVIDIA_SetA_Devices.NTamd64.6.0 的下面有的在NVIDIA_SetA_Devices.NTamd64.6.1 的下面NT6.0 也就是vista 的代号,说面下面那串ID 是对于Vista 的NT6.1 也就是win7 的代号,说明下面那串ID 是对于win7 的(顺便吐槽下,win8 代号是NT6.2.和win7 一样是vista 的马甲)所以对于win7 用户,我们要确保修改的ID 在NVIDIA_SetA_Devices.NTamd64.6.1 的下面如图这时我们就需要用到前面那串硬件ID 了我们在前面找到的ID 是PCIVEN_10DEDEV_0A34SUBSYS_20361043这串ID 我们只要用ctrlF,搜索0A34这四个字符就行注:上一楼说过了,找到的内容要在NVIDIA_SetA_Devices.NTamd64.6.1 的下面如图,我们可以看到,红色下划线标出的那串字符与我们显卡的硬件ID 完全吻合。
G Series LCD Monitor G244F E2 (3BB4) G244PF E2 (3B

G Series LCD MonitorG244F E2 (3BB4) G244PF E2 (3BB4) User GuideContentsGetting Started (3)Package Contents (3)Installing the Monitor Stand (4)Adjusting the Monitor (6)Monitor Overview (8)Connecting the Monitor to PC (11)OSD Setup (13)Navi Key (13)Hot Key (14)OSD Menus (15)Gaming (15)Professional (17)Image (18)Input Source (19)Navi Key (19)Setting (20)Specifications (22)Preset Display Modes (24)Troubleshooting (25)Safety Instructions (26)TÜV Rheinland Certification (28)Regulatory Notices (29)RevisionV1.0, 2023/09Getting StartedThis chapter provides you with the information on hardware setup procedures. While connecting devices, be careful in holding the devices and use a grounded wrist strap to avoid static electricity.∙Contact your place of purchase or local distributor if any of the items is damaged or missing.∙Package contents may vary by country.∙The included power cord is exclusively for this monitor and should not be used with other products.Installing the Monitor Stand1. Leave the monitor in its protective packaging. Align the stand bracket to the monitor groove.2. Tighten the stand bracket with screws.3. Connect the base to the stand and tighten the base screw to secure the base.4. Make sure the stand assembly is properly installed before setting the monitor upright.G244F E2G244PF E2Important ∙Place the monitor on a soft, protected surface to avoid scratching the display panel. ∙Do not use any sharp objects on the panel. ∙The groove for installing the stand bracket can also be used for wall mount. Please contact your dealer for proper wall mount kit. ∙This product comes with NO protective film to be removed by the user! Any mechanical damages to the product including removal of the polarizing film mayAdjusting the MonitorThis monitor is designed to maximize your viewing comfort with its adjustment capabilities.⚠ImportantAvoid touching the display panel when adjusting the monitor.G244F E2G244PF E2Monitor Overview G244F E2G244PF E2Connecting the Monitor to PC1. Turn off your computer.2. Connect the video cable from the monitor to your computer.3. Assemble the external power supply & power cord. (Figure A)4. Connect the external power supply to the monitor power jack. (Figure B)5. Plug the power cord into the electrical outlet. (Figure C)6. Turn on the monitor. (Figure D)7. Power on the computer and the monitor will auto detect the signal source. G244F E2G244PF E2OSD SetupThis chapter provides you with essential information on OSD Setup.⚠ImportantAll information is subject to change without prior notice.Navi KeyThe monitor comes with a Navi Key, a multi-directional control that helps navigate the On-Screen Display (OSD) menu.G244F E2G244PF E2Up/Down/Left/Right:∙selecting function menus and items∙adjusting function values∙entering into/exiting from function menusPress (OK):∙launching the On-Screen Display (OSD)∙entering submenus∙confirming a selection or settingHot Key∙Users may enter into preset function menus by moving the Navi Key up, down, left or right when the OSD menu is inactive.∙Users may customize their own Hot Keys to enter into different function menus.OSD Menus⚠ImportantThe following settings will be grayed out when HDR signals are received:∙Night Vision ∙MPRT∙Low Blue Light∙HDCR ∙Brightness ∙Contrast3.0A 3.0A* Based on CIE1976 test standards.Preset Display Modes ImportantTroubleshootingThe power LED is off.• Press the monitor power button again.• Check if the monitor power cable is properly connected.No image.• Check if the computer graphics card is properly installed.• Check if the computer and monitor are connected to electrical outlets and are turned on.• Check if the monitor signal cable is properly connected.• The computer may be in Standby mode. Press any key to activate the monitor. The screen image is not properly sized or centered.• Refer to Preset Display Modes to set the computer to a setting suitable for the monitor to display.No Plug & Play.• Check if the monitor power cable is properly connected.• Check if the monitor signal cable is properly connected.• Check if the computer and graphics card are Plug & Play compatible. The icons, font or screen are fuzzy, blurry or have color problems.• Avoid using any video extension cables.• Adjust brightness and contrast.• Adjust RGB color or tune color temperature.• Check if the monitor signal cable is properly connected.• Check for bent pins on the signal cable connector.The monitor starts flickering or shows waves.• Change the refresh rate to match the capabilities of your monitor.• Update your graphics card drivers.• Keep the monitor away from electrical devices that may cause electromagnetic interference (EMI).Safety Instructions∙Read the safety instructions carefully and thoroughly.∙All cautions and warnings on the device or User Guide should be noted.∙Refer servicing to qualified personnel only.Power∙Make sure that the power voltage is within its safety range and has been adjusted properly to the value of 100~240V before connecting the device to the power outlet. ∙If the power cord comes with a 3-pin plug, do not disable the protective earth pin from the plug. The device must be connected to an earthed mains socket-outlet.∙Please confirm the power distribution system in the installation site shall provide the circuit breaker rated 120/240V, 20A (maximum).∙Always disconnect the power cord or switch the wall socket off if the device would be left unused for a certain time to achieve zero energy consumption.∙Place the power cord in a way that people are unlikely to step on it. Do not place anything on the power cord.∙If this device comes with an adapter, use only the MSI provided AC adapter approved for use with this device.Environment∙To reduce the possibility of heat-related injuries or of overheating the device, do not place the device on a soft, unsteady surface or obstruct its air ventilators.∙Use this device only on a hard, flat and steady surface.∙To prevent the device from tipping over, secure the device to a desk, wall or fixed object with an anti-tip fastener that helps to properly support the device and keep it safe in place.∙To prevent fire or shock hazard, keep this device away from humidity and high temperature.∙Do not leave the device in an unconditioned environment with a storage temperature above 60℃ or below -20℃, which may damage the device.∙The maximum operating temperature is around 40℃.∙When cleaning the device, be sure to remove the power plug. Use a piece of soft cloth rather than industrial chemical to clean the device. Never pour any liquid into the opening; that could damage the device or cause electric shock.∙Always keep strong magnetic or electrical objects away from the device.∙If any of the following situations arises, get the device checked by service personnel:• The power cord or plug is damaged.• Liquid has penetrated into the device.• The device has been exposed to moisture.• The device does not work well or you can not get it working according to the User Guide.• The device has dropped and damaged.• The device has obvious sign of breakage.TÜV Rheinland CertificationTÜV Rheinland Low Blue Light CertificationBlue light has been shown to cause eye fatigueand discomfort. MSI now offers monitors with TÜVRheinland Low Blue Light certification to ensureusers’ eye comfort and well-being. Please followthe instructions below to reduce the symptoms fromextended exposure to the screen and blue light.∙Place the screen 20 – 28 inches (50 – 70 cm) away from your eyes and a little below eye level.∙Consciously blinking the eyes every now and then will help to reduce eye strain after extended screen time.∙Take breaks for 20 minutes every 2 hours.∙Look away from the screen and gaze at a distant object for at least 20 seconds during breaks.∙Make stretches to relieve body fatigue or pain during breaks.∙Turn on the optional Low Blue Light function.TÜV Rheinland Flicker Free Certification∙TÜV Rheinland has tested this product toascertain whether the display produces visibleand invisible flicker for the human eye andtherefore strains the eyes of users.∙TÜV Rheinland has defined a catalogue oftests, which sets out minimum standardsat various frequency ranges. The test catalogue is based on internationally applicable standards or standards common within the industry and exceeds these requirements.∙The product has been tested in the laboratory according to these criteria.∙The keyword “Flicker Free” confirms that the device has no visible and invisible flicker defined in this standard within the range of 0 - 3000 Hz under various brightness settings.∙The display will not support Flicker Free when Anti Motion Blur/MPRT is enabled. (The availability of Anti Motion Blur/MPRT varies by products.)Regulatory NoticesCE ConformityThis device complies with the requirements set out in the Council Directive on the Approximation of the Laws of the Member States relating to Electromagnetic Compatibility (2014/30/EU), Low-voltage Directive (2014/35/EU), ErP Directive (2009/125/EC) and RoHS directive (2011/65/EU). This product has been tested and found to comply with the harmonized standards for Information Technology Equipment published under Directives of Official Journal of the European Union.FCC-B Radio Frequency Interference StatementThis equipment has been tested and found to comply with the limitsfor a Class B digital device, pursuant to Part 15 of the FCC Rules.These limits are designed to provide reasonable protection against harmful interference in a residential installation. This equipment generates, uses and can radiate radio frequency energy and, ifnot installed and used in accordance with the instruction manual, may cause harmful interference to radio communications. However, there is no guarantee that interference will not occur in a particular installation. If this equipment does cause harmful interference to radio or television reception, which can be determined by turning the equipment off and on, the user is encouraged to try to correct the interference by one or more of the measures listed below:∙Reorient or relocate the receiving antenna.∙Increase the separation between the equipment and receiver.∙Connect the equipment into an outlet on a circuit different from that to which the receiver is connected.∙Consult the dealer or an experienced radio/television technician for help. Notice 1The changes or modifications not expressly approved by the party responsible for compliance could void the user’s authority to operate the equipment. Notice 2Shielded interface cables and AC power cord, if any, must be used in order to comply with the emission limits.This device complies with Part 15 of the FCC Rules. Operation is subject to the following two conditions:1. This device may not cause harmful interference, and2. This device must accept any interference received, including interference that may cause undesired operation.MSI Computer Corp.901 Canada Court, City of Industry, CA 91748, USA(626) 913-0828WEEE StatementUnder the European Union (“EU”) Directive on Waste Electrical and Electronic Equipment, Directive 2012/19/EU, products of “electrical and electronic equipment” cannot be discarded as municipal waste anymoreand manufacturers of covered electronic equipment will be obligated totake back such products at the end of their useful life. Chemical Substances InformationIn compliance with chemical substances regulations, such as the EU REACH Regulation (Regulation EC No. 1907/2006 of the European Parliament and the Council), MSI provides the information of chemical substances in products at: https:///global/indexRoHS StatementJapan JIS C 0950 Material DeclarationA Japanese regulatory requirement, defined by specification JIS C 0950, mandates that manufacturers provide material declarations for certain categories of electronic products offered for sale after July 1, 2006.https:///global/Japan-JIS-C-0950-Material-Declarations India RoHSThis product complies with the “India E-waste (Management and Handling) Rule 2016” and prohibits use of lead, mercury, hexavalent chromium, polybrominated biphenyls or polybrominated diphenyl ethers in concentrations exceeding 0.1 weight % and 0.01 weight % for cadmium, except for the exemptions set in Schedule 2 of the Rule. Turkey EEE RegulationConforms to the EEE Regulations of the Republic Of Turkey Ukraine Restriction of Hazardous SubstancesThe equipment complies with requirements of the Technical Regulation, approved by the Resolution of Cabinet of Ministry of Ukraine as of 10 March 2017, № 139, in terms of restrictions for the use of certain dangerous substances in electrical and electronic equipment.Vietnam RoHSAs from December 1, 2012, all products manufactured by MSI comply with Circular 30/2011/TT-BCT temporarily regulating the permitted limits for a number of hazardous substances in electronic and electric products.31Green Product Features∙Reduced energy consumption during use and stand-by ∙Limited use of substances harmful to the environment and health∙Easily dismantled and recycled ∙Reduced use of natural resources by encouraging recycling ∙Extended product lifetime through easy upgrades ∙Reduced solid waste production through take-back policy Environmental Policy ∙The product has been designed to enable proper reuse of parts and recycling and should not be thrown away at its end of life. ∙Users should contact the local authorized point of collection for recycling and disposing of their end-of-life products. ∙Visit the MSI website and locate a nearby distributor for further recycling information. ∙*******************************************************************disposal, take-back, recycling, and disassembly of MSI products.Warning!Overuse of screens is likely to affect eyesight.Recommendations: 1. Take a 10-minute break for every 30 minutes of screen time. 2. Children under 2 years of age should have no screen time. For children aged 2 years and over, screen time should be limited to less than one hour per day.Copyright and Trademarks Notice Copyright © Micro-Star Int’l Co., Ltd. All rights reserved. The MSI logo used is a registered trademark of Micro-Star Int’l Co., Ltd. All other marks and names mentioned may be trademarks of their respective owners. No warranty as to accuracy or completeness is expressed or implied. MSI reserves the right to make changes to this document without prior notice.The terms HDMI™, HDMI™ High-Definition Multimedia Interface, HDMI™ Trade dress and the HDMI™ Logos are trademarks or registered trademarks of HDMI™ Licensing Administrator, Inc.Technical Support If a problem arises with your product and no solution can be obtained from the user’s manual, please contact your place of purchase or local distributor. Alternatively,please visit https:///support/ for further guidance.。
均衡器参数详解

均衡器参数详解2009-10-17 09:171、均衡器的调整方法:超低音: 20Hz-40Hz,适当时声音强而有力。
能控制雷声、低音鼓、管风琴和贝司的声音。
过度提升会使音乐变得混浊不清。
低音: 40Hz-150Hz,是声音的基础部份,其能量占整个音频能量的70%,是表现音乐风格的重要成份。
适当时,低音张弛得宜,声音丰满柔和,不足时声音单薄,150Hz,过度提升时会使声音发闷,明亮度下降,鼻音增强。
中低音: 150Hz-500Hz,是声音的结构部分,人声位于这个位置,不足时,演唱声会被音乐淹没,声音软而无力,适当提升时会感到浑厚有力,提高声音的力度和响度。
提升过度时会使低音变得生硬,300Hz处过度提升3-6dB,如再加上混响,则会严重影响声音的清晰度。
中音: 500Hz-2KHz,包含大多数乐器的低次谐波和泛音,是小军鼓和打击乐器的特征音。
适当时声音透彻明亮,不足时声音朦胧。
过度提升时会产生类似电话的声音。
中高音: 2KHz-5KHz,是弦乐的特征音<拉弦乐的弓与弦的摩搡声,弹拔乐的手指触弦的声音某)。
不足时声音的穿透力下降,过强时会掩蔽语言音节的识别。
高音: 7KHz-8KHz,是影响声音层次感的频率。
过度提升会使短笛、长笛声音突出,语言的齿音加重和音色发毛。
极高音: 8KHz-10KHz合适时,三角铁和立*的金属感通透率高,沙钟的节奏清晰可辨。
过度提升会使声音不自然,易烧毁高频单元。
2、平衡悦耳的声音应是:150Hz以下<低音)应是丰满、柔和而富有弹性;150Hz-500Hz<中低音)应是浑厚有力百不混浊;500Hz-5KHz<中高音)应是明亮透彻而不生硬;5KHz以上<高音)应是纤细,园顺而不尖锐刺耳。
整个频响特性平直时:声音自然丰满而有弹性,层次清晰园顺悦耳。
频响多峰谷时:声音粗糙混浊,高音刺耳发毛,无层次感扩声易发生反馈啸叫。
3、频率的音感特征:30~60Hz 沉闷如没有相当大的响度,人耳很难感觉。
500平米中学多功能报告厅设备清单及预算

数字会议系统建设(500平)序号设备名称型号和技术规格数量制造商名称单价小计备注一、会议讨论系统(按主席台上8位发言人员,会议话筒为有线无线两用更加方面布置会场)1 2会议话筒智能混音器得胜 MS-168W;频率响应:70-16,000 Hz;含底座有线/无线两用安度GS-MX9200,8路智能混音器,每通道均设有可选择的EQ调节,每路均有独立可选择的幻像电源81台台中国/得胜台湾/安度5654,5004,5204,500会议讨论系统二、视频显示系统(以LED显示单元为主显示系统,投影为辅助显示系统)1 2 3 4 5投影机投影幕投影机吊架L ED显示屏L ED显示同步主机夏普D3580XA,投影机显示技术:DLP 标准显示分辨率(dpi):1024*768最大支持1600*1200;标称对比度:2500:1;标称光亮度:4200流明;投影方式:正投/背投/吊投美视150英寸美视画框幕(150英寸)定制投影机安装架P5 LED 三合一 室内全彩 深圳威光室内表贴三合一LED显示屏4.8mX2.7mLED显示屏控制 英特尔四核处理器222131台日本/夏普11,8005,9001,5009,6005,40023,60011,8003,000124,8005,400主显示系统辅助显示系统幅加拿大/美视个台套中国/夏普定制中国/威光中国/国产三、音频扩声系统(本音响系统为会议及多媒体多用途,并且包含电脑点歌系统)1调音台雅马哈MG166CX 调音台-130 dB动态范围,带15dB增益,16声道插入,4路编组,4路立体声,6路辅助.18dB/oct75Hz低切滤波器,内置电源设计,48V幻像电源PIONEER DV310-G DVD,支持类型:DVD,DVD-R,DVD-RW,SVCD,VCD,CD,CD-R,CD-RW,DVD+R,DVD+RW,DVD-R DL,兼容支持WMA/MP3等格式,JPEG照片浏览器,支持DivX等,全格式兼容雷石单机版电脑点歌系统(1000G海量硬盘存储),含操作台,触摸屏,点歌主机、歌库、软件等得胜TS-6700发射器:输出功率:20mW 总滤波失真:< 0... 接收器:调制类型:VHF 接收频率:220MHz-产品特性1失真度:0.5% (1kHz)话筒坐地支架美国JBL MDD215专业音箱,承载功率 500(W),阻抗 8(Ω)JBL JRX125 专业全频音箱 500(W),阻抗 8(Ω)JBL JRX112 舞台专业音箱,承载功率 300(W),阻抗 8(Ω)JBL MDD212专业超重低音音箱 承载功率 500(W),阻抗 8(Ω)1台日本/雅马哈3,8003,8002 3 4 5 6 7 8 9DVD播放机电脑点歌机无线话筒话筒支架主扩声音箱辅助全频音箱返送音箱超低音箱11242222台套套套只只只只日本/先锋中国/雷石中国/得胜中国/国产美国/JBL美国/JBL美国/JBL美国/JBL82410,8009402605,2204,9203,8663,76082410,8001,8801,04010,4409,8407,7327,520音响及周边设备设备10主扩声功放声准CA18 专业功率放大器,承载功率1150(W),阻抗 8(Ω)声准CA18 专业功率放大器,承载功率1150(W),阻抗 8(Ω)声准CA6 专业功率放大器,承载功率450(W),阻抗 8(Ω)声准CA18 专业功率放大器,承载功率1150(W),阻抗 8(Ω)雅士尼音频处理器YAMAHA REV100效果器DBX 2231,31段图示均衡器, TRS或XLR差分平衡入和输出,带宽: 20Hz——20Hz,+/-0.5dB,信噪比:>102dBSABINE FBX2420,反馈抑制器,防止啸叫,24bit的数字解析度,三种颜色的LED滤波器显示,每个通道设有12个滤波器,从40Hz~20kHz自动控制8路电源时序器111111212台台台台美国/声准美国/声准美国/声准美国/声准4,4804,4803,9404,4804,8002,7003,0403,3601,9804,4804,4803,9404,4804,8002,7006,0803,3603,96011辅助全频音箱功放12返送音箱功放13超低音箱功放14数字音频处理器15 16 17 18效果器均衡器反馈抑制器电源时序器台美国/雅士尼台日本/YAMAHA台美国/DBX台美国/SABINE台美国/BE四、中央控制系统(远程视频会议基本配置,实时画面预览及大屏幕画面分割)1 2 3图形拼接控制器DH DSCON 图形拼接控制器(将会议实况分割至主显示及辅助显示系统1-4画面)A V矩阵V GA矩阵大华 AV0404视频矩阵,4路输入,4路输出大华 VGA0808-A矩阵,8路VGA输入,8路VGA输出,8路音频输入,8路音频输出;音频与VGA信号同步切换。
美国SAIBIN FBX2420反馈抑制器使用说明

美国SAIBIN FBX2420反馈抑制器使用说明下面的一些步骤能够使系统在不改变系统音调质量的前提下,在回授发生之前得到最大的增益(注意:不要同时设置两个声道)。
步骤1:放置音箱和传声器在需要的位置,注意传声器不要直接对着音箱;步骤2:按“Bypass”按钮,设置FBX通道在直通模式;步骤3:把调音台输出电平拉至最低位置,打开调音台,然后是FBX和其它附属设备,最后是功放。
然后调整调音台每个声道的平衡,把扩声系统的主输出设至最小;步骤4:按下复位RESET DYNAMICS键直至所有指示灯熄灭以清除前一次的滤波器设置,Clip电平指示灯将闪烁;步骤5(可选项):设置固定滤波器的数目。
按下“NUMBER OCTA VE”按钮( )秒钟。
滤波器指示灯(LED)将闪烁4次然后熄灭。
放开按钮,LED将开始一个接一个点亮,当相应固定滤波器数目的灯点亮时,按下“Set Fixed”按钮。
固定滤波器已被成功设置,剩下的滤波器将是动态滤波器;(到达哪一个位置时,时候便默认为几个,如;闪烁到第3个时便默认为3个。
闪烁至11个时默认为11个固定通道)步骤6:接着再设定活动滤波器;按下RESET DYNAMICS 再次设定活动滤波器.(方法同设定固定滤波器雷同)步骤7:按下“Bypass”按钮,红色LED熄灭,按下STEUP键正式进入该通道进入Active激活模式;步骤8:慢慢提升扩声系统中所要设置的通道的主输出电平,直到回授发生。
FBX将快速去除回授。
第一个滤波器灯将闪烁,表明一个滤波器已被设置。
重复上述过程直到所有的固定滤波器和一个动态滤波器被设定。
步骤9:慢慢拉低主输出电平,别让系统处于另一个回授点的边缘,这时候的音量电平就是FBX所能提供的最大音量电平。
电平过高将导致无法控制的回授;当固定滤波器通道完全激活以后,系统自动暂停整个SABINE 的工作。
此时READY 键中的蓝色灯开始亮起。
设置基本完成。
其他方面:通道A和通道B(左右声道)必须单独、分开设定。
sabre format 系统指令
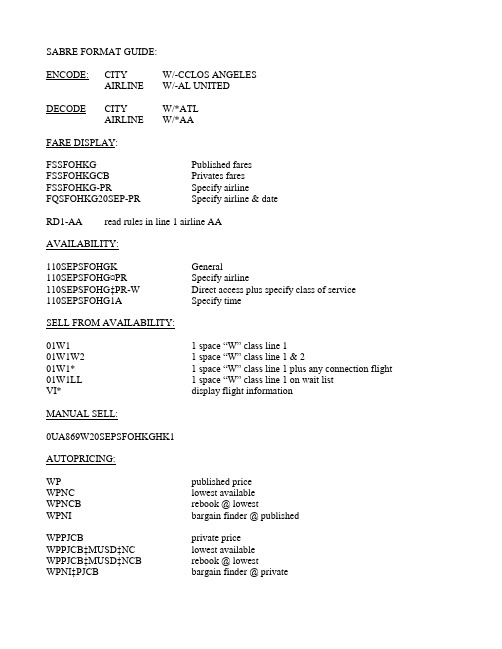
SABRE FORMAT GUIDE:ENCODE: CITY W/-CCLOS ANGELESAIRLINE W/-AL UNITEDDECODE CITY W/*ATLAIRLINE W/*AAFARE DISPLAY:FSSFOHKG Published faresFSSFOHKGCB Privates faresFSSFOHKG-PR Specify airlineFQSFOHKG20SEP-PR Specify airline & dateRD1-AA read rules in line 1 airline AAAVAILABILITY:110SEPSFOHGK General110SEPSFOHG¤PR Specify airline110SEPSFOHG‡PR-W Direct access plus specify class of service110SEPSFOHG1A Specify timeSELL FROM AVAILABILITY:01W1 1 space “W” class line 101W1W2 1 space “W” class line 1 & 201W1* 1 space “W” class line 1 plus any connection flight 01W1LL 1 space “W” class line 1 on wait listVI* display flight informationMANUAL SELL:0UA869W20SEPSFOHKGHK1AUTOPRICING:WP published priceWPNC lowest availableWPNCB rebook @ lowestWPNI bargain finder @ publishedWPPJCB private priceWPPJCB‡MUSD‡NC lowest availableWPPJCB‡MUSD‡NCB rebook @ lowestWPNI‡PJCB bargain finder @ privatePRICING BY PASSENGER TYPE:WPPADT Adult published fareWPPCNN child fareWPPSRC senior fareWPPINF infant fareWPPJCB/JNN adult + child private fareWPPJCB/JNF adult + infant fare* by quantity always add before passenger typeWPP1ADT/1CNNWPP2JCB/2JNN/1JNFCREATE PNR:NAME FIELD: -SMITH/MARY-2LEE/JOHN/JAMESCHANGE FIRST NAE -1.1¤MARIAHDELETE NAME -1.1¤TICKETING FIELD: 7T-APHONE FIELD: 9 SFO 415-505-5000EMAIL ADDRESS: PE‡*******************‡PH DISPLAY EMAIL *PECHANGE EMAIL PE¤FREQUENT FLYER INFO FFBA123456-1.1REMARK 5/ JOHN LEESTORE FARE:WS Published fareWSPJCB Private fareWSP*** Specify passenger typeRECEIVED & CLOSED 6IRERIRSEND EMAIL5V‡SL – FREE TXT (65 CHARACTERS MAX)EMRETRIEVE PNR:BY NAME *-LEE/JONESDIVIDE PNR:D1.16IRF6ERERFORCE FARE:WPS1/2*QZXA00THF Single fare basisWPS1*QZXA00THF‡S2*QZWA00THF Multiple fare basisRATE DESK PRICE:W‡C Published fareW‡C‡P*** Specify passenger type (if bulk use those types codes)W‡I‡YUSD400.00/120.00XT‡L1/2*WEA00THF Single fare‡L1*WEA00THF-L2*LEZ00THF Multiple fare basisW‡I‡C SAL TA Q10.00 190.00WEA00THF TA SAL Q10.00 190.00WEA00THF NUC 400.00 USD END ROE1.00 SOTO XT 29.00US 5.00YC 7.00XY 5.00XA 2.50AY 47.00SV 4.50XF END XFSFO4.5W‡I‡C MGA X/SAL TA using city connexionsW‡I‡ED/ONLY UNUSED TKT IS REF FOR 100USD/CHNG 100USD/NONEDER*W Display recordW‡D Delete all recordsW‡D1Delete specific recordFORM OF PAYMENT:5-CASH5-*CCVI1234567890123456‡01/02REQUEST ADDRESS VERIFICATION:CK*AVSVI1234567890123456/356MAINST/94010/PROSI FIELD:3 OSI PR TKT NBRSSR FIELD3PSPA/K123456/US/16SEP10/JONES/SIMON/M -1.1 Passport information SEATS:4GA/W specify all in windows4G1* specify segment4GX1 cancel specific segment4GXALL cancel all*B display seatsTICKETINGW‡AUA‡U222AC‡KP8‡ETR Using U designate tour codeW‡Q/L188/DP0‡ACO Q/ for ticket designator, KP it's comm。
赛能说明书
篇一:比赛规则说明书比赛规则说明书一、球类赛规则1.1 男子7人足球(7人+3替)一、队员人数1、每队上场队员最多7人,可以有替补队员3人,如果因特殊情况一队只有6人到场,可以以6人应战对手7人。
2、一场比赛应由两队参加,每队上场队员不得多于7人,其中必须有1人为守门员。
如果比赛前任何一队队员少于或等于5人或在比赛中队员被罚出场致使场内队员少于5人时,该场比赛队员少的队为弃权,对方2:0胜,如对方净胜球数超过2个,则按实际比分计。
每场比赛准许换三个人。
换下的球员不能再上场了。
二、队员装备运动员上场不准穿钢钉球鞋。
自备装备,可以穿护板。
可以带自己的足球三、比赛规则1、某队迟到10分钟以上按自动弃权处理,本场裁判有权判该队本场比赛0:2失败。
2、某队已经有6人到场,等(第7人5分钟)不到,如果不肯以6人迎战对手7人,就按弃权论。
迟到的第7人在比赛开始之后赶来,只允许下半场登场,即整个上半场必须6人对7人。
下半场恢复7v7。
3、开球方式掷硬币或者猜拳裁判与双发队长协商后决定。
4、为了鼓励积极性,守门员可以主动上前参与进攻,如甲方守门员过了半场参与进攻,则不允许在乙方断球后在本方半场直接吊门(进球也无效,并给予吊门队员黄牌警告),必须过半场才可以直接射门。
5、如果甲方守门员没有参与进攻,很老实的在甲方自己的禁区中,那么就算乙方从自己禁区直接吊门、射门,进球都算有效。
6、守门员只能在禁区内用手,禁区外故意手球视情况出示红黄牌。
无举臂、抬手动作,球直接砸在手臂上,不算手球。
(具体情况裁判自己掌握)7、本方球员用脚回传本方守门员,守门员必须先用脚触球才能用手拿,违反此条判罚间接任意球。
本方球员用头回传本方守门员,则可以直接用手接。
四、比赛时间1、比赛时间分为两个25分钟相等的半场。
在每半场比赛因各种原因损失的所有时间应被扣除(有补时)。
在每半场比赛结束时,如因执行罚点球,应允许延长时间执行罚完点球为止。
2、上下半场之间的休息时间不得超过10分钟。
Festo 产品说明书

Double stop dog for long unsupported length Opening system for rapid opening,either from the right or the leftCross bars with high locking rangeLateral glide surfaces for side-mounted operation Tried-and-tested mounting bracket Integrated strain relief possibleSeries 2400 and 2450snap-open along inner radiusSeries 2450 half E-Tube snap-open along inner radius, either from the right or the leftFully enclosed E-Tube Series 2480snap-open along inner radiusModular interior separationEasy assembly by optimized pinAlso available as ESD versionStrain relief separator - Separator with integrated strain relief page 5.112RRBaPlease note: For using this series for long travels (gliding),please consult with igus first. For long travels, igus specifies E-Chains that snap open on the outer radius.0 = standard color, other colorspage 1.39 · Pitch = 46 mm/link - Links/m = 220 = standard color, other colorspage 1.39 · Pitch = 46 mm/link - Links/m = 22RRPlease note: For using this series for long travels (gliding),please consult with igus first. For long travels, igus specifies E-Chains that snap open on the outer radius.Please note: For using this series for long travels (gliding),please consult with igus first. For long travels, igus specifies E-Chains that snap open on the outer radius.Series 2400·2450·2480·2500E-ChainsOption KMA, pivoting forSeries 2400 and Series 2500Option KMA, locking forSeries 2400 and Series 250024501 (2)The attachment variants arising971.30.SL 971.31.SL971.80971.30.SL A.0577960.30.125960.30.175.0797960.30.150960.30.200.09109960.30.175960.30.225.10123960.30.175960.30.225.12145960.30.200960.30.250A quick fix for mountingthe stationary end of an E-ChainWith this module for the fixed end, fast and easy mounting onto the Aluminum "SuperTrough" is now possible without any drilling. Fast mounting of the E-Chain by clamping onto the aluminum troughQuick relocation of the stationary end NoInsert for the installation set"Heavy-Duty":971.50.XXX instead of (960.30.XXX)on the right column "attached outwards"Guide trough set (set of 2 trough side parts, incl. glide strips) without glide bar Order text: 16 m guide trough without glide bar (8 x 2 m sections)Part No.Guide trough set (set of 2 trough side parts, incl. glide strips) with glide bar Order text: 16 m guide trough with glide bar (8 x 2 m sections)Part No.Module for the fixed end Order text: 1 setPart No.Option: For an additional noise dampening with silencer profile, please add Index A - Example:Part No.Installation set "Basic"Components, trough "Basic": Trough side parts, aluminum, 2 mGlide bar, plastic, 2 m Glide strips, plastic, 2 m (without glide strips onrequest) Optional: Silencer profile, rubberComponents, installation set "Basic": Bottom clamp, aluminum C-profile, steel galvanizedScrew M6 x16Sliding nut M6Interface connector, plasticPart No. 971.30| 971.31| Trough height: 87 mmAluminum "SuperTrough"| Basic VersionBa =Outer width E-Chains Bi =Inner width E-Chains ha =Outer height E-Chains H Ri =Inner trough height H Ra =Outer trough height B Ri =Inner trough widthB Ra =Outer trough widthn Mon n Ri !H Ri ≥2 • ha B Ri ≥Ba + 4= Guide trough set = Installation set "Basic"Principle sketch: Number of installation sets to be installed =Number of trough sections + 1。
赛宾FBX2420反馈抑制器简单调试方法

赛宾FBX2420反馈抑制器简单调试方法1、话筒和音箱位置固定,话筒不要直接对着音箱;2、按"Bypass"设置FBX通道在直通模式;3、调音台输出最低打开调音台-FBX-其他周边设备-功放,主输出设置为最小;4、按下FBS复位键“RESET DYNAMICS"直至所有指示灯熄灭以清除前一次的滤波器设置, Clip电平指示灯将闪烁;5、(可选)设置滤波器数目:按下“NUMBER OCTAVE"到滤波器指示灯"LED”闪烁4次熄灭放开按键,"LED"灯一个接一个点亮,在固定滤波器数目灯点亮时按下“Set Fixed",固定滤波器设置成功,剩下是动态滤波器;6、设置活动滤波器:按下“RESET DYNAMICS"键摄订活动滤波器(方法同5);7、按下“Bypass"键红色LED熄灭,按下STEUP键进入该通道Active激活模式;8、慢慢提升主输出到反馈发生,FBX将快速抑制反馈,第一个滤波器灯闪烁该滤波器已被设置。
重复上述过程知道所有滤波器被设定;9、慢慢压低主输出别让体统处于另一个反馈点的边缘,这时的音量就是FBX的最大音量电平。
当滤波器完全激活系统自动暂停SABINE的工作,READY键中的蓝色灯亮,设置基本完成注意:A\B通道必须单独设置,设置A通道必须关闭B通道,设置B通道必须关闭A 通道,用"Bypass"跳通第一通道,两个通道一样的设置;"FIFTH OCTAVE"键(滤波器宽度)一般默认,可设置反馈时衰减倍频程,取舍在1/5和1/10之间;方法:按下"Fifth Octave"键激活1/5音节滤波器内部的LED灯亮,再次按键就被设置为标准的1/10音节滤波器了。
以上是我个人所知道的调试方法,不足之处还请各位高人多多指点~~~~~想起来了这帖子是ZT的吧原文中就有一处错误 2420可没有set fixed键应该是“number fixed”~~。
美国SAIBIN FBX2420反馈抑制器使用说明
美国SAIBIN FBX2420反馈抑制器使用说明下面的一些步骤能够使系统在不改变系统音调质量的前提下,在回授发生之前得到最大的增益(注意:不要同时设置两个声道)。
步骤1:放置音箱和传声器在需要的位置,注意传声器不要直接对着音箱;步骤2:按“Bypass”按钮,设置FBX通道在直通模式;步骤3:把调音台输出电平拉至最低位置,打开调音台,然后是FBX和其它附属设备,最后是功放。
然后调整调音台每个声道的平衡,把扩声系统的主输出设至最小;步骤4:按下复位RESET DYNAMICS键直至所有指示灯熄灭以清除前一次的滤波器设置,Clip电平指示灯将闪烁;步骤5(可选项):设置固定滤波器的数目。
按下“NUMBER OCTA VE”按钮( )秒钟。
滤波器指示灯(LED)将闪烁4次然后熄灭。
放开按钮,LED将开始一个接一个点亮,当相应固定滤波器数目的灯点亮时,按下“Set Fixed”按钮。
固定滤波器已被成功设置,剩下的滤波器将是动态滤波器;(到达哪一个位置时,时候便默认为几个,如;闪烁到第3个时便默认为3个。
闪烁至11个时默认为11个固定通道)步骤6:接着再设定活动滤波器;按下RESET DYNAMICS 再次设定活动滤波器.(方法同设定固定滤波器雷同)步骤7:按下“Bypass”按钮,红色LED熄灭,按下STEUP键正式进入该通道进入Active激活模式;步骤8:慢慢提升扩声系统中所要设置的通道的主输出电平,直到回授发生。
FBX将快速去除回授。
第一个滤波器灯将闪烁,表明一个滤波器已被设置。
重复上述过程直到所有的固定滤波器和一个动态滤波器被设定。
步骤9:慢慢拉低主输出电平,别让系统处于另一个回授点的边缘,这时候的音量电平就是FBX所能提供的最大音量电平。
电平过高将导致无法控制的回授;当固定滤波器通道完全激活以后,系统自动暂停整个SABINE 的工作。
此时READY 键中的蓝色灯开始亮起。
设置基本完成。
其他方面:通道A和通道B(左右声道)必须单独、分开设定。
利用AutomixMatrix780的MIXMATRIX功能实现反馈抑制
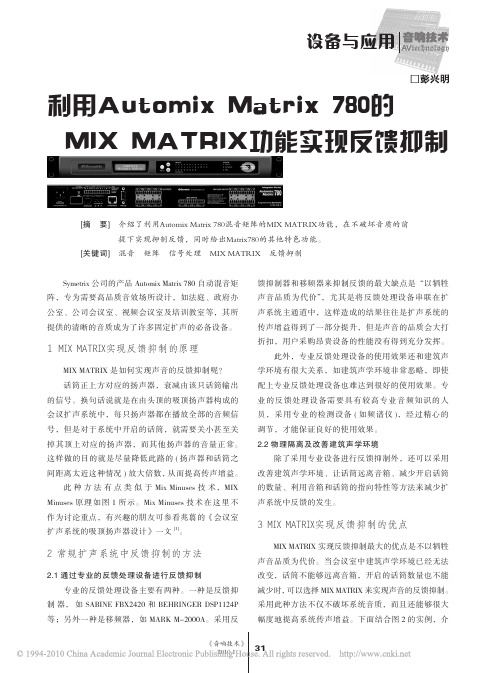
Symetrix公司的产品Automix Matrix 780自动混音矩阵,专为需要高品质音效场所设计,如法庭、政府办公室、公司会议室、视频会议室及培训教室等,其所提供的清晰的音质成为了许多固定扩声的必备设备。
1 MIX MATRIX实现反馈抑制的原理MIX MATRIX是如何实现声音的反馈抑制呢?话筒正上方对应的扬声器,衰减由该只话筒输出的信号。
换句话说就是在由头顶的吸顶扬声器构成的会议扩声系统中,每只扬声器都在播放全部的音频信号,但是对于系统中开启的话筒,就需要关小甚至关掉其顶上对应的扬声器,而其他扬声器的音量正常。
这样做的目的就是尽量降低此路的(扬声器和话筒之间距离太近这种情况)放大倍数,从而提高传声增益。
此种方法有点类似于Mix Minuses技术,MIX Minuses原理如图1所示。
Mix Minuses技术在这里不作为讨论重点,有兴趣的朋友可参看兆翦的《会议室扩声系统的吸顶扬声器设计》一文[1]。
2 常规扩声系统中反馈抑制的方法2.1 通过专业的反馈处理设备进行反馈抑制专业的反馈处理设备主要有两种。
一种是反馈抑制器,如SABINE FBX2420和BEHRINGER DSP1124P 等;另外一种是移频器,如MARK M-2000A。
采用反馈抑制器和移频器来抑制反馈的最大缺点是“以牺牲声音品质为代价”,尤其是将反馈处理设备串联在扩声系统主通道中,这样造成的结果往往是扩声系统的传声增益得到了一部分提升,但是声音的品质会大打折扣,用户采购昂贵设备的性能没有得到充分发挥。
此外,专业反馈处理设备的使用效果还和建筑声学环境有很大关系,如建筑声学环境非常恶略,即使配上专业反馈处理设备也难达到很好的使用效果。
专业的反馈处理设备需要具有较高专业音频知识的人员,采用专业的检测设备(如频谱仪),经过精心的调节,才能保证良好的使用效果。
2.2 物理隔离及改善建筑声学环境除了采用专业设备进行反馈抑制外,还可以采用改善建筑声学环境、让话筒远离音箱、减少开启话筒的数量、利用音箱和话筒的指向特性等方法来减少扩声系统中反馈的发生。
活动邀请函
活动邀请函展示会邀请函范文篇一尊敬的:本公司将于20xx年6月10日举办“创新产品展示及说明会”,您将切身体验到新技术、新平台、新应用为您的生活和工作方式所带来的革命性变化。
我们已经为您预留了座位,真诚地期待您的光临与参与!会议时间:20xx年6月10日上午9:00会议地点:公司会议报告厅会议议程:销售市场部20xx年4月20日展示会邀请函范文篇二尊敬的贵宾:您好!感谢您一直以来对威创的关注和支持,我们诚挚邀请您参加于20xx 年4月9日-11日召开的“威创20xx年产品展示活动”!在活动中,我们将聚焦行业应用热点,阐述威创市场策略,展示威创丰富的产品。
20xx年,拼接显示“应用”加速,行业向纵深发展,威创顺势研发行业应用系统及方案,智慧城市及公安等应用方案陆续付诸实践,积极推动产业链整合,携手合作伙伴为顾客创造更高价值。
针对城市管理信息孤岛等问题,探讨多终端、信息共享需求变化对拼接显示行业的影响。
优化的产品组合,新一代的处理器,dlp、lcd、led丰富的产品线阵营,一窥产品与技术进步的走向。
相约北京,我们衷心等待您的莅临。
广东威创视讯科技股份有限公司敬上报名请点击注:1、报名时间截至20xx年4月5日。
2、我们将根据报名反馈信息发送正式邀请函。
展示会邀请函范文篇三为酬谢关爱天龙音响的新老朋友,杭州天龙音响在20xx年9月20日举办20xx年新产品展示会,故联同广州市番禺锐丰音响器材有限公司及安恒利(国际)有限公司的协助,届时将发布最新系列音箱及周边设备的相关信息,欢迎各位新老客户、同行、朋友们光临展示会现场,为大家提供一个交流的好机会,促进友谊,共创商机。
真诚期待您的光临,并谨表谢意!会议内容:介绍及演示jblsr47-a、ms系列音箱、soundzone(声区)控制器;crownch、cl系列功放及话筒;sabinefbx2420反馈抑制器、无线话筒;soundcraftm、e、lx-7ii系列调台;dbx、dod周边等等。