航空模型发动机完全手册范本
航模发动机大全-实际操作运行

航模发动机大全-实际操作运行航模发动机大全-实际操作运行对于无线电遥控直升机或飞机,我们需要一定的时间,并通过“实际”的经验才能培养出操纵所必需的技术。
其中首先遇到的就是启动发动机,调整油针,磨合以及如何对低速或怠速运行进行调整。
这一切即便没有老手的帮助,也能通过自学完成。
如果你正处在学飞的阶段,最好能在去飞行场地之前就把这四项有关发动机的基本知识统统掌握了。
教练本来就很忙。
这样,他就不用把时间浪费在对这些基本问题的解释上了。
之所以要按照自己的时间安排去充分地熟悉一台发动机,还有一个更为重要的理由。
如果能用一段足够长的时间来运行发动机,就可以使发动机更容易使用,其功率也会提高。
本章后面,我们再来介绍为什么发动机的运行会有这种特点。
如果你是一位初学者,你必须知道,绝大多数有经验的航模爱好者在他们不能确保发动机能可靠运行之前,是决不会起飞的。
我本人就是按照本章所介绍的方法去执行的。
我还建议每一位航模爱好者,不管你以前是如果做的,都要照此办理。
准备螺旋桨我们使用的Royal转速表,其显示的转速是除以100以后的值。
(192)中的发动机转速为6500转/分。
我们可以清楚地看到,在照片上几乎看不出旋转着的黑色螺旋桨,人在现场用肉眼也几乎看不见。
如果我们把桨尖涂成白色或黄色的话,外圈的圆弧就会看得比较清楚,可以作为一个重要的提示,提醒你注意避让(193)。
生产厂家一般只给大桨的桨尖上色,40级发动机用的螺旋桨则没有这个待遇。
如果你买的螺旋桨桨尖上没有颜色,一定要花几分钟把每个桨尖都漆上一条半寸宽的色带。
我认识的一位模友,就因为没有看到螺旋桨,结果把手给打了,不得不送到了医院。
自那次事故以后,直到现在,他的手也没有好利索。
玻璃纤维加强尼龙制成的螺旋桨(195),其上的毛边就像刀口一样。
作为另一项安全举措,一定要用砂纸把这些毛边打磨掉。
每一台活塞发动机都存在某种程度上的振动。
但是如果螺旋桨不平衡的话,就会产生过度的振动。
三叶航模发动机说明书(Three...

三叶航模发动机说明书(Three dimensional model aircraft enginemanual)In 1959, the first home-made model was born with an engine. After that, with the continuous growth of the domestic model community, the trefoil engine has developed various types of engines, such as aircraft, marine, helicopter, vehicle and so on. With its rich type, excellent quality, high cost performance advantages, the trefoil engine has gradually become a pioneer in the industry at home and abroad.Every fan will be the initial contact with the remote control model for the selection of a model and hesitate to fully experience the fun, game player please don't be anxious for success even if you are gifted, lay a good foundation is also very important to know whether you need three cars, boats, wing or helicopter, in the squad. There is always a right for you. Act quicklyType diameter (mm) stroke volume (mm) suggested the propeller practical speed (RPM) quality (g)AP15A 2.26, 15.50, 12.008 * 43000-17000155Engine ManualPlease note that! Use your safety tips whenever you need it. The following instructions, warnings and safety requirements must be followed to give play to the superior performance of your internal combustion engine and give you pleasure in use.You are personally responsible for the safe use of this internal combustion engine. You must understand what you are doing. Keep in mind that this internal combustion engine is not a toy, but a sophisticated machine. If you ignore this and fail to observe the safety regulations, it may cause harm to you and others, and never make a happy thing an injury or even a tragedy! If you have any questions or questions about any security, please contact the model retail store or contact us directly.Before you start using the internal combustion engine, you must read the safety instructions and follow them. Special warning:1 when running an internal combustion engine, children and other personnel who may be harmed must be kept away from you and internal combustion engines! All visitors must leave at least 6 meters!2, the internal combustion engine should be firmly installed on a solid test stand, plus spring washer. The internal combustion engine must never be clamped directly on the table vise. When a model is mounted on an internal combustion engine, the model is recommended for a high quality chassis, as recommended by a manufacturing plant or retail store, and that the internal combustion engine is firmly secured to the base.3, to choose the appropriate diameter and pitch propeller (which can be found on the propeller data from the specification and model drawings can also be understood from the propeller manufacturer or retailer); must not be used with nicks, scratches, cracks, wear, balance or damage the propeller; never change and repair, bending or scraping propeller. If yourinternal combustion engine is larger than 40 (6.5cc), we recommend that you only use wooden paddles instead of plastic or fiberglass paddles. All non wooden goods need special inspection and careful use. They should be handled according to the instructions of the propeller manufacturer.4 when installing the propeller, make the arc side blade opposite. Secure the propeller firmly to the front and rear paddle pads with a suitable wrench (there is a special screw nut wrench sold in the retail shop). The vibration of an internal combustion engine may be loose. The propeller must be checked regularly and tightened or replaced if necessary.5, during engine starting or running, to make your face and body in the propeller plane; then the engine is in operation, do not reach the adjustment from the internal combustion engine above the rotating propeller behind to adjust from the internal combustion engine and carburetor.6. Start with rubber stick, paddle or electric starter. These can be found in model retail stores. According to the instructions of these tools. If you use your fingers to paddle, you must start with a coach or under the guidance of an experienced fan.7, if you want to stop the internal combustion engine operation, you can close the door,Cut off the air supply; also interrupt the fuel supply (press the tubing or pull the tubing out of the carburetor). Never stop the rotation of the propeller with your hands, fingers or otherparts of your body. What's more, nothing can stop the running internal-combustion engine.8. In any case, no more high-voltage wires or power lines below or near the fly line are used to operate the model aircraft.* safety recommendations:A, wear a safety goggles or safety helmet when starting or running an internal combustion engine.B, don't run an internal-combustion engine where there is loose gravel or sand. The propeller will throw sand into your face and eyes.C, do not let loose clothing, such as clothing, cuffs, ties or scarves, etc., close to the propeller. Do not store pencils, rulers, screwdrivers and other items that may slip out of your shirt pocket to prevent them from falling out and touching the propeller.D, to confirm the thermal head (electric plugs), starter clamp and connecting wire from the propeller.E, if fitted with fairing, be sure not to press the edge of the blade on the propeller blade, otherwise it will cause fatigue in the propeller.F to keep all internal combustion fuel in safe place, away from electrical sparks, high heat, or other places where fuel may be ignited. Bear in mind that models use fuel very easily forfire and must be taken care of in use. In the start-up, preparation and operation of the internal combustion engine, smoking is not allowed and smokers are not allowed to enter the internal combustion engines or fuel storage stations.G, such as moving a model in an internal-combustion engine, should pay special attention to the propeller to keep it away from itself and others.H and model internal combustion engines produce a lot of heat when they work. Do not touch any part of the internal combustion engine before it stops running and cooling.L, do not operate internal combustion engines in closed spaces such as garages, basements, etc.. Model internal combustion engines, like automotive internal combustion engines, emit deadly carbon monoxide when running. The internal combustion engine can only be operated in safe and well ventilated areas.The working principle of internal combustion engine:An electric heated model of an internal combustion engine first draws fuel through the external force and compresses it. It is ignited by the heat burner at the top of the cylinder head and begins to burn. The ignition battery should have enough capacity to heat the platinum wire coil and keep it in orange red. If you take off the muffler, you can see the orange light in the cylinder from the exhaust port.There are two basic conditions for fuel to start burning, one is the heat of platinum wire ring; two is the catalytic actionof platinum wire on fuel. When the internal-combustion engine starts, it runs as long as it supplies the proper proportion of fuel and air.The internal combustion engine starting:The model diesel engine produced by the three leaf company has carried out the bench test before the factory, and the idle state of the carburetor has been basically adjusted. One hundred percent can start. Starting of bench test: bench test is not important for internal combustion engine. But a short bench test allows you to be familiar with starting and adjusting, and also good for running machines.1, internal combustion engine with four thick enough, and can penetrate through the casing on both sides of the mounting hole and screw nut washer, firmly fixed in the grooves or hard thick laminates, wood screws should be long enough, the thickness of 15 or 20mm, the width of the groove and the casing under the same width. The board is then firmly attached to the table, where the propeller leaves a considerable distance from the table, and there is no loose material around it to prevent inhalation or vibration into the propeller's rotating range.2. Prepare an oil tank. The height of the oil outlet of the tank is close to the height of the carburetor in the internal combustion engine (compared with the horizontal plane). Then prepare a 3AH battery above 1.5V or a 2V small battery, the latter with a minimum of3.5 meters long wire as a step-down (long lines can be around the battery). Of course, it's better to use a special ignition (model shop is available).3. Put the propeller into the internal combustion engine and make the paddle at 2 o'clock position (from the front of the paddle) just as the piston begins to compress the mixture in the cylinder. The specifications of propellers are shown in the attached table.4, the carburetor high speed oil needle in the end, and then returned to a circle, half to two laps or so, the high-speed oil needle open;5, the door open, operators face the left thumb up the airplane carburetor air inlet, counterclockwise a propeller, you can see the oil flow in the oil pipe and reach the nozzle, dial two oars and let the oil into the internal combustion engine, not too much oil, to prevent oil rich. Loosen the finger blocked air intake;6, this can be through hot fire power;7. Close the air door half, and force the oars. You will hear the sound of the oil coming out of the cylinder. If there is no sound, you can repeat the oil two times (Note: must be broken at this time heat head power). Beginners can start by removing the muffler and injecting a few drops of oil from the exhaust port;8, the door opened to the maximum, slowly twist small high speed needle, the engine speed increased, experienced lovers with the ears hear the engine running sound will know whether the engine to the maximum speed;9, remove the heat on the head of the 1.5V power connector, the engine can work properly.According to the above procedure, a model internal combustion engine can be started, but for beginners, it is necessary to practice again and again. Especially with the hand to poke the propeller, must be in the coach or experienced enthusiasts under the guidance of, so as to avoid the sudden start of the internal combustion engine, fingers hurt. It is strongly recommended that beginners do not start with the hand paddle, and start the internal combustion engine with a starter. This will make it safer and more reliable and easier to start.The starting model of internal combustion engine to model the mailbox on the well, then the receiver switch remote control switch and the model of the open, and then according to the test of 3 ~ 9 steps to start, the remote control with a carburetor throttle. fault analysisIf in accordance with the above procedures, the internal combustion engine is still unable to start, there may be several reasons:1, excessive intake of fuel, beginners impatient, repeatedly use fingers to block the carburetor inlet, the introduction of fuel into the cylinder, resulting in excessive fuel, even at this time the exhaust pipe is full of fuel. The internal combustion engine can be turned over, and the propeller is turned gently. The excess oil is discharged from the exhaust port, and the heat head can be removed. A few propellers areturned to make the excess fuel in the cylinder exhausted.2, the heat does not ignite. Check if the heat burner is shining properly (from the exhaust port). Can also be hot head, connect the 1.5V power to see if you can burn red. If it is not red, hot fire is a problem. If the 1.5V power supply is not enough, it may not be possible (usually the 3# thermal power is connected to the 1.5V power supply, and more than 2A of the current is needed).3, the use of fuel oil, castor oil overdose.4 、 from the mailbox, the tubing to the carburetor, the whole oil system leaks, leaks, or jams.5, the use of longer internal combustion engine, cylinder and piston have been worn, compression ratio is very low, it is not easy to start. Two stroke internal combustion engine, the whole body is not allowed to leak, and if there is a leak place, the engine is difficult to start.By remote control (R/C) vaporizer:Remote control internal combustion engines are equipped with remote control carburetor, it is easy to adjust, reliable work, not only can speed up to very low, but also can quickly accelerate. The structure is as follows:The carburetor has two oil needle systems:1 - high speed adjustment (high speed oil needle)2 - low speed mixture adjustment (idle oil needle)3 - throttle stop adjustment, can control the idle (throttle to the minimum)The idle oil needle has been adjusted at the factory, with minor adjustments to achieve optimum value. Don't make the idle position wrong. Enter the idle, mainly by the throttle, and determined by the throttle stop position, rather than by the idle oil needle, which is only to adjust the proportion of mixed gas, to ensure stable operation and good acceleration in idle speed.Electric fuel oil:Any brand of commercial electric fuel oil (better than 10% nitro methane) is suitable for model diesel engines produced by shamrock.Domestic lovers generally use methanol and castor oil mixed oil, castor oil which accounts for about 20% to 25%. Please note that these fuels are toxic and should be used with great care. Do not enter the mouth, the eye or the wound.Miami head:You can choose any medium heat type heat head.* * * a final reminderAn internal-combustion engine is not a toy". It has a lot of power, and you take full responsibility for it. Please remember: the operation of any model require security technology and all along. The model aircraft, model ships, or model cars in the operation have great energy and can cause serious damage and destruction.。
rotax582活塞航空发动机基本培训手册

系统说明 Description of System
主机滑油泵系统
• • • • • 1:50滑油自动混合 由发动机曲轴经齿轮驱动 滑油量由发动机转速和摇臂位 置决定 磨合时在燃油中额外添加1:100 滑油,加强润滑 滑油箱尺寸应比燃油箱容量大 5% (The oil tank size should be more than 5% of the fuel tank capacity)
冷却系统
1. 曲轴箱 2. 缸体 3. 缸头 4. 水泵 5. 散热器 6. 水管 7. 水管 8. 水箱盖 9. 水温表 10. 溢流管 11. 溢流瓶 12. 通大气 13. 膨胀箱 14. 缸头排气 15. 过压阀 16. 回流阀
节温器
香港太古坊华兰路20号华兰中心1302室 电话:(00852)28859525 传真:(00852)28863241 Website:
香港太古坊华兰路20号华兰中心1302室 电话:(00852)28859525 传真:(00852)28863241 Website:
安全
Safety
无论你是一个合资格的飞行员或是一个初学者,在单独 飞行前,必须完全了解该飞行器的控制和操作。驾驶任 何飞行器都具有一定的风险,必须了解并充分准备防范。 对所有飞行员来说,认可的飞行员培训课程和持续的教 育是绝对有必要的。确保你可以从你的代理商那儿尽可 能多地得到关于你的飞行器维护和操作方面的资料。 应该明白,任何发动机都可能在任何时候突然停车,这 可能会导致飞行器坠毁和严重伤亡。因此我们建议严格 遵守代理商提供的关于维护、操作和其他附加资料的内 容。 尊重当地政府部门关于飞行方面的法规,在合适的时间、 地点、地形和空速下飞行。 选择并使用适当的飞行器仪表。这些仪表没有包括在 ROTAX发动机的交货状态中。请使用经批准认可的仪表。
航空模型发动机使用要领和有关常识
航空模型发动机使用要领和有关常识航模专用发动机的使用要领:使用发动机要注意以下几个方面:1.磨合运转——凡是新发动机,必须先以较低的转速运转一个阶段,时间从半小时到一小时以至更多些,称为磨合运转(磨车)。
磨合运转很重要,磨合运转不好,发动机不但寿命短、马力小、难以起动,还会带来很多故障。
说磨车没有用,是白白损耗发动机等认识都是片面的。
正确的磨合运转决不会缩短发动机的寿命,相反会延长寿命与改进性能。
即以新汽车和摩托车等为例,出厂时汽化器上装有限制转速的堵头,或是规定车速不得超过某个限度,要行驶几百公里后才可逐步地提高车速,这也就是为了磨合各个机件。
为什么要磨车呢?因为每台小发动机都是由若干零件装成的,这些零件的相互配合还没有完全协调,各个摩擦表面更免不了有高低不平或毛刺的地方。
如在这时就以高速工作,活塞和气缸等零件就会产生过热甚至卡死,造成表面拉毛等损伤。
磨合运转就是以较慢的速度运转,慢慢地、一点一滴地将那些互相接触的零件表面都“磨”得很光滑,能互相适应和协调配合。
这好比我们刚穿上一双新鞋时会感到有点不舒服一样,如果硬要在这时候跑步的话,脚就会不适应;如果穿了几天以后再跑步,脚就会觉得“顺”多了。
磨车必须在结实的试车台或桌子上进行,决不能装在模型飞机上或其他不够结实的板上进行,以免在运转时引起振动,使机件受损。
磨车要用较大的螺旋桨来限制发动机的转速,一般维持在5000~6000转/分左右,然后逐步提高转速。
转速过低会产生较大的振动,对零件不利。
最好是稳定均匀的中等转速。
磨车期间,不要使用有附加剂的油料,油门要开大些,不要将调压杆压得太紧。
一般磨车步骤如下:刚磨车时,应在发动机运转1~2分钟后就迅速关断油路停车,待发动机稍稍冷却后再开车,不要连续运转很长时间。
这样做,也有利于熟悉这台发动机的起动和调整。
而后,先低速运转20~30分钟,如果气缸头不太烫手(手指按上1~2秒钟也能忍受),转速均匀,就可以稍稍压紧调压杆,关小一点油针,提高一点转速。
Unrestricted Aeroline 航空航天手册 制造 – 第四版说明书
Siemens 套件: SINUMERIK 840D sl, SINAMICS S120, SIMOTICS S-1FT7 motors
应用: 模具制作; 1:1 模型加工; 铝结构件,层压形式,固定 装置及夹具,复合材料,钢和铸铁
亮点: 高动态、高精度 Z 轴可达 3,000mm 创新的铣头技术,紧凑的设计
量的批量和单件生产 通过应用节能组件,机床等同于最新的能源规范
Unrestricted
Siemens 套件: SINUMERIK 840D sl, SINAMICS, SINUMERIK Operate, 安全集成 应用: 批量生产用的铝型材、塑料、CFRP(碳纤维复合材料) 零件 亮点: 大型零件: X:最大 3,400 x 1,250 x 700 mm (x,
由于频繁换刀和距离较远,较短 的二次加工时间是另一个显著特 征
Zimmermann 龙门铣床为大型零 件提供了最佳先决条件。此外, 所有5轴的智能和可变设计,使5 面加工可达性好,干涉轮廓小
在铣削带斜边凹槽的结构件时, 旋转轴摆动角度最小,而且每个 加工循环后C轴不用返回
主轴在A/B-或A/C-方向的实现最 佳定向,即使在转角处也能保持 恒定进给率
Unrestricted
Unrestricted
A380 翼肋
欧洲战斗机零件
主起落架
主起落架
在高性能加工中心Ecospeed上生 产A-380翼肋4。该零件可在 12.96小时内完成加工,最大金属 去除率为8,000 cm3/min
在高性能加工中心 Ecospeed 上 生产欧洲战斗机机身结构件。材 料去除率为 95%,5 轴加工占比 80%
航空行业涡轮发动机使用说明书

航空行业涡轮发动机使用说明书一、概述航空行业涡轮发动机是飞机动力系统的核心组件,本使用说明书旨在为使用者提供详细的使用指南,以确保发动机的安全运行和最佳性能。
二、安全须知1. 使用前,请仔细阅读本说明书,并按照指导操作。
2. 发动机使用过程中,必须经过专业培训和持证操作人员。
3. 使用者必须严格按照飞机制造商的规定和要求操作发动机。
4. 发动机使用过程中如发现任何异常情况或故障,请立即停止使用并联系相关维修人员。
三、发动机基本概述(这一部分可以介绍涡轮发动机的工作原理、结构组成、主要部件)四、发动机安装与拆卸1. 安装前的准备工作:确保飞机结构满足安装要求,检查配件和安装工具是否齐全。
2. 安装步骤:按照飞机制造商提供的安装步骤和顺序进行安装,确保每个步骤的准确性和安全性。
3. 拆卸工作:拆卸前需切断发动机与其他系统之间的连接,并按照安装的逆序进行拆卸操作。
五、发动机启动与停机1. 启动前的准备:检查燃油、润滑油和液压油的充足程度,确保系统正常运行。
2. 启动步骤:按照操作手册提供的步骤进行启动过程,并检查各个指示灯和仪表是否正常。
3. 停机:按照制造商的规定和程序进行停机操作,并等待发动机完全停止运行才能关闭电源。
六、发动机维护与检修1. 维护计划:根据飞机制造商提供的维护计划和周期,定期检查和更换润滑油、空气滤清器等部件。
2. 日常检修:定期检查发动机各个连接件和管路的紧固情况,清洁发动机表面和散热器。
3. 故障排除:如遇到发动机性能下降、异常噪音等问题,根据维修手册和故障排除流程进行操作。
七、使用注意事项1. 发动机在高温、高湿度、高海拔等恶劣环境下的使用要注意特殊要求。
2. 高速飞行过程中要注意飞机的动力控制和温度管理,防止过热或过载。
3. 长时间停放前,应进行相应的防腐蚀处理,防止发动机受损。
4. 使用者必须熟悉燃油和润滑油的规格要求,并确保使用正确的材料。
八、附录1. 发动机相关数据表格:包括性能参数、工作范围、重要零部件维护周期等。
世界航空发动机手册
世界航空发动机手册一、航空发动机概述1.定义与作用航空发动机,作为飞机的“心脏”,是为飞行器提供动力的核心部件。
它将燃料的化学能转化为气流的动能,推动飞行器前进。
发动机的性能直接影响着飞机的飞行速度、高度、航程等各项性能指标。
2.发展历程与现状自从1903年美国莱特兄弟发明飞机以来,航空发动机就进入了人们的视野。
经过一百多年的发展,航空发动机技术不断革新,性能不断提高。
目前,世界上的航空发动机主要有涡喷、涡扇、涡轮螺旋桨、涡轮轴等类型。
二、航空发动机类型及特点1.涡喷发动机涡喷发动机是一种轴流式发动机,具有结构简单、重量轻、推力大等特点。
它广泛应用于战斗机和部分民用飞机上。
2.涡扇发动机涡扇发动机是一种高效率、低噪音、大推力的发动机,分为小涵道比和大涵道比两种。
它主要用于大型客机和军用运输机。
3.涡轮螺旋桨发动机涡轮螺旋桨发动机是一种涡轮轴发动机的变种,具有较高的燃油效率和较低的噪音。
它主要应用于小型飞机和直升机。
4.涡轮轴发动机涡轮轴发动机是一种高速、高功率的发动机,主要用于直升机和部分军用飞机。
三、航空发动机关键技术1.高压比、高效率的压气机设计压气机是航空发动机的核心部件之一,其高压比和高效率对于提高发动机的整体性能至关重要。
设计师们需要不断优化压气机的气流布局、叶片形状等参数,以实现更高的压缩比和效率。
2.高效低污染的燃烧室设计燃烧室的设计关系到发动机的燃油消耗、排放污染物和噪音水平。
为了实现高效低污染的燃烧,设计师们需要研究新型燃烧过程、喷嘴结构和燃烧室形状。
3.高温材料及冷却技术随着航空发动机性能的提高,涡轮前温度不断升高,对高温材料和冷却技术提出了更高的要求。
研发新型高温材料和高效的冷却系统,是提高发动机寿命和可靠性的关键。
4.高精度、高可靠性的控制系统航空发动机控制系统是发动机正常运行的保证。
采用高精度、高可靠性的传感器和执行器,以及先进的控制算法,可以确保发动机在各种工况下的稳定运行。
三叶航模发动机说明书

任何一种品牌的商品电热式燃料油(含10%硝基甲烷更好)都适用于三叶 公司生产的模型内燃机。国内爱好者一般使用甲醇和蓖麻油的混合油,其中蓖麻油约占20%~25%。请注意,这些燃料都是由毒的,应特别小心使用,切勿进入口内、眼内和伤口内。
★ 热火头:
可选用任何中等到热型的热火头。
5、 使用较久的内燃机,气缸与活塞已磨损、压缩比降得很低时,也不易起动。二冲程内燃机整个机体是不允许漏气的,如有漏气的地方,发动机很难起都装有遥控汽化器,它调整容易,工作可靠,既可将转速调到很低,又能迅速地加速。其结构如图:
这种汽化器有两套油针系统:
D、 要确认热火头(电热塞)、启动器的夹子和连接线远离螺旋桨。
E、 如装用整流罩,一定不要使它的缺口边压住螺旋桨桨叶,否则会使螺旋桨出现疲劳现象。
F、 要将所有内燃机燃料存放在安全的地方,应远离有电火花、高热或其它有可能点燃燃料的地方。牢记,模型用燃料非常容易着火,使用中必须特别当心。在内燃机的启动准备和运转阶段中,不能吸烟,也别让吸烟者走进内燃机或燃料存放处。
型 号 容积 缸径(mm) 行程(mm) 建议螺旋桨 实用转速(rpm) 质量(g)
AP15A 2.26 15.50 12.00 8×4 3000-17000 155
三叶发动机使用说明书
请注意!无论何时都要运用您的安全常识。必须遵照下述说明、有关警告和安全规定,才能发挥您的内燃机的优越性能,并给您在使用中带来愉快。
★ 内燃机的起动:
三叶公司生产的模型内燃机在出厂前,每台都进行了台架试车,汽化器的怠速状态也已基本调整好。百分之百可以起动。台架试车的起动:台架试车对本内燃机来说并不重要。但短暂的台架试车可以让您熟悉起动和调整,对磨合机器也有好处。
航模零基础系列:发动机

学航模零基础系列教程发动机CattleCattle带您进入航模的世界!Cattle与您一路同行,让我们从今天开始吧!戏说发动机V1.2发动机,看到这个,第一感觉那可真是一个大的不得了的工程,既然是一个不得了的工程,想要说清楚,讲个明白那可得有一本牛津大字典的容量了。
不过咱这不是科学普及嘛,就得篇幅少,通俗易懂点不是,这可真是一个抓耳挠腮,较劲脑汁的问题。
废话少说了,言归正传。
今天就写点科学普及的故事吧!欢迎拍砖了。
既然是故事,咱就言简意赅,主要让大家有个感性的总体认识。
看着有点意思呢,就接着看,看着想拍桌子了,就拍下桌子,看着枯燥了,就睡个觉,看着糊涂了尽管问。
看着不耐烦了呢,也提个醒,我也好不再烦人。
(1)发动机篇小时候望着蓝天、白云,还有那翱翔天空的白鸽,俺就想了什么时候俺也能上天呢?还记得小时候玩的那个小玩具,姑且叫它愤怒的小鸟吧。
“我是一只小小鸟,想要飞却飞不高啊”这样旋转的“机翼”就成为旋翼,旋翼产生升力就是直升机可以垂直起落的基本原理,这也许就是最早的飞行模型吧!这也是人们在跳出了小鸟拍翅飞行之谜后,利用伯努利空气动力升力原理,用科学理论掀开的历史伟大一页!曾经多才多艺的达·芬奇他老人家也设计过一个类似的飞机模型,不过还是没有超越纸上谈兵的地步。
还是莱特兄弟靠谱,在历史上留下了重要一笔(据说中国的冯如也是第一个飞上蓝天的,当然了嫦娥就不说了,孰是孰非就不争了,作为中国人,反正我信了)。
飞机的发展历史就不多说了,再说就跑题了,有一千零一夜的时候再续了。
鸟儿能飞,因为她有一双翱翔的翅膀,飞机能飞,因为它有一颗强大的心脏----发动机。
现代的发动机,不管是涡轮、涡轴、还是涡扇、涡喷。
其本质都是一样的,都是热力发动机。
根据伟大的牛顿爵士第三定律—作用力与反作用力,还有一堆天书般的公式与经验公式,总之,经过热能与动能的转换,加热、压缩的空气就成了发动机的推进动力。
发动机发展至今,其基本组件还是那几个,就像人一样,相貌虽不同,但总归咋一看还都是有鼻子有眼的。
航模发动机使用大全-确保清洁,确保飞行
航模发动机使用大全-确保清洁,确保飞行航模发动机使用大全-确保清洁,确保飞行中国遥控模型网,为厂家、商家和玩家提供强大信息平台!我们在第九章中学习了如何在每次飞行之后对电热式发动机进行日常的清理与上油。
这些内容十分重要,因为燃料中的甲醇会吸收水份而使钢制零件生锈,同时残留的蓖麻油也会硬化成清漆状而把各个活动部件粘死在一起。
这些措施对于两次飞行之间的保养来说是足够了,但是如果炸过机,或者发动机在贮存之前没有先把残余燃料清除干净,这时,就还需要进行一次彻底的清理才行。
第十三章就介绍了在无需把发动机完全拆散的情况下,如何对二冲程与四冲程两种发动机进行彻底的清理。
二冲程发动机的清理(381)中这台旧的Fox 35发动机在炸机之后就一直被扔在箱子里。
这一扔就是十来年。
这台发动机在炸机之前还用过几个小时,因此汽缸盖上残留了一些难以去除的焦炭。
由于长时间的贮存,残留的蓖麻油在发动机内部形成了厚厚的一层清漆状的残膜,但是发动机并没有生锈。
发动机外面则糊满了粘手的废油。
炸机时,沙粒混入了发动机的内部,同时发动机的外表也沾满了沙子。
这台发动机尽管很脏,但是并没有损坏,只需认真地清理一番就能让它重返蓝天。
我们先用发动机专用清洁剂清理发动机的外表。
这种清洁剂具有强腐蚀性,可以损伤眼睛,甚至造成失明。
因此,在使用时务必要戴好防护镜。
将化油器膛孔(382)及排气口处的沙子用棉签清理干净,然后用纸巾将这些开口塞紧(383)。
一定不要让发动机清洁剂接触到皮肤。
建议你给曲轴装上一个木把(384)。
这样,你就可以举着这根棍用清洁剂来清理了(385)。
在这张照片中可以看到,所使用的硬质防酸刷子能让清洁剂进入包括散热片间隙在内的每一个缝隙中(386)。
清洁剂需要过45分钟才能起作用。
等到清洁剂起作用后,用牙刷与普通自来水把清洁剂与溶解下来的残渣洗净(387)。
如果积炭过重的话,可能还要再做一遍处理。
但是我们这台Fox 35的外表只处理了一遍就已经干净了(388)。
CRRCpro GF50I 说明书
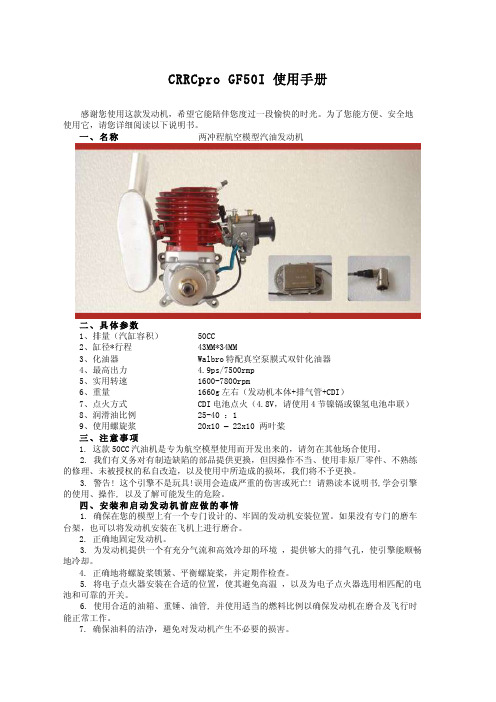
CRRCpro GF50I 使用手册感谢您使用这款发动机,希望它能陪伴您度过一段愉快的时光。
为了您能方便、安全地使用它,请您详细阅读以下说明书。
一、名称两冲程航空模型汽油发动机二、具体参数1、排量(汽缸容积) 50CC2、缸径*行程 43MM*34MM3、化油器 Walbro特配真空泵膜式双针化油器4、最高出力 4.9ps/7500rmp5、实用转速 1600-7800rpm6、重量 1660g左右(发动机本体+排气管+CDI)7、点火方式 CDI电池点火(4.8V,请使用4节镍镉或镍氢电池串联)8、润滑油比例 25-40 :19、使用螺旋浆 20x10 – 22x10 两叶桨三、注意事项1. 这款50CC汽油机是专为航空模型使用而开发出来的,请勿在其他场合使用。
2. 我们有义务对有制造缺陷的部品提供更換,但因操作不当、使用非原厂零件、不熟练的修理、未被授权的私自改造,以及使用中所造成的损坏,我们将不予更换。
3. 警告! 这个引擎不是玩具!误用会造成严重的伤害或死亡! 请熟读本说明书,学会引擎的使用、操作, 以及了解可能发生的危险。
四、安装和启动发动机前应做的事情1. 确保在您的模型上有一个专门设计的、牢固的发动机安装位置。
如果没有专门的磨车台架,也可以将发动机安装在飞机上进行磨合。
2. 正确地固定发动机。
3. 为发动机提供一个有充分气流和高效冷却的环境,提供够大的排气孔,使引擎能顺畅地冷却。
4. 正确地将螺旋桨锁紧、平衡螺旋桨,并定期作检查。
5. 将电子点火器安装在合适的位置,使其避免高温,以及为电子点火器选用相匹配的电池和可靠的开关。
6. 使用合适的油箱、重锤、油管, 并使用适当的燃料比例以确保发动机在磨合及飞行时能正常工作。
7. 确保油料的洁净,避免对发动机产生不必要的损害。
8. 确保发动机表面干净,不影响散热。
9. 在稳妥地固定好模型飞机后,才能启动发动机。
10.请使用绝对安全的方法来启动发动机。
航模基本知识手册细则
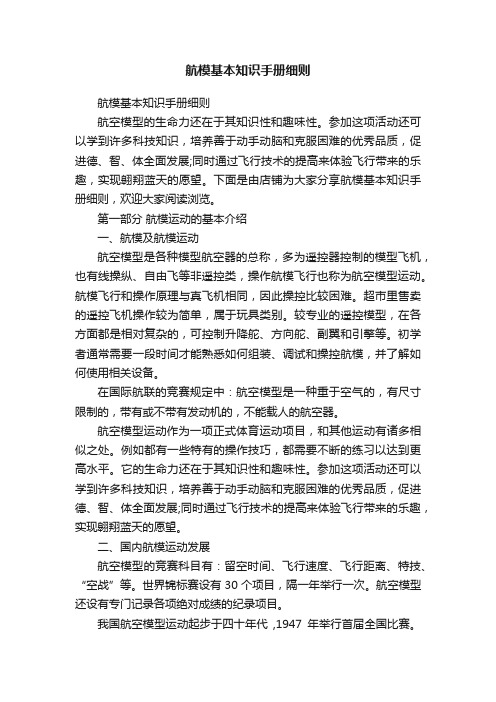
航模基本知识手册细则航模基本知识手册细则航空模型的生命力还在于其知识性和趣味性。
参加这项活动还可以学到许多科技知识,培养善于动手动脑和克服困难的优秀品质,促进德、智、体全面发展;同时通过飞行技术的提高来体验飞行带来的乐趣,实现翱翔蓝天的愿望。
下面是由店铺为大家分享航模基本知识手册细则,欢迎大家阅读浏览。
第一部分航模运动的基本介绍一、航模及航模运动航空模型是各种模型航空器的总称,多为遥控器控制的模型飞机,也有线操纵、自由飞等非遥控类,操作航模飞行也称为航空模型运动。
航模飞行和操作原理与真飞机相同,因此操控比较困难。
超市里售卖的遥控飞机操作较为简单,属于玩具类别。
较专业的遥控模型,在各方面都是相对复杂的,可控制升降舵、方向舵、副翼和引擎等。
初学者通常需要一段时间才能熟悉如何组装、调试和操控航模,并了解如何使用相关设备。
在国际航联的竞赛规定中:航空模型是一种重于空气的,有尺寸限制的,带有或不带有发动机的,不能载人的航空器。
航空模型运动作为一项正式体育运动项目,和其他运动有诸多相似之处。
例如都有一些特有的操作技巧,都需要不断的练习以达到更高水平。
它的生命力还在于其知识性和趣味性。
参加这项活动还可以学到许多科技知识,培养善于动手动脑和克服困难的优秀品质,促进德、智、体全面发展;同时通过飞行技术的提高来体验飞行带来的乐趣,实现翱翔蓝天的愿望。
二、国内航模运动发展航空模型的竞赛科目有:留空时间、飞行速度、飞行距离、特技、“空战”等。
世界锦标赛设有30个项目,隔一年举行一次。
航空模型还设有专门记录各项绝对成绩的纪录项目。
我国航空模型运动起步于四十年代,1947年举行首届全国比赛。
新中国成立后,于五十年代建立了组织指导机构,培养了一批技术骨干,群众性的航空模型运动得到蓬勃发展 , 运动水平迅速提高。
1978年10月,我国加入了国际航空联合会(FAI) , 1979年开始步入世界赛场。
我国航模运动起步晚,新中国成立后曾大力发展和普及航模运动,但伴随一些国情变化,我国航模运动发展相对落后不少,在近几年发展相对较快。
EME 55II 航空模型用汽油引擎使用说明书
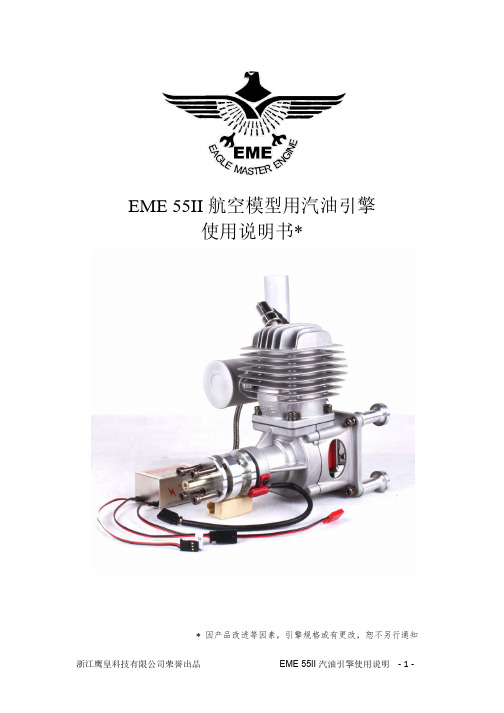
EME 55II 航空模型用汽油引擎使用说明书** 因产品改进等因素,引擎规格或有更改,恕不另行通知安全提示◎感谢您选择、购买 EME 55II 汽油引擎,愿我们的产品给您的飞行带来乐趣。
EME 55II 汽油引擎以及配套的航模器材不是儿童玩具,具有一定的风险;不正确使用 EME 55II 汽油引擎可能导致严重伤害;为避免潜在的风险,请您仔细阅读本说明书。
◎绝对禁止在室内启动引擎;不可在室外独自启动引擎。
◎绝对禁止在运转时调整引擎油针或其它部件;所有调整应在引擎停止运转后进行。
◎引擎在地面运转时,绝对禁止站立于引擎前方或螺旋桨旋转平面;操纵者及观众应站立于引擎后方;建议观众与引擎保持 5m 或更远距离。
◎建议使用木质或碳纤维材质螺旋桨,不建议使用尼龙材质螺旋桨;定期检查配套螺旋桨、桨罩是否松动;禁止使用有损伤的桨或桨罩。
◎引擎使用的燃料有毒、易燃,请妥善保管;避免燃料接触口腔或眼睛,如有接触请立即用清水冲洗,并请医师诊治;燃料应保存在阴凉、避免阳光直晒的位置,并远离火种。
技术规格项目参数工作容积55.6cc重量机体 1380g,排气管 180g压缩比7.6输出功率 5.7 HP @ 7500 RPM怠速转速1350 RPM实用转速1350 ~ 7500 RPM静拉力 114.2 kgf (海拔 50~200m)静拉力 212.5 kgf (海拔 1800~2000m)火花塞EME / NGK CM6 火花塞点火电源7.4V-8.4V 镍镉/镍氢电池组燃料93#汽油,1:30~1:35 混合比装箱清单项目数量汽油引擎 1 只排气管 1 只点火装置 1 套火花塞 1 只安装铝柱 4 只安装螺丝M5*15 及 M5*22 各 4 只安装垫片M5 垫片 1 套排气管螺丝 2 只排气纸垫片 1 片说明书 1 份美化贴纸 1 张引擎安装◎使用随机附带的铝柱和M5 螺丝将引擎牢固地安装在磨车台或模型飞机上,且磨车台或模型飞机对应位置应安装 M5 垫片(发动机端无需安装垫片);螺丝应涂覆螺纹胶(需另购),防止因振动导致螺纹连接松动。
航模发动机大全
目录第一章概述第二章发动机基础知识――点火、冲程及工作循环第三章发动机基础知识(续)第四章市面上的发动机第五章电热塞第六章燃料、润滑、燃烧与冷却第七章消音器、邻里关系、背压与温度第一章概述第一章对我们这几个作者以及本书所涉及的内容做一个简介。
我们这套黄色封面的航模实用知识丛书对大多数航模爱好者而言都不会感到陌生。
不少人可能已经有了这其中的好几本了。
写丛书中前两本书的时候,离个人电脑的出现还差好多年呢。
书是手写,然后再用打字机打字的。
那时候写作可完全不像现在这样容易轻松。
不过,这不正可以说明我们帮助像您这样的航模爱好者的历史已经颇有年头了么。
在本书《发动机知识大全》问世之前,已出版有十一本书了。
而每本书的销售量都逐年增长。
因此,以往鉴来,我们有理由相信,本书也必然能达到预期的目的。
是我在1953年购买的。
直到现在,我还不时用它飞一下,而其表现始终不俗。
照片(3)中展示的则是该型的?新产品。
当然,Fox35只是一个特例,不能算是普遍规律。
时代的确在变迁。
多年前我们写第一本关于发动机的书的时候,发动机的品种还比较少。
而现在――无论是航模发动机的生产厂家、发动机的大小,还是复杂程度――可供的选择,用我儿子的话说,那称得上是“超多”。
照片(5-10)中所列举的,只是航模发动机的部分产地而已。
市售的发动机,小到可以用在微型模型上。
大,则几乎能用在载人的超轻型飞机上。
通过照片(12),我们可以看到市售发动机的尺寸范围有多大。
本章内提到的发动机,有的十分复杂,有的则只有为数不多的几个运动部件。
但是你很快就会意识到,尽管发动机的质量有的很好,有的一般,但是在一位章,以便你了解什么是合理的安装,以及如何进行合理的安装。
化油器的调整和维护是发动机使用中?重要的一环。
第十二章的内容则使你能正确地处理几乎各型发动机。
每位航模爱好者迟早都需要对发动机及其零部件进行清洗和拆装。
第十三章至第十六章介绍的就是这部分工作。
接下来的第十七章至第二十章,则把上一部分的内容扩展到了四冲程发动机。
航模火箭发动机配方
航模火箭发动机配方全文共四篇示例,供读者参考第一篇示例:航模火箭发动机是广大模型飞行爱好者常用的一种动力装置,它能够为火箭提供足够的推力,使得火箭能够顺利升空并完成飞行任务。
而火箭发动机的核心部分就是发动机燃料。
不同的发动机燃料配方可以影响火箭的性能和飞行轨迹,因此合理设计发动机配方对于火箭的发射成功至关重要。
下面将介绍几种常见的航模火箭发动机配方,并分析它们的特点和适用情况。
一、黑火药配方黑火药是最早被使用的火药制剂,由硝酸钾、木炭和硫磺按一定比例混合而成。
它具有燃尽速度快、推力大的特点,适合用于一次性火箭发射。
黑火药发动机的制作工艺简单,成本较低,因此广受欢迎。
但其推力和燃烧时间难以控制,对于复杂的火箭飞行任务可能不够稳定。
二、硝酸纤维素配方硝酸纤维素是一种高能量燃料,常被用于制作高性能的火箭发动机。
它的制作工艺比黑火药要复杂,但具有推力大、燃烧速度快、能量密度高的优点。
硝酸纤维素配方可以根据需要进行调整,适用于不同类型的火箭,如探测器、竞速火箭等。
但由于硝酸纤维素具有一定的爆炸性,制作过程需要谨慎。
三、KNSU配方KNSU是一种由硝酸铅、硝酸尿素和硫尿素混合而成的低烟发射药,具有燃烧速度适中、推力稳定等特点。
KNSU配方广泛用于中小型火箭的发动机中,制作工艺相对简单,且具有较好的可调性。
KNSU 发动机适用于需要较高稳定性和可控性的飞行任务。
四、APCP配方APCP是一种由固体氧化剂过氧化苯乙烯和聚甲基丙烯酸酯混合而成的推进剂,具有能量密度高、无污染、无毒害等优点。
APCP配方广泛应用于航天器和导弹的发动机中,但由于其制作工艺较为复杂,成本较高,一般用于高性能火箭的发射。
APCP发动机具有较高的推力和燃烧速度,适用于需要长时间飞行的任务。
在选择火箭发动机配方时,需要考虑火箭的设计要求、飞行任务以及制作条件等因素,选择合适的发动机配方才能确保火箭的成功发射。
在制作过程中要严格遵循化学安全规范,避免发生意外事故。
MVVS 58 IRS ProSport 模型飞机 Вла designated燃气引擎说明书
Operating instructions MVVS 58 IRS / ProSport No: 3001 / 3001PVersion 1.7Before using the engine, please read these instructions carefully. Congratulations on choosing the gas engine MVVS 58 / MVVS 58 ProSport.MVVS 58 has been designed and manufactured for propeller-powered radio-controlled model planes. It is able to meet all of your expectations of an acrobatic racing engine.Technical specificationsBore 42 mm Maximum power output ** 8.5 HP/6950 RpM Stroke 42 mm Maximum torque **Weight of complete engine1820 g Fuel Unleaded 95-octane fuel without ignition*Weight of ignition unit 165 g Lubrication Oil with petrol inmixture 1:40RpM range 1000 – 7500 RpM* Some manufacturers state the weight of incomplete engines. The value in the table above stands for the weight of a completely assembled engine, including the spark plug, carburetor, drive washer and prop screws.** Power output varies with the exhaust used. The value given in the table stands for the maximum available power output.Safety precautions:1) Never use the engine for any manned vehicles.2) When operating model planes, always follow the rules and laws in effect in your country.3) The manufacturer declines all responsibility for all damages arising from the operation of models and otherappliances droved by MVVS 58 engine.4) Always use original spare parts.5) Never tamper with the engine construction.6) Before each flight check that all the propeller screws are tightened up and in good condition. If you use a spinner,check that it is tightened up, too. When mounting the spinner always follow the assembly instructions.7) Periodically check that the engine is firmly fixed to the engine mounts. Never start a loose engine!8) Always use a balanced propeller! Always replace the propeller when damaged!9) Make sure that no part of your body intersects the plane of the spinning propeller.10) Always wear close-fitting, well-fastened clothes when starting or operating the running engine. Never wear looselyhanging clothes (ties, scarf, etc.).11) Never try to stop the engine by any part of your body.12) Always stop the engine either by turning off the ignition switch or by completely closing the carburetor throttlevalve.13) Before starting the engine always make sure that the model is safely fixed in place and cannot start moving.14) Fuel is combustible and therefore must be kept in an enclosed container at a safe distance from the engine when itis running.15) When preparing fuel carefully follow the manufacturer’s or dealer’s instructions.16) Small objects must be kept at a safe distance from the engine when it is running. Never throw any objects towardsthe spinning propeller.17) Be careful in choosing the location where you wish to start the engine. Avoid dusty or sandy areas.18) Start the engine in well-ventilated areas only. Never start the engine indoors.19) When starting the engine make sure that bystanders, especially children, are at a safe distance of at least 10 m.20) The engine power output makes it possible to fly big models. Mal-operation of such models may cause seriousdamage. Start using the MVVS 58 in model planes only after you have mastered operating smaller models.Selecting a suitable propellerIt is usually the case that propellers of the same dimensions coming from different manufacturers are not the same. Oftentimes not even propellers of the same dimensions produced by a same manufacturer are not the same. The engine power is best utilized when the propeller dynamics curve and engine power curve (revolutions / power output) intersect in the area of the engine top power output. Unfortunately, no propeller manufacturer provides this information. Engine power output is also a variable quality. It depends above all on the silencer used and can considerably vary. The situation is furthercomplicated by environmental parameters (temperature and atmospheric pressure in particular): low temperature and high pressure increase propellers’ input requirements by 20% in comparison with input at hot weather.MVVS 58 has been designed to generate maximum power at 6800 – 7100 RpM, according to the type of exhaust used. If you wish to utilize the maximum power output, choose a propeller, which allow the engine to reach these revolutions, or slightly lower revolutions (given the unloading of the propeller depending on the speed of flight) on the ground.We do not recommend using propellers with which the engine reaches more than 7500 RpM on the ground.Fig.two-blade propellers:22x10, 22x12, 22x1424x8, 24x9, 24x10, 24x1225x7, 25x8, 25x9, 25x10, 25x1226x7, 26x8, 26x9, 26x10three-blade propellers:22x10, 22x1224x9, 24x10, 24x12These values are only approximate and may vary with the factors described in the previous section, as well as with the type of the exhaust system used.Note: If the propeller is thinner than 21 mm (see fig.) use an additional washer (catalogue No. 3001 1104). On the other hand, the thickness of the propeller with washers must not exceed 36 mm if standard propeller screws are used.FuelAlways use unleaded 95-octane petrol mixed in the proportion 40 volume units of petrol to 1 unit of Mobil Racing 2T oil. If necessary, quality brand-name synthetic oil intended for racing two-stroke engines can be used too.Running the engine in, use MVVS Racing 2T oil, which come with the engine. Mix it in the proportion 30:1.Never use inexpensive oil developed for garden appliances or synthetic oils intended for the operation of methanol model engines. The manufacturer declines all responsibility for all engine damages arising from the use of low-quality fuel.AssemblyThe engine is fastened in place with four holders built in the rear cover. The rear cover is adjustable by 90° which ensure easy access to the carburetor’s operating elements. The engine can be mounted directly to the firewall or an assembly kit can be used (special accessories). Use M6 screws or screws M4 with a reduction kit (special accessories). If you decide to fasten the engine using flexible motor mounts, always choose parts with enough solidity and strength. Make sure to secure the screws against loosening and regularly check that they are tightened up and in good condition.Since air is used to cool the engine, sufficient air circulation under the cowl must be ensured. Never forget about a hot air outlet – which must be bigger than the intake. Gas engines heat up to a much greater degree than methanol ones!Do not forget that the engine needs oxygen from the air to be able to operate. Therefore ensure access of air to the engine intake as well. Caution: intake of warm air from beneath the cowl may cut the engine power output.Note: Attach a hose to the airpressure inlet on the carburetor and terminate it outside the cowl.Caution!When mounting the engine in the model use seals to protect all openings and prevent the pollution of the engine’s insidewith sawdust, residual abrasives etc.ExhaustUse only factory-made exhausts pipes designed for this type of engine, preferably brand-name MVVS engines with which you also get the power output guaranteed.The manufacturer declines all responsibility for all engine damages arising from the use of improper exhaust systems.When mounting the exhaust follow the manufacturer’s instructions. Make sure to secure sufficient cooling of the exhaust.Carburetor adjustment:Basic setting:adjusting needle ( L ) for low revolutions range 1turn and 45 minadjusting needle ( H ) for high revolutions range 1 turn and 10 min(the values are derived from the position of clock-hands)The new engine comes adjusted to the basic setting. This settingshould be kept during running the engine in!After the engine has been run in, adjust it following theinstructions below:- start the engine and warm it up- let the engine run at idle speed for approx. 5 secondsIf the engine starts to run backwards do not open thethrottle - stop the engine immediately! Otherwise the enginecan be damaged!Step I- Accelerate to 2/3 of the throttle range within approx.1 sec (faster acceleration). Repeat three times – if theengine accelerates quickly and without a hiccup go to Step III. If acceleration is not smooth go on to Step II.Step II- Faulty acceleration with hiccups and a tendency to cut out is usually attributable to a poor fuel mixture in the medium-revolutions range. Stop the engine and recheck the fuel feed (the hose-pipe must not be pinched or broken;if fitted, check also the fuel filter permeability). Restart the engine and test acceleration again. If problems persist adjust the carburetor. Open the adjusting needle L by 5 min and retest acceleration. If acceleration is smooth, open the needle by another 3-5 min - this should be done because the needle was previously set at a boundary value; if atmospheric conditions changed during flight, the problems might recur.If the engine still has bad acceleration, open the needle by 10 min (60 degree). If the engine’s operation does not improve afterwards, stop it and check the basic setting. Set the adjusting needle L at 1 turn and 50 min and the adjusting needle H at 1 turn and 10 min. Restart the engine again and test acceleration. If the engine runs correctly go to Step III. If engine does not accelerate properly, open the needle by another 10 min. If it does not accelerate, the defect supposed to be elsewhere than in incorrect adjustment. In this case go to the section on problem solving. Step III- If the engine accelerates correctly, according to the above test, set it at idle speed and accelerate to full speed.Repeat twice more. If the engine functions correctly, go to Step IV. If it cuts out, open the L needle by 5-10 min more.If the engine does not respond to acceleration fast enough keep closing the L needle until the engine starts to cut out in response to gas. At that point reopen the L nozzle by 5-10 min.Step IV- If the engine reacts correctly set it at full speed. If revolutions do not drop, the engine has been adjusted successfully. If revolutions seem to drop, open the adjusting needle H by approx. 5-10 min.Caution The engine must be stopped while you adjust the carburetor in order to prevent injury by the propeller. Caution Never close the choke valve completely when the engine is operating! The choke valve is set to allow minimum air flow only when fully closed, which could cause damage to the intake reed valve.Depending from the throttle control used there is possibility touse throttle stop-screw and the throttle valve spring enclosed.If the throttle pull rod is not equipped with flexible element themontage of the throttle valve spring is recommended. Otherwisethe vibrations of the engine can cause excessive wear of thethrottle valve shafting and with this deteriorate the carburetorfunction.Adjusting carburetor position:You can turn the rear cover by 90°which makes it possible to adjust the carburetor’s position (especially its adjusting needles) when fixing it in the model.How to dismantle the rear cover:Unscrew two M5 screws that hold the carburetor in place, remove the pressure hose from the carburetor (mind the gasket under the carburetor), remove the carburetor and loosen four M5 screws along the crankcase (Caution! Do not loosen the M4 screws that fix the reed-valve to the rear cover).Remove the rear cover by pulling it out of the crankcase – never use a hammer or any other similar tool. The rear cover is sealed in the crankcase with two sealing rings – therefore more strength is needed, however, it must always be pull only!Make sure you disassemble the engine in a clean environment!Position the rear cover as desired, carefully insert it in the crankcase and tighten the screws. Do not forget insert the gasket when reassembling the carburetor.Starting and running in a new engine:Before you first start the engine, make sure that the plug is screwed in and tightened up and that the plug socket is fitted in place and fastened down properly.Fix the ignition sensor in proper position above the magnet with screws enclosed.Unless the spark plug is not inserted in plug socket, never turn the engine with ignition turned on.This could lead to ignition damage!1) Make sure that the ignition is switched off, the choke valve is closed and the throttle valve is about half opened. Then give the engine 3-4 turns, provided that carburetor is not overflowing. If it is overflowing, only give the engine 1-2 turns.2) Switch the ignition on, open the choke valve, set the throttle at slightly higher idle speed and give the engine a few quickly turns. If even after the fourth turn, with the choke valve closed, you do not hear a suggestion of the engine starting, give the engine 2 turns following the instructions in paragraph 1 above. Then proceed according to instructions given in paragraph 2.3) If the engine does not start even after another set of turns open the throttle to maximum and give the engine approx. 4 turns. Switch the ignition off and on again and restart the engine with throttle turned slightly down and the choke valve set open.4) If the engine still would not start, unscrew the plug and check its contacts. Clean any possible petrol moisture ( i.e. an indication of engine overflow ) and screw it in again. Further starting should only be done with the throttle turned down. If the plug is dry then probably not enough fuel has been drawn into the carburetor. If that is the case, check the fuel feed and then return to the instructions given in paragraph 1.If the engine starts to run backwards do not open the throttle - stop the engine immediately! Otherwise the engine can be damaged!Having started the engine, leave it running for approx. 5 min at a higher idle speed. Then run it in for approx. 20 min, while changing revolutions from idle to 1/2-3/4 of the range and shortly holding each position - gradually prolong the holding periods. After 10 minutes of operation start opening the throttle at maximum for short periods of time. Stop the engine and let it cool down. Then restart it and check the adjustment. If everything is all right, you can first take off. During first few flights do not overload the engine and do not let it run at high revolutions for long periods of time (very important at hot weather). Use up all fuel that was produced as a mixture with the oil that is included in the package. From now on, fuel and oil should be mixed in the proportion 40:1.Problem guideThe engine would not start:- check and possibly replace the spark plug (check the spark by inserting the plug into the plug socket and turning the engine)- check the fuel feed- turn the engine to check its mechanical condition- check whether the carburetor nozzles are adjusted correctly- take the carburetor off and visually examine the condition of the carbon-fiber reed valve- unscrew the carburetor cover on the side of the pressure inlet, check the fuel screen possibly give the carburetor a blow with a current of air; when reassembling, make sure you arrange the membrane and gasketin a correct order- recheck the pressure hose attached to the carburetorReplacing the reed valve:- unscrew and remove the carburetor (mind the gasket)- unscrew four M4 screws on the flange, remove the flange and take off the reed valve (mind the gasket)- unscrew four M2 screws and remove the old valves, replace them with new ones, screw the screws back in and tighten them gently- when reassembling, make sure you fix the gasket correctlyMechanical faults of the engine:- turning the engine is not possible:- likely cause – the piston in the cylinder got seized: loosen and unscrew the M5 nuts under the cylinder (to loose the nuts use exclusively a special wrench which you can order as an accessory)- carefully remove the cylinder- you will probably be able to find out the likely cause of the engine’s mechanical problem by visually examining the piston and crankcase.- mechanical repairs must always be commit to a professional service departmentService informationAfter each 20 hours of running or 1 year change the spark plug.After each 50 hours of operation time preventively check up the con-rod and the reed valve.After 300 hours of operation time commit the engine to the professional service department for check-up.WarrantyThe MVVS gas engines come with a two-year guarantee against defects in workmanship and materials. Only original buyers of the engines are eligible warranty claimants. The warranty cannot be transferred with a change in ownership.This guarantee does not cover:- any normal wear that might occur- damage arising from accidents- damage arising from the use of an unbalanced or damaged propeller- damage arising from the use of a too small or a too big propeller- damage arising from the use of low-quality fuel- damage arising from the use of other than original spare parts and accessories- damage arising from sucking a foreign object into the engine- damage arising from any improper useFor further questions, please contact:MVVS, spol. s r.o., tr. Kpt. Jarose 35, 602 00 Brno, Czech RepublicTel. +420 545 211 683, fax: +420 545 211 418E – mail: ************Web: www.mvvs.czSpare Parts ListNr.: Description: Nr.: Description:0101 Crankcase 1101 Drive washer0202 Front bearing 1102 Drive washer key0204 Packing 1103 Propeller nut0203 Rear bearing 1104 Propeller washer0301 Rear cover 1105 Propeller screw0302 Rear cover screws-set 1107 Propeller screws - set0303 Rear cover …O“- ring 0306 Carburetor flange0304 Pressure nipple 0307 Carb. flange gasket0401 Cylinder 0308 Carb. flange screws - set0402 Cylinder screws - set 1301 Reed valve case0403 Cylinder nut 1302 Reed valve0404 Cylinder gasket 1303 Reed valve screws0405 Exhaust screws - set 1304 Reed valve gasket-upper0406 Exhaust nut 1305 Reed valve gasket-bottom 0407 Exhaust flange gasket 1306 Reed valve strap0701 Piston 1307 Carburetor screws0702 Piston ring 3314S Electronic ignition unit0801 Piston pin 3314P Electronic ignition unit ProSport 0802 Piston pin retainer 3309 Spark plug0901 Connecting rod 1405 Ignition sensor fixing screws 0904 Connecting rod washer 3227 Carburetor1001 Crankshaft。
MZ202 发动机中文说明书
MZ202 发动机中文说明书MZ 202我们建议您安装或使用发动机前阅读本手册简易星形发动机股份有限公司#3-8473 124街不列颠哥伦比亚省素里市加拿大V3W-9G4第2页内容页码警告3 介绍4发动机交付5 保证书5重要安全提示6 技术参数7 性能图8主要扭矩设置8 石油和燃料9如何准备你的燃料/混合油10 预启动程序10 起动发动机首次11 第一步突破11 最后检查12 启动程序12 调整化油器13 齿轮传动14 故障排除15 接线图18 维护计划19 备品备件清单22 初步飞行检查23 发动机维修日志24 MZ202的分解图25相较于原始模型,修改或不同的模块配件日期第3页警告这不是一个经过航空检验的引擎。
这种发动机尚未经受符合航空标准的耐用性和安全性测试,不作为认证引擎。
它被设计用在UlM或飞机,其中所使用发动机故障不会产生严重的后果。
用户必须承担因使用这款发动机还必须与派生的所有风险责任,必须了解到这款发动机是会遇到突发故障。
引擎故障可能会导致紧急降落。
这样的事故可能会造成严重的物质损害,伤害或死亡。
切勿将配备这种发动机的飞机用在一些如果迫降作为发动机突然发生故障会引起问题的的地区,条件和海拔条件下。
第4页简介恭喜你选择了MZ202引擎。
这种特殊设计的组件使它成为一个特别轻便,坚固和可靠的模型。
如果它安装正确和定期保养,你的发动机将持续很长一段时间,足够满足您的要求。
前卫的技术被用来制造这台发动机是在同类产品独一无二的。
光合金汽缸已经用镍硅碳化物处理过,重量轻,可靠,并具有一几乎是无止境的寿命。
曲轴是镍铬钼钢硬化,地面和建成高标准的阻力。
计算机数控设备和CAD-CAM技术已经使得建立超轻型曲轴箱成为可能。
此外,在曲轴箱采用了电动起动马达。
A 伏,180瓦的交流发电机供应点火系统,用于重新充电起动电池。
可变自动计时保证电子双点火开关型可靠性,安全性和最佳的发动机性能。
以上特点保证了MZ202是一个完整的,轻量级的,可靠的推进系统。
- 1、下载文档前请自行甄别文档内容的完整性,平台不提供额外的编辑、内容补充、找答案等附加服务。
- 2、"仅部分预览"的文档,不可在线预览部分如存在完整性等问题,可反馈申请退款(可完整预览的文档不适用该条件!)。
- 3、如文档侵犯您的权益,请联系客服反馈,我们会尽快为您处理(人工客服工作时间:9:00-18:30)。
航空模型发动机完全手册前言目前,航空模型上采用的动力装置主要有:橡筋条、活塞式发动机、喷气式发动机、电动式发动机和压缩气体发动机等数种。
其中活塞式发动机按照混合气着火方法分为:压缩燃烧式(压燃式)、电热式(热火栓式)和电火花点燃式三种。
本书主要介绍在我国使用较广的压燃式发动机。
最后在附录中简要介绍一下电热式和电火花点燃式发动机。
活塞式航空模型发动机是一种小型燃机,一般称为小发动机。
它的基本组成部分和工作原理,与中学物理书上介绍的燃机(包括柴油机和汽油机)大体相同,也和日常见到的手扶拖拉机、摩托车或汽车上使用的发动机大体相同,不过要简单得多。
小发动机的体积虽然很小,并且只有一、二十个零件,但它已经是一种精密机器了,必须很仔细地科学地去学习它和使用它。
航模爱好者在使用小发动机的过程中,要注意理论联系实际,将书本上学到的有关发动机的基本知识,运用到具体实践中去。
要学懂小发动机的工作原理、燃料组成、起动步骤和调整方法,学会怎样排除故障,并注意养成正确的操作方法,为今后在农业机械化运动中,或在工矿和科学试验等工作中,更好地学习和运用各种机械设备打下良好的基础。
一构造和原理(一)小发动机的构造:图1是轴进气压燃式小发动机的解剖图。
现将它的各个零件和功用分别说明如下:1.气缸和活塞——气缸是燃料和空气的混合气体进行燃烧的地方,也是将燃料燃烧后放出来的热能转换为机械能的地方。
气缸呈圆筒形,表面非常光滑,近似镜面。
气缸的混合气体燃烧膨胀时,产生很高的压力,作用在活塞顶上,推动活塞向下运动;经过曲轴连杆机构,使曲轴转动并带动螺旋桨旋转,产生拉力使飞机前进。
发动机转动时,活塞以很高的速度在气缸中来回运动。
气缸壁上开有排气口和转气口等配气孔。
活塞在气缸往复运动时,同时控制了排气口和转气口等配气孔的开闭。
气缸和活塞是小发动机上最主要也是最精密的零件,它们之间的配合非常精确,以保证密封和压缩性能。
如果使用不当,或让灰沙等脏物进入气缸部,那就会使气缸和活塞很快磨损,影响密封性能,造成发动机转速下降,甚至不能起动等不良后果。
活塞在气缸来回运动时,由于受到曲臂长度的限制,有两个极限位置。
活塞能达到的最高位置,即距曲轴旋转中心最远的位置,叫做上止点;最低的位置,叫做下止点(图2)。
活塞从上止点移动到下止点(或从下止点移动到上止点)所经过的路程,也就是上止点至下止点之间的距离,叫做活塞行程(冲程)。
当活塞在上止点时,由活塞顶面、反活塞的下表面和气缸周围侧壁所包含的容积,叫做燃烧室容积。
活塞在下止点时,由活塞、反活塞和气缸壁所包含的容积,叫做气缸全容积。
上止点与下止点之间的气缸容积,即活塞在一个行程所经过的容积,叫做气缸工作容积。
平时我们说这是一台1.5毫升(c.c.)的小发动机,就是指这台小发动机的气缸工作容积是1.5毫升。
一般适宜于普及使用的是1.5~2.5毫升的小发动机。
这里不妨作个比较:注射防疫针时,往往要打1毫升药剂;可见,这种发动机的气缸工作容积是很小的。
再如:“轻骑”牌两用摩托车的发动机气缸工作容积是55 毫升;“幸福”牌250型两轮摩托车的发动机工作容积是250毫升:“解放”牌卡车的发动机是六个气缸,总的工作容积是5.55升,即5550毫升。
一般说来,气缸工作容积越大,功率也越大。
气缸全容积和燃烧室容积的比值叫做压缩比。
在图2的例子中,气缸全容积是燃烧室容积的12倍。
也就是说,活塞在下止点时,气缸的混合气体积有12份,待到上止点,就被压缩成1份。
因此,它的压缩比为12.2.曲轴连杆机构——活塞在气缸只能作往复直线运动。
要通过曲轴连杆机构,把活塞的往复直线运动变成曲轴的旋转运动。
正如我们日常见到的缝纫机一样,只要用脚上下蹬踏板,通过连杆和曲拐,飞轮就旋转了。
曲轴是发动机受力较大的一个零件。
它的前端装有前、后桨垫和螺帽,后端曲臂(曲拐)上连有曲柄销。
连杆用来连接曲轴和活塞,它的一头套在曲轴的曲柄销上,另一头套住活塞销,并与活塞连接。
这些互相连接又可活动的零件,通常合称为曲轴连杆机构,或称曲拐连杆机构、曲柄连杆机构。
3.机匣——机匣是发动机的壳体,用来连接气缸、曲轴、活塞和汽化器等零件,使之成为一个整体。
在机匣的左右两侧,有安装发动机的凸边。
机匣后部有用螺纹固定的机匣后盖,以保证机匣腔密封。
二行程发动机的机匣也是新鲜混合气的通道,新鲜混合气由汽化器进入机匣,在活塞向下运动时经转气道进入气缸。
4.反活塞和调压杆——反活塞好比是能上下活动的气缸顶盖。
拧紧调压杆(顺时针方向转动),反活塞被压下;拧松调压杆,反活塞又能在气缸气体受压缩时产生的压力作用下,再向上弹起。
反活塞的上下移动,可以改变燃烧室的大小,因而能够改变压缩比。
反活塞在气缸中的位置越低,燃烧室的容积越小,压缩比越大,气缸可燃混合气压缩后的体积越小,混合气的压力和温度越高,这就容易着火燃烧。
但是,压缩比应该控制适当。
压缩比过大,混合气会过早开始燃烧,引起爆震和停车,甚至可能弄断连杆或曲轴等零件;过小,混合气压缩后产生的压力和温度不够,温度低于混合气的燃点,混合气就不能着火燃烧,发动机就不能起动,或不能稳定地连续运转。
对压燃式发动机来说,压缩比的大小对起动和运转性能特别重要,必须注意掌握。
压燃式小发动机的压缩比大都是可以调节的,一般为15~25.决定压缩比的方法这在以后还要介绍。
5.气缸头——气缸头通过螺纹拧在气缸上,周围有散热片,用以增加和空气接触的面积,帮助气缸冷却。
气缸头顶部有螺纹,用来拧入调压杆。
6.汽化器——汽化器的功用是使燃料从液体变为雾状物后,再与空气以适当的比例混合,成为可燃混合气。
小发动机的汽化器一般由进气管、喷油管和调节油针组成,可算是一种最简单的汽化器了。
喷油管横穿进气管,有1~2个喷液体燃料的小孔。
燃料的流量由头部带锥度的油针调节。
顺时针旋紧油针,喷油孔被堵住,燃料不能流出;旋松油针,燃料就从喷油孔中流出。
因此,旋动油针能调节燃料流量的大小。
7.固定螺旋桨的零件——螺旋桨装在前、后桨垫之间,由螺帽紧紧地固定住。
后桨垫一般都有带锥度的孔,以便和曲轴的锥度部分压紧。
为了使螺旋桨不打滑,在后桨垫表面上还有凹凸的刻纹。
(二)小发动机的工作原理:小发动机是一种二行程发动机。
工作时,可燃混合气通过进气管进入机匣腔。
活塞下降时,压缩机匣腔的混合气,使它经过转气道和转气口进入气缸上部。
当活塞再次上升时,混合气在气缸上部受到强烈的压缩,温度升高,着火燃烧。
高温高压的气体猛烈膨胀,推动活塞作功。
将热能转换为机械能。
燃烧后的废气在排气口打开时即被排出;与此同时,新鲜混合气又由机匣腔进入气缸,进行第二次的压缩和燃烧。
再次重复上述过程。
发动机连续运转后,可调节压缩比和油量来获得不同的功率和转速。
为了进一步了解二行程小发动机的工作原理,现以常见的轴进气压燃式小发动机为例,来说明发动机在两个行程中的工作情况:第一个行程(活塞上行。
进气和压缩行程)——活塞由下止点开始向上移动时,排气口和转气口还是打开的,机匣腔中的新鲜混合气继续通过转气道和转气口进入气缸上部,同时驱除气缸中残留的废气。
一般压燃式发动机采用360°转、排气口,在气缸下部的壁有几条半圆形凹槽,称为转气道,转气道上方叫做转气口;排气口开在转气口的上面,参见图3气缸的切面形状。
图4,当活塞继续上移,转气口和排气口先后关闭(被活塞挡住),气缸上部的混合气受到压缩,温度和压力急剧升高。
与此同时,由于活塞向上移动,机匣腔的容积扩大,压力降低,随着活塞继续上升,曲轴颈上的进气孔与进气管接通,大气压力迫使外界空气以高速流过进气管中的喷油管,该处压力低于大气压力,燃料从喷油孔中喷出(道理与滴滴涕喷筒打药液的情况相仿),并被流过的空气吹成雾状,在与空气以一定比例混合成可燃混合气后,通过进气孔和曲轴的中空通道进入机匣腔。
从这一行程可以看出:活塞上方进行压缩混合气的同时,活塞下方正在吸入供下一次燃烧的新鲜混合气。
第二个行程(活塞下行。
燃烧、膨胀、排气和转气行程)——图5,活塞到达上止点,气缸混合气的温度已升高到混合气的燃点,于是着火燃烧。
高压高温的气体膨胀时,迫使活塞向下运动作功。
这就是燃烧和膨胀的过程。
图6,当活塞下移到某一位置时,曲轴上的进气孔被关闭,刚进入机匣腔的混合气开始受到压缩;活塞继续下移,排气口打开,气缸中的废气开始向外排出。
接着转气口也打开了。
此时,机匣腔中受压缩的混合气的压力已大于气缸残余气体的压力,混合气就经过转气道和转气口进入气缸上部,并帮助驱除废气。
这就是排气和转气(又称驱气、扫气或换气)的过程。
这时候,气缸又充满了新鲜的可燃混合气。
在这个行程中,完成了燃烧、膨胀、排气和转气过程,活塞又回到了开始时的下止点位置。
所谓二行程发动机,归纳起来,就是活塞经过上、下两个行程(曲轴相应旋转一圈),完成进气、压缩、燃烧、膨胀、排气和转气过程,即完成一个工作循环。
发动机连续运转时,气缸就周而复始地进行着上述的工作循环。
大拖拉机、汽车和飞机一般采用四行程发动机(四个行程完成一个工作循环),这种发动机需要气门等复杂机构。
因此,摩托车、小拖拉机、小型农药机械和航空模型上一般都采用二行程发动机。
航空模型发动机完全手册(三)二行程小发动机的特点:1.利用活塞和曲轴进行配气工作,排气和转气靠活塞控制气缸壁上的排气口和转气口来完成,当活塞上下运动时,这两个配气口就随着活塞的不同位置而打开或关闭;进气由曲轴上的进气孔来控制(也有用活塞和机匣后盖旋板等控制的)。
2.可燃混合气不是直接由外界进入气缸上部,而是分两步完成。
第一步,混合气从进气孔进入机匣腔;第二步,由机匣腔经过转气道和转气口进入气缸上部。
3.有几个工作过程是同时进行的。
活塞运动时,活塞上方(气缸上部)和下方(机匣腔)同时进行着某个工作过程。
如:(1)活塞上行,机匣腔吸进新鲜混合气的同时,活塞压缩气缸上方部的混合气。
(2)气缸部的气体燃烧膨胀,迫使活塞下行作功的同时,活塞压缩机匣腔的新鲜混合气。
(3)气缸排出废气的同时,进行转气,使气缸部再次充满新鲜混合气。
4.曲轴旋转一周,混合气燃烧作功一次,发动机的运转较为平稳。
5.省去了气门等机构,构造简单,重量轻,适用于小型发动机。
由于二行程发动机的排气和转气大部分是在同时进行,废气不能排除干净,这些残留废气占去了一部分气缸工作容积,影响了下一次燃烧的效果。
同时,有一部分新鲜混合气未经燃烧就从排气口跑出,增加了耗油率。
这是二行程发动机的一个较大的缺点。
压燃式小发动机的构造式样很多,仅进气方式就有曲轴式(图1所示)、活塞式、旋板式和活门式等好几种,不过工作原理都相同。
早期的小发动机,大都采用依靠活塞来控制进气的结构形式,这种形式至今还在一些摩托车和小型汽油机上使用。
它的进气管接在发动机的腰部,进气口开在气缸壁上(位于转气口下方,由活塞下裙来控制进气口的开启或关闭)。
