佳能 20系列固件升级图文说明

合集下载

了解数码相机的固件升级方法

了解数码相机的固件升级方法

大家都知道电脑使用过一段时间后能进行升级,可以根据自己的需求对内存、硬盘、显卡等部件进行更换,同时也可以进行软件升级,将主板的BIOS升级等,但很多人都不知道数码相机也可以进行升级。

数码相机的升级除了高端产品可以更换镜头等外部配件外,对于大多数数码相机来说,最有效果的升级方式是进行固件(Firmware)升级。

数码相机的固件就像主板的BIOS一样,是内置在数码相机之内的一个程序,是固化在数码相机中的控制指令软件,数码相机就是根据固件来完成图像的拍摄和处理的。

随着技术的快速发展,数码相机在出厂以后,往往用不了多长时间就出现了许多新的技术,而很多厂商也会及时推出新的固件让用户进行升级,但一般都是品牌知名度比较好的企业,例如佳能、奥林巴斯等,这也是数码相机增值服务的一项重要内容。

那么,数码相机的固件升级是如何进行的呢?下面就让我给你详细介绍一下吧!升级前的准备数码相机的固件升级其实还是有一定风险的,不过只要操作得当,应该不会对用户造成什么困难。

升级前,你先要查看你的数码相机能否进行固件升级,可以在厂商的网站和其他一些资讯网站上查找,在确定你的数码相机可以升级后,你还要查看固件升级后可以解决什么问题,以决定你的数码相机是否需要固件升级。

同时,还有另外一个直接的方法,你可以在厂商网站上寻找类似佳能网站上提供的“数码相机固件版本表”的表格,在其中找到需要升级的数码相机型号,然后点击它的下载网址,在页面转到这款相机的固件下载页后,在固件下载页最下方的Serial Number框中输入数码相机的机身编号。

网页将根据您的相机机身编号自动判断数码相机是否需要升级。

升级使用的设备包括需要升级的数码相机、具有USB接口的计算机、充足电的电池、USB 连线、存储卡、数码相机应用软件光盘和新的固件。

不同数码相机需要的连接线不同,则在升级前要准备的数据线就可能不一样,如果你的数码相机是使用USB线与计算机连接的,就一定要注意计算机要具备USB接口,其他一些附件一般在购买数码相机时都应该具备,还有就是要在网站提示下下载最新的固件文件。

尼康相机固件更新指南说明书
尼康相机固件更新指南说明书

Updating Camera Firmware—Macintosh—Thank you for choosing a Nikon product. This guide describes how to perform this firmware update. If you are not confident that you can perform the update successfully, the update can be performed by a Nikon service representative.See the camera manual for information on camera operations.ImportantThe camera may be damaged if power is interrupted or camera controls are operated during the update. Do not turn the camera off, remove or disconnect the power source, or operate camera controls during the update. If the update is not completed successfully and the camera becomes inoperable, take the camera to a Nikon-authorized service representative for inspection.Get readyTo upgrade the camera firmware, you will need:• The camera• A computer equipped with a card reader or card slot• One of the following camera power sources:— An AC adapter— A battery or batteries with sufficient charge to complete the update• A Nikon-approved memory card that has been formatted in the camera (note thatall data on the memory card will be deleted when the card is formatted; beforeformatting the card, back up any data you wish to keep to a computer or otherdevice)• The camera User’s ManualCheck the current camera firmware versionThe menus displayed on your camera may differ from those shown here.Turn the camera on.12Press the to display the menus.Select Firmware version in the setup menu.3The current firmware version will be displayed. 4Confirm that the firmware version is the correctversion for this update.“XXXX” is the camera name and “**” the firmware version. 5Exit to the setup menu and turn the camera off.Download and extract the new firmwareClick the I agree - Begin download link on the download site to download the file “F-XXXX-V**M.dmg”, where “XXXX” is the camera name and “**” the firmware version. When download is complete, a disk image will appear on the desktop containing the files and folders listed below:Copy the firmware to the memory cardThe firmware can be copied to the camera memory card using a computer equipped with a card reader or card slot.Insert a formatted memory card in the card reader or card slot. If Nikon Transfer 1or ViewNX 2 is installed, Nikon Transfer or Nikon Transfer 2 may startautomatically; exit the application before proceeding.An untitled volume (“NO_NAME”) will appear on the desktop. Copy the2“firmware” folder from the disk image to this untitled volume.When copying is complete, open the “firmware” folder on the untitled volume and confirm that it contains the file “firmware.bin”.ImportantBe sure to copy the “firmware” folder to the root directory of the memory card.The camera will not recognize the new firmware if it is placed in a folder under the root directory.3Drag the untitled volume into the Trash and remove the memory card from the card reader or card slot.Update the camera firmwareThe menus displayed on your camera may differ from those shown here.During the update, do not:• Remove the memory card• Turn the camera off• Unplug or disconnect the AC adapter• Remove the battery• Subject the camera to powerful electromagnetic noiseAny of the above actions could cause the camera to become inoperable.Insert the memory card containing the firmware into the camera memory card 1slot.Turn the camera on.23Press the to display the menus.Select Firmware version in the setup menu. 4A firmware update dialog will be displayed. Select Yes to begin the update.5 The message shown at right will be displayed while the update is in progress.lete.Confirm that the update was completed successfully. 6-1. T urn the camera off and remove the memory card.6-2. C heck the camera firmware version as described in Step 2, “Check thecurrent camera firmware version”. If the updated version is displayed, the updatewas successful.6-3. “XXXX” is the camera name and “**” the firmware version.If the update was not successful, contact a Nikon service representative. 6The message shown at right will be displayed when the update is compFormat the memory card in the camera.7This completes the firmware update.。

魔灯固件最简单的升级方法
魔灯固件最简单的升级方法

很多朋友见到这么多文件发给他,都是一头雾水,头蒙,该怎么升级,其实很简单,就是把固件复制到卡里,相机内升级固件就可以了。

相机出现绿色英文提示:please restart your camera,关机相机,再开机就好了。

删除键是魔灯的菜单,menu是佳能的菜单。

半按快门退出菜单。

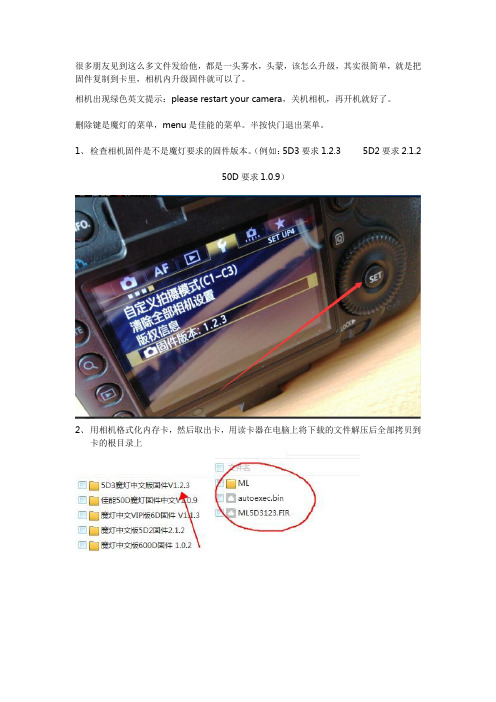
1、检查相机固件是不是魔灯要求的固件版本。

(例如:5D3要求1.2.3 5D2要求2.1.2
50D要求1.0.9)
2、用相机格式化内存卡,然后取出卡,用读卡器在电脑上将下载的文件解压后全部拷贝到
卡的根目录上
3、将卡插入相机,选择固件版本,按SET键,执行固件升级。

大约10秒,出现上图,立即关闭相机电源,必须在倒计时结束前关机相机电源。

打开相机,按删除键,调出ML菜单
5D3高级中文版,要告诉我你的机器码,格尼授权文件以后,才可以使用魔灯菜单
注意事项:相机不开机,按住SET键不松开开机(不加载魔灯固件)。

或者不装卡,重新插上电池就可以开机了,是因为卡里文件不对造成的。

实在开不开机,按住Q键和快门10秒后不松开,再开机!。

佳能相机刷MagicLantern魔灯固件教程以及菜单说明

佳能相机刷MagicLantern魔灯固件教程以及菜单说明

佳能相机刷MagicLantern魔灯固件教程以及菜单说明魔灯固件属于第三方固件,通过修改RAM中的官方固件达到在不损坏机器的情况下增加原有官方固件限制或没有的功能,以此增添更多的拍摄乐趣和功能。

只是一个外挂程序,并没有对机器固件做任何写操纵,该软件已经在佳能多款DC上试用过,尚无证据显示使用后会造成相机损坏。

如果确有心理负担,请不要尝试使用。

魔灯官网下载(英文原版) /支持下列机型5D (classic)固件版本: 1.1.15D Mark III 1.1.3固件版本: 1.1.35D Mark III 1.2.3固件版本: 1.2.35D Mark II固件版本: 2.1.26D固件版本: 1.1.67D固件版本: 2.0.360D, 60Da固件版本: 1.1.150D固件版本: 1.0.9700D / Rebel T5i固件版本: 1.1.5650D / Rebel T4i固件版本: 1.0.4600D / Rebel T3i固件版本: 1.0.2550D / Rebel T2i固件版本: 1.0.9500D / Rebel T1i固件版本: 1.1.11100D / Rebel T3固件版本: 1.0.5EOS M固件版本: 2.0.2100D / Rebel SL1固件版本: 1.0.170D固件版本: 1.1.21200D / Rebel T5固件版本: 1.0.2450D / Rebel XSi固件版本: 1.1.05D Mark III 1.3.4固件版本: 1.3.4EOS M 2.0.3固件版本: 2.0.3550D/T2i 1.1.0固件版本: 1.1.07D 2.0.6固件版本: 2.0.6刷入方法注意:刷入前先升级相机固件版本到和魔灯固件一样的固件版本第一步:首先将相机设为M模式第二步:按MENU键,进入菜单,使用相机格式化功能格式化SD卡进入格式化菜单后选择“低级格式化”,点确认,开始格式化SD卡第三步:将SD卡插入读卡器,将压缩文件包中的文件拷到SD卡第四步:将SD卡插回相机,按MENU键,进入固件升级菜单进入固件升级菜单后,点击确定开始升级升级过程不要按任何按键(大约5-10秒左右),直到出现绿色的字。

Canon Canonflex 20mm F2.8 单反相机说明书

Canon Canonflex 20mm F2.8 单反相机说明书

The new Super-Canomatic Lens R has the unexcelled quality of all Canon lenses, and guarantees pictures of the utmost clearness and critical sharpness. When you release the shutter, the diaphragm closes automatically to the pre-selected aperture stop then reopens automatically to full aperture immediately after exposure. No parallax problems ever with the Super-Canomatic Lens R or any of the many interchangeable lenses that can be used, as the object is always viewed through the taking lens.
out of focus
in correct foclis
For convenient focusing, the frosted surface of the rangefinder can be used. For more critical focusing , the splitimage rangefinder Jines should be used. As soon as the split-image appears in perfect alignment, the lens is critically focused.

佳能复印机系统升级培训
佳能复印机系统升级培训

其它
需要准备的工具
• SST升级软件 V3.22 或者是更高的版本。 • 电脑配置ቤተ መጻሕፍቲ ባይዱ
开始升级
错误提示
错误提示
复印机
复印机显示
解释
• 1:Upgrade (Auto) • 只对更高版本的文件进行下载 ,在下载完毕后,重新启动复印机, 写入操作才会执行。 • 2、Upgrade ( w Confirmation ) • 当下载旧版本或一样版本的文件时,会有提示让你确认是否需要 重新下载,当下载完成后,需要手动关闭复印机再重新启动后, 写入操作才会执行。 • 3、Upgrade (Overwrite all) • 所有的文件都会重新下载和写入。 • 当下载完成后,需要手动关闭复印机再重新启动后,写入操作才 会执行。 • 4、Format HDD • 在安全模式下格式化硬盘的操作才会生效 。 • 可用于格式化 BOOTDEV分区。 • 可用于格式化全新的硬盘,这时会显示[4]: Format HDD (All) , 这操作会对整个硬盘进行格式化。
复印机显示
• 结束
佳能复印机系统升级培训

U盘篇
2008-07-08
需要准备的工具
• U盘 接口 容量 格式 USB1.1 or better 推荐 1 GB 或 更大容量 一个分区,FAT 16 或者是 FAT32 ★ 不支持 NTFS and HFS 格式,不支持 多个分区 ★ U 盘不可以有防止写入功能,如果有 请确保U盘处于可写入状态
解释
• • • • • 5、Backup 不使用(用于研发) 6、Restore former version 只在系统备份文件已经存在的时候显示, 对备份系统起作用,并对当前的系统做一个新的备份。

佳能单反相机固件升级和设置照片风格

佳能单反相机固件升级和设置照片风格

佳能单反相机固件升级和设置照片风格一、下载EOS Utility的两种方法:1. 佳能官网提供直接下载完全安装版本,而不是升级版,链接如下。

Windows用EOS Digital Solution Disk Software 28.1A (适用于无法使用捆绑CD的用户)只是要输入机身序列号即可下载。

详细信息:----- "EOS Digital Solution Disk Software"是一款软件套件,里面含有"Digital Photo Professional"、"EOS Utility"及"Picture Style Editor"等应用软件,仅供无法使用捆绑CD的用户将此套件安装至计算机。

此包含有以下版本的应用软件:Digital Photo Professional 3.13.10;EOS Utility 2.13.10;Picture Style Editor 1.13.10。

文件名: ksd281a_installer.zip文件版本: 28.1A最近更新 : 07-May-2013发行编号 : 020*******文件类型 : zip文件语言 : 德文, 英文, 西班牙文, 法文, 意大利文, 日文, 韩文, 俄文, 简体中文文件大小 : 145,819KBDigital Photo Professional: 此软件推荐给以拍摄RAW图像为主的用户使用。

使用本软件可以高速查看、编辑、处理和打印RAW图像。

还可以编辑JPEG图像而保持原图像不变。

EOS Utility: 通过将相机连接到计算机,可以用EOS Utility将相机拍摄的静止图像和短片传输到计算机。

还可以用软件设定各种相机设置并用与相机相连接的计算机进行遥控拍摄。

Picture Style Editor: 可以编辑照片风格并创建和保存原创的照片风格文件。

佳能IPF大幅面打印机打印头升级固件和注墨指南.doc-推荐下载

佳能IPF大幅面打印机打印头升级固件和注墨指南.doc-推荐下载

2-2 定义搜索范围。USB 选 Local,网络选 Network.也可以选 ALL。 3-1、指定固件文件:点“specify Firmware”
对全部高中资料试卷电气设备,在安装过程中以及安装结束后进行高中资料试卷调整试验;通电检查所有设备高中资料电试力卷保相护互装作置用调与试相技互术通关,1系电过,力管根保线据护敷生高设产中技工资术艺料0不高试仅中卷可资配以料置解试技决卷术吊要是顶求指层,机配对组置电在不气进规设行范备继高进电中行保资空护料载高试与中卷带资问负料题荷试2下卷2,高总而中体且资配可料置保试时障卷,各调需类控要管试在路验最习;大题对限到设度位备内。进来在行确管调保路整机敷使组设其高过在中程正资1常料中工试,况卷要下安加与全强过,看度并22工且22作尽22下可22都能22可地护以缩1关正小于常故管工障路作高高;中中对资资于料料继试试电卷卷保破连护坏接进范管行围口整,处核或理对者高定对中值某资,些料审异试核常卷与高弯校中扁对资度图料固纸试定,卷盒编工位写况置复进.杂行保设自护备动层与处防装理腐置,跨高尤接中其地资要线料避弯试免曲卷错半调误径试高标方中高案资等,料,编试要5写、卷求重电保技要气护术设设装交备备置底4高调、动。中试电作管资高气,线料中课并敷3试资件且、设卷料中拒管技试试调绝路术验卷试动敷中方技作设包案术,技含以来术线及避槽系免、统不管启必架动要等方高多案中项;资方对料式整试,套卷为启突解动然决过停高程机中中。语高因文中此电资,气料电课试力件卷高中电中管气资壁设料薄备试、进卷接行保口调护不试装严工置等作调问并试题且技,进术合行,理过要利关求用运电管行力线高保敷中护设资装技料置术试做。卷到线技准缆术确敷指灵设导活原。。则对对:于于在调差分试动线过保盒程护处中装,高置当中高不资中同料资电试料压卷试回技卷路术调交问试叉题技时,术,作是应为指采调发用试电金人机属员一隔,变板需压进要器行在组隔事在开前发处掌生理握内;图部同纸故一资障线料时槽、,内设需,备要强制进电造行回厂外路家部须出电同具源时高高切中中断资资习料料题试试电卷卷源试切,验除线报从缆告而敷与采设相用完关高毕技中,术资要资料进料试行,卷检并主查且要和了保检解护测现装处场置理设。备高中资料试卷布置情况与有关高中资料试卷电气系统接线等情况,然后根据规范与规程规定,制定设备调试高中资料试卷方案。

如何给佳能数码单反固件升级[图文详解]

如何给佳能数码单反固件升级[图文详解]

如何给佳能数码单反固件升级[图文详解]1. 我们登录网站点击如下图所示位置:2. 在标题中的“服务与支持”下拉菜单中,点击“驱动与固件下载”后会弹出如下页面,在页面红圈里的固件升级处,点击【请点击这里】按钮3. 然后在接下来的页面里选择【产品类型】是照相机【产品系列】是EOS数码单反照相机【产品型号】是选择你所要升级的相机型号,这里我选择了5DMarkII。

然后单击右下角的搜索按钮…4.在上面的页面中选择好三项以后点击右下的【搜索】按钮,然后会出现如下页面5.点击下载后会出现如下的页面这个页面比较的长,不管它一直拉到最下面… 将红圈儿处的复选框选中…选中后就会出现下载的超级链接,如下图,点击红圈儿处的“点击这里”开始下载…【在向下继续前我要郑重提醒】,往下的操作具有一定的危险性,需要注意相机电池的电量一定要充足或者使用外接电源防止升级过程中断电对相机造成伤害!进行升级用的存储卡一定要是质量优良的,防止因存储卡质量问题导致升级失败损害相机!!拿不准的影友最好在有升级固件经验的人的指导下进行操作或者干脆拿去佳能服务部进行升级】6.下载了固件文件后先要把它解压出来,下面以Windows的版本为例,因为使用Windows的影友还是多一些吧。

下载下来的文件是一个压缩包文件解压缩它(如图)7.解压出来的文件就是这个样子的(如下图),一个扩展名是FIR的文件,这就是真正的固件升级用文件了。

8.将上面的这个文件拷贝到存储卡里的根目录下,装入相机里,然后打开相机找到如下图的选项,选择该选项然后按相机的【SET】键确定,此时如果存储卡里有我们下载的相应的固件升级文件,相机就会开始升级。

【警告】!升级过程中必须保持电池是满格电量,千万不能关闭电源或断电,或打开存储卡舱盖、电池舱盖!否则后果无法想象~!】可能会使相机变板儿砖也不一定,我没试过,也不建议大家尝试…相机会做如下的提示,请大家参考下图操作【再次警告】:此过程绝对不可断电!电量不足导致关机,关闭相机电源,打开存储卡舱门、电池仓盖,拔掉交流电源…等等一切可能导致相机断电的行为都“绝对禁止!”升级完毕后存储卡里的升级文件会自动被删除,大家不必再进行处理(此处也体现了佳能的人性化)就此便圆满完成佳能数码单反相机的固件升级操作,撒花......。

升级产品Z的固件和软件版本操作指南

升级产品Z的固件和软件版本操作指南

升级产品Z的固件和软件版本操作指南随着科技的不断进步,产品的固件和软件版本的更新已成为日常生活中不可或缺的一部分。

本文将为您提供升级产品Z的固件和软件版本的详细操作指南,以确保您能够顺利完成升级过程,享受到更好的产品体验。

一、准备工作在开始升级之前,请确保您已经完成以下准备工作:1. 确认产品型号和当前固件/软件版本:在升级之前,您需要了解当前产品的型号以及安装的固件/软件版本。

这可以通过查看产品说明书或者在产品设置中查找相关信息来获得。

2. 确认升级文件的来源:在升级之前,您需要确认升级文件的来源是否可靠。

建议您从官方网站或者授权渠道下载升级文件,以确保文件的完整性和安全性。

3. 备份重要数据:在升级过程中,可能会出现数据丢失或者文件损坏的情况。

为了避免数据丢失,建议您提前备份重要数据,以便在需要时进行恢复。

二、升级固件版本以下是升级产品Z固件版本的操作步骤:1. 下载升级文件:从官方网站或者授权渠道下载与您产品型号匹配的固件升级文件,并将其保存到您的电脑或者移动设备上。

2. 连接产品Z:使用产品附带的数据线或者无线连接方式将产品Z与您的电脑或者移动设备连接。

3. 进入升级模式:根据产品说明书中的指引,将产品Z进入升级模式。

这可能涉及按下特定的按键组合或者在设置中进行相应的操作。

4. 打开升级工具:在电脑或者移动设备上打开升级工具,并选择产品Z的型号和当前固件版本。

5. 导入升级文件:在升级工具中导入您下载的固件升级文件,确保文件的完整性。

6. 开始升级:点击升级按钮,等待升级过程完成。

在升级过程中,请勿断开产品Z与电脑或者移动设备的连接,以免导致升级失败。

7. 完成升级:当升级过程完成后,升级工具将会显示升级成功的提示信息。

此时,您可以断开产品Z与电脑或者移动设备的连接,并重新启动产品Z。

三、升级软件版本以下是升级产品Z软件版本的操作步骤:1. 下载升级文件:从官方网站或者授权渠道下载与您产品型号匹配的软件升级文件,并将其保存到您的电脑或者移动设备上。

让佳能相机充满魔力篇一:MagicLantern固件刷机及功能简介

让佳能相机充满魔力篇一:MagicLantern固件刷机及功能简介
通过这张图,可以查看到ML的RAW视频录制,对各款相机的支持度,以及各款相机的读写速 度。 如果想用RAW视频的话,想要完整1080P能流畅的话,只有一个选项,5D3。 如果想体验比较高分辨率并且流畅的RAW视频,6D,7D,5D2和50D(不能录制音频)是不错的 选择。 当然你还需要一张高速的内存卡,1000X或者1066X的CF卡。
间隔拍摄(Intervalometer) B门计时器(Bulb Timer)
总结
大概简介先写到这里,如果有需要的话,下一篇打算详细说下和照相相关的几个常用选项,双 ISO,ettr,包围曝光和间隔拍摄。之后再介绍下视频RAW的工作流程以及和H264的对比。 ML的固件有它不稳定的时候(当机了需要关电或者下电池重启),也有它的劣势比较耗电,总 体来说, 它能让你收中的佳能相机用起来更方便,功能更强大。 至少它
这个是Magic Lantern的官网。
下面是Magic Lantern所支持的机型,以及开发中和停止维护的机型。
ML目前支持的相机列表
正在开发中的和已经不再维护的
主要功能
Magic Lantern 最牛叉的功能是给佳能家的相机增加了Video Raw(10/12/14bit)的功能。相对 于H.264的视频录制,就像RAW和JPEG差别一样。在细节表现和后期的可编辑度上完全就是天 壤之别。网上有很多5D3和BMCC的RAW视频对比,近乎于通过ML这个插件,让你拥有了一台 准专业级的摄像机。通过帧率锁定(FPS override),可以完成逐帧的调节,实现官方固件所不 支持的帧数。还可以通过HDR视频录制(HDR Video),来设置双ISO的进行视频录制,以满 足大光比情况下的拍摄。
因为Magic Lantern固件并不能取代或修改佳能固件,而是以一种外挂插件的性质官方固件一起 运行,所以它很容易卸载,并且运行中也几乎没有风险。Magic Lantern主要是在相机里加入了 一个引导,在相机正常启动完成后,让相机从SD/CF卡上加载ML到相机内存中运行。

佳能相机固件升级方法

佳能相机固件升级方法

佳能相机固件升级方法
一、升级前的准备
1.确认相机的内部程序版本是低版本,否则无需升级.方法是在与计算机联机时,打开联机软件的Camera Settings窗口,可以看到相机固件的版本号.
2.相机的准备:升级前一定确认电池已经充足电或者交流供电器供电正常,因为一旦升级过程中掉电,将导致相机不能使用,准备一张空白的CF卡并重新格式化。

3.准备升级程序:下载升级软件,软件解包后将DC97目录(如果有这个目录的话,如果没有,直接将释放出的文件复制到CF卡根目录)及其内容复制到CF卡上,如果您有读卡器或笔记本电脑可直接复制,若没有,需要把数码相机与计算机联
接,运行UploadFirmware.
二、升级
1.将相机的控制盘转到“回放”功能'Play'位(图标为三角
形).
2.按MENU键,从菜单中选择Firm Update功能.(如果CF
卡上没有升级文件则此选项不出现
3.按SET键,选择'OK'.
4.按SET键,开始写程序.在写程序的过程中,指示灯会变
换指示,升级完成后指示灯熄灭.写程序的过程大概需要90秒钟。

佳能相机固件
建议你不要轻易的升级固件,因为轻易升级固件要是失败了,就会导致相机的永久性损坏。

要是一定要升级固件还是送去客服,让客服的工作人员给你升级固件吧!。

Panasonic DMC-G2 相机的固件升级说明书

Panasonic DMC-G2 相机的固件升级说明书

Dear Customer√About the Upgrade of the DMC-G2 FirmwareThe following functions were added or changed from Ver.1.1 of the firmware.Please read this in conjunction with the operating instructions for the camera.•The firmware version can be checked from the [VERSION DISP .] of the [SETUP] menu.Attaching the 3D interchangeable lens (H-FT012; optional) to the camera allows you to take 3D pictures for extra impact.To view 3D pictures, a television that supports 3D is required.Attach the 3D interchangeable lens to the camera.Bring the subject into the frame and record by pressing the shutter button fully.•Focusing is not required when recording 3D pictures.•Still pictures recorded with the 3D interchangeable lens attached are saved in MPO format (3D).Note•You cannot record 3D pictures in vertical orientation.•It is recommended to use a tripod or a flash to record steady pictures.•When a distance to the subject is 0.6m (1.97feet) to approximately 1m (3.28feet), horizontal disparity becomes too great, and you may not see the 3D effect at the edges of the image.•Up to approx. 650 3D pictures can be recorded on a 2GB card. (When the aspect ratio is set to[X ], and the quality is set to [].)•Using the 3D interchangeable lens darkens the camera optics and so the automatically adjusted ISO sensitivity may be set higher than normal.•Read the operating instructions of the 3D interchangeable lens for details.For 3D recording/viewing, also read the “Cautions for Use” in the 3Dinterchangeable lens operating instructions.We have added a function for recording 3D pictures.To ensure that the 3D pictures can be safely viewed, pay attention to thefollowing points when recording.•Where possible, record with the unit in a horizontal state.•The suggested minimum subject distance is 0.6m (1.97feet).•Be careful not to shake the camera while in a vehicle or walking.VQC8287ENGLISHVQC82872∫Functions that cannot be used during 3D recordingWhen recording with the 3D interchangeable lens (H-FT012; optional), the following feature will be disabled:(Recording functions)•Auto Focus/Manual Focus operation•Aperture setting•Zoom operation•Recording motion pictures ¢1•[DYNAMIC ART] in My Color Mode¢1The motion picture button, Motion Picture P Mode and the [MOTION PICTURE] Mode menuwill be unavailable or unusable.([REC] Mode menu)•[PICTURE SIZE]¢2/[QUALITY]¢3/[STABILIZER]/[RED-EYE REMOVAL]/[I.RESOLUTION]/[I.EXPOSURE]/[EX.OPT.ZOOM]/[DIGITAL ZOOM]/[AUDIO REC.]¢2The setting is fixed as shown below.¢3When attaching 3D interchangeable lens, the following icons are displayed.([CUSTOM] menu)•[AF/AE LOCK]/[PRE AF]/[DIRECT FOCUS AREA]/[FOCUS PRIORITY]/[AF ASSIST LAMP]/[AF+MF]/[MF ASSIST]/[MF GUIDE]/[BUTTON]/[REC AREA]/[REMAINING DISP .]Connecting the camera to a 3D compatible television and playing back pictures taken in 3D allows you to enjoy 3D pictures for extra impact.It is also possible to play back the recorded 3D pictures by inserting an SD card into the 3D compatible television with an SD card slot.Aspect ratioPicture size X1600k 1200pixels Y1600k 1064pixels W 1600k 904pixels1440k 1440pixels[]:MPO i Fine (Both MPO images and fine JPEG images are recorded simultaneously.)[]:MPO i Standard (Both MPO images and standard JPEG images are recordedsimultaneously.)We have added a function for playing back 3D pictures.•[3D PLAYBACK] has been added to the [SETUP] menu.•[2D/3D SETTINGS] has been added to the [PLAYBACK] menu.(This is a menu that is only displayed when 3D display is possible.)•[3D] has been added to the [SLIDE SHOW] of the [PLAYBACK] menu.•[3D PLAY] has been added to the [PLAYBACK MODE] of the [PLAYBACK] menu.3VQC8287Set the [3D PLAYBACK] in the [SETUP] menu to [].Connect the camera to a 3D compatible television using an HDMI mini cable (optional) and press [(].•For the pictures recorded in 3D, [] will appear on the thumbnail display at playback.•When [VIERA Link] in the [SETUP] menu is set to [ON] and the camera is connected to a TV supporting VIERA Link, input of the TV will be switched automatically and playback screen will be displayed.When using the VIERA Link, you can perform operations using the television remote control.–At multi-playback, if you selected the [] tab, only the still pictures recorded in 3D will be displayed.–At One screen display, each press of 3 on the television remote control will switch between 2D playback and 3D playback. (only when 3D playback is available)To display the recording information, press the [SUB MENU] button and select to switch to recording information.–During 3D playback, the Slide show settings screen cannot be displayed.∫Playback in 3D by selecting only the still pictures recorded in 3DSelect [3D PLAY] in [PLAYBACK MODE] in the [PLAYBACK] Mode menu.∫Playback as a 3D slide show by selecting only the still pictures recorded in 3D Select [3D] in [SLIDE SHOW] in the [PLAYBACK] Mode menu.∫Switch the playback method for the still pictures recorded in 3D1Select the picture recorded in 3D.2Press [MENU/SET] to display the menu.3Select [2D/3D SETTINGS] on the [PLAYBACK] Mode menu and then press 1.•Playback method will switch to 3D if it is playing back in 2D (conventional image), or it will switch to 2D if it is playing back in 3D.•If you feel tired, uncomfortable or otherwise strange when playing back pictures recorded in 3D, set to 2D.For the latest information on 3D compatible televisions and recorders that are capable of playing back 3D pictures recorded using the unit, see the support site below.http://panasonic.jp/support/global/cs/dsc/ (This Site is English only.)Preparations:Set the [HDMI MODE] in the [SETUP] menu to [AUTO] or [1080i].[]:Set when connecting to a 3D compatible television.[]:Set when connecting to a television not compatible with 3D.Set this when you would like to view pictures in 2D (conventional image) ona 3D compatible television.VQC82874∫Functions that cannot be set/do not work with 3D pictures•[HIGHLIGHT] in the [CUSTOM] menu ¢•Playback Zoom ¢•Deleting pictures ¢•Editing functions of [PLAYBACK] Mode menu ([TITLE EDIT]/[TEXT STAMP]/[VIDEO DIVIDE]/[RESIZE]/[CROPPING]/[ASPECT CONV.]/[ROTATE]/[ROTATE DISP.]/[FAVORITE]¢/[PRINT SET]¢/[PROTECT]¢/[FACE REC EDIT]¢)¢Can be used when displayed in 2D.Note•When a picture recorded in 3D is displayed on the LCD monitor/viewfinder of this unit, it is played back in 2D (conventional image).•A black screen is displayed for a few seconds when switching back and forth playback of 3D pictures and 2D pictures.•When you select a 3D picture thumbnail, it may take a few seconds for playback to start. After playback, the thumbnail display may take a few seconds to reappear.•When viewing 3D pictures, your eyes may become tired if you are too close to the television screen.•If your television does not switch to a 3D picture, make the necessary settings on the TV. (For details, refer to the operating instructions of the TV.)∫Saving 3D picturesYou can save 3D pictures using a recorder or a computer.Dubbing with a recorder3D pictures will be recorded in MPO format when copied with the 3D compatible recorder.•When the copied pictures do not playback in 3D, perform the necessary setup on the television. (For details, refer to the operating instruction of the television.)•Note that the equipment described may not be available in certain countries and regions.Copying to a PCIf you update the supplied “PHOTOfunSTUDIO 5.0 HD Edition” software to the latest version, it will be able to handle MPO format still pictures recorded using the camera.Check the latest information about the equipment that can copy on the following website.http://panasonic.jp/support/global/cs/dsc/ (This Site is English only.)For details on how to update the software, refer to the following website.http://panasonic.jp/support/global/cs/dsc/ (This Site is English only.)。

佳能固件升级方法

佳能固件升级方法

佳能固件升级方法佳能固件升级是指将佳能相机或镜头的固件升级至最新版本的操作。

固件是相机或镜头内部的软件系统,它控制着设备的功能和性能。

佳能定期发布固件更新,以提供更好的相机和镜头性能,修复已知的问题,并增加一些新功能。

以下是佳能固件升级的方法:1. 查找最新固件版本:在佳能官方网站上,找到相机或镜头的支持页面,一般可以在“支持”、“下载”或“驱动程序和软件”链接下找到。

在该页面上,您可以查找您的设备型号和当前固件版本,以及最新的固件版本。

请注意,在下载固件之前,阅读并理解发布说明文档中的说明。

2. 下载固件文件:在找到最新固件版本后,点击下载按钮以获取固件文件。

请确保选择正确的设备型号和操作系统版本对应的固件文件。

3. 准备SD卡:使用一张空白的SD卡,并将其格式化为FAT32文件系统。

请注意,此操作会清除SD卡上的所有数据,请在格式化前备份重要数据。

4. 将固件文件复制到SD卡:将下载好的固件文件复制到格式化好的SD卡根目录中。

请确保不要将文件放入任何文件夹中,将其放在根目录是最好的。

5. 准备相机或镜头:在升级之前,请确保相机或镜头电池电量足够,并在升级过程中保持电源充足。

将相机或镜头连接到电源适配器是一个好主意,以防止在升级过程中电池耗尽。

6. 执行固件升级:将准备好的SD卡插入相机或镜头,并将设备开机。

进入设备的设置菜单,找到“固件版本”或“固件升级”选项。

选择此选项,相机或镜头将自动检测SD卡中的固件文件,并引导您完成升级过程。

请注意,在升级过程中,不要关闭设备或拔出SD卡。

7. 完成升级:在升级过程完成后,相机或镜头将自动重启。

请检查固件版本,确保已成功升级至最新版本。

如果升级失败或出现问题,请尝试重新执行整个升级过程。

总结:整个佳能固件升级过程需要确保正确的固件文件、格式化好的SD卡,以及稳定的电源供应。

在执行固件升级前,请仔细阅读佳能的发布说明文档,并按照说明操作,以避免不必要的问题。

Canon FS20 21 22 200 说明书

Canon FS20 21 22 200 说明书

• :文字仅适用于图标所示的型号。 • 本说明书使用以下术语: 如果未指明 “存储卡”或 “内置存储器” ,则术语 “内存”本身指代上述两者 (仅 / / ) 。 “场景”是指一种视频图像单位,该单位从按下 钮以开始记录的时刻 到再次按下以暂停记录的时刻为止。 可交替使用 “照片”和 “静止图像” ,两者含义相同。 • 本说明书中的相片是用静态相机拍摄的模拟图像。图示和菜单图标均参考 ,除非另有说明。
_______________________________
FUNC. (功能) 菜单 设置菜单 摄像设置 (变焦类型、影像稳定器等) 存储器操作 (初始化等) 显示设置 (液晶显示屏亮度、语言等) 系统设置 (扬声器音量、提示音等) 日期 / 时间设置 故障排除 提示列表
Y P O C
附录:菜单选项列表 82 故障? 93 注意事项及禁止事项
Y P O C
基本记录
拍摄视频 选择视频质量 (记录模式) 变焦:光学、优化和数码变焦 快速启动功能
33
基本播放
播放视频 选择要播放的记录 按拍摄日期选择场景 从视频图像时间线选择播放起点 从索引屏幕预选记录 删除场景
38
高级功能
特殊场景摄像程序 拍摄时控制快门速度和其他功能 小型摄像灯 视频快照 预记录功能 自拍 自动背景照明校正和手动曝光度调整 手动对焦调整 白平衡 图像效果 数码效果 屏幕显示和数据码 使用耳机 使用外部麦克风
Y P O C
9
简介
概貌
随附的附件和 CD-ROM
摄像机随附以下附件。
CA-570 小型电源转接 BP-808 电池 WL-D88 无线遥控器 用于无线遥控器的 CR2025 锂钮扣电池
STV-250N 立体声视频连接线

相机固件升级参考手册 说明书-ZWO-camera-firmware-upgrade-manual

相机固件升级参考手册 说明书-ZWO-camera-firmware-upgrade-manual

ZWO相机固件升级参考手册ZWO Camera Firmware Upgrade reference manual文档编号:ZW1802240ACSCZWO Co., Ltd.Phone:+86 512 65923102版权所有○c苏州市振旺光电有限公司2015-2035。

保留一切权利。

非经本公司许可,任何组织和个人不得擅自摘抄、复制本文档内容的部分或者全部,并不得以任何形式传播。

注意由于产品版本升级或其他原因,本文档内容会不定期进行更新。

除非另有约定,本文档仅作为使用指导,本文档中的所有陈述、信息和建议不构成任何明示或暗示的担保。

Copyright ○c ZWO Co., Ltd. 2015-2025. All rights reserved.No part of this document may be reproduced or transmitted in any form or by any means without prior written consent of ZWO Co., LtdNoteDue to product version upgrades or other reasons, the contents of this document are not regularly updated. Unless otherwise agreed, this document is intended as a guide only and all statements, information and recommendations in this document do not constitute any guarantee, expressed or implied.Chapter 1: FirmwareintroductionFirmware:It is a read-only program stored inside the camera.It is an important part of the camera, taking on the most basic work. It should work well before the driver works.Our firmware has2 parts. one part is responsible for the communication ofthe camera. another part is responsible for the data collection and sending of instructions and some simple processing.These two parts can be upgraded independently.Chapter 2: How to upgrade it2.1 Run the FWUpdate tool.The FWUpdate tool is a small application that doesn't need to be installed.Just double-click to run.If it can not run, and prompts:The application has failed to start because its side-by-side configuration is incorrect. Please see the application event log or usethe command-line sxstrace.exe tool for more detail.Please install this software first:/en-us/download/details.aspx?id=55822.2 Get the current camera firmware version.2.2.1 Connect your camera to the PC. Usually it appears in the drop boxautomatically. If not, click the rescan button.If you connect multiple ZWO devices, please select the one you need to upgrade.For example:The above picture shows an ASI1600MM Cool Camera is connected via USB2.0, and its firmware contains two parts. Part 1: FW Version (V3.0). Part2: FGPA FW Version (230V2.1.0.0).2.2.2 If your camera is connected, the bootloader appears. Like this:Do not worry, it means that there is no FW is on your motherboard. So just move on to the next step.2.3 How to update the Firmware for Part 12.3.1 Click the Firmware Update button and select the correct file, then it will automatically start updating. The firmware file is the one that has an “img” suffix.At the beginning of the download, the current process is displayed at the bottom of the window.2.3.2 Download status and description.This part of firmware will be downloaded to RAM first and then it will saved in Flash.Correct Status A:"DownLoading to RAM"and"Write RAM success"These two tips can be ignored.Error Status B: "Write RAM error"If the file is not found, select the correct file and try it again. If the errorcode shows up, please email us.Correct Status C:"DownLoading firmware to SPI flash"and" Firmware update success,please reconnect your camera "These two tips can be ignored ,it can reconnect itself.Error Status D: " Firmware update error"Please email us.Notice:Sometimes the state stays in "WriteRAM Success," and does not continue updating. Please email us at this time.The upgrade process usually takes three to five seconds.2.4 How to update the FPGA Firmware for Part 22.4.1Click the FPGA Update button and select the correct file, then it willautomatically start updating. The firmware file should be a file with a “vme”or “bit” suffix.Like the upgrade Part1 of the FW, the progress status will be also shown below. And it needs to erase enough space in Flash before writing.Correct Status A:" erasing..."," downloading..."and " success"These3 tips can be ignored.Error Status B: "…failed…"If you have failed information, please email us the information.NoticeThis part of upgrade process takes about 30-35 seconds.If each step indicates success, it means the upgrade is done. And the pleasere-connect your camera and then check the version again. They should be different from the previous version.Please send email to ****************** for more information.。

ZOOM R20 固件更新指南说明书

ZOOM R20 固件更新指南说明书

Introduction■Items to prepareWindows or macOS computerwith Internet accessSD card■Firmware update process1.Download the firmware update file.2.Extract the ZIP file.3.Copy the extracted firmware update file to a SD card.4.Update the firmware.This guide explains firmware update to version 2.00 as an example.1.Download the firmware update file.Download the ZIP file that contains the firmware update file from the R20 download page.On Windows2.Extract the ZIP file.Select the folder that contains the downloaded ZIP file. Click ① “Compressed Folder Tools” and then click ② “Extract all”. This extracts the ZIP file.①②3.Copy the firmware update file to a SD card.Copy the “R20SYSTEM.BIN” file to a SD card.Firmware update fileCopy the firmware update fileto a SD card.On macOS2. Extract the ZIP file.After downloading, open the ① “Downloads” folder which appears at the right end of the Dock by default. Then, click ②. Downloaded files will be shown.3. Copy the firmware update file to a SD card.Copy the “R20SYSTEM.BIN” file to a SD card.①②R20_v2.00_ER20_v2.00_E Firmware update fileCopy the firmware update file to a SD card.The following procedures are the same on both Windows and macOS.4.Connect an AC adapter.5.Insert the SD card into the R20.6.Turn the power on while pressingThe following screen appears.7.The firmware update starts.NOTEDuring the firmware update, do not turn the power off or remove the SD card.Doing so could cause the R20 to become unstartable.8.After the firmware update completes, turn the power off.NOTEIn the unlikely event that firmware update should fail, follow the procedures from the beginning again to update the firmware.Check the firmware versions used by the R20.1. TAP on the ProjectsScreen .2. Tap “Firmwear Version”.3. Check the firmware version.・Copying or reprinting this manual in part or in whole without permission is prohibited.・Windows® is a trademark or registered trademark of Microsoft® Corporation.・macOS® is a trademark or registered trademark of Apple Inc.・SDXC logos are trademarks.・Other product names, registered trademarks and company names in this document are the property of their respective companies.・All trademarks and registered trademarks in this document are for identification purposes only and are not intended to infringe on the copyrights of their respective owners.・The illustrations in these instructions might differ from actual screens.©2022 ZOOM CORPORATION Z2I-4554-01。

香港商兴华拓展 LEICA V-LUX 20韧体 升级指南

香港商兴华拓展 LEICA V-LUX 20韧体 升级指南

LEICA V-LUX 20韌體韌體升級升級升級指南指南
2010年7月
升級準備
1. LEICA V-LUX 20相機
2. 充滿電的電池
3. SD/SDHC 記憶卡
4. SD/SDHC 讀卡機
5. 可連上網的電腦
升級步驟
1. 在V-LUX 20相機內,將記憶卡格式化。

──開啟相機電源,按MENU 鍵進入選單,在「設定」選單內,選擇「格式化」(FORMAT)。

注意:此動作會將記憶卡內的資料完全清除。

2. 使用電腦下載韌體檔案,下載網址為:/files/1279080882.zip ,將ZIP 檔解壓縮,會出現
「VL20_V20.BIN 」檔案。

確認檔案大小為10,814,976位元組。

提醒:請勿將BIN 檔案再次解壓縮。

3. 將「VL20_V20.BIN 」檔案,透過讀卡機,放入SD/SDHC 記憶卡內,請放置在資料夾的最上層。

傳輸檔案時,請使用讀卡機,不可用相機連接電腦。

4. 將相機背面的按鈕,向下切換到播放模式,開啟相機電源。

5. 螢幕出現升級提示選項,選擇「是」(YES ),待5-10秒後,完成升級。

註:若電池未充滿電,螢幕將不會出現升級提示。

新功能說明
1. 改良播放模式
2. 動態影片擷取單張照片
3. 動態影片分段切割
詳細請參閱:/files/1279080883.pdf。

Vi20W升级固件操作说明

Vi20W升级固件操作说明

升级操作说明
本升级工具在WindowsXP、Vista及Win7系统上可正常运行。

1.把下载的固件包解压,生成相应文件夹,如下图演示:
2.打开解压后的文件夹,双击文件,生成升级所必需的文件,这一步会自动安装驱动程序,如下图是XP系统下弹出的对话框,请点击“仍然继续”
完成驱动程序的自动安装。

3.找到升级工具文件双击打开,如下图所示:
4.点击上图的“否”关闭用户向导升级,并点击“选择固件”按钮选择本目录下后缀名为.img 文件,如下图:
5.播放器先关机然后长按M键(并排三个按键的中间那个键)不放,再通过USB数据线连上电脑,待出现下图界面时,松开M键开始升级。

(注:如果此时弹出安装驱动程序
的对话框,请把路径指向本目录下的UsbDriver文件夹,并按下一步提示完成驱动程序的安装)。

6.点击“是”,再次弹出确认对话框,请选择“是”,如下图所示:
7.大约半分钟左右,显示升级进度条走动界面,如下图所示:
8.当进度条走完以后,出现如下界面时,表示升级成功:
注:
1.升级前请备份播放器内存放的有用数据,如果本机插有TF卡,请先拔出TF卡;
2.升级前请仔细阅读此说明,操作不当造成播放器无法使用,需联系购机处返厂作维修处
理;。

  1. 1、下载文档前请自行甄别文档内容的完整性,平台不提供额外的编辑、内容补充、找答案等附加服务。
  2. 2、"仅部分预览"的文档,不可在线预览部分如存在完整性等问题,可反馈申请退款(可完整预览的文档不适用该条件!)。
  3. 3、如文档侵犯您的权益,请联系客服反馈,我们会尽快为您处理(人工客服工作时间:9:00-18:30)。

佳能20系列固件升级图文说明
现对佳能20系列机器升级固件进行图文说明,首先把在电脑上安装20系列机器驱动,装好后请用USB打印线把机器及电脑进行连接,测试下是否连接成功。

成功后请在机器面板上按设置/注册按键(见下图)
然后选择到系统管理设置(见下图)
按OK键,出现系统管理员ID及密码窗口,输入ID及密码(如图)
出现上面窗口后请按登陆/注销键
这样就会进系统管理设置界面,再找到更新固件一栏,如下图
按OK键,提示以下内容:
再按OK键,提示以下屏幕
好,到这个屏为止,机器面板上操作全完成了,再让我们到电脑上解压升级包(固件升包请到群共享文件中下载),双击打开,直到出现下图
全点下一步,在升级期间,切记不要断开USB数据线及机器电源,还有机器上面板任一键不要按,也就是说机器上按键不要按,一按就会升级失败!
上图是电脑屏幕上显示的过程,下图就是升级成功屏显。

当电脑屏显以上字样时,机器上就会出现
这样的字样,恭喜你升级成功了。

这样请把机器重新关机,再开就全部完成了!
注:以上为池州佳联版权,只限群内共享,请勿外传。

相关文档
最新文档