IBM外置磁带机的安装方法
IBM.TS3500操作手册
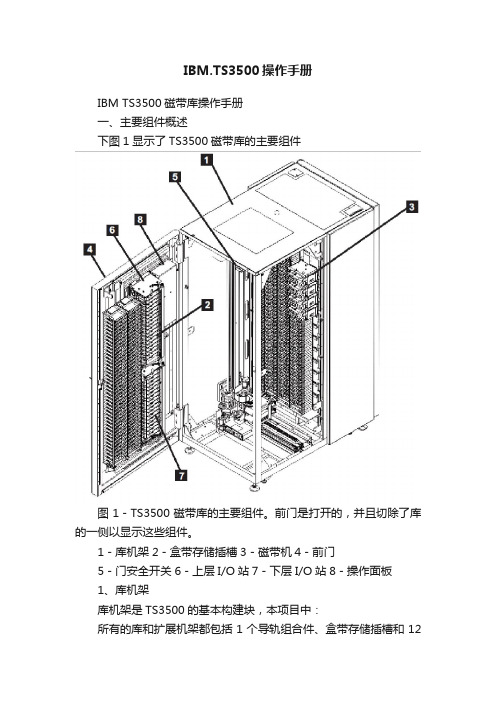
IBM.TS3500操作手册IBM TS3500磁带库操作手册一、主要组件概述下图1显示了TS3500磁带库的主要组件图1-TS3500磁带库的主要组件。
前门是打开的,并且切除了库的一侧以显示这些组件。
1-库机架2-盒带存储插槽3-磁带机4-前门5-门安全开关6-上层I/O站7-下层I/O站8-操作面板1、库机架库机架是TS3500的基本构建块,本项目中:所有的库和扩展机架都包括1个导轨组合件、盒带存储插槽和12个磁带机插槽。
基本机架包括:盒带存取器,存取器控制器,带有16个盒带存储插槽的上层I/O站,带有16个盒带存储插槽的下层I/O站,操作员面板,操作员面板控制器。
每个机架的背面都有维护存取口,使维修人员能存取磁带机和电源结构,如图2:图2-库机架中电源结构位置图。
2、盒带存储插槽盒带存储插槽安装在TS3500磁带库的机架内,用来存储盒式磁带,每条存储插槽都具有一个唯一的地址,以标识其物理位置。
存储插槽的地址由3个值构成:机架号——用Fxx表示,其中F是机架,xx是机架号。
基本机架的机架号为01,依次递增。
列号——用Cyy表示,其中C为列,yy为列号。
对于每个机架,左机架壁处的那一列的列号为1。
所有机架壁上的列号均为奇数,而所有门壁上的列号均为偶数。
行号——用Rzz表示,其中R为行,zz为行号。
对于各列,顶端存储位置的行号为1,向下各行以1为单位增加。
3、磁带机TS3500磁带库中的每个机架都可包含以下一种磁带机类型:IBM LTO Ultrium磁带机,包括Ultr4,Ultr3,Ultr2或者Ultr1磁带机。
IBM 3592磁带机,包括3592-J1A磁带机或者TS1120磁带机。
4、门前门位于磁带库中每个机架的前面,能让操作员能对安装在门壁和机架壁上的盒带存储插槽进行操作,如图3:图3-TS3500磁带库的前门1-操作员面板;2-电源开关;3-I/O站;4-I/O站;5-门把手;6-键锁。
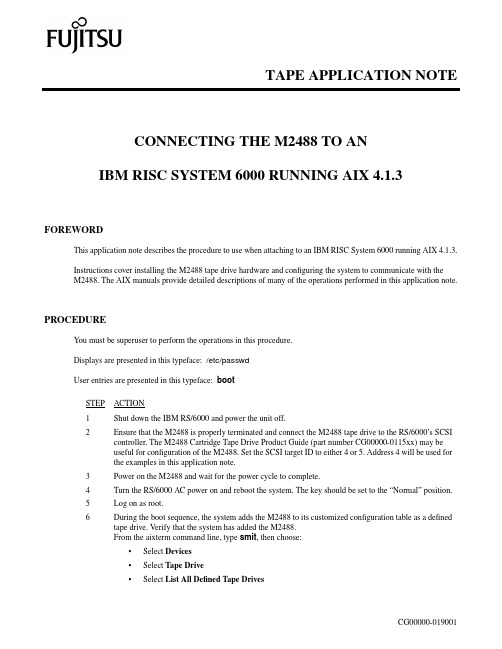
IBM RISC System 6000 AIX 4.1.3上的M2488磁带驱动器连接应用说明书
TAPE APPLICATION NOTECONNECTING THE M2488 TO ANIBM RISC SYSTEM 6000 RUNNING AIX 4.1.3FOREWORDThis application note describes the procedure to use when attaching to an IBM RISC System 6000 running AIX 4.1.3.Instructions cover installing the M2488 tape drive hardware and configuring the system to communicate with theM2488. The AIX manuals provide detailed descriptions of many of the operations performed in this application note.PROCEDUREYou must be superuser to perform the operations in this procedure.Displays are presented in this typeface:/etc/passwdUser entries are presented in this typeface:bootSTEP ACTION1Shut down the IBM RS/6000 and power the unit off.2Ensure that the M2488 is properly terminated and connect the M2488 tape drive to the RS/6000’s SCSI controller. The M2488 Cartridge Tape Drive Product Guide (part number CG00000-0115xx) may beuseful for configuration of the M2488. Set the SCSI target ID to either 4 or 5. Address 4 will be used forthe examples in this application note.3Power on the M2488 and wait for the power cycle to complete.4Turn the RS/6000 AC power on and reboot the system. The key should be set to the “Normal” position.5Log on as root.6During the boot sequence, the system adds the M2488 to its customized configuration table as a defined tape drive. Verify that the system has added the M2488.From the aixterm command line, type smit, then choose:•Select Devices•Select Tape Drive•Select List All Defined Tape DrivesCG00000-019001STEP ACTION6 (con’t)The system will display the tape drives connected to SCSI I/O controller(s) as in the example shownbelow (note that under “status” below, the system may return a status of “Defined” or “Available”):name status location descriptionrmt0Defined00-01-00-4, 0Other SCSI Tape DriveWhere:name the logical name of the M2488 (rmt0)status whether the drive is Defined (known, but not ready for use) or Available (readyfor use). If the status is reported as “Defined” go to Step 7. If the status is reportedas “Available” go to Step 9.location the SCSI ID of the M2488 (4, 0 in the example)description a short description of the tape drive type. The M2488 is added as “Other SCSItape drive”If status was returned as “Defined”, the M2488 has been added to the defined tape drive list asdescribed in Step 6. Now, change the M2488's status from Defined to Available (defined and readyfor use).When you are ready, select Done.7From the SMIT Devices -Tape Drive window select:•Configure a Defined Tape DriveThe system displays a list of defined tape drives. Select the M2488 by its logical address and loca-tion. The system responds by reporting the status of your command.To verify that the system has changed the status of the M2488 from defined to available, selectList All Defined Tape Drives. The system displays:name status location descriptionrmt0Available00-01-00-4, 0Other SCSI Tape DriveWhen you are ready, select Done.8If the system has returned a status of “Available,” you may want to change the attributes of theM2488 to meet the needs of the customer's system. Follow these instructions to change tape driveattributes.9From the SMIT Devices -Tape Drive window select:•Change / Show characteristics of a Tape DriveThe system displays a table of all of its defined tape drives. Select the M2488 by its logical addressand location.10Setting or changing M2488 AttributesThe system will display the attributes assigned to the M2488 tape drive.You can change the follow-ing attributes as necessary (recommended settings are in UPPER case).2 of 4CG00000-019001February 1996STEP ACTION10 (con’t)BLOCK size (0=variable length)0Use DEVICE BUFFERS during writes YESUse EXTENDED filemarks YESDo not set to NOBLOCKSIZE for variable length support0DENSITY setting #19DENSITY setting #29Set delay after a FAILED command10Set maximum delay for the READ/WRITE command120Select OK.11To leave SMIT, select Done,Cancel,Cancel, and Cancel. The SMIT window will close.12To test the M2488 save the “/etc/passwd” file to tape using the tar command:tar -cvf /dev/rmt0 /etc/passwdThe system responds with: a/etc/passwd 1 blocksNote: depending on the size of the file, a different number of blocks may be reported.13Verify that the “/etc/passwd” file was saved to tape by executing the following command:tar tf /dev/rmt0The system responds with: /etc/passwdInstallation and verification of the system is now complete.NOTESIt is assumed that the user has a standard M2488 and is familiar with the SCSI-2 standard and host operating system conventions.The user assumes all responsibility for understanding the interrelationships of this information with other affected software or system products. Fujitsu Computer Products of America (FCPA) provides this information as a service only, and assumes no responsibility for any damages which could result from the use of this information.The information in this application note is subject to change without notice and is not to be construed as a commit-ment by FCPA.February 1996CG00000-019001 3 of 44 of 4CG00000-019001February 1996。
IBM磁带存储TS3XXX用法以及常见问题解决
140MB/s
Generation 1
Generation II
Generation III
Generation IV
generation V
100 GB 15 MB/S
8 FC-1, Ultra II
Full High MP 609M 4 M/S 6 M/S No 384
124 kbpi
200 GB 35 MB/S
•1-4 LTO Ultrium 5 HH Drive Features •HH SAS or Fibre •3-slot I/O
•48 DataCartridge Slots
•Standalone or Rack
•Multi-Path Architecture •LTO Gen 5 Media
•LTO Gen 5/4 Encryption
TS3100 (3573)
T S3200 (3573)
T S3310 (3576)
3 or 4 HH or FH
1 FH or 2 HH 24
3 or 4 HH or FH
2 FH or 4 HH 48
3 or 4 FH
18 403
TS3500 (3584)
3 or 4 FH 192
+20,000
IBM LTO Ultrium 5 HH Product Family
Generation 1 100 GB
Generation 2 200 GB
Generation 3 400 GB
Generation 4 800 GB
Next Generation 5
1.5 TB
15 MB/sec
20 - 40 MB/sec 40 - 80 MB/sec 80-120 MB/sec
使用磁带机
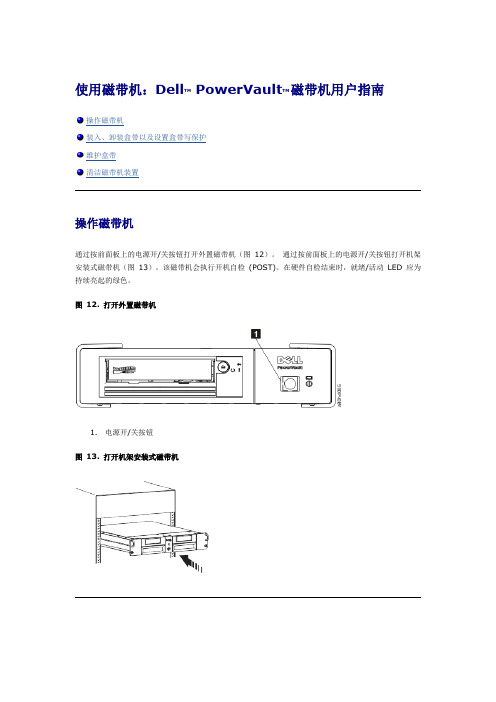
操作磁带机装入、卸装盒带以及设置盒带写保护维护盒带清洁磁带机装置操作磁带机通过按前面板上的电源开/关按钮打开外置磁带机(图12)。
通过按前面板上的电源开/关按钮打开机架安装式磁带机(图13)。
该磁带机会执行开机自检(POST)。
在硬件自检结束时,就绪/活动LED 应为持续亮起的绿色。
图12. 打开外置磁带机1.电源开/关按钮图13. 打开机架安装式磁带机重置磁带机您可在不关闭磁带机和系统电源的情况下重置磁带机。
如果磁带机停止响应,此操作可能十分必要。
要执行此操作,按住磁带机前面板上的弹出按钮10 秒钟(图13)。
磁带机将重要技术数据强制转储到磁带机内存,并覆盖现有转储。
然后磁带机重新引导以进行通信。
图13. 重置磁带机1.弹出按钮装入、卸装盒带以及设置盒带写保护如LTO Ultrium 标准中所指定的,只能在磁带机中使用LTO Ultrium 格式的盒带。
确保仅有一个标签粘贴在盒带的标签区。
切勿使用非标准标签,也不要将任何东西粘贴到盒带上标签区以外的地方。
Dell PowerVault 磁带机与其前代产品的盒带相兼容。
以下描述了在其他兼容介质类型上支持的功能:注:1. 1 GB = 1 000 000 000 字节2. 压缩率= 2:13. RO = 只读图14显示了LTO Ultrium 数据盒带及其组件。
图14. LTO Ultrium 数据盒带1.LTO 盒带内存2.标签区3.写保护开关4.插入导轨5.盒带门6.导带引脚装入盒带1.确保磁带机电源已打开。
(就绪/活动LED 为持续点亮的绿色。
)2.确保写保护开关(请参阅图14中的3)在正确位置。
(请参阅“设置盒带上的写保护开关”。
)3.拿住盒带使写保护开关面向您。
4.将盒带滑入磁带装填仓(请参阅图15)。
磁带机自动装入盒带。
o如果盒带已在弹出位置,而您想重新插入它,则取下盒带,然后重新插入。
o如果盒带已装入,并且您循环加电,则不会自动弹出盒带。
3584更换磁带机注意事项
IBM3584更换磁带机注意事项安图特(北京)科技有限公司2015-05-07内部文件,未经授权不得复制或引用。
一、更换前准备1.1查看到货备件的外观情况尽量不要破损,PN/SN号要和客户那里拆下来的一致1.2磁带机与电源底座大型带库的磁带机一般都携带有一个电源底座,在这个电源底座的后面的位置会有一个小的芯片版来记录与这个底座相连接的磁带机一些信息,如果供货商提供的备件,不带电源底座,仅仅是一个磁带机,那就需要在更换时,将客户的磁带机与电源底座拆分后,把自己带的磁带机接上,此时需要用到一些专用工具,连接到这个芯片上,去更新这个芯片中记录的sn号,此步骤比较麻烦,而且更换后容易出现问题,所以在申请备件时,尽量申请磁带机与电源底座一起的1.3升级微码尽量在更换前将微码升级至与客户损坏备件一致的版本,如果微码不符,换到磁带库上以后,同步微码的过程时间很长,需要1个小时左右,有时还会有报错的情况发生。
1.4 测试用ITDT测试到货的磁带机,主要测试load/unload,read/write/verify这几个情况,尽量每个步骤多测试几遍。
1.5 更改磁带机的offline模式有部分磁带机在供货商那里出货是,将带机的offline模式调为了3584 rs422 ATT 模式,此模式只有在接入3584时,sfp才会发光,自己单独磁带机接光纤卡,连主机测试时光纤模块不会发光,需要用3590的液晶面板接在磁带机后面的串口上,在ce offline model->drv features中,将模式调为3494 no rs422模式。
二、更换更换主要分为2个步骤,一个是prepare FRU replacement,一个是更换完后的finish FRU replacement。
3584的柜子带I/O仓以及液晶屏是主柜,也就是Frame1,磁带机自上而下分别为Row1-Row12(每个柜子12个磁带机),主柜的第一个磁带机是携带有机械臂信息的,即Frame 1 Row 1,在更换时会有特别提示,只需要注意一下,没有特别更换步骤。
磁带服务器跟换磁带
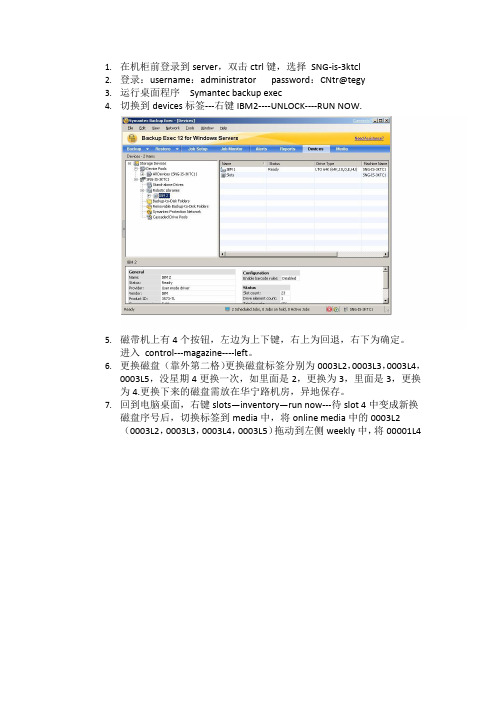
4.切换到devices标签---右键IBM2----UNLOCK----RUN NOW.
5.磁带机上有4个按钮,左边为上下键,右上为回退,右下为确定。
进入control---magazine----left。
6.更换磁盘(靠外第二格)更换磁盘标签分别为0003L2,0003L3,0003L4,0003L5,没星期4更换一次,如里面是2,更换为3,里面是3,更换为4.更换下来的磁盘需放在华宁路机房,异地保存。
7.回到电脑桌面,右键slots—inventory—run now---待slot 4中变成新换磁盘序号后,切换标签到media中,将online media中的0003L2(0003L2,0003L3,0003L4,0003L5)拖动到左侧weekly中,将00001L4拖动到daily中。
磁带服务器跟换磁带服务器更换网站更换服务器ibm服务器更换硬盘hp服务器更换硬盘更换dns服务器如何更换dns服务器阿里云服务器更换系统如何更换服务器更换服务器申请
1.在机柜前登录到sername:administrator password:CNtr@tegy
磁带机安装文档
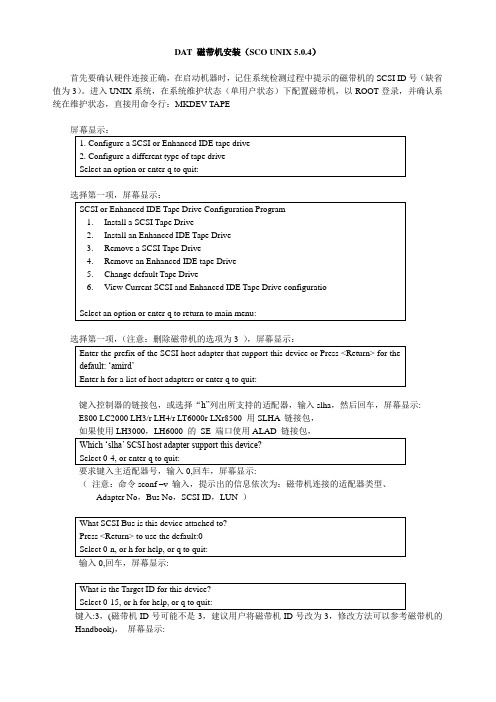
DAT 磁带机安装(SCO UNIX 5.0.4)首先要确认硬件连接正确,在启动机器时,记住系统检测过程中提示的磁带机的SCSI ID号(缺省值为3)。
进入UNIX系统,在系统维护状态(单用户状态)下配置磁带机,以ROOT登录,并确认系统在维护状态,直接用命令行:MKDEV TAPE屏幕显示:键入控制器的链接包,或选择“h”列出所支持的适配器,输入slha,然后回车,屏幕显示:E800 LC2000 LH3/r LH4/r LT6000r LXr8500 用SLHA 链接包,如果使用LH3000,LH6000 的SE 端口使用ALAD 链接包,要求键入主适配器号,输入0,回车,屏幕显示:(注意:命令sconf –v 输入,提示出的信息依次为:磁带机连接的适配器类型、Adapter No,Bus No,SCSI ID,LUN )Handbook),屏幕显示:键入HPTape ,屏幕显示:键入Enter,屏幕显示:键入y,屏幕显示:键入y ,安装完毕,重新引导系统,即可使用磁带机。
检查磁带机的安装方法一:可以通过tape status、tape rewind命令检查磁带机是否正确配置:方法二:在维护状态键入MKDEV TAPE,屏幕显示:常用的磁带机读写命令1)读命令:tar tvf /dev/rct0回车后,屏幕滚动显示磁带中备份的内容和备份时间。
2)写命令:tar cvf /dev/rct0 directory _name or filename回车后,屏幕滚动显示备份内容,比如:备份Var 文件夹,回车后,屏幕滚动显示a var/scohttp/logs symbolic link to /var/opt/K/SCO/Unix/5.0.5Eb/var/scohttp/logsa ……………….a………………表示V ar 文件夹中的子文件夹得到备份命令完成后,回到提示符状态3)恢复命令:tar xvf /dev/rct04)擦除磁带内容:tape erase (键入命令后,命令提示符闪烁,同时磁带机灯闪烁),这个命令需要用很长时间,用户需要多等待,以DLT1 磁带机为例,屏幕显示:%Stp-0 - - Vendor = BNCHMARK Product = DLT1_还可以通过两种种方式进入硬件/核心管理,添加磁带机。
IBM 磁带存储TS3XXX用法以及常见问题解决

TS2900连接方式 连
TS2900磁带自动装入器,
只支持SAS驱动器 (LTO3,LTO4)
1. 以太网线 2. SAS连接线 3. 电源线
TS3100/TS3200磁带驱动器类型与连接 磁
SCSI接 口 驱 动 器 , 无 接 “ WRAP”标 识 终 结 器 标
FC接 口 驱 动 器 , 每 驱 接 动 器 只 有 一 个 可 用 FC 端口
IBM存储售后主要问题,Session 3: 存 : IBM 磁带存储 TS2900/TS3100/TS3200/TS3310用法 用 及常见问题解决
Innovation that matters
Tian XiaoLu Techline Storage Team
Topic
IBM LTO 磁带库产品简介 磁带库初始化安装 IBM LTO磁带库管理/使用以及配置 磁 使 如何定义清洁槽和使用清洁功能 各操作系统下驱动程序的下载以及安装 诊断工具简介 :TapeUtil/NTUtil/ITDT LTO磁带库 常见问题以及解决 方法 磁
1. 在 液 晶 面 板 主 菜 单 项 中 选 择 : Unlock I/ O Station 2. 在 I/O Station里 放 入 数 据 带 . 里
放 TS3200/TS3100 如 何通 过I/O Slot放 磁带
1.通 过 液 晶 面 板 菜 单 项 设 置 : Control通 >Open I/O Station 2. 在 I/O Station里 放 入 数 据 带 . 里
放 TS3310 如何通过I/O Slot放 磁带
1. 查 看 逻 辑 带 库 可 用 的 storage slots , 通 过 web菜 单 选 项 Monitor System-> 菜 Library Map. 2. 在 I/O Station里 放 入 数 据 带 . 里 3. 从 液 晶 面 板 菜 单 项 : Operations >Insert Media 或 从 Web 管 理 界 面 : Manage Cartridges->I/O Station
IBM TSM 磁带机和光驱的设备驱动程序
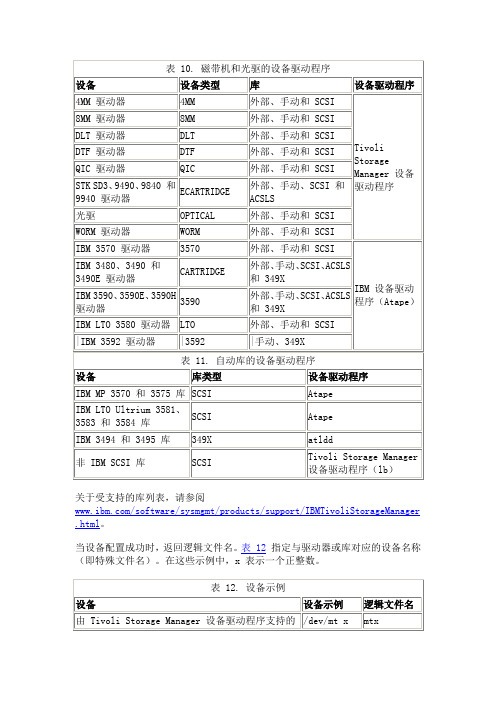
表12.设备示例
设备
设备示例
逻辑文件名
由Tivoli Storage Manager设备驱动程序支持的磁带机
/dev/mt x
mtx
由Tivoli Storage Manager设备驱动程序支持的附带SCSI的库。
STK SD3、9490、9840和9940驱动器
ECARTRIDGE
外部、手动、SCSI和ACSLS
光驱
OPTICAL
外部、手动和SCSI
WORM驱动器
WORM
外部、手动和SCSI
IBM 3570驱动器
3570
外部、手动和SCSI
IBM设备驱动程序(Atape)
IBM 3480、3490和3490E驱动器
IBM 3575、3581、3583和3584库
/dev/smc x
smcx
IBM 349X库
/dev/lmcp x
lmcpx
在REMOVABLEFILE设备类型(CD-ROM)上使用的安装点
/dev/cd x
cdx
在REMOVABLEFILE设备类型(zip驱动器)上使用的文件系统
/zip
不适用
为IBM SCSI磁带机安装设备驱动程序
/dev/lb x
lbx
由Tivoli Storage Manager设备驱动程序支持的光驱
/dev/rop x
opx
与GENERICTAPE设备类型关联的驱动器
/dev/rmt x
rmtx
IBM 3570设备和作为库的IBM 3590 B11的自动盒式磁带设备功能部件
手把手教你安装IBM TS3310磁带库
手把手教你安装IBM TS3310磁带库前不久装了回IBM的磁带库TS3310,感觉在上架方面还是有需要注意的地方,特别对于刚接触此带库的工程师来说,能有个安装手册在手就不怕在客户那里担惊受怕了。
话说TS3310还真是个大家伙,特别是加上了3576-E9U这个扩展柜后更是体积暴增,一个还好对付,2、3个一上那可就费力咯。
本篇文章主要针对此款磁带库的机架安装和初步的面板应用做出详细的指导,希望能对工程师们的工作有所帮助。
本文是第一篇,主要给大家介绍TS3310磁带机。
一、产品简述TS3310 磁带机性能强大、容量大并且可靠,能够满足磁带存储的巨大要求。
该磁带库模块化程度高且可伸缩性强,从基本磁带库5U控制模块,直到每个配置均是9U的附加扩展单元都在可伸缩范围内。
LTO3的磁带驱动器可以读写原始LTO2数据磁带盒并读取LTO1数据磁带盒。
TS3310磁带库包含磁带库控制模块,固定盒式磁带存储器(30个插槽)、I/O站(6个插槽)、触摸显示屏、磁带盒处理自动装置以及最多两个LTO 3磁带机。
您可以将多达4个可选扩展模块添加到控制模块。
每个L9U扩展模块可以容纳最多4个LTO3磁带机和最多80个盒式磁带插槽,以及12个可配置I/O站插槽。
该磁带库支持带有LVD Ultra160 SCSI或本机交换光纤通道连接的LTO3磁带机,从而能够与许多开放式系统服务器连接。
1. 前面板组件展示1 存取口2 电源按钮3 绿色供电(液晶指示灯)4 琥珀色操作员干预警报指示灯5 操作员面板(触摸式)6 5U控制模块7 I/O站8 9U扩展模块I/O站I/O站位于磁带库的前面板上,它将在不干扰正常磁带库操作的前提下实现磁带盒的导入和导出,一个控制模块I/O站的容量为6个磁带盒,一个9U扩展模块I/O站的容量为12个磁带盒。
注:此磁带库会读取条形码标签以确定每个插槽中的特定磁带盒,请确保磁带库中的所有磁带盒都有适当的条形码标签。
NBU更换磁带机操作步骤
更换磁带机后系统操作步骤1.STK磁带库更换完磁带机后,系统要做相关的修改,才能使用该磁带机;2.操作系统扫描硬件设备,搜索到相应的磁带机设备;在HP-UX中,执行下面的命令扫描出磁带机;HQxNBUA:/var/adm/syslog]ioscan -fnCtapeClass I H/W Path Driver S/W State H/W Type Description======================================================================== tape 0 2/0/2/1/1.2.0 stape CLAIMED DEVICE HP C5683A/dev/rmt/0m /dev/rmt/0mnb /dev/rmt/c5t2d0BESTn /dev/rmt/c5t2d0DDSb/dev/rmt/0mb /dev/rmt/c5t2d0BEST /dev/rmt/c5t2d0BESTnb /dev/rmt/c5t2d0DDSn/dev/rmt/0mn /dev/rmt/c5t2d0BESTb /dev/rmt/c5t2d0DDS /dev/rmt/c5t2d0DDSnbtape 1 2/0/10/1/0.98.7.255.1.3.0 stape CLAIMED DEVICE STK T9940B/dev/rmt/1m /dev/rmt/1mnb /dev/rmt/c18t3d0BESTn /dev/rmt/c18t3d0D3480b/dev/rmt/1mb /dev/rmt/c18t3d0BEST /dev/rmt/c18t3d0BESTnb /dev/rmt/c18t3d0D3480n/dev/rmt/1mn /dev/rmt/c18t3d0BESTb /dev/rmt/c18t3d0D3480 /dev/rmt/c18t3d0D3480nb如果没有发现更换的磁带机,首先检查磁带机使用的光纤卡,记录光纤卡的设备文件;HQxNBUA:/var/adm/syslog]ioscan -fnkCfcClass I H/W Path Driver S/W State H/W Type Description===================================================================fc 0 2/0/8/1/0 td CLAIMED INTERFACE HP Tachyon XL2 Fibre Channel Mass Storage Adapter/dev/td0fc 1 2/0/10/1/0 td CLAIMED INTERFACE HP Tachyon XL2 Fibre Channel Mass Storage Adapter/dev/td1用fcmsutil命令更新卡上的属性在/var/adm/syslog/syslog.log 中获取类似nport 0x610713的报错信息,提取这个代码Fcmsutil /dev/tdx确认HBA卡,查看HBA卡的WWNHQxNBUA:/var/adm/syslog]fcmsutil /dev/td0 replace_dsk 0x610713Disk at nportid 0x610713(Loop_id 0) will not be authenticated其中,0x610713是该光纤卡在交换机上的port id,该port id可以在syslog文件中找到;rmsf –H H/W Path重新扫描磁带机;HQxNBUA:/var/adm/syslog]ioscan -fnCtapeClass I H/W Path Driver S/W State H/W Type Description========================================================================= tape 0 2/0/2/1/1.2.0 stape CLAIMED DEVICE HP C5683A/dev/rmt/0m /dev/rmt/0mnb /dev/rmt/c5t2d0BESTn /dev/rmt/c5t2d0DDSb/dev/rmt/0mb /dev/rmt/c5t2d0BEST /dev/rmt/c5t2d0BESTnb /dev/rmt/c5t2d0DDSn/dev/rmt/0mn /dev/rmt/c5t2d0BESTb /dev/rmt/c5t2d0DDS /dev/rmt/c5t2d0DDSnbtape 2 2/0/8/1/0.97.7.255.1.3.0 stape CLAIMED DEVICE STK T9940B tape 1 2/0/10/1/0.98.7.255.1.3.0 stape CLAIMED DEVICE STK T9940B/dev/rmt/1m /dev/rmt/1mnb /dev/rmt/c18t3d0BESTn /dev/rmt/c18t3d0D3480b/dev/rmt/1mb /dev/rmt/c18t3d0BEST /dev/rmt/c18t3d0BESTnb /dev/rmt/c18t3d0D3480n/dev/rmt/1mn /dev/rmt/c18t3d0BESTb /dev/rmt/c18t3d0D3480 /dev/rmt/c18t3d0D3480nb安装设备文件;HQxNBUA:/var/adm/syslog]insf -einsf: Installing special files for asio0 instance 0 address 2/0/0/0/0insf: Installing special files for asio0 instance 1 address 2/0/0/0/1insf: Installing special files for sdisk instance 0 address 2/0/0/2/0.6.0insf: Installing special files for sctl instance 0 address 2/0/0/2/0.7.0insf: Installing special files for sdisk instance 1 address 2/0/0/2/1.2.0insf: Installing special files for sctl instance 1 address 2/0/0/2/1.7.0insf: Installing special files for sdisk instance 2 address 2/0/0/3/0.6.0insf: Installing special files for sctl instance 2 address 2/0/0/3/0.7.0insf: Installing special files for sctl instance 3 address 2/0/0/3/1.7.0insf: Installing special files for sctl instance 4 address 2/0/2/1/0.7.0insf: Installing special files for sdisk instance 3 address 2/0/2/1/0.8.0insf: Installing special files for sdisk instance 4 address 2/0/2/1/0.10.0insf: Installing special files for stape instance 0 address 2/0/2/1/1.2.0insf: Installing special files for sctl instance 5 address 2/0/2/1/1.7.0insf: Installing special files for sdisk instance 23 address 2/0/8/1/0.97.8.19.0.1.0 insf: Installing special files for sdisk instance 27 address 2/0/8/1/0.97.8.19.0.2.0 insf: Installing special files for sdisk instance 31 address 2/0/8/1/0.97.8.19.0.3.0 insf: Installing special files for sdisk instance 35 address 2/0/8/1/0.97.8.19.0.4.0 insf: Installing special files for sdisk instance 39 address 2/0/8/1/0.97.8.19.0.5.0 insf: Installing special files for sdisk instance 43 address 2/0/8/1/0.97.8.19.0.6.0 insf: Installing special files for sdisk instance 47 address 2/0/8/1/0.97.8.19.0.7.0 insf: Installing special files for sdisk instance 51 address 2/0/8/1/0.97.8.19.0.8.0 insf: Installing special files for sdisk instance 55 address 2/0/8/1/0.97.8.19.0.9.0 insf: Installing special files for sdisk instance 59 address 2/0/8/1/0.97.8.19.0.10.0 insf: Installing special files for sdisk instance 63 address 2/0/8/1/0.97.8.19.0.11.0 insf: Installing special files for sdisk instance 67 address 2/0/8/1/0.97.8.19.0.12.0 insf: Installing special files for sdisk instance 71 address 2/0/8/1/0.97.8.19.0.13.0 insf: Installing special files for sdisk instance 75 address 2/0/8/1/0.97.8.19.0.14.0 insf: Installing special files for sdisk instance 79 address 2/0/8/1/0.97.8.19.0.15.0 insf: Installing special files for sdisk instance 7 address 2/0/8/1/0.97.8.19.1.0.0 insf: Installing special files for sdisk instance 18 address 2/0/8/1/0.97.8.19.1.1.0 insf: Installing special files for sdisk instance 26 address 2/0/8/1/0.97.8.19.1.2.0 insf: Installing special files for sdisk instance 30 address 2/0/8/1/0.97.8.19.1.3.0 insf: Installing special files for sdisk instance 34 address 2/0/8/1/0.97.8.19.1.4.0 insf: Installing special files for sdisk instance 38 address 2/0/8/1/0.97.8.19.1.5.0 insf: Installing special files for sdisk instance 42 address 2/0/8/1/0.97.8.19.1.6.0 insf: Installing special files for sdisk instance 46 address 2/0/8/1/0.97.8.19.1.7.0 insf: Installing special files for sdisk instance 50 address 2/0/8/1/0.97.8.19.1.8.0 insf: Installing special files for sdisk instance 54 address 2/0/8/1/0.97.8.19.1.9.0 insf: Installing special files for sdisk instance 58 address 2/0/8/1/0.97.8.19.1.10.0 insf: Installing special files for sdisk instance 62 address 2/0/8/1/0.97.8.19.1.11.0 insf: Installing special files for sdisk instance 66 address 2/0/8/1/0.97.8.19.1.12.0 insf: Installing special files for sdisk instance 70 address 2/0/8/1/0.97.8.19.1.13.0 insf: Installing special files for sdisk instance 74 address 2/0/8/1/0.97.8.19.1.14.0 insf: Installing special files for sdisk instance 78 address 2/0/8/1/0.97.8.19.1.15.0 insf: Installing special files for sdisk instance 129 address 2/0/8/1/0.97.8.19.1.15.6 insf: Installing special files for sdisk instance 81 address 2/0/8/1/0.97.8.19.1.15.7 insf: Installing special files for sctl instance 7 address 2/0/8/1/0.97.8.255.1.3.0 insf: Installing special files for schgr instance 0 address 2/0/8/1/0.97.15.255.1.3.0 insf: Installing special files for stape instance 1 address 2/0/10/1/0.98.7.255.1.3.0 insf: Installing special files for sdisk instance 24 address 2/0/10/1/0.98.8.19.0.1.0 insf: Installing special files for sdisk instance 28 address 2/0/10/1/0.98.8.19.0.2.0 insf: Installing special files for sdisk instance 32 address 2/0/10/1/0.98.8.19.0.3.0 insf: Installing special files for sdisk instance 36 address 2/0/10/1/0.98.8.19.0.4.0 insf: Installing special files for sdisk instance 40 address 2/0/10/1/0.98.8.19.0.5.0 insf: Installing special files for sdisk instance 44 address 2/0/10/1/0.98.8.19.0.6.0 insf: Installing special files for sdisk instance 48 address 2/0/10/1/0.98.8.19.0.7.0insf: Installing special files for sdisk instance 57 address 2/0/10/1/0.98.8.19.0.9.0 insf: Installing special files for sdisk instance 61 address 2/0/10/1/0.98.8.19.0.10.0 insf: Installing special files for sdisk instance 65 address 2/0/10/1/0.98.8.19.0.11.0 insf: Installing special files for sdisk instance 69 address 2/0/10/1/0.98.8.19.0.12.0 insf: Installing special files for sdisk instance 73 address 2/0/10/1/0.98.8.19.0.13.0 insf: Installing special files for sdisk instance 77 address 2/0/10/1/0.98.8.19.0.14.0 insf: Installing special files for sdisk instance 82 address 2/0/10/1/0.98.8.19.0.15.0 insf: Installing special files for sdisk instance 5 address 2/0/10/1/0.98.8.19.1.0.0 insf: Installing special files for sdisk instance 15 address 2/0/10/1/0.98.8.19.1.1.0 insf: Installing special files for sdisk instance 25 address 2/0/10/1/0.98.8.19.1.2.0 insf: Installing special files for sdisk instance 29 address 2/0/10/1/0.98.8.19.1.3.0 insf: Installing special files for sdisk instance 33 address 2/0/10/1/0.98.8.19.1.4.0 insf: Installing special files for sdisk instance 37 address 2/0/10/1/0.98.8.19.1.5.0 insf: Installing special files for sdisk instance 41 address 2/0/10/1/0.98.8.19.1.6.0 insf: Installing special files for sdisk instance 45 address 2/0/10/1/0.98.8.19.1.7.0 insf: Installing special files for sdisk instance 49 address 2/0/10/1/0.98.8.19.1.8.0 insf: Installing special files for sdisk instance 52 address 2/0/10/1/0.98.8.19.1.9.0 insf: Installing special files for sdisk instance 56 address 2/0/10/1/0.98.8.19.1.10.0 insf: Installing special files for sdisk instance 60 address 2/0/10/1/0.98.8.19.1.11.0 insf: Installing special files for sdisk instance 64 address 2/0/10/1/0.98.8.19.1.12.0 insf: Installing special files for sdisk instance 68 address 2/0/10/1/0.98.8.19.1.13.0 insf: Installing special files for sdisk instance 72 address 2/0/10/1/0.98.8.19.1.14.0 insf: Installing special files for sdisk instance 76 address 2/0/10/1/0.98.8.19.1.15.0 insf: Installing special files for sdisk instance 80 address 2/0/10/1/0.98.8.19.1.15.7 insf: Installing special files for sctl instance 6 address 2/0/10/1/0.98.8.255.1.3.0 insf: Installing special files for ipmi instance 0 address 2/6insf: Installing special files for pseudo driver cninsf: Installing special files for pseudo driver mminsf: Installing special files for pseudo driver devkrsinsf: Installing special files for pseudo driver ptyminsf: Installing special files for pseudo driver ptysinsf: Installing special files for pseudo driver ipinsf: Installing special files for pseudo driver arpinsf: Installing special files for pseudo driver rawipinsf: Installing special files for pseudo driver tcpinsf: Installing special files for pseudo driver udpinsf: Installing special files for pseudo driver stcpmapinsf: Installing special files for pseudo driver nulsinsf: Installing special files for pseudo driver netqainsf: Installing special files for pseudo driver dmeminsf: Installing special files for pseudo driver diag0insf: Installing special files for pseudo driver telminsf: Installing special files for pseudo driver telsinsf: Installing special files for pseudo driver tlcltsinsf: Installing special files for pseudo driver tlcotsinsf: Installing special files for pseudo driver iomeminsf: Installing special files for pseudo driver tlcotsodinsf: Installing special files for pseudo driver dmpinsf: Installing special files for pseudo driver volsinsf: Installing special files for pseudo driver dev_configinsf: Installing special files for pseudo driver strloginsf: Installing special files for pseudo driver sadinsf: Installing special files for pseudo driver asyncdskinsf: Installing special files for pseudo driver echoinsf: Installing special files for pseudo driver dlpiinsf: Installing special files for pseudo driver ptminsf: Installing special files for pseudo driver ptsinsf: Installing special files for pseudo driver diag1insf: Installing special files for pseudo driver kloginsf: Installing special files for pseudo driver syinsf: Installing special files for pseudo driver kepdinsf: Installing special files for pseudo driver diag2insf: Installing special files for pseudo driver root重新扫描磁带机,扫描出磁带机设备;HQxNBUA:/var/adm/syslog]ioscan -fnCtapeClass I H/W Path Driver S/W State H/W Type Description========================================================================= tape 0 2/0/2/1/1.2.0 stape CLAIMED DEVICE HP C5683A/dev/rmt/0m /dev/rmt/0mnb /dev/rmt/c5t2d0BESTn /dev/rmt/c5t2d0DDSb/dev/rmt/0mb /dev/rmt/c5t2d0BEST /dev/rmt/c5t2d0BESTnb /dev/rmt/c5t2d0DDSn/dev/rmt/0mn /dev/rmt/c5t2d0BESTb /dev/rmt/c5t2d0DDS /dev/rmt/c5t2d0DDSnbtape 2 2/0/8/1/0.97.7.255.1.3.0 stape CLAIMED DEVICE STK T9940B/dev/rmt/2m /dev/rmt/2mnb /dev/rmt/c14t3d0BESTn /dev/rmt/c14t3d0D3480b/dev/rmt/2mb /dev/rmt/c14t3d0BEST /dev/rmt/c14t3d0BESTnb /dev/rmt/c14t3d0D3480n/dev/rmt/2mn /dev/rmt/c14t3d0BESTb /dev/rmt/c14t3d0D3480 /dev/rmt/c14t3d0D3480nbtape 1 2/0/10/1/0.98.7.255.1.3.0 stape CLAIMED DEVICE STK T9940B/dev/rmt/1m /dev/rmt/1mnb /dev/rmt/c18t3d0BESTn /dev/rmt/c18t3d0D3480b/dev/rmt/1mb /dev/rmt/c18t3d0BEST /dev/rmt/c18t3d0BESTnb /dev/rmt/c18t3d0D3480n/dev/rmt/1mn /dev/rmt/c18t3d0BESTb /dev/rmt/c18t3d0D3480 /dev/rmt/c18t3d0D3480nbHQxNBUA:/var/adm/syslog]在AIX中,执行下面的命令扫描出磁带机;重新扫描磁带机硬件设备;#cfgmgr –v检查磁带机是否被发现;#lsdev –Cctape扫描出磁带机后,修改磁带机的block size属性;#smitty tape把block size改成0,即variable length block size.对于Linux的操作系统,需要重新启动服务器,扫描出磁带机。
IBM 机架 安装说明
搬动时请按照安全技术规范操作。
≥18千克(39.7磅)≥32千克(70.5磅)≥55千克(121.2磅)请勿在安装于机架中的设备顶部放置任何物品。
下图显示了在机架式机柜中安装服务器时所需的物品。
这些物品如有缺失或损坏,请与购买处联系。
注:有些物品是服务器自带的,并不在机架安装工具箱中。
请为方孔机架式机柜使用卡式螺母,为圆孔机架式机柜使用簧片螺母,对于螺纹孔机架式机柜,请使用您自己的机架螺丝。
如果您的机架式机柜需要安装卡式螺母,请使用卡式螺母插入工具或一字螺丝刀进行安装。
2要将服务器安装到机架式机柜中,请完成以下步骤:在机架式机柜中选择可用的U 形空间用来安装服务器。
如果机架式机柜有圆孔或方孔,请在每个后机架凸缘上选择的U 形空间顶部和底部孔中安装卡式螺母或簧片螺母。
然后,在每个前机架凸缘上的U 形空间底部孔中安装卡式螺母或簧片螺母。
注:如果要移动装有服务器的机架式机柜,或者如果安放机架式机柜的地方容易晃动,请在每个前机架凸缘上的U形空间顶部孔中安装卡式螺母或簧片螺母。
如果机架式机柜长度需要,请抬起导轨调节滑琐来调整导轨长度,让其伸展到所需的长度。
如果机架式机柜上有圆孔,请从导轨前部的安装锁钉上卸下圆形螺母。
如果机架式机柜上有螺纹孔,请使用Philips 十字螺丝刀从导轨上卸下安装锁钉和螺母组合件。
站在机架式机柜前面,将安装锁钉(如果机架式机柜有方孔,还包括螺母)钩入机架式机柜前部U 形空间的中间孔。
确保导轨支架伸到机架凸缘的外面。
如果是在带螺纹孔的机架式机柜中安装服务器,这一步不适用。
伸展导轨的后部,让导轨支架伸到机架凸缘的外面。
3如图所示,用两个M6螺丝固定导轨后部,一个M6螺丝固定导轨前部。
如果是在带螺纹孔的机架式机柜中安装服务器,在用M6螺丝固定导轨时必须保证导轨位置正确。
对其他导轨重复步骤2到5。
如果要移动装有服务器的机架式机柜,或者如果安放机架式机柜的地方容易晃动,请在服务器后机架上安装装运支架:1.卸下服务器外盖:a.松开外盖后部的固定螺丝。
磁带库安装使用手册V1.0

磁带库安装使用手册二零零三年六月版权声明©2003 深圳市华为技术服务有限公司版权所有,保留一切权利。
非经本公司书面许可,任何单位和个人不得擅自摘抄、复制本书的部分或全部,并不得以任何形式传播。
修订记录目录第一章磁带库设备简介 (4)第二章磁带库的安装与调试说明 (5)第三章标准磁带库的安装调试 (7)3.1. 磁带库F OR S UN SOLARIS安装 (7)3.2. 磁带库F OR HP UX安装 (8)3.3. 磁带库F OR IBM AIX安装 (9)第四章常见磁带库的安装调试 (11)4.1. D ELL 128T磁带库的安装 (11)4.2. IBM3583磁带库的安装 (11)4.3. STK L20磁带库的安装 (13)4.4. OVERLAND N EOSERIES磁带库的安装 (14)第一章磁带库设备简介随着电信、金融、保险等行业的迅速发展,需要进行备份归档的业务数据量也越来越大,简单的依靠磁带机手工备份数据已经越来越不适应这种需求的变化。
人们需要一种专用的设备帮助技术人员进行工作,它可以配合各种备份管理软件完成各种数据备份、存档、磁带管理及灾难恢复等工作,支持多驱动器同时工作及自动存取磁带,极大的提高工作效率;同时它还可以支持SCSI、FC等多种接口,支持多种软硬件平台,其数据处理能力及存储容量可以根据客户需求灵活配置,这就是磁带库。
磁带库正是在这种需求的驱动下应运而生的。
目前常用的磁带库一般由磁带驱动器、机械臂和磁带置放模组组成。
磁带驱动器的作用是在磁带上读写数据,类似于以前使用的磁带机;机械臂的作用是用来识别和存取、移动磁带;磁带置放模组的作用是用来储存磁带的。
一般磁带库中配置是一个机械臂、多个驱动器和磁带置放模组。
如下图1-1为一个磁带库的示意图图1-1 磁带库示意图第二章磁带库的安装与调试说明2.1.磁带库的电缆连接磁带库的安装过程比较简单,一般情况下只需将磁带库的驱动器和机械臂通过SCSI或光纤与备份服务器或光纤交换机连接起来,然后在不同的操作系统下使用相应的命令创建设备即可,如在IBM的AIX中需执行#cfgmgr命令。
IBM LTO3581磁带机安装使用指南
附件6:IBM LTO3581磁带机安装使用指南1.硬件安装将IBM LTO3581磁带机连接到计算机上,该计算机在备份系统中称为介质服务器,需要通过SCSI连接线或SCSI卡把磁带机和介质服务器连接起来。
在沁北项目中,采用SCSI线连接IBM LTO3581磁带机和IBM235,Windows 2000系统不能正确识别磁带机,导致磁带机不能正常工作,采用SCSI卡后正常。
使用磁带机附带的SCSI连接线连接磁带机SCSI接口和介质服务器的SCSI卡。
把磁带机附带的终结端子接到磁带机上没有使用的SCSI口。
连接磁带机电源线。
注意保存磁带机附带的仓门钥匙。
2.软件安装(1)安装介质服务器上的SCSI卡驱动程序从驱动程序软盘按普通驱动安装方法安装即可。
(2)安装IBM LTO3581磁带机的驱动程序从磁带机附带驱动光盘按普通驱动安装方法安装即可。
(3)安装VERITAS Backup Exec备份软件在介质服务器上安装备份软件,按照安装向导提示采用默认安装即可。
VERITAS Backup Exec支持远程备份作业,如果需要可以在其它机器上安装远程管理软件。
需要注意的是,为支持远程备份,应该首先在备份软件的Server 端导入Remote Agent for Windows Servers的许可证号;然后在需要被远程备份的机器上安装Remote Agent,如果拥有远程机器的管理权限,可以从服务器端使用推式安装方法将Remote Agent安装到多个远程机器上。
3.磁带机的使用(1)清洗磁带机使用之前应该采用清洗磁带清洗磁道。
将清洗磁带放入磁带机,选择清洗操作。
(2)磁带的导入在磁带机操作面板上按MODE一次或多次直到出现LOAD dRv,按SELECT面板提示SRC SLOT 1?可以使用NEXT或PREVIOUS指定要从哪个SLOT导入磁带,确认后按SELECT按钮,等待磁带机操作。
如果出现LDR Ready表示导入成功,如果出现E字样,ALARM指示灯变红,表明操作有误,检查后重新操作。
NBU磁带库备份系统的安装步骤
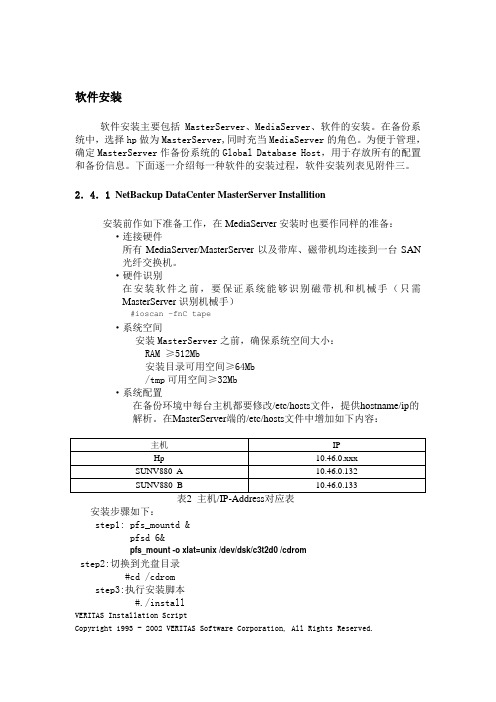
软件安装软件安装主要包括MasterServer、MediaServer、软件的安装。
在备份系统中,选择hp做为MasterServer,同时充当MediaServer的角色。
为便于管理,确定MasterServer作备份系统的Global Database Host,用于存放所有的配置和备份信息。
下面逐一介绍每一种软件的安装过程,软件安装列表见附件三。
2.4.1 NetBackup DataCenter MasterServer Installition安装前作如下准备工作,在MediaServer安装时也要作同样的准备:·连接硬件所有MediaServer/MasterServer以及带库、磁带机均连接到一台SAN光纤交换机。
·硬件识别在安装软件之前,要保证系统能够识别磁带机和机械手(只需MasterServer识别机械手)#ioscan –fnC tape·系统空间安装MasterServer之前,确保系统空间大小:RAM ≥512Mb安装目录可用空间≥64Mb/tmp可用空间≥32Mb·系统配置在备份环境中每台主机都要修改/etc/hosts文件,提供hostname/ip的解析。
在MasterServer端的/etc/hosts文件中增加如下内容:安装步骤如下:step1: pfs_mountd &pfsd 6&pfs_mount -o xlat=unix /dev/dsk/c3t2d0 /cdromstep2:切换到光盘目录#cd /cdromstep3:执行安装脚本#./installVERITAS Installation ScriptCopyright 1993 - 2002 VERITAS Software Corporation, All Rights Reserved.Installation Options1 NetBackup2 NetBackup Client Software3 NetBackup Client Java Softwareq To quit from this scriptChoose an option [default: q]: 1/*选则1,安装Server,同时也安装mediaserver 软件The NetBackup and Media Manager software is built for use on hp hardware.Do you want to install NetBackup and Media Manager files? (y/n) [y] yNetBackup is normally installed in /usr/openv/netbackup.Is it OK to install in /usr/openv/netbackup? (y/n) [y] y/*确定Netbackup安装目录Media Manager is normally installed in /usr/openv/volmgr.Is it OK to install in /usr/openv/volmgr? (y/n) [y] y/*确定MediaManager安装目录The hp clients will be loaded.Do you want to load any other NetBackup clients onto the server? (y/n) [y] n/*确定是否安装其他client,server本身已包含client软件,所以选择“n”……Enter license key: /*输入NetBackup DataCenter Base license AJX6-OPWD-IC6K-3N36-383P-NCNP-PNNR-PPP:NetBackup DataCenter Base product with the following features enabled: Core Frozen Image ServicesOpen Transaction Managerhas been registered.All additional keys should be added at this time.Do you want to add additional license keys now? (y/n) [y] y /*输入其他相关license,也可在安装完软件后再输入其他licenseLicense Key Utility-------------------A) Add a License KeyD) Delete a License KeyF) List Active License KeysL) List Registered License KeysH) Helpq) Quit License Key UtilityEnter a letter:Installing NetBackup DataCenter version: 4.5GAIs backupserver the master server? (y/n) [y] y /*设置主机backupserver作masterserver Do you have any media (slave) servers? (y/n) [n] y/*设置其他主机作mediaserver Enter the fully qualified name of a media (slave) server (q to quit)? SUNV880_AEnter the fully qualified name of a media (slave) server (q to quit)? SUNV880_B Enter the fully qualified name of a media (slave) server (q to quit)? qChecking for a bpcd entry in /etc/inetd.conf: Adding bpcd entry.Original /etc/inetd.conf saved as /etc/inetd.conf.NBU_061103.10:25:08.Checking for a vnetd entry in /etc/inetd.conf: Adding vnetd entry.Checking for a vopied entry in /etc/inetd.conf: Adding vopied entry.Checking for a bpjava-msvc entry in /etc/inetd.conf: Adding bpjava-msvc entry.Checking /etc/services for the needed NetBackup and Media Manager services.Copying original /etc/services file to /etc/services.NBU_061103.10:31:32/etc/services to update NetBackup and Media Manager services./etc/services will be updated to add the following entries for NetBackup/Media Manager.bprd 13720/tcp bprdbpcd 13782/tcp bpcdbpdbm 13721/tcp bpdbmvnetd 13724/tcp vnetdvopied 13783/tcp vopiedbpjobd 13723/tcp bpjobdnbdbd 13784/tcp nbdbdvisd 9284/tcp visdbpjava-msvc 13722/tcp bpjava-msvcvmd 13701/tcp vmdacsd 13702/tcp acsdtl8cd 13705/tcp tl8cdtldcd 13711/tcp tldcdts8d 13709/tcp ts8dodld 13706/tcp odldtl4d 13713/tcp tl4dtsdd 13714/tcp tsddtshd 13715/tcp tshdtlmd 13716/tcp tlmdtlhcd 13717/tcp tlhcdlmfcd 13718/tcp lmfcdrsmd 13719/tcp rsmdTo change these entries modify the file /tmp/services.ov_edited.24848and enter <RETURN> when ready to continue:/etc/services has been updated to contain NetBackup and Media Manager services.To make NetBackup and Media Manager start up automatically when the system is restarted, the rc.veritas.aix script found in /usr/openv/netbackup/bin/goodies has been placed in the /etc directory, you must modify /etc/inittab to include it.……Enter which host will store global device information.(default: backupserver): backupserver /*设置masterserver 作全局设备信息中心To be able to install the client software the NetBackupprocesses need to be started. Do you want to start theNetBackup processes so client software can be installed? (y/n) [y] yStarting the NetBackup database manager process (bpdbm)./*启动bpdbm进程以装载client软件Do you want to create policy and schedule examples that you can view or usewhen you are configuring your own policies and schedules? (y/n) [y]n/*确定是否安装策略模板Client database indexing reduces the search time when restoringclient files, but it takes about 2% more disk space.Do you want to index the client database files? (y/n) [y] y/*确定是否采用client index 文件The default index level is 9 levels. Use the default? (y/n) [y] y /*确定 client index levelRunning index_clients process in background mode.Output from the process will be written to /tmp/index_clients.output.Do you want to start the Media Manager device daemon processes? (y/n) [y] y Starting the Media Manager device daemon processes./*确定是否启动MediaManager 进程Do you want to start the NetBackup bprd process sobackups and restores can be initiated? (y/n) [y] yStarting the NetBackup request daemon process (bprd)./*确定是否启动Netbackup 监听进程Done executing NB.instStep4 :确认安装成功#/usr/openv/netbackup/bin/goodies/bp.kill_all关闭所有已启动的NBU进程#/usr/openv/netbackup/bin/goodies/netbackup start启动NBU进程#/usr/openv/netbackup/bin/bpps –a查看NBU进程#/usr/openv/netbackup/bin/jnbSA&启动NBU的java管理界面至此,MasterServer软件安装完毕。
IBM LTO3581磁带机安装使用指南

附件6:IBM LTO3581磁带机安装使用指南1.硬件安装将IBM LTO3581磁带机连接到计算机上,该计算机在备份系统中称为介质服务器,需要通过SCSI连接线或SCSI卡把磁带机和介质服务器连接起来。
在沁北项目中,采用SCSI线连接IBM LTO3581磁带机和IBM235,Windows 2000系统不能正确识别磁带机,导致磁带机不能正常工作,采用SCSI卡后正常。
使用磁带机附带的SCSI连接线连接磁带机SCSI接口和介质服务器的SCSI卡。
把磁带机附带的终结端子接到磁带机上没有使用的SCSI口。
连接磁带机电源线。
注意保存磁带机附带的仓门钥匙。
2.软件安装(1)安装介质服务器上的SCSI卡驱动程序从驱动程序软盘按普通驱动安装方法安装即可。
(2)安装IBM LTO3581磁带机的驱动程序从磁带机附带驱动光盘按普通驱动安装方法安装即可。
(3)安装VERITAS Backup Exec备份软件在介质服务器上安装备份软件,按照安装向导提示采用默认安装即可。
VERITAS Backup Exec支持远程备份作业,如果需要可以在其它机器上安装远程管理软件。
需要注意的是,为支持远程备份,应该首先在备份软件的Server 端导入Remote Agent for Windows Servers的许可证号;然后在需要被远程备份的机器上安装Remote Agent,如果拥有远程机器的管理权限,可以从服务器端使用推式安装方法将Remote Agent安装到多个远程机器上。
3.磁带机的使用(1)清洗磁带机使用之前应该采用清洗磁带清洗磁道。
将清洗磁带放入磁带机,选择清洗操作。
(2)磁带的导入在磁带机操作面板上按MODE一次或多次直到出现LOAD dRv,按SELECT面板提示SRC SLOT 1?可以使用NEXT或PREVIOUS指定要从哪个SLOT导入磁带,确认后按SELECT按钮,等待磁带机操作。
如果出现LDR Ready表示导入成功,如果出现E字样,ALARM指示灯变红,表明操作有误,检查后重新操作。
- 1、下载文档前请自行甄别文档内容的完整性,平台不提供额外的编辑、内容补充、找答案等附加服务。
- 2、"仅部分预览"的文档,不可在线预览部分如存在完整性等问题,可反馈申请退款(可完整预览的文档不适用该条件!)。
- 3、如文档侵犯您的权益,请联系客服反馈,我们会尽快为您处理(人工客服工作时间:9:00-18:30)。
I B M外置磁带机的安装
方法
集团标准化小组:[VVOPPT-JOPP28-JPPTL98-LOPPNN]
8767H H X磁带机外置托架安装指南
装箱清单:
完成下列步骤来安装磁带机外置托架和磁带机:
1、松开磁带机外置托架后部的螺钉,然后移开外置托架的上盖。
2、安装SCSIID和SCSIsignal连接器:
a、把连接器的插头从外置托架的后部移开;
b、使用钢笔的尖端或者一个伸直的别针来设置SCSIID连接器上的ID。
然后确定连接器,将它插入后部打开的位置
并按压使之固定。
连接器上用“R”来标示右边的,用“L”来标示左边的。
c、将SCSIsignal连接器插入外置托架打开的位置,然后,插入并拧紧锁定来固定这个连接器。
3、将磁带机安装进外置托架中:
a、使用磁带机带来的SCSIsignal连接线连接到外置托架的内部接口上;
b、将导轨贴在磁带机的两边,右导轨使用“R”来标示,左导轨使用“L”来标示;
c、将安装好的磁带机和导轨滑动插入外置托架中;
d、连接好磁带机后部的电源、ID和SCSIsignal连接线。
4、安装上外置托架的盖板,然后,拧紧后部的螺钉来固定上盖板。
5、连接好外置托架的外部连接线:
a、将SCSIsignal连接线的一端插到SCSI控制器上,然后将另一端连接到外置托架的后部接口上;
b、将电源线连接到外置托架上,然后将电源线连接到适当的外部电源设备上。
6、请参考磁带机随机的文档来获得安装与使用的相关信息。
黄浦江南路288号
南京牧田中国
8768FHX磁带机外置托架安装指南
装箱清单:
完成下列步骤来安装磁带机外置托架和磁带机:
1、松开磁带机外置托架后部的螺钉,然后移开外置托架的上盖。
2、安装SCSIID和SCSIsignal连接器:
a、把连接器的插头从外置托架的后部移开;
b、使用钢笔的尖端或者一个伸直的别针来设置SCSIID连接器上的ID。
然后确定连接器,将它插入后部打开的位置
并按压使之固定。
连接器上用“R”来标示右边的,用“L”来标示左边的。
c、将SCSIsignal连接器插入外置托架打开的位置,然后,插入并拧紧锁定来固定这个连接器。
3、将磁带机安装进外置托架中:
a、使用磁带机带来的SCSIsignal连接线连接到外置托架的内部接口上;
b、将导轨贴在磁带机的两边,右导轨使用“R”来标示,左导轨使用“L”来标示;
c、将安装好的磁带机和导轨滑动插入外置托架中;
d、连接好磁带机后部的电源、ID和SCSIsignal连接线。
4、安装上外置托架的盖板,然后,拧紧后部的螺钉来固定上盖板。
5、连接好外置托架的外部连接线:
a、将SCSIsignal连接线的一端插到SCSI控制器上,然后将另一端连接到外置托架的后部接口上;
b、将电源线连接到外置托架上,然后将电源线连接到适当的外部电源设备上。
6、请参考磁带机随机的文档来获得安装与使用的相关信息。
87651UX磁带机外置托架安装指南
装箱清单:
完成下列步骤来安装磁带机外置托架和磁带机:
注意:在安装过程中你将会需要一个平刀片和一个螺丝起子。
1、松开磁带机外置托架后部的螺钉,然后移开外置托架的上盖。
2、在外置托架的两边安装滑轨(在混装硬件安装袋中有10个10-32x3/8-inc的螺钉)。
3、将可调整的rear-rack后部机柜安装滑轨连接到front-rack前部机柜安装滑轨上(在混装硬件安装袋中有4个
10-32x1/2-inch的螺钉)。
4、将两边的滑轨组件安装到机柜上:
a、按照机柜的需求安装10个clipnuts垫片或10个cagenuts垫片(如果机柜的装配边缘是圆孔,则要安装
clipnuts;如果机柜的装配边缘是方孔,则要安装cagenuts),使用相关安装工具或螺丝起子来安装。
b、将滑轨排列安装到机柜装配边缘上(前部和后部),如果需要调整滑轨的长度,将导轨后部的螺丝拧松,然后调整
到合适的长度再拧紧。
c、插入并拧紧8个M5型号的螺丝以便将滑轨固定到机柜上。
注意:使用机柜装配边缘最顶端和最底端的装配孔来连接这样的滑轨组件,使用中间的装配孔来安装磁带机外置托架等设备。
5、安装SCSIID和SCSIsignal连接器:
注意:这里需要用到清单图2中的SCSIaccessorykit附加配件,将要安装在外置托架上。
a、从外置托架的后边打开并移走盖板;
b、使用钢笔的尖端或者一个伸直的别针来设置SCSIID连接器上的ID。
然后确定连接器,将它插入后部打开的位置
并按压使之固定。
连接器上用“R”来标示右边的,用“L”来标示左边的。
c、将SCSIsignal连接器插入外置托架打开的位置,然后,插入并拧紧锁定来固定这个连接器。
6、将磁带机安装进外置托架中:
a、使用磁带机带来的SCSIsignal连接线连接到外置托架的内部接口上;
b、将外置盒的填充物盖板取出,然后取下填充物盖板上的驱动器滑轨;
c、将导轨贴在磁带机的两边,右导轨使用“R”来标示,左导轨使用“L”来标示;
d、将安装好的磁带机和导轨滑动插入外置托架中;
e、连接好磁带机后部的电源、ID和SCSIsignal连接线。
7、安装上外置托架的盖板,然后,拧紧后部的螺钉来固定上盖板。
8、将磁带机外置托架安装在机柜上:
a、将机柜上两边的滑轨拉出直到它们锁住;
b、使用这两根机柜上的滑轨排列在磁带机外置托架的两边,然后将外置托架和滑轨一起推入机柜,直到所定的位
置;
c、将前面的两个螺钉拧紧,使得将外置托架固定在机柜上。
9、连接好外置托架的外部连接线:
a、将SCSIsignal连接线的一端插到主机上,然后将另一端连接到外置托架的后部接口上;
b、将电源线连接到外置托架上,然后将电源线连接到适当的外部电源设备上。
10、请参考磁带机随机的文档来获得安装与使用的相关信息。
