磁带机用户指南
Dell PowerVault LTO-3-060 磁带机用户指南.pdf_1700855553.7
Dell™ PowerVault™ LTO-3-060 磁带机用户指南前言简介安装LTO 驱动程序软件Linux 配置程序操作原理规范故障排除指南获得帮助本文挡中的信息如有更改,恕不另行通知。
© 2008 Dell Inc. 版权所有。
P/N 0TK131 Rev. A01本文档中用到的商标:Dell、DELL 徽标和 PowerVault 是 Dell Inc. 的商标。
Microsoft 是 Microsoft Corporation 的注册商标。
本文档中述及的其它商标和产品名称是指拥有相应商标和商品名称的公司或其制造的产品。
除本公司的商标和商品名称之外,Dell Inc. 对其它公司的商标和商品名称不拥有任何所有权。
首次发布:2008 年 5 月返回目录页台湾公司实体声明Dell™ PowerVault™ LTO3-060 磁带机用户指南Contact (联系人):Jackie Deng 先生Address (地址):5F, No. 1, Lane 116, Yung-Heng Rd.Yung-Ho City, TaipeiTaiwanTel (电话):+886-02-2925 3158Fax (传真):+886-02-2925-3155Email (电子邮件):*****************返回目录页特性表 1-1描述 PowerVault LTO-3-060 半高磁带机的关键性能特点和能力。
返回目录页安装LTO 驱动程序软件Dell™ PowerVault™ LTO-3-060 磁带机用户指南本章说明如何安装LTO 驱动程序软件。
如果您想将PowerVault LTO-3-060 半高磁带机与Microsoft®本机备份程序搭配使用,系统为Windows Server® 2003 操作系统,那么请安装相应版本的 LTO 驱动程序软件。
驱动程序软件在 Dell PowerVault Documentation and Drivers CD(Dell PowerVault 文档资料和驱动程序 CD)中。
dell-powervault124T安装磁带自动加载机及使用手册

dell-powervault124T安装磁带自动加载机及使用手册安装磁带自动加载机:Dell™PowerVault™124TDLTVS160磁带自动加载机用户指南及使用安装磁带自动加载机:DellPowerVault124TDLTVS160磁带自动加载机用户指南安装概述安装准备附件选择位置条形码阅读器产品概述打开磁带自动加载机包装确认产品组件准备主机并检验连接安装设备驱动程序安装概述安装磁带自动加载机包括以下步骤,本节稍后将详细说明:1.准备安装新的DellPowerVault124TDLTVS160磁带自动加载机(请参阅―安装准备‖)。
2.识别正确的SCSI总线类型(见―‖)。
3.确定随磁带自动加载机提供的附件(请参阅―附件‖)。
4.把磁带自动加载机安装在主机服务器附近的一个计算机机架上。
如果安装机架安装设备,请参考您的机架安装指南。
5.关闭服务器和所有连接到服务器的设备(请参阅―连接SCSI和电源线‖)。
6.将SCSI电缆连接到磁带自动加载机和服务器的SCSI主机适配器(请参阅―源线‖)。
7.将电源线连接到磁带自动加载机,并将电源线插入到最近的电源插座(请参阅―连接SCSI和电源线‖)。
打开磁带自动加载机以确保其通过通电自检(POST)。
8.为磁带自动加载机设置SCSIID(请参阅―设置SCSIID‖)。
9.设置主机并检验连接(请参阅―‖)。
安装磁带自动加载机:Dell™PowerVault™124TDLTVS160磁带自动加载机用户指南及使用安装准备在您安装新的DellPowerVault124TDLTVS160磁带自动加载机前,小心拆开包装并检查运输过程中可能出现的任何损坏。
包装内提供的入门指南提供了正确拆包装和检查磁带自动加载机所需的所有信息。
找到入门指南,按其中的说明操作。
确保工作区域没有可能引起静电放电(ESD)的条件。
接触已知的接地表面(例如计算机的金属机箱)将您身体上的静电释放。
HP 448磁带机用户手册
目录
关于本指南 . . . . . . . . . . . . . . . . . . . . . . . . . . . . 9
适用读者 . . . . . . . . . . . . . . . . . . . . . . . . . . . . . . . . . . . . . . . . . . 9 相关文档资料 . . . . . . . . . . . . . . . . . . . . . . . . . . . . . . . . . . . . . . . 9 文档约定和符号 . . . . . . . . . . . . . . . . . . . . . . . . . . . . . . . . . . . . . . 9 HP 技术支持 . . . . . . . . . . . . . . . . . . . . . . . . . . . . . . . . . . . . . . . . 10 产品保修 . . . . . . . . . . . . . . . . . . . . . . . . . . . . . . . . . . . . . . . . . . 10 注册磁带机 . . . . . . . . . . . . . . . . . . . . . . . . . . . . . . . . . . . . . . . . . 10 订阅服务 . . . . . . . . . . . . . . . . . . . . . . . . . . . . . . . . . . . . . . . . . . 10 HP 网站 . . . . . . . . . . . . . . . . . . . . . . . . . . . . . . . . . . . . . . . . . . 11 文档反馈 . . . . . . . . . . . . . . . . . . . . . . . . . . . . . . . . . . . . . . . . . . 11
戴尔磁带机配置手册
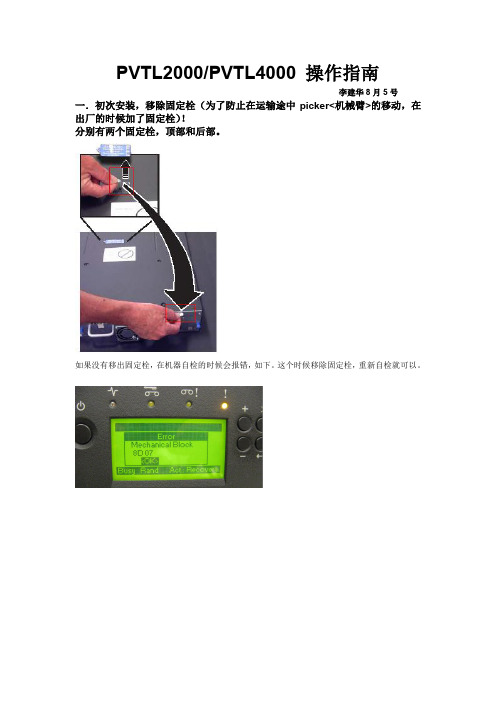
PVTL2000/PVTL4000 操作指南李建华8月5号一.初次安装,移除固定栓(为了防止在运输途中picker<机械臂>的移动,在出厂的时候加了固定栓)!分别有两个固定栓,顶部和后部。
如果没有移出固定栓,在机器自检的时候会报错,如下。
这个时候移除固定栓,重新自检就可以。
二.机器的结构前面板结构,各个等指示功能如下:后部结构主要是连接电源,数据线和管理网线内部结构磁带加载magazine(如果从带机中退出来,请参考下面的方法)左面的magazine右边的managzine通过I/Ostation 进入磁带Magazine紧急退出空三.面板操作功能四.RMU .管理软件:(RMU=remote manage unit)通过前面板的IP地址进入网页管理界面用户名和密码如下:Web UI------------------------------------------------------------User: AdminPassword: secure------------------------------------------------------------User: servicePassword: ser001在RMU管理软件下获取带机日志五.VERITAS下配置TL2000/TL4000在设备管理器中检查设备驱动在VERITAS下您在到的设备情况Load 磁带当你去加入磁带到I/O slot 或者magazine 的时候,前面板会报错如下这个时候您需要到veritas中解除锁定,然后加载磁带,从I/O slot 或者magazine都可以。
六.配置清洁槽如果前面的清洁灯亮起,那么带机有需要清洁。
你可以在RMU或者前面板设置成自动清洁,然后在VERITAS中设置清洁槽为,让带机报错需要清洁后,它会自动清洁。
当然如果你不想浪费一个slot,可以手动加载清洁带做清洁。
七.故障排除1.如果清洁灯亮,请参考上面的步骤。
戴尔 110t lto-2 磁带机用户手册说明书
电流(c u r r e n t):单位时间的电荷量。
电流以安培计量。
电源接口(p o w e r c o n n e c t o r):外壳的内部电源线连接到的接口,位于磁带机背面。
电源线(p o w e r c o r d):将设备连接到电源的连接线。
读(r e a d):从存储设备、数据介质或其它源获取或转译数据。
端口(p o r t):(1)系统或网络访问点,用于数据进出。
(2)设备上的接口,其它设备(例如,显示器和打印机)的电缆连接到该接口上。
(3)对硬件的物理连接的表示。
端口有时指适配器,但在一个适配器上可以有多个端口。
终结器(t e r m i n a t o r):(1)用于结束 SCSI 总线的部件。
(2)一种单端口、75 欧姆的设备,用于从传输线吸收能量。
通过吸收无线电频率信号,终结器防止能量反射回电缆线路。
终结器通常是被屏蔽的,这可防止不想要的信号进入电缆系统或有效的信号离开电缆系统。
F发光二极管(l i g h t-e m i t t i n g d i o d e):一种半导体管,当受到施加的电压时发光,用在电子显示器中。
伏特(v o l t):电位差和电动势的 SI(国际)单位。
正式定义是:当在带一安培恒定电流的导体上的两点之间耗散的功率等于一瓦特时,这两点间的电位差。
服务器(s e r v e r):通过网络为一个或多个客户机提供服务的功能性设备。
其示例包括文件服务器、打印服务器或邮件服务器。
IBM pSeries、IBM iSeries、HP 和 Sun都是服务器。
与“主机”(host)同义。
复位(r e s e t):将设备或电路返回为清除状态。
G固件(f i r m w a r e):通常作为操作系统一部分交付的专有代码。
固件比从可替换介质装入的软件更高效,并且比纯硬件电路更适应于更改。
固件的一个示例是 PC 主板上的只读内存(ROM)中的基本输入/输出系统(BIOS)。
使用磁带机
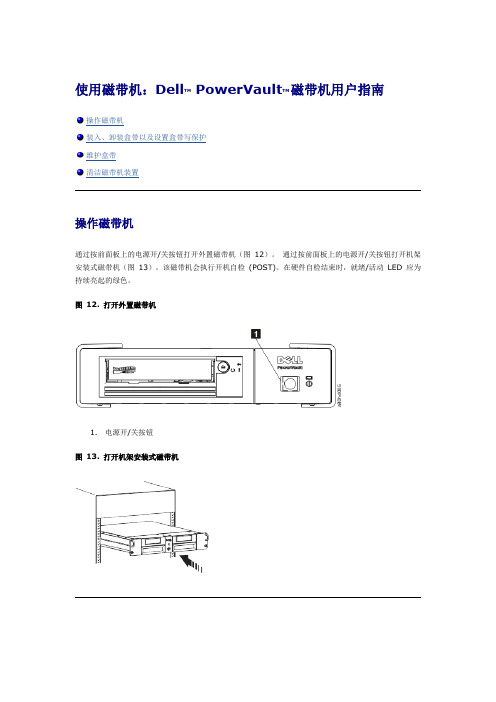
操作磁带机装入、卸装盒带以及设置盒带写保护维护盒带清洁磁带机装置操作磁带机通过按前面板上的电源开/关按钮打开外置磁带机(图12)。
通过按前面板上的电源开/关按钮打开机架安装式磁带机(图13)。
该磁带机会执行开机自检(POST)。
在硬件自检结束时,就绪/活动LED 应为持续亮起的绿色。
图12. 打开外置磁带机1.电源开/关按钮图13. 打开机架安装式磁带机重置磁带机您可在不关闭磁带机和系统电源的情况下重置磁带机。
如果磁带机停止响应,此操作可能十分必要。
要执行此操作,按住磁带机前面板上的弹出按钮10 秒钟(图13)。
磁带机将重要技术数据强制转储到磁带机内存,并覆盖现有转储。
然后磁带机重新引导以进行通信。
图13. 重置磁带机1.弹出按钮装入、卸装盒带以及设置盒带写保护如LTO Ultrium 标准中所指定的,只能在磁带机中使用LTO Ultrium 格式的盒带。
确保仅有一个标签粘贴在盒带的标签区。
切勿使用非标准标签,也不要将任何东西粘贴到盒带上标签区以外的地方。
Dell PowerVault 磁带机与其前代产品的盒带相兼容。
以下描述了在其他兼容介质类型上支持的功能:注:1. 1 GB = 1 000 000 000 字节2. 压缩率= 2:13. RO = 只读图14显示了LTO Ultrium 数据盒带及其组件。
图14. LTO Ultrium 数据盒带1.LTO 盒带内存2.标签区3.写保护开关4.插入导轨5.盒带门6.导带引脚装入盒带1.确保磁带机电源已打开。
(就绪/活动LED 为持续点亮的绿色。
)2.确保写保护开关(请参阅图14中的3)在正确位置。
(请参阅“设置盒带上的写保护开关”。
)3.拿住盒带使写保护开关面向您。
4.将盒带滑入磁带装填仓(请参阅图15)。
磁带机自动装入盒带。
o如果盒带已在弹出位置,而您想重新插入它,则取下盒带,然后重新插入。
o如果盒带已装入,并且您循环加电,则不会自动弹出盒带。
惠普DAT存储(usb)磁带机使用手册
准备装配托架 .......................................................................... 23 连接装配件 ............................................................................ 24 安装磁带机 ............................................................................ 24 将 USB 电缆连接到服务器 ................................................................ 25
升级备份软件 ........................................................................... 20 启用加密(仅 DAT 320) ............................................................. 21
2 驱动程序和备份软件 ............................................ 19
安装驱动程序 ........................................................................... 19 在 Windows 上安装 .................................................................. 19 安装过程 ....................................................................... 19 在 Linux 上安装 .................................................................... 20
DELL124TLTO5磁带机手册

系统时间由 RMU 显示,它在记录事件和错误时内部使用。 系统时间为常规时间或通电时间。 常规时间为年/月/日时间,例如 2004/11/21 19:28。 通电时间为通电周期 (POC)/通电小 时数 (POH)。 例如,POC: 00121,POH: 00002:07:45,其中 POC 为系统自制造起已引导的次数,POH 为自系统上次引导起经过的小时、分钟和秒数。 如果常规时间已知,将使用该 时间,否则使用通电时间。 PowerVault 124T 磁带自动加载机在每次通电后必须重新设置。 如果配置了时间服务器可自动重置时间(请参阅 "设置时间服务器" )。
1. 从主菜单滚动至 "Configuration"( 配 置 ),然后按 Enter。 2. 从 "Configuration"( 配 置 )菜单滚动至 "Ethernet"( 以 太网),然后按 Enter。 3. 从 "Ethernet"( 以 太网)子菜单滚动至 "Set IP"(设置 IP),然后按 Enter。 4. 滚动至 DHCP,然后按 Enter。 设置静态 IP 地址: 1. 从主菜单滚动至 "Configuration"( 配 置 ),然后按 Enter。 2. 从 "Configuration"( 配 置 )菜单滚动至 "Ethernet"( 以 太网),然后按 Enter。 3. 从 "Ethernet"( 以 太网)子菜单滚动至 "Set IP"(设置 IP),然后按 Enter。 4. 滚动至 "Static IP"(静态 IP),然后按 Enter。 光标自动显示在第一位。 5. 在 IP 地址的每一位使用向上和向下箭头更改每位的值。 按 Enter 使光标前进到下一位。
Dell PowerVault LTO 磁带机 用户指南说明书
ix
x Dell PowerVault LTO 磁带机: 用户指南
简介
v 『概述』 – 第 2 页的『串行连接的 SCSI (SAS) 接口』
v 第 2 页的『加密』 v 第 3 页的『规范和功能部件』 v 第 4 页的『磁带备份软件』 v 第 4 页的『前面板』 v 第 6 页的『后面板』
概述
加密
该磁带机具有采用 T10 加密方法的应用程序管理的加密 (AME)。您必须有支持加密的应用程序才能使用磁带 机加密功能。仅 LTO Ultrium 4 和更高版本的数据盒带支持数据加密。有关更多信息,请参阅应用程序支持 文档。
2 Dell PowerVault LTO 磁带机: 用户指南
规范和功能部件
本文档中的信息可能会有更改,恕不另行通知。 Copyright © 2017 Dell Inc. or its subsidiaries. All rights reserved. Dell、EMC 和其他商标是 Dell Inc. 或其子公司的商标。其他商标可能是其各自拥有者的商标。 v 内置磁带机型号:LTO Ultrium 8-H、LTO Ultrium 7-H、LTO Ultrium 6-H、LTO Ultrium5-H、LTO Ultrium 4-H
设置磁带机 . . . . . . . . . . . . . . 9
预安装的内置磁带机 . . . . . . . . . . . . 9 安装内置磁带机 . . . . . . . . . . . . . 9
安装内置磁带机 - 分步指导 . . . . . . . . 9 安装外置和机架安装式磁带机 . . . . . . . . 13
操作磁带机 . . . . . . . . . . . . . . 17 装入、卸装盒带以及设置盒带写保护 . . . . . . 18 维护盒带 . . . . . . . . . . . . . . . 21 清洁磁带机械装置 . . . . . . . . . . . . 22
Dell PowerVault 124T LTO-2 磁带自动加载机用户指南说明书
配置磁带自动加载机 SCSI设置 设置安全 设置以太网 设置磁带架 设置时间 设置密码 条形码阅读器要配置 Dell PowerVault 124T LTO-2 磁带自动加载机,必须检验以下内容的安装:l SCSI ID。
对于磁带自动加载机,存在单个SCSI ID。
l磁带架。
l以太网IP 地址(如果未使用 DHCP)。
l SNMP 服务器 IP 地址(仅在使用 SNMP 的情况下)。
l时间服务器 IP 地址,仅在使用时间服务器的情况下(或者如果手动配置,则为时区、日期和时间)。
l控制模式。
lIP 网关(可选)l简单网络管理协议 (SNMP) 服务器(可选) l时间服务器,或手动设置时间和时区(可选)设置 IP 地址IP 地址是任何连接到网络的设备的地址。
每个设备都必须有一个唯一的 IP 地址。
IP 地址书写方式采用四组以句点分隔的数字的形式,从 0.0.0.0 到 255.255.255.255,并且包括后者。
IP 地址为永久或动态分配。
永久或静态地址在该设备每次连接到网络时保持不变。
动态地址在设备每次连接到使用动态主机配置协议 (DHCP) 的网络服务器时可能改变。
设置动态 IP 地址:1.从主菜单滚动至“Configuration ”(配置),然后按 Enter 。
2.从“Configuration ”(配置)菜单滚动至“Ethernet ”(以太网),然后按 Enter 。
3.从“Ethernet ”(以太网)子菜单滚动至“Set IP ”(设置 IP ),然后按 Enter 。
4.滚动至 DHCP ,然后按 Enter 。
设置静态 IP 地址:1.从主菜单滚动至“Configuration ”(配置),然后按 Enter 。
2.从“Configuration ”(配置)菜单滚动至“Ethernet ”(以太网),然后按 Enter 。
3.从“Ethernet ”(以太网)子菜单滚动至“Set IP ”(设置 IP ),然后按 Enter 。
天花板式磁带机所有者指南说明书

CEILING CASSETTE OWNER’S MANUALModels:Indoor UnitSC-18CC-UMSC-24CC-UMSC-30CC-UMSC-36CC-UMSC-42CC-UMSC-48CC-UM Outdoor Unit SC-18Z-UM SC-24Z-UM SC-30Z-UM SC-36Z-UM SC-42Z-UMSC-48Z-UMSafety Precautions . . . . . . . . . . . . . . . . . . . . . . . . . . . . . . . . . . . . . .4System Components . . . . . . . . . . . . . . . . . . . . . . . . . . . . . . . . . . . . . 5System Functions . . . . . . . . . . . . . . . . . . . . . . . . . . . . . . . . . . . . .6-8Wireless Remote Controller . . . . . . . . . . . . . . . . . . . . . . . . . . . .9-14Care and Cleaning . . . . . . . . . . . . . . . . . . . . . . . . . . . . . . . . . . .15-16Troubleshooting . . . . . . . . . . . . . . . . . . . . . . . . . . . . . . . . . . . .17-18Diagnostic Codes . . . . . . . . . . . . . . . . . . . . . . . . . . . . . . . . . . .19-20Energy Saving Tips . . . . . . . . . . . . . . . . . . . . . . . . . . . . . . . . . . . . .21Warranty . . . . . . . . . . . . . . . . . . . . . . . . . . . . . . . . . . . . . . . . . . .BackThank you for choosing aCeiling CassetteAir Conditioning & Heating System!Please read this owner’s manual carefully before operation and retain it for future reference.Table of ContentsSAFETY PRECAUTIONSPlease read the following before operation.these signal words: DANGER , WARNING , and CAUTION . These words are used with the safety-alert symbol.DANGER identifies the most serious hazards which will result in severe personal injury or death.WARNING signifies hazards which could result in personal injury or death.CAUTION is used to identify unsafe practices which may result in minor personal injury or product and property damage.NOTE is used to highlight suggestions which will result in enhanced installation, reliability, or operation.NOTE:Your actual air conditioning & heating system and related devices may differ from the images shown in this manual.SYSTEM SCHEMATICIndoor unit System Components*1.Indoor Power Supply2. Drain Pipe3. Communication Cable4. Decorative Discharge AirGrille (Included)5. Refrigeration Pipes6. Wired Tether Controller(Sold Separately)7. Remote Controller 8. Service Cover9. Communication Cable10. Front Panel 11. Outdoor Power Supply 12. Liquid Pipe13. Gas Pipe14. Drain Hose Outdoor Unit1254371412111013* Not all items included inequipment purchaseWHISPER QUIETNot only are the Stealth systems energy efficient but they are quiet too. Ceiling Cassette operates with sound levels starting as low as 37 dB(A).MULTI FAN SPEEDSWhether operating in either Cooling or Heating mode, the indoor fan can be set to your choice of three different speeds (Low, Medium or High) to achieve maximum comfort.BUILT IN CONDENSATE LIFT PUMPThe unit features a built-in drain pump that lifts condensate up to 39 inches above the drain pan to a gravity condensate drain system. In most cases, the internal condensate lift mechanism will avoid the need for an external condensate pump.CONDENSATE SENTRYThe unit’s fail-safe mechanism recognizes when there is a high level in the condensate pan and shuts off the system to prevent overflow.INTELLIGENT PRE-HEATINGDesigner Systems guards against the annoying cool air blown into the room in heating mode. The system constantly monitors the discharge air temperature. It will delay the indoor fan until the indoor coil has warmed up to prevent blowing uncomfortable cool air into the room.CONTROLLERSThe Ceiling Cassette unit comes with a factory supplied Wireless Remote Controller. An optional Wired Tether Controller is sold separately. NOTE:The controllers are mutually exclusive. They cannot be used at the same time.WIRELESS REMOTEThe Stealth multi-functional infrared hand held wireless controller is sleek,ergonomically designed, easy to use and has a large LCD display (no back light).TETHER CONTROLLERThe Stealth wired Tether Controller mounts to the wall up to 25 feet from the unit. It provides complete control over your unit’s operation mode, desiredtemperature, fan speed, airflow direction and more. (Sold Separately)INTELLIGENT DEFROSTThe Intelligent Defrost function increases room comfort and saves energy by eliminating unnecessary defrost cycles. In heating mode, the unit will monitor the outdoor coil for frost buildup. Once frost buildup has been detected, the system will switch into a defrost mode to remove the frost.I FEEL MODEThe unit will sense room temperature at the remote controller instead of at the indoor unit.It then adjusts airflow and temperature accordingly for the ultimate in personal comfort control and energy savings. T his function is only available with the wired Tether Controller. (Sold Separately)SWING LOUVERThe adjustable swing louvers can be controlled from the wireless controller. V ertical swing louvers allows five different air discharge directions including Continuous Sweep. Maximize comfort by adjusting the direction of airflow in the room by moving the louvers up or down. FRESH AIR INTAKEThe Ceiling Cassette has a ventilation air knockout that allows a 4-inch flex duct connection and a field-supplied duct booster fan. T he maximum fresh air allowed is 20% of the unit's high-speed fan airflow rating.POWER FAILURE MODEPower interruptions are no problem for the Designer system. User selections and system parameters are stored in non-volatile memory. T hese parameters are retained during a power failure. W henpower is returned, the Ceiling Cassette system will automatically return to the last operating mode.TURBO MODEUse Turbo Mode for situations where you wish to achieve the desired room temperature in the shortest possible time. T his mode runs the unit at ultra high speeds for quickest results. CLOCKThe wireless remote controller has a built-in clock feature. T he remote will display the time of day in a 24-hour format.TIMER MODEThe unit can be programmed to turn ON or OFF after a specific amount of time. T he time period is adjustable between one half and 24 hours.MODE BUTTONThe unit can be set to five different operating modes: HEAT, COOL, DRY, FAN ONLY and AUTO. NOTE:AUTO MODE has fixed setpoints of 68° F heating and 77° F cooling, which arenot adjustable. The system will automatically select heating or cooling to maintain room temperature within this band.SLEEP MODEThe unit will automatically adjust room temperature during your sleep time. T his slight change in temperature will not affect your comfort level due to the natural effects that sleeping has on the body, but it will save on energy consumption and will lower electric bills.X-FAN MODEWhen operating in humid areas, the X-fan or Dry Coil function allows the indoor fan to run for a pre-determined amount of time after the unit is turned off (cooling or dry modes) to ensure that additional moisture is removed from coil.FAHRENHEIT °F / CELSIUS °CThe remote controller can be set to display in either °F or °C.SELF-DIAGNOSISWith an on-board computer using real-time diagnostics, the Stealth Designer system helps toprolong its own life. T he automatic diagnosis feature continuously scans for unacceptable operating conditions or malfunctions. If such conditions occur, the system takes corrective action or stops. Error codes are shown on the unit display to facilitate easy troubleshooting and repair.PRIVACY LOCK MODEThe wireless remote controller has a Privacy Lock. T he Privacy Lock averts unauthorized access or tampering with system settings.AGENCY LISTINGSAll systems are listed with AHRI (Air conditioning, Heating, and Refrigeration Institute) and are ETL certified per UL Standards.INTRODUCTION FOR ICONS ON DISPLAY SCREEN 1 Signal Transmitter 2 ON/OFF Button3 Mode Button4 –Button5 + Button6 Fan Button7 Swing Button 8 Clock Button9 Timer ON Button 10 X-Fan Button11 Temp Button 12 Timer OFF Button13 Turbo Button14 Sleep Button15 Light Button24681013357911141215Auto Mode Cool Mode Dry Mode Fan Mode Heat Mode Clock Sleep Mode Set Fan SpeedOperation ModeX-Fan ModeSet TemperatureSet TimeTimer OnPrivacy LockUp &Down SwingLightSet Temp.Indoor Ambient Temp.Outdoor Ambient Temp.Temp. Display TypeTurbo ModeWhen you press the ON/OFF button,“OPER” icon will be displayedand the unit will start in the last operating mode and room setpoint.When you press the ON/OFF button again, the “OPER” icon willdisappear and the unit will shut down. The remote controller willdisplay the time and last room setpoint.NOTE: If theON/OFF button is pressed too soon after a stop, the compressor will not start for 3 minutes due to theinherent protection against frequent compressor cycling.REMOTE CONTROLLER OPERATIONSThe wireless remote controller is sleek,versatile andallows you to change room temperatures and functions on your DesignerCeiling Cassette system from the palm of your hand. The large LCD display and buttons make it easy-to-understand and easy-to-use.The remote controller is set from factory to display temperatures in°F . If °C is desired, turn the remote OFF and then press “MODE “ and “––” buttons on the remote simultaneously. The wireless remote controller is the interface between the user and the Stealth cassette system. Commands are entered by the user to control the system. Any command that has been entered with the remote controller will remain in memory until it is changed by the user or the batteries are replaced.When entering commands, point the remote controller in the direction of the unit. The unitwill emit an audible beep when the signals are received correctly.ON/OFF BUTTONON Mode DisplaySWING LOUVERSPress the Swing Louver button to select five different vertical(up & down) air discharge directions including Continuous Sweep.The Swing Louver icon will be displayed. Press this buttonto set swing angle, which changes in direction as below:Indicates louver swings back and forth in the five directions, as shown.OFF 102348765Swing Louver DisplayOPERATION OF WIRELESS REMOTE CONTROLLER MODE BUTTONUse the “MODE” button to select one of the available modes.The selected mode will be displayed on the remote controllerand the appropriate icon will be displayed.AUTO–Unit will automatically select heating or cooling tomaintain room temperature between 68°F and 77°F.The remote controller will display the Auto Mode icon withno setpoint. The front panel display will show "77."COOL–To cool to selected setpoint and remove moisture.System varies compressor speed to maintain desired temperature.HEAT –To heat to selected room setpoint. System varies compressor speed to maintain desired room temperature.FAN ONLY–To circulate air without heating or cooling. Use Fan Speed button to select speed from low to high.DRY–Select DRY MODE to increase moisture removalduring warm humid conditions. In Dry mode the indoor fanwill run at low speed during the cooling cycle. When setpointis reached, the indoor fan will turn off with the compressor.:::::Icons DisplayedFAN BUTTONBy pressing this button, AUTO, LOW ( ), MEDIUM ( ), orHIGH ( ), speeds can be circularly selected. AUTO is thedefault fan speed after Power ON.NOTE:In DRY mode, fan speed is not adjustable, it will remain at LOW.Fan ButtonLIGHT BUTTONPress the LIGHT button to turn On or Off the display on the ceilingcassette. When the indoor unit first powers on, the ceiling cassettedisplay will default to ON. The LIGHT icon will display when thefront panel display is ON.Light DisplayPRIVACY LOCK MODEThe Privacy Lock prevents unauthorized access to the unit controls and prevents tampering with system settings. The remote controller can be locked by pushing the "+" and "-" buttons simultaneously for 2 seconds. The Privacy Lock icon will be displayed on the remoteUWhen the “TEMP ” button is pushed once, the temperature indicator is displayed. This indicates that the setpoint temperature is displayed.When the “TEMP ” button is pushed a second time, the display will show an icon with a thermometer inside a house. This indicates that the room temperature is displayed.When the "TEMP ” button is pushed a third time, the display will show an icon with a thermometer outside a house. This indicates that the outdoor temperature is displayed. (Not available on some models).The room temperature and outdoor temperature will be displayed for only 5 seconds before reverting back to displaying room setpoint.TIMER ON MODEThe Ceiling Cassette unit can be programmed to automatically turn ON after a selected time period. With the unit in OFF mode, press TIMER button to activate the TIMER mode, and the ON/OFF icon will begin blinking. Press + or - button to select a time setting from 0.5 to 24 hours. Press once for slow adjustment and hold down for fast adjustment. Press TIMER button to confirm settings, and icon will stop blinking. The unit will turn ON after the selected time period.TIMER OFF MODEThe Ceiling Cassette unit can be programmed to automatically turn OFF after a selected time period. With the unit in ON mode, press TIMER button to activate the TIMER mode, and the ON/OFF icon will begin blinking. Press + or - button to select a time setting from 0.5 to 24 hours. Press once for slow adjustment and hold down for fast adjustment. Press TIMER button to confirm settings, and icon will stop blinking. The unit will turn OFF after the selected time period.Timer ONTimer OFFTEMP BUTTONTemp ButtonSLEEP MODEThe unit will automatically adjust room temperature during your sleep time. This slight change in temperature will not affect your comfort level due to the natural effects that sleeping has on the body, but it will save on energy consumption and will lower your electric bill. Press the SLEEP button to select Sleep Mode. The SLEEP icon will appear.In Cool or Dry modes:If setpoint is between 61℉to 73℉, temperature will slowly increase 2℉per hour for 3 hours, then maintain this setpoint for 4 hours, then reduce setpoint by 2℉and hold at this setpoint until Sleep Mode is cancelled.If setpoint is between 74℉to 81℉, temperature will slowly increase 2℉per hour for 2 hours,then maintain this setpoint for 5 hours, then reduce setpoint by 2℉and hold at this setpoint until Sleep Mode is cancelled.If setpoint is between 82℉to 85℉, temperature will slowly increase 2℉ per hour for 1 hour,then maintain this setpoint for 6 hours, then reduce setpoint by 2℉and hold at this setpoint until Sleep Mode is cancelled.If setpoint is 86℉, unit will run at this setpoint for 7 hours, then reduce setpoint by 2℉and hold at this setpoint until Sleep Mode is cancelled.In Heat mode:If setpoint is between 82 ℉to 86℉, the unit will slowly reduce setpoint by 2℉per hour for 3 hours, and then maintain this setpoint until Sleep Mode is cancelled.If setpoint is between 69 ℉to 81℉, the unit will slowly reduce setpoint by 2℉per hour for 2 hours, and then maintain this setpoint until Sleep Mode is cancelled.If setpoint is between 63℉to 68℉, the unit will reduce setpoint by 2℉, and then maintain this setpoint until Sleep Mode is cancelled.X-FAN MODEWhen operating in humid areas, the unit has a DRY COIL function called X-Fan that will allow the indoor fan to run for a pre-determined amount of time after the unit is turned off (cooling or dry modes) to ensure that additional moisture is removed from coil. Push the “X-FAN ” button to enable this feature. The X-FAN icon will be displayed on remote controller. To deactivate this feature, push the “X-FAN ”button again.X-Fan Mode DisplaySleep Mode DisplayCLOCK BUTTONPress the CLOCK button to enter Clock Setup Mode. The clock iconwill begin flashing. Set the clock by pressing the + or - buttons.Press once for slow adjustment; press and hold down for fastadjustment. When finished, press the CLOCK button to save yourclock settings. This is the current time, not the timer setting.NOTE: Clock time adopts 24-hour mode. A 12-hour formatis not available.CHANGING BATTERIES AND ADDITIONAL NOTESTo change batteries, slide cover off battery compartment on back of remote controller. Remove and safely discard old batteries. Insert two new AAA 1.5V dry batteries, using correct polarity. Reattach back cover. NOTE:•If the remote controller will not be used for a long time, remove batteries to prevent leakage damage.•Be sure to aim the remote controller at the receiver of the main unit when operating.•When remote emits a signal, icon will flicker; a tone will be heard when unit receives that signal.Removeold batteries Installnew batteriesCHANGING BATTERIES Clock DisplayTURBO MODEThe desired room setpoint can be achieved faster in TURBOmode. After selecting the“HEAT”or“COOL” mode button,push the“TURBO”button. The TURBO icon will bedisplayed on the remote controller and the unit will run at anultra-high speed. To deactivate the feature, push the“TURBO”button again. The unit will return to normal operation.Turbo Mode DisplayAIR FILTER CLEANINGChanging your air filter on a regular basis prevents many problems. Dirty air filters will affect the performance and the longevity of your unit. It is recommended that air filters be cleaned every three (3) months.Routine maintenance consists of checking the condensate drain for clogs, hosing off the outdoorcoil of outdoor unit and cleaning the air filter and the indoor decorative grille.DECORATIVE GRILLE CLEANINGWash the decorative grille using warm water and mild detergent with a soft cloth or soft brush.NOTE:Do not use bleach, abrasives or water above 110°F (45°C) as it may cause discoloration or damage to the surface of the unit.WARNINGHOW TO REMOVE AIR FILTERRemove the screwPush the fastenerFor the 24-42K cassette unit:1. Push the latch as shown in the figure2. Release the screws under clasps by a screwdriver.3. Release the fastener and open the panel grille.1.Clean dust, lint and dirt from the air filter using a vacuum cleaner or washing with water. If dirt is conspicuous, wash with a mild detergent in lukewarm water. After washing air filter with water, let dry in the shade.Do not expose the air filter to direct sunlight or direct heat to dry.2.Reinsert the air filter into filter door, careful to align properly.3.Close secure filter door.Replace the screwRe-install grille assemblyThe Designer System has on board diagnostics. T he indoor unit and Tether Controller will display error codes. T he following is a summary of the codes with explanation:Error CodesError CodesENERGY SAVING TIPS1. Relaxing room temperature at night is OK:During the nighttime hours youdon't require the same level of conscious cooling or heating. Try using Sleep Mode to gradually relax room temperature and allow the unit to run less and save energy.2. Curtains and shades:In the summer, you need to block the effects of the sun.Close window curtains and shades on the south and west side of your home to help block solar heat. In winter, the sun is your friend. Open curtains and shades to allow solar heat into your room.3. Close doors:If you don’t need to heat and cool your whole home, confine the heatingand cooling to one room by closing doors. Limit the space you’re heating and cooling to specified capability of the unit.4. Service the unit:Some basic maintenance might be all you need. The outdoor unitwill greatly benefit from a good hosing out, especially in treed areas where seeds and other debris can stick to coil fins and make the unit work up to 15% harder!5. Rearrange the room:Furniture that obstructs airflow means you could be heatingand cooling the back of a chair or the front of a sofa instead of the actual living space.Remove or rearrange obstacles blocking airflow.6. Try 75 degrees:75°F is a good point for an air conditioner to run at its optimalperformance level. Even a 5-degree change in temperature can make your unit use up to 40% more energy!7. Lighting:Turning lights off can help reduce your heat. Each light bulb is a tiny heater.Your air conditioner must waste energy overcoming the heat from your lights to reach and hold your desired room temperature.8. Is anyone home?If possible, while you're away turn your unit to Auto mode andmake sure windows and drapes are closed. Although room temperature may be less than optimal for a few minutes when you come home, the unit will soon have the room back to your desired temperature.9. Don't forget the fan:The fan is much like a car. The faster it runs, the more energy ituses. Sometimes we need the car to go fast, but slow is good enough most of the time.Try saving money by using the comfortable quiet low fan speed as much as possible.LIMITED WARRANTY STATEMENTFOR WARRANTY SERVICE OR REPAIR:Contact your installing contractor. Y ou may find the installer’s name on the equipment or in your Owner’s packet. Complete product registration below and send back by email to ***********************PRODUCT REGISTRATIONModel No.。
HP StorageWorks Ultrium (傲群)460磁带机 说明书

2460HP StorageWorks Ultrium (傲群) 460磁带机HP Ultrium (傲群) 磁带机家族的第二代产品融合了HP Ultrium (傲群) 230和HP Ultrium (傲群) 215磁带机的成功经验,该新款磁带机进一步巩固了惠普在磁带机方面的领先地位。
它具有前所未有的性能、容量和可靠性水平-建立了超级磁带机市场的新标准。
Ultr ium (傲群) 460的传输率达60 MB/秒,是企业级数据保护需要的理想选择-尤其是在备份窗口越来越小的情况下。
Ultr ium (傲群) 460磁带机的读写能够完全兼容第一代Ultrium (傲群)磁带机。
作为四代LTO Ultr ium (傲群)开放格式的一部分,Ultr ium (傲群) 460为客户提供最佳的选择和投资保护。
最新信息• 提高性能和容量,建立新的磁带机高标准。
容量成倍增加,达到400GB, 性能更实现了60MB/秒(假定压缩率2:1)• 降低拥有成本。
第二代磁带机介质的每GB成本比其它任何介质都便宜主要特性与优点可控制性:• 高性能:两小时内可存储400 GB (假定数据压缩率2:1)• 演变:由非常成功的第一代Ultrium (傲群) 磁带机演变而来• 经济合理:所有磁带机中每GB成本最低• 易管理:磁带内存有助于提高介质管理和可靠性灵活性:• 可靠:无传统之累的发展规划的优势在于当前及未来产品采用同类中的最佳技术可扩展性:• 开放:由业界领导者所支持的4代发展规划的组成部分-开放的格式增加竞争优势• 广泛的连接:通过广泛的服务器、操作系统和备份软件包的测试技术规格本机容量200 GB本机(压缩400 GB)持续传输率30 MB/秒本机(压缩60 MB/秒)格式Ultrium (傲群) 2代向下兼容性读写完全兼容第1代磁带机,读写第1代格式比Ultrium(傲群) 230磁带机快30%介质Ultrium (傲群) 2介质,Ultrium (傲群) 1介质接口Ultra 3 SCSI (LVD)接口插头类型SCSI磁带机使用跨立式3部分SCSI外围连接器。
LL009F磁带自动装载器用户指南11版说明书

LL009FT ape AutoloaderUser’s Guide11th Edition856-127974-200-ACorporationSafety PrecautionsT o ensure safe use, carefully read and understand these Safety Precautions before using this unit.Handle this unit properly, as described in this manual, to prevent injury or property damage.Keep this guide at hand for immediate reference when needed.The following symbols are used in this guide to make it easy to understand how to operate the unit safely and correctly. Confirm the following carefully before reading this manual.Risks and necessary actions to reduce risks are indicated individually by the following symbols.Be careful when touching or reaching inside the unit.Be sure to close all the doors of the unit unless it is necessary to keep them open. When working with the unit door opened, do not unnecessarily touch or approach components. There is a possibility of electric shock or injury.Be careful when handling the LCD if broken.The unit contains an LCD. The LCD contains liquid which is harmful to the human body. In addition, the backlight of the LCD contains mercury.When touching the broken LCD, be careful not to touch the liquid inside the LCD. If theObserve the following cautions when handling the power cord.Do not touch the plug with wet hands as this may cause electric shock.When inserting the power cord into and removing it from the power outlet, be sure to hold the plug, not the cord. Failure to do so may damage the power cord, causingNote the following safety precautions when performing maintenance tasks. Failure to follow these precautions may result in serious injury.conductive objectsObserve the following cautions when installing the unit.Do not install the unit in a location where it can come into direct contact with the outside air, which may include rain, mist, corrosive gases, or salt content. Doing so may cause electric shock, smoke, fire or damage to the unit.Warning LabelsThe following warning labels have been attached to this unit. Customers and maintenance service personnel are urged to keep these warnings in the forefront of their minds when operating this unit. (Do not remove or soil these labels.)If any of these labels are missing, removed, soiled, or otherwise unreadable, contact your local maintenance service company.安全注意事項為了確保您正確使用本設備,使用前請務必詳讀本說明書後,再行正確使用。
LBM 200 400 GB 半高型 LTO-2 磁带机 说明书
常规安全准则
请始终遵守以下预防措施以降低伤害和财产损失的危险。
维修
请勿尝试自行维修产品,除非 IBM 支持中心指示您这样做。只通过得到批准修复您特 定产品的 IBM 授权服务供应商进行维修。
注:某些部件可由客户升级或更换。这些部件被称作客户可更换部件或 CRU。IBM 明 确地标明了这些 CRU,并提供了文档,文档中含有客户何时可以更换这些部件的说明。 执行这些替换时,您必须严格按照所有说明进行操作。在您尝试替换前,请始终确保 电源关闭,并且将产品的任何电源断开。如果您有任何问题或疑问,请联系 IBM 支持 中心。
延长线和相关设备
确保您所使用的延长线、电涌保护器、不间断电源和配电盘的额定值要达到所使用产 品的电气要求。请勿使这些设备过载。如果使用配电盘,载荷不应该超出配电盘的输 入额定值。如果您对于电源载荷、电源需求和输入额定值有疑问,请咨询电气人员获 取更多信息。
© Copyright IBM Corp. 2003, 2005
目录
安全 . . . . . . . . . . . . . . . . . . . vii
维修 . . . . . . . . . . . . . . . . . vii 电源线和电源适配器 . . . . . . . . . . . vii 延长线和相关设备 . . . . . . . . . . . . vii 电源插头和插座 . . . . . . . . . . . . . viii 电池 . . . . . . . . . . . . . . . . viii 发热和产品通风 . . . . . . . . . . . . . viii CD 和 DVD 驱动器安全 . . . . . . . . . . ix
磁带机使用手册

问:磁带故障最常见的原因答:正常的磨损可以导致磁带损坏,如磁带读写数据时与读/写磁头表面长时间地一遍一遍地摩擦。
备份管理员操作磁带时,磁带可能被丢来丢去,一层一层地码放在金属盒子里面,或者受到振动导致磁带盒里脆弱的部件损坏。
也有环境问题导致的磁带损坏。
高温或者低温,湿度,灰尘都可以导致磁带故障。
当然也有磁带机里磁带旋转时的转动传送的问题。
问:除了磁带故障外,关于磁带操作我们还需要注意哪些问题?答:使用备份监视软件监视磁带盒磁带机,这样你就可以知道磁带和磁带机的质量和性能是否已经开始变差。
这样你就可以进一步知道某一磁带上的数据是否需要迁移到新的磁带上去。
要记住两件最重要的事情:操作磁带要轻拿轻放;随时监视磁带。
这样你就可以明确地知道他们执行状态是否良好,是否出现了某些质量问题。
问:2-4GB的HP DDS数据磁带的使用寿命大约为多长?答:据惠普称,DDS系列数据磁带产品至少可承受2,000次读写或100次完全备份,也就是说,可以保证10年的存档寿命。
问:磁带应该有多长的使用寿命?答:如果你问的是磁带的记忆能力而不是存储介质的记忆能力,通常没法给出一个确切的答案(至少我个人意见如此)。
问题的答案依赖于你所处的环境。
首先,要看你究竟使用的是何种存储介质以及它们预定的总读写次数。
然后将这项数据和你一周内对它的读写次数进行比较。
记住,磁头每经过磁带一次,“读写次数”都要增加一次,包括倒带、快进等都要计算在内。
经常会有一些人会发现他们永远也不会使用到自己磁带的极限读写次数。
当然,如果你不均匀地使用你的磁带,而像擦皮鞋一样经常的读写某段磁带(很多人都是这样),那么事情就没法预料了。
这种做法会显著增加你的磁带中某一段的数据读写次数,从而大大降低磁带的寿命。
最简单的回答是:“把磁带一直用到它报废,然后将它扔到一边儿去!”问:如何防止磁带恢复失效曾经人们都开玩笑说:“备份永远不会出错,只有恢复才会失效。
”不幸的是,这个玩笑给人带来更多的却是痛苦。
入门级磁带机使用方法
⼊门级磁带机使⽤⽅法⼤多数磁带驱动器使⽤SCSI接⼝,这意味着⼏乎所有的磁带驱动器只需要使⽤mt-st⼯具即可在Linux系统上进⾏操作。
这些⼯具在Linux的每⼀版本中都有,⽽且使⽤⽅便。
Mt-st⼯具和带磁带驱动器的tar⼯具,可以提供进⾏备份的所有必要条件。
如果SCSI接⼝卡的驱动已经安装好,仔细阅读dmesg输出⽂件,它将告诉你SCSI连接哪些设备,并且告诉你它们被分配的节点。
通常,磁带驱动分配在 /dev/st0下。
/dev/st0是到带设备,写完数据后会⾃动倒带,/dev/nst0是不倒带设备.控制磁带机的常⽤命令:mt -f device options控制磁带,其中device是磁带机设备,/dev/st0options是mt命令的参数,⼏个常⽤参数是:status 查看磁带机状态rewind 倒带eod 定位磁带到最后⼀个有效⽂件的结尾fsf n 向前倒带跳过n个⽂件erase 清除磁带内容往磁带中写数据⼀般使⽤tar命令tar cvf /dev/st0 backup.dmp将backup.dmp⽂件写⼊磁带tar tvf /dev/st0查看磁带上的内容tar rvf /dev/st0 old.dmp将old.dmp追加写⼊到磁带(如果还使⽤cvf参数,磁带中就只剩下old.dmp了)使⽤tar命令提取数据:mkdir /restorecd /restoretar xvf /dev/st0这将在/restore路径下恢复磁带上的数据。
从档案⽂件中提取单个⽂件:tar xvpf /dev/st0 etc/fstab这将从磁带上恢复/etc/fstab⽂件。
TSM磁带取出和放⼊的命令⼀。
磁带从磁带机取出异地存放1.checkout libv S97446L5 checklabel=no remove=no force=yes2.q libv 后如过列表⾥⽆S97446L5后可将磁带从磁带机取出。
IBM LTO3581磁带机安装使用指南
附件6:IBM LTO3581磁带机安装使用指南1.硬件安装将IBM LTO3581磁带机连接到计算机上,该计算机在备份系统中称为介质服务器,需要通过SCSI连接线或SCSI卡把磁带机和介质服务器连接起来。
在沁北项目中,采用SCSI线连接IBM LTO3581磁带机和IBM235,Windows 2000系统不能正确识别磁带机,导致磁带机不能正常工作,采用SCSI卡后正常。
使用磁带机附带的SCSI连接线连接磁带机SCSI接口和介质服务器的SCSI卡。
把磁带机附带的终结端子接到磁带机上没有使用的SCSI口。
连接磁带机电源线。
注意保存磁带机附带的仓门钥匙。
2.软件安装(1)安装介质服务器上的SCSI卡驱动程序从驱动程序软盘按普通驱动安装方法安装即可。
(2)安装IBM LTO3581磁带机的驱动程序从磁带机附带驱动光盘按普通驱动安装方法安装即可。
(3)安装VERITAS Backup Exec备份软件在介质服务器上安装备份软件,按照安装向导提示采用默认安装即可。
VERITAS Backup Exec支持远程备份作业,如果需要可以在其它机器上安装远程管理软件。
需要注意的是,为支持远程备份,应该首先在备份软件的Server 端导入Remote Agent for Windows Servers的许可证号;然后在需要被远程备份的机器上安装Remote Agent,如果拥有远程机器的管理权限,可以从服务器端使用推式安装方法将Remote Agent安装到多个远程机器上。
3.磁带机的使用(1)清洗磁带机使用之前应该采用清洗磁带清洗磁道。
将清洗磁带放入磁带机,选择清洗操作。
(2)磁带的导入在磁带机操作面板上按MODE一次或多次直到出现LOAD dRv,按SELECT面板提示SRC SLOT 1?可以使用NEXT或PREVIOUS指定要从哪个SLOT导入磁带,确认后按SELECT按钮,等待磁带机操作。
如果出现LDR Ready表示导入成功,如果出现E字样,ALARM指示灯变红,表明操作有误,检查后重新操作。
Dell EMC ML3 磁带库用户指南说明书

用户界面 . . . . . . . . . . . . . . . 12 受支持的磁带机 . . . . . . . . . . . . . 12
控制路径磁带机 . . . . . . . . . . . . 12 混合磁带机 . . . . . . . . . . . . . 12 磁带机箱后面板 . . . . . . . . . . . . 13 磁带机的物理和逻辑地址 . . . . . . . . . 15 受支持的盒式磁带 . . . . . . . . . . . . 16 磁带库功能 . . . . . . . . . . . . . . 17 随机和顺序逻辑磁带库方式 . . . . . . . . 17 加密 . . . . . . . . . . . . . . . . 18 磁带库共享 . . . . . . . . . . . . . 18 控制路径故障转移、数据路径故障转移和负载均衡 18 警报和日志记录 . . . . . . . . . . . . 20 主机连接 . . . . . . . . . . . . . . . 21 网络连接 . . . . . . . . . . . . . . . 21
安装 . . . . . . . . . . . . . . . . 35
StorageTek SL150模块化磁带库用户指南.pdf_1701844297.191086说明

StorageTek SL150 Modular Tape Library 用户指南E40200-062016 年 8 月StorageTek SL150 Modular Tape Library用户指南E40200-06版权所有 © 2012, 2016, Oracle 和/或其附属公司。
保留所有权利。
本软件和相关文档是根据许可证协议提供的,该许可证协议中规定了关于使用和公开本软件和相关文档的各种限制,并受知识产权法的保护。
除非在许可证协议中明确许可或适用法律明确授权,否则不得以任何形式、任何方式使用、拷贝、复制、翻译、广播、修改、授权、传播、分发、展示、执行、发布或显示本软件和相关文档的任何部分。
除非法律要求实现互操作,否则严禁对本软件进行逆向工程设计、反汇编或反编译。
此文档所含信息可能随时被修改,恕不另行通知,我们不保证该信息没有错误。
如果贵方发现任何问题,请书面通知我们。
如果将本软件或相关文档交付给美国政府,或者交付给以美国政府名义获得许可证的任何机构,则适用以下注意事项:U.S. GOVERNMENT END USERS: Oracle programs, including any operating system, integrated software, any programs installed on the hardware, and/or documentation, delivered to U.S. Government end users are "commercial computer software" pursuant to the applicable Federal Acquisition Regulation and agency-specific supplemental regulations. As such, use, duplication, disclosure, modification, and adaptation of the programs, including any operating system, integrated software, any programs installed on the hardware, and/or documentation, shall be subject to license terms and license restrictions applicable to the programs. No other rights are granted to the U.S. Government.本软件或硬件是为了在各种信息管理应用领域内的一般使用而开发的。
- 1、下载文档前请自行甄别文档内容的完整性,平台不提供额外的编辑、内容补充、找答案等附加服务。
- 2、"仅部分预览"的文档,不可在线预览部分如存在完整性等问题,可反馈申请退款(可完整预览的文档不适用该条件!)。
- 3、如文档侵犯您的权益,请联系客服反馈,我们会尽快为您处理(人工客服工作时间:9:00-18:30)。
返回“目录”页面
简介:Dell TM PowerVault TM磁带机用户指南
概述
串行连接的 SCSI (SAS) 接口
加密
功能
磁带备份软件
前面板
后面板
概述
Dell PowerVault 磁带机是一款高性能且高容量的磁带存储设备,用于在开放式系统环境中备份和复原数据,机可以集成到系统中(内置式)或作为单独封装的台式机设备提供(外置式)。
在 LTO 系列产品中有五代 D
Dell PowerVault 磁带机提供最大 1500 GB(2:1 压缩率下为 3000 GB)的格式化盒带容量,并提供最大为每秒 140 MB 的数据传图 1 显示内置式磁带机。
图 2 显示单独购买的外置式磁带机。
图 1.PowerVault 内置式
图 2.PowerVault 外置式
图 3. PowerVault 机架安装型号
串行连接的 SCSI (SAS) 接口
配有 SAS(串行连接的 SCSI)接口的磁带机可以直接链接到控制器。
与传统的 SCSI 接口相比,SAS 接口具备以下优点:SAS 支持用更细且更长的电缆同时连接不同大小和类型的多个(最多 128 个)设备。
其全双工信号传输支持的最高速率为每秒 Gb。
SAS 磁带机可以热插拔。
加密
该磁带机具有应用程序管理的加密 (AME) 功能。
Windows Server 支持 AME。
您必须有支持加密的应用程序才能使用磁带机加密功更多信息,请参阅应用程序支持文档。
规格
PowerVault 所属代
规格LTO5-140LTO4-120LTO3-80
自然容量1500GB800GB400GB
2:1 压缩容量3000GB1600GB800GB
最大数据传输率每秒 140 MB每秒 120 MB每秒 80 MB
介质分区X不适用不适用
数据安全方式X不适用不适用
加密状态 LED X不适用不适用
* 假定 2:1 压缩率。
实际能实现的容量及传输率取决于数据集,数据集影响实际的压缩率。
功能
磁带机具有以下功能:
内置的写后读 (read-after-write) 验证可确保高级别的数据完整性
瞬间最大数据传输率为每秒 600 MB
256 MB 的读/写高速缓存内存量
智能 LTO-DC 双方式压缩算法
Failsafe 导带捕获机制具有针捕获错误恢复的功能
读取 LTO 盒带中的盒带内存
TapeAlert 支持改进的诊断和故障诊断
两个 6 Gb 串行连接的 SCSI 接口
速度匹配(磁带机可以放慢速度以匹配系统数据率)。
休眠方式,用于节能
向后读写兼容性(依赖所属代)
与标有正式的 Ultrium LTO 徽标的所依赖的各代盒带兼容
可与其他标有正式的 Ultrium LTO 徽标的 LTO 磁带机互换磁带
使用 WORM 介质支持 WORM(一次写入多次读取)
使用 LTO Ultrium 4 和 5 介质的数据加密功能
仅用于传输磁带机固件和转储的以太网接口(非 iSCSI 接口)
磁带备份软件
您需要支持 Dell PowerVault 磁带机的备份软件。
通常,本机备份应用程序(如 NTBackup 和 tar)并不能提供利用磁带机全部
的数据流速率。
我们建议使用备份应用程序,它可提供更好的内存管理以及其他有用的功能(如 TapeAlert)。
要了解最新的受支本,请访问 Dell 支持 Web 站点:,或访问您的备份软件供应商的支持站点。
前面板
图 4.前面板
1.弹出按键
2.就绪/活动 LED
3.故障 LED
4.单字符显示器(SCD)
5.单个点
6.加密状态 LED
1. 弹出按键。
弹出按键使您能够执行一些功能。
“使用磁带机”中详细描述了这些功能。
2. 就绪/活动 LED。
Dell PowerVault LTO5-140HH 磁带机的前面板上有一个绿色的就绪/活动 LED,该 LED 提供有关磁带机状态LED 亮起时可以为持续亮起或闪烁。
请参阅表 1 以获取更多描述。
3. 故障 LED。
Dell PowerVault LTO5-140HH 磁带机的前面板上有个黄色的故障 LED,该 LED 指示磁带机是已出错、处于不正状态还是需要清洁。
请参阅表 1 以获取更多详细描述。
4. 单字符显示器 (SCD)。
此 LED 为诊断/维护功能、出错状态和参考消息显示单字符代码。
5. 单个点。
该单字符显示器在正常运作期间显示空白。
当显示器上亮有一个点并闪烁时,磁带机已经将重要技术数据转储到磁带
6. 加密状态 LED。
该白色 LED 指示盒带上的所有数据(除了标签信息)是否均已加密。
仅限 LTO5 盒带。
表 1.SCD、就绪/活动 LED 和故障 LED 描述
就绪/活动 LED 为绿色的情况故障 LED 为黄色
的情况
白色加密 LED
的情况
SCD 面板的
情况
SCD 点的情
况
LED 和 SCD 面板和 SCD 点的含
关关关关关磁带机未通电或已关闭磁带机电
持续亮起关关
关或
关磁带机电源已打开或(如果单字
器显示为持续亮起的)需要每秒闪烁一次关开或关关关磁带机正在从磁带读取、正在写
正在倒带、正在磁带上查找数据
磁带或卸装磁带。
如果盒带上的
据在这些磁带机运行期间均处于
态,那么加密 LED 会亮起。
如
电期间磁带机内装有盒带,那么
活动 LED 也闪烁绿色光。
在此
磁带机完成开机自检 (POST) 并
带(该过程大约需要 13 分钟时
当磁带机完成恢复并且作好读写
备时,就绪/活动 LED 停止闪烁
出盒带,请按“卸装”按钮。
关亮起/持续亮起关持续亮起开/关磁带机处于维护模式或在维护模
9 时在 SCD 中显示错误代码。
关持续亮起关每秒闪烁一
开/关在维护模式下执行选定的选项。
次
关每秒闪烁一次关持续亮起关出错且磁带机或介质可能需要维
要清洁。
请注意单字符显示器上
然后转至故障诊断部分的错误代
定错误代码的含义。
如果 SCD
示,则必须装入清洁盒带关每秒闪烁两次关关关磁带机正在更新固件。
关每两秒闪烁一次关关关磁带机检测到错误并正在执行固
复。
它将自动重置。
后面板
图 5.内置 SAS 磁带机的后面板
1.SAS 接口
2.以太网 - 非 iSCSI - 仅用于传输固件和转储
3.功能部件开关(位于底部)
4.RS-422
图 6.外置 SAS 磁带机的后面板
1.电源接口
2.风扇外壳
3.SAS 接口
4.以太网 - 非 iSCSI - 仅用于传输固件和转储图 7.机架安装磁带机的后面板
1.电源接口
2.风扇外壳
3.SAS 接口
4.以太网 - 非 iSCSI - 仅用于传输固件和转储。