摄影三点布光技巧详解(英文)
三点式照明
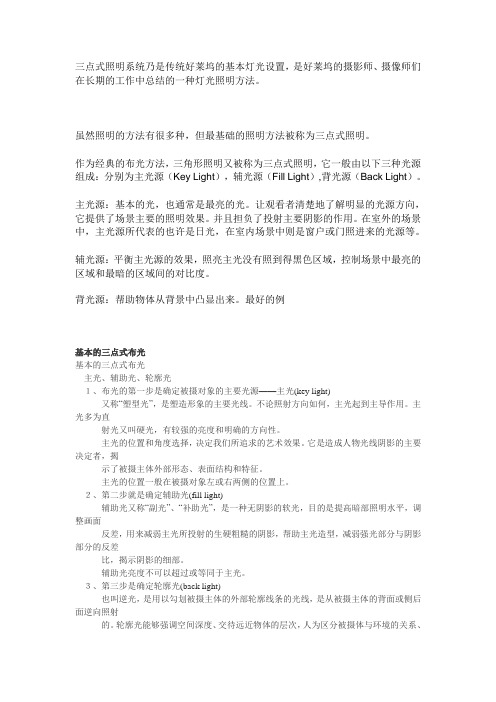
三点式照明系统乃是传统好莱坞的基本灯光设置,是好莱坞的摄影师、摄像师们在长期的工作中总结的一种灯光照明方法。
虽然照明的方法有很多种,但最基础的照明方法被称为三点式照明。
作为经典的布光方法,三角形照明又被称为三点式照明,它一般由以下三种光源组成:分别为主光源(Key Light),辅光源(Fill Light),背光源(Back Light)。
主光源:基本的光,也通常是最亮的光。
让观看者清楚地了解明显的光源方向,它提供了场景主要的照明效果。
并且担负了投射主要阴影的作用。
在室外的场景中,主光源所代表的也许是日光,在室内场景中则是窗户或门照进来的光源等。
辅光源:平衡主光源的效果,照亮主光没有照到得黑色区域,控制场景中最亮的区域和最暗的区域间的对比度。
背光源:帮助物体从背景中凸显出来。
最好的例基本的三点式布光基本的三点式布光主光、辅助光、轮廓光1、布光的第一步是确定被摄对象的主要光源——主光(key light)又称“塑型光”,是塑造形象的主要光线。
不论照射方向如何,主光起到主导作用。
主光多为直射光又叫硬光,有较强的亮度和明确的方向性。
主光的位置和角度选择,决定我们所追求的艺术效果。
它是造成人物光线阴影的主要决定者,揭示了被摄主体外部形态、表面结构和特征。
主光的位置一般在被摄对象左或右两侧的位置上。
2、第二步就是确定辅助光(fill light)辅助光又称“副光”、“补助光”,是一种无阴影的软光,目的是提高暗部照明水平,调整画面反差,用来减弱主光所投射的生硬粗糙的阴影,帮助主光造型,减弱强光部分与阴影部分的反差比,揭示阴影的细部。
辅助光亮度不可以超过或等同于主光。
3、第三步是确定轮廓光(back light)也叫逆光,是用以勾划被摄主体的外部轮廓线条的光线,是从被摄主体的背面或侧后面逆向照射的。
轮廓光能够强调空间深度、交待远近物体的层次,人为区分被摄体与环境的关系、形成被摄体与被摄体之间的立体感。
4、背景光又称为“环境光”,是用来照明环境背景的一种光线。
三灯布光的方法与技巧

三灯布光的特点三灯布光在人像的拍摄中运用的是最多的、也是最容易掌握的。
这种三灯布光方法具有变化多、变化快、灵活易掌握的特点,一般都很容易受顾客的接受和欢迎。
三灯布光的组合形式1. 三灯平光布光三灯平光布光方案在人像的拍摄中运用非常广泛,平柔的光线十分适合表现明快、美好、理想、和谐的艺术气氛,但相对立体用光来说,画面的立体感差一些,被摄者容易显胖,运用光线对被摄者塑造的可能性弱一些。
三灯平光布光方案我们又称之为“V”字形布光。
图1 光位图1 所谓“V”字形布光,就是三盏灯在数码相机的左右各布一盏,在数码相机的下方布一盏,三盏灯形成V字形光位(如图1、光位图1)。
V字形的布光适合表现脸型较瘦、面部立体感较强的被摄者,不适合表现脸型较胖的被摄者。
底灯的运用有利于消除被摄者的眼袋和笑沟,使被摄者显得年轻。
在人像摄影中,一般三盏灯都是加柔光箱的柔性光,三灯的光心在摄影中指向被摄者的面部,三灯的强度是相同的,三盏灯的色温也是一致的。
在运用V字形灯光拍摄数码人像时,由于没有背景灯光,如果要使背景的色彩得以如实表现,可以让被摄者尽量靠近背景,用前面三灯的余光照亮背景,定光点靠近背景的准确曝光量。
V字形的布光如果在其中的一盏灯上寻求光质、强度、色温的变化又可产生出一系列新的布光方案大家可以多尝试。
2. 主光+辅光+轮廓光布光主光+辅光+轮廓光布光布光法是人像摄影中较传统的一种布光方法,它以表现主体人物为主,对背景和环境都只是用主辅光的余光加以表现。
在这种布光方案中,主光一般都处在前侧光至侧逆光(如45°前侧光、90°侧光、120°侧逆光)之间作一系列变化。
主光的光质一般相对辅光可以硬一些,主光的光位是根据被摄者的表现需要、画面艺术气氛塑造的要求以及画面影调表现等因素来灵活决定,主光的强度一般在画面中相对来说是较强的,可以根据画面的实际曝光量、主辅光之间的光比、数码相机的感光度等因素来决定的。
新闻报道灯光、三点式
新闻报道灯光应该柔和,自然,使观众感到亲切,越来越多的新闻演播室采用三基色柔光灯照明,广告照明必须突出和美化产品,了解舞台照明和电视照明的区别,是拍好电视戏剧片的关键。
学会运用光线与色彩来表现舞蹈和音乐。
群体场面必须采用分区布光和整体布光相结合。
不同类型的电视节目,有其不同的属性,不同的风格,因此,用光也有很大的差别,新闻报道节目分为室内和室外两大类别,而室内节目又可分正点新闻报道和访谈式的追踪报道或述评,这类节目的用光以自然而不失庄重为主,并要确保图像的稳定。
室内新闻报道的照明正点新闻报道通常是1-2人,人物照明的布光按主光、辅助光、逆光、背景光、基本光配置。
是按照主光、辅助光、基本光等基本手法进行的布光方法,特点是主辅光分工明细,但由于光源多,一定要调节好各灯的光暗,以取得最佳光比,同时由于灯多,容易产生很多不良的阴影,要充分用扉子板遮挡不必要的余光。
在新闻直播中,正常情况下,基本光是作适当的补偿光,更重要的是可以起一个备份的作用,万一某个主光灯灯泡烧了,在直播过程中不可以马上更换,此时的基本光可以适当提高亮度作为应急使用,以确保有图像输出。
此时可以用每人分别配备主、辅、逆光的传统方式,但一定要控制好光的投射范围及方向,以免给人一种杂乱无章的感觉。
比较科学的办法应该是每人一支逆光灯,然后用柔光灯作正面光调整柔光灯的亮度,使主光与辅助光比较柔和地过渡。
这种方法也适合于两个人物的布光,其实当今的固定式谈话节目用光都趋向于自然、柔和,这样更能让人觉得亲切和谐。
∙室内访谈式报道此类节目更接近生活化,是在轻松、随和的气氛中进行谈话式采访或讨论。
这类节目的背景可能是很生活化或是抽象化的实景,也可以是抠象背景,人物的分布与新闻报道有很大差别。
为了便于交流,通常是呈圆弧形分布的。
此时除了每人一支逆光灯外,可以用1支较大功率的电影聚光灯作主光,同时顾及三人,也是作为一个光源方向,可以配合背景的光源方向而确定,再用2支柔光灯作辅助光。
三点照明布光方法和布光经验的灯光方案
三点照明布光方法和布光经验的灯光方案2007-07-21 15:33:23| 分类:渲染技术| 标签:|字号大中小订阅三点灯光是杰出的好莱坞灯光照明方案,“三点灯光”:Key Light(基调灯), Fill Light(补光灯), 和Back Light(背光灯),下面我们就要学习怎么样设置这种灯光。
1.在黑暗的环境中开始:在你的场景中确认没有默认的灯光,并且没有球形的环境;当你添加第一盏灯的时候,场景中应该没有其他的灯照明。
2增加Key Light基调灯基调灯用来照明场景中的主题,最大程度的影响场景的照明和阴影的显示。
它是最主要的灯光来源,例如作为太阳,窗户,或是天花板上的灯光来源;而且几吊灯也不一定要放在光线的来源点上。
创建a spot light 作为基调灯,从顶视图上看,基调灯偏移摄像机(15-45左或是右)度角。
从侧视图上看,升高基调灯在摄像机之上,是你的场景主体采光距离摄像机15-45度角。
基调灯要比主体前面的其他的光源都要亮一些,它是最主要的阴影投射来源,最深的阴影,高光也是又它来决定的。
注意:在这里的场景测试当中,你的场景中只有一盏灯光,它在光亮和黑暗的区域之间应该有比较好的平衡和对比,一盏灯光的渲染结果跟最终的效果没有多大的差别,除了阴影比较黑,灰度对比比较粗糙之外。
观察上面的gif效果,当他停留在只有基调灯的时候仔细观察。
3增加补光等Fill Light. 补光灯的作用是柔和和扩展基调灯的照明范围,能够看到更多的主题和细节。
补光能够模拟天光(比如太阳或是其它的光源)二级光比如作为table lamps餐桌灯,反射或是弹回光线在你的场景中,你可以放置很多的补光,聚光灯是比较常用的,但点光源也可以用。
从顶视图来看,补光和基调灯处于相对的角度,(一个在左,一个在右)灯光的放置补一定要完全对称。
不过补光是不能超过基调灯的亮度的。
通常补光的亮度一般是基调灯的一半,若有更多的阴影环境,那么补光和基调灯的值为1:8,如果有多重的补广交替,那么这些补广的总值不能超过基调灯。
电影打光专业词汇 中英对照

电影打光专业词汇中英对照
在电影制作过程中,打光是一项至关重要的技术。
好的打光可以为电影增色添彩,创造出各种氛围和情感。
本文将介绍一些常见的电影打光专业词汇及其英文对照。
1. 主光源(Key Light):这是主要的照明源,用于照亮场景的主要部分或主体。
2. 辅助光(Fill Light):辅助光用来填补主光源产生的阴影,以减少对比度并提供更多的细节。
3. 背景光(Back Light):也称为轮廓光,这种光线从被摄物体背后射来,用以突出其轮廓,使其与背景分离。
4. 顶灯(Top Light):顾名思义,是从上方照射下来的光线,通常用于创造戏剧性效果或者模拟自然光。
5. 底灯(Bottom Light):从下方照射上来的光线,常用于创造恐怖或者神秘的气氛。
6. 硬光(Hard Light):产生明显阴影的强光,通常来自点光源。
7. 软光(Soft Light):产生柔和阴影的散射光,通常来自大面积光源。
8. 额外光(Rim Light):一种用来强调被摄物边缘的光线,通常比主光弱。
9. 色温(Color Temperature):描述光源颜色的物理量,单位为开尔文(K)。
10. 光照强度(Luminance):描述光源发出的光通量的密度,单位为坎德拉每平方米(cd/m²)。
以上就是关于电影打光的一些常见专业词汇的中英对照,希望对电影制作者和爱好者有所帮助。
摄影灯光技术分享第三期|摄影棚的灯光使用·三点布光

摄影灯光技术分享第三期|摄影棚的灯光使用·三点布光 这是我们来聊聊三点布光的思想。
我上学那会三点布光是老师最开始讲的,很多经典的肖像,乃至油画作品都是使用这样的光线的。
后来工作感觉也不知不觉的经常用到,慢慢的我感觉三点布光可能不是一种布光方式,是一种思考方法,几乎我每次拍照都会用到。
三点布光不仅仅是三个灯,即主光、补光、轮廓光或者背景光,是我们拍照的时候要考虑的三个面,主影调、光比、突出主体。
前面咱们聊过一些主光和补光,咱们这回结合第三个要素来聊聊光线。
一般最常用的方式,第三盏灯最常作为轮廓光。
轮廓光第一个作用就是分离出主体,我找遍了自己的照片似乎没有典型用来分离主体的照片,所以用一张不那么经典的好了。
经典肖像中常常使用轮廓光,往往是第一考量是人物一部分进入阴影和背景融合在一起了,有些时候这个样的情况有利于表现人物,也有的情况并不好,比如一些电影海报的抠图,所以我们会使用轮廓光来分离出主体。
比如这张,第一帖里有展示过,这里我是用了一块反光板来起到分离主体和背景的作用。
当然有可能有朋友觉得这个轮廓光加不加都一样,可能从技术层面上看确实没有差别,但是我的感觉是,有轮廓光的情况我的视觉重点更集中在整张脸,包括隐藏在阴影里的视线,这个是我想保留的。
我尝试用ps去掉了左侧的轮廓光,视觉则集中在右面脸,而且感觉整个画面偏右让我很不舒服,个人感觉,大家可以对比一下,选择自己的喜好。
除了作为轮廓光,背景光也是常用的方法,通过照亮背景,分离出主题,比如这张,通过提亮背景、染上颜色来突出完全隐入阴影的主体。
具体颜色的一些简单用法,我们之后还会再聊。
这边还要注意下,要控制色彩在身上留下来的面积,我们需要通过人物和背景的距离来控制,不要离背景太近,不然人身上就是一片红了。
画面的抖动模糊是后期加进去的,希望更有一点动势的感觉。
原帖地址:《摄影灯光技术分享》 有的时候我使用轮廓光是为了复古来模仿早期一些摄影作品的感觉,比如这张,本身并没有技术需要来使用轮廓光,但是针对这组拍摄,一开始就希望通过暖色来模仿复古片子。
三点照明布光方法和布光经验的灯光方案

三点照明布光方法和布光经验的灯光方案三点照明是一种常用的布光方法,通过使用三个灯光源,分别放置在主体物体的背后、侧面和前方,来达到平衡和突出主体物体的效果。
三点照明布光方法可以应用于拍摄照片、电影、舞台等不同场合。
在进行灯光布光时,需要考虑灯光的位置、亮度和颜色等因素,以达到理想的效果。
第一个灯光源通常被称为主灯,它位于主体物体的前方,用于照亮主体的整体轮廓。
主灯可以使用较大的灯泡或灯箱,以提供充足的光源,并可以根据需要进行调节。
主灯的位置和角度应根据主体物体的形状和大小来确定,以确保整体照明效果均衡。
第二个灯光源被称为填光灯,它位于主体物体的侧面,用于填补主灯产生的较强阴影。
填光灯通常应该比主灯的亮度略低,并且角度也应稍微偏离主灯的方向,以避免过度平坦的照明效果。
填光灯可以使用柔和的灯罩或反射板来散射光线,以达到柔和的照明效果。
第三个灯光源被称为背景光,它位于主体物体的背后,用于照亮主体与背景之间的空间,并产生轮廓和分离感。
背景光可以使用强调色调的灯光,以突出背景的色彩和纹理。
背景光的亮度和角度应根据需要进行调整,以达到理想的效果。
除了以上的三点照明布光方法,还有一些布光经验和灯光方案可以帮助摄影师或灯光师在实际拍摄中获得理想的效果。
首先,灯光的颜色可以通过使用不同的滤光片来控制。
滤光片可以改变灯光的色温,使其更加暖色或冷色。
这样可以根据主题和情感效果来选择合适的灯光色温。
其次,可以使用反光板或补光灯来填补由于主灯产生的强烈阴影。
反光板通常是白色或银色的表面,可以将主灯反射到主体物体的阴影区域,从而增加亮度和细节。
补光灯可以放置在强烈阴影的一侧,以提供额外的照明。
此外,还可以使用色彩背景来增加照片或场景的艺术效果。
色彩背景可以通过色彩滤光片、背景灯光或后期处理来实现。
选择合适的色彩背景可以为照片或场景增添丰富的色彩和情感。
在实际布光中,还需要考虑到主体物体的形状、大小和纹理等因素,以及环境的限制和要求。
三点布光法则

三点布光法则导语:三点布光,又称为区域照明,一般用于较小范围的场景照明。
如果场景很大,可以把它拆分成若干个较小的区域进行布光。
一般有三盏灯即可,分别为主体光、辅助光与轮廓光。
一、三点布光法则基础理论一个复杂的场景由100名灯光师分别来布光会有100种不同的方案与效果,但是布光的几个原则是大家都会遵守的。
对于室内效果图与室内摄影,有个著名而经典的布光理论就是“三点照明”。
二、三点布光法则主要作用主体光:通常用它来照亮场景中的主要对象与其周围区域,并且担任给主体对象投影的功能。
主要的明暗关系由主体光决定,包括投影的方向。
主体光的任务根据需要也可以用几盏灯光来共同完成。
如主光灯在15度到30度的位置上,称顺光;在45度到90度的位置上,称为侧光;在90度到120度的位置上成为侧逆光。
主体光常用聚光灯来完成。
笔者喜欢把主体光的亮度设置为240左右。
辅助光:又称为补光。
用一个聚光灯照射扇形反射面,以形成一种均匀的、非直射性的柔和光源,用它来填充阴影区以及被主体光遗漏的场景区域、调和明暗区域之间的反差,同时能形成景深与层次,而且这种广泛均匀布光的特性使它为场景打一层底色,定义了场景的基调。
由于要达到柔和照明的效果,通常辅助光的亮度只有主体光的50%-80%。
轮廓光:又称背光,轮廓光的作用是将主体与背景分离,帮助凸显空间的形状和深度感,它尤其重要,特别是当主体由暗色头发、皮肤、衣服,背景也很暗时,没有轮廓光它们容易混为一体,二者缺乏区分。
轮廓光通常是硬光,以便强调主体轮廓。
三、三点布光法则使用顺序1)先定主体光的位置与强度;2)决定辅助光的强度与角度;3)决定轮廓光的位置与强度;4)分配背景光与装饰光。
这样产生的布光效果应该能达到主次分明,互相补充。
四、三点布光法则注意事项1)灯光宜精不宜多。
过多的灯光使工作过程变得杂乱无章,难以处理,显示与渲染速度也会受到严重影响。
只有必要的灯光才能保留。
另外要注意灯光投影与阴影贴图及材质贴图的用处,能用贴图替代灯光的地方最好用贴图去做。
三点布光法的概念
三点布光法的概念
三点布光法是一种在摄影和电影拍摄中常用的照明技术,用于创造出具有层次感和立体感的画面效果。
三点布光法主要包括三个关键灯光:主光、辅助光和背光。
1. 主光(Key light)是最重要的光源,通常是一个较强的突出光,用于照亮主要被拍摄对象的一侧。
主光能够产生明暗对比,突出物体的形状和纹理。
2. 辅助光(Fill light)用于补充主光的光源。
辅助光通常比主
光暗一些,目的是避免过度的阴影,使画面更加柔和。
辅助光可以来自于反射板、柔光箱或其他光源。
3. 背光(Back light)位于被拍摄对象背后,用于将其与背景
区分开来。
背光能够产生物体周围的轮廓,并为画面增加深度感。
通过合理的主光、辅助光和背光的组合和调整,三点布光法可以有效地塑造被拍摄对象的形状和深度感,使画面具有层次感和立体感。
同时,三点布光法可以根据需要调整灯光的角度、强度和颜色,以达到不同的效果和情绪。
【简易灯光教学】之三点式打光法
【简易灯光教学】之三点式打光法首先给个概念,以摄影来说,光分为环境光及人物光。
三点式打光法基本上是针对人物的人物光。
三点式打光主要有"主光:Key light"、"补光:fill light"、"背光:Back light"。
首先,我们需要一个完全无光线的环境,跟一个人物。
主光,就是指主要光源,我们称之为Key light。
基本上以相机或摄影机在人物正前方时,Key light通常落在人物的右前上方或左前上方15-45度角的位置。
摆放位置左或右皆可啦,但主光通常角度高于人物的头部约15-45度角之间。
只有一盏主光源的情况之下,人物的脸不受光的面会产生比较强烈的暗面。
我想这基本上谁也能够理解,但在没有特殊要求的平面摄影情况之下,通常不会想要人物的脸部产生这样的暗面。
产生暗面的这种时候我们就需要补光。
补光,就是辅助光,我们称之为fill light。
当主光在人物左前上方15-45度角时,通常补光位于人物右前下方也约15-45度角。
基本上就是跟主光相对相反的位置上。
如果主光在左上,补光就在右下。
反之亦然。
基本上都以头部为中心。
上15-45度角,下15-45度角。
补光打下去,基本上就能消除主光在人物上产生的强烈阴暗面。
三点式打光当然不会只有主光跟补光,但其实要拍摄小人的话这样其实就很够了。
背光主要是在实景拍摄的时候,为了要分离人物跟背景打的光源。
背光,顾名思义,光线在人物的背后,我们称之为Back light。
通常位于人物正后方高于头部15-45度角。
基本上背光高于头部,模二的灯没有只能照单面的那种吗?这种向360度都有光的灯实在不是很能凸显出背光的意义(因为背光的意义就是打出人物的轮廓以此分离人物与背景,不过这样打连背景都受光根本分离不了)。
打了正常只有单一方向的背光时,人物的外围轮廓会有明显的光与相较之下是暗的不受光的背景分离。
但因为只有这种360方向都发光的灯...我也没辙,所以连书柜也受光了...背光的意义就...嗯。
三点布光法则

三点布光法则引言在摄影和电影拍摄中,光线是至关重要的因素之一。
通过合理运用光线,可以创造出不同的氛围和效果,使照片或影片更加生动和有吸引力。
其中一种常用的灯光布置技巧就是三点布光法则。
本文将详细介绍三点布光法则的原理、优势以及如何正确应用。
一、什么是三点布光法则?三点布光法则是指通过使用三个灯光源来照亮被摄体,在画面中创造出明暗对比和立体感的一种灯光布置方式。
这三个灯光源分别被称为“主灯”、“补光”和“背景灯”,每个灯光源都有各自的功能和位置。
•主灯:主要用于照亮被摄体的主要部分,通常位于被摄体前方约45度角,并稍微高于被摄体。
•补光:用于补充主灯所产生的阴影部分,使画面更加均匀明亮。
补光通常位于被摄体前方约45度角,并与主灯在同一高度。
•背景灯:用于照亮被摄体后方的背景,以使其与被摄体产生明暗对比。
背景灯通常位于被摄体后方,并稍微高于被摄体。
通过合理配置这三个灯光源,可以在照片或影片中创造出立体感和层次感,使画面更加生动有趣。
二、三点布光法则的优势三点布光法则相比于其他布光方式具有以下优势:1.创造立体感:通过合理运用主灯、补光和背景灯的位置和强度,可以在画面中创造出明暗对比和立体感,使被摄体更加突出。
2.增强层次感:主灯的位置和角度可以使得被摄体在画面中产生阴影和高光部分,从而增强画面的层次感。
3.背景与主题分离:通过使用背景灯照亮背景,可以将背景与被摄体分开,并产生明暗对比。
这种分离能够突出被摄体并凸显主题。
4.提升画面品质:三点布光法则能够使画面更加均匀明亮,并增强画面的细节和质感,从而提升整体画面品质。
三、如何正确应用三点布光法则正确应用三点布光法则需要考虑以下几个方面:1.灯光源选择:选择合适的灯光源是成功应用三点布光法则的关键。
常见的灯光源有闪光灯、连续灯和天然光等。
根据实际情况选择适合的灯光源。
2.灯具位置:主灯、补光和背景灯的位置要根据被摄体和拍摄需求进行调整。
主灯通常位于被摄体前方约45度角,并稍微高于被摄体;补光与主灯在同一高度,也位于被摄体前方约45度角;背景灯位于被摄体后方,并稍微高于被摄体。
国外高级布光教程(图解)

国外高级布光教程【翻】(1/4)初步介绍:一开始看起来关于艺术家如何处理光线的经验非常少:我们经常在白天可以观察出光影效果。
我曾通过数字和口述方式读到或了解到关于光线的问题,并且发现普遍的关于光线处理的资料非常少。
(貌似翻译的有问题:原文I've read countless books dealing with digital and traditional art an d the subject of light only ever seems to be touched on very light ly)然而任何人都希望了解到如何能建立一个基于物理世界里光线所能表现出的效果。
我(笔者)感觉最让人不可接受的是那些3D教科书里重复所写的类似公式一样的布光技巧,抛弃了艺术家对场景的洞察能力方面的培养。
而致使很多数字艺术家们思维禁锢,到使用的时候却把握不准。
而摄影师和画家会对光线的把握要好一些,但是光线对于任何艺术工作者都是很重要的。
没有这部分的了解是很难完成写实效果的,使场景失去大气的感觉。
我在因特网上没有发现关于光线深入介绍的教程实例,那么我决定写下这篇文档。
这里所写的内容都是从我个人角度出发的,所以这篇文档中可能会出现偏漏。
这篇文章里的内容会很精炼,所以不需要拥有专业知识即可顺利阅读,然而我不可能拿全世界的场景来做示范,那么就需要你正确领悟在不同场景里灯光的设置。
第一部分:基础知识我会通篇使用白色的球体和桌面来解释在日常生后中光线的表现力这里有一个模拟光线充足的下午场景。
主光源是太阳,而作为第二光源的大气(SKY)照明会产生非常不一般的特性,而会有一些光线通过桌面等事物的反射来形成第三光源。
从太阳和一些小光源会使光线产生明亮的效果,它们会产生比较锐利的阴影线。
那么第二光源,大气,是一个非常大的光源,它会产生非常柔和的阴影。
我接下来会详细介绍光源和影子,但是现在你要记住光源越小,所产生的影子就越硬。
最常见的6种布光方法 -回复

最常见的6种布光方法-回复标题:最常见的6种布光方法:打造出色的照片效果摄影是一门艺术,而照明则是摄影过程中至关重要的一环。
合适的布光方法能够为照片增添层次感和视觉效果,使照片更加生动。
本文将依次介绍最常见的6种布光方法,为您揭示其中的奥秘。
第一种:明亮平均光(flat lighting)平均光指的是自然光源均匀地照射在整个场景中,不产生明显的阴影和高光。
在使用这种布光方法时,您可以选择朝向光源或者背对光源进行拍摄。
这种布光方法适用于某些特定的拍摄主题,比如商业摄影或者需要突出物体细节的商品拍摄。
但需要注意的是,明亮平均光容易使照片显得平淡无奇,适度的后期处理可以增加画面的活力。
第二种:侧光(side lighting)侧光在拍摄中经常被使用,它能够创造出边缘明暗对比鲜明的照片效果。
通过将光源放置在被摄物体的一侧,可以使主体在一侧明亮,而另一侧形成柔和的阴影。
这种布光方法适用于强调物体的表面细节,增强造型感,比如拍摄人像或者静物。
同时,由于阴影的存在,色彩也会变得更加丰富。
第三种:背光(backlighting)背光是指将光源放置在被摄物体的后方,面对拍摄者。
此时,光线透过物体传过来,形成背景明亮,主体阴影的特殊效果。
背光常常被用于拍摄背光人像,它可以制造出梦幻般的轮廓效果和光晕,给照片增添神秘感。
此外,背光还能够突出透明物体的质感和轮廓。
第四种:聚光灯(spotlighting)聚光灯是一种非常有趣和创意的布光方法,它通过在背景或者主体上使用狭缝状的光源,使注视点集中在特定的区域。
聚光灯可以将注意力集中在被拍摄物体的某个局部,营造出戏剧性的效果。
在使用聚光灯时,需要通过适当调整光源位置和角度来控制阴影的形状和强度。
这种布光方法适用于艺术摄影、舞台摄影等领域。
第五种:环境光(ambient lighting)环境光是指利用场景中已有的自然光源,而不使用其他人工光源进行拍摄的方法。
环境光可以为拍摄带来柔和、温暖、自然的照片效果。
三点布光法

三点布光法,分别是主光辅助光(副光)还有背光一般主光是在摄像机后30或45度位置直照物体,使物体有个照射效果还有阴影,主光的灯一定要勾上阴影效果,选阴影贴图或其他。
光强度要稍微高。
强度越高阴影越明显。
辅助光,也是同样的在相机后面30或45度,不过是在主光另一边,照到主光照不到那片物体。
作用是照主光照不到的暗面,同时辅助主光。
使主光的阴影面不要死死的。
注意不要打开阴影选项。
同时强度要弱。
一般不超0.5,背光,在物体的后面,光线的逆方向打一个泛光灯,作用是柔和主光和辅助光。
使光线变柔和。
强度也要稍微小点。
布光还有几个地方需要特别注意:1)灯光宜精不宜多。
过多的灯光使工作过程变得杂乱无章,难以处理,显示与渲染速度也会受到严重影响。
只有必要的灯光才能保留。
另外要注意灯光投影与阴影贴图及材质贴图的用处,能用贴图替代灯光的地方最好用贴图去做。
例如要表现晚上从室外观看到的窗户内灯火通明的效果,用自发光贴图去做会方便得多,效果也很好,而不不要用灯光去模拟。
切忌随手布光,否则成功率将非常低。
对于可有可无的灯光,要坚决不予保留。
2)灯光要体现场景的明暗分布,要有层次性,切不可把所有灯光一概处理。
根据需要选用不同种类的灯光,如选用聚光灯还是泛光灯;根据需要决定灯光是否投影,以及阴影的浓度;根据需要决定灯光的亮度与对比度。
如果要达到更真实的效果,一定要在灯光衰减方面下一番功夫。
可以利用暂时关闭某些灯光的方法排除干扰对其他的灯光进行更好地设置。
3)要知道MAX中的灯光是可以超现实的。
要学会利用灯光的“排除”与“包括”功能绝对灯光对某个物体是否起到照明或投影作用。
例如要模拟烛光的照明与投影效果,我们通常在蜡烛灯芯位置放置一盏泛光灯。
如果这盏灯不对蜡烛主体进行投影排除,那么蜡烛主体产生在桌面上的很大一片阴影可能要让我们头痛半天。
在建筑效果图中,也往往会通过“排除”的方法使灯光不对某些物体产生照明或投影效果。
4)布光时应该遵循由主题到局部、由简到繁的过程。
浅析影视短片《You_Can't_Be_Hear》夜景布光技巧
影像论坛 / Video Forum在电影创作研究中,高质量的布光设计能提高整部电影的制片质量,渲染故事氛围,协助导演讲述故事。
本文主要采用案例分析法,对短片《You Can't Be Hear》进行分析,通过摄影指导的岗位,围绕故事的夜间场景布光和营造夜景的氛围展开阐述。
首先,通过故事分析来了解故事里对于拍摄现场环境的描述,特别是对于灯光的描述,阐述场景中的灯光和故事的关系。
其次,从实践角度阐述《You Can't Be Hear》从前期灯光策划,灯位图的设置,灯光类型的运用,相机的设置,以及在后期对于夜景灯光的处理。
希望能为布光技巧, 特别是在夜景布光技巧方面的研究进行适当的补充和完善,也为今后实践带来有价值的参考。
前期准备得到剧本时,首先做的事情就是进行剧本分解(script breakdown),把其中有关布光场景描述的句子提取出来,然后进行分析。
分析完后和导演一起在网上找一些和预期效果相同的图片和电影截图作为参考,然后根据照片分析灯光的布置。
在分析的过程中,绘制灯光布置的平面图,确定每个场景、每个位置用什么类型的灯。
在分析完成之后找到灯光师进行讨论,然后开始对布光方案进行分析,最后出一个最终的布光方案。
作品《You Can't Be Hear》创作阐述前期灯光选择以及摄影机设置在前期灯光选择方面,全部选择了ARRI tungsten(钨丝灯),原因是ARRI tungsten(钨丝灯)的显色指数高达99.9%,它在色彩还原方面非常出色,LED灯与其没有可比性。
对于钨丝灯来说,它有着体积小、亮度高、显色性高、色温稳定、无频闪、价格便宜等优点,尤其是它3200K左右的橙色暖光,对于人物肤色的表现比较出众,成为了不少电影中制造暖光源的有效工具,而且搭配上前面特制的菲涅尔透镜可以产生很清晰的影子,光照到的地方亮度也很均匀。
便宜的LED灯显色指数都很低,要达到钨丝灯一样显色指数的灯价格都很高,这就是选择ARRI tungsten(钨丝灯)的原因。
如何布光,是优秀摄影师应该掌握的基本方法

如何布光,是优秀摄影师应该掌握的基本方法史蒂芬·H·布鲁姆(Stephen H.Burum, ASC)为大家细说一种由来已久的技术——利用菲涅尔透镜为演员布光,将其从背景中分离并使阴影细节丰富。
史蒂芬·H·布鲁姆因与导演布莱恩·德·帕尔玛(Brian De Palma)合作的八部令人印象深刻的电影而声名远扬,包括《粉红色杀人夜》、《越战创伤》、《情枭的黎明》和《碟中谍》。
除此之外,他也在让大家记忆犹新的《现代启示录》第二摄制组担任摄影指导工作,以及《斗鱼》和《魅影奇侠》的精美画面也都有他的功劳。
他因《铁面无私》和《玫瑰战争》获美国电影摄影师协会奖提名,《最后巨人》让他又名列奥斯卡奖提名,同时为其斩获美国电影摄影师协会奖。
2008年,ASC协会授予他终生成就奖。
室内场景是大家最难上手的,走进一个漆黑的大房间,所有东西都要你自己去创造。
电影布光通常有三种通用功能。
每个人在给场景打光的时候都至少是为了实现这三种之一。
第一点是制造阴影,生成阴影的光源可以是一个小型的点光源、一个大型柔光光源或介于这两者之间的任何可能性;阴影可以是硬边缘的清晰阴影,也可以是边缘过渡消失的柔和阴影,你们还可以选择根本没有阴影。
通过这些方式去区分天气是晴天还是多云,或是两者之间的任何状态。
”第二点是制造立体感,摄影只能借助一个镜头去看世界,但是你需要让这种二维图像拥有三维质感。
只有一种方法能够达到这一点,那就是在暗部中制造亮部,或在亮部中制造暗部。
举个例子来说,你也许会在某人深色的头部后方加上背光,这样就得到了一个暗部、一点明亮的光晕以及另一个暗部。
再比如人物的肩膀处于暗部,你可能就会对着他肩膀后面的墙面打光。
像这样的平面可以想加进去多少就加多少。
第三点是添加辅助光,辅助光决定了你的视野在暗部中能探究到多深,从而赋予画面某种氛围。
”这是所有电影摄影师都会用到的,就像三原色一样,所有画家都会用三原色,只不过他们会用不同的方式去调色。
人像摄影中的三灯布光

人像摄影中的三灯布光人像摄影中的三灯布光三灯布光在人像的拍摄中运用的是最多的、也是最容易掌握的。
这种三灯布光方法具有变化多、变化快、灵活易掌握的特点,一般都很容易受顾客的接受和欢迎。
下面一起来看看吧!三灯布光的组合形式1.三灯平光布光三灯平光布光方案在人像的拍摄中运用非常广泛,平柔的光线十分适合表现明快、美好、理想、和谐的艺术气氛,但相对立体用光来说,画面的立体感差一些,被摄者容易显胖,运用光线对被摄者塑造的可能性弱一些。
三灯平光布光方案我们又称之为“V”字形布光。
所谓“V”字形布光,就是三盏灯在数码相机的左右各布一盏,在数码相机的下方布一盏,三盏灯形成V字形光位。
V字形的布光适合表现脸型较瘦、面部立体感较强的被摄者,不适合表现脸型较胖的被摄者。
底灯的运用有利于消除被摄者的眼袋和笑沟,使被摄者显得年轻。
在人像摄影中,一般三盏灯都是加柔光箱的柔性光,三灯的光心在摄影中指向被摄者的面部,三灯的强度是相同的,三盏灯的色温也是一致的。
在运用V字形灯光拍摄数码人像时,由于没有背景灯光,如果要使背景的色彩得以如实表现,可以让被摄者尽量靠近背景,用前面三灯的余光照亮背景,定光点靠近背景的准确曝光量。
V字形的布光如果在其中的一盏灯上寻求光质、强度、色温的变化又可产生出一系列新的布光方案大家可以多尝试。
2.主光+辅光+轮廓光布光主光+辅光+轮廓光布光布光法是人像摄影中较传统的一种布光方法,它以表现主体人物为主,对背景和环境都只是用主辅光的余光加以表现。
在这种布光方案中,主光一般都处在前侧光至侧逆光(如45°前侧光、90°侧光、120°侧逆光)之间作一系列变化。
主光的光质一般相对辅光可以硬一些,主光的光位是根据被摄者的表现需要、画面艺术气氛塑造的要求以及画面影调表现等因素来灵活决定,主光的强度一般在画面中相对来说是较强的.,可以根据画面的实际曝光量、主辅光之间的光比、数码相机的感光度等因素来决定的。
国外高级布光教程(34)

国外高级布光教程(34)国外高级布光教程(3/4)光影教程第三部分:自然光源自然光来自四周的环境因素,它们之间的不同点在于广阔程度。
我们所有的自然光都来自于太阳,然而在一天中的不同时间,不同天气,不同的环境可以造就不同的光线硬度,冷暖度。
基本上阳光的介绍在第一部分已经有涉及,然而那是我们设想的完美的大晴天。
这幅图像解释的是晴天的时候上午时分或者下午时分的光照效果,而这是阳光最直接,表现最好的时刻。
然而有个最主要因素会影响到光照效果,那就是天气情况。
像我们第一部分讨论的,在地球大气层中散射着很多短波长的光线,也是这种原因让天空看起来很蓝,虽然太阳是红艳的。
阳光需要穿越的大气层越厚,散射的效果就越明显。
也就是说太阳在空中的位置越低,光照需要穿越的大气层越厚,也就是说一天中开始和结束的时候散射会很厉害。
也就是说在一天中的不同时间,天空会呈现出不同的情况。
不过我们需要有个必要条件就是太阳没有落山之前,这样才能呈现出以上的效果。
云层也基于两个因素,颜色和阳光邢台,来影响光照,同时云层是透明的,也就是说光线可以通过云层穿越过去,但是同时也会被固有色影响。
当光线穿越透明透明度高的面时,比如说玻璃,光线就会平行穿越,然而通过什么方式可以让光线偏移,分散出多数光线。
大气层蓝天效果的产生就可以做为例子,然而,云层会影响到任何波长的光线,不仅仅是短波光。
事实上阳光会被云层柔化,因为一个稍硬的光源(太阳)被设置到一个大的柔光区域(整个天空)而云层存在与天上,同时太阳光也来自天空。
所以得到的光线会很柔和。
中午的阳光当太阳光位于全天中最高的时候,光线会变得最白,最亮。
对比会非常的高,影子也会很深,那么影子部分的细节会变得很黑 - 即使用肉眼观测也很难看到影子里的细节。
而这种布光方式是用来处理强对比度的效果的。
强光会使固有色削弱,中午时分的阳光相比其他时间而言会让图像看着饱和度不高。
高对比度让影像很难产生细节,然而相比而言低调自然的照片会让人感觉舒服。
- 1、下载文档前请自行甄别文档内容的完整性,平台不提供额外的编辑、内容补充、找答案等附加服务。
- 2、"仅部分预览"的文档,不可在线预览部分如存在完整性等问题,可反馈申请退款(可完整预览的文档不适用该条件!)。
- 3、如文档侵犯您的权益,请联系客服反馈,我们会尽快为您处理(人工客服工作时间:9:00-18:30)。
Three Point Lighting: Learn How to Use the Key, Fill, and Back Lights Three point lighting is the standard lighting technique used in video. It’s a good idea to become comfortable with three point lighting because as a video shooter, you’ll find yourself using it over and over again.It has the power to transform an otherwise boring and flat image into a dynamic interesting image with a subject that “pops”.It’s not as difficult as you might think to use the 3 point lighting technique, and in this article, I’ll share with you what I’ve learned…Three Point Lighting Adds DimensionThe goal of three point lighting is to create the illusion of a three-dimensional subject in atwo-dimensional image. While you can create dimension a number of different ways, there’s no doubt that using light and shadow is a powerful way to accomplish this, and three point lighting is the lighting technique most commonly used.What are the three points of light we’re talking about?∙The Key Light– This is the main light used on your subject.∙The Fill Light– The purpose of this light is to fill in the shadows created by the key light, preventing them from getting too dark.∙The Back Light– This is used to separate the subject from the background.The Key Light is the Main Light in a 3 Point Lighting SetupWhen I’m arranging lights, I like to place the key light first be cause it’s the main one, and I use the rest of the lights to “support” the key light.The purpose of the key light is to put the light on the subject. You can place it anywhere you want, but a common placement is about 45 degrees to either side of the camera, and about 45 degrees up from the subject.Which side of the camera should you place it on? It depends on the look you’re going for. You can get as creative as you want with this. First, let’s cover the common placement of the key light, and then let’s cover some more creative fun placements.A good rule of thumb if you’re trying to create a standard look…Whichever way the subject is facing in the frame, put the key light on that side of the camera. Let’s consider an example. Imagine that you’re shooting video of a standard talking head, and they’re facing the left side of the frame. In this case, you would put the key light on the left side of the video camera as well.Incidentally, this style of lighting is called “short lighting” because if you divide the subject’s face in half with an imaginary line, this kind of lighting illuminates the short side of the face, leaving the broad side of the subject’s face (the side of the face closest to the camera) in shadow.If you were in an interview situation, you would place the camera first. Then have the the interviewer sitting to the left of the camera’s position, and then have the key light to the left of the interviewer (assuming the interviewer is off camera). This lights the far side of the subject’s face and causes your subject to look toward the left side of the frame, because that’s where the interviewer is.Key Light Placements: Creative OptionsIf you’re feeling creative, try placing the key light at different angles and elevations. You can put the key light off to one side of the subject, nearly straight out to the side, and illuminate only half of their face. This is called “side lighting” because…well…they’re lit from the side. If you’re shooting a film, you might use side lighting to symbolically represent the conflict the character is feeling. Or you could also just do it because it looks amazing, and then people will think you did it to symbolize conflict. (Accidental genius!)You could also try placing the key light at a high elevation, angled higher above your subject’s head but pointing down toward your subject. This placement would create deep shadows in their eye sockets —usually an undesirable look—but if you’re trying to make the subject look sinister for some reason, you might like this technique. Maybe you’re interviewing them for a documentary because they’re a prison convict, or maybe they’re a politician (couldn’t resist this one), and you want them to appear ominous.As viewers, we’re always intrigued when we can’t see the subject’s eyes. We don’t trust them. Or they might seem dead to us. (What else has dark shadows in the eyes and mouth? Answer: Skulls. Ooh.) While you’re at it, you might have a reason to place the key light low below the subject, and then point it up toward them. This lights the chin and the underside of the nose. It casts shadows in the opposite direction we’re accustomed to seeing them. Because it’s so strange, it makes the viewers feel unsettled.Think of all the times you told ghost stories in the dar k with only a flashlight under your chin. It’s a freaky look that can make your subject appear evil. Or just highly dramatic.You probably wouldn’t have to think too hard to come up with reasons for using this kind of lightingin a film…Two men plotting an assassination around a campfire, or one man threatening another man over a dinner table lit only by a candle on the surface beneath them. You get the idea. This can be a fun look to play with.Another frequent placement for a key light is behind the subject. This places the entire subject in shadow which we commonly call a silhouette. You can intentionally use this look to create a dramatic image, to keep the subject anonymous, or to de-emphasize the subject for whatever reason. Finally, another common placement —and the most boring— is right in front of the subject. The light might be directly above the camera, pointing toward the subject. This is called flat video lighting. It appears to widen the face, fills in shadows caused by wrinkles, and is the least dramatic style of lighting. This kind of lighting is sometimes called “glamor lighting” because on models it can enhance the look of their face, but my experience is that on most people, it just makes them look flat and boring, without character.So where should you put the key light? Anywhere you want it—depending on the look you’re trying to get. You have total freedom, so play with it and see what looks you like.The Fill Light: The Second Light in 3 Point LightingWhen you turn on the key light and nothing else, you might find that the overall look of the image is too dramatic and contrasty. There might be too many deep shadows. That’s where the fill light comes in. The purpose of the fill light is simply to fill in the shadows caused by the key light.One thing to be cautious about —the fill light should not create a second shadow. If you see two shadows, that means the fill light is too powerful and needs to be reduced.You can reduce the light a number of different ways. Some lights can be dimmed (for example, some LED and fluorescent lights) without changing the color temperature of the light. But it’s more common that you need to either move the light further from the subject, or put scrims or diffusion material over the light. You could also remove some bulbs or change the bulb to a less powerful one, but that means you’ll have to wait for it to cool off. That could take a while, so it’s usually faster to move the light away from the subject or put a scrim on it.Scrims are designed to reduce the light without softening it. They basically look like a net made out of metal. If you have professional video lights, you can probably purchase scrims as accessories for your specific video lighting equipment.You can also use neutral density gels to reduce light.These “gels” are semi-transparent gray sheets that you can put over the light to reduce the light without changing its color.Why am I spending so much time discussing reducing the intensity of the fill light? If you’re using a separate light f ixture for the fill light, then there’s a good chance you’ll end up wanting to reduce the light at some point. This seems to be a common adjustment for me. The look you like might bedifferent than the look I like, but I usually want some fill light in the shadows, but not too much — so I end up having to reduce the light.Other Options for the Fill LightYou don’t have to use a separate light as a fill light.If you’re trying to save money with your setup, this is a good place to do it. You can simply use something that reflects light from the key light and then bounce the light back toward the subject and into the shadows. This reduces the shadow darkness and creates the same effect as a fill light.Common tools for this are reflectors and white foam core boards. Reflectors are great because they tend to be very portable. Many of them collapse the same way a windshield sunscreen for your car might collapse. This makes them very easy to transport.White foam core boards are great because they’re inexpensive and they’re pretty stiff. If you’re using them to reflect sunlight outdoors, they don’t shake in the breeze the way a collapsible reflector tends to shake. The downside is foam core boards don’t collapse, so they’re more difficult to take with you, and the y tend to fall apart after a few uses. They’re not robust at all, so you’ll find yourself making frequent trips to the craft store to get new ones. (Hint — Buy a bunch at a time. I get mine for less than two dollars each.)But really you could use any reflective material as a fill light. You just want to make sure that 1) it doesn’t introduce any color into the shadow – which is why white foam core works better than green foam core —and 2) it doesn’t reflect too much light, which is why I would use a mirro r or aluminum foil as a key light and not so much for a fill light.It’s hard to go wrong with a fill light. Use it to fill in the shadows a little, or a lot, depending on the look you’re going for.Placing the fill light is pretty easy. It’s usually oppos ite the side of the camera from the key light. For example if the key light is to the camera’s left, then the fill light (or “fill source” if you’re using a reflector, which is a common thing) is off to the camera’s right.By the way, if you’re using a ref lector, you might need to get it in there pretty close to the subject without letting it show in the frame. This is where having assistants and C-stands can come in handy because it’s nearly impossible to hold the reflector in place AND operate the video c amera at the same time.The Back Light: The Third Light in 3 Point LightingI love back lights. I love the glowing rim they create around the hair and shoulders of the subject. I know many people argue against using them because in real life people don’t w alk around with a glowing halo around their head and shoulders. That’s true, but it doesn’t matter to me. I still love the look, and so I use it —unless I think I shouldn’t, and then I don’t.Here’s how you create a back light — You put a light behind your subject, usually suspended on the end of a horizontal arm attached to a C-stand or sturdy light stand (with sandbags on the base to keepit from toppling over). You place the light above their head and behind them so it points about 45 degrees down toward their hair and back.It’s extremely helpful to have barn doors on this light, so you can control the direction of the light and prevent it from accidentally spraying light in the camera lens. This would reduce the contrast in your image and maybe even create lens flare. That’s a problem you usually don’t want, so barn doors (or a snoot, if you’re feeling snooty —sorry, couldn’t resist that one either) can go a long way toward reducing spill light, which is light spilling into unwanted places, such as the camera lens. The only place you want this light is on the head, neck, and shoulders of your subject (for a talking head shot). How about a few tips and tricks for using the back light? Here’s a good one. Attach this light to a dimmer.If it’s a tungsten light, then as you dim it down, it will become redder, but that’s okay because this can actually look pretty awesome in a back light. Plus, you’ll find that controlling the intensity of this light is a common thing you’ll want to do. If the subject’s hair and clothing are dark, then you’ll have to really turn up the back light to mak e it show up at all. If their hair and clothing are light (such as a blond in a white shirt), then you’ll want to reduce the back light a lot.If you don’t want to dim it, you can also reduce the light’s intensity by dropping a scrim in front of it. Of course, you can also use the neutral density gel or diffusion paper I mentioned earlier. I usually use a combination of the dimmer with a sheet of diffusion paper, simply clipping the paper to the light’s barn doors with some clothespins. This softens the lig ht a little while also reducing the intensity.But once again, you should make these decisions based on the look you like. If you like blown out hair, then crank that thing up all the way. Just be careful, clients may not like it. ;)A Common Misconception with Three Point LightingThe truth is you don’t really need three separate lights to use 3 point lighting. Here’s a common technique that actually requires zero lights…Go outside in the late afternoon, early evening, when the sun is about 45 degrees up in the sky, and shoot video of a friend. Place your friend with their back to the sun, and you put your camera in front of them. With the sun behind them, they’ll have a beautiful glow around their hair and shoulders. This gives the effect of the back light in a 3 point lighting setup. The sun is the back light.Now have someone hold a reflector off to the side, out of the frame. Reflect some of the sunlight into your friend’s face (use the white side of the reflector, not the shiny mirror side —you don’t want to blind them!). This reflected light acts like a key light to model their face.What about the fill light? Nature will do its job. The sunlight will reflect off the grass, off the sidewalk, off the sky and clouds, creating an ambient light that will help fill in the shadows. See? You have now created a three point lighting setup without having to purchase any lights.That said, if you want full control over the lights indoors, you probably want to purchase (or rent) one light to be your key light, a reflector or a foam core board to be the fill source (fill light), and a separate smaller light to be the back light behind your subject.Three Point Lighting is That EasyJust like everything in video, the more you practice 3 point lighting, the more you’l l learn how to use it, and the more fun you’ll have experimenting. I encourage you to practice the traditional approaches, but also to play and have fun with nontraditional methods. For me, discovering new things is a lot of the fun of shooting video.。
