产品说明书(雅阁台灯)
小台灯的说明书怎么写

小台灯的说明书怎么写
小台灯的说明书怎么写
小台灯的说明书怎么写
1、充电时,把台灯的电源线两孔一头完全插入台灯的AC插座,并将电源线带插头的一端直接插入AC90~240V电源插座上,相应充电指灯亮,表示台灯处于充电状态,充足电约12个小时。
2、按动开关即可控制台灯的强光和弱光及开或关。
3、将开关按到一档的位置时.充满电可连续使用10个小时,将开关按到二档位置时充满电可连续使用5个小时,将开关按到一档的位置时将会点亮8个LED 亮弱光。
将开关按到二档位置时将会点亮16个LED亮强光。
4、使用时本产品与一般台灯可放在平面使用外,还具有夹在支撑物上和挂在墙上使用的功能,灵活又方便。
5、在使用过程中,当LED灯泡亮暗淡时,电池趋于完全放电状态,此时,为保护电池,应停止使用,并必须及时充电,不应在LED灯泡无光时才充电,这时电池极易损坏失效。
6、台灯应经常充电使用,请勿长搁置。
如不经常使用,请每存放三个月内补充电一次约8个小时,否则会降低电池寿命。
台灯使用说明范文

台灯使用说明范文
一、安装
1、请检查台灯本身的安全性和质量,确保台灯安全可靠,以免发生
意外。
2、将台灯安装在安全和牢固的墙上,以防止台灯受到重击,地板和
地面的上升。
3、确保台灯与电源间距足够,以免受到电击。
4、请勿使用湿润的环境装置和摆放台灯,避免发生短路。
二、使用
1、按下电源开关,台灯将自动启动发光功能,可以根据实际需要进
行调光或颜色切换。
2、若需要改变台灯的高度,请在拧旋转调节之前,先断开电源,然
后进行调整。
3、避免将台灯安装在湿润或多震动的地方,以免影响正常发光。
4、定期清洁台灯,清洁台灯时,请勿直接取出电器,以免引起电路
发热或短路,以及其他不安全因素。
三、安全
1、当台灯本身或部件出现异常时,请立即停用,并及时修理或更换。
2、请勿尝试拆卸台灯本身。
3、请勿将台灯接入非家庭用电源,以免引起火灾或短路。
4、请谨慎使用台灯,以免发生火灾或人身伤害。
四、保养
1、定期检查台灯,查看是否有松动现象,如有松动现象,请及时紧固或更换部件。
2、定期清洁台灯,请勿使用拭湿物进行清洁,以免影响台灯的性能和使用寿命。
八代广本雅阁使用说明书
广州本田雅阁用户手册舒适与方便设施定速巡航控制安全系统音响系统音响系统(B型)音响系统(A型)电子钟调节声音音响系统遥控装置车内空气环境控制系统出风口控制自动操作半自动操作关闭所有的装置温度独立控制阳光传感器/温度传感器仪表与控制装置座椅加热装置车内照明灯烟灰盒点烟器梳妆镜遮阳板硬币盒饮料架附件电源插座中央储物盒中央口袋太阳镜托架扶手手刹车后视镜调节电动后视镜电动后视镜加热器天窗电动车窗折叠后排座椅后排座椅扶手座椅调节前排座椅的手动调节驾驶员座椅高度的手动调节驾驶员座椅的电动调节驾驶员腰部的支撑头枕钥匙与锁钥匙遥控器防盗启动锁止系统点火开关电动车门锁儿童安全门锁行李箱杂物箱方向盘附近的控制装置前大灯前、后雾灯转向信号仪表盘亮度风挡玻璃刮水器风挡玻璃洗涤器危险警告后窗除霜装置方向盘的调节仪表车速表转速表里程表行程表冷却液温度表燃油表指示灯控制位置驾驶员与乘员的安全气囊的补充资料补充安全注意事项正面气囊是如何工作的侧面气囊是如何工作的侧面气囊截止指示灯是如何工作的气囊的维修保养SRS组件SRS指示灯是如何工作的成年人保护措施关好车门调整前排座椅调整座椅靠背调整头枕扣紧并调整座椅安全带调整方向盘保持正确坐姿对孕妇的忠告补充安全注意事项安全标牌一氧化碳中毒的危险性座椅安全带的补充资料座椅安全带系统的组件三点式安全带座椅安全带自动张紧器座椅安全带的保养儿童保护措施必须安置好全部儿童乘员儿童应该被安置在后排座椅上乘员侧正面气囊对儿童具有严重的危险性必须搭载多名儿童乘员时儿童需要贴身照顾时补充安全注意事项使用儿童保护装置的一般准则婴儿保护措施幼龄儿童保护措施大龄儿童保护措施侧面气囊对儿童具有严重的危险性车辆的安全设施气囊座椅和座椅靠背头枕驾驶前安全检查表座椅安全带重要安全注意事项车辆简介索引驾驶之前附件与改装节省燃油驾驶习惯车况运载行李在加油站的操作开启发动机罩给燃油箱加油汽油磨合阶段驾驶准备驾驶手动变速器推荐的换档点最大容许速度起动发动机在高海拔冷天气下起动自动变速器换档杆位置指示灯换档操作杆的位置最大容许速度换档锁定解除驻车制动系统制动器磨损指示器制动系统的设计防抱死制动装置车辆稳定性辅助(VSA)系统VSA关闭开关在恶劣天气下行驶牵引拖车保养灰尘与花粉滤清器正时皮带车辆的存放车灯更换灯泡轮胎充气检查保养轮胎换位更换轮胎与车轮车轮与轮胎冬季轮胎防滑链传动带空调系统刮水器刮片蓄电池火花塞(6缸车型)更换规格火花塞(4缸车型)更换规格发动机罩锁扣燃油滤清器空气滤清器滤芯动力转向制动液与离合器液制动系统离合器系统变速器油自动变速器手动变速器风挡玻璃洗涤器冷却系统添加发动机冷却液更换发动机冷却液发动机机油添加机油推荐使用的机油添加剂更换机油与滤清器油液位置用户保养检查规定的保养记录定期保养表外观保养防腐蚀内部保养地毯地席编织物维尼龙皮革座椅安全带车窗空气清新剂外部保养洗车打蜡铝合金车轮漆面的修补处理意外事故紧急牵引保险丝检查与更换保险丝关闭天窗制动系统指示灯故障指示灯充电系统指示灯低机油压力指示灯发动机过热助推起动如果不能起动发动机根本无法起动或者起动机运转太慢起动机运转正常更换漏气轮胎技术数据三元催化转化器规格识别代号所示为未配备导航系统的自动变速器车型。
看说明书做玩具小台灯

《看说明书做玩具小台灯》设计教学目标1.引导学生认识说明书,体会说明语言的特点。
2.找出说明书不妥之处,修改说明书。
教学重难点1.修改说明书。
2、学习说明方法。
教学过程一、激活生活1.可以说,我们每一个同学都是伴着玩具长大的。
请同学们回忆一下,你曾亲手制作过玩具吗?是怎样制作的?能从制作玩具的名称、材料、步骤等几个方面简单介绍一下吗?2.生回忆想象。
3.指名说说。
(可引导学生按照固定的句式练说,如:我曾经制作过,它需要的材料有,制作步骤分为。
)二、认识、研读说明书1.今天,我们就来看一份说明书制作一个玩具小台灯。
2.出示说明书,生自由读,边读边想象制作过程。
3.根据自学提示,小组研读说明书。
自学提示:(1)说明书从哪两方面介绍?(材料、做法。
)(2)说明书给我们介绍了四种材料,你在准备材料的过程中,认为有哪些地方交代的不够清楚、明白?(3)说明书给我们介绍了制作玩具的三个步骤,如果让你制作,在制作过程中,会有什么样的困难或迷惑?4、小组讨论。
5、汇报展示。
A、逐种材料研读。
半个乒乓球——如何能获得半个乒乓球?(要从交代清楚如何获得半个乒乓球的工具开始,如钢锯、乒乓球。
)一个瓶盖——瓶盖的大小。
一段铅丝——铅丝的长短、粗细。
(瓶盖的大小,铅丝的长短、粗细要与乒乓球所做的灯罩配合适中。
)B、说明书给我们介绍了制作玩具的三个步骤,如果让你制作,在制作过程中,会有什么样的困难或迷惑?第一步:在半个乒乓球中间钻个小洞,做灯罩。
(如何钻小洞?钻多大的小洞?)第二步:把铅丝的另一头插进乒乓球的小洞里。
把洞的两边粘牢。
铅丝的一头用红橡皮泥做一个小灯泡。
(铅丝的另一头是从里面还是从外面插进乒乓球的小洞里?)5、师归纳总结:(1)材料和工具制定不全。
(2)材料规格交代不清楚。
(3)制作过程交代简单。
(4)制作的步骤交代不清。
三、修改说明书。
1、有两个同学分别制作了教材中图一、图二两盏小台灯。
(出示简图。
)请思考:(1)两个同学做的台灯,哪一个做对了,哪一个做错了?(2)对照做法说明看一看,做错的那位同学是哪一步没有做对?在说明中把他没对的那一步画下来。
07款雅阁阅读灯说明

07款雅阁阅读灯说明
07款雅阁阅读灯说明
简介
•本文详细介绍了07款雅阁的阅读灯功能和使用方法。
功能特点
•雅阁07款配备了高性能阅读灯,为乘客提供舒适的阅读体验。
•阅读灯具有独立开关,可以根据需求自由调节光线亮度。
•阅读灯采用LED照明技术,具有节能环保的特点。
使用方法
1.找到车厢顶部中央的阅读灯开关。
2.将阅读灯开关拨至“开”位,即可点亮阅读灯。
3.长按阅读灯开关,可以逐渐调节光线亮度,满足个人需要。
4.阅读完毕后,将阅读灯开关拨至“关”位,灯光即可熄灭。
注意事项
•阅读灯使用过程中,请勿使灯光直接照射驾驶员,以免影响安全驾驶。
•阅读灯使用过程中,请避免将灯光直接照射乘客眼睛,以免造成不适。
•阅读灯使用时间过长会消耗车辆电池电量,请适度使用。
总结
•07款雅阁的阅读灯提供高性能照明功能,为乘客创造良好的阅读环境。
•使用简便,可根据需要调节光线亮度。
•在使用过程中请注意安全和舒适,避免对驾驶员和乘客造成不适。
车载灯具产品说明书

©2007 Whelen Engineering Company Inc.Form No.14139A (072809)For warranty information regarding this product, visit /warranty•Proper installation of this product requires the installer to have a good understanding of automotive electronics, systems and procedures.•Whelen Engineering requires the use of waterproof butt splices and/or connectors if that connector could be exposed to moisture.•Any holes, either created or utilized by this product, should be made both air- and watertight using a sealant recommended by your vehicle manufacturer.•Failure to use specified installation parts and/or hardware will void the product warranty.•If mounting this product requires drilling holes, the installer MUST be sure that no vehicle components or other vital parts could be damaged by the drilling process. Check both sides of the mounting surface before drilling begins. Also de-burr the holes and remove any metal shards or remnants. Install grommets into all wire passage holes.•If this manual states that this product may be mounted with suction cups, magnets, tape or Velcro®, clean the mounting surface with a 50/50 mix of isopropyl alcohol and water and dry thoroughly.•Do not install this product or route any wires in the deployment area of your air bag. Equipment mounted or located in the air bag deployment area will damage or reduce the effectiveness of the air bag, or become a projectile that could cause serious personal injury or death. Refer to your vehicle owner’s manual for the air bag deployment area. The User/Installer assumes full responsibility to determine proper mounting location, based on providing ultimate safety to all passengers inside the vehicle.•For this product to operate at optimum efficiency, a good electrical connection to chassis ground must be made. The recommendedprocedure requires the product ground wire to be connected directly to the NEGATIVE (-) battery post (this does not include products that use cigar power cords).•If this product uses a remote device for activation or control, make sure that this device is located in an area that allows both the vehicle and the device to be operated safely in any driving condition.•Do not attempt to activate or control this device in a hazardous driving situation.•This product contains either strobe light(s), halogen light(s), high-intensity LEDs or a combination of these lights. Do not stare directly into these lights. Momentary blindness and/or eye damage could result.•Use only soap and water to clean the outer lens. Use of other chemicals could result in premature lens cracking (crazing) and discoloration. Lenses in this condition have significantly reduced effectiveness and should be replaced immediately. Inspect and operate this product regularly to confirm its proper operation and mounting condition. Do not use a pressure washer to clean this product.•It is recommended that these instructions be stored in a safe place and referred to when performing maintenance and/or reinstallation of this product.•FAILURE TO FOLLOW THESE SAFETY PRECAUTIONS AND INSTRUCTIONS COULD RESULT IN DAMAGE TO THE PRODUCT OR VEHICLE AND/OR SERIOUS INJURY TO YOU AND YOUR PASSENGERS!A u t o m o t i v e : Warnings to InstallersWhelen’s emergency vehicle warning devices must be properly mounted and wired in order to be effective and safe. Read and follow all of Whelen’s written instructions when installing or using this device. Emergency vehicles are often operated under high speed stressful conditions which must be accounted for when installing all emergency warning devices. Controls should be placed within convenient reach of the operator so that they can operate the system without taking their eyes off the roadway. Emergency warning devices can require high electrical voltages and/or currents. Properly protect and use caution around live electrical connections.Grounding or shorting of electrical connections can cause high current arcing, which can cause personal injury and/or vehicle damage, including fire. Many electronic devices used in emergency vehicles can create or be affected by electromagnetic interference. Therefore, after installation of any electronic device it is necessary to test all electronic equipment simultaneously to insure that they operate free of interference from other components within the vehicle. Never power emergency warning equipment from the same circuit or share the same grounding circuit with radio communication equipment. All devices should be mounted in accordance with the manufacturer’s instructions and securely fastened to vehicle elements of sufficient strength to withstand the forces applied to the device. Driver and/or passenger air bags (SRS) will affect the way equipment should be mounted. This device should be mounted by permanent installation and within the zones specified by the vehicle manufacturer, if any. Any device mounted in the deployment area of an air bag will damage or reduce the effectiveness of the air bag and may damage or dislodge the device. Installer must be sure that this device, its mounting hardware and electrical supply wiring does not interfere with the air bag or the SRS wiring or sensors. Mounting the unit inside the vehicle by a method other than permanent installation is not recommended as unit may become dislodged during swerving; sudden braking or collision. Failure to follow instructions can result in personal injury. Whelen assumes no liability for any loss resulting from the use of this warning device. PROPER INSTALLATION COMBINED WITH OPERATOR TRAINING IN THE PROPER USE OF EMERGENCY WARNING DEVICES IS ESSENTIAL TO INSURE THE SAFETY OF EMERGENCY PERSONNEL AND THE PUBLIC.Warnings to UsersWhelen’s emergency vehicle warning devices are intended to alert other operators and pedestrians to the presence and operation of emergency vehicles and personnel. However, the use of this or any other Whelen emergency warning device does not guarantee that you will have the right-of-way or that other drivers and pedestrians will properly heed an emergency warning signal. Never assume you have the right-of-way. It is your responsibility to proceed safely before entering an intersection, driving against traffic, responding at a high rate of speed, or walking on or around traffic lanes. Emergency vehicle warning devices should be tested on a daily basis to ensure that they operate properly. When in actual use, the operator must ensure that both visual and audible warnings are not blocked by vehicle components (i.e.: open trunks or compartment doors), people, vehicles, or other obstructions. It is the user’s responsibility to understand and obey all laws regarding emergency warning devices. The user should be familiar with all applicable laws and regulations prior to the use of any emergency vehicle warning device. Whelen’s audible warning devices are designed to project sound in a forward direction away from the vehicle occupants. However, because sustained periodic exposure to loud sounds can cause hearing loss, all audible warning devices should be installed and operated in accordance with the standards established by the National Fire Protection Association.Safety FirstThis document provides all the necessary information to allow your Whelen product to be properly and safely installed. Before beginning the installation and/or operation of your new product, the installation technician and operator must read this manual completely. Important information is contained herein that could prevent serious injury or damage.WARNING: This product can expose you to chemicals including Methylene Chloride which is known to the State of California to cause cancer, and Bisphenol A, which is known to the State of California to cause birth defects or other reproductive harm. For more information go to .Installation Guide:Traffic Advisor™ (Arrow Style):Model(s) RF125NF1, RF125NF2,RF165NF1, RF165NF251 Winthrop RoadChester, Connecticut 06412-0684Phone: (860) 526-9504Internet: Salese-mail:*******************CustomerServicee-mail:*******************®ENGINEERING COMPANY INC.Installation:Caution: Permanent mounting of this product will require drilling. It is absolutely necessary to make sure that no other vehicle components could be damaged by this process. Check both sides of the mounting surface before starting. If damage is likely, select a different mounting location.IMPORTANT: It is the responsibility of the installation technician to make sure that the installation and operation of this product will not interfere with or compromise the operation or efficiency of any vehicle equipment!1.Place the Traffic Advisor™ in its mounting position on the mounting surface making sure the arrow is level. Mark the 4 bolt locations onto the mounting surface (2 mounting bolts per side).2.Remove the Traffic Advisor from the mounting surface and drill the 4mounting holes using a drill sized for the 3/8” bolts.3.Install the mounting hardware onto the bolts in the order shown and mount the Traffic Advisor™ to the vehicle (Fig. 1).IMPORTANT: When you are routing wires, the existing, factory wire harness should be followed whenever possible. The existing harness has been positioned so no wires will be damaged by vehicle operation. The factory harness may include a service loop that will keep the wires from being damaged or broken by the movement of the dump body.Wiring:WARNING!All customer supplied wires that connect to the positive terminal of the battery must be sized to supply at least 125% of the maximum operating current and FUSED at the battery to carry that load. DO NOT USE CIRCUIT BREAKERS WITH THIS PRODUCT!Wire Connections:1.Splice the RED and RED/WHT wires together, then extend this single wire to the battery and install a 15 amp fuse block (customer supplied) to the end of the wire. Remove the fuse before connecting any wires to the battery. Connect the wire to the POSITIVE (+)battery terminal.IMPORTANT: There must not be more than 2 feet of wire between fuse block and battery. The wire between fuse and battery is unprotected, do not allow this wire to come in contact with any other wires.2.Splice the BLACK and BLK/WHT wires together, then extend this single wire to the battery and connect it to the battery ground. If your vehicle has a cable extending from the negative terminal of the battery to the chassis, it is best to attach the black wire at the chassis connection.Operation:The operation of this TA is controlled by the Whelen wireless Traffic Advisor™ controller. Refer to the instructions that come with the controller for operation.Service:This section shows you how to access the lightbar for service or lighthead replacement.To replace a lighthead,first loosen the set screw(s) on the bracket.Now squeeze the clip together so that it disengages from the extrusion and pull the bracket straight out.With the bracket removed the lighthead lifts out and can be unplugged from the harness and removed from the lightbar.IMPORTANT! Before returning the vehicle to active service, visually confirm the proper operation of thisproduct, as well as all vehicle components/equipment.。
台灯说明书

机电与车辆工程学院《Pro/E三维机械设计》专业:____________________________________班级:___________________________________姓名:___________________________________学号:___________________________________任课教师:_______________________________日期:学习台灯一、台灯体的三维实体建模1单击"文件“工具栏中的“新建文件汀的按钮,选择“零件“模块,在“名称“ 文本框中输入“ taidengti",取消“使用缺省模板”复选框,点击“确定”按钮,选择u mms_part.solid\在单击“确定”按钮,进入零件设计环境。
2点击"草绘工具“命令,弹出"草绘"对话框,选取u FRONT"基准面为绘图平面,使用默认的参照面,进入草绘环境,绘制如图1所示的矩形。
3完成草绘后,将此截面拉伸,深度为20. 00,生成如图2所示的长方体。
4点击"草绘工具”命令,弹出"草绘會对话框,选取长方体顶面为绘图平面,右侧面为u Right"参照面。
进入草绘坏境后,绘制如图3的截面。
5、完成图3的草绘后,拉伸此截面,拉伸深度为20.00。
拉伸方向改为箭头向下,点击“建造特征”命令,系统生成图4所示的拉伸体。
6、插入“倒圆角”命令,将当前设计环境中设计对象的四条边上倒上半径为20.00的圆角。
再次插入“倒圆角”命令,将当前设计环境中设计对象的两条边倒上半径为30. 00的圆角。
系统生成如图5所示的图形。
7、点击“草绘器工具”工具条中的“可变剖面扫描工具”,系统打开“扫描特征”工具条,单击该工具条的“扫描为实体”命令;然后点击“草绘工具”命令,弹出“草绘”对话框;再单击“基准平面工具”命令。
本田雅阁实用操作手册
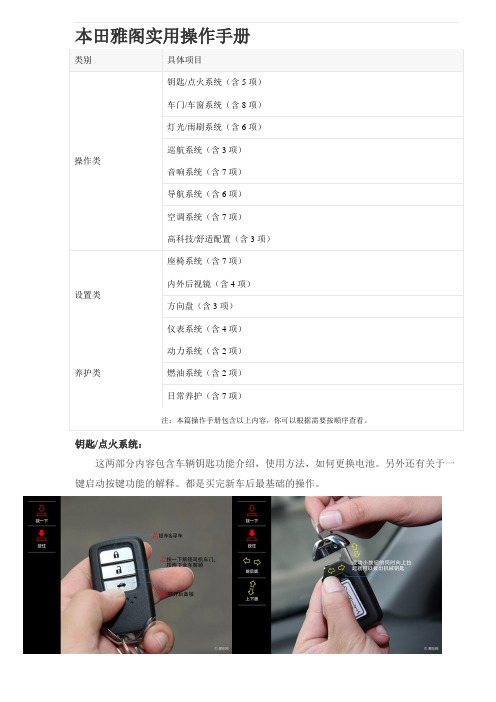
本田雅阁实用操作手册类别具体项目操作类钥匙/点火系统(含5项)车门/车窗系统(含8项)灯光/雨刷系统(含6项)巡航系统(含3项)音响系统(含7项)导航系统(含6项)空调系统(含7项)高科技/舒适配置(含3项)设置类座椅系统(含7项)内外后视镜(含4项)方向盘(含3项)仪表系统(含4项)养护类动力系统(含2项)燃油系统(含2项)日常养护(含7项)注:本篇操作手册包含以上内容,你可以根据需要按顺序查看。
钥匙/点火系统:这两部分内容包含车辆钥匙功能介绍,使用方法,如何更换电池。
另外还有关于一键启动按键功能的解释。
都是买完新车后最基础的操作。
车门/车窗/后视镜控制:此部分主要介绍了如何使用无钥匙进入,机械钥匙使用方法,各种车窗控制功能,比如一键升级和锁止,电动外后视镜调节、折叠,后备箱如何开启等。
多功能方向盘/仪表指示灯含义/灯光/雨刷控制:这部分讲的都是日常用车最容易涉及的功能,尤其多功能方向盘是很多车主不完全清楚的。
仪表指示灯含义同样如此,通过读懂仪表,我们可以对车辆有更及时深入的了解。
座椅/音响/空调控制:座椅调节是车上最容易操作的部分之一,但音响空调的控制就不是每个人都能理解了。
比如导航如何输入地址,空调如何开启内外循环、除霜去雾等功能都需要认真学习。
动力驾驶/燃油/养护使用系统:最后来到了和驾驶有关的部分,包括最基本的挡位介绍,电子手刹使用方法等等。
另外还有如何添加玻璃水、机油等常识性问题。
而一些不常用,但关键极其重要的配置,比如备胎位置、前后拖车钩位置等都需要车主牢记。
物业安保培训方案为规范保安工作,使保安工作系统化/规范化,最终使保安具备满足工作需要的知识和技能,特制定本教学教材大纲。
一、课程设置及内容全部课程分为专业理论知识和技能训练两大科目。
其中专业理论知识内容包括:保安理论知识、消防业务知识、职业道德、法律常识、保安礼仪、救护知识。
作技能训练内容包括:岗位操作指引、勤务技能、消防技能、军事技能。
台灯说明书.doc

学 号:
任课教师:
日 期:
学习台灯
一、台灯体的三维实体建模
1单击“文件”工具栏中的“新建文件”的按钮,选择“零件”模块,在“名 称”文本框中输入“taidengti”,取消“使用缺省模板”复选框,点击“确定”按 钮,选择“mms_part_solid',在单击“确定”按钮,进入零件设计环境。
5、完成图3的草绘后,拉伸此截面,拉伸深度为20.00。拉伸方向改为箭头向
下,点击“建造特征”命令,系统生成图4所示的拉伸体。
6、插入“倒圆角”命令,将当前设计环境中设计对象的四条边上倒上半径为20.00的圆角。再次插入“倒圆角”命令,将当前设计环境中设计对象的两条边 倒上半径为30.00的圆角。系统生成如图5所示的图形。
8、使用“草绘”对话框中默认的参照面,单击对话框中的“草绘”命令,系统 进入草图绘制状态。
9、在当前的设计环境中绘制如图6所示的一条样条曲线。
10、单击“草绘器工具”工具条中的“继续当前部分”命令。接着单击“扫描特 征”工具条中的“继续执行”命令,激活“扫描特征”工具条,此时设计环境中 的对象如图7所示,箭头表示扫描起点及方向。
7、 点击“草绘器工具”工具条中的“可变剖面扫描工具”,系统打开“扫描特 征”工具条,单击该工具条的“扫描为实体”命令;然后点击“草绘工具”命令, 弹出“草绘”对话框;再单击“基准平面工具”命令。弹出“基准平面”对话框, 接着单击“TOP”基准面,在“基准平面”对话框的“平移”编辑框中输入数值30.00,单击“草绘”对话框中的“确定”命令。
2点击“草绘工具”命令,弹出“草绘”对话框,选取“FRONT”基准面为绘 图平面,使用默认的参照面,进入草绘环境,绘制如图1所示的矩形。
手持式舞台灯 说明书

拆箱检查感谢您购买本公司的激光产品,使用前请仔细阅读说明书,说明书包含重要的安全建议信息和用户操作说明,请严格按规程操作,以免误用而导致人身安全或损坏灯具, 在收到产品时, 请小心取放;检查产品是否有运输而可能造成的损坏;配 件:1.激光灯1台 2.充电器1个(配USB线) 3.说明书1份 4.三脚架1个注意事项1. 严格按本操作说明书所述规程操作, 请勿擅自拆卸灯具。
2. 本产品确保防水、防潮、防震,勿在多尘环境中使用。
3. 基于半导体激光器特性, 要求工作环境温度为15~30℃,连续工作两个小时候后, 需关闭灯具10分钟, 激光器会完全冷却。
4. 防止异物进入机体内, 以免导致故障。
5. 请勿频繁开关, 以免影响激光灯使用寿命, 并尽量避免长时间开启。
6. 避免用远望设备观察激光光源, 这样可能增大危险。
7. 再次运输时,请注意防震,最好使用原包装。
警 告1. 本灯具激光危险等级为Class III A, 直接在光束内观察有危险。
2. 该灯具对电源要求110-220V/50-60Hz,若超出此范围, 建议使用稳压设备, 否则将严重影响激光寿命。
声 明本产品在出厂时己经过全面严格的检测,使用者应严格遵守以上所陈述的警告事项和操作说明,任何因误用而导致对产品的损坏不在本公司保修范围之内, 对忽视操作手册而导致的故障和问题亦不在经销商负责的范围内,任何操作产生的激光对人体损害,本公司不负责任。
规 格电源:交流适配器输入AC110-220V/50-60Hz,输出5.0V/0.5A激光器-波长:532nm(绿),660nm(红)尺寸:125X64X41mm净重:0.22 KG面板介绍1.红/绿光 2.马达调速 3.LED 4.充电指示灯5.ON/OFF切换开关(当开关拔到ON:LED绿光可用;当开关拔到OFF:充电状态,充电时指示灯红色,充满时变黄色.)手持式舞台灯说明书P o r t a b l e12345[备注]: 内置充电电池, 可接电脑USB或外接电源.Portable Stage Lights User ManualUnboxing Check Thank you for using our products, For the sake of safety and better operation of this projector, please read this manual carefully before using and operating it, lest incur any personal injury or damage to the projector.Package List: 1.Projector 1PC 2. Charger 1PC(W/USB) 3.Owen’s Manual 1PC 4.Tripod 1PCNotice:1. Please operate the projector according to the Manual strictly.2. This unit should be prevented from water, moisture and shake.3. The working temperature of this unit is 15-30℃, and it must be powered off after continuously working 2 hours to let the laser diode cool down.4. To keep the body of this unit clean to avoid any unnecessary troubles.5. Do not turn on and off it frequently and try to avoid making it worked for a long time.6. Do not use the telescope to watch the laser rays, otherwise will be largen the dangers.7. You had better use the original package during the transportation.Warnings:1. The grade of the laser for it is Class III A, and will be dangerous if exposure to the eyes directly.2. The working Voltage is 110-220V/50-60Hz, once exceeded this range its lifetime will be shorten.Statement: All the projectors are examined strictly before shipment, In that case the user should operate it according to the manual strictly, We and the distributor will not be responsible for any mistakescause by the wrong operations.Specification:1. Power AC power supply input AC110-220V/50~60Hz, Output 5.0V/ 0.5A2. Laser generator-Wavelength :532nm(Green), 660nm(Red)3. Dimension:125X64X41mm4. Weight :0.22KGPanel:1. Red/Green Laser P o r t a b l e123452. Speed3. LED4. Charge Lamp5.ON/OFF Switch(Switch”ON”:Green LED working;Switch”OFF”:Charging status,the charge lamp in Red color during Charging and changes to Yellow color when Charge finished.)[REMARKS]:Built-in rechargeable battery,can be accessed by computer USB or external power supply.。
台灯设计说明怎么写

台灯设计说明怎么写台灯(Desk lamp),是灯的一种,小巧精致,方便携带。
此电器主要放置在写字台或餐桌上,以供照明之用。
那么,台灯制定说明怎么写?下面我为大家整理的一些内容,希望大家喜爱!1、"灯具'家具中不可或缺的部分。
自古来说有光的地方,就有了人类文明。
从粗糙的石灯到青铜灯,陶瓷灯到现代的电灯,灯具的历史变迁打上了深入的时代烙印,同时也是社会经济和文化的缩影。
现在忙碌的生活,筋疲力竭的人们回到家中,只为寻求那一丝的舒适与安定。
而现在的家居装饰大多以符合大众的审美观出发,常规的东西过于繁重,格调的一层不变局限了选择的余地。
2、因此,在当今这个制定风格中找到突破点,制造出更新颖的革新制定,更具有代表性,从而达到推动制定理念向前发展的优良势头,给大众更加耳目一新的感觉,增加消费者选择的多样性,使得现代的灯具能倍受青睐,是本制定的出发点。
3、灯具在家居装饰中有着显著的特点。
现在关于灯饰的材质要求也越来越高,而市面上的造型样式却越来越古板,从而影响到消费者对理想灯具的选择。
所以这次毕业制定我想致力于现代简约风格的灯具制定,从而使得更多的消费者扩展选择的范围,让灯饰的风格合适于各种年龄层次的家庭装饰。
2台灯的控制方式分类1.触控式触控式台灯的原理是内部安装电子触摸式IC与台灯触摸处之电极片形成一控制回路。
当人体碰触到感应之电极片,触摸信号藉由脉动直流电产生一脉冲信号传送至触摸感应端,接着触摸感应端会发出一触发脉冲信号,就可控制开灯;如再触摸一次,触摸信号会再藉由脉动直流电产生一脉冲信号传送至触摸感应端,此时触摸感应端就会停止发出触发脉冲信号,当交流电过零时,灯自然熄灭。
不过有时停电后或电压不稳也会有自行亮起情形,如果触摸接收信号敏感度极佳纸张或布也是可以控制的。
2.亮度可调式可调台灯的工作原理是由电阻R2、电位器RP1、电容C组成阻容移相电路,调节RP1,即可改变双向晶闸管V的导通角,从而改变灯泡EL的亮度。
07款雅阁阅读灯说明

07款雅阁阅读灯说明
【原创版】
目录
1.07 款雅阁阅读灯简介
2.阅读灯的操作方法
3.阅读灯的更换与维修
4.注意事项
正文
【1.07 款雅阁阅读灯简介】
07 款雅阁阅读灯是指 2007 年款本田雅阁汽车所配备的一种辅助照明设备,主要用于在夜间或者光线较弱的环境下,为驾驶员提供舒适的阅读条件。
阅读灯通常安装在驾驶员座位附近,方便驾驶员在行驶过程中查看导航、行车记录仪等设备。
【2.阅读灯的操作方法】
07 款雅阁阅读灯的操作方法如下:
1) 打开点火开关。
2) 按下阅读灯开关,通常位于驾驶员座位附近的中控台或头顶上方。
开关上有一个表示阅读灯的图标,方便驾驶员识别。
3) 阅读灯点亮。
如需调整灯光亮度,可尝试按住开关一段时间,部分车型支持亮度调节。
4) 关闭阅读灯时,再次按下开关即可。
【3.阅读灯的更换与维修】
1) 如果阅读灯损坏,需要更换,可以参考车辆维修手册进行操作。
通常需要拆卸部分内饰板,然后更换阅读灯。
2) 如果阅读灯亮度不够,可能是灯泡老化或接触不良,需要进行检查和维修。
可以尝试更换灯泡或清洁接触点。
【4.注意事项】
1) 在使用阅读灯时,请确保不会影响驾驶员的安全视线。
2) 请勿在阅读灯上悬挂重物,以免损坏照明设备。
07款雅阁阅读灯说明

07款雅阁阅读灯说明(实用版)目录1.07 款雅阁阅读灯简介2.07 款雅阁阅读灯的安装位置3.07 款雅阁阅读灯的操作方法4.07 款雅阁阅读灯的更换与维修5.结论正文【1.07 款雅阁阅读灯简介】07 款雅阁阅读灯是专为 2007 年款本田雅阁汽车设计的一种辅助照明设备,旨在为驾驶员在夜间或者光线不足的情况下提供舒适的阅读环境。
该阅读灯采用 LED 光源,具有节能、耐用、亮度可调等优点,是现代汽车照明系统的重要组成部分。
【2.07 款雅阁阅读灯的安装位置】07 款雅阁阅读灯通常安装在驾驶员座位旁边的 A 柱上,距离地面约1.2 米,与驾驶员视线平行,以保证照明效果不会影响驾驶员的安全驾驶。
安装时,需要将阅读灯嵌入 A 柱的预留孔中,并使用螺丝固定。
【3.07 款雅阁阅读灯的操作方法】07 款雅阁阅读灯的操作非常简单。
首先,找到位于阅读灯上的开关,通常是一个小按钮。
然后,按下按钮,阅读灯就会亮起。
再次按下按钮,阅读灯就会熄灭。
部分车型还配备了阅读灯亮度调节功能,可以通过旋钮或者按键来调整亮度。
【4.07 款雅阁阅读灯的更换与维修】如果 07 款雅阁阅读灯出现故障,需要进行更换或维修,可以参考以下步骤进行操作:1.首先,断开车辆的电源,以免在操作过程中发生触电事故。
2.找到阅读灯的安装位置,通常在 A 柱上,使用螺丝刀卸下螺丝,取下阅读灯。
3.如果是更换阅读灯,需要购买同型号的阅读灯,然后将新的阅读灯安装到原来的位置,并用螺丝固定。
4.如果是维修阅读灯,需要检查灯泡是否损坏,如果损坏则需要更换新的灯泡。
维修完成后,将阅读灯重新安装到原来的位置,并用螺丝固定。
【5.结论】07 款雅阁阅读灯作为一款辅助照明设备,旨在为驾驶员提供舒适的阅读环境。
超亮LED台灯说明书

USER MANUALItem# 1311393Model# UDL0756-WHTSAVE THESE INSTRUCTIONSFor Customer Care, product operationinformation or problem resolution,call toll-free 1-877-654-1991. 5 Levels of Brightness Dimmer FunctionChroma RGB Mood &Night Light3 Light Modes Warm/Natural/BrightTouch Control2 USB Charging Ports(5V, 2.1 Amps Each)Ultra-Brite, Long-Lasting LEDsChroma RGB MoodUltraBrite LED Desk Lamp with 2 USB Ports#1311393Model# UDL0756-WHTUser ManualSAVE THESE INSTRUCTIONSFor Customer Care, production operation information or problem resolution, call toll-free 1-877-654-1991.IMPORTANT SAFETY INSTRUCTIONWARNING - DO NOT EXPOSE THE ADAPTOR TO RAIN OR MOISTURE TO REDUCE THE RISK OF FIRE, ELECTRIC SHOCK, OR INJURY TO PERSONS. WARNING!: USE THIS PRODUCT ONLY ON A FIRM, LEVEL SURFACE AND PREVENT ANY OBJECTS OR MATERIALS FROM COVERING THE LIGHT SOURCE AND/OR VENTILATION HOLES OF THE PRODUCT. PLEASE READ THE INSTRUCTIONS BEFORE OPERATING THIS PRODUCT.- L ED module is not replaceable.- D o not break or pull out LED bulbs.- Indoor use only.- Do not look directly at the light.- L ED module lamp head may get hot after several hours of continuous use, AVOID placing your hands directly on LED light panel.- Keep lamp away from materials that may burn.- I f the power cord or adaptor is damaged, replace the power supply cord and adapter. Call Customer Care for assistance.Operation Instructions:1. U se this product only on a firm and level surface and prevent any objects or materials from covering the light source of the product.2. C onnect the AC adapter input into the connector in the rear of the lamp. Plug the AC adapter into a standard household 120V AC outlet. Note: Use only with the supplied AC adapter to avoid damage or fire.3. Touch On/Off to turn on the lamp.4. T ouch control button to adjust brightness. There are five levels of brightness.5. T ouch to switch between 3 light temperature modes: Warm, Natural, Bright light.6. Touch to activate low level night light.7. T ouch once to activate Chroma RGB mood light. Touch once again to hold current color. Touch to deactivate Chroma RGB mood light.8. T ouch On/Off to turn off.USB Port Specifications:* O utput: 5 Volt, 2.1A (both ports).The USB Ports are capable of charging most phones, iPads and small tablets. Requires USB cable to charge (not included).Specifications:Light Bulbs: 56 Energy-Efficient LEDs + 7 RGB LEDsBrightness Levels: 5 Levels of BrightnessLight Temperature Modes: 3 Modes (Warm/Natural/Bright Light)LED Life: 35,000 hoursUSB Port Type: 2 Charging ports – 2.1A (5V)For adapter only Light Output (Lumens): 700LMColor Rendering Index (CRI): 80 RaCorrelated Color Temperature (CCT):Cold (4500K-5000K), Warm (2700K-3000K),Neutral (3000K-4500K)Watts: 10WInput Voltage: 100-240V 50/60HzPower: DC 12V 3AProduct Height: 16.8 in (426mm)Base Size: 7.48”L X 5.74”W (190 x 146mm)Maintenance Instructions:1. R ead the instruction manual carefully before assembly or usein case of any risk.2. D o not switch the light On/Off repeatedly in a short time to protect the lifetime of the LED.3. LED module is not replaceable. Do not break or pull out LED bulbs.4. Do not look directly at the light.5. Keep lamp away from material that may burn.6. Use a dry cloth for daily cleaning.7. F or product operation information or a problem resolution,call toll-free 1-877-654-1991.Lamp FCC Instructions:NOTE: This equipment has been tested and found to comply with the limits for a Class B digital device, pursuant to Part 15 of the FCC Rules. These limits are designed to provide reasonable protection against harmful interference in a residential installation. This equipment generates, uses and can radiate radio frequency energy and, if not installed and used in accordance with the instructions, may cause harmful interference to radio communications. H owever, there is no guarantee that interference will not occur in a particular installation. If this equipment does cause harmful interference to radio or television reception, which can be determined by turning the equipment off and on, the user is encouraged to try to correct the interference by one or more of the following measures:- Reorient or relocate the receiving antenna.- Increase the separation between the equipment and receiver.- Connect the equipment into an outlet on a circuit different from that towhich the receiver is connected.- Consult the dealer or an experience radio/TV technician for help.Lamp transformer FCC instructions:NOTE: This equipment has been tested and found to comply with the limits for a Class B digital device, pursuant to Part 15 of the FCC Rules. These limits are designed to provide reasonable protection against harmful interference in a residential installation. This equipment generates, uses and can radiate radio frequency energy and, if not installed and used in accordance with the instructions, may cause harmful interference to radio communications. H owever, there is no guarantee that interference will not occur in a particular installation. If this equipment does cause harmful interference to radio or television reception, which can be determined by turning the equipment off and on, the user is encouraged to try to correct the interference by one or more of the following measures:- Reorient or relocate the receiving antenna.- Increase the separation between the equipment and receiver.- Connect the equipment into an outlet on a circuit different from that towhich the receiver is connected.- Consult the dealer or an experience radio/TV technician for help.“This device complies with Part 15 of the FCC Rules. Operation is subject to the following two conditions: (1) This device may not cause harmful interference, and (2) this device must accept any interference received, including interference that may cause undesired operation.”One-Year Limited Product WarrantyThe manufacturer warrants the unit for a limited time to be free from defects in material and workmanship. If any part is found to be defective during the warranty period, your sole and exclusive remedy will be repair or replacement, at the manufacturer’s option and expense, of the defective part except for the ship-ping cost. It is the responsibility of the consumer to pay the shipping costs to return the machine to the manufacturer.This warranty is valid for the original consumer only with original proof of pur-chase and is not transferable. This warranty does not apply in cases of abuse, mis-handling or unauthorized repair. ANY IMPLIED WARRANTY, INCLUDING THAT OF MERCHANTABILITY OR FITNESS FOR A PARTICULAR PURPOSE, IS HEREBY LIMITED IN DURATION TO THE APPROPRIATE WARRANTY PERIOD SET FORTH ABOVE. In no event shall the manufacturer be liable for any consequential or incidental dam-ages attributable to this product. This warranty gives you specific legal rights. You may have other legal rights that vary according to the laws of the State in which you reside.For more details, or to obtain service under this warranty, please contact us at 877-654-1991. Please retain original proof of purchase to ensure that your prod-uct is recorded and warranty information received.Return Instructions1. B efore you return your unit, call 877-654-1991 for a Return Authorization Num-ber (RA#), shipping instructions, and the manufacturer’s address.2. M ake a photocopy of the proof of purchase (receipt), showing original purchase date, and include it inside the package (DO NOT send the original receipt).3. P ack the unit in its original carton, or equivalent, and write the RA# clearly on the outside of the box.4. S hip the unit to the address provided. Save your shipping receipt. IMPORTANT!You must call us to obtain an RA# before returning a defective product.No shipments will be accepted without a valid RA#.。
台灯使用说明书(范本)

台灯使用说明书台灯使用说明书篇一:台灯使用说明书LE D铜陵三极照明科技有限责任公司安徽省铜陵市狮子山区曹山路358 LE D台灯简介L ED 台灯就是以LED(Li ght Emi tting D iode)既发光二极管为光源的台灯,LE D 是一种固态的半导体器件,它可以直接把电能转化为光能。
LED 照明又称固态照明,作为继白炽灯荧光灯后的第三代照明技术,具有节能环保安全可靠的特点,固态光源是被业界看好的未来十年替换传统照明器具极具潜力的新型光源,代表着照明技术的未来。
发展新固态照明,不仅是照明领域的革命,而且符合当前政府提出的“建设资源节约型和环境友好型社会”的要求。
L ED 台灯采用的是直流供电,无频闪,超长寿命,功率很低,显色性很好,更方便读书和学习。
LED 光源属冷光源,光源处无高温部分,无红外线或紫外线辐射,对儿童使用比目前的台灯更安全,由于 LED是无眩光结构,对上网时间较长的用户,可大大减少视力疲劳,LED 台灯是真正的护眼保健节能台灯。
外接开关电源规格:电源频率: 5060Hz输入电压:AC110V-220V输出电压:DC12V 输出端带D C 插头灯头(LED组)供电为恒流驱动带音乐播放LE D台灯操作介绍:请勿在高温、易燃物体表面或潮湿环境使用本灯具,以免损坏或发生短路。
产品发生故障时,请委托专业人员进行检查及检修,以确保安全。
篇二:台灯使用说明书要想保护视力,关键在于学会正确使用台灯,而不是一味寄希望于护眼灯。
第一,用白灯泡。
科学研究证实,在白光下我们的视力最好,所以,选择能发出柔和均匀白光的白炽灯或磨砂灯,而不要选彩色灯泡。
第二,灯泡的度数要合适。
如果度数太低,照到书上的光线较暗,我们不容易看清字迹,这样会引起视疲劳,时间长了还会导致近视。
2023年台灯说明文字优秀 2023的台灯(二篇)

2023年台灯说明文字优秀 2023的台灯(二篇)(经典版)编制人:__________________审核人:__________________审批人:__________________编制单位:__________________编制时间:____年____月____日序言下载提示:该文档是本店铺精心编制而成的,希望大家下载后,能够帮助大家解决实际问题。
文档下载后可定制修改,请根据实际需要进行调整和使用,谢谢!并且,本店铺为大家提供各种类型的经典范文,如报告大全、演讲致辞、规章制度、应急预案、方案大全、心得体会、祝福语、作文大全、教学资料、其他范文等等,想了解不同范文格式和写法,敬请关注!Download tips: This document is carefully compiled by this editor. I hope that after you download it, it can help you solve practical problems. The document can be customized and modified after downloading, please adjust and use it according to actual needs, thank you!Moreover, our store provides various types of classic sample essays, such as a comprehensive report, speeches, rules and regulations, emergency plans, plans, experiences, blessings, essays, teaching materials, other sample essays, etc. If you want to learn about different formats and writing methods of sample essays, please pay attention!2023年台灯说明文字优秀 2023的台灯(二篇)在日常学习、工作或生活中,大家总少不了接触作文或者范文吧,通过文章可以把我们那些零零散散的思想,聚集在一块。
雅格5707手提灯说明书

雅格5707手提灯说明书
一、雅格5707手提灯使用说明:
1、根据照明需要,可采用手持、肩挎、吊挂等多种使用方式。
2、使用时,用手指按下灯具尾部点动开关,当听到“啪"的一下清脆声时,表明灯具开启或关闭。
3、灯具使用后,要及时用柔软的棉布擦掉透明件和灯具上的污物,保持灯具干净。
二、手提式LED防爆行灯性能特点
1、安全性能:本产品经机构防爆认证,隔爆最高防爆等级,完全按照国家防爆标准生产,具有优良的防爆,防静电效果,可在各种易燃易爆场所安全工作。
2、工作性能:采用进口LED,具有节能高效等特点,光强度高,能耗小,经济环保,使用寿命长;透明件采用胶材料制作,透光率高,耐冲击性能佳。
3、配置科学:灯具尾部有便于拆卸的防滑手柄和挂钩,可以根据现场情况选择放置形式,并且方便地移动到需要照明的地方。
4、适用性强:外壳采用轻质铝合金材料,防护等级高,耐磨抗腐、耐高低温、高湿,确保灯具在各种恶劣环境中可靠使用。
5、使用便利:外形简约,平放可防止滚动和滑落;采用手持、卧放、悬挂式等多种使用方式,使用方便。
可按客户要求做出调整,以满足不同场所需要。
- 1、下载文档前请自行甄别文档内容的完整性,平台不提供额外的编辑、内容补充、找答案等附加服务。
- 2、"仅部分预览"的文档,不可在线预览部分如存在完整性等问题,可反馈申请退款(可完整预览的文档不适用该条件!)。
- 3、如文档侵犯您的权益,请联系客服反馈,我们会尽快为您处理(人工客服工作时间:9:00-18:30)。
型号:YG-3980
产品特点
o本产品电池额定容量高达550mAH;
o超长寿命电池,高达200次以上循环使用;
o采用19个长寿命、超高亮度、节能LED;
o强弱光可调节。
使用说明
•充电时翻转出交流插头,直接插入AC220V/110V电源插座上,相应充电指示灯亮,正常充足电需要8小时,最长充电时间不得超过12小时;
•第一次按下开关12个LED点亮,第二次按下开关19个LED点亮,第三次按下开关台灯关闭,以此循环;
•台灯充足电12个LED可连续使用5个小时左右,19个LED可连续使用3个小时左右。
注意事项
•首次使用时,请先充足电,不使用时,存放三个月内必须补充电一次;
•当台灯的照明光线明显变暗时请及时充电,否则会影响电池寿命;
•台灯在充电时切勿使用以免损坏LED灯;
•请勿让台灯淋雨或受潮。
型号:YG-3979
产品特点
•本产品外观新颖,灯架采用折叠式设计,可灵活调整照明角度;
•本产品电池额定容量高达1300mAH;
•超长寿命电池,高达200次以上循环使用
•采用22个长寿命、超高亮度、节能LED;
•采用触摸方式控制LED灯光的亮灭和无级亮度调节
使用说明
o将AC电源线与台灯连接好后再将交流插头直接插入AC220V/110V电源插座上,相应充电指
示灯亮;正常充足电需要11个小时,最长充电时间不得超过17个小时。
o使用时用手指轻触触摸点
o待机状态下,短按触摸点时,LED输出最大亮度,灯亮;
o待机状态下,长按触摸点时,灯光亮度由最大亮度逐渐降低,松开时灯光亮度停在松开时刻对
应的亮度,若长按时间超过3秒,则灯光亮度达到最低亮度后不再变化,
o灯亮状态下,短按触摸点时,LED关闭输出,灯灭;
o灯亮状态下,长按触摸点时,灯光亮度按上一次调节相反的方向逐渐增加(或降低),松开时
灯光亮度停在松开时刻对应的亮度,若长按时间超过3秒,则灯光亮度达到最大(或最小)亮度后不再变
化;
o电池充满电,强光照明看连续使用6个小时这样。
注意事项
o首次使用时,请先充足电,不使用时,存放三个月内必须补充电一次;
o当台灯的照明光线明显变暗时请及时充电,否则会影响电池寿命;
o台灯在充电时切勿使用以免损坏LED灯;
o请勿让台灯淋雨或受潮。
型号:YG-3948
产品特点
•本产品电池额定容量高达1800mAH;
•超长寿命电池,高达200次以上循环使用;
•采用33个长寿命、超高亮度、节能LED;
•采用触摸方式控制LED灯光的亮灭和无级亮度调节
使用说明
o充电:把电源开关键拨向“OFF”位置,将AC电源线与台灯连接好后再将交流插头直接插入
AC220V/110V电源插座上,相应充电指示灯亮;正常充足电需要11个小时,最长充电时间不得超过17
个小时。
o照明:照明吧电源开关键拨向“ON”位置,停止照明吧开关键拨向“OFF”
o待机状态下,短按触摸点时,LED输出最大亮度,灯亮;
o待机状态下,长按触摸点时,灯光亮度由最大亮度逐渐降低,松开时灯光亮度停在松开时刻对
应的亮度,若长按时间超过3秒,则灯光亮度达到最低亮度后不再变化,
o灯亮状态下,短按触摸点时,LED关闭输出,灯灭;
o灯亮状态下,长按触摸点时,灯光亮度按上一次调节相反的方向逐渐增加(或降低),松开时
灯光亮度停在松开时刻对应的亮度,若长按时间超过3秒,则灯光亮度达到最大(或最小)亮度后不再变
化;
o电池充满电强光照明可连续使用5个小时左右。
注意事项
o首次使用时,请先充足电,不使用时,存放三个月内必须补充电一次;
o当台灯的照明光线明显变暗时请及时充电,否则会影响电池寿命;
o请勿让台灯淋雨或受潮。
型号:YG-3929
产品特点
o本产品电池额定容量高达600mAH。
o超长寿命电池,高达200次以上循环使用。
o采用18个长寿命、超高亮度、节能LED。
o强弱光可调。
使用说明
o充电时将交流插头推出,直接插入AC220V/50Hz电源插座上,相应充电指示灯
亮。
正常充足电需要9个小时,最长充电时间不得超过15小时。
o第一次按下开关6个LED点亮,第二次按下开关18个LED点亮,第三次按下开
关台灯关闭,以此为循环。
o充足电6个LED照明可连续使用10个小时左右,18个LED照明可连续使用3.5
个小时左右。
注意事项
o首次使用时,请先充足电,不使用时,存放三个月内必须补充电一次。
o当照明光线明显变暗时,请及时充电,否则会影响电池使用寿命。
o产品充电时切勿使用。
o勿让本品淋雨或受潮。
型号:YG-3907
产品特点
o本产品电池额定容量高达700mAH;
o超长寿命电池,高达200次以上循环使用;
o采用13个长寿命、超高亮度、节能LED;
o LED灯耗电低,照明时间长。
使用说明
o充电时将交流插头推出,直接插入AC220V/50Hz电源插座上充电指示灯亮,台灯充足电需要
12小时,最长充电时间不得超过14小时;
o使用时把开关键向下按,台灯点亮,再向下按一次则关闭;
o台灯充足电,可连续使用5小时左右。
注意事项
o首次使用时,请先充足电,不使用时,存放三个月内必须补充电一次;
o当台灯的照明光线明显变暗时请及时充电,否则会影响电池寿命;
o台灯在充电时切勿使用以免损坏LED灯;
o请勿让台灯淋雨或受潮。
型号:YG-3981。