portal开发入门手册范本
Portal用户定制页面说明书
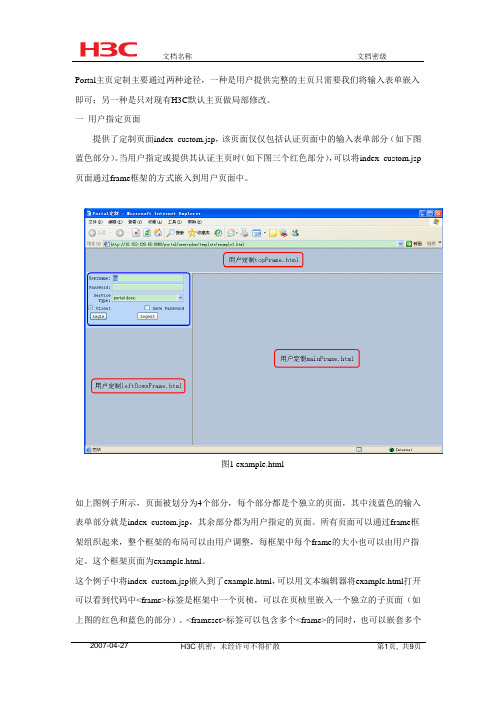
Portal主页定制主要通过两种途径,一种是用户提供完整的主页只需要我们将输入表单嵌入即可;另一种是只对现有H3C默认主页做局部修改。
一用户指定页面提供了定制页面index_custom.jsp,该页面仅仅包括认证页面中的输入表单部分(如下图蓝色部分)。
当用户指定或提供其认证主页时(如下图三个红色部分),可以将index_custom.jsp 页面通过frame框架的方式嵌入到用户页面中。
图1 example.html如上图例子所示,页面被划分为4个部分,每个部分都是个独立的页面,其中浅蓝色的输入表单部分就是index_custom.jsp,其余部分都为用户指定的页面。
所有页面可以通过frame框架组织起来,整个框架的布局可以由用户调整,每框架中每个frame的大小也可以由用户指定。
这个框架页面为example.html。
这个例子中将index_custom.jsp嵌入到了example.html,可以用文本编辑器将example.html打开可以看到代码中<frame>标签是框架中一个页桢,可以在页桢里嵌入一个独立的子页面(如上图的红色和蓝色的部分)。
<frameset>标签可以包含多个<frame>的同时,也可以嵌套多个<frameset>。
<html><head></head><frameset rows="72,*" cols="*" ><frame name="topFrame" src="topFrame.html"><frameset cols="310,*" rows="*"><frameset rows="160,*" cols="*" ><frame name="leftFrame" src="index_custom.jsp"><frame name="leftDownFrame" src="leftDownFrame.html"> </frameset><frame name="mainFrame" src="mainFrame.html"></frameset></frameset></html>图2首先页面被最外层的frameset分为上下两部分,上下两部分的大小由标签中属性rows指定(如图三)。
最新PORTAL系统操作手册描述

P O R T A L系统操作手册描述PORTAL系统操作手册描述本操作手册主要介绍portal系统逻辑设计及主要的业务操作。
Portal是基于预算管理体系建立的;对实际执行环节进行控制,即从事项申请环节开始进行可用预算的比较和可用资金支出的下达;在借支、报销环节由系统自动控制资金流出上限。
序号情景列表1 事项申请提交(包括事项申请及借支)2 事项申请审批3 纯借支申请提交(基于事项申请终审通过形成的活动号)4 纯借支申请审批5 核销申请提交(基于事项申请终审通过形成的活动号)6 核销申请审批7 审批查询系统登录:50000/irj/portal➢用户ID:输入用户ID即员工工号,长度为8位,不足8位在工号前补0➢密码:基于安全的策略控制,输入错误次数超出限制,用户将会自动被锁定事项申请提交1.提交事项申请登录系统后,进入如下界面,点击“事项申请”:进入下一界面,备注:关于搜索帮助查询使用方法:点击,如图进行输入查询首字符进行查询:关键字段说明字段值解释审批类型事项申请及借支含单独申请不借支、事项申请及借支预算标识预算内预算外申请会涉及考核,预算外需要经总裁特批费用发生部门50010376 系统根据申请人直接带出费用发生部门,一般不用修改公司代码5000 根据自己所属公司填写打款种类员工填写借支申请时填写:员工、供应商、客户、办事处打款编码填写借支申请时填写挂账种类员工填写借支申请时填写:员工、供应商、客户、办事处挂账编码填写借支申请时填写活动说明测试本次申请的简单描述点击“增加”,维护行项目信息;若需填写多行信息,并且各行信息有共同项,选中要复制的行,点击“数据复制”直接复制选中行数据,提高录入效率。
关键字段说明字段值解释会计年度 2009 申请费用占用那个年度的预算期间 005 申请费用占用那个期间的预算费用项目差旅费选则费用项目部门营销财务部选择要占用预算部门项目号不分项目选择费用对应的项目区域北京办事处选择费用对应的区域,若后勤一般选择“不分区域”渠道不分渠道选择费用对应的渠道,若后勤一般选择“不分渠道”申请金额1000 输入要申请的费用金额借支金额借支金额要小于申请金额对于业务代表若需要维护其他业务信息点击“展开业务信息”,进一步维护业务信息,需要通过附件进行说明的可以上传附件。
新手如何配置portal平台
一、Portal开发流程:(SSHPortlet开发)0.配置环境变量:path classpath javahome 为Portal的所在路径1.首先建立一空portlet修改工程名及包名2.导入Portlet所需要JAR包portal-ejb.jarportlet.jarportal-kernel.jarportal-service.jarservlet-api.jarstructs.jar3.修改build.propertiesappserver.dir=porta1容器所在的路径object.dir=工程的所在路径(../工程名)=war包的名字(XX.war)=jar包的名字(XX.jar)4.修改所需是的XML文件(1).liferay-display.xml 中的portlet idliferay-portlet.xml中的portlet-name、struts-pathportlet.xml中的portlet-name、display-name、short-title、keywordsweb.xml中的display-name、servlet-name以上四项中的这些标签取值最好都一模一样。
(2)将liferay-portlet.xml中的<portlet-name>、<struts-path>与portlet.xml中的<portlet-name>、<display-name>、中person和web.xml中的<display-name>、、中的person字符串都替换成你自己的虚拟路径名,struts-config.xml中的所有虚拟路径也替换成你的路径名。
5.修改portlet标题a.如果想让portlet的title也中文,则将portlet.xml中的title取值为中文,如果部署有误,则将其native2ascii转化后填上(title的值为何有时需native2ascii转换有时不需还不清楚,待系统正式上线后再研究)。
portal主题页面开发介绍

您可能想知道如何将您门户网站上的徽标换成您公司的徽标。
或者您想在门户网站上添加一个左侧导航窗格,或更改其背景颜色。
通过了解WebSphere Portal 用于显示门户页面的JSP 流程以及这些JSP 的内容,您可以创建或修改主题或皮肤,使您的门户网站看上去象您公司的Web 站点。
© 2003 International Business Machines Corporation. Allrights reserved.引言您可能想知道如何将您门户网站上的徽标换成您公司的徽标。
或者您想在门户网站上添加一个左侧导航窗格,或更改其背景颜色。
通过了解WebSphere Portal 用于显示门户页面的JSP 流程以及这些JSP 的内容,您可以创建或修改主题或皮肤,使您的门户网站看上去象您公司的Web 站点。
IBM WebSphere Portal Enable for Multiplatforms V4.2 使用不同的Java Server Page(JSP)、级联样式表(Cascading Style Sheet,CSS)和图像来显示门户页面。
它使用位于C:\WebSphere\PortalServer\app\wps.ear\wps.war目录下themes、skins和screens目录中的JSP 来构造门户页面。
这些目录中的每一个都包含html、wml和chtml子目录,WebSphere Portal 将它们用于服务不同客户机,例如桌面浏览器和移动设备。
本文是一系列文章的第一篇,这一系列将讲解WebSphere Portal 如何为通过Internet Explorer(IE)访问WebSphere Portal 的客户机使用缺省主题和缺省皮肤显示门户页面。
对于所有其他的主题和皮肤,处理过程也是类似的。
本系列文章说明了:∙用于显示门户页面的JSP 流程∙如何使用engine.tld中定义的JSP 标记∙如何使用级联样式表(CSS)元素∙如何使用属性文件显示门户网站标题和其它属性本文描述了缺省主题定义的Default.jsp、Head.jsp和ToolBarInclude.jsp的内容和流程。
ABB Ability Buildings Portal 用户手册说明书
ABB Ability TM Buildings PortalTable of Contents1Forewords (3)2Login / Signup (3)2.1Sign up (3)2.2Sign in (5)2.3Organizations (5)2.3.1Organization creation, (5)2.3.2Switching organization, (6)3ABB Ability™ Buildings Portal (7)3.1Solution overview (7)3.2Operator (7)3.3Editor (7)3.3.1Users and Authorizations (7)3.3.2Licenses Top of Form (7)3.3.3Solutions (13)3.4Planner (14)4Solution requirements (14)5Menu / Navigation (14)5.1Navigation menu (14)1ForewordsThis is the official documentation for ABB Ability Buildings portal, a cloud-based platform designedfor planning, commissioning, and operating smart buildings that utilize ABB Ability BuildingsSolutions. This guide provides comprehensive coverage of the platform's features and functionality,covering topics such as Login and Sign up, the for ABB Ability Buildings portal, the Editor section, andrequirements. Whether you are a first-time user or an experienced operator, we believe this guide willbe an invaluable resource for getting the most out of ABB Ability Buildings Portal.2Login / Signup2.1Sign upTo create an account for the ABB Ability Buildings portal, follow the steps below:•Navigate to buildings.ability.abb, the ABB Ability Buildings portal.•Click on the "Sign up" button on the right side of the page.•You will be directed to the account registration page. Fill out the form with the following details: First name, Last name, Email address, Password, Confirm password•In addition to the previous steps, you need to complete the following fields depending on whether you are a business or private user:Business User:•Company / School / Institution: This field is required to complete the registration process.•Phone Number: Enter your business phone number.•Country or Region*: Select the country or region where your business is located.•My Main Interest is: Select a field of activity from the dropdown menu.Private User:•Phone Number: Enter your personal phone number.•Country or Region: Select the country or region where you are located.•My Main Interest is: Select a field of activity from the dropdown menu.Once you have filled out the required fields, click on the "Sign UP” button to submit the form. Aconfirmation message will appear on the screen, indicating that your account has been createdsuccessfully.You will also receive a confirmation email with your login credentials.Please note that by creating an account, you agree to the terms and conditions of the ABB AbilityBuildings portal.2.2Log in•Go to buildings.ability.abb,•Click the "Log In" button on the right side of the page.•Enter your email and password and log in.2.3OrganizationsOrganization in ABB Ability Buildings portal is a collection of sites, which belongs to one organization.The ABB Ability Buildings work within the context of an organization. This means that to access most ofthe portal's functions, users are required to create an organization.Users can be members of multiple organizations. This feature is particularly useful for system integrators,facility managers and other individuals who work with multiple organizations, or who need to collaborate with different teams within the same organization. By being able to switch between organizations within the same portal, users can streamline their work and avoid the need to log in and out of multiple systems.2.3.1Organization creationIf you have not created an organization yet, the portal will prompt you to do so when you attempt toaccess a feature that requires it. To create a new organization, click "Create new organization”.Enter your organization details. You will be prompted to provide the following information: organization name, street, town/city, state, zip code, and country.Once you have entered all the necessary information, click "Save" to save your new organization.Your organization will now be visible in the "Select Organization" view, which can be accessed from thetop right menu of the portal. From there, you can easily switch between different organizations if you are a member of multiple ones.To create another organization, click the “Create new organization” button in the top right corner of thetable.2.3.2Switching organization,Option 1:•Click on the top-right menu button on the portal.•Select "Change organization" from the dropdown menu.•Choose the organization that you want to switch to from the list of available organizations.•You will now be directed to the selected organization.Option 2:•Click on the "Change" button on the top-left panel of the portal.•From the list of available organizations, select the one that you want to switch to.•You will now be directed to the dashboard of the selected organization.3ABB Ability™ Buildings Portal3.1Solution overviewThe portal is a comprehensive platform designed to support building users in every step of the building lifecycle. Whether you are an architect, engineer, contractor, or building owner, the portal provides a centralized location for all your building-related needs. The portal offers a wide range of solution and tools that are tailored to each stage of the building lifecycle, and are divided to three main experiences: Operator, Editor, Planner.3.2OperatorThe Operator view is specifically designed to make it easy for portfolio managers to monitor and manage data from their buildings. With this view, portfolio managers can access operational features from a multi-site perspective, which is an essential tool for maintaining efficient building operations using ABB Buildings solutions.3.3EditorThe view is designed for system integrators to configure and manage smart building systems in a single centralized location. The view includes tools for solutions configurations. It also allows us to establish access levels for different users, purchase a license and see the sites’ details. The Building Editor view is an essential tool for system integrators to configure the system.3.3.1Users and AuthorizationsThe "Users & Authorization" section is a set of functions that allows administrators to manage the users and their access to the portal. With this tool, administrators can add new users and modify user roles.In addition to the basic functions of a cloud portal, administrators can invite new members to join the organization. Once invited, these users will have access to the portal with varying levels of authorization depending on their assigned role. There are typically two types of users in a cloud portal: members and admins.3.3.2Licenses Top of FormThe "Licenses" view is designed for administrators to manage the licenses assigned to an organization. It provides the ability to purchase new licenses, upgrade or downgrade existing licenses, and prolong the license using the marketplace service.The view also displays a list of all active licenses, including any add-ons that are associated with them. Active licenses are split into two categories:•Available licenses: to access them, click the “Manage Available Licenses” button.•Unassigned license: to access them, click the “Manage Unassigned Licenses” button.To purchase a license, users can take advantage of two different methods. First, they can copy the organization ID and visit the ABB marketplace to purchase a license directly. Alternatively, users can obtain a voucher code from their local sales unit to apply towards the purchase of a license.To use a Control Hub license, users need to assign the license to an Edge device by following the steps detailed below: Step 1. Go to the building editor in the portal. Navigate to the "Licenses" view.Step 2. C lick the “Manage Unassigned Licenses” button. If there is at least one unassigned license, the button will indicate it with a small red icon on the button.Step 3. Choose which license you wish to assign then click its corresponding “Manage License and Assign” button.Step 4. A new pop-up is now displayed. Click the dropdown menu under “Assign or Reassign License” and select one of the available locations.Ste 5. Finally, click the “Save” button.3.3.2.1Purchase license via MarketplaceStep 1: Go to the building editor in the portal. Navigate to the "Licenses" view.Step 2: Click the "Purchase Licenses" button. This will redirect you to the marketplace service, which requires a separate client account. If you do not have a marketplace account, follow the instructions available in the marketplace documentation to register.Step 3: Search for your desired product in the product catalogue. Click view product button to see product details.Step 4: Click "Select" to choose your base subscription.Step 5: Add any desired add-ons by clicking "Add".Step 6: Review your selections and click "Add to basket".Step 7: Verify that your selected products and add-ons are correct, then click "Next".Step 8: Provide your organization ID, which can be copied from the "Licenses" view in the portal.Step 9: Confirm your billing details by clicking "Next".your purchase.Once your order is confirmed, you will receive an order confirmation. You can view the details of your subscription on the "My Subscription" page in the marketplace or using licenses view in ABB Ability Buildings portal.3.3.2.2Voucher codeStep 1:Obtain the voucher code from your local sales unit.Step 2: Go to the building editor in the portal and navigate to the "Licenses" view.Step 3: Insert voucher code in text box and click “activate”The new license will appear on the list of all licenses.3.3.3Solutions3.3.3.1Building AnalyzerABB Ability™ Building Analyzer tracks both buildings data (occupancy, equipment runtime hours, temperatures, and costs) and utilities (energy, gas, water, steam) in real-time and provides actionable insights to help you save money while improving energy efficiency, sustainability, and occupant awareness.This digital solution empowers you to take the first step in your building decarbonization journey.As a cloud-based SaaS solution, ABB Ability™ Building Analyzer can extract data from an unlimited number of data points of almost any source and type and display it in one intuitive and easy to use interface. Insights are turned into opportunities for improvement, quantified and prioritized in terms of energy consumption, carbon emissions and ROI.The solution is suitable for commercial buildings of any size and tenant-type and allows its users to connect to the service from any geographical location.3.3.3.2Efficiency AIABB Ability™ Efficiency AI uses Artificial Intelligence (AI) to proactively optimize the HVAC system in buildings toachieve remarkable cost savings and emission reductions, while im-proving occupant comfort. An SaaS business model with rapid implementation of the com-plete solution, it generates high energy cost savings in a fast amount of time. Efficiency AI is an easy retrofit solution that works on top of any BACnet HVAC system with minimal investment needed.3.3.3.3Control HUBControl HUB is our easy to install control solution that leverages preconfigured templates and makes the indoor environments comfortable and efficient by automating and controlling the HVAC equipment in the building. It can decarbonize buildings by connecting all data and enabling commands and schedules.3.4PlannerThis view provides planners with access to a wide range of data and tools to create energy-efficient and cost-effective building designs. The Building Planner view is an essential tool for creating high-performance, sustainable buildings. For now, available only in German language.4Solution requirements•Internet connection: A stable and reliable internet connection with a minimum speed of 10 Mbps is recommended.•Processor: A multi-core processor with a clock speed of 2.0 GHz or higher.•RAM: At least 4 GB of RAM is recommended to ensure that the cloud portal can run smoothly and handle multiple tasks simultaneously.•Browser compatibility: The portal is compatible with the latest versions of popular web browsers such as Google Chrome, Mozilla Firefox, Microsoft Edge, and Apple Safari.•Platform compatibility: The portal is accessible on both Windows and Mac operating systems, as well as on mobile devices running iOS or Android.5Menu / Navigation5.1Navigation menuTop right navigation menu is the main method for navigating through the portal.•The "Home" button in a cloud portal contains marketing materials about ABB products. These resources help users learn more about the ABB Buildings solutions, their capabilities, andbenefits.•Users in a portal can switch between organizations using the "Change organization" button. This allows them to change organization. Read more in 2.3.•The profile settings button in a portal lets users manage their account information.•The “F eedback to ABB” button in a cloud portal allows users to provide feedback and suggestions about the ABB Buildings solutions. This helps ABB identify areas for improvement and makechanges to better meet user needs.。
02.开发和部署简单的portal

开发一个简单的Weblogic Portal 1.打开WORKSHOP,新建一个PORTAL EAR Project2.设置工程名为application ,其他值保持默认,点击NEXT3.这一步保持默认值,点击NEXT4.保持默认值,点击NEXT5.我们没有创建datasync工程,所以保持默认值,点击Finsh,完成EAR工程的创建。
6.在WORKSHOP中新建一个Portal Web Project7.设置project 名称为portal.EAR Membership中勾选Add Project to EAR,EAR Project Name设置为刚刚创建的application8.在工程portal中新建下图中的JA V A类9.右键点击portal工程下的WebRoot目录,在弹出的菜单中选中New Portlet10.输入File Name:HelloPortlet,点击Next11.再弹出的界面中选择Java Portlet ,点击NEXT12.设置Portlet详细信息。
按下图中类容设置。
其中Class Name填入刚创建的com.heer.wuhan.study.portal.HelloPortlet 。
点击NEXT13.该步骤保持默认值即可。
点击Create14.右键点击portal工程下的WebRoot目录,在弹出的菜单中选中New Portal15.在File Name 中输入名称为test,点击Finish16.系统自动打开一个Portal视图,如下图所示17.在Design Palette中选中可以看到刚才创建的portlet :您好18.将“您好”portlet 拖放到test.portal19.拖放成功后再test.portal中可以看到“您好”pre-compilation21.选中要导出的ear包的位置,点击finish.22.进入weblogic控制台点击进入Deployments,在Lock&Edit模式下,点击Install23.在安装应用程序界面选中刚才导出的ear文件,点击NEXT24.确认选中Install this deployment as an application ,点击NEXT25.选择将应用部署到的被管理的app服务器中,点击NEXT26.保持默认即可,点击NEXT27.选中NO,I will review the configuration later.点击FINISH.28.重新进入Deployments界面,点击绿色的Activate Changes按钮29.选中application,点击Start按钮,在弹出的选项中点击Servicing all requests30.在启动应用界面中点击YES31.application 应用的状态变为start running32.间隔一段时间后再次点击Deployments。
portal设计简要说明

portal设计简要说明
门户展现框架
一、portal容器
1、用户布局自定义(拖拽后保存)
2、主题自定义(主体颜色、TOP和FOOT图片、背景修改后保存)
*客户端保存
二、portlet
1、添加portlet
2、隐藏portlet *注册用户可以使用此功能
3、收起portlet√
4、拖拽portlet √
三、门户初始化设置(后台管理)
1、portlet模块设置
A、读取一级栏目信息自动生成portlet模块(栏目名、栏目ID、访问地址)
B、设置portlet模块(模块名、访问地址)
C、独立模块为portlet创建页面
D、通用栏目及内容portlet展现模板。
分居栏目ID读取内容列表。
2、用户布局自定义(拖拽后保存)
3、主题自定义(主体颜色、TOP和FOOT图片、背景修改后保存)。
SUNONE Portal 开发指南

SUN ONE PORTAL开发指南版本号:2.02004年03月30日目录1引言 (1)1.1编写目的 (1)1.2引用术语 (1)1.3版本控制 (1)1.3.1文档信息 (1)1.3.2版本历史 (1)1.3.3分发列表 (2)2概述 (3)3WEB SERVER JSP/SERVLET的开发部署 (4)4登录和PORTALET个性化 (8)4.1登录页面个性化 (8)4.2P OR TAL个性化页面的定制 (8)5WEB SERVER FILTER的开发部署 (9)5.1FIL TER简介 (9)5.2FIL TER的开发和部署 (9)6PORTAL TAB,CHANNEL,TABLE开发部署 (10)6.1注册S ERVICES (10)6.2配置D ESK T OP (13)6.3JSPP ROVIDER管理 (15)6.3.1添加JSPProvider (15)6.3.2修改JSPProvider (17)6.3.3删除JSPProvider (18)6.4JSPT ABLE C ONTAINER管理 (19)6.4.1添加JSPTableContainer (19)6.4.2删除JSPTableContainer (21)6.4.3修改JSPTableContainer (21)6.4.4添加Portlet (23)6.5JSPT AB C ONTANIER管理 (24)7SSO API的开发 (25)8DOMINO SSO的开发 (26)9SUN JAAS的开发 (27)1引言1.1 编写目的本文以江苏移动EMIS项目为背景,全面介绍SUNONE Portal相关开发。
1.2 引用术语1.3 版本控制1.3.1文档信息文档准备人: 周胜宇,尧霞,赖庆辉准备日期:审阅人:审阅日期:审阅人:审阅日期:1.3.2版本历史1.3.3分发列表2概述SunOne Portal开发涉及到:●Web Server JSP/Servlet开发●登录和个性化●Desktop配置●SSO API●JAAS认证方法扩展3Web Server JSP/Servlet的开发部署SunOne Portal 既然是一个web应用程序,就需要一个web容器,他默认安装是 SunOne Web Server 6.0(Servelt2.2)Web Server 是个jsp容器,可以用来解析jsp和servlet,可以用来发布web 应用程序。
Portal门户开发规范
1Portlet组件开发要求对于嵌入门户的Portlet,必须符合JSR 168标准。
JSR 168本身就是一套标准API,与Sevlet相似,开发Portlet应用必须遵守这个标准。
现行很多开源的MVC框架都支持此标准,如struts等。
开发商可以选择适合自己的方式,遵守JSR 168标准开发Portlet应用,只有这样才能满足将应用部署到门户中的这个基本要求。
1.1可定制显示样式对于Portlet在门户中的展现,Portlet作为页面上的一个个小方块,它的高、宽是要自由调整的;而它的高、宽、样式等可以通过对Portlet配置参数进行设置。
Portlet提供修改参数的模式机制(edit mode),在此模式下管理员权限能修改各个参数的值,从而调节展现。
例如,参数如表1:表 1 portlet参数1.2可定制显示模式Portlet的作用是在门户上展现后台整合的内容。
门户对信息的显示不是固定的一种方式,而是按要求提供多种显示模式供用户选择。
比如,引入进来的数据是显示曲线图,可通过选择柱形模式,使Portlet显示柱形图。
这要求Portlet的开发设计是基于显示模式,而不是显示成果。
通过调节显示模式,从而得到不同的显示结果,因而要求Portlet的设计是显示模式层面。
1.3可插入处理服务接口功能Portlet能配置引入所需的服务接口,且能插入处理服务接口的调用结果的模块。
Portlet对服务调用的方式应用配置方式,具备对于处理服务的结果提供插入模块处理的能力。
以WebSphere服务接口为例,Portlet能配置访问WS接口的URL;对于调用服务后都是得到XML,对于XML结果的处理,是一个可插入的模块,可以随时更改。
1.4提供通信接口Portlet提供通信的接口,供其它Portlet和自身实现通信。
例如,自身能根据其它Portlet发送过来的参数,实现不同的显示功能。
1.5命名规则对于Portlet展现的页面的变量统一的命名方式为:开发商简称_业务系统名_模块名_方法。
portal开发入门手册范本

门户开发入门手册版本历史目录1.1 创建P ORTA域 (4)1.1.1 启动Configuration Wizard (4)1.1.2 创建或扩展域 (4)1.1.3 选择域源 (5)1.1.4 配置管理员用户名和密码 (6)1.1.5 指定服务器启动模式和JDK (7)1.1.6 自定义环境和服务设置 (9)1.1.7 创建WebLogic 域 (9)1.1.8 创建域 (10)1.2 创建P ORTAL EAR项目 (11)1.3 创建P ORTA WE B项目 (16)1.4 创建数据同步项目 (20)1.5 创建P RTAL (23)1.5.1 创建一个Portal (23)1.5.2 增加一个页面到你的Portal (25)1.5.3 发布和查看Portal (27)1.5.4 创建Portlets (27)1.5.5 把Portlets 添加到Portal (31)1.6登录管理控制台并创建P ORTA和桌面 (32)1.6.1 打开管理控制台 (32)1.6.2 登录管理控制台 (33)1.6.3 创建Portal和桌面 (34)1 创建Portal 域启动Configuration Wizard 创建或扩展域选择域源配置管理员用户名和密码指定服务器启动模式和JDK 自定义环境和服务设置创建WebLogic 域创建域1.1 启动Configuration Wizard 打开“开始” -> “BEAProducts”->“Tools”->“Configuration Wizard ”。
之后将会出现“欢迎”窗口。
1.2 创建或扩展域提示您选择是新建域还是扩展现有域选择“新建WebLogic域”再点击“下一步”,出现“选择域源”窗口1.3选择域源提示您选择创建域所使用的源附:1、Workshop fro WebLogic Platform : Extends Basic WebLogic Server domain to create BEA Workshop for WebLogic doma in.2、GroupSpace:是一个协作应用程序,包含若干个让用户管理各种容类型的portlet 。
V5.6 Portal用户文档
第18章Portal18.1Portal概述18.1.1什么是Portal企业和组织需要为企业内部员工、外部客户群体量身定制有“价值”的企业信息,但是,一方面,许多有“价值”的企业信息的获取并不是一件轻松的事情,信息部门需要整合来自不同应用系统、不同数据源、不同平台的各种类型的数据和资源;另一方面,如何轻松实现一个为所有的用户群体量身定制的系统构架也不是一件容易的事情。
应用传统技术整合这些资源的技术复杂度和成本都太高,企业无法负担。
Portal技术的出现,带给人们解决这类难题的曙光。
Portal技术强调以用户为中心,提供个性化、单点登录、不同来源的内容整合功能,从而实现了信息系统的集中访问。
Portal从本质上来说就是一个内容聚集的信息集成平台。
18.1.2NC Portal的简介NC Portal是基于JSR168规范而实现的一套J2EE技术体系架构的Portal。
它构建于NC基础服务与NC轻量级开发框架之上,完美融合Ajax技术与Spring MVC技术,提供了灵活而丰富的个性化和管理定制功能。
NC Portal允许多种安全认证方式,可以轻松将NC ERP、LDAP服务器、或者第三方用户库中的用户导入到NC Portal中做为Portal用户,采取了基于角色访问控制(RBAC)的权限模型,并提供了完善和通用的第三方系统集成框架和单点登录框架,NCPortal56发版默认集成NC、IUFO、HR、NC网上报销、BO等系统,实施单点登录比商业Portal简单易用。
NC Portal从5.6版本开始全面支持集团/公司的组织结构,全面支持流程,它提供的Portal管理功能,允许管理员在运行态对Portal进行定制,而无需重启服务甚至编码。
同时,内建的换肤机制使得实现自定义皮肤非常简单,只需完成相应图片的替换即可。
NC Portal引入了一些通用的API,使得Portlet可轻松调用Ajax,json,以及使用NC RichClient组件。
portal教程

Light Portal介绍此文档根据Light Portal官方网站翻译。
https:///什么是Light Portal?Light Portal是一个基于Ajax与Java的开源Portal框架,它能够被无缝地集成到任何Java Web应用程序中或作为一个独立的Portal系统。
特点:* Ajax 和基于JAVA的Portal框架* 支持JSR168 Portlet API设计规范.* 可以建立社会网络功能, 包括用户配置, 连接, 群组, 加上50种预先绑定的门户.* 为所有用户提供个性化网页,最终用户可以方便地添加,修改或删除页面或子页面* 包含多个预先建立的主题和用户界面窗口,还支持定制.* 支持多种移动浏览器,如iPhone手机的Opera Mini等.* 支持 Internationalizaiton (i18n).* 支持 OpenID 验证Light Portal的组织结构下图显示了. Light Portal的主要组成部分。
每个章节在后面都将详解ApplicationsApplications兼容JSR 168 portlet。
Light Portal推出了一套核心应用软件和社交网络应用,如用户配置文件,连接,团体,日历,电子邮件客户端,博客,论坛,搜索,事件,图片, RSS新闻阅读器和其他Application FrameworkApplication Framework包括2部分,一个是AJAX UI Manager,另一个是Portal Server。
开发者可以在核心应用中使用这些Framework API* AJAX UI ManagerAJAX UI Manager 是一个 JavaScript library. 其职责包括提供门户网站,门户网站页面上, portlet中的窗口,并与服务器端异步. * Portal ServerPortal Server is a web based application and a JSR 168 Portlet container.Portal Server是一个基于网络的应用和兼容JSR 168 Portlet的容器、、、、、、、、、、、、、、、、、、、、、、、、、、、、、、、、、、、、///////////////////////////////////////////////////////////////////// Portal实现原理1.Portal用例读者可以在下面三个网站上注册自己的用户,体会Portal的功能。
Portal操作手册

目录一采购管理 (2)1.1 采购计划单 (3)1.2 采购订单 (6)1.2.1 正常新增采购订单 (6)1.2.2 从采购计划单中导入的采购订单 (9)1.2.3 从发货订单中导入明细到采购订单中 (12)1.2.4 采购订单调整单 (16)1.3 采购单 (18)1.4 采购入库单 (20)1.4.1采购核价单 (21)1.5 采购退货单 (22)二经销商采购管理 (25)2.1 采购订单 (25)2.2 采购单 (27)2.3 经销商采购退 (28)三销售管理 (30)3.1 发货订单——订配货 (31)3.2 销售单 (35)3.2.1订单销售 (35)3.2.2正常销售 (36)3.3 销售差异处理 (37)3.4 销售退货 (40)3.5 销售退货差异处理 (45)四仓储物流 (46)4.1 调拨单 (46)4.2入库单 (52)4.3 调拨差异处理 (53)4.4 盘点 (54)4.4.1 全盘 (55)4.4.2 随机盘、历史盘 (56)4.4.3抽盘、历史抽盘 (57)五基础建档 (59)5.1 地点类 (59)5.2 货品类 (61)5.3 人员类 (64)5.4 财务类 (64)5.5 单据类 (64)6. 财务管理 (65)6.1 经销商资金控制 (65)6.2经销商销售价格体系 (66)6.2.1 经销商账户扣款单 (66)6.2.2 经销商账户收款单 (67)6.2.3经销商发票 (67)6.2.3 价格调整模块 (68)分销系统操作手册PORTAL分销管理系统结合了企业分销网络中的所有业务,包括基础资料维护、向供货商的采购业务、对客户的销售业务、对终端顾客的零售业务,以及公司本身的订配货业务。
其业务流又具体分为物流、资金流、信息流这三大主线。
物流:管理从供货商进货开始,到企业仓库间的调货,再到企业对客户的商品销售,最后管理到商品面向市场的零售,构成了一个完整的货物流,在系统中形成一套库存账。
portal服务器搭建

portal服务器搭建Windows下AC PORTAL系统安装⼿册第 I 章简述本⼿册只讲述了在Windows环境下安装JDK、TomCat和Mysql以及AC PORTAL 项⽬的安装步骤以及配置⽅法,经过验证是可⾏的,可以作为内部⼯程师的安装指导说明书,可以让⼯程师在⽇后的安装过程中少⾛⼀些弯路,提⾼整体⼯作效率。
第 II 章安装前的准备⾸先要说明⼀下,由于JDK、TomCat和Mysql三个软件都是绿⾊软件,对系统的兼容性有很强的要求,不同环境下所使⽤不同版本会带来不同的结果,兼容性会导致安装配置过程失败,下⾯是我在安装时选择的软件版本,可以到以下⽹站下载2.01 JAVA环境软件Tomcat软件:apache-tomcat-5.5.23;(windows版本)Mysql软件:Mysql 5.0_Setup.exe (windows下安装版)JDK软件:jdk1.5.0_10(windows版本)2.02 AC PORTAL项⽬⽂件MYSQL数据库的portal.sql备件⽂件PORTAL系统的ROOT⽬录⽂件的备件2.03 AC PORTAL项⽬需要⽤到的开源包mysql-connector-java-3.0.16-ga-bin.jaritext-1.4.jariTextAsian.jarUpload.jarjxl.jar第 III 章安装说明3.01 MySQL数据库的安装和配置(a)MYSQL数据库的安装1.打开Mysql 5.0_Setup⽂件,进⼊到MySQL数据库的安装进程,如下图界⾯2.点击NEXT进⼊SETUP TYPE安装界⾯,默认选择“Typical”;如图:3.点击NEXT进⼊下图安装界⾯界⾯;如果已经安装过MYSQL会提⽰选择安装、修复、移除MYSQL。
4.完成后出现创建/doc/1f8ece7ca417866fb84a8ea8.html 帐号的界⾯。
如果是⾸次使⽤MySQL,选“Create anew free /doc/1f8ece7ca417866fb84a8ea8.html accout”,点“Next”,输⼊你的Email地址和⾃⼰设定的⽤于登录/doc/1f8ece7ca417866fb84a8ea8.html 的密码。
Portal技术学习

Portal技术学习“portlets是一种web组件-就像servlet开发 s-是专为将合成页面里的内容聚集在一起而设计的。
通常请求一个portal页面会引发多个portlets被调用。
每个portlet都会生成标记段,并与别的portlets生成的标记段组合在一起嵌入开发到portal页面的标记内。
”(摘自portlet规范,js r 168)本文探讨了以下内容:1. portal页面的元素2. portal是什么?3. portlets是什么?4. 开发“hello world” portlet5. 在pluto上部署helloworld portlet6. 如何创建portal页面7. 结束语8. 资源 portlet规范将portlet定义为一种“基于java技术的web组件,由处理请求和生成动态内容的portlet容器管理”。
这段话听起来是不是有些费解?本文将说明portlets是什么以及能用它们做什么。
图1显示了在访问一个portal服务器开发时浏览器中页面的样子。
图1 典型的portal服务器开发的页面(点击查看原图) 如果仔细查看浏览器里的页面,就会看到页面是由不同的“窗口”组成的。
一个窗口用于刷新天气,另一个用于新闻,还有一个用于刷新股价,等等。
这里的每一个窗口都代表了一个portlets。
如果看得再仔细些,还会发现每个窗口都有一个标题条和一些按钮,包括最小化和最大化按钮。
在系统开发里,这些窗口是相互独立开发、各不同的应用开发。
新闻portlet的开发者创建应用开发并打包成war格式的文件,随后portal服务器开发的管理员在服务器开发上部署该war文件并创建页面,接下来每个用户会选择在他的页面里有哪些应用开发。
例如,如果用户对股价不感兴趣而对体育感兴趣,他可以用“体育”窗口替换“股价”窗口。
portlet技术需要学习许多新概念,本文不可能全都涵盖,因此本文分为两部分。
- 1、下载文档前请自行甄别文档内容的完整性,平台不提供额外的编辑、内容补充、找答案等附加服务。
- 2、"仅部分预览"的文档,不可在线预览部分如存在完整性等问题,可反馈申请退款(可完整预览的文档不适用该条件!)。
- 3、如文档侵犯您的权益,请联系客服反馈,我们会尽快为您处理(人工客服工作时间:9:00-18:30)。
门户开发入门手册版本历史目录1.1创建P ORTAL域 (4)1.1.1 启动 Configuration Wizard (4)1.1.2 创建或扩展域 (4)1.1.3 选择域源 (5)1.1.4 配置管理员用户名和密码 (6)1.1.5 指定服务器启动模式和 JDK (7)1.1.6 自定义环境和服务设置 (9)1.1.7 创建 WebLogic 域 (9)1.1.8 创建域 (10)1.2创建P ORTAL EAR项目 (11)1.3创建P ORTAL W EB 项目 (16)1.4创建数据同步项目 (20)1.5创建P RTAL (23)1.5.1 创建一个Portal (23)1.5.2 增加一个页面到你的Portal (25)1.5.3 发布和查看Portal (27)1.5.4 创建Portlets (27)1.5.5 把Portlets添加到Portal (31)1.6登录管理控制台并创建P ORTAL和桌面 (32)1.6.1 打开管理控制台 (32)1.6.2 登录管理控制台 (33)1.6.3 创建Portal和桌面 (34)1创建Portal域●启动 Configuration Wizard●创建或扩展域●选择域源●配置管理员用户名和密码●指定服务器启动模式和 JDK●自定义环境和服务设置●创建 WebLogic 域●创建域1.1启动 Configuration Wizard打开“开始”->“BEA Products”->“Tools”->“Configuration Wizard”。
之后将会出现“欢迎”窗口。
1.2创建或扩展域提示您选择是新建域还是扩展现有域。
选择“新建WebLogic域”,再点击“下一步”,出现“选择域源”窗口。
1.3选择域源提示您选择创建域所使用的源。
附:1、WorkShop fro WebLogic Platform:Extends Basic WebLogic Server domain to create BEA Workshop for WebLogic domain.2、GroupSpace:是一个协作应用程序,包含若干个让用户管理各种容类型的portlet。
这些容类型包括一些协作性元素,例如问题(Issue)、讨论主题、GroupNote(富文本文件)和外部文档等。
3、Weblogic Portal GroupSpace Framework:扩展Portal域,允许开发GroupSpace 应用。
4、WebLogic Portal GroupSpace Application:扩展了具有GroupSpace应用的Portal 域,增加了预配置的GroupSpace应用到域中。
1.4配置管理员用户名和密码提示您指定启动管理服务器时使用的用户名和密码。
1.5指定服务器启动模式和 JDK提示您指定域的启动模式和域使用的JDK。
附:域启动模式之间的差异:下表说明开发模式与生产模式在主要功能方面的差异。
功能开发模式... 生产模式...SSL 可以使用 WebLogic Server 安全性服务提供的示数字证书和示密钥库。
利用这些证书,可设计出在由 SSL 担保的环境中工作的应用程序。
不应使用示数字证书和示密钥库。
如果这样做,将会显示警告消息。
部署应用程序WebLogic Server 实例可以自动部署和更新位于 domain_name/autodeploy 目录中的应用程序(其中 domain_name 为域名)。
建议只在单服务器开发环境中使用此方法。
由于自动部署功能被禁用,因此必须使用 WebLogic ServerAdministration Console、weblogic.Deployer 工具或 WebLogic脚本工具 (WLST)。
日志文件转储启动某个服务器时,该服务器会自动将其本地服务器日志文件重命名(转储)为server-name.log.n。
在服务器会话的剩余时间里,只要文件大小达到 500 KB,服务器就会转储其本地日志文件。
文件大小达到 500 KB 后,服务器会转储其本地日志文件。
JDBC 系统资源默认容量为 15 个连接。
默认容量为 25 个连接。
1.6自定义环境和服务设置选择“是”的话主要是用来更改域在各服务器、群集和计算机间的分布和修改现有JDBC 和 JMS 文件存储设置。
1.7创建 WebLogic 域提示您指定域的名称和路径名,然后开始创建域。
1.8创建域显示域创建过程的状态消息。
2创建Portal EAR 项目1、选择“新建”->“Portal EAR 项目”,如下图:2、输入项目名称,如下图:3、单击“下一步”,如下图:Weblogic Portal传播服务:传播是指将一个门户域环境的数据库和 LDAP 容移动到另一个门户域环境的过程。
管理控制台:配置Portal管理控制台。
管理框架:支持管理控制台和查看工具的应用。
下图为Weblogic Portal应用程序Facets与库包的对应关系:4、根据你所需的功能选择相应的组件,之后选择“下一步”,如下图:5、点击“完成”。
3创建PortalWeb 项目1、选择“新建”->“Portal Web 项目”,如下图:2、输入项目名称,如下图:3、选择“下一步”.下图为Weblogic Portal Web应用程序Facets与库包的对应关系4、根据你所需要的功能,选择相应的组件。
之后单击“下一步”。
5、输入Web模块的配置信息。
之后选择“下一步”,如下图:6、配置Weblogic特定的Web模块设置。
选择“使用共享J2EE库”,之后单击“完成”。
4创建数据同步项目数据同步项目是一个可选项目,它存储在个性化应用程序和门户开发中使用的通用门户服务数据。
这些门户服务包括“用户配置文件”、“会话属性”、“活动”及其他。
如果需要,可以在若干个 EAR 项目之间共享单个数据同步项目。
1、选择“新建”->“数据同步项目”,如下图:2、输入数据同步项目名称。
如下图:3、单击“下一步”。
4、选择将使用此数据同步项目的EAR项目,之后单击“完成”。
5创建Portal●创建一个Portal●增加一个页面到你的Portal●发布和查看Portal●创建Portlets●把Portlets添加到Portal5.1创建一个Portal1、选择myPortalWeb/WebContent目录,单击鼠标右键选择新建 -> Portal2、在文件名输入框中输入myPort al。
3、单击完成。
5.2增加一个页面到你的Portal1、从调色板视图中拖动页面图标至”Page的右边,如下图:新页面的默认标题为“New Page”,按照以下的步骤可以改变它:a、选中“new Page”标签。
b、在“属性”视图中输入“Page 2”作为新的标题。
如下图:c、保存你所作的更改。
5.3发布和查看Portal1、右键单击“myPortal.portal”,选择“运行方式”->“在服务器上运行”,如下图:2、单击“完成”。
5.4创建Portlets1、创建一个存放Portlets的文件夹a、右键单击“WebContent”目录选择“新建”->“文件夹”,如下图:b、输入文件夹名称并单击“完成”。
2、创建一个URL Portletsa、右键单击portlets文件夹选择“新建”->“Portlet”。
如下图:b、输入文件名并单击“完成”.将会显示Portlet类型对话框,如下图:c、选择“浏览器(URL) Portlet”并选择“下一步”。
d、填充Portlet选项值,并选择“创建”。
如下图:5.5把Portlets添加到Portal1、在“调色板”视图中选择“URL Portal”并拖动至“Page 2”的左边一列的占位区。
如图:2、保存.6登录管理控制台并创建Portal和桌面●打开管理控制台●登录管理控制台●创建Portal和桌面6.1打开管理控制台1、选择“运行”->“打开”管理门户管理控制台””,如下图:之后就弹出“门户管理控制台”的登录界面,如下图:6.2登录管理控制台1、输入用户名weblogic和密码weblogic并单击“登录”。
登录成功后就会显示管理控制台的主菜单界面,如下图:6.3创建Portal和桌面1、在管理控制台的主页中单击“门户管理”。
之后就会进入如下所显示的界面:2、在左边的树中单击“门户”菜单项,如下图:2、单击“新建门户”,将要显示“新建门户”对话框,如下图:3、输入各输入框的值,单击“新建门户”。
之后将会列出你刚才所建门户,如下图:4、单击“我的门户”查看门户的详细信息,门户的详细信息如下图:5、单击“新建桌面”。
将会弹出新建桌面对话框,如下图:6、单击“选择一个.portal文件”后再单击“下一步”。
之后将会出现“选择门户文件”对话框,如下图:7、单击“显示全部”后,选中“myPortal.portal”,单击“下一步”.之后将会显示“输入桌面属性”对话框。
如下图:8、输入桌面属性信息后,单击“下一步”。
将会出现“检查属性”对话框。
如下图:9、单击“下一步”,将会显示“完成”对话框,如下图:10、单击“完成”。
7自定义页面7.1复制visitorTools至Portal Web项目1、在WorkShop工具中打开“合并项目”视图,如下图所示:2、复制visitorTools至项目在“合并项目”视图中打开你所建的Portal web项目树,找到“visitorTools”文件,再在“visitorTools”文件夹上单击鼠标右键选择“复制至项目”。
如下图所示:7.2修改Portal外壳属性为“Visitor Tools Desktop Shell”1、打开Portal文件,如下图:2、修改属性值,从下拉列表中选择“Visitor Tools Desktop Shell”,如下图:3、保存。
4、如果之前已经在管理控制台中建立过了桌面,需要将之前的桌面删除掉,再重建。
7.3编写登录界面登录到门户桌面由于自定义页面这个功能必须得用户登录后才能使用,因此需要有个登录的界面供用户登录至门户桌面。
登录功能的代码在示例包中,下图显示的是示例包中登录功能的目录结构:1、打开登录界面,输入用户名weblogic和密码weblogic,如下图:2、查看自定义页面功能。
