ZYC901A安卓车机说明书
潮车品牌电动汽车导航系统说明书

Screen:All selections and instructions are displayed on the screen. Enter information into the system either by voice or by using the interface dial.Note:Shifting into Reverse (R)activates the rearview camera;the image is displayed on the screen.AUDIO button:Displays the audio screen.MAP/GUIDE button:Displays the map.When en route,switches the display between the map and guidance screens.MENU button:Displays the “Enter a destination by”screen.When en route,displays the route options on the MENU screen.SETUP button:Displays the Setup screen to change and update information in the system.INFO button:Displays the screen for selecting Messages, Traffic Incidents, Weather Information*, Trip Computer, Cellular Phonebook, Calendar, Calculator,and Roadside Assistance.More options are available by moving theInterface Dial to the right; Voice Command Help, Map Legend, and Key to Zagat Ratings.Interface Dial/ENTER button:Moves left,right,up,and e to move the highlighting around the display,to scroll through lists,or to look around a displayed map.Push in to enter the selection into the system.CANCEL button:Cancels the current screen and returns to the previous screen.CLOCK:Controlled by the navigation system and canautomatically compensate for daylight savings time and time zone changes.Navigation SystemSee the navigation system manual for more information .Map Screen LegendAcura Dealer School Restaurant ATM Parking LotPost OfficeHonda Dealer Hospital Grocery Store Gas Station Hotel/Lodging Parking Garage Freeway Exit Informationshow current location.)Landmark IconNOTE:If you move the Interface Dial over an area (map features shown above),the name is displayed on the screen.NOTE:See Map Legend on the Information screen for further explanation.GPS Signal StrengthMissing: Poor/No Reception to view.)zoom in or out by rotating the Interface Dial knob .): Park : Hospital : Shopping Mall : Golf Course: Water Area : Cemetery : University : Indian Reservation: Airport/Stadium/BusinessCommonly Used Voice Commandsfollowing page for an example of this process.Voice RecognitionQuick Start GuideEntering a Destination Using Voice ControlNote:Press and release the Navi Talk button, wait for a beep, and say your command.1.Say "display menu." The displaychanges to the Enter Destination by screen.2.Say "address."3.Say “city” (or “change state” ifnecessary).8.Say the street address numberas a continuous series. Forexample, for the addressnumber 15200, say "one, five,two, zero, zero, done."5.A list of city names appears. Saythe number listed next to the desired city.6.Say the street name. Do not saythe direction (north, south, east, or west) or type (street, avenue, etc).7.Say the number listed next to thename of the desired street.4.Say the name of the city or say"select current city."9.The system displays the“Calculate route to” screen. Say "OK" to display a map of the route. The plotted route appears in blue.Tip: While en route, you can cancel or change your current destination or select other options by saying "display menu."Using the Voice Control SystemThe voice control system allows for convenient, hands-free operation of navigation and selected audio and climate control system functions. For a complete list of voice commands, see the Navigation System Manual or presssystem mutes). Press and release the Navi TALK button,then wait for a beep .Give a voice command in a clear, natural speaking voice (without pause) within 3 seconds. Otherwise, the system will prompt you to repeat your command.Tip:A multiple beep sound indicates a function is unavailable, or is already set.•BACK button:Returns the display to the previous screen. It is enabled for navigation commands only, but can cancel an audio or climate command up to one second after the command confirmation.General Voice Control GuidelinesThe voice control microphone is located in the ceiling console. To optimize voice recognition and hear the voice feedback, we recommend:say "Repeat voice."•Ensure that the navi volume and "Voice feedback" in the Setup menu are set to ON. The feedbackprovides confirmation of your command and provides the best way to say the command.Voice RecognitionQuick Start Guide。
SpecoTech AS1 智能无线音频分布流媒体流汽器说明书

3. Connect your system Power connection Power the streamer with the power adaptor included in the accessories. It is recommended to connect the adapter into the streamer first, and then plug the AC plug into your wall or other outlet.
speaker) • Mobile device or computer
2|Pa ge
200 New Highway
*
Amityville, NY 11701
*
Interface and Functions
① WiFi Antenna: Used to connect to WiFi ② Reset: Used to reset the device when if you are having problems with
LY-900A用户使用说明书

LY-900A 用户使用指南深圳来源电子有限公司年月日前言尊敬的客户:欢迎你选择、使用本公司产品,为了方便你使用,请仔细阅读说明书,并按照说明书的步骤操作,希望我们的产品能成为您车辆安全管理的好帮手。
使用时无论遇到怎么样的问题,请及时反映给我们,我们时刻恭候为你服务。
目录目录 (2)一、安全事项 (3)二、关于GPS的相关信息 (3)三、产品出厂配置 (4)四、基本功能特性 (6)五、LY-900A产品外观介绍 (7)六、设备安装说明 (9)七、常见问题 (13)一、安全事项为了避免危险或违法,请认真阅读以下这些规则。
1、请您在贴有通知的场所按规定关闭本产品。
这些场所包括医院或休养院等医疗场所可能正在使用对外部射频信号敏感的设备。
2、请您在使用本产品时必须保证本产品与相关医疗设备(起搏器、助听器和其他设备)保持至少6英寸(15厘米)的距离以免造成干扰,如果发生干扰,请立即关闭本产品。
3、请不要将本产品放在安全气囊上方或者安全气囊展开后能够触及的区域内4、在进入因潜在因素而容易发生爆炸的地区之前,请关闭本产品。
5、为了避免干扰爆破作业,在爆破区的电雷管附近或贴有“关掉您的移动电话”的地方请关闭本产品。
6、如果本产品浸水、撞坏或摔坏,请取下停止使用,并及时送到指定维修服务处进行修理。
不要使用微波炉等外部加热设备对其进行干燥处理。
二、关于GPS的相关信息本产品 GPS 的定位精度是 10 米以内。
然而,请注意以下条件,GPS 接收的性能可能会被受到影响,这就可能造成 GPS 定位不准确。
1、封闭的室内,隧道或地下通道。
2、高密度的高层建筑区域。
3、有密集、高大树木的森林。
4、多云多雨的气候。
5、汽车的窗上有贴有特殊类型的玻璃贴膜。
6、被金属物遮挡。
7、在战争或其他特殊形势下,一些 GPS 卫星可能暂时性的被美国政府锁住。
注意:在高速移动的过程中追踪器重开机,GPS 准确定位的时间可能会有延长情况;在一些情况下,追踪器的 GPS定位信息在跟踪软件或地图上的显示可能会有点偏离实际地点或道路。
益欧A6L行车记录仪说明书

益欧车载终端设备产品名称:北斗汽车行使记录仪产品型号:A6L 版本号:V1.1法律声明:首先感谢阁下使用深圳益欧科技有限公司(以下称为“益欧科技”)的产品。
如果您已同意以下条款,将获得我们提供的支持与服务。
当您对此有疑义,欢迎来电咨询。
若您不能接受以下条款,请停止使用本手册。
本文手册所有权归深圳益欧科技有限公司。
保留任何未在本手册中明示授予的权利。
手册中涉及博实结科技的专有信息。
未经博实结科技事先书面许可,任何单位和个人不得复制、传递、分发、使用和泄漏该手册以及该手册包含的任何图片、表格、数据及其他信息。
“益欧”是益欧科技的注册商标。
在未经益欧科技事先书面同意的情况下,阅读本文档并不表示以默示、不可反言或其他方式授予阅读者任何使用本文档中出现的任何标记的权利。
本产品的存放、使用应遵照产品手册、相关合同或相关法律、法规的要求进行。
本公司保留在不预先通知的情况下,对此手册中描述的产品进行修改和改进的权利;同时保留随时修订或收回本手册的权利。
本用户手册中如有文字不明之处,请您及时向本公司或者代理商、销售商咨询。
目录第一章产品组成及接口定义 (4)一、产品概况 (4)二、产品配置清单 (5)三、产品接口定义及接线说明 (6)第二章整机参数及功能操作说明 (8)一、产品整机参数表 (8)二、产品整机功能表 (8)三、产品安装操作流程 (9)第三章常见问题分析与售后服务 (13)一、常见问题分析 (13)二、注意事项 (14)三、售后服务 (14)一、产品概况汽车行驶记录仪是一款集定位、2G/3G/4G通讯、车辆远程监控于一体的车载监控终端。
内置行驶记录仪,即汽车“黑匣子”,方便交警执法和政府监管。
本产品可外装油量采集设备、温度采集设备使用;支持双IP、IC 卡登签、实时监控、拍照等功能;车载监控终端符合北斗部标北斗协议(JT/T 794-2019、JT/T 808-2019)、国标协议(GB/T 19056-2012)等国家相关政策标准,可适用于两客一危、货运车、出租车、网约车、校车、押运车等车辆行业监管需求。
ZY20 中渔 说明书 用户手册

ZY-20 CDMA2000/GSM数字移动电话机用户手册说明与注意说明:说明表示可以帮助您更好地使用该手机。
注意:注意表示对手机存在潜在损坏或数据丢失,甚至财产损失,并且告诉您如何避免此类问题。
温馨提示使用前请认真阅读本说明书。
本公司拥有对本手册的最终解释权,如描述、图片与实际产品有细微差别,请以实际产品为主。
手机如有升级版本,不另行通知,请与我司客户服务联系。
我司保留在不作任何预先通知的情况下对本手册中内容作修改的权利。
目录1 了解您的手机 (6)1.1 基本规格 (6)1.2 按键定义 (6)1.3 常用状态图标 (7)2 开始使用 (8)2.1 安装/取出电池 (8)2.2 电池充电 (8)2.3 安装/取出电话卡 (8)2.4 T-Flash卡 (9)3 基本功能 (10)3.1 开机/关机 (10)3.2 拨打电话 (10)3.2.1 紧急电话 (10)3.2.2 拨号盘 (10)3.2.3 快速拨号 (10)3.3 接听电话 (10)3.4 通话操作 (11)4 文本输入 (12)4.1 智能拼音输入法 (12)4.1.1 键盘输入 (12)4.1.2 词组输入 (12)4.2 数字输入法 (12)4.3 字母输入法 (12)4.4 笔画输入法 (13)5 菜单 (14)5.1 通讯录 (14)5.1.1 联系人列表 (14)5.1.2 新建 (14)5.1.3 查找 (14)5.1.4 群组 (14)5.1.5 分组复制 (14)5.1.6 删除 (15)5.1.7 快速拨号 (15)5.1.8 容量查询 (15)5.1.9 C网本机号码 (15)5.1.10 G网本机号码 (15)5.2 信息 (15)5.2.1 短信 (15)5.2.2 彩信 (16)5.2.3 语音信箱 (18)语音信箱 (18)5.3 通话记录 (19)5.3.2 GSM通话记录 (20)5.3.3 全部记录 (20)5.4 互联网 (20)5.5 天翼 (20)5.6 爱音乐 (20)5.7 天翼空间 (20)5.8 天翼视讯 (21)5.9 娱乐 (21)5.9.1 FM收音机 (21)5.9.2 音乐播放 (21)5.9.3 视频播放 (21)5.9.4 照相机 (21)5.9.5 录像 (22)5.9.6 录音机 (22)5.9.7 游戏 (22)5.9.8 文本阅读器 (23)5.9.9 UCWEB (23)5.9.10 QQ (23)5.9.11 JA V A (24)5.10 文件管理 (24)5.10.1 本地文件夹 (24)5.10.2 T-FLASH卡 (24)5.10.3 内置U盘 (24)5.10.4 容量查询 (25)5.11 个人助理 (25)5.11.1 闹钟 (25)5.11.2 日程表 (25)5.11.3 记事本 (25)5.11.4 计算器 (25)5.11.5 货币兑换 (25)5.11.6 秒表 (26)5.11.7 世界时间 (26)5.11.8 定时关机 (26)5.11.9 定时器 (26)5.11.10 归属地查询 (26)5.11.11 天气预报 (26)5.11.12 手电筒 (26)5.12 设置 (26)5.12.1 话机设置 (26)5.12.2 卡槽设置 (27)5.12.3 显示设置 (27)5.12.4 通话设置 (27)5.12.5 安全设置 (27)6 常见问题 (30)7 安全信息 (31)1 了解您的手机1.1 基本规格说明:待机时间是指手机在不通话、不移动情况下的持续开机工作时间。
SMSL A50-说明书.pdf

/使用说明书A5O本说明书的内容可能会随版本更改,如有变动,恕不另行通知Ver 1.0请将设备安装在通风良好、阴凉、干燥、干净的位置,远离直射阳光热源、振动、灰尘、 潮湿或寒冷。
只能使用本机指定的电压。
使用高于指定数值的电压很危险,而且可能导致火灾,损坏本机或造成人身伤害。
对于使用高于指定电压造成的任何损害,我司将不负任何责任。
不要试图自行改造或修理本机。
如果需要任何服务,请与销售或者我司客服人员联系。
不管有任何理由,都没有打开机壳的必要。
如果打算长时间不使用本机(比如度假时),请从墙壁交流电源插座上断开电佛山双木三林科技有限公司承诺产品的良好品质,产品自售出之后7天内 正常使用情况下出现故障,客户可以选择退货或者保修(不影响二次销售 才可退货)。
正常使用一年内出现故障可以免费保修。
二、购买日期以销售商开出的购机发票或收据日期为准,网购可以交易截图为准。
三、有以下情况都不能享受“三包”服务1.一切人为因素损坏,包括非正常工作环境下使用或不按照说明书使用。
2.用户私自拆机、改装、维修。
3.使用非指定或许可的配件造成损坏的。
4.机身的QC或保修贴损毁。
5.不能出示有效购机凭证。
6.不属于本公司产品。
四、保修方式为送修此条款只适于中国大陆,其它地区请参考当地销售代理商的规定和国家法规。
使用2片美国TI大功放数字放大芯片TPA3116。
新的蓝牙5.0技术, 兼具低功耗和高音质。
电子音量控制, 杜绝电位器调音量时的杂音。
具备音效调节, 高低音单独可调。
具备pop声控制电路,开关机没有pop声。
大功率电源适配器, 适配音频的动态响应。
极致的小体积, 放置更加灵活。
配备全功能高品质遥控器。
使用环境有其它WiFi 2.4G、蓝牙设备,容易产生干扰,可能导致连接不成功,或者声音卡顿、甚至播放中断。
蓝牙还会因距离太远或受到阻挡物(如墙壁)阻隔而影响有效传输, 建议一般无障碍直线距离为8-10米左右。
部分安卓移动设备,可能存在蓝牙不完全兼容的情况,而导致不能正常放,请使用前确认手机不存在兼容性问题。
ZYC901A安卓车机说明书

安卓车机说明书
用户手册
ZYC901A
目录
注意事项 ........................................................................................................................................ 3
² 为了保证机器正常运转,防止火灾或电击发生,请不要将机器暴露在潮湿的空气 中,更不能将液体洒落机器上。
² 如果机器支持碟片(可选),只能播放 12 厘米的碟片,并且每次只能播放一张 碟片。请不要将 8 厘米的碟片或者其它物品塞入机器。
基本操作
系统复位 1) 用户在第一次使用本机时,请长按复位“RESET”键 3 秒以上,使机子恢复到出
蓝牙免提系统操作 ......................................................................................................................16
蓝牙音乐播放(A2DP) ...........................................................................................................17
GPS 卫星导航功能操作.............................................................................................................12
光碟播放基本操作(可选功能) ..............................................................................................13
功能使用说明书

用本机,并送往购买处或售后服务中心处理 ;
6
若继续使用则可能导致火灾或其它事故。
7. 驾驶时请将音..................... 1 开 / 关机................... 1 进入主桌面及其功能简介..... 1 图标移动................... 1 时间设置................... 2
汽车影音导航系统
CAR AV NAVIGATION SYSTEM
功能使用说明书
使用注意事项
感谢您惠购本产品!为了您更好的使用本机,请仔细阅读本功能使用说明书。
1. 当 本机在操作过程中出现异常现象时,请首先参阅本说明书“常见故障排除 向导”中的解决方法,如果找不到解决方法,请用尖头物按面板的 [ 复位键 ], 将本机复位到出厂状态。
勿播放光碟,应将光碟取出,待播放机内部露水除去以后再使用。如果经过 几个小时仍不能正常播放,请与经销商联系。 8. 本机不能吸入形状不规则的碟,若强行插入会造成机芯故障。 9. 出 现在本说明书中的插图是为了更清楚地说明如何进行控制,因此插图中的 显示界面可能与本机的实际显示略有不同,并且有些显示屏幕的插图可能在 实际操作中无法实现。 10. 请遵照使用说明书操作本机,非法操作造成的损坏不在保修范围内。
CD 播放控制菜单............. 10 USB/SD 音视频碟播放控制菜单... 11 蓝牙播放源................... 12 断开移动设备............... 13 拨打电话................... 13 接听电话................... 14 移动设备音乐............... 14 调整蓝牙设置............... 14 蓝牙一键通导航............... 15 调节音效..................... 16 调整设置..................... 17 通用设置................... 17 时间设置................... 17 声音设置................... 17 视频设置................... 18 碟片设置................... 18 音量设置................... 19 恢复设置................... 19 其它......................... 20 收听其它设备中的音乐....... 20 系统复位................... 20 更换保险丝................. 20 导航功能................... 20 可选功能................... 20 产品信息..................... 21 故障排除..................... 22 附加信息..................... 23
安卓车机用行车记录仪R320电子说明书

前言尊敬的用户:您好!首先非常感谢您使用我们公司的系列产品,能够为您服务是我们的荣幸!为确保您正确使用本公司产品,请仔细阅读本手册。
手册采用图文并茂的方式,配合文字的插图详细直观地阐述产品的操作,由于产品生产日期、批次不同,说明可能会与实际使用的产品有差异,请以实物为准。
最后再次感谢您的惠顾与支持,同时也希望您在使用过程中反馈一些宝贵意见。
因为这些意见,能够使我们不断地去完善产品。
因为我们都呼吁安全第一,生命无价!也希望每一位驾驶员都遵守好交通规则,快快乐乐地出门,平平安安地回家!祝各位:万事如意,事事顺心!一、外观及按键功能描述(以下所有图片仅供参考)二、购买安装须知●产品为安卓操作系统汽车中控台车机专用(以下简称安卓车机)●请您先确认产品主机及配件是否完整,然后进行插电测试(测试时无需安装内存卡)●产品通过车机USB连接,内置安卓车机录像仪APP安装包,录像仪与安卓车机USB接口直连后,安装好APP即可正常使用;●产品本身无WiFi热点,使用方式为通过数据电源线连接车机,在车机上显示,通过车机热点或者手机热点,实现手机互联查看(具体操作步骤见后)●产品针对后加装的安卓车机开发,具体适配品牌或方案商的产品为展讯,鼎威、诺威达、腾实、恒昌通、迪恩杰、云智易联、卓芯威等;(原车自带的安卓车机因操作系统被锁定,未开源,不能安装外部软件,故无法使用。
)●录像仪的安装:撕去3M胶保护膜将膜贴于静电贴上,粘贴于后视镜附近的前挡风玻璃上,并保证良好视野。
部分车主因挡风玻璃贴膜,导致静电贴无法吸附挡风玻璃,可直接通过3M胶固定录像仪;部分录像仪支架可拆卸,录像仪固定之后,往下轻推录像仪(如下图),听到“咔哒”声后,可以使录像仪与支架分离。
录像仪安装时确认水平和垂直位置之后,固定录像仪;静电贴和3M胶贴在使用之后不宜再次使用,需要更换新的胶贴。
●连接电源:用电源数据线连接车机端和录像仪端。
(请务必使用原厂电源数据线)连接完成后,若录像仪指示灯变亮,则说明连接成功。
ZY新产品使用说明书

ZY12000/55型掩护式液压支架产品使用维护说明书天地科技股份有限公司开采设计事业部二○一四年十月目录第一节支架的适用条件及配套设备------------------------2第二节支架的特点及组成----------------------------------- 3第三节支架的主要技术特征-------------------------------- 3第四节支架的主要结构件及其作用------------------------ 6第五节防护装置-----------------------------------------------10第六节立柱及千斤顶-----------------------------------------11第七节支架的操作及维护------------------------------------14第八节支架常见故障及其排除----------------17第九节警示-------------------------------------------------24附录一液压系统常见故障、原因及排除方法---------28第一节支架的适用条件及配套设备一、支架的适用条件老顶 I、II级直接顶 1、2类煤层倾角≤45°煤层厚度~5.3m二、支架的主要配套设备1、液压支架: ZY12000/26/552、采煤机: KSW-1500EU13、刮板机: SGZ1000/2×12004、转载机: SZZ1200/7005、破碎机: PLM3000三、执行标准1、《液压支架通用技术条件》2、MT550-1996 《大采高液压支架技术条件》四、型号含义Z——液压支架; Y——掩护式; 12000——工作阻力为12000kN;27——支架最小高度为2550mm;55——支架最大高度为6000mm。
第二节 ZY12000/55掩护式液压支架的组成ZY12000/55掩护式液压支架主要由金属结构件、液压元件二大部分组成。
诺基亚 6090 车载电话 安装及使用说明

诺基亚6090车载电话安装及使用说明汉世威c ar c o m目 录一、简单操作指南 (1)二、安装 (4)三、欢迎使用 (3)四、安全码 (3)五、开始使用 (3)六、基本功能 (11)1. 拨打电话 (11)2. 接听电话 (12)3. 调节音量 (13)4. 重拨已拨出的号码 (13)5. 在通讯录里存储姓名和电话号码 (13)6. 从通讯录里拨打电话 (15)七、其它重要功能 (16)1. 设置时间 (16)2. 设置铃声 (16)3. 通话选项 (17)4. 语音信息 (18)5. 文字信息 (18)6. 编写和发送信息 (19)7. 删除信息 (19)8. 传真和数据通话 (20)9. 点火感应 (20)10. 自动关机···················································20 汉世威c ar c o m11. 汽车音响静音············································21 12. 背光调节···················································22 八、使用菜单··················································22 1. 通过滚动的方式进入菜单····························22 2. 通过快捷方式进入菜单·······························23 3. 菜单功能列表··············································24汉世威c a r c o m一、简单操作指南:摘下手柄:至少按下手柄托上的一个按键,即可摘下手柄。
任我游 600 610车载导航仪 说明书
目
录
4.3 清除一个航点 ............................................................................................ 29 4.4 清除所有自建的航点 .................................................................................. 29 4.5 特殊报警点 ................................................................................................ 29 4.6 搜寻功能 .................................................................................................... 30 4.6.1 首先选择参考点 ............................................................................. 30 4.6.2 按最近查找记录 ............................................................................. 30 4.6.3 按兴趣点搜寻 ................................................................................. 31 4.6.4 出口搜寻 ........................................................................................ 33 4.6.5 搜寻街道 & 道路 ............................................................................. 34 4.6.6 查找路口 ........................................................................................ 36 4.7 清除搜索记录 ............................................................................................ 37 4 . 8 “家”的设定 ......................................................................................... 37 5. 旅行工具包 .......................................................................................................... 38 5.1 交通信息 .................................................................................................... 39 5.2 旅行向导 .................................................................................................... 42 5.3 MP3 播放功能 ........................................................................................... 44 5.4 相册功能 .................................................................................................... 46 5.5 货币汇率换算功能 ..................................................................................... 47 5.6 测量单位转换 ............................................................................................ 49 5.7 计算机功能 ................................................................................................ 50 5.8 世界钟功能 ................................................................................................ 51 5.9 语音电子书播放功能(此功能操作和 MP3 播放雷同)............................ 53 iii
导航系统19用户指南说明书
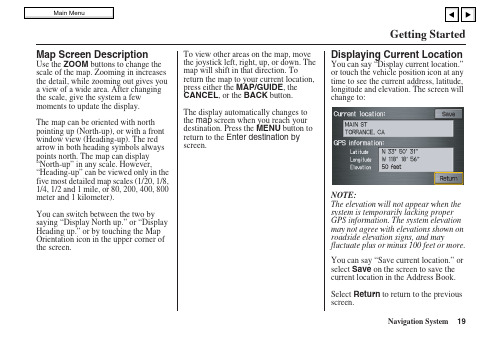
Getting StartedMap Screen DescriptionUse the ZOOM buttons to change the scale of the map. Zooming in increases the detail, while zooming out gives you a view of a wide area. After changing the scale, give the system a few moments to update the display.The map can be oriented with north pointing up (North-up), or with a front window view (Heading-up). The red arrow in both heading symbols always points north. The map can display “North-up” in any scale. However, “Heading-up” can be viewed only in the five most detailed map scales (1/20, 1/8, 1/4, 1/2 and 1 mile, or 80, 200, 400, 800 meter and 1 kilometer).You can switch between the two by saying “Display North up.” or “Display Heading up.” or by touching the Map Orientation icon in the upper corner of the screen.To view other areas on the map, movethe joystick left, right, up, or down. Themap will shift in that direction. Toreturn the map to your current location,press either the MAP/GUIDE, theCANCEL, or the BACK button.The display automatically changes tothe map screen when you reach yourdestination. Press the MENU button toreturn to the Enter destination byscreen.Displaying Current LocationYou can say “Display current location.”or touch the vehicle position icon at anytime to see the current address, latitude,longitude and elevation. The screen willchange to:NOTE:The elevation will not appear when thesystem is temporarily lacking properGPS information. The system elevationmay not agree with elevations shown onroadside elevation signs, and mayfluctuate plus or minus 100 feet or more.You can say “Save current location.” orselect Save on the screen to save thecurrent location in the Address Book.Select Return to return to the previousscreen.Navigation System19Getting StartedSystem Function Diagram This diagram shows the navigation system features, starting at the center and working outward in layers. The navigation program starts at “Key ON,” and then displays the globe screen (blue). If OK is selected, the functions in the yellow segments of the diagram become available in the Set up and Information screens.The white segments of the diagram are available anytime, even if you do not select OK.The items above the map screen show various methods, to begin driving to your destination (orange). You are provided with map/voice guidance, routing cautions, and a direction list. While driving to your destination, use the voice control system as much as possible to interact with the navigation, audio, and climate control systems (green).20Navigation SystemNavigation System 21When you press the MENU button, the display changes to:Address (see page 22)This selection requires you to enter the city (and possibly the state), and the address that you want to go to.Intersection (see page 26)This selection allows you to enter the names of two intersecting streets in a city. This is useful if you know the general location of your destination, but not the exact address.Places (see page 29)The system contains the locations of many businesses, parks, hospitals, etc. This selection lets you search these by category, name, or phone number.Map Input (see page 34)This selection allows you to point to a destination on the map using the joystick. This allows you to enter a destination or address that may not be listed in the database.Previous Destinations (see page 37)When you enter a destination with any of the available selections (except Address Book and Go Home ), the last 50 destinations are saved by the system. Use this selection to choose a destination again.NOTE:If Previous Destinations is grayed out, there are no Previous Destinations entered.Today’s Destinations (see page 38)You can enter and sort up to five destinations and store them in theToday’s Destinations list. You can then use the Today’s Destination selection.NOTE:If Today’s Destinations is grayed out, there are no Today’s Destinations entered.Address Book (see page 39)This selection allows you to select a stored address. The system can store up to a combined total of 200 User 1 and 2 addresses.Go Home (see page 40)This selection allows you to select your home or a common place as a destination.NOTE:If you have no home address entered,the system prompts you for one.Entering a Destination。
ED9901A中文说明书

1.产品主要技术指标12.产品出厂缺省值3.声光显示3.1.正常工作状态下:3.1.1.有效指令:嘟短声3.1.2.无效指令:嘟长声3.2.编程状态下:3.2.1.绿灯常亮3.2.2.有效指令:嘟嘟两声3.2.3.无效指令:嘟嘟嘟三声4.撤销未完成的指令:在键入指令没有全部完成前,按下[*]键,可以撤销该项指令25.功能及设置5.1.进入编程:[*]+[6位编程密码]嘟嘟,缺省:990101 5.2.修改编程密码:[0]+[输入6位新编程密码]+[重复输入6位新编程密码]5.3.设置有效卡:[5]+[输入3位编码]嘟嘟+[感应卡1]嘟、嘟嘟+[感应卡2]嘟、嘟嘟+……+[感应卡n]嘟、嘟嘟+[*]嘟嘟,完成加卡5.3.1.3位编码:是001——500之间不可重复数字。
该编码是在卡丢失后删除卡的重要方式,请发卡人员妥善保存卡编码5.3.2.连续设置有效卡时,每张卡的编码按前一张卡的编码+1递增。
例如输入编码为015,再次读卡时,再次卡的编码为016……依次类推5.3.3.有效卡缺省个人密码:000035.4.删除有效卡:5.4.1.编码方式删卡:[7]+[输入3位编码1]嘟嘟+[输入3位编码2]嘟嘟+……+[输入3位编码n]嘟嘟+[*]嘟嘟,完成删卡5.4.2.感应方式删卡:[7]+[感应卡1]嘟、嘟嘟+[感应卡2]嘟、嘟嘟+……+[感应卡n]嘟、嘟嘟+[*]嘟嘟完成删卡5.4.3.删除所有已设置卡:请使用恢复出厂设置的方式5.4.4.删除有效卡后其个人密码也一并删除5.5.退出编程状态:[*]嘟嘟5.6.设置感应卡的开门方式:5.6.1.卡或密码方式:[1]+[0]嘟嘟(缺省)5.6.2.卡+个人密码方式:[1]+[1]嘟嘟45.7.密码5.7.1.“卡或密码”方式中的密码:是指每张有效卡内的个人密码(最多500个个人密码),以及1个通用密码5.7.2.关闭修改个人密码功能:[1]+[2]嘟嘟(缺省)5.7.3.开启修改个人密码功能:[1]+[3]嘟嘟5.7.4.修改个人密码:非编程状态下[#]嘟嘟+[读感应卡]嘟、嘟嘟+[输入4位原密码](缺省0000)嘟嘟+[输入4位新密码]+[重复输入4位新密码]嘟嘟;5.7.5.修改通用密码:[3]+[4位通用密码](缺省1234)当通用密码或者个人密码为0000时,在“卡或密码”方式下,密码无效5.8.设置开锁时间:[2]+[TT]。
深圳首航车载终端规格书(全功能)

版本号:SOFARSCB1.0SF110-G1X车载终端说明书深圳市首航科技有限公司《SF110-G1X 车载终端说明书》目录1范围 (3)2规范性引用文件 (3)3术语和定义 (4)3.1终端 (4)3.2定位监控 (4)3.3报警处警 (4)3.4电瓶保护 (4)3.5远程升级 (4)4缩写 (4)5产品图片和尺寸 (5)6技术参数 (5)7 SF110-G1X车机主要功能 (6)7.1常规功能 (6)7.1.1定位追踪 (6)7.1.2报警功能 (6)7.1.3远程控制功能 (7)7.1.4电源管理 (7)7.1.5其他功能 (7)7.2特色功能 (8)7.2.1启动自动上传命令 (8)7.2.2关闭自动上传命令 (8)7.2.3实时查询统计数据 (8)7.2.4统计数据描述说明 (8)7.2.5注意 (8)8指示灯状态 (9)8.1通讯指示灯(红色):GSM工作状态指示: (9)8.2工作指示灯(绿色):工作状态指示: (9)9出厂检测 (9)9.1一般性能检查 (10)9.1.1外观检查 (10)9.1.2文字、图形、标志、铭牌检查 (10)9.1.3电气部件测试 (10)9.2电气性能测试 (11)9.2.1.电源电压适应性测试 (11)9.2.2.耐电源极性反接性能 (11)9.2.3 耐电源过电压实验 (11)9.2.4.断电保护试验 (11)SF110-G1X车载终端规格书1范围SF110-G1X是深圳市首航科技有限公司自主研发生产的新一代高科技产品;本产品通过利用全球卫星定位导航系统(GPS)、电子地图(GIS)、移动通信网络(GSM / GPRS )、计算机通信及自动控制等技术能为用户提供更加优质的卫星定位、移动通信、远程控制、信息传输等功能。
本文详细描述了首航科技车载终端系列产品中SF110-G1X车载终端的基本配置、详细功能、性能指标等内容。
2规范性引用文件下列文件中的条款是本产品在设计、测试、生产中所依据的标准,凡是注明日期的引用文件,其随后所有的修改单(不包括勘误的内容)或修订版均不适用于本产品。
ZW-9018G 外置车载GPS导航 说明书

1、应用范围 (General Description)本产品适合导航盒的使用,用于完成低成本、高性能的DVD+汽车导航功能。
2、产品特色(Feature )n 超高集成度,方便与汽车单双DIN DVD 集成n 接口丰富,与汽车DVD 完美结合,功能扩展潜力巨大。
n 支持多种视频输出格式和分辨率,可输出RGB ,YPbPr ,S-VIDEO ,CVBS 视频,双声道音频输出,可直接与汽车DVD 的AV (AUDIO AND VIDEO )端连接n CVBS ,Y/C 可选择PAL ,NTSC 输出。
可设定亮度,对比度,色度,饱和度。
n CVBS ,Y/C ,YPbPr 输出分辨率320*240,400*234,480*234等,通过跳电阻自行改变设定n RGB 输出,分辨率320*240,400*234,480*234,640*480,或其他,并可调节亮度和对比度。
n 超强的适应性:显示大小调节,显示位置可调节。
n 可流畅播放MP3/MP4多媒体文件 n 支持文本阅读,图片浏览。
n 支持导航声音优先功能(客户在观看DVD 时如有导航提示,则自动播放导航语音)n 遥控器及触摸屏操作。
支持灵活的触摸屏操作,可方便与汽车DVD 整合共用一个触摸屏。
n 选用超高灵敏度GPS 接收模块,可在信号极其微弱的情况下准确定位n SD 卡存储导航软件或多媒体文件 n 支持最大4GB 的NAND FLASH ,可放导航软件和地图,或多媒体文件n 可以通过SD 卡升级OS 及所有软件(如地图等)深圳振潍科技有限公司 电话: 0755-2646 9412 h t t p ://w w w .c h i n a z e r o w a y .c o m Q Q:312042721 / 1147620693、产品规格(Specification )系统参数 主频400MHZ主芯片型号 SAMSUNG S3C2440A-40 内存 64MB存储空间 64MB(可扩展为4GB) 导航软件存储 SD 卡操作系统 WINCE5.0 NET 支持音频类型 MP3/PCM/WMA支持视频类型 ASF/AVI/WMV/DIVX 视频解码性能 QVGA >25帧/S 软件编译类型ARMV4基本参数视频输出类型 复合视频 / 模拟RGB 视频输出电压 1.0Vpp/75欧分辨率 320*240/400*234/480*234/640*480 声音输出 双声道CD 音质声音功率 双声道0.25W/CHANEL 重量约100g产品尺寸 55mm(长)*45mm (宽)*8mm(高) 工作温度 -40℃ 到 +80℃ 存储温度 -40℃ 到 +100℃ 工作湿度 45% 到 80% 储存湿度 30% 到 90% 操作电压 DC 12V 平均功耗 3W 待机功耗<50mW深圳振潍科技有限公司 电话: 0755-2646 9412 h t t p ://w w w .c h i n a z e r o w a y .c o m Q Q:312042721 / 114762069GPS 参数 芯片组 SiRF Star III 频率1.575GHZC/A CODE 1.023 MHZ chip rate 通道数20通道 跟踪灵敏度 -159dBm 定位精度 10m, 2D RMS 速率0.1m/s 数据更新率 1HZ重新捕获时间 平均0.1s 热启动时间 平均1s 温启动时间 平均38s 冷启动时间 平均42s 最大定位高度 18,000m 最大速率 515m/s 加速度< 4gGPS 天线类型 外置有源陶瓷天线 天线增益 27dB天线电压 3.3V ±5% 天线电流 15mA天线接口类型90度弯脚SMA 插头深圳振潍科技有限公司 电话: 0755-2646 9412 h t t p ://w w w .c h i n a z e r o w a y .c o m Q Q:312042721 / 114762069图片(Picture):接线图(Outline )产品外形尺寸图深圳振潍科技有限公司 电话: 0755-2646 9412 h t t p ://w w w .c h i n a z e r o w a y .c o m Q Q:312042721 / 114762069外部接口说明u 20PIN 外部接口说明(J3)采用双排专用汽车接口,间距为4.2mm脚位 描述 脚位 描述1 左声道输出 11 右声道输出2 模拟地12 YM(触摸屏接口)/串口TXD3 RED/Y 信号输出 13 复合同步/行同步信号输出4 BLUE/AV 信号输出 14 GREEN/C 信号输出 5视频地15声音有效输出/红外地 L->声音有效OPEN->无声音 6 红外输入 16 红外电源输出 7 SPEAKER-(功放输出负)17 SPEAKER+(功放输出正)/(VSYNC)8 YP (触摸屏接口) 18 XM(触摸屏接口)/RXD 9汽车地 19XP(触摸屏接口)10 ACC 输入20 汽车电源输入(+12V )深圳振潍科技有电话: 0755-2646 9h t t p ://w w w .c h i n a z e r o w a y .c o m Q Q:312042721 / 1147620694、导航软件需求说明(Software Request)n 使用的操作系统是 5.0 CORE 版本n 导航软体编译类型是ARMV4,有需要SDK 的请联系我们 n 导航板GPS 使用的是COM2,波特率9600,在CVBS 输出时导航软件的分辨率为320*240;RGB 输出时接6.5寸屏的分辨率为400*234,接6.2寸、7寸屏时的分辨率为480*234,通过硬件选择n 如需要使用遥控器操作,客户需要提供遥控器的编码以及与导航软件对应的码值5、导航软件安装说明(Software Install) n 插入装有导航软件的SD 卡n 系统启动后,选取“选项”按钮,进入选项界面 n 再选取“导航设置”按钮,进行导航路经设置n 在导航设置选项里,选取打开文件图标,进行导航应用程序的选取(一般是扩展名为EXE 的文件),选取后也可以选取“启动时自动运行导航软件”选项,系统启动后直接运行导航软件 n 选取导航应用程序文件后退出设置界面,点取“导航”按钮,运行导航软件6、操作说明A .校正触摸屏将汽车点燃器输入接口(或其他12V 电源供应器)插入DC 座内,导航器将显示LOGO 并显示进度光标,大约6S 后系统自动进入控制台界面,如下图:深圳振潍科技有限公司 电话: 0755-2646 9412 h t t p ://w w w .c h i n a z e r o w a y .c o m QQ :312042721 / 114762069点击“”图标,进入触摸屏校正设置界面,按照画面提示常按中心光标位置,直到校正光标自动移至左上角位置,依次分别校正左下角光标位置、右下角光标位置、右上角光标位置。
R5 R15a音量盒系统用户手册说明书

R5/R15athe group included a active sub-woofer speaker R15a ,four pieces full-range speaker R15 with flying frameR series medium array loudspeaker systemUser Manual UM-R5/R15a-20180702Ve r A11. 2. 3. 4. 5. 6. 7. 8. 9. 10. Read the instruction first before using this product.Pay attention to all warnings.Obey all operating instructions.Do not expose this product to rain or moisture.Do not block any ventilation openings. Install according to instructions .Do not install this product near any heat source, such as , heater, burner, or any other equipment with heat radiation .Only use spare parts by manufacturer.Pay attention to the safety symbol on the of the cover.manual Please keep this manual for future reference Clean this equipment with a dry cloth.manufacturer's a supplied the outside SAFETY INSTRUCTIONSPLEASE READ THIS MANUAL FIRSTThank you for a buying product. Read this manual first as it will help you operate the system properly. Please keep this manual for future reference.WARNING:This product must be installed by professionals. When using hanging brackets or rigging other than those supplied withthe product, please ensure they comply with the local safety codes.The exclamation point within an equilateral triangle is intended to alert you to the presence of important operating and servicing instructions.ATTENTION: Don't refit the system or spare parts without being authorized as this will .void the warranty WARNING: Don't (such as candles) the equipment.place naked flames close to3333455576INTRODUCTIONFeatures Description Applications888910TECHNICAL SPECIFICATIONTechnical sheetFrequency response curve&impedance curve 2D DimensionsSOFTWARE APPLICATION GUIDEWIRING DIAGRAMINSTALLATIONInstallation instruction Mounting Accessories Installation Reference INTRODUCTION OF POWER AMPLIFIER MODULA R5/R15a2CONTENTCONTENTProduct information subjects to be updated without notification, please visit for the latest update.Compact Active Line Array Sound Reinforcement System7Connection instructionR5/R15a3R5/R15aDescription:FeaturesPRODUCT INTRODUCTIONone group included a active sub-woofer speaker R15a ,four pieces full-range speaker R15 with flying frameCompact Active Line Array Sound Reinforcement System■ compact for a variety of environments■ ■ Frequency response(-3db)50Hz-20kHz■ Sensitivity 95db,Maximum SPL 121db/127(Peak)■ Dispersion of one group(H x V) 90°x10°■ Active amplifier2x800W/4Ω■ the suspension can be adjusted by minimum 1 , and can be suspended in multiple groups.■ The new paint and advanced spraying technology are used on the surface of the box body, which makes the surface resistance to damage three times higher than that used common process and paint.■ R5/R15a Sound quality: clear, full, and without losing weight°RS232 interface provide overall control over the system Considering the vertical angle of different environments, Application■ Multifunctional hall ■ Small-sized Auditoriom ■ Church ■ Meeting room ■ Ciname■ Touring performance venuebuilt-in 2x800W/4Ω amplifier and DSP make it available crossover point & slope, delay, gain and limit protection can frequency response to up to 40kHz. The tweeter's impedance and phase response curves are nearly ideal horizontal lines. pulse response. Utilization of the unique thin foam surround and specially coated cone paper has reduced the distortion rate effectively. The active subwoofer applies Low Distortion, 3 R5/R15a is specially designed for luxury cinema; large cluster configuration .R5/R15a is designed by applying line array concept. It fea-tures compact dimensions and easy to handle design. The for use at any moment when connected to sound resource. System control over each cluster at frequency response, be achieved by connecting the speaker system to PC via RS -232 port. Adoption of ribbon tweeters offers a wide-range The light moving mass of milligrams ensures excellent im-Linear Amplification, and DSP technologies.subwoofer and 4 full range speaker which can from multi-auditorium applications. The system consists of 1 active -sized meeting room; muti-functional hall; church and Input signals are amplified by the built-in pre-amplifier,then processed and distributed by DSP, finally output via kers, which forms an integrated system. The flying hardware is designed to fit different application situation flexibly with the splay angel adjustable by 1°increment vertically.power amplifier to the subwoofer and the full-range spea-βThe power amplifier module of R15a has added the rs-485 excuse and USB interface, which is convenient for the user to adjust on-line, and the step-less speed control fan is built in. (according to the problem of power amplifier, synch-ronous acceleration fan makes the performance more stable and overload protection. Short circuit protection func-signal is attenuated through dsp. Until completely shut off the power amplifier output, to provide users with a more secure and reliable protection. The function of peak value indication is improved, and the overload indication of ad overload indicator / DSP is provided. It is convenient for the user to adjust and control effectively, and a more high quality chip is used, so that the signal-noise performance of the system is improved greatly.tion (even if the load is abnormal, it can avoid power amplifier damage and provide reliable safety performance) temperature protection function, when the temperature exceeds the required range, the output amplitude of the 4R5/R15a1. 2. Fuse3. Power Supply InputPower Supply Switch 4. Signal Output (NL4 socket)5. RS-232 Port 6. USB Port7. Volume Knob 8. Signal Peak Indicator 9. RS-485 Output10. RS-485 Input 11. Signal Output 12. Signal InputAMPLIFIER MODULEIntroduction Of Power Amplifier ModuleCompact Active Line Array Sound Reinforcement System123491056781112RS-232PEAK VOLUMELINEINPUTOUTPUTRS-485INPUT OUTPUT USB OUTPUT TO R5FUSE:T5AL/250VINPUT VOLTAGE:220-240V~ 50/60Hz ONOFF POWERINPUT CURRENT:2.2A R15a800WACTIVE SUBWOOFERS.N.DONGGUAN 3G AUDIO TECHNOLOGY CO., LTD.Made In China2. U Bracket(101.06.0020.00153)CO M P A C T L I N E A R R A Y S O U N D R E I N F O R C E M E N T S Y S T E M 6R5/R15aR5 rear upper connecting rodR5 rear lower connecting rodINSTALLATION(1) Open the package; take out R5, R15a and the accessories.(2) Install four U-rings into one flying frame.(3) Demount the ball-catch bolt from the pulling plate of R5, place R15a pulling plate lockpin into the slot of R5 pulling plate with holes against each other; put the ball-catch bolt back.(4) Insert connecting rod into R5 rear and angle-adjustment slot of R15a on the bottom, adjust angle according to practical needs.(5) Install one or multiple sets of R5 by sequence onto the bottom of the previous R5.InstallationM8 locknutFlying FrameR15aR5 rear link plate assemblyCompact Active Line Array Sound Reinforcement System R5 front hoisting plateWarning: E nsure that all accessories in the installationsystem reach a safety factor of not less than 5:1 or meet local safety standards when the system is installed.Angle adjustment methodAfter the connecting rod is aligned with a hole with an angle of 0 on the upper connecting rod, the entry and exit pin has a vertical angle of 0 between two speakers.°°front hoisting plateR5/R15a WIRING DIAGRAM Compact Active Line Array Sound Reinforcement SystemConnecting instructionPower Supply Input Signal InputR5 Speaker OutputR5 OutputR5 InputR5 OutputR5 InputR5 OutputR5 InputR5 OutputR5 Input78R5/R15aSpecificationFrequency response(-3dB):Maximum SPL(1m):System composition:connector:Input:wire:Input source electromotive force:Input overload source EMF:Heat dissipation mode: Power cord: Safe voltage range: Power consumption (static): Power consumption ( dynamics):Construction:Installation: Dimention(WxDxH):Packing dimension : (WxDxH)Net Weight:Gross weight:50Hz-20kHz121dB/127dB(Peak)Canon1 line balance input,1 line balance output(Parallel with output) 1pin: ground ;2pin:signal +;3pin: signal - 1V rms wire 1kHzmaximum input level 4V rms natural coolingnational standard three pins230V+/-10%500W Square boxTECHNICAL SPECIFICATION4 - point hanger , hanger , boltblack Polyimide spray on the surface of the box,grille withSurface treatment: 21W90°×10°Dispersion Angle(HxV):one group includes one pc active subwoofer speaker R15a RS232RS485USB,,Control interface:Compact Active Line Array Sound Reinforcement Systemfour Pcs full range speaker R5 with speaker hanger impedance:R5 16Ω,R15a 4Ω Power:R5 140W,R15a 800w input impedence:20k Ω balance input 10k Ω unbalance outputR5:11kg(24.2lb),R15a:40KG(88lb) Flying frame:18kg(39.6lb)black plastic power coating on the surface of the box, 1.2mm steel hole plate R5:350x245x645mm(21.3x10.8x6.3in) R15a:650x625x665mm(21.3x21.7x16.9in)flying fram: 553x115x578mm(21.8x4.5x22.8in)R5:350x245x645mm(13.8x9.6x25.4in)R15a:540x551x430mm(25.6x20.7x26.2in)flying frame:675x200x655mm(26.6x7.9x25.8in)R5:9.5kg(20.9lb),R15a:36kg(79.2lb) Flying frame:16.5kg(36.3lb)Frequency (Hz )Frequency response and Impedance curveS e n s i t i v i t y (d B )2060708090100110200601810I m p e d a n c e (O h m s )501002005002k5k10k20k1k11030Frequency response with control (R12a )Frequency response with control (four R6a )9R5/R15aTop viewFace viewSide viewRear view2D DimensionSPECIFICATIONCompact Active Line Array Sound Reinforcement System550mm [21.7in]580mm [22.8in]1170m m [46.1i n ]Figure(1)This interface includes all function modules about the equipment, menu description as following:1.1> File: Open the configuration files, or Save current configuration as a file into computer;1.2>Communications: Connect ("Enable Communications") or Disconnect ("DisableCommunications") the equipment, Operation details refer to following description.1.3> Program: Obtain the information of currently used configuration file (Disconnection status),or the information of current program in the equipment(Connection status)."""On disconnection status, only Display Current Program No, Display Current Program Name"""Edit Current Program Name and Load Factory Default Configuration may be valid. Allchanges do not affect the equipment internal program settings."""On connection status, all items are valid under the Program menu. If selecting the Edit Current "Program Name command, the current program name auto saved in the equipment;""If selecting the Load Factory Default Configuration command, the current program is overwrite by the default setting automatically (! Attention Please: this operation will overwrite the current program configuration, before executing this operation, please make sure you really ready to load"""factory default settings). Details of other function items (such as List Program & Recall and"""as current program in device)under the Program menu, please refer to following description.Figure(2)The software will search the connected (hardware connection) device automatically, Search"will be shown at the bottom of interface's status bar, see Figure 3:Figure(3)Devices online are listed at left, the right part shows the information of the device chosen by user.If user want to use the config file that opens from computer,Download Program Data to Devicemust be chosen(the operation execute transmitting the parameters into Device's RAM, if no furthersave into device operation, the parameters will be lost after the device power off ). If user choseUpload Program Data From Device , it will load the current program that stored in device to PC.Select the left device that you will want to connect, click the Connect button to start connecting.! Attention please: If connect with several devices, each device must a ID number which isexclusive in the system )"""""After connecting successfully, the software will update the display automatically, and show theinformation of currently connected device, and current program used by device, see Figure 5:On above interface, click corresponding function button, and executing those operation that you want.Figure(4)Figure(5)3.2>User also may save the parameters in the device, total max six programs may be saved throughSave as current program in device under program menu. See Figure 7:"""According to the different file source, the two ways are available for recall the existing configuration file. For the file saved in the computer, it may be recalled from Open under File menu. Then connectthe equipment, choose Download program data to device in pop-out dialog box, see Figure 4.""""""Figure(6)Figure(7)Select the program you want to use in the pop-out dialog box, then click Recall button, the software will update the display automatically, and the device using the program that has been recalled.""4. Change the information of the device that is online.Device information means the identifier of device, such as the description of device position etc, Include ID and device name. After connecting, it may be changed through clicking Edit current device information in device menu, See Figure 9:! Attention: ID number is only available for number 1~10, that's to say only max 10 device may be connected one RS-485 Net. The max length of name is 14ASCII characters."Figure(8)Figure(9)Figure(10)After finishing the adjustment of parameters, the current parameters may be saved into the device for the next power on operation. If user does not save the program into device, all the changes based on previous parameters will not be saved. Choose "Disable communications" under "communications" menu todisconnection. Please see the figure 11:Figure(11)Notes:。
车机 说明书
车机说明书一、概述本车机说明书旨在为您提供关于车机设备的基本信息、使用方法、安全注意事项、故障诊断与排除、保养与维护以及技术支持与售后服务的指南。
车机设备是一种安装在汽车内部的多媒体设备,具有导航、影音娱乐、通信等多种功能。
二、设备安装与连接1. 安装位置:请将设备安装在汽车内部的安全位置,避免阳光直射和高温环境。
2. 电源连接:请使用汽车电源适配器或相关配件将设备与汽车电源连接。
3. 蓝牙连接:请打开手机蓝牙功能,搜索并连接设备。
4. 网络连接:请根据设备支持的网络制式选择合适的网络连接方式。
三、设备功能与操作1. 导航功能:请在设备上输入目的地,选择合适的路线进行导航。
2. 影音娱乐:请在设备上选择音乐、视频等娱乐节目进行播放。
3. 电话通信:请在设备上拨打或接听电话,确保通信质量良好。
4. 其他功能:请根据设备支持的其他功能进行操作。
四、安全注意事项1. 请在驾驶过程中合理使用设备,避免分散注意力。
2. 请勿在行驶过程中进行设备维护和更换。
3. 请勿在设备上放置易滑落或滚动的物品,以免造成安全隐患。
4. 在发生交通事故时,请立即关闭设备并撤离现场。
五、故障诊断与排除1. 若设备无法启动,请检查电源连接是否正常。
2. 若设备出现卡顿或死机,请重启设备或进行软件更新。
3. 若设备声音异常,请检查音频输入输出接口是否连接正常。
4. 若设备无法连接网络,请检查网络设置是否正确。
六、保养与维护1. 请定期清洁设备外壳和屏幕,保持清洁卫生。
2. 请定期更新软件版本,保证设备正常运行。
深圳五菱锋电子产品说明书

深圳五菱锋电子产品说明书目录一固定式全程同步录音录像设备 (2)〔一〕功能特点: (2)〔二〕技术参数: (3)二双光驱直录式DVD硬盘录像机 (4)〔一〕产品简介: (4)〔二〕功能特点: (4)〔三〕技术参数: (5)三便携式全程同步录音录像终端 (6)〔一〕产品介绍: (6)〔二〕功能特点: (6)〔三〕技术参数 (7)四环境信息显示屏 (8)〔一〕产品说明: (8)〔二〕功能特点: (8)〔三〕技术参数: (8)五专业级拾音器 (9)〔一〕产品简介: (9)〔二〕功能特点: (9)〔三〕技术参数: (10)六数字音频处理器 (10)〔一〕产品简介: (10)〔二〕功能特点: (10)〔三〕技术参数: (11)七画中画操纵器 (11)〔一〕产品介绍 (11)〔二〕功能特点 (12)〔三〕技术参数: (12)一固定式全程同步录音录像设备(一)功能特点:●全数字化结构,高集成度,超前设计,高稳固性。
运用大规模集成电路,高速中央处理芯片,专业级视频和音频处理芯片,专工业级主板,专业音视频压缩技术、画面处理技术、语音降噪基数、网络操纵技术等,充分保证系统的先进性和稳固性。
●双光驱刻录方式灵活可选双光驱同时刻录。
依照用户的不同情形提供多种刻录方式,如单光驱刻录、单硬盘刻录、双光驱同时刻录、以及单光驱单硬盘同时刻录;使用时操作简单灵活,既节约资源又提高效率。
●支持多路音视频输入,扩展性强,操作方便,简单。
●超稳固性实时刻录技术,确保最高刻盘成功率。
硬件直截了当驱动DVD刻录机工作,最大限度减轻激光灼烧时刻,保证刻盘实时性。
●四种刻录模式可任意选择,按时刻的长短依次为HQ、SP、EP、SLP模式●讯问现场画面、询问时刻、讯问环境叠加功能●超长刻录时刻,一张DVD光盘储备最高可达12小时,满足讯问需求●支持多种刻录盘片类型,录像资料可在任意PC上播放支持DVD+R、DVD-R、DVD+RW、DVD-RW全格式兼容刻录;可实现画中画,画面叠加刻录。
- 1、下载文档前请自行甄别文档内容的完整性,平台不提供额外的编辑、内容补充、找答案等附加服务。
- 2、"仅部分预览"的文档,不可在线预览部分如存在完整性等问题,可反馈申请退款(可完整预览的文档不适用该条件!)。
- 3、如文档侵犯您的权益,请联系客服反馈,我们会尽快为您处理(人工客服工作时间:9:00-18:30)。
光碟播放基本操作(可选功能) ..............................................................................................13
厂设置。 2) 出现由不当操作引起的死机等非正常工作现象时,请长按复位“RESET”键 3 秒
以上,本机即可恢复正常。 注:由于面板上的复位键较小,请使用笔尖或类似的尖头物体点按此键。 启动/关闭主机 1) 在 ACC 开关处于开启状态下,按主机面板“POWER”按键打开电源; 2) 将光碟插入碟槽,机器将自动开启,开启后进入读碟模式;
² 为了保证机器正常运转,防止火灾或电击发生,请不要将机器暴露在潮湿的空气 中,更不能将液体洒落机器上。
² 如果机器支持碟片(可选),只能播放 12 厘米的碟片,并且每次只能播放一张 碟片。请不要将 8 厘米的碟片或者其它物品塞入机器。
基本操作
系统复位 1) 用户在第一次使用本机时,请长按复位“RESET”键 3 秒以上,使机子恢复到出
基本操作 ........................................................................................................................................ 3
车机设置 ........................................................................................................................................ 4
安卓设置 ........................................................................................................................................ 9
收音机功能操作 .......................................................................................................................... 11
U 盘,SD 卡播放操作................................................................................................................14
IPOD 播放(可选功能) ...........................................................................................................15
² 不要把本机器贮藏或安装在阳光直射的地方,也不要将其置于其他有害物质环境 里,特别是液晶屏。如果安装的时候,液晶屏正好处于空调器通风道附近,请保 证凉风或者热风不要直接吹到机器上,否则可能损坏机器,甚至对汽车或者人身 产生伤害。
² 切勿用一些尖锐的物体刮划显示屏,不要拿硬物大力按压显示屏,否则会造成显 示屏或触摸屏的损坏。
第 2 页 共20页
2015-12-22 V1.0
用户手册
ZYC901A
注意事项
为了您的安全,请尽量不要在驾驶时观看视频和操作机器;开车时请将音量调到能清 楚听到外界声音的水平。开始操作前,请详细阅读本手册以及系统的其他手册,了解 本使用手册和机器上的相关安全提示和警告标识,阅读完之后放.............................................................................................................16
蓝牙音乐播放(A2DP) ...........................................................................................................17
AVIN(辅助源输入)操作 ......................................................................................................... 17
显示屏使用简介 ..........................................................................................................................17
ZYC901A
安卓车机说明书
用户手册
ZYC901A
目录
注意事项 ........................................................................................................................................ 3
车机设置
在触摸屏上点击主界面的设置图标“ ”进入系统设置界面,点击对应的选项条来 进入对应的设置选项,可以上下拖动选项条来找到所需要的设置项。
第 4 页 共20页
2015-12-22 V1.0
用户手册
ZYC901A
注意: 设置项中开关滑动条说明。
[
]此时为开启状态。
[
]此时为关闭状态。
1. 背景壁纸
² 首先请注意交通安全。
² 如您在操作本系统遇到困难时,请将车停放在安全的地方后操作。
² 勿让儿童操作本机器,以免造成人身伤害或机器损坏。
² 在使用卫星导航功能时请遵照交通规则驾驶。
² 请不要在禁止使用电子设备或严禁明火的地方使用,如:加油站、酒厂、电磁强 干扰地区等,否则可能造成危险。
² 不要自行保养、维护、安装本机器。在接通电源的情况下请勿安装或维修本机, 由未受过电子设备或车辆附件安装训练或缺乏经验的人员安装及维修本机器非常 危险。
1. 背景壁纸 ...........................................................................................................................5 2. 开机画面 ...........................................................................................................................5 3. 通用设置 ...........................................................................................................................6 4. 显示设置 ...........................................................................................................................6 5. 音效选项 ...........................................................................................................................7 6. 视频选项 ...........................................................................................................................8 7. 蓝牙选项 ...........................................................................................................................8 8. 导航选项 ...........................................................................................................................9 9. 方控学习 ...........................................................................................................................9
第 3 页 共20页
2015-12-22 V1.0
用户手册
ZYC901A
3) 开机时,长按主机面板“POWER”按键开关,或者熄火拔出车钥匙都将关闭本 机电源。
音量调整
旋转主机面板上的音量旋钮(有些机型面板上的音量控制键为“VOL+/VOL-”按键) 可调节本机音量的大小。
静音开关
按面板上的“MUTE”键可使系统静音,再按一次或者调节音量则可以恢复声音。 背光灯开关
2) 在主页界面时,轻触不同的功能图标进入相应的界面,各功能的详细操作请见以 后的章节。左右轻触滑动主页可实现多个主页之间切换。