Veritas Volume Manager(VxVM)-vxassist命令手册
Veritas Volume Manager(VxVM) 5.1 SP1 for Solaris10 Sparc安装和升级
Veritas Volume Manager(VxVM) 5.1 SP1 for Solaris10 Sparc安装和升级1.概述在Solaris10 Sparc系统上安装Veritas Volume Manager(VxVM) 5.1 SP1软件包,由于5.1 SP1无法对磁盘进行初始化,因此需要进行5.1SP1RP4版本的升级。
2.安装准备1、安装Solaris10 for Sparc的操作系统;2、下载Storage Foundation and High AvailabilitySolutions 5.1 SP1的安装包和5.1SP1RP4升级包并存放到要安装的服务器上;3、准备安装要用的license序列号(IRZU-PDRZ-EWVS-KP4L-B7AO-4HFP-3P)。
3.安装过程3.1.解压安装文件把安装包(VRTS_SF_HA_Solutions_5.1_SP1_Solaris_SPARC.tar.gz)解压到/export目录中,由于Solaris不能直接解压*.tar.gz文件,所以要用到gunzip和tar两个命令结合进行解压。
bash-3.2# cd /exportbash-3.2# lshomesfha-sol_sparc-5.1SP1RP4-patches.tar.gzVRTS_SF_HA_Solutions_5.1_SP1_Solaris_SPARC.tar.gzbash-3.2# gunzip -c VRTS_SF_HA_Solutions_5.1_SP1_Solaris_SPARC.tar.gz|tar xvf –//解压文件bash-3.2# lsdvd1-sol_sparc //解压后的安装文件夹homesfha-sol_sparc-5.1SP1RP4-patches.tar.gzVRTS_SF_HA_Solutions_5.1_SP1_Solaris_SPARC.tar.gzbash-3.2#3.2.找到安装执行文件进行安装文件volume_manager目录,找到installvm安装文件bash-3.2# pwd/export/dvd1-sol_sparc/volume_managerbash-3.2# lscopyright EULA pkginfo.txt uninstallvmdocs installvm toolsbash-3.2##3.3.执行installvm安装bash-3.2# ./installvmVeritas Volume Manager 5.1 SP1 Install ProgramCopyright (c) 2010 Symantec Corporation. All rights reserved. Symantec, the Symantec Logo are trademarks orregistered trademarks of Symantec Corporation or its affiliates in the U.S. and other countries. Other names may betrademarks of their respective owners.The Licensed Software and Documentation are deemed to be "commercial computer software" and "commercial computersoftware documentation" as defined in FAR Sections 12.212 and DFARS Section 227.7202.Logs are being written to /var/tmp/installvm-201411271646Fxl while installvm is in progress.Do you agree with the terms of the End User License Agreement as specified in thevolume_manager/EULA/en/EULA_SF_Ux_5.1SP1.pdf file present on media? [y,n,q,?] yVeritas Volume Manager 5.1 SP1 Install Program1) Install minimal required Veritas Volume Manager packages - 244 MB required2) Install recommended Veritas Volume Manager packages - 409 MB required3) Display packages to be installed for each optionSelect the packages to be installed on all systems? [1-3,q,?] (2) //选择2推荐安装Enter the Solaris Sparc system names separated by spaces: [q,?] (test-02) //输入系统名字Veritas Volume Manager 5.1 SP1 Install Programtest-02 Logs are being written to /var/tmp/installvm-201411271646Fxl while installvm is in progressVerifying systems: 0% _______________________________________________________________________________Checking system communication ............................................................................ DoneChecking release compatibility ........................................................................... DoneChecking installed product ............................................................................... DoneChecking prerequisite patches and packages ........................................................ DoneChecking platform version ................................................................................ DoneChecking file space ...................................................................................... DonePerforming product license checks ........................................................................ DonePerforming product prechecks ............................................................................. Done System verification checks completed successfully //完成系统检查Veritas Volume Manager 5.1 SP1 Install Programtest-02The following Veritas Volume Manager packages will be installed on all systems:Package Package DescriptionVRTSvlic Veritas LicensingVRTSperl Veritas Perl 5.10.0 RedistributionVRTSspt Veritas Software Support Tools by SymantecVRTSvxvm Veritas Volume Manager BinariesVRTSaslapm Volume Manager - ASL/APMVRTSob Veritas Enterprise Administrator Service by SymantecVRTSsfmh Veritas Storage Foundation Managed Host by SymantecThe following Veritas Volume Manager patches will be installed on all systems:Patch Package142629-06 VRTSvxvm143687-02 VRTSob //显示要安装的包Press [Enter] to continue: 回车test-02Logs are being written to /var/tmp/installvm-201411271646Fxl while installvm is in progressInstalling VM: 0% _______________________________________________________________________________ Performing VM preinstall tasks ........................................................................... DoneInstalling VRTSvlic package .............................................................................. DoneInstalling VRTSperl package .............................................................................. DoneInstalling VRTSspt package ............................................................................... DoneInstalling VRTSvxvm package .............................................................................. DoneInstalling VRTSaslapm package ............................................................................ DoneInstalling VRTSob package ................................................................................ DoneInstalling 142629-06 patch ............................................................................... DoneInstalling 143687-02 patch ............................................................................... DoneInstalling VRTSsfmh package .............................................................................. DonePerforming VM postinstall tasks .......................................................................... DoneCopying installer libraries and scripts .................................................................. Done Veritas Volume Manager Install completed successfully //提示12个包安装成功test-02To comply with the terms of Symantec's End User License Agreement, you have 60 days to either:* Enter a valid license key matching the functionality in use on the systems* Enable keyless licensing and manage the systems with a Management Server. For more details visit/sfhakeyless. The product is fully functional during these 60 days.1) Enter a valid license key2) Enable keyless licensing and complete system licensing laterHow would you like to license the systems? [1-2,q] (2) 1 //选择1输入一个license key注册Checking system licensingVM is unlicensed on all systemsEnter a VM license key: [b,q,?] IRZU-PDRZ-EWVS-KP4L-B7AO-4HFP-3PStorage Foundation Enterprise successfully registered on test-02Do you wish to enter additional licenses? [y,n,q,b](n) //输入n不用添加另一个licenseVeritas Volume Manager 5.1 SP1 Install Programtest-02Logs are being written to /var/tmp/installvm-201411271646Fxl while installvm is in progressStarting VM: 0% _______________________________________________________________________________ Performing VM configuration .............................................................................. DoneStarting vxdmp ........................................................................................... DoneStarting vxio ............................................................................................ DoneStarting vxspec .......................................................................................... DoneStarting vxconfigd ....................................................................................... DoneStarting vxesd ........................................................................................... DoneStarting vxrelocd ........................................................................................ DoneStarting vxcached ........................................................................................ DoneStarting vxconfigbackupd ................................................................................. DoneStarting vxattachd ....................................................................................... DonePerforming VM poststart tasks ............................................................................ Done Veritas Volume Manager Startup completed successfully //提示启动成功installvm log files, summary file, and response file are saved at://提示log文件存放位置/opt/VRTS/install/logs/installvm-201411271646Fxlbash-3.2#bash-3.2# vxdisk list //可以查看vxdisk的磁盘列表DEVICE TYPE DISK GROUP STATUSdisk_0 auto:SVM - - SVMdisk_1 auto:SVM - - SVMds34000_0 auto:none - - online invalidds34000_1 auto:none - - online invalidds34000_2 auto:none - - online invalidds34000_3 auto:none - - online invalidds34000_4 auto:none - - online invalidds34000_5 auto:none - - online invalidbash-3.2#bash-3.2#4.升级过程由于在配置过程中发现VxVM5.1 SP1 不能初始化磁盘,查找文档发现需要对VxVM升级到5.1 SP1RP3版本后才可以正常,所以下载5.1 SP1RP4的补丁进行升级。
VxVM通用命令介绍材料
vertas volume manager命令手册一、常见命令获取机器ID和机器类型的命令添加License的命令...一、获取机器ID和机器类型的命令#hostid#uname -i二、添加License的命令#vxlicense -c三、查看License的命令# vxlicense -p四、名词解析VRTSvxvm VxVM软件VRTSlic VxVM licensing utilitiesVRTSvmdoc VxVM电子文档VRTSvmman VxVM帮助手册VRTSvmdev VxVM developer’s packageVRTSvxsa VxVM图形管理界面VRTSvxfs VxFS软件VRTSfsdoc VxFS文档五、添加VxVM和VxFS包#mount –F hsfs –o ro /dev/dsk/c0t6d0s2 /mnt# pkgadd –d path_name product_packages注意:要以超级用户权限登录系统,完了后还要重启系统。
六、安装VxFS后,修改/etc/system ,在里面添加一行:set lwp_default_stksize=0x4000并将原始的文件拷贝一份。
七、检查安装包:#pkginfo 列出所有安装的包#pkginfo | grep VRTS 列出安装的VERITAS的包#pkginfo –l pkckage 列出某个安装包的详细信息八、用vxinstall来创建rootdg 。
选择Custom安装。
九、显示执行过的命令:#tail –f /var/opt/vmsa/logs/command十、命令行在如下几个目录中,可以找到在命令行中使用的命令:/etc/vx/bin/usr/sbin/usr/lib/vxvm/bin注:把这些目录加入到PATH环境变量中去。
十一、几条常用命令:vxassist 、vxprint 、vxdg 、vxdisk十二、检查是否有别的VMSA版本存在:#pkginfo –l | grep vmsa如果有则删除:#pkgrm VRTSvmsa十三、启动VMSA1.以root用户登录;2.#./vmsa_server &3.xhost + system_name (这一步有时需要做)4.DISPLAY=’uname –n ‘:0.0 ;export DISPLAY(这一步有时需要做)十四、启动VMSA客户端1.本地启动:# vmsa2.远程启动:# vmsa remote_machine_name十五、几个命令1.确定VMSA是否运行:# vmsa_server -q2.停止VMSA服务: # vmsa_server -k3.显示VMSA运行版本:# vmsa_server -v4.启动自动模式:# autostart on5.显示当前运行模式:# netstat -a | grep vmsa6.改变自动模式:# autostart off7.运行在只读模式下:# vmsa_server -r & 和# vmsa -r &十六、添加磁盘的方法:(行命令)1.vxdisksetup :configures a disk for VxVM2.vxdg addisk :add a disk to a disk group3.# /etc/vx/bin/vxdisksetup –i disk_address [attributes]注:The disk_address defines the controller , target , and SCSI logical unit number of the disk to be set up and takes the form c # t # d # . The –i option writes a disk header to the disk , making the disk derectly usable .4.# vxdg –g diskgroup adddisk disk_name=device_name十七、查看磁盘信息(命令行)1.vxdisk list :list disk information2.prtvtoc :Display VTOC configuration3.vxdisk –o alldgs list :show all disk groups in the output .4.# vxdisk list disk_name :显示某个磁盘的信息。
volumemanager使用手册
volumemanager使用手册Sun Enterprise Volume Manager 2.6安装使用指南Sun Enterprise V olume Manager (SEVM) 2.6是Sun Microsystem公司推出的用于管理磁盘及其空间的软件产品。
它的主要功能是把主机系统(包括磁盘阵列)的部分或全部磁盘按实际应用要求进行组合和统一管理,它通过Raid 5或Mirror 等存储机制,为用户提供高可靠性的大、中和小各档次的存储空间。
1.SEVM2.6的安装与配置步骤1.首先,安装Solaris操作系统,按硬盘分区方案对系统盘和数据盘进行分区。
同时预留一个50M的分区c0t0d0s42.补丁安装:如果不装相应的补丁,V olume Manager将不能正确识别A5000磁盘阵列,并在配置时提示要求输入license(许可)。
请按顺序安装补丁:105356-08、105357-02、10375-12。
3.在主机光驱中载入V olume Manager 2.6的介质,然后用pkgadd命令安装V olume Manager 2.6,请选择全部安装,安装完毕之后不要重启机器,可紧接着安装V olume Manager 的补丁:106606-02,然后重启机器。
4.重启完毕后,请按如下命令顺序配置:最后一条命令是删除V olume Manager 的标记文件,如果该空文件存在,说明V olume Manager 尚未配置。
按照此手工方法配置后,不必象随机手册中所写的那样运行vxinstall命令来初始化SEVM!5.V olume Manager 的安装和配置基本完成。
如果要将磁盘阵列上的VG切换到本机上来运行,须在另一台服务器上关闭数据库,EXPORT 相应的VG,然后,再在本机上IMPORT相应的位于磁盘阵列上的VG。
6.注意:安装过程所用到的补丁都可以在现在的Oralce 服务器上得到,目录/export/home,更新的补丁可在Sun公司站点:得到。
veritas volume 指令

veritas volume 指令摘要:1.Veritas volume指令的概述2.Veritas volume指令的用途和功能3.如何使用Veritas volume指令4.Veritas volume指令的实战应用5.Veritas volume指令的优点与不足6.总结正文:Veritas volume指令是Linux系统中一款强大的磁盘管理工具,它可以帮助用户对磁盘进行分区、格式化、挂载等操作。
本文将详细介绍Veritas volume指令的用途、使用方法以及实战应用,帮助读者更好地掌握这款工具。
一、Veritas volume指令的概述Veritas volume指令是Veritas Volume Manager(VVM)的一部分,VVM是一个用于管理Linux系统上磁盘空间的工具。
通过Veritas volume指令,用户可以轻松地对磁盘进行分区、调整分区大小、迁移数据等操作。
二、Veritas volume指令的用途和功能1.创建、删除、调整分区:Veritas volume指令可以用于创建新的分区,删除不需要的分区,以及调整已有分区的大小。
2.磁盘空间管理:Veritas volume指令可以帮助用户对磁盘空间进行有效管理,避免磁盘空间不足的问题。
3.数据迁移:通过Veritas volume指令,用户可以将数据从一个分区迁移到另一个分区,方便数据整理和维护。
4.快照:Veritas volume指令支持对分区创建快照,以便在数据损坏或丢失时进行恢复。
5.磁盘阵列管理:Veritas volume指令可以用于创建、删除和管理磁盘阵列。
三、如何使用Veritas volume指令使用Veritas volume指令之前,首先需要确保系统已经安装了Veritas Volume Manager。
使用以下命令启动Veritas volume指令:```bashsudo vmkfs -t <文件系统类型> <设备名称>```例如,创建一个EXT3格式的分区:```bashsudo vmkfs -t ext3 /dev/sda1```四、Veritas volume指令的实战应用1.创建分区:某企业需要对一块新的硬盘进行分区,可以使用Veritas volume指令创建多个分区,以便进行文件服务器、数据库服务器等不同用途的部署。
vvm—常用命令手册
v e r t a s v o l u m e m a n a g e r命令手册一、常见命令获取机器ID和机器类型的命令添加License的命令...一、获取机器ID和机器类型的命令#hostid#uname -i二、添加License的命令#vxlicense -c三、查看License的命令# vxlicense -p四、名词解析VRTSvxvm VxVM软件VRTSlic VxVM licensing utilitiesVRTSvmdoc VxVM电子文档VRTSvmman VxVM帮助手册VRTSvmdev VxVM developer’s packageVRTSvxsa VxVM图形管理界面VRTSvxfs VxFS软件VRTSfsdoc VxFS文档五、添加VxVM和VxFS包#mount –F hsfs –o ro /dev/dsk/c0t6d0s2 /mnt# pkgadd –d path_name product_packages注意:要以超级用户权限登录系统,完了后还要重启系统。
六、安装VxFS后,修改/etc/system ,在里面添加一行:set lwp_default_stksize=0x4000并将原始的文件拷贝一份。
七、检查安装包:#pkginfo 列出所有安装的包#pkginfo | grep VRTS 列出安装的VERITAS的包#pkginfo –l pkckage 列出某个安装包的详细信息八、用vxinstall来创建rootdg 。
选择Custom安装。
九、显示执行过的命令:#tail –f /var/opt/vmsa/logs/command十、命令行在如下几个目录中,可以找到在命令行中使用的命令:/etc/vx/bin/usr/sbin/usr/lib/vxvm/bin注:把这些目录加入到PATH环境变量中去。
十一、几条常用命令:vxassist 、vxprint 、vxdg 、vxdisk十二、检查是否有别的VMSA版本存在:#pkginfo –l | grep vmsa如果有则删除:#pkgrm VRTSvmsa十三、启动VMSA1.以root用户登录;2.#./vmsa_server &3.xhost + system_name (这一步有时需要做)4.DISPLAY=’uname –n ‘:;export DISPLAY(这一步有时需要做)十四、启动VMSA客户端1.本地启动:# vmsa2.远程启动:# vmsa remote_machine_name十五、几个命令1.确定VMSA是否运行:# vmsa_server -q2.停止VMSA服务: # vmsa_server -k3.显示VMSA运行版本:# vmsa_server -v4.启动自动模式:# autostart on5.显示当前运行模式:# netstat -a | grep vmsa6.改变自动模式:# autostart off7.运行在只读模式下:# vmsa_server -r & 和# vmsa -r &十六、添加磁盘的方法:(行命令)1.vxdisksetup :configures a disk for VxVM2.vxdg addisk :add a disk to a disk group3.# /etc/vx/bin/vxdisksetup –i disk_address [attributes]注:The disk_address defines the controller , target , and SCSI logical unit number of the disk to be set up and takes the form c # t # d # . The –i option writes a disk header to the disk , making the disk derectly usable .4.# vxdg –g diskgroup adddisk disk_name=device_name十七、查看磁盘信息(命令行)1.vxdisk list :list disk information2.prtvtoc :Display VTOC configuration3.vxdisk –o alldgs list :show all disk groups in the output .4.# vxdisk list disk_name :显示某个磁盘的信息。
Veritas Volume Manager(VxVM)-vxassist命令手册

vxassist是VxVM中非常重要的一个工具,使用非常频繁,我这里给出一个命令手册,并作了一些简单的翻译和注释,仅供参考.General1. Creating a Volume1.1 Creating a Concatenated V olume1.2 Creating a Striped V olume1.3 Creating a RAID-5 V olume2. Extending a Volume2.1 Extending a volume up to certain length2.2 Extending by a Given Length3. Shrinking a V olume3.1 Shrinking to a Given Length3.2 Shrinking by a Given Length4. Removing a Volume5. Mirroring a V olume5.1 Creating & Mirroring a New Volume5.2 Mirroring an Existing V olume5.3 Mirroring All Volumes6.Removing a Mirror7.Adding a RAID-5 Log8.Adding a DRL Log9.Removing a RAID-5 Log10.Preparing a Volume for Online Backup11.Displaying Volume Configuration InformationGeneralvxassist工具是VxVM中用于进行卷管理的工具,可以用于创建卷、增加镜像、扩展或者收缩存在的卷等,是非常重要的一个工具.The vxassist utility in Veritas Volume Manager is used to create volumes, add mirrors and logs to existing volumes, extend and shrink existing volumes, provides for the migration of data from a specified set of disks, and provides facilities for the on-line backup of existing volumes. vxassist在创建卷组时,如果不指定,缺省的会把卷分配给rootdg(note:在VxVM4.0中rootdg 不再必须,但是你可以指定一个default dg具有类似的功能).vxassist的缺省单位是blocks,但是你可以指定K 或M 或G 为单位,这都是合法的.The default behavior of vxassist is to create volumes in the rootdg diskgroup if diskgroup is not specified . The default length is taken as number of blocks but this can be specified in Kilobytes or Megabytes or Gigabytes.vxassist command syntax :vxassist <option> <Keyword> volume_name [attributes]Commonly used options are given below (See man vxassist for complete list of supported options) -g for specifying diskgroups -b for background operation -d file containing defaults for vxassist if not specified /etc/default/vxassist is used Keywords used are make , mirror , move , growto ,growby ,shrintto ,shirnkby ,snapstart , snapshot ,snapwait Attributes specify volumes layout disks controllar to include exclude etcDevice Nodes :Default rootdg disk group. Block Device Node /dev/vx/dsk/volume_name Raw Device Node /dev/vx/rdsk/volume_name Other DiskGroups Block Device Node /dev/vx/dsk/diskgroup_name/volume_name Raw Device Node /dev/vx/rdsk/diskgroup_name/volume_name_______________________________________1. Creating a Volume :1.1 Creating a Concatenated Volume缺省的,vxassist把一个卷组里的所有磁盘统一看待,如果创建的volume大于单个磁盘,那么空间分配自动的跨越磁盘.By default, vxassist creates a concatenated volume using the space available on a disk or on the number of disks in a diskgroup if the volume size specified is more then the one available on a single disk.Disks can be specified from a diskgroup for a volume group but if not mentioned available disks are selected by the volume manager.Command syntax :· vxassist make volume_name volume_lengthTo create a new volume appvol of 100 MB in the default disk group rootdg with available disks:· #vxassist make appvol 100mTo create the volume appvol of 100MB on disk03· #vxassist make appvol 100m disk031.2 Creating a Striped VolumeA striped volume contains at least one plex that consists of two or more subdisks located on two or more physical disks.Command Syntax :· vxassist make volume_name length layout=stripeTo create a striped volume appvol2 with the default stripe unit size on the default number of disks· #vxassist make appvol2 100m layout=stripeTo create a striped volume appvol2 100MB striped volume on three specific disks.· #vxassist make appvol2 100m layout=stripe disk04 disk05 disk061.3 Creating a RAID-5 VolumeA RAID-5 volume contains a RAID-5 plex that consists of two or more subdisks located on two or more physical disks. Only one RAID-5 plex can exist per volume. A RAID-5 volume may also contain one or more RAID-5 log plexes, which are used to log information about data and parity being written to the volume.Command Syntax :· vxassist make volume_name length layout=raid5To create the RAID-5 volume appvol4 with the default stripe unit size on the default number of disks with RAID-5 log,· #vxassist make appvol4 100m layout=raid5.2. Extending a Volume--扩展一个建好的VolumeCaution : If you plan to use volume size change (grow or shrink ) on a volume with data make sure you have the good backup of the volume available before carrying out such operation .2.1 Extending a volume up to certain lengthCommand syntax· vxassist growto volume_name lengthTo extend vol3 upto 8000 sectors, type:--例如,扩展vol3到8000个扇区· #vxassist growto vol3 8000Note:这里可以指定大小,例如:vxassist growto redo101 100M如果使用的是非缺省DG,还需要指定磁盘组:vxassist -g oradg growto redo101 100M2.2 Extending by a Given LengthCommand Syntax· vxassist growby volume_name lengthTo extend volapp by 1000 sectors, type:· #vxassist growby volapp 10003. Shrinking a VolumeCaution - Do not shrink a volume below the size of the file system. If you have a VxFS file system, you can shrink the file system and then shrink the volume. If you do not shrink the file system first, you risk unrecoverable data loss.Always make sure you have a good backup of the data volume to be shirnked.3.1 Shrinking to a Given LengthShrink a volume to a specific length as follows:· vxassist shrinkto volume_name lengthMake sure you do not shrink the volume below the current size of the file system or database using the volume. This command can be safely used on empty volumes.To shrink volcat to 1300 sectors, type:· #vxassist shrinkto volcat 13003.2 Shrinking by a Given LengthShrink a volume by a specific length as follows:· vxassist shrinkby volume_name lengthTo shrink volcat by 8000 sectors, type:· #vxassist shrinkby volapp2 80004. Removing a VolumeRemoving a volume requires removing all references to the volumes to be removed like unmounting the volume if mounted and removing its reference from /etc/vfstab .如果你需要remove一个volume,那么首先你需要stop这个卷组,停止其上的所有活动事务.An active volume has to be stopped first to stop all the activities to the volume only then it can be removed.Stopping Volume :Command Syntax· vxvol stop volume_nameTo stop appvol1· #vxvol stop appvol1Removing VolumeCommand Syntax· vxedit -rf rm volume_nameTo remove the volume appvol1· #vxedit -rf rm appvol115. Mirroring a VolumeMirroring allow data to be written simultaneously to two disks so that in case of failure of one disk data is available from the other mirrored disk. Boot disks can be mirriored to provide alternate booting disk .5.1 Creating & Mirroring a New VolumeCommand Syntax :· vxassist make volume_name length layout=mirrorTo create the mirrored volume, appvol22 of 100mb· #vxassist make appvol22 100m layout=mirrorTo create a volume with Dirty Region Logging enabled· #vxassist make volume_name length layout=mirror,log5.2 Mirroring an Existing VolumeCommand syntax· vxassist mirror volume_nameCreating a mirror of volume vol44:· #vxassist mirror vol445.3 Mirroring All VolumesTo mirror all existing volumes to available disk space· /etc/vx/bin/vxmirror -a6. Removing a MirrorRemoving a mirror involves first dissociating the plex from its volume and then removing the plex and any associated subdisks completely.The last valid mirror plex associated with a volume cannot be removed.Dissociate and remove the plex from its volume as follows:· vxplex -o rm dis plex_namevxprint -h shows the volume and associated plexes :Disk group: rootdg TY NAME ASSOC KSTATE LENGTH PLOFFS STATE TUTIL0 PUTIL0 v volm fsgen ENABLED 10240 - ACTIVE - - pl volm-01 volm ENABLED 10240 - ACTIVE - - sd disk01-02 volm-01 - 10240 0 - - - pl volm-02 volm ENABLED 10240 - ACTIVE - - sd disk02-03 volm-02 - 10240 0 - - -To disassociate and remove volmir-02 from volmir, type:· #vxplex -o rm dis volm-02The output of vxprint -h for volm now shows volume volm with only one plex::Disk group: rootdg TY NAME ASSOC KSTATE LENGTH PLOFFS STATE TUTIL0 PUTIL0 v volm fsgen ENABLED 10240 - ACTIVE - - pl volm-01 volmir ENABLED 10240 - ACTIVE - - sd disk01-02 volmir-01 - 10240 0 - - -7. Adding a RAID-5 LogA RAID-5 log maintains a copy of the data and parity being written to the volume at any given time. If a system failure occurs, VxVM can replay the RAID-5 log to resynchronize the volume. This copies the data and parity that was being written at the time of failure from the log to the appropriate areas of the RAID-5 volume.RAID-5 log plexes are used to log information about data and parity being written to the raid volume. A log plex is created for the volume by default when a raid volume is created but additional ones can be added by following command .· vxassist addlog name_of_raid5_vol8. Adding a DRL LogDirty region logging (DRL) is used with mirrored volume layouts. DRL keeps track of the regions that have changed due to I/O writes to a mirrored volume. Prior to every write, a bitmap is written to a log to record the area of the disk that is being changed. In case of system failure, DRL uses this information to recover only the portions of the volume that need to be recovered.To put Dirty Region Logging into effect for a volume, a log subdisk must be added to that volume and the volume must be mirrored. Only one log subdisk can exist per plex.The following example creates a log for the mirrored volume vol03:· #vxassist addlog vol03When vxassist is used to add a log subdisk to a volume, a log plex is also created to contain the log subdisk, by default.Once created, the plex containing a log subdisk can be treated as a regular plex. Data subdisks can be added to the log plex. The log plex and log subdisk can be removed using the same procedures used to remove ordinary plexes and subdisks.9. Removing a RAID-5 LogRemoving a RAID-5 log involves first dissociating the log from its volume and then removing the log and any associated subdisks completely.Dissociate the log from its volume as follows:· #vxplex -o rm dis plex_nameTo identify the log plex, use the command:· vxprint -ht raid5_volume_nameTo disassociate the log plex volrd-02 from volrd, type:· #vxplex -o rm dis volrd-02The output of vxprint -h for volrd now shows:Disk group: rootdg TY NAME ASSOC KSTATE LENGTH PLOFFS STATE TUTIL0 PUTIL0 v volrd raid5 ENABLED 32 - ACTIVE - - pl volrd-01 volrd ENABLED 32 - ACTIVE - - sd disk01-02 volrd-01 - 32 0 - - - sd disk02-03 volrd-01 - 32 0 - - -10. Preparing a Volume for Online BackupVolume manager provides an easy way to take backup of the online data by creating an offline snapshot mirror of the volume .The vxassist snapstart operation creates a write-only backup mirror, which is attached to and synchronized with the volume to be backed up and later detached and made offline by vxassist snapshot command . The snapshot volume can be used by backup utilities while the original volume continues to be available for applications and users.The volume backup method described here does not apply to RAID-5 volumes.Backing up a volume with vxassist involves the following procedureCreate a snapshot mirrorsnapstart starts creating a online snapshot mirror of the volume using the available disk space . The snapshot is completed with vxassist snapshot command when offline snapshot volume is created with a userdefined name .Command Syntax:vxassist snapstart volume_nameTo create a snapshot mirror of a volume called vol8, type#vxassist snapstart vol8Create a snapshot volumeCommand Syntaxvxassist snapshot volume_name new_volume_nameTo create a snapshot volume of vol8, type:#vxassist snapshot vol8 snapvol8You can now back up the snapshot volume by whatever means you prefer. To avoid wasting space, you can then remove the snapshot volume, which occupies as much space as the original volume11 Displaying Volume Configuration InformationThe vxprint command can be used to display information about how a volume is configured.Display the volume, mirror, and subdisk record information for all volumes as follows:#vxprint -htclass="style25 style31"Disk group: rootdgDG NAME NCONFIG NLOG MINORS GROUP-IDDM NAME DEVICE TYPE PRIVLEN PUBLEN STATE V NAME USETYPE KSTATE STATE LENGTH READPOL PREFPLEXPL NAME VOLUME KSTATE STATE LENGTH LAYOUT NCOL/WID MODESD NAME PLEX DISK DISKOFFS LENGTH [COL/]OFF DEVICE MODEdg rootdg 759096729.1025.tweetydm disk10 c1t0d0s2 sliced 559 1044400 -dm disk20 c2t0d0s2 sliced 559 1044400 -v pubs fsgen ENABLED ACTIVE 2288 SELECT -pl pubs-01 pubs ENABLED ACTIVE 2288 CONCAT - RWsd disk10-01 pubs-01 disk10 0 2288 0 c0t0d0 ENAv vol8 fsgen ENABLED ACTIVE 20480 SELECT -pl vol8-01 vol8 ENABLED ACTIVE 20480 CONCAT - RWsd disk10-02 vol8-0 disk10 2288 20480 0 c0t1d0 ENAwhere dg is a disk group, dm is a disk, v is a volume, pl is a plex, and sd is a subdisk. The top few lines indicate the headers that match each type of output line that follows. Each volume is listed along with its associated plex(es) and subdisk(s).Display volume-related information for a specific volume as follows:#vxprint -t volume_nameTo display information about vol8, type:#vxprint -t vol8。
veritas volume 指令

Veritas Volume Manager(VxVM)是一种磁盘卷管理器,用于管理服务器上的磁盘卷。
以下是一些常用的Veritas Volume Manager指令:
1. vxdisk - 列出和管理系统上的磁盘设备。
例如,vxdisk list可以列出系统上的所有磁盘设备。
2. vxprint - 显示和管理磁盘卷和卷组。
例如,vxprint -ht命令可以显示系统中的所有磁盘卷和卷组的层次结构。
3. vxdg - 创建和管理卷组。
例如,vxdg init可以初始化一个新的卷组。
4. vxassist - 创建和管理卷。
例如,vxassist make可以创建一个新的卷。
5. vxedit - 编辑卷和卷组的属性。
例如,vxedit set属性命令可以修改卷的属性。
6. vxresize - 调整卷和文件系统的大小。
例如,vxresize -g group_name volume_name new_size命令可以调整卷的大小。
7. vxrecover - 恢复由于磁盘故障导致的卷组损坏。
例如,vxrecover -sb命令可以恢复卷组的状态。
8. vxtask - 检查和管理后台任务。
例如,vxtask list 可以列出系统上正在运行的后台任务。
这些是Veritas Volume Manager中一些常用的指令,可以帮助管理员对磁盘卷进行管理和维护。
请注意,在使用这些指令之前,请确保你具备足够的权限和了解相关文档。
VERITAS的容灾方案
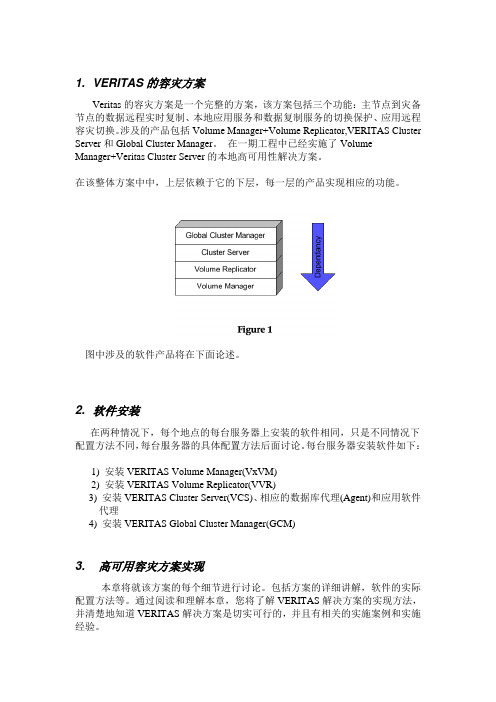
1. VERITAS的容灾方案Veritas的容灾方案是一个完整的方案,该方案包括三个功能:主节点到灾备节点的数据远程实时复制、本地应用服务和数据复制服务的切换保护、应用远程容灾切换。
涉及的产品包括Volume Manager+Volume Replicator,VERITAS Cluster Server和Global Cluster Manager。
在一期工程中已经实施了VolumeManager+Veritas Cluster Server的本地高可用性解决方案。
在该整体方案中中,上层依赖于它的下层,每一层的产品实现相应的功能。
图中涉及的软件产品将在下面论述。
2. 软件安装在两种情况下,每个地点的每台服务器上安装的软件相同,只是不同情况下配置方法不同,每台服务器的具体配置方法后面讨论。
每台服务器安装软件如下:1) 安装VERITAS Volume Manager(VxVM)2) 安装VERITAS Volume Replicator(VVR)3) 安装VERITAS Cluster Server(VCS)、相应的数据库代理(Agent)和应用软件代理4) 安装VERITAS Global Cluster Manager(GCM)3. 高可用容灾方案实现本章将就该方案的每个细节进行讨论。
包括方案的详细讲解,软件的实际配置方法等。
通过阅读和理解本章,您将了解VERITAS解决方案的实现方法,并清楚地知道VERITAS解决方案是切实可行的,并且有相关的实施案例和实施经验。
我们假设原来就已经按照双机系统设计,那么本方案仅需要增加不同地点间的广域连接,不需要增加其它硬件。
软件方面要用VERITAS高可用软件替换原有的HA/Cluster软件,新增Volume Manager、VERITAS Volume Replicator和Global Cluster Manager。
在介绍功能前,需要强调的的是:VERITAS提供的是完整的容灾解决方案。
VxVM veritas卷管理 sun solaris 卷管理
VxVM二零零四年十一月1概念 (3)2管理 (4)2.1 管理磁盘 (4)2.2 DMP (5)2.3 磁盘组 (6)2.4 卷 (7)3热重定位机制 (11)1概念VxVM3.2 for SUN●后台进程vxconfigd:维护配置和管理vxiod:提供扩展I/O操作vxrelocd:热重定位,以恢复冗余*软件RAIDvxdctl命令是vxconfigd后台进程的接口*让VXVM认识系统盘*●管理对象物理对象:物理硬盘虚拟对象:VxVM下管理对象,如卷、plex、subdisk、磁盘组、VM磁盘物理对象:物理硬盘,命名为CxTxDxSx,其中S2表示整个盘。
阵列磁盘命名如为enc0_0、enc0_1虚拟对象:VM磁盘、磁盘组、子磁盘、plex、卷VM磁盘:命令缺省为diskxx为物理盘在VxVM管理下如disk01 *PV子磁盘:一组相邻区域,命名缺省为diskxx-xx如disk01-01plex:类型有连续、条带化(RAID0)、镜像(RAID1)、带奇偶校验的条带化(RAID5),命名为volxx-01卷:在V3.0以后支持分层卷,卷又建立在基础卷的卷,如条带镜像卷vol1有二个列,每个列子盘又建在基础镜像卷上vop01、vop02。
●DMP动态多径处理*HP – Pvlink IBM 是在低层完成的为Veritas功能,用于多路径访问磁盘,用于冗余和均衡负责(需磁盘控制器支持),两个磁盘设备名使用一个设备名替代。
如enc0_0有两条路径(c1t99d0、c2t99d0)●设备发现动态增加磁盘到VxVM中●卷布局共有六种:连续和跨接、条带化(RAID0)、镜像(RAID1)、条带化加镜像(镜像条带RAID0+1)、镜像加条带化(条带镜像RAID1+0)、RAID5连接和跨接:数据依次存贮子盘,当子盘位于不同VM为跨接。
RAID0:子磁盘按组分成列,每个物理盘仅限一列,一列可由多个子盘,无冗余功能RAID1:RAID0+1:先分条先镜像,如一个磁盘坏,需重组整个plexRAID1+0:先镜像后分条,如一个磁盘坏,仅重组一个盘。
VERITAS Volume Manager 概述
VERITAS Volume Manager 概述SUN的网站上面有一段关于VERITAS的摘录:VERITAS Volume Manager软件是一个高端系统级的磁盘/存贮阵列解决方案。
它可以实现简单的、在线的磁盘管理和配置,大大减少了系统维护的宕机时间。
该产品同样可以帮助你实现数据集成和高可靠性(快速恢复和容错性能)。
VERITAS Volume Manager软件也可以为企业电脑和新兴的SAN(Storage Area Network)提供易用、在线的存贮管理功能。
通过对RAID技术的支持,VERITAS Volume Manager软件提高了现有硬件的容错能力,防止磁盘和硬件故障。
它还提供逻辑Volume管理层,这样,VERITAS Volume Manager克服了物理磁盘的硬件限制。
也许,你已经注意到了。
但还是让我列出他们完全忽略了的事情:Support for: Simple, RAID0, RAID1, RAID0+1, RAID1+0, RAID5# Dynamic Multipathing (DMP): Load balancing and redundant I/O paths to disk arrays supporting multi-controller attachment.# Online Relayout: VERITAS allows you to change the layout of a VERITAS volume while it is live and mounted. Change a RAID0 to a RAID5 without a second of downtime!# Snapshoting: Take a snapshot of your data, creating a "shadow" of it which you can use for online backups.# Hot Relocation: Designate "spares" which will take the place of failed disks onthe-fly.# Dirty Region Logging (DRL): Volume transaction logs which provide fast recoveries after system crashes.# More...... more than I can list!那,我们开始吧!VERITAS Volume Manager是VERITAS公司()的一个产品。
[原创] veritas volume manager(常用命令集)
![[原创] veritas volume manager(常用命令集)](https://img.taocdn.com/s3/m/8e4a63a0b0717fd5360cdcb3.png)
终于在春节前把veritas volume manager写完了.希望对要学习这个的朋友有一些帮助吧.最后一部分把常用命令给大家希望可以有一个帮助吧.(前面的一部分内容是我转贴过来的)做了一个组合吧.刚写好的,可能有些乱,还请大家不要介意.谢谢大家的支持!!!二、添加License的命令#vxlicense -c三、查看License的命令# vxlicense -p四、名词解析VRTSvxvm VxVM软件VRTSlic VxVM licensing utilitiesVRTSvmdoc VxVM电子文档VRTSvmman VxVM帮助手册VRTSvmdev VxVM developer’s packageVRTSvxsa VxVM图形管理界面VRTSvxfs VxFS软件VRTSfsdoc VxFS文档五、添加VxVM和VxFS包#mount -F hsfs -o ro /dev/dsk/c0t6d0s2 /mnt# pkgadd -d path_name product_packages注意:要以超级用户权限登录系统,完了后还要重启系统。
六、安装VxFS后,修改/etc/system ,在里面添加一行:set lwp_default_stksize=0x4000并将原始的文件拷贝一份。
七、检查安装包:#pkginfo 列出所有安装的包#pkginfo | grep VRTS 列出安装的VERITAS的包#pkginfo -l pkckage 列出某个安装包的详细信息八、用vxinstall来创建rootdg 。
选择Custom安装。
九、显示执行过的命令:#tail -f /var/opt/vmsa/logs/command十、命令行在如下几个目录中,可以找到在命令行中使用的命令:/etc/vx/bin/usr/sbin/usr/lib/vxvm/bin注:把这些目录加入到PATH环境变量中去。
Veritas vxvm之卷管理

vxvm之卷管理一、创建卷:1、使用vxassist命令:查出卷的最大空间:[root@node03 /]# vxassist -g testgp maxsize layout=raid5 nlog=2Maximum volume size: 37523456 (18322Mb)在任一磁盘上创建卷:[root@node03 /]# vxassist -b -g testgp make vol01 1g[root@node03 /]# vxassist -b -g testgp make vol02 1g(如果希望卷立即能够使用,指定 -b 选项。
-b选项可以使用init=active替代。
)完了后创建vxfs或ufs文件系统:[root@node03 /]# mkfs -F vxfs /dev/vx/rdsk/testgp/vol01[root@node03 /]# mkfs -F vxfs /dev/vx/rdsk/testgp/vol02[root@node03 /]# mount -F vxfs /dev/vx/dsk/testgp/vol01 /share/vol01使用vxvoladm查看信息[root@node03 /]# vxvoladm list[root@node03 /]# vxprint -ht在特定的磁盘上创建卷:[root@node03 /]# vxdisk listDEVICE TYPE DISK GROUP STATUSc1t0d0s2 auto:none - - online invalidc1t1d0s2 auto:cdsdisk testgp01 testgp onlinec1t2d0s2 auto:cdsdisk testgp02 testgp onlinec1t3d0s2 auto:cdsdisk testgp03 testgp onlinec1t4d0s2 auto:cdsdisk testgp04 testgp onlinec1t5d0s2 auto:cdsdisk testgp05 testgp online[root@node03 /]# vxassist -b -g testgp make vol03 1G testgp04 testgp05[root@node03 /]# newfs /dev/vx/dsk/testgp/vol03创建镜像卷:[root@node03 /]# vxassist -b -g testgp make vol05 2G layout=mirror要创建具有 3 个镜像而非默认的 2 个镜像的卷:[root@node03 /]# vxassist -b -g testgp make vol06 2G layout=mirror nmirror=3创建镜像连续卷:[root@node03 /]# vxassist -b -g testgp make vol07 2G layout=mirror-concat nmirror=3 创建连续镜像卷:[root@node03 /]# vxassist -b -g testgp make vol08 2G layout=concat-mirror nmirror=3 创建启用脏区日志的卷:[root@node03 /]# vxassist -b -g testgp make vol09 2G layout=mirror logtype=drl nlog=2 nmirror=2创建条带卷:[root@node03 /]# vxassist -b -g testgp make vol10 2G layout=stripe创建镜像条带卷:[root@node03 /]# vxassist -b -g testgp make vol11 2G layout=mirror-stripe创建条带镜像卷:[root@node03 /]# vxassist -b -g testgp make vol12 2G layout=stripe-mirror创建 RAID-5 卷:[root@node03 /]# vxassist -b -g testgp make vol13 2G layout=raid5 nlog=22、使用vxmake创建卷:这个命令比较麻烦,只说怎样初始化并启动使用 vxmake 创建的卷:如果使用 vxmake 命令创建的卷尚未初始化,或者该卷被设置为未初始化状态,则可以运行vxvol 命令初始化该卷。
VERTAS命令集合

vxassist [-g diskgroup] move volume !olddisk newdisk 在磁盘之间重定位卷中的子磁盘。
vxassist [-g diskgroup] maxsize layout=layout [attributes] 显示可创建服务器存储技术volume manager命令集合veritas volume manager 命令集vxassist [-g diskgroup] move volume !olddisk newdisk 在磁盘之间重定位卷中的子磁盘。
vxassist [-g diskgroup] maxsize layout=layout [attributes] 显示可创建的卷的最大大小。
vxassist make volume length [layout=layout ] [attributes]创建卷。
vxassist make volume length layout=mirror [nmirror=N] [attributes] 创建镜像卷。
vxassist make volume length layout=layout exclusive=on [attributes] 创建只能由集群中的单个节点以排它方式打开的卷。
vxassist make volume length layout=stripe|raid5 [stripeunit=W] [ncol=N] [attributes] 创建条带式卷或RAID-5 卷。
vxassist make volume length layout=layout mirror=ctlr [attributes] 使用不同控制器上的镜像数据plex 创建卷。
vxassist mirror volume [attributes] 将镜像添加到卷。
vxassist remove mirror volume [attributes] 从卷中删除镜像。
veritas volume 指令 -回复

veritas volume 指令-回复【veritas volume 指令】Veritas Volume Manager(VxVM)是一款在Unix和Linux操作系统上运行的高级磁盘卷管理器。
它允许系统管理员对磁盘卷进行管理和配置,包括磁盘的划分、扩展、收缩以及容错等操作。
其中,Veritas Volume 指令是使用VxVM进行操作的关键命令之一。
本文将一步一步回答有关Veritas Volume指令的相关问题。
一、什么是Veritas Volume指令?Veritas Volume指令是一组用于管理和操作Veritas Volume Manager 的命令。
它们可以通过控制台或命令行界面(CLI)使用,用于创建、删除、修改和维护逻辑磁盘卷以及相关的存储资源。
二、如何使用Veritas Volume指令?1. 查看存储资源:使用vxdisk list命令可以列出系统中的所有磁盘和存储设备。
该命令可以显示每个磁盘的状态、路径、类型、容量等信息。
2. 创建磁盘组:使用vxassist命令可以创建新的磁盘组,并将磁盘分配给这个磁盘组。
例如,使用以下命令创建一个名为mydg的磁盘组,并将磁盘c1t0d0添加到该磁盘组中:vxassist -g mydg add c1t0d03. 创建卷:使用vxassist命令创建卷并分配存储空间。
例如,使用以下命令创建一个名为myvol的卷,并将其大小设置为100MB:vxassist -g mydg make myvol 100m4. 扩展卷:使用vxassist命令可以对现有卷进行扩展,增加存储空间。
例如,使用以下命令将myvol卷扩展到200MB:vxassist -g mydg growby myvol 100m5. 增加磁盘:使用vxdiskadd命令可以将新的磁盘添加到磁盘组中。
例如,使用以下命令将磁盘c1t1d0添加到mydg磁盘组中:vxdiskadd c1t1d06. 删除卷:使用vxedit命令可以删除卷。
vvm—常用命令手册
V x V M—常用命令手册内部编号:(YUUT-TBBY-MMUT-URRUY-UOOY-DBUYI-0128)v e r t a s v o l u m e m a n a g e r命令手册一、常见命令获取机器ID和机器类型的命令添加License的命令...一、获取机器ID和机器类型的命令#hostid#uname -i二、添加License的命令#vxlicense -c三、查看License的命令# vxlicense -p四、名词解析VRTSvxvm VxVM软件VRTSlic VxVM licensing utilitiesVRTSvmdoc VxVM电子文档VRTSvmman VxVM帮助手册VRTSvmdev VxVM developer’s packageVRTSvxsa VxVM图形管理界面VRTSvxfs VxFS软件VRTSfsdoc VxFS文档五、添加VxVM和VxFS包#mount –F hsfs –o ro /dev/dsk/c0t6d0s2 /mnt# pkgadd –d path_name product_packages注意:要以超级用户权限登录系统,完了后还要重启系统。
六、安装VxFS后,修改/etc/system ,在里面添加一行:set lwp_default_stksize=0x4000并将原始的文件拷贝一份。
七、检查安装包:#pkginfo 列出所有安装的包#pkginfo | grep VRTS 列出安装的VERITAS的包#pkginfo –l pkckage 列出某个安装包的详细信息八、用vxinstall来创建rootdg 。
选择Custom安装。
九、显示执行过的命令:#tail –f /var/opt/vmsa/logs/command十、命令行在如下几个目录中,可以找到在命令行中使用的命令:/etc/vx/bin/usr/sbin/usr/lib/vxvm/bin注:把这些目录加入到PATH环境变量中去。
vxvm 命令集
VXVM常用1.状态维护>>>vxdisk list ****vx控制下磁盘状态*****>>>vxprint -g datadg>>>vxdisk list ***有哪些磁盘组>>>vxstat -g datadg -i 5 ****观察卷的I/O ***vxdg -g datadg free 看磁盘剩余空间vxassist -g datadgmaxsize layout=stripe/mirror disk01 disk02 看容许某种操作可用的空间。
2.磁盘相关>>>vxdisksetup -i c1t1d0 ****将磁盘至于VX控制之下(初始化磁盘)***>>>vxdiskunsetup -C c1t1d0 *****将磁盘取消vx控制***如果offline 到 error, 先转换为online,再到error3.磁盘组相关>>>vxdginitdatadg disk01=c1t1d0 *****新建一个磁盘组*****>>>vxdg destroy datadg ***删除一个磁盘组****>>>vxdg -g infxdgadddisk infxdg00=T30_0 *****将一个磁盘至于一个磁盘组下**** >>>vxdg -o override -g infxdgrmdisk infxdg00 ***删除一个磁盘从一个磁盘组下**** vxdgrmdiskdisk_name ***直接***(慎用)>>>vxdg deport infxdg ***将infxdg从系统中踢出***>>>vxdg import infxdg ***将infxdg导入***>>>vxvol -g datadgstartall ****启动vol****>>>vxvol -g datadgvol stop/start vol01>>>vxdg -g datadg free ***其中length为空闲大小(disk space)dd if=/dev/vx/rdsk/datadg/data01 of=/dev/null bs=1024k3.卷相关>>>vxassist -g datadg -b make vol02 50m ****创建卷***>>>vxedit -g datadg -rfrm vol02 ****删除卷***>>>vxassist -g datadg make vol01 2G layout=stripe disk01 disk02disk03 ***stripe****>>>vxassist -g datadg make vol01 2G layout=raid5,nolog disk01 disk02disk03 ***raid 5***>>>vxedit -g datadg set user=informix group=informix mode=660 vol01 ***改变卷属性***>>>vxresize -F ufs -g disk_groupvolume_name +2m ***扩大空间***4.镜像1.镜像 vxassist -g datadg mirror vol01 disk02 disk02与原设备在一个磁盘组里可能有一个vxplexatt 命令要测试2.镜像分离 vxplex -g datadgdet vol01-01vxplex -g datadg dis vol01-013.删除镜像 vxedit -g datadg -rfrm vol01-01 删除镜象后才可以删除卷1.给一个卷增加空间vxassist -g datadggrowbyvoltest 2g 给voltest扩大2gvxassist -g datadggrowtovoltest 2g 给voltest增加到2g1. 将一个磁盘置于VX控制之下。
veritas volume 指令 -回复

veritas volume 指令-回复什么是Veritas Volume Manager?Veritas Volume Manager (VxVM)是一种用于在UNIX和Linux操作系统上管理磁盘卷的软件。
它允许管理员创建和管理虚拟卷,将多个物理磁盘驱动器组合成一个逻辑卷,并为应用程序提供高性能和高可用性的存储解决方案。
Veritas Volume Manager还提供了数据迁移、磁盘故障恢复和动态调整命令等功能。
在本文中,我们将深入了解Veritas Volume Manager,并介绍一些常见的VxVM命令和用法。
1. VxVM基本概念在开始使用Veritas Volume Manager之前,有几个基本概念需要了解。
首先是磁盘组(disk group),这是一个或多个物理磁盘的逻辑集合。
磁盘组可以划分为一个或多个卷(volume),卷可以在操作系统中被视为一个独立的硬盘。
卷可以通过将多个物理磁盘组合在一起来创建,从而提供更大的存储空间和更好的性能。
2. Veritas Volume Manager的安装和配置在使用Veritas Volume Manager之前,需要先进行安装和配置。
首先,确保已安装VxVM软件包,并使用root权限运行配置工具vxinstall进行初始化配置。
在配置过程中,需要选择并初始化用于VxVM的物理磁盘,并创建一个磁盘组。
配置完成后,可以使用vxdisk 命令来验证和管理物理磁盘。
3. 创建和管理磁盘组使用vxdg命令可以创建和管理磁盘组。
例如,要创建一个名为mydiskgroup的磁盘组,可以运行以下命令:vxdg init mydiskgroup要查看已创建的磁盘组列表,可以使用vxdg list命令。
通过添加选项可以获取更详细的信息,如vxdg -g mydiskgroup list。
4. 创建和管理卷使用vxmake命令可以创建卷。
例如,要创建一个名为myvolume的卷,并将其分配到磁盘组mydiskgroup中,可以运行以下命令:vxmake mydiskgroup myvolume layout=mirror其中,layout选项指定了卷的布局方式。
VxVM培训
卷和虚拟对象
当将物理磁盘置于Volume Manager 控制之下 时,就在物理对象和Volume Manager 对象之 间建立了联系。
Volume Manager 对象包括: 磁盘组 VM 磁盘 卷 plex (镜像) 子磁盘
Volume Manager 磁盘
当将物理磁盘置于Volume Manager 控 制之下时,Volume Manager 磁盘(或 VM 磁盘)就被分配给物理磁盘。
VxVM系统的安装
安装前的准备(VxVM3.2)
安装SUN最新的补丁 安装SUNWsan 安装109529-06 安装111413-08 下载VxVM最新的patch
vxvm32p2+vmsa32p2_247308.tar.Z
软件包的安装
1) 将vritas volume manager CD放入cdrom.
Volume Manager 初始化 Volume Manager 后台驻留程序 系统设置 系统设置原则 系统保护
Volume Manager 初始化
使用vxinstall 程序初始化Volume Manager。
vxinstall 将指定的磁盘置于Volume Manager 控制下。
在磁盘可以受Volume Manager 控制之 前,该磁盘必须可通过操作系统设备接 口进行存取。
Volume Manager 用户界面
Volume Manager 将数据管理的物理部 分与逻辑部分分开,从而提供了增强数 据存储服务。
第二章
入门指南
介绍
本节简要描述安装Volume Manager 和 设置Volume Manager 操作所必须运行 的后台驻留程序所需的步骤。
- 1、下载文档前请自行甄别文档内容的完整性,平台不提供额外的编辑、内容补充、找答案等附加服务。
- 2、"仅部分预览"的文档,不可在线预览部分如存在完整性等问题,可反馈申请退款(可完整预览的文档不适用该条件!)。
- 3、如文档侵犯您的权益,请联系客服反馈,我们会尽快为您处理(人工客服工作时间:9:00-18:30)。
vxassist是VxVM中非常重要的一个工具,使用非常频繁,我这里给出一个命令手册,并作了一些简单的翻译和注释,仅供参考.General1. Creating a Volume1.1 Creating a Concatenated V olume1.2 Creating a Striped V olume1.3 Creating a RAID-5 V olume2. Extending a Volume2.1 Extending a volume up to certain length2.2 Extending by a Given Length3. Shrinking a V olume3.1 Shrinking to a Given Length3.2 Shrinking by a Given Length4. Removing a Volume5. Mirroring a V olume5.1 Creating & Mirroring a New Volume5.2 Mirroring an Existing V olume5.3 Mirroring All Volumes6.Removing a Mirror7.Adding a RAID-5 Log8.Adding a DRL Log9.Removing a RAID-5 Log10.Preparing a Volume for Online Backup11.Displaying Volume Configuration InformationGeneralvxassist工具是VxVM中用于进行卷管理的工具,可以用于创建卷、增加镜像、扩展或者收缩存在的卷等,是非常重要的一个工具.The vxassist utility in Veritas Volume Manager is used to create volumes, add mirrors and logs to existing volumes, extend and shrink existing volumes, provides for the migration of data from a specified set of disks, and provides facilities for the on-line backup of existing volumes. vxassist在创建卷组时,如果不指定,缺省的会把卷分配给rootdg(note:在VxVM4.0中rootdg 不再必须,但是你可以指定一个default dg具有类似的功能).vxassist的缺省单位是blocks,但是你可以指定K 或M 或G 为单位,这都是合法的.The default behavior of vxassist is to create volumes in the rootdg diskgroup if diskgroup is not specified . The default length is taken as number of blocks but this can be specified in Kilobytes or Megabytes or Gigabytes.vxassist command syntax :vxassist <option> <Keyword> volume_name [attributes]Commonly used options are given below (See man vxassist for complete list of supported options) -g for specifying diskgroups -b for background operation -d file containing defaults for vxassist if not specified /etc/default/vxassist is used Keywords used are make , mirror , move , growto ,growby ,shrintto ,shirnkby ,snapstart , snapshot ,snapwait Attributes specify volumes layout disks controllar to include exclude etcDevice Nodes :Default rootdg disk group. Block Device Node /dev/vx/dsk/volume_name Raw Device Node /dev/vx/rdsk/volume_name Other DiskGroups Block Device Node /dev/vx/dsk/diskgroup_name/volume_name Raw Device Node /dev/vx/rdsk/diskgroup_name/volume_name_______________________________________1. Creating a Volume :1.1 Creating a Concatenated Volume缺省的,vxassist把一个卷组里的所有磁盘统一看待,如果创建的volume大于单个磁盘,那么空间分配自动的跨越磁盘.By default, vxassist creates a concatenated volume using the space available on a disk or on the number of disks in a diskgroup if the volume size specified is more then the one available on a single disk.Disks can be specified from a diskgroup for a volume group but if not mentioned available disks are selected by the volume manager.Command syntax :· vxassist make volume_name volume_lengthTo create a new volume appvol of 100 MB in the default disk group rootdg with available disks:· #vxassist make appvol 100mTo create the volume appvol of 100MB on disk03· #vxassist make appvol 100m disk031.2 Creating a Striped VolumeA striped volume contains at least one plex that consists of two or more subdisks located on two or more physical disks.Command Syntax :· vxassist make volume_name length layout=stripeTo create a striped volume appvol2 with the default stripe unit size on the default number of disks· #vxassist make appvol2 100m layout=stripeTo create a striped volume appvol2 100MB striped volume on three specific disks.· #vxassist make appvol2 100m layout=stripe disk04 disk05 disk061.3 Creating a RAID-5 VolumeA RAID-5 volume contains a RAID-5 plex that consists of two or more subdisks located on two or more physical disks. Only one RAID-5 plex can exist per volume. A RAID-5 volume may also contain one or more RAID-5 log plexes, which are used to log information about data and parity being written to the volume.Command Syntax :· vxassist make volume_name length layout=raid5To create the RAID-5 volume appvol4 with the default stripe unit size on the default number of disks with RAID-5 log,· #vxassist make appvol4 100m layout=raid5.2. Extending a Volume--扩展一个建好的VolumeCaution : If you plan to use volume size change (grow or shrink ) on a volume with data make sure you have the good backup of the volume available before carrying out such operation .2.1 Extending a volume up to certain lengthCommand syntax· vxassist growto volume_name lengthTo extend vol3 upto 8000 sectors, type:--例如,扩展vol3到8000个扇区· #vxassist growto vol3 8000Note:这里可以指定大小,例如:vxassist growto redo101 100M如果使用的是非缺省DG,还需要指定磁盘组:vxassist -g oradg growto redo101 100M2.2 Extending by a Given LengthCommand Syntax· vxassist growby volume_name lengthTo extend volapp by 1000 sectors, type:· #vxassist growby volapp 10003. Shrinking a VolumeCaution - Do not shrink a volume below the size of the file system. If you have a VxFS file system, you can shrink the file system and then shrink the volume. If you do not shrink the file system first, you risk unrecoverable data loss.Always make sure you have a good backup of the data volume to be shirnked.3.1 Shrinking to a Given LengthShrink a volume to a specific length as follows:· vxassist shrinkto volume_name lengthMake sure you do not shrink the volume below the current size of the file system or database using the volume. This command can be safely used on empty volumes.To shrink volcat to 1300 sectors, type:· #vxassist shrinkto volcat 13003.2 Shrinking by a Given LengthShrink a volume by a specific length as follows:· vxassist shrinkby volume_name lengthTo shrink volcat by 8000 sectors, type:· #vxassist shrinkby volapp2 80004. Removing a VolumeRemoving a volume requires removing all references to the volumes to be removed like unmounting the volume if mounted and removing its reference from /etc/vfstab .如果你需要remove一个volume,那么首先你需要stop这个卷组,停止其上的所有活动事务.An active volume has to be stopped first to stop all the activities to the volume only then it can be removed.Stopping Volume :Command Syntax· vxvol stop volume_nameTo stop appvol1· #vxvol stop appvol1Removing VolumeCommand Syntax· vxedit -rf rm volume_nameTo remove the volume appvol1· #vxedit -rf rm appvol115. Mirroring a VolumeMirroring allow data to be written simultaneously to two disks so that in case of failure of one disk data is available from the other mirrored disk. Boot disks can be mirriored to provide alternate booting disk .5.1 Creating & Mirroring a New VolumeCommand Syntax :· vxassist make volume_name length layout=mirrorTo create the mirrored volume, appvol22 of 100mb· #vxassist make appvol22 100m layout=mirrorTo create a volume with Dirty Region Logging enabled· #vxassist make volume_name length layout=mirror,log5.2 Mirroring an Existing VolumeCommand syntax· vxassist mirror volume_nameCreating a mirror of volume vol44:· #vxassist mirror vol445.3 Mirroring All VolumesTo mirror all existing volumes to available disk space· /etc/vx/bin/vxmirror -a6. Removing a MirrorRemoving a mirror involves first dissociating the plex from its volume and then removing the plex and any associated subdisks completely.The last valid mirror plex associated with a volume cannot be removed.Dissociate and remove the plex from its volume as follows:· vxplex -o rm dis plex_namevxprint -h shows the volume and associated plexes :Disk group: rootdg TY NAME ASSOC KSTATE LENGTH PLOFFS STATE TUTIL0 PUTIL0 v volm fsgen ENABLED 10240 - ACTIVE - - pl volm-01 volm ENABLED 10240 - ACTIVE - - sd disk01-02 volm-01 - 10240 0 - - - pl volm-02 volm ENABLED 10240 - ACTIVE - - sd disk02-03 volm-02 - 10240 0 - - -To disassociate and remove volmir-02 from volmir, type:· #vxplex -o rm dis volm-02The output of vxprint -h for volm now shows volume volm with only one plex::Disk group: rootdg TY NAME ASSOC KSTATE LENGTH PLOFFS STATE TUTIL0 PUTIL0 v volm fsgen ENABLED 10240 - ACTIVE - - pl volm-01 volmir ENABLED 10240 - ACTIVE - - sd disk01-02 volmir-01 - 10240 0 - - -7. Adding a RAID-5 LogA RAID-5 log maintains a copy of the data and parity being written to the volume at any given time. If a system failure occurs, VxVM can replay the RAID-5 log to resynchronize the volume. This copies the data and parity that was being written at the time of failure from the log to the appropriate areas of the RAID-5 volume.RAID-5 log plexes are used to log information about data and parity being written to the raid volume. A log plex is created for the volume by default when a raid volume is created but additional ones can be added by following command .· vxassist addlog name_of_raid5_vol8. Adding a DRL LogDirty region logging (DRL) is used with mirrored volume layouts. DRL keeps track of the regions that have changed due to I/O writes to a mirrored volume. Prior to every write, a bitmap is written to a log to record the area of the disk that is being changed. In case of system failure, DRL uses this information to recover only the portions of the volume that need to be recovered.To put Dirty Region Logging into effect for a volume, a log subdisk must be added to that volume and the volume must be mirrored. Only one log subdisk can exist per plex.The following example creates a log for the mirrored volume vol03:· #vxassist addlog vol03When vxassist is used to add a log subdisk to a volume, a log plex is also created to contain the log subdisk, by default.Once created, the plex containing a log subdisk can be treated as a regular plex. Data subdisks can be added to the log plex. The log plex and log subdisk can be removed using the same procedures used to remove ordinary plexes and subdisks.9. Removing a RAID-5 LogRemoving a RAID-5 log involves first dissociating the log from its volume and then removing the log and any associated subdisks completely.Dissociate the log from its volume as follows:· #vxplex -o rm dis plex_nameTo identify the log plex, use the command:· vxprint -ht raid5_volume_nameTo disassociate the log plex volrd-02 from volrd, type:· #vxplex -o rm dis volrd-02The output of vxprint -h for volrd now shows:Disk group: rootdg TY NAME ASSOC KSTATE LENGTH PLOFFS STATE TUTIL0 PUTIL0 v volrd raid5 ENABLED 32 - ACTIVE - - pl volrd-01 volrd ENABLED 32 - ACTIVE - - sd disk01-02 volrd-01 - 32 0 - - - sd disk02-03 volrd-01 - 32 0 - - -10. Preparing a Volume for Online BackupVolume manager provides an easy way to take backup of the online data by creating an offline snapshot mirror of the volume .The vxassist snapstart operation creates a write-only backup mirror, which is attached to and synchronized with the volume to be backed up and later detached and made offline by vxassist snapshot command . The snapshot volume can be used by backup utilities while the original volume continues to be available for applications and users.The volume backup method described here does not apply to RAID-5 volumes.Backing up a volume with vxassist involves the following procedureCreate a snapshot mirrorsnapstart starts creating a online snapshot mirror of the volume using the available disk space . The snapshot is completed with vxassist snapshot command when offline snapshot volume is created with a userdefined name .Command Syntax:vxassist snapstart volume_nameTo create a snapshot mirror of a volume called vol8, type#vxassist snapstart vol8Create a snapshot volumeCommand Syntaxvxassist snapshot volume_name new_volume_nameTo create a snapshot volume of vol8, type:#vxassist snapshot vol8 snapvol8You can now back up the snapshot volume by whatever means you prefer. To avoid wasting space, you can then remove the snapshot volume, which occupies as much space as the original volume11 Displaying Volume Configuration InformationThe vxprint command can be used to display information about how a volume is configured.Display the volume, mirror, and subdisk record information for all volumes as follows:#vxprint -htclass="style25 style31"Disk group: rootdgDG NAME NCONFIG NLOG MINORS GROUP-IDDM NAME DEVICE TYPE PRIVLEN PUBLEN STATE V NAME USETYPE KSTATE STATE LENGTH READPOL PREFPLEXPL NAME VOLUME KSTATE STATE LENGTH LAYOUT NCOL/WID MODESD NAME PLEX DISK DISKOFFS LENGTH [COL/]OFF DEVICE MODEdg rootdg 759096729.1025.tweetydm disk10 c1t0d0s2 sliced 559 1044400 -dm disk20 c2t0d0s2 sliced 559 1044400 -v pubs fsgen ENABLED ACTIVE 2288 SELECT -pl pubs-01 pubs ENABLED ACTIVE 2288 CONCAT - RWsd disk10-01 pubs-01 disk10 0 2288 0 c0t0d0 ENAv vol8 fsgen ENABLED ACTIVE 20480 SELECT -pl vol8-01 vol8 ENABLED ACTIVE 20480 CONCAT - RWsd disk10-02 vol8-0 disk10 2288 20480 0 c0t1d0 ENAwhere dg is a disk group, dm is a disk, v is a volume, pl is a plex, and sd is a subdisk. The top few lines indicate the headers that match each type of output line that follows. Each volume is listed along with its associated plex(es) and subdisk(s).Display volume-related information for a specific volume as follows:#vxprint -t volume_nameTo display information about vol8, type:#vxprint -t vol8。