EPSON ME OFFICE 80W 无线WiFi打印配置手册
爱普生(Epson) 墨仓式无线一体机(打印 复印 扫描 )1

品牌爱普生Epson品牌爱普生Epson品牌爱普生Epson型号L358型号L351型号L211颜色黑色颜色黑色颜色黑色类型墨仓式无线一体机类型墨仓式一体机类型墨仓式一体机多功能打印复印扫描 WiFi多功能打印扫描复印多功能打印复印扫描打印幅面A4打印幅面A4打印幅面A4分辨率5760 x 1440dpi(带有智能墨滴变换技术)分辨率5760 x 1440dpi (带有智能墨滴变换技术)5760 x 1440dpi (带有智能墨滴变换技术)黑色文本(A4)打印速度文本打印速度黑色文本(A4) 约32ppm *1 (经济模式) 彩色文本(A4)约15 ppm*1 (经济模式) ISO打印速度黑色约8.8ipm *2(普通模式)彩色约4.3ipm *2(普通模式)照片打印速度 6寸彩色照片(4 x 6英寸)约27秒/页(有边距,经济模式) 6寸彩色照片(4 x6英寸)约69秒/页(有边距,普通模式)光学分辨率600 dpi约33 页/分钟 (经济模式)*1打印机语言中文、英文最大物理分辨率 600×1200 dpi主体打印功能主体打印功能主体打印功能分辨率爱普生(Epson) 墨仓式无线一体机(约9页/分钟(IPM)*2其它功能最小墨滴 3微微升双面打印手动双面打印逐份打印支持黑色文本(A4)约27ppm *1 (经济模式)彩色文本(A4)彩色文本(A4)约15 ppm *1(经济模式)约15页/分钟(经济模式)*1ISO打印速度约4.5页/分钟(IPM)*2扫描类型平板彩色图像扫描仪黑色约6ipm*2(普通模式)照片(4 x 6英寸)扫描分辨率600×1200dpi彩色约3ipm *2(普通模式)27秒/页(有边距,经济模式)扫描速度黑白 A4300dpi 2.4毫秒/线彩色 A4300dpi 9.5毫秒/线黑色 A4600dpi 7.2毫秒/线彩色 A4600dpi 14.3照片打印速度69秒/页(有边距,默认模式)色彩深度彩色输入48位/ 输出24位灰度输入16位/ 输出8位黑白输入16位/输出1位6寸彩色照片(4 x 6英寸)约27秒/页(有边距,经济模式)打印速度扫描功能打印速度打印机语言中文、英文其他功能光学分辨率600 dpi 最大扫描区域216 x 297mm (8.5 x 11.7英寸)6寸彩色照片(4 x 6英寸) 约69秒/页(有边距,普通模式)打印机语言中文、英文其它功能摩擦进纸扫描类型平板彩色图像扫描仪复印速度黑色文本(A4) 约5秒/页(快速复印模式) 彩色文本(A4) 约10秒/页(快速复印模式)扫描分辨率600×1200dpi 最大复印页数20页黑白 A4300dpi 2.4毫秒/线 彩色 A4300dpi 9.5毫秒/线扫描类型平板彩色图像扫描仪黑白 A4600dpi 7.2毫秒/线 彩色 A4600dpi 14.3毫秒/线扫描分辨率600×1200dpi彩色 输入48位/ 输出24位系统参数驱动支持的操作系统Windows XP/XPProfessional x64Edition/Vista/7 或更高版本 Mac OS X 10.5.8,10.6.x,10.7.x 或更高版本黑白 A4300dpi 2.4毫秒/线灰度 输入16位/ 输出8位接口USB 接口(兼容USB2.0)彩色 A4300dpi 9.5毫秒/线黑白 输入16位/ 输出1位电源额定电压AC 100-240V 额定频率 50~60Hz黑色 A4600dpi 7.2毫秒/线扫描速度色彩深度扫描功能复印功能规格扫描功能扫描速度尺寸472 X 300 X145毫米(自动进纸器关闭时)472 X 528 X279毫米(自动进纸器打开时)彩色 A4600dpi 14.3毫秒/线重量4.4 kg (不包括墨水/电源线)彩色输入48位/ 输出24位黑色文本(A4) 约5秒/页(经济模式)噪音水平连接计算机打印,普通纸默认设置(依照ISO7779)LwAd : B(A)5.8B(A)LpAm :dB(A) 44dB(A)灰度输入16位/ 输出8位彩色文本(A4) 约10秒/页(经济模式)支持纸张尺寸A4 210×297毫米、A6105×148 毫米、A5 148×210 毫米、B5 182×257毫米、9×13厘米(3.5×5英寸)、10×15 厘米 (4×6 英寸)、13×18 厘米 (5×7 英寸)、13×20 厘米(5×8 英寸)、20×25 厘米 (8×10 英寸)、16:9宽尺寸(102×181 毫米)、Letter 8 1/2×11 英寸、Legal 8 1/2×14 英寸、100 X 148毫米黑白输入16位/ 输出1位复印功能复印速度色彩深度最大复印页数20页耗电量独立复印模式 大约 12W (ISO 24712 样张) 待机模式 大约 3.5W 睡眠模式大约 1.5 W 关机模式 大约 0.3 W黑色文本(A4) 约5秒/页(快速复印模式)其它功能在线支持打印 扫描复印彩色文本(A4) 约10秒/页(快速复印模式)双面打印 手动双面打印逐份打印 支持最大复印页数20页驱动支持的操作系统Windows XP/XPProfessional x64Edition/Vist a/7 或更高版本 Mac OS X 10.5.8,10.6.x,10.7.x 或更高版本Windows XP/XPProfessional x64Edition/Vist a/7或更新网络功能规格系统参数特性特性复印功能复印速度网络功能Mac OS X 10.5.8,10.6.x,10.7.x 或更新其它功能在线支持接口USB 接口(兼容USB2.0)额定电压:AC 220~240V 额定频率:50~60HzWindows XP/XPProfessional x64Edition/Vist a/7 或更高版本472 X 300 X 145毫米 (自动进纸器关闭时)Mac OS X 10.5.8,10.6.x,10.7.x 或更高版本472 X 528 X 279毫米 (自动进纸器打开时)随机捆绑软件重量4.4 kg (不包括墨水/电源线)Epson Event Manager连接计算机打印,普通纸默认设置(依照ISO7779)用户指南LwAd : B(A)5.8 B(A)打印机驱动程序LpAm :dB(A) 44dB(A)扫描仪驱动程序A4, A5, A6,B5, 10x15厘米(4x6英寸), 13x18厘米(5x7英寸), 9x13厘米(3.5x5英寸)接口USB 接口(兼容USB2.0)噪音水平寸系统参数电源尺寸规格系统参数信纸(81/2x11英寸), Legal(81/2x14英寸)电源额定电压:AC 220~240V、额定频率:50~60Hz13x20厘米(5x8英寸),20x25厘米(8x10英寸),16:9 宽尺寸,100x148毫米472 X 300 X 145毫米(自动进纸器关闭时)信封: #10(41/8x9 1/2英寸),DL(110x220毫米),C6(114x162毫米)472 X 528 X 279毫米(自动进纸器打开时)独立复印模式 大约 11W (ISO 24712 样张)重量4.4 kg (不包括墨水/电源线)待机模式 大约 4.5 W 连接计算机打印,普通纸默认设置(依照ISO7779)睡眠模式 大约 2.3W LwAd : B(A)5.8 B(A)关机模式 大约 0.3 WLpAm :dB(A) 44dB(A)支持纸张尺寸8.5 x 44英寸独立复印模式 大约13W按需喷墨(微压电打印技术)待机模式 大约3.5W 打印方向 双向逻辑查找睡眠模式 大约1.5W 纸张进纸方式 摩擦进纸关机模式 大约 0.3W 随机捆绑软件Epson EventManager,Easy Photo Print,EPSO Nnetsetup,EPSO Nnet print支持纸张尺寸耗电量特性特性尺寸噪音水平耗电量特性用户指南,网络指南,连接指南,打印机驱动程序,扫描仪驱动程序按需喷墨(微压电打印技术)双向逻辑查找喷嘴数量配置黑色180个,其它颜色各59个(青色、洋红色、黄色)最小墨滴 3微微升双面打印手动双面打印逐份打印支持进纸盒容量50页,A4普通纸(75g/m2)出纸器容量30页,A4普通纸(75g/m2)墨水容量大容量墨水补充装每瓶容量70ml。
epson无线解决方案

epson无线解决方案
《Epson无线解决方案:让您的打印变得更简单》
无线打印技术的出现,已经为用户带来了更加便捷和灵活的打印体验。
而Epson作为一家全球知名的打印解决方案提供商,也推出了一系列的无线解决方案,帮助用户们加快打印速度,提高打印效率。
Epson无线解决方案的主要特点是无线连接,通过Wi-Fi或者是蓝牙技术,用户可以轻松将电脑、手机或者平板连接到打印机上,实现快速的打印操作。
而且,在无线连接的同时,Epson的打印机也可以保持高品质的打印效果,无论是色彩的还原度还是图像的清晰度,都能得到很好的保证。
另外,Epson的无线解决方案还支持云打印功能,用户可以通过连接云打印服务,将文件直接发送到打印机进行打印,省去了传统的传输步骤,进一步提高了打印的便捷性。
而且用户还可以通过手机App等工具,随时随地远程控制打印机,实现无人值守的打印操作。
总的来说,Epson的无线解决方案为用户们带来了更加便捷、高效的打印体验,让打印更加简单。
随着科技的不断发展,相信Epson未来还会推出更多更好的无线解决方案,帮助用户们实现更加智能化的打印操作。
爱普生打印机菜单设置
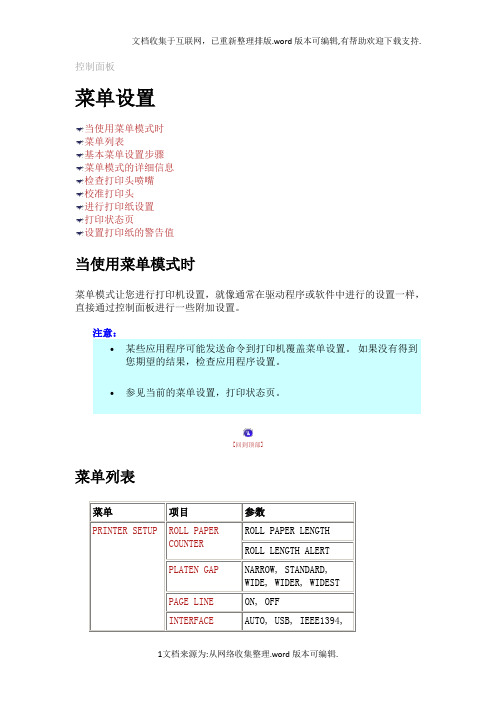
INTERFACE
AUTO, USB, IEEE1394,OPTIONAL I/F CARD
CODE PAGE
PC437, PC850
ROLL PAPER MARGIN
DEFAULT, TOP/BOTTOM 15 mm, TOP 35/BOTTOM 15 mm, 3 mm, 15 mm,
MAGENTA 2 E*****F, E****F, E***F, E**F, E*F, nn%, 0%
CYAN E*****F, E****F, E***F, E**F, E*F, nn%, 0%
CYAN 2 E*****F, E****F, E***F, E**F, E*F, nn%, 0%
YELLOW E*****F, E****F, E***F, E**F, E*F, nn%, 0%
[回到顶部]
菜单模式的详细信息
PRINTER SETUP(打印机设置)
此菜单包含下列项目。
ROLL PAPER COUNTER(卷纸计数器)
通过设置卷纸警告,当没有足够的剩余打印纸时,出现一条信息。
当使用卷纸时,键入在打印机中放入的卷纸长度和警告值。 可以设置5.0到99.5m之间的卷纸长度,在卷纸长度为1到15m时设置警告值。
EXECUTE
CLOCK SETTING
MM/DD/YY HH:MM
CONTRAST ADJUSTMENT
-20[dec] to +20[dec]
HEAD ALIGNMENT
PAPER THICKNESS
STANDARD, 0.1 mm - 1.5 mm
ALIGNMENT
AUTO, MANUAL
[回到顶部]
epson打印机wifi如何设置

epson打印机wifi如何设置epson打印机wifi如何设置1、首先,把epsonl385打印机插上电源通电,待自检完成后,便可以设置。
如果用户家里的无线路由器带有WPS(Wi-Fi Protected Setup)或QSS(又称快速安全设置)功能,那就简单多了。
2、通过WPS或QSS无线路由器按钮连接,给无线路由器通电,待上面的指示灯交替闪烁时,证明路由器已经正式启动,按机身Wi-Fi 按键3秒钟,左侧Wi-Fi指示灯开始红灯和绿灯交替闪烁,当红灯和绿灯正常亮时打印机配置完成。
实现快速连接。
3、如果您还未安装打印机驱动,请登录爱普生网站下载L358驱动安装:按照屏幕提示完成驱动安装及设置,当出现“连接类型”界面时请选择“+其他计算机”,按照屏幕提示操作将会自动配置打印机和扫描端口设置,配置完成后就可以实现Wi-Fi无线打印和扫描。
4、如果需要单独配置打印机端口和扫描仪端口时,按下i按键,先通过打印出网络状态页来确认打印机的IP地址。
5、电脑端设置打印端电脑左下角点击开始—设置—打印机和传真,进入打印机完成驱动的图标界面,鼠标右键点击打印机图标(epsonl385)选择“打印机属性”->“端口”->“添加端口”->选择“Standard TCP/IP Port”,点击“新端口”,输入打印机的IP地址,选择“下一步”,完成端口添。
点击“应用”,无线网络打印设置完成。
6、电脑端设置扫描端口电脑左下角点击“开始”→“所有程序”→“EPSON”→“Epson Scan”→“Epson scan设置”,打开Epson Scan设置后将“本地”修改成“网络”;点击“添加”会自动搜索到一体机IP地址,用鼠标点击IP地址,再点击“确定”,完成设置。
cad里如何添加打印机的一、打开“Autodesk打印机管理器”的步骤:从“开始”菜单中选择“设置”“控制面板”。
双击“Autodesk打印机管理器”图标。
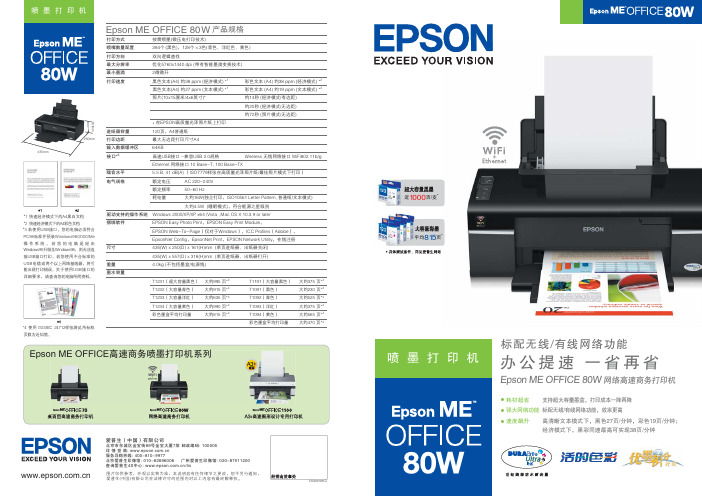
epson ME OFFICE 80W喷墨打印机 产品规格
大约375 页*4 大约230 页*4 大约525 页*4 大约375 页*4 大约565 页*4 大约470 页*4
Epson ME OFFICE高速商务喷墨打印机系列
爱普生(中国)有限公司 北京市东城区金宝街89号金宝大厦7层 邮政编码: 100005 详 情 登 陆: 服务导购热线: 400-810-9977 北京爱普生印像馆: 010-82696006 广州爱普生印像馆: 020-87511200 查询爱普生4S中心: /4s
约20秒 (经济模式/无边距)
约72秒 (照片模式/无边距)
进纸器容量
* 在EPSON高质量光泽照片纸上打印 120页,A4普通纸
打印边距 输入数据缓冲区 接口*3
最大无边距打印尺寸A4 64KB 高速USB接口 -兼容USB 2.0规格
Wireless 无线网络接口 WiFi802.11b/g
噪音水平
图片仅供参考,外观以实物为准,本说明若有任何细节之更改,恕不另行通知, 爱普生(中国)有限公司在法律许可的范围内对以上内容有最终解释权。
EIS090103CZ
近1000页/支* 平均815页*
喷墨打印机
标配无线/有线网络功能
办公提速 一省再省
Epson ME OFFICE 80W 网络高速商务打印机
双面打印也精彩
以往的普通墨水,因为洇染而大大影响双面打印的效果,爱普生 DURABrite Ultra颜料墨水不洇染的特性保证不会影响到 背面的打印效果,使得普通纸正反面都可以精彩呈现。
丰富实用的软件,操作得心应手
ME OFFICE 80W提供了简洁的驱动程序和丰富实用的捆绑软件。
实用的Epson Web-to-Page
近1000页/支*
EPSON 打印机网络 管理员手册
Permission is granted to anyone to use this software for any purpose, including commercial applications, and to alter it and redistribute it freely, subject to the following restrictions:
EPSON 打印机设置指南说明书
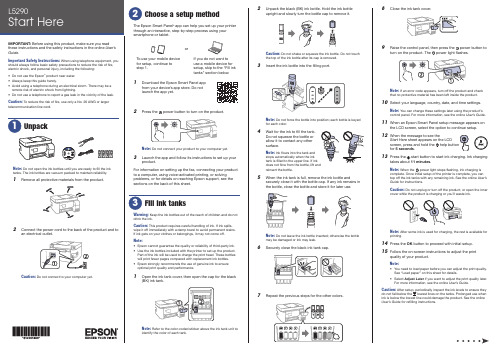
8 Close the ink tank cover.9 R aise the control panel, then press the power button toturn on the product. Thepower light flashes.Note: If an error code appears, turn off the product and check that no protective material has been left inside the product.10 S elect your language, country, date, and time settings.Note: You can change these settings later using the product’s control panel. For more information, see the online User’s Guide .11 W hen an Epson Smart Panel setup message appears onthe LCD screen, select the option to continue setup.12 WStart Here sheet appears on the LCDscreen, press and hold the help button for 5 seconds .13 P ress the start button to start ink charging. Ink chargingtakes about 11 minutes .Note: When the power light stops flashing, ink charging is complete. Once initial setup of the printer is complete, you can top off the ink tanks with any remaining ink. See the online User’s Guide for instructions.Caution: Do not unplug or turn off the product, or open the innercover while the product is charging or you’ll waste ink.Note:14 P ress the OK button to proceed with initial setup.15 F ollow the on-screen instructions to adjust the printquality of your product.Note:• Y ou need to load paper before you can adjust the print quality. See “Load paper” on this sheet for details.• S elect Adjust Later if you want to adjust the print quality later.For more information, see the online User’s Guide .Caution:User’s Guide for refilling instructions.Do not open the ink bottles until you are ready to fill the inktanks. The ink bottles are vacuum packed to maintain reliability.emove all protective materials from the product.The Epson Smart Panel ® app can help you set up your printer through an interactive, step-by-step process using your smartphone or tablet.If you do not want to use a mobile device for setup, skip to the “Fill ink tanks” section below.To use your mobile device for setup, continue to step 1.or1 D ownload the Epson Smart Panel appfrom your device’s app store. Do notlaunch the app yet.2 P ress the power button to turn on the product.Note: D o not connect your product to your computer yet.3 L aunch the app and follow its instructions to set up yourproduct.For information on setting up the fax, connecting your productto a computer, using voice-activated printing, or solving problems, or for details on reaching Epson support, see the sections on the back of this sheet.Warning: Keep the ink bottles out of the reach of children and do not drink the ink.Caution: This product requires careful handling of ink. If ink spills,wipe it off immediately with a damp towel to avoid permanent stains. If ink gets on your clothes or belongings, it may not come off.Note:• E pson cannot guarantee the quality or reliability of third-party ink.• U se the ink bottles included with the printer to set up the product. Part of the ink will be used to charge the print head. These bottles will print fewer pages compared with replacement ink bottles.• E pson strongly recommends the use of genuine ink to ensure optimal print quality and performance.1 O Note: Refer to the color-coded sticker above the ink tank unit to identify the color of each tank.Note:• I f you are using a Mac or your computer does not have aCD/DVD drive, an Internet connection is required to obtain the product software.• T o print from a Chromebook™, go to/support/chromebookprint for instructions.1 M ake sure the product is NOT CONNECTED to yourcomputer.W indows ®: If you see a Found New Hardware screen, click Cancel and disconnect the USB cable.2 I nsert the product CD (Windows only) or download andrun your product’s software package. For the latestsoftware, visit /support/L5290.3 F ollow the instructions on the computer screen to run the setup program.4 W hen you see the Select Your Connection screen, selectone of the following and follow the on-screen instructions:•Wireless connectionIn most cases, the software installer automatically attempts to set up your wireless connection. If setup is unsuccessful, you may need to enter your network name (SSID) and password.• Direct USB connectionMake sure you have the USB cable ready.•Wired network connectionMake sure you have an Ethernet cable (not included).Mobile and voice-activated printing• Print directly from your Android™ (v4.4 or later) device*.Simply connect your printer and device to the same networkand tap the menu icon to select the print option.• Turn your mobile device into an intuitive, easy-to-useprinting and scanning control center with Epson Smart Panel. Download the app from your mobile device’s app store.• Print from wherever you are, next to your printer orremotely, with Epson Connect™. Learn more at /connect .• Use voice-activated assistants to print a variety of creativeand everyday items from your Epson product. Simply add your product to an Epson Connect account, then link the account to a voice-activated assistant. See/support/voice for more information.* M ay require the Epson Print Enabler or Mopria Print Service app from Google Play™.EPSON and Epson Smart Panel are registered trademarks, EPSON Exceed Your Vision is a registered logomark, and Epson Connect is a trademark of Seiko Epson Corporation.Designed for Excellence is a trademark of Epson America, Inc.Windows is a registered trademark of Microsoft Corporation in the United States and/or other countries.Mac is a trademark of Apple Inc., registered in the U.S. and other countries.Android, Chromebook, and Google Play are trademarks of Google LLC.General Notice: Other product names used herein are for identification purposes only and may be trademarks of their respective owners. Epson disclaims any and all rights in those marks.This information is subject to change without notice.© 2021 Epson America, Inc., 2/21Printed in XXXXXXCPD-60040See the online User’s Guide for information about loading capacity, available paper types and sizes, loading envelopes, and using the ADF .1 M ake sure the product is not charging ink. Then raise thepaper support and tilt it backwards slightly.2 S lide the edge guides all theway out.3 L oad paper, glossy orprintable side up and shortedge first, in the middle of the rear paper feeder.Note:guides.4 Slide the edge guides againstthe paper, but not too tightly.5 Pthe paper stopper.6 Select the paper settings on the product’s control panel.C onnect the fax line1 C onnect a phone cord to a telephone wall jack and to theLINE port on your product. See the online User’s Guidefor more information.2 P ress the OK button to set up the fax, or press the #pound button to set it up later.Any problems?Network setup was unsuccessful.• Make sure you select the right network name (SSID).• Restart your router (turn it off and then on), then try toconnect to it again.• The printer can only connect to a network that supports2.4 GHz connections. If your router offers both 2.4 GHz and5 GHz connections, make sure 2.4 GHz is enabled.• If you see a firewall alert message, click Unblock or Allow to let setup continue.• If your network has security enabled, make sure you enteryour network password (WEP key or WPA passphrase) correctly. Be sure to enter your password in the correct case.• Print a network connection report to identify networkproblems and solutions. See your online User’s Guide forinstructions.There are lines or incorrect colors in my printouts.Run a nozzle check to see if there are any gaps in the printout. Then clean the print head, if necessary. See the online User’s Guide for more information.The product’s screen is dark.Make sure your product is turned on and press any button to wake it from sleep mode.Setup is unable to find my product after connecting it with a USB cable.Make sure your product is on and the USB cable is securely connected.Any questions?User’s GuideWindows: Click the icon on your desktop or Apps screen to access the online User’s Guide .Mac: Click the icon in Applications/Epson Software/Guide to access the online User’s Guide .If you don’t have a User’s Guide icon, go to the Epson website, as described in “Technical support.”Technical supportVisit /support/L5290 to download drivers, view manuals, get FAQs, or contact Epson.You can also speak to a service technician by calling one of these numbers:Argentina (54 11) 5167-0300 Guatemala * 1-800-835-0358 0800-288-37766 Mexico 01-800-087-1080Bolivia * 800-100-116 Mexico City (52 55) 1323-2052Chile (56 2) 2484-3400 Nicaragua * 00-1-800-226-0368Colombia 018000-915235Panama * 00-800-052-1376 Bogota (57 1) 592-2200 Paraguay 009-800-521-0019Costa Rica 800-377-6627 Peru 0800-10126DominicanLima (51 1) 418-0210 Republic * 1-888-760-0068 Uruguay 00040-5210067Ecuador * 1-800-000-044 Venezuela (58 212) 240-1111El Salvador * 800-6570* C ontact your local phone company to call this toll-free number from a mobile phone.If your country does not appear on the list, contact your nearest Epson sales office. Toll or long distance charges may apply.Need paper and ink?Ensure brilliant results with Epson specialty and plain papers, engineered specifically for Epson printers. You can purchase them from an Epson authorized reseller. To find the nearest one, visit or contact Epson as described in “Any questions?” on this sheet.L5290 replacement inks。
无线打印机怎么连接wifi无线打印机连接wifi方法【详解】
无线打印机怎么连接wifi无线打印机连接wifi方法【详解】WIFI的使用几乎已经完全渗透进我们生活的方方面面中了,我们进入一个陌生环境的第一句话似乎就是询问别人关于无线密码的信息。
并且除此之外iain,我们还可以通过无线连接实现打印机操作步骤等等,这个人性化的设置似乎大大方便了我们的日常操作体验,成为不少朋友热衷的功能之一。
今天为大家介绍的就是关于无线打印机的连接步骤。
一、无线打印机怎么连接wifi1、在确保有打印机共享的前提下,打开网上邻居或者控制面板2、进入后,选择打印机和传真,也可以从开始中直接选择3、进入后,选择添加打印机4、跳出添加对话框后,选择网络打印机的选项,然后继续下一步5、选择浏览打印机6、在共享打印机的列表中选择共享打印机的名字7、确定设置之后可以选择为默认打印机,这样就连接好了,可以通过无线网络直接打印了注意:1、将打印机连接到家里的无线路由器,带WIFI的打印机有无线连接功能键,一般可以选择接入的无线路由器,选择你家里那个连接上,具体参考说明书,这个时候打印机会被分配一个无线局域网内的ip地址。
2、将笔记本电脑也接入家里的无线路由器,这个时候通过查找到打印机的ip地址(用查找网上邻居),通过文件和打印共享的设置,就可以使用wifi打印机了,也不用切换网络3、如果要使用方便,最好参考说明书,为打印机分配一个固定的ip地址。
二、手机无线打印操作步骤无线打印的普及,使其成为现在厂商新品的必备功能,有时会为了降低成本在推出支持无线打印产品的同时,会加入不支持无线打印机型,不过往往前者更受欢迎。
小编不能说是阅“机”无数,但是由于工作性质的原因,跟打印机的接触还是不少的,在众多打印机产品中,惠普的无线打印功能的体验好感还是很有优势的。
今天我们就以惠普M226dw来演示一下如何完成手机无线打印。
惠普支持无线的打印产品,一般都会支持两种连接方式,一种是普通的无线连接,即是将打印机与移动设备(我们以手机为例)接入同一局域网内;另一种则是无线直连,打印机会自身发射无线信号(SSID),直接将手机连接这个SSID,就能进行无线打印,这种方式的优点在于,即便身处在没有网络(或者网络出错的情况下)依旧可以完成打印工作。
爱普生打印机设置

爱普生(epson)LQ630K打印机设置一、打印机进入自检状态(配置状态)同时按住进纸/退纸和暂停键不放开机,等打印头发出滴”声后归位,松开按键,打印机会打印出当前配置,并进入配置状态(630K的打印设置主要通过以上三个键(换行/换页进纸/退纸,暂停)来完成。
二、打印出当前配置表,找到需要调整的项目。
打印出的配置表如下:方框内的高速草体和汉字高速两项默认是关和普通,需要改为高速草体(开)、汉字高速(高速或超高速)。
当n莫寸自动切堆自骂拱冇打舉有向耐向ft#ESC/P-K离速单协況字离K算目接口等待时间10粹井肯接口取向糅式幵P a C k e t Wit自动网丰朗F尸DSJ甩PPDS)字悴朱怫只字字伺暨牟-7典文字间血1C 亡PC 4V7国岳字荷整ItaJx U,3.A.手副谣抵爭待时闽1开耳嚴董格(眾用&験总方密旌接的)羌三、通过改变项目和参数来完成先说明一下这三个键在配置时的作用: 1换行/换页:改变设置项2、进纸/退纸:进入自检时用3、暂停:调整参数(怎么调整参数,下面会详细介绍)把配置表附上参数好进行说明:当苗攒置1•范飙蛊的员怅 11英寸 董2 3 除过反聲 45 打甲方向 就方餡 G FSC/P-R 75黑 离謹草体 Xg 汶字高谨10商动肖动推口譽诗时闻 to 秒 井行接口凰向梶式 开 Packet# 式自动 自曲岡标(TBM PPDJU 其AxG.M.(IBM PPDS> 笑**末警汉字字饲距6-7 epi 10 cpi PC +3-7Italic U.S.A. 手醴毬紙爭谭时阿1 H幵卑嚴叢轴(采用压醍起方袪崖炊的】关如卑亶屮媪览改设■”请吳谢打甲桃电操*1当前项目是在第1项:拖纸器的页长 2、 需要设置第9项:汉字高速3、 操作方法:按换行/换页键8次,跳到第9项(注 意,按键时只是会有响声,不像 windows 有菜单可 以看啊,所以只有自己数着按了几下)4、 如何改变参数呢?答案是按暂停键!参数的状态 特别说明,是以三个指示灯(电源、缺纸、暂停) 的亮灭组合来表示的,具体如下:电源灭I缺纸灭I暂停亮:默认值电源灭I缺纸亮I暂停灭:高速电源亮I缺纸亮I暂停灭:超高速(据说对打印头有损伤,没长期试过,实际实验高速已经很快了)5、按暂停键可以依次改变当前参数状态四、设置完成,关机,重新开机即可(也可重新进入设置状态打印出当前配置表看盾参数是否已改变)特别提示:关机后,重新开机要有5秒以上的间隔时间,否则,据提示容易损伤打印机•主要原因分析:1.纸厚调节杆的位置设置不正确,导致打印头距离纸张过近,打印头刮蹭纸张变形,无法顺利走出;2•打印机色带档片(透明色带挡片,如图(1))破损变形、被揭去或使用兼容色带,导致纸张受到阻挡, 无法顺利走出;图(1)色带档片3.纸张太软或太薄,出纸时造成纸张在打印机内上翘变形,无法顺利走出,造成卡纸;4•实际使用环境(温度、湿度)超出了打印机的工作条件。
EPSON无线打印机 使用手册
Epson Connect用户指南NPD4945-00 SC此手册中出现的打印机/一体机以下简称“打印机”。
爱普生产品使用说明或网页等可能描述了其他公司(非爱普生)的硬件/软件产品、功能及服务,爱普生对于其他公司生产的产品和提供的服务(包括但不限于其内容、性能、准确性、兼容性、可靠性、合法性、适当性和连续性)不做任何明示和/或默示担保。
注释:其他信息,可查看产品本身、产品包装和其他形式的资料,包括爱普生网页()Epson Connect和其他移动解决方案Epson Connect是什么?Epson Connect提供移动服务,可让您在任何地方发送任务实现打印和扫描。
您可使用智能手机、平板电脑或笔记本电脑发送任务实现打印照片和文档。
如果您发送扫描的数据到与Epson Connect兼容的打印机,此时的打印机类似于彩色传真机。
您还可使用您的爱普生打印机扫描文档并将其上传到指定的地方,如:在线存储设备或“云(Colud)”帐户。
可使用下面服务。
一旦您已注册了您的打印机和帐户,您可使用下面的所有服务。
有关如何注册到Epson Connect、如何使用服务和故障排除的详细信息,参见Epson Connect入口网页:https:///服务概述Email Print从任何地方仅通过发送邮件即可实现打印照片和文档。
扫描至云(Cloud)扫描您的文档和照片至“云(Cloud)”帐户。
Epson iPrint对于iOS或Android智能手机和平板电脑的无线打印应用软件。
Epson iPrint具有二项有用的功能。
首先是本地打印,允许您打印并扫描至与本地相同Wi-Fi网络连接的打印机作为您的设备打印。
第二是远程打印,允许您通过互联网远程打印。
如果您未安装Epson iPrint,从下面的URL下载它并安装,然后注册。
http://ipr.toRemote Print Driver通过互联网远程打印。
注释:O扫描至云(Cloud)为Scan to cloud。
Epson 打印机设置指南.pdf_1701929604.4050834说明书

3 R emove and discard the protective material piece fromthe ink pack tray.4 S hake an ink pack 10 times, then remove it from thepackaging.Note: Do not touch the green chip on the ink pack.5 Note:inserted and level with the top of the ink pack tray.6 IMobile printingConnect wirelessly from your smartphone, tablet, or computer.Print documents and photos from across the room or around the world:• Print directly from your iOS device. Simply connect your printer and device to the same network and tap the action icon to select the print option.• Use Epson Print Enabler (free from Google Play™) with Android™ devices (v4.4 or later). Then connect your printer and device to the same network and tap the menu icon to select the print option.• Print remotely with Epson Connect™ and Google Cloud Print™. See your online User’s Guide for instructions or learn more at /connect .Any problems?Network setup was unsuccessful.• Make sure you select the right network name (SSID).• Restart your router (turn it off and then on), then try to connect to it again.• The printer can only connect to a network that supports 2.4 GHz connections. If your router offers both 2.4 GHz and 5 GHz connections, make sure 2.4 GHz is enabled.• If you see a firewall alert message, click Unblock or Allow to let setup continue.• If your network has security enabled, make sure you enter your network password (WEP key or WPA passphrase) correctly. Be sure to enter your password in the correct case.There are lines or incorrect colors in my printouts.Run a nozzle check to see if there are any gaps in the printout. Then clean the print head, if necessary. See the online User’s Guide for more information.The product’s screen is dark.Make sure your product is turned on, and touch the screen orpress any button to wake it from sleep mode.Setup is unable to find my printer after connecting it with a USB cable.Make sure your product is securely connected as shown:6 S elect the paper settings on the product’s control panel.I nstall software Note: If your computer does not have a CD/DVD drive or you are using a Mac, an Internet connection is required to obtain the product software.To print from a Chromebook™, go to.jm/support/gcp for instructions.Standard software package 1 M ake sure the product is NOT CONNECTED to yourcomputer.Windows ®: If you see a Found New Hardware screen, clickCancel and disconnect the USB cable.2 I nsert the product CD or download and run your product’ssoftware package. For the latest software, visit:WF-C5210.jm/support/wfc5210WF-C5290.jm/support/wfc52903 F ollow the instructions on the computer screen to run thesetup program.4 W hen you see the Select Your Connection screen, selectone of the following and follow the on-screen instructions:• Wireless connectionIn most cases, the software installer automatically attempts to set up your wireless connection. If setup is unsuccessful, you may need to enter your network name (SSID) and password.• Direct USB connectionMake sure you have a USB cable (not included).• Wired network connectionMake sure you have an Ethernet cable (not included).PCL or PostScript driver (WF-C5290)Download the software and see your online User’s Guide for instructions:.jm/support/wfc5290EPSON and DURABrite are registered trademarks, EPSON Exceed Your Vision is a registered logomark, and Epson Connect is a trademark of Seiko Epson Corporation.Designed for Excellence is a trademark of Epson America, Inc.Mac is a trademark of Apple Inc., registered in the U.S. and other countries.Android, Google Cloud Print, Chromebook, and Google Play are trademarks of Google Inc.General Notice: Other product names used herein are for identification purposes only and may be trademarks of their respective owners. Epson disclaims any and all rights in those marks.This information is subject to change without notice.CPD-55232R1© 2018 Epson America, Inc., 2/18 Any questions?User’s GuideWindows: Click the icon on your desktop or Apps screen to access the online User’s Guide .Mac: Click the icon in Applications/Epson Software/Guide to access the online User’s Guide .If you don’t have a User’s Guide icon, go to the Epson website, as described below.SupportVisit .jm/support and search for your product to download drivers, view manuals, get FAQs, or contact Epson.You can also speak to a service technician by calling one of these numbers:Argentina(54 11) 5167-0300 Guatemala * 1-800-835-03580800-288-37766Mexico 01-800-087-1080Bolivia * 800-100-116 Mexico City (52 55) 1323-2052Chile (56 2) 2484-3400 Nicaragua * 00-1-800-226-0368Colombia 018000-915235 Panama * 00-800-052-1376Bogota (57 1) 523-5000 Paraguay 009-800-521-0019Costa Rica 800-377-6627 Peru 0800-10126DominicanLima (51 1) 418-0210 Republic * 1-888-760-0068 Uruguay 00040-5210067Ecuador * 1-800-000-044 Venezuela (58 212) 240-1111El Salvador * 800-6570* C ontact your local phone company to call this toll-free number from a mobilephone.If your country does not appear on the list, contact yournearest Epson sales office. Toll or long distance charges may apply.Need paper and ink?Ensure peak performance and brilliant results with Genuine Epson Ink and specialty papers, engineered specifically for Epson printers. You can purchase them from an Epsonauthorized reseller. To find the nearest one, visit .jm or contact Epson as described in “Any questions?” on this sheet.WF-C5210/WF-C5290 replacement ink packs。
设置无线网络打印机

如何设置无线网络打印机以及驱动安装基础结构通信模式下的具体设置如果需要连接到不使用原厂默认值的既存网络,只需要使用“HP Deskjet 460系列工具箱”,输入三个无线网络配置规范的开关位置其中一个位置的网络设置即可。
您可以通过以下两种方法进行设置:方法一:通过 USB 连接线在既存网络上进行设置1. 用 USB 连接线把打印机连接到网络中的一台电脑。
2. 在既存网络中取得分配给打印机的网络名称、IP 地址及安全性等信息。
3. 关闭包括病毒防火墙在内的所有正在运行的程序。
4. 运行驱动光盘,出现光盘自运行窗口后,选择“安装打印机驱动程序”。
5. 选择“无线”,点击“下一步”。
6. 选择“利用 USB 连接线配置”,点击“下一步”。
7. 根据说明完成安装。
8. 安装完成后。
Windows XP 操作系统中,依次点击“开始”→“所有程序”→“HP Deskjet 460系列”→“HP Deskjet 460系列工具箱”,在“HP Deskjet 460系列工具箱”中,选择“打印机服务”选项卡。
在“打印机服务”中选择“无线配置规范”。
如图 HP Deskjet 460 系列工具箱所示:Windows 2000/98/ME 操作系统中,依次点击“开始”→“程序”→“HP Deskjet 460系列”→“HP Deskjet 460系列工具箱”,在“HP Deskjet 460系列工具箱”中,选择“打印机服务”选项卡。
在“打印机服务”中选择“无线配置规范”。
如图 HP Deskjet 460 系列工具箱所示:图 5: HP Deskjet 460 系列工具箱9. 在“配置无线配置规范”的窗口中,选择“编辑当前配置规范”。
如图配置无线网络配置规范所示:图 6: 配置无线网络配置规范10. 根据您网络的具体情况设置完成后,拔掉 USB 连接线,进行无线网络打印。
11. 在网络中需要使用无线打印机的电脑上必须根据以上步骤安装打印机的驱动程序。
EPSON 打印机参数
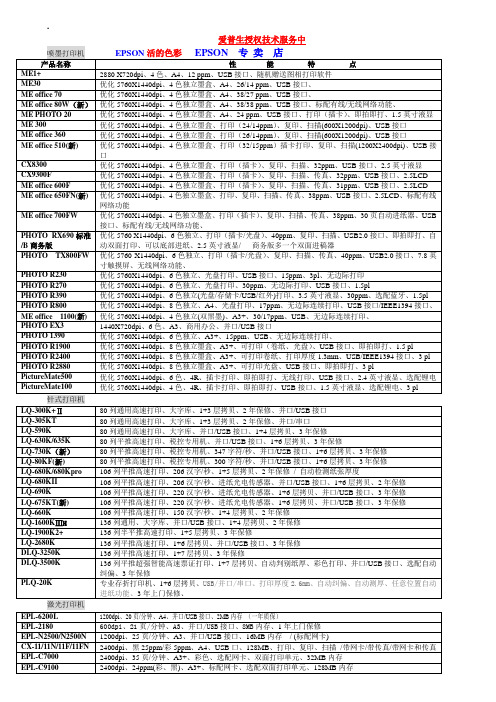
优化5760X1440dpi、4色独立墨盒、A4、38/38 ppm、USB接口、标配有线/无线网络功能、
ME PHOTO 20
优化5760X1440dpi、4色独立墨盒、A4、24ppm、USB接口、打印(插卡)、即拍即打、1.5英寸液显
ME 300
优化5760X1440dpi、4色独立墨盒、打印(24/14ppm)、复印、扫描(600X1200dpi)、USB接口
CX8300
优化5760X1440dpi、4色独立墨盒、打印(插卡)、复印、扫描、32ppm、USB接口、2.5英寸液显
CX9300F
优化5760X1440dpi、4色独立墨盒、打印(插卡)、复印、扫描、传真、32ppm、USB接口、2.5LCD
ME office600F
优化5760X1440dpi、4色独立墨盒、打印(插卡)、复印、扫描、传真、31ppm、USB接口、2.5LCD
针式打印机
LQ-300K+Ⅱ
80列通用高速打印、大字库、1+3层拷贝、2年保修、并口/USB接口
LQ-305KT
80列通用高速打印、大字库、1+3层拷贝、2年保修、并口/串口
LQ-590K
80列通用高速打印、大字库、并口/USB接口、1+4层拷贝、3年保修
LQ-630K/635K
80列平推高速打印、税控专用机、并口/USB接口、1+6层拷贝、3年保修
LQ-730K(新)
80列平推高速打印、税控专用机、347字符/秒、并口/USB接口、1+6层拷贝、3年保修
LQ-80KF(新)
80列平推高速打印、税控专用机、300字符/秒、并口/USB接口、1+6层拷贝、3年保修
惠普彩色激光多功能打印机用户指南说明书
䐙ㄨㇸ≈
/videos/LaserJet /support/colorljM479MFP
HP Color LaserJet Pro M479 用户指南
版权与许可
© Copyright 2019 HP Development Company, L.P.
2 纸盘 .......................................................................................................................................................................................................... 17 简介 .......................................................................................................................................................................................... 17 将纸张装入纸盘 1 ................................................................................................................................................................ 18 简介 ..................................................................................................................................................................... 18 将纸张装入纸盘 1(多用途纸盘) ............................................................................................................ 18 纸盘 1 纸张方向 ............................................................................................................................................... 20 将纸张装入纸盘 2 ................................................................................................................................................................ 22 简介 ..................................................................................................................................................................... 22 将纸张装入纸盘 2 ........................................................................................................................................... 22 纸盘 2 纸张方向 ............................................................................................................................................... 24 将纸张装入纸盘 3 ................................................................................................................................................................ 26 简介 ..................................................................................................................................................................... 26Fra bibliotek商标说明
无线打印服务设置

无线打印服务设置现代科技的不断进步,使得无线打印服务在我们的生活中扮演着重要的角色。
无线打印服务的设置可以更加方便地实现文件的共享和打印,提高工作效率。
本文将介绍如何设置无线打印服务,让您能够更好地利用这项技术。
一、确认设备支持无线打印服务在进行无线打印服务设置之前,首先需要确认您的设备是否支持该功能。
现在几乎所有的打印机都支持无线打印功能。
您可以查看设备的说明书或者在设备设置中查找无线打印功能的选项。
如果您使用的打印机不支持无线打印功能,您可以考虑购买一个无线打印适配器。
这样可以将普通打印机转换成无线打印机,实现无线打印服务。
二、连接打印机和电脑在进行无线打印服务设置之前,首先需要确保打印机和电脑连接正常。
您可以使用USB或者以太网等有线方式将打印机和电脑连接起来。
这样可以确保打印机的驱动程序正确安装并能够正常工作。
三、设置无线打印服务1. 打开电脑的操作系统设置,找到“设备”选项,点击进入设备设置页面。
2. 在设备设置页面中,找到“打印机和扫描仪”选项,点击进入打印机设置页面。
3. 在打印机设置页面中,找到“添加打印机或扫描仪”选项,点击进入打印机添加页面。
4. 操作系统会搜索周围的无线打印机,显示列表供您选择。
如果打印机没有显示在列表中,您可以点击“手动添加打印机或扫描仪”选项,并按照系统给出的指引手动添加打印机。
5. 在列表中选择您要添加的打印机,并点击“下一步”按钮。
6. 系统会自动下载并安装打印机的驱动程序,完成无线打印服务的设置。
四、测试无线打印服务在完成无线打印服务设置之后,为了确保一切正常工作,您可以进行一次无线打印测试。
1. 打开一个文档或图片,点击打印选项。
2. 在打印设置页面中,选择您设置的无线打印机,并点击“打印”按钮。
3. 检查打印机是否正常接收到打印任务,并正常输出纸质文件。
如果打印机正常工作,那么恭喜您,您已经成功设置了无线打印服务。
现在,您可以享受无线打印带来的便利和效率。
Epson 打印机用户操作手册说明书
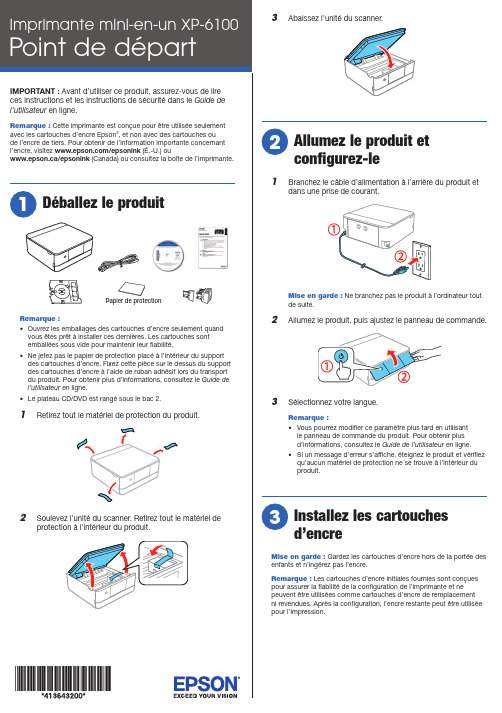
Papier de protectionuvrez les emballages des cartouches d’encre seulement quandvous êtes prêt à installer ces dernières. Les cartouches sont3 A baissez l’unité du scanner.A llumez le produit etconfigurez-le1 B ranchez le câble d’alimentation à l’arrière du produit etdans une prise de courant.Mise en garde : Ne branchez pas le produit à l’ordinateur toutde suite.2 A llumez le produit, puis ajustez le panneau de commande.3 Sélectionnez votre langue.Remarque :• V ous pourrez modifier ce paramètre plus tard en utilisantle panneau de commande du produit. Pour obtenir plusd’informations, consultez le Guide de l’utilisateur en ligne.• S i un message d’erreur s’affiche, éteignez le produit et vérifiezqu’aucun matériel de protection ne se trouve à l’intérieur duproduit.I nstallez les cartouchesd’encreMise en garde : Gardez les cartouches d’encre hors de la portée desenfants et n’ingérez pas l’encre.Remarque : Les cartouches d’encre initiales fournies sont conçuespour assurer la fiabilité de la configuration de l’imprimante et nepeuvent être utilisées comme cartouches d’encre de remplacementni revendues. Après la configuration, l’encre restante peut être utiliséepour l’impression.Mise en garde : N’éteignez pas l’imprimante et ne soulevezpas l’unité du scanner pendant le chargement, sinon vous gaspillerez de l’encre.Remarque : Dans le cadre du processus de configuration, le numéro de série de votre imprimante sera envoyé vers un serveur Epson sécurisé afin de vous rendre admissible auxprogrammes que nous pourrions offrir de temps à autre, incluant le programme de réapprovisionnement en encre Epson. Vous aurez la possibilité de donner votre consentement individuel pour chacun de ces programmes.8 S uivez les instructions à l’écran pour régler la qualitéd’impression de votre produit.Remarque :• V ous devez charger du papier avant de pouvoir ajuster la qualité d’impression. Consultez la section « Chargez le papier » ci-après pour les détails.• S électionnez Ajuster plus tard si vous souhaitez ajuster la qualité d’impression plus tard. Pour obtenir plusd’informations, consultez le Guide de l’utilisateuren ligne.C hargez le papierVous pouvez charger les formats de papier suivants :• B ac 1 : Papier photo 3,5 × 5 po (89 × 127 mm), 4 × 6 po(102 × 152 mm) ou 5 × 7 po (127 × 178 mm)• B ac 2 : Papier de format lettre, A4, légal ou 8 × 10 po (203 × 254 mm)Consultez le Guide de l’utilisateur en ligne pour obtenir de l’information concernant les types et les formats de papier disponibles, les capacités de chargement et les instructions pour l’impression sur CD, DVD et disques Blu-ray ®.1 Abaissez le couvercle avant.2 Tirez un bac papier.Bac 21 Soulevez l’unité du scanner.Mise en garde : Ne touchez pas au câble plat blanc ou auguide de la tête d’impression.2 Sd’encre noire (BK).Remarque : d’encre noire photo (PB) ou les autres cartouches d’encre.3 DMise en garde :illustrées ci-dessous. Cela pourrait nuire à l’impression et au rendement normal.4 Retirez le bouchon de chaquecartouche d’encre.Remarque : Conservez les bouchons et utilisez-les pour couvrir lescartouches d’encre après les avoir retirées de l’imprimante à des fins de stockage ou lorsque vous souhaitez procéder à leur élimination.5 I nsérez les cartouches en angle dans le logement dechaque couleur. Appuyez sur chaque cartouche jusqu’àce qu’elle s’enclenche.6 Abaissez l’unité du scanner.7 S électionnez Installée et appuyez sur le bouton OK pourcommencer le chargement de l’encre. Le chargement del’encre prend environ 10 minutes. Lorsque vous voyez un message d’achèvement à l’écran ACL de l’imprimante, lechargement est terminé.1 A ssurez-vous que le produit N’EST PAS BRANCHÉ àvotre ordinateur.W indows ® : Si une fenêtre Nouveau matériel détecté s’affiche,cliquez sur Annuler et débranchez le câble USB.2 I nsérez le CD de votre produit (Windows seulement) outéléchargez et exécutez le progiciel de votre produit. Pourobtenir la version la plus récente du progiciel, visitez le site www.epson.ca/support/xp6100.3 S uivez les instructions à l’écran de l’ordinateur pour exécuter le programme de configuration.4 L orsque l’écran Sélectionnez votre connexion s’affiche,sélectionnez l’une des connexions suivantes et suivez lesinstructions qui s’affichent à l’écran :• Connexion sans filDans la plupart des cas, le programme d’installation des logiciels essaie automatiquement de configurer votre connexion sans fil. Si la configuration échoue, il est possible que vous deviez saisir le nom de réseau (SSID) et le mot de passe.• Connexion USB directeA ssurez-vous d’avoir un câble USB (non inclus).Impression mobile et à commande vocale• Imprimez directement depuis un appareil iOS. Vous n’avez qu’à connecter votre imprimante et l’appareil au même réseau et à appuyer sur l’icône d’action pour sélectionner l’option d’impression.• Imprimez avec appareils Android MC (v4.4 ou une versionultérieure).* Connectez simplement votre imprimante et l’appareil au même réseau et appuyez sur l’icône de menu pour sélectionner l’option d’impression.• Imprimez à distance ou lorsque vous vous trouvez près de votre imprimante avec Epson Connect MC et Google Cloud Print MC . Apprenez-en plus sur le site www.epson.ca/connect .• Utilisez les assistants à commande vocale pour imprimer une variété de contenus créatifs et courants depuis votre produit Epson. Vous n’avez qu’à ajouter votre produit à un compte Epson Connect, puis à relier le compte à un assistant à commande vocale. Consultezwww.epson.ca/voice pour plus d’informations.* P ourrait nécessiter l’application Epson Print Enabler ou l’application Mopria Print Service, disponibles sur Google Play .3 Glissez les guide-papier latéraux vers l’extérieur.Bac 1Bac 24 I nsérez le papier avec la face d’impression ou le côtéglacé vers le bas.Bac 1Bac 2R emarque : Assurez-vous que le papier est bien chargé contre la paroi arrière du bac et qu’il ne dépasse pas l’extrémité avant du bac.5 F aites glisser les guide-papier latéraux contre le papier,sans trop serrer. Assurez-vous que le papier est bienplacé sous les languettes des guide-papier latéraux.6 M aintenez le bac droit lorsque vous l’insérezcomplètement dans le produit.Bac 1Bac 27 S électionnez les paramètres de papier sur le panneaude commande du produit.8 Déployez le plateau de sortie.I nstallez les logicielsRemarque : Si vous utilisez un Mac ou si votre ordinateur ne possède pas de lecteur CD/DVD, une connexion Internet est requise pour obtenir les logiciels de votre produit.Pour imprimer depuis un Chromebook MC , visitez le site Web www.epson.ca/support/gcp pour les instructions.Avis concernant la mise à jour du micrologiciel : Epson fournit périodiquement des mises à jour de micrologiciel afin de résoudre des problèmes de sécurité ou de performance, des bogues mineurs et pour s’assurer que votre imprimante fonctionne tel que prévu. Votre imprimante a été conçue pour être utilisée seulement avec des cartouches d’encre de marque Epson authentiques. Certaines mises àjour pourraient affecter le fonctionnement de l’encre de tiers.Soutien techniqueVisitez le site Web www.epson.ca/support/xp6100 afin de télécharger des pilotes, voir les manuels, consulter les FAQ et communiquer avec Epson.Composez le 905 709-3839, de 6 h à 20 h, heure du Pacifique, du lundi au vendredi, et de 7 h à 16 h, heure du Pacifique, le samedi. Les heures et les jours de soutien sont modifiables sans préavis. Des frais d’interurbain peuvent s’appliquer.RecyclageEpson offre un programme de recyclage pour le matériel et les cartouches d’encre en fin de vie utile. Veuillez consulter le site Web www.epson.ca/recycle pour obtenir de l’information concernant le retour de vos produits pour une élimination appropriée.Achat de papier et d’encrePour garantir d’excellents résultats, utilisez les papiers pour usages spéciaux d’origine Epson, conçus spécialement pour les imprimantes Epson. Vous pouvez acheter l’encre et lespapiers pour usages spéciaux d’origine Epson à l’adresse www.epson.ca et auprès d’un détaillant Epson autorisé. Composez le 1 800 807-7766.Cartouches d’encre de remplacement XP-6100EPSON et Claria sont des marques déposées, EPSON Exceed Your Vision est un logotype déposé et Epson Connect est une marque de commerce de Seiko Epson Corporation. Small-in-One est une marque déposée et Designed for Excellence est une marque de commerce d’Epson America, Inc.Windows est une marque déposée de Microsoft Corporation aux États-Unis et/ou dans d’autres pays.Mac est une marque de commerce d’Apple Inc., enregistrée aux États-Unis et dans d’autres pays.Android, Google Cloud Print, Chromebook et Google Play sont des marques de commerce de Google LLC.Avis général : Les autres noms de produit figurant dans le présent document ne sont cités qu’à des fins d’identification et peuvent être des marques de commerce de leurs propriétaires respectifs. Epson renonce à tous les droits associés à ces marques.L’information contenue dans le présent document peut être modifiée sans préavis.© 2018 Epson America, Inc., 11/18 CPD-55650Des problèmes?La configuration réseau a échoué.•Assurez-vous d’avoir sélectionné le bon nom de réseau (SSID).•Redémarrez votre routeur (éteignez-le et rallumez-le), puis essayez de vous reconnecter au routeur.•Le produit ne peut être connecté qu’à un réseau qui prend en charge les connexions 2,4 GHz. Si votre routeur offre des connexions 2,4 GHz et 5 GHz, assurez-vous que la fréquence 2,4 GHz est activée.•Si vous apercevez un message d’alerte de pare-feu,cliquez sur Débloquer ou Permettre pour permettre à la configuration de se poursuivre.•Si la sécurité de votre réseau est activée, assurez-vous d’avoir bien saisi le mot de passe du réseau (clé WEP ou phrase passe WPA). Le mot de passe doit être saisi selon la casse appropriée.Il y a des lignes ou des couleurs incorrectes sur mes tirages.Exécutez une vérification des buses pour voir s’il y a des écarts sur le tirage. Ensuite, nettoyez la tête d’impression, au besoin. Consultez le Guide de l’utilisateur en ligne pour obtenir plus d’informations.L’écran de l’imprimante s’est assombri.Assurez-vous que votre produit est allumé et appuyez sur l’un des boutons afin que le produit quitte le mode veille.Impossible de détecter le produit après l’avoir relié avec un câble USB.Assurez-vous que le produit est allumé et qu’il est bien branchétel qu’illustré ci-dessous :Des questions?Guide rapideInformations de base et de dépannage.Guide de l’utilisateurWindows : Cliquez sur l’icône sur le bureau ou sur l’écran Applications afin d’accéder au Guide de l’utilisateur en ligne.Mac : Cliquez sur l’icône dans le dossier Applications/Epson Software/Guide afin d’accéder au Guide de l’utilisateur en ligne.Si vous n’avez pas l’icône du Guide de l’utilisateur, visitez le site d’Epson, comme indiqué ci-après.。
爱普生ME OFFICE 80W
爱普生ME OFFICE 80W
佚名
【期刊名称】《数码》
【年(卷),期】2009(000)011
【摘要】爱普生MEOFFICE80W喷墨打印机虽然是一款为商务用户定制的商用喷墨打印产品,但是它同样也适合家庭用户。
该款打印机应用了爱普生独有的精准微压电打印技术,打印分辨率为5740×1440dpi,最快打印速度为38页/分钟。
为了满足用户在这个高速发展的互联网时代应用,爱普生MEOFFICE80W还具备无线网络连接打印功能,有效的提高了工作效率。
爱普生MEOFFCIE80W沿袭了商务系列的设计,时尚大方。
在性能方面,最快黑白彩色文档速度为38页/分钟,耗材使用爱普生DURA Brite Ultra防水耐光墨,文档的可保存性更强。
【总页数】1页(P143)
【正文语种】中文
【中图分类】TP334.83
【相关文献】
1.办公小能手爱普生MEOffice 535彩色喷墨一体机 [J], 姚燕科
2.商用喷打好选择爱普生ME Office 80W [J],
3.支持移动互联终端爱普生ME OFFICE 570W喷墨一体机 [J],
4.开启无线商务季爱普生ME Office 80W网络高速商务打印机 [J],
5.乐活打印由爱普生ME Office 600F带来的Office新规 [J],
因版权原因,仅展示原文概要,查看原文内容请购买。
wifi打印控制流程
wifi打印控制流程Wifi打印控制流程 (Wifi printing control flow) is a critical aspect of modern office operations. It enables users to wirelessly print documents from their computers, laptops, or mobile devices without the need for physical connections. This convenience has greatly improved productivity and efficiency in the workplace.Wifi打印控制流程的重要性不言而喻,它极大地方便了用户的操作,提高了工作效率。
From a user's perspective, the process of using wifi打印控制流程involves several steps. First, the user needs to ensure that the printer is connected to the wifi network. This may require entering the wifi network's password into the printer's settings. Once the printer is connected to the network, the user can then select the document they wish to print on their device. They can then choose the wifi-connected printer as the printing option. The document is then sent wirelessly to the printer, which processes the print job and produces a physical copy of the document.从用户的角度来看,使用wifi打印控制流程包括几个步骤。
- 1、下载文档前请自行甄别文档内容的完整性,平台不提供额外的编辑、内容补充、找答案等附加服务。
- 2、"仅部分预览"的文档,不可在线预览部分如存在完整性等问题,可反馈申请退款(可完整预览的文档不适用该条件!)。
- 3、如文档侵犯您的权益,请联系客服反馈,我们会尽快为您处理(人工客服工作时间:9:00-18:30)。
注释: 在使用此产品时,请确保阅读此产品使用说明,再按照其中的要求安装或使用此产品。
目录- 目录 -1.无线网络基础知识 (2)2.手动设置 (3)2.1 EPSON net easy install设置方法 (3)2.1.1 EPSON net easy install无线设置方法的特点 (3)2.1.2 无线设置方法(适用办公环境用户) (3)2.1.3 无线设置方法(适用家庭用户) (14)2.1.4 无线打印方法 (19)2.2 AD Hoc模式设置方法 (20)2.2.1 AD Hoc模式设置方式的特点 (20)2.2.2 无线设置方法 (20)2.2.3 无线打印方法 (25)3. WPS模式设置方法 (26)3.1 WPS模式设置方法的特点 (26)3.2 WPS模式设置方法 (26)3.3 无线打印方法 (34)无线网络基础知识1.无线网络基础知识无线网络的类型:无线网络不用电缆连接,而是用无线电波连接和传递信号。
具有移动自由、不受线路限制、安装快速简便、容易扩展的优点。
无线基础架构模式:网络中的无线设备(计算机、打印机等)使用用路由器或接入点处理所有的数据传输和网络流量。
简易模式:配备无线适配器的无线网络中的无线设备(计算机、打印机等)不用路由器或接入点就可以直接通信。
这种模式也称为点对点网络或Ad hoc网络。
简易模式不用用户另外使用无线路由设备,但是其不具备上面提到的无限基础网络具有的那些优点。
在简易模式下使用EPSON ME Office 80W,建议使用“AD hoc”无线设置方法。
无线基础架构模式具有以下优点:网络信号的可靠性高;具有更好的网络安全性能;具有灵活的网络扩展性;在无线基础架构模式下使用EPSON ME Office 80W,建议使用“EPSON net easy install”或“WPS”、“SES”、“WCN”无线设置方法。
2.手动设置2.1 EPSON net easy install 设置方法2.1.1 无线设置方法的特点适用用户:具有无线基础架构的用户。
或同时拥有有线网络的用户。
(例如同时拥有无线路由器和有线局域网的用户)优点:1、“EPSON net easy install”会在计算机屏幕上一步步的指导用户安装驱动程序、连接硬件设备、自动配置无线IP地址。
用户只需根据提示即可完成全部设置。
2.1.2 无线设置方法(适用办公环境用户)a.设置一台无线路由器或AP:b.将设备按照以下方式连接(注,请将EPSON ME Office 80W有线连接):c.运行“EPSON Easy install”软件,安装设备驱动程序及软件:d.当安装进程进行到“端口选择”时,如下图所示,选择“网络”:点击下一步,开始寻找安装在有线局域网中的ME Office 80W:选择“第一次安装打印机”,并点击下一步:选择方法一:点击下一步,此时找到已经连接到局域网中的ME Office 80W:选中该打印机后,点击“下一步”,选中“无线”方式选中当前可用的无线网络,例如“EPSON WiFi”:点击下一步后,进行打印机的无线IP地址设置,可以使用自动(DHCP),或点击“更改”,进入人工IP设置。
下面以人工IP设置为例:点击“变更”后,选中“手动设置IP地址(高级)”:点击“下一步”,进行IP地址、子网掩码、默认网关的设置:点击“下一步”后,确认网络设置:点击下一步,将此无线网络设置传送给打印机:根据提示,拔掉网络连线,无线网络设置开始自动配置:Net server无线功能被成功安装:Wireless Router/APe.ME Office 80W的打印功能即可以正常使用了。
2.1.3 无线设置方法(适用家庭用户)a.设置一台无线路由器:b.将设备按照以下方式连接(注,请将EPSON ME Office 80W与PC使用网线有线连接):同时,PC与无线路由器之间的需保持无线连接:(例如,本例中的无线路由名称为“EPSON WiFi”)c.按下ME Office 80W操作面板上的 键,打印出一张打印机的当前网络状态表,例如打印机当前的IP地址为“169.254.187.54”。
d.设置计算机端的有线网卡:选中Internet协议(TCP/IP),点击“属性”,设置一个IP地址,例如“169.254.187.53”:注:只有设置IP地址后,PC和打印机之间才可能进行通讯。
e.运行“EPSON Easy install”软件,安装设备驱动程序及软件:点击下一步,开始寻找安装在有线局域网中的ME Office 80W:选择“第一次安装打印机”,并点击下一步:选择方法二:直接与计算机连接点击下一步后,找到与PC相连的ME Office 80W:下面的设置步骤,请参考方法一中的描述。
2.1.4 无线打印方法用户使用“EPSON net Easy install”配置好无线网络设置后,EPSON ME Office 80W 以下面的连接方式工作:无线IP 地址被自动的配置在EPSON ME Office 80W 的打印机和扫描仪上,用户可以直接在应用软件中方便的使用打印和扫描功能。
2.2 AD Hoc 模式设置方法2.2.1 AD Hoc 模式设置方式的特点适用用户:没有无线路由器或AP等无线基础架构网络的用户。
尤其适用于设备(计算机、打印机等)数量很少的用户。
优点:无需使用或添置无线路由器等设备即可使用无线功能。
2.2.2 无线设置方法a.首先,使用本地方式安装EPSON ME Office 80W的打印驱动程序;b.使用网线直接将PC和打印机连接起来,无需使用无线路由器:c.按下ME Office 80W操作面板上的 键,打印出一张打印机的当前网络状态表,例如打印机当前的IP地址为“169.254.187.54”。
d.设置计算机端的有线网卡:选中Internet协议(TCP/IP),点击“属性”,设置一个IP地址,例如“169.254.187.53”:注:只有设置IP地址后,PC和打印机之间才可能进行通讯。
同时,PC与无线路由器之间的需保持无线连接:(例如,本例中的无线路由名称为“EPSON WiFi”)选中这台ME Office 80W,并点击软件中的“Configuration”选项,出现以下界面:选中“Network Interface/ Network/ Basic(Wireless)”项;选中Internet协议(TCP/IP),点击“属性”,设置一个IP地址,例如“169.254.187.53”:点击“Transmit”:g.在“打印机和传真”中,选择打印机。
在“端口”中,添加“Standard TCP/IP Port”,输入IP地址。
h.在PC 上连接网络(本例子中的网络名是“Office 80W”)i.打印机即可在AD Hoc模式下使用了。
2.2.3 无线打印方法用户使用“AD Hoc”模式配置好无线网络设置后,EPSON ME Office 80W以下面的连接方式工作:无线IP地址获得后,需要人工添加在EPSON ME Office 80W的打印机,用户可以直接在应用软件中方便的使用打印功能。
3. WPS 模式设置方法3.1 WPS 模式设置方法的特点3.2 WPS 模式设置方法a.首先,使用本地方式安装EPSON MEOffice 80W的打印驱动程序;b.您需要一个带有“WPS”按键的无线路由器或接入器,以“Linksys WRT54G2”为例:使用以下的方式连接设备:适用用户:拥有WPS功能的无线路由器的无线基础架构网络的用户。
对于无线网络安全有一定的要求。
优点:安装简便;网络安全有保障;c.首先,将PC与无线路由器或接入器建立无线连接;d.在打印机的操作面板上按下 键,打印机将打印出一张网络状态页,记录下“WPS-PIN Code”;e.以“Linksys WRT54G2”无线路由器为例,其默认IP为“192.168.1.1”。
在PC上通过IE,访问该路由器。
在“Wireless”菜单下,选择“Wi-Fi Protected Setup”,并将8位PIN码输入进空格中,然后点击“Register”。
同时,按下“WiFi”键和 键,直到两灯交替闪烁(请注意,此操作需要在生成8位PIN码的两分钟内完成)f.连接完成后,可以看到在打印机的操作面板的网络指示灯,橙色和绿色的灯常亮,表示打印机无线网络设置成功。
g.请注意,此时PC与路由器的连接被断开。
可以在PC的“无线网络连接”菜单中,看到新生成的SSID,例如本例子中的“Linksys_WPS_3330”:h.将PC和无线路由器有线连接,从PC重新访问无线路由器。
在“Wi-Fi Protected Setup”菜单下,找到生成的网络连接密码“Passphares”项。
例如,本例子中生成的密码为: h1e4STNPki.拔掉有线网络连线,在PC上重新连接SSID,并输入“Passphares”项的内容,无线网络重新连接。
(注意,PC的无线网络中“网络验证”和“数据加密”选项中的设置应与打印机液晶显示屏上的设置相同。
j.按下 键,打印出打印机的网络状态页,找到分配好的无线IP地址。
在PC的打印机驱动中的端口上设置无线IP地址(例如本例子为192.168.1.107),打印机即可使用了。
SES模式设置方法WPS 模式设置方法设置3.3 无线打印方法用户使用“WPS”模式配置好无线网络设置后,EPSON ME Office 80W 以下面的连接方式工作:无线IP 地址获得后,需要人工添加在EPSON ME Office 80W 的打印机仪上,用户可以直接在应用软件中方便的使用打印功能。
Wireless Router/AP。