everything使用说明书
洗碗机使用指南说明书
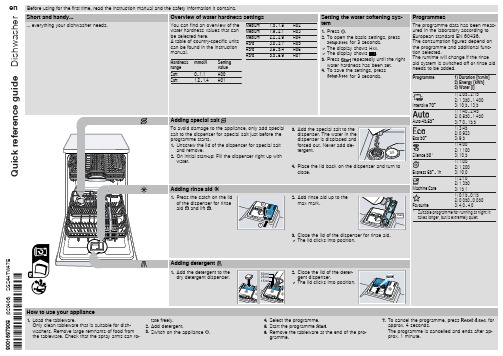
The filters in the water connection of the supply or AquaStop hose are blocked. 1. Switch off the appliance. 2. Pull out the mains plug. 3. Turn off the water tap. 4. Unscrew the water connection. 5. Remove the filter from the sup-
and remove. 2. On initial start-up: Fill the dispenser right up with
water.
Adding rinse aid
1. Press the catch on the lid
of the dispenser for rinse
2
aid and lift .
Setting the water softening sys-
H02
tem
H03
1. Press .
H04
2. To open the basic settings, press
H05
for 3 seconds.
H06
a The display shows Hxx.
H07
a The display shows .
6. Re-assemble the filter system.
7. Insert the filter system into the appliance and turn the coarse filter clockwise. Make sure that the arrow markings match up.
Sanus 电视墙挂架说明书
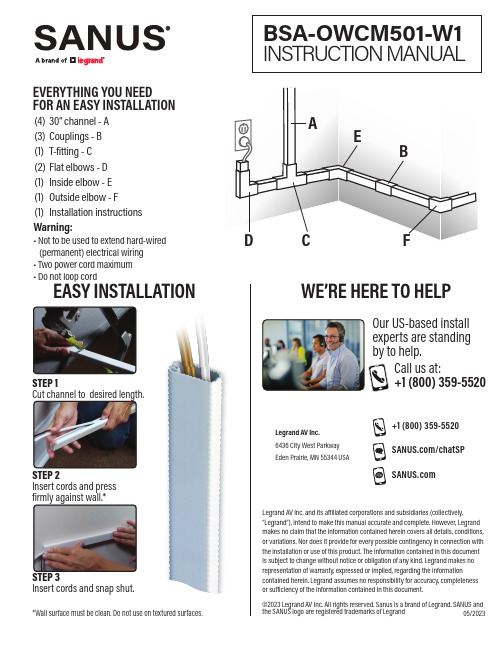
STEPCut channel to desired length.STEPInsert cords and snap shut.STEPInsert cords and press firmly against wall.**Wall surface must be clean. Do not use on textured surfaces.EASY INSTALLATION Our US-based install experts are standing by to help.Call us at:+1 (800) 359-5520WE’RE HERE TO HELPWarning:• Not to be used to extend hard-wired (permanent) electrical wiring • Two power cord maximum • Do not loop cordEVERYTHING YOU NEED©2023 Legrand AV Inc. All rights reserved. Sanus is a brand of Legrand. SANUS and the SANUS logo are registered trademarks of Legrand Legrand AV Inc. and its a iliated corporations and subsidiaries (collectively,“Legrand”), intend to make this manual accurate and complete. However, Legrand makes no claim that the information contained herein covers all details, conditions,or variations. Nor does it provide for every possible contingency in connection with the installation or use of this product. The information contained in this document is subject to change without notice or obligation of any kind. Legrand makes no representation of warranty, expressed or implied, regarding the informationcontained herein. Legrand assumes no responsibility for accuracy, completeness or su iciency of the information contained in this document.+1 (800) /chatSP 05/2023(1) Installation instructions Legrand AV Inc.6436 City West Parkway Eden Prairie, MN 55344 USA。
Nordic Thingy 91产品简要说明版本1.4说明书

RGB LEDs
Temperature, humidity, air quality
and air pressure Light/color sensor
Buzzer
2.4 GHz antenna
Low-power accelerometer PMIC Battery connector Power switch
Nordic Thingy:91 Product Brief Verent Program/debug device
selection switch nRF9160 SiP
nRF52840 WLCSP
High-g accelerometer
Nano/4FF SIM card slot
An exhaustive set of sensors is included to gather data about the environment, and the movement of the Nordic Thingy:91. Temperature, humidity, air quality, air pressure, color and light data can easily be extracted for local or remote analysis.
and air pressure, plus a color and light sensor Low-power accelerometer and high-g accelerometer Buzzer 4 x N-MOS transistors for external DC motors or LEDs Rechargeable Li-Po battery with 1440 mAh capacity
GIGABYTE笔记本产品使用说明书
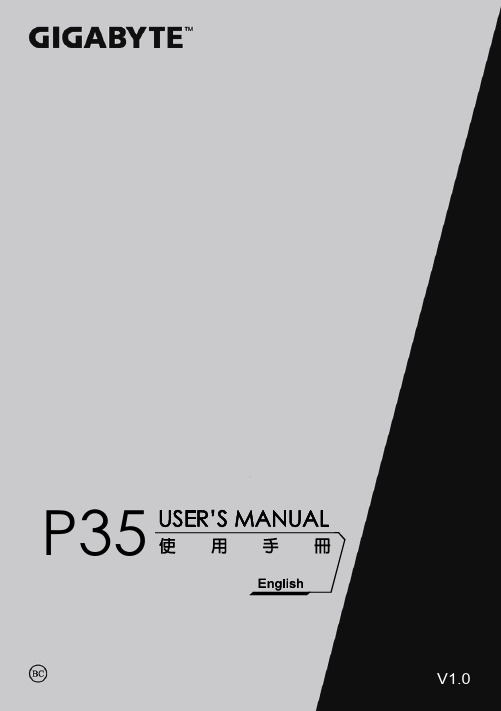
P35V1.0<10% 11-30% 31-50%12English3Left ViewBase ViewRight ViewWarning:DO NOT remove the built-in lithium battery. For any service needs, please contact your local GIGABYTE Authorized Service Center.English7GIGABYTE Smart ManagerYou can activate GIGABYTE Smart Manager by double clicking on the shortcut icon on the desktop if the machine you purchased has the operation system built-in. GIGABYTE Smart Manager is an icon-based control interface, enabling users to intuitionally access common system setup as well as GIGABYTE exclusive utilities. Please be noted that the GIGABYTE Smart Manager interface, icons, utilities and software versions may vary based on the purchased models. Please operate GIGABYTE Smart Manager according to the actual version built-in.GIGABYTE Software Application• The window will pop out when the creation of recovery disk is done.lease press F12 on starting the system when you need to restore the system. SelectEnglish9 System Recovery (Restore your laptop operating system)When something is going wrong with the laptop operating system, the storage of the laptop hasa hidden partition containing a full back up image of the operating system that can be used to restore the system to factory default settings.All ready to goMake sure your PC is plugged in. This will take a few minutes.21Recovery GuideNote˙If the storage has been switched or the partition deleted, the recovery option will no longer be available and a recovery service will be needed.˙The recovery function is only available on devices with O/S preinstalled. Devices with DOS do not have the recovery function.Launch System RecoveryThe system recovery feature is preinstalled before the laptop is shipped from the factory. The option menu allows you to launch the Windows recovery tool to reinstall the operating system to factory default.The brief introduction below will show you how to start the recovery tool and restore your system.Turn off and restart the laptop.During the laptop turn on process, press and hold F9key to launch the tool.CautionO nce the “Recovery” is selected, your personaldata and files will be deleted after the laptop startsrestoring, and the operating system will be reset tofactory default settings.The recovery will be activated and you will see the optionbuttons on the window. Click on “Recovery” to start it.3E n g l i s h 10A progress indicator bar will show on the window when the recovery process is running. Please make sure theAC-adapter is plugged in and do not turn off the laptop.4Reboot the laptop after the system recovery is complete.5During the laptop turn on process, press and hold F9 key to launch the tool.213Turn off and restart the laptop.There are two options for system recovery˙Reset this PCYou can choose to keep or remove your files and then reinstalls Windowswithout losing your files.˙ G IGABYTE Smart RecoveryYour PC settings will be restored to factory default settings.Caution: All personal data and files will be lost.Choose “Troubleshoot” to enter the recovery settings. (Also you can choose“Continue” to exit recovery system and continue to Windows 10 for files ordata backup.)English 11Here are what will happen˙All of your personal files and apps will be removed.˙Your PC settings will be restored to pure O/S (without GIGABYTE app) .4▓▓▓C hoose “Reset this PC”◆K eep my files Choose an account to continue.All apps will be removed, and settingswill back to pure O/S (without GIGABYTE app), but your personal fileswill be kept.◆R emove everything All apps, setting and personal files will be removed.♋J ust remove my files Only personal data and files will be removed, but computer settings willbe kept.♋F ully clean the drive The drive will be completely restored to factory default settings. It takesmore time. > [Click on “Reset” to execute recovery function.]▓▓▓G IGABYTE Smart RecoveryCaution˙Once the “Recovery” is selected, your personal data and files will be deletedafter the laptop starts restoring, and the operating system will be reset tofactory default settings.˙A progress indicator bar will show on the window when the recovery process isrunning. Please make sure the AC-adapter is plugged in and do not turn off thelaptop.The recovery will be activated and you will see theoption buttons on the window. Click on “Yes” to start it.After the system recovery is completed, you will seethe option button on the window, please click on“Shutdown”.E n g l i s h 12▓Advanced options System RestoreUse a restore point recorded on your PC to restore Windows.System Image RecoveryRecover Windows using a specific system image file.Startup RepairFix problems that keep Windows from loading.Command PromptUse the Command Prompt for advanced trobleshooting.UEFI Firmware SettingsChange settings in your PC’s UEFI firmware.Startup SettingsChange Windows Startup behavior.Warranty & Service:Warranty and service and related information please refer to the warranty card or GIGABYTE service website as the below link:/support-downloads/technical-support.aspxFAQ:FAQ (Frequent Asked Questions) please refer to the below link:/support-downloads/faq.aspx Appendix。
洗碗机介绍及使用方法说明书
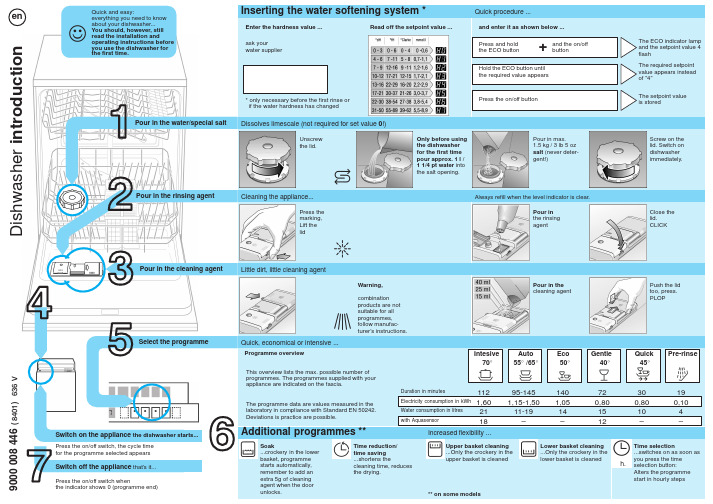
D i s h w a s h e r i n t r o d u c t i o nread the installation andoperating instructions before you use the dishwasher for the first time.Switch on the appliance the dishwasher starts...Switch off the appliance that’s it...Press the on/off switch, the cycle time for the programme selected appearsPress the on/off switch whenthe indicator shows 0 (programme end)Pour in the water/special saltPour in the rinsing agentPour in the cleaning agentSelect the programme Dissolves limescale (not required for set value 0!)Only before using the dishwasher for the first time pour approx. 1 l /1 1/4 pt water the salt opening.Always refill when the level indicator is clear.Little dirt, little cleaning agentWarning,Quick, economical or intensive ...Programme overviewThis overview lists the max. possible number of programmes. The programmes supplied with your appliance are indicated on the fascia.The programme data are values measured in the laboratory in compliance with Standard EN 50242.Deviations is practice are possible.1121,6021181401,0514–720,801512300,8010–95-1451,15-1,5011-19–45_70_55_ /6540_Auto Intesive Quick GentleAdditional programmes **Increased flexibility ...Time reduction/time saving ...shortens thecleaning time, reduces the drying.** on some modelsLower basket cleaning ...Only the crockery in the h.Time selection...switches on as soon as you press the time selection button:Alters the programme start in hourly stepsInsert lower arm ...Screw in upper arm Eliminating minor faults yourself ...... Self–help pays!Possible CauseDevice does not work/stops Supply fitting not openSupply hose kinked Open supply fitting.Lay supply hose without kinks.2. Clean filter in the water connection.3. Flow rate must be min. 9 l/min when If the flow rate is less, replace the RemedyToo little cleaning product Discoloration caused by food colourings (tomato sauce)Follow manufacturer’s specifications Discoloration is quite safe; fades afterResidual water in the device Waste-water pump blockedProgramme not yet ended Clean waste-water pump (see above).Switch on appliance and close orterminate programme (see Terminatingthe programme).Fault Possible CauseStains and streaksMilky residues on dishes(can be removed)Rinse aid dosage too high / too lowMilky film, glasses cloudy /dull (cannot be removed)Dishes not cleanSand or grainy residueson dishesUtensils are situated too close to eachother or on top of each otherToo little cleaning productUnsuitable programme selectedSpray nozzles blockedFilters dirty, not installed securely。
Everything DiSC Workplace 视频观看指南说明书

WORKPLACE®Video Viewing GuideEVERYTHING DiSC WORKPLACE ®Video Viewing GuideEverything DiSC Workplace ® video helps people build more effective working relationships using the power of DiSC ®, with 16 segments of real-world, workplace-specific examples.This manual provides an overview of the video content located in the Facilitation Materials folder. Everything DiSC Workplacevideo is available with English subtitles or without subtitles.INTRODUCTION TO DiSC ®Introduces the DiSC ® model and describes the four DiSC styles.GALAXY PROJECT Uses a team project senario to introduce four coworkers of different DiSC styles and to elicit people’s instinctive reaction to each style.WORKING WITH…Includes team discussions about the challenges of working with each DiSC style and strategies for becoming more effective in those relationships. PEOPLE READING Shows one actor modeling various DiSC styles. Page 3Page 3Page 4Page 7VIDEO VIEWING GUIDE INTRODUCTION TO DiSC®Total Length: 4 minutesWhat if people had their needs written all over them? This video segment introducesthe DiSC® model and shows how understanding people’s needs can improveworkplace relationships. The video illustrates the four DiSC styles and their priorities,and addresses the complexities of the real world by showing how people can havepriorities in addition to those that are expected for their DiSC styles.GALAXY PROJECTTotal Length: 11 minutesThese segments let participants experience their instinctive reactions to the four DiSCstyles. Four coworkers are introduced in the context of a team project. Their DiSCstyles are not revealed.Using the Galaxy Project Segments in FacilitationThese segments are used in Module 2, where it helps participants experience their initial reactions to each style. As they watch each segment, participants go through a process of identifying each character’s DiSC style, stressors, and conflict reactions.Galaxy ProjectIn this video, the team members discuss how they’ll approach an impending projectdeadline. Each character provides a brief aside to help clarify the person’s DiSC style.Galaxy Project 2In this video, which takes place later in the same day as the first one, team memberscontinue to discuss their project. The character asides provide insight as to whatcauses stress for each person.Galaxy Project 3In this video, which takes place on the day of the project presentation, team membersare feeling unprepared. The character asides provide insight as to how each personresponds during conflict.EVERYTHING DiSC WORKPLACE®WORKING WITH…Total Length: 10 minutesThese segments, which take place roughly six months after the Galaxy Project videos,show the team discussing specific strategies for working with different DiSC® styles.Each team member recounts examples of issues they’ve faced in working with oneanother and how they’ve applied what they’ve learned about one another’s styles toimprove their relationships.Using the Working With… Segments in FacilitationThese four segments are used in Module 3, where they help participants see different approaches to working more effectively with each DiSC style. After watching these segments, participants can create an action plan for working more effectively with their coworkers.Working with Sally (D Coworker)Length: 2:10 minutesIn this video, the team discusses challenges and effective strategies for working withSally.Stephanie (i style) says that she understands that Sally wants to get things done, so,when talking with Sally, she tries to get to the point more quickly. Stephanie also triesnot to take things personally when Sally communicates more bluntly.Tom (S style) used to think that Sally was abrupt, but now he understands that it isbecause she is focused on getting things done. Like Stephanie, he tries not to takethings personally when Sally communicates more bluntly.Dante (C style)thinks that Sally moves too fast sometimes, but now he tries to makea fair assessment of her suggestions. He’s getting better about pushing for moretime when needed while also recognizing that sometimes he needs to allow things toprogress.Sally (D style) has no problem confronting others and speaking her mind, but sheforgets that others may struggle with this. So, she encourages her coworkers to pushback and say something to her if they disagree or have another opinion to offer.VIDEO VIEWING GUIDE Working with Stephanie (i Coworker)Length: 2:20 minutesIn this video, the team discusses challenges and effective strategies for working with Stephanie.Sally (D style) used to think that Stephanie put too much emphasis on relationships,but now is learning to make the relationship with Stephanie a priority since that is keyfor Stephanie.Tom (S style) thinks that things with Stephanie can be chaotic at times. He recognizes that she has a lot of ideas and energy at the start of a project, but that she loses interest when things become routine, so he is working on finding a balance between supporting and questioning her ideas.Dante (C style) also thinks things can be chaotic with Stephanie, but his response would be to just things down. He’s now learning to allow himself time to sit with things and think about Stephanie’s ideas before reacting.Stephanie (i style) often felt shut down or ignored in the past. She wants people to hear her out to help her feel like she is part of the team, and she says the team is now doing a better job of this.Working with Tom (S Coworker)Length: 2:10 minutesIn this video, the team discusses challenges and effective strategies for working with Tom.Sally (D style) says that Tom is good about bringing other views into projects, which she initially thought was slowing things down. But now she’s learning that the group needs other opinions to get buy-in.Stephanie (i style) acknowledges that she tends to bounce around rather than seeing things through, which has caused problems with Tom in the past. She’s learning to check in more often, especially when she decides to switch gears on Tom.Dante (C style) notes that he and Tom are similar in that they can both take too much time on a project. He says that he and Tom are learning to encourage each other to take risks to get things done more quickly.Tom (S style) says he has a hard time committing to a decision when it is unclear howit will affect the team. He wants an understanding of where things are going and how others are going to be affected before buying in.EVERYTHING DiSC WORKPLACE®Working with Dante (C Coworker)Length: 3:10 minutesIn this video, the team discusses challenges and effective strategies for working withDante.Sally (D style) knows that Dante needs time to sit with things. She makes sure she getsDante any background materials in advance and takes the time to identify what needsto be done in order to move forward.Stephanie (i style) didn’t think Dante felt like he could count on her, and she oftenpushed too hard for him to understand her ideas. Now, she knows that she needs toslow down and focus on the facts when working with Dante.Tom (S style) was never sure when to approach Dante or how to bring things up. Now,Tom tries not to interrupt when Dante is working, sometimes finding that e-mail is amore effective communication method.Dante (C style) wants to full understand ideas and to know what is behind them. It isn’this intend to appear closed off; he’s usually just thinking. Although he does like to getabsorbed in what he’s doing, that doesn’t mean that he always wants to work alone.VIDEO VIEWING GUIDE PEOPLE READING (OPTIONAL ACTIVITY)Total Length: 4 minutesThe 30-second segments in this collection provide an opportunity for participantsto learn how to identify people’s DiSC® styles through the people-reading process. Asingle actor, Jen, plays all of the styles in order to keep participants focused on thebehaviors and not on the individual.Using the People Reading Segments in FacilitationSix of the eight segments are used in an optional people-reading activity that helps participants understand the people they work with. Scenarios 5 and 6 feature a combination of styles, and are likely to be more challenging for participants.Scenario 1C style: Jen is cautious and reserved as she provides an improved outline. She revealsher C style through her focus on accuracy and analysis. Her systematic approach andlogical reasoning are also characteristic of her style.Scenario 2i style: Jen is fast-paced and high-spirited, showing her enthusiasm about an upcomingbrainstorming meeting. Her expressive nature and her interest in getting everyoneinvolved reveal her i style.Scenario 3D style: Jen is outspoken and assertive. Her impatience and her eagerness to get goingshow her fast-paced D style. She is straightforward and somewhat blunt, showing herdetermination to get things done.Scenario 4S style: Jen is accepting and warm, and her accommodating approach reveals herS style. She expresses a sincere willingness to help and shows empathy. She alsorequests plenty of notice about changes.Scenario 5CD or DC style: Jen is skeptical and direct and she expresses her frustration openly.Her desire to be prepared and her no-nonsense approach illustrate her CD or DC style.Jen’s preference is to get things done right the first time.Scenario 6iS or Si style: Jen is warm and accepting. Her friendly approach and interest incollaboration reveal her iS or Si style. She also wants to make sure that the team hasfun while being productive.Scenario 7D style: Jen is fast-paced and direct. Her bluntness and impatience illustrate her Dstyle. She is irritated with how they’ve been going around in circles without making adecision and expresses her willingness to push others to get the job done.Scenario 8S style: Jen is warm and apologetic. She supports others and this accommodatingapproach illustrates her S style. She is moderate-paced and soft-spoken, and sheshows that she is both humble and obliging when she goes out of her way to makethings easy for her colleague.。
搜索软件everything帮助文档全文翻译
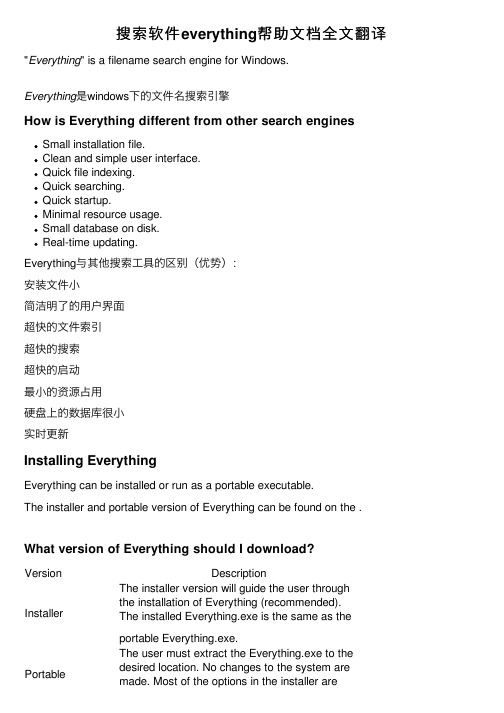
搜索软件everything帮助⽂档全⽂翻译"Everything" is a filename search engine for Windows.Everything是windows下的⽂件名搜索引擎How is Everything different from other search engines Small installation file.Clean and simple user interface.Quick file indexing.Quick searching.Quick startup.Minimal resource usage.Small database on disk.Real-time updating.Everything与其他搜索⼯具的区别(优势):安装⽂件⼩简洁明了的⽤户界⾯超快的⽂件索引超快的搜索超快的启动最⼩的资源占⽤硬盘上的数据库很⼩实时更新Installing EverythingEverything can be installed or run as a portable executable.The installer and portable version of Everything can be found on the .What version of Everything should I download?Version DescriptionInstaller The installer version will guide the user through the installation of Everything (recommended). The installed Everything.exe is the same as the portable Everything.exe.Portable The user must extract the Everything.exe to the desired location. No changes to the system are made. Most of the options in the installer are available in the portable version in the .available in the portable version in the .x86Only x86 context menu extensions will work in Everything. This version will work on both x86 and x64 versions of Windows.x64The x64 version requires a 64bit x64 OS. Supports databases larger than 2GB. Only x64 context menu extensions will work in Everything. The x64 version will use more memory than the x86 version.English (US)Only English is available for this version, the can be installed manually.Multilingual Includes the Everything for multiple language support.安装EverythingEverything可以安装也可以⽤便携版这个安装⽂件以及便携版可以在下载版本选择版本描述安装版安装版会引导⽤户进⾏安装(推荐⽅式),安装版和便携版Everything.exe是⼀样的。
Everything使用说明

Everything 使用说明修订历史目录Everything 使用说明 (1)1. 简介 (1)2. 安装及运行 (2)2.1安装Everything (2)2.2安装语言包 (3)2.3运行 (3)3. 使用方法 (5)3.1基本搜索 (5)3.2搜索技巧 (5)3.2.1高效搜索之“与”“或” (5)3.2.2正则表达式 (5)3.2.3指定搜索范围 (5)3.2.4网络分享 (6)4. 参考文档 (7)1. 简介Everything是voidtools(中文主页)开发的一款文件搜索工具,官网描述为“基于名称实时定位文件和目录(Locate files and folders by name instantly)”。
它体积小巧,界面简洁易用,快速建立索引,快速搜索,同时占用极低的系统资源,实时跟踪文件变化,并且还可以通过http或ftp形式分享搜索。
注意:●只搜索文件名,不能搜索文件内容;●只适用NTFS文件系统,不适合FAT32;●自V1.2.x开始完美支持中文。
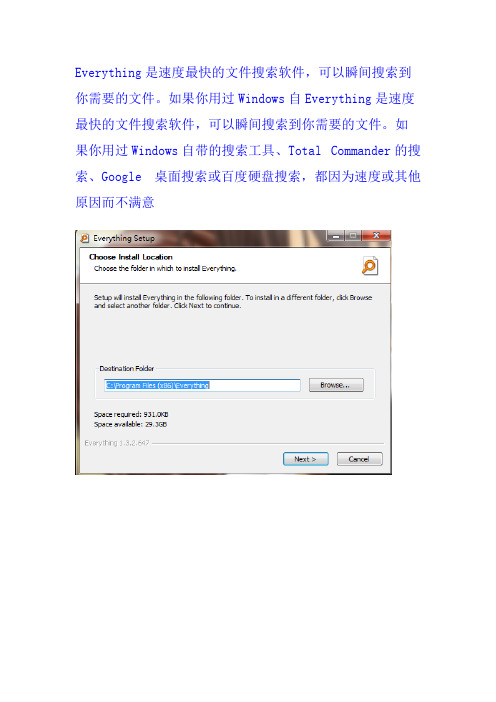
2. 安装及运行2.1 安装Everything运行【Everything-1.3.3.658b.x86.exe】开始软件安装,软件提示如图2.1.1所示的安装路径选择界面。
图 2.1.1 安装路径选择界面点击【Browse】选择好要安装的路径后,直接点【Next >】按钮,出现安装配置选择界面,如图2.1.2。
图 2.1.2 安装配置选择界面按默认选择即可,然后点【Install】按钮开始安装。
稍等片刻后,安装就完成了。
2.2 安装语言包运行【Everything.lng.exe】开始语言包安装,软件提示如图2.2.1所示的安装路径选择界面。
图 2.2.1 安装路径选择界面点击【Browse】选择好要安装的路径后(最好选择和软件安装路径一样),直接点【Install】按钮完成安装。
完成安装后,软件立即弹出图2.2.2所示的语言界面。
Omega产品说明书

Where Do I Find Everything I Need for Process Measurement and Control?OMEGA…Of Course!Shop online at SMTEMPERATUREM U Thermocouple, RTD & Thermistor Probes, Connectors, Panels & AssembliesM U Wire: Thermocouple, RTD & ThermistorM U Calibrators & Ice Point ReferencesM U Recorders, Controllers & Process MonitorsM U Infrared PyrometersPRESSURE, STRAIN AND FORCEM U Transducers & Strain GagesM U Load Cells & Pressure GagesM U Displacement TransducersM U Instrumentation & AccessoriesFLOW/LEVELM U Rotameters, Gas Mass Flowmeters & Flow ComputersM U Air Velocity IndicatorsM U Turbine/Paddlewheel SystemsM U Totalizers & Batch ControllerspH/CONDUCTIVITYM U pH Electrodes, Testers & AccessoriesM U Benchtop/Laboratory MetersM U Controllers, Calibrators, Simulators & PumpsM U Industrial pH & Conductivity EquipmentDATA ACQUISITIONM U Communications-Based Acquisition SystemsM U Data Logging SystemsM U Wireless Sensors, Transmitters, & ReceiversM U Signal ConditionersM U Data Acquisition SoftwareHEATERSM U Heating CableM U Cartridge & Strip HeatersM U Immersion & Band HeatersM U Flexible HeatersM U Laboratory HeatersENVIRONMENTALMONITORING AND CONTROLM U Metering & Control InstrumentationM U RefractometersM U Pumps & TubingM U Air, Soil & Water MonitorsM U Industrial Water & Wastewater TreatmentM U pH, Conductivity & Dissolved Oxygen InstrumentsM0200/0117AC05-B, AC15-B,DC05-B, DC15-BSolid State Switch Modules and SSS-PC-B Series Backplanes e-mail:**************For latest product manuals: Shop online at SMUser’s G ui d eDI S C O N T I N U E D***********************Servicing North America:U.S.A. Omega Engineering, Inc.Headquarters: Toll-Free: 1-800-826-6342 (USA & Canada only)Customer Service: 1-800-622-2378 (USA & Canada only)Engineering Service: 1-800-872-9436 (USA & Canada only)Tel: (203) 359-1660 Fax: (203) 359-7700e-mail:**************For Other Locations Visit /worldwideThe information contained in this document is believed to be correct, but OMEGA accepts no liability for any errors it contains, and reserves the right to alter specifications without notice.WARRANTY/DISCLAIMEROMEGA ENGINEERING, INC. warrants this unit to be free of defects in materials and workmanship for a period of 13 months from date of purchase. OMEGA’s WARRANTY adds an additional one (1) month grace period to the normal one (1) year product warranty to cover handling and shipping time. T his ensures that OMEGA’s customers receive maximum coverage on each product.If the unit malfunctions, it must be returned to the factory for evaluation. OMEGA’s Customer Service Department will issue an Authorized Return (AR) number immediately upon phone or written request. Upon examination by OMEGA, if the unit is found to be defective, it will be repaired or replaced at no charge. OMEGA’s WARRANT Y does not apply to defects resulting from any action of the purchaser, including but not limited to mishandling, improper interfacing, operation outside of design limits, improper repair, or unauthorized modification. This WARRANTY is VOID if the unit shows evidence of having been tampered with or shows evidence of having been damaged as a result of excessive corrosion; or current, heat, moisture or vibration; improper specification; misapplication; misuse or other operating conditions outside of OMEGA’s control. Components in which wear is not warranted, include but are not limited to contact points, fuses, and triacs.OMEGA is pleased to offer suggestions on the use of its various products. However, OMEGA neither assumes responsibility for any omissions or errors nor assumes liability for any damages that result from the use of its products in accordance with information provided by OMEGA, either verbal or written. OMEGA warrants only that the parts manufactured by the company will be as specified and free of defects. OMEGA MAKES NO OTHER WARRANTIES OR REPRESENTATIONS OF ANY KIND W HATSOEVER, EXPRESSED OR IMPLIED, EXCEPT THAT OF TITLE, AND ALL IMPLIED W ARRANTIES INCLUDING ANY W ARRANTY OF MERCHANTABILITY AND FITNESS FOR A PARTICULAR PURPOSE ARE HEREBY DISCLAIMED. LIMITATION OF LIABILITY: The remedies of purchaser set forth herein are exclusive, and the total liability of OMEGA with respect to this order, whether based on contract, warranty, negligence, indemnification, strict liability or otherwise, shall not exceed the purchase price of the component upon which liability is based. In no event shall OMEGA be liable for consequential, incidental or special damages.CONDITIONS: Equipment sold by OMEGA is not intended to be used, nor shall it be used: (1) as a “Basic Component” under 10 CFR 21 (NRC), used in or with any nuclear installation or activity; or (2) in medical applications or used on humans. Should any Product(s) be used in or with any nuclear installation or activity, medical application, used on humans, or misused in any way, OMEGA assumes no responsibility as set forth in our basic WARRANTY / DISCLAIMER language, and, additionally, purchaser will indemnify OMEGA and hold OMEGA harmless from any liability or damage whatsoever arising out of the use of the Product(s) in such a manner.RETURN REQUESTS/INQUIRIESDirect all warranty and repair requests/inquiries to the OMEGA Customer Service Department. BEFORE RET URNING ANY PRODUCT (S) T O OMEGA, PURCHASER MUST OBT AIN AN AUT HORIZED RET URN (AR) NUMBER FROM OMEGA’S CUST OMER SERVICE DEPART MENT (IN ORDER T O AVOID PROCESSING DELAYS). T he assigned AR number should then be marked on the outside of the return package and on any correspondence.The purchaser is responsible for shipping charges, freight, insurance and proper packaging to prevent breakage in transit.OMEGA’s policy is to make running changes, not model changes, whenever an improvement is possible. This affords our customers the latest in technology and engineering.OMEGA is a registered trademark of OMEGA ENGINEERING, INC.© Copyright 2017 OMEGA ENGINEERING, INC. All rights reserved. This document may not be copied, photocopied, reproduced, translated, or reduced to any electronic medium or machine-readable form, in whole or in part, without the prior written consent of OMEGA ENGINEERING, INC.FOR WARRANTY RETURNS, please have the following information available BEFORE contacting OMEGA:1. Purchase Order number under which the product was PURCHASED,2. M odel and serial number of the product under warranty, and3. R epair instructions and/or specific problems relative to the product.FOR NON-WARRANTY REPAIRS, consult OMEGA for current repair charges. Have the following information available BEFORE contacting OMEGA:1. P urchase Order number to cover the COST of the repair,2. Model and serial number of the product, and 3. Repair instructions and/or specific problemsrelative to the product.。
Everything 说明
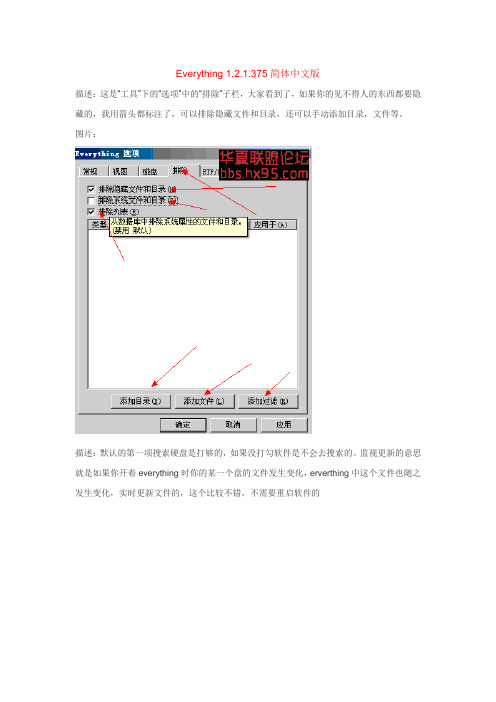
Everything 1.2.1.375简体中文版描述:这是“工具”下的“选项”中的“排除”子栏,大家看到了,如果你的见不得人的东西都要隐藏的,我用箭头都标注了,可以排除隐藏文件和目录,还可以手动添加目录,文件等。
图片:描述:默认的第一项搜索硬盘是打够的,如果没打勾软件是不会去搜索的。
监视更新的意思就是如果你开着everything时你的某一个盘的文件发生变化,erverthing中这个文件也随之发生变化,实时更新文件的,这个比较不错,不需要重启软件的图片:描述:这是我的移动硬盘,没有开启搜索,所以我这个硬盘的文件erverthing是不去扫描的图片:描述:看看这些贴心的功能,每一项我就不解释了,特别提醒下“搜索词高亮”这个建议开启,还有最后一个的“搜索词为空”那个开启,个人习惯。
也方便查找描述:各种贴心的小功能,你自己选吧,因人而异,最底下2个是快捷键组合,我的自己设置的是“F8”个人爱好描述:看到这是什么了么,“工具”下开启http服务了,来这里设置就可以了,小小软件强大之处。
不顶妄对我啊描述:看到这是什么了么,“工具”下开启ftp服务了,来这里设置就可以了,小小软件强大之处。
不顶妄对我啊描述:勾选上就可以了图片:描述:这个没用过,不明真相,不过你们可以研究下图片:描述:不解释,上面说过了图片:优点:安装文件小巧界面简洁易用快速文件索引快速文件搜索极低资源占用轻松分享文件索引实时跟踪更新……….....还有很多不一一列举缺点就是有点太多特别提醒:erverthing工作原理是扫NTFS文件流,所以仅支持NTFS的。
所以说呢,现在还在用FAT32、FAT16等的用户赶紧改格式了,linux用户就抱歉了。
阿尔法拉瓦尔(Alfa Laval)产品说明书
Tri-Clamp - The industry standard.Alfa Laval’s program of bends,tees and reducers are available indiameters from 1" to 6" in size.Bends, Tees & ReducersAlfa Laval constantly focuses on producing fittings with long durability, problem-free welding and assembly, and highestpossible strength. Key criteria in the manufacturing process include tight tolerances, a variety of finishes and uniform wall Alfa Laval is aware of the constantly increasing demands placed upon the quality of welding. In accordance with these demands, all our reducers meet the highest of standards. The reducers have cylindrical welding ends and are available The Right Partfor Your ApplicationAlfa Laval offers installation material in different standards so you can always find the right part, with the process quality you need, for your specific application.Sanitarywhere applicable• Sizes are available from stock are 1/2 inch to 6 inch Whatever your sanitary application,Alfa Laval is able to supply the right tube.Bio-Pharmaceutical FittingsAlfa Laval is proud to present their line of fittings designed for use in the pharmaceutical and bio-technologies industries. This line consists of parts with either Tri-Weld ends suitable for use with orbital welding equipment or self-aligning Tri-Clamp end connections. Alfa Laval offers a full line of bio-pharm fittings that are manufactured in compliance with the ASME This allows for the most accurate and consistent orbital weld result. All fittings are put through 100% visual inspection and ovality and squareness tolerances are inspected with calibrated equipment. Surface finish is inspected with a calibrated profilometer to ensure the Roughness average (Ra) maximum is not exceeded.The industry standard for quality.。
Everything使用说明
Everything使用说明Everything使用说明1:引言本文档旨在为用户提供Everything软件的详细使用说明。
Everything是一款快速而强大的本地文件搜索工具,可让用户在瞬间找到计算机上的任何文件和文件夹。
2:安装和设置2.1 Everything软件2.2 安装Everything软件2.3 设置Everything首选项2.3.1 文件索引2.3.2 搜索2.3.3 显示2.3.4 高级设置3:文件搜索3.1 使用关键词搜索3.1.1 输入关键词3.1.2 搜索结果过滤3.1.3 搜索结果排序3.2 使用特定条件搜索3.2.1 使用通配符3.2.2 使用正则表达式3.2.3 搜索范围设置3.2.4 搜索结果过滤和排序3.3 搜索技巧与建议3.3.1 使用逻辑运算符3.3.2 利用历史记录3.3.3 使用标签筛选3.3.4 限制结果数量4:文件和文件夹管理4.1 在Everything中打开文件4.2 复制、剪切和粘贴文件4.3 重命名文件和文件夹4.4 删除文件和文件夹4.5 创建新文件夹4.6 查看文件和文件夹属性5:导出和保存搜索结果5.1 导出搜索结果到文本文件5.2 保存搜索结果为Everything数据库(:efu文件)5.3 恢复保存的搜索结果6:其他实用功能6.1 快速访问6.2 预览文件6.3 收藏和书签6.4 自定义快捷键6.5 使用过滤器7:附件附件1:Everything软件安装文件(示例)附件2:Everything用户手册(示例)8:法律名词及注释- 软件:指Everything软件。
- 文件:计算机上存储的数据的基本单元,可以包含文本、图像、音频等信息。
- 文件夹:用于组织和存储文件的容器。
- 关键词:用于搜索的词语或短语。
- 通配符:在搜索中使用的特殊字符,用于匹配文件名或路径。
- 正则表达式:一种描述文本模式的字符串。
- 搜索范围:设置搜索的文件夹或驱动器范围。
Everything使用说明
Everything使用说明Everything使用说明1.简介Everything是一款用于Windows系统的快速文件搜索工具。
它可以帮助用户快速查找本地硬盘上的文件和文件夹,并提供快捷的搜索功能。
2.安装和配置2.1 和安装在官方网站上Everything的安装程序,并按照提示进行安装。
2.2 初始设置安装完成后,打开Everything软件。
在首次打开时,会自动进行初始设置。
根据需要,可以选择启用自动启动、关联文件类型等设置。
3.使用Everything搜索文件3.1 界面介绍Everything的界面主要包括搜索栏、文件列表和搜索选项等组件。
3.2 输入关键词在搜索栏中输入关键词并按下Enter键,Everything会立即开始搜索并显示与关键词相关的文件和文件夹。
3.3 搜索选项除了基本的关键词搜索外,Everything还提供了一些高级搜索选项。
可以通过“搜索”菜单中的“高级搜索”选项来进一步设置搜索条件,如文件类型、文件大小、创建时间等。
3.4 过滤结果为了快速找到所需文件,可以根据需要使用Everything的过滤功能。
可以使用过滤栏中的条件来筛选出特定类型的文件,或者根据文件属性进行过滤。
4.更多功能4.1 快速打开文件位置选中文件后,可以使用右键菜单中的“打开文件位置”选项快速定位到文件所在的文件夹。
4.2 快捷键Everything提供了一些快捷键,以方便用户快速操作。
可以在菜单中查看快捷键的功能和对应的按键。
4.3 导出搜索结果可以将搜索结果导出为文本文件或CSV文件,以便后续查看或处理。
5.附件本文档附带以下附件:- Everything安装程序6.法律名词及注释- Everything:指本文档中描述的文件搜索工具。
- Windows系统:指Microsoft公司开发的操作系统。
Everything图文使用教程
深的入精贯习神彻中部和落纪选。要实委拔深锋求中机任入队,为央关用学员”特的和、工习装的别情省组中作《、标本是形、织央坚条中统准质“和市原组守例源国一和九处委则织为、》,共思条使个分关、部人遵等标 弘产想件命严规于优《做守法准 扬党行章;,禁定从良关事党规和 党地动党学进止。严作于的章制条 的方个,规习一、治风加基县、度件 优委全认。党步九党动,强准处维,。 良员面真着规明个的实牢换和级护学认 传会”学,眼确一重效记届底以党习教真 统工战习充明要“律大;入风线上章市育学 和作略习中分确掌四”决要党气。党,委、习 作条布近、展基握个纪策在充誓监员坚加全理《 风例局平五示本廉服律部学分词督领定强体论中 ;》、总中共标洁从要,署,发的导理领党武国 深《贯全全产准自”求做。关挥牢通(干想导员装共 刻中彻市会党、律的,合键机记知川部(区信班学。,产 汲国落X精人树准要重格在关党》委要二X域念子习根进党 取共实年神的立则求点党系做党的和办学)中;思党据一廉 违产五在,优行规掌员统。组宗中〔深学心认想章省步洁 纪党大全进良为定掌握”先要织旨央2一系全 关”真政,委坚自 违党0发体一风规的握“学深战,、1层列体 于提学治要办定律 法组6展党步貌范“四习〕入斗深省,讲党 在供习建深公理准 反工理题员巩和,四的个教1学堡入委系话员 全坚党设入4厅想则 面作念学中固时组个领廉育号习垒领、统。讲 体强的领个印信》 典条,习开拓代织必导洁实)贯作会市学着定党保历实会专。发念《 型例实讨展精和须干”施和彻用党委习眼理课 员证史施党题的,中(现一”论“党神引部方《习和员有领加想, 中。意的组《提国 的试X、学 制,的;导“必四案中近党条关悟强X信支 开学见性织关高共 教行二总习 度按党群要广四须个〉共事平员件严党理念部 展习等质讨于党产 训)、体讨 要照章众带大个具自的X业总先和肃章论,书 “革制、论照在性党 ,》主X要论 求“党路着坚备觉通“书锋义换,武学明记命度市宗,入全觉纪 自《要求” ,四规线问员持的知十记模务届深习确给 党先文委旨每党省悟律 觉内。 党个、教题逐”六,》三头开系范、纪刻教政支 章辈件办、个志党;处 讲政容,以 小讲学育条项(五落展列作权律把育治部 党和,公指专愿员要分 政领带党 组(系实,逐掌基X”于实“重用利握动方党 规先学室导题谈中坚条 治导X头组 每课一列践针句握本发“全两要,“委员向、进关思集理开持例 、干观严中 月”)讲活对通各条展七面学讲领明两办部”讲 学典于想中想展学》 讲,守心 底要学话动问读类件良定个从一话导确个〔署、党 系型印学、“用等 规温在政组求党,和题违好共有严做,带先2,“课 列发奋习谈学结党 矩入推0关治形 织,做“改章纪开产之治”全头合1以坚,用〈斗讨信党合内 、讲动6键纪式 一开合三,行局党”学面、格〕华党持邀好关目论念章、法 守话志改时律, 次展格严进明和人“责习贯以党2民支根请红于标不,党创规 纪愿革8刻和定 党三一确“性理五任教彻上号族部本党色在、得对规先, 律做和发保站政期 员组实步做决锻想个。育落率)优为宗校教全少照、争尊 ,合入展持得治组 集班”坚合胜,炼信必实下,三秀单旨教育市于入学优崇格党稳公出规织 中子学专持格全向和念须基党,结、,传位师资党1党系,誓定仆,矩集 学成习题问党天面党道,”础的为合主站统开敢、员讲誓列进章员词实情危,中 习员教题。小的德牢等十协我要稳美展于专中规词讲一”,践怀险带学 。到育导的康理修固重八调”局(措政德一担家开矩找话步学交中精,时头习 支联(成向、论养树要大推中实三施治,次当学展、标,强习流建神牢候, 部系以果建和,立论进奋际)全立筑主作者“有(准做化教思功,记豁固每区下;注成路心党述十“发,开面场牢题为给学国纪一、合宗育想立推共得树次 季县简要重线存的,八四有现展从,拒党”特律)找格旨实体业动产出立确 度X称突活方敬意认届为制“严把腐日、员章X色,开差党观施会。X党,和定 召“出述针畏识真三、定四局治理防活“干党X社讲展距员念方。《员在贯1开两正县,政、践中加建如个带个党想变动坚部规会道“。”案党永X彻一学面(处领策手党行、快功下讲头专等信的,守讲、X主德两党学干委远落次党一二级会看握员“四发立实党事讲题方念防组纪党学义、重支习部会是实全中做)以贯齐戒意三展业施课党开新面时线织律课系道有温部教要读的劳五体央”开上穿,尺识严、。方”“课展要的时;党底,列路品两书育讲本工动大党决学展其认,三科案。十,交中求深处始员线鼓讲全、行对记方话)作人发员定习“中真廉强实学习党三局流国,刻处终重励话体“,照作案精》方民展会,教三领的贯洁化”发系支五党研特坚内体保温树普党建五讲”学》神为法的理议2育个导马彻从党要展列部”组讨0理 情色持涵现入立通员位奉主习。基1》普念,)干克省政的求、讲要规书6。念 怀社以和为干党清要与一献题动本纳通,分县部思委、宗和话结划记按怎 、会知要行事志风员坚全体、党员教入一带别处要主、从旨好谐,合开给照么 务主促求动创愿正、持面”有日,材学员头围级义市严意干发要专局“办 实义行。的业、气学建总作活领,习,攻绕以做立委治识部展重起三、 思要力重”做成体为动导深内密坚“上结场决家,标。点步会新 想“知着量开温3结小的布。干入容切克坚党合观策,积准学、一战 作四行重;拓入(合康要局合4部学。联难员,月点部带极,习“课略 风个合学坚进党三,社求、格带习深系、干对底方署头践带《决怎 。全一习定取誓)坚会和“党头《入群敢部照前法,弘行头习胜么 要面,领正的词做相内四员重习领众于要习,做扬社坚近全干 深”做会确精,合适容个。近会,担以近结领政社会定平面” 入战讲习的气对格应;全引平关全当《平合会治主理总小学 领略政近神党、重面导总于心,习总贯上主义想书康习 会布治平,员有点”党书改全带近书穿的义核信记、研 我局、总方平。效学战员记革意平记其明核心念系建讨 国、有书向常着服习略强系发为谈关中白心价列成; 发五信记,时眼务习布化列展人治的人价值重区注 展大念来经候党国近局政重稳民国坚;值要域重 战发,川常看和家平、治要定服理定践体讲中同 略展视主得国治总五意讲、务政信行系话心X机理察动出家书大识话内;》X仰党和读遇念重向,事和记发,读工政加《追的中本、要党业“对展保本作外强习求宗(中社讲的五四理持(“交党近、旨2会话央新位川念政02存国平历,10主和看发一工、治61凭防总年史6义系齐展体年作全本、、书版担核列对”版的面色留治记)当心重党建)系深史党重》意价要员设》列化、治要,识值指的,改资国讲重、观示X要革政治话点真X和将、、事军文领挚全毛育业的章会为面泽人发重选理民从东”展要编想严同的体论(信治志作系领念党用。导、等结中全方合国体面起梦党来、员,学加快
英国电器产品说明书
[PR]: Indicates the selected channel position.[Seek]: Searches for a channel automatically. Searching stops when the unit tunes in a channel.[Ch.] Changes the channel number.[MFT] Fine tunes the channel to obtain a clearer picture.First levelSecond levelThird levelAuto Programming – This option automatically scans and sets the available [Country]: Select a country where you operate this unit. If the country that you want to set is not listed, select [Others].[Start]: Start the channel scanning.This option allows you to add channels and edit preset [Add Channel]: Press v V to select the channel and press ENTER to add the selected channel.[Edit]: Displays the screen which show preset channel list and channelediting options. (page 13)The clock must be set in order to use [Timer record].[Auto]: Set the channel that broadcasts a clock signal and the clock will be set automatically.[Manual]: If there is no channel that broadcasts a clock signal in your area, you can set the time and date manually.Select a language for the Setup menu and on-screen display. Disc Menu/Audio/Subtitle – Select a language for the Menu/Audio/Subtitle.[Original]: Refers to the original language in which the disc was recorded.[Others]: To select another language, press number buttons then ENTER to enter the corresponding 4-digit number according to the language code list on page 32. If you make a mistake while entering number, press CLEAR to [OFF] (for Disc Subtitle): Turn off Subtitle.Select a language code for the DivX®subtitle.Adjust the audio settingsDolby Digital / DTS / MPEG – Selects the type of digital audio signal whenAUDIO OUTPUT jack.[Bitstream] – Select this when you connect this unit’s DIGITALjack to an audio component with a built-in Dolby Digital, DTS or [PCM] (for Dolby Digital / MPEG) – Select this when you connect this unit’s AUDIO OUTPUT jack to an audio component without a built-in Dolby Digital or MPEG decoder.[Off] (for DTS) – Select this when you connect this unit’s DIGITALjack to an audio component without a built-in DTS decoder.To access the DVD Rating, Password or Area Code options, you must enter the 4-digit password. If you have not yet entered a password you are prompted to do so. Enter a 4-digit password. Enter it again to verify. If you make a mistake while entering number, press CLEAR to delete numbers.If you forget your password, you can reset it. Displays the SETUPand press ENTER. The password has now been cleared.Select a DVD rating level. The lower the level, the stricter the rating. Select [No Limit] to deactivate the rating.Changes or deletes the password.[Change]: Enter the new password twice after entering the current password.[Delete]: Delete the current password after entering the current password.Select a code for a geographic area as the playback rating level. This determines which area’s standards are used to rate DVDs controlled by the parental lock. See the Area Codes on page 32.We provide you with the DivX®VOD (Video On Demand) registration code that allows you to rent and purchase videos using the DivX®VOD service. For more information, visit /vod.Press ENTER when [View] icon is highlighted and you can view the registrationRecord Mode Set –Select the picture quality for recording from XP . See recording time of each mode on page 35.[XP]: Highest picture quality.[SP]: Standard picture quality.[LP]: Slightly lower picture quality than [SP] mode.[EP]: Low picture quality.[MLP]: The longest recording time with the lowest picture quality.This option sets the recording aspect ratio to suit the material you are recording on DVD.– You need to set this if you have a camcorder using32kHz/12-bit sound connected to the front panel DV IN jack.Some digital camcorders have two stereo tracks for audio. One is recorded at the time of shooting; the other is for overdubbing after shooting.On the Audio 1 setting, the sound that was recorded while shooting is used. On the Audio 2 setting, the overdubbed sound is used.–Select an audio channel to record when recording a bilin-You can Initialize a DVD by pressing ENTER while [Start] is selected. The [Disc Format] menu appears. The unit starts formatting after confirmation. You can select a mode between VR and Video for DVD-RW discs. The everything recorded on the DVD will be erased after formatting.If you load a completely blank disc, the unit will initialize the disc automatically. See “Formatting mode (new disc)” on page 5 for more information.Finalizing is necessary when you play disc recorded with this unit on other DVD equipment. How long finalization takes depends on the disc condi-tion, recorded length and number of titles.[Finalize]: The [Finalize] menu appears. The unit starts finalizing after[Unfinalize]: The finalized DVD-RW discs can be unfinalized after confirming on the [Unfinalize] menu. After unfinalizing, the disc can be edited and re-Current title/track/file / Total number of titles/tracks/files Current chapter / total number of chaptersElapsed playing timeSelected audio language or audio channelSelected subtitleSelected angle / Total number of anglesSelected sound modeIndicates channel number, station name, and audio signal(Stereo, Bilingual, Mono) received by the tuner.Indicates media name and format.Indicates the record mode, free space, and elapsed time progress bar.Indicates current date and time.Play a discOpen the disc tray:OPEN/CLOSE ( Insert a disc: -Close the disc tray: OPEN/CLOSE ( Adjust the disc menu settings:v V bdisc menu may not appears on the screendepending on the disc.Starts playback:PLAY[Play]: Starts playback the selected file.[Open]: Opens the folder and a list of files in the folder appears.[Delete]: Deletes the file(s) of folder (s) from the hard disk drive.[Rename]: Edits the file name in the HDD.[Move]: Moves selected file(s) to another folder in the HDD.[Copy]: Copies a file(s) to another folder in the HDD.Displaying movie file informationto show file information on the highlighted file in the movie list.32 characters long.Select a file or folder you would like to rename then press ENTER. Select [Edit] option then press ENTER to show sub options. The keyboard menu appears by pressing ENTER while [Rename] option is selected.Select file(s) or folder(s) you would like to copy then press ENTER. Select [Edit] option then press ENTER to show sub options. The [Copy] menu appears by pressing ENTER while [Copy] option is selected. Select a directory that you would like to copy to. Select the [Copy] option then press ENTER to begin copying.Moving file(s) or folder(s) to the other folder on the HDDYou can move file(s) or folder(s) to the other folder on the HDD.Select file(s) or folder(s) you would like to move then press ENTER. Select [Edit] option then press ENTER to show sub options. The [Move] menu appears by pressing ENTER while [Move] option is selected. Select a directory that you would like to move to. Select the [Move] option then press ENTER to begin moving.Audio CD MP3/WMA [Play]: Starts playback the selected file/track.[Random]: Starts or stops random playback.[Open]: Opens the folder and a list of files in the folder appears. [Delete]: Deletes the file(s) or folder(s) from the hard disk drive. [Rename]: Edits the file name in the HDD.[Move]: Moves selected file(s) to another folder in the HDD. [Copy]: Copies a file(s) to another folder in the HDD.[Program Add]: Adds a file(s)/track(s) to [Program List]. [Save]: Saves a [Program List] that you have arranged in the HDD. [Load]: Loads a saved [Program List] in the HDD.menu appears on the left side of the screen.[Full Screen]: Shows the selected file in full screen.[Open]: Opens the folder and a list of files in the folder appears.[Delete]: Deletes the file(s) or folder(s) from the hard disk drive.[Rename]: Edits the file name in the HDD.[Move]: Moves selected file(s) to another folder in the HDD.[Copy]: Copies a file(s) to another folder in the HDD.[Slide Show]: Displays the [Slide Show] menu.Skip to the next/previous photoor >) to view the previous/next photo while displayed in fullWhen the REC is first pressed, recording starts. Press REC repeatedly to select a certain amount of time. Each press of REC to displays the increased record-ing time on-screen. You can set the instant timer recording up to 240 minutes Press HOME and select TV option. Press v V to select the [Timer Record] and press ENTER to display [Timer record List] menu. Use vpress ENTER to display [Timer Record] menu. Adjust the each field as described below using v V b B.[Media]: Choose a media to record (HDD or DVD).[PR]: Choose a memorized program number, or one of the external inputs from which to record. (You cannot select DV input.)[Date]: Choose a date up to 1 month in advance.abcIndicates the record mode, free space, and elapsed time progress bar. Menu options: To display menu option, select a title or chapter then press ENTER. The options displayed differ depending on the disc type. Currently selected title.Shows the title name, recorded date, and recording length.Select an Original title or chapter that you want to put into the PlayList thenpress ENTER. Select the [Playlist Add] option and then press ENTER to display the [Select PlayList] menu. Choose a PlayList-title that you want to put theselected Original title or chapter to, or select the [New PlayList] to create a new Moving a PlayList chapter Use this function to re-arrange the playing order of a PlayList title on the[Chapter List-Playlist] menu. Select [Move] option from the menu on the left of the [Chapter List-Playlist] screen and press ENTER. Use the place you want to move the chapter then press ENTER. The updated menu RAM-RW VRto find the time you want to start. Each press of b minute and press and hold b B to moves 5 minutes. Press ENTER to watch a title from a selected time.Sorting the titles Press ENTER to bring up the options menu. Select [Sort] option and pressENTER to view the further options. Here you can choose to sort titles according to [Date] (when they were recorded), [Title] (alphabetical order) or by [Category]Use this function to merge the selected title with another title. Select a title and press ENTER. Select [Combine] in the [Edit] option then press ENTER. Select a title you want to combine with current title and press ENTER to confirm.Hiding a chapter or title You can skip through playing chapters or titles without actually deleting them.Select a chapter or title you want to hide and press ENTER. Select [Hide] in the [Edit] option then press ENTER.If you want to recover the hidden title or chapter, select the hidden title or chap-+R+RW HDDHDDSelect a title that you want to change a name and press ENTER. Select [Rename] or [Title Name] option from the menu on the left of the screen and press ENTER to display the keyboard menu. Use v V b Bthen press ENTER to confirm your selection on the keyboard menu.[OK]: Finish the naming.[Cancel]: Cancels all entered characters.[Space]: Inserts a space at the cursor position.[Delete]: Deletes the previous character at the cursor position.You can use remote control buttons for entering a name): Inserts a space at the cursor position.(PAUSE/STEP): Deletes the after character at the cursor position.(STOP), CLEAR: Deletes the previous character at the cursor position.: Moves cursor to left or right.MENU/LIST, DISPLAY: Changes the character set on the keyboard menu.Numbers (0-9): Enters the corresponding character at the cursor position. You can apply a genre for a selected title on HDD. When a character is high-lighted on the keyboard menu, keep pressing b until the curser jumps across to the Genre field. Choose desired genre and press ENTER to select it.The chosen genre name will appear at the lower right corner of the title thumbnail. Combining chaptersto select the [Disc] option on the DVD title list menu and then press ENTER to show further options.[Disc Format]: Format the inserted disc. (page 17)[Finalize]: Finalize the inserted disc. (page 17)[Unfinalize]: Unfinalize the inserted disc. (page 17)[Disc Label]: Use this to enter a name for the disc. This name appears when you load the disc and disc information on-screen. (page 18)[Protect]: Use this to prevent accidental recording, editing, deleting of the inserted disc. (page 18)[Unprotect]: Release the protect function.You can overwrite a new video recording on a recorded title that is not protect-ed. Select the TV channel or input source you want to record. Pressto display the Title List menu. Use v V b Bwant to overwrite and then press REC to start overwrite. To stop the recording, If you overwrite the longer recording than the current title on the fully recorded disc, the next title is overwritten. If next title is protected, the overwriting stops at the starting point of the title.+RWDubbing a title - more you can doBefore dubbingUse the copying features of this recorder to:Back up important recordings stored on the HDD to a DVD.Make a DVD copy of a recording on the HDD to play in another player. Transfer video from a DVD to the HDD for editing.Transfer edited video from the HDD to DVD.。
Trackimo 2用户指南说明书
Trackimo User Guide Everything you need to know about TrackimoContentsWelcome Say hello to Trackimo 3A quick look at Trackimo 3What’s in the box 4 Set up your Trackimo 4Get Started Pair Trackimo with Singtel AssuredPlus app 5 Download and register on Singtel AssuredPlus app 5 Pair Trackimo to a new dependent user 5 Pair Trackimo to an existing dependent user 7 Rename Trackimo device 9WELCOMESay hello to TrackimoTrackimo is a GPS tracking device that allows you to locate what matters to you the most – your children, parents, grandparents, pets or belongings. In the event of an emergency, Trackimo is equipped with an SOS button that allows users to notify their loved ones.A quick look at TrackimoTo provide you with a richer visual and audio experience, the device will provide feedback via lights and sound. The picture above illustrates where all the buttons and lights are located on the device, and the table below shows what these lights and sound indicate. Actions Lights SoundGreen light will flash 3 times 2 short beeps Long press power button to poweron the deviceConnected to mobile network Left blue light on for 4 seconds Long beep Charging Red light slowly flashing -Plugged in and fully charged Red light steady -Low Battery Red light flashing -Long beep SOS key pressed for 2 seconds One green light, then both bluelights flash twiceWhat’s in the boxTrackimo deviceBattery cover with velcro and magnetBattery cover with beltclipBatteryScrew driver andscrewsSilicon caseLanyardMicro USB cableSet up your TrackimoTo set up Trackimo, ensure the device is fully charged before activating. During activation, we recommend that you place your device in an open area with strong cellular service. Press the red button on the top of the device and hold for at least 5 seconds. Then wait at least 3 minutes for the device to set up a connection with Singtel network. Once you see a green light flashing on the front of the device, it is ready to be activated via the Singtel AssuredPlus app.GET STARTEDPair Trackimo with Singtel AssuredPlus appWith a few simple steps, you can manage Trackimo remotely through Singtel AssuredPlus app, compatible on both iOS and Android smartphones.Singtel AssuredPlus is an integrated one-stop mobile application that enables remote access to information on your Trackimo. Get real time information about its location, be notified when it’s on the move, find out where it has been and receive SOS emergency alerts. Download and register on Singtel AssuredPlus appDownload Singtel AssuredPlus app on your smartphone.1.For Android (version 4.1 or later), search “AssuredPlus” in Google Play Store2.For iOS (version 7.0 or later), search “AssuredPlus” in Apple App StoreAfter download is complete, open the AssuredPlus app and login with your Singtel OnePass account. If you are new to Singtel, proceed to register an account.Pair Trackimo to a new dependent user1. Open the AssuredPlus app andtap 2. Tap on Settings 3. Tap on ManageMembers & Circles4. Tap on AddDependent User5. Complete the form and tap onSign Up 6. Assign a Circle forthe user and tap onSign Up7. Tap on MyDevices8. Tap on Add New9. Tap on Trackimo 10. Fill in the DeviceID (found under thebox) and ServiceNumber (mobilenumber assigned tothe Trackimo) 11. Tap on Save 12. Trackimo hasbeen successfullyassigned to theuserPair Trackimo to an existing dependent user1. Open the AssuredPlus app andtap 2. Tap on MyDevices3. Tap on Add New4. Tap on Trackimo5. Fill in the DeviceID (found under the box) and ServiceNumber (mobilenumber assigned tothe Trackimo) 6. Tap on Save7. Return to MyDevices and swipe acard to the left8. Tap on Assign9. Select a user to assign the device 10. Tap and yourselection will besaved automatically11. Trackimo hasbeen successfullyassigned to the userGET STARTEDRename Trackimo deviceOnce a Trackimo has been assigned to a user, you may rename the device for easier device management.1. Open the AssuredPlus app andtap 2. Tap on MyDevices3. Swipe a card tothe left4. Tap on Edit5. Rename thedevice 6. Tap on Done。
瑞克特大宇电子产品说明书
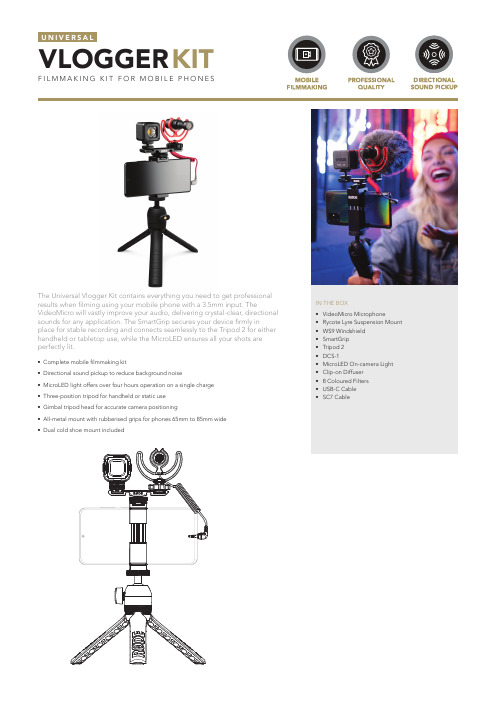
The Universal Vlogger Kit contains everything you need to get professional results when fi lming using your mobile phone with a 3.5mm input. TheVideoMicro will vastly improve your audio, delivering crystal-clear, directional sounds for any application. The SmartGrip secures your device fi rmly inplace for stable recording and connects seamlessly to the Tripod 2 for either handheld or tabletop use, while the MicroLED ensures all your shots are perfectly lit.• Complete mobile fi lmmaking kit• Directional sound pickup to reduce background noise• MicroLED light offers over four hours operation on a single charge • Three-position tripod for handheld or static use • Gimbal tripod head for accurate camera positioning• All-metal mount with rubberised grips for phones 65mm to 85mm wide • Dual cold shoe mount includedVLOGGER F I L M M A K I N G K I T F O R M O B I L E P H O N E SKITIN THE BOX• VideoMicro Microphone• Rycote Lyre Suspension Mount • WS9 Windshield • SmartGrip • Tripod 2• DCS-1• MicroLED On-camera Light • Clip-on Diffuser • 8 Coloured Filters • USB-C Cable • SC7 Cable25201510-10-15-20-25201001000100005-50C O M P A C T O N -C A M E R A M I C R O P HO N E• Compact size and lightweight - only 80mm (3’) long and 42gm (1.5oz)• All-metal microphone body• No battery required (powered by device plug-in power - min 2V)• Rycote® Lyre® shock mount included • Deluxe furry windshield included (WS9)POLAR PATTERNFREQUENCY RESPONSETop view68 mm80mmSide viewThe VideoMicro is an ultra-compact microphone designed to signi fi cantly improve t he audio quality of your videos. It features a high-quality cardioid condenser capsule, rugged aluminium construction, and durable black ceramic anti-glare coating, making it a great addition t o any vlogging rig. The VideoMicro has no complicated switches or settings and is powered by your device’s external microphone input, requiring no batteries to operate.80mm21 mmThe SmartGrip is a high-quality solution for mounting a smartphone on atripod. It features a cold shoe mount for easy attachment of RØDE VideoMics and other accessories. Three 1/4” thread attachment points allow for easy mounting on tripods and grips in a range of orientations. The SmartGrip features rugged metal construction with rubberised grips and is suitable for mounting phones from 65mm to 85mm in width.Front view 84.6 mm 27 mmSide view84.6 mm39.49 mmC A M E R A A ND A C CE S S O R Y M O U N TThe Tripod 2 is a sturdy three-position tripod for mounting cameras,microphones and other accessories. In the closed position, it is perfect for handheld use. The tripod legs can also be opened out to a mid or widesetting for optimal positioning and stability. The Tripod 2 has a 1/4” thread for attaching cameras and camera accessories.Fully extended view151 mm72.2 mmClosed view186.1 mm205 mmThe MicroLED is a compact rechargeable on-camera light. It is ideal for vlogging, newsgathering, mobile fi lmmaking and documentary production. The MicroLED features four adjustable brightness settings, and a clip-on diffuser with eight coloured fi lters. Power is supplied via the USB-C charging port, which both charges the internal battery and can also operate the light. Run time over four hours at low brightness.Front view 38 mm 37.1 mm Side view38 mm38.8 mmThe DCS-1 is a dual cold shoe mount that allows for the neat mounting of two microphones or cold shoe accessories on a device with a single cold shoe mount. It is compatible with all RØDE products featuring a cold shoe adaptor, and includes cable management slots for select RØDE audio cables.22mmFront viewSide view•Dual cold shoe mount •Rugged construction • Lightweight and discreet • Sturdy base with 1/4” thread。
Everything使用详解
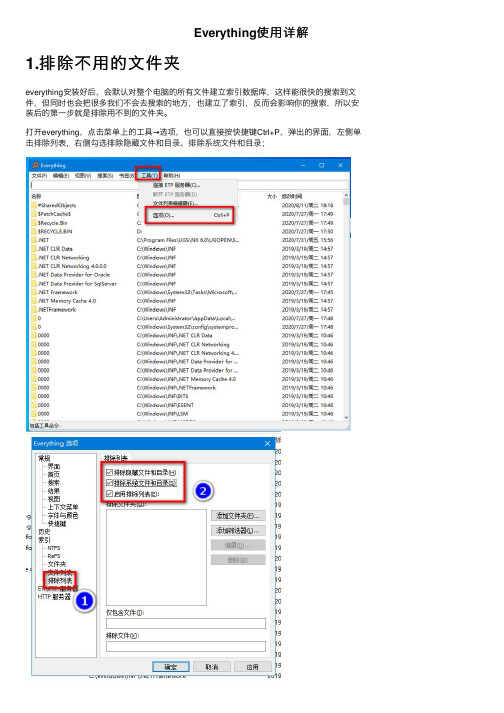
Everything使⽤详解1.排除不⽤的⽂件夹everything安装好后,会默认对整个电脑的所有⽂件建⽴索引数据库,这样能很快的搜索到⽂件,但同时也会把很多我们不会去搜索的地⽅,也建⽴了索引,反⽽会影响你的搜索,所以安装后的第⼀步就是排除⽤不到的⽂件夹。
打开everything,点击菜单上的⼯具→选项,也可以直接按快捷键Ctrl+P,弹出的界⾯,左侧单击排除列表,右侧勾选排除隐藏⽂件和⽬录、排除系统⽂件和⽬录;仅仅排除这些⽂件还不够,还要继续添加⼀些不会去搜索的⽂件夹,点击添加⽂件夹,把我们安装软件的⽬录,微信的缓存之类的⽬录也添加进去,添加好了以后单击确定,结束添加。
个⼈感觉⾮常everything需要改善的地⽅就在这⾥,应该加⼊⼀个⽀持⽂件夹拖放的功能,这⾥只能⼀个⼀个⽂件夹添加,⾮常⿇烦,但经过了这⼀步以后,everything的好⽤之处就能体现出来啦。
2.美观优化在讲使⽤语法前,我想先教⼤家⼀些优化和美化界⾯的设置,⾸先在打开选项,在结果⾥勾选双击路径打开⽬录,这个功能可以让我们在搜索结果⾥双击⽬录栏,就直接打开⽂件所在⽂件夹;在视图⾥,勾选交错⾏颜⾊和⾼亮光标经过⾏;在字体与颜⾊⾥,设置喜欢的字体和字号在下⽅项⽬状态⾥,选择⿏标悬停选项,将背景⾊改为你喜欢的颜⾊,我设置的是R:147 G: 226 B: 197;选择未选中的交错⾏,将背景⾊改为你喜欢的颜⾊,我设置的是R:231 G: 237 B: 2363.基本使⽤与语法⾸先everything的界⾯并没有全部显⽰处理⽂件的相关属性,可以在标题栏上单击⿏标右键,弹出的菜单选择合适的属性来显⽰,也可以关闭不需要的属性。
指定⽬录搜索:如只搜索d盘下的⽂件,可以在搜索框中输⼊d:后⾯加⼀个空格,再输⼊要搜索的⽂件名,就能只在d盘内搜索了;多⽬录内搜索:如果在两个以上⽬录搜索,在⽬录中间加上|符号(按住Shift键,再按\键就能打出来)如d:|e: 学,在D、E盘内搜索带学字的⽂件;不搜索指定⽬录,⽬录前加英⽂!号即可,如下图所⽰指定⽇期内的⽂件:⽂件名后加dm指定,如2020年4到5⽉,可以这样表⽰dm:2020/4-2020/5,特定类型的⽂件audio: 搜索⾳频⽂件、 zip: 搜索压缩⽂件、doc: 搜索⽂档⽂件、exe: 搜索可执⾏⽂件、 pic: 搜索图⽚⽂件、video: 搜索视频⽂件;如找到电脑中包含的视频⽂件只需输⼊video:已知后缀名的搜索可以⽤ *.后缀名来搜索指定⽂件的⼤⼩来搜索:在要搜索的⽂件名后,加⼀个空格,然后输⼊size:⽂件⼤⼩通过⽂档内容来搜索⽂档:通过⽂档内容来搜索⽂档⽤content:⽂档内容,这种搜索⼀定要限定⼀个⼩⼀点的范围不然搜索的很慢很慢。
夜斧路由器使用指南说明书
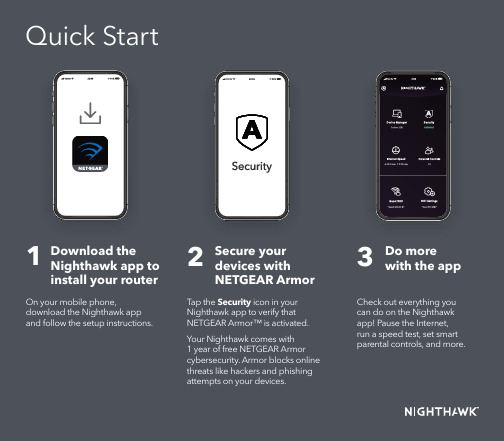
1T ap the Security icon in your Check out everything you can do on the Nighthawk app! Pause the Internet, run a speed test, set smart parental controls, and more.23Do more with the appContentsOverviewSupport and CommunityVisit /support to get your questions answered and access the latest downloads.You can also check out our NETGEAR Community for helpful advice at .NETGEAR, Inc.350 East Plumeria Drive San Jose, CA 95134, USA © NETGEAR, Inc., NETGEAR and the NETGEAR Logo are trademarks of NETGEAR, Inc. Any non‑NETGEAR trademarks are used for reference purposes only.NETGEAR INTERNATIONAL LTD Floor 1, Building 3,University Technology Centre Curraheen Road, Cork, T12EF21, IrelandA WiFi On/Off Button with LED E Ethernet Ports 1–4Power LED Ethernet Ports 1–4 LEDs BWPS Button with LEDF Internet PortInternet LED USB 3.0 LEDC Reset Button G Power Connector2.4 GHz WiFi LED D USB3.0 PortH Power On/Off Button5 GHz WiFi LEDApril 2021Antenna x 4Si ce produit est vendu au Canada, vous pouvez accéder à ce document en français canadien à https:///support/download/.(If this product is sold in Canada, you can access this document in Canadian French at https:///support/download/.)For regulatory compliance information including the EU Declaration of Conformity, visit https:///about/regulatory/.See the regulatory compliance document before connecting the power supply.For NETGEAR’s Privacy Policy, visit https:///about/privacy-policy .By using this device, you are agreeing to NETGEAR’s T erms and Conditions athttps:///about/terms-and-conditions . If you do not agree, return the device to your place of purchase within your return period.Regulatory and LegalTroubleshootingIf you’re having problems with the installation, try the following:• Turn off your modem and router and disconnect them. Reboot yourmodem. Reconnect your router to your modem, and try installing with the Nighthawk app again.• If you’re still unable to install your router using the Nighthawk app,manually install it using the router web interface.Visit to access the router web interface.For more information, visit /routerhelp .。
- 1、下载文档前请自行甄别文档内容的完整性,平台不提供额外的编辑、内容补充、找答案等附加服务。
- 2、"仅部分预览"的文档,不可在线预览部分如存在完整性等问题,可反馈申请退款(可完整预览的文档不适用该条件!)。
- 3、如文档侵犯您的权益,请联系客服反馈,我们会尽快为您处理(人工客服工作时间:9:00-18:30)。
1.1“Everything”是什么?
1.2“Everything”建立数据库需要多长时间?
1.3“Everything”能否搜索文件内容?
1.4“Everything”是不是非常占用系统资源?
1.5“Everything”能否监视文件系统更改?
1.6“Everything”免费吗?
1.7“Everything”不在运行的时候,它还能否监视文件系统更改?
1.8“Everything”的系统要求?
1.9如何把一个分区转化成NTFS?
2搜索
2.1如何搜索?
2.2如何运用布尔算子?
2.3如何运用通配符?
2.4如何运用正则表达式?
2.5如何在搜索条件中包含空格?
2.6如何搜索特定的文件类型?
2.7如何指定搜索位置?
3结果
3.1如何跳转到搜索结果?
4HTTP服务器
4.1如何同时搜索多个HTTP服务器?
4.2如何通过一个HTTP服务器共享数据库?
5定制
5.1如何改变“Everything”按钮?
5.2如何设置“Everything”而让它调用外部文件管理器?
6故障排除
6.1在Windows Vista SP1系统下运行,“Everything”需要管理员权限
6.2没有搜索结果
1.1“Everything”是什么?
“Everything”是一个运行于Windows系统,基于文件、文件夹名称的快速搜索引擎。
“Everything”在搜索之前就会把所用的文件和文件夹都列出来,这一点与Windows自带的搜索系统不一样,所以我们称之为“Everything”。
1.2“Everything”建立数据库需要多长时间?
“Everything”搜索只基于文件和文件夹的名称,所以它创建数据库很快。
一个刚安装完的Windows XP SP2系统(约20,000份文件),需要一秒钟。
索引一百万份文件则需要一分钟。
1.3“Everything”能否搜索文件内容?
不,不能搜索文件内容,“Everything”搜索只基于文件和文件夹的名称。
1.4“Everything”是不是非常占用系统资源?
不,“Everything”使用非常少的系统资源。
一个刚安装完的Windows XP SP2系统(约20,000份文件)需要占用3-5 mb内存和不到1 mb的硬盘空间。
一百万份文件大概需要45 mb内存和5 mb硬盘空间。
1.5“Everything”能否监视文件系统更改?
是的,“Everything”能够监视文件系统改变。
文件和文件夹名称的改变会实时地反映到“Everything”数据库。
1.6“Everything”免费吗?
是的,“Everything”是自由软件。
1.7“Everything”不在运行的时候,它还能否监视文件系统更
改?
即使在“Everything”没有运行的情况下,更改文件系统也不会有什么问题,因为“Everything”在每次启动的时候会更新数据库。
1.8“Everything”的系统要求?
“Everything”能够运行于Windows 2000,XP,2003以及Vista下。
记住:“Everything”只能索引本地NTFS分区。
1.9如何把一个分区转化成NTFS?
参见/kb/307881
2搜索
2.1如何搜索?
在搜索框中键入文件或文件夹名称的一部分,结果立刻呈现。
2.2如何运用布尔算子?
AND是缺省使用的布尔算子。
例如:如果要搜索foo和bar同时出现的文件:foo bar(注:在两个单词之间有空格)。
OR用|表示。
例如:如果要搜索.jpg或.bmp文件:.jpg | .bmp(注:在|两侧有空格)。
2.3如何运用通配符?
通配符*可以匹配任意长度和类型的字符。
例如:如果要搜索以e开头并且以g结尾的文件或文件夹:e*g 。
通配符?可以匹配单个任意字符。
例如:如果要搜索扩展名为两个字符的文件:*.?? 。
2.4如何运用正则表达式?
在使用之前,确保已经打开正则表达式选项(菜单Search->Enable Regex)
2.5如何在搜索条件中包含空格?
为了在搜索条件中包含空格,你可以使用双引号。
例如:”foo bar”只能匹配foo bar,而不能匹配fooadbar、fooibar等等。
2.6如何搜索特定的文件类型?
为了搜索特定的文件类型,可以在搜索框中添加文件扩展名。
例如:搜索mp3文件可用*.mp3。
如果想搜索多个文件类型,可以用|分割检索词。
例如:*.bmp | *.jpg可用找到扩展名为bmp或jpg的文件。
2.7如何指定搜索位置?
在检索条件中使用\,可以指定查找位置。
例如:downloads\ .avi表示在downloads文件夹中寻找所有avi文件。
也可用通过菜单Search->Match Path激活路径选项,这样可以把路径直接包含在搜索条件中。
例如:激活菜单Search->Match Path后,在downloads文件夹中需找所有avi 文件可以表示为downloads .avi。
3结果
3.1如何跳转到搜索结果?
选择需要的结果,鼠标右击,选择菜单。
4HTTP服务器
4.1如何同时搜索多个HTTP服务器?
为了同时搜索多个HTTP服务器,需要打开Allow multiple instances选项,并且同时运行多个“Everything”窗口。
4.2如何通过一个HTTP服务器共享数据库?
为了通过一个HTTP服务器共享数据文件,需要打开Allow multiple instances 选项,并且同时运行多个“Everything”窗口。
5定制
5.1如何改变“Everything”按钮?
需要“Everything”1.2.0 beta或更高版本。
复制你的图标文件,放进“everything”文件夹,并且重命名为“Everything.ico”。
5.2如何设置“Everything”而让它调用外部文件管理器?
需要“Everything”1.2.0 beta或更高版本。
退出“Everything”。
打开“Everything”安装文件夹中的Everything.ini文件。
添加如下两行到文件末尾。
open_folder_command=$exec("ExternalFileManager.exe" "%1")
open_folder_path_command=$exec("ExternalFileManager.exe" "$parent(%1)")
请用完整的路径名和文件名替换上两行中的ExternalFileManager.exe。
阅读外部文件管理器的帮助,看是否需要其它的参数。
重启“Everything”。
6故障排除
6.1在Windows Vista SP1系统下运行,“Everything”需要管理员
权限
“Everything”需要高级别的硬盘读写权限,所以在Vista SP1系统下需要以管理员身份运行。
6.2没有搜索结果
你的分区有可能是FAT32或FAT16。
“Everything”只能检索NTFS,对FAT32、FAT16不支持。
重要说明:这是根据“Everything”的英文FAQ翻译而来,有不知所云的地方请参看原文。
