Juniper SRX配置手册
Juniper_SRX中文配置手册簿及现用图解

前言、版本说明 (3)一、界面菜单管理 (5)2、WEB管理界面 (6)(1)Web管理界面需要浏览器支持Flash控件。
(6)(2)输入用户名密码登陆: (7)(3)仪表盘首页 (7)3、菜单目录 (10)二、接口配置 (16)1、接口静态IP (16)2、PPPoE (17)3、DHCP (18)三、路由配置 (20)1、静态路由 (20)2、动态路由 (21)四、区域设置Zone (23)五、策略配置 (25)1、策略元素定义 (25)2、防火墙策略配置 (29)3、安全防护策略 (31)六、地址转换 (32)1、源地址转换-建立地址池 (33)2、源地址转换规则设置 (35)七、VPN配置 (37)1、建立第一阶段加密建议IKE Proposal (Phase 1) (或者用默认提议) (38)2、建立第一阶段IKE策略 (39)3、建立第一阶段IKE Gateway (40)4、建立第二阶段加密提议IKE Proposal (Phase 2) (或者用默认提议) (41)5、建立第一阶段IKE策略 (42)6、建立VPN策略 (43)八、Screen防攻击 (46)九、双机 (48)十、故障诊断 (49)前言、版本说明产品:Juniper SRX240 SH版本:JUNOS Software Release [9.6R1.13]注:测试推荐使用此版本。
此版本对浏览速度、保存速度提高了一些,并且CPU占用率明显下降很多。
9.5R2.7版本(CPU持续保持在60%以上,甚至90%)9.6R1.13版本(对菜单操作或者保存配置时,仍会提升一部分CPU)一、界面菜单管理1、管理方式JuniperSRX系列防火墙出厂默认状态下,登陆用户名为root密码为空,所有接口都已开启Web管理,但无接口地址。
终端连接防火墙后,输入用户名(root)、密码(空),显示如下:rootsrx240-1%输入cli命令进入JUNOS访问模式:rootsrx240-1% clirootsrx240-1>输入configure进入JUNOS配置模式:rootsrx240-1% clirootsrx240-1> configureEntering configuration mode[edit]rootsrx240-1#防火墙至少要进行以下配置才可以正常使用:(1)设置root密码(否则无法保存配置)(2)开启ssh/telnet/http服务(3)添加用户(root权限不能作为远程telnet,可以使用SHH方式)(4)分配新的用户权限2、WEB管理界面(1)Web管理界面需要浏览器支持Flash控件。
JuniperSRX防火墙配置管理手册

Juniper SRX系列防火墙配置管理手册目录一、JUNOS操作系统介绍 (3)1.1 层次化配置结构 (3)1.2 JunOS配置管理 (4)1.3 SRX主要配置内容 (4)二、SRX防火墙配置操作举例说明 (5)2.1 初始安装 (5)2.1.1 设备登陆 (5)2.1.2 设备恢复出厂介绍 (5)2.1.3 设置root用户口令 (5)2.1.4 设置远程登陆管理用户 (6)2.1.5 远程管理SRX相关配置 (6)2.2 配置操作实验拓扑 (7)2.3 策略相关配置说明 (7)2.3.1 策略地址对象定义 (8)2.3.2 策略服务对象定义 (8)2.3.3 策略时间调度对象定义 (8)2.3.4 添加策略配置举例 (9)2.3.5 策略删除 (10)2.3.6 调整策略顺序 (10)2.3.7 策略失效与激活 (10)2.4 地址转换 (10)2.4.1 Interface based NAT 基于接口的源地址转换 (11)2.4.2 Pool based Source NAT基于地址池的源地址转换 (12)2.4.3 Pool base destination NAT基于地址池的目标地址转换 (12)2.4.4 Pool base Static NAT基于地址池的静态地址转换 (13)2.5 路由协议配置 (14)静态路由配置 (14)OSPF配置 (15)交换机Firewall限制功能 (22)限制IP地 (22)限制MAC地址 (22)三、SRX防火墙常规操作与维护 (23)3.2设备关机 (23)3.3设备重启 (23)3.4操作系统升级 (24)3.5密码恢复 (25)3.6常用监控维护命令 (26)Juniper SRX Branch系列防火墙配置管理手册说明SRX系列防火墙是Juniper公司基于JUNOS操作系统的安全系列产品,JUNOS集成了路由、交换、安全性和一系列丰富的网络服务。
Juniper SRX 防火墙配置管理手册

Juniper SRX系列防火墙配置管理手册目录一、JUNOS操作系统介绍31。
1 层次化配置结构31.2 JunOS配置管理31。
3 SRX主要配置内容4二、SRX防火墙配置操作举例说明52.1 初始安装52。
1。
1 设备登陆52.1。
2 设备恢复出厂介绍52.1。
3 设置root用户口令52.1。
4 设置远程登陆管理用户62。
1。
5 远程管理SRX相关配置62。
2 配置操作实验拓扑72.3 策略相关配置说明72.3.1 策略地址对象定义82。
3.2 策略服务对象定义82.3.3 策略时间调度对象定义82.3。
4 添加策略配置举例92.3.5 策略删除102.3。
6 调整策略顺序102.3。
7 策略失效与激活102.4 地址转换112.4.1 Interface based NAT 基于接口的源地址转换112。
4。
2 Pool based Source NAT基于地址池的源地址转换122。
4。
3 Pool base destination NAT基于地址池的目标地址转换13 2。
4。
4 Pool base Static NAT基于地址池的静态地址转换142.5 路由协议配置14静态路由配置14OSPF配置15交换机Firewall限制功能22限制IP地22限制MAC地址23三、SRX防火墙常规操作与维护233。
2设备关机233.3设备重启243。
4操作系统升级243。
5密码恢复253.6常用监控维护命令26Juniper SRX Branch系列防火墙配置管理手册说明SRX系列防火墙是Juniper公司基于JUNOS操作系统的安全系列产品,JUNOS集成了路由、交换、安全性和一系列丰富的网络服务。
目前Juniper公司的全系列路由器产品、交换机产品和SRX安全产品均采用统一源代码的JUNOS操作系统,JUNOS是全球首款将转发与控制功能相隔离,并采用模块化软件架构的网络操作系统。
JUNOS作为电信级产品的精髓是Juniper真正成功的基石,它让企业级产品同样具有电信级的不间断运营特性,更好的安全性和管理特性,JUNOS软件创新的分布式架构为高性能、高可用、高可扩展的网络奠定了基础.基于NP架构的SRX系列产品产品同时提供性能优异的防火墙、NAT、IPSEC、IPS、UTM等全系列安全功能,其安全功能主要来源于已被广泛证明的ScreenOS操作系统。
JuniperSRX高端防火墙简明配置手册

Juniper SRX防火墙简明配置手册目录一、 JUNOS 操作系统介绍 (3)1.1层次化配置结构 (3)1.2 JunOS 配置管理 (4)1.3 SRX 主要配置内容 (4)二、 SRX 防火墙配置说明 (5)2.1初始安装 (5)2.1.1登陆 (5)2.1.2设置 root 用户口令 (9)2.1.3JSRP 初始化配置 (9)2.1.4设置远程登陆管理用户 (14)2.1.5远程管理 SRX相关配置 (15)2.1.6ZONE 及相关接口的配置 (15)2.2 Policy (16)2.3 NAT (17)2.3.1Interface based NAT (18)2.3.2Pool based Source NAT (18)2.3.3Pool base destination NAT (19)2.3.4Pool base Static NAT (20)2.4 IPSEC VPN (21)2.5 Application and ALG (22)三、 SRX 防火墙常规操作与维护 (22)3.1单机设备关机 (22)3.2单机设备重启 (23)3.3单机操作系统升级 (23)3.4双机模式下主备 SRX 关机 (23)3.5双机模式下主备设备重启 (24)3.6双机模式下操作系统升级 (24)3.7双机转发平面主备切换及切换后恢复 (25)3.8双机控制平面主备切换及切换后恢复 (25)3.9双机模式下更换备SRX (25)3.10双机模式下更换主SRX (26)3.11双机模式更换电源 (27)3.12双机模式更换故障板卡 (27)3.13配置备份及还原方法 (27)3.14密码修改方法 (28)3.15磁盘文件清理方法 (28)3.16密码恢复 (28)3.17常用监控维护命令 (29)四、 SRX 防火墙介绍 (31)Juniper SRX防火墙简明配置手册SRX系列防火墙是 Juniper 公司基于 JUNOS操作系统的安全系列产品,JUNOS集成了路由、交换、安全性和一系列丰富的网络服务。
JuniperSRX中文配置手册及图解
JuniperSRX中文配置手册及图解前言、版本说明 (1)一、界面菜单管理 (3)2、WEB管理界面 (4)(1)Web管理界面需要浏览器支持Flash控件。
(4)(2)输入用户名密码登陆: (4)(3)仪表盘首页 (5)3、菜单目录 (7)二、接口配置 (12)1、接口静态IP (12)2、PPPoE (13)3、DHCP (14)三、路由配置 (16)1、静态路由 (16)2、动态路由 (16)四、区域设置Zone (18)五、策略配置 (20)1、策略元素定义 (20)2、防火墙策略配置 (22)3、安全防护策略 (25)六、地址转换 (26)1、源地址转换-建立地址池 (26)2、源地址转换规则设置 (27)七、VPN配置 (30)1、建立第一阶段加密建议IKE Proposal (Phase 1) (或者用默认提议) (30)2、建立第一阶段IKE策略 (31)3、建立第一阶段IKE Gateway (32)4、建立第二阶段加密提议IKE Proposal (Phase 2) (或者用默认提议) (33)5、建立第一阶段IKE策略 (34)6、建立VPN策略 (35)八、Screen防攻击 (38)九、双机 (39)十、故障诊断 (39)前言、版本说明产品:Juniper SRX240 SH版本:JUNOS Software Release [9.6R1.13]注:测试推荐使用此版本。
此版本对浏览速度、保存速度提高了一些,并且CPU占用率明显下降很多。
9.5R2.7版本(CPU持续保持在60%以上,甚至90%)9.6R1.13版本(对菜单操作或者保存配置时,仍会提升一部分CPU)一、界面菜单管理1、管理方式JuniperSRX系列防火墙出厂默认状态下,登陆用户名为root密码为空,所有接口都已开启Web管理,但无接口地址。
终端连接防火墙后,输入用户名(root)、密码(空),显示如下:root@srx240-1%输入cli命令进入JUNOS访问模式:root@srx240-1% cliroot@srx240-1>输入configure进入JUNOS配置模式:root@srx240-1% cliroot@srx240-1> configureEntering configuration mode[edit]root@srx240-1#防火墙至少要进行以下配置才可以正常使用:(1)设置root密码(否则无法保存配置)(2)开启ssh/telnet/http服务(3)添加用户(root权限不能作为远程telnet帐户,可以使用SHH方式)(4)分配新的用户权限2、WEB管理界面(1)Web管理界面需要浏览器支持Flash控件。
最新Juniper_SRX中文配置手册及图解

1前言、版本说明 (3)2一、界面菜单管理 (5)32、WEB管理界面 (6)4(1)Web管理界面需要浏览器支持Flash控件。
(6)5(2)输入用户名密码登陆: (6)6(3)仪表盘首页 (7)73、菜单目录 (10)8二、接口配置 (16)91、接口静态IP (16)102、PPPoE (17)113、DHCP (18)12三、路由配置 (20)131、静态路由 (20)142、动态路由 (20)15四、区域设置Zone (22)16五、策略配置 (24)171、策略元素定义 (24)182、防火墙策略配置 (27)193、安全防护策略 (29)20六、地址转换 (30)211、源地址转换-建立地址池 (31)222、源地址转换规则设置 (33)23七、VPN配置 (35)241、建立第一阶段加密建议IKE Proposal (Phase 1) (或者用默认提议) 25 (36)262、建立第一阶段IKE策略 (36)273、建立第一阶段IKE Gateway (37)284、建立第二阶段加密提议IKE Proposal (Phase 2) (或者用默认提议) 29 (38)305、建立第一阶段IKE策略 (39)316、建立VPN策略 (40)32八、Screen防攻击 (43)33九、双机 (45)34十、故障诊断 (46)353637383940414243444546前言、版本说明4748产品:Juniper SRX240 SH49版本:JUNOS Software Release [9.6R1.13]5051注:测试推荐使用此版本。
此版本对浏览速度、保存速度提高了一些,并52且CPU占用率明显下降很多。
53549.5R2.7版本(CPU持续保持在60%以上,甚至90%)55569.6R1.13版本(对菜单操作或者保存配置时,仍会提升一部分CPU)57585960616263646566676869707172737475767778798081828384858687一、界面菜单管理881、管理方式89JuniperSRX系列防火墙出厂默认状态下,登陆用户名为root密码为空,90所有接口都已开启Web管理,但无接口地址。
(完整word)13.JuniperSRX WEB 配置实验手册

SRX WEB模式实验手册前言、版本说明 (2)一、界面菜单管理 (4)2、WEB管理界面 (4)(1)Web管理界面需要浏览器支持Flash控件。
(4)(2)输入用户名密码登陆: (5)(3)仪表盘首页 (5)3、菜单目录 (7)二、接口配置 (11)1、接口静态IP (11)2、PPPoE (13)3、DHCP (13)三、路由配置 (14)1、静态路由 (14)2、动态路由 (15)四、区域设置Zone (16)五、策略配置 (17)1、策略元素定义 (17)2、防火墙策略配置 (20)3、安全防护策略 (23)六、地址转换 (23)1、源地址转换—建立地址池 (24)2、源地址转换规则设置 (25)七、VPN配置 (27)1、建立第一阶段加密建议IKE Proposal (Phase 1) (或者用默认提议). 282、建立第一阶段IKE策略 (29)3、建立第一阶段IKE Gateway (30)4、建立第二阶段加密提议IKE Proposal (Phase 2) (或者用默认提议)315、建立第一阶段IKE策略 (32)6、建立VPN策略 (32)八、Screen防攻击 (34)前言、版本说明产品:Juniper SRX240 SH版本:JUNOS Software Release [9。
6R1.13]注:测试推荐使用此版本。
此版本对浏览速度、保存速度提高了一些,并且CPU占用率明显下降很多。
9.5R2.7版本(CPU持续保持在60%以上,甚至90%)9。
6R1.13版本(对菜单操作或者保存配置时,仍会提升一部分CPU)一、界面菜单管理1、管理方式JuniperSRX系列防火墙出厂默认状态下,登陆用户名为root密码为空,所有接口都已开启Web管理,但无接口地址。
终端连接防火墙后,输入用户名(root)、密码(空),显示如下:root@srx240-1%输入cli命令进入JUNOS访问模式:root@srx240—1% cliroot@srx240—1〉输入configure进入JUNOS配置模式:root@srx240—1% cliroot@srx240-1〉 configureEntering configuration mode[edit]root@srx240-1#防火墙至少要进行以下配置才可以正常使用:(1)设置root密码(否则无法保存配置)(2)开启ssh/telnet/http服务(3)添加用户(root权限不能作为远程telnet帐户,可以使用SHH方式)(4)分配新的用户权限2、WEB管理界面(1)Web管理界面需要浏览器支持Flash控件。
(完整word版)Juniper_SRX防火墙Web配置手册

Juniper SRX防火墙配置手册1系统配置 (1)1。
1 配置ROOT帐号密码 (1)1。
2 配置用户名和密码 (2)2接口配置 (7)2。
1 IPV4地址配置 (8)2.2 接口T RUNK模式配置 (12)2。
3 接口A CCESS模式配置 (13)3VLAN配置 (14)3。
1 创建VLAN配置 (14)4路由配置 (18)4。
1 静态路由配置 (20)5自定义应用配置 (21)5。
1 自定义服务配置 (21)5。
2 应用组配置 (22)6地址组配置 (23)6。
1 地址簿配置 (23)6.2 地址组配置 (24)7日程表配置 (26)8NAT配置 (29)8.1 S TATIC NAT配置 (29)1 系统配置1.1 配置root帐号密码首次登陆设备时,需要采用console方式,登陆用户名为:root,密码为空,登陆到cli下以后,执行如下命令,设置root帐号的密码。
root# set system root—authentication plain-text—passwordroot# new password : root123root# retype new password: root123密码将以密文方式显示。
注意:必须要首先配置root帐号密码,否则后续所有配置的修改都无法提交。
SRX系列低端设备在开机后,系统会加载一个默认配置,设备的第一个接口被划分在trust 区域,配置一个ip地址192。
168.1.1,允许ping、telnet、web等管理方式,可以通过该地址登陆设备.登陆后显示页面如下:在该页面上,可以看到设备的基本情况,在左边的chassis view中可以看到端口up/down 情况,在system identification中可以看到设备序列号、设备名称、软件版本等信息,在resource utilization中可以看到cpu、menory、session、存储空间等信息,在security resources中可以看到当前的会话统计、策略数量统计等信息。
Juniper SRX防火墙配置手册-命令行模式

Juniper SRX防火墙简明配置手册目录一、JUNOS操作系统介绍 (3)1.1 层次化配置结构 (3)1.2 JunOS配置管理 (4)1.3 SRX主要配置内容 (5)二、SRX防火墙配置对照说明 (6)2.1 初始安装 (6)2.1.1 登陆 (6)2.1.2 设置root用户口令 (6)2.1.3 设置远程登陆管理用户 (7)2.1.4 远程管理SRX相关配置 (7)2.2 Policy (8)2.3 NAT (8)2.3.1 Interface based NAT (9)2.3.2 Pool based Source NAT (10)2.3.3 Pool base destination NAT (11)2.3.4 Pool base Static NAT (12)2.4 IPSEC VPN (13)2.5 Application and ALG (15)2.6 JSRP (15)三、SRX防火墙常规操作与维护 (19)3.1 设备关机 (19)3.2设备重启 (20)3.3操作系统升级 (20)3.4密码恢复 (21)3.5常用监控维护命令 (22)Juniper SRX防火墙简明配置手册SRX系列防火墙是Juniper公司基于JUNOS操作系统的安全系列产品,JUNOS集成了路由、交换、安全性和一系列丰富的网络服务。
目前Juniper公司的全系列路由器产品、交换机产品和SRX安全产品均采用统一源代码的JUNOS操作系统,JUNOS是全球首款将转发与控制功能相隔离,并采用模块化软件架构的网络操作系统。
JUNOS作为电信级产品的精髓是Juniper真正成功的基石,它让企业级产品同样具有电信级的不间断运营特性,更好的安全性和管理特性,JUNOS软件创新的分布式架构为高性能、高可用、高可扩展的网络奠定了基础。
基于NP架构的SRX系列产品产品同时提供性能优异的防火墙、NAT、IPSEC、IPS、SSL VPN和UTM等全系列安全功能,其安全功能主要来源于已被广泛证明的ScreenOS操作系统。
junipersrx防火墙配置管理手册

Juniper SRX系列防火墙配置管理手册目录一、JUNOS操作系统介绍 (3)层次化配置结构 (3)JunOS配置管理 (4)SRX主要配置内容 (4)二、SRX防火墙配置操作举例说明 (5)初始安装 (5)设备登陆 (5)设备恢复出厂介绍 (5)设置root用户口令 (5)设置远程登陆管理用户 (6)远程管理SRX相关配置 (6)配置操作实验拓扑 (7)策略相关配置说明 (7)策略地址对象定义 (8)策略服务对象定义 (8)策略时间调度对象定义 (8)添加策略配置举例 (9)策略删除 (10)调整策略顺序 (10)策略失效与激活 (10)地址转换 (10)Interface based NAT 基于接口的源地址转换 (11)Pool based Source NAT基于地址池的源地址转换 (12)Pool base destination NAT基于地址池的目标地址转换 (12)Pool base Static NAT基于地址池的静态地址转换 (13)路由协议配置 (14)静态路由配置 (14)OSPF配置 (15)交换机Firewall限制功能 (22)限制IP地 (22)限制MAC地址 (22)三、SRX防火墙常规操作与维护 (23)设备关机 (23)设备重启 (23)操作系统升级 (24)密码恢复 (24)常用监控维护命令 (25)Juniper SRX Branch系列防火墙配置管理手册说明SRX系列防火墙是Juniper公司基于JUNOS操作系统的安全系列产品,JUNOS集成了路由、交换、安全性和一系列丰富的网络服务。
目前Juniper公司的全系列路由器产品、交换机产品和SRX安全产品均采用统一源代码的JUNOS操作系统,JUNOS是全球首款将转发与控制功能相隔离,并采用模块化软件架构的网络操作系统。
JUNOS作为电信级产品的精髓是Juniper真正成功的基石,它让企业级产品同样具有电信级的不间断运营特性,更好的安全性和管理特性,JUNOS软件创新的分布式架构为高性能、高可用、高可扩展的网络奠定了基础。
Juniper_SRX防火墙简明配置手册

JUNOS 通过 set 语句进行配置,配置输入后并不会立即生效,而是作为候选配置(Candidate
第 3 页 共 17 页
Config)等待管理员提交确认,管理员通过输入 commit 命令来提交配置,配置内容在通过 SRX 语法检查后才会生效,一旦 commit 通过后当前配置即成为有效配置( Active config) 。另外, JUNOS 允 许 执 行 commit 命 令 时 要 求 管 理 员 对 提 交 的 配 置 进 行 两 次 确 认 , 如 执 行 commit confirmed 2 命令要求管理员必须在输入此命令后 2 分钟内再次输入 commit 以确认提交, 否则 2 分钟后配置将自动回退,这样可以避免远程配置变更时管理员失去对 SRX 的远程连接风险。 在执行 commit 命令前可通过配置模式下 show 命令查看当前候选配置( Candidate Config) ,在 执行 commit 后配置模式下可通过 run show config 命令查看当前有效配置(Active config) 。此外 可通过执行 show | compare 比对候选配置和有效配置的差异。 SRX 上由于配备大容量硬盘存储器,缺省按先后 commit 顺序自动保存 50 份有效配置,并可通 过执行 rolback 和 commit 命令返回到以前配置 (如 rollback 0/commit 可返回到前一 commit 配置) ; 也 可 以 直 接 通 过 执 行 save configname.conf 手 动 保 存 当 前 配 置 , 并 执 行 load override configname.conf / commit 调用前期手动保存的配置。执行 load factory-default / commit 命令可恢 复到出厂缺省配置。 SRX 可对模块化配置进行功能关闭与激活,如执行 deactivate security nat/comit 命令可使 NAT 相关配置不生效,并可通过执行 activate security nat/commit 使 NAT 配置再次生效。 SRX 通过 set 语句来配置防火墙, 通过 delete 语句来删除配置, 如 delete security nat 和 edit security nat / delete 一样,均可删除 security 防火墙层级下所有 NAT 相关配置,删除配置和 ScreenOS 不 同,配置过程中需加以留意。
Juniper_SRX配置手册
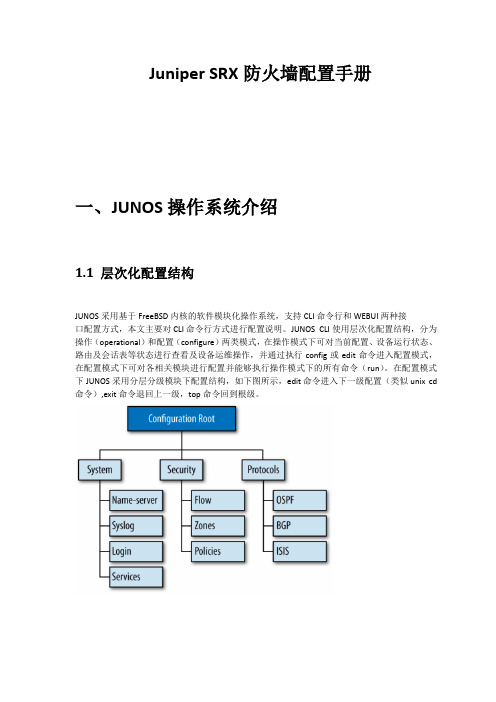
Juniper SRX防火墙配置手册一、JUNOS操作系统介绍1.1 层次化配置结构JUNOS采用基于FreeBSD内核的软件模块化操作系统,支持CLI命令行和WEBUI两种接口配置方式,本文主要对CLI命令行方式进行配置说明。
JUNOS CLI使用层次化配置结构,分为操作(operational)和配置(configure)两类模式,在操作模式下可对当前配置、设备运行状态、路由及会话表等状态进行查看及设备运维操作,并通过执行config或edit命令进入配置模式,在配置模式下可对各相关模块进行配置并能够执行操作模式下的所有命令(run)。
在配置模式下JUNOS采用分层分级模块下配置结构,如下图所示,edit命令进入下一级配置(类似unix cd 命令),exit命令退回上一级,top命令回到根级。
1.2 JunOS配置管理JUNOS通过set语句进行配置,配置输入后并不会立即生效,而是作为候选配置(Candidate Config)等待管理员提交确认,管理员通过输入commit命令来提交配置,配置内容在通过SRX 语法检查后才会生效,一旦commit通过后当前配置即成为有效配置(Active config)。
另外,JUNOS 允许执行commit命令时要求管理员对提交的配置进行两次确认,如执行commit confirmed 2命令要求管理员必须在输入此命令后2分钟内再次输入commit以确认提交,否则2分钟后配置将自动回退,这样可以避免远程配置变更时管理员失去对SRX的远程连接风险。
在执行commit命令前可通过配置模式下show命令查看当前候选配置(Candidate Config),在执行commit后配置模式下可通过run show config命令查看当前有效配置(Active config)。
此外可通过执行show | compare比对候选配置和有效配置的差异。
SRX上由于配备大容量硬盘存储器,缺省按先后commit顺序自动保存50份有效配置,并可通过执行rolback和commit命令返回到以前配置(如rollback 0/commit可返回到前一commit配置);也可以直接通过执行save configname.conf手动保存当前配置,并执行load override configname.conf / commit调用前期手动保存的配置。
Juniper SRX防火墙简明配置手册

Juniper SRX防火墙简明配置手册1.登录web管理界面工程师站网卡ip设置为10.5.241.0网段的地址,子网255.255.255.0,网线直连防火墙第一个接口,打开web浏览器输入地址10.5.241.29,输入用户名:root 密码:zaq1@WSX 点击log in如下图:2.配置接口地址点击configure-interfaces-ports-ge0/0/0-add添加ge0/0/0接口地址为10.5.241.29/24,zone选择untrust:点击configure-interfaces-ports-ge0/0/1-add添加ge0/0/1接口地址为10.56.21.29/24,zone选择trust:3.配置静态nat点击nat-staticnat-add 配置rule名称,from选择untrust,rules点击add添加静态路由,如下图:4.配置proxy点击nat-proxy-add,interface选择ge0/0/0,将映射的外网ip地址添加进来,如下图:5.配置静态路由点击Routing-StaticRouting-Add,route配置为0.0.0.0,next-hop配置为10.5.241.1(外网网关地址)6.配置zone策略点击security-zones/screens-add配置zone name为untrust,binding screen选择untrust-screen,interface in the zone选择接口ge0/0/0.0,host inbound traffic-zone里配置好允许访问的服务端口。
点击security-zones/screens-add配置zone name为trust,interface in the zone选择接口ge0/0/1.0,host inbound traffic-zone里配置好允许访问的服务端口。
Juniper_SRX配置手册之欧阳歌谷创作
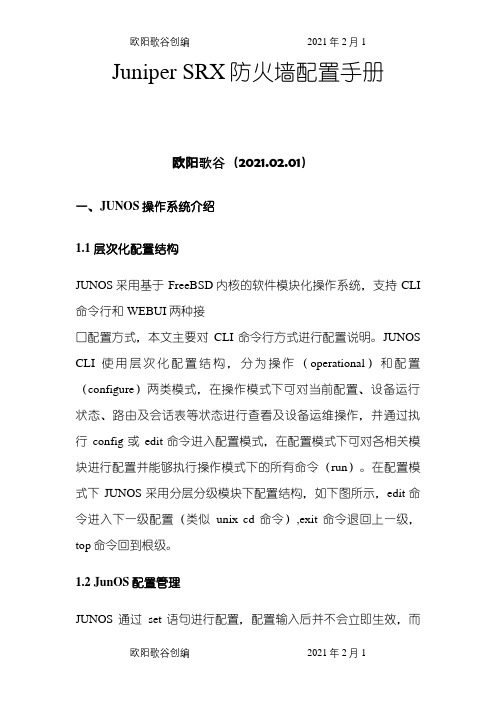
Juniper SRX防火墙配置手册欧阳歌谷(2021.02.01)一、JUNOS操作系统介绍1.1 层次化配置结构JUNOS采用基于FreeBSD内核的软件模块化操作系统,支持CLI 命令行和WEBUI两种接口配置方式,本文主要对CLI命令行方式进行配置说明。
JUNOS CLI使用层次化配置结构,分为操作(operational)和配置(configure)两类模式,在操作模式下可对当前配置、设备运行状态、路由及会话表等状态进行查看及设备运维操作,并通过执行config或edit命令进入配置模式,在配置模式下可对各相关模块进行配置并能够执行操作模式下的所有命令(run)。
在配置模式下JUNOS采用分层分级模块下配置结构,如下图所示,edit命令进入下一级配置(类似unix cd命令),exit命令退回上一级,top命令回到根级。
1.2 JunOS配置管理JUNOS通过set语句进行配置,配置输入后并不会立即生效,而是作为候选配置(CandidateConfig)等待管理员提交确认,管理员通过输入commit命令来提交配置,配置内容在通过SRX语法检查后才会生效,一旦commit通过后当前配置即成为有效配置(Active config)。
另外,JUNOS允许执行commit命令时要求管理员对提交的配置进行两次确认,如执行commit confirmed 2命令要求管理员必须在输入此命令后2分钟内再次输入commit以确认提交,否则2分钟后配置将自动回退,这样可以避免远程配置变更时管理员失去对SRX的远程连接风险。
在执行commit命令前可通过配置模式下show命令查看当前候选配置(Candidate Config),在执行commit后配置模式下可通过run show config命令查看当前有效配置(Active config)。
此外可通过执行show | compare比对候选配置和有效配置的差异。
Juniper SRX基本配置手册

Juniper SRX防火墙基本配置手册1SRX防火墙的PPPoE拔号配置Juniper SRX防火墙支持PPPoE拔号,这样防火墙能够连接ADSL链路,提供给内网用户访问网络的需求。
配置拓扑如下所示:Ge-0/0/4 via PPPoE to obtian IP addressJuniper SRX240防火墙在Juniper SRX防火墙上面设置ADSL PPPoE拔号,可以在WEB界面或者命令行下面查看PPPoE拔号接口pp0,在命令行下面的查看命令如下所示:juniper@HaoPeng# run show interfaces terse | match ppInterface Admin Link Proto Local Remotepp0 up up在WEB界面下,也能够看到PPPoE的拔号接口pp0配置步聚如下所示:第一步:选择接口ge-0/0/4作为PPPoE拔号接口的物理接口,将接口封装成PPPoETo configure PPPoE encapsulation on an Ethernet interface:juniper@HaoPeng# set interfaces ge-0/0/4 unit 0 encapsulation ppp-over-ether第二步:配置PPPoE接口PP0.0的参数To create a PPPoE interface and configure PPPoE options:user@host# set interfaces pp0 unit 0 pppoe-options underlying-interfacege-0/0/4.0 auto-reconnect 100 idle-timeout 100 client第三步:配置PPPoE接口的MTU值To configure the maximum transmission unit (MTU) of the IPv4 family:user@host# set interfaces pp0 unit 0 family inet mtu 1492第四步:配置PPPoE接口的地址为negotiate-addressTo configure the PPPoE interface address:user@host# set interfaces pp0 unit 0 family inet negotiate-address第五步:配置PPPoE接口的PAP认证set int pp0 unit 0 ppp-options pap default password 88888878 local-name ****************local-password88888878 passive注意:default password和local password都必须设置成ADSL拔号时所用的密码,local name 必须是ADSL拔号时所用的用户名。
Juniper_SRX中文配置手册及图解

前言、版本说明 (2)一、界面菜单管理 (4)2、WEB管理界面 (4)(1)Web管理界面需要浏览器支持Flash控件。
(4)(2)输入用户名密码登陆: (4)(3)仪表盘首页 (5)3、菜单目录 (7)二、接口配置 (12)1、接口静态IP (12)2、PPPoE (13)3、DHCP (14)三、路由配置 (16)1、静态路由 (16)2、动态路由 (16)四、区域设置Zone (18)五、策略配置 (20)1、策略元素定义 (20)2、防火墙策略配置 (22)3、安全防护策略 (25)六、地址转换 (26)1、源地址转换-建立地址池 (26)2、源地址转换规则设置 (27)七、VPN配置 (30)1、建立第一阶段加密建议IKE Proposal (Phase 1) (或者用默认提议) (30)2、建立第一阶段IKE策略 (31)3、建立第一阶段IKE Gateway (32)4、建立第二阶段加密提议IKE Proposal (Phase 2) (或者用默认提议) (33)5、建立第一阶段IKE策略 (34)6、建立VPN策略 (35)八、Screen防攻击 (37)九、双机 (38)十、故障诊断 (38)前言、版本说明产品:Juniper SRX240 SH版本:JUNOS Software Release [9.6R1.13]注:测试推荐使用此版本。
此版本对浏览速度、保存速度提高了一些,并且CPU占用率明显下降很多。
9.5R2.7版本(CPU持续保持在60%以上,甚至90%)9.6R1.13版本(对菜单操作或者保存配置时,仍会提升一部分CPU)一、界面菜单管理1、管理方式JuniperSRX系列防火墙出厂默认状态下,登陆用户名为root密码为空,所有接口都已开启Web管理,但无接口地址。
终端连接防火墙后,输入用户名(root)、密码(空),显示如下:root@srx240-1%输入cli命令进入JUNOS访问模式:root@srx240-1% cliroot@srx240-1>输入configure进入JUNOS配置模式:root@srx240-1% cliroot@srx240-1> configureEntering configuration mode[edit]root@srx240-1#防火墙至少要进行以下配置才可以正常使用:(1)设置root密码(否则无法保存配置)(2)开启ssh/telnet/http服务(3)添加用户(root权限不能作为远程telnet帐户,可以使用SHH方式)(4)分配新的用户权限2、WEB管理界面(1)Web管理界面需要浏览器支持Flash控件。
Juniper SRX配置手册
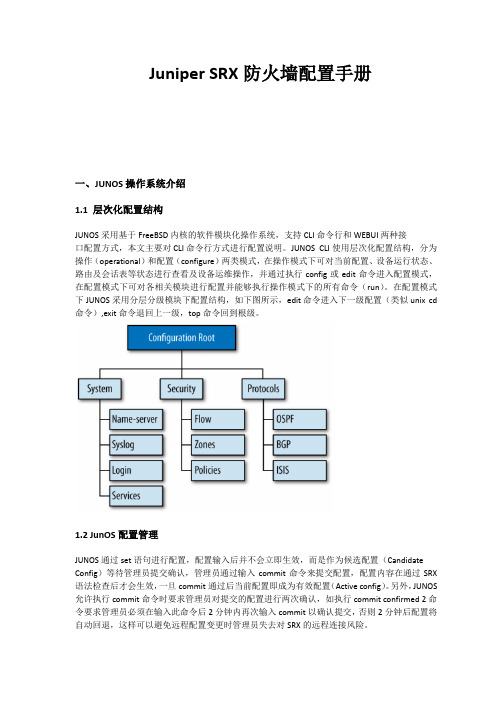
Juniper SRX防火墙配置手册一、JUNOS操作系统介绍1.1 层次化配置结构JUNOS采用基于FreeBSD内核的软件模块化操作系统,支持CLI命令行和WEBUI两种接口配置方式,本文主要对CLI命令行方式进行配置说明。
JUNOS CLI使用层次化配置结构,分为操作(operational)和配置(configure)两类模式,在操作模式下可对当前配置、设备运行状态、路由及会话表等状态进行查看及设备运维操作,并通过执行config或edit命令进入配置模式,在配置模式下可对各相关模块进行配置并能够执行操作模式下的所有命令(run)。
在配置模式下JUNOS采用分层分级模块下配置结构,如下图所示,edit命令进入下一级配置(类似unix cd 命令),exit命令退回上一级,top命令回到根级。
1.2 JunOS配置管理JUNOS通过set语句进行配置,配置输入后并不会立即生效,而是作为候选配置(Candidate Config)等待管理员提交确认,管理员通过输入commit命令来提交配置,配置内容在通过SRX 语法检查后才会生效,一旦commit通过后当前配置即成为有效配置(Active config)。
另外,JUNOS 允许执行commit命令时要求管理员对提交的配置进行两次确认,如执行commit confirmed 2命令要求管理员必须在输入此命令后2分钟内再次输入commit以确认提交,否则2分钟后配置将自动回退,这样可以避免远程配置变更时管理员失去对SRX的远程连接风险。
在执行commit命令前可通过配置模式下show命令查看当前候选配置(Candidate Config),在执行commit后配置模式下可通过run show config命令查看当前有效配置(Active config)。
此外可通过执行show | compare比对候选配置和有效配置的差异。
SRX上由于配备大容量硬盘存储器,缺省按先后commit顺序自动保存50份有效配置,并可通过执行rolback和commit命令返回到以前配置(如rollback 0/commit可返回到前一commit配置);也可以直接通过执行save configname.conf手动保存当前配置,并执行load override configname.conf / commit调用前期手动保存的配置。
JuniperSRX详细配置手册(含注释)
JuniperSRX详细配置手册(含注释)Juniper SRX标准配置第一节系统配置 (3)1.1、设备初始化 (3)1.1.1登陆 (3)1.1.2设置root用户口令 (3)1.1.3设置远程登陆管理用户 (3)2、系统管理 (4)1.2.1 选择时区 (4)1.2.2 系统时间 (4)1.2.3 DNS服务器 (5)1.2.4系统重启 (5)1.2.5 Alarm告警处理 (5)1.2.6 Root密码重置 (6)第二节网络设置 (7)2.1、Interface (7)2.1.1 PPPOE (7)2.1.2 Manual (8)2.1.3 DHCP (8)2.2、Routing (9)Static Route (9)2.3、SNMP (9)第三节高级设置 (9)3.1.1 修改服务端口 (9)3.1.2 检查硬件序列号 (9)3.1.3 内外网接口启用端口服务 (10)3.1.4 创建端口服务 (10)3.1.5 VIP端口映射 (10)3.1.6 MIP映射 (11)3.1.7禁用console口 (12)3.1.8 Juniper SRX带源ping外网默认不通,需要做源地址NAT (12)3.1.9 设置SRX管理IP (12)3.2.0 配置回退 (13)3.2.1 UTM调用 (13)3.2.2 网络访问缓慢解决 (13)第四节VPN设置 (14)4.1、点对点IPSec VPN (14)4.1.1 Route Basiced (14)4.1.2 Policy Basiced (17)4.2、Remote VPN (19)4.2.1 SRX端配置 (19)4.2.2 客户端配置 (20)第一节系统配置1.1、设备初始化1.1.1登陆首次登录需要使用Console口连接SRX,root用户登陆,密码为空login: rootPassword:--- JUNOS 9.5R1.8 built 2009-07-16 15:04:30 UTCroot% cli /***进入操作模式***/root>root> configureEntering configuration mode /***进入配置模式***/[edit]Root#1.1.2设置root用户口令(必须配置root帐号密码,否则后续所有配置及修改都无法提交)root# set system root-authentication plain-text-passwordroot# new password : root123root# retype new password: root123密码将以密文方式显示root# show system root-authenticationencrypted-password"$1$xavDeUe6$fNM6olGU.8.M7B62u05D6."; # SECRET-DATA 注意:强烈建议不要使用其它加密选项来加密root和其它user口令(如encrypted-password 加密方式),此配置参数要求输入的口令应是经加密算法加密后的字符串,采用这种加密方式手工输入时存在密码无法通过验证风险。
- 1、下载文档前请自行甄别文档内容的完整性,平台不提供额外的编辑、内容补充、找答案等附加服务。
- 2、"仅部分预览"的文档,不可在线预览部分如存在完整性等问题,可反馈申请退款(可完整预览的文档不适用该条件!)。
- 3、如文档侵犯您的权益,请联系客服反馈,我们会尽快为您处理(人工客服工作时间:9:00-18:30)。
Juniper SRX防火墙配置手册一、JUNOS操作系统介绍1.1 层次化配置结构JUNOS采用基于FreeBSD内核的软件模块化操作系统,支持CLI命令行和WEBUI两种接口配置方式,本文主要对CLI命令行方式进行配置说明。
JUNOS CLI使用层次化配置结构,分为操作(operational)和配置(configure)两类模式,在操作模式下可对当前配置、设备运行状态、路由及会话表等状态进行查看及设备运维操作,并通过执行config或edit命令进入配置模式,在配置模式下可对各相关模块进行配置并能够执行操作模式下的所有命令(run)。
在配置模式下JUNOS采用分层分级模块下配置结构,如下图所示,edit命令进入下一级配置(类似unix cd 命令),exit命令退回上一级,top命令回到根级。
1.2 JunOS配置管理JUNOS通过set语句进行配置,配置输入后并不会立即生效,而是作为候选配置(Candidate Config)等待管理员提交确认,管理员通过输入commit命令来提交配置,配置内容在通过SRX 语法检查后才会生效,一旦commit通过后当前配置即成为有效配置(Active config)。
另外,JUNOS 允许执行commit命令时要求管理员对提交的配置进行两次确认,如执行commit confirmed 2命令要求管理员必须在输入此命令后2分钟内再次输入commit以确认提交,否则2分钟后配置将自动回退,这样可以避免远程配置变更时管理员失去对SRX的远程连接风险。
在执行commit命令前可通过配置模式下show命令查看当前候选配置(Candidate Config),在执行commit后配置模式下可通过run show config命令查看当前有效配置(Active config)。
此外可通过执行show | compare比对候选配置和有效配置的差异。
SRX上由于配备大容量硬盘存储器,缺省按先后commit顺序自动保存50份有效配置,并可通过执行rolback和commit命令返回到以前配置(如rollback 0/commit可返回到前一commit配置);也可以直接通过执行save configname.conf手动保存当前配置,并执行load override configname.conf / commit调用前期手动保存的配置。
执行load factory-default / commit命令可恢复到出厂缺省配置。
SRX可对模块化配置进行功能关闭与激活,如执行deactivate security nat/comit命令可使NAT相关配置不生效,并可通过执行activate security nat/commit使NAT配置再次生效。
SRX通过set语句来配置防火墙,通过delete语句来删除配置,如delete security nat和edit security nat / delete一样,均可删除security防火墙层级下所有NAT相关配置,删除配置和ScreenOS不同,配置过程中需加以留意。
1.3 SRX主要配置内容部署SRX防火墙主要有以下几个方面需要进行配置:System:主要是系统级内容配置,如主机名、管理员账号口令及权限、时钟时区、Syslog、SNMP、系统级开放的远程管理服务(如telnet)等内容。
Interface:接口相关配置内容。
Security: 是SRX防火墙的主要配置内容,安全相关部分内容全部在Security层级下完成配置,如NAT、Zone、Policy、Address-book、Ipsec、Screen、Idp等,可简单理解为ScreenOS防火墙安全相关内容都迁移至此配置层次下,除了Application自定义服务。
Application:自定义服务单独在此进行配置,配置内容与ScreenOS基本一致。
routing-options:配置静态路由或router-id等系统全局路由属性配置。
二、SRX防火墙配置对照说明策略处理流程图2.1 初始安装2.1.1 登陆Console口(通用超级终端缺省配置)连接SRX,root用户登陆,密码为空login: rootPassword:--- JUNOS 9.5R1.8 built 2009-07-16 15:04:30 UTCroot% cli/ /进入操作模式root>root> configure //进入配置模式[edit]Root#2.1.2 设置root用户口令设置root用户口令root# set system root-authentication plain-text-passwordroot# new password : root123root# retype new password: root123[edit]root# set system login class super-user idle-timeout 3 设置当前用户超时时间密码将以密文方式显示root# show system root-authenticationencrypted-password "$1$xavDeUe6$fNM6olGU.8.M7B62u05D6."; # SECRET-DATA注意:强烈建议不要使用其它加密选项来加密root和其它user口令(如encrypted-password加密方式),此配置参数要求输入的口令应是经加密算法加密后的字符串,采用这种加密方式手工输入时存在密码无法通过验证风险。
2.1.3 设置远程登陆管理用户root# set system login user lab class super-user authentication plain-text-password //创建用户lab root# new password : lab123 //配置用户lab密码root# retype new password: lab123注:此lab用户拥有超级管理员权限,可用于console和远程管理访问,另也可自行灵活定义其它不同管理权限用户。
2.1.4 管理SRX相关配置root>show system uptime//查看时间root#run set date YYYYMMDDhhmm.ss //设置系统时钟root#set system time-zone Asia/beijing //设置时区为北京root#set system host-name SRX3400-A //设置主机名root#set system name-server 1.1.1.1 //设置DNS服务器root#set system ntp server 202.120.2.101 //设置NTP服务器root>show ntp associationsroot>show ntp status //查看NTProot>show security alg status//查看ALG状态ALG Status :DNS : EnabledFTP : EnabledH323 : EnabledMGCP : EnabledMSRPC : EnabledPPTP : EnabledRSH : EnabledRTSP : EnabledSCCP : EnabledSIP : EnabledSQL : EnabledSUNRPC : EnabledTALK : EnabledTFTP : EnabledIKE-ESP : Disabledroot#set system services ftproot#set system services telnetroot#set system services web-management http//在系统级开启ftp/telnet/http远程接入管理服务root>request system reboot //重启系统root>request system power-off // 关闭系统root>show version //查看版本信息Model: srx210bJUNOS Software Release [10.4R5.5]root>show system uptime //查看系统启动时间Current time: 2011-08-11 05:09:15 UTCSystem booted: 2011-08-11 01:12:48 UTC (03:56:27 ago)Protocols started: 2011-08-11 01:15:28 UTC (03:53:47 ago)Last configured: 2011-08-11 03:11:08 UTC (01:58:07 ago) by root5:09AM up 3:56, 1 user, load averages: 0.01, 0.02, 0.00root>Show chassis haredware//查看硬件板卡及序列号Hardware inventory:Item Version Part number Serial number DescriptionChassis AC5210AA0079 SRX210bRouting Engine REV 40 750-021778 AACN5249 RE-SRX210BFPC 0 FPCPIC 0 2x GE, 6x FE, 1x 3G Power Supply 0root> show chassis environment //查看硬件板卡当前状态Class Item Status MeasurementTemp Routing Engine OK 52 degrees C / 125 degrees F Routing Engine CPU AbsentFans SRX210 Chassis fan OK Spinning at normal speedPower Power Supply 0 OKroot>show chassis routing-engine //查看主控板(RE)资源使用及状态Routing Engine status:Temperature 52 degrees C / 125 degrees FTotal memory 512 MB Max 415 MB used ( 81 percent)Control plane memory 336 MB Max 306 MB used ( 91 percent)Data plane memory 176 MB Max 107 MB used ( 61 percent)CPU utilization:User 4 percentBackground 0 percentKernel 5 percentInterrupt 0 percentIdle 91 percentModel RE-SRX210BSerial ID AACN5249Start time 2011-08-11 01:12:47 UTCUptime 4 hours, 17 minutes, 57 secondsLast reboot reason 0x200:chassis control resetLoad averages: 1 minute 5 minute 15 minute0.09 0.05 0.01root>show system license //查看授权License usage:Licenses Licenses Licenses Expiry Feature name used installed neededax411-wlan-ap 0 2 0 permanentroot>show system processes extensive//查看系统利用率last pid: 1968; load averages: 0.01, 0.03, 0.00 up 0+04:20:28 05:32:46111 processes: 17 running, 83 sleeping, 11 waitingMem: 120M Active, 87M Inact, 231M Wired, 30M Cache, 61M Buf, 1356K FreeSwap:PID USERNAME THR PRI NICE SIZE RES STATE C TIME WCPU COMMAND 1097 root 4 76 0 194M 34836K select 0 298:05 98.44% flowd_octeon22 root 1 171 52 0K 16K RUN 0 203:47 84.96% idle: cpu024 root 1 -20 -139 0K 16K RUN 0 5:42 0.00% swi7: clock21 root 1 171 52 0K 16K RUN 1 2:21 0.00% idle: cpu15 root 1 -84 0 0K 16K rtfifo 0 1:02 0.00% rtfifo_kern_recv 1109 root 1 76 0 9724K 3796K select 0 0:46 0.00% rtlogd868 root 1 76 0 7004K 2588K select 0 0:37 0.00% eventd52 root 1 -8 0 0K 16K mdwait 0 0:34 0.00% md01085 root 1 76 0 16984K 10676K select 0 0:29 0.00% snmpd1088 root 1 76 0 14288K 4788K select 0 0:23 0.00% l2ald1090 root 2 76 0 20124K 6476K select 0 0:22 0.00% pfed1115 root 1 76 0 4180K 1104K select 0 0:19 0.00% license-check 1087 root 1 4 0 39620K 20172K kqread 0 0:15 0.00% rpd23 root 1 -40 -159 0K 16K WAIT 0 0:15 0.00% swi2: net---(more 39%)---root>monitor interface ge-0/0/0 //动态统计接口数据包转发信息Interface: ge-0/0/0.0, Enabled, Link is UpFlags: SNMP-TrapsEncapsulation: ENET2Local statistics: Current delta Input bytes: 2986416 [4121] Output bytes: 47303 [90] Input packets: 47631 [64] Output packets: 969 [1] Remote statistics:Input bytes: 94404820 (1896 bps) [6685] Output bytes: 9553700 (952 bps) [2078] Input packets: 111689 (4 pps) [50] Output packets: 59369 (2 pps) [29] Traffic statistics:Input bytes: 97391236 Output bytes: , [10806] Next='n', Quit='q' or ESC, Freeze='f', Thaw='t', Clear='c', Interface='i'root>monitor traffic interface ge-0/0/0 //动态报文抓取verbose output suppressed, use <detail> or <extensive> for full protocol decode Address resolution is ON. Use <no-resolve> to avoid any reverse lookup delay.Address resolution timeout is 4s.Listening on ge-0/0/0.0, capture size 96 bytesReverse lookup for 172.56.1.23 failed (check DNS reachability).Other reverse lookup failures will not be reported.Use <no-resolve> to avoid reverse lookups on IP addresses.05:41:02.773631 In arp who-has 172.56.1.23 tell 172.56.1.2405:41:02.783007 In arp who-has 172.56.1.21 tell 172.56.1.2405:41:02.787524 In arp who-has 172.56.6.135 tell 172.56.7.305:41:02.884849 In IPX 00000000.00:13:8f:74:bc:19.0455 > 00000000.ff:ff:ff:ff:ff:ff.0455: ipx-netbios 5005:41:03.437039 In arp who-has 172.56.7.41 tell 172.56.1.2405:41:03.509837 Out IP truncated-ip - 10 bytes missing! 172.56.3.34.55730 > .domain: 51866+[|domain]05:41:03.568547 In STP 802.1d, Config, Flags [none], bridge-id 8000.00:06:53:48:8a:80.8010, length 4305:41:03.678096 In IPX 00000000.00:13:8f:74:bc:19.0455 > 00000000.ff:ff:ff:ff:ff:ff.0455: ipx-netbios 502.1.5 接口的初始化接口说明:root% cli//进入操作模式root>root> show interfaces //查看接口状态调整输出详细程度root>show intefaces terseroot>show interfaces briefroot>show interfaces detailroot>show interfaces extensive //由上到下查看接口的信息越来越详细root>show interfaces detail | match fe-0/0/0 //使用管道符匹配特定关键字root>help reference security policy-security //查看配置参考信息root> help apropos security //帮助搜索关键字相关的操作命令root> configure //进入配置模式[edit]root#root# show interfaces //查看接口配置状态为接口配置IP地址的两种方法:set配置:root#set interfaces ge-0/0/0.0 family inet address 1.1.1.1/24 //为接口配置IP地址root#show interfaces ge-0/0/0.0 family inet //查看接口配置address 1.1.1.1./24edit 配置直接指定到某个层级:[edit ]root#edit interfaces ge-0/0/0.0 family inet //在该层级下为接口配置[edit interfaces ge-0/0/0.0 family inet]root#set address 1.1.1.1/24 //配置IP地址[edit interfaces ge-0/0/0.0 family inet]root#up //返回上一级,一层一层的退出(也可以使用exit和top退出到[edit])[edit interfaces]Root#showroot # set system syslog file monitor-log any any//创建名字为monitor-log的日志root # s et system syslog file monitor-log match "172.56.3.34" //监控接口root # monitor start monitor-log //开始监控root # monitor stop//停止监控删除配置:root#delete interfaces ge-0/0/0.0 //普通删除配置命令root#wildcard delete interfaces fe-0* //通配符匹配删除配置命令matched:fe-0/0/0matched:fe-0/0/1matched:fe-0/0/2matched:fe-0/0/3matched:fe-0/0/4matched:fe-0/0/5matched:fe-0/0/6matched:fe-0/0/7delete 8 objecgts?[yes,no](no)yes配置address-book (address-book就是为地址命名,以便调用)[edit]root# edit security zones security-zone outside // 配置outside区域address-book [edit security zones security-zone outside]root# set address-book address out-address 172.56.3.0/16 //把接口IP放入地址薄out-address [edit security zones security-zone outside]root# up[edit security zones]root#edit security-zone inside //配置inside区域address-book [edit security zones security-zone inside]root# set address-book address in-address 10.1.1.0/24 //把接口IP放入地址薄in -address [edit security zones security-zone inside]root# exit[edit security zones]root# exit配置application[edit]root# edit applications application tcp-1752//定义服务名字[edit applications application tcp-1752]root# set protocol tcp source-port 1752 destination-port 1752//定义协议及端口号[edit]root# show applicationsapplication tcp-1752 {protocol tcp;source-port 1752;destination-port 1752;配置application-set[edit]root# set applications application-set web-mgt application junos-ssh //配置应用服务集web-mgt [edit]root# set applications application-set web-mgt application junos-ping[edit]root# set applications application-set web-mgt application junos- pc-anywhere[edit]root# set applications application-set web-mgt application junos-http[edit]root# set applications application-set web-mgt application junos-ftproot# show applications //查看applications application-set web-mgt {application junos-ssh;application junos-ping;application junos-pc-anywhere;application junos-http;application junos-ftp;}替换配置:root#set interfaces ge-0/0/0.0 family inet address 1.1.1.1/24root# show interfaces ge-0/0/0ge-0/0/0 {unit 0 {family inet {address 1.1.1.1/24root#replace pattern ge-0/0/0 with ge-0/0/1 //一个接口取代另一个接口的配置root# show interfaces ge-0/0/1ge-0/0/1{unit 0 {family inet {address 1.1.1.1/24复制配置:root#set interfaces ge-0/0/0.0 family Ethernet-swithing vlanroot#copy interfaces ge-0/0/0.0 to ge-0/0/1.0 //复制接口配置配置模式下的showroot#show //查看配置root#show | display set // 查看set格式的配置set version 10.4R5.5set system time-zone asia/beijingset system root-authentication encrypted-password "$1$XyydlG84$f46l82dR8C/JHUvzFuq9o."set system name-server 202.96.134.133set system login user lab uid 2002set system login user lab class super-userset system login user lab authentication encrypted-password "$1$Y0X8gbap$GZNvirOuGhW.4ZAq4xwHF."set system services sshset system services telnetset system services web-management http interface vlan.0set system services web-management http interface ge-0/0/1.0set system services web-management http interface vlan.3set system services web-management http interface ge-0/0/0.0set system services web-management http interface fe-0/0/4.0set system services web-management https system-generated-certificateset system services web-management https interface vlan.0set system services web-management https interface ge-0/0/1.0set system syslog file nat-log any anyset system syslog file nat-log match RT_FLOW_SESSIONset system syslog file monitor-log any anyset system syslog file monitor-log match 172.56.3.34---(more)---基本提交与恢复配置命令:root#commit //最基本的提交配置命令root#show | compare //查看待提交的配置与当前运行的配置差别(+表示增加的,-表示减少的) -encrypted-password "$1$XyydlG84$f46l82dR8C/JHUvzFuq9o."; ## SECRET-DATA+ encrypted-password "$1$PRX8HyIJ$X0uFTlOJ4yn.DQYeDiHl10"; ## SECRET-DATA[edit system services web-management http]-interface [ vlan.0 ge-0/0/1.0 vlan.3 ge-0/0/0.0 fe-0/0/3.0 ];+ interface [ vlan.0 ge-0/0/1.0 vlan.3 ge-0/0/0.0 fe-0/0/4.0 ];[edit interfaces]+ fe-0/0/4 {+ unit 0 {+ family inet;+ family ethernet-switching;+ }+ }[edit security zones security-zone inside interfaces]vlan.3 { ... }+ fe-0/0/4.0 {+ host-inbound-traffic {+ system-services {+ http;+ }+ }+ }-fe-0/0/3.0 {-host-inbound-traffic {-system-services {-http;root#rollback ?/ /查看可恢复的配置(注意:使用load facroty-default命令恢复到出厂配置)Possible completions:<[Enter]> Execute this command0 2011-08-11 03:11:08 UTC by lab via cli1 2011-08-10 09:39:44 UTC by lab via cli2 2011-08-10 07:48:34 UTC by lab via cli3 2011-08-10 07:40:08 UTC by lab via cli4 2011-08-10 07:36:20 UTC by lab via cli5 2011-08-10 07:31:18 UTC by lab via cli6 2011-08-10 07:25:45 UTC by lab via cli7 2011-08-10 07:21:26 UTC by lab via cli8 2011-08-10 07:20:15 UTC by lab via cli9 2011-08-10 06:51:14 UTC by lab via cli10 2011-08-10 06:50:16 UTC by lab via cli11 2011-08-10 06:31:23 UTC by lab via cli12 2011-08-10 06:29:02 UTC by lab via cli[abort]---(more 42%)---[edit]root#rollback 4 // 恢复某一配置(注意:需要commit之后恢复配置才能生效)root#commit at “2012-01-01 18:00:00” //在某一日期或时间提交配置命令root>clear system commit //清除未被提交的配置root#commit comment “only-configuration-interfaces”//为提交的配置进行说明调换策略顺序Insert security policies from-zone zone-name to-zone zone-name policy name [before | after ] policy name配置SNMP配置系统信息(可配可不配)set snmp location lab (设备位置)setsnmpcontact"******************"(管理员联系方式)配置SNMP通讯的“团体名”(可理解为通讯密码,必须配置)set snmp community public authorization read-write在接口上启用SNMP访问(必须配置)set security zones security-zone trust interfaces ge-0/0/0.0 host-inbound-traffic system-services snmp (Please add other services as needed)访问控制(可配可不配,建议配置)set snmp community public clients 172.26.0.0/16set snmp community public clients 0.0.0.0/0 restrict2.1.6 配置安全策略图解:定义outside属于Internet,inside属于内部局域网,通过juniper访问Internet。
