智能音乐播放器用户手册2023
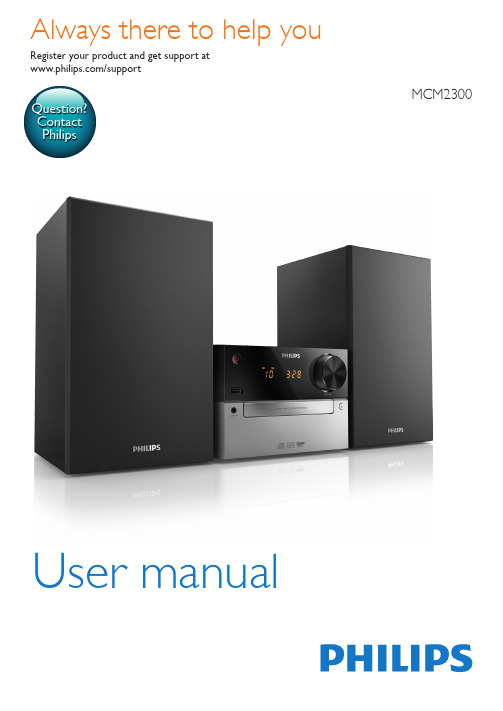
Philips MCM2300 微型音乐播放器用户手册说明书
5
10 Troubleshooting
16
Overview of the main unit
6
Overview of the remote control
7
4 Get started
8
Connect speakers
8
Connect power
8
Prepare the remote control
8
2 Notice
Any changes or modifications made to this device that are not expressly approved by Gibson Innovations may void the user’s authority to operate the equipment.
Risk of short circuit or fire! • Before you connect the product to the
power outlet, make sure that the power voltage matches the value printed on the back of the product. Never connect the product to the power outlet if the voltage is different.
Risk of injury or damage to the product! • Visible and invisible laser radiation when
open. Avoid exposure to beam. • Do not touch the disc optical lens inside
辐普电子 Philips Bluetooth 音乐播放器说明书

PhilipsMicro music systemCD, MP3-CD, USB, FMUSB port for chargingBTM2310Relax to great musicObsessed with soundListen to your smartphone tunes, stream your music library over Bluetooth and play MP3-CDs on this compact, all-in-one Philips music system. Charge all your smart devices, fromsmartphones to tablets with the built-in USB charging port.Enrich your sound experience•15W maximum output power•Digital Sound Control•Bass Reflex Speaker System delivers a powerful, deeper bassEnjoy your music from multiple sources•Wireless music streaming via Bluetooth•Play MP3-CD, CD and CD-R/RW•Audio-in for portable music playback•USB Direct for easy MP3 music playbackEasy to use•Motorized CD loader for convenience access•Digital tuning with preset stations for extra convenienceIssue date 2022-04-29Version: 3.0.712 NC: 8670 001 11798EAN: 69 59033 84805 6© 2022 Koninklijke Philips N.V.All Rights reserved.Specifications are subject to change without notice. Trademarks are the property of Koninklijke Philips N.V. or their respective HighlightsMicro music systemBluetooth® CD, MP3-CD, USB, FM, USB port for chargingSpecificationsWireless music streamingBluetooth is a short range wireless communication technology that is both robust and energy-efficient. The technology allows easy wireless connection to iPod/iPhone/iPad or other Bluetooth devices, such as smartphones, tablets or even laptops. So you can enjoy your favorite music, sound from video or game wireless on this speaker easily.USB Direct for easy MP3 musicThanks to the complete file transferability, you can easily enjoy the convenience and fun of accessing more digital music via the built-in USB Direct.Audio-inThe Audio in connectivity allows direct playback of Audio in content from portable media players.Besides the benefit of enjoying your favorite music in the superior sound quality delivered by the audio system, the Audio in is also extremely convenient as all you have to do is to plug your portable MP3 player to the audio system.Bass Reflex Speaker SystemBass Reflex Speaker System delivers a deep bass experience from a compact loudspeaker box system. It differs from a conventional loudspeaker box system in the addition of a bass pipe that isacoustically aligned to the woofer to optimize the low frequency roll-off of the system. The result is deeper controlled bass and lower distortion. The system works by resonating the air mass in the bass pipe to vibrate like a conventional woofer.Combined with the response of the woofer, the system extends the overall low frequency sounds to create a whole new dimension of deep bass.Digital Sound ControlDigital Sound Control offers you a choice of pre-set balanced, clear, powerful, warm and bright controls you can use to optimise the frequency ranges for different musical styles. Each mode uses graphic equalizing technology to automatically adjust the sound balance and enhance the most important sound frequencies in your chosen music style.Ultimately, Digital Sound Control makes it easy for you get the most out of your music by precisely adjusting the sound balance to match the type ofmusic you are playing.Sound•Sound enhancement: digital sound control •Maximum output power (RMS): 15WLoudspeakers•Speaker drivers: 3" woofer•Speaker types: bass reflex speaker systemAudio playback•Disc playback modes: fast forward/backward, next/previous track search, repeat/shuffle/program •Playback media: CD, CD-R/RW, MP3-CD, USB flash drive•USB Direct playback modes: fast backward/fast forward, play/pause, previous/next, repeat, shuffle, stopTuner/Reception/Transmission•Tuner bands: FM mono, FM stereo •Station presets: 20•Antenna: FM fixed pigtail antenna•Tuner enhancement: auto digital tuning, auto scan, Easy set (plug & play)Connectivity•USB: USB host •Audio in (3.5mm)•Bluetooth profiles: A2DPConvenience•Alarms: CD Alarm, Radio Alarm, USB alarm •Clock: On main display, sleep timer •Display type: LED display •Loader type: trayAccessories•Included accessories: AC Power Cord, FM antenna, User Manual•Remote control: 21-key remote Dimensions•Main unit width: 180 mm •Main unit height: 121 mm •Main unit depth: 247 mm•Main speaker dimensions (W x D): 150 x 125 mm •Main speaker height: 238 mm •Packaging width: 577 mm •Packaging height: 312 mm •Packaging depth: 185 mm •Gross weight: 4.67 kg •Net weight: 3.55 kgPower•Power supply: 100-240VAC, 50/60Hz。
音乐播放器使用说明书
音乐播放器使用说明书欢迎使用我们的音乐播放器!以下将详细介绍如何正确操作和使用该播放器,以便您尽快熟悉并享受音乐的美妙。
1. 音乐播放器简介我们的音乐播放器是一款功能强大、操作简单的多媒体设备,可播放各种格式的音乐文件。
其内置高保真音质解码芯片,展现出最佳的音乐享受。
2. 开机与关机在开始操作之前,确保音乐播放器已经充电完毕或已连接到电源。
长按电源按钮,直到屏幕亮起表示设备开机成功。
要关机,可以再次长按电源按钮,直到屏幕关闭,并确保将播放器断开与电源连接。
3. 音乐文件的导入将音乐文件导入播放器有两种方法:- 方法一:通过电脑连接a) 使用USB数据线连接电脑和音乐播放器。
b) 电脑识别到设备后,将音乐文件拖放到设备的音乐文件夹中。
c) 完成导入后,断开电脑与播放器的连接,即可拔掉数据线。
- 方法二:使用内置存储卡a) 将内置存储卡取出,插入读卡器中,然后将读卡器插入电脑。
b) 将音乐文件拖放到存储卡的音乐文件夹中。
c) 将存储卡重新插入音乐播放器。
4. 播放音乐在成功导入音乐文件后,您可以按以下步骤播放音乐:a) 从主界面上选择“音乐”选项。
b) 使用导航按钮选择欲播放的音乐文件,并按下确认按钮。
c) 音乐将开始播放,屏幕上将显示音乐的详细信息,如歌曲名、艺术家等。
5. 调整音量和音效- 调整音量:使用音量加减按钮可以增加或减少播放器的音量。
通过频率等按钮可以选择不同的音效模式,以便您根据个人喜好进行调整。
- 耳机模式:若您想通过耳机聆听音乐,可以将耳机插入音频插孔上,并确保音量适中,以免对听力造成伤害。
6. 播放模式和列表播放器提供多种播放模式和列表功能,以满足您的个性化需求。
您可以通过操作按钮或者触摸屏幕进行选择和切换。
7. 电池使用与充电播放器内置的锂电池能够提供长时间的续航能力。
当播放器的电量低于正常工作电压时,您可以通过将播放器连接到电源或电脑来进行充电,同时屏幕上将显示当前电池电量。
fiio+M3 Pro+产品+用户手册说明书

欢迎使用FiiO M3Pro是由飞傲出品的便携高清无损音乐播放器。
欢迎您登陆飞傲官方网站了解更多飞傲产品信息,购买相关配件。
加入飞傲论坛登陆论坛,了解最新产品动态,与飞傲工程师、用户交流飞傲产品相关话题。
加入飞傲播放器用户群676838863结识更多飞傲用户,并有客服人员在线答疑。
如您在使用过程中有任何疑问,可通过以下方式同我们联系微信公众号平台:飞傲400热线:400426826由于产品功能的不断更新,您手中的用户手册可能会与实际操作有所出入。
您可前往官网下载最新版本用户手册目录1产品简介 (4)2按键与接口使用介绍 (4)2.1按键与接口图示 (4)2.2按键与接口使用说明 (6)2.2.1电源/锁屏键 (6)2.2.2音量加键 (6)2.2.3暂停/播放键 (6)2.2.4音量减键 (6)2.2.5TF卡槽 (6)2.2.6拾音孔 (6)2.2.7USB接口 (6)2.2.83.5耳机/线路输出 (6)3.5mm耳机/线路输出接口复用,支持3段和4段耳机插入使用(不支持线控功能) (6)3页面显示介绍 (6)3.1开关机和首页 (6) (7)3.2主界面菜单及下拉框 (7)3.3锁屏时钟 (8)3.4状态栏 (9)3.5浏览文件 (9)3.6录音 (10)3.7分类播放 (11)3.7.1全部歌曲 (11)3.7.2艺术家 (11)3.7.3专辑 (11)3.7.4风格 (11)3.7.5我的最爱 (12)3.7.6播放列表 (12)3.7.7最近添加 (12)3.8更新歌曲库 (12)3.9播放设置 (13)3.9.1播放模式 (13)3.9.2记忆播放 (13)3.9.3播放间隙 (13)3.9.4最大音量 (14)3.9.5开机音量自定义 (14)3.9.6声道平衡 (14)3.9.7均衡器 (14)3.9.8文件夹跳曲 (15)3.10系统设置 (15)3.10.1背光亮度 (15)3.10.2背光时间 (15)3.10.3省电待机 (15)3.10.4睡眠待机 (16)3.10.5USB模式 (16)3.10.6录音质量 (16)3.10.7锁屏时钟 (16)3.10.8输出选择 (16)3.10.9设置时间 (17)3.10.10设置日期 (17)3.10.11Language/语言 (18)3.10.12格式化 (18)3.10.13恢复出厂设定 (18)3.10.14本机与存储信息 (19)3.11播放界面 (19)3.12批量操作 (19)3.13AB复读功能 (20)4内置试听歌曲说明 (22)5电子书 (22) (22)6计算器 (23) (23)7图库 (24)8固件升级 (24)9注意事项 (25)10常见问题解答 (25)10.1M3Pro可以用哪些电源来充电? (25)10.2M3Pro的充电电流是多少? (25)10.3M3Pro的充电时间是多久? (25)10.4M3Pro可以边充电边听歌吗? (25)10.5M3Pro可以用其它Micro USB数据线进行充电吗? (25)10.6为什么M3Pro部分台式电脑USB插座无法充电或者充电速度很慢? (25)10.7如何判断M3Pro充电的状态? (25)10.8M3Pro支持哪些操作系统拷贝歌曲? (26)10.9M3Pro支持USB的接口标准数据拷贝? (26)10.10M3Pro支持文件在电脑上的文件管理器的直接拖拽复制和删除吗? (26)10.11M3Pro联机电脑需要安装驱动吗? (26)10.12怎么知道M3Pro是否有最新的固件? (26)10.13M3Pro固件如何升级? (26)10.14升级失败会变砖吗?如果变砖怎么办? (26)10.15M3Pro支持哪些类型的卡? (26)10.16M3Pro挑卡吗? (26)10.17M3Pro支持多大容量的卡? (26)10.18如何将TF卡格式化为FAT32的格式? (26)10.19TF卡上的所有文件都不能在M3Pro上显示。
EBS-1C智能时程音乐播放器说明书

EBS-1C智能时程音乐播放器功能说明一、概述★微电脑控制,单键飞梭,图形化界面,多级菜单操作模式。
★真彩色TFT显示器,中文字幕,工作状态一目了然。
★简体中文,繁体中文,英文三种语言菜单任意切换。
真彩色3.0英寸TFT显示器★内置2GB内存,外扩展SD卡最大容量可达32G。
★支持周历定时程序和特殊日期定时程序,满足各种时间、各种场合的使用需要。
★可支持电脑联机编辑定时程序,全自动电源、广播分区管理。
★高精度Maxim RTC时钟、定时可精确到秒。
★支持消防联动功能,警报触发信号输入播放指定音乐文件。
★支持外扩电源时序器,可输出短路信号,控制外围设备。
★支持本地定点呼叫。
★支持远程MIC呼叫,并可实现定点呼叫。
★支持分区,电源快捷键控制,操作直观易用。
★可定时播放内存和SD卡节目,8路音频定时输出,3路定时电源输出口。
★强大的音乐播放功能,支持MPEG 1/2 Layer 3 、WMA、WAV、OGG、APE、FLAC等音频格式。
★强大的媒体库功能,用户可以根据自己的个性需要灵活管理自己音乐文件。
★强大的音效处理功能,支持3D,重低音,微软音效等多种音效功能。
★HiFi级的音频解码性能,音质与专业CD相媲美。
★支持高清MIC录音、LINE IN录音、FM录音。
★内置高清晰FM收音机,并支持FM节目录制,可随意录制选定的FM收音机节目。
★支持远距离可视遥控(可选)。
二、操作界面使用说明(由于机型不同布局或颜色略有不同)1.面板功能⑴电源开关:本机电源控制,上切电源开启,电源指示灯亮表示电源正常,下切则关闭电源。
⑵SD卡插槽和USB连接座:插SD卡和连接PC,传输数据。
⑶液晶显示:显示操作功能和信息⑷按键:控制本机功能操作2.按键功能.ZONE1 分区1开关按键 .ZONE5 分区5开关按键.ZONE2 分区2开关按键 .ZONE6 分区6开关按键.ZONE3 分区3开关按键 .ZONE7 分区7开关按键.ZONE4 分区4开关按键 .ZONE8 分区8开关按键.PWR 启动外置电源 .ESC 返回按键.CALL 呼叫按键 .上一曲或光标右移.AUX 外接音源输入 .下一曲或光标左移.MENU 弹出当前操作界面菜单 .■停止播放.MUTE 静音,关闭分区输出。
音乐播放器使用手册

音乐播放器使用手册1. 概述音乐播放器是一款方便用户随时欣赏音乐的应用程序。
本手册将向您介绍音乐播放器的基本功能和操作方法,帮助您快速上手并享受音乐的魅力。
2. 安装和启动2.1 下载和安装音乐播放器应用程序。
2.2 在设备上找到并点击音乐播放器图标,启动应用程序。
3. 音乐库3.1 导入音乐文件:将您喜欢的音乐文件复制到音乐播放器的音乐库文件夹中。
3.2 浏览音乐库:打开音乐播放器后,您可以在主界面上看到音乐库的内容,通过滑动屏幕可以浏览您的音乐文件。
4. 播放音乐4.1 单曲播放:点击您想要播放的音乐文件,在屏幕底部的播放控制栏中点击播放按钮,音乐将开始播放。
4.2 循环播放:在屏幕底部的播放控制栏中点击循环按钮,音乐将在播放结束后自动重新开始。
4.3 随机播放:在屏幕底部的播放控制栏中点击随机按钮,音乐将按照随机顺序进行播放。
4.4 播放列表:您可以创建和编辑播放列表,在播放控制栏中点击播放列表按钮,进行相关操作。
5. 音乐控制5.1 暂停和恢复播放:在屏幕底部的播放控制栏中点击暂停按钮,音乐将暂停播放;再次点击该按钮可以恢复播放。
5.2 快进和后退:在音乐播放过程中,您可以通过滑动屏幕上的进度条来快进或后退至特定位置。
5.3 调节音量:通过设备音量键或在屏幕底部的播放控制栏中调节音量滑块来控制音量大小。
6. 媒体库管理6.1 管理音乐文件:您可以在音乐播放器中对音乐文件进行管理,包括删除、移动和重命名等操作。
6.2 创建和编辑播放列表:您可以创建不同的播放列表,根据个人喜好对音乐文件进行分类和组织。
7. 设置和个性化7.1 音效调节:根据个人需求,您可以在设置界面中调节音效,如均衡器、重低音等。
7.2 外观主题:音乐播放器提供多种外观主题可供选择,您可以根据个人喜好进行更换。
7.3 睡眠定时:在设置界面中可设置音乐播放器在特定时间后自动停止播放,帮助您入睡。
8. 小贴士- 确保音乐文件未损坏或格式不受支持,以免造成播放问题。
2023年智能手机使用手册
2023年智能手机使用手册智能手机已经成为人们日常生活中难以分离的一部分。
随着科技的不断进步,2023年的智能手机功能更加强大、操作更加便捷。
本篇手册将为您提供关于2023年智能手机的详细使用指南和技巧,帮助您充分发挥智能手机的功能,提升您的日常生活体验。
一、设备激活与基本设置在开始使用您的2023年智能手机之前,您需要完成设备激活和基本设置。
首次开机时,按照屏幕上的引导操作完成设备的激活和连接Wi-Fi网络的设置。
接下来,您可以根据个人喜好和需求,设置屏幕亮度、音量、语言等基本参数。
还可以添加账户、设置指纹识别等功能以提高手机的安全性。
二、智能手机界面与导航2023年智能手机的界面与导航设计更加直观、简洁。
主屏幕上通常会展示时间、日期、天气等基本信息,并提供一键快捷入口至常用应用。
您可以通过滑动手势或使用导航键来浏览主屏幕和应用列表。
同时,智能手机还支持应用的多任务管理,轻松切换和关闭应用程序。
三、通信与社交媒体作为一种重要的沟通工具,2023年智能手机提供更便捷的通信方式。
您可以使用短信、彩信、语音或视频呼叫、社交网络等多种方式与他人保持联系。
此外,智能手机还支持第三方通讯软件,如微信、WhatsApp等,方便与国内外的朋友、家人和同事进行即时通讯。
四、多媒体与娱乐2023年智能手机不仅可以满足通信需求,也为用户提供了丰富的多媒体娱乐功能。
通过手机上的音乐播放器、相机和视频播放器,您可以欣赏高品质的音乐、拍摄精美的照片和录制精彩的视频。
此外,智能手机还支持在线视频、电影、电视剧的观看,为您提供无尽的娱乐选择。
五、应用与服务2023年智能手机上的应用与服务数量繁多,满足各类用户的需求。
您可以通过应用商店下载和安装各种类型的应用程序,包括社交媒体、新闻阅读、购物、健康、旅行等。
此外,智能手机还支持移动支付、语音助手等便捷的生活服务功能,帮助您更加高效地管理日常事务。
六、手机维护与保养正确的手机维护和保养可以延长手机的寿命和性能。
uMusic智能播放系统指南说明书
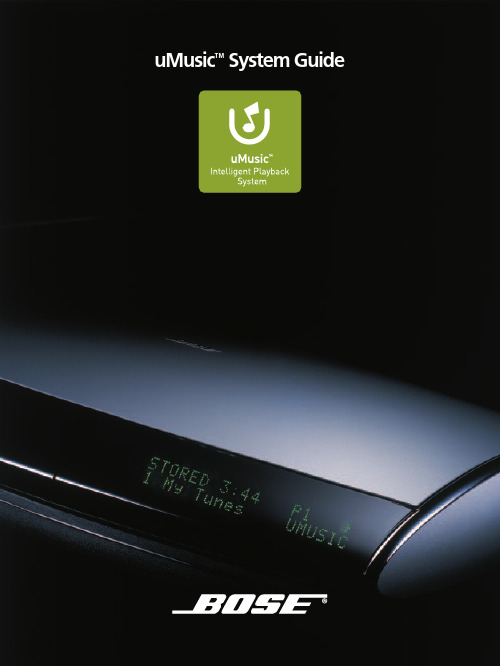
uMusic™System GuideWhat is the uMusic™intelligent playback system? The uMusic™system is a breakthrough Bose®technology that makes it easy to store and enjoy your CD collection. It’s built into Lifestyle®38 andLifestyle®48 DVD home entertainment systems.What does the uMusic system do?Stores your CDs.•Organizes and categorizes your music collection.•Discovers relationships among your songs.•Learns your likes and dislikes.•Automatically plays the music you wantwhen you want it.•Gives you many ways to enjoy your music.• Follow these steps for each CD:Press on the media center. 2. Place a CD in the tray and pressagain.3. Pressis being stored, the media center displaysSTORINGWhen STORING no longer appears on the display, you can remove the CD and repeat the process with another CD.Press on your remote. The uMusic system automaticallystarts selecting songs for2Note:T o skip a song press on this button. When you skip a song, it stops playing and the uMusic system selects a different song.uMusic™System Preset Name ModeNavigation Buttons:move through Library items and System menus.Enter:enter submenus,confirm selection of anitem.Stored:select Stored music as the audio source. Thisstarts the uMusic ™playbacksystem.System*:access System menus: change CD infor-mation; clear Playlist;name or clear Presets.Library*:browse yourstored music collection.T rack :skip this song.uMusic system: return to uMusic mode from Encore, CD#, Whole CD,Playlist.+:indicate that youreally like a song.Whole CD:play CDthat contains the songyou are listening to.Info*:see information aboutthe song now playing.Playlist:press to play thePlaylist. Press and hold toadd a song to the Playlist.CD#:play a particular CD.Press CD# and immediately enter the CD number .–:indicate dislike of asong and skip it.Encore:play music most like current song.Exit: leave System,Library or Info screen.uMusic ™System Button Quick Referencesystem can keep track of 9 different sets of pref-When you first press , theo use a different preset, pressExpress your preferences more stronglyPress –to make this song (and songs like it)less likely to play in the current preset.(Pressing –does not delete the song or com-pletely exclude it from playing in this preset.)Press +to make this song (and songs like it)more likely to play in the current preset. The effect of the–and +buttons is stronger than the effect of skipping a song or listening to it all the way through.Library*: Browse by genre, artist, album or track Press Library. A screen appears on the TV whereyou can search through your collection by genre,artist, album or track. Use the navigation buttonsto search. Y ou can also browse the Library usingthe media center display.Note:The media centerdisplays the word LIBRARY andshows two lines of informationfrom the Music L ibrary.P lay a track or CD from the LibraryWhen you find a track or album you want to hear,press Enter.The track or album plays and themedia center display says LIBRARY. When thesong or CD is done, the uMusic™system againselects songs for you.7Name a preset*A preset’s name can be up to 8 characters long.Press System.Select Media Center(top of screen).uMusic™Presets.Press Enter.Choose preset to name. Press Enter.uMusic Preset Action.Press Enter.Note: T o see screens related to features marked *, turn on your TV and select the TV input connected to your media center. See page 16 in this booklet.8Select Edit Name. Press Enter.Enter the name you want.Select Done (go to top right). Press Enter.Press Exit to leave the System screen.Clear a preset*This clears what the preset has learned about your musical taste. Y ou should clear a preset if you have been using it for one purpose or person and want to use it for another.Press System.Select Media Center(top of screen).uMusic™Presets.Press Enter.Choose preset you want to clear. Press Enter.uMusic Preset Action.Press Enter.Select Clear Ratings. Press Enter.Select Y es.Press Enter.Press Exit to leave the System screen. Note: T o see screens related to features marked *, turn on your TV and select the TV input connected to your media center. See page 16 in this booklet.Press System.Select Stored CDs.CD#.Press Enter.Choose CD number. Press Enter.(T o find the number of a CD, see page 19.)T rack.Press Enter.Choose track to delete. Press Enter.T rack Action.Press Enter.Select Delete T rack.Press Enter.Select Y es.Press Enter.Press Exit to leave the System screen. Note: T o find more information about the uMusic™ system, see page 23 in this booklet for a list of the relevant sections to read in your operating guide.Delete a CD*Press System.Select Stored CDs.CD#.Press Enter.Choose CD# to delete. Press Enter.(T o find the number of a CD, see page 19.)CD Action.Press Enter.Select Delete CD.Press Enter.Select Y es. Press Enter.Press Exit to leave the System screen.What are “Gracenote CDDB” and “All Music Guide”?+Like DislikeWhen you give a rating to a song, the Like –Dislike2. Press on your Lifestyle system begins to play3. PressNote: Y ou may want to turn off your LifestyleOn/Off – and let it process the CDs overnight. Don’t cutpower to the system, as it is needed to process the CDs.Why is the number of albums in the Library different from the number of CDs in the Stored CD menu? The Stored CD menu gives a number to each CD. The• Skip a song: Press• Go back to the previous song: Press• Fast forward: Press and hold• Reverse to an earlier point in the song: Press and hold .takes only about 10 minutes. UseJust play the DVD and followperformance specifically tailored to your room.23。
MP03 音乐播放器用户手册说明书

FEATURES
• Compressed audio playback • Supports up to 32GB USB flash and SD cards • ID3 information support • FM radio tuner • RS-232 remote control interface
Specifications
General specifications.................................................................................................................................8
03
USER MANUAL MP 03 Music Player
Operation
Remote control
Changing batteries
1. Open the battery cover
2. Insert two AAA batteries as marked inside the remote control battery compartment
5 The product should be located away from heat sources such as radiators, heat vents, or other devices that produce heat.
6 The product should be connected to a power supply that is described in the operating instructions or are marked on the product.
凌阳科技 音乐播放器 操作说明书

音乐播放器操作说明书V1.0 – 2006.01.10凌阳科技大学计划教育推广中心北京海淀上地信息产业基地中黎科技园1号楼5层TEL: 86-10-62981668 FAX: 86-10-62962425 E-mail:unsp@ http://www:版权声明凌阳科技股份有限公司保留对此文件修改之权利且不另行通知。
凌阳科技股份有限公司所提供之信息相信为正确且可靠之信息, 但并不保证本文件中绝无错误。
请于向凌阳科技股份有限公司提出订单前, 自行确定所使用之相关技术文件及规格为最新之版本。
若因贵公司使用本公司之文件或产品, 而涉及第三人之专利或著作权等智能财产权之应用及配合时, 则应由贵公司负责取得同意及授权, 本公司仅单纯贩售产品, 上述关于同意及授权, 非属本公司应为保证之责任. 又未经凌阳科技股份有限公司之正式书面许可, 本公司之所有产品不得使用于医疗器材, 维持生命系统及飞航等相关设备。
目录1 操作说明书概述 (1)1.1 功能简介 (1)1.2 电气参数 (1)1.3 注意事项 (1)2 硬件连接说明 (2)2.1 硬件框图 (2)2.2 硬件功能模块连接说明 (2)3 操作说明 (3)3.1 制作过程 (3)3.2 操作步骤 (7)4 常见问题 (8)1 操作说明书概述随着IC集成度越来越高,成本越来越低,使得MP3得到了很大的普及。
现在我们随时随地的感受着数码音乐。
本毕业方案采用凌阳科技公司的SPCE061A单片机、SPR模组与液晶1602实现一个简易的音乐盒播放器,也让我们实现数码音乐DIY。
1.1 功能简介可以实现多首音乐的播放;可以实现音乐播放的开始、暂停、停止、上一首、下一首的控制功能;在音乐播放时可以在液晶1602上显示均衡效果;具有友好的用户界面。
1.2 电气参数61板I/O口电压5V供电电源电压5.0V-5.5V1.3 注意事项电源不能接反注意接地电源提供的电压必须大于5V,否则液晶1602不能被点亮2 硬件连接说明2.1 硬件框图系统以SPCE061A为核心,可以划分为键盘(61板上自带的按键)输入、液晶LCD1602用户界面提示与均衡器效果、SPR4096资源存储与61板语音播放等部分,如下图所示。
Philips DC315 音乐播放器用户手册说明书

1 Prepare the AC power adaptor.
2 Connect one end of the AC adaptor to the DC IN socket on the main unit.
3 Connect the other end of the AC
b
adaptor to the wall outlet.
Stop alarm ring
1 When the alarm rings, press the corresponding ALM 1 or ALM 2. » The alarm stops but the alarm settings remain.
A Play from iPod/iPhone
B Set the alarm timer
1 Ensure that you have set the clock correctly.
2 Press and hold ALM 1 or ALM 2 for 2 seconds. » or and hour digits begin to blink.
© Royal Philips Electronics N.V. 2009 All rights reserved.
Specifications are subject to change without notice. Trademarks are the property of Koninklijke Philips Electronics N.V. or their respective owners.
2 Setup
23 Enjoy
Repeat alarm
1 When the alarm rings, press REPEAT ALARM/ BRIGHTNESS CONTROL. » The alarm repeats ringing minutes later.
Helios EB-100数字音乐播放器手机平板电脑用户手册说明书

L M SPlease choose the correct earbud sizefor your own ear canalAfter insertion in your ear, manually adjust the position of thePairing(Press and hold the button forabout 2 seconds until the lightflashes red and blue intermittently.)Functional Buttons(Flashing blue lights indicate//97m m324m mF r o n tB a c k(It is charging when theblue light flashes. )Put the earbuds in the correct position in thecase. LED light indicators will show the relativecharge level for the charging case.Each light is about 25% power. SoOne light = 25% charge,Two lights = 50% charge,Three lights = 75%Four lights = 100% chargeWhen all four LED lights are solid blue and no longer flash,it indicates full charge.)(It is chargingFCC STATEMENT:This device complies with Part15of the FCC Rules.Operation is subject to the following two conditions:(1)This device may not cause harmful interference,and(2)This device must accept any interference received,including interference that may cause undesired operation.Warning:Changes or modifications not expressly approved by the party responsible for compliance could void the user's authority to operate the equipment.NOTE:This equipment has been tested and found to comply with the limits for a Class B digital device,pursuant to Part15of the FCC Rules.These limits are designed to provide reasonable protection against harmful interference in a residential installation.This equipment generates uses and can radiate radio frequency energy and,if not installed and used in accordance with the instructions,may cause harmful interference to radio communications.However,there is no guarantee that interference will not occur in a particular installation.If this equipment does cause harmful interference to radio or television reception,which can be determined by turning the equipment off and on,the user is encouraged to try to correct the interference by one or more of the following measures: Reorient or relocate the receiving antenna. Increase the separation between the equipment and receiver. Connect the equipment into an outlet on a circuit different from that to which the receiver is connected. Consult the dealer or an experienced radio/TV technician for help.RF warning statement:The device has been evaluated to meet general RF exposure requirement.The device can be used in portable exposure condition without restriction.。
MP3智能音乐播放系统6区说明书(内页)
※系统概述:M P3智能音乐播放系统:采用世界最先进的微电脑控制、M P3、F L A S H录音技术。
将广播自动播放、音源选播、录音下载/音频和麦克风录音存储等先进功能综合为一体。
高标准的产品定位,多功能的超前设计,成为广播设备的典范之精品,达到国内领先水平。
广泛适用于校园自动广播音乐打铃、外语广播教学听力考试系统。
※综合功能:M P3自动广播、智能分区广播、日常教学广播、消防紧急广播、背景音乐播放、外语教学及听力考试广播功能。
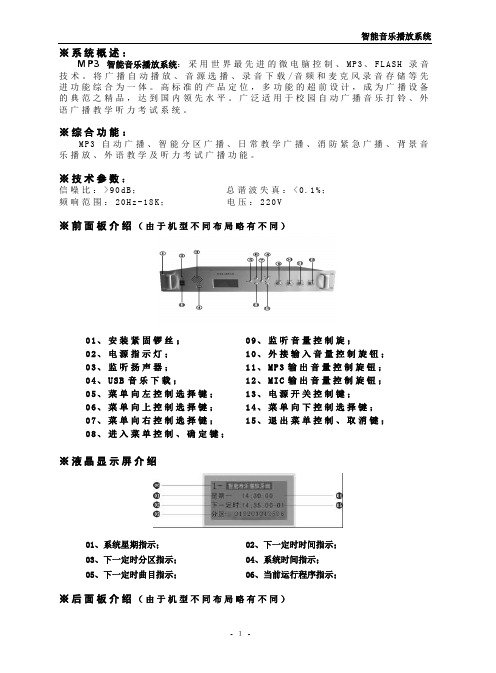
※技术参数:信噪比:>90d B;总谐波失真:<0.1%;频响范围:20H z-18K;电压:220V※前面板介绍(由于机型不同布局略有不同)01、安装紧固锣丝;02、电源指示灯;03、监听扬声器;04、U S B音乐下载;05、菜单向左控制选择键;06、菜单向上控制选择键;07、菜单向右控制选择键;08、进入菜单控制、确定键;09、监听音量控制旋;10、外接输入音量控制旋钮;11、M P3输出音量控制旋钮;12、M I C输出音量控制旋钮;13、电源开关控制键;14、菜单向下控制选择键;15、退出菜单控制、取消键;※液晶显示屏介绍01、系统星期指示;03、下一定时分区指示;05、下一定时曲目指示;02、下一定时时间指示;04、系统时间指示;06、当前运行程序指示;※后面板介绍(由于机型不同布局略有不同)- 1-2注:(短路输入端囗: 当这个端囗有短路信号输入时,本机会立刻播放你放在內存里SP A 文件夹内的一首曲目,SP A 这文件夹內只能放一首要紧急报警用的歌曲,其它需要定时播放的歌曲要放在SPA 文件夹外面,如歌曲的路径放错则定时播放将不执行。
短路输出端囗: 这个端囗与功放电源和分区的动作同步,即当有定时点到时,这端囗即短路,当定时歌曲放完即断开,这端囗作用是用于控制电源时序器接多台功放之用。
※设备连接图(由于机型不同布局略有不同)※键盘锁01、天线; 03、mic 孔; 05、分区接线座; 07、220v 电源接线座;02、音频输入输出插孔; 04、短路输入输出紧急报警接口; 06、电源输出接线座;本系统有两种控制方式手动控制和自动控制,在系统上电时进入自动控制方式(显示屏的右上角出现上锁符号),如果直接按确定键,或按住“退出”键2秒左右,上锁符号消失,这时系统进入手动控制方式,键盘的其它按键有效,用户可以随心所欲操作本系统。
Philips Streamium NP3300 12 无线网络音乐播放器用户说明书

Philips Streamium Wireless music playerNP3300Enjoy thousands of Internet radio & online musicObsessed with soundPut the verve back into music and get CD-quality sound from Internet radio with FullSound. This Philips NP3300/12 Network music system also plays music wirelessly from PC/Mac, handing you control on its color screen or via a smartphone app.Unlimited listening pleasure - wirelessly•Tune in and explore thousands of Internet radio stations •Wireless stream music and photos from your PC/MAC•Stream and enjoy over 10 million great songs from Napster*Easy navigation and control •View album art in full color•Turn your Smartphone into a remote for Philips AV products Ready to connect•Works with home broadband connection and Wi-Fi router Quality sound performance•FullSound enriches your music with fuller bass and clarity •Stereo sound system for better music enjoymentHighlightsWireless stream music & photosYour PC/ MAC is filled with music that you can now conveniently stream onto your Philips audio device – without messy cables. Share your favorite songs with others at a party, or simply enjoy them at the comfort of your home. Do the same for your photo collections, and view them at leisure while you listen to music. Unlock your PC/ MAC treasures with the convenience of wireless streaming.Napster online music library*Get all the music you ever want with Napster - an online music service that offers you over 10 million tracks from 790,000 artists, 980,000 albums and all genres. Access to Napster is made effortless with the Philips micro system, thanks to the icon-based LCD display panel,and gives you all the music you want - quickly and easily. With just a few clicks, Napster's vast library is freed from your PC or MAC, and streamed wirelessly for you to enjoy on the Philips system. Change the way you listen to music now.Internet radio stationsStreamium comes with thousands of Internet radio stations. Now you can stay abreast of all kind of music worldwide. Connect your Streamium to the Internet and listen to your favorite online programs without having to turn on your PC/MAC.FullSoundPhilips' innovative FullSound technologyfaithfully restores sonic details to compressedmusic, dramatically enriching and enhancing it, so you can experience music without any distortion. Based on an audio post-processing algorithm, FullSound combines Philips'renowned expertise in music reproduction with the power of the latest generation Digital Signal Processor (DSP). The result is fuller bass with more depth and impact, boosted voice and instrument clarity, and rich detail.Rediscover your compressed music in true-to-life sound that will touch your soul and move your feet.MyRemote appThe Philips MyRemote app lets you use your iPhone, iPod Touch or Android Smartphone as a remote to control your Philips networked AV products. The app automatically recognizes your Philips Blu-ray player, Home theater or Streamium audio system connected to your home Wi-Fi network, and gives you instant control over the devices from anywhere in your home. And if you have more than one Philips networked AV product, the app will allow you to switch between them and control each one independently. This free app iscreated exclusively by Philips.Issue date 2022-06-03 Version: 3.0.712 NC: 8670 000 78755 EAN: 87 12581 60961 0© 2022 Koninklijke Philips N.V.All Rights reserved.Specifications are subject to change without notice. Trademarks are the property of Koninklijke Philips N.V. or their respective owners.SpecificationsSound•Equalizer settings: Neutral•Sound Enhancement: Treble and Bass Control •Volume Control: up/down•Type: FullSound•Music Power:3 WAudio Playback•Compression format: MP3, WMA, non DRM AAC (m4A), eAAC+, FLAC•Sample frequencies: 8-48 kHz (MP3)•PC Link playback mode: MP3 streaming via network, Wi-Fi wireless connection•ID3-tag support•Internet Radio•MP3 bit rates: 8-320kpbs and VBR Connectivity•Wireless connection: Wireless LAN (802.11n), Wireless LAN(802.11g), Wireless LAN(802.11b)•Wireless Universal Plug & Play: UPnP client •LAN wired: Ethernet (RJ 45) 1x•Encryption / security: WEP 128 bit, WEP 64 bit, WPA, WPS-PBC, WPS-PIN, WPA2•Headphone: 3.5 mmStill Picture Playback•On-device display: Streaming from PC •Picture Compression Format: JPEG Convenience•Display Type: LCD•Backlight•Backlight color: White •On-Screen Display languages: English, Dutch,French, German, Italian, Spanish, Portuguese,Swedish, Russian•Eco Power Standby: 0.5 watt•Headphone jack•Signal strength indication•Clock: On main display, Internet time•Alarms: Buzzer Alarm, Sleep timer, Music Alarm(UPnP)•Display Enhancements: Brightness Control, Touchscreen control•Indications: DIM modeAccessories•Included accessories: World Wide Warrantyleaflet•Remote control: 1-way Remote•Batteries: 2x AAA•User Manual: English, French, German, Spanish,Italian, Dutch, Norwegian, Swedish, Finnish,Portuguese, Danish, Russian, Polish (in CD)•CD-ROM:CD-ROM with TwonkyMedia and usermanuals•Warranty Card: Warranty Card•AC/DC Adaptor: 110-240V•Quick start guideDimensions•Product dimensions (WxDxH): 253x103x102mm•Set weight: 0.78 kgLoudspeakers•Built-in speakers: 2•Loudspeaker types: Integrated*Napster is available only in Germany and the United Kingdom.。
音乐播放器操作手册

音乐播放器操作手册一、前言二、功能介绍2.1 播放音乐2.2 音乐管理2.2.1 添加音乐2.2.2 删除音乐2.2.3 编辑音乐信息2.3 播放模式2.3.1 顺序播放2.3.2 随机播放2.3.3 单曲循环2.4 播放列表2.4.1 创建播放列表2.4.2 添加音乐到播放列表2.4.3 删除播放列表2.4.4 编辑播放列表三、详细操作步骤3.1 播放音乐3.1.1 打开音乐播放器3.1.2 选择要播放的音乐3.1.3 点击播放按钮开始播放音乐3.1.4 点击暂停按钮暂停音乐播放3.1.5 点击停止按钮停止音乐播放3.2 添加音乐3.2.1 点击添加音乐按钮进入添加音乐页面 3.2.2 选择要添加的音乐文件3.2.3 点击确认按钮完成音乐添加3.3 删除音乐3.3.1 在音乐列表中选中要删除的音乐3.3.2 点击删除按钮删除音乐3.3.3 确认删除操作3.4 编辑音乐信息3.4.1 在音乐列表中选中要编辑的音乐3.4.2 点击编辑按钮进入编辑音乐信息页面 3.4.3 修改音乐信息3.4.4 点击确认按钮完成编辑操作3.5 选择播放模式3.5.1 点击播放模式切换按钮3.5.2 选择顺序播放、随机播放或单曲循环 3.5.3 确认选择播放模式3.6 创建播放列表3.6.1 点击新建播放列表按钮3.6.2 输入播放列表名称3.6.3 点击确认按钮完成播放列表创建3.7 添加音乐到播放列表3.7.1 在音乐列表中选中要添加的音乐3.7.2 点击添加到播放列表按钮3.7.3 选择要添加的播放列表3.7.4 确认添加操作3.8 删除播放列表3.8.1 在播放列表中选中要删除的播放列表 3.8.2 点击删除播放列表按钮3.8.3 确认删除操作3.9 编辑播放列表3.9.1 在播放列表中选中要编辑的播放列表 3.9.2 点击编辑播放列表按钮3.9.3 修改播放列表名称3.9.4 确认编辑操作四、附录4.1 常见问题解答4.2 联系我们。
MPMan数码音乐播放器使用指南与技术参考手册说明书

ALL rights reservedCopyright 1997-2002 , Inc.Under the copyright laws, neither the documentation nor the software may be copied, photocopied, reproduced, translated, or reduced to any electronic medium or machine-readable form, in whole or in part, without the prior written consent of , Inc.Note that the contents of this manual are subject to change without any notice to improve the product’s features.Please refer to the MPMan®URL for the updated information.Registered trademarksMPMan®is a registered trademark of , Inc.Microsoft, Windows 98, Windows 98 SE, Windows ME, Windows 2000 and Windows XP are registered trademarks of Microsoft Corporation.Except registered trademark, other trademarks like company name or product name are concerned of the owner of the registered trademark.Chapter 1Preparation before Use1. System Requirements2. Contents3. Precautions4. Inserting A Battery5. Using the Battery Compartment& Battery Status6. MMC/SD Card InsertManager Software Installation andPlayer Connection1. Installation of Manager Software (USB Driver) • Installing Under Windows 98/ME/2000 Operating System• Installing Under Windows XP Operating System 2. Connecting the MPMan Player and PC 3. Setting the USB Controller in CMOS BIOSChapter 2ENGLISH6.connected to player, and starts “Hardware Add-on Wizard”.automatically installed.7.If the driver installation is successful, “MPMan F70 USB Driver” will be shown in “Control panel/System/Device Manager/Universal Serial Bus (USB) Controller”.�Note!If the USB cable is separated from the MPMan player, “MPMan F70 USB Driver” disappears. If USB cable is connected, it appears again�Note!For Windows 2000, you can check from “Control panel/System/Hardware/Device Manager/Universal Serial Bus (USB) Controller”.�Note!support USB devices.contact your PC supplier to get the BIOS upgrade information.in CMOS BIOS” section.7.Select “Search for the best driver in these locations” and “Include this location in the search” items.Then, click the “Browse” button.8.From “Browse For Folder”, select “Driver_XP”folder in the CD-ROM drive.Then, click the “OK” button.9.Now, the “Include this location in the search”item contains the path of the Driver_XP folder.Click the “Next” button.13.Please wait while the drivers for the MPMan player are installed.14.Installation of the drivers is completed.Click the “Finish” button.15.If the driver installation is successful, “MPMan F70 USB Driver” will be shown in “Control panel/Printer and Other Hardware/System/Device Manager/Universal Serial Bus (USB)Controller”.�Note!If the USB cable is separated from the MPMan player, “MPMan F70 USB Driver” disappears.If USB cable is connected, it appears again181.How to Use Manager▶Before starting the Manager ProgramTurn off the power on the player and connect the USB cable to the player.The LCD display screen on the player will show “- USB connect -”.�Note!Don’t connect or disconnect the USB cable while Manager is running.After closing the Manager software, connect or disconnect the USB cable.▶To Start ManagerDouble-click the MPMan-F70 icon Windows on the desktop, or select the “/Start/Program/MPMan-F70/” MPMan-F70 menu in the Windows menu.▶Manager DescriptionNumber of Files Internal Memory MMC/SD CardRefrashMove DownMedia Format DeleteMove UpAvailable Memory Total MemoryHow to Use Manager1. How to Use Manager2. To Prepare for MP3 File3. Downloading MP3 Files from PC to Player4. To Upload from Player to PCChapter 3Sample music provided•Sample MP3 files are included in the installation CD.4.To Upload from Player to PCTo upload from Flash Memory, select “Internal Memory.”To upload from MMC/SD Card, select “MMC/SD Card”.After selecting the files to be uploaded, go into “File” →▶MP3 File PropertiesClick on “” icon. A window titled File Properties” will appear. To change properties of the MP3 file, please type in new data.▶Deleting MP3 FilesSelect the desired files and click “”.▶Determining Order of Play Select the desired files and click “” or “”.▶Formatting Flash MemoryTo format Flash Memory, select “Internal Memory”.Click the format button “” and all files (MP3and others) saved on the player will be formatted.To format only MP3 files, click “”.ENGLISHHow to Use the Player1. Player Overview2. LCD Display3. Using the Player for the First Time4. Operating the Key5. Detailed Instructions6. The Menu DisplayChapter 4” and click “Format” to start formatting.Play Mode Icon HOLD IconA-B Repeat IconFile TypeCharacterCurrent Track Number /Total Number of TracksBattery IconBitratePlay TimeTrack Name Still loving you3.Button ControlFrom the “MENU” mode use the JOG switch to control the settingsUse the jog switch to select MENU:• JOG-PUSH : To select • JOG-UP : To move up• JOG-DOWN : To move downIf the key is not in use for 10 seconds the player will return to the menu display.Menu EXIT PLAYMODE USER EQ ASL MODE MONAURAL OUT TRACK BLANK SAVE POSITION SCROLL SPEED SCREEN OFF LCD CONTRAST BACKLIGHT INFORMATION123456789101112ENGLISHMPMan General Information and Specifications1. What is MPMan ®2. How Does MPMan ®Work?3. Characteristics - Advantages of MPMan ®4. Product SpecificationsChapter 5®is the portable palm ®®productENGLISH32~320kbps (w / VBR)32~320kbps (w / VBR)32~224kbps (w / VBR)32~224kbps (w / VBR)Others1. Trouble Shootings2. Warranty ConditionsChapter 6▶HOW DO I GET A DETAIL INFORMATION ABOUT MP3 FILES?•Please visit the MPMan home page at •legal MP3 Internet sites and updated Q&A.▶HOLD?of the near CD quality sound MP3 files respectively.▶WHEN DO I NEED TO REPLACE THE BATTERY?sound. It is time to replace the battery.▶NOT RECOGNIZEUSB driver is correctly installed.▶THE BACKLIGHT IS NOT WORKING.•backlight.•change the battery if you wish.▶What is Covered and How Longto repair or replace those parts. Each MPMan ®and 90 days parts, from the date of purchase, defined as follows: (1) Original Consumer Retail Purchase, (2) first Rental Purchase Agreement, or(3) First Lease Purchase Agreement (the “Warranty Period”).for the remaining portion of the originalThe , Inc. Warranty Administrator and its MPMan ®Manufacturer) replacement parts are used in the repair of your MPMan ®▶Other Warranty Coveragein this warranty.▶What are the Exceptions This warranty does not cover:God;(2) cabinetry, decorative parts, knobs, or buttons ;(3) an MPMan ®any way or incorporated into other products ;(4) installation and set-up service adjustments ; orauthorized MPMan ®dealer.damages, so the above exclusion may not apply to you.▶PERIOD.state.®distributors shall ®product.®product and is ®product is covered for 90 days labor。
- 1、下载文档前请自行甄别文档内容的完整性,平台不提供额外的编辑、内容补充、找答案等附加服务。
- 2、"仅部分预览"的文档,不可在线预览部分如存在完整性等问题,可反馈申请退款(可完整预览的文档不适用该条件!)。
- 3、如文档侵犯您的权益,请联系客服反馈,我们会尽快为您处理(人工客服工作时间:9:00-18:30)。
智能音乐播放器用户手册2023欢迎使用智能音乐播放器!
为了让您更好地了解和使用我们的产品,我们为您准备了这份用户手册。
本手册将介绍智能音乐播放器的各项功能和操作方法,帮助您轻松掌握它的使用技巧。
在开始使用之前,请确保已正确接通电源并完成了基本设置。
一、产品概述
智能音乐播放器是一款集音乐播放、智能控制和个性化推荐功能于一体的音乐设备。
它采用了先进的人工智能技术和云端数据支持,能够轻松满足您对音乐的各类需求。
二、产品特点
1. 智能语音控制:通过内置的语音识别模块,您可以通过语音指令轻松操作播放器,如“打开音乐”、“下一首歌”等。
2. 智能推荐:根据您的音乐偏好和历史播放记录,智能音乐播放器会为您推荐符合您口味的音乐,让您的音乐体验更加舒适。
3. 多功能播放:支持各种音频格式的播放,包括MP3、WAV、FLAC等。
同时,您还可以通过蓝牙连接外部音箱,享受更高质量的音乐声音。
4. 个性化设置:您可以根据自己的偏好自定义播放器的主题颜色、背景图片等,让您的使用体验更加个性化。
5. 多设备同步:支持多设备之间的音乐同步播放,您可以随时随地
切换设备而不中断音乐播放。
三、基本操作
1. 开机与关机:
长按电源键3秒以上,听到“开机成功”提示音后,播放器即可正常
工作。
长按电源键3秒以上,听到“关机成功”提示音后,播放器将关闭。
2. 音乐播放与暂停:
通过触摸面板或语音指令,您可以控制音乐的播放与暂停。
轻触一
次触摸面板或说出“播放”指令即可开始播放音乐,再次轻触或说出“暂停”指令即可暂停音乐。
3. 音量调节:
通过触摸面板的上下滑动,或者说出“增大音量”、“减小音量”等指令,您可以自由调节音乐的音量大小。
4. 切换音乐:
通过触摸面板的左右滑动,或者说出“上一首”、“下一首”等指令,
您可以切换当前播放的音乐。
5. 播放模式切换:
通过触摸面板或说出“切换播放模式”等指令,您可以切换音乐播放
器的不同播放模式,如循环播放、随机播放等。
四、高级操作
1. 语音助手使用:
长按电源键,等待语音提示音后,您可以开始与智能音乐播放器进行语音交互。
通过说出“打开XXX应用”、“播放歌手XXX的歌曲”等指令,您可以更加便捷地操作播放器。
2. 定时关闭播放器:
通过语音指令或触摸面板设置播放器的定时关闭功能,让您在入睡前自动关闭音乐。
3. 私人FM电台:
通过触摸面板或语音指令,您可以打开私人FM电台,播放符合您喜好的音乐,犹如拥有一个专属DJ。
五、常见问题解答
以下是一些常见问题的解答,供您参考:
1. 为什么播放器无法开机?
请检查电源是否接触良好,并确保电源线连接正常。
2. 播放器无法与音箱连接怎么办?
请检查蓝牙连接是否配对成功,并确保音箱处于可连接状态。
3. 如何导入自己的歌曲?
可以通过连接电脑,将自己的歌曲文件拖拽到播放器的存储目录中。
更多问题和操作指南,请查阅我们的在线帮助文档或联系客服人员。
六、客户支持与售后服务
如果您在使用中遇到任何问题或有任何建议,欢迎随时联系我们的
客服人员。
我们将竭诚为您提供技术支持和售后服务。
谢谢使用智能音乐播放器,祝您享受愉快的音乐之旅!。
