思科OSPF 命令配置手册
思科路由器命令大全(完整版)
思科路由器命令大全(完整版)思科路由器命令大全(完整版)本文档旨在提供思科路由器命令的详细说明和使用指南,包括路由器配置、网络管理、安全性设置等内容。
每个章节都详细介绍了不同的命令和参数,以帮助用户更好地理解和使用思科路由器。
1:路由器基本配置1.1 主机名设置1.2 用户名和密码设置1.3 IP 地址和子网掩码配置1.4 默认网关配置2:接口配置2.1 以太网接口配置2.2 串行接口配置2.3 子接口配置2.4 虚拟局域网 (VLAN) 配置3:路由协议配置3.1 静态路由配置3.2 动态路由配置3.2.1 RIP 配置3.2.2 OSPF 配置3.2.3 BGP 配置4:网络管理4.1 SNMP 配置4.2 NetFlow 配置4.3 Syslog 配置4.4 路由器时间设置5:安全性配置5.1 访问控制列表 (ACL) 配置5.2 VPN 配置5.3 防火墙配置5.4 AAA 配置附件:本文档附带的附件包括示例配置文件、命令输出示例等,以帮助读者更好地理解和应用文档中的内容。
法律名词及注释:本文档所涉及的法律名词及其注释如下:1:主机名:指路由器的主机标识名称,用于在网络中识别路由器。
2:用户名和密码:用于登录和管理路由器的凭证信息。
3: IP 地址:网络协议中用于唯一标识设备的数字地址。
4:子网掩码:用于标识 IP 地址中网络部分和主机部分的分界线。
5:默认网关:用于转发网络流量的下一跳路由器。
6:以太网接口:用于连接局域网设备的物理接口。
7:串行接口:用于连接广域网设备的物理接口。
8:子接口:在一个物理接口上创建多个逻辑接口,用于实现VLAN 分隔等功能。
9:虚拟局域网 (VLAN):用于将局域网划分成多个逻辑网络的技术。
10:静态路由:手动配置的路由表项,用于指定数据包传输的路径。
11:动态路由:根据路由协议动态学习和更新的路由表项,用于自动路由选择。
12: RIP:路由信息协议,一种距离向量路由协议。
思科OSPF命令配置手册
思科OSPF命令配置手册OSPF 命令配置手册本书是一本简洁而完整的OSPF命令手册.书中提供了很多示例场景,演示了可在由最少数量的路由器组成的网络环境中实施的每条OSPF命令的正确用法.这可以让读者学会每条OSPF命令,而不需搭建一个庞大的,昂贵的实验室环境.这些示例场景清晰地展示了每条OSPF 命令的目的和用法.有的例子介绍了一些常见的不能正常工作的环境,帮助读者加深对一些特别的OSPF命令的理解.本书覆盖了OSPF中的很多主题,包括接口配置,OSPF区域配置,路由过滤,OSPF进程配置,路由成本,缺省路由产生,路由再分布,管理距离,OSPF邻居关系,路由汇聚,以及"show","debug"和"clear"命令等. 本书的使用方式与读者的目标有关.如果读者是要准备CCIE的笔试和LAB考试,那么本书可被用作学习每条OSPF命令的目的和正确用法的实验室指南.如果读者是一位网络设计人员,那么本书可被用作OSPF命令的参考书.第1章 OSPF进程配置命令 31.1 router ospf process-id 31.2 route ospf process-id vrf name 5第2章 OSPF区域命令 92.1 area area-id authentication 92.2 area area-id authentication message-digest 162.3 area area-id default-cost cost 252.4 area area-id nssa 302.5 area area-id nssa default-infromation-originate 362.6 area area-id nssa no-redistribution 432.7 area area-id nssa no-summary 532.8 area area-id range ip-address mask 602.9 area area-id range ip-address mask advertise 602.10 area area-id range ip-address mask not-advertise 602.11 area area-id stub 662.12 area area-id stub no-summary 722.13 area transit-area-id virtual-link router-id 762.14 area transit-area-id virtual-link router-idauthentication authentication-key password 822.15 area transit-area-id virtual-link router-idauthentication message-digest 822.16 area transit-area-id virtual-link router-idauthentication null 832.17 area transit-area-id virtual-link router-idauthentication-key password 952.18 area transit-area-id virtual-link router-id dead-interval seconds 1012.19 area transit-area-id virtual-link router-id hello-interval seconds 1072.20 area transit-area-id virtual-link router-id message-digest-key key-id md5 password 1122.21 area transit-area-id virtual-link router-id retransmit-interval seconds 1192.22 area transit-area-id virtual-link router-id transmit-delay seconds 125第3章默认成本 1293.1 auto-cost reference-bandwidth bandwidth 129第4章产生缺省路由 1394.1 default-information originate 1394.2 default-information originate always 1424.3 default-information originate metric cost 1454.4 default-information originate always metric cost 1454.5 default-information originate metric-type type 1484.6 default-information originate always metric-type type 1484.7 default-information originate route-map route-map-name 152第5章为再次分布协议设置缺省的度量 1595.1default-metric cost 159第6章管理距离 1656.1 distance administrative-distance 1656.2 distance administrative-distance source-ip- address source-ip-mask 1696.3 distance administrative-distance source-ip- address source-ip-mask access-list-number1696.4 distance ospf external administrative-distance 1746.5 distance ospf inter-area administrative-distance 1746.6 distance ospf intra-area administrative-distance 174第7章用分布列表过滤路由 1817.1 distribute-list access- list-number in 1817.2 distribute-list access-list-number in interface-type interface-number 1867.3 distribute-list access-list-number out 1917.4 distribute-list access-list-number out interface-type interface-number 1917.5 distribute-list access-list-number out routing-process 1927.6 distribute-list access-list-number in 1977.7 distribute-list access-list-name in interface-type interface-number 2017.8 distribute-list access-list-name out 2067.9 distribute-list access-list-name out interface-type interface-number 2077.10 distribute-list access-list-name out routing-process 2077.11 distribute-list prefix prefix-list-name in 2127.12 distribute-list prefix prefix-list-name in interface-type interface-number 2177.13 distribute-list prefix prefix-list-name out 2227.14 distribute-list prefix prefix-list-name out interface-type interface-number 2227.15 distribute-list prefix prefix-list-name out routing-process 222第8章 MOSPF LSA的处理 2318.1 ignore lsa mospf 231第9章记录OSPF邻居状态的改变 2339.1 log-adjacency-changes 2339.2 log adjacency-changes detail 233第10章最大路径配置 23710.1 maximum-paths number-of-paths 237第11章 OSPF邻居命令 24311.1 neighbor ip-address 24311.2 neighbor ip-address cost cost 25611.3 neighbor ip-address database-filter all out 25911.4 neighbor ip-address poll-interval interval 26111.5 neighbor ip-address priority priority 263第12章 OSPF网络命令 26712.1 network ip-address wild-card-mask area area-id 267第13章被动的OSPF接口 27313.1 passive-interface interface-name interface-number 27313.2 passive-interface default 276第14章路由的再次分布 28114.1 redistribute routing-process process-id 28114.2 redistribute routing-process process-id metric ospf-metric 28114.3 redistribute routing-process process-id metric-type metric-type 28114.4 redistribute routing-process process-id subnets 28114.5 redistribute routing-process process-id tag tag-value 28214.6 redistribute routing-process process-id route-map route-map-name 292第15章控制OSPF路由器ID 30715.1 router-id ip-address 307第16章汇聚外部路由 31516.1 summary-address ip-address mask 31516.2 summary-address ip- address mask not-advertise 31516.3 summary-address ip-address mask tag value 318第17章 OSPF计时器 32517.1 timers lsa-group-pacing seconds 32517.2 timers spf delay interval 326第18章流量分担 32918.1 traffic-share min across-interfaces 329第19章接口配置命令 33119.1 ip ospf authentication 33119.2 ip ospf authentication authentication-key password 33119.3 ip ospf authentication message-digest 33119.4 ip ospf authentication null 33119.5 ip ospf cost cost 33819.6 ip ospf database-filter all out 34219.7 ip ospf dead-interval seconds 34419.8 ip ospf demand-circuit 34619.9 ip ospf flood-reduction 34819.10 ip ospf hello-interval seconds 35119.11 ip ospf message-digest-key key-id md5 password 35419.12 ip ospf mtu-ignore 35919.13 ip ospf network broadcast 36319.14 ip ospf network non-broadcast 37419.15 ip ospf network point-to-multipoint 37519.16 ip ospf network point-to-multipoint non-broadcast 37519.17 ip ospf network point-to-point 38419.18 ip ospf priority priority 39119.19 ip ospf retransmit-interval seconds 39419.20 ip ospf transmit-delay seconds 397第20章 show命令 40120.1 show ip ospf 40120.2 show ip ospf process-id 40120.3 show ip ospf border-routers 40320.4 show ip ospf process-id border-routers 40320.5 show ip ospf database 40420.6 show ip ospf process-id database 40420.7 show ip ospf database adv-router router-id 40420.8 show ip ospf process-id database adv-router router-id 40420.9 show ip ospf database asbr-summary 40420.10 show ip ospf process-id database asbr-summary 40520.11 show ip ospf database asbr-summary asbr-id 40520.12 show ip ospf process-id database asbr-summary asbr-id 40520.13 show ip ospf database database-summary 40520.14 show ip ospf process-id database database-summary 40520.15 show ip ospf database external 40520.16 show ip ospf process-id database external 40520.17 show ip ospf database network 40520.18 show ip ospf process-id database network 40520.19 show ip ospf database nssa-external 40520.20 show ip ospf process-id database nssa-external 40620.21 show ip ospf database router 40620.22 show ip ospf process-id database router 40620.23 show ip ospf database self-originate 40620.24 show ip ospf process-id database self-originate 40620.25 show ip ospf database summary 40620.26 show ip ospf process-id database summary 40620.27 show ip ospf flood-list 40820.28 show ip ospf process-id flood-list 40820.29 show ip ospf flood-list int-name int-number 40820.30 show ip ospf process-id flood-list int-name int-number 40820.31 show ip ospf interface 40920.32 show ip ospf process-id interface 40920.33 show ip ospf interface int-name int-number 40920.34 show ip ospf process-id interface int-name int-number 40920.35 show ip ospf neighbor 41120.36 show ip ospf process-id neighbor 41120.37 show ip ospf neighbor neighbor-id 41120.38 show ip ospf process-id neighbor neighbor-id 41120.39 show ip ospf neighbor int-name int-number 41120.40 show ip ospf process-id neighbor int-name int-number 41120.41 show ip ospf neighbor detail 41120.42 show ip ospf process-id neighbor detail 41120.43 show ip ospf neighbor detail neighbor-id 41120.44 show ip ospf process-id neighbor detail neighbor-id 41120.45 show ip ospf neighbor int-name int-number 41120.46 show ip ospf process-id neighbor int-name int-number 41220.47 show ip ospf request-list 41320.48 show ip ospf process-id request-list 41320.49 show ip ospf request-list neighbor-id 41320.50 show ip ospf process-id request-list neighbor-id 41320.51 show ip ospf request-list int-name int-number 41320.52 show ip ospf process-id request-list int-name int-number 41320.53 show ip ospf retransmission-list 41420.54 show ip ospf process-id retransmission-list 41420.55 show ip ospf retransmission neighbor-id 41420.56 show ip ospf process-id retransmission neighbor-id 41420.57 show ip ospf retransmission int-name int-number 41520.58 show ip ospf process-id retransmission int-name int-number 41520.59 show ip ospf summary-address 41620.60 show ip ospf process-id summary-address 41620.61 show ip ospf virtual-links 41620.62 show ip ospf process-id virtual-links 416第21章 debug命令 41921.1 debug ip ospf adj 41921.2 debug ip ospf events 42021.3 debug ip ospf flood 42221.4 debug ip ospf flood ip-access-list-number 42221.5 debug ip ospf lsa-generation 42521.6 debug ip ospf lsa-generation ip-access-list-number 42521.7 debug ip ospf packet 42621.8 debug ip ospf retransmission 42721.9 debug ip ospf spf 42721.10 debug ip ospf spf external 42721.11 debug ip ospf spf external access-list-number 42721.12 debug ip ospf spf inter 42721.13 debug ip ospf spf inter access-list-number 42721.14 debug ip ospf spf intra 42721.15 debug ip ospf spf intra access-list-number 428第22章 clear命令 43122.1 clear ip ospf counters 43122.2 clear ip ospf process-id counters 43122.3 clear ip ospf process-id counters neighbor 43122.4 clear ip ospf process-id counters neighbor int-name int-number 43122.5 clear ip ospf process 43222.6 clear ip ospf process-id process 43222.7 clear ip ospf redistribution 43322.8 clear ip ospf process-id redistribition 433。
思科OSPF实验1:基本的OSPF配置
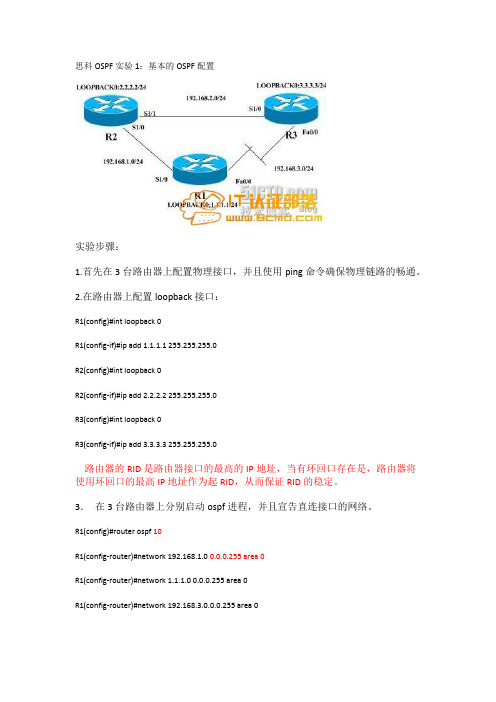
思科OSPF实验1:基本的OSPF配置实验步骤:1.首先在3台路由器上配置物理接口,并且使用ping命令确保物理链路的畅通。
2.在路由器上配置loopback接口:R1(config)#int loopback 0R1(config-if)#ip add 1.1.1.1 255.255.255.0R2(config)#int loopback 0R2(config-if)#ip add 2.2.2.2 255.255.255.0R3(config)#int loopback 0R3(config-if)#ip add 3.3.3.3 255.255.255.0路由器的RID是路由器接口的最高的IP地址,当有环回口存在是,路由器将使用环回口的最高IP地址作为起RID,从而保证RID的稳定。
3.在3台路由器上分别启动ospf进程,并且宣告直连接口的网络。
R1(config)#router ospf 10R1(config-router)#network 192.168.1.0 0.0.0.255area 0R1(config-router)#network 1.1.1.0 0.0.0.255 area 0R1(config-router)#network 192.168.3.0.0.0.255 area 0ospf的进程号只有本地意义,既在不同路由器上的进程号可以不相同。
但是为了日后维护的方便,一般启用相同的进程号。
ospf使用反向掩码。
Area 0表示骨干区域,在设计ospf网络时,所有的非骨干区域都需要和骨干区域直连!R2,R3的配置和R1类似,这里省略。
不同的是我们在R2和R3上不宣告各自的环回口。
*Aug 13 17:58:51.411: %OSPF-5-ADJCHG: Process 10, Nbr 2.2.2.2 on Serial1/0 from LOADING to FULL, Loading Done配置结束后,我们可以看到邻居关系已经到达FULL状态。
OSPF-思科

The show ip ospf neighbor Command
RouterB# show ip ospf neighbor
Neighbor ID 10.64.1.1 10.2.1.1 Pri 1 1 State FULL/BDR FULL/Dead Time 00:00:31 00:00:38 Address 10.64.1.1 10.2.1.1 Interface Ethernet0 Serial0
Router#
show ip ospf
• Displays the OSPF router ID, timers, and statistics
Router#
show ip ospf neighbor [detail]
• Displays information about the OSPF neighbors, including Designated Router (DR) and Backup Designated Router (BDR) information on broadcast networks
Debug of a single packet
Router# debug ip ospf packet OSPF: rcv. v:2 t:1 l:48 rid:200.0.0.117 aid:0.0.0.0 chk:6AB2 aut:0 auk:
配置基本的OSPF
© 2003, Cisco Systems, Inc. All rights reserved.
• Regular areas (nonbackbone areas)
OSPF 区域
Area术语
LS 数据结构:毗邻数据库
• 路由器交换hello包发现邻居.
ciscoOSPF配置
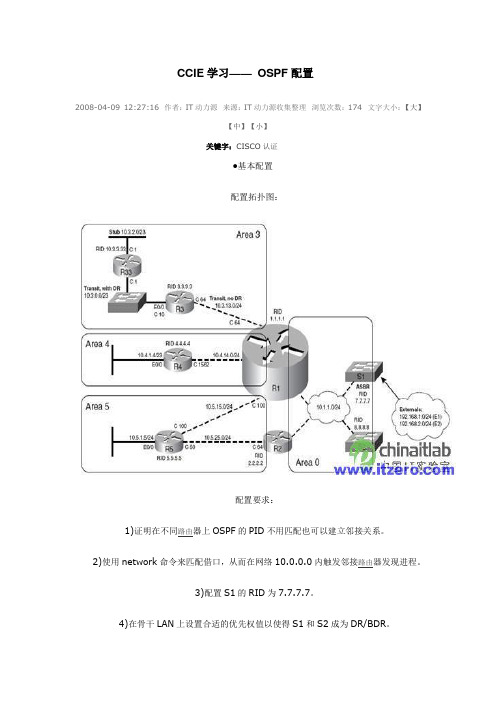
CCIE 学习—— OSPF 配置2008-04-09 12:27:16 作者:IT 动力源 来源:IT 动力源收集整理 浏览次数:174 文字大小:【大】【中】【小】关键字:CISCO 认证●基本配置 配置拓扑图:配置要求:1)证明在不同路由器上OSPF 的PID 不用匹配也可以建立邻接关系。
2)使用network 命令来匹配借口,从而在网络10.0.0.0内触发邻接路由器发现进程。
3)配置S1的RID 为7.7.7.7。
4)在骨干LAN 上设置合适的优先权值以使得S1和S2成为DR/BDR 。
5)在骨干LAN上配置dead间隔为最小(1秒),它是hello间隔的4倍,所以hello间隔为250毫秒。
6)配置区域3为完全NSSA区域,区域4为完全桩区域,区域5为桩区域。
具体配置:1)R1的配置:interface FastEthernet0/0ip address 10.1.1.1 255.255.255.0ip ospf dead-interval minimal hello-multiplier 4!router ospf 1area 3 nssa no-summaryarea 4 stub no-summaryarea 5 stubnetwork 10.1.0.0 0.0.255.255 area 0network 10.3.0.0 0.0.255.255 area 3network 10.4.0.0 0.0.255.255 area 4network 10.5.0.0 0.0.255.255 area 52)R2的配置:interface FastEthernet0/0ip address 10.1.1.2 255.255.255.0ip ospf dead-interval minimal hello-multiplier 4!router ospf 2area 5 stubnetwork 10.1.0.0 0.0.255.255 area 0network 10.5.25.2 0.0.0.0 area 53)R3的配置:router ospf 1area 3 nssa no-summarynetwork 10.0.0.0 0.255.255.255 area 34)R4的配置:router ospf 1area 4 stub no-summarynetwork 10.0.0.0 0.255.255.255 area 45)S1的配置:interface Vlan1ip address 10.1.1.3 255.255.255.0ip ospf dead-interval minimal hello-multiplier 4ip ospf priority 255!router ospf 1router-id 7.7.7.7network 10.1.0.0 0.0.255.255 area 06)S2的配置:interface Vlan1ip address 10.1.1.4 255.255.255.0ip ospf dead-interval minimal hello-multiplier 4ip ospf priority 254!router ospf 1network 10.0.0.0 0.255.255.255 area 0●OSPF的开销以及怎样重启OSPF进程IOS确定OSPF接口开销的方法:1)使用neighbor neighbor cost value命令对每台邻接路由器设置开销(对于允许使用neighbor命令的网络类型)。
思科路由协议配置OSPF多区域[整理]
![思科路由协议配置OSPF多区域[整理]](https://img.taocdn.com/s3/m/36b3706503768e9951e79b89680203d8ce2f6a85.png)
思科路由协议配置OSPF多区域多区域的OSPFOSPF的区域类型:骨干区域:是OSPF网络的核心,负责连接所有的非骨干区域,区域之间的通讯必须通过骨干区域才能完成,也就是说在OSPF的多区域网络中必须存在骨干区域。
骨干区域的编号为0,area 0 就是骨干区域。
非骨干区域:区域编号为非0数值的OSPF区域。
OSPF的通讯类型:域内通讯量:区域内部网络之间的互相通讯。
域间通讯量:区域之间网络之间的互相通讯。
外部通讯量:OSPF网络与非OSPF网络之间的通讯。
OSPF路由器的类型:IR 域内路由器ABR 区域边界路由器BR 骨干路由器ASBR 自治系统边界路由器OSPF多区域网络中的LSA类型:LSA1:是由每台OSPF路由器产生,始发本机接口所连接链路的信息。
LSA1只在区域内部进行泛洪,可以实现域内的路由通讯。
LSA2:在多路访问型的网络中出现,由DR产生,发送给DRother的汇总后的LSA更新。
地址使用224.0.0.6,只在区域内部泛洪,实现的也是域内通讯。
LSA3:是由ABR域间路由器始发,泛洪到一个区域其所能到达的其他区域的路由信息。
实现域间路由信息的传递,ABR要宣告给它所连接的所有区域,最终实现域间的通讯。
LSA4:是由ABR始发,宣告到一个区域,宣告ASBR的位置信息。
告诉内部去往OSPF外部出口的路由信息。
LSA5:是由ASBR自治系统边界路由器产生,描述其所能到达的OSPF 外部路由信息,该更新将在整个OSPF自治系统中泛洪。
LSA7:NSSA中特有的外部路由更新。
为了实现对NSSA区域的优化,优化掉第4、5种类型的更新,又不会影响到其所连接的外部路由信息,在NSSA区域内部使用LSA7,来通告其所连接的外部路由信息,当LSA7经过ABR区域边界路由器时,会被转化成LSA5,因为对于其他区域来讲,外部路由就是LSA5。
ospf的路由类型:C 直连路由R rip路由D eigrp的内部路由D EX eigrp的外部路由O ospf的域内路由O IA ospf的域间路由O E2 ospf的2类外部路由O E1 ospf的1类外部路由O*IA OSPF的默认路由O N1 OSPF的NSSA区域的1类外部路由O N2 OSPF的NSSA区域的2类外部路由路由重分发,使rip、eigrp和ospf进行路由信息交换rip到ospfr1(config)#router ospf 10r1(config-router)#redistribute rip metric 20 subnetseigrp到ospfr7(config)#router ospf 10r7(config-router)#redistribute eigrp 10 metric-type 1 metric 30 subnetsospf 到 ripr1(config)#router ripr1(config-router)#redistribute ospf 10 metric 2ospf 到 eigrpr7(config)#router eigrp 10r7(config-router)#redistribute ospf 10 metric 1000 100 255 1 1500r4#show ip ospf database //查看ospf的LSDB末梢区域的配置ABRr2(config)#router ospf 10r2(config-router)#area 1 stubIRr4(config)#router ospf 10r4(config-router)#area 1 stubr5(config)#router ospf 10r5(config-router)#area 1 stub在末梢区域的基础上配置完全末梢区域在ABR上配置r2(config)#router ospf 10r2(config-router)#area 1 stub no-summary配置NSSA区域ABRr3(config)#router ospf 10r3(config-router)#area 2 nssar3(config-router)#area 2 nssa default-information-originater3(config-router)#area 2 nssa no-summary //优化掉LSA3IRr6(config)#router ospf 10r6(config-router)#area 2 nssaASBRr7(config)#router ospf 10r7(config-router)#area 2 nssaOSPF的外部路由r1(config-if)#int s0/0r1(config-if)#ip ospf cost 5 //定义OSPF的接口链路度量值r1(config-if)#int s0/1r1(config-if)#ip ospf cost 30r1(config-if)#router ospf 10r1(config-router)#network 0.0.0.0 0.0.0.0 area 0r2(config)#int s0/0r2(config-if)#ip add 192.168.11.2 255.255.255.0r2(config-if)#no shutdownr2(config-if)#ip ospf 10 area 0 //将该接口宣告到ospf 10 的区域0r2(config-if)#ip ospf cost 5将RIP充分发到OSPF,选择1类外部路由r2(config)#router ospf 10r2(config-router)#redistribute rip metric-type 1 metric 20 subnetsr2(config-router)#exitr3(config)#router ospf 10r3(config-router)#redistribute rip metric-type 1 metric 10 subnets选择2类外部路由r2(config)#router ospf 10r2(config-router)#no redistribute rip metric-type 1 metric 20 subnetsr2(config-router)#redistribute rip metric 20 subnetsr3(config)#router ospf 10r3(config-router)#no redistribute rip metric-type 1 metric 10 subnetsr3(config-router)#redistribute rip metric 10 subnetsr1#clear ip ospf process //重启下OSPF进程在OSPF多区域网络中必须存在骨干区域,区域0,因为所有的域间通讯必须要通过骨干区域。
思科OSPF协议配置命令笔记
路由器OSPF协议配置命令strong>OSPF 协议配置命令4.7.1 default redistribute cost配置引入外部路由时缺省的花费值, no default redistribute cost 命令取消配置。
default redistribute cost costno default redistribute cost【参数说明】cost 为花费值,范围 1~65535 之间的整数。
【命令模式】OSPF协议配置模式【使用指南】在OSPF将路由器上其它路由协议发现的路由引入作为自己的自治系统外部路由信息时,还需要一些额外的参数,包括:路由的缺省花费和缺省的标记等。
【举例】配置OSPF引入外部路由时缺省的花费值为 10。
Quidway(config-router-ospf)#default redistribute cost 10【相关命令】default redistribute tagdefault redistribute type4.7.2 default redistribute interval配置OSPF引入外部路由的时间间隔,no default redistribute interval 命令恢复缺省值。
default redistribute interval timeno default redistribute interval【参数说明】time 为引入外部路由的时间间隔,以秒为单位,范围 1~65535 之间的整数。
【缺省情况】OSPF引入外部路由的时间间隔缺省为 1秒。
【命令模式】OSPF协议配置模式【使用指南】由于OSPF总是要不停的引入外部的路由信息并将它们传播到整个自治系统中去,因此,有必要规定协议引入外部路由的时间间隔。
【举例】指定OSPF引入外部路由的时间间隔为 2秒。
Quidway(config-router-ospf)#default redistribute interval 2【相关命令】default istribute limit4.7.3 default redistribute limit配置OSPF可引入路由数量的上限, no default redistribute limit 命令恢复缺省值。
OSPF配置手册命令集合
OSPF命令与配置手册(总结)╃曉ヅ波特╄℡目录一.OSPF进程配置命令 (2)建立OSPF进程vrf等内容二. OSPF区域命令 (1)区域的认证stub区域缺省路由度量nssa区域区域间的汇总虚链路的认证以及虚链路的各种计时器三. 默认成本 (2)修改OSPF计算度量的参考值四. 产生缺省路由(ASBR) (2)推缺省无条件退缺省推缺省路由的开销和类型1、2与标记使用route-map的推缺省策略五.为再次分布协议设置缺省度量(种子度量) (3)重分发的缺省度量六. 管理距离 (4)修改本底OSPF管理距离修改邻居发送路由的管理距离基于访问列表的管理距离控制区域内、区域外、重分发的管理距离七.用分布列表过滤路由 (4)过滤路由(访问列表命名访问列表前缀列表等)基于端口的过滤路由(访问列表命名访问列表前缀列表等)基于路由协议的重分发过滤(访问列表命名访问列表前缀列表等)距离适量路由协议的另外一种OUT方向的过滤(访问列表命名访问列表前缀列表等)八.Mospf lsa的处理 (5)忽略LSA类型6九.记录OSPF状态的改变 (5)邻居建立过程的状态详细显示十.最大路径 (4)调整负载均衡的最大路径十一.OSPF邻居命令 (5)邻居指定邻居开销邻居的lsa洪范控制、优先级、重传时间等十二.OSPF网络命令 (6)宣告网络接口的方式十三.被动的OSPF接口 (6)被动接口的两种配置方式十四.路由的再次分布 (6)重分发路由、定义类型、度量基于route-map的重分发和标记十五. 控制OSPF路由器ID (7)手动配置router-ID十六.汇聚外部路由 (7)汇总外部路由和标记十七.OSPF计时器 (7)LSA步测间隔执行SPF运算延迟和间隔十八.流量分担 (7)结合eigrp和igrp 的非等价负载均衡十九.接口配置命令 (8)接口的认证接口的开销接口的计时器接口的网络类型更改接口优先级LSA的重发间隔、延迟等二十.各种shwo命令 (9)所有的show 命令二十一. dubug命令 (11)所有的debug调试二十二.clear 命令 (11)清空ospf的各种模式一.Ospf进程配置命令Router ospf 100 开启一个ospf 100进程同时会自动生成一个rid Router ospf 100 vrf mingzi 开启一个vrf的进程应用于mpls-vpn连接se使用二.Ospf 区域命令(认证nssa stub virtual-link hello间隔重传间隔等)R outer ospf 1A rea 0 authentication 开启区域明文认证(等同于所有接口都开启认证)I nt f0/0I p ospf authentication-key cisco 认证密码int S1/2IP OSPF authentication开启单个接口明文认证ip ospf authentication-key cisco 定义密码R outer ospf 100A rea 1 virtual-link 1.1.1.1authentication authentication-key cisco仅仅在虚链路明文认证而不是整个区域0认证A rea 0 authentication 整个区域都进行明文认证A rea 1 virtual-link 1.1.1.1 authentication-key cisco 定义虚链路密码4int F0/0ip ospf authentication message-digest 开启单独接口的md5I p ospf message-digest-key 1 cisco 定义钥匙链和密码两个都要匹配5R outer ospf 1A rea 0 authentication message-digest 开启整个区域的md5int s1/2I p ospf message-digest-key 1 cisco定义接口钥匙链和密码6 R outer ospf 1 仅仅在虚链路上开启徐链路的md5A rea 1 virtual-link 1.1.1.1 authentication message-digestA rea 1 virtual-link 1.1.1.1 message-digest-key 1 CISCO骨干区域包括虚链路区域的认证A rea 0 authentication message-digestArea 1 virtual-link 12.12.12.1 message-digest-key 1 md5 ciscoArea 100 virtual-link 2.2.2.2 authentication null虚链路忽略认证Debug ip ospf events 查看密码报错Router ospf 123Area 100 nssa 定义为nssa区域Area 100 nssa default-infromation-originate推缺省abr不用建立静态缺省asbr需建立Area 100 nssa no-redistribution 阻止充分发从asbr发入nssa (设备同时担任asbr和abr)Area 100 nssa no-summary 定义为完全次末节且自动推缺省Area 100 range 192.168.0.0 255.255.0.0 (advertise not-advertise)把区域0的路由汇总汇总时注意防环的null 0 接口not-advertise 用于阻止汇总路由在asbr 或abr广播Area 100 stub设定为stub区域自动推缺省Area 100 stub no-summary设置为完全末节Area 100 virtual-link 2.2.2.2 在区域100同2.2.2.2 这个路由器建立虚链路Area 100 virtual-link 2.2.2.2 authentication null 在虚链路不进行验证Area 100 virtual-link 2.2.2.2 dead-interval 10 (seconds秒)修改虚链路hello死亡时间Area 100 virtual-link 2.2.2.2 hello-interval 10 修改hello间隔时间Area 100 virtual-link 2.2.2.2 retransmit-interval 10 修改lsa重传间隔缺省5秒*ps:*重发间隔不一致不影响ospf邻居关系和传递lsaArea 100 virtual-link 2.2.2.2 transmit-delay 10 描述虚链路上传播lsa的延迟时间Show ip ospf 查看区域情况Show ipospf virtual-link 查看虚链路属性Show ip ospf neighbor 查看邻居属性三.默认成本(ospf使用默认成本100 000 000/ 接口带宽单位bit= ospf成本)1修改接口带宽Int s0/0Bandwidth 64 修改为64kbitRouter ospf 100Auto-cost reference-bandwidth 500修改默认成本为500四.产生缺省路由只能在ospf路由域边界操作(asbr)Default-information originate(必须有静态缺省路由存在且有效)Default-information originate always无条件产生缺省路由到ospf域内Default-information originate metric 1000修改该缺省路由的开销Default-information originate metric always metric 1000修改该无条件缺省开销Default-information originate metric-type 1修改改为类型oe1计算本地到边界开销Default-information originate metric always metric-type 1 修改该无条件缺省类型1 Default-information originate route-map ccie 仅当网络3.3.3.3 正常才推缺省(检测边界可达行)Access-list 100 permit 3.3.3.0 0.0.0.255Rote-map ccieMatch 100五.为再次分布协议设置缺省度量(应用于asbr)Default-metric 1000 修改推缺省的成本六.管理距离Distance 80修改所有的ospf 管理距离仅本地有效Distance 80 1.1.1.1 0.0.0.0 仅仅修rid1.1.1.1 宣告的lsa的路由的管理距离distance 10 1.1.1.1 0.0.0.0 100 修改1.1.1.1 宣告的las里面的acl100 覆盖的路由的管理距离Distance ospf intra-area 70 inter-area 60 exteral 50修改区域内路由70 区域间60 充分发的50七.用分布列表过滤路由Router ospf 100Distribute -list 100 in只能使用in方向保证lsdb同步并且ospf传递的是lsa不是路由条目Access 100 permit 1.1.1.0 0.0.0.255Access 100 deny anyDistribute-list 100 in serial 0/0 从固定的接口过滤加载的路由条目Distribute-list 101 in serial 0/1Access 100 permit 10.0.0.0 0.0.0.255Access 101 permit 20.0.0.0 0.0.0.255Distribute-list 100 out 在距离适量路由协议(rip eigrp igrp 等)上可以使用out方向Distribute-list 100 out serial 0/0 从固定接口过滤发送的条目Distribute-list 100 out eigrp 1 阻止从eigrp 1的路由条目发送到ospf中用out方向Distribute-list mingzi in 基于命名的访问列表的过滤Ip Access-list standard mingziDeny 2.2.2.0 0.0.0.255Deny 3.3.3.0 0.0.0.255Permit anyDistribute-list mingzi in serial0/0 基于命名的访问列表从指定端口过滤Distribute-list mingzi out serial0/0 out方向仅适用于距离适量路由协议Distribute-list mingzi out eigrp 10阻止从eigrp1中的路由再次分发到ospf中Distribute-list prefix mingzi in通过使用前缀列表控制限定的范围Ip prefix-list mingzi seq 5 deny 2.2.2.2/32 seq为前缀列表的编号Ip perfix-list mingzi seq 10 deny 3.3.3.3/32Ip perfix-list mingzi seq 15 permit 0.0.0.0 /0Distribute-list prefix mingzi in serial 0/0使用前缀列表控制从s0/0接受的条目Distribute-list prefix mingzi outDistribute-list prefix mingzi out serial0/0Distribute-list prefix mingzi out eigrp 10限制从eigrp10 充分发的路由条目进入ospf可以通过Show ip ospf database external 查看充分发的限制效果验证lsa确实保存但没有路由条目八.Mospf lsa的处理Ignore lsa mospf 当网络中有非思科设备且开启了mospf 当前命令阻止syslog信息因为cisco设备并不支持lsa类型6 即不支持mospf九.记录ospf状态的改变Log-adjacency-changes默认开启可以显示ospf邻居full后在控制台输出logLog-adjacency-changes detail默认不开启现实ospf邻居建立的所有状态过程十.最大路径配置(等价负载均衡的应用)Router ospf 100Maximum-psths 6缺省值是4条其值范围1~6 根据ios版本不同有变化十一.Ospf邻居命令当在帧中继网络云中接口默认为NBMA网络类型因此必须手动指定邻居的存在使用neighbor 命令也可以使用ip ospf network ***命令更改网络类型该命令删除了使用neighbor的必要性。
思科交换机的基本配置命令
思科交换机的基本配置命令网络技术知识其实也是弱电里面的一个难点,这个一般是在大学课程里面才能详细的学习,今天小编带来的是交换机的基本配置命令。
一、基本配置命令switch>用户模式1:进入特权模式enableswitch>enableswitch#2:进入全局配置模式configureterminalswitch>enableswitch#configureterminalswitch(conf)#3:交换机命名hostnameaptech2950以aptech2950为例switch>enableswitch#configureterminalswitch(conf)#hostnameaptch-2950aptech2950(conf)#4:配置使能口令enablepasswordcisco以cisco为例switch>enableswitch#configureterminalswitch(conf)#hostnameaptch2950aptech2950(conf)#enablepasswordcisco5:配置使能密码enablesecretciscolab以cicsolab为例switch>enableswitch#configureterminalswitch(conf)#hostnameaptch2950aptech2950(conf)#enablesecretciscolab6:设置虚拟局域网vlan1interfacevlan1switch>enableswitch#configureterminalswitch(conf)#hostnameaptch2950aptech2950(conf)#interfacevlan1aptech2950(conf-if)#ipaddress192.168.1.1255.255.255.0配置交换机端口ip和子网掩码aptech2950(conf-if)#noshut是配置处于运行中aptech2950(conf-if)#exitaptech2950(conf)#ipdefault-gateway192.168.254设置网关地址7:进入交换机某一端口interfacefasteher0/17以17端口为例switch>enableswitch#configureterminalswitch(conf)#hostnameaptch2950aptech2950(conf)#interfacefasteher0/17aptech2950(conf-if)#8:查看命令showswitch>enableswitch#showversion察看系统中的所有版本信息showinterfacevlan1查看交换机有关ip协议的配置信息showrunning-configure查看交换机当前起作用的配置信息showinterfacefastether0/1察看交换机1接口具体配置和统计信息showmac-address-table查看mac地址表showmac-address-tableaging-time查看mac地址表自动老化时间9:交换机恢复出厂默认恢复命令switch>enableswitch#erasestartup-configureswitch#reload10:双工模式设置switch>enableswitch#configureterminalswitch2950(conf)#hostnameaptch-2950aptech2950(conf)#interfacefasteher0/17以17端口为例aptech2950(conf-if)#duplexfull/half/auto有full,half,auto三个可选项11:cdp相关命令switch>enableswitch#showcdp查看设备的cdp全局配置信息showcdpinterfacefastether0/17查看17端口的cdp配置信息showcdptraffic查看有关cdp包的统计信息showcdpnerghbors列出与设备相连的cisco设备12:csico2950的密码恢复拔下交换机电源线。
思科路由器设置OSPF

思科路由器设置OSPF推荐文章路由器设置端口映射方法是什么热度:双路由器时设置连接方法和单路由器一样吗热度:路由器UPNP是什么怎么设置热度:Linksys无线路由器怎么样设置热度:怎么设置cisco思科无线ap 热度:OSPF也称为接口状态路由协议,OSPF路由协议是一种典型的链路状态(Link-state)的路由协议,一般用于同一个路由域内有不少用户不知道cisco怎么设置ospf?店铺为大家分享了具体操作方法,供大家参考!思科路由器设置OSPF命令参考以下步骤:router(config)#router ospf 1 启动OSPF路由进程router(config-router)#router-id 1.1.1.1 配置Router IDrouter(config-router)#network 1.0.0.0 0.255.255.255 area 0 指定OSPF协议运行的接口和所在的区域多区域OSPF:router(config)#router ospf 1router(config-router)#router-id 1.1.1.1router(config-router)#network 1.0.0.0 0.255.255.255 area 0 router(config-router)#network 2.0.0.0 0.255.255.255 area 1 末梢区域:router(config)#area1 stub完全末梢区域:router(config)#area1 stub no-summary路由重分发配置:router ripredistribute ospf 10 metric 10router ospf 10redistribute rip metric 10 subnetsNSSA区域配置:router(config)#area1 nssa虚链路配置:router(config)#area 100 virtual-link 1.1.1.1对方RID 店铺分享了cisco设置ospf的解决方法,希望大家喜欢。
思科路由器ospf实验手册
实验目的:1)理解ospf的区域分层设计2)Ospf的配置3)Router-id的选择过程4)Ospf的dr和dbr选举配置5)Ospf的路由查看,邻居关系查看基本配置:R1:interface FastEthernet0/0ip address 10.1.1.1 255.255.255.0router ospf 1//1是进程号,是区分不同的ospf进程的,本地意义,不同的路由器可以可配置不同的号码network 10.1.1.1 0.0.0.0 area 0//0.0.0.0 表示精确的发布这个接口R2:interface Loopback0ip address 2.2.2.2 255.255.255.0!interface FastEthernet0/0ip address 10.1.1.2 255.255.255.0router ospf 1network 2.2.2.2 0.0.0.0 area 0network 10.1.1.2 0.0.0.0 area 0R3:interface Loopback0ip address 3.3.3.3 255.255.255.0!interface FastEthernet0/0ip address 10.1.1.3 255.255.255.0router ospf 1network 3.3.3.0 0.0.0.255 area 0network 10.1.1.0 0.0.0.255 area 0//0.0.0.255,表示发布的x.x.x.a,a表示任何子网地址,只要在这个子网地址范围内,都将被发布出去,本实验中是没有意义的,主类网段都不一样R4:(abr,area border router)interface Loopback0ip address 4.4.4.4 255.255.255.0!interface FastEthernet0/0ip address 10.1.1.4 255.255.255.0interface Serial1/0ip address 20.1.1.4 255.255.255.0network 4.4.4.4 0.0.0.0 area 0network 10.1.1.4 0.0.0.0 area 0network 20.1.1.4 0.0.0.0 area 1//因为r4是abr(区域边界路由器),不同的接口应该划在不同的区域中R5:interface Loopback0ip address 5.5.5.5 255.255.255.0ip ospf 1 area 1 前面的1是进程号,后面的1是区域号//是ospf另外一种发布接口的方法interface Serial1/0ip address 20.1.1.5 255.255.255.0ip ospf 1 area 1router ospf 1可以在r4上看一下ospf的邻居关系R4上应该有4个邻居关系Show ip ospf neighborrouter-idRouter-id 的作用?1. 标识路由器,用router-id来区分不同的路由器的链路状态数据库2. 类似于人的名字(身份证号码)3. Router-id如果规划好了,对路由器的识别就很容易。
在思科模拟器中OSPF怎样设定思科模拟器怎么配置四个路由器四个区域OSPF100

在思科模拟器中OSPF怎样设定思科模拟器怎么配置四个路由器四个区域OSPF100在思科模bai拟器中ospf设定的du步骤如下:zhi1、router1的dao配置版;配置环回口和int2/0的介面的ip地址和ospf的配置。
2、权router2的配置;配置环回口和int2/0的介面的ip地址和ospf的配置。
以及int2/0 的时脉频率。
3、router3的配置;配置环回口和int3/0的介面的ip地址和ospf 的配置。
以及int3/0 的时脉频率。
4、以router3为例,show??ip ospf inte***ce,此命令可以显示路由器的介面状态,如区域号、路由器的id、网路型别、介面成本。
5、以router 3为例。
通过show ?ip router命令,显示路由的情况,设定完成这样问题就解决了。
enable 进入特权复模式configuration terminal 进入配置模式router ospf xx(进位制程号,随意就一个bai标示)du 进入路由zhi模式***work x.x.x.x x.x.x.x area 0 宣告网路show ip ospf neighbor 检视daoospf邻居关系show ip route protocol ospf 检视ospf路由买本ospf的书看看,有点复杂思科模拟器怎么配置四个路由器四个区域ospf100把中间路由器的的四个介面的ip网段在ospf的程序下宣告到area 0区域。
把其他四个路由器连线中间路由器的埠的网段地址也宣告到area 0中。
剩下4个loopback介面的网段地址按图分别宣告到不同的area中就可以了这个只要做一个中心型的网路即可,中心是一个公共区域0,其他3个路由器其他介面连线交换机或pc机组成各个非骨干区域。
拓扑图如下:用思科模拟器怎么配置这个图多区域ospf ,求大神把中间路由器的的四个介面的ip网段在ospf的程序下宣告到area 0区域。
CiscoOSPF_路由协议配置

必须匹配邻接关系的变量 √ √
√ √
OSPF路由器具有唯一的标识符,称为路由器 ID。每个路由器在活跃接口上,选择出最高 的点分十进制 IP地址作为路由器 ID。这一规则的例外情况是路由器上指定了一个回送 (loopback)接口。当回送接口被定义,选择分配给任何回送接口的最高 IP地址作为路由器 ID。 路由器ID对于为OSPF网络选择指定的备份路由器十分重要。如果该接口故障,则路由器就不 可达。为了避免发生这种情况,最好定义一个回送接口作为强制的 OSPF路由器ID。
300计计Cisco 路由器手册
下载
与address参数配对的是 wildcard-mask参数。为 wildcard-mask参数指定的值标识 address参 数值的哪一位用于解释 address参数值。wildcard-mask使用点分十进制格式。如下例所示:
network 172.16.0.0 0.0.255.255 area 0
■ LSA传输延迟( LSA transmit delay):这里所指定的值和重传间隔一起使用,以确定在 一个链路上 LSA传送不成功。
17.2 在Cisco路由器上指定OSPF
在一个 OSPF区域的内部路由器、区域边界路由器和自治系统边界路由器( ASBR)中, 为所有路由器配置使用缺省值可以提供一个可操作的网络。大部分决策工作将由 OSPF邻居邻 接关系协商完成,以确定 DR和BDR,但是加入网络的对等路由器没有认证机制,也没有保护 有效带宽和处理器利用的缺省值。为 OSPF区域定义网络专用值可以使网络工程师能够创建一 个确定的OSPF配置,而非一个不确定的拓扑结构。
表17-1 在Hello报文中出现的 OSPF邻接关系变量
O S P F邻接关系变量
思科路由器命令行手册
CISCO路由器配置手册返回教程第一章路由器配置基础一、基本设置方式二、命令状态三、设置对话过程四、常用命令五、配置IP寻址六、配置静态路由第二章广域网协议设置一、HDLC二、PPP三、X.25四、Frame Relay五、ISDN六、PSTN第三章路由协议设置一、RIP协议二、IGRP协议三、OSPF协议四、重新分配路由五、IPX协议设置第四章服务质量及访问控制一、协议优先级设置二、队列定制三、访问控制第五章虚拟局域网(VLAN)路由一、虚拟局域网(VLAN)二、交换机间链路(ISL)协议三、虚拟局域网(VLAN)路由实例参考第一章路由器配置基础一、基本设置方式一般来说,可以用5种方式来设置路由器:1.Console口接终端或运行终端仿真软件的微机;2.AUX口接MODEM,通过电话线与远方的终端或运行终端仿真软件的微机相连;3.通过Ethernet上的TFTP服务器;4.通过Ethernet上的TELNET程序;5.通过Ethernet上的SNMP网管工作站。
但路由器的第一次设置必须通过第一种方式进行,此时终端的硬件设置如下:波特率:9600数据位:8停止位:1奇偶校验: 无二、命令状态1.router>路由器处于用户命令状态,这时用户可以看路由器的连接状态,访问其它网络和主机,但不能看到和更改路由器的设置内容。
2.router#在router>提示符下键入enable,路由器进入特权命令状态router#,这时不但可以执行所有的用户命令,还可以看到和更改路由器的设置内容。
3.router(config)#在router#提示符下键入configure terminal,出现提示符router(config)#,此时路由器处于全局设置状态,这时可以设置路由器的全局参数。
4.router(config-if)#; router(config-line)#; router(config-router)#;…路由器处于局部设置状态,这时可以设置路由器某个局部的参数。
思科网络设备配置命令
思科网络设备常用配置命令一、VLAN配置1、添加VLANvlan database //VLAN数据库模式vlan <vlan-id> name <name>真实设备还可以采用全局模式添加VLAN:config terminalvlan <vlan-id>name <name>2、分配接口interface range f0/m – nswitchport mode accessswitchport access vlan <vlan-id>3、查看配置show vlan briefshow vlan id <vlan-id>二、中继配置1、配置Trunkinterface f0/mswitchport mode trunkswitchport trunk encapsulation { isl | dot1q | negotiate } //配封装方式,可不配2、查看接口模式show interface f0/m switchport三、VTP配置vtp domain <域名> //创建VTP域vtp mode { server | client | transparent } //配VTP模式vtp password <密码> //配VTP口令show vtp status //查看配置四、以太网通道配置interface range f0/m – nchannel-protocol {pagp | lacp} //可以不配channel-group <number> mode on五、STP配置spanning-tree vlan <vlan-id> root { primary | secondary } //配为主或次根网桥spanning-tree vlan <vlan-id> priority <0~655535> //配优先级,越小越优先show spanning-tree //查看STP六、三层交换机配置,实现VLAN互通ip routing //启动路由interface vlan <vlan-id> //配置VLAN的IP地址ip address <ip> <netmask>no shutdowninterface f0/m //配f0/m为路由接口no switchport七、静态路由与默认路由配置ip route <network> <netmask> <下一跳地址> //静态路由ip route 0.0.0.0 0.0.0.0 <下一跳地址> //默认路由八、单臂路由配置int f0/xno shutdown (模拟设备小凡用no switchport)int f0/x.1encapsulation dot1q <vlan-id>ip address <ip> <netmask>九、RIP协议配置router ripversion {1 | 2} //选择版本,默认为版本1no auto-summary //关闭路由汇总network <网络地址> //宣告网段redistribute ospf <ospf进程号> //重分发OSPF路由协议十、OSPF协议配置router ospf <进程号>network <网络地址> <反向掩码> area <区域号>redistribute rip //路由重分发十一、HSRP配置interface f0/mstandby <HSRP组号> ip <虚拟IP> //配为HSRP成员standby <HSRP组号> priority <0~255> //配优先级,高的为活跃路由器standby <HSRP组号> preempt //配占先权十二、访问控制列表1、标准ACLaccess-list <1~99> permit | deny <源地址> <反向掩码>interface f0/mip access-group <表号> {in | out }2、扩展ACLaccess-list <100~199> {permit | deny} <协议> <源地址> <反向掩码> <目的地址> <反向掩码> eq 端口3、命名ACLip access-list {standard| extend } <ACL表名>permit | deny <源地址> <反向掩码>{permit | deny} <协议> <源地址> <反向掩码> <目的地址> <反向掩码> eq 端口4、定时ACLtime-range <时间范围名称>periodic <星期X英文> hh:mm to <星期X英文> hh:mm //定义一个时间周期absolute [start hh:mm 日月年] [ end hh:mm 日月年] //定义绝对时间access-list <100~199> {permit | deny} <协议> <源地址> <反向掩码> <目的地址> <反向掩码> eq 端口time-range <时间范围名称> //配ACL时引入时间范围十三、网络地址转换1、静态NATip nat inside soure static <私有IP> <公有IP>interface f0/m //内部端口启用NATip nat insideinterface s1/n //外部端口启用NATip nat outside2、动态NATaccess-list <1~99> permit | deny <源地址> <反向掩码>ip nat pool <地址池名> <开始公有IP> <结束公有IP> netmask <掩码>ip nat inside soure list <ACL表号> pool <地址池名> [overload] //配地址复用加overload 十四、PPP认证1、PAP认证interface serial 0/0encapsulation pppip address <IP地址> <掩码>主认证方:username user_name password 0 pass_wordppp authentication pap被认证方:配置认证用户名和密码Router(config-if)# ppp pap sent-username user_name password 0 pass_word2、CHAP认证主认证方:配置认证用户名和密码Router(config)# username user_name password 0 pass_word启用CHAP认证Router(config-if)# ppp authentication chap配置认证用的用户名Router(config-if)# ppp chap hostname user_name被认证方:配置认证用户名和密码Router(config)# username user_name password 0 pass_word配置认证用的密码Router(config-if)# ppp chap password 0 pass_word优先使用username设置的密码;没有再用ppp chap设置的。
思科Cisco路由器配置——使用OSPF协议实现的全网互通配置实验详解
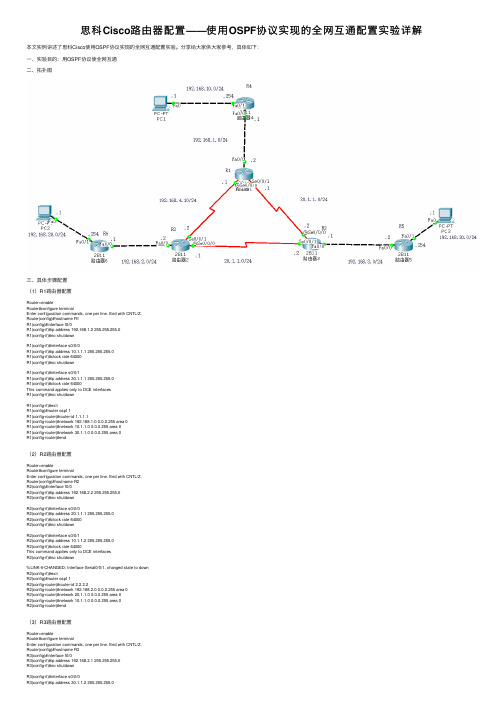
思科Cisco路由器配置——使⽤OSPF协议实现的全⽹互通配置实验详解本⽂实例讲述了思科Cisco使⽤OSPF协议实现的全⽹互通配置实验。
分享给⼤家供⼤家参考,具体如下:⼀、实验⽬的:⽤OSPF协议使全⽹互通⼆、拓扑图三、具体步骤配置(1)R1路由器配置Router>enableRouter#configure terminalEnter configuration commands, one per line. End with CNTL/Z.Router(config)#hostname R1R1(config)#interface f0/0R1(config-if)#ip address 192.168.1.2 255.255.255.0R1(config-if)#no shutdownR1(config-if)#interface s0/0/0R1(config-if)#ip address 10.1.1.1 255.255.255.0R1(config-if)#clock rate 64000R1(config-if)#no shutdownR1(config-if)#interface s0/0/1R1(config-if)#ip address 30.1.1.1 255.255.255.0R1(config-if)#clock rate 64000This command applies only to DCE interfacesR1(config-if)#no shutdownR1(config-if)#exitR1(config)#router ospf 1R1(config-router)#router-id 1.1.1.1R1(config-router)#network 192.168.1.0 0.0.0.255 area 0R1(config-router)#network 10.1.1.0 0.0.0.255 area 0R1(config-router)#network 30.1.1.0 0.0.0.255 area 0R1(config-router)#end(2)R2路由器配置Router>enableRouter#configure terminalEnter configuration commands, one per line. End with CNTL/Z.Router(config)#hostname R2R2(config)#interface f0/0R2(config-if)#ip address 192.168.2.2 255.255.255.0R2(config-if)#no shutdownR2(config-if)#interface s0/0/0R2(config-if)#ip address 20.1.1.1 255.255.255.0R2(config-if)#clock rate 64000R2(config-if)#no shutdownR2(config-if)#interface s0/0/1R2(config-if)#ip address 10.1.1.2 255.255.255.0R2(config-if)#clock rate 64000This command applies only to DCE interfacesR2(config-if)#no shutdown%LINK-5-CHANGED: Interface Serial0/0/1, changed state to downR2(config-if)#exitR2(config)#router ospf 1R2(config-router)#router-id 2.2.2.2R2(config-router)#network 192.168.2.0 0.0.0.255 area 0R2(config-router)#network 20.1.1.0 0.0.0.255 area 0R2(config-router)#network 10.1.1.0 0.0.0.255 area 0R2(config-router)#end(3)R3路由器配置Router>enableRouter#configure terminalEnter configuration commands, one per line. End with CNTL/Z.Router(config)#hostname R3R3(config)#interface f0/0R3(config-if)#ip address 192.168.3.1 255.255.255.0R3(config-if)#no shutdownR3(config-if)#interface s0/0/0R3(config-if)#ip address 30.1.1.2 255.255.255.0R3(config-if)#clock rate 64000R3(config-if)#no shutdown%LINK-5-CHANGED: Interface Serial0/0/0, changed state to down R3(config-if)#interface s0/0/1R3(config-if)#ip address 20.1.1.2 255.255.255.0R3(config-if)#clock rate 64000This command applies only to DCE interfacesR3(config-if)#no shutdown%LINK-5-CHANGED: Interface Serial0/0/1, changed state to down R3(config-if)#exitR3(config)#router ospf 1R3(config-router)#router-id 3.3.3.3R3(config-router)#network 192.168.3.0 0.0.0.255 area 0R3(config-router)#network 30.1.1.0 0.0.0.255 area 0R3(config-router)#network 20.1.1.0 0.0.0.255 area 0R3(config-router)#end(4)R4路由器配置Router>enableRouter#configure terminalEnter configuration commands, one per line. End with CNTL/Z. Router(config)#hostname R4R4(config)#interface f0/0R4(config-if)#ip address 192.168.1.1 255.255.255.0R4(config-if)#no shutdownR4(config-if)#interface f0/1R4(config-if)#ip address 192.168.10.254 255.255.255.0R4(config-if)#no shutdownR4(config-if)#exitR4(config)#router ospf 1R4(config-router)#router-id 4.4.4.4R4(config-router)#network 192.168.1.0 0.0.0.255 area 0R4(config-router)#network 192.168.10.0 0.0.0.255 area 0R4(config-router)#end(5)R5路由器配置Router>enableRouter#configure terminalEnter configuration commands, one per line. End with CNTL/Z. Router(config)#hostname R5R5(config)#interface f0/0R5(config-if)#ip address 192.168.3.2 255.255.255.0R5(config-if)#no shutdownR5(config-if)#interface f0/1R5(config-if)#ip address 192.168.30.254 255.255.255.0R5(config-if)#no shutdownR5(config-if)#exitR5(config)#router ospf 1R5(config-router)#router-id 5.5.5.5R5(config-router)#network 192.168.3.0 0.0.0.255 area 0R5(config-router)#network 192.168.30.0 0.0.0.255 area 0R5(config-router)#end(6)R6路由器配置Router>enableRouter#configure terminalEnter configuration commands, one per line. End with CNTL/Z. Router(config)#hostname R6R6(config)#interface f0/0R6(config-if)#ip address 192.168.2.1 255.255.255.0R6(config-if)#no shutdownR6(config-if)#interface f0/1R6(config-if)#ip address 192.168.20.254 255.255.255.0R6(config-if)#no shutdownR6(config-if)#exitR6(config)#router ospf 1R6(config-router)#router-id 6.6.6.6R6(config-router)#network 192.168.2.0 0.0.0.255 area 0R6(config-router)#network 192.168.20.0 0.0.0.255 area 0R6(config-router)#end四、验证测试1、查看R1路由表信息2、查看ip路由协议配置与统计信息3、查看OSPF数据库信息4、查看OSPF进程及区域的细节。
CISCO官方配置手册OSPFv3

Americas Headquarters:Cisco Systems, Inc., 170 West Tasman Drive, San Jose, CA 95134-1706USA © 2007 Cisco Systems, Inc. All rights reserved.Implementing OSPF for IPv6First Published: March 17, 2003Last Updated: May 1, 2006The Implementing OSPF for IPv6module expands on OSPF to provide support for IPv6routing prefixes.This module describes the concepts and tasks you need to implement OSPF for IPv6 on your network.Finding Feature Information in This Module Your Cisco IOS software release may not support all of the features documented in this module.To reach links to specific feature documentation in this module and to see a list of the releases in which each feature is supported,use the “Feature Information for Implementing OSPF for IPv6”section on page 209or the “Start Here: Cisco IOS Software Release Specifics for IPv6 Features”document.Finding Support Information for Platforms and Cisco IOS and Catalyst OS Software Images Use Cisco Feature Navigator to find information about platform support and Cisco IOS and Catalyst OS software image support. To access Cisco Feature Navigator, go to /go/cfn . An account on is not required.Contents •Prerequisites for Implementing OSPF for IPv6, page 188•Restrictions for Implementing OSPF for IPv6, page 188•Information About Implementing OSPF for IPv6, page 188•How to Implement OSPF for IPv6, page 193•Configuration Examples for Implementing OSPF for IPv6, page 206•Additional References, page 208•Feature Information for Implementing OSPF for IPv6, page 209Implementing OSPF for IPv6 Prerequisites for Implementing OSPF for IPv6188Implementing IPv6 for Cisco IOS SoftwarePrerequisites for Implementing OSPF for IPv6Before you enable OSPF for IPv6 on an interface, you must do the following:•Complete the OSPF network strategy and planning for your IPv6 network. For example, you must decide whether multiple areas are required.•Enable IPv6 unicast routing.•Enable IPv6 on the interface.•Configure the IP Security (IPSec) secure socket application program interface (API) on OSPF for IPv6 in order to enable authentication and encryption.This document assumes that you are familiar with IPv4. Refer to the publications referenced in the“Related Documents” section for IPv4 configuration and command reference information.Restrictions for Implementing OSPF for IPv6•When running a dual-stack IP network with OSPF version2for IPv4and OSPF for IPv6,be careful when changing the defaults for commands used to enable OSPF for IPv6. Changing these defaultsmay affect your OSPF for IPv6 network, possibly adversely.•Authentication is supported as of Cisco IOS Release 12.3(4)T.•ESP authentication and encryption are supported as of Cisco IOS Release 12.4(9)T.Information About Implementing OSPF for IPv6To implement OSPF for IPv6, you need to understand the following concepts:•How OSPF for IPv6 Works, page188•Comparison of OSPF for IPv6 and OSPF Version 2, page189•LSA Types for IPv6, page189•Force SPF in OSPF for IPv6, page191•Load Balancing in OSPF for IPv6, page191•Importing Addresses into OSPF for IPv6, page191•OSPF for IPv6 Customization, page192•OSPF for IPv6 Authentication Support with IPSec, page192How OSPF for IPv6 WorksOSPF is a routing protocol for IP. It is a link-state protocol, as opposed to a distance-vector protocol.Think of a link as being an interface on a networking device. A link-state protocol makes its routingdecisions based on the states of the links that connect source and destination machines. The state of alink is a description of that interface and its relationship to its neighboring networking devices. Theinterface information includes the IPv6prefix of the interface,the network mask,the type of network itis connected to, the routers connected to that network, and so on. This information is propagated invarious type of LSAs.Implementing OSPF for IPv6Information About Implementing OSPF for IPv6A router’s collection of LSA data is stored in a link-state database.The contents of the database,whensubjected to the Dijkstra algorithm, result in the creation of the OSPF routing table. The differencebetween the database and the routing table is that the database contains a complete collection of rawdata;the routing table contains a list of shortest paths to known destinations via specific router interfaceports.OSPF version3, which is described in RFC2740, supports IPv6.Comparison of OSPF for IPv6 and OSPF Version 2Much of the OSPF for IPv6 feature is the same as in OSPF version 2. OSPF version 3 for IPv6, whichis described in RFC2740,expands on OSPF version2to provide support for IPv6routing prefixes andthe larger size of IPv6 addresses.In OSPF for IPv6,a routing process does not need to be explicitly created.Enabling OSPF for IPv6onan interface will cause a routing process, and its associated configuration, to be created.In OSPF for IPv6,each interface must be enabled using commands in interface configuration mode.Thisfeature is different from OSPF version 2, in which interfaces are indirectly enabled using the routerconfiguration mode.When using a nonbroadcast multiaccess (NBMA) interface in OSPF for IPv6, users must manuallyconfigure the router with the list of neighbors. Neighboring routers are identified by their router ID.In IPv6,users can configure many address prefixes on an interface.In OSPF for IPv6,all address prefixeson an interface are included by default. Users cannot select some address prefixes to be imported intoOSPF for IPv6; either all address prefixes on an interface are imported, or no address prefixes on aninterface are imported.Unlike OSPF version 2, multiple instances of OSPF for IPv6 can be run on a link.In OSPF for IPv6,it is possible that no IPv4addresses will be configured on any interface.In this case,the user must use the router-id command to configure a router ID before the OSPF process will bestarted. A router ID is a 32-bit opaque number. OSPF version 2 takes advantage of the 32-bit IPv4address to pick an IPv4 address as the router ID. If an IPv4 address does exist when OSPF for IPv6 isenabled on an interface,then that IPv4address is used for the router ID.If more than one IPv4addressis available, a router ID is chosen using the same rules as for OSPF version 2.OSPF automatically prefers a loopback interface over any other kind, and it chooses the highest IPaddress among all loopback interfaces. If no loopback interfaces are present, the highest IP address inthe router is chosen. You cannot tell OSPF to use any particular interface.For further information about configuring a router ID and the router-id command,refer to“ConfiguringOSPF” chapter of the Cisco IOS IP Configuration Guide and Cisco IOS IP Command Reference,Volume2of4: Routing Protocols, Release 12.4.LSA Types for IPv6The following list describes LSA types, each of which has a different purpose:•Router LSAs(Type1)—Describes the link state and costs of a router’s links to the area.These LSAs are flooded within an area only.The LSA indicates if the router is an Area Border Router(ABR)orAutonomous System Boundary Router (ASBR), and if it is one end of a virtual link. Type 1 LSAsare also used to advertise stub networks.In OSPF for IPv6,these LSAs have no address informationImplementing IPv6 for Cisco IOS Software189Implementing OSPF for IPv6 Information About Implementing OSPF for IPv6190Implementing IPv6 for Cisco IOS Softwareand are network-protocol-independent. In OSPF for IPv6, router interface information may bespread across multiple router LSAs. Receivers must concatenate all router LSAs originated by agiven router when running the SPF calculation.•Network LSAs (Type 2)—Describes the link-state and cost information for all routers attached to the network. This LSA is an aggregation of all the link-state and cost information in the network.Only a designated router tracks this information and can generate a network LSA.In OSPF for IPv6,network LSAs have no address information and are network-protocol-independent.•Interarea-prefix LSAs for ABRs (Type 3)—Advertises internal networks to routers in other areas (interarea routes). Type 3 LSAs may represent a single network or a set of networks summarizedinto one advertisement.Only ABRs generate summary LSAs.In OSPF for IPv6,addresses for theseLSAs are expressed as prefix,prefix length instead of address,mask.The default route is expressedas a prefix with length 0.•Interarea-router LSAs for ASBRs (Type 4)—Advertise the location of an ASBR. Routers that are trying to reach an external network use these advertisements to determine the best path to the nexthop. ASBRs generate Type 4 LSAs.•Autonomous system external LSAs(Type5)—Redistributes routes from another AS,usually froma different routing protocol into OSPF. In OSPF for IPv6, addresses for these LSAs are expressedas prefix,prefix length instead of address,mask. The default route is expressed as a prefix withlength 0.•Link LSAs (Type 8)—Have local-link flooding scope and are never flooded beyond the link with which they are associated.Link LSAs provide the link-local address of the router to all other routersattached to the link, inform other routers attached to the link of a list of IPv6 prefixes to associatewith the link,and allow the router to assert a collection of Options bits to associate with the networkLSA that will be originated for the link.•Intra-Area-Prefix LSAs (Type 9)—A router can originate multiple intra-area-prefix LSAs for each router or transit network, each with a unique link-state ID. The link-state ID for eachintra-area-prefix LSA describes its association to either the router LSA or the network LSA andcontains prefixes for stub and transit networks.An address prefix occurs in almost all newly defined LSAs. The prefix is represented by three fields: PrefixLength, PrefixOptions, and Address Prefix. In OSPF for IPv6, addresses for these LSAs areexpressed as prefix,prefix length instead of address,mask.The default route is expressed as a prefix with length0. Type 3 and Type 9 LSAs carry all IPv6 prefix information that, in IPv4, is included in router LSAs and network LSAs. The Options field in certain LSAs (router LSAs, network LSAs,interarea-router LSAs,and link LSAs)has been expanded to24bits to provide support for OSPF in IPv6.In OSPF for IPv6,the sole function of link-state ID in interarea-prefix LSAs,interarea-router LSAs,and autonomous-system external LSAs is to identify individual pieces of the link-state database. Alladdresses or router IDs that are expressed by the link-state ID in OSPF version2are carried in the body of the LSA in OSPF for IPv6.The link-state ID in network LSAs and link LSAs is always the interface ID of the originating router on the link being described. For this reason, network LSAs and link LSAs are now the only LSAs whose size cannot be limited.A network LSA must list all routers connected to the link,and a link LSA must list all of the address prefixes of a router on the link.NBMA in OSPF for IPv6On NBMA networks,the designated router(DR)or backup DR(BDR)performs the LSA flooding.Onpoint-to-point networks, flooding simply goes out an interface directly to a neighbor.Implementing OSPF for IPv6Information About Implementing OSPF for IPv6 Routers that share a common segment(Layer2link between two interfaces)become neighbors on thatsegment. OSPF uses the Hello protocol, periodically sending hello packets out each interface. Routersbecome neighbors when they see themselves listed in the neighbor’s hello packet. After two routersbecome neighbors, they may proceed to exchange and synchronize their databases, which creates anadjacency. Not all neighboring routers have an adjacency.On point-to-point and point-to-multipoint networks, the software floods routing updates to immediateneighbors. There is no DR or BDR; all routing information is flooded to each networking device.On broadcast or NBMA segments only,OSPF minimizes the amount of information being exchanged ona segment by choosing one router to be a DR and one router to be a BDR. Thus, the routers on thesegment have a central point of contact for information exchange. Instead of each router exchangingrouting updates with every other router on the segment,each router exchanges information with the DRand BDR. The DR and BDR relay the information to the other routers.The software looks at the priority of the routers on the segment to determine which routers will be theDR and BDR.The router with the highest priority is elected the DR.If there is a tie,then the router withthe higher router ID takes precedence.After the DR is elected,the BDR is elected the same way.A routerwith a router priority set to zero is ineligible to become the DR or BDR.When using NBMA in OSPF for IPv6, you cannot automatically detect neighbors. On an NBMAinterface, you must configure your neighbors manually using interface configuration mode. Force SPF in OSPF for IPv6When the process keyword is used with the clear ipv6ospf command,the OSPF database is cleared andrepopulated, and then the SPF algorithm is performed. When the force-spf keyword is used with theclear ipv6 ospf command, the OSPF database is not cleared before the SPF algorithm is performed. Load Balancing in OSPF for IPv6When a router learns multiple routes to a specific network via multiple routing processes (or routingprotocols), it installs the route with the lowest administrative distance in the routing table. Sometimesthe router must select a route from among many learned via the same routing process with the sameadministrative distance. In this case, the router chooses the path with the lowest cost (or metric) to thedestination.Each routing process calculates its cost differently and the costs may need to be manipulatedin order to achieve load balancing.OSPF performs load balancing automatically in the following way. If OSPF finds that it can reach adestination through more than one interface and each path has the same cost,it installs each path in therouting table. The only restriction on the number of paths to the same destination is controlled by themaximum-paths command. The default maximum paths is 16, and the range is from 1 to 64. Importing Addresses into OSPF for IPv6When importing the set of addresses specified on an interface on which OSPF for IPv6 is running intoOSPF for IPv6,users cannot select specific addresses to be imported.Either all addresses are imported,or no addresses are imported.Implementing IPv6 for Cisco IOS Software191Implementing OSPF for IPv6 Information About Implementing OSPF for IPv6192Implementing IPv6 for Cisco IOS SoftwareOSPF for IPv6 CustomizationYou can customize OSPF for IPv6for your network,but you likely will not need to do so.The defaultsfor OSPF in IPv6 are set to meet the requirements of most customers and features. If you must changethe defaults, refer to the IPv4 configuration guide and the IPv6 command reference to find theappropriate syntax.Caution Be careful when changing the defaults. Changing defaults will affect your OSPF for IPv6 network, possibly adversely.OSPF for IPv6 Authentication Support with IPSecIn order to ensure that OSPF for IPv6packets are not altered and re-sent to the router,causing the routerto behave in a way not desired by its managers,OSPF for IPv6packets must be authenticated.OSPF forIPv6 uses the IP Security (IPSec) secure socket application program interface (API) to addauthentication to OSPF for IPv6 packets. This API has been extended to provide support for IPv6.OSPF for IPv6 requires the use of IPSec to enable authentication. Crypto images are required to useauthentication, because only crypto images include the IPSec API needed for use with OSPF for IPv6.In OSPF for IPv6, authentication fields have been removed from OSPF headers. When OSPF runs onIPv6, OSPF requires the IPv6 authentication header (AH) or IPv6 ESP header to ensure integrity,authentication, and confidentiality of routing exchanges. IPv6 AH and ESP extension headers can beused to provide authentication and confidentiality to OSPF for IPv6.To use the IPSec AH, you must enable the ipv6 ospf authentication command. To use the IPSec ESP,you must enable the ipv6 ospf encryption command. The ESP header may be applied alone or incombination with the AH, and when ESP is used, both encryption and authentication are provided.Security services can be provided between a pair of communicating hosts, between a pair ofcommunicating security gateways, or between a security gateway and a host.To configure IPSec,users configure a security policy,which is a combination of the security policy index(SPI)and the key(the key is used to create and validate the hash value).IPSec for OSPF for IPv6can beconfigured on an interface or on an OSPF area. For higher security, users should configure a differentpolicy on each interface configured with IPSec.If a user configures IPSec for an OSPF area,the policyis applied to all of the interfaces in that area,except for the interfaces that have IPSec configured directly.Once IPSec is configured for OSPF for IPv6, IPSec is invisible to the user.The secure socket API is used by applications to secure traffic.The API needs to allow the applicationto open,listen,and close secure sockets.The binding between the application and the secure socket layeralso allows the secure socket layer to inform the application of changes to the socket,such as connectionopen and close events. The secure socket API is able to identify the socket; that is, it can identify thelocal and remote addresses, masks, ports, and protocol that carry the traffic requiring security.Each interface has a secure socket state, which can be one of the following:•NULL: Do not create a secure socket for the interface if authentication is configured for the area.•DOWN: IPSec has been configured for the interface (or the area that contains the interface), but OSPF for IPv6either has not requested IPSec to create a secure socket for this interface,or there isan error condition.•GOING UP: OSPF for IPv6 has requested a secure socket from IPSec and is waiting for aCRYPTO_SS_SOCKET_UP message from IPSec.•UP: OSPF has received a CRYPTO_SS_SOCKET_UP message from IPSec.Implementing OSPF for IPv6How to Implement OSPF for IPv6•CLOSING: The secure socket for the interface has been closed. A new socket may be opened for the interface, in which case the current secure socket makes the transition to the DOWN state.Otherwise, the interface will become UNCONFIGURED.•UNCONFIGURED: Authentication is not configured on the interface.OSPF will not send or accept packets while in the DOWN state.For further information on IPSec, refer to the Implementing IPSec in IPv6 Security document. OSPF for IPv6 Virtual LinksFor each virtual link, a master security information datablock is created for the virtual link. Because asecure socket must be opened on each interface, there will be a corresponding security informationdatablock for each interface in the transit area.The secure socket state is kept in the interface’s securityinformation datablock.The state field in the master security information datablock reflects the status ofall of the secure sockets opened for the virtual link.If all of the secure sockets are UP,then the securitystate for the virtual link will be set to UP.Packets sent on a virtual link with IPSec must use predetermined source and destination addresses.Thefirst local area address found in the router’s intra-area-prefix LSA for the area is used as the sourceaddress.This source address is saved in the area data structure and used when secure sockets are openedand packets sent over the virtual link.The virtual link will not transition to the point-to-point state untila source address is selected.Also,when the source or destination address changes,the previous securesockets must be closed and new secure sockets opened.For further information on IPSec and how to implement it, refer to the Implementing Security for IPv6module.How to Implement OSPF for IPv6This section contains the following procedures:•Enabling OSPF for IPv6 on an Interface, page193 (required)•Defining an OSPF for IPv6 Area Range, page194 (optional)•Configuring IPSec on OSPF for IPv6, page195 (optional)•Configuring NBMA Interfaces, page200 (optional)•Forcing an SPF Calculation, page201 (optional)•Verifying OSPF for IPv6 Configuration and Operation, page202 (optional)Enabling OSPF for IPv6 on an InterfaceThis task explains how to enable OSPF for IPv6routing and configure OSPF for IPv6on each interface.By default, OSPF for IPv6 routing is disabled and OSPF for IPv6 is not configured on an interface. SUMMARY STEPS1.enable2.configure terminal3.interface type numberImplementing IPv6 for Cisco IOS Software193Implementing OSPF for IPv6How to Implement OSPF for IPv6194Implementing IPv6 for Cisco IOS Software 4.ipv6 ospf process-id area area-id [instance instance-id ]DETAILED STEPSDefining an OSPF for IPv6 Area RangeThe cost of the summarized routes will be the highest cost of the routes being summarized.For example,if the following routes are summarized:OI 2001:0DB8:0:0:7::/64 [110/20]via FE80::A8BB:CCFF:FE00:6F00, Ethernet0/0OI 2001:0DB8:0:0:8::/64 [110/100]via FE80::A8BB:CCFF:FE00:6F00, Ethernet0/0OI 2001:0DB8:0:0:9::/64 [110/20]via FE80::A8BB:CCFF:FE00:6F00, Ethernet0/0They becomes one summarized route, as follows:OI 2001:0DB8::/48 [110/100]via FE80::A8BB:CCFF:FE00:6F00, Ethernet0/0This task explains how to consolidate or summarize routes for an OSPF area.PrerequisitesOSPF for IPv6 routing must be enabled.SUMMARY STEPS1.enable 2.configure terminalCommand or ActionPurpose Step 1enable Example:Router>enableEnables privileged EXEC mode.•Enter your password if prompted.Step 2configure terminal Example:Router#configure terminalEnters global configuration mode.Step 3interface type number Example:Router(config)#interface ethernet 0/0Specifies an interface type and number, and places therouter in interface configuration mode.Step 4ipv6 ospf process-id area area-id [instanceinstance-id ]Example:Router(config-if)#ipv6 ospf 1 area 0Enables OSPF for IPv6 on an interface.Implementing OSPF for IPv6How to Implement OSPF for IPv6195Implementing IPv6 for Cisco IOS Software 3.ipv6 router ospf process-id 4.area area-id range ipv6-prefix /prefix-length [advertise |not-advertise ] [cost cost ]DETAILED STEPSConfiguring IPSec on OSPF for IPv6Once you have configured OSPF for IPv6 and decided on your authentication, you must define thesecurity policy on each of the routers within the group.The security policy consists of the combination of the key and the SPI. To define a security policy, you must define an SPI and a key.You can configure an authentication or encryption policy either on an interface or for an OSPF area.When you configure for an area, the security policy is applied to all of the interfaces in the area. For higher security, use a different policy on each interface.You can configure authentication and encryption on virtual links.The following tasks explain how to configure authentication and encryption on an interface or in an OSPF area, and on virtual links.•Defining Authentication on an Interface, page 195•Defining Encryption on an Interface, page 196•Defining Authentication in an OSPF Area, page 197•Defining Encryption in an OSPF Area, page 198•Defining Authentication and Encryption for a Virtual Link in an OSPF Area, page 199Defining Authentication on an InterfaceThis task explains how to define authentication on an interface.Command or ActionPurpose Step 1enable Example:Router>enableEnables privileged EXEC mode.•Enter your password if prompted.Step 2configure terminal Example:Router#configure terminalEnters global configuration mode.Step 3ipv6 router ospf process-id Example:Router(config)#ipv6 router ospf 1Enables OSPF router configuration mode.Step 4area area-id range ipv6-prefix /prefix-length[advertise |not-advertise ] [cost cost ]Example:Router(config-rtr)#area range 1 2001:0DB8::/48Consolidates and summarizes routes at an area boundary.Implementing OSPF for IPv6How to Implement OSPF for IPv6196Implementing IPv6 for Cisco IOS Software PrerequisitesBefore you configure IPSec on an interface, you must configure OSPF for IPv6 on that interface.SUMMARY STEPS1.enable 2.configure terminal 3.interface type number 4.ipv6 ospf authentication ipsec spi spi md5[key-encryption-type {key |null }]DETAILED STEPSDefining Encryption on an InterfaceThis task describes how to define encryption on an interface.PrerequisitesBefore you configure IPSec on an interface, you must configure OSPF for IPv6 on that interface.SUMMARY STEPS1.enable 2.configure terminal 3.interface type numberCommand or ActionPurpose Step 1enable Example:Router>enableEnables privileged EXEC mode.•Enter your password if prompted.Step 2configure terminal Example:Router#configure terminalEnters global configuration mode.Step 3interface type number Example:Router(config)#interface ethernet 0/0Specifies an interface type and number, and places therouter in interface configuration mode.Step 4ipv6 ospf authentication ipsec spi spi md5[key-encryption-type {key |null }]Example:Router(config-if)#ipv6 ospf authenticationipsec spi 500 md51234567890abcdef1234567890abcdefSpecifies the authentication type for an interface.How to Implement OSPF for IPv6197Implementing IPv6 for Cisco IOS Software4.ipv6 ospf encryption {ipsec spi spi esp encryption-algorithm [[key-encryption-type ]key ]authentication-algorithm [key-encryption-type ]key |null }DETAILED STEPSDefining Authentication in an OSPF AreaThis task explains how to define authentication in an OSPF area.SUMMARY STEPS1.enable2.configure terminal3.ipv6 router ospf process-id4.area area-id authentication ipsec spi spi md5 [key-encryption-type ]keyCommand or ActionPurposeStep 1enableExample:Router>enableEnables privileged EXEC mode.•Enter your password if prompted.Step 2configure terminalExample:Router#configure terminalEnters global configuration mode.Step 3interface type numberExample:Router(config)#interface ethernet 0/0Specifies an interface type and number, and places the router in interface configuration mode.Step 4ipv6 ospf encryption {ipsec spi spi espencryption-algorithm [[key-encryption-type ]key ]authentication-algorithm[key-encryption-type ]key |null }Example:Router(config-if) ipv6 ospf encryption ipsec spi 1001 esp null sha1123456789A123456789B123456789C123456789DSpecifies the encryption type for an interface.How to Implement OSPF for IPv6198Implementing IPv6 for Cisco IOS SoftwareDETAILED STEPSDefining Encryption in an OSPF AreaThis task describes how to define encryption in an OSPF area.SUMMARY STEPS1.enable2.configure terminal3.ipv6 router ospf process-id4.area area-id encryption ipsec spi spi esp encryption-algorithm [[key-encryption-type ]key ]authentication-algorithm [key-encryption-type ]keyDETAILED STEPSCommand or ActionPurposeStep 1enableExample:Router>enableEnables privileged EXEC mode.•Enter your password if prompted.Step 2configure terminalExample:Router#configure terminalEnters global configuration mode.Step 3ipv6 router ospf process-idExample:Router(config)#ipv6 router ospf 1Enables OSPF router configuration mode.Step 4area area-id authentication ipsec spi spi md5[key-encryption-type ]keyExample:Router(config-rtr)#area 1authentication ipsec spi 678 md5 1234567890ABCDEF1234567890ABCDEFEnables authentication in an OSPF area.Command or ActionPurposeStep 1enableExample:Router>enableEnables privileged EXEC mode.•Enter your password if prompted.Step 2configure terminalExample:Router#configure terminalEnters global configuration mode.。
- 1、下载文档前请自行甄别文档内容的完整性,平台不提供额外的编辑、内容补充、找答案等附加服务。
- 2、"仅部分预览"的文档,不可在线预览部分如存在完整性等问题,可反馈申请退款(可完整预览的文档不适用该条件!)。
- 3、如文档侵犯您的权益,请联系客服反馈,我们会尽快为您处理(人工客服工作时间:9:00-18:30)。
7.5 distribute-list access-list-number out routing-process 192
7.6 distribute-list access-list-number in 197
2.11 area area-id stub 66
2.12 area area-id stub no-summary 72
2.13 area transit-area-id virtual-link router-id 76
2.14 area transit-area-id virtual-link router-id
4.6 default-information originate always metric-type type 148
4.7 default-information originate route-map route-map-name 152
第5章 为再次分布协议设置缺省的度量 159
5.1 default-metric cost 159
第3章 默认成本 129
3.1 auto-cost reference-bandwidth bandwidth 129
第4章 产生缺省路由 139
4.1 default-information originate 139
4.2 default-information originate always 142
7.13 distribute-list prefix prefix-list-name out 222
7.14 distribute-list prefix prefix-list-name out interface-type interface-number 222
7.15 distist-name out routing-process 222
14.2 redistribute routing-process process-id metric ospf-metric 281
14.3 redistribute routing-process process-id metric-type metric-type 281
14.4 redistribute routing-process process-id subnets 281
第17章 OSPF计时器 325
17.1 timers lsa-group-pacing seconds 325
17.2 timers spf delay interval 326
第18章 流量分担 329
18.1 traffic-share min across-interfaces 329
interval seconds 101
2.19 area transit-area-id virtual-link router-id hello-
interval seconds 107
2.20 area transit-area-id virtual-link router-id message-
169
6.4 distance ospf external administrative-distance 174
6.5 distance ospf inter-area administrative-distance 174
6.6 distance ospf intra-area administrative-distance 174
10.1 maximum-paths number-of-paths 237
第11章 OSPF邻居命令 243
11.1 neighbor ip-address 243
11.2 neighbor ip-address cost cost 256
11.3 neighbor ip-address database-filter all out 259
11.4 neighbor ip-address poll-interval interval 261
11.5 neighbor ip-address priority priority 263
第12章 OSPF网络命令 267
12.1 network ip-address wild-card-mask area area-id 267
第6章 管理距离 165
6.1 distance administrative-distance 165
6.2 distance administrative-distance source-ip- address source-ip-mask 169
6.3 distance administrative-distance source-ip- address source-ip-mask access-list-number
7.10 distribute-list access-list-name out routing-process 207
7.11 distribute-list prefix prefix-list-name in 212
7.12 distribute-list prefix prefix-list-name in interface-type interface-number 217
第7章 用分布列表过滤路由 181
7.1 distribute-list access- list-number in 181
7.2 distribute-list access-list-number in interface-type interface-number 186
7.3 distribute-list access-list-number out 191
authentication authentication-key password 82
2.15 area transit-area-id virtual-link router-id
authentication message-digest 82
2.16 area transit-area-id virtual-link router-id
4.3 default-information originate metric cost 145
4.4 default-information originate always metric cost 145
4.5 default-information originate metric-type type 148
digest-key key-id md5 password 112
2.21 area transit-area-id virtual-link router-id retransmit-interval seconds 119
2.22 area transit-area-id virtual-link router-id transmit-delay seconds 125
2.7 area area-id nssa no-summary 53
2.8 area area-id range ip-address mask 60
2.9 area area-id range ip-address mask advertise 60
2.10 area area-id range ip-address mask not-advertise 60
第13章 被动的OSPF接口 273
13.1 passive-interface interface-name interface-number 273
13.2 passive-interface default 276
第14章 路由的再次分布 281
14.1 redistribute routing-process process-id 281
14.5 redistribute routing-process process-id tag tag-value 282
14.6 redistribute routing-process process-id route-map route-map-name 292
第15章 控制OSPF路由器ID 307
第8章 MOSPF LSA的处理 231
8.1 ignore lsa mospf 231
第9章 记录OSPF邻居状态的改变 233
9.1 log-adjacency-changes 233
9.2 log adjacency-changes detail 233
第10章 最大路径配置 237
第1章 OSPF进程配置命令 3
1.1 router ospf process-id 3
1.2 route ospf process-id vrf name 5
第2章 OSPF区域命令 9
2.1 area area-id authentication 9
2.2 area area-id authentication message-digest 16
2.3 area area-id default-cost cost 25
2.4 area area-id nssa 30
2.5 area area-id nssa default-infromation-originate 36
