惠而浦B600E洗衣机说明书
惠而浦 上置式洗衣机系列 说明书
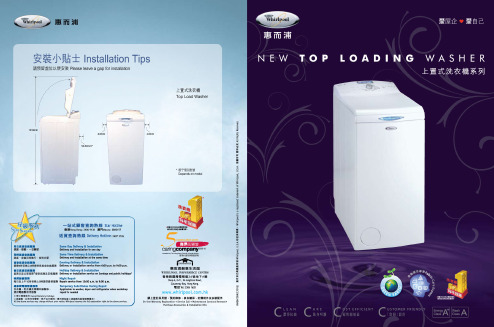
惠而浦早於1989年率先推出「星級服務」,以客為先,提供一流的售後服務。
我們會以客人的需要出發,為他們提供一站式的服務。
只需一個電話,服務大使便會為您安排預約安裝、維修、訂購配件、解答產品資料以及訂購產品等週全服務。
並會配合客人的作息時間,盡量安排假日、黃昏等送貨時段,提供同時送貨及安裝的安排。
我們的星級隊伍會定期接受總公司有關產品及科技培訓,不斷提昇隊伍的技術及標準,為用戶提供專業又貼心的服務。
我們會為產品提供全面的保養計劃,當中包括:師傅上門免費檢查及維修;免費產品回廠維修;免費更換原廠功能性零件;晚間維修服務,以及維修期間電器暫借服務,務求令客戶稱心安心。
Star Service 以客為尊星級服務 就是最好Simply the Best 惠而浦... Whirlpool...Whirlpool is attentive to provide you with both the best product and service. The “Star Service” launched in 1989 was the first of its kind and remains the most professional team until now. We promise a swift response to all inquiries over the phone, from appointment of installation and repair, sales orders of products and parts, to technical support. Flexible delivery arrangement can be made to suit customers’ schedules. Besides, our in-house service team is fully trained by experts from headquarters on the latest technology to give the best after-sales services. In addition, we offer comprehensive maintenance scheme which includes door-to-door free inspection, night repair and temporary substitutes during repair.作為領導同業之全球最大家電產品生產商,惠而浦一直致力以先進的生產科技應用於日常家電中,以為用家帶來更優質生活為目標。
惠而浦 洗衣机 说明书
- 按下 「開始/暫停」- 掣 預調時間從顯示器中消
失;再次按下 「開始/暫停」來立即開始選定的程序。
洗衣劑用量建議
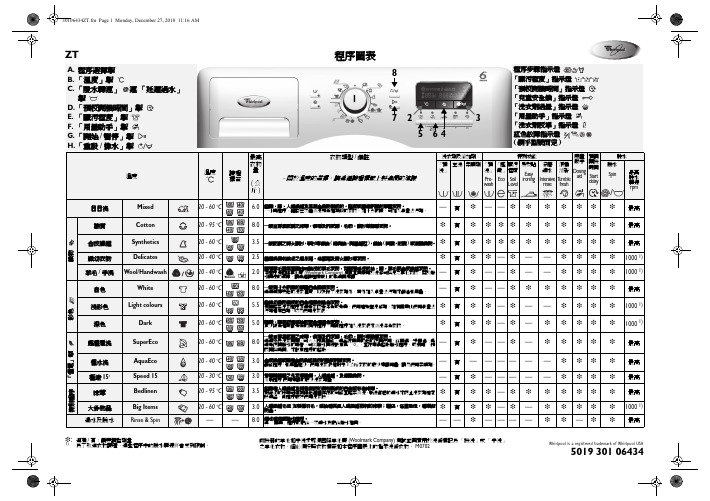
通過 「用量助手」掣,您可讓洗衣機就要洗的衣物量給您洗 衣劑用量的建議,這取決于選定的臟污程序和洗衣量的大 小。 • 助您節省洗衣劑和支持環保並保護肌膚,以避免洗衣劑過
量。 • 使用此功能前,您必須先讓洗衣機適應建議的洗衣劑用量。
有
❉ ——❉
—
校開機時間」來設定程序的啟動。
— — — — — — 3.0
合成纖維或棉和合成纖維混紡的輕微骯臟衣物。 節能程序,耗電量極少。使用洗衣液和對于 3 公斤衣物的最少建議用量。請勿使用柔順劑。
有
3.0
穿著時間短之外衣等棉質,人造纖維,及混棉織物。 清新程序 使用建議的最少洗衣劑量。
— 有 ❉ — —— —
1:40
超慳電洗
60
8.0
75
0.95
4:00
慳水洗
40
3.0
19
0.45
1:00
極速 15
30
3.0
30
0.20
0:15
床單
60
3.5
60
1.30
2:00
大件物品
40
3.0
74
0.75
1:30
能源消耗值,是根據 IEC/EN 60 456 標準所規定的正常條件下測量而獲得。由於供水壓力和溫度以及洗衣量和衣物類型的不同,各家庭的能源消耗值 與上表中的數值可能會有不同。 * 顯示器所顯示的時間也可能與表中所列數值有所偏差,因為時間按洗衣時的家庭實際情況計算。 ** 要在水泵排水前降低水溫,主洗步驟結束時會加入一些冷水。 *** 能源標簽的參考程序 ( 洗衣劑盒隔片已拆下來使用洗衣粉劑 )。
Whirlpool 自动式衣物洗衣机说明书
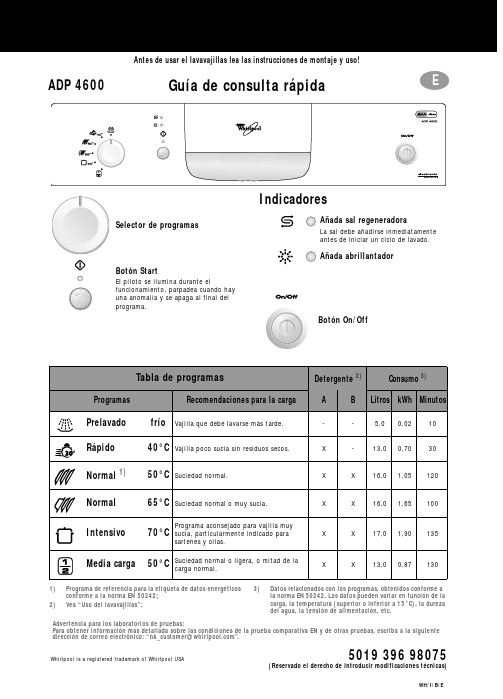
Whirlpool is a registered trademark of Whirlpool USA5019 396 98075ADP 4600Guía de consulta rápidaAntes de usar el lavavajillas lea las instrucciones de montaje y uso!(Reservado el derecho de introducir modificaciones técnicas)Añada sal regeneradoraLa sal debe añadirse inmediatamente antes de iniciar un ciclo de lavado.Añada abrillantador1)Programa de referencia para la etiqueta de datos energéticosconforme a la norma EN 50242;2)Vea “Uso del lavavajillas”;3)Datos relacionados con los programas, obtenidos conforme a la norma EN 50242. Los datos pueden variar en función de la carga, la temperatura (superior o inferior a 15°C), la dureza del agua, la tensión de alimentación, etc.Selector de programasBotón StartEl piloto se ilumina durante elfuncionamiento, parpadea cuando hay una anomalía y se apaga al final del programa.IndicadoresBotón On/OffTabla de programasDetergente 2)Consumo 3)ProgramasRecomendaciones para la cargaABLitros kWh MinutosPrelavado frío Vajilla que debe lavarse más tarde.--5,00,0210Rápido 40°C Vajilla poco sucia sin residuos secos.X -13,00,7030Normal 1)50°C Suciedad normal.XX16,01,05120Normal 65°C Suciedad normal o muy sucia.X X 16,01,65100Intensivo 70°C Programa aconsejado para vajilla muysucia, particularmente indicado parasartenes y ollas.X X 17,01,90135Media carga50°C Suciedad normal o ligera, o mitad de la carga normal.X X 13,00,87130Advertencia para los laboratorios de pruebas:Para obtener información más detallada sobre las condiciones de la prueba comparativa EN y de otras pruebas, escriba a la siguiente direccióndecorreoelectrónico:“*************************”.Cómo usar el lavavajillasPara mayor información lea las instrucciones de uso.Presione el botón ON /OFF.Compartimiento grande A:Cada ciclo de partimiento pequeño B:Sólo para programas con prelavado.Indicador mecánico C .Piloto eléctrico en el panel de mandos (si existe).Sólo si hay equipo de ablandamiento.Indicador mecánico D . Indicador eléctrico en el panel de mandos (si existe).Lea las instrucciones de carga.Se enciende el último programa seleccionado.Elija un programa (presionando el botón o mando).El piloto se enciende.Si es necesario (si existe). El piloto se enciende.El programa elegido queda memorizado (aunque se corte la corriente).-Abra la puerta sólo si es necesario (Atención: salida de vapor muy caliente).-Si el lavavajillas se apaga antes detiempo, cuando se vuelve a encender, el programa continúa desde donde se había interrumpido.Cuando se haya apagado el botón START: presione el botón ON/OFF . Todos los pilotos se apagan.Advertencia: cuando se abre la puerta, sale vapor muy caliente. Descargue el lavavajillas empezando por el cesto inferior.Encienda el lavavajillas Llenado del distribuidorde detergenteA B CControle el abrillantadorControle la sal regeneradoraCargue los cestos Cierre la puerta,abra el grifo de agua Seleccione el programaSeleccione lasfunciones suplementariasPresione el botón START“Cambiar programa”Mantenga presionado el botón START 2segundos hasta que el piloto Start se apague;Seleccione el nuevo programa y vuelva a presionar el botón START.C i c l o d e l a v a d oApague el lavavajillas Cierre el grifo de agua,descargue los cestosIndicaciones para la carga del lavavajillas y dotación de cestosCesto superior:según el modelo de lavavajillasSoporte multifunción (A): 1)Según la posición, utensilios largos, tazas y vasos. Son posibles tres posiciones.Soportes para la vajilla (B):Según la posición, platos, tazas y copas.Soporte para vasos giratorio (C): 2)Según la posición, vasos pequeños o copas.Los utensilios largos como, por ejemplo, tenedores de carne o cuchillos se han de colocar con la punta hacia el aparato.Media carga:Cargue sólo el cesto superior.Coloque el cesto de los cubiertos (D ) en el cesto superior.Regulación de la altura del cesto (vacío o cargado):•Regulación inferior: tire de las dos manillas del cesto (E ) hacia afuera y baje el cesto.•Regulación superior: tire de las dos manillas hacia arriba (E ) hasta que el cesto quede encastrado (esta es la regulación de fábrica).Los lados del cesto deben estar a la misma altura.Extracción del cesto superior para poder lavar platos grandes o bandejas en el cesto inferior:Abrir los seguros derecho eizquierdo (F ) de las guías del cesto y extraer el cesto superior.Cuando el cesto superior está colocado, los seguros deben estar cerrados.Cesto inferior:Según el modelo de lavavajillas, con soportes para platos rebatibles o fijos (G ).Media carga:Cargue sólo el cesto inferior.Mayor potencia de lavado sobre todo para platos y ollas.Cesto para los cubiertos (J) o (H):Algunos modelos están dotados de una rejilla (I ) para cubrir el cesto de los cubiertos. Cesto para los cubiertos (D ), si existe, sólo para aparatos con media carga.Los objetos que puedan causar heridas se han de colocar en el cesto con la punta hacia abajo.Utilice sólo vajillas aptas para el lavado en lavavajillas. No lave en el lavavajillas objetos no idóneos: piezas de madera o aluminio, utensilios de plástico, vajillas con decoraciones no esmaltadas, cubiertos de plata.Su revendedor le ofrece:1)Soporte multifunción (A) - N. serie AMH 369.2)Soporte para vasos giratorio (C) - N. serie WGH 1000.FFSeguro cerradoSeguro abiertoQué hacer en caso de...Si el lavavajillas presenta alguna anomalía de funcionamiento, verifique los siguientes detalles antes de llamar al Servicio de Asistencia (*vea el capítulo correspondiente en las instrucciones de uso).Problema Causa SoluciónEl lavavajillas nofunciona•No recibe agua.•Abra el grifo de agua.•El lavavajillas no carga suficiente agua.•Limpie el filtro de entrada del grifo del agua.•Verifique si el tubo de alimentación está doblado.•No hay corriente.•Enchufe la clavija en la toma de corriente.•Presione el botón START.•Cierre la puerta.•Controle el fusible de la casa.•Inicio del programa preseleccionado.•Si es necesario ponga el inicio del programa en “0”. Si la vajilla no quedaperfectamente seca•Abrillantador insuficiente.•Aumente la dosis*.•Queda agua en las cavidades de la vajilla.•Cargue la vajilla inclinada.Si la vajilla no queda perfectamente limpia •El chorro de agua no alcanza toda lasuperficie.•Coloque la vajilla de manera que las piezas no setoquen entre sí.Las cavidades de las piezas deben estar hacia abajo.•Detergente insuficiente.•Dosifique el detergente siguiendo las indicaciones delenvase.•Elección de un programa inadecuado.•Seleccione un programa de lavado más intenso.•Brazos aspersores bloqueados.•Los brazos aspersores tienen que girar libremente.•Boquillas de los brazos aspersoresatascadas.•Quite las impurezas que obstruyen el flujo del agua *.•Detergente no adecuado / demasiadoviejo.•Utilice un detergente de buena calidad.Residuos arenosos y granulares •Filtros atascados.•Controle regularmente los filtros y límpielos si esnecesario *.•Filtros mal introducidos.•Introduzca los filtros correctamente y bloquéelos *.Partes de plástico manchadas •Jugo de tomate / zanahoria,...•Según el material, si es necesario utilice undetergente con mayor poder blanqueador.Depósitos en la vajilla•poco adheridos•Rayas en la vajilla / en los vasos.•Aumente la dosis de abrillantador *.•Rayas / surcos en los vasos.•Reduzca la dosis de abrillantador *.•Capa de sal en la vajilla / en los vasos.•Cierre bien la tapa del recipiente de sal *.•muy adheridos•Ablandamiento del agua insuficiente,manchas calcáreas.•Regule el selector de la dureza del agua, si es necesario añada sal *.Vasos opacos / no brillantes •Este tipo de vasos no es lavable enlavavajillas.•Cargue vasos lavables en lavavajillas.Óxido en los cubiertos•No son de acero inoxidable.•Utilice cubiertos de acero inoxidable.Identificación de los errores del lavavajillas •El piloto START parpadea.•Indicador F... (si existe).•Compruebe que el conjunto de filtros no estéatascado y que la alimentaciónon del agua no estéinterrumpida (si fuera necesario, limpie los filtros *).Ponga de nuevo en marcha el programa. Mantengapulsada la tecla START durante 2 segundos, hasta quese apague el piloto correspondiente. Seleccione denuevo el programa y pulse la tecla START.Si tras efectuar los controles citados la anomalía persiste o se vuelve a presentar, apague el aparato y cierre el grifo del agua; luego póngase en contacto con el Servicio de Asistencia (las direcciones aparecen en la garantía).Tenga preparados los siguientes datos:•Tipo de anomalía.•Tipo y modelo de lavavajillas.•Código de asistencia (número de la etiqueta adhesiva de AsistenciaTécnica que está en la parte interior de la puerta, a la derecha)。
Whirlpool 电子洗衣机用户手册说明书
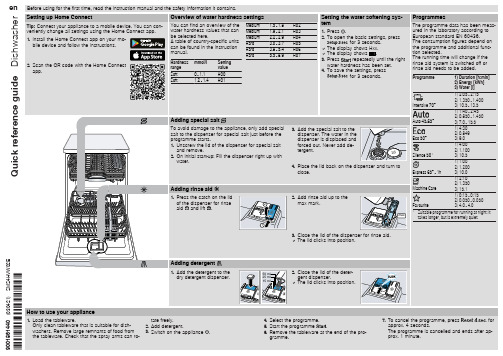
7. To cancel the programme, press
for
approx. 4 seconds.
The programme is cancelled and ends after ap-
prox. 1 minute.
Cleaning filters
1. After each wash check the filters for
Cause and troubleshooting
Supply hose is kinked. ▶ Install the supply hose without kinks.
Water tap is turned off. ▶ Turn on the water tap.
Water tap is jammed or furred up. ▶ Turn on the water tap.
The flow rate must be at least 10 l/min when the water supply is open.
The filters in the water connection of the supply or AquaStop hose are blocked. 1. Switch off the appliance. 2. Pull out the mains plug. 3. Turn off the water tap. 4. Unscrew the water connection. 5. Remove the filter from the sup-
4. Place the lid back on the dispenser and turn to close.
全自动波轮洗衣机基本使用方法

全自动波轮洗衣机基本使用方法全自动波轮洗衣机基本使用方法:1、模糊控制功能:打开水龙头-放入衣服和洗衣粉-盖好上盖-按电源键开机-按启动键,机器就进入模糊控制程序,自动根据衣服的多少设定水位和洗涤时间,自动执行一洗二漂三甩干,最后自动断电停机。
2、在上面按启动键之前,可以按程序、功能键等手动设定需要的单独程序和功能,然后按启动键执行。
3、甩干时需要将盖子关好,否则机器保护不动作。
4、底脚调整机器平衡后要锁紧,否则工作时桶晃动过大会触动防撞桶保护开关而停机。
5、整个洗衣过程中进水龙头要一直开启。
洁桶程序外观参数外形设计白色外型尺寸(高)915×(宽)526×(深)536mm 产品重量32Kg品牌荣事达Royalstar系列三动力系列型号XQBS50-882G颜色白色类别波轮式自动化程度全自动显示方式LED数码屏显示控制方式电脑控制开门方式顶开式排水方式下排水电机类型普通电机特色功能防缠绕支持儿童安全锁不支持预约功能支持干衣功能不支持夜间洗不支持电辅加热烘干不支持电辅加热洗涤不支持自动断电支持智能断电记忆不支持排水阀漏水保护不支持进水阀漏水保护不支持规格节能等级2级洗净比0.82水位选择(段)8洗衣程序喷瀑水流/自洁/洗涤/漂洗/脱水/浸泡洗涤容量(kg) 5洗涤功率(W)400脱水容量(kg) 5脱水功率(W)400水温调节范围常温箱体材质渗锌钢板内筒材质不锈钢电源规格220V/50HZ产品尺寸(深×宽×526×536×915高)mm产品重量(kg)33三动力核心技术之离合器通过新型离合器,由传统单轴驱动升级为三轴驱动,形成万向矢量水流,方向多变,动力澎湃,立体式的对衣物进行冲刷。
横向水流形成多维手搓洗涤方式,提高洗衣洁净度;纵向水流平衡上下水流速度和力度,让衣物自由舒展不缠绕。
清除污渍不缠绕,从里到外,洁净衣物每一面.兼顾波轮、搅拌式洗衣机优势,领先行业技术3-5年.三动力核心技术之双波轮三动力洗衣机采用创新双波轮设计,集合魔力S 波轮与搅拌波轮的优点,带来双重的洁净效果。
Whirlpool 洗衣机用户手册说明书

E AWO/D 43115TABLA DE PROGRAMAS❉:opcional / Sí : requiere dosificación1)Para un mejor cuidado de la ropa, en este programa la velocidad de centrifugado está limitada a 400 rpm.5019 301 10258Whirlpool is a registered trademark of Whirlpool USAProgramaEtiquetas de mante-nimiento Tipo de lavado/notas- Para seleccionar la temperatura, respete las recomendaciones del fabricante quefiguran en la etiqueta de mantenimientoCarga máx.kgDetergentes y aditivos Opciones especialesVelocidad máx.centri-fugado rpmPre-lavado Lavado PrincipalSuavizante Pre-lavado Lavado en frío Anti-arrugas Centri-fugado variableAlgodón40 - 60 - 95 °C40 - 60 - 95 °CRopa de cama, mantelería, ropa interior, toallas, camisas, etc., de algodón o lino con suciedad de normal a elevada.Para ropa muy sucia también se puede seleccionar la opción adicional de “prelavado”.5,0❉Sí❉❉❉❉❉1000Sintéticos 30 - 40 - 60 °C 30 - 40 - 60 °CBlusas, camisetas, delantales etc., con un con un grado de suciedad leve o normal de poliéster (Diolen, T revira), poliamida (Perlon, Nylon) o mezclas con algodón.2,5❉Sí❉❉❉❉❉1000Delicados30 - 40 °C 30 - 40 °CCortinas y prendas delicadas, vestidos, faldas y blusas.1,5❉Sí❉❉❉—❉1000Carga diaria40 °C40 °CT extiles de algodón o fibra sintética con suciedad leve o normal.3,0—Sí❉—❉❉❉1000Lavado rápido30 °C30 °CRopa externa poco usada de algodón, poliéster, poliamida y mezclas con algodón.3,0—Sí❉—❉—❉1000LanaFrío - 40 °C- 40 °C Sólo prendas de lana sin acabado de fieltro, etiquetadas con la marca de lana y como resistentes al lavado a máquina.1,0—Sí❉—❉—❉1000Lavado a mano40 °C 40 °C T extiles de lino, seda, lana y viscosa etiquetados como “lavar a mano”.1,0—Sí❉———❉4001)Lencería 30 °C30 °CEste ciclo es especialmente adecuado para la lencería fina (se recomienda el uso de una red para lavado).1,0—Sí❉—❉—❉4001)Aclarado y centrifugado—Igual que el último aclarado y el centrifugado final del programa “Algodón”.5,0——❉———❉1000Centrifugado —Este programa incluye un centrifugado intensivo. Es el mismo que en el programa “Algodón”.5,0——————❉1000Centrifugado suave —Este programa utiliza un centrifugado suave. Es el mismo que en el programa “Lana”.1,0——————❉1000Descarga de agua—El agua se elimina sin centrifugar.—————————A.Indicación de “Puerta abierta”La lavadora posee unas funciones de seguridad automáticas gracias a las cuales reconoce e indicainmediatamente los posibles fallos y reacciona adecuadamente, p. ej.:B.Indicación de “Reparación”C.Indicación de “Grifo cerrado”D.Indicación de “Limpie la bomba”E.Selector de programasF.Botón “Inicio/Pausa”G.Selector de velocidad de centrifugadoH.Indicador de avance del programaI.Botón “Reinicio”DHC FIGEB A5019 301 10258Whirlpool is a registered trademark of Whirlpool USAAñada detergente según lo indicado en la primera página y en las instrucciones de uso. Cierre la puerta y gire el selector de programas al programa y la temperatura que desee. Destella el indicador luminoso situado junto al botón “Inicio/Pausa”.Pulse los botones de las opciones que desee. Seencienden los indicadores luminosos correspondientes.Si no es posible una combinación de programa y opciones adicionales, los indicadores luminosos se apagan automáticamente. Las combinaciones de opciones que no son posibles quedan automáticamente desactivadas.Botón “Prelavado”•Sólo para cargas de ropa muy sucia (por ejemplo con arena, suciedad gruesa). El tiempo del ciclo aumenta aproximadamente 15 minutos.Botón “Lavado en frío”•El agua sólo se calienta hasta 20 °C•Opción adecuada para ropa delicada con una temperatura máxima recomendada en la etiqueta de 30 °C.•Sólo se puede seleccionar en el paso de temperatura mínima de cada programa.Botón “Antiarrugas”•Puede utilizarse junto con los programas “Algodón”, “T ejidos sintéticos” y “Carga diaria” para facilitar el planchado.•Mejora la calidad del agua y realiza un centrifugado suave.Botón “Centrifugado variable”•Cada programa posee una velocidad máxima de centrifugado predefinida.•Pulse el botón para ajustar otra velocidad de centrifugado.•Si selecciona la velocidad de centrifugado “0” el centrifugado final se cancela pero los niveles intermedios del centrifugado continúan durante el aclarado. El agua se elimina sin centrifugar.DATOS DE CONSUMOPrograma T emperatura (°C)Carga(kg)Agua(l)Energía(kWh)Duración aprox. delprograma (horas :minutos)*Algodón 955,049**1,902:00Algodón ***605,0440,852:20Algodón 405,0440,602:00T ejidos sintéticos 602,550**0,70 1.30T ejidos sintéticos 402,5450,551:15T ejidos delicados 301,5500,500:45Prendas mixtas 403,0450,451:00Lavado rápido303,0400,400:30Lana401,0550,600:45Lavado a mano 401,0450,600:40Lencería301,0450,500:40Los datos de consumo se midieron en condiciones normalizadas de acuerdo con la norma CEI/EN 60456. Los valores de consumo en el hogar pueden variar respecto a los valores de la tabla según la presión y temperatura del agua, la carga y el tipo de lavado.*El indicador de tiempo restante puede desviarse de los valores de la tabla, porque considera las condiciones de la vivienda que corresponden en ese momento.**Para reducir la temperatura del agua, se agrega agua fría al final del ciclo principal de lavado, antes de que la bombavacíe el agua.***Programa de referencia para la etiqueta de energía.AÑADA DETERGENTE, CIERRE LA PUERTA Y SELECCIONE EL PROGRAMASELECCIONE CUALQUIER OPCIÓN Abra el grifo y pulse el botón “Inicio/Pausa”. Destella el indicador luminoso situado junto al botón“Inicio/Pausa”. El indicador de secuencia del programa muestra la fase actual del programa, de izquierda a derecha a través de Lavado, Aclarado y Centrifugado/Descarga.•Cuando termina la fase del programa, se apaga el indicador luminoso correspondiente.Antes del inicio y de la finalización de un programa, los indicadores luminosos se encienden para señalar que se puede abrir la puerta. Mientras el programa de lavado esté en marcha, la puerta permanece cerrada y por ninguna razón se debe intentar forzar su apertura. En caso de una necesidad urgente de abrirla durante un programa en marcha, consulte “Cancelación (Reinicio) de un programa antes de que termine”.“Reparación”El indicador de “Reparación” se puede encender por el fallo de un componente eléctrico. Consulte la “Guía para la solución de problemas” incluida con lasinstrucciones de uso; si el fallo continúa, póngase en contacto con el Servicio posventa.“Grifo cerrado”La lavadora no recibe alimentación de agua o es insuficiente. Abra el grifo; si la indicación sigue encendida, consulte la “Guía para la solución de problemas” incluida con las instrucciones de uso.“Limpie la bomba”La lavadora no descarga el agua. Compruebe si el tubo de descarga está doblado o si hay que limpiar el filtro; en este último caso, consulte en las instrucciones de uso (“Extracción del filtro”).•T odos los indicadores de secuencia delprograma están apagados y se enciende el indicador de “Puerta abierta”.1.Gire el selector de programas a la posición de “Apagado/O”.2.Cierre el grifo.3.Abra la puerta y retire la ropa.4.Deje la puerta entreabierta para facilitar el secadodel tambor.1.Pulse el botón “Inicio/Pausa” para detenertemporalmente el programa. El indicador destella.2.Seleccione el nuevo programa (con latemperatura), las opciones suplementarias y (si lo desea) otra velocidad de centrifugado.3.Pulse nuevamente el botón “Inicio/Pausa”. Elnuevo programa continúa el programa de lavado en la fase en que se interrumpió el anterior. En este programa no es necesario añadir más detergente.El botón “Reinicio” permite cancelar un programa antes del final.•Pulse el botón “Reinicio” durante, almenos, 3 segundos. El agua se descarga antes de poder abrir la puerta.INICIO DEL PROGRAMAINDICACIÓN DE “PUERTA ABIERTA”INDICACIONES ROJAS FIN DEL PROGRAMACAMBIO DE PROGRAMA O DE OPCIONES DESPUÉS DEL INICIO DEL PROGRAMA CANCELACIÓN (REINICIO) DE UN PROGRAMA ANTES DE QUE TERMINE。
Whirlpool 电器产品说明书
Because Whirlpool Corporation policy includes a continuous commitment to improve our products, we reserve the right to change materials and specifications without notice.
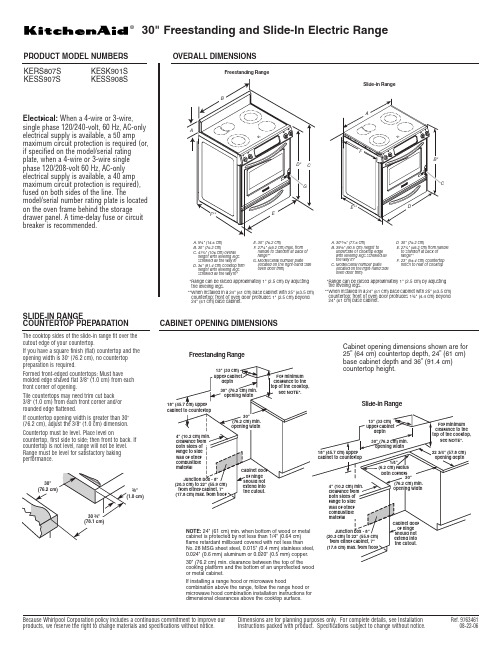
G. Model/serial number plate (located on the right-hand side oven door trim)
*Range can be raised approximately 1" (2.5 cm) by adjusting the leveling legs.
see NOTE*.
Cabinet opening dimensions shown are for 25” (64 cm) countertop depth, 24” (61 cm) base cabinet depth and 36” (91.4 cm) countertop height.
18" (45.7 cm) upper cabinet to countertop
from either cabinet, 7" (17.8 cm) max. from floor
Cabinet door or hinge
should not extend into the cutout.
13" (33 cm)
upper cabinet
depthC
18" (45.7 cm) upper cabinet to countertop
D 30" (76.2 cm)
Whirlpool 洗衣机用户指南说明书
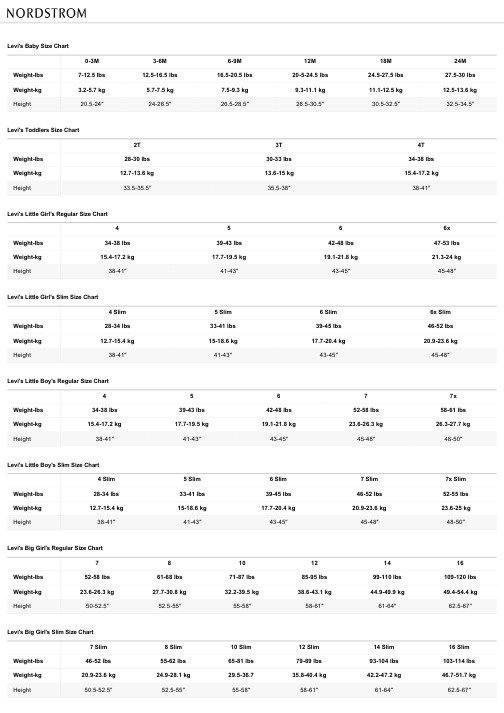
Weightkg
15.417.2 kg
Height
3841″
5 3943 lbs 17.719.5 kg
4143″
6 4248 lbs 19.121.8 kg
4345″
6x 4753 lbs 21.324 kg
4548″
Levi's Little Girl's Slim Size Chart
Levi's Baby Size Chart
03M
Weightlbs
712.5 lbs
Weightkg
3.25.7 kg
Height
20.524″
36M 12.516.5 lbs
5.77.5 kg 2426.5″
69M 16.520.5 lbs
7.59.3 kg 26.528.5″
10.5 (Plus) 8190 lbs 36.740.8 kg 54.557.5″
12.5 (Plus) 91108 lbs 41.349 kg 57.560.5″
14.5 (Plus) 109120 lbs 49.454.4 kg
60.562″
16.5 (Plus) 121132 lbs 54.959.9 kg
16 Slim 103114 lbs 46.751.7 kg
62.567″
Levi's Big Girl's Plus Size Chart
7.5 (Plus)
Weightlbs
6371 lbs
Weightkg
28.630.4 kg
Height
50.552.5″
美国Whirlpool洗衣机指南说明书

Description Inches mmA Width of FC door15-7/16392.1B Width of RC door20-1/16509.5C Space between doors1/4 6.35D Overal width35-¾90831-9/16801.6 E Height of doorhandles53-11/161363.6 F Height to top of doorhandlesG Height of doors65-11/161668.4H Height of grille3-¼82.533-½850.9 I Height to bottom ofthe dispenserJ Widht of Dispenser9-⅞250.8 K Height of Dispenser9-¾947.62-½63.5 L Water line locationdistance from side6-⅞174.6 M Water line locationdistance from bottomElectrical : A 115 volt, 60 Hz, AC only, 15- or 20-amp fused, grounded electrical supply is required. It is recommended that a separate circuit serving only your refrigerator be provided. Use an outlet that cannot be turned off by a switch. Do not use an extension cord.Water lines:are not foamed in and are externalPower chord locationWater : A cold water supply with water pressure of between 30 and 120 psi (207 and 827 kPa) is required to operate the water dispenser and ice maker. If you have questions about your water pPower chordTypeLenghtInches mmStandard75-⅝1920Description Inches mmA Width from FC side of refrigerator to11-⅜288.9 handle - door fully open 135°B Width from FC side of refrigerator to2-¾69.8 handle - door open 90°C Width from RC side of refrigerator to14-⅝365.1 handle - door fully open 135°D Depth without doors23-¾603.25E Depth with doors26-⅞682.6F Depth with handles29-9/16750.8G Depth with doors open 90°45-5/161150.9H Space required for water lines250.8 and power chordTo ensure proper ventilation for your refrigerator, allow for ¹⁄₂" (1.27 cm) of space on each side and at the top.Allow for 1" (2.54 cm) of space behind the refrigerator. If your refrigerator has an ice maker, allow extra space at the back for the water line connections. When installing your refrigerator next to a fixed wall, leave a 2" (5.08 cm)minimum space on each side (depending on your model) to allow the doors to swing open.NOTES :■ This refrigerator is intended for use in a location where the temperature ranges from a minimum of 55°F (13°C) to a maximum of 110°F (43°C). The preferred room temperature range for optimum performance, which reduces electricity usage and provides superior cooling, is between 60°F (15°C) and 90°F (32°C). It is recommended that you do not install the refrigerator near a heat source, such as an oven or radiator.■ Normal minimum cabinet cut-out width required for product installation is 36" (91.44 cm). However, if the product is placed against an extended wall and the ability to remove the crisper pans is desired, an additional 18" (45.72 cm) of cabinet width is required, so a total cabinet opening width of 54" (137.16 cm) is recommended.Location RequirementsDescriptionInches mmA Height of recessed refrigerator68-⅜1736.7B Height to top of hinges 68-13/161747.8C Total height691752.6D Depth to back of hinges 21-¾552.4E Depth without doors 23-¾603.2F Depth with doors 26-⅞682.6GDepth with handles29-9/16750.8Interior dimensions Width HeightRefrigerator Compartment 17 ⅝ in 447.6 mm 62 ⅛ in 1577.9 mm Freezer Compartment12-⅛ in 307.9 mm60 ⅜ in(1533.5 mmRefrigerator Compartment FeaturesDescriptionAwidthBheightCdepthMeat Pan17-½ in 444.5 mm 8-⅞ in 225.4 mm 11-¾ in 298.4 mm Crisper pan17-½ in 444.5 mm8-⅞ in 225.4 mm11-¾ in 298.4 mmSnack Pan17-½ in 444.5 mm 5-⅞ in 149.2 mm 15-¼ in 387.3 mm Shelf17-½ in 13 inMeat Pan Crisper PanSnack PanShelfTop binFreezer Compartment FeaturesDescriptionAwidthBheightCdepthBottom bin11-¾ in 298.4 mm 7-⅝ in 193.6 mm 11-½ in 292.1 mm Top bin11-¾ in 298.4 mm 8-¾ in 222.2 mm 11-½ in 292.1 mmBottom Shelf11-¾ in 298.4 mm N/A 10-⅝ in 269.8 mmTop Shelf11-¾ in N/A12-¾ in Bottom bin Top ShelfBottom Shelf。
洗衣机的使用说明流程

洗衣机的使用说明流程1. 准备工作在使用洗衣机之前,您需要做一些准备工作。
以下是准备工作的步骤:•确保洗衣机稳定放置在平坦的地面上。
•检查洗衣机的供电线是否连接正常,插头是否牢固。
•检查洗衣机的进水管和排水管是否连接正确,并且没有漏水的问题。
•准备好洗衣粉或洗衣液,根据洗衣衣物的种类和脏污程度选择合适的洗涤剂。
2. 选择洗涤程序现代洗衣机通常具有多种洗涤程序可供选择。
根据您的衣物种类、脏污程度和个人喜好,选择合适的洗涤程序。
以下是常见的洗涤程序:•快速洗:适用于衣物较少和脏污程度较轻的情况,洗涤时间较短。
•标准洗:适用于大部分衣物的日常清洗,洗涤时间适中。
•强力洗:适用于脏污较重的衣物,洗涤时间较长。
•柔洗:适用于容易变形或需要轻柔清洗的衣物,如羊毛衫等。
3. 调整洗涤参数洗涤参数的调整可以帮助您更好地适应不同种类的衣物需求。
以下是常见的洗涤参数:•温度:根据衣物的种类和洗涤要求,选择适合的洗涤温度。
通常有冷水、温水和热水三个选项。
•转速:根据衣物的种类和洗涤要求,选择合适的洗涤转速。
较高的转速可以更好地去除衣物上的污渍,但可能会引起衣物磨损。
•预洗:对于脏污较重的衣物,可以选择预洗功能,先进行简单的洗涤,再进行主洗,提高洗涤效果。
4. 加载衣物在加载衣物时,需要注意以下几点:•不要超载:不要将洗衣机装得太满,以免影响洗涤效果和洗衣机的使用寿命。
•分类装载:将不同种类的衣物分类装载,如内衣、裤子、上衣等。
这样可以避免颜色混合和衣物变形的问题。
•注意细节:检查衣物的口袋和拉链是否关闭,以免洗涤过程中损坏其他衣物或洗涤机。
5. 开始洗涤在开始洗涤前,请确保您已经按照上述步骤进行了所有的准备工作。
按下洗涤机的启动按钮,洗衣机将根据您选择的洗涤程序和参数开始工作。
6. 完成洗涤当洗涤结束时,洗衣机会发出声音提示。
以下是完成洗涤后的操作步骤:•关闭洗衣机的电源开关。
•将洗衣机的洗涤室门打开,将洗涤的衣物取出。
洗衣机说明书

·检查儿童锁功能是否设置? ·洗涤上盖是否打开?
电磁兼容 家用电器、电动工具和类似器具的要求 第1部分:发射 电磁兼容 限值 谐波电流发射限值(设备每相输入电流≤16A) 家 用和 类似 用途 电器 噪音 限值 电 动 洗衣 机能效水效 限 定值 及等 级 家 用 和类 似用 途电 器的 安全 离 心式脱 水机 的特殊 要求
th
设定脱水速度时,该数码窗显示设定的脱水速度。(仅限WB70803B) 例:300转/分
快 速 启 动
自 定 义 程 序
各 程 序 的 选 用 指 导 适合衣物的类型 程序 各种洗涤物 自编 一般日常的洗涤物 标准 脏污严重的耐用外套 强洗 每天换洗不脏的衣物 快速 毛毯或大物 大件 羊毛、饰有花边和刺绣的衣物 羊毛 仅需漂洗脱水的衣物 漂脱 仅需漂洗的衣物 单漂 仅需脱水甩干的衣物 单脱 移 动 。 浸泡 洗涤 漂洗 各 程 序 默 认 的 运 行 情 况 漂洗方式 洗涤时间 脱水时间 约10分 一次喷淋+一次蓄水 约5分 两次蓄水漂洗 约10分 约5分 两次溢水漂洗 约12分 约8分 一次蓄水漂洗 约5分 约3分 两次溢水漂洗 约12分 约8分 两次蓄水漂洗 约6分 约2分 一次蓄水漂洗 约5分 一次蓄水漂洗 约5分 预约
、“ 快 速” 合适的水位、水流等工作程序。
4 .按 “过 程 选择” 键, 选 择您想 要 进行 的 项目, 每按 一次灯 光 按以下 顺 序循环 脱水
WB60803/WB60903 (档) 约15 约18 (档) 约21 约24 约28 约32 约38 约42 WB70803/WB70903/WB70803B 9 约45 9 约45 9 约54 10 约50 10 约52 10 约60
其
它
智能洗衣机产品说明书省心洗涤解决方案

智能洗衣机产品说明书省心洗涤解决方案智能洗衣机产品说明书:省心洗涤解决方案尊敬的用户,感谢您选择我们的智能洗衣机产品。
为了让您在使用过程中能够得到更好的体验,我们特别为您准备了以下详尽的产品说明。
请仔细阅读本说明书,并按照指示正确操作,以充分发挥产品的性能。
一、产品简介我们的智能洗衣机结合了最新的科技与设计理念,旨在为您提供省心洗涤的解决方案。
该洗衣机搭载了先进的智能控制系统,以及多种高效的洗衣模式,从而满足您不同类型衣物的需求。
二、产品特点1. 智能控制系统:该洗衣机配备了智能控制面板,可轻松选择洗衣模式、设置洗涤时间,以及调整温度和转速等参数。
操作简单明了,即使是第一次使用洗衣机的用户也能轻松上手。
2. 多种洗衣模式:我们的洗衣机内置了多种洗衣模式,包括标准洗涤、快速洗涤、羊毛/丝绸洗涤、漂洗/脱水等,可根据不同的布料类型和污渍程度选择适当的模式,确保洗涤效果的最佳。
3. 节能环保:智能洗衣机采用节能设计,通过智能控制系统的优化,可以实现洗涤过程的节约水电,最大限度地保护环境,降低您的用水用电成本。
4. 安全可靠:我们的洗衣机具备多重安全保护措施,如过热保护、漏电保护等,确保您的使用安全。
5. 静音设计:智能洗衣机采用了静音技术,减少噪音产生,让您在洗衣过程中享受更为宁静的环境。
三、使用方法1. 准备工作:将洗衣机与供水源和电源连接稳固,确保电源插座与接地线连接正常。
2. 加入衣物:打开洗衣机的洗衣门,将待洗衣物放入洗衣筒中,并确保不超过洗衣机的最大容量。
3. 添加洗涤剂:根据洗衣物的数量和类型,适量添加洗涤液体或洗衣粉。
请勿过量使用洗涤剂,以免影响洗涤效果。
4. 选择洗衣模式:通过控制面板选择合适的洗衣模式,并根据需要调整其他参数,如温度和转速。
5. 启动洗衣机:确认好设置后,按下启动按钮,洗衣机即开始运行。
在整个洗涤过程中,请勿随意打开洗衣门,以免影响洗衣效果。
6. 完成洗涤:洗衣机显示程序结束后,可将洗涤好的衣物取出晾晒或烘干。
惠而浦滚筒洗衣机使用说明书
®/™ ©2021 Todos los derechos reservados. Se usa bajo licencia enCanadá.Guía rápida para comenzar a usar la lavadora de carga superiorINSTRUCCIONES DEFUNCIONAMIENTOPeligro de incendioNunca coloque en la lavadora artículos que estén humedecidos con gasolina o cualquier otro líquido inflamable.Ninguna lavadora puede eliminar completamente el aceite.No seque ningún artículo que haya tenido alguna vez cualquier tipo de aceite (incluyendo aceites de cocina).No seguir estas instrucciones puede ocasionar la muerte,explosión o incendio.ADVERTENCIA:A fin de reducir el riesgo de incendio,choque eléctrico o lesiones personales,lea las INSTRUCCIONESIMPORTANTES DE SEGURIDAD que se encuentran en el Manual del propietario,antes de usar el electrodoméstico.NOTAS:�No todas las funciones y los ciclos están en todos los modelos,y el aspecto del panel de control puede variar.�Si el modelo cuenta con interfaz táctil,el panel de control incluiráuna superficie sensible que responde al toque ligero de los dedos.Para cerciorarse de que se hayan registrado sus selecciones,toque el panel de control con la punta del dedo,no con la uña.Al seleccionar un ajuste o una opción,simplemente toque el nombre.�Si su modelo tiene teclas físicas,no olvide presionarlas con firmeza.�Al finalizar el ciclo,las opciones y ajustes de opciones se guardan en memoria para el ciclo siguiente.Sin embargo,si laalimentación eléctrica de la lavadora se interrumpe,los ajustes y opciones volverán a los valores de fábrica por defecto.Paso 1.Agregue detergente de altorendimiento (HE)NOTA:Consulte la sección"Agregar productos de lavandería"para obtener más información sobre cómo agregar detergente HE,suavizante de telas o blanqueador.Paso 2.CargarprendasColoque las prendas en montones flojos y de modo parejo alrededor de la pared de la canasta para lograr resultados óptimos.Paso 3.Cierre la tapa;y luegoseleccione el ciclo y losajustes.Paso 4.Presione Start/Pause/Unlock(Inicio/Pausa/Cancelar).Guía de ciclos –Ciclo Normal (Normal)Para un cuidado óptimo de las telas,elija el ciclo que sea más adecuado para la carga que va a lavar.Los ajustes recomendados para obtener un rendimiento óptimo están resaltados en negrita .No todos los ciclos y opciones están disponibles en todos los modelos.No todos los ajustes y las opciones están disponibles con cada ciclo.NOTA:Todos los enjuagues son con agua frírmación de pedidos en líneaPara obtener información de mantenimiento e instrucciones de instalación, almacenamiento en invierno, y consejos para el traslado, consulte el Manual del propietario que se incluye con su máquina.Para obtener información acerca de cualquiera de los siguientes artículos, la guía completa de ciclos, garantía, dimensiones detalladas de los productos o instrucciones de uso completas, visitehttps:///owners, en Canadá, https://www.whirlpool.ca/owners). Esto le podría ahorrar el costo de una llamada al servicio técnico.Sin embargo,si necesita contactarnos,use la información que aparece debajo para la región que corresponda.Estados Unidos:1–866–698–2538Whirlpool Brand Home Appliances Customer eXperience Center 553 Benson RoadBenton Harbor, MI 49022–2692Canadá:1–800-807-6777Whirlpool Brand Home Appliances Customer eXperience Centre 200–6750 Century Ave.Mississauga, Ontario L5N 0B7Descripciones de los botonesSOIL LEVEL (N ivel de suciedad) (E n algunos modelos)Seleccione el ajuste más adecuado para su carga. Para telas resistentes con suciedad profunda, seleccione Heavy Soil Level (Nivel de suciedad intenso) para un mayor tiempo de lavado. Para telas delicadas y con suciedad ligera, seleccione nivel de suciedad Light (ligero) o Extra Light (extra ligero) para un menor tiempo de lavado. Un ajuste para un nivel de suciedad más ligero ayuda a reducir los enredos y la formación de arrugas.WASH TEMP (Temperatura de lavado)Este control detecta y mantiene temperaturas de agua uniformes mediante la regulación del agua fría y caliente queentra.Diseñada para utilizarsolamente detergentes de alto rendimiento (HE).Seleccione una temperatura de lavado según el tipo de tela que estélavando y el nivel de suciedad.Para obtener los mejores resultados,siga las instrucciones de las etiquetas de las prendas y use el agua delavado más caliente que las telas puedan resistir.NOTAS:�En algunos modelos y ciclos,es posible que el agua tibia y caliente sea más fría que su lavadora anterior.�Incluso en un lavado con agua fría y fresca,puede agregarse un poco de agua tibia a la lavadora para mantener una temperaturamínima.Todos los enjuagues son con agua fría.B otón de Start/Pause (Botón de Inicio/Pausa)Presiónelo para poner en marcha el ciclo seleccionado. Presiónelo para iniciar el ciclo seleccionado; presiónelo nuevamente para hacer una pausa en el ciclo y desbloquear la tapa. Cierre la tapa y presiónelo para reanudar elciclo. Manténgalo presionado para cancelar un ciclo y desagotar el agua de la lavadora.NOTA: Si la lavadora está exprimiendo, puede tomar varios minutos para que se destrabe la tapa.Luces De Progress (Progreso)Las luces de Progress (Progreso) muestran el progreso de un ciclo. Esposible que note sonidos o pausas en cada etapa del proceso, los cuales son diferentes a los de las lavadoras tradicionales.S ensing /F ill (D etección/llenado)Cuando se presiona el botón Start/Pause (Inicio/Pausa) y la perilla WaterLevel (Nivel de agua) se ajusta en Auto Sensing (Detección automática), lalavadora se llenará y comenzará a detectar para determinar el tamaño de la carga y el equilibrio. Una pausa breve pero notable en la acción del ciclo se produce durante la detección. Esto es normal.Una vez que finalice la detección, la lavadora se llenará hasta el nivelapropiado para el tamaño de la carga y, en ciertos ciclos, la agitación ocurrirá mientras la canasta se llena de agua. Esto también es normal. Cuando la lavadora haya terminado de llenar, comenzará la fase de lavado del ciclo. Para asegurar que se detecte el tamañode carga más preciso, evite abrir la tapa durante la fase de detección.NOTA: Se hará una pausa en las fases de detección y lavado si se abre latapa no bloqueada. Cierre la tapa para reanudar el ciclo. Si se deja la tapa abierta más de 10 minutos, el ciclo se cancelará y la lavadora bombeará paraextraer el agua.Wash (Lavado )La lavadora se llenará hasta el nivel de agua correcto de acuerdo con el tamaño de la carga y la selección de Water Level (Nivel de agua). Es posibleque ciertos ciclos agiten durante el proceso de llenado para reforzar el lavado. Cuando comience el ciclo de lavado, escuchará que el agitador HE aumenta la velocidad.PERILLA DE CICLOS DE LAVADO Use la perilla de ciclos de lavado para seleccionar entre los ciclos disponibles en su lavadora. Gire la perilla para seleccionar un ciclo parala carga de lavado. Consulte en línea la “Guía de ciclos” para obtenerdescripciones detalladas.RINSE OPTION (O pción de enjuague)Seleccione la opción más adecuada para su carga. Seleccione Autowith Extra Rinse (auto con enjuague adicional), Deep Water Rinse(enjuague con agua profunda) o Deep Water with Extra Rinse (enjuague con agua profunda con enjuague adicional) cuando se usa suavizante de telas durante un ciclo. La misma asegura que el suavizante de telas sea agregado en el momento apropiado durante el enjuague, para que se distribuya uniformemente.WATER LEVEL (Nivel de agua )Ajuste la perilla Water Level (nivel de agua) en la configuración Auto Sensing (detección automática) y la lavadora detectaráautomáticamente el nivel de agua apropiado para el tamaño y el tipo de la carga.Si desea agregar la cantidad máxima de agua al ciclo de lavado, gire la perilla Water Level (Nivel de agua) hasta el ajuste Deep Water Wash (Lavado con agua profunda).NOTA: Es probable que los tiempos de los ciclos sean más largosdebido al mayor tiempo de llenado cuando se usa la opción Deep WaterWash (Lavado con agua profunda).Agregar productos de lavanderíaIMPORTANTE:El uso de un detergente que no sea de alto rendimiento probablemente derive en tiempos de ciclo más prolongados y menor rendimiento del enjuague.También puede resultar en mal funcionamiento de los componentes y,con el tiempo,la acumulación de moho.Los detergentes de alto rendimiento (HE)deben producir poca espuma y dispersarse rápidamente para producir la cantidad adecuada de espuma a fin de lograr un rendimientoóptimo.Agregar detergente de alto rendimiento (HE) en la canasta:Agregue una cantidad medida de detergente de alto rendimiento (HE) o un paquete de detergente de lavandería de dosis única en la canasta. Si va a usar un producto pararealzar el lavado, como Oxi, blanqueador no decolorante ocristales de suavizante para telas, agréguelo en el fondo dela canasta de lavado antes de agregar las prendas.NOTA: Siga las instrucciones del fabricante para determinar la cantidad de los productos de lavandería que debe usar.W11556538AAgregar blanqueador líquidocon cloro:No llene en exceso,no diluya ni utilice más de 1taza (236mL).No utilice blanqueador para ropa decolor ni productos Oxi en el mismo ciclo con blanqueador líquido concloro.IMPORTANTE:La perilla Rinse Option (Opción de enjuague)debe ajustarse en Auto with Extra Rinse (Automático con enjuagueadicional),Deep Water Rinse (Enjuague con agua profunda)o Deep Water with Extra Rinse (Agua profunda con enjuague adicional)cuando se usa suavizante de telas en el dosificadorcorrespondiente.Esto asegura que el suavizante para telas seagregue en el momento correcto durante la fase de enjuague y que se distribuya uniformemente.Cómo agregar suavizante de telas líquido al dosificador:Vierta una cantidad medida de suavizante de telas líquido en el depósito; siempre siga las instrucciones del fabricante para usar la cantidad correcta de suavizante de telas según el tamaño de la carga. Para diluir el suavizante líquido para telas, llene el depósito con agua tibia hasta que el líquido llegue a la parte inferior del borde. Vea las flechas de la línea máxima de llenado.Cómo agregar manualmente el suavizante de telas líquido a la carga de lavado:Durante el último enjuague, espere hasta que la lavadora haya terminado de llenarse y presione el botón S tart /Pause (Inicio/Pausa) para hacer una pausa en la lavadora. Levante la tapa y agregue la cantidad medida recomendada de suavizante de telas líquido. No utilice más que la cantidad recomendada. Cierre la tapa y presione el botón S tart /Pause (Inicio/Pausa) nuevamente para poner en marcha la lavadora. Siempre siga las instrucciones del fabricante para usar la cantidad correcta de suavizante detelas según el tamaño de su carga.Los sonidos del motor pueden cambiar en las distintas etapas del ciclo de lavado mientras la lavadora realiza las distintas acciones de lavado.NOTA: La tapa se bloqueará automáticamente después de que finalice la fase de lavado y antes de que ocurra el exprimido inicial, y permanecerá bloqueada durante el resto del ciclo.R inse (Enjuague)Ciertos ciclos usan un enjuague con rociado, que agrega agua a la tina mientras la canasta centrifuga. Podrá escuchar el motor encendiéndose brevemente (zumbido corto) para mover la canasta mientras la lavadora se llena. En ciertos casos, la lavadora emitirá sonidos similares a los del ciclo de lavado a medida que llena, aclara y mueve la carga.F inal Spin (Centrifugado final)La lavadora centrifuga la carga a velocidades cada vez mayores para la extracción adecuada del agua, según el ciclo y la velocidad de centrifugado seleccionados.Cycle Complete (C iclo C ompleto)Una vez que se haya terminado el ciclo, la tapa se desbloqueará y seencenderá esta luz. Saque la carga de inmediato para obtener los mejores resultados.Lid Locked (Tapa bloqueada)La característica de bloqueo de la tapa permite velocidades de centrifugado más altas. Cuando la luz está encendida, la tapa estábloqueada y no se puede abrir si no se hace una pausa en el ciclo. Cuando la luz está apagada, la tapa puede abrirse.Para abrir la tapa después de que se ha bloqueado, presione Start/Pause/Cancel (Inicio/Pausa/Cancelar). La tapa se desbloqueará una vez que se haya detenido el movimiento de la lavadora. Esto puede tomar variosminutos si la carga estaba centrifugándose a alta velocidad. Presione Start/Pause/Cancel (Inicio/Pausa/Cancelar) con la tapa cerrada para reanudar el ciclo.ADVERTENCIA: No lave prendas resistentes o tipo resistentes al agua. No seguir de cerca estas instrucciones puede resultar en una condición de vibración anormal y desequilibrio que podría ocasionaren lesiones físicas, daños a la propiedad y/o daños al aparato.06/21LlenadoMáximoRegistrar ProductoProgramar ServicioTécnico Instrucciones Y Preguntas FrecuentesManuales Y DescargasAgregar Plan DeServicioPiezas Filtro Accesorios。
Whirlpool 洗衣机说明书
Model : TDLR70123產品型號 : TDLR70123Health & Safety, Use & Care, Installation Guide andOnline Warranty Registration Information產品安全指引、使用說明、安裝指南及網上登記保養資料.sg 2繁體中文312EN3 USER MANUALUSER MANUAL3 INDEXWarranty information are at page 24 of the User Manual.44445566678-910-11 Control PanelProgramme ChartProduct DescriptionDetergent DispenserProgrammesFirst Time UseDaily UsePause or Change a Running ProgrammeD oor Open IndicatorProgramme EndOptionsChild LockBleachingHints & TipsCleaning & MaintenanceTransport and HandlingTroubleshootingSafety InstructionsInstallation Guide55555666CLEANING & MAINTENANCEFor any cleaning and maintenance, switch off and unplug the washing machine. Do not use flammable fluids to clean the washing machine. Clean and maintain your washing machine periodically (at least 4 times per year).Cleaning the outside of the washing machineUse a soft damp cloth to clean the outer parts of the washing machine. Do not use glass or general purpose cleaners, scouring powder or similar to clean the control panel – these substances might damage the printing.Detergent dispenserClean regularly, at least three or four times a year, to prevent detergent build-up:Press the release button to release the detergent dispenser and remove it. A small quantity of water can remain in the dispenser, thus you should carry it in an upright position. Wash the dispenser using running water. Youcan also remove the siphon cap on the back of the dispenser for cleaning. Replace the siphon cap in the dispenser (if removed) Reinstall the dispenser by locating the dispenser’s bottom tabs into the appropriate openings on the lid, and by pushing the dispenser against the lid until it locks into place. Make sure that the detergent dispenser is correctly reinstalled.Checking the water supply hoseCheck the inlet hose regularly for brittleness and cracks. If damaged, replace it by a new hose available through our After-Sales Service or your specialist dealer. Depending on the hose type: If the inlet hose has a transparent red, the water stop function was triggered, and the hose must be replaced by a new one. For unscrewing this hose, press the release button (if available) while unscrewing the hose.TRANSPORT AND HANDLINGPull out the mains plug, and close the water tap. Disconnect the inlet hose from the water tap, and remove the drain hose from your draining point. Remove all rest water from the hoses and washing machine and fix hoses so that they cannot get damaged during transport. To facilitate moving the machine, pull the mobility lever situated at the bottom front (if available on your model) out a little by hand. Pull the washing machine out to the stop with the foot. Afterwards push the mobility lever back into the original stable position. Refit the transport bracket. Follow the instructions for removing thetransport bracket in the INSTALATION GUIDE in reverse order.left to right (picture b , c ) by hand it will fall into the drum.4. Open the drum. You can recover the object through the hole in the drum.5. Refit the lifter from inside the drum: Position the plastic tip above the hole on the right side of the drum (picture d ). Then slide the plastic lifter from right to left until it clips.6. Close the drum flaps again, turn the drum through half a turn and check the positioning of the blade at all its anchorage points.7. Plug the washing machine in again.EN7TROUBLESHOOTINGThe washing machine may sometimes not work properly for certain reasons. Before calling the After-sales service, it is recommended to check to see if the problem can be easily resolved using the following list.8SAFETY INSTRUCTIONSIMPORTANT TO BE READ AND OBSERVEDBefore using the appliance, read these safety instructions. Keep them nearby for future reference. These instructions and the appliance itself provide important safety warnings, to be observed at all times. The manufacturer declines any liability for failure to observe these safety instructions, for inappropriate use of the appliance or incorrect setting of controls.Very young children (0-3 years) should be keptshould be kept away from theappliance unless continuously supervised. Children from 8 years old and above and persons with reduced physical, sensory or mental capabilities or lack of experience and knowledge can use this appliance only if they aresupervised or have been given instructions on safe use and understand the hazards involved. Childrenmust not play with the appliance. Cleaning and user maintenance must not be carried outby children without supervision.Never open the door forcibly or use it as a step.CAUTION: The appliance is notintended to beas a timer, or separate remote controlled system.This appliance is intended to be used in household andkitchen areas in shops,offices and other working environments; farm houses; by clients in hotels, motels, bed & breakfastand other residential environments.Do not load themachine above the maximum (kg of drycloth) indicated in the programme table.This appliance is not for professional use. Do not useDo not use any solvents (e.g. turpentine, benzene),containing solvents, scouring powder, glass or general purposecleaners, or flammable fluids; do not machinewash fabrics that have been treated with solvents or flammable liquids.The appliance must be handled and installed by two to unpack and install - risk of cuts.If you want to stack a dryer on top of your washingmachine, first contact our After-Sales Service or yourspecialist dealer toverify whether this is possible. This is only possible ifthe dryer is attached to the washing machine by means of appropriate stacking kit availablethrough our After- Sales Service or your specialist dealer.Move the appliance without lifting it by the Installation, including water supply (if any) and a qualified technician. Do not repair or replace any part of the appliance unless specifically stated in the user manual. Keep children away from the installation site. After unpacking the appliance, make sure that it has not been damaged during transport. In the event ofproblems, contact the dealer or your nearest After-sales Service. Once installed, packaging waste (plastic, styrofoam parts etc.) must be stored out of reach of children - risk of suff ocation. The appliance must be disconnected from the power supply before any installation operation - risk of electric shock. During installation, make sure the appliance does not damage the power cable - risk of file or electric shock. Only activate the appliance when the installation has been completed.Do not install your appliance where it may be to extreme conditions, such as: poor ventilation, temperatures below 5 °C or above 35 °C.When installing the appliance make sure that the feet are stable and resting on the floor, adjustingthem as required, and check that the appliance is perfectly to level using a spirit level.If the appliance is being installed on wood or secure a 60 x 60 x 3 cm (at least) sheet of plywood to thefloor then place the appliance on top of this.Connect the water inlet hose(s) to the water supply with the regulations of your local water company.For cold fill only models: do not connect to the hot For models with hot fill: the hot water inlet The washing machine is fitted with transport bolts to any possible damage to the interior during transport. Before using the machine, it is imperative thatthe transport bolts are removed. After their removal,cover the openings with the 4 enclosed plastic caps.After installation of the device, wait a few hours starting it so that it acclimates to the environmental conditions of the room.Make sure that the ventilation openings in the base not obstructed by a carpet or other material.EN9CLEANING AND MAINTENANCEdisconnected from the power supply before performing any maintenance operation. To avoid risk of personal injury use protective gloves (risk of laceration) and safety shoes (risk of contusion); be sure to handle by two persons (reduce load); never use steam cleaning equipment (risk of electric shock).Non-professional repairs not authorized by the manufacturer could result in a risk to health and safety, for which the manufacturer cannot be held liable. Any defect or damage caused from non-professional repairs or maintenance will not be covered by the guarantee.Use only new hoses to connect the appliance to theThe supply water pressure must bein theIt must be possible to disconnect the appliance from or by a multi-poleswitch installed upstream of thesocket in accordancewith the wiring rules and the appliance must be earthed in conformity with national electrical safety standards.Do not use extension leads, multiple sockets or The electricalcomponents must not be accessible to the user after installation. Do not use the appliance when you are wet or barefoot . Do not operate this appliance if it has a damaged power cable or plug, if it is not working properly, or if it has been damaged ordropped.If the supply cord is damaged, it must be replaced an identical one by the manufacturer, its serviceagent or similarly qualified persons in order to avoid a hazard - risk of electric shock.DISPOSAL OF PACKAGING MATERIALS The packaging material is 100% recyclable and ismarked with the recycle symbol .The various parts of the packaging must therefore be disposed of responsibly and in full compliance with local authority regulations governing waste disposal.DISPOSAL OF HOUSEHOLD APPLIANCESThis appliance is manufactured with recyclable or reusable materials. Dispose of it in accordance with local waste disposal regulations. For further information on the treatment, recovery and recycling of householdelectrical appliances, contact your local authority, the collection service for household waste or the store where you purchased the appliance. This appliance is marked in compliance with European Directive 2012/19/EU, Waste Electrical and Electronic Equipment (WEEE). By ensuring this product is disposed of correctly, you will help prevent negative consequences for theenvironment and human health.The symbol on the product theaccompanying documentation indicates that it should not be treated taken to an appropriate collection center for the recycling of electrical and electronic equipment.INSTALLATION GUIDE10ENABmax 100 cm/39 inch min 55 cm/22 inchm a x 2,5m/8,2 f e e tmax 100 cm/39 inch min 55 cm/22 inch6使用說明書感謝您購買惠而浦產品為了獲得更完善的服務,有關保養資訊請參考第24頁索引使用說明書12131313131414141414控制面板 程序表 產品介紹 洗滌劑投放盒 洗衣程序説明首次使用日常使用程序運行過程中暫停或變更設定 開門指示燈 程序結束功能選項童鎖使用含氯漂白劑提示與貼士保養及維護搬運及處理故障排除指南安全説明安裝指引141515151617-1819-20141515CH保養及維護若需進行任何保養和維護,請關閉電源並拔下電源插頭。
惠而浦11公斤全自动洗衣机使用说明书
Operating Instructions, TipsOperating the Washer...........................6–13Agitator..........................................................7Control Settings...........................................6Cycle Descriptions.. (5)Cycle Times..................................................7Energy-Saving Tips.....................................7Fabric and Cycle Settings.........................8Lint Filter................................................7, 18Soak................................................................6Washer Lid Latch........................................6Operating the Dryer.............................14–17Air Fluff Drying..........................................15Automatic and Timed Drying................15Control Settings........................................14Energy-Saving Tips..................................17Fabric and Cycle Settings.......................16Lint Filter..............................................14, 18Loading.......................................................14Sorting.................................................14, 17Problem Solver .......................20–24More questions ?…callGE Answer Center® 800.626.2002PreparationDetergents and Additives...................10, 11Hard Water....................................................10Loading the Washer..................................6, 8Sorting Clothes...........................................6, 9Stains..............................................................12Stain Removal Guide.. (13)Consumer Services (27)Appliance Registration..................................2Important Phone Numbers........................27Model and Serial Numbers..........................2Repair Service..................................................2Warranty........................................Back CoverSpacemaker ™LaundryModels:WSM2420, WSM2480HOW TO LOAD YOUR W ASHERThis illustration, with clothes just reaching the Clothes Retaining Ring, shows a proper load. Clothes have ample room to move because they are not packed down, nor wrapped around the agitator. Clothes are loaded dry since wet items are likely to pack down which encourages overloading. This size load requires a full water fill.What is the best size load of clothes—large, medium, or small? Save time, energy and detergent by avoiding extra use of the washer. Try to wash a full load of clothes. If you can it is better to save clothes until you have a full load. If you must wash smaller loads, save water, energy and detergent by adjusting the water level for the size of the load. See Operating Instructions.•Load clothes dry.•Take a properly sorted group of clothes and drop them loosely in the wash basket in this order:Large items—like sheets. Donot wrap around the agitator.Small items—likewashcloths.Medium size items—liketowels.DO NOT OVERLOAD YOUR WASHER.•Try to mix large and small items in each machine load for better washing action.•Wash large items (blankets, bed spreads, mattress pads, etc.) separately.•If machine is overloaded, you may experience oversudsing or out of balance conditions.826WSM2420WSM2480Printed in the United States12-05 JRFor The Period Of:We Will Replace:One YearAny part of the GE Spacemaker ™Laundry which fails due to a defect in materials or workmanship. From the date of the During this limited one-year warranty,we will also provide, free of charge,all labor and related service original purchaseto replace the defective part.What Is Not Covered:All warranty service provided by our Factory Service Centers, or an authorized Customer Care ®technician. To schedule service,on-line, 24 hours a day, visit us at , or call 800.GE.CARES (800.432.2737). Please have serial number and model number available when calling for service.This warranty is extended to the original purchaser and any succeeding owner for products purchased for home use within the USA. If the product is located in an area where service by a GE Authorized Servicer is not available, you may be responsible for a trip charge or you may be required to bring the product to an Authorized GE Service location. In Alaska, the warranty excludes the cost of shipping or service calls to your home.Some states do not allow the exclusion or limitation of incidental or consequential damages. This warranty gives you specific legal rights, and you may also have other rights which vary from state to state. To know what your legal rights are, consult your local or state consumer affairs office or your state’s Attorney General.Warrantor: General Electric Company. Louisville, KY 40225I Service trips to your home to teach you how to use the product.I Improper installation, delivery or maintenance.I Failure of the product if it is abused, misused, orused for other than the intended purpose or used commercially.I Replacement of house fuses or resetting of circuit breakers.IProducts which are not defective or broken, or which are working as described in the Owner’s Manual.I Damage to the product caused by accident, fire, floods or acts ofGod.I Incidental or consequential damage caused by possible defects with this appliance.I Defects or damage due to operation in freezing temperatures.I Damage caused after delivery.I Product not accessible to provide required service.Staple your receipt here. Proof of the original purchase date is needed to obtain serviceunder the warranty.GE Spacemaker ™Laundry。
惠而浦洗衣机说明书

惠而浦洗衣机说明书惠而浦洗衣机说明书篇一:Whirlpool双速自动洗衣机使用及保养说明Whirlpool双速自动洗衣机使用及保养说明安全警告:在仪器显示警告标志时请立即按照提示操作执行,否则将危及生命。
安全指南■ 使用前阅读所有说明不可洗涤用汽油或干洗剂清洗,浸泡,沾污的物品或其他易燃易爆物品,其挥发的蒸汽可能引发爆炸。
不可向机内添加汽油,干洗剂或其他易燃易爆物质。
在一定的条件下,在持续两周以上未使用的热水系统中可能产生氢气(易爆)。
因此在长期未用后,用前打开所有龙头放水数分钟以排出累积的氢气。
此时,不要抽烟或使用明火。
不要让小孩在机器周围玩耍,用时确保小孩远离机器。
小孩或未成年人不得在没有监护人的情况下使用机器。
机器废弃前将舱盖除去。
内筒运转时不要将手伸入机器内部。
机器不要露天放置。
不要随意乱动控制键。
在有能力的情况下,按照说明要求安装或维修。
照安装说明接地电源线损坏时立即由专业人员更换。
洗衣机处置仪器按欧洲指南2002/96/EC废弃电器(WEEE)标记。
确保正确地处置该产品以免对环境或人体产生危害。
机器或文件上的标志表明该产品不可照家用废弃物处理,而应电器回收要点处理。
应按当地废弃物处置环境法规处置关于处置与回收再利用的更多详情请与当地政府办公室,家用废品处置服务机构或卖家联系。
零部件手册有多个版本,您所购买的仪器可能包括以下的部分或全部零部件。
A.控制面板 B.仪器机型及序列号标签 C.液态织物柔软剂分配器 D.搅动器 E.盖F.液氯增白剂分配器 G.篮筐 H.内筒其他可能含有的配件自洁式软麻过滤器CLEANTOUCH控制面板XTRA ROLL ACTION PLUS 搅动器 DURASMOOTH 白瓷篮筐附加清洗选择器控制面板填装量:小,中,大(自左向右,下同)温度:上方(洗涤:热水、温水、冷水、温水)下方(清洗:冷水、冷水、冷水、温水)使用操作程序关上舱盖后将程控钮旋至所需位置并拔出,搅动、计时开始前放入与所选填装量相当的物品。
惠而浦B600E洗衣机说明书

• 当选择快速洗衣程序时,“浸泡”过程和功能选择按键不起作用。
• 标准程序为默认的洗涤程序。 洗衣过程选择和显示,有六种洗衣过程组合,可供选择。
6. 时间预约 (洗涤结束时间预约) • 按此按键可以预约洗衣结束时间,选择范围为0~12小时。每按一次 键增加1小时。 • 当预约设定时间小于洗涤时间时,按“启动/暂停”键洗衣机直接运 行. • 时间预约时数码管显示的时间单位为小时,表示在该显示的时间之 后完成洗涤。设置预约时间时预约显示标志“. .”点亮,设置预约时 间后一旦按“启动/暂停”按键,将自动进入预约状态;10秒之后除预 约显示标志“. .”闪烁外,其余指示灯均熄灭。除电源开关键和“启动 /暂停”键外,按其他任意键将显示预约过程约10秒。洗涤开始前所 有指示灯自动恢复到熄灭前状态。因进水量的不同,实际完成时间 与预约时间稍有出入。
设定的洗涤时间、脱水时间。 11. 若需时间预约,可通过“预约时间”键选择预约时间。 12. 取出需要洗涤的衣物口袋中的所有硬币,纸币等异物,然
后将衣物均匀地投入洗衣桶内。 13. 投放洗涤剂,也可根据需要投放柔软剂、漂白剂。 14. 盖上洗衣机盖板。 15. 按下“启动/暂停”键,洗衣机开始工作。
简明用户指南
B600E (XQB60-B600E)
操作面板说明
1. 电源开关 • 按下接通电源,再按切断电源。 • 洗衣结束约3分钟后或非正常工作状态时会自动切断电源。 • 按下电源开关后,如按启动/暂停键,洗衣机处于智能模糊控制状
态,洗衣机运转、自动检测、设定水位,完成整个洗衣过程; 如按 其他任意键(除电源开关键和启动暂停键外),洗衣机将会自动退出 智能模糊控制状态而进入人工设定状态;如不按任何键,3分钟后 洗衣机自动断电。
- 1、下载文档前请自行甄别文档内容的完整性,平台不提供额外的编辑、内容补充、找答案等附加服务。
- 2、"仅部分预览"的文档,不可在线预览部分如存在完整性等问题,可反馈申请退款(可完整预览的文档不适用该条件!)。
- 3、如文档侵犯您的权益,请联系客服反馈,我们会尽快为您处理(人工客服工作时间:9:00-18:30)。
后将衣物均匀地投入洗衣桶内。 13. 投放洗涤剂,也可根据需要投放柔软剂、漂白剂。 14. 盖上洗衣机盖板。 15. 按下“启动/暂停”键,洗衣机开始工作。
9. 洗衣程序 • 详见本页背面“洗衣程序”介绍。
洗涤用水量、非正常工作状态处理
5. 锁键 • 在预约或洗衣机运行过程中,同时按下“时间预约”和“脱水时间” 两个按键,面板上所有九个按键均被锁定。 • 再次同时按下“时间预约”和“脱水时间”,按键锁定状态被解除。 • 发生故障自动解除锁键,故障解除自动恢复锁键。
7. 过程选择 • 洗衣机在暂停或设定状态,按此键可选择洗衣机默认设定程序以外
的洗衣过程组合。 • 显示灯长亮,说明该洗衣过程被选中并等待进行。 • 显示灯闪烁,说明该洗衣过程正在进行中。
8. 水位选择 • 洗衣机在模糊控制状态下,按启动/暂停键,洗衣机会根据衣物的重
量自动设定3、5、7、9四档水位中某一档进行全自动洗涤。 • 若要自行设定水位,可根据洗衣量手动按此键设定水位,并退出智
简明用户指南
B600E (XQB60-B600E)
操作面板说明
1. 电源开关 • 按下接通电源,再按切断电源。 • 洗衣结束约3分钟后或非正常工作状态时会自动切断电源。 • 按下电源开关后,如按启动/暂停键,洗衣机处于智能模糊控制状
态,洗衣机运转、自动检测、设定水位,完成整个洗衣过程; 如按 其他任意键(除电源开关键和启动暂停键外),洗衣机将会自动退出 智能模糊控制状态而进入人工设定状态;如不按任何键,3分钟后 洗衣机自动断电。
或使用洗衣机默认过程组合。 6. 通过“水位选择”键,选择洗衣水位。 7. 若需更好漂洗效果,可通过“功能选择”键选择“附加漂 洗”。 8. 若洗涤较脏衣物,可通过“功能选择”键选择“溢水漂洗” 9. 若清洁洗衣机桶,可通过“功能选择”键选择“桶清洁” 。 10. 通过“洗涤时间” 、“脱水时间”键,可以改变洗衣机默 认
9
8
7
654
3
2
1
本公司秉承不断改良产品之宗旨,如产品材质及规格有变动,恕不另行通知
W10171303
简明用户指南
B600E (XQB60-B600E)
洗衣过程选择
洗涤步骤、产品规格
洗衣程序
洗涤步骤
洗衣程序
洗涤时间 (约分钟)
漂洗次数
脱水时间 (约分钟)
适用范围
大件
3+12
2
标准
15
2
轻柔
8
2
4
洗涤一般到非常脏的床单、桌布及内衣裤、毛巾、衬衫等棉麻 类织物。
4. 洗涤时间/脱水时间 • 可通过此处2个按键人工改变洗涤或脱水默认时间。 • 每按键一次减少1分钟,按下不放数码循环递减跳动。 • 当洗涤时间为0分钟时,再按键回到25分钟;当脱水时间为0分钟时,
再按键回到7分钟。 • 分别按此处两键可查询当前设定的洗涤或脱水时间。 • 洗衣程序运行或暂停时按键无效。
• 表示进水30分钟后未达到设定水位。按说明书中 “洗涤不工作”情况检查,故障排除后开闭盖板一 次 可 恢 复 进 水 。 如 无 人 干 预 , 洗 衣 机 在 约 1小 时 后 自动断电关机。
• 经以上处理仍未解决,请联系专业维修部门及有 关专业人员维修,用户不得擅自拆装。
下列现象不是故障:
• 脱水时停止脱水,显示b1或b2:脱水不平衡自动处理状态,这是由于衣波轮搅拌,消除 衣物的侧偏后,便可重新脱水。
6. 时间预约 (洗涤结束时间预约) • 按此按键可以预约洗衣结束时间,选择范围为0~12小时。每按一次 键增加1小时。 • 当预约设定时间小于洗涤时间时,按“启动/暂停”键洗衣机直接运 行. • 时间预约时数码管显示的时间单位为小时,表示在该显示的时间之 后完成洗涤。设置预约时间时预约显示标志“. .”点亮,设置预约时 间后一旦按“启动/暂停”按键,将自动进入预约状态;10秒之后除预 约显示标志“. .”闪烁外,其余指示灯均熄灭。除电源开关键和“启动 /暂停”键外,按其他任意键将显示预约过程约10秒。洗涤开始前所 有指示灯自动恢复到熄灭前状态。因进水量的不同,实际完成时间 与预约时间稍有出入。
过程方式
显示
浸泡
洗涤
漂洗
脱水
默认洗衣过程
☼
☼
☼
全程序
☼
☼
☼
☼
单洗涤
☼
单脱水
☼
洗涤+漂洗
☼
☼
漂洗+脱水
☼
☼
• 洗涤程序指示灯显示状态
☼(闪烁):表示在进行的过程。 ☼(闪烁)+蜂鸣报警:表示洗衣遇到故障不能正常进行。
1. 放下排水管。 2. 接好进水管,打开水龙头。 3. 接通电源,按下电源开关。 4. 通过“洗衣程序”键选择洗衣程序或使用默认的洗衣程序。 5. 若需自选洗衣过程,按“过程选择”键,选择洗衣组合,
2. 启动/暂停 • 按该键可开始工作,再按该键可中途暂停。
3. 功能选择 • “记忆” 此功能能够提供给用户与上次洗涤相同的洗涤选择,即 洗衣机会自动保存您最近一次完成的洗涤程序,并由此功能再现。 • “桶清洁”只用于对洗衣桶的清洁,默认水位为第7段水位, 默认洗 漂脱,漂洗次数为一次,显示标准洗衣程序。 • 根据衣物的脏污程度可选择“附加漂洗”,“附加漂洗”是指在标 准漂洗次数上增加一次。 • “溢水漂洗” 是指在漂洗过程中不断注入清水使皂沫和污垢通过 溢水口排出。
非正常工作状态处理
现象 E1 E3 E4
注意
原因及处理
• 表示两次脱水不平衡状态无法自动处理,请人工 均匀放置衣物,盖好盖板。或运行时盖板未盖好, 请盖好盖板。洗衣机会自动继续运转。在人工干预 前 一 直 保 持 “E1”显示状态。 • 表示排水时间超过5分钟。可能是排水管未放下、 堵塞、冻住,请放下或疏通排水管,开闭盖板一 次,洗衣机可继续工作。如无人干预,洗衣机在约 1.5小 时 后 自 动 断 电 关 机 。
3
洗涤一般脏、需要经常更换的衣物,如衬衫,罩衫等涤纶、锦 纶和混棉类织物。
2
适合洗涤不太脏的、质地较柔软的衣物,如棉质及合成纤物。
快速
6
1
3
穿着时间短的外衣等绵质、涤纶及混棉类织物。
羊毛
6
2
2
有纯羊毛标志,并可机洗的羊毛衣物。
• 当选择大件程序时,洗涤过程为双重强力洗涤。 第一阶段以较低水位洗涤(约为设定水位70%左右),以高浓度洗涤液和强力洗涤节拍充分瓦解顽固污渍。经过3
能模糊控制功能。 • 选择 “迷你、3、5、7、9”水位段时,水位指示灯长亮;选择“2、4、
6、8、10”水位段时,水位指示灯闪烁。
洗涤用水量
水位 9/10 7/8 5/6 3/4 迷你/2
洗 涤 容 量 ( kg) 4.0-6.0 3.5-4.0 2.0-3.5 1.0-2.0 0-1.0
洗 涤 用 水 量 ( 约 L) 50/55 43/46 37/40 31/34 25/28
* 如选择了时间预约并启动,则洗衣机进入预约状态。 * 洗涤完毕后,蜂鸣器会自动提示,约三分钟之后会自动断电关机。 产品规格
额定电压 额定频率 额定输入功率 洗涤脱水容量
重量 外形尺寸 箱体尺寸 进水压力
220V~ 50Hz 400W 6.0Kg 34Kg 546×537×920mm 530×530mm 0.02-0.78MPa
分钟洗涤后,洗衣机自动补水,并到达设定水位,开始第二阶段的洗涤。 • 本表格显示的时间仅为此程序在第7水位段时的洗涤时间和脱水时间。 • 当漂洗次数为2次时,可将柔软剂置放于柔软剂投放孔中,由洗衣机自动投放。
• 当选择快速洗衣程序时,“浸泡”过程和功能选择按键不起作用。
• 标准程序为默认的洗涤程序。 洗衣过程选择和显示,有六种洗衣过程组合,可供选择。
