swagger接口规范说明
WebApi接口测试工具:Swagger
WebApi接⼝测试⼯具:Swagger前⾔:WebApi接⼝开发完毕后,交付给前端⼈员或⼿机端开发者时接⼝说明⽂档是必不可少的配套设备,如果公司流程不规范⼤家使⽤⼝⼝相传的交接⽅式,⽽且没有改进的欲望,那你可以到此为⽌了。
Swagger是⽅便测试接⼝,快速展⽰注释内容,⽣成Restful风格接⼝⽂档的框架。
⼀、Swagger介绍Swagger能成为最受欢迎的REST APIs⽂档⽣成⼯具之⼀,有以下⼏个原因:Swagger 可以⽣成⼀个具有互动性的API控制台,开发者可以⽤来快速学习和尝试API。
Swagger 可以⽣成客户端SDK代码⽤于各种不同的平台上的实现。
Swagger ⽂件可以在许多不同的平台上从代码注释中⾃动⽣成。
Swagger 有⼀个强⼤的社区,⾥⾯有许多强悍的贡献者。
按照下述步骤操作,你就能在WebApi中使⽤Swagger,本⽂做测试⽤的版本v5.6.0,好好看吧,如果有可改进的地⽅,欢迎⼤家留⾔。
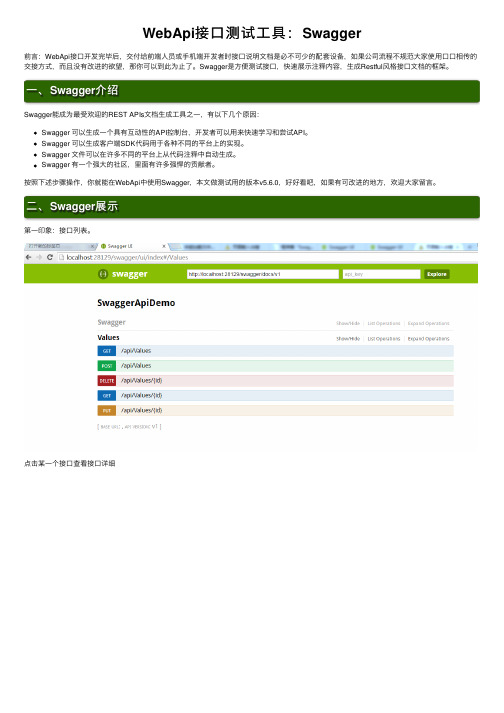
⼆、Swagger展⽰第⼀印象:接⼝列表。
点击某⼀个接⼝查看接⼝详细点击Try it out三、Swagger的使⽤1、如何引⼊组件⾸先,我们需要定义⼀个API项⽬然后通过Nuget引⼊组件,如下图2、如何使⽤组件1、打开解决⽅案属性-->⽣成,勾选XML⽂档⽂件,保存就ok。
2、SwaggerNet类中,注释类上⾯的两⾏3、如果运⾏出现以下错误,则更改配置⽂件web.config出现该异常是由于没有增加依赖项,⼤家可以⾃⾏查看⾃⼰的dll⽂件版本,做出修改,把下⾯的代码插⼊到web.config中。
<dependentAssembly><assemblyIdentity name=".Http.Formatting" publicKeyToken="31bf3856ad364e35" culture="neutral"/><bindingRedirect oldVersion="0.0.0.0-5.0.0.0" newVersion="5.0.0.0"/></dependentAssembly><dependentAssembly><assemblyIdentity name="System.Web.Http" publicKeyToken="31bf3856ad364e35" culture="neutral"/><bindingRedirect oldVersion="0.0.0.0-5.0.0.0" newVersion="5.0.0.0"/></dependentAssembly><dependentAssembly><assemblyIdentity name="Newtonsoft.Json" publicKeyToken="30ad4fe6b2a6aeed" culture="neutral"/><bindingRedirect oldVersion="0.0.0.0-8.0.0.0" newVersion="8.0.0.0"/>3、测试接⼝为了⽅便测试我们新建⼀个App的Model///<summary>/// App信息///</summary>public class App{///<summary>/// App的ID号///</summary>public int Id { get; set; }///<summary>/// App的名称///</summary>public string Name { get; set; }///<summary>/// App的说明///</summary>public string Remark { get; set; }}返回消息ResultJson的Model///<summary>///返回处理结果///</summary>public class ResultJson{///<summary>///返回代码///</summary>public int Code { get; set; }///<summary>///返回消息///</summary>public string Message { get; set; }}public class AppController : ApiController{private List<App> GetApps(){List<App> list = new List<App>();list.Add(new App() { Id = 1, Name = "WeChat", Remark = "WeChat" });list.Add(new App() { Id = 2, Name = "FaceBook", Remark = "FaceBook" }); list.Add(new App() { Id = 3, Name = "Google", Remark = "Google" });list.Add(new App() { Id = 4, Name = "QQ", Remark = "QQ" });return list;}///<summary>///获取所有APP///</summary>///<returns>所有APP集合</returns>[HttpGet]public HttpResponseMessage Get(){return MyJson.ObjectToJson(GetApps());}///<summary>///获取指定APP///</summary>///<param name="id">需要获取APP的id</param>///<returns>返回指定APP</returns>[HttpGet]public HttpResponseMessage Get(int id){var app = GetApps().Where(m => m.Id.Equals(id)).FirstOrDefault();return MyJson.ObjectToJson(app);}///<summary>///增加App信息///</summary>///<param name="value"></param>///<returns></returns>[HttpPost]public HttpResponseMessage Insert([FromBody]App value){ResultJson json = new ResultJson() { Code = 200, Message = "Ok" };return MyJson.ObjectToJson(json);}///<summary>///更新APP信息///</summary>///<param name="value">APP信息</param>///<returns>更新结果</returns>[HttpPut]public HttpResponseMessage UpdateApp([FromBody]App value){ResultJson json = new ResultJson() { Code = 200, Message = "Ok" };return MyJson.ObjectToJson(json);}///<summary>///删除APP信息///</summary>///<param name="id">APP编号</param>///<returns>删除结果</returns>[HttpDelete]public HttpResponseMessage DeleteApp(int id){ResultJson json = new ResultJson() { Code = 200, Message = "Ok" };return MyJson.ObjectToJson(json);}}好了我们运⾏后可以看看效果点击 Try it out我们还可以将注释打开,我们就可以在页⾯⾥⾯看到注释,⽅便调试接⼝时候调⽤⼈了解各参数信息。
swagger注释API详细说明
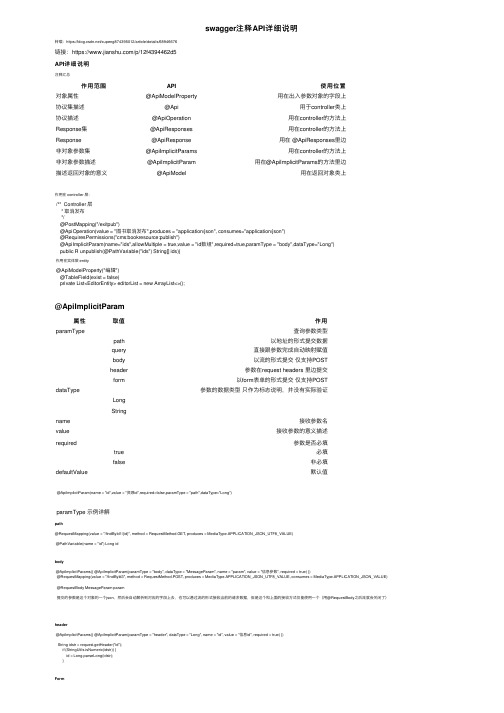
swagger注释API详细说明转载:https:///xupeng874395012/article/details/68946676链接:https:///p/12f4394462d5API详细说明注释汇总作⽤范围API使⽤位置对象属性@ApiModelProperty⽤在出⼊参数对象的字段上协议集描述@Api⽤于controller类上协议描述@ApiOperation⽤在controller的⽅法上Response集@ApiResponses⽤在controller的⽅法上Response@ApiResponse⽤在 @ApiResponses⾥边⾮对象参数集@ApiImplicitParams⽤在controller的⽅法上⾮对象参数描述@ApiImplicitParam⽤在@ApiImplicitParams的⽅法⾥边描述返回对象的意义@ApiModel⽤在返回对象类上作⽤在 controller 层:/** Controller 层* 取消发布*/@PostMapping("/exitpub")@ApiOperation(value = "图书取消发布",produces = "application/json", consumes="application/json")@RequiresPermissions("cms:bookresource:publish")@ApiImplicitParam(name="ids",allowMultiple = true,value = "id数组",required=true,paramType = "body",dataType="Long")public R unpublish(@PathVariable("ids") String[] ids){作⽤在实体层 entity@ApiModelProperty("编辑")@TableField(exist = false)private List<EditorEntity> editorList = new ArrayList<>();@ApiImplicitParam属性取值作⽤paramType查询参数类型path以地址的形式提交数据query直接跟参数完成⾃动映射赋值body以流的形式提交仅⽀持POSTheader参数在request headers ⾥边提交form以form表单的形式提交仅⽀持POSTdataType参数的数据类型只作为标志说明,并没有实际验证LongStringname接收参数名value接收参数的意义描述required参数是否必填true必填false⾮必填defaultValue默认值@ApiImplicitParam(name = "id",value = "资源id",required=false,paramType = "path",dataType="Long")paramType ⽰例详解path@RequestMapping(value = "/findById1/{id}", method = RequestMethod.GET, produces = MediaType.APPLICATION_JSON_UTF8_VALUE)@PathVariable(name = "id") Long idbody@ApiImplicitParams({ @ApiImplicitParam(paramType = "body", dataType = "MessageParam", name = "param", value = "信息参数", required = true) })@RequestMapping(value = "/findById3", method = RequestMethod.POST, produces = MediaType.APPLICATION_JSON_UTF8_VALUE, consumes = MediaType.APPLICATION_JSON_VALUE) @RequestBody MessageParam param提交的参数是这个对象的⼀个json,然后会⾃动解析到对应的字段上去,也可以通过流的形式接收当前的请求数据,但是这个和上⾯的接收⽅式仅能使⽤⼀个(⽤@RequestBody之后流就会关闭了)header@ApiImplicitParams({ @ApiImplicitParam(paramType = "header", dataType = "Long", name = "id", value = "信息id", required = true) })String idstr = request.getHeader("id");if (StringUtils.isNumeric(idstr)) {id = Long.parseLong(idstr);}Form@ApiImplicitParams({ @ApiImplicitParam(paramType = "form", dataType = "Long", name = "id", value = "信息id", required = true) })@RequestMapping(value = "/findById5", method = RequestMethod.POST, produces = MediaType.APPLICATIO常⽤ swagger 注解常⽤到的注解有:ApiApiModelApiModelPropertyApiOperationApiParamApiResponseApiResponsesResponseHeader1. api标记Api ⽤在类上,说明该类的作⽤。
swagger 使用手册
swagger 使用手册Swagger 是一种用于构建、文档化和调试基于 RESTful 的 Web 服务的开源工具。
它提供了一组功能强大的工具和库,使开发人员能够以简单而有序的方式设计和测试 API,并生成规范化的文档。
本手册将指导您如何使用 Swagger 构建和文档化 API,并探索其各种功能和用法。
一、Swagger 简介Swagger 是一个开源工具,用于为 RESTful 的 Web 服务提供文档和调试功能。
它由一组用于定义、构建和文档化 API 的规范组成,包括Swagger 规范、Swagger UI 和 Swagger Codegen。
1. Swagger 规范:Swagger 规范是一种用于描述和定义 RESTful 接口的语言。
它使用YAML 或 JSON 格式,提供了一组结构化的字段,用于描述 API 的路径、操作、输入参数、输出响应等。
Swagger 规范允许开发人员以简洁而一致的方式定义和组织 API。
2. Swagger UI:Swagger UI 是一个用于可视化和交互式文档的工具。
它可以根据Swagger 规范生成漂亮且易于浏览的 API 文档,并提供了一组交互式功能,如请求构建器和响应查看器。
Swagger UI 可以帮助开发人员更好地了解和测试 API。
3. Swagger Codegen:Swagger Codegen 是一个代码生成工具,可以根据 Swagger 规范自动生成客户端和服务器端代码。
通过使用 Swagger Codegen,开发人员可以快速生成与API 规范一致的代码,从而加快开发速度并减少错误。
二、Swagger 的使用步骤下面是使用 Swagger 构建和文档化 API 的基本步骤:1. 定义 Swagger 规范:首先,您需要根据 API 的路径、操作、输入参数和输出响应等信息,以 Swagger 规范的格式编写 API 的定义。
您可以使用 YAML 或 JSON格式编写 Swagger 规范,然后将其保存为一个文件(如 swagger.yaml或 swagger.json)。
.netcore2.1使用swagger显示接口说明文档

.netcore2.1使⽤swagger显⽰接⼝说明⽂档 项⽬之前开发完接⼝后,我们还需要写接⼝说明⽂档,现在有了swagger⽅便了很多,可以⽹页版直接测试,当然了也减少了我们的⼯作量。
使⽤swagger⽣成接⼝说明⽂档,⼤致需要2个步骤 1、从“管理 NuGet 程序包”对话框中:右键单击“解决⽅案资源管理器” > “管理 NuGet 包”中的项⽬将“包源”设置为“”在搜索框中输⼊“Swashbuckle.AspNetCore”从“浏览”选项卡中选择“Swashbuckle.AspNetCore”包,然后单击“安装” 2、添加并配置 Swagger 中间件public void ConfigureServices(IServiceCollection services){services.AddMvc().SetCompatibilityVersion(CompatibilityVersion.Version_2_1);services.AddSwaggerGen(c =>{c.SwaggerDoc("v1", new Info { Title = "My API", Version = "v1" });});}public void Configure(IApplicationBuilder app, IHostingEnvironment env){if (env.IsDevelopment()){eDeveloperExceptionPage();}else{eHsts();}//启⽤静态⽂件中间件eStaticFiles();// Enable middleware to serve generated Swagger as a JSON endpoint.eSwagger();// Enable middleware to serve swagger-ui (HTML, JS, CSS, etc.),// specifying the Swagger JSON endpoint.eSwaggerUI(c =>{c.SwaggerEndpoint("/swagger/v1/swagger.json", "My API V1");});eHttpsRedirection();eMvc();}services.AddSwaggerGen(c =>{c.SwaggerDoc("v1", new Info { Title = "My API", Version = "v1" });var xmlPath = bine(AppContext.BaseDirectory, "OfficalProject.xml");c.IncludeXmlComments(xmlPath);});//启⽤静态⽂件中间件eStaticFiles();// Enable middleware to serve generated Swagger as a JSON endpoint.eSwagger(c => { c.RouteTemplate = "swagger/{documentName}/swagger.json"; });// Enable middleware to serve swagger-ui (HTML, JS, CSS, etc.),// specifying the Swagger JSON endpoint.eSwaggerUI(c =>{// c.SwaggerEndpoint("/swagger/v1/swagger.json", "My API V1");c.SwaggerEndpoint("v1/swagger.json", "SwaggerTest");//c.SwaggerEndpoint("/swagger/v2/swagger.json", "My API V2");}); 上⾯红⾊字体的就是修改的部分,下⾯我们的⽂档就有注释啦 重要! 重要! 重要! 我们如在实际使⽤中,如遇到接⼝⽂档不能正常显⽰问题,可以调⽤这个地址进⾏排错 实际应⽤中,某些接⼝我们想不在外⾯显⽰,只需在控制器上⾯加上 [ApiExplorerSettings(IgnoreApi =true)][ApiExplorerSettings(IgnoreApi =true)] //设置该控制器不在swagger⽂档中显⽰[Route("api/[controller]")][ApiController]public class ValuesController : ControllerBase{// GET api/values[HttpGet]public ActionResult<IEnumerable<string>> Get(){return new string[] { "value1", "value2" };}}。
swagger3 openapidefinition 注解

swagger3 openapidefinition 注解下载温馨提示:该文档是我店铺精心编制而成,希望大家下载以后,能够帮助大家解决实际的问题。
文档下载后可定制随意修改,请根据实际需要进行相应的调整和使用,谢谢!并且,本店铺为大家提供各种各样类型的实用资料,如教育随笔、日记赏析、句子摘抄、古诗大全、经典美文、话题作文、工作总结、词语解析、文案摘录、其他资料等等,如想了解不同资料格式和写法,敬请关注!Download tips: This document is carefully compiled by the editor. I hope that after you download them, they can help you solve practical problems. The document can be customized and modified after downloading, please adjust and use it according to actual needs, thank you!In addition, our shop provides you with various types of practical materials, such as educational essays, diary appreciation, sentence excerpts, ancient poems, classic articles, topic composition, work summary, word parsing, copy excerpts, other materials and so on, want to know different data formats and writing methods, please pay attention!在现代软件开发中,API(Application Programming Interface)已经成为了不可或缺的一部分。
.netcore的Swagger接口文档使用教程(二):NSwag
.netcore的Swagger接⼝⽂档使⽤教程(⼆):NSwag 上⼀篇介绍了Swashbuckle ,地址: 讲的东西还挺多,怎奈微软还推荐了⼀个NSwag,那就继续写吧! 但是和Swashbuckle⼀样,如果还是按照那样写,东西有点多了,所以这⾥就偷个懒吧,和Swashbuckle对照的去写,介绍⼀些常⽤的东西算了,所以建议看完上⼀篇再继续这⾥。
⼀、⼀般⽤法 创建⼀个.net core项⽬(这⾥采⽤的是.net core3.1),然后使⽤nuget安装NSwag.AspNetCore,建议安装最新版本。
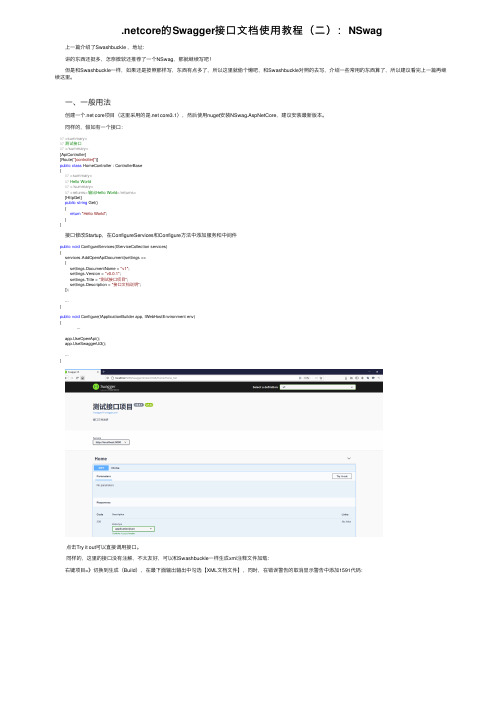
同样的,假如有⼀个接⼝: ///<summary>///测试接⼝///</summary>[ApiController][Route("[controller]")]public class HomeController : ControllerBase{///<summary>/// Hello World///</summary>///<returns>输出Hello World</returns>[HttpGet]public string Get(){return"Hello World";}} 接⼝修改Startup,在ConfigureServices和Configure⽅法中添加服务和中间件 public void ConfigureServices(IServiceCollection services){services.AddOpenApiDocument(settings =>{settings.DocumentName = "v1";settings.Version = "v0.0.1";settings.Title = "测试接⼝项⽬";settings.Description = "接⼝⽂档说明";});...}public void Configure(IApplicationBuilder app, IWebHostEnvironment env){ ...eOpenApi();eSwaggerUi3();...} 点击Try it out可以直接调⽤接⼝。
Swagger2-3接口文档的使用
Swagger2文档的使用Swagger是一款遵循Restful风格的接口文档开发神器,支持基于API自动生成接口文档,接口文档始终与API保持同步,不再需要手动编写接口文档,并且采用全注解的方式,开发简单,代码侵入性低,对服务端开发的程序员来说非常方便,可以节约大量写接口文档的时间。
除此之外,Swagger生成的文档还支持在线测试,参数和格式都定好了,直接在界面上输入参数对应的值即可在线测试接口。
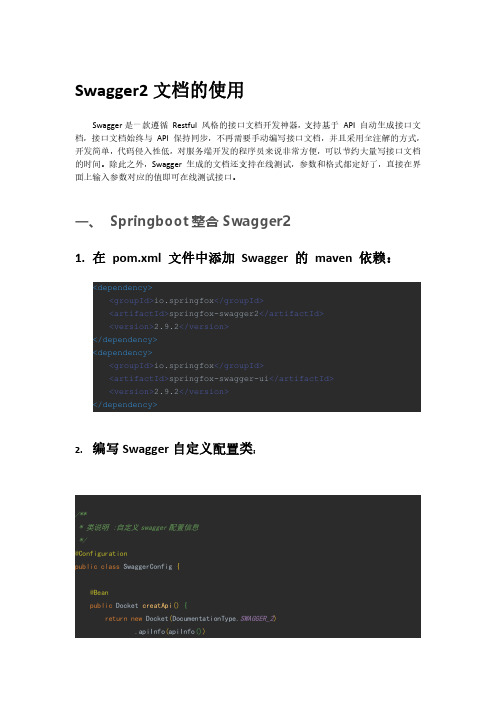
一、Springboot整合Swagger21.在pom.xml文件中添加Swagger的maven依赖:<dependency><groupId>io.springfox</groupId><artifactId>springfox-swagger2</artifactId><version>2.9.2</version></dependency><dependency><groupId>io.springfox</groupId><artifactId>springfox-swagger-ui</artifactId><version>2.9.2</version></dependency>2.编写Swagger自定义配置类:/***类说明:自定义swagger配置信息*/@Configurationpublic class SwaggerConfig{@Beanpublic Docket creatApi(){return new Docket(DocumentationType.SWAGGER_2).apiInfo(apiInfo())//选择哪些路径和api会生成document.select()//controller路径.apis(RequestHandlerSelectors.basePackage("com.example.springbootswagger.con troller"))//对所有api进行监控//.apis(RequestHandlerSelectors.any())//对所有路径进行监控.paths(PathSelectors.any()).build();}//接口文档的一些基本信息private ApiInfo apiInfo(){return new ApiInfoBuilder()//文档主标题.title("springboot+swagger整合")//文档描述.description("test接口文档")//API的版本.version("1.0.0").termsOfServiceUrl("###").license("LICENSE").licenseUrl("###").build();}}3.在controller类添加swagger的注解:@Api(value="/user",tags={"用户操作接口"})@RestController@RequestMapping("/user")public class UserController{/***在方法上面添加@ApiOperation注解,表明该方法需要被swagger自动生成文档**@param userId用户ID*@return User用户*/@ApiImplicitParam(paramType="path",dataType="int",name="userId",value="用户ID",required=true)@ApiOperation(value="在方法上面添加@ApiOperation注解,表明该方法需要被swagger自动生成文档",notes="在方法上面添加@ApiOperation注解,表明该方法需要被swagger自动生成文档",httpMethod="GET")@GetMapping(value="/getUserById/{userId}")public User getUserById(@PathVariable Integer userId){User user=new User();user.setUserId(userId);user.setName("李四");user.setAge(18);user.setSex("男");return user;}}4.启动类上增加允许swagger@SpringBootApplication@EnableSwagger2public class SpringbootSwaggerApplication{public static void main(String[]args){SpringApplication.run(SpringbootSwaggerApplication.class,args);}}5.高版本的springboot访问路径匹配不到需要增加以下配置spring.mvc.pathmatch.matching-strategy=ant_path_matcher6.访问路径格式:http://服务器ip:端口/项目名称//swagger-ui.html例子:http://ip:/8080/swagger/swagger-ui.html二、swagger常用注解说明:1、@Api的使用说明:修饰controller类,标识这个类是swagger的资源,属性说明:∙tags:类的说明,但是tags如果有多个值,会生成多个list ∙value:也是类的说明,可以使用tags替代∙@Api(value="用户controller",tags={""}) @RestController@RequestMapping("/user")public class UserController{}2、@ApiOperation的使用说明:修饰controller的方法,表示一个http请求的操作,属性说明:∙value:用于方法描述∙notes:用于提示内容∙tags:可以重新分组,视情况而用)3、@ApiParam的使用说明:修饰方法的参数,用于添加参数说明与是否必填等元数据,属性说明:∙name:参数名∙value:参数说明∙required:是否必填∙@ApiOperation(value="获取用户信息",tags={"获取用户信息"},notes="注意问题点")@GetMapping("/getUserInfo")public User getUserInfo(@ApiParam(name="id",value="用户id",required=true)Integer id,@ApiParam(name="username",value="用户名")String username){User user=new User();user.setUserId(id);user.setName(username);user.setAge(18);user.setSex("男");return user;}4、@ApiModel的使用说明:修饰对象类,表示对对象类进行说明,用于参数用实体类接收的场景,属性说明∙value:表示对象名,可省略∙description:描述,可省略5、@ApiModelProperty的使用说明:修饰对象类中的属性,对属性进行说明,属性说明:∙value:字段说明∙name:重写属性名字∙dataType:重写属性类型∙required:是否必填∙example:举例说明∙hidden:是否隐藏∙@ApiModel(description="用户模型")@Datapublic class User{/***用户ID*/@ApiModelProperty("用户ID")private Integer userId;/***用户名*/@ApiModelProperty(value="用户名",name="name",example="lisi")private String name;/***性别*/@ApiModelProperty("性别")private String sex;/***年龄*/@ApiModelProperty(value="年龄",name="age",required=true)private Integer age;@ApiModelProperty(value="id数组",hidden=true)private Integer[]ids;}6、@ApiIgnore的使用说明:修饰类、方法、参数等,表示不显示在swagger文档中,比较简单,这里不做举例7、@ApiImplicitParam的使用说明:用于方法,表示单独的请求参数8、@ApiImplicitParams的使用说明:用于方法,包含多个@ApiImplicitParam,属性说明:∙name:参数ming∙value:参数说明∙dataType:数据类型∙paramType:参数类型∙example:举例说明∙@ApiOperation("查询测试")@GetMapping("/select")@ApiImplicitParam(name="name",value="用户名",dataType="String",paramType="query")public void select(){}@ApiOperation("查询测试2")@GetMapping("/select2")@ApiImplicitParams({@ApiImplicitParam(name="name",value="用户名",dataType="string", paramType="query",example="lisi"),@ApiImplicitParam(name="id",value="用户id",dataType="long", paramType="query")})public void select2(){}9、@ApiResponses与@ApiResponse使用说明:这两个注解都表示对响应结果进行说明10、@RequestMapping注解的推荐配置:◆value、◆method、◆produces●@ApiOperation("信息软删除")@ApiResponses({@ApiResponse(code=200,message="操作成功"),@ApiResponse(code=500,message="服务器内部异常"),@ApiResponse(code=401,message="权限不足")})@ApiImplicitParams({@ApiImplicitParam(paramType="query",dataType="Long",name="id", value="信息id",required=true)})@RequestMapping(value="/remove.json",method=RequestMethod.GET,produces= MediaType.APPLICATION_JSON_UTF8_VALUE)public User remove(Long id){return null;}三,更友好的界面1.添加依赖<dependency><groupId>com.github.xiaoymin</groupId><artifactId>swagger-bootstrap-ui</artifactId><version>1.9.6</version></dependency>2.增加配置类@Configurationpublic class WebMvcConfig implements WebMvcConfigurer{@Overridepublic void addResourceHandlers(ResourceHandlerRegistry registry){ WebMvcConfigurer.super.addResourceHandlers(registry);registry.addResourceHandler("/doc.html").addResourceLocations("classpath:/META-INF/resources/");registry.addResourceHandler("/webjars/**").addResourceLocations("classpath:/META-INF/resources/webjars/");}}3.访问路径http://ip:端口/doc.htmlswagger3文档的使用一、SpringBoot集成Swagger31.删除了对springfox-swagger2的依赖;2.删除所有@EnableSwagger2…注解;3.添加了springfox-boot-starter依赖项;4.移除了guava等第三方依赖;5.文档访问地址改为http://ip:port/project/swagger-ui/index.html。
【工具】Swagger2写接口注释

【⼯具】Swagger2写接⼝注释⼀、遇到的问题作为⼀名coder,经常需要向别⼈提供接⼝,或者调⽤别⼈的接⼝。
于是就有了接⼝参数是什么意思,要怎么传参数,返回值是什么意思……有多少调⽤⽅,就会有多少⼈来询问这些参数。
如果是长时间之后,⾃⼰或许都不知道这些参数是什么意思。
于是维护接⼝⽂档便成了⼀项必不可少的⼯作,维护⽂档也有很多问题:如果⼿⼯写会很费劲接⼝变更后可能会忘了同步⽂档……⼆、Swagger配置Swagger()可以快速帮助实现接⼝api的维护与简单测试。
a、引⼊maven依赖包<dependency><groupId>io.springfox</groupId><artifactId>springfox-swagger2</artifactId><version>2.5.0</version></dependency><dependency><groupId>io.springfox</groupId><artifactId>springfox-swagger-ui</artifactId><version>2.5.0</version></dependency>b、配置Swagger@Configuration@EnableSwagger2@Profile("dev")public class SwaggerConfig {public static final String SWAGGER_SCAN_BASE_PACKAGE = "api.doc.demo.controller";public static final String VERSION = "1.0.0";@Beanpublic Docket createRestApi() {return new Docket(DocumentationType.SWAGGER_2).apiInfo(apiInfo()).select()/**api接⼝包扫描路径*/.apis(RequestHandlerSelectors.basePackage(SWAGGER_SCAN_BASE_PACKAGE))/**可以根据url路径设置哪些请求加⼊⽂档,忽略哪些请求*/.paths(PathSelectors.any()).build();}private ApiInfo apiInfo() {return new ApiInfoBuilder()/**设置⽂档的标题*/.title("Swagger2 接⼝⽂档⽰例")/**设置⽂档的描述*/.description("更多内容请关注:")/**设置⽂档的联系⽅式*/.contact(new Contact("create by XXX", "", "xxxx.@"))/**设置⽂档的License信息->1.3 License information*/.termsOfServiceUrl("").license("xxx").licenseUrl("")/**设置⽂档的版本信息-> 1.1 Version information*/.version(VERSION).build();}}c、常⽤注解@ApiOperation : api说明@ApiOperation(value="获取⽤户列表", notes="获取所有⽤户列表",produces = "application/json")@RequestMapping(value="/getList", method= RequestMethod.GET)public List<UserModel> getUserList() {return getDemoList();}@ApiResponses :默认Response的基础上增加新的Response说明@ApiImplicitParam :描述接⼝参数@ApiImplicitParam(name = "userId",value = "⽤户ID",dataType = "int",paramType = "path")@ApiImplicitParams :多个参数@ApiImplicitParams({@ApiImplicitParam(name = "id",value = "⽤户ID",paramType = "path",dataType = "int"),@ApiImplicitParam(name = "userName",value = "⽤户名称",paramType = "form",dataType = "string") })@ApiModel : model属性@ApiModel(value = "user", description = "user对象")public class UserModel {@ApiModelProperty(value = "ID", dataType = "Integer", required = true)private Integer userId;@ApiModelProperty(value = "⽤⼾名", dataType = "String")private String userName;@ApiModelProperty(value = "性別", dataType = "Integer", allowableValues = "0,1,2")private Integer sex;}这样就可以通过访问 http://localhost:8080/swagger-ui.html 看到接⼝API调⽤说明。
swagger使用以及一些注解说明

@ApiResponses:(接口返回结果;可选,当描述多个@ApiResponse时候使用) @ApiResponse:(可选) code:HTTP请求返回码。(必选) message:返回信息。(必选) response:返回类型,需使用全类名。eg:"com.xxx.dto.DemoRequestDTO.class"(可选)
接口用途必选直接在注解后括号内写即value的值会在swaggerui里显示具体示例如下notes
swagger使 用 以 及 一 些 注 解 说 明
@Api:作用于Conntroller类上 value:字段说明 description:描述 tags:分组 (经常用到tags,例如如下,我只是给value,则默认应用了类名)
@ApiOperation: value:接口用途(必选) 直接在注解后括号内写,即value的值,会在swagger-ui里显示,具体示例如下 notes:备注说明(可选) httpMethod:请求方式(可选) response:返回参数类型(可选) tags:接口分组名(可选)
@ApiImplicitParams:(可选,当描述多个@ApiImlicitParam时使用),即描述多个参数的时候使用 @ApiImplicitParam(
@ApiIgnore: 作用于接口入参参数列表,表示swagger忽略该入参
@ApiModelPropeБайду номын сангаасty:作用于入参实体对象的属性上(本身可选,对应子字段也全部可选) value:字段描述 name:属性名字 dataType:属性类型 required:是否必传 example:参数样例 hidden:隐藏
接口入参描述,本身可选,对应的子字段也可选。
swagger以及swaggerUI使用的步骤
swagger以及swaggerUI使⽤的步骤1.swagger,可以这么理解swagger是接⼝规范。
Rest Api 传递参数的除了get请求外,put post,需要传递json。
或者就是直接都通过传递json到后台这⾥主要介绍⼀下springboot后台整合swagger的使⽤步骤。
如果要查看swagger(OpenApi)的规范,可以参考git的官⽅⽂件规范。
springboot 整合swagger的简单基本使⽤。
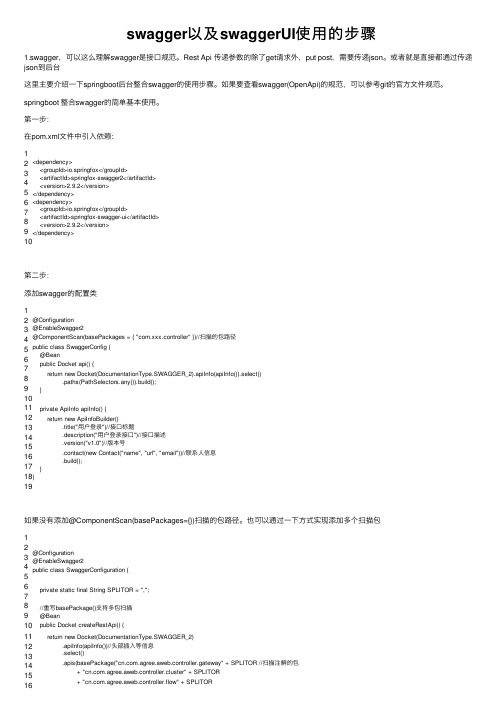
第⼀步:在pom.xml⽂件中引⼊依赖:12 3 4 5 6 7 8 9 10<dependency><groupId>io.springfox</groupId><artifactId>springfox-swagger2</artifactId> <version>2.9.2</version></dependency><dependency><groupId>io.springfox</groupId><artifactId>springfox-swagger-ui</artifactId> <version>2.9.2</version></dependency>第⼆步:添加swagger的配置类12 3 4 5 6 7 8 9 10 11 12 13 14 15 16 17 18 19@Configuration@EnableSwagger2@ComponentScan(basePackages = { "com.xxx.controller"})//扫描的包路径public class SwaggerConfig {@Beanpublic Docket api() {return new Docket(DocumentationType.SWAGGER_2).apiInfo(apiInfo()).select() .paths(PathSelectors.any()).build();}private ApiInfo apiInfo() {return new ApiInfoBuilder().title("⽤户登录")//接⼝标题.description("⽤户登录接⼝")//接⼝描述.version("v1.0")//版本号.contact(new Contact("name", "url", "email"))//联系⼈信息.build();}}如果没有添加@ComponentScan(basePackages={})扫描的包路径。
swagger 使用手册

swagger 使用手册摘要:一、Swagger 简介1.Swagger 是什么2.Swagger 的发展历程3.Swagger 的主要功能和特点二、Swagger 安装与配置1.安装Swagger2.配置Swagger3.安装与配置Swagger 的依赖库三、Swagger 使用方法1.创建API 接口2.定义API 接口的参数3.定义API 接口的返回值4.管理API 接口版本5.使用Swagger UI 查看和管理API 接口四、Swagger 实战案例1.创建一个简单的Swagger 项目2.定义一个简单的API 接口3.使用Swagger UI 查看API 接口五、Swagger 的高级功能1.集成其他工具和框架2.自定义Swagger 的样式和布局3.生成API 文档六、Swagger 在我国的应用与发展1.我国对Swagger 的使用情况2.Swagger 在我国的发展趋势3.对我国开发者使用Swagger 的建议正文:Swagger 是一个API 文档生成工具,它可以帮助开发者更轻松地创建、管理和维护RESTful API 接口。
Swagger 的使用场景广泛,可以应用于微服务、API 网关等场景。
接下来,我们将详细介绍Swagger 的使用方法、安装与配置以及高级功能。
一、Swagger 简介Swagger 是一个开源的API 文档生成工具,其核心是一个规范化的、标准化的RESTful API 描述语言。
Swagger 的主要功能是帮助开发者更方便地理解和使用RESTful API。
通过使用Swagger,开发者可以轻松地创建API 接口、查看API 接口文档、更新API 接口,甚至自动生成API 客户端。
二、Swagger 安装与配置要使用Swagger,首先需要安装Swagger。
Swagger 有多种安装方式,如使用Maven、Gradle 等构建工具。
以Maven 为例,只需在pom.xml 文件中添加Swagger 的依赖即可。
Java之Swagger配置扫描接口以及开关案例讲解

Java之Swagger配置扫描接⼝以及开关案例讲解1. Swagger--配置扫描接⼝及开关1.1 配置扫描接⼝SwaggerConfig.java/*** 配置docket以配置Swagger具体参数*/@Beanpublic Docket docket() {/** 通过.select()⽅法,去配置扫描接⼝,RequestHandlerSelectors配置如何扫描接⼝* basePackage(final String basePackage) // 根据包路径扫描接⼝(最常⽤)* any() 扫描所有,项⽬中的所有接⼝都会被扫描到* none() 不扫描接⼝* 通过⽅法上的注解扫描,如withMethodAnnotation(GetMapping.class)只扫描get请求* withMethodAnnotation(final Class<? extends Annotation> annotation)* 通过类上的注解扫描,如.withClassAnnotation(Controller.class)只扫描有controller注解的类中的接⼝* withClassAnnotation(final Class<? extends Annotation> annotation)*/return new Docket(DocumentationType.SWAGGER_2).apiInfo(apiInfo()).select().apis(RequestHandlerSelectors.basePackage("com.tian.swagger.controller")).build();}运⾏结果(因为现在只扫描了com.tian.swagger.controller 的包所以只会有⼀个HelloController):1.2 配置接⼝扫描过滤SwaggerConfig.java/*** 配置docket以配置Swagger具体参数*/@Beanpublic Docket docket() {/** 通过.select()⽅法,去配置扫描接⼝,RequestHandlerSelectors配置如何扫描接⼝* basePackage(final String basePackage) // 根据包路径扫描接⼝* any() 扫描所有,项⽬中的所有接⼝都会被扫描到* none() 不扫描接⼝* 通过⽅法上的注解扫描,如withMethodAnnotation(GetMapping.class)只扫描get请求* withMethodAnnotation(final Class<? extends Annotation> annotation)* 通过类上的注解扫描,如.withClassAnnotation(Controller.class)只扫描有controller注解的类中的接⼝* withClassAnnotation(final Class<? extends Annotation> annotation)*/return new Docket(DocumentationType.SWAGGER_2).apiInfo(apiInfo()).select().apis(RequestHandlerSelectors.basePackage("com.tian.swagger.controller")).paths(PathSelectors.ant("/tian/**")).build(); }这⾥只选择了请求路径包含了/tian下的所有接⼝这⾥可以选择的参数有:any() // 任何请求都扫描none() // 任何请求都不扫描regex(final String pathRegex) // 通过正则表达式控制ant(final String antPattern) // 通过ant()控制1.3 配置Swagger开关enable(boolean) 表⽰是否启⽤Swagger 默认为true(启⽤) 如果为false,则Swagger不能在游览器中访问SwaggerConfig.java/*** 配置docket以配置Swagger具体参数*/@Beanpublic Docket docket() {// enable(boolean) 表⽰是否启⽤Swagger 默认为true(启⽤) 如果为false,则Swagger不能在游览器中访问return new Docket(DocumentationType.SWAGGER_2).apiInfo(apiInfo()).enable(false).select().apis(RequestHandlerSelectors.basePackage("com.tian.swagger.controller")).paths(PathSelectors.ant("/tian/**")).build(); }运⾏结果:1.4 我只希望我的Swagger在⽣产环境中使⽤,在发布的时候不使⽤。
swagger接口规范说明

1.bean对象中添加注解1.1class上添加注解@ApiModel1.2属性上添加注解@ApiModelProperty(value = "姓名", example = "name"),属性是属于对象关联属性则不需要添加example。
事例:2.controller中添加注解2.1class上添加注解@Api(description = " swagger事例")。
Description可以描述这个controller是用来做什么的,@ApiIgnore:在class上是过滤掉这个controller不让这个类下面的接口在前端显示,在方法上让这个接口不在前端显示@RequestMapping(value = "/testObject",method = RequestMethod.POST)Method统一为RequestMethod.POST2.2方法上添加注解2.2.1@ApiOperation(value = "test",notes = "test",produces ="application/json")说明:value:方法名notes:方法描述produces:相应格式(统一为application/json)2.2.2@ApiImplicitParams({@ApiImplicitParam(name = "subcategoryId", value = "年级iD", required = true, paramType = "query", dataType = "string")})说明:参数传入每一个@ApiImplicitParam表示一个参数name:参数名,通过request.getParameter("name").的名字value:说明required:是否必填,true:必填,false:不必填paramType:参数获取类型(统一使用query)dataType:数据类型事例:如果没有返回数据对象,只需返回ResultObject3.访问swaggerUI,通过在工程访问路径后加上swagger-ui.html。
Swagger(webapi自动生成接口说明文档)
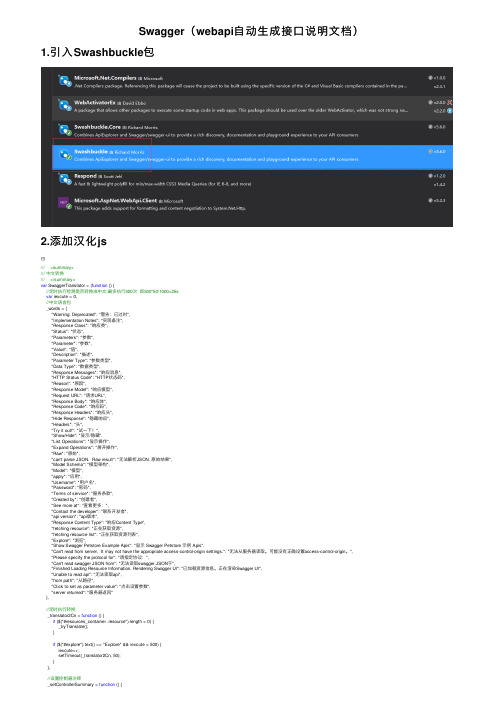
Swagger(webapi⾃动⽣成接⼝说明⽂档)1.引⼊Swashbuckle包2.添加汉化js/// <summary>/// 中⽂转换/// </summary>var SwaggerTranslator = (function () {//定时执⾏检测是否转换成中⽂,最多执⾏500次即500*50/1000=25svar iexcute = 0,//中⽂语⾔包_words = {"Warning: Deprecated": "警告:已过时","Implementation Notes": "实现备注","Response Class": "响应类","Status": "状态","Parameters": "参数","Parameter": "参数","Value": "值","Description": "描述","Parameter Type": "参数类型","Data Type": "数据类型","Response Messages": "响应消息","HTTP Status Code": "HTTP状态码","Reason": "原因","Response Model": "响应模型","Request URL": "请求URL","Response Body": "响应体","Response Code": "响应码","Response Headers": "响应头","Hide Response": "隐藏响应","Headers": "头","Try it out!": "试⼀下!","Show/Hide": "显⽰/隐藏","List Operations": "显⽰操作","Expand Operations": "展开操作","Raw": "原始","can't parse JSON. Raw result": "⽆法解析JSON. 原始结果","Model Schema": "模型架构","Model": "模型","apply": "应⽤","Username": "⽤户名","Password": "密码","Terms of service": "服务条款","Created by": "创建者","See more at": "查看更多:","Contact the developer": "联系开发者","api version": "api版本","Response Content Type": "响应Content Type","fetching resource": "正在获取资源","fetching resource list": "正在获取资源列表","Explore": "浏览","Show Swagger Petstore Example Apis": "显⽰ Swagger Petstore ⽰例 Apis","Can't read from server. It may not have the appropriate access-control-origin settings.": "⽆法从服务器读取。
[工具]Swagger-api接口文档描述
![[工具]Swagger-api接口文档描述](https://img.taocdn.com/s3/m/1c92a0e7bb0d4a7302768e9951e79b89680268df.png)
[⼯具]Swagger-api接⼝⽂档描述摘要⼯作中经常的⽤到webapi,之前都是提供的使⽤postman模拟请求的截图,⾮常的不⽅便,如果能在项⽬中集成⼀个在线查看接⼝说明的地⽅,肯定更⽅便更直观。
在⽹上看到swagger这个组件,界⾯简单⼲净,结构也⽐较符合⾃⼰的要求。
所以打算在项⽬中使⽤这个组件。
⼀个例⼦1、说做就做,⾸先创建⼀个mvc的项⽬。
2、使⽤nuge控制台安装Swashbuckl。
Install-Package Swashbuckl安装成功后,会在App_Start⽂件夹下多了SwaggerNet.cs。
using System.Web.Http;using WebActivatorEx;using SwaggerDemo;using Swashbuckle.Application;[assembly: PreApplicationStartMethod(typeof(SwaggerConfig), "Register")]namespace SwaggerDemo{public class SwaggerConfig{public static void Register(){var thisAssembly = typeof(SwaggerConfig).Assembly;GlobalConfiguration.Configuration.EnableSwagger(c =>{// By default, the service root url is inferred from the request used to access the docs.// However, there may be situations (e.g. proxy and load-balanced environments) where this does not// resolve correctly. You can workaround this by providing your own code to determine the root URL.////c.RootUrl(req => GetRootUrlFromAppConfig());// If schemes are not explicitly provided in a Swagger 2.0 document, then the scheme used to access// the docs is taken as the default. If your API supports multiple schemes and you want to be explicit// about them, you can use the "Schemes" option as shown below.////c.Schemes(new[] { "http", "https" });// Use "SingleApiVersion" to describe a single version API. Swagger 2.0 includes an "Info" object to// hold additional metadata for an API. Version and title are required but you can also provide// additional fields by chaining methods off SingleApiVersion.//c.SingleApiVersion("v1", "SwaggerDemo");// If your API has multiple versions, use "MultipleApiVersions" instead of "SingleApiVersion".// In this case, you must provide a lambda that tells Swashbuckle which actions should be// included in the docs for a given API version. Like "SingleApiVersion", each call to "Version"// returns an "Info" builder so you can provide additional metadata per API version.////c.MultipleApiVersions(// (apiDesc, targetApiVersion) => ResolveVersionSupportByRouteConstraint(apiDesc, targetApiVersion),// (vc) =>// {// vc.Version("v2", "Swashbuckle Dummy API V2");// vc.Version("v1", "Swashbuckle Dummy API V1");// });// You can use "BasicAuth", "ApiKey" or "OAuth2" options to describe security schemes for the API.// See https:///swagger-api/swagger-spec/blob/master/versions/2.0.md for more details.// NOTE: These only define the schemes and need to be coupled with a corresponding "security" property// at the document or operation level to indicate which schemes are required for an operation. To do this,// you'll need to implement a custom IDocumentFilter and/or IOperationFilter to set these properties// according to your specific authorization implementation////c.BasicAuth("basic")// .Description("Basic HTTP Authentication");//// NOTE: You must also configure 'EnableApiKeySupport' below in the SwaggerUI section//c.ApiKey("apiKey")// .Description("API Key Authentication")// .Name("apiKey")// .In("header");////c.OAuth2("oauth2")// .Description("OAuth2 Implicit Grant")// .Flow("implicit")// .AuthorizationUrl("/api/oauth/dialog")////.TokenUrl("https:///token")// .Scopes(scopes =>// {// scopes.Add("read", "Read access to protected resources");// scopes.Add("write", "Write access to protected resources");// });// Set this flag to omit descriptions for any actions decorated with the Obsolete attribute//c.IgnoreObsoleteActions();// Each operation be assigned one or more tags which are then used by consumers for various reasons.// For example, the swagger-ui groups operations according to the first tag of each operation.// By default, this will be controller name but you can use the "GroupActionsBy" option to// override with any value.////c.GroupActionsBy(apiDesc => apiDesc.HttpMethod.ToString());// You can also specify a custom sort order for groups (as defined by "GroupActionsBy") to dictate// the order in which operations are listed. For example, if the default grouping is in place// (controller name) and you specify a descending alphabetic sort order, then actions from a// ProductsController will be listed before those from a CustomersController. This is typically// used to customize the order of groupings in the swagger-ui.////c.OrderActionGroupsBy(new DescendingAlphabeticComparer());// If you annotate Controllers and API Types with// Xml comments (/en-us/library/b2s063f7(v=vs.110).aspx), you can incorporate// those comments into the generated docs and UI. You can enable this by providing the path to one or// more Xml comment files.////c.IncludeXmlComments(GetXmlCommentsPath());// Swashbuckle makes a best attempt at generating Swagger compliant JSON schemas for the various types // exposed in your API. However, there may be occasions when more control of the output is needed.// This is supported through the "MapType" and "SchemaFilter" options://// Use the "MapType" option to override the Schema generation for a specific type.// It should be noted that the resulting Schema will be placed "inline" for any applicable Operations.// While Swagger 2.0 supports inline definitions for "all" Schema types, the swagger-ui tool does not.// It expects "complex" Schemas to be defined separately and referenced. For this reason, you should only // use the "MapType" option when the resulting Schema is a primitive or array type. If you need to alter a// complex Schema, use a Schema filter.////c.MapType<ProductType>(() => new Schema { type = "integer", format = "int32" });// If you want to post-modify "complex" Schemas once they've been generated, across the board or for a// specific type, you can wire up one or more Schema filters.////c.SchemaFilter<ApplySchemaVendorExtensions>();// In a Swagger 2.0 document, complex types are typically declared globally and referenced by unique// Schema Id. By default, Swashbuckle does NOT use the full type name in Schema Ids. In most cases, this // works well because it prevents the "implementation detail" of type namespaces from leaking into your// Swagger docs and UI. However, if you have multiple types in your API with the same class name, you'll// need to opt out of this behavior to avoid Schema Id conflicts.////eFullTypeNameInSchemaIds();// Alternatively, you can provide your own custom strategy for inferring SchemaId's for// describing "complex" types in your API.////c.SchemaId(t => t.FullName.Contains('`') ? t.FullName.Substring(0, t.FullName.IndexOf('`')) : t.FullName); // Set this flag to omit schema property descriptions for any type properties decorated with the// Obsolete attribute//c.IgnoreObsoleteProperties();// In accordance with the built in JsonSerializer, Swashbuckle will, by default, describe enums as integers. // You can change the serializer behavior by configuring the StringToEnumConverter globally or for a given // enum type. Swashbuckle will honor this change out-of-the-box. However, if you use a different// approach to serialize enums as strings, you can also force Swashbuckle to describe them as strings.////c.DescribeAllEnumsAsStrings();// Similar to Schema filters, Swashbuckle also supports Operation and Document filters://// Post-modify Operation descriptions once they've been generated by wiring up one or more// Operation filters.////c.OperationFilter<AddDefaultResponse>();//// If you've defined an OAuth2 flow as described above, you could use a custom filter// to inspect some attribute on each action and infer which (if any) OAuth2 scopes are required// to execute the operation////c.OperationFilter<AssignOAuth2SecurityRequirements>();// Post-modify the entire Swagger document by wiring up one or more Document filters.// This gives full control to modify the final SwaggerDocument. You should have a good understanding of// the Swagger 2.0 spec. - https:///swagger-api/swagger-spec/blob/master/versions/2.0.md // before using this option.////c.DocumentFilter<ApplyDocumentVendorExtensions>();// In contrast to WebApi, Swagger 2.0 does not include the query string component when mapping a URL// to an action. As a result, Swashbuckle will raise an exception if it encounters multiple actions// with the same path (sans query string) and HTTP method. You can workaround this by providing a// custom strategy to pick a winner or merge the descriptions for the purposes of the Swagger docs////c.ResolveConflictingActions(apiDescriptions => apiDescriptions.First());// Wrap the default SwaggerGenerator with additional behavior (e.g. caching) or provide an// alternative implementation for ISwaggerProvider with the CustomProvider option.////c.CustomProvider((defaultProvider) => new CachingSwaggerProvider(defaultProvider));.EnableSwaggerUi(c =>{// Use the "InjectStylesheet" option to enrich the UI with one or more additional CSS stylesheets.// The file must be included in your project as an "Embedded Resource", and then the resource's// "Logical Name" is passed to the method as shown below.////c.InjectStylesheet(containingAssembly, "Swashbuckle.Dummy.SwaggerExtensions.testStyles1.css");// Use the "InjectJavaScript" option to invoke one or more custom JavaScripts after the swagger-ui// has loaded. The file must be included in your project as an "Embedded Resource", and then the resource's // "Logical Name" is passed to the method as shown above.////c.InjectJavaScript(thisAssembly, "Swashbuckle.Dummy.SwaggerExtensions.testScript1.js");// The swagger-ui renders boolean data types as a dropdown. By default, it provides "true" and "false"// strings as the possible choices. You can use this option to change these to something else,// for example 0 and 1.////c.BooleanValues(new[] { "0", "1" });// By default, swagger-ui will validate specs against swagger.io's online validator and display the result// in a badge at the bottom of the page. Use these options to set a different validator URL or to disable the // feature entirely.//c.SetValidatorUrl("http://localhost/validator");//c.DisableValidator();// Use this option to control how the Operation listing is displayed.// It can be set to "None" (default), "List" (shows operations for each resource),// or "Full" (fully expanded: shows operations and their details).////c.DocExpansion(DocExpansion.List);// Specify which HTTP operations will have the 'Try it out!' option. An empty paramter list disables// it for all operations.////c.SupportedSubmitMethods("GET", "HEAD");// Use the CustomAsset option to provide your own version of assets used in the swagger-ui.// It's typically used to instruct Swashbuckle to return your version instead of the default// when a request is made for "index.html". As with all custom content, the file must be included// in your project as an "Embedded Resource", and then the resource's "Logical Name" is passed to// the method as shown below.////c.CustomAsset("index", containingAssembly, "YourWebApiProject.SwaggerExtensions.index.html");// If your API has multiple versions and you've applied the MultipleApiVersions setting// as described above, you can also enable a select box in the swagger-ui, that displays// a discovery URL for each version. This provides a convenient way for users to browse documentation// for different API versions.////c.EnableDiscoveryUrlSelector();// If your API supports the OAuth2 Implicit flow, and you've described it correctly, according to// the Swagger 2.0 specification, you can enable UI support as shown below.////c.EnableOAuth2Support(// clientId: "test-client-id",// clientSecret: null,// realm: "test-realm",// appName: "Swagger UI"////additionalQueryStringParams: new Dictionary<string, string>() { { "foo", "bar" } }//);// If your API supports ApiKey, you can override the default values.// "apiKeyIn" can either be "query" or "header"////c.EnableApiKeySupport("apiKey", "header");});}}}3、在项⽬属性,勾选⽣成xml⽂件。
swagger注释API详细说明
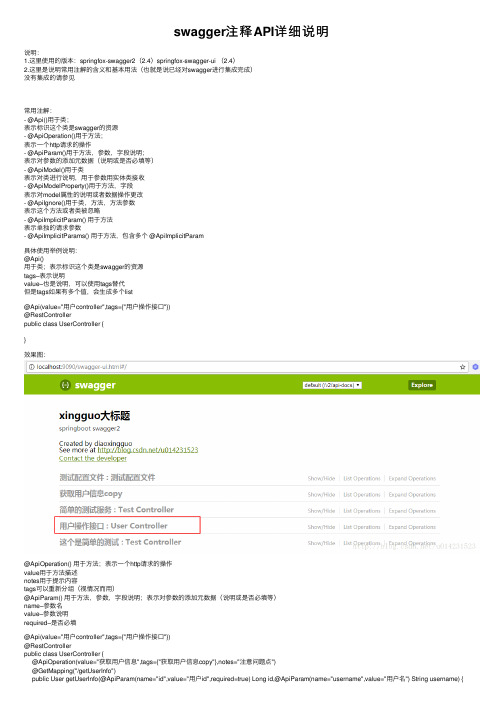
swagger注释API详细说明说明:1.这⾥使⽤的版本:springfox-swagger2(2.4)springfox-swagger-ui (2.4)2.这⾥是说明常⽤注解的含义和基本⽤法(也就是说已经对swagger进⾏集成完成)没有集成的请参见常⽤注解:- @Api()⽤于类;表⽰标识这个类是swagger的资源- @ApiOperation()⽤于⽅法;表⽰⼀个http请求的操作- @ApiParam()⽤于⽅法,参数,字段说明;表⽰对参数的添加元数据(说明或是否必填等)- @ApiModel()⽤于类表⽰对类进⾏说明,⽤于参数⽤实体类接收- @ApiModelProperty()⽤于⽅法,字段表⽰对model属性的说明或者数据操作更改- @ApiIgnore()⽤于类,⽅法,⽅法参数表⽰这个⽅法或者类被忽略- @ApiImplicitParam() ⽤于⽅法表⽰单独的请求参数- @ApiImplicitParams() ⽤于⽅法,包含多个 @ApiImplicitParam具体使⽤举例说明:@Api()⽤于类;表⽰标识这个类是swagger的资源tags–表⽰说明value–也是说明,可以使⽤tags替代但是tags如果有多个值,会⽣成多个list@Api(value="⽤户controller",tags={"⽤户操作接⼝"})@RestControllerpublic class UserController {}效果图:@ApiOperation() ⽤于⽅法;表⽰⼀个http请求的操作value⽤于⽅法描述notes⽤于提⽰内容tags可以重新分组(视情况⽽⽤)@ApiParam() ⽤于⽅法,参数,字段说明;表⽰对参数的添加元数据(说明或是否必填等)name–参数名value–参数说明required–是否必填@Api(value="⽤户controller",tags={"⽤户操作接⼝"})@RestControllerpublic class UserController {@ApiOperation(value="获取⽤户信息",tags={"获取⽤户信息copy"},notes="注意问题点")@GetMapping("/getUserInfo")public User getUserInfo(@ApiParam(name="id",value="⽤户id",required=true) Long id,@ApiParam(name="username",value="⽤户名") String username) {// userService可忽略,是业务逻辑User user = userService.getUserInfo();return user;}}效果图:@ApiModel()⽤于类;表⽰对类进⾏说明,⽤于参数⽤实体类接收value–表⽰对象名description–描述都可省略@ApiModelProperty()⽤于⽅法,字段;表⽰对model属性的说明或者数据操作更改value–字段说明name–重写属性名字dataType–重写属性类型required–是否必填example–举例说明hidden–隐藏@ApiModel(value="user对象",description="⽤户对象user")public class User implements Serializable{private static final long serialVersionUID = 1L;@ApiModelProperty(value="⽤户名",name="username",example="xingguo")private String username;@ApiModelProperty(value="状态",name="state",required=true)private Integer state;private String password;private String nickName;private Integer isDeleted;@ApiModelProperty(value="id数组",hidden=true)private String[] ids;private List<String> idList;//省略get/set}@ApiOperation("更改⽤户信息")@PostMapping("/updateUserInfo")public int updateUserInfo(@RequestBody @ApiParam(name="⽤户对象",value="传⼊json格式",required=true) User user){ int num = userService.updateUserInfo(user);return num;}效果图:@ApiIgnore()⽤于类或者⽅法上,可以不被swagger显⽰在页⾯上⽐较简单, 这⾥不做举例@ApiImplicitParam() ⽤于⽅法表⽰单独的请求参数@ApiImplicitParams() ⽤于⽅法,包含多个 @ApiImplicitParamname–参数mingvalue–参数说明dataType–数据类型paramType–参数类型example–举例说明@ApiOperation("查询测试")@GetMapping("select")//@ApiImplicitParam(name="name",value="⽤户名",dataType="String", paramType = "query")@ApiImplicitParams({@ApiImplicitParam(name="name",value="⽤户名",dataType="string", paramType = "query",example="xingguo"),@ApiImplicitParam(name="id",value="⽤户id",dataType="long", paramType = "query")})public void select(){}效果图:。
Swagger使用手册(自己收藏)
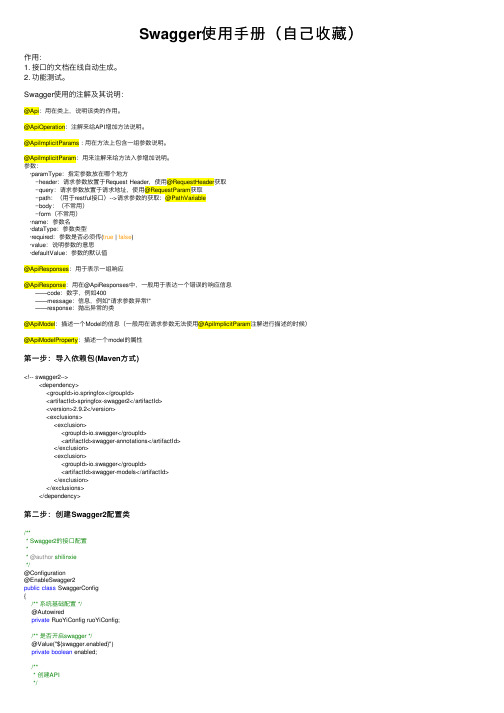
Swagger使⽤⼿册(⾃⼰收藏)作⽤:1. 接⼝的⽂档在线⾃动⽣成。
2. 功能测试。
Swagger使⽤的注解及其说明:@Api:⽤在类上,说明该类的作⽤。
@ApiOperation:注解来给API增加⽅法说明。
@ApiImplicitParams : ⽤在⽅法上包含⼀组参数说明。
@ApiImplicitParam:⽤来注解来给⽅法⼊参增加说明。
参数:·paramType:指定参数放在哪个地⽅··header:请求参数放置于Request Header,使⽤@RequestHeader获取··query:请求参数放置于请求地址,使⽤@RequestParam获取··path:(⽤于restful接⼝)-->请求参数的获取:@PathVariable··body:(不常⽤)··form(不常⽤)·name:参数名·dataType:参数类型·required:参数是否必须传(true | false)·value:说明参数的意思·defaultValue:参数的默认值@ApiResponses:⽤于表⽰⼀组响应@ApiResponse:⽤在@ApiResponses中,⼀般⽤于表达⼀个错误的响应信息——code:数字,例如400——message:信息,例如"请求参数异常!"——response:抛出异常的类@ApiModel:描述⼀个Model的信息(⼀般⽤在请求参数⽆法使⽤@ApiImplicitParam注解进⾏描述的时候)@ApiModelProperty:描述⼀个model的属性第⼀步:导⼊依赖包(Maven⽅式)<!-- swagger2--><dependency><groupId>io.springfox</groupId><artifactId>springfox-swagger2</artifactId><version>2.9.2</version><exclusions><exclusion><groupId>io.swagger</groupId><artifactId>swagger-annotations</artifactId></exclusion><exclusion><groupId>io.swagger</groupId><artifactId>swagger-models</artifactId></exclusion></exclusions></dependency>第⼆步:创建Swagger2配置类/*** Swagger2的接⼝配置** @author shilinxie*/@Configuration@EnableSwagger2public class SwaggerConfig{/** 系统基础配置 */@Autowiredprivate RuoYiConfig ruoYiConfig;/** 是否开启swagger */@Value("${swagger.enabled}")private boolean enabled;/*** 创建API*/@Beanpublic Docket createRestApi(){return new Docket(DocumentationType.SWAGGER_2)// 是否启⽤Swagger.enable(enabled)// ⽤来创建该API的基本信息,展⽰在⽂档的页⾯中(⾃定义展⽰的信息).apiInfo(apiInfo())// 设置哪些接⼝暴露给Swagger展⽰.select()// 扫描所有有注解的api,⽤这种⽅式更灵活.apis(RequestHandlerSelectors.withMethodAnnotation(ApiOperation.class))// 扫描指定包中的swagger注解//.apis(RequestHandlerSelectors.basePackage("com.ruoyi.project.tool.swagger"))// 扫描所有 .apis(RequestHandlerSelectors.any()).paths(PathSelectors.any()).build();}/*** 添加摘要信息*/private ApiInfo apiInfo(){// ⽤ApiInfoBuilder进⾏定制return new ApiInfoBuilder()// 设置标题.title("标题:XXXXXX")// 描述.description("描述:⽤于管理集团旗下公司的⼈员信息,具体包括XXX,XXX模块...")// 作者信息.contact(new Contact(ruoYiConfig.getName(), null, null))// 版本.version("版本号:" + ruoYiConfig.getVersion()).build();}}第三步:使⽤Swagger提供的注解/*** @Auther: shilinxie* @Description:Swagger ⽰例*/@RestController@RequestMapping("/oss")@Api(value = "Swagger ⽰例",description = "⽤来演⽰Swagger的⼀些注解")public class TestController {@ApiOperation(value="修改⽤户密码", notes="根据⽤户id修改密码")@ApiImplicitParams({@ApiImplicitParam(paramType="query", name = "userId", value = "⽤户ID", required = true, dataType = "Integer"),@ApiImplicitParam(paramType="query", name = "password", value = "旧密码", required = true, dataType = "String"),@ApiImplicitParam(paramType="query", name = "newPassword", value = "新密码", required = true, dataType = "String")})@RequestMapping("/updatePassword")public String updatePassword(@RequestParam(value="userId") Integer userId, @RequestParam(value="password") String password, @RequestParam(value="newPassword") String newPassword){if(userId <= 0 || userId > 2){return "未知的⽤户";}if(StringUtils.isEmpty(password) || StringUtils.isEmpty(newPassword)){return "密码不能为空";}if(password.equals(newPassword)){return "新旧密码不能相同";}return "密码修改成功!";}}。
Swagger字段说明
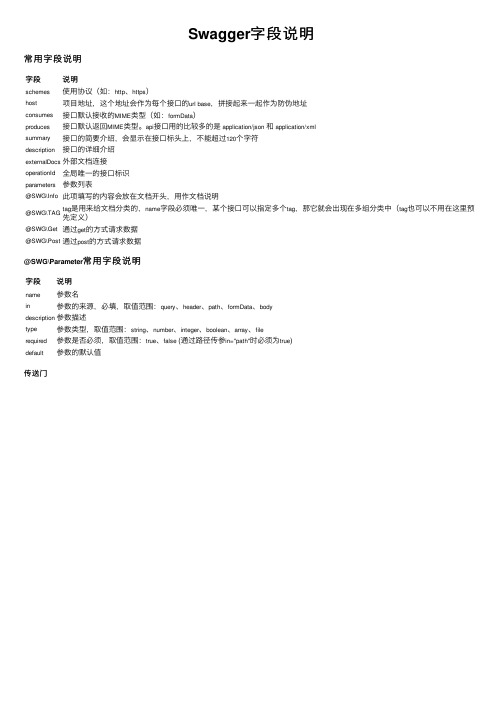
Swagger字段说明常⽤字段说明
字段说明
schemes使⽤协议(如:http、https)
host项⽬地址,这个地址会作为每个接⼝的url base,拼接起来⼀起作为防伪地址consumes接⼝默认接收的MIME类型(如:formData)
produces接⼝默认返回MIME类型。
api接⼝⽤的⽐较多的是application/json和application/xml summary接⼝的简要介绍,会显⽰在接⼝标头上,不能超过120个字符
description接⼝的详细介绍
externalDocs外部⽂档连接
operationId全局唯⼀的接⼝标识
parameters参数列表
@SWG\Info此项填写的内容会放在⽂档开头,⽤作⽂档说明
@SWG\TAG tag是⽤来给⽂档分类的,name字段必须唯⼀,某个接⼝可以指定多个tag,那它就会出现在多组分类中(tag也可以不⽤在这⾥预先定义)
@SWG\Get通过get的⽅式请求数据
@SWG\Post通过post的⽅式请求数据
@SWG\Parameter常⽤字段说明
字段说明
name参数名
in参数的来源,必填,取值范围:query、header、path、formData、body description参数描述
type参数类型,取值范围:string、number、integer、boolean、array、file required参数是否必须,取值范围:true、false (通过路径传参in="path"时必须为true) default参数的默认值
传送门。
swagger 参数说明
swagger 参数说明
swagger一个自动化API述文件格式,它可以帮助开发者们更加便捷地为 API义请求参数,定义响应参数以及定义 API分组规则。
使用 swagger数说明能够有效提升 API发的效率,下面就来介绍swagger 中的参数说明。
首先,swagger数说明主要用于说明 API请求参数。
在 swagger 中,使用者可以为请求参数定义名称、类型、描述信息、参数的格式、是否为必须输入参数等信息,有了这些信息,API调用方就可以清楚地知道该如何传递参数,以及他们可以从 API 中获取什么样的响应
参数。
其次,swagger数说明也用于定义 API响应参数。
在 swagger 中,开发者可以为响应参数定义名称、类型、描述信息等信息,这时就需要用户去定义响应参数是否会根据请求参数列表返回,也就是说针对不同的请求参数,API应的参数是否会有区别。
此外,swagger可以用于定义 API分组规则。
分组规则主要用于帮助开发者方便地组织 API结构,让 API加容易被理解和使用,从
而提高 API发的效率。
最后,swagger支持对请求参数和响应参数进行类型检查,类型检查是 API发中最常见也是最重要的手段之一,它可以帮助开发者
更加准确地捕获 API问时传递的参数,以及 API应给调用者的结果,有效地防范潜在的 bug 产生,为 API开发提供更好的覆盖范围。
总的来说,swagger数说明是一种有效的 API发方式,它可以极
大地缩短 API发的周期,有效地帮助开发者定义请求参数、响应参数和 API分组规则,还可以对请求参数和响应参数进行类型检查,从而减少潜在的 bug 产生,最大程度地提升开发效率。
- 1、下载文档前请自行甄别文档内容的完整性,平台不提供额外的编辑、内容补充、找答案等附加服务。
- 2、"仅部分预览"的文档,不可在线预览部分如存在完整性等问题,可反馈申请退款(可完整预览的文档不适用该条件!)。
- 3、如文档侵犯您的权益,请联系客服反馈,我们会尽快为您处理(人工客服工作时间:9:00-18:30)。
1.bean对象中添加注解
1.1class上添加注解@ApiModel
1.2属性上添加注解@ApiModelProperty(value = "姓名", example = "name"),属性是属于
对象关联属性则不需要添加example。
事例:
2.controller中添加注解
2.1class上添加注解@Api(description = " swagger事例")。
Description可以描述这个
controller是用来做什么的,@ApiIgnore:在class上是过滤掉这个controller不让这个类下面的接口在前端显示,在方法上让这个接口不在前端显示
@RequestMapping(value = "/testObject",method = RequestMethod.POST)
Method统一为RequestMethod.POST
2.2方法上添加注解
2.2.1@ApiOperation(value = "test",notes = "test",produces =
"application/json")
说明:
value:方法名
notes:方法描述
produces:相应格式(统一为application/json)
2.2.2@ApiImplicitParams({
@ApiImplicitParam(name = "subcategoryId", value = "年级iD", required = true, paramType = "query", dataType = "string")
})
说明:参数传入每一个@ApiImplicitParam表示一个参数
name:参数名,通过request.getParameter("name").的名字
value:说明
required:是否必填,true:必填,false:不必填
paramType:参数获取类型(统一使用query)
dataType:数据类型
事例:
如果没有返回数据对象,只需返回ResultObject
3.访问swaggerUI,通过在工程访问路径后加上swagger-ui.html。