canon说明书
Canon 印刷机用户手册说明书
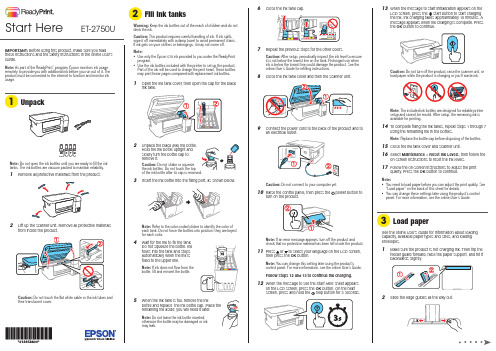
13 W hen the message to start initialization appears on theLCD screen, press the start button to start chargingthe ink. Ink charging takes approximately 10 minutes. A message appears when ink charging is complete. Press the OKbutton to continue.Note: The included ink bottles are designed for reliable printersetup and cannot be resold. After setup, the remaining ink isavailable for printing.14 T o complete filling the ink tanks, repeat steps 1 through 7using the remaining ink in the bottles.Note: Replace the bottle cap before disposing of the bottles.15 C lose the ink tank cover and scanner unit.16 S elect Maintenance > Reset Ink Levels, then follow theon-screen instructions to reset the ink levels.17 Follow the on-screen instructions to adjust the printquality. Press the OK button to continue.Note:• Y ou need to load paper before you can adjust the print quality. See“Load paper” on the back of this sheet for details.• Y ou can change these settings later using the product’s controlpanel. For more information, see the online User’s Guide.See the online User’s Guide for information about loadingcapacity, available paper types and sizes, and loadingenvelopes.1 M ake sure the product is not charging ink. Then flip thefeeder guard forward, raise the paper support, and tilt itbackwards slightly.2 Slide the edge guides all the way out.IMPORTANT: Before using this product, make sure you readthese instructions and the safety instructions in the online User’sGuide.Note: As part of the ReadyPrint™ program, Epson monitors ink usageremotely to provide you with additional ink before you run out of it. Theproduct must be connected to the internet to function and monitor inkusage.Note: Do not open the ink bottles until you are ready to fill the inktanks. The ink bottles are vacuum packed to maintain reliability.1 R emove all protective materials from the product.2 L ift up the scanner unit. Remove all protective materialsfrom inside the product.Caution: Do not touch the flat white cable or the ink tubes andtheir translucent cover.Note:• U• U1 O2 U3 I4 W5 W.ET-2750UStart HereMobile and voice-activatedprinting• Print directly from your smartphone or tablet using iOS or Android™ with Epson iPrint™. Simply connect your printer and device to the same network and tap the action icon to select the print option.• Print directly from your Android (v4.4 or later) device*.Simply connect your printer and device to the same network and tap the menu icon to select the print option. • Print from wherever you are, next to your printer or remotely, with Epson Connect™. Learn more at /connect .• Use voice-activated assistants to print a variety of creativeand everyday items from your Epson ® product. Simply add your product to an Epson Connect account, then link the account to a voice-activated assistant. See /voice for more information.* M ay require the Epson Print Enabler or Mopria Print Service app from Google Play™.Any problems?Network setup was unsuccessful.• Make sure you select the right network name (SSID).• Restart your router (turn it off and then on), then try toconnect to it again.• The printer can only connect to a network that supports 2.4 GHz connections. If your router offers both 2.4 GHz and 5 GHz connections, make sure 2.4 GHz is enabled.• If you see a firewall alert message, click Unblock or Allow to let setup continue.• If your network has security enabled, make sure you enter your network password (WEP key or WPA passphrase) correctly. Be sure to enter your password in the correct case.• Print a network connection report to identify network problems and solutions. See your online User’s Guide for instructions.There are lines or incorrect colors in my printouts.Run a nozzle check to see if there are any gaps in the printout. Then clean the print head, if necessary. See the online User’s Guide for more information.The product’s screen is dark.Make sure your product is turned on, and press any button towake it from sleep mode.EPSON is a registered trademark, EPSON Exceed Your Vision is a registered logomark, and Epson Connect and Epson iPrint are trademarks of Seiko Epson Corporation. ReadyPrint and Designed for Excellence are trademarks of Epson America, Inc.Windows is a registered trademark of Microsoft Corporation in the United States and/or other countries.Mac is a trademark of Apple Inc., registered in the U.S. and other countries.Android and Google Play are trademarks of Google LLC.General Notice: Other product names used herein are for identification purposes only and may be trademarks of their respective owners. Epson disclaims any and all rights in those marks.This information is subject to change without notice.3 L oad paper, glossy or printable side up and short edgefirst, in the middle of the rear paper feed slot.4 Slide the edge guide against the paper, but not too tightly.5 Pull out the output tray.6 Select the paper settings on the product’s control panel.Note: An Internet connection is required to obtain the product software.1 M ake sure the product is NOT CONNECTED to yourcomputer.Windows ®: If you see a Found New Hardware screen, click Cancel and disconnect the USB cable.2D ownload and run your product’s software package:/support/et2750u3 F ollow the instructions on the computer screen to run thesetup program.4 W hen you see the Select Your Connection screen, selectone of the following:• Wireless connectionIn most cases, the software installer automatically attempts to set up your wireless connection. If setup is unsuccessful, you may need to enter your network name (SSID) and password.• Direct USB connectionM ake sure you have a USB cable (not included).Declaration of ConformityAccording to 47CFR, Part 2 and 15 for Class B Personal Computers and Peripherals; and/or CPU Boards and Power Supplies used with Class B Personal Computers:We:Epson America, Inc.Located at: 3840 Kilroy Airport Way, MS 3-13,Long Beach, CA 90806-2469 Telephone:(562) 981-3840Declare under sole responsibility that the product identified herein, complies with 47CFR Part 2 and 15 of the FCC rules as a Class B digital device. Each product marketed, is identical to the representative unit tested and found to be compliant with the standards. Records maintained continue to reflect the equipment being produced can be expected to be within the variation accepted, due to quantity production and testing on a statistical basis as required by 47CFR §2.906. Operation is subject to the following two conditions: (1) this device may not cause harmful interference, and (2) this device must accept any interference received, including interference that may cause undesired operation.Trade Name: EpsonType of Product: Multifunction printer Model: C634A Marketing Name: ET -2750U。
canon eos m5中文使用手册说明书
基本指南進階指南相機的基本操作自動模式/混合自動拍攝模式其他拍攝模式播放模式無線功能設定選單配件附錄索引P 模式Tv 、Av 、M 、C1及C2模式用前須知基本指南進階指南相機的基本操作自動模式/混合自動拍攝模式其他拍攝模式播放模式無線功能設定選單配件附錄索引P 模式Tv 、Av 、M 、C1及C2模式用前須知基本指南進階指南相機的基本操作自動模式/混合自動拍攝模式其他拍攝模式播放模式無線功能設定選單配件附錄索引P 模式Tv 、Av 、M 、C1及C2模式用前須知基本指南進階指南相機的基本操作自動模式/混合自動拍攝模式其他拍攝模式播放模式無線功能設定選單配件附錄索引P 模式Tv 、Av 、M 、C1及C2模式用前須知2223232424262728293131 (33)34 (37) (37)37基本指南進階指南相機的基本操作自動模式/混合自動拍攝模式其他拍攝模式播放模式無線功能設定選單配件附錄索引P 模式Tv 、Av 、M 、C1及C2模式用前須知5353 (53)5556) (56)) (57)5858) (58)) (59)) (59)) (59)) (60)(以1分鐘的短片為例) (60)) (61)61 (62)63636464656566) (66)在混合自動拍攝模式下拍攝 .播放短片摘要靜止影像/短片靜止影像短片場景圖示 .螢幕上的方框 ......................................................................................常用的便捷功能 ...............................................................................42使用自拍 ..............................................................................................使用自拍功能以避免相機震動 .....................................................自訂自拍 .........................................................................................輕觸螢幕進行拍攝(輕觸式快門) .......................................................連續拍攝 ..............................................................................................影像自訂功能 ...................................................................................45變更影像畫質 ......................................................................................拍攝RAW 格式的影像 ....................................................................使用選單 .........................................................................................變更長寬比 ..........................................................................................變更短片影像畫質 ..............................................................................實用的拍攝功能 ...............................................................................48使用雙軸電子水平儀 ..........................................................................使用自動程度 ......................................................................................自訂相機操作 ...................................................................................49避免自動對焦輔助光發光 ..................................................................關閉防紅眼燈 ......................................................................................變更拍攝後影像的顯示時間 ..............................................................其他拍攝模式.....................................................................使用您喜愛的設定進行拍攝(創意輔助儲存/載入設定.儲存設定載入設定基本指南進階指南相機的基本操作自動模式/混合自動拍攝模式其他拍攝模式播放模式無線功能設定選單配件附錄索引P 模式Tv 、Av 、M 、C1及C2模式用前須知8181818182828283 (83)84 (84)85858686 (87)8889) (89) (91)929292 (93).............................93調整影像亮度(曝光補償關閉曝光模擬鎖定影像亮度/曝光(自動曝光鎖變更測光方法 .變更ISO 感光度調整自動ISO 設定 .自動包圍曝光(自動包圍曝光拍攝) ...................................................自動校正亮度及對比度(自動亮度優化) ...........................................拍攝明亮主體(高光色調優先) ...........................................................影像色彩 ...........................................................................................71調整白平衡 ..........................................................................................自訂白平衡 .....................................................................................手動校正白平衡 .............................................................................手動設定白平衡色溫 .....................................................................自訂色彩(相片風格) ...........................................................................自訂相片風格 .................................................................................儲存自訂相片風格 .........................................................................對焦 ...................................................................................................75選擇自動對焦方式 ..............................................................................單點自動對焦 .................................................................................+追蹤............................................................................................流暢區域自動對焦 .........................................................................選擇要對焦的主體(觸控自動對焦使用自動對焦鎖拍攝 ..........................................................................使用伺服自動對焦拍攝 ......................................................................變更對焦設定 ......................................................................................微調焦點 ..............................................................................................使用手動對焦模式拍攝 .輕鬆辨識對焦區域(手動對焦突出輪廓) .閃光燈 ...............................................................................................80變更閃燈模式 .自動 .................................................................................................基本指南進階指南相機的基本操作自動模式/混合自動拍攝模式其他拍攝模式播放模式無線功能設定選單配件附錄索引P 模式Tv 、Av 、M 、C1及C2模式107108108109109110110110111111111111112112113113114115115116117117119120120將功能指定給按鈕及轉盤將功能指定給速控轉盤自訂快速設定選單 .選擇要包含在選單中的項目重新排列選單項目儲存拍攝設定 ......................................................................................可儲存的設定 .................................................................................儲存常用拍攝選單項目(我的選單) ...................................................重新命名我的選單設定頁 .............................................................刪除我的選單設定頁 .....................................................................將我的選單設定頁或項目全部刪除 .............................................自訂我的選單設定頁顯示 .............................................................播放模式..........................................................................檢視 .................................................................................................100輕觸式螢幕操作 ................................................................................切換顯示模式 ....................................................................................自訂顯示的拍攝資訊 ...................................................................過度曝光警告(影像的光亮部份) .顯示自動對焦點 ...........................................................................顯示格線 .......................................................................................亮度直方圖 ...................................................................................RGB 直方圖 ...................................................................................拍攝靜止影像時檢視建立的短片按日期檢視 ...................................................................................瀏覽及篩選影像 .............................................................................104使用索引搜尋影像 .輕觸式螢幕操作輕觸兩下放大尋找符合特定條件的影像 .使用主轉盤在影像之間跳轉 .輕觸式螢幕操作基本指南進階指南相機的基本操作自動模式/混合自動拍攝模式其他拍攝模式播放模式無線功能設定選單配件附錄索引P 模式Tv 、Av 、M 、C1及C2模式141141142142142143發送的影像 ........................143 .............................144 ................................................144144144145146146147 ...................................................147148 ............................................................148 ....................................................149150150150151151152152152縮減檔案大小 .編輯短片摘要 .無線功能.可用的無線功能使用Wi-Fi 功能使用藍牙®功能 ..................................................................................將影像傳輸至智能手機 .................................................................124將影像傳輸至具備藍牙功能的智能手機 ........................................將影像傳輸至兼容NFC 的智能手機 ................................................相機處於拍攝模式時透過NFC 連接............................................相機處於播放模式時透過NFC 連接............................................透過Wi-Fi 選單連接至智能手機.......................................................使用其他存取點 ................................................................................確認存取點的兼容性 ...................................................................使用兼容WPS 的存取點 ...............................................................連接至列出的存取點 ...................................................................以前使用過的存取點 ...................................................................發送影像至註冊的網絡服務 .........................................................132註冊網絡服務 ....................................................................................註冊CANON iMAGE GATEWAY ...............................................註冊其他網絡服務 .......................................................................上傳影像至網絡服務 ........................................................................使用媒體播放器檢視影像 .............................................................136從連接的打印機無線打印影像 .....................................................137發送影像至其他相機影像發送選項發送多張影像 .逐張選擇影像選擇範圍發送評分的影像基本指南進階指南相機的基本操作自動模式/混合自動拍攝模式其他拍攝模式播放模式無線功能設定選單配件附錄索引P 模式Tv 、Av 、M 、C1及C2模式用前須知164164165166166166167167 (169169169)170171171171171172173174 ...........................................174175175175176176176 ...........................................................177 ...........................................177 .. (177)使用省電模式 .省電調整 .螢幕亮度 .切換螢幕資訊顏色 .世界時鐘 .日期及時間 .顯示的語言 ........................................................................................關閉相機聲音 ....................................................................................開啟相機聲音 ....................................................................................隱藏提示 ............................................................................................按圖示列出拍攝模式 ........................................................................調整輕觸式螢幕面板 ........................................................................清潔影像感應器 ................................................................................關閉自動清潔 ...............................................................................啟動清潔感應器 ...........................................................................手動清潔感應器 ...........................................................................查看認證標誌 ....................................................................................設定要記錄在影像中的版權資訊 ....................................................刪除全部版權資訊 .......................................................................調整其他設定 ....................................................................................回復相機的預設設定 ........................................................................回復相機的所有預設值 ...............................................................回復個別功能的預設值 ...............................................................配件 .................................................................................系統圖 .............................................................................................161另購配件 .. (162)鏡頭 ....................................................................................................電源 ....................................................................................................閃光燈 ................................................................................................麥克風 ................................................................................................其他配件 ............................................................................................打印機 ................................................................................................基本指南進階指南相機的基本操作自動模式/混合自動拍攝模式其他拍攝模式播放模式無線功能設定選單配件附錄索引P 模式Tv 、Av 、M 、C1及C2模式用前須知清除打印清單的所有影像將影像加入相簿 .指定選擇的方法逐張加入影像將所有影像加入相簿移除相簿的所有影像附錄 .................................................................................疑難排解 .........................................................................................179螢幕提示 .........................................................................................183螢幕資訊 .. (185)拍攝時 ................................................................................................電量 ...............................................................................................播放時 ................................................................................................資訊顯示1 .....................................................................................資訊顯示2 .....................................................................................資訊顯示3 .....................................................................................資訊顯示4 .....................................................................................資訊顯示5 .....................................................................................資訊顯示6 .....................................................................................資訊顯示7 .....................................................................................資訊顯示8 .....................................................................................短片控制介面的總覽 ...................................................................功能及選單表 (188)各拍攝模式下的可用功能 ................................................................快速設定選單 ....................................................................................拍攝設定頁 .C.Fn 設定頁INFO.速控.設定設定頁 .我的選單設定頁 .播放設定頁 .播放模式下的快速設定選單 .206206206206206207207207207208209209210210210210210210211)的注意事項 ...............................214214214215 . (215215215)基本指南進階指南相機的基本操作自動模式/混合自動拍攝模式其他拍攝模式播放模式無線功能設定選單配件附錄索引P 模式Tv 、Av 、M 、C1及C2模式用前須知基本指南進階指南相機的基本操作自動模式/混合自動拍攝模式其他拍攝模式播放模式無線功能設定選單配件附錄索引P 模式Tv 、Av 、M 、C1及C2模式用前須知基本指南進階指南相機的基本操作自動模式/混合自動拍攝模式其他拍攝模式播放模式無線功能設定選單配件附錄索引P 模式Tv 、Av 、M 、C1及C2模式用前須知用前須知基本指南進階指南相機的基本操作自動模式/混合自動拍攝模式其他拍攝模式播放模式無線功能設定選單配件附錄索引P 模式Tv 、Av 、M 、C1及C2模式用前須知基本指南進階指南相機的基本操作自動模式/混合自動拍攝模式其他拍攝模式播放模式無線功能設定選單配件附錄索引P 模式Tv 、Av 、M 、C1及C2模式用前須知基本指南進階指南相機的基本操作自動模式/混合自動拍攝模式其他拍攝模式播放模式無線功能設定選單配件附錄索引P 模式Tv 、Av 、M 、C1及C2模式用前須知基本指南進階指南相機的基本操作自動模式/混合自動拍攝模式其他拍攝模式播放模式無線功能設定選單配件附錄索引P 模式Tv 、Av 、M 、C1及C2模式用前須知基本指南進階指南相機的基本操作自動模式/混合自動拍攝模式其他拍攝模式播放模式無線功能設定選單配件附錄索引P 模式Tv 、Av 、M 、C1及C2模式用前須知基本指南進階指南相機的基本操作自動模式/混合自動拍攝模式其他拍攝模式播放模式無線功能設定選單配件附錄索引P 模式Tv 、Av 、M 、C1及C2模式用前須知基本指南進階指南相機的基本操作自動模式/混合自動拍攝模式其他拍攝模式播放模式無線功能設定選單配件附錄索引P 模式Tv 、Av 、M 、C1及C2模式用前須知基本指南進階指南相機的基本操作自動模式/混合自動拍攝模式其他拍攝模式播放模式無線功能設定選單配件附錄索引P 模式Tv 、Av 、M 、C1及C2模式用前須知基本指南進階指南相機的基本操作自動模式/混合自動拍攝模式其他拍攝模式播放模式無線功能設定選單配件附錄索引P 模式Tv 、Av 、M 、C1及C2模式用前須知基本指南進階指南相機的基本操作自動模式/混合自動拍攝模式其他拍攝模式播放模式無線功能設定選單配件附錄索引P 模式Tv 、Av 、M 、C1及C2模式升起閃光燈],請按下起閃光燈。
CanonEOS600D说明书
实时显示拍摄
关闭闪光灯
1,如果取景器中的数字显示闪烁请防止相机抖动。在低光照条件下容易产生相机抖动此 时取景器内的快门速度显示将会闪烁。稳固地握持相机或使用三脚架。使用变焦镜头时请 使用镜头的广角端以减少由于相机抖动而产生的模糊。
2,不使用闪光灯拍摄人像。在低光照条件下告诉主体到完成拍摄照片为止保持静止。如果 曝光时人物移动照片中的人物就会显得模糊
创意自动拍-1
创意自动拍-2
拍摄人像
1,主体距背景离越远越好。主体距背景越远背景的虚化效果就会越明显。在平坦的暗 色背景前也可以更好地突出人物主体。, 2,使用远摄镜头。如果有变焦镜头请使用远摄端使主体上半身充满画面。必要时向 主体靠近。 3,对面部对焦。检查覆盖面部的自动对焦点是否闪动红光
拍摄短片-1
拍摄短片-2
短片拍摄期间请不要把镜头对准太阳。太阳的热量会损坏相机内部部件
播放短片
恢复相机默认设置
放大查看
旋转图像
删除单张图像
保护图像
批量删除图像-1
若还要删除被保护的图像请格式化存储卡
批量删除图像-2
拍摄信息显示
取景器信息
基本拍摄区模式
设置日期和时间
1.如果存放没有电池的相机或相机电池已耗尽则日期/时间可能被重设。如果发生这种情 况请再次设定日期/时间
语言设置
变焦操作
1,左右旋转可以改变焦距 2,请勿直接透过任何镜头注视太阳。否则可能会导致失明。 3,如果镜头的前部对焦环在自动对焦期间旋转请勿触摸旋转部分
相机握持方法
拍摄夜景人像
拍摄风光
查看图像
P-程序自动曝光-1
P-程序自动曝光-2
更改ISO感光度-1
CANON 打印机 说明书

发送和接受传真 ...................... 快速拨号 ............................ 传真问题的疑难解答 ..................
1
1-1
安装 CAPT
如果您将 imageCLASS D680/D620 用作本地打印机 (直接连到您的计算机上),请遵 循下列步骤。如果 imageCLASS D680/D620 已在您的网络上,而且您想使用它进行启 动,请遵循下列步骤 (在网络用户,1-23 页)。如果您想把 imageCLASS D680/D620 安装为网络打印机,请请遵循下列步骤 (在连接到作为网络打印机的 imageCLASS D680/D620,1-26 页)。
■ 添加打印机向导
要在使用 Windows 95/98/Me 的本地计算机上安装 CAPT,您可使用 Windows 95/98/ Me 添加打印机向导。
以下是 Windows 98 下 “使用并行端口”的安装程序。
1 从开始菜单中选择设置,然后选择打印机。出现 “打印机”文件夹。
2 双击添加打印机图标。添加打印机向导对话框出现。单击下一步 >。
第 4 章:
疑难解答 检查清单 . . . . . . . . . . . . . . . . . . . . . 4-1 打印机问题 . . . . . . . . . . . . . . . . . . . . 4-2 CAPT 的故障 . . . . . . . . . . . . . . . . . . . 4-4 CAPT 消息 . . . . . . . . . . . . . . . . . . . . 4-6 使用疑难解答程序 . . . . . . . . . . . . . . . . . 4-8 卸载 CAPT 软件 . . . . . . . . . . . . . . . . . 4-10
佳能相机使用说明书

佳能相机使用说明书
Canon相机使用说明书:
1、打开相机:拿出相机电池,插入电池盒,确保两个插头顺利插好,关闭电池盖,再开启相机的电源键。
2、设置:调节屏幕、格式化存储卡、按住拍照模式调节拍照方式,
拍照参数设置光圈、快门速度、ISO感光度等变量,最后复位镜头和设置。
3、拍照:在拍照方式中,确定合适位置。
然后手持相机,按下快门
按键,将所有需要拍摄的照片拍摄完毕。
4、照片处理:将照片导入电脑,利用图像处理软件进行裁剪、处理
等操作,编辑成符合要求的照片。
5、关闭:拍摄完毕后,关闭相机的电源,拆卸电池盒里的电池,并
关闭电池盖,最后将相机放好。
Canon EOS 7D 使用说明书

佳能EOS 7D是一款拥有1800万像素成像能力,并具备高清摄像功能的单反相机。
得益于双DIGIC4图像处理器,7D可以每秒钟8张的速度进行拍摄,被定位于入门级全幅机。
第章012全方位功能大探索Canon EOS 7D打开包装——一个都不能少也许你是刚刚接触到数码单反相机,也许你已经拥有过其他的数码单反相机,但是,不管哪种相机,我们做的第一步都是打开包装,熟悉相机包装盒内的一切及用途。
刚刚拿到佳能EOS 7D的那一刻是激动的,首先我们应该先检查一下包装盒内的物品。
无论你是亲自到实体店购买,还是上网购买,需要做的第一件事就是小心翼翼地打开相机包装,然后逐一核对在包装盒一端的物品清单上的内容。
其中包括连接线、使用说明书、光盘以及许多印刷材料。
最重要的物品是相机机身和镜头(如果你购买的是套机)、电池、电池充电器以及相机带。
你还需要一样东西,那就是存储卡,因为包装盒内不包括存储介质。
你在购买时最好是先让店家的员工帮你把相机带挂好。
光圈:f/2.8快门速度:1/2500s感光度:ISO6400曝光模式:手动曝光曝光补偿:0使用广角镜头拍摄梯田,画面视野开阔,风景优美。
佳能EOS 7D之初相识3第01章在收到包装盒时,第一时间一定要仔细地检查一下它的密封性,看看是否有被撕过的迹象。
包装盒封条包装盒中至少应当包括下列物品。
包装中的每件物品都很重要,我们拆开时需要确保每个物品都包括在内,一个也不能少。
4全方位功能大探索Canon EOS 7D立体声AV电缆AVC-DC400ST如果想在大屏幕上查看相机的输出,可以使用这根电缆,把7D相机连接到标清(模拟)电视机的黄色RCA视频插孔和红色/白色RCA音频插孔。
它与下面介绍的USB电缆使用相同的连接口,因此不能同时使用。
接口电缆IFC-200U利用这根USB电缆,可以把照片从相机传输到计算机中(由于直接传输会消耗大量电池电量,所以不建议这么做),在相机和计算机之间上传和下电池充电器载设定,并使用光盘包括的软件远程操作相机。
Canon 多功能打印机说明书

• W ireless Direct Connection * enables easy connection from your mobile devices without a router.• P rint speeds of up to 35 pages per minute .**• E asily navigate with the 3.5-inch, Color, Touch-Panel LCD.•P rint on-the-gowith Canon PRINT Business,*** Apple ®AirPrint ®,†Mopria™ Print Service,††and Google Cloud Print™.•• S upports host-based UFR II, PCL 5e/6 and Adobe®PostScript ® to provide printing versatility foryour business .• E co-friendly , two-sided printing out-of-the-box saves paper and related costs.• S ecure Print helps protect the privacy of yourprinted documents.• D irect Print from USB allows printing from JPEG, TIFF, and PDF formats.• T ouch and Print with Near Field Communication (NFC)•• using your compatible mobile Android device.• L ow energy consumption; uses just 1.6 W in wireless Energy Saver mode.•G enerous,expandable paper capacity allows for up to 800 sheets.■• E mbedded uniFLOW capability allows for print security,follow-me printing, and output management and reporting.REVOLUTIONIZE TODAY’S WORKSPACEWireless, Duplex, Laser PrinterThe LBP253dw offers power and performance for your home or office in a compact footprint.USB 2.0 High-Speed, 10/100/1000 Base-T Ethernet, 802.11 b/g/n Wireless,*Near Field Communication (NFC)••Operating SystemsWindows® 10/8.1/8/7, Windows Vista®, Windows Server®2012 R2/2012/2008 R2/2008/2003 R2/2003, Mac®OS X 10.5.8 and Up (Drivers available for download from /support)Paper HandlingS upported Paper Sizes ▪▪:A6 (4.125" x 5.875") to Legal (8.5" x 14")S tandard Cassette:250 Sheets, 16-32 lb. Bond (up to 120 gsm)M ultipurpose Tray:50 Sheets, 16-43 lb. Bond (up to 163 gsm)O ptional Cassette PF44:500 Sheets, 16-32 lb. Bond (up to 120 gsm)O utput Tray:150 Sheets (face-down)DuplexY esDuty CycleUp to 50,000 Pages Per MonthSecurityIEEE802.1x, SNMPv3, HTTPS, IPsec, Secure Print, Department ID ManagementPRINTER SPECIFICATIONSFirst-Print TimeApproximately 6 seconds or less (Letter)▪▪▪Printer LanguageUFR II, PCL 5e/6, PSPrinter ResolutionUp to 600 x 600 dpi; 1200 x 600 dpi qualityPrint FeaturesToner Saver, Booklet, Poster, WatermarkPrint Memory1GBMobile PrintCanon PRINT Business,***Apple AirPrint,†Mopria Print Service,†† Google Cloud Print•WarrantyOne-year limited Exchange/Carry-in♦(Extended warranties available)ENVIRONMENTAL SPECIFICATIONSTypical Energy Consumption (TEC)1.3 kWhEPEATSilverPower ConsumptionD uring Operation: Approx. 570 W; Standby: Approx. 11.7 W;Energy Saver: 1.6 W or Less (wireless)Noise Level♦♦D uring Operation: 53 dB (Sound Pressure),70.6 dB (Sound Power)During Standby: Inaudible (Sound Pressure/Sound Power)WHAT COMES IN THE BOXPackage ContentsLBP250 Series Product, Canon Cartridge 119 Standard(BLK Yield: 2,100 Sheets), Power Supply Cable, Starter Guide,User Manual/Software DVD-Rom, Warranty CardimageCLASS LBP253dw AND ACCESSORIESimageCLASS LBP253dw 0281C005Cartridge 119(Full-Yield Cartridge; 2,100 sheets ISO/IEC) 3479B001Cartridge 119 Hi-Capacity(Full-Yield Cartridge; 6,400 sheets ISO/IEC) 3480B001Paper Feeder PF-44 (500-sheet cassette, optional) 3439B001and Google Play™ Store. Users of Canon Mobile Printing can simplyupdate the app to use Canon PRINT Business; users who haveinstalled Canon Mobile Scanning for Business should install CanonPRINT Business on their compatible device. After Canon PRINTBusiness is installed, users can re-register their Canon MobileScanning for Business device list and local documents. Android™is a trademark of Google Inc. App Store is a service mark of AppleInc. iPhone®, iPad Air®, iPad®, iPad mini™ are trademarks of AppleInc., registered in the U.S. and other countries. iOS is a trademarkor registered trademark of Cisco in the United States and othercountries and is used under license.†A irPrint functionality requires an iPad, iPad Mini, iPad 2, thenew iPad, iPhone 3GS or later, or iPod touch 3rd generation orlater device running iOS 4.2 or later, and an AirPrint-enabledprinter connected to the same network as your iOS device. Aprinter connected to the USB port of your Mac, PC, AirPortBase Station, or Time Capsule is not supported.††M opria Print Service, available for free at the Google Play Store,requires a compatible Android KitKat 4.4 smartphone or tablet.The printer must be either wirelessly connected to the networkrouter or with an Ethernet cable. The mobile device and printermust be connected to the same network.•G oogle Cloud Print requires an Internet connection and GoogleAccount. Printer firmware update may be necessary for GoogleCloud Print™ function. Certain exceptions may apply. A PCrunning Windows XP or later or a Mac running OS 10.4.11 or laterand USB cable are required to perform firmware update.••Requires an Android mobile device with NFC hardware runningAndroid 4.0 or later, and the Canon Print Business app, availablefor free at Google Play. Canon Print Business app must be opento use tap and print functionality.■B ased on 20 lb. Bond paper.■■C ustom sizes available.■■■M ay vary depending on the output environment.♦ Warranty program is subject to certain conditions andrestrictions. See the warranty card for details.♦♦ Declared noise emission in accordance with ISO 9296.As an ENERGY STAR partner, Canon U.S.A., Inc. has certified this model as meeting the ENERGY STAR energy efficiency criteria through an EPA recognized certification body. ENERGY STAR and the。
Canon EOS 100 说明书

USER MANUALCommand DialCreative ZoneP : Program AETv : Shutter-priority AEAv : Ap e r t u r e-p r i o r i t y AEM : Manual E x p o s u r eDE P:Depth-of-Field AEI S O: Film Speed S e tt i n g�: Multiple ExposuresAEB: Auto Exposure B r a c ke t i n gCF : Custom Function SettingI m a g e Z o n eo : Full A u t o(I : P o r t r a i tM-;La nds c ape& : C l o s e-u p'-.: S po r t s11111: Bar-code p r o g r a m4I n t r o d u c t i o nT hank yo u f o r select i ng a Canon E OS c a m e r a The EOS 100 i s a n a ut of o c u s SLR c am e ra i n co r po r a t • i n g a dvanced f un c ti o n s d es igned for eas e of use , and f e a t u r e s a silen t drive me ch an is m to make i t t h e qu ie t es t cam er a i n E OS s erie s M o r eove r , the E O S 100 al low s i n p u t of u p to five b a r-c ode pro gr am s f ro m t he Bar Code B o o k c on ta i n i ng sa mpl e p h o t o g r a p h s and c orrespondi n g bar c od es f or se tt i ng opt i m um s hootin g dat a I n c o r p o r a t i n g the l a t e s t E O S t e c h n o l • o g y , the EOS 100 i s p a c ked w i t h f e a tures i n c l u d i n g a b u i l t -i n a u t o z o o m fla sh w i t h au t om a t ic fla s h c o v e r • a ge f or 28mm w i d e -ang l e t e n s e s an d t w i n e l ec t r o n i c i n p u t d i a l s for s u pe r i or o p e r a b i l i t y . P a rt i cu l arl y b e n e f i • cia l i s t h e EOS 1 O O 's s i le nt o p era t i on wh i ch a ll o w s y ou to t a ke p i c t ur e s i n s it u a tio ns no r m a ll y a voided w i t h other ca m e ra s du e t o t he i r d i st r acti ng o p e r a ti o n n o i s e * Th e ex pl a n a tion s i n t h is i n s t r u c t i o n b ook a ss u m e u s e of t h e camera w i th t h e E F 28-80mm f /3.5-5.6 U SM zoom l e n s a tt a c h e d H o weve r, o p e r a ti on i s bas i ca ll y t h e same fo r any E F l e n sF e a t u r es1. Silent dr ive m ec h anism p rovi d e s qui e t film w i n d •i n g and r e w i n d i n g2. Ba r-c ode sy s t e m a ll o w s i n p u t o f u p t o fiv e b a r -c o d eprogra m s fo r s e tt i n g optim u m s hooting dat a 3. A uto z o o m f l ash automa t ic all y a dju s t s th e f l as hcove ra g e a ngle acc o r d ing t o t he t e n s f oca l l e ng t h (28m m , 50mm , 80m m )4. T w i n el ec t ro n ic i n p u t dials f o r q u i c k , e ffi c i e n tca mer a o p e r at i o n .5 Cr o ss-ty p e BASIS AF senso r and AF au x il ia r y l i g h tfo r sur e f ocusi ng even with l o w -c o n t r a s t s u b j e c t s 6. Command di a l "i mage zo n e " p ro v i d e s simple , f u ll ya u toma ti c ope r a t i o nA tt e n t i o nI M P O R T A N T I N F O R M A T I O NThe Canon E O S 100 will give optimum p e r f o r • mance together w i t h specially designed Cano n E F l e n s e s , flash u n i t s and other Canon brand a c c e s • sories . I t i s poss i ble that t h e use of i n c o m p a t i b l e l e ns e s o r other accessories may r esu l t i n u ns a t i s • facto r y per f ormance or damage to your c a m e r a . We therefo r e suggest the use of Canon EF l e n s e s and accessori e s Damage to your Canon c a m e r a as a r es u l t of malfunct i on or i m p r o p e r c o n ne c t i o ns caused by the use of i nc omp a t i b l e products m a y void i t s w a r r a n t yPlease read these instructions carefully for a thorough understanding b e f or e taking p i ct u r e s .While read i ng this booklet, u n f o l d the front and back flaps for easy reference to the c a m e r a 's part s •2N o m e n c l a t u r eAccessory S h o e ---------• F l a s h -----------•R e d-e y e r e d u c t i o n l a m p ---•Film Winding M o de /S e l f -ti m e r -• & Remote Control B u t t o nLCD P a n e l -------���,tSAF Mode B u tt o n -----£���Main Dial w,--,._ -.,_�, Shutter Button ----------1-I-AF Auxiliary Li g h t -------.L-• E m i tt e r /S e l f -t i m e r & Remote ControlI n d i cat o r �/ -- F l a sh /R ed -E y e R ed u c t i o nMode ButtonMetering Mode/Flash E x • posure Compensation Button--- Back C o v e rL a tc hLens R el e a se ButtonR e m o t e Control R e c e i v e rGrip/Battery -• C o m p a r t m e n t�i s t a n c e S c a r e/" /---- Manual F o c u s i n g R i ngNo m e n c l a t u r eV i e w f i n d e r E y ep i e c e --F iim C h e c k � W in d ow ""'Quick Control D ia l ------�--Q u i c k Cont r ol Dial S w it c h----A E L o c k /C u s t o mFunction S e l e c t B u tt o n----St r a p F ix tureFilm R e w i n d B u tt o nTripod Socket ------Grip E x t e n s i o n P os i t i on i n g H o l eB a t t e ry Cove r L a t c h781- 1··---= 1�11/, ' •- -=� - --:_ �!-These devices comply with Part 15 of the FCC R u le s . Operation i s subject to the following two c o n d i t i o n s : (1) These devices may not cause h a r m f u l i n t e r f e r en c e , and (2) these devices must accept any i n t e r f e r en c e received. i n cl u d i n g i n t e r fe re n ce that may cause u nd e s i r ed o p e r a t i on .Do not make any changes or m od i f i c a t i o n s to the equipments unless otherwise spec i fied i n the i ns tr u c t i o n s . I f such changes or modifications should be made , you could be required to stop operation of the e q u ip me n t s .These equipments have been tested and found to comply with the l i m i t s for a class B dig i tal device , p u r s u a n t to part 15 of the FCC Rules . These li m i t s are designed to provide reasonable protection against h a r m f u l i n • terference i n a r e s i d en t i a l i n s t a ll a t i o n . These equipments g e ne r a t e , use and can radiate radio frequency energy and , i f not i n st a ll e d and used i n accordance w i t h the i ns t r u c t i o n s , may cause h a r m f u l i n t e r f e r e n c e to r a d i o c o mm un i c a t i o n s .However , there i s no guarantee that i nt e r f e r e n c e will not occur i n a particula r i n s t a ll a t io n . I f these e q u ip • ments do cause harmful i nt e r f e r e n c e to r ad i o o r television reception , which can be dete r m i ned by t u rn i n g the equipments off and on , the user i s encouraged to try to correct the i n t erf e r e nc e by one o r more of th e following m e a s u r e s :• R eo r i e n t or relocate the receiving an t e n na .• I ncr e a s e the separation between the equipments and r e c e i v e r . • C on s u l t the dealer or an experienced r a d i o rrv technician for h e l pr--These digital apparatuses do not exceed the Class B l i m i t s for radio noise emissions from digital a p pa r :J tuses set out i n the Radio I n t e r f e r e n c e Regulations of the Canadian Department of C o mm u n i c a ti o n s .79。
Canon EOS 5D 说明书

C Cˈ ˈ ȃ感谢您购买佳能产品。
EOS 5D是一款高性能数码单镜头反光自动对焦相机,配备有35.8×23.9毫米、1280万有效像素的大型CMOS感应器。
本机具有九个高精度自动对焦点,兼容全部佳能EF镜头(EF-S镜头除外)。
本机专为快速摄影而设计,可以随时拍摄,它还具有许多适合各种摄影要求的功能,适合全自动抓拍乃至创意摄影。
使用本机前,首先阅读本使用手册并试用相机,熟悉各种操作。
为避免意外和损坏,请阅读“安全警告”(第8、9页)和“操作注意事项”(第10、11页)。
拍摄前,请先测试相机使用本机前,请先试拍几张,并检查图像是否正确记录到存储卡上。
如果相机或者存储卡有问题,图像不能记录或被计算机读取,由此造成的损失或不便,佳能公司不承担任何责任。
关于版权贵国的版权法律可能禁止使用您所记录的人物图像和某些物体的图像,除非仅供个人欣赏。
另外要注意,某些公开演出、展览等可能禁止拍照,即使供个人欣赏也不例外。
Canon和EOS是佳能公司的商标。
Adobe和Photoshop是Adobe Systems Incorporated的商标。
CompactFlash是SanDisk公司的商标。
Windows是微软公司在美国和其它国家的商标或注册商标。
Macintosh是Apple Corporation在美国和其它国家的注册商标。
本手册中提及的所有其它企业名称和商标均属其各自所有者所有。
*本数码相机支持相机文件系统设计规则2.0 (Design rule for Camera File System2.0)和Exif 2.21 (也称为“Exif Print”)。
Exif Print是一种增强数码相机和打印机之间兼容性的标准。
通过连接到兼容Exif Print的打印机,打印机可以使用拍摄信息以优化打印输出效果。
物品清单请检查相机包装内是否包含以下物品。
如有缺失,请与经销商联系。
EOS 5D / 机身(含眼罩、机身盖及为日期和时间供电的后备锂电池)电池组BP-511A(含保护盖)电池充电器CG-580/CB-5L * 含CG-580或CB-5L。
佳能数码相机使用说明书
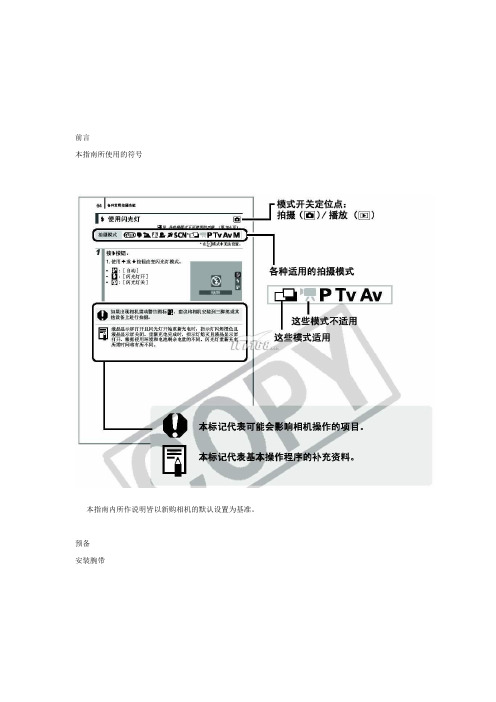
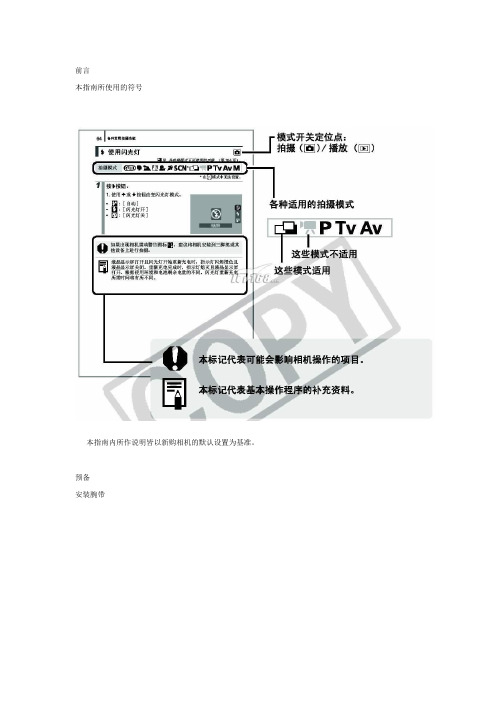
前言本指南所使用的符号本指南内所作说明皆以新购相机的默认设置为基准。
预备安装腕带为防止相机在使用过程中掉落,建议使用腕带。
安装电池1. 将电池仓盖锁扣推向箭头(1) 的方向,定住锁扣不放,此时将电池仓盖推向箭头(2) 方向,然后以箭头(3) 方向将电池仓盖向上打开。
2. 装入两颗电池。
3. 关闭电池仓盖(1),然后将电池仓盖向下按着推向(2),直到咔一声到位为止。
插入存储卡1. 将电池仓盖锁扣推向箭头(1) 的方向,定住锁扣不放,此时将电池仓盖推向箭头(2) 方向,然后以箭头(3) 方向将电池仓盖向上打开。
2. 装入存储卡直到咔一声到位为止。
3. 关闭电池仓盖(1),然后将电池仓盖向下按着推向(2),直到咔一声到位为止。
存储卡插入相机前,请先确定其方向正确。
若存储卡以反方向插入,相机则无法识别该卡或导致故障。
要取出存储卡用手指推存储卡直至听到咔哒声,然后松开存储卡。
设置日期和时间首次开启相机电源时,即会出现日期/ 时间设置菜单。
请依照下面说明的第3 及4 步骤设置日期及时间。
1. 按电源按钮。
2. 选择[ 日期/ 时间]。
3. 选择年、月、日和时间及显示的排列方式。
您可在图像上加印所设置的日期及时间。
设置显示的语言您可变更显示在液晶显示屏菜单及信息所使用的语言。
拍摄静止图像1. 按电源按钮。
(1) 将播放起动声音,液晶显示屏上将显示起动图像。
(2) 再次按电源按钮关闭电源。
2. 选择拍摄模式。
3. 将相机对准拍摄主体。
4. 轻按( 半按) 快门按钮进行对焦。
(1) 相机对焦时,相机鸣响两次,指示灯亮为绿色(使用闪光灯时亮为橙色)。
(2)在液晶显示屏的对焦点上会出现绿色自动对焦框。
5. 不作其他任何变动,将按钮按到底( 全按) 拍摄。
(1) 将播放一次快门声音并记录图像。
(2) 图像被录入存储卡时,指示灯将呈绿色闪烁。
静音设置拍摄后立即查看图像( 拍摄预览)拍摄所录制的图像随即在液晶显示屏上出现约2 秒。
佳能Canon_EOS_450D用户手册使用说明书

佳能Canon_EOS_450D用户手册使用说明书一、相机概述1.1 产品特点(1)高像素:有效像素为1220万,为您带来高画质的照片。
(2)高速连拍:最高可达 3.5张/秒,让您不错过任何精彩瞬间。
(3)DIGIC III图像处理器:高速、高效的处理能力,保证画面质量。
(4)实时显示拍摄:方便您在拍摄时进行构图和调整。
1.2 相机部件说明(2)快门按钮:按下快门按钮,相机拍摄照片。
(3)模式转盘:选择拍摄模式,包括自动、程序自动、快门优先、光圈优先等。
(4)液晶显示屏:显示拍摄参数、照片预览等信息。
(5)菜单按钮:调整相机设置,访问各种功能。
(6)方向键:用于在菜单和设置中进行选择和调整。
(7)多功能控制钮:快速选择对焦点、调整曝光补偿等。
(8)电池盒:安装电池,为相机提供电源。
二、基本操作2.1 安装镜头将镜头对准相机接口,顺时针旋转,直至镜头锁定。
2.2 安装电池和存储卡打开电池盒,放入电池。
将存储卡插入卡槽,确保卡槽盖关闭。
2.3 开机拨动电源开关至ON位置,相机开机。
2.4 设置拍摄模式根据拍摄需求,转动模式转盘,选择合适的拍摄模式。
2.5 对焦和拍摄半按快门按钮,相机自动对焦。
待对焦成功后,完全按下快门按钮,完成拍摄。
2.6 查看照片拍摄完成后,按下播放按钮,可在液晶显示屏上查看照片。
三、常用功能设置3.1 调整ISO感光度在拍摄菜单中,选择ISO感光度设置,根据拍摄环境调整ISO值。
3.2 设置白平衡在拍摄菜单中,选择白平衡设置,根据拍摄场景选择合适的白平衡模式。
3.3 调整曝光补偿在拍摄菜单中,选择曝光补偿设置,根据实际拍摄需求调整曝光值。
3.4 连拍设置3.5 设置照片格式和品质在拍摄菜单中,选择照片格式和品质设置,根据需求选择JPEG或RAW格式,以及相应的品质等级。
四、高级功能与创意拍摄4.1 景深控制了解光圈与景深的关系,可以让您的照片更具艺术感。
在Av(光圈优先)模式下,您可以通过调整光圈大小来控制景深。
佳能数码相机使用说明书
前言本指南所使用的符号本指南内所作说明皆以新购相机的默认设置为基准。
预备安装腕带为防止相机在使用过程中掉落,建议使用腕带。
安装电池1. 将电池仓盖锁扣推向箭头(1) 的方向,定住锁扣不放,此时将电池仓盖推向箭头(2) 方向,然后以箭头(3) 方向将电池仓盖向上打开。
2. 装入两颗电池。
3. 关闭电池仓盖(1),然后将电池仓盖向下按着推向(2),直到咔一声到位为止。
插入存储卡1. 将电池仓盖锁扣推向箭头(1) 的方向,定住锁扣不放,此时将电池仓盖推向箭头(2) 方向,然后以箭头(3) 方向将电池仓盖向上打开。
2. 装入存储卡直到咔一声到位为止。
3. 关闭电池仓盖(1),然后将电池仓盖向下按着推向(2),直到咔一声到位为止。
存储卡插入相机前,请先确定其方向正确。
若存储卡以反方向插入,相机则无法识别该卡或导致故障。
要取出存储卡用手指推存储卡直至听到咔哒声,然后松开存储卡。
设置日期和时间首次开启相机电源时,即会出现日期/ 时间设置菜单。
请依照下面说明的第3 及4 步骤设置日期及时间。
1. 按电源按钮。
2. 选择[ 日期/ 时间]。
3. 选择年、月、日和时间及显示的排列方式。
您可在图像上加印所设置的日期及时间。
设置显示的语言您可变更显示在液晶显示屏菜单及信息所使用的语言。
拍摄静止图像1. 按电源按钮。
(1) 将播放起动声音,液晶显示屏上将显示起动图像。
(2) 再次按电源按钮关闭电源。
2. 选择拍摄模式。
3. 将相机对准拍摄主体。
4. 轻按( 半按) 快门按钮进行对焦。
(1) 相机对焦时,相机鸣响两次,指示灯亮为绿色(使用闪光灯时亮为橙色)。
(2)在液晶显示屏的对焦点上会出现绿色自动对焦框。
5. 不作其他任何变动,将按钮按到底( 全按) 拍摄。
(1) 将播放一次快门声音并记录图像。
(2) 图像被录入存储卡时,指示灯将呈绿色闪烁。
静音设置拍摄后立即查看图像( 拍摄预览)拍摄所录制的图像随即在液晶显示屏上出现约2 秒。
Canon 数字单反相机用户指南说明书
z
z AUTO z AUTO z AUTO
AUTO
r
P S A M u j Y S h Z M N O H p Q R s f U V W F 13
q DETAIL r TON LUMIERE s TON OMBRE h REDUCT. DU BRUIT K LONGUE EXPO RB u SELECT REGL PERSO K MODIF/ENR REG PERSO
Bracketing
O/W/X/H/Y 4 4 4 4
J CONV-TELE NUMERIQUE
4444
444444444444444
K MODE ECRAN TACTILE
4444
4444444444444444444
REDUC. YEUX ROUGE : REDUC. YEUX ROUGE :
A4
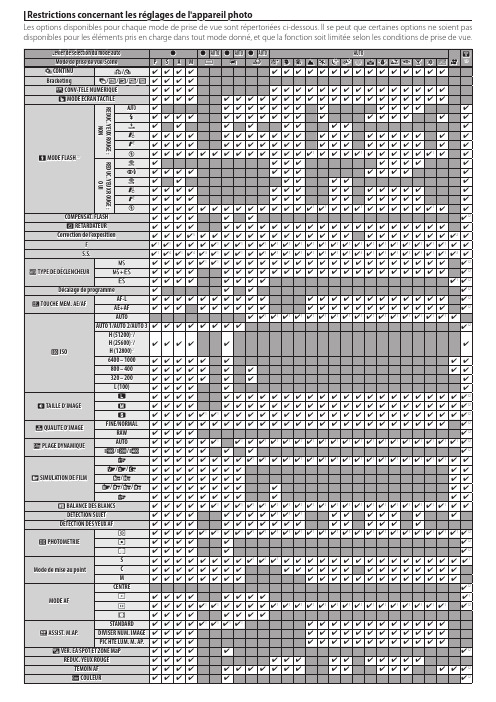
Restrictions concernant les réglages de l'appareil photo
Les options disponibles pour chaque mode de prise de vue sont répertoriées ci-dessous. Il se peut que certaines options ne soient pas disponibles pour les éléments pris en charge dans tout mode donné, et que la fonction soit limitée selon les conditions de prise de vue.
J ESPACE
4 4 4 4 4 4 4 4 4 4 4 4 4 4 4 4 4 4 4 4 4 4 4 4 4 4 9 4 12
Canon 多功能打印机用户手册.pdf_1701927179.2489023说明书
12 W hen the message to see the Start Here sheet appearson the LCD screen. Press the OK button, then press andhold the help button for 3 seconds.13 W hen the ink confirmation message appears on the LCDscreen, select Done to start charging the ink. Ink charging takes approximately 10 minutes. A message appears when ink charging is complete. Press the OK button to continue.Caution: Do not turn off the product, raise the scanner unit, orload paper while the product is charging or you’ll waste ink.Note: The included ink bottles are designed for reliable printer setup and cannot be resold. After setup, the remaining ink is available for printing.14 T o complete filling the ink tanks, repeat steps 1 through 7using the remaining ink in the bottles.Note: Replace the bottle cap before disposing of the bottles.15 C lose the ink tank cover and scanner unit.16 S elect Next and follow the on-screen instructions to resetthe ink levels.17 F ollow the on-screen instructions to adjust the printquality. Press the OK button to continue.Note:• Y ou need to load paper before you can adjust the print quality. See “Load paper” on the back of this sheet for details.• You can change these settings later using the product’s control panel. For more information, see the online User’s Guide .See the online User’s Guide for information about loadingcapacity, available paper types and sizes, loading envelopes, and using the ADF .1 M ake sure the product is not charging ink, and then open2SIMPORTANT: Before using this product, make sure you readthese instructions and the safety instructions in the online User’s Guide .Note: As part of the ReadyPrint ™ program, Epson monitors ink usage remotely to provide you with additional ink before you run out of it. The product must be connected to the internet to function and monitor ink usage.Note: Do not open the ink bottles until you are ready to fill the inktanks. The ink bottles are vacuum packed to maintain reliability.1 R emove all protective materials from the product.2 L ift up the scanner unit. Remove all protective materialsfrom inside the product.Caution: Do not touch the flat white cable or the ink tubes andtheir translucent cover.• U• U 1 2 3 4 ET-3750UStart Here4 W hen you see the Select Your Connection screen, selectone of the following:• Wireless connectionIn most cases, the software installer automatically attempts to set up your wireless connection. If setup is unsuccessful, you may need to enter your network name (SSID) and password.• Direct USB connectionM ake sure you have a USB cable (not included).• Wired network connectionMake sure you have an Ethernet cable (not included).Mobile and voice-activated printing• Print directly from your smartphone or tablet using iOS or Android™ with Epson iPrint™. Simply connect your printer and device to the same network and tap the action icon to select the print option.• Print directly from your Android (v4.4 or later) device*.Simply connect your printer and device to the same network and tap the menu icon to select the print option. • Print from wherever you are, next to your printer or remotely, with Epson Connect™. Learn more at /connect .• Use voice-activated assistants to print a variety of creative and everyday items from your Epson ® product. Simply add your product to an Epson Connect account, then link the account to a voice-activated assistant. See /voice for more information.* M ay require the Epson Print Enabler or Mopria Print Service app from Google Play™.Any problems?Network setup was unsuccessful.• Make sure you select the right network name (SSID).• Restart your router (turn it off and then on), then try to connect to it again.• The printer can only connect to a network that supports 2.4 GHz connections. If your router offers both 2.4 GHz and 5 GHz connections, make sure 2.4 GHz is enabled.• If you see a firewall alert message, click Unblock or Allow to let setup continue.• If your network has security enabled, make sure you enter your network password (WEP key or WPA passphrase) correctly. Be sure to enter your password in the correct case.• Print a network connection report to identify network problems and solutions. See your online User’s Guide for instructions.EPSON is a registered trademark, EPSON Exceed Your Vision is a registered logomark, andEpson Connect and Epson iPrint are trademarks of Seiko Epson Corporation. ReadyPrint and Designed for Excellence are trademarks of Epson America, Inc.Windows is a registered trademark of Microsoft Corporation in the United States and/or other countries.Mac is a trademark of Apple Inc., registered in the U.S. and other countries.Android and Google Play are trademarks of Google LLC.General Notice: Other product names used herein are for identification purposes only and may be trademarks of their respective owners. Epson disclaims any and all rights in those marks.This information is subject to change without notice.3 INote: Make sure the paper is loaded against the front edgeguide and not sticking out from the end of the cassette.4 S lide the side edge guides against the paper, but not too5 K eep the cassette flat as you insert it all the way.67 Select the paper settings on the product’s control panel.Note: An Internet connection is required to obtain the product software.1 M ake sure the product is NOT CONNECTED to yourcomputer.Windows ®: If you see a Found New Hardware screen, click Cancel and disconnect the USB cable.2D ownload and run your product’s software package:/support/et3750u 3 F ollow the instructions on the computer screen to run the setup program.nsure brilliant results with Epson specialty Declaration of ConformityAccording to 47CFR, Part 2 and 15 for Class B Personal Computers and Peripherals; and/or CPU Boards and Power Supplies used with Class B Personal Computers:We:Epson America, Inc.Located at: 3840 Kilroy Airport Way, MS 3-13,Long Beach, CA 90806-2469 Telephone:(562) 981-3840Declare under sole responsibility that the product identified herein, complies with 47CFR Part 2 and 15 of the FCC rules as a Class B digital device. Each product marketed, is identical to the representative unit tested and found to be compliant with the standards. Records maintained continue to reflect the equipment being produced can be expected to be within the variation accepted, due to quantity production and testing on a statistical basis as required by 47CFR §2.906. Operation is subject to the following two conditions: (1) this device may not cause harmful interference, and (2) this device must accept any interference received, including interference that may cause undesired operation.Trade Name: EpsonType of Product: Multifunction printer Model: C631A Marketing Name: ET -3750U。
Canon摄影产品说明书

____- - - - - - - - - Rangefinder Eyepiece . .............. . . . . ..... . .... . ,-.';;;___________ Range- Viewfinder Magnification Control Lever.. . !!!!!!'--___________ Film Rewinding Knob .. .. .... .. ................. .. .
A time exposure may be obtained by using the B (Bulb ) position on the High Shutter Speed Dial. The shutter remains open from the time you press the Shutter Release Button until the pressure is removed . You may also obtain a time exposure with the Slow Shutter Speed Dial at T (Time). Press the Shutter Release Button and the shutter will open and remain open until you turn the Slow Shutter Speed Dial to 1. The Shutter will close only when this method is used.
Canon M130系列打印机说明书

ROWW
Panou de control cu LEDuri şi pictograme
Panou de control LCD cu 2 linii
Panoul de control cu ecran senzitiv
M130a G3Q57A
M130nw G3Q58A
M130fn G3Q59A
M130fw G3Q60A
1 Specificaţii tehnice
Nume model Cod produs
Manevrarea hârtiei
Tava 1 (capacitate de 150 de coli)
Imprimare duplex manuală
Sertar de ieşire de 150 de coli
Alimentator de documente pentru 50 de pagini
M132fn G3Q63A
M132fp G3Q64A
M132fw G3Q65A
M133a P6N89A
M133fn P6N90A
M134a G3Q66A
M134fn G3Q67A
ROWW
3
Nume model Cod produs
Modul de fax V.
34
1 Vitezele de copiere şi scanare se pot modifica. Pentru cele mai actuale informaţii, accesaţi /support/ljM129MFP.
4 Specificaţii tehnice
M132fn G3Q63A
M132fp G3Q64A
M132fw G3Q65A
Canon 打印机用户手册.pdf_1701926357.803357说明书
Do not open the ink bottles until you are ready to fill the inktanks. The ink bottles are vacuum packed to maintain reliability. Ink emove all protective materials from the product.Note:1 O 2 U 3 D 4 RC 5 F12 P ress and hold the button for 3 seconds untilthe power light starts flashing, to begin charging theink. Ink charging takes approximately 20 minutes. Ink charging is complete when the power light stopsflashing.20 minutesNote: The ink bottles included with the printer are designed for printer setup and not for resale. After some ink is used for charging, the rest is available for printing.Caution:Do not turn off the product or load paper while the product is charging or you’ll waste ink.1 M ake sure the product is not charging. Then flip thefeeder guard forward, raise the paper support, and tilt itbackwards slightly.2 Slide the edge guide to the left.3 L4 S6 C arefully seal the bottle using the reverse side of thebottle tip or screw on the lid for proper disposal.789 C lose the ink tank cover.10 C onnect the power cord to the back of the product and toan electrical outlet.C aution: Do not connect to your computer yet.11 R aise the control panel and turn on the product. Wait forthe power light to stop flashing, then follow step 12 tocontinue ink charging.Note:If all the product lights are flashing, turn off the product and check that no protective material has been left inside the product.Caution: Do not lower the control panel without first squeezing the release bar underneath or you may damage the product.Any problems?Network setup was unsuccessful• For detailed instructions on setting up your product on awireless network, see the online Wireless Installation Guide .• Make sure you select the right network name (SSID).• Restart your router (turn it off and then on), then try to connect to it again.• The printer can only connect to a network that supports 2.4 GHz connections. If your router offers both 2.4 GHz and 5 GHz connections, make sure the 2.4 GHz network is enabled.• If you see a firewall alert message, click Unblock or Allow to let setup continue.• If your network has security enabled, make sure you enter your network password (WEP key or WPA passphrase) correctly. Be sure to enter your password in the correct case.There are lines or incorrect colors in my printoutsRun a nozzle check to see if any of the print head nozzles areclogged. Then clean the print head, if necessary. See the online User’s Guide for more information.Setup is unable to find my product after connecting it with a USB cableMake sure the product is on and securely connected as shown:Error indicatorsIf you see one of the error indicators below, follow the steps here to proceed:5 Pull out the output tray and raise the paper stopper.Note: If your computer does not have a CD/DVD drive or you are using a Mac, an Internet connection is required to obtain the product software.1 M ake sure the product is NOT CONNECTED to yourcomputer.W indows ®: If you see a Found New Hardware screen, click Cancel and disconnect the USB cable.2I nsert the product CD or download and run your product’ssoftware package:.jm/support/L3953 F ollow the instructions on the screen to run the setupprogram.4 W hen you see the Select Your Connection screen, selectone of the following:• Wireless connectionIn most cases, the software installer automatically attempts to set up your wireless connection. If setup is unsuccessful, you may need to enter your network name (SSID) and password.• Direct USB connectionM ake sure you have the USB cable ready.Mobile printing optionsConnect wirelessly from your smartphone, tablet, or computer.Print documents and photos from across the room or around the world. See your online User’s Guide for instruction or learn more at .jm/connect .。
- 1、下载文档前请自行甄别文档内容的完整性,平台不提供额外的编辑、内容补充、找答案等附加服务。
- 2、"仅部分预览"的文档,不可在线预览部分如存在完整性等问题,可反馈申请退款(可完整预览的文档不适用该条件!)。
- 3、如文档侵犯您的权益,请联系客服反馈,我们会尽快为您处理(人工客服工作时间:9:00-18:30)。
佳能IXUS95IS-IXY110IS中文说明书在使用本产品之前,请务必先仔细阅读本使用说明书。
请务必妥善保管好本书,以便日后能随时查阅。
请在充分理解内容的基础上,正确使用。
使用说明书相机使用者指南数码相机中文请检查您的相机包装中是否包含下列物件。
如有任何物件缺失,请与您购买相机的零售商联系。
〓本包装内不含存储卡。
〓要浏览PDF 说明书,需使用Adobe Reader。
检查包装内物品相机电池NB-6L(含端子盖)界面连接线IFC-400PCU影音连接线AVC-DC400腕带WS-DC7电池充电器CB-2LY/CB-2LYE入门指南保修卡/产品合格证数码相机解决方案光盘也可参考CD-ROM 上的PDF 说明书。
安装后,会在桌面上出现快捷图标。
如果软件安装失败,您可在CD-ROM 的Readme 文件夹中找到说明书。
〓相机使用者指南(简称“本指南”)一旦您掌握了基本知识,即可利用相机的多种功能拍摄更高难度的照片。
〓个人专用打印指南在您需要将相机连接到打印机进行打印时阅读。
〓软件入门指南在您需要将相机连接到计算机上时阅读。
说明如何安装和使用“数码相机解决方案光盘”上的软件。
http://web.canon.jp/imaging/information-e.html试拍请先试拍几张图像并播放这些图像,以确认图像是否可以正确记录。
请注意,若因相机或附件(包括存储卡)的故障,导致不能拍摄图像或机器无法读取拍摄的图像而造成的任何损失,佳能公司、其子公司和分支机构、以及经销商皆不负赔偿责任。
侵犯版权警告本相机记录的图像仅供个人使用。
未经版权所有者的事先许可,不得记录侵犯版权法的图像。
即使摄制的图像仅供个人使用,请注意在某些状况下运用相机或其他设备复制表演、展览、或商业资产的图像可能侵犯别人的版权或其他法律权益。
保修范围本相机的保修服务范围仅限于在原出售国家/ 地区。
如果本相机在国外出现问题,请把它送回原出售国家/ 地区,再向佳能热线中心求助。
有关联系佳能热线中心的方法,请查阅本产品合格证上的佳能(中国)网站或佳能热线中心的相关信息。
液晶显示屏液晶显示屏以非常精密的制造技术生产而成。
99.99%以上的像素均符合规格,但偶尔有些不良像素可能会显示为亮点或暗点。
这并不表示相机已损坏,也不影响记录的图像。
相机机身温度长时间使用相机时,机身可能会变热,请小心使用。
这并不表示相机已损坏。
存储卡本相机可使用多种存储卡。
本指南通称这些卡为存储卡。
请先阅读本文您想要做什么?●进行拍摄,让相机进行设置. . . . . . . . . . . . . . . . 22●拍摄各种场景. . . . . . . . . . . . . . . . . . . . 52 – 54●聚焦人物面部. . . . . . . . . . . . . . . . . . 22, 60, 76●在不能使用闪光灯的地方拍摄(关闭闪光灯). . . . . . . . 55●把自己也拍到照片里(自拍). . . . . . . . . . . . . 59, 60●在照片中插入日期和时间. . . . . . . . . . . . . . . . . 58●拍摄近摄照片(微距). . . . . . . . . . . . . . . . . . 63●使用变焦拍摄近摄照片(数码微距拍摄). . . . . . . . . . 64●拍摄旧照片或黑白照片. . . . . . . . . . . . . . . . . . 70●改变所要拍摄的图片的大小(记录像素数). . . . . . . . . 65●连续拍摄照片. . . . . . . . . . . . . . . . . . . . . . 67●无相机晃动拍摄(影像稳定器模式). . . . . . . . . . . .111●在低光照条件下拍摄无相机晃动图像(高ISO 感光度) . . . . . . . . . . . . . . . . . . 54, 68y水族馆(第54页) S潜水(第54页) Z低光照(第54页)Ht室内(第53页)焰火(第53页)IF w P夜景(第52页)海滩(第53页)雪景(第54页)V儿童和宠物(第53页)人像(第52页)拍摄良好的人物照U日落(第53页)拍摄良好的风景照拍摄各种其他场景O植物(第54页)拍摄COPY您想要做什么?5●调亮黑暗的主体(校正对比度). . . . . . . . . . . . . . 81●使用取景器拍摄照片. . . . . . . . . . . . . . . . . . . 731●观看我的照片. . . . . . . . . . . . . . . . . . . . . . 25●自动播放照片(幻灯片播放). . . . . . . . . . . . . . . 92●在电视机上观看照片. . . . . . . . . . . . . . . . . . . 95●快速搜索照片. . . . . . . . . . . . . . . . . . . . 90, 91●删除照片. . . . . . . . . . . . . . . . . . . . . . 26, 97●防止意外删除照片. . . . . . . . . . . . . . . . . . . . 96观看E●拍摄短片. . . . . . . . . . . . . . . . . . . . . . . . 29●观看短片. . . . . . . . . . . . . . . . . . . . . . . . 31拍摄/ 观看短片打印2●轻松打印照片. . . . . . . . . . . . . . . . . . . . . . 27●把图像保存到计算机上. . . . . . . . . . . . . . . . . . 32保存3●关闭声音. . . . . . . . . . . . . . . . . . . . . . . . 47●在国外使用相机. . . . . . . . . . . . . . . . . . . . . 13其他COPY6第1 – 3 章介绍了本相机的基本操作和常用功能。
从第4 章开始介绍各种高级功能,让您在阅读各个章节时作深入了解。
检查包装内物品 (2)请先阅读本文 (3)您想要做什么? (4)安全注意事项 (8)为电池充电 (12)插入电池和存储卡 (14)设置日期和时间 (17)设置显示语言 (19)格式化存储卡 (20)按快门按钮 (21)A 拍摄照片 (22)1 观看图像 (25)删除图像 (26)打印图像 (27)E 拍摄短片 (29)观看短片 (31)传输图像至计算机 (32)附件 (36)另售附件 (38)部件指南 (40)屏幕上显示的信息 (42)节电功能(自动关机) (44)m FUNC. 菜单–基本操作 (45)n 菜单–基本操作 (46)更改声音设置 (47)使相机恢复到默认设置 (48)低级格式化存储卡 (49)更改屏幕亮度 (50)4 在各种条件下拍摄 (52)! 关闭闪光灯 (55)进一步放大拍摄主体(数码变焦) (56)插入日期和时间 (58)? 使用自拍机 (59)" 使用面部优先自拍 (60)G 以程序AE 模式拍摄 (62)h 打开闪光灯 (62)u 拍摄遥远的主体(无限远) (63)e 近摄(微距) (63)R 放大近距离主体(数码微距) (64)更改记录像素数(图像尺寸) (65)更改图像质量(压缩率) (65)b 调节亮度(曝光补偿) (67)W 连续拍摄 (67)更改ISO 感光度 (68)调整白平衡 (69)改变图像的色调(我的色彩) (70)使用电视机监视器拍摄 (71)? 使用二秒自拍机拍摄 (71)$ 自定义自拍机 (72)用对焦锁定改变构图 (73)使用取景器拍摄 (73)更改自动对焦框模式 (76)% 用自动对焦锁拍摄 (77)放大对焦点 (78)目录1 入门指南 (11)2 深入了解 (39)3 特殊条件下的拍摄和常用功能 (51)4 自己选择设置 (61)5 了解更多的相机功能 (75)COPY目录7更改测光模式 (79)& 用自动曝光锁拍摄 (79)( 用闪光曝光锁拍摄 (80)...用慢速同步拍摄 (80)@ 调亮黑暗的主体(校正对比度)..81〓红眼校正 (82)≈长时间曝光拍摄 (83)更改图像质量 (86)自动曝光锁/ 曝光转换 (87)其他拍摄功能 (87)播放功能 (88)g 按照9 张一组的方式搜索图像(索引显示) (90)d 用跳转显示搜索图像 (91). 观看幻灯片 (92)查看对焦情况 (93)k 放大图像 (94)+ 更改图像切换效果 (94)在电视机上观看图像 (95): 保护图像 (96)/ 删除全部图像 (97)\ 旋转图像 (98)= 调整图像尺寸 (99)@ 调亮黑暗的主体(校正对比度) (100)] 校正红眼现象 (101)选择打印图像(DPOF) (102)更改功能 (106)更改拍摄功能 (109)更改播放功能 (111)使用家用电源 (114)故障排除 (115)屏幕显示讯息一览 (118)各拍摄模式下可使用的功能 (120)菜单 (122)规格 (126)使用须知 (129)索引 (130)6 使用各种短片拍摄功能.. 857 使用播放和其他功能 (89)8 自定义相机 (105)9 实用信息 (113)COPY8〓使用相机前,请务必阅读下述安全注意事项。
请务必保证正确操作相机。
〓下几页说明的安全注意事项旨在防止您自己及他人受到伤害,或防止器材受到损坏。
〓此外,请务必查阅您所使用的另售附件随附的使用指南。
相机电池、电池充电器警告表示可能造成严重的人身伤害或死亡。
注意表示可能造成人身伤害。
注意表示可能造成器材损坏。
警告〓请勿透过相机的取景器看亮光源(太阳等)。
否则可能损害视力。
〓请勿靠近人的眼睛启动闪光灯。
闪光灯发出的强光可能会损害视力。
请特别注意,使用闪光灯时应与婴幼儿保持一米以上的距离。
〓请将本器材存放在儿童或婴幼儿接触不到的地方。
腕带:儿童脖子上缠绕腕带可能会导致窒息。
存储卡、日期电池:可能遭意外吞食而发生危险。
一旦发生这种情况,请立即就医。
〓请勿尝试对未经本指南明确说明的本器材的任何部分进行拆解或改装。
〓相机跌落或遭受其他损坏之后,请勿接触相机的内部,以免受到伤害。
〓如果相机冒烟、发出异味或出现其他异常,应立即停止使用。
〓请勿使用酒精、汽油、稀释剂等有机溶剂来清洁器材。
〓请勿让液体或异物进入相机。