根盘做vxvm镜像
Symantec-VxVM安装与配置及数据迁移
Symantec-VxVM安装与配置及数据迁移VXVM安装及配置一、VXVM安装bash-3.00# cd /abash-3.00# lsauthentication_service getting_started.pdf storage_foundation_cluster_file_system volume_manager cluster_management_console gnu storage_foundation_for_db2 volume_replicatorcluster_server installer storage_foundation_for_oracle windowscluster_server_agents perl storage_foundation_for_oracle_racfile_system storage_foundation storage_foundation_for_sybasebash-3.00# ./installerInstallation ProgramCopyright (c) 2006 Symantec Corporation. All rights reserved. Symantec, the Symantec Logo are trademarks or registered trademarks of Symantec Corporation or itsaffiliates in the U.S. and other countries. Other names may be trademarks of their respective owners.The Licensed Software and Documentation are deemed to be "commercial computer software" and "commercial computer software documentation" as defined in FAR Sections 12.212 and DFARS Section 227.7202.Logs for installer are being created in /var/tmp/installer-4Xx9zQ.Storage Foundation and High Availability Solutions 5.0Symantec Product Version Installed Licensed====================================== ========= ============================ Symantec Licensing Utilities are not installed. Unable to determine product installationstatus.Task Menu:I) Install/Upgrade a Product C) Configure an Installed ProductL) License a Product P) Perform a Pre-Installation CheckU) Uninstall a Product D) View a Product DescriptionQ) Quit ?) HelpEnter a Task: [I,C,L,P,U,D,Q,?] IStorage Foundation and High Availability Solutions 5.01) Veritas File System2) Veritas Volume Manager3) Veritas Volume Replicator4) Veritas Storage Foundation5) Veritas Storage Foundation for Oracle6) Veritas Storage Foundation for DB27) Veritas Storage Foundation for Sybase8) Veritas Storage Foundation Cluster File System9) Veritas Storage Foundation for Oracle RAC10) Symantec Product Authentication Serviceb) Back to previous menuSelect a product to install: [1-10,b,q] 2Enter the system names separated by spaces on which to install VxVM: test1Initial system check:Checking VxVM installation on test1 ............................................................................................................. not installedStorage Foundation and High Availability Solutions 5.0Checking installed packages on test1Storage Foundation and High Availability Solutions 5.0VxVM can be installed without optional packages to conserve disk space.Additional packages are typically installed to simplify future upgrades.1) Required Veritas Volume Manager packages - 839 MB required2) All Veritas Volume Manager packages - 863 MB required3) Storage Foundation Enterprise packages - 1051 MB requiredSelect the packages to be installed on all systems? [1-3,q,?] (3) 2Storage Foundation and High Availability Solutions 5.0The following VxVM packages will be installed:VRTSperl Veritas Perl 5.8.8 RedistributionVRTSvlic Veritas LicensingVRTSicsco Symantec Common InfrastructureVRTSpbx Symantec Private Branch ExchangeVRTSsmf Symantec Service Management FrameworkVRTSat Symantec Product Authentication ServiceVRTSobc33 Veritas Enterprise Administrator Core ServiceVRTSob Veritas Enterprise Administrator ServiceVRTSobgui Veritas Enterprise AdministratorVRTSccg Veritas Enterprise Administrator Central ControlGridVRTSmh Veritas Storage Foundation Managed Host by SymantecVRTSaa Veritas Enterprise Administrator Action AgentVRTSspt Veritas Software Support T oolsSYMClma Symantec License Inventory AgentVRTSvxvm Veritas Volume Manager BinariesVRTSdsa Veritas Datacenter Storage AgentVRTSfspro Veritas File System Management Services ProviderVRTSvmman Veritas Volume Manager Manual PagesVRTSvmdoc Veritas Volume Manager DocumentationPress [Return] to continue:...continued:VRTSdcli Veritas Distributed Command Line InterfaceVRTSalloc Veritas Volume Manager Intelligent Storage ProvisioningVRTSvmpro Veritas Volume Manager Management Services ProviderVRTSvsvc Veritas Volume Server and Client ProviderVRTSvdid Veritas Device Identification APIVRTSddlpr Veritas Device Discovery Layer Services Provider VRTSvrpro Veritas Volume Replicator Client Extension and Provider forVeritas Enterprise AdministratorVRTSvcsvr Veritas Cluster Server Agents for VVRVRTSjre Veritas Java Runtime Environment RedistributionVRTSjre15 Veritas Java Runtime Environment Redistribution VRTSweb Veritas Java Web ServerVRTSvrw Veritas Volume Replicator Web ConsoleVRTSvrdoc Veritas Volume Replicator DocumentationPress [Return] to continue:Checking for any AP driver issues on test1 ............................................................................................................... NoneStorage Foundation and High Availability Solutions 5.0Installing VxVM: 100%Installation completed successfully on all systemsStorage Foundation and High Availability Solutions 5.0Checking system licensingVxVM is not licensed on test1Enter a VxVM license key for test1: 3JZG-WUMV-U43N-RRI9-EP36-PZPD-P3JZG-WUMV-U43N-RRI9-EP36-PZPD-P successfully registered on test1Permanent VxVM license registered on test1Do you want to enter another license key for test1? [y,n,q] (n) nIt is optional to configure VxVM now. If you choose to configure VxVM later, you can either do so manually or run the installvm -configure command.Are you ready to configure VxVM? [y,n,q] (y) n二、VXVM配置DG1、确定磁盘对应关系确定vxvm管理磁盘跟物理磁盘对应关系bash-3.2# formatSearching for disks...doneAVAILABLE DISK SELECTIONS:0. c0t0d0/pci1c,600000/scsi2/sd0,01. c0t1d0/pci1c,600000/scsi2/sd1,02. c1t202600A0B8744C8Ad0/pci1e,600000/SUNW,qlc3/fp0,0/ssdw202600a0b8744c8a,0 3. c1t202600A0B8744C8Ad1/pci1e,600000/SUNW,qlc3/fp0,0/ssdw202600a0b8744c8a,1 4. c1t202600A0B8744C8Ad2/pci1e,600000/SUNW,qlc3/fp0,0/ssdw202600a0b8744c8a,2 5. c1t202600A0B8744C8Ad3/pci1e,600000/SUNW,qlc3/fp0,0/ssdw202600a0b8744c8a,3 6. c1t202600A0B8744C8Ad4/pci1e,600000/SUNW,qlc3/fp0,0/ssdw202600a0b8744c8a,4 7. c1t202700A0B8744C8Ad0/pci1e,600000/SUNW,qlc3/fp0,0/ssdw202700a0b8744c8a,0 8. c1t202700A0B8744C8Ad1/pci1e,600000/SUNW,qlc3/fp0,0/ssdw202700a0b8744c8a,1 9. c1t202700A0B8744C8Ad2/pci1e,600000/SUNW,qlc3/fp0,0/ssdw202700a0b8744c8a,2 10. c1t202700A0B8744C8Ad3/pci1e,600000/SUNW,qlc3/fp0,0/ssdw202700a0b8744c8a,3 11. c1t202700A0B8744C8Ad4/pci1e,600000/SUNW,qlc3/fp0,0/ssdw202700a0b8744c8a,4 Specify disk (enter its number):bash-3.2# vxdisk pathSUBPATH DANAME DMNAME GROUP STATEc1t202600A0B8744C8Ad0s2 Disk_2 - - ENABLEDc1t202600A0B8744C8Ad3s2 Disk_3 - - ENABLEDc1t202600A0B8744C8Ad1s2 Disk_4 - - ENABLEDc1t202600A0B8744C8Ad2s2 Disk_5- - ENABLEDc1t202600A0B8744C8Ad4s2 Disk_6 - - ENABLEDc1t202600A0B8744C8Ad4s2 Disk_11 - - ENABLEDc1t202700A0B8744C8Ad2s2 Disk_12 - - ENABLEDc1t202700A0B8744C8Ad3s2 Disk_12 - - ENABLEDc1t202700A0B8744C8Ad0s2 Disk_12 - - ENABLEDc1t202700A0B8744C8Ad1s2 Disk_12 - - ENABLEDc0t0d0s2 c0t0d0s2 - - ENABLEDc0t1d0s2 c0t1d0s2 - - ENABLED2、初始化磁盘bash-3.2# vxdisk listDEVICE TYPE DISK GROUP STATUSDisk_2 auto:cdsdisk - - online invalidDisk_3 auto:none - - online invalidDisk_4 auto:none - - online invalidDisk_5 auto:none - - online invalidDisk_6 auto:none - - online invalidDisk_7 auto - - errorDisk_8 auto - - errorc0t0d0s2 auto:none - - online invalidc0t1d0s2 auto:none - - online invalid bash-3.2# vxdisk init Disk_2bash-3.2# vxdisk init Disk_3bash-3.2# vxdisk init Disk_4bash-3.2# vxdisk init Disk_5bash-3.2# vxdisk init Disk_6bash-3.2# vxdisk listDEVICE TYPE DISK GROUP STATUS Disk_2 auto:cdsdisk - - onlineDisk_3 auto:cdsdisk - - onlineDisk_4 auto:cdsdisk - - onlineDisk_5 auto:cdsdisk - - onlineDisk_6 auto:cdsdisk - - onlineDisk_7 auto - - errorDisk_8 auto - - errorc0t0d0s2 auto:none - - online invalid c0t1d0s2 auto:none - - online invalid3、制作DGbash-3.2# vxdg init vxdg vxdgn01=Disk_2bash-3.2# vxdisk listDEVICE TYPE DISK GROUP STATUS Disk_2 auto:cdsdisk vxdgn01 vxdg onlineDisk_3 auto:cdsdisk - - onlineDisk_4 auto:cdsdisk - - onlineDisk_5 auto:cdsdisk - - onlineDisk_6 auto:cdsdisk - - onlineDisk_7 auto - - errorDisk_8 auto - - errorc0t0d0s2 auto:none - - online invalid c0t1d0s2 auto:none - - online invalid4、DG中添加磁盘bash-3.2# vxdg -g vxdg adddisk vxdgn02=Disk_3bash-3.2# vxdg -g vxdg adddisk vxdgn03=Disk_4bash-3.2# vxdg -g vxdg adddisk vxdgn05=Disk_5bash-3.2# vxdg -g vxdg adddisk vxdgn06=Disk_6bash-3.2# vxdisk listDEVICE TYPE DISK GROUP STATUS Disk_2 auto:cdsdisk vxdgn01 vxdg onlineDisk_3 auto:cdsdisk vxdgn02 vxdg onlineDisk_4 auto:cdsdisk vxdgn03 vxdg onlineDisk_5 auto:cdsdisk vxdgn05 vxdg onlineDisk_6 auto:cdsdisk vxdgn06 vxdg onlineDisk_7 auto - - errorDisk_8 auto - - errorc0t0d0s2 auto:none - - online invalid c0t1d0s2 auto:none - - online invalid5、查看DG大小bash-3.2# vxassist -g vxdg maxsizeMaximum volume size: 119166976 (58187Mb)6、DG中删除磁盘(1)直接用命令移除bash-3.2#vxdg –g vxdg rmdisk vxdgn01bash-3.2#vxdg –g vxdg rmdisk vxdgn02bash-3.2#vxdg –g vxdg rmdisk vxdgn03bash-3.2#vxdg –g vxdg rmdisk vxdgn04bash-3.2#vxdg –g vxdg rmdisk vxdgn05DEVICE TYPE DISK GROUP STATUS Disk_2 auto:cdsdisk vxdgn01 vxdg onlineDisk_3 auto:cdsdisk - - onlineDisk_4 auto:cdsdisk - - onlineDisk_5 auto:cdsdisk - - onlineDisk_6 auto:cdsdisk - - onlineDisk_7 auto - - errorDisk_8 auto - - errorc0t0d0s2 auto:none - - online invalid c0t1d0s2 auto:none - - online invalid(2)用管理软件移除bash-3.2# vxdiskadmVolume Manager Support OperationsMenu: VolumeManager/Disk。
Veritas Volume Manager(VxVM)-vxassist命令手册

vxassist是VxVM中非常重要的一个工具,使用非常频繁,我这里给出一个命令手册,并作了一些简单的翻译和注释,仅供参考.General1. Creating a Volume1.1 Creating a Concatenated V olume1.2 Creating a Striped V olume1.3 Creating a RAID-5 V olume2. Extending a Volume2.1 Extending a volume up to certain length2.2 Extending by a Given Length3. Shrinking a V olume3.1 Shrinking to a Given Length3.2 Shrinking by a Given Length4. Removing a Volume5. Mirroring a V olume5.1 Creating & Mirroring a New Volume5.2 Mirroring an Existing V olume5.3 Mirroring All Volumes6.Removing a Mirror7.Adding a RAID-5 Log8.Adding a DRL Log9.Removing a RAID-5 Log10.Preparing a Volume for Online Backup11.Displaying Volume Configuration InformationGeneralvxassist工具是VxVM中用于进行卷管理的工具,可以用于创建卷、增加镜像、扩展或者收缩存在的卷等,是非常重要的一个工具.The vxassist utility in Veritas Volume Manager is used to create volumes, add mirrors and logs to existing volumes, extend and shrink existing volumes, provides for the migration of data from a specified set of disks, and provides facilities for the on-line backup of existing volumes. vxassist在创建卷组时,如果不指定,缺省的会把卷分配给rootdg(note:在VxVM4.0中rootdg 不再必须,但是你可以指定一个default dg具有类似的功能).vxassist的缺省单位是blocks,但是你可以指定K 或M 或G 为单位,这都是合法的.The default behavior of vxassist is to create volumes in the rootdg diskgroup if diskgroup is not specified . The default length is taken as number of blocks but this can be specified in Kilobytes or Megabytes or Gigabytes.vxassist command syntax :vxassist <option> <Keyword> volume_name [attributes]Commonly used options are given below (See man vxassist for complete list of supported options) -g for specifying diskgroups -b for background operation -d file containing defaults for vxassist if not specified /etc/default/vxassist is used Keywords used are make , mirror , move , growto ,growby ,shrintto ,shirnkby ,snapstart , snapshot ,snapwait Attributes specify volumes layout disks controllar to include exclude etcDevice Nodes :Default rootdg disk group. Block Device Node /dev/vx/dsk/volume_name Raw Device Node /dev/vx/rdsk/volume_name Other DiskGroups Block Device Node /dev/vx/dsk/diskgroup_name/volume_name Raw Device Node /dev/vx/rdsk/diskgroup_name/volume_name_______________________________________1. Creating a Volume :1.1 Creating a Concatenated Volume缺省的,vxassist把一个卷组里的所有磁盘统一看待,如果创建的volume大于单个磁盘,那么空间分配自动的跨越磁盘.By default, vxassist creates a concatenated volume using the space available on a disk or on the number of disks in a diskgroup if the volume size specified is more then the one available on a single disk.Disks can be specified from a diskgroup for a volume group but if not mentioned available disks are selected by the volume manager.Command syntax :· vxassist make volume_name volume_lengthTo create a new volume appvol of 100 MB in the default disk group rootdg with available disks:· #vxassist make appvol 100mTo create the volume appvol of 100MB on disk03· #vxassist make appvol 100m disk031.2 Creating a Striped VolumeA striped volume contains at least one plex that consists of two or more subdisks located on two or more physical disks.Command Syntax :· vxassist make volume_name length layout=stripeTo create a striped volume appvol2 with the default stripe unit size on the default number of disks· #vxassist make appvol2 100m layout=stripeTo create a striped volume appvol2 100MB striped volume on three specific disks.· #vxassist make appvol2 100m layout=stripe disk04 disk05 disk061.3 Creating a RAID-5 VolumeA RAID-5 volume contains a RAID-5 plex that consists of two or more subdisks located on two or more physical disks. Only one RAID-5 plex can exist per volume. A RAID-5 volume may also contain one or more RAID-5 log plexes, which are used to log information about data and parity being written to the volume.Command Syntax :· vxassist make volume_name length layout=raid5To create the RAID-5 volume appvol4 with the default stripe unit size on the default number of disks with RAID-5 log,· #vxassist make appvol4 100m layout=raid5.2. Extending a Volume--扩展一个建好的VolumeCaution : If you plan to use volume size change (grow or shrink ) on a volume with data make sure you have the good backup of the volume available before carrying out such operation .2.1 Extending a volume up to certain lengthCommand syntax· vxassist growto volume_name lengthTo extend vol3 upto 8000 sectors, type:--例如,扩展vol3到8000个扇区· #vxassist growto vol3 8000Note:这里可以指定大小,例如:vxassist growto redo101 100M如果使用的是非缺省DG,还需要指定磁盘组:vxassist -g oradg growto redo101 100M2.2 Extending by a Given LengthCommand Syntax· vxassist growby volume_name lengthTo extend volapp by 1000 sectors, type:· #vxassist growby volapp 10003. Shrinking a VolumeCaution - Do not shrink a volume below the size of the file system. If you have a VxFS file system, you can shrink the file system and then shrink the volume. If you do not shrink the file system first, you risk unrecoverable data loss.Always make sure you have a good backup of the data volume to be shirnked.3.1 Shrinking to a Given LengthShrink a volume to a specific length as follows:· vxassist shrinkto volume_name lengthMake sure you do not shrink the volume below the current size of the file system or database using the volume. This command can be safely used on empty volumes.To shrink volcat to 1300 sectors, type:· #vxassist shrinkto volcat 13003.2 Shrinking by a Given LengthShrink a volume by a specific length as follows:· vxassist shrinkby volume_name lengthTo shrink volcat by 8000 sectors, type:· #vxassist shrinkby volapp2 80004. Removing a VolumeRemoving a volume requires removing all references to the volumes to be removed like unmounting the volume if mounted and removing its reference from /etc/vfstab .如果你需要remove一个volume,那么首先你需要stop这个卷组,停止其上的所有活动事务.An active volume has to be stopped first to stop all the activities to the volume only then it can be removed.Stopping Volume :Command Syntax· vxvol stop volume_nameTo stop appvol1· #vxvol stop appvol1Removing VolumeCommand Syntax· vxedit -rf rm volume_nameTo remove the volume appvol1· #vxedit -rf rm appvol115. Mirroring a VolumeMirroring allow data to be written simultaneously to two disks so that in case of failure of one disk data is available from the other mirrored disk. Boot disks can be mirriored to provide alternate booting disk .5.1 Creating & Mirroring a New VolumeCommand Syntax :· vxassist make volume_name length layout=mirrorTo create the mirrored volume, appvol22 of 100mb· #vxassist make appvol22 100m layout=mirrorTo create a volume with Dirty Region Logging enabled· #vxassist make volume_name length layout=mirror,log5.2 Mirroring an Existing VolumeCommand syntax· vxassist mirror volume_nameCreating a mirror of volume vol44:· #vxassist mirror vol445.3 Mirroring All VolumesTo mirror all existing volumes to available disk space· /etc/vx/bin/vxmirror -a6. Removing a MirrorRemoving a mirror involves first dissociating the plex from its volume and then removing the plex and any associated subdisks completely.The last valid mirror plex associated with a volume cannot be removed.Dissociate and remove the plex from its volume as follows:· vxplex -o rm dis plex_namevxprint -h shows the volume and associated plexes :Disk group: rootdg TY NAME ASSOC KSTATE LENGTH PLOFFS STATE TUTIL0 PUTIL0 v volm fsgen ENABLED 10240 - ACTIVE - - pl volm-01 volm ENABLED 10240 - ACTIVE - - sd disk01-02 volm-01 - 10240 0 - - - pl volm-02 volm ENABLED 10240 - ACTIVE - - sd disk02-03 volm-02 - 10240 0 - - -To disassociate and remove volmir-02 from volmir, type:· #vxplex -o rm dis volm-02The output of vxprint -h for volm now shows volume volm with only one plex::Disk group: rootdg TY NAME ASSOC KSTATE LENGTH PLOFFS STATE TUTIL0 PUTIL0 v volm fsgen ENABLED 10240 - ACTIVE - - pl volm-01 volmir ENABLED 10240 - ACTIVE - - sd disk01-02 volmir-01 - 10240 0 - - -7. Adding a RAID-5 LogA RAID-5 log maintains a copy of the data and parity being written to the volume at any given time. If a system failure occurs, VxVM can replay the RAID-5 log to resynchronize the volume. This copies the data and parity that was being written at the time of failure from the log to the appropriate areas of the RAID-5 volume.RAID-5 log plexes are used to log information about data and parity being written to the raid volume. A log plex is created for the volume by default when a raid volume is created but additional ones can be added by following command .· vxassist addlog name_of_raid5_vol8. Adding a DRL LogDirty region logging (DRL) is used with mirrored volume layouts. DRL keeps track of the regions that have changed due to I/O writes to a mirrored volume. Prior to every write, a bitmap is written to a log to record the area of the disk that is being changed. In case of system failure, DRL uses this information to recover only the portions of the volume that need to be recovered.To put Dirty Region Logging into effect for a volume, a log subdisk must be added to that volume and the volume must be mirrored. Only one log subdisk can exist per plex.The following example creates a log for the mirrored volume vol03:· #vxassist addlog vol03When vxassist is used to add a log subdisk to a volume, a log plex is also created to contain the log subdisk, by default.Once created, the plex containing a log subdisk can be treated as a regular plex. Data subdisks can be added to the log plex. The log plex and log subdisk can be removed using the same procedures used to remove ordinary plexes and subdisks.9. Removing a RAID-5 LogRemoving a RAID-5 log involves first dissociating the log from its volume and then removing the log and any associated subdisks completely.Dissociate the log from its volume as follows:· #vxplex -o rm dis plex_nameTo identify the log plex, use the command:· vxprint -ht raid5_volume_nameTo disassociate the log plex volrd-02 from volrd, type:· #vxplex -o rm dis volrd-02The output of vxprint -h for volrd now shows:Disk group: rootdg TY NAME ASSOC KSTATE LENGTH PLOFFS STATE TUTIL0 PUTIL0 v volrd raid5 ENABLED 32 - ACTIVE - - pl volrd-01 volrd ENABLED 32 - ACTIVE - - sd disk01-02 volrd-01 - 32 0 - - - sd disk02-03 volrd-01 - 32 0 - - -10. Preparing a Volume for Online BackupVolume manager provides an easy way to take backup of the online data by creating an offline snapshot mirror of the volume .The vxassist snapstart operation creates a write-only backup mirror, which is attached to and synchronized with the volume to be backed up and later detached and made offline by vxassist snapshot command . The snapshot volume can be used by backup utilities while the original volume continues to be available for applications and users.The volume backup method described here does not apply to RAID-5 volumes.Backing up a volume with vxassist involves the following procedureCreate a snapshot mirrorsnapstart starts creating a online snapshot mirror of the volume using the available disk space . The snapshot is completed with vxassist snapshot command when offline snapshot volume is created with a userdefined name .Command Syntax:vxassist snapstart volume_nameTo create a snapshot mirror of a volume called vol8, type#vxassist snapstart vol8Create a snapshot volumeCommand Syntaxvxassist snapshot volume_name new_volume_nameTo create a snapshot volume of vol8, type:#vxassist snapshot vol8 snapvol8You can now back up the snapshot volume by whatever means you prefer. To avoid wasting space, you can then remove the snapshot volume, which occupies as much space as the original volume11 Displaying Volume Configuration InformationThe vxprint command can be used to display information about how a volume is configured.Display the volume, mirror, and subdisk record information for all volumes as follows:#vxprint -htclass="style25 style31"Disk group: rootdgDG NAME NCONFIG NLOG MINORS GROUP-IDDM NAME DEVICE TYPE PRIVLEN PUBLEN STATE V NAME USETYPE KSTATE STATE LENGTH READPOL PREFPLEXPL NAME VOLUME KSTATE STATE LENGTH LAYOUT NCOL/WID MODESD NAME PLEX DISK DISKOFFS LENGTH [COL/]OFF DEVICE MODEdg rootdg 759096729.1025.tweetydm disk10 c1t0d0s2 sliced 559 1044400 -dm disk20 c2t0d0s2 sliced 559 1044400 -v pubs fsgen ENABLED ACTIVE 2288 SELECT -pl pubs-01 pubs ENABLED ACTIVE 2288 CONCAT - RWsd disk10-01 pubs-01 disk10 0 2288 0 c0t0d0 ENAv vol8 fsgen ENABLED ACTIVE 20480 SELECT -pl vol8-01 vol8 ENABLED ACTIVE 20480 CONCAT - RWsd disk10-02 vol8-0 disk10 2288 20480 0 c0t1d0 ENAwhere dg is a disk group, dm is a disk, v is a volume, pl is a plex, and sd is a subdisk. The top few lines indicate the headers that match each type of output line that follows. Each volume is listed along with its associated plex(es) and subdisk(s).Display volume-related information for a specific volume as follows:#vxprint -t volume_nameTo display information about vol8, type:#vxprint -t vol8。
VMware虚拟化架构存储LUN复制以及挂载镜像LUN的步骤
VMware虚拟化架构存储LUN复制,挂载镜像LUN方法
测试方式:
1、在存储上划分两个同等大小的LUN,通过存储镜像同步软
件,将中心机房的生产系统LUN通过光纤通道复制到辅助楼7楼备份机房
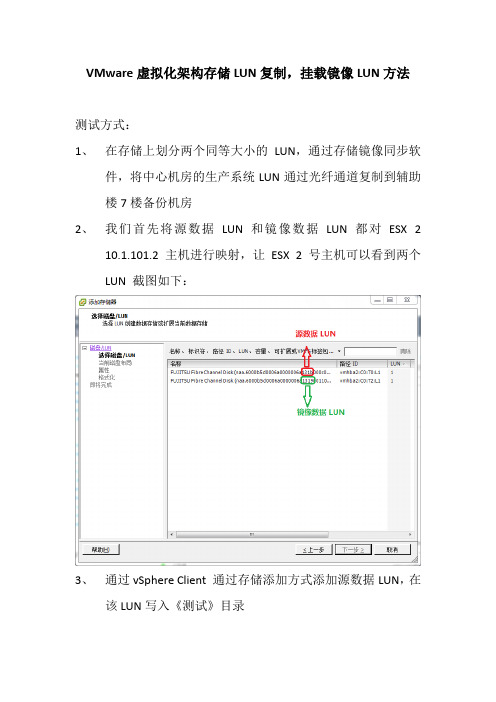
2、我们首先将源数据LUN和镜像数据LUN都对ESX 2
10.1.101.2主机进行映射,让ESX 2号主机可以看到两个
LUN 截图如下:
3、通过vSphere Client 通过存储添加方式添加源数据LUN,在
该LUN写入《测试》目录
4、完成之后我们通过存储管理员,将源数据LUN和ESX 2主
机的映射关系取消,模拟链路故障。
现在ESX 2号主机无法看到源数据LUN了。
5、现在我们实现了LUN之间的数据同步,所以镜像LUN上也
存在着这些数据。
6、现在登录ESX 2号主机的ServiceConsole界面,输入
esxcfg-volume -r 《yuan》yuan的名称为我们添加源数据LUN 时候定义的名称。
命令解释可以参考下列帮助:
至此,镜像LUN的挂载就完成了,我们可以在ESX 2号主机的存储器里面看到镜像LUN的数据和名称:。
Symantec-VxVM安装与配置及数据迁移资料讲解

Symantec-VxVM安装与配置及数据迁移资料讲解S y m a n t e c-V x V M安装与配置及数据迁移VXVM安装及配置⼀、VXVM安装bash-3.00# cd /abash-3.00# lsauthentication_service getting_started.pdfstorage_foundation_cluster_file_system volume_managercluster_management_console gnustorage_foundation_for_db2 volume_replicatorcluster_server installerstorage_foundation_for_oracle windowscluster_server_agents perlstorage_foundation_for_oracle_racfile_system storage_foundationstorage_foundation_for_sybasebash-3.00# ./installerInstallation ProgramCopyright (c) 2006 Symantec Corporation. All rights reserved. Symantec, theSymantec Logo are trademarks or registered trademarks of Symantec Corporation oritsaffiliates in the U.S. and other countries. Other names may be trademarks of their respective owners.The Licensed Software and Documentation are deemed to be "commercial computer software" and "commercial computer software documentation" as defined in FARSections12.212 and DFARS Section 227.7202.Logs for installer are being created in /var/tmp/installer-4Xx9zQ.Storage Foundation and High Availability Solutions 5.0 Symantec Product Version Installed Licensed===========================================================================Symantec Licensing Utilities are not installed. Unable to determine productinstallation status.Task Menu:I) Install/Upgrade a Product C) Configure an Installed ProductL) License a Product P) Perform a Pre-Installation CheckU) Uninstall a Product D) View a Product DescriptionQ) Quit ?) HelpEnter a Task: [I,C,L,P,U,D,Q,?] IStorage Foundation and High Availability Solutions 5.01) Veritas File System2) Veritas Volume Manager3) Veritas Volume Replicator4) Veritas Storage Foundation5) Veritas Storage Foundation for Oracle6) Veritas Storage Foundation for DB27) Veritas Storage Foundation for Sybase8) Veritas Storage Foundation Cluster File System9) Veritas Storage Foundation for Oracle RAC10) Symantec Product Authentication Serviceb) Back to previous menuSelect a product to install: [1-10,b,q] 2Enter the system names separated by spaces on which to install VxVM: test1Initial system check:Checking VxVM installation ontest1 ............................................................................................................. not installedStorage Foundation and High AvailabilitySolutions 5.0Checking installed packages on test1Storage Foundation and High AvailabilitySolutions 5.0VxVM can be installed without optional packages to conserve disk space.Additional packages are typically installed to simplify future upgrades.1) Required Veritas Volume Manager packages - 839 MB required2) All Veritas Volume Manager packages - 863 MB required3) Storage Foundation Enterprise packages - 1051 MB requiredSelect the packages to be installed on all systems? [1-3,q,?] (3) 2Storage Foundation and High Availability Solutions 5.0 The following VxVM packages will be installed: VRTSperl Veritas Perl 5.8.8 RedistributionVRTSvlic Veritas LicensingVRTSicsco Symantec Common InfrastructureVRTSpbx Symantec Private Branch ExchangeVRTSsmf Symantec Service Management FrameworkVRTSat Symantec Product Authentication ServiceVRTSobc33 Veritas Enterprise Administrator Core ServiceVRTSob Veritas Enterprise Administrator ServiceVRTSobgui Veritas Enterprise AdministratorVRTSccg Veritas Enterprise Administrator Central Control Grid VRTSmh Veritas Storage Foundation Managed Host by Symantec VRTSaa Veritas Enterprise Administrator Action AgentVRTSspt Veritas Software Support ToolsSYMClma Symantec License Inventory AgentVRTSvxvm Veritas Volume Manager BinariesVRTSdsa Veritas Datacenter Storage AgentVRTSfspro Veritas File System Management Services Provider VRTSvmman Veritas Volume Manager Manual PagesVRTSvmdoc Veritas Volume Manager DocumentationPress [Return] to continue:...continued:VRTSdcli Veritas Distributed Command Line InterfaceVRTSalloc Veritas Volume Manager Intelligent Storage Provisioning VRTSvmpro Veritas Volume Manager Management Services Provider VRTSvsvc Veritas Volume Server and Client ProviderVRTSvdid Veritas Device Identification APIVRTSddlpr Veritas Device Discovery Layer Services Provider VRTSvrpro Veritas Volume Replicator Client Extension and Provider for Veritas Enterprise AdministratorVRTSvcsvr Veritas Cluster Server Agents for VVRVRTSjre Veritas Java Runtime Environment RedistributionVRTSjre15 Veritas Java Runtime Environment Redistribution VRTSweb Veritas Java Web ServerVRTSvrw Veritas Volume Replicator Web ConsoleVRTSvrdoc Veritas Volume Replicator DocumentationPress [Return] to continue:Checking for any AP driver issues ontest1 ............................................................................................................... NoneStorage Foundation and High Availability Solutions 5.0Installing VxVM: 100% Installation completed successfully on all systemsStorage Foundation and High Availability Solutions 5.0 Checking system licensingVxVM is not licensed on test1Enter a VxVM license key for test1: 3JZG-WUMV-U43N-RRI9-EP36-PZPD-P3JZG-WUMV-U43N-RRI9-EP36-PZPD-P successfully registered on test1Permanent VxVM license registered on test1Do you want to enter another license key for test1? [y,n,q] (n) nIt is optional to configure VxVM now. If you choose to configure VxVM later, you can either do so manually or run the installvm -configure command.Are you ready to configure VxVM? [y,n,q] (y) n⼆、VXVM配置DG1、确定磁盘对应关系确定vxvm管理磁盘跟物理磁盘对应关系bash-3.2# formatSearching for disks...doneAVAILABLE DISK SELECTIONS:0. c0t0d0/pci@1c,600000/scsi@2/sd@0,01. c0t1d0/pci@1c,600000/scsi@2/sd@1,02. c1t202600A0B8744C8Ad0/pci@1e,600000/SUNW,qlc@3/fp@0,0/ssd@w202600a0b8744c8a,03. c1t202600A0B8744C8Ad1/pci@1e,600000/SUNW,qlc@3/fp@0,0/ssd@w202600a0b8744c8a,14. c1t202600A0B8744C8Ad2/pci@1e,600000/SUNW,qlc@3/fp@0,0/ssd@w202600a0b8744c8a,25. c1t202600A0B8744C8Ad3/pci@1e,600000/SUNW,qlc@3/fp@0,0/ssd@w202600a0b8744c8a,36. c1t202600A0B8744C8Ad4/pci@1e,600000/SUNW,qlc@3/fp@0,0/ssd@w202600a0b8744c8a,47. c1t202700A0B8744C8Ad0/pci@1e,600000/SUNW,qlc@3/fp@0,0/ssd@w202700a0b8744c8a,08. c1t202700A0B8744C8Ad1/pci@1e,600000/SUNW,qlc@3/fp@0,0/ssd@w202700a0b8744c8a,19. c1t202700A0B8744C8Ad2/pci@1e,600000/SUNW,qlc@3/fp@0,0/ssd@w202700a0b8744c8a,210. c1t202700A0B8744C8Ad3/pci@1e,600000/SUNW,qlc@3/fp@0,0/ssd@w202700a0b8744c8a,311. c1t202700A0B8744C8Ad4/pci@1e,600000/SUNW,qlc@3/fp@0,0/ssd@w202700a0b8744c8a,4 Specify disk (enter its number): bash-3.2# vxdisk pathSUBPATH DANAME DMNAME GROUP STATEc1t202600A0B8744C8Ad0s2 Disk_2 - - ENABLEDc1t202600A0B8744C8Ad3s2 Disk_3 - - ENABLEDc1t202600A0B8744C8Ad1s2 Disk_4 - - ENABLEDc1t202600A0B8744C8Ad2s2 Disk_5 - - ENABLEDc1t202600A0B8744C8Ad4s2 Disk_6 - - ENABLEDc1t202600A0B8744C8Ad4s2 Disk_11 - - ENABLEDc1t202700A0B8744C8Ad2s2 Disk_12 - - ENABLEDc1t202700A0B8744C8Ad3s2 Disk_12 - - ENABLEDc1t202700A0B8744C8Ad0s2 Disk_12 - - ENABLEDc1t202700A0B8744C8Ad1s2 Disk_12 - - ENABLEDc0t0d0s2 c0t0d0s2 - - ENABLEDc0t1d0s2 c0t1d0s2 - - ENABLED2、初始化磁盘bash-3.2# vxdisk listDEVICE TYPE DISK GROUP STATUSDisk_2 auto:cdsdisk - - online invalidDisk_3 auto:none - - online invalidDisk_4 auto:none - - online invalidDisk_5 auto:none - - online invalidDisk_6 auto:none - - online invalidDisk_7 auto - - errorDisk_8 auto - - errorc0t0d0s2 auto:none - - online invalidc0t1d0s2 auto:none - - online invalidbash-3.2# vxdisk init Disk_2bash-3.2# vxdisk init Disk_3bash-3.2# vxdisk init Disk_4bash-3.2# vxdisk init Disk_5bash-3.2# vxdisk init Disk_6bash-3.2# vxdisk listDEVICE TYPE DISK GROUP STATUSDisk_2 auto:cdsdisk - - onlineDisk_3 auto:cdsdisk - - onlineDisk_4 auto:cdsdisk - - onlineDisk_5 auto:cdsdisk - - onlineDisk_6 auto:cdsdisk - - onlineDisk_7 auto - - errorDisk_8 auto - - errorc0t0d0s2 auto:none - - online invalidc0t1d0s2 auto:none - - online invalid 3、制作DGbash-3.2# vxdg init vxdg vxdgn01=Disk_2bash-3.2# vxdisk listDEVICE TYPE DISK GROUP STATUS Disk_2 auto:cdsdisk vxdgn01 vxdg online Disk_3 auto:cdsdisk - - onlineDisk_4 auto:cdsdisk - - onlineDisk_5 auto:cdsdisk - - onlineDisk_6 auto:cdsdisk - - onlineDisk_7 auto - - errorDisk_8 auto - - errorc0t0d0s2 auto:none - - online invalidc0t1d0s2 auto:none - - online invalid 4、DG中添加磁盘bash-3.2# vxdg -g vxdg adddisk vxdgn02=Disk_3bash-3.2# vxdg -g vxdg adddisk vxdgn03=Disk_4bash-3.2# vxdg -g vxdg adddisk vxdgn05=Disk_5bash-3.2# vxdg -g vxdg adddisk vxdgn06=Disk_6bash-3.2# vxdisk listDEVICE TYPE DISK GROUP STATUS Disk_2 auto:cdsdisk vxdgn01 vxdg online Disk_3 auto:cdsdisk vxdgn02 vxdg online Disk_4 auto:cdsdisk vxdgn03 vxdg online Disk_5 auto:cdsdisk vxdgn05 vxdg online Disk_6 auto:cdsdisk vxdgn06 vxdg online Disk_7 auto - - errorDisk_8 auto - - errorc0t0d0s2 auto:none - - online invalidc0t1d0s2 auto:none - - online invalid5、查看DG⼤⼩bash-3.2# vxassist -g vxdg maxsizeMaximum volume size: 119166976 (58187Mb)6、DG中删除磁盘(1)直接⽤命令移除bash-3.2#vxdg –g vxdg rmdisk vxdgn01bash-3.2#vxdg –g vxdg rmdisk vxdgn02bash-3.2#vxdg –g vxdg rmdisk vxdgn03bash-3.2#vxdg –g vxdg rmdisk vxdgn04bash-3.2#vxdg –g vxdg rmdisk vxdgn05DEVICE TYPE DISK GROUP STATUS Disk_2 auto:cdsdisk vxdgn01 vxdg online Disk_3 auto:cdsdisk - - online Disk_4 auto:cdsdisk - - onlineDisk_5 auto:cdsdisk - - onlineDisk_6 auto:cdsdisk - - onlineDisk_7 auto - - errorDisk_8 auto - - errorc0t0d0s2 auto:none - - online invalidc0t1d0s2 auto:none - - online invalid (2)⽤管理软件移除bash-3.2# vxdiskadmVolume Manager Support OperationsMenu: VolumeManager/Disk1 Add or initialize one or more disks2 Encapsulate one or more disks3 Remove a disk4 Remove a disk for replacement5 Replace a failed or removed disk6 Mirror volumes on a disk7 Move volumes from a disk8 Enable access to (import) a disk group9 Remove access to (deport) a disk group10 Enable (online) a disk device11 Disable (offline) a disk device12 Mark a disk as a spare for a disk group13 Turn off the spare flag on a disk14 Unrelocate subdisks back to a disk15 Exclude a disk from hot-relocation use16 Make a disk available for hot-relocation use17 Prevent multipathing/Suppress devices from VxVM's view18 Allow multipathing/Unsuppress devices from VxVM's view19 List currently suppressed/non-multipathed devices20 Change the disk naming scheme21 Get the newly connected/zoned disks in VxVM view22 Change/Display the default disk layouts23 Mark a disk as allocator-reserved for a disk group24 Turn off the allocator-reserved flag on a disklist List disk informationDisplay help about menuDisplay help about the menuing systemq Exit from menusSelect an operation to perform: 9Remove access to (deport) a disk groupMenu: VolumeManager/Disk/DeportDiskGroupUse this menu operation to remove access to a disk group thatis currently enabled (imported) by this system. Deport a diskgroup if you intend to move the disks in a disk group to another system. Also, deport a disk group if you want to use all of the disks remaining in a disk group for some new purpose.You will be prompted for the name of a disk group. You will also be asked if the disks should be disabled (offlined). For removable disk devices on some systems, it is important todisable all access to the disk before removing the disk.Enter name of disk group [,list,q,?] (default: list) GROUP DISK/VOLUME DEVICE/STATE LENGTH vxdg disk vxdgn02 Disk_3 27188992vxdg disk vxdgn03 Disk_4 22994688vxdg disk vxdgn05 Disk_5 27188992vxdg disk vxdgn06 Disk_6 20897536Enter name of disk group [,list,q,?] (default: list) vxdg VxVM NOTICE V-5-2-788 Please respond with "y" or "n" Select a different disk group? [y,n,q,?] (default: n)Remove access to (deport) a disk groupMenu: VolumeManager/Disk/DeportDiskGroupUse this menu operation to remove access to a disk group that is currently enabled (imported) by this system. Deport a disk group if you intend to move the disks in a disk group to another system. Also, deport a disk group if you want to use all of the disks remaining in a disk group for some new purpose.You will be prompted for the name of a disk group. You will also be asked if the disks should be disabled (offlined). For removable disk devices on some systems, it is important todisable all access to the disk before removing the disk.Enter name of disk group [,list,q,?] (default: list) GROUP DISK/VOLUME DEVICE/STATE LENGTH vxdg disk vxdgn02 Disk_3 27188992vxdg disk vxdgn03 Disk_4 22994688vxdg disk vxdgn05 Disk_5 27188992vxdg disk vxdgn06 Disk_6 20897536Enter name of disk group [,list,q,?] (default: list) vxdg VxVM INFO V-5-2-377The requested operation is to disable access to the removabledisk group named vxdg. This disk group is stored on thefollowing disks:vxdgn02 on device Disk_3vxdgn03 on device Disk_4vxdgn05 on device Disk_5vxdgn06 on device Disk_6You can choose to disable access to (also known as "offline")these disks. This may be necessary to prevent errors ifyou actually remove any of the disks from the system.Disable (offline) the indicated disks? [y,n,q,?] (default: n)Continue with operation? [y,n,q,?] (default: y)VxVM INFO V-5-2-269 Removal of disk group vxdg was successful. Disable another disk group? [y,n,q,?] (default: n) Volume Manager Support OperationsMenu: VolumeManager/Disk1 Add or initialize one or more disks2 Encapsulate one or more disks3 Remove a disk4 Remove a disk for replacement5 Replace a failed or removed disk6 Mirror volumes on a disk7 Move volumes from a disk8 Enable access to (import) a disk group9 Remove access to (deport) a disk group10 Enable (online) a disk device11 Disable (offline) a disk device12 Mark a disk as a spare for a disk group13 Turn off the spare flag on a disk14 Unrelocate subdisks back to a disk15 Exclude a disk from hot-relocation use16 Make a disk available for hot-relocation use17 Prevent multipathing/Suppress devices from VxVM's view18 Allow multipathing/Unsuppress devices from VxVM's view19 List currently suppressed/non-multipathed devices20 Change the disk naming scheme21 Get the newly connected/zoned disks in VxVM view22 Change/Display the default disk layouts23 Mark a disk as allocator-reserved for a disk group24 Turn off the allocator-reserved flag on a disklist List disk informationDisplay help about menuDisplay help about the menuing systemq Exit from menusSelect an operation to perform: qGoodbye.bash-3.2# vxdisk listDEVICE TYPE DISK GROUP STATUSDisk_2 auto:cdsdisk - - onlineDisk_3 auto:cdsdisk - - onlineDisk_4 auto:cdsdisk - - onlineDisk_5 auto:cdsdisk - - onlineDisk_6 auto:cdsdisk - - onlineDisk_7 auto - - errorDisk_8 auto - - errorc0t0d0s2 auto:none - - online invalid三、制作LV1、制作普通lvbash-3.2# vxassist -b -g vxdg make lv01G2、制作镜像lvbash-3.2# vxassist -b -g vxdg make lv02 1G layout=mirror3、制作三份镜像lvbash-3.2# vxassist -b -g vxdg make lv03 1G layout=mirror mirror=3 4、制作条带lvbash-3.2# vxassist -b -g vxdg make lv04 1G layout=stripe5、制作raid5lvbash-3.2# vxassist -b -g vxdg make lv05 1G layout=raid5bash-3.2# vxprint -htDisk group: vxdgDG NAME NCONFIG NLOG MINORS GROUP-IDST NAME STATE DM_CNT SPARE_CNT APPVOL_CNTDM NAME DEVICE TYPE PRIVLEN PUBLEN STATERV NAME RLINK_CNT KSTATE STATE PRIMARY DATAVOLS SRLRL NAME RVG KSTATE STATE REM_HOST REM_DGREM_RLNKCO NAME CACHEVOL KSTATE STATEVT NAME RVG KSTATE STATE NVOLUMEV NAME RVG/VSET/CO KSTATE STATE LENGTH READPOL PREFPLEX UTYPEPL NAME VOLUME KSTATE STATE LENGTH LAYOUTNCOL/WID MODESD NAME PLEX DISK DISKOFFS LENGTH [COL/]OFF DEVICE MODESV NAME PLEX VOLNAME NVOLLAYR LENGTH [COL/]OFFAM/NM MODESC NAME PLEX CACHE DISKOFFS LENGTH [COL/]OFF DEVICE MODEDC NAME PARENTVOL LOGVOLSP NAME SNAPVOL DCOEX NAME ASSOC VC PERMS MODE STATESR NAME KSTATEdg vxdg default default 51000 1417083437.22.cluster-01dm vxdgn02 Disk_3 auto 65536 27188992 -dm vxdgn03 Disk_4 auto 65536 22994688 -dm vxdgn05 Disk_5 auto 65536 27188992 -dm vxdgn06 Disk_6 auto 65536 20897536 -v lv01 - ENABLED ACTIVE 2097152 SELECT - fsgenpl lv01-01 lv01 ENABLED ACTIVE 2097152 CONCAT - RW sd vxdgn02-01 lv01-01 vxdgn02 0 2097152 0 Disk_3 ENA v lv02 - ENABLED ACTIVE 2097152 SELECT - fsgenpl lv02-01 lv02 ENABLED ACTIVE 2097152 CONCAT - RW sd vxdgn03-01 lv02-01 vxdgn03 0 2097152 0 Disk_4 ENA pl lv02-02 lv02 ENABLED ACTIVE 2097152 CONCAT - RW sd vxdgn05-01 lv02-02 vxdgn05 0 2097152 0 Disk_5 ENA v lv03 - ENABLED ACTIVE 2097152 SELECT - fsgenpl lv03-01 lv03 ENABLED ACTIVE 2097152 CONCAT - RW sd vxdgn06-01 lv03-01 vxdgn06 0 2097152 0 Disk_6 ENA pl lv03-02 lv03 ENABLED ACTIVE 2097152 CONCAT - RW sd vxdgn02-02 lv03-02 vxdgn02 2097152 2097152 0 Disk_3 ENA pl lv03-03 lv03 ENABLED ACTIVE 2097152 CONCAT - RW sd vxdgn03-02 lv03-03 vxdgn03 2097152 2097152 0 Disk_4 ENAv lv04 - ENABLED ACTIVE 2097152 SELECT lv04-01 fsgen pl lv04-01 lv04 ENABLED ACTIVE 2097152 STRIPE 2/128 RW sd vxdgn05-02 lv04-01 vxdgn05 2097152 1048576 0/0 Disk_5 ENA sd vxdgn06-02 lv04-01 vxdgn06 2097152 1048576 1/0 Disk_6 ENAv lv05 - ENABLED ACTIVE 2097152 RAID - raid5pl lv05-01 lv05 ENABLED ACTIVE 2097152 RAID 3/32 RW sd vxdgn05-03 lv05-01 vxdgn05 3145728 1048576 0/0 Disk_5 ENA sd vxdgn06-03 lv05-01 vxdgn06 3145728 1048576 1/0 Disk_6 ENA sd vxdgn02-03 lv05-01 vxdgn02 4194304 1048576 2/0 Disk_3 ENA pl lv05-02 lv05 ENABLED LOG 2880 CONCAT - RWsd vxdgn03-03 lv05-02 vxdgn03 4194304 2880 0 Disk_4 ENAv lv07 - ENABLED ACTIVE 2097152 SELECT - fsgenpl lv07-01 lv07 ENABLED ACTIVE 2097152 CONCAT - RW sd vxdgn05-04 lv07-01 vxdgn05 4194304 2097152 0 Disk_5 ENA Disk group: vxvgDG NAME NCONFIG NLOG MINORS GROUP-IDST NAME STATE DM_CNT SPARE_CNT APPVOL_CNT DM NAME DEVICE TYPE PRIVLEN PUBLEN STATERV NAME RLINK_CNT KSTATE STATE PRIMARY DATAVOLS SRLRL NAME RVG KSTATE STATE REM_HOST REM_DG REM_RLNKCO NAME CACHEVOL KSTATE STATEVT NAME RVG KSTATE STATE NVOLUMEV NAME RVG/VSET/CO KSTATE STATE LENGTH READPOL PREFPLEX UTYPEPL NAME VOLUME KSTATE STATE LENGTH LAYOUTNCOL/WID MODESD NAME PLEX DISK DISKOFFS LENGTH [COL/]OFF DEVICE MODESV NAME PLEX VOLNAME NVOLLAYR LENGTH [COL/]OFFAM/NM MODESC NAME PLEX CACHE DISKOFFS LENGTH [COL/]OFF DEVICE MODEDC NAME PARENTVOL LOGVOLSP NAME SNAPVOL DCOEX NAME ASSOC VC PERMS MODE STATESR NAME KSTATEdg vxvg default default 5000 1417145016.14.cluster-01dm vxvgn01 Disk_2 auto 65536 20897536 -6、移除lvbash-3.2# vxassist -g vxdg remove volume lv07bash-3.2# vxassist -g vxdg remove volume lv05bash-3.2# vxassist -g vxdg remove volume lv04bash-3.2# vxassist -g vxdg remove volume lv03bash-3.2# vxassist -g vxdg remove volume lv02bash-3.2# vxassist -g vxdg remove volume lv01bash-3.2# vxprint -htDisk group: vxdgDG NAME NCONFIG NLOG MINORS GROUP-IDST NAME STATE DM_CNT SPARE_CNT APPVOL_CNTDM NAME DEVICE TYPE PRIVLEN PUBLEN STATERV NAME RLINK_CNT KSTATE STATE PRIMARY DATAVOLS SRLRL NAME RVG KSTATE STATE REM_HOST REM_DGREM_RLNKCO NAME CACHEVOL KSTATE STATEVT NAME RVG KSTATE STATE NVOLUMEV NAME RVG/VSET/CO KSTATE STATE LENGTH READPOL PREFPLEX UTYPE PL NAME VOLUME KSTATE STATE LENGTH LAYOUTNCOL/WID MODESD NAME PLEX DISK DISKOFFS LENGTH [COL/]OFF DEVICE MODESV NAME PLEX VOLNAME NVOLLAYR LENGTH [COL/]OFFAM/NM MODESC NAME PLEX CACHE DISKOFFS LENGTH [COL/]OFF DEVICE MODEDC NAME PARENTVOL LOGVOLSP NAME SNAPVOL DCOEX NAME ASSOC VC PERMS MODE STATESR NAME KSTATEdg vxdg default default 51000 1417083437.22.cluster-01dm vxdgn02 Disk_3 auto 65536 27188992 -dm vxdgn03 Disk_4 auto 65536 22994688 -dm vxdgn05 Disk_5 auto 65536 27188992 -dm vxdgn06 Disk_6 auto 65536 20897536 -Disk group: vxvgDG NAME NCONFIG NLOG MINORS GROUP-IDST NAME STATE DM_CNT SPARE_CNT APPVOL_CNTDM NAME DEVICE TYPE PRIVLEN PUBLEN STATERV NAME RLINK_CNT KSTATE STATE PRIMARY DATAVOLS SRLRL NAME RVG KSTATE STATE REM_HOST REM_DGREM_RLNKCO NAME CACHEVOL KSTATE STATEVT NAME RVG KSTATE STATE NVOLUMEV NAME RVG/VSET/CO KSTATE STATE LENGTH READPOL PREFPLEX UTYPEPL NAME VOLUME KSTATE STATE LENGTH LAYOUTNCOL/WID MODESD NAME PLEX DISK DISKOFFS LENGTH [COL/]OFF DEVICE MODESV NAME PLEX VOLNAME NVOLLAYR LENGTH [COL/]OFFAM/NM MODESC NAME PLEX CACHE DISKOFFS LENGTH [COL/]OFF DEVICE MODEDC NAME PARENTVOL LOGVOLSP NAME SNAPVOL DCOEX NAME ASSOC VC PERMS MODE STATESR NAME KSTATEdg vxvg default default 5000 1417145016.14.cluster-01dm vxvgn01 Disk_2 auto 65536 20897536 -三、数据迁移1、迁移环境旧磁盘需要迁移的数据将数据迁移⾄新磁盘c1t202600A0B8744C8Ad3 即对应的磁盘Disk_3上2、将新磁盘加⼊vx1dg组中bash-3.2# vxdg -g vx1dg adddisk vx1dgn02=Disk_33、做lv镜像bash-3.2# vxassist -b -g vx1dg mirror lv01 vx1dgn02bash-3.2# vxassist -b -g vx1dg mirror lv02 vx1dgn02bash-3.2# vxassist -b -g vx1dg mirror lv03 vx1dgn024、将⽼磁盘中的lv分离镜像bash-3.2# vxplex -g vx1dg dis lv01-01bash-3.2# vxplex -g vx1dg dis lv02-01bash-3.2# vxplex -g vx1dg dis lv03-015、删除⽼磁盘中lv的镜像bash-3.2# vxedit -g vx1dg -r rm lv01-01bash-3.2# vxedit -g vx1dg -r rm lv02-01bash-3.2# vxedit -g vx1dg -r rm lv03-016、将⽼磁盘从dg中删除bash-3.2# vxdg -g vx1dg rmdisk vx1dgn01bash-3.2# df -hFilesystem size used avail capacity Mounted on/dev/md/dsk/d100 34G 7.9G 25G 24% //devices 0K 0K 0K 0% /devicesctfs 0K 0K 0K 0% /system/contractproc 0K 0K 0K 0% /procmnttab 0K 0K 0K 0% /etc/mnttabswap 13G 1.7M 13G 1% /etc/svc/volatileobjfs 0K 0K 0K 0% /system/objectsharefs 0K 0K 0K 0% /etc/dfs/sharetab/platform/sun4u-us3/lib/libc_psr/libc_psr_hwcap1.so.134G 7.9G 25G 24% /platform/sun4u-us3/lib/libc_psr.so.1 /platform/sun4u-us3/lib/sparcv9/libc_psr/libc_psr_hwcap1.so.1 34G 7.9G 25G 24% /platform/sun4u-us3/lib/sparcv9/libc_psr.so.1fd 0K 0K 0K 0% /dev/fdswap 13G 112K 13G 1% /tmpswap 13G 56K 13G 1% /var/runswap 13G 0K 13G 0% /dev/vx/dmpswap 13G 0K 13G 0% /dev/vx/rdmp/dev/md/dsk/d130 14G 15M 14G 1% /export/home/dev/vx/dsk/vx1dg/lv01961M 2.7M 901M 1% /test1/dev/vx/dsk/vx1dg/lv02961M 1.0M 903M 1% /test2/dev/vx/dsk/vx1dg/lv03961M 1.0M 903M 1% /test3bash-3.2# vxdisk listDEVICE TYPE DISK GROUP STATUSDisk_2 auto:cdsdisk - - onlineDisk_3 auto:cdsdisk vx1dgn02 vx1dg onlineDisk_4 auto:cdsdisk - - onlineDisk_5 auto:cdsdisk vxdgn02 vxdg onlineDisk_6 auto:cdsdisk vxdgn01 vxdg onlineDisk_11 auto - - errorDisk_12 auto - - errorc0t0d0s2 auto:none - - online invalidc0t1d0s2 auto:none - - online invalid。
VMware + Solaris 10 x86 + VxVM + VCS 安装测试NFS总结
VMware + Solaris 10 x86 + VxVM + VCS 安装测试NFS总结昨天终于把虚拟机vmware下的solaris 10 x86 + vxvm + vcs 双机给安装起来了,还测试了一把NFS failover服务!折腾到半夜1点多,总结的教训就是没细看随软件包文档,走了一些弯路,特别是配置NFS 服务组的时候,online 资源发现一些问题,现在都已经完美解决了!废话少说,把整个过程总结如下。
一、硬件环境配置1). 笔记本, AMD Turion 64 CPU, 3G内存,至少留20G空间安装solaris x86 虚拟机.二、软件版本1). VMWare workstation 6.5 for windows ---->网上可下载2). solaris 10 x86 u6 版本--->SUN网站下载3). Veritas Storage Foundation HA 5.0 for solaris x86-64. 软件包包含了VCS和VxVM. ---> Symantec 网站可以下载试用版。
需要另外具备vcs和vxvm liense key.三、最终安装结果1). 虚拟出共享阵列/磁盘,并让VxVM控制管理,在DG上划出一个V olume,作为VCS双机下NFS双机共享目录,实现Failover机制。
四、安装与配置过程1 前提条件:1). 如果机器CPU不是支持64位的,V eritas套件肯定是无法安装起来的,我在symantec网站查阅过版本信息,目前还没有支持x86 32位的版本,如果您机器不是64位的,请立刻放弃这个想法,所有的后续安装都是徒劳无功的。
2). 具备第一条件后,还需要vcs和vxvm的license,没license就没得用,不一定要正式的,demo的也行。
2 安装Solaris系统,配置共享磁盘按照常规步骤安装Solaris,一共装2个做双机。
LVM做根盘镜像Windows系统-电脑资料
LVM做根盘镜像Windows系统-电脑资料LVM MI LY: 宋体; mso-ascii-font-family: "Times New Roman"; mso-hansi-font-family: "Times New Roman"">做根盘镜像一、选择一个内置的硬盘,。
例如:/dev/dsk/c0t4d0 做成一个启动盘# pvcreate –Bf /dev/rdsk/c0t4d0 二、将这个硬盘加入 vg00 中 # v LVMMILY: 宋体; mso-ascii-font-family: "Times New Roman"; mso-hansi-font-family: "Times New Roman"">做根盘镜像一、选择一个内置的硬盘。
例如:/dev/dsk/c0t4d0做成一个启动盘# pvcreate–Bf/dev/rdsk/c0t4d0二、将这个硬盘加入vg00中# vgextend/dev/vg00/dev/dsk/c0t4d0三、将启动文件装入硬盘引导区# mkboot /dev/rdsk/c0t4d0# mkboot –a “hpux –lq” /dev/rdsk/c0t4d0(- a :autofile)更新原来的根盘引导区,假设原来的根盘为:/dev/dsk/c0t60一、选择一个内置的硬盘。
例如:/dev/dsk/c0t4d0做成一个启动盘# pvcreate–Bf/dev/rdsk/c0t4d0二、将这个硬盘加入vg00中# vgextend/dev/vg00/dev/dsk/c0t4d0三、将启动文件装入硬盘引导区# mkboot /dev/rdsk/c0t4d0# mkboot –a “hpux –lq” /dev/rdsk/c0t4d0(- a :autofile)四、更新原来的根盘引导区,假设原来的根盘为:/dev/dsk/c0t60# mkboot –a “hpux –lq ”/dev/rdsk/c0t6d0五、对/stand ,/,交换区作镜像# lvextend–m1/dev/vg00/lvol1/dev/dsk/c0t4d0(/stand) # lvextend–m1/dev/vg00/lvol2/dev/dsk/c0t4d0(/swap) # lvextend–m1/dev/vg00/lvol3/dev/dsk/c0t5d0(/)六、对vg00上的其它逻辑卷作镜像# lvextend–m1/dev/vg00/lvol4/dev/dsk/c0t4d0# lvextend–m1/dev/vg00/lvol5/dev/dsk/c0t4d0七、更新BDRA和LABEL文件# lvlnboot–b/dev/vg00/lvol1# lvlnboot–v–r/dev/vg00/lvol3# lvlnboot–s/dev/vg00/lvol2八、检测BRDA准确性# lvlnboot–R/dev/vg00九、检测镜像准确性# lvlnboot–v应出现根盘上Boot , Root , Swap , Dump区已被镜像的信息十、建议去掉swap上的MWC的策略,减少I/O的负载# shu td own–ry0进入维护模式bo进入ISL模式ISL > hpux –lm# vgchange–ayvg00# lvchange–Mn–cn/dev/vg00/lvol2# lvlnboot–R/dev/vg00# shutdown–ry0。
VxVM veritas卷管理 sun solaris 卷管理
VxVM二零零四年十一月1概念 (3)2管理 (4)2.1 管理磁盘 (4)2.2 DMP (5)2.3 磁盘组 (6)2.4 卷 (7)3热重定位机制 (11)1概念VxVM3.2 for SUN●后台进程vxconfigd:维护配置和管理vxiod:提供扩展I/O操作vxrelocd:热重定位,以恢复冗余*软件RAIDvxdctl命令是vxconfigd后台进程的接口*让VXVM认识系统盘*●管理对象物理对象:物理硬盘虚拟对象:VxVM下管理对象,如卷、plex、subdisk、磁盘组、VM磁盘物理对象:物理硬盘,命名为CxTxDxSx,其中S2表示整个盘。
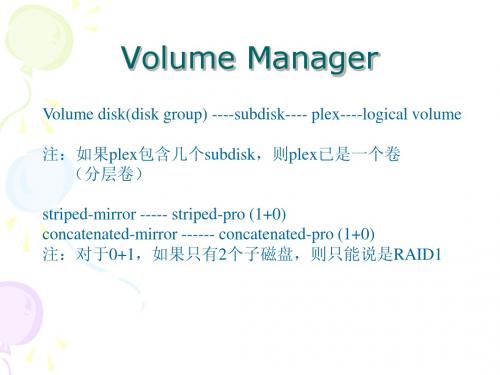
阵列磁盘命名如为enc0_0、enc0_1虚拟对象:VM磁盘、磁盘组、子磁盘、plex、卷VM磁盘:命令缺省为diskxx为物理盘在VxVM管理下如disk01 *PV子磁盘:一组相邻区域,命名缺省为diskxx-xx如disk01-01plex:类型有连续、条带化(RAID0)、镜像(RAID1)、带奇偶校验的条带化(RAID5),命名为volxx-01卷:在V3.0以后支持分层卷,卷又建立在基础卷的卷,如条带镜像卷vol1有二个列,每个列子盘又建在基础镜像卷上vop01、vop02。
●DMP动态多径处理*HP – Pvlink IBM 是在低层完成的为Veritas功能,用于多路径访问磁盘,用于冗余和均衡负责(需磁盘控制器支持),两个磁盘设备名使用一个设备名替代。
如enc0_0有两条路径(c1t99d0、c2t99d0)●设备发现动态增加磁盘到VxVM中●卷布局共有六种:连续和跨接、条带化(RAID0)、镜像(RAID1)、条带化加镜像(镜像条带RAID0+1)、镜像加条带化(条带镜像RAID1+0)、RAID5连接和跨接:数据依次存贮子盘,当子盘位于不同VM为跨接。
RAID0:子磁盘按组分成列,每个物理盘仅限一列,一列可由多个子盘,无冗余功能RAID1:RAID0+1:先分条先镜像,如一个磁盘坏,需重组整个plexRAID1+0:先镜像后分条,如一个磁盘坏,仅重组一个盘。
vxvm 命令集
VXVM常用1.状态维护>>>vxdisk list ****vx控制下磁盘状态*****>>>vxprint -g datadg>>>vxdisk list ***有哪些磁盘组>>>vxstat -g datadg -i 5 ****观察卷的I/O ***vxdg -g datadg free 看磁盘剩余空间vxassist -g datadgmaxsize layout=stripe/mirror disk01 disk02 看容许某种操作可用的空间。
2.磁盘相关>>>vxdisksetup -i c1t1d0 ****将磁盘至于VX控制之下(初始化磁盘)***>>>vxdiskunsetup -C c1t1d0 *****将磁盘取消vx控制***如果offline 到 error, 先转换为online,再到error3.磁盘组相关>>>vxdginitdatadg disk01=c1t1d0 *****新建一个磁盘组*****>>>vxdg destroy datadg ***删除一个磁盘组****>>>vxdg -g infxdgadddisk infxdg00=T30_0 *****将一个磁盘至于一个磁盘组下**** >>>vxdg -o override -g infxdgrmdisk infxdg00 ***删除一个磁盘从一个磁盘组下**** vxdgrmdiskdisk_name ***直接***(慎用)>>>vxdg deport infxdg ***将infxdg从系统中踢出***>>>vxdg import infxdg ***将infxdg导入***>>>vxvol -g datadgstartall ****启动vol****>>>vxvol -g datadgvol stop/start vol01>>>vxdg -g datadg free ***其中length为空闲大小(disk space)dd if=/dev/vx/rdsk/datadg/data01 of=/dev/null bs=1024k3.卷相关>>>vxassist -g datadg -b make vol02 50m ****创建卷***>>>vxedit -g datadg -rfrm vol02 ****删除卷***>>>vxassist -g datadg make vol01 2G layout=stripe disk01 disk02disk03 ***stripe****>>>vxassist -g datadg make vol01 2G layout=raid5,nolog disk01 disk02disk03 ***raid 5***>>>vxedit -g datadg set user=informix group=informix mode=660 vol01 ***改变卷属性***>>>vxresize -F ufs -g disk_groupvolume_name +2m ***扩大空间***4.镜像1.镜像 vxassist -g datadg mirror vol01 disk02 disk02与原设备在一个磁盘组里可能有一个vxplexatt 命令要测试2.镜像分离 vxplex -g datadgdet vol01-01vxplex -g datadg dis vol01-013.删除镜像 vxedit -g datadg -rfrm vol01-01 删除镜象后才可以删除卷1.给一个卷增加空间vxassist -g datadggrowbyvoltest 2g 给voltest扩大2gvxassist -g datadggrowtovoltest 2g 给voltest增加到2g1. 将一个磁盘置于VX控制之下。
[原创] veritas volume manager(常用命令集)
![[原创] veritas volume manager(常用命令集)](https://img.taocdn.com/s3/m/8e4a63a0b0717fd5360cdcb3.png)
终于在春节前把veritas volume manager写完了.希望对要学习这个的朋友有一些帮助吧.最后一部分把常用命令给大家希望可以有一个帮助吧.(前面的一部分内容是我转贴过来的)做了一个组合吧.刚写好的,可能有些乱,还请大家不要介意.谢谢大家的支持!!!二、添加License的命令#vxlicense -c三、查看License的命令# vxlicense -p四、名词解析VRTSvxvm VxVM软件VRTSlic VxVM licensing utilitiesVRTSvmdoc VxVM电子文档VRTSvmman VxVM帮助手册VRTSvmdev VxVM developer’s packageVRTSvxsa VxVM图形管理界面VRTSvxfs VxFS软件VRTSfsdoc VxFS文档五、添加VxVM和VxFS包#mount -F hsfs -o ro /dev/dsk/c0t6d0s2 /mnt# pkgadd -d path_name product_packages注意:要以超级用户权限登录系统,完了后还要重启系统。
六、安装VxFS后,修改/etc/system ,在里面添加一行:set lwp_default_stksize=0x4000并将原始的文件拷贝一份。
七、检查安装包:#pkginfo 列出所有安装的包#pkginfo | grep VRTS 列出安装的VERITAS的包#pkginfo -l pkckage 列出某个安装包的详细信息八、用vxinstall来创建rootdg 。
选择Custom安装。
九、显示执行过的命令:#tail -f /var/opt/vmsa/logs/command十、命令行在如下几个目录中,可以找到在命令行中使用的命令:/etc/vx/bin/usr/sbin/usr/lib/vxvm/bin注:把这些目录加入到PATH环境变量中去。
VxVM培训

2021/9/26
9
Volume Manager 磁盘
2021/9/26
10
磁盘组
磁盘组是共享公用配置的VM 磁盘的集 合。
磁盘组配置是包含有关相关的 VolumeManager 对象及其属性和联系的 详细信息的记录集。默认磁盘组为 rootdg (根磁盘组)。
在磁盘可以受Volume Manager 控制之 前,该磁盘必须可通过操作系统设备接 口进行存取。
2021/9/26
25
Volume Manager 用户界面
Volume Manager 将数据管理的物理部 分与逻辑部分分开,从而提供了增强数 据存储服务。
2021/9/26
26
2021/9/26
(sparc) 2.5.4
9 VRTSvmsa VERITAS Volume Manager Storage Administrator
(sparc) 1.0.2
10 VRTSvxfs VERITAS File System
(sparc) 3.2.5 Advanced for Solaris 2.5.1 and 2.6
2021/9/26
41
第三章
VxVM系统的安装
2021/9/26
42
安装前的准备(VxVM3.2)
安装SUN最新的补丁 安装SUNWsan 安装109529-06 安装111413-08 下载VxVM最新的patch
vxvm32p2+vmsa32p2_247308.tar.Z
2021/9/26
(sparc) 2.5.4
2021/9/26
vhd镜像格式原理
vhd镜像格式原理VHD(Virtual Hard Disk)是一种虚拟硬盘镜像格式,它被广泛应用于虚拟化技术中。
VHD镜像格式的原理是将物理硬盘的数据以文件的形式存储在主机操作系统的文件系统中,从而实现对虚拟机的存储管理。
VHD镜像格式的原理主要包括文件结构、磁盘容量和动态扩展等方面。
首先,VHD镜像格式的文件结构是由一系列的数据块组成的。
这些数据块包括VHD文件头、VHD文件尾和一系列的数据块。
VHD文件头包含了关于VHD镜像的基本信息,如文件大小、磁盘容量、扇区大小等。
VHD文件尾则包含了一些附加信息,如校验和、时间戳等。
而数据块则是存储了虚拟机的实际数据。
其次,VHD镜像格式的磁盘容量可以根据实际需求进行设置。
VHD镜像可以设置为固定大小或动态扩展大小。
固定大小的VHD镜像在创建时会占用指定大小的磁盘空间,无论实际使用空间有多少,都会一直占用这个大小的空间。
而动态扩展大小的VHD镜像则会根据实际使用空间的大小进行动态扩展,只占用实际使用的空间大小,从而节省了磁盘空间。
最后,VHD镜像格式的动态扩展是通过使用位图来实现的。
位图是一个与VHD镜像大小相同的二进制文件,用于记录VHD镜像中每个数据块的使用情况。
当虚拟机写入数据时,位图会相应地更新,标记相应的数据块为已使用。
而当虚拟机删除数据时,位图也会相应地更新,标记相应的数据块为空闲。
通过位图的使用,VHD镜像可以实现动态扩展,只占用实际使用的空间大小。
总结起来,VHD镜像格式的原理是将物理硬盘的数据以文件的形式存储在主机操作系统的文件系统中,通过文件结构、磁盘容量和动态扩展等方式实现对虚拟机的存储管理。
VHD镜像格式的灵活性和高效性使得它成为了虚拟化技术中不可或缺的一部分。
无论是在个人电脑上的虚拟机应用,还是在大型数据中心的云计算环境中,VHD镜像格式都发挥着重要的作用。
vmware上传镜像流程原理
vmware上传镜像流程原理
VMware上传镜像的流程和原理如下:
1. 准备镜像文件:将需要上传的镜像文件准备好,通常是一个包含操作系统和应用程序的虚拟机镜像文件,如VMDK格式。
2. 登录VMware vSphere:使用vSphere Client或vSphere Web Client登录到VMware vSphere管理界面。
3. 创建虚拟机模板:在vSphere管理界面中,创建一个虚拟机
模板,该模板包含了将要上传的镜像的配置信息,如操作系统版本、硬件设置等。
虚拟机模板可以重复使用,方便批量部署相同配置的虚拟机。
4. 上传镜像文件:在vSphere管理界面中,选择将要上传镜像
的存储位置,如本地存储或网络存储。
然后,通过将镜像文件拖拽到存储位置或使用上传工具将镜像文件上传到存储位置。
5. 完成上传过程:上传镜像文件需要一定的时间,具体时间取决于文件大小和网络速度。
上传完成后,镜像文件将被存储在选定的存储位置中。
上传镜像的原理是通过vSphere管理界面与vCenter Server进
行交互,将镜像文件上传到虚拟化基础设施中。
当镜像文件被上传时,vCenter Server会将镜像文件存储在指定的存储位置,并与虚拟机模板进行关联。
虚拟机模板包含了创建虚拟机所需的配置信息,如操作系统设置、网络设置、磁盘大小等。
在创
建虚拟机时,可以使用该虚拟机模板进行快速部署,从而减少重复配置的工作。
Veritas vxvm之卷管理

vxvm之卷管理一、创建卷:1、使用vxassist命令:查出卷的最大空间:[root@node03 /]# vxassist -g testgp maxsize layout=raid5 nlog=2Maximum volume size: 37523456 (18322Mb)在任一磁盘上创建卷:[root@node03 /]# vxassist -b -g testgp make vol01 1g[root@node03 /]# vxassist -b -g testgp make vol02 1g(如果希望卷立即能够使用,指定 -b 选项。
-b选项可以使用init=active替代。
)完了后创建vxfs或ufs文件系统:[root@node03 /]# mkfs -F vxfs /dev/vx/rdsk/testgp/vol01[root@node03 /]# mkfs -F vxfs /dev/vx/rdsk/testgp/vol02[root@node03 /]# mount -F vxfs /dev/vx/dsk/testgp/vol01 /share/vol01使用vxvoladm查看信息[root@node03 /]# vxvoladm list[root@node03 /]# vxprint -ht在特定的磁盘上创建卷:[root@node03 /]# vxdisk listDEVICE TYPE DISK GROUP STATUSc1t0d0s2 auto:none - - online invalidc1t1d0s2 auto:cdsdisk testgp01 testgp onlinec1t2d0s2 auto:cdsdisk testgp02 testgp onlinec1t3d0s2 auto:cdsdisk testgp03 testgp onlinec1t4d0s2 auto:cdsdisk testgp04 testgp onlinec1t5d0s2 auto:cdsdisk testgp05 testgp online[root@node03 /]# vxassist -b -g testgp make vol03 1G testgp04 testgp05[root@node03 /]# newfs /dev/vx/dsk/testgp/vol03创建镜像卷:[root@node03 /]# vxassist -b -g testgp make vol05 2G layout=mirror要创建具有 3 个镜像而非默认的 2 个镜像的卷:[root@node03 /]# vxassist -b -g testgp make vol06 2G layout=mirror nmirror=3创建镜像连续卷:[root@node03 /]# vxassist -b -g testgp make vol07 2G layout=mirror-concat nmirror=3 创建连续镜像卷:[root@node03 /]# vxassist -b -g testgp make vol08 2G layout=concat-mirror nmirror=3 创建启用脏区日志的卷:[root@node03 /]# vxassist -b -g testgp make vol09 2G layout=mirror logtype=drl nlog=2 nmirror=2创建条带卷:[root@node03 /]# vxassist -b -g testgp make vol10 2G layout=stripe创建镜像条带卷:[root@node03 /]# vxassist -b -g testgp make vol11 2G layout=mirror-stripe创建条带镜像卷:[root@node03 /]# vxassist -b -g testgp make vol12 2G layout=stripe-mirror创建 RAID-5 卷:[root@node03 /]# vxassist -b -g testgp make vol13 2G layout=raid5 nlog=22、使用vxmake创建卷:这个命令比较麻烦,只说怎样初始化并启动使用 vxmake 创建的卷:如果使用 vxmake 命令创建的卷尚未初始化,或者该卷被设置为未初始化状态,则可以运行vxvol 命令初始化该卷。
VxVM快速入门经典教程_lenx整理V2.0
Veritas V olume Manager快速入门经典教程转载自:/viewthread.php?tid=601343作者:Cuddletech翻译:kaiyi 邮件:kaiyiw@整理:lenx 邮件:lenx2000@目录V eritas V olume Manager快速入门经典教程 (1)目录 (1)一、译者及整理者的前言 (2)二、欢迎来到VERITAS的世界 (3)1、VxVM的土地上,谁是谁? (3)2、VxVM文档及参考书目 (3)三、VxVM概述与逻辑结构 (5)1、SUN网站上VERITAS摘录 (5)2、VxVM对象之间的逻辑关系 (6)3、创建VxVM对象的二种方法 (9)4、RAID0 RAID5 layout(布局) (10)5、卷和卷设备文件管理 (11)四、卷管理详细操作教程 (13)1、用vxdiskadd添加磁盘 (14)2、VxAssist与VxMake比较 (20)3、用vxmake创建条带化卷 (22)4、用vxmake手工建RAID卷 (26)5、用vxassist创建简单卷 (31)6、用vxassist创建条带化卷 (33)7、用vxassist建立镜像卷 (35)8、用vxassist创建RAID5卷 (39)9、用vxvol启用创建好的卷 (41)10、用vxassi s调整卷大小 (43)一、译者及整理者的前言最近在研究VERITAS VM,但在网上找了很久,只能找到一些以命令为核心的学习笔记。
大部分的中文资料,写的都是各命令的用法,没有基本概念的讲解,也没有对基本原理的分析。
看了之后不禁让我十分混淆。
比如说,网上有文章讲如何使用vxassist命令创建volume,却没有讲volume,plex,subdisk和vm disk之间的关系。
就如同看超级女声却没有张靓颖一样。
这样的文章对于那些已经理解基本概念的人来说,比较有参考价值。
但是对于象我这样的初学者来说,太过于晦涩难懂啦。
informix基本操作详

oninit应用程序用于改变系统的运营模式。
informix数据库有六种模式:1:off_line:不运行状态2:Quiescent:静模式。
在此模式下用户不能连接到数据库,但是可用onstat 等命令查询数据库信息。
主要用于对系统进行底层维护操作。
3:on_line:运行状态4:read-only:只读模式5:recovery:恢复模式。
是一种临时状态,存在于从离线模式到静模式之间。
6:shutdown:关闭模式。
是一种临时状态,存在于从在线模式到静模式或者离线模式之间。
oninit -ipsvy-i :初始化数据库,包括磁盘空间,该参数只在安装完成之后做一次。
只会保留onconfig文件配置的初始化信息,其它全部消失。
-p:当数据库不正常宕机后,数据库中会保留临时表,这些表会占据一定的磁盘空间,一般在重启数据库的时候,数据库会自动删除临时表数据的,如果加上这个参数,则会继续保留这些数据。
-s:数据库启动至静模式,做维护工作,不受其它用户的干扰-v:正常启动数据库,并显示启动的过程信息-y:关闭交互式提示,自动选择yes。
-j:启动informix进入单用户状态。
(informix 11 之后版本)onmod e 应用程序提供以下功能:1:改变online的工作模式2:强制生成检查点3:立即改变该会话过程中online共享内存的驻留空间4:转换逻辑日志文件5:撤销online的数据库服务进程6:撤销online的事物只有注册为root或informix的用户才能执行onmode参数:-a :increase shared memory segment size。
增加共享内存大小-BC [1|2] :change server large chunk mode。
支持大chunk模式-c [block|unblock] :do checkpoint Block or Unblock。
设置检测点-b <version> :Revert Dynamic Server disk structures。
sun solaris Volume Manager
VxVM重点概念(Cont.) VxVM重点概念(Cont.)
Dirty Region Logging 只能用在镜像卷 提高数据的可靠性:1)mirror/raid5 2)DRL 3) hotspare Hot Relocation (进程:vxrelocd) 进程: 进程 热重定位功能可自动检测磁盘故障,并用电子邮件将故障 通知给系统管理员和其他指定用户。热重定位还尝试使用 备用磁盘和空闲磁盘空间恢复冗余并保持对镜像卷和 RAID-5 卷的存取。但是必须手动删除和替换出错磁盘。
进程vxrelocd 进程vxrelocd
初始化VxVM 初始化VxVM
# vxinstall 初始化VxVM (vxdiskadm) 必须至少将一个磁盘初始化为rootdg,VxVM 运行时,必 须至少有一个磁盘始终保持在rootdg中。 Vxinstall完成后,需要重启系统。
当硬盘加入VxVM后,分区改为: 2 -------- backup --------- 0- 7505 16.86G 3 -------- — ---------- 1- 2 4.60M (private) 4 -------- — ---------- 3- 7505 16.86G(public)
初始化VxVM(Cont.) 初始化VxVM(Cont.)
private:Hold an entire copy of the configuration database for the disk group;(相当于metadb) Configuration information must be stored on at least one disk in the disk group. public:Cover the remainder of the disk and is used to store subdisks (or allocate storage space)
vmware用差分VHD实现多镜像
硬件需求:一固态硬盘.一机械硬盘.如没有固态硬盘.可以用PR与PC代替
固态硬盘至少分两个区.一个区做系统.另一个放入VMware的母镜像.VHD动态格式的(重要),偶然发现,原来Vmware是支持VHD的.此镜像永久不能删除.不能改变固态硬盘的分区之类的.
(PR未经测.一样的操作.只不过将镜像放在PR内,成功机率百分百.)
1,在支持VHD的系统的固态或内存盘上用Bootice生成一个母VHD.不可以在实机系统上挂载
2.打开vmware,挂载母VHD,在VMware安装系统.完成后卸载母镜像
3.在机械上盘用BootICE上生成数个子VHD.
4.重新建立若干虚拟机.对应若干子VHD,打完收工
在这种情形下.子VHD与母VHD不必在同一分区内
缺点:不能任意改变母镜像.并且不能任意改变母镜像所在盘的分区信息.
优点:启动速度快.因为母镜像在速度快的盘里.需要还原时只需重新生成子VHD.并且使用了读写分离.最大限度的用上了硬盘的IO
VHDX未作测试.谁装了Win8 10之类的麻烦试下.告许我结果.。
vxvm 命令集
VXVM常用1.状态维护>>>vxdisk list ****vx控制下磁盘状态*****>>>vxprint -g datadg>>>vxdisk list ***有哪些磁盘组>>>vxstat -g datadg -i 5 ****观察卷的I/O ***vxdg -g datadg free 看磁盘剩余空间vxassist -g datadgmaxsize layout=stripe/mirror disk01 disk02 看容许某种操作可用的空间。
2.磁盘相关>>>vxdisksetup -i c1t1d0 ****将磁盘至于VX控制之下(初始化磁盘)***>>>vxdiskunsetup -C c1t1d0 *****将磁盘取消vx控制***如果offline 到 error, 先转换为online,再到error3.磁盘组相关>>>vxdginitdatadg disk01=c1t1d0 *****新建一个磁盘组*****>>>vxdg destroy datadg ***删除一个磁盘组****>>>vxdg -g infxdgadddisk infxdg00=T30_0 *****将一个磁盘至于一个磁盘组下**** >>>vxdg -o override -g infxdgrmdisk infxdg00 ***删除一个磁盘从一个磁盘组下**** vxdgrmdiskdisk_name ***直接***(慎用)>>>vxdg deport infxdg ***将infxdg从系统中踢出***>>>vxdg import infxdg ***将infxdg导入***>>>vxvol -g datadgstartall ****启动vol****>>>vxvol -g datadgvol stop/start vol01>>>vxdg -g datadg free ***其中length为空闲大小(disk space)dd if=/dev/vx/rdsk/datadg/data01 of=/dev/null bs=1024k3.卷相关>>>vxassist -g datadg -b make vol02 50m ****创建卷***>>>vxedit -g datadg -rfrm vol02 ****删除卷***>>>vxassist -g datadg make vol01 2G layout=stripe disk01 disk02disk03 ***stripe****>>>vxassist -g datadg make vol01 2G layout=raid5,nolog disk01 disk02disk03 ***raid 5***>>>vxedit -g datadg set user=informix group=informix mode=660 vol01 ***改变卷属性***>>>vxresize -F ufs -g disk_groupvolume_name +2m ***扩大空间***4.镜像1.镜像 vxassist -g datadg mirror vol01 disk02 disk02与原设备在一个磁盘组里可能有一个vxplexatt 命令要测试2.镜像分离 vxplex -g datadgdet vol01-01vxplex -g datadg dis vol01-013.删除镜像 vxedit -g datadg -rfrm vol01-01 删除镜象后才可以删除卷1.给一个卷增加空间vxassist -g datadggrowbyvoltest 2g 给voltest扩大2gvxassist -g datadggrowtovoltest 2g 给voltest增加到2g1. 将一个磁盘置于VX控制之下。
- 1、下载文档前请自行甄别文档内容的完整性,平台不提供额外的编辑、内容补充、找答案等附加服务。
- 2、"仅部分预览"的文档,不可在线预览部分如存在完整性等问题,可反馈申请退款(可完整预览的文档不适用该条件!)。
- 3、如文档侵犯您的权益,请联系客服反馈,我们会尽快为您处理(人工客服工作时间:9:00-18:30)。
根盘做vxvm镜像1.安装Veritas Volume Manager 4.1软件将安装包storage_foundation_4.1_sol_CD1.tar上传到机器的/install目录下;# cd /install# lsstorage_foundation_4.1_sol_CD1.tar# tar xf storage_foundation_4.1_sol_CD1.tar# lscluster_server storage_foundationfile_system storage_foundation_4.1_sol_CD1.targetting_started.pdf supportgnu volume_managerinstaller volume_replicatorwindows perl# ./installerSelection Menu:I) Install/Upgrade a Product C) Configure an Installed ProductL) License a Product P) Perform a Preinstallation CheckU) Uninstall a Product D) View a Product DescriptionQ) Quit ?) HelpEnter a Selection: [I,C,L,P,U,D,Q,?]I1) VERITAS File System2) VERITAS Volume Manager3) VERITAS Volume Replicator4) VERITAS Storage Foundation, Storage Foundation for Oracle, StorageFoundation for DB2, and Storage Foundation for SybaseB) Back to previous menuSelect a product to install: [1-4,b,q] 2Enter the system names separated by spaces on which to install VxVM: sun880-2Checking OS version on sun880-2 ............................ SunOS 5.10Verifying global zone on sun880-2 .............................. globalChecking VRTSvxvm package ............................... not installedInitial system check completed successfully.Initial system check completed successfully.Press [Return] to continue:Installing VERITAS Infrastructure packages on sun880-2:Checking VRTScpi package ................................ not installedChecking VRTSvlic package ............................... not installedChecking file system space ................ required space is availableInstalling VRTScpi 4.1.0.92 on sun880-2 .......................... DoneInstalling VRTSvlic 3.02.005k on sun880-2 ........................ DoneVERITAS Infrastructure packages installed successfully.Press [Return] to continue:1) Install all of the optional packages2) Install none of the optional packages3) View package descriptions and select optional packagesSelect the optional packages to be installed on all systems? [1-3,q,?] (1)Press [Return] to continue:Installation requirement checks completed successfully.Press [Return] to continue:Volume Manager installation completed successfully.Press [Return] to continue:2.输入vxvm认证序列号VxVM Licensing Verification:Checking VxVM license key on sun880-2 .................... not licensedEnter a VxVM license key for sun880-2: [?] XXXX-XXXX-XXXX-XXXX-XXXX-XXXX-XXXX-XXRegistering VERITAS Volume Manager PERMANENT key on sun880-2Do you want to enter another license key for sun880-2? [y,n,q,?] (n)VxVM licensing completed successfully.Press [Return] to continue:Are you ready to configure VxVM? [y,n,q] (y)Do you want to set up the enclosure-based naming scheme? [y,n,q,?] (n)Volume Manager configured successfully.Press [Return] to continue:Do you want to set up the default disk group for each system? [y,n,q,?] (y)n Volume Manager default disk group setup and daemon startupSetting default disk group to no on sun880-2 ..................... DoneStarting vxcached on sun880-2 ................................. StartedVolume Manager was started successfully.Press [Return] to continue:3.查看vxvm安装结果# pkginfo -l VRTSvxvmPKGINST: VRTSvxvmNAME: VERITAS Volume Manager, BinariesCATEGORY: systemARCH: sparcVERSION: 4.1,REV=02.17.2005.21.28BASEDIR: /VENDOR: VERITAS SoftwareDESC: Virtual Disk SubsystemPSTAMP: VERITAS-4.1z:2005-02-17INSTDATE: Aug 28 2009 11:53HOTLINE: 800-342-0652EMAIL: support@STATUS: completely installedFILES: 792 installed pathnames19 shared pathnames12 linked files98 directories400 executables286213 blocks used (approx)# vxdisk listDEVICE TYPE DISK GROUP STATUS c0t0d0s2 auto:none - - online invalid c0t1d0s2 auto:none - - online invalid c0t3d0s2 auto:none - - online invalid c0t4d0s2 auto:none - - online invalid # vxdg listNAME STATE ID4.封装根盘# vxdiskadm选择2 Encapsulate one or more disksSelect an operation to perform: 2Select disk devices to encapsulate:[<pattern-list>,all,list,q,?] listDEVICE DISK GROUP STATUSc0t0d0 - - online invalidc0t1d0 - - online invalidc0t3d0 - - online invalidc0t4d0 - - online invalidSelect disk devices to encapsulate:[<pattern-list>,all,list,q,?] c0t0d0Continue operation? [y,n,q,?] (default: y)Which disk group [<group>,list,q,?] (default: no) rootdgThere is no active disk group named rootdg.Create a new group named rootdg? [y,n,q,?] (default: y)Use a default disk name for the disk? [y,n,q,?] (default: y)Continue with operation? [y,n,q,?] (default: y)Continue with encapsulation? [y,n,q,?] (default: y)Enter desired private region length[<privlen>,q,?] (default: 2048)VxVM vxencap INFO V-5-2-0 Updating /etc/vfstab ...The c0t0d0 disk has been configured for encapsulation.The first stage of encapsulation has completed successfully. Youshould now reboot your system at the earliest possible opportunity.The encapsulation will require two or three reboots which will happen automatically after the next reboot. To reboot execute the command:shutdown -g0 -y -i6This will update the /etc/vfstab file so that volume devices areused to mount the file systems on this disk device. You will needto update any other references such as backup scripts, databases,or manually created swap devices.Encapsulate other disks? [y,n,q,?] (default: n)Volume Manager Support OperationsMenu: VolumeManager/Disk5.重新引导系统按照提示重新引导系统:# init 6引导完查看封装结果:# df -kFilesystem kbytes used avail capacity Mounted on/dev/vx/dsk/bootdg/rootvol15127779 8801467 6175035 59% //devices 0 0 0 0% /devicesctfs 0 0 0 0% /system/contract proc 0 0 0 0% /procmnttab 0 0 0 0% /etc/mnttabswap 7952608 1216 7951392 1% /etc/svc/volatile objfs 0 0 0 0% /system/objectfd 0 0 0 0% /dev/fdswap 7951392 0 7951392 0% /tmpswap 7951424 32 7951392 1% /var/runswap 7951392 0 7951392 0% /dev/vx/dmp swap 7951392 0 7951392 0% /dev/vx/rdmp/dev/vx/dsk/bootdg/opt5045478 443564 4551460 9% /opt/dev/vx/dsk/bootdg/home5045478 9 4995015 1% /export/home# vxdisk listDEVICE TYPE DISK GROUP STATUSc0t0d0s2 auto:sliced rootdg01 rootdg onlinec0t1d0s2 auto:none - - online invalidc0t3d0s2 auto:none - - online invalidc0t4d0s2 auto:none - - online invalid# vxdg listNAME STATE IDrootdg enabled 1251433943.8.sun880-2# vxprint -thDisk group: rootdgDG NAME NCONFIG NLOG MINORS GROUP-IDST NAME STATE DM_CNT SPARE_CNT APPVOL_CNTDM NAME DEVICE TYPE PRIVLEN PUBLEN STATERV NAME RLINK_CNT KSTATE STATE PRIMARY DATAVOLS SRLRL NAME RVG KSTATE STATE REM_HOST REM_DG REM_RLNK CO NAME CACHEVOL KSTATE STATEVT NAME NVOLUME KSTATE STATEV NAME RVG/VSET/CO KSTATE STATE LENGTH READPOL PREFPLEX UTYPEPL NAME VOLUME KSTATE STATE LENGTH LAYOUT NCOL/WID MODESD NAME PLEX DISK DISKOFFS LENGTH [COL/]OFF DEVICE MODE SV NAME PLEX VOLNAME NVOLLAYR LENGTH [COL/]OFF AM/NM MODESC NAME PLEX CACHE DISKOFFS LENGTH [COL/]OFF DEVICE MODEDC NAME PARENTVOL LOGVOLSP NAME SNAPVOL DCOdg rootdg default default 85000 1251433943.8.sun880-2dm rootdg01 c0t0d0s2 auto 20351 143328960 -v home - ENABLED ACTIVE 10247232 ROUND - fsgen pl home-01 home ENABLED ACTIVE 10247232 CONCAT - RW sd rootdg01-04 home-01 rootdg01 43024127 10247232 0 c0t0d0 ENAv opt - ENABLED ACTIVE 10247232 ROUND - fsgenpl opt-01 opt ENABLED ACTIVE 10247232 CONCAT - RWsd rootdg01-05 opt-01 rootdg01 32776895 10247232 0 c0t0d0 ENAv rootdg017vol - ENABLED ACTIVE 213696 ROUND - gen pl rootdg017vol-01 rootdg017vol ENABLED ACTIVE 213696 CONCAT - RW sd rootdg01-03 rootdg017vol-01 rootdg01 53271359 213696 0 c0t0d0 ENAv rootvol - ENABLED ACTIVE 30721344 ROUND - root pl rootvol-01 rootvol ENABLED ACTIVE 30721344 CONCAT - RW sd rootdg01-02 rootvol-01 rootdg01 2055551 30721344 0 c0t0d0 ENAv swapvol - ENABLED ACTIVE 2055552 ROUND - swap pl swapvol-01 swapvol ENABLED ACTIVE 2055552 CONCAT - RW sd rootdg01-B0 swapvol-01 rootdg01 143328959 1 0 c0t0d0 ENA sd rootdg01-01 swapvol-01 rootdg01 0 2055551 1 c0t0d0 ENA6.将镜像盘添加到rootdg中# vxdiskadd c0t1d0Add or initialize disksMenu: VolumeManager/Disk/AddDisksHere is the disk selected. Output format: [Device_Name]c0t1d0Continue operation? [y,n,q,?] (default: y)You can choose to add this disk to an existing disk group, anew disk group, or leave the disk available for use by futureadd or replacement operations. To create a new disk group,select a disk group name that does not yet exist. To leavethe disk available for future use, specify a disk group nameof "none".Which disk group [<group>,none,list,q,?] (default: no) rootdgUse a default disk name for the disk? [y,n,q,?] (default: y)Add disk as a spare disk for rootdg? [y,n,q,?] (default: n)Exclude disk from hot-relocation use? [y,n,q,?] (default: n)The selected disks will be added to the disk group rootdg withdefault disk names.c0t1d0Continue with operation? [y,n,q,?] (default: y)The following disk device has a valid VTOC, but does not appear to have been initialized for the Volume Manager. If there is data on the diskthat should NOT be destroyed you should encapsulate the existing disk partitions as volumes instead of adding the disk as a new disk.Output format: [Device_Name]c0t1d0Encapsulate this device? [y,n,q,?] (default: y) nc0t1d0Instead of encapsulating, initialize? [y,n,q,?] (default: n) yInitializing device c0t1d0.When selecting the format for the disk, keep in mind that a CDS disk cannot contain a subdisk for a 'root' or 'swap' volume, so it cannotbe used for mirroring, evacuating, or sparing the boot disk.Enter the desired format这里要保持磁盘类型跟根盘一致,因为根盘是sliced,所以这里也选sliced:[cdsdisk,sliced,simple,q,?] (default: cdsdisk) slicedEnter desired private region length[<privlen>,q,?] (default: 2048)VxVM NOTICE V-5-2-88Adding disk device c0t1d0 to disk group rootdg with diskname rootdg02.Goodbye.# vxdisk listDEVICE TYPE DISK GROUP STATUSc0t0d0s2 auto:sliced rootdg01 rootdg onlinec0t1d0s2 auto:sliced rootdg02 rootdg onlinec0t3d0s2 auto:none - - online invalidc0t4d0s2 auto:none - - online invalid7.对根盘rootvol做镜像先用vxrootmir做rootvol的镜像# vxrootmir -v rootdg02! vxassist -g bootdg mirror rootvol layout=contig,diskalign rootdg02! vxbootsetup -g bootdg -v rootdg02! vxmksdpart -f -v -g rootdg rootdg02-01 0 0x2 0x200! vxpartadd /dev/rdsk/c0t1d0s2 0 0x2 0x200 20352 30721344! /usr/sbin/installboot /usr/platform/SUNW,Sun-Fire-880/lib/fs/ufs/bootblk /dev/rdsk/c0t1d0s0! vxeeprom devalias vx-rootdg02 /dev/dsk/c0t1d0s0在vxrootmir做镜像的时候,可以另开窗口,查看镜像进度:# vxtask listTASKID PTID TYPE/STATE PCT PROGRESS161 ATCOPY/R 09.75% 0/30721344/2996224 PLXATT rootvol rootvol-02 rootdg镜像做完后,查看rootvol的镜像结果,可以看到rootvol卷有两个副本,其他卷没有做镜像# vxprint -th -g rootdgDG NAME NCONFIG NLOG MINORS GROUP-IDST NAME STATE DM_CNT SPARE_CNT APPVOL_CNTDM NAME DEVICE TYPE PRIVLEN PUBLEN STATERV NAME RLINK_CNT KSTATE STATE PRIMARY DATAVOLS SRLRL NAME RVG KSTATE STATE REM_HOST REM_DG REM_RLNK CO NAME CACHEVOL KSTATE STATEVT NAME NVOLUME KSTATE STATEV NAME RVG/VSET/CO KSTATE STATE LENGTH READPOL PREFPLEX UTYPEPL NAME VOLUME KSTATE STATE LENGTH LAYOUT NCOL/WID MODESD NAME PLEX DISK DISKOFFS LENGTH [COL/]OFF DEVICE MODE SV NAME PLEX VOLNAME NVOLLAYR LENGTH [COL/]OFF AM/NM MODESC NAME PLEX CACHE DISKOFFS LENGTH [COL/]OFF DEVICE MODEDC NAME PARENTVOL LOGVOLSP NAME SNAPVOL DCOdg rootdg default default 85000 1251433943.8.sun880-2dm rootdg01 c0t0d0s2 auto 20351 143328960 -dm rootdg02 c0t1d0s2 auto 9919 143328960 -v home - ENABLED ACTIVE 10247232 ROUND - fsgen pl home-01 home ENABLED ACTIVE 10247232 CONCAT - RW sd rootdg01-04 home-01 rootdg01 43024127 10247232 0 c0t0d0 ENAv opt - ENABLED ACTIVE 10247232 ROUND - fsgen pl opt-01 opt ENABLED ACTIVE 10247232 CONCAT - RWsd rootdg01-05 opt-01 rootdg01 32776895 10247232 0 c0t0d0 ENAv rootdg017vol - ENABLED ACTIVE 213696 ROUND - genpl rootdg017vol-01 rootdg017vol ENABLED ACTIVE 213696 CONCAT - RW sd rootdg01-03 rootdg017vol-01 rootdg01 53271359 213696 0 c0t0d0 ENAv rootvol - ENABLED ACTIVE 30721344 ROUND - rootpl rootvol-01 rootvol ENABLED ACTIVE 30721344 CONCAT - RWsd rootdg01-02 rootvol-01 rootdg01 2055551 30721344 0 c0t0d0 ENApl rootvol-02 rootvol ENABLED ACTIVE 30721344 CONCAT - RWsd rootdg02-01 rootvol-02 rootdg02 0 30721344 0 c0t1d0 ENAv swapvol - ENABLED ACTIVE 2055552 ROUND - swap pl swapvol-01 swapvol ENABLED ACTIVE 2055552 CONCAT - RW sd rootdg01-B0 swapvol-01 rootdg01 143328959 1 0 c0t0d0 ENAsd rootdg01-01 swapvol-01 rootdg01 0 2055551 1 c0t0d0 ENA 8.对根盘其他卷做镜像# vxassist -b -g rootdg mirror home rootdg02# vxassist -b -g rootdg mirror opt rootdg02# vxassist -b -g rootdg mirror rootdg017vol rootdg02# vxassist -b -g rootdg mirror swapvol rootdg02# vxprint -th -g rootdgv home - ENABLED ACTIVE 10247232 ROUND - fsgen pl home-01 home ENABLED ACTIVE 10247232 CONCAT - RW sd rootdg01-04 home-01 rootdg01 43024127 10247232 0 c0t0d0 ENA pl home-02 home ENABLED ACTIVE 10247232 CONCAT - RW sd rootdg02-02 home-02 rootdg02 30721344 10247232 0 c0t1d0 ENAv opt - ENABLED ACTIVE 10247232 ROUND - fsgen pl opt-01 opt ENABLED ACTIVE 10247232 CONCAT - RWsd rootdg01-05 opt-01 rootdg01 32776895 10247232 0 c0t0d0 ENApl opt-02 opt ENABLED TEMPRMSD 10247232 CONCAT - WO sd rootdg02-03 opt-02 rootdg02 40968576 10247232 0 c0t1d0 ENAv rootdg017vol - ENABLED ACTIVE 213696 ROUND - genpl rootdg017vol-01 rootdg017vol ENABLED ACTIVE 213696 CONCAT - RW sd rootdg01-03 rootdg017vol-01 rootdg01 53271359 213696 0 c0t0d0 ENApl rootdg017vol-02 rootdg017vol ENABLED ACTIVE 213696 CONCAT - RW sd rootdg02-04 rootdg017vol-02 rootdg02 51215808 213696 0 c0t1d0 ENAv rootvol - ENABLED ACTIVE 30721344 ROUND - rootpl rootvol-01 rootvol ENABLED ACTIVE 30721344 CONCAT - RWsd rootdg01-02 rootvol-01 rootdg01 2055551 30721344 0 c0t0d0 ENApl rootvol-02 rootvol ENABLED ACTIVE 30721344 CONCAT - RWsd rootdg02-01 rootvol-02 rootdg02 0 30721344 0 c0t1d0 ENAv swapvol - ENABLED ACTIVE 2055552 ROUND - swap pl swapvol-01 swapvol ENABLED ACTIVE 2055552 CONCAT - RW sd rootdg01-B0 swapvol-01 rootdg01 143328959 1 0 c0t0d0 ENAsd rootdg01-01 swapvol-01 rootdg01 0 2055551 1 c0t0d0 ENApl swapvol-02 swapvol ENABLED TEMPRMSD 2055552 CONCAT - WO sd rootdg02-05 swapvol-02 rootdg02 51429504 2055552 0 c0t1d0 ENA9.修验证镜像盘启动# init 0ok boot disk1至此,根盘镜像完成。