雅马哈PSR-410说明书
BackBeat GO 410 耳机用户指南说明书
BackBeat GO serie 410 Guida dell'utenteSommarioPanoramica dell'auricolare3Sicurezza3Associazione4Procedura di associazione4Modalità di associazione4Installare l'app5Operazioni preliminari6Accensione o spegnimento6Ricarica e montaggio6Risposta e termine di una chiamata7Regolare il volume7Musica7Sempre collegati9Esclusione microfono9Ripetere l'ultimo numero9Ulteriori caratteristiche:10Uso di due dispositivi10Modalità DeepSleep10Magnete intelligente11Cavo convertibile11Custodia per auricolare11Supporto13Indicatore luminoso (LED)Risposta/fine chiamata: toccare una (1) volta Accensione: tenere premuto per 2 secondi Spegnimento: tenere premuto per 4 secondi Riproduzione musicale/pausa: toccare una (1) volta Brano successivo: tenere premuto per 2 secondi Brano precedente: tenere premuto per 2 secondi Siri, Assistente Google ™Tenere premuto per 2 secondi +Pulsante di aumento del volume: toccare per aumentare il volume -Pulsante di riduzione del volume: toccare per ridurre il volume + e -Pulsante di regolazione del volume: consente di attivare/disattivare l'esclusione del microfono + e Cancellazione del rumore attiva: tenere premuto per 2 secondi per attivare/disattivare - e Magnete intelligente: tenere premuto per 2 secondi per attivare/disattivare Prima di utilizzare l'auricolare, consultare il documento "Tutela della sicurezza" per importantiindicazioni relative alla sicurezza, alla ricarica, alla batteria e alle norme vigenti.SicurezzaInstallare l'appPer ottenere il massimo dall'auricolare, scaricare la nostra app gratuita, BackBeat per iOS/Android™.L'app consente di:•Selezione di una lingua•Attivazione/disattivazione della funzione•Find MyHeadset•Visualizzare la guida dell'utentePer prestazioni ottimali, installare l'app BackBeat su tutti i dispositivi associati all'auricolare.Premere il pulsante centrale finché non viene emesso l'avviso vocale di accensione o spegnimento.Ricaricacompletata.RegolazioneOperazioni preliminariAccensione o spegnimentoRicarica e montaggioSostituire i cuscinettiSostituire i cuscinetti e fissarli in posizione è facile. Lato sinistro e lato destro sono indicati sul cuscinetto e sull'auricolare.Toccare una volta il pulsante di riproduzione/pausa.Passaggio al brano successivoPremere per 2 secondi il pulsante di aumento (+) del volume.Riproduzione del brano precedentePremere per 2 secondi il pulsante di riduzione (-) del volume.La connessione Bluetooth ha un raggio d'azione massimo di 10 metri dal telefono al dispositivo e viceversa prima che l'audio peggiori e la connessione venga persa. Se si perde la connessione, il dispositivo tenta di ripristinarla non appena rientra nel raggio d'azione.Durante una chiamata, premere i pulsanti Volume su e Volume giù . Viene emesso l'avviso vocale"Esclusione microfono attivata/disattivata".Toccare due volte il pulsante centrale per chiamare l'ultimo numero composto.Sempre collegatiEsclusione microfonoRipetere l'ultimo numeroRispondere alle chiamate da due dispositivi è facile.Mentre è in corso una chiamata, il secondo dispositivo associato emette una notifica sonora per la chiamata in arrivo.Per rispondere a una seconda chiamata dall'altro dispositivo, toccare il pulsante centrale per terminare la chiamata corrente e rispondere automaticamente alla nuova chiamata. Se si sceglie dinon rispondere alla seconda chiamata, questa viene trasferita alla segreteria.Se gli auricolari vengono lasciati accesi ma fuori dal raggio d'azione del telefono a cui sono associati per 90 minuti, preservano la carica della batteria passando in modalità DeepSleep.Una volta che il dispositivo ritorna entro il raggio d'azione del cellulare, premere il pulsantecentrale per uscire dalla modalità DeepSleep.Ulteriori caratteristiche:Uso di due dispositiviModalità DeepSleepCustodia per auricolareAvvolgere l'auricolare come mostrato per riporlo nella custodia.SupportoULTERIORI INFORMAZIONI/supportPlantronics Inc.Plantronics BV345 Encinal Street Santa Cruz, CA 95060 Stati Uniti Scorpius 171 2132 LR Hoofddorp Paesi Bassi© 2018 Plantronics, Inc. Il marchio e i loghi Bluetooth sono di proprietà di Bluetooth SIG, Inc. e l'uso di tali marchi da parte di Plantronics è consentito su licenza. Tutti gli altri marchi sono di proprietà dei rispettivi proprietari.Brevetti in attesa di approvazione.213188-16 (10.18)。
M-AUDIO 410中文说明书

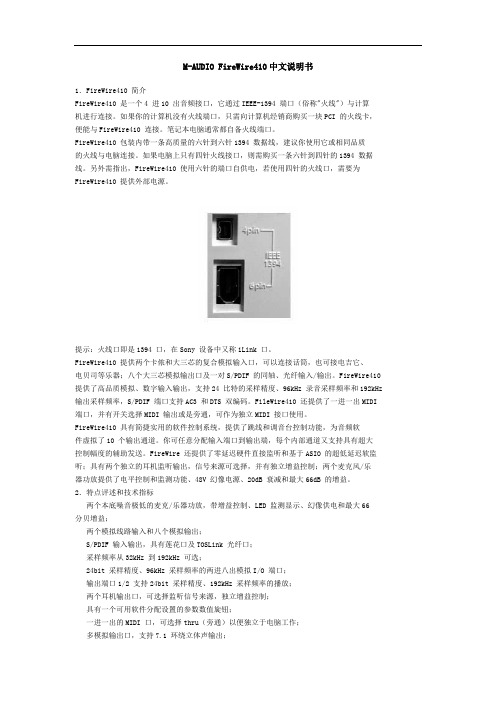
M-AUDIO FireWire410中文说明书1.FireWire410 简介FireWire410 是一个4 进10 出音频接口,它通过IEEE-1394 端口(俗称"火线")与计算机进行连接。
如果你的计算机没有火线端口,只需向计算机经销商购买一块PCI 的火线卡,便能与FireWire410 连接。
笔记本电脑通常都自备火线端口。
FireWire410 包装内带一条高质量的六针到六针1394 数据线,建议你使用它或相同品质的火线与电脑连接。
如果电脑上只有四针火线接口,则需购买一条六针到四针的1394 数据线。
另外需指出,FireWire410 使用六针的端口自供电,若使用四针的火线口,需要为FireWire410 提供外部电源。
提示:火线口即是1394 口,在Sony 设备中又称iLink 口。
FireWire410 提供两个卡侬和大三芯的复合模拟输入口,可以连接话筒,也可接电吉它、电贝司等乐器;八个大三芯模拟输出口及一对S/PDIF 的同轴、光纤输入/输出。
FireWire410 提供了高品质模拟、数字输入输出,支持24 比特的采样精度、96kHz 录音采样频率和192kHz 输出采样频率,S/PDIF 端口支持AC3 和DTS 双编码。
FileWire410 还提供了一进一出MIDI 端口,并有开关选择MIDI 输出或是旁通,可作为独立MIDI 接口使用。
FireWire410 具有简捷实用的软件控制系统,提供了跳线和调音台控制功能,为音频软件虚拟了10 个输出通道。
你可任意分配输入端口到输出端,每个内部通道又支持具有超大控制幅度的辅助发送。
FireWire 还提供了零延迟硬件直接监听和基于ASIO 的超低延迟软监听;具有两个独立的耳机监听输出,信号来源可选择,并有独立增益控制;两个麦克风/乐器功放提供了电平控制和监测功能、48V 幻像电源、20dB 衰减和最大66dB 的增益。
M-AUDIO-410中文说明书
M-AUDIO FireWire410中文说明书1.FireWire410 简介FireWire410 是一个4 进10 出音频接口,它通过IEEE-1394 端口(俗称"火线")与计算机进行连接。
如果你的计算机没有火线端口,只需向计算机经销商购买一块PCI 的火线卡,便能与FireWire410 连接。
笔记本电脑通常都自备火线端口。
FireWire410 包装内带一条高质量的六针到六针1394 数据线,建议你使用它或相同品质的火线与电脑连接。
如果电脑上只有四针火线接口,则需购买一条六针到四针的1394 数据线。
另外需指出,FireWire410 使用六针的端口自供电,若使用四针的火线口,需要为FireWire410 提供外部电源。
提示:火线口即是1394 口,在Sony 设备中又称iLink 口。
FireWire410 提供两个卡侬和大三芯的复合模拟输入口,可以连接话筒,也可接电吉它、电贝司等乐器;八个大三芯模拟输出口及一对S/PDIF 的同轴、光纤输入/输出。
FireWire410 提供了高品质模拟、数字输入输出,支持24 比特的采样精度、96kHz 录音采样频率和192kHz 输出采样频率,S/PDIF 端口支持AC3 和DTS 双编码。
FileWire410 还提供了一进一出MIDI 端口,并有开关选择MIDI 输出或是旁通,可作为独立MIDI 接口使用。
FireWire410 具有简捷实用的软件控制系统,提供了跳线和调音台控制功能,为音频软件虚拟了10 个输出通道。
你可任意分配输入端口到输出端,每个内部通道又支持具有超大控制幅度的辅助发送。
FireWire 还提供了零延迟硬件直接监听和基于ASIO 的超低延迟软监听;具有两个独立的耳机监听输出,信号来源可选择,并有独立增益控制;两个麦克风/乐器功放提供了电平控制和监测功能、48V 幻像电源、20dB 衰减和最大66dB 的增益。
Forney Industries 220V MP MIG WELDER 410用户指南说明书

Adjust wire feed speed ( ) andvoltage ( )Flux- Cored* Face the appropriate groove towards the inside of machine3/8” from metal, depress trigger completely to initiate arc0.023” (0.6mm) - 0.035” (0.9mm) diameter8” (200mm) wire spool 4” (100mm) wire spoolRemoveconsumables and depress trigger until wire comes out.ReplaceconsumablesSee chart on welder for correct settingsFIND MORE INFORMATION AT MIG QUICK START GUIDE220 MP WELDERITEM# 410Solid wireFlux-coredImproper wire spool installationUse wire with a diameter between 0.023” (0.6mm) and 0.035” (0.9mm). Larger diameters draw too much amperage.Trying to weld single pass on material larger than 3/8” (9.5mm) thick is not possible with this machine. Multi-pass recommended for thicker materials.Welder should be the only thing plugged into the circuit.• Usually due to low input power.• Welder should be only thing plugged into circuit.• Avoid using extension cords. If one must be used, it must be 3 conductor #12 AWG or larger up to 25 feet.• Generators must be a minimum 5,000W continuous output with no low-idle function (or low-idle off), 5% THD Max.Frequently tripping circuit breaker or exceeding duty cycleLow weld output or poor fusion• Can cause feed issues and inconsistent weld quality.• Verify all parts are in the proper place. Refer to manual.8” (200mm) wire spool 4” (100mm) wire spoolTo ensure maximum quality, always clean and prepare welding surfaces.Workpiece PreperationConnect ground clamp to clean, bare metal. No rust, paint or other coatings. Attach the ground clampdirectly to the workpiece if you are experiencing issues.Workpiece groundingLow weld output or poor fusion 110-120V208-240V• Usually due to low input power.• Welder should be only thing plugged into circuit.• Avoid using extension cords. If one must be used, it must be 3 conductor #8 AWG.• Generators must be a minimum 10,000W continuous output with no low-idle function (or low-idle off), 5% THD Max.FIND MORE INFORMATION ATTIG QUICK START GUIDE220 MP WELDER (NOT RECOMMENDED FOR ALUMINUM)ITEM# 410Read user manual1.• Generator OK with continuous output > 5,000 W (120V) or 10,000 W (230V)• Extension cord: #12 AWG (120V) or #8 AWG (230V) or larger. 25’ (8m) or shorter extension cords recommended* TIG Torch sold separatelyFIND MORE INFORMATION AT Use 3/16” diameter electrodes or smaller. Some 3/16” will draw too much amperage.Trying to weld single pass on material larger than 3/8” thick is not possible with this machine. Multi-pass recommended for thicker materials.Welder should be the only thing plugged into the circuit.Frequently tripping circuit breaker or exceeding duty cycleSTICK QUICK START GUIDE220 MP WELDERITEM# 410Electrode HolderGround• Usually due to low input power.• Welder should be only thing plugged into circuit.• Avoid using extension cords. If one must be used, it must be 3 conductor #12 AWG or larger up to 25 feet.• Generators must be a minimum 5,000W continuous output with no low-idle function (or low-idle off), 5% THD Max.Low weld output or poor fusion110-120V• Usually due to low input power.• Welder should be only thing plugged into circuit.• Avoid using extension cords. If one must be used, it must be 3 conductor #8 AWG.• Generators must be a minimum 10,000W continuous output with no low-idle function (or low-idle off), 5% THD Max.208-240VLow weld output or poor fusion。
Sporlan R-410A产品介绍说明书

Sporlan products suitable for R-410A are introduced in this publication,Including special features,specifications, and characteristics of the devices for R-410A systems. Additional features,specifications,and characteristics for other refrigerants are included in appropriate sections of the Sporlan Catalogue.For immediate access to Sporlan literature please visit .R-410A is a 50% / 50% blend,by weight,of R-32 and R-125. The vapor pressure of R-410A is almost 50% greater than R-22’s vapor pressure.New R-410A systems must be designed to handle the higher pressure and require special service tools,such as manifold gauge sets,recovery units,and recovery tanks.R-410A is intended for use solely with polyolester (POE) oil, while R-22 can be used with POE,Alkylbenzene,or Mineral Oil.The higher pressure,and the fact that R-410A performs very much like a single component refrigerant,provide an opportunity to produce a more compact system with greater efficiency.In addition,R-410A refrigerant allows more suction line pressure drop since it is less sensitive to suction line efficiency losses.The future of the HVAC & R market looks promising for the development and use of R-410A systems.Applications primarily include air conditioning,chillers and commercial refrigeration.The superior performance characteristics of R-410A and the industry’s transition to HFCs have made this refrigerant a viable alternative to R-22 and other refrigerants,and is becoming the refrigerant of choice for many new air conditioning and heat pump designs.Catalogue R-410A MEJuly 2001Page 2— Catalogue R-410A&E Z I B EZ I B B g u o r h T t h g i a r t &E Z I EZ I B B el g n A &E Z I B I B B C u o r h T t h g i a r EZ I B B C el g n A THERMOSTATIC EXPANSION VALVESSporlan offers thermostatic expansion valves in R-410A nominal capacities between 0.88 and 28 kW. The models offered are externally equalized, have straight through or angle configuration, and SAE or ODF connections. The Sporlan refrigerant code for R-410A is the letter "Z ",which is used in the designation of products especially designed for R-410A service.The BIZE models have a conventional port construction.BBIZE models have the advantage of a balanced port construction,which makes them ideally suited for systems with a wide range of operating conditions.The CBIZE and CBBIZE models are similar to the BIZE and BBIZE, but have an internal check valve to allow refrigerant flow to bypass the expansion valve port in the reverse flow direction in heat pump systems.The integral check valve means fewer connections, easier installation,and increased reliability.The Sporlan TEVs designed for R-410A have replaceable thermostatic elements with a locknut ring stronger than normally used with common refrigerants such as R-22 or R-134a. This feature makes the thermostatic element capable of withstanding higher pressures. Replaceable thermostatic elements are designated by “KT-45-” plus the charge.Example: KT-45-ZGA.Currently, three thermostatic charges are available for R-410A service:ZGA – Has similar performance to the VGA charge used in R-22or NGA charge used in R-407C systems. The constituents and heavy thermal ballasts in the charge provide excellent anti-hunt characteristics by dampening the valve in the opening direction. The maximum operating pressure or MOP of this charge is not as defined as the ZCP160 charge,an alternate charge for R-410A air conditioning and heat pump applications.ZCP160– Has similar performance to the VCP100 charge used in R-22 systems or the NCP100 charge used in R-407C systems. The maximum operating pressure or MOP of this charge takes effect around 12°C evaporator temperature.The ZCP160 charge has a mild thermal ballast that dampens the valve in the opening direction only.ZN – Has similar performance to the VN charge used in R-22or NN charge used in R-407C systems. A heavy thermal ballast dampens the valve in the opening and closing directions.The ZN charge is a non-condensable charge without an MOP, and thus not subject to charge migration. It is used in special medium and high temperature applications, such as chillers located outdoors that must operate while exposed to cold temperatures.Contact the nearest Acal sales office if you have an application that requires a valve or charge that is not listed.Catalogue R-410A — Page 3ODF ConnectionsPage 4— Catalogue R-410ABIZE & BBIZEStraight Through ConfigurationB55 mmADDCCBIZE & BBIZEAngle ConfigurationE n i m 9n i m 9n i m 7n i m 7ni m 1Capillary Tube Length 76.2 cm Standard 152.4 cm Available47 mm49 mm56 mm90 mm30°7.9 m m m i n .B I ZE = 46 m m B B I Z E = 47 m mBIZE 46 mm BBIZE 47 mmCC E E49 mm49 mmDDDDDBCE Equalizer Option:1/8" OD x 31 cm ,61 cm or 91 cmlong capillary tube external equalizer with or without 1/4" SAE flare nutEqualizer Option:1/8" OD x 31 cm,61 cm or 91 cm long capillary tube external equalizer with or without 1/4" SAE flare nutE EGGFA1/4" ODFExternal Equalizer Fitting 1/4" ODF external equalizer fitting35Catalogue R-410A — Page 5CBIZE & CBBIZEStraight Through ConfigurationCBBIZEAngle ConfigurationEqualizer option:1/8" OD x 31 cm,61 cm or 91 cm long capillary tube external equalizer with or without 1/4" SAE flare nutEqualizer option:1/8" OD x 31 cm,61 cm or 91 cmlong capillary tube external equalizer with or without 1/4" SAE flare nut58 mmABCC30°DDG46mm49 mm59 mm93 mmFCBDAEHChatleff fittingsoption7.9 m m m i n .48 m m O D F 41 m mS A E6.4 m m 49 mm49 mmPage 6— Catalogue R-410AFor more information on Sporlan distributors please refer to Bulletin 20-10.SOLENOID VALVESValves with 4 different port sizes and ODF solder connections are available. The smallest port valve uses a MKC-1 coil while the rest use a MKC-2 coil. Sporlan solenoid valves are available in many different voltage and cycle ratings. Standard coils are listed in the specifications table below.Solenoid coils are available with either an integral junction box, a 1/2" conduit boss, or DIN connector. Hirshman connectors are also available. Models with other sizes and features are under development. Please contact the nearest Acal sales office if you have an application that requires a solenoid valve with capacities or voltages not shown in this catalogue.Catalogue R-410A — Page 7E6 SeriesE19 SeriesCoil removal 40 mmCoil removal 45 mmCoil removal 45 mm*B*BAADDDD*BAACCC E E14 SeriesFor more information on solenoid valves refer to Bulletin 30-10E6S130-HPE19S250-HPME9S240-HPPage 8— Catalogue R-410ACatch-All ®FILTER-DRIERSAll sealed models of Sporlan’s Catch-All and the HPC-100(heat pump) models are suitable for use in R-410A systems. The high water capacity and the acid removal ability of the Catch-All core are well suited to meet the demands of R-410A refrigerant and POE oil.Extensive testing of the materials and the molded core in the Catch-All have demonstrated its compatibility and effectiveness in systems using R-410A. Form 40-139 has a detailed explanation of R-410A compatibility testing of the Catch-All.fittingsFiberglass pad 100 mesh screenH ea v yl ea f sp ri n gCatalogue R-410A — Page 9 It’s the CORE that Counts!Page 10— Catalogue R-410ASA-14SU For more information refer to Bulletin 70-10Overall width is:33 mm for 1/4" and 3/8" sizes, 40 mm for 1/2" and 5/8" sizes, and 35 mm for 7/8" and 1-1/8" sizes.Most solder connections can be used as male fittings as well as female fittings.The 1/4”ODF is 3/8" ODM, the 3/8" ODF is 1/2" ODM, the 1/2" ODF is 5/8" ODM, and the 5/8"ODF is 3/4"ODM.Models with female flare and/or swivel nut connections are supplied with a copper gasket in the fitting.* These models have copper connections and feature a removable element cartridge — for replacement cartridge specify AC-20.Note:Change or add Catch-All Filter-Drier when the paper turns from green to chartreuse .SA-13SCatalogue R-410A — Page 11Zhu Gao DeRm. 1010, Tower 1 Kerry Everbright City 218 Tian Mu Road West Shanghai 200070, P.R. of China Tel: (86) 21 6353 4577Fax: (86) 21 6354 1227E-mail:*******************Acal China China Acal plcAir Conditioning & RefrigerationHeadquarters Office United Kingdom Peter Hogan 2 Chancellor Court Occam Road, Surrey Research Park Guildford GU2 7AH, United Kingdom Tel: (44) 1483 544500 Fax: (44) 1483 544550E-mail:*****************.ukwebsite:Helen Rosalia 10 Cutter Mill Road, Suite 203Great Neck, New York 11021, U.S.A. Tel: (1) 516 487 9870 Fax: (1) 516 487 9342E-mail:***************website: Hugo Dalla ZannaRua Conde do Pinhal, 2267, Suite 201 CEP 13560-140São Carlos, SP , Brasil Tel: (55) 16 270 8027 Fax: (55) 16 270 1604E-mail:**************A cal New York Inc International Sales Headquarters (excludes Europe & Japan)Acal S.A.Acal Brazil Brazil U.S.A.New York France Eliane Emerit-Bonnot Zone d'Activite des Marais 1 Avenue Louison Bobet BP 6494122 Fontenay-sous-Bois,Cedex, France Tel: (33) 1 4514 7300 Fax: (33) 1 4877 6230E-mail:***********website: www.acal.fr Acal Controls Ltd.European Sales Office Headquarters (excludes France & Germany)England Angus Mackintosh Unit 2, The Rose Estate, Osborn Way Hook, Hampshire RG27 9UT, United Kingdom Tel: (44) 1256 382520Fax: (44) 1256 382530E-mail: **********************.uk website: Elke Villhauer Fischeracker 274223 Flein/Heilbronn, Germany Tel: (49) 7 131 5810 Fax: (49) 7 131 5812 90E-mail:************website: www.acal.de Acal GmbH Germany Tony Koh Tampines Central P.O. Box 400, Singapore 915214Tel: (65) 654 65461 Fax: (65) 654 65462E-mail:******************.sgAcal Singapore Singapore Sarkis Ohannessian P.O. Box 70-994Antelias, Lebanon Tel: (961) 4 522 309 Fax: (961) 4 522 309E-mail:****************.lb A cal Middle East Lebanon Anil Yadav 16/34 1st. Floor Sidhora Kalan Near Shakti Nagar Rly Bridge Delhi, India 110052Tel: (91) 11 364 3211 Fax: (91) 11 364 3212E-mail:******************Acal India India Mike Rivera PMB# 2195944 Coral Ridge Drive Coral Springs, Florida 33076, U.S.A.Tel: (1) 954 345 8278 Fax: (1) 954 255 6468E-mail:********************.net Acal Florida U.S.A.Florida Peter Harms Suite 3, 70 Kingsway Glen Waverley VIC 3150Tel: (61) 3 95747810Fax: (61) 3 9574 7820E-mail:****************Acal Australia Pty. Ltd.Australia。
M-AUDIO_410中文说明书解析
M-AUDIO FireWire410中文说明书1.FireWire410 简介FireWire410 是一个4 进10 出音频接口,它通过IEEE-1394 端口(俗称"火线")与计算机进行连接。
如果你的计算机没有火线端口,只需向计算机经销商购买一块PCI 的火线卡,便能与FireWire410 连接。
笔记本电脑通常都自备火线端口。
FireWire410 包装内带一条高质量的六针到六针1394 数据线,建议你使用它或相同品质的火线与电脑连接。
如果电脑上只有四针火线接口,则需购买一条六针到四针的1394 数据线。
另外需指出,FireWire410 使用六针的端口自供电,若使用四针的火线口,需要为FireWire410 提供外部电源。
提示:火线口即是1394 口,在Sony 设备中又称iLink 口。
FireWire410 提供两个卡侬和大三芯的复合模拟输入口,可以连接话筒,也可接电吉它、电贝司等乐器;八个大三芯模拟输出口及一对S/PDIF 的同轴、光纤输入/输出。
FireWire410 提供了高品质模拟、数字输入输出,支持24 比特的采样精度、96kHz 录音采样频率和192kHz 输出采样频率,S/PDIF 端口支持AC3 和DTS 双编码。
FileWire410 还提供了一进一出MIDI 端口,并有开关选择MIDI 输出或是旁通,可作为独立MIDI 接口使用。
FireWire410 具有简捷实用的软件控制系统,提供了跳线和调音台控制功能,为音频软件虚拟了10 个输出通道。
你可任意分配输入端口到输出端,每个内部通道又支持具有超大控制幅度的辅助发送。
FireWire 还提供了零延迟硬件直接监听和基于ASIO 的超低延迟软监听;具有两个独立的耳机监听输出,信号来源可选择,并有独立增益控制;两个麦克风/乐器功放提供了电平控制和监测功能、48V 幻像电源、20dB 衰减和最大66dB 的增益。
雅马哈效果器说明书
一般技术规格模数/数模转换20Hz-20kHz(全部旁路)动态范围80dB(典型)全谐波失真小于0.1%(1kHz,最大电平)模数/数模转换模数转换16比特数模转换16比特采样频率44.1kHz储存程序99效果程序立体声混响、混响、混响加门、延迟、延迟+混响,混响-镶边,合唱+混响,交响乐+混响输入连接口PHONE JACK×2正常电平-20dB(输入电平标称)阻抗20kΩ(单声道:10kΩ)输出连接口PHONE JACK×2正常电平-20dB(输入电平正常)阻抗2kΩ(单声道:1kΩ)显示七段LED发光二极管×2(显示程序号)前面板控制部分输入电平,混音平衡,延迟衰减,电平前面板键部分▲,▼,MIDI,储存LED发光二极管显示器峰值,左右,延迟,衰减,电平(可编辑目录)MIDI输入5-Pin DIN电源直流12V输入尺寸(宽×高×厚)480×232×45.5mm(18.9″×9.1″×1.8″)重量2.5kg电源适配器美国加拿大:PA-1BU(120V AC)一般:PA-1BU(220V/240V AC)英国:PA-1(240V AC)详细使用说明:一、正确安装和连接YAMAHA--- REV100。
如使用单声道可只接左声道。
INPUT LEVEL:输入电平旋钮,调节此旋钮使峰值指示灯在正常工作时偶尔闪亮。
一直闪亮表示信号过强,声音会削波,过弱又会发生音质下降,因此调节适当的电平输入是使用好效果器的第一步,也是很重要的一步。
MIX BALANCE:效果混合旋钮,用来调节效果声和原声之间的比例。
PROGRAM:用来选择不同的程序,编辑程序存储。
二、改变效果程序:YAMAHA—REV100共有99种效果程序,用上下光标键选择。
混响程序名类型说明01 Vocal rev1 人声适用于人声混响02 Vocal rev2 大厅3号程序的前期延长,混响时间短03 Vocal rev3 人声04 Room ambience1 盘子04-08这些效果适用于鼓和打击乐音色,可作用于整个鼓组或某个鼓音色05 Room ambience2盘子06 Room ambience3盘子07 Wood booth1 人声08 Wood booth2 人声09 Acoustic piano plate 用于钢琴的混响10 Club piano 大厅用于钢琴的混响11 Booming kick1大厅用于底鼓的混响,强调低频12 Booming kick2 房间用于底鼓的混响,强调低频13 Loud snare房间用于军鼓的混响14 Acoustec steel guitar1 盘子钢弦原声吉它的混响15 Acoustec steel guitar2 盘子钢弦原声吉它的混响16 String plate 盘子弦乐的混响17 Acoustec gut guitar1 人声尼龙弦原声吉它混响18 Acoustec gut guitar2 人声尼龙弦原声吉它混响19 Btass room1 房间铜管乐器的混响20 Btass room 房间铜管乐器的混响立体声混响程序名类型说明21 Large hall1 大厅Stage比hall的混响更明亮22 Large hall2 大厅Stage比hall的混响更明亮23 Stage1 大厅Stage比hall的混响更明亮24 Stage2 大厅Stage比hall的混响更明亮25 Chamger1 人声模拟大房间,高顶的混响26 Chamger2 大厅模拟大房间,高顶的混响27 Church1 房间模拟大房间,高顶的混响28 Church2 大厅模拟大房间,高顶的混响29 Old gunnel 大厅模拟长通道中的混响,old暗、new明亮30 New tunnel 人声31 Large room1 房间房间混响,32比31低频更多32 Large room2 房间33 Slide reverb 房间混响的声像在右34 Huge room1 房间比房间混响更有力的混响35 Huge room2 房间比房间混响更有力的混响36 Bathroom 盘子短立体声的混响37 String ensemble 盘子用于弦乐的大混响38 Rude reverb1 人声粗混响39 Rude reverb2 人声粗混响40 Comcert grand piano 人声用于原钢琴的混响门混响程序名类型说明41 Small ambience1 大厅小房间反射混响,42比41的低频少42 Small ambience2 大厅43 Tight poom1 房间比上面两种效果更小的混响44 Tight poom 大厅比上面两种效果更小的混响45 Gate reverb1 盘子各种门混响46 Gate reverb2 人声各种门混响47 Gate reverb3 大厅各种门混响48 Gate reverb4 大厅各种门混响49 Stone room 房间石头房间混响50 Big curve 人声最长的门混响延迟程序名说明51 Analog delay1 软延迟52 Ping pong delay 声像左右变化的延迟53 Eighth note triplet 像8分三连音符的延迟54 Karaoke 用于卡拉OK的回声效果55 Short delay doubler 一次短的延迟56 Stereo long delay 左右声道同长的立体声延迟57 Sgereo medium delay 左右声道不等长的立体声延迟58 Stereo long delay 左右声道同长的短延迟59 Mono long delay 单声道输出的重复延迟60 Mono short delay 单声道输出的重复延迟延迟/混响程序名类型说明61 Electric piano 延迟+大厅常用于钢琴62 String pad 延迟大厅常用于背景音乐63 Synth 延迟人声用于弦乐背景64 Vocal1 64、65是用短延迟的长混响,适用于人声65 Vocal2 延迟大厅64、65是用短延迟的长混响,适用于人声66 Vocal3 延迟房间66是强调延迟的短混响67 Btinght vocal 延迟盘子有小延迟的亮混响68 Chorus 延迟+盘子一半混响,一半延迟69 Drum kit1 延迟+ 房间用于鼓和打击乐的混响70 Drum kit2 延迟盘子用于鼓和打击乐的混响混响/调制程序名类型说明71 Soft flange1 大厅+飘忽此效果结合了混响和小音高变化的飘忽,常用于合成音色背景音乐72 Soft flange2 大厅+飘忽此效果结合了混响和小音高变化的飘忽,常用于合成音色背景音乐73 Amgience flange1 房间飘忽短混响加飘忽74 Amgience flange2 房间飘忽短混响加飘忽75 Soft reverb flange 房间飘忽短混响加音高变化更大的飘忽76 Organ cabinet1 盘子飘忽用于风琴的飘忽效果77 Organ cabinet2 房间交响用于风琴的飘忽效果78 Symphonic reverb1 大厅+交响以混响为主的精致效果79 Symphonic reverb2 人声+交响以混响为主的精致效果80 Flange room1 房间+飘忽为鼓和打击乐加特效81 Flange room2 房间+飘忽为鼓和打击乐加特效82 Rolling flange1 盘子+飘忽为鼓和打击乐加特效83 Rolling flange2盘子+飘忽为鼓和打击乐加特效84 Big flange 人声飘忽喷气机效果85 Chorus rererb1 大厅+合唱85,86是普通的混响+合唱,用途很广如用于钢琴86 Chorus reverb2 盘子+合唱87 Chorus reverb3 大厅+和唱88 Chorus reverb4 人声+合唱89 Tremolo reverb1 大厅+震音震音+混响的各种变化效果90 Tremolo reverb2 大厅震音震音+混响的各种变化效果91 Tremolo reverb3 盘子+震音震音+混响的各种变化效果92 Tremolo reverb4 人声+震音震音+混响的各种变化效果93 Tremolo reverb5 人声+震音震音+混响的各种变化效果94 Tremolo reverb6 大厅+震音震音+混响的各种变化效果95 Tremolo reverb7 大厅+震音震音+混响的各种变化效果96 Ambient slow pan1大厅+震音左右声像变化和短混响97 Ambient slow pan2 房间+震音左右声像变化和短混响98 Sequence pan1房间+震音根据乐曲速度而定的声像变化效果99 Sequence pan2房间+震音根据乐曲速度而定的声像变化效果编辑模式(Edit Mode)REV100的每个效果都具有多个参数,3个主要参数可通过面板上的旋钮控制。
雅马哈效果器说明书
一般技术规格模数/数模转换20Hz-20kHz(全部旁路)动态范围80dB(典型)全谐波失真小于0.1%(1kHz,最大电平)模数/数模转换模数转换16比特数模转换16比特采样频率44.1kHz储存程序99效果程序立体声混响、混响、混响加门、延迟、延迟+混响,混响-镶边,合唱+混响,交响乐+混响输入连接口PHONE JACK×2正常电平-20dB(输入电平标称)阻抗20kΩ(单声道:10kΩ)输出连接口PHONE JACK×2正常电平-20dB(输入电平正常)阻抗2kΩ(单声道:1kΩ)显示七段LED发光二极管×2(显示程序号)前面板控制部分输入电平,混音平衡,延迟衰减,电平前面板键部分▲,▼,MIDI,储存LED发光二极管显示器峰值,左右,延迟,衰减,电平(可编辑目录)MIDI输入5-Pin DIN电源直流12V输入尺寸(宽×高×厚)480×232×45.5mm(18.9″×9.1″×1.8″)重量2.5kg电源适配器美国加拿大:PA-1BU(120V AC)一般:PA-1BU(220V/240V AC)英国:PA-1(240V AC)详细使用说明:一、正确安装和连接YAMAHA--- REV100。
如使用单声道可只接左声道。
INPUT LEVEL:输入电平旋钮,调节此旋钮使峰值指示灯在正常工作时偶尔闪亮。
一直闪亮表示信号过强,声音会削波,过弱又会发生音质下降,因此调节适当的电平输入是使用好效果器的第一步,也是很重要的一步。
MIX BALANCE:效果混合旋钮,用来调节效果声和原声之间的比例。
PROGRAM:用来选择不同的程序,编辑程序存储。
二、改变效果程序:YAMAHA—REV100共有99种效果程序,用上下光标键选择。
混响程序名类型说明01 Vocal rev1 人声适用于人声混响02 Vocal rev2 大厅3号程序的前期延长,混响时间短03 Vocal rev3 人声04 Room ambience1 盘子04-08这些效果适用于鼓和打击乐音色,可作用于整个鼓组或某个鼓音色05 Room ambience2盘子06 Room ambience3盘子07 Wood booth1 人声08 Wood booth2 人声09 Acoustic piano plate 用于钢琴的混响10 Club piano 大厅用于钢琴的混响11 Booming kick1大厅用于底鼓的混响,强调低频12 Booming kick2 房间用于底鼓的混响,强调低频13 Loud snare房间用于军鼓的混响14 Acoustec steel guitar1 盘子钢弦原声吉它的混响15 Acoustec steel guitar2 盘子钢弦原声吉它的混响16 String plate 盘子弦乐的混响17 Acoustec gut guitar1 人声尼龙弦原声吉它混响18 Acoustec gut guitar2 人声尼龙弦原声吉它混响19 Btass room1 房间铜管乐器的混响20 Btass room 房间铜管乐器的混响立体声混响程序名类型说明21 Large hall1 大厅Stage比hall的混响更明亮22 Large hall2 大厅Stage比hall的混响更明亮23 Stage1 大厅Stage比hall的混响更明亮24 Stage2 大厅Stage比hall的混响更明亮25 Chamger1 人声模拟大房间,高顶的混响26 Chamger2 大厅模拟大房间,高顶的混响27 Church1 房间模拟大房间,高顶的混响28 Church2 大厅模拟大房间,高顶的混响29 Old gunnel 大厅模拟长通道中的混响,old暗、new明亮30 New tunnel 人声31 Large room1 房间房间混响,32比31低频更多32 Large room2 房间33 Slide reverb 房间混响的声像在右34 Huge room1 房间比房间混响更有力的混响35 Huge room2 房间比房间混响更有力的混响36 Bathroom 盘子短立体声的混响37 String ensemble 盘子用于弦乐的大混响38 Rude reverb1 人声粗混响39 Rude reverb2 人声粗混响40 Comcert grand piano 人声用于原钢琴的混响门混响程序名类型说明41 Small ambience1 大厅小房间反射混响,42比41的低频少42 Small ambience2 大厅43 Tight poom1 房间比上面两种效果更小的混响44 Tight poom 大厅比上面两种效果更小的混响45 Gate reverb1 盘子各种门混响46 Gate reverb2 人声各种门混响47 Gate reverb3 大厅各种门混响48 Gate reverb4 大厅各种门混响49 Stone room 房间石头房间混响50 Big curve 人声最长的门混响延迟程序名说明51 Analog delay1 软延迟52 Ping pong delay 声像左右变化的延迟53 Eighth note triplet 像8分三连音符的延迟54 Karaoke 用于卡拉OK的回声效果55 Short delay doubler 一次短的延迟56 Stereo long delay 左右声道同长的立体声延迟57 Sgereo medium delay 左右声道不等长的立体声延迟58 Stereo long delay 左右声道同长的短延迟59 Mono long delay 单声道输出的重复延迟60 Mono short delay 单声道输出的重复延迟延迟/混响程序名类型说明61 Electric piano 延迟+大厅常用于钢琴62 String pad 延迟大厅常用于背景音乐63 Synth 延迟人声用于弦乐背景64 Vocal1 64、65是用短延迟的长混响,适用于人声65 Vocal2 延迟大厅64、65是用短延迟的长混响,适用于人声66 Vocal3 延迟房间66是强调延迟的短混响67 Btinght vocal 延迟盘子有小延迟的亮混响68 Chorus 延迟+盘子一半混响,一半延迟69 Drum kit1 延迟+ 房间用于鼓和打击乐的混响70 Drum kit2 延迟盘子用于鼓和打击乐的混响混响/调制程序名类型说明71 Soft flange1 大厅+飘忽此效果结合了混响和小音高变化的飘忽,常用于合成音色背景音乐72 Soft flange2 大厅+飘忽此效果结合了混响和小音高变化的飘忽,常用于合成音色背景音乐73 Amgience flange1 房间飘忽短混响加飘忽74 Amgience flange2 房间飘忽短混响加飘忽75 Soft reverb flange 房间飘忽短混响加音高变化更大的飘忽76 Organ cabinet1 盘子飘忽用于风琴的飘忽效果77 Organ cabinet2 房间交响用于风琴的飘忽效果78 Symphonic reverb1 大厅+交响以混响为主的精致效果79 Symphonic reverb2 人声+交响以混响为主的精致效果80 Flange room1 房间+飘忽为鼓和打击乐加特效81 Flange room2 房间+飘忽为鼓和打击乐加特效82 Rolling flange1 盘子+飘忽为鼓和打击乐加特效83 Rolling flange2盘子+飘忽为鼓和打击乐加特效84 Big flange 人声飘忽喷气机效果85 Chorus rererb1 大厅+合唱85,86是普通的混响+合唱,用途很广如用于钢琴86 Chorus reverb2 盘子+合唱87 Chorus reverb3 大厅+和唱88 Chorus reverb4 人声+合唱89 Tremolo reverb1 大厅+震音震音+混响的各种变化效果90 Tremolo reverb2 大厅震音震音+混响的各种变化效果91 Tremolo reverb3 盘子+震音震音+混响的各种变化效果92 Tremolo reverb4 人声+震音震音+混响的各种变化效果93 Tremolo reverb5 人声+震音震音+混响的各种变化效果94 Tremolo reverb6 大厅+震音震音+混响的各种变化效果95 Tremolo reverb7 大厅+震音震音+混响的各种变化效果96 Ambient slow pan1大厅+震音左右声像变化和短混响97 Ambient slow pan2 房间+震音左右声像变化和短混响98 Sequence pan1房间+震音根据乐曲速度而定的声像变化效果99 Sequence pan2房间+震音根据乐曲速度而定的声像变化效果编辑模式(Edit Mode)REV100的每个效果都具有多个参数,3个主要参数可通过面板上的旋钮控制。
【9A文】雅马哈电子琴说明书

雅马哈电子琴说明书步骤式学习系统(1)LISTEN&LEARN听&学、节拍、伴奏等待:利用听&学、节拍、伴奏等待键,可先开始熟悉乐曲。
(2)KeRtoScuccess关键乐段教学:关键乐段教学键,可协助您渐进式学习乐曲。
(3)PhraseRepeat乐段重複练习:乐段重複练习键,则可反覆练习乐曲中一段指定的乐句,熟能生巧,更易上手。
可录製5首乐曲、2轨式(弹奏乐曲、伴奏风格)录音功能录製自己的弹奏,不但在学习弹奏上能更了解自己需加强之处,更能自製属于自己的创作曲喔。
ULTRA-WIDESTEREO超宽立体声超宽立体声的声音效果,好像喇叭置身在乐器以外的场域裡,宽阔无比。
乐曲/音色/伴奏1.SONG乐曲:102首乐曲,可运用在教学上。
2.VOICE音色:497种音色,不但拥有了多种中国乐器音色,例如:二胡、笛子、琵琶、扬琴、古筝等等;还包括多种双重乐器音色,例钢琴/絃乐等等。
3.STRLE伴奏:106种伴奏,丰富的伴奏风格,学习更快乐。
规格表PSR-E333键盘61个力度标准感应键最大同时发音数32个音符(最大)萤幕LCD萤幕音色497(140种面板音色+13组打击乐/SFR音色+344种RGlite音色)伴奏型态106音乐资料库100预设乐曲102(NewDemoSong)效果9种残响+4种叠奏+26种和声类型+3种超宽立体声类型录音功能5首2轨式录音第五代教学功能steps(Listening/Timing/Waiting)+SpecialLesson和絃字典有GeneralMIDI有USB(TOHOST)有扩大机2.5WR2尺寸(宽×深×高)945×369×132mm重量4.9公斤电子琴因其携带方便,表现力强,演奏方法较为容易等特点,长期以来一直受到人们的喜爱。
但在实际生活中,从广大琴童的学琴经历来看,部分教师和家长在认识上都存在一定的误区。
雅马哈效果器说明书Word版
一般技术规格模数/数模转换20Hz-20kHz(全部旁路)动态范围80dB(典型)全谐波失真小于0.1%(1kHz,最大电平)模数/数模转换模数转换16比特数模转换16比特采样频率44.1kHz储存程序99效果程序立体声混响、混响、混响加门、延迟、延迟+混响,混响-镶边,合唱+混响,交响乐+混响输入连接口PHONE JACK×2正常电平-20dB(输入电平标称)阻抗20kΩ(单声道:10kΩ)输出连接口PHONE JACK×2正常电平-20dB(输入电平正常)阻抗2kΩ(单声道:1kΩ)显示七段LED发光二极管×2(显示程序号)前面板控制部分输入电平,混音平衡,延迟衰减,电平前面板键部分▲,▼,MIDI,储存LED发光二极管显示器峰值,左右,延迟,衰减,电平(可编辑目录)MIDI输入5-Pin DIN电源直流12V输入尺寸(宽×高×厚)480×232×45.5mm(18.9″×9.1″×1.8″)重量2.5kg电源适配器美国加拿大:PA-1BU(120V AC)一般:PA-1BU(220V/240V AC)英国:PA-1(240V AC)详细使用说明:一、正确安装和连接YAMAHA--- REV100。
如使用单声道可只接左声道。
INPUT LEVEL:输入电平旋钮,调节此旋钮使峰值指示灯在正常工作时偶尔闪亮。
一直闪亮表示信号过强,声音会削波,过弱又会发生音质下降,因此调节适当的电平输入是使用好效果器的第一步,也是很重要的一步。
MIX BALANCE:效果混合旋钮,用来调节效果声和原声之间的比例。
PROGRAM:用来选择不同的程序,编辑程序存储。
二、改变效果程序:YAMAHA—REV100共有99种效果程序,用上下光标键选择。
混响程序名类型说明01 Vocal rev1 人声适用于人声混响02 Vocal rev2 大厅 3号程序的前期延长,混响时间短03 Vocal rev3 人声04 Room ambience1 盘子 04-08这些效果适用于鼓和打击乐音色,可作用于整个鼓组或某个鼓音色05 Room ambience2盘子06 Room ambience3盘子07 Wood booth1 人声08 Wood booth2 人声09 Acoustic piano plate 用于钢琴的混响10 Club piano 大厅用于钢琴的混响11 Booming kick1大厅用于底鼓的混响,强调低频12 Booming kick2 房间用于底鼓的混响,强调低频13 Loud snare房间用于军鼓的混响14 Acoustec steel guitar1 盘子钢弦原声吉它的混响15 Acoustec steel guitar2 盘子钢弦原声吉它的混响16 String plate 盘子弦乐的混响17 Acoustec gut guitar1 人声尼龙弦原声吉它混响18 Acoustec gut guitar2 人声尼龙弦原声吉它混响19 Btass room1 房间铜管乐器的混响20 Btass room 房间铜管乐器的混响立体声混响程序名类型说明21 Large hall1 大厅 Stage比hall的混响更明亮22 Large hall2 大厅 Stage比hall的混响更明亮23 Stage1 大厅 Stage比hall的混响更明亮24 Stage2 大厅 Stage比hall的混响更明亮25 Chamger1 人声模拟大房间,高顶的混响26 Chamger2 大厅模拟大房间,高顶的混响27 Church1 房间模拟大房间,高顶的混响28 Church2 大厅模拟大房间,高顶的混响29 Old gunnel 大厅模拟长通道中的混响,old暗、new明亮30 New tunnel 人声31 Large room1 房间房间混响,32比31低频更多32 Large room2 房间33 Slide reverb 房间混响的声像在右34 Huge room1 房间比房间混响更有力的混响35 Huge room2 房间比房间混响更有力的混响36 Bathroom 盘子短立体声的混响37 String ensemble 盘子用于弦乐的大混响38 Rude reverb1 人声粗混响39 Rude reverb2 人声粗混响40 Comcert grand piano 人声用于原钢琴的混响门混响程序名类型说明41 Small ambience1 大厅小房间反射混响,42比41的低频少42 Small ambience2 大厅43 Tight poom1 房间比上面两种效果更小的混响44 Tight poom 大厅比上面两种效果更小的混响45 Gate reverb1 盘子各种门混响46 Gate reverb2 人声各种门混响47 Gate reverb3 大厅各种门混响48 Gate reverb4 大厅各种门混响49 Stone room 房间石头房间混响50 Big curve 人声最长的门混响延迟程序名说明51 Analog delay1 软延迟52 Ping pong delay 声像左右变化的延迟53 Eighth note triplet 像8分三连音符的延迟54 Karaoke 用于卡拉OK的回声效果55 Short delay doubler 一次短的延迟56 Stereo long delay 左右声道同长的立体声延迟57 Sgereo medium delay 左右声道不等长的立体声延迟58 Stereo long delay 左右声道同长的短延迟59 Mono long delay 单声道输出的重复延迟60 Mono short delay 单声道输出的重复延迟延迟/混响程序名类型说明61 Electric piano 延迟+大厅常用于钢琴62 String pad 延迟大厅常用于背景音乐63 Synth 延迟人声用于弦乐背景64 Vocal1 64、65是用短延迟的长混响,适用于人声65 Vocal2 延迟大厅 64、65是用短延迟的长混响,适用于人声66 Vocal3 延迟房间 66是强调延迟的短混响67 Btinght vocal 延迟盘子有小延迟的亮混响68 Chorus 延迟+盘子一半混响,一半延迟69 Drum kit1 延迟+ 房间用于鼓和打击乐的混响70 Drum kit2 延迟盘子用于鼓和打击乐的混响混响/调制程序名类型说明71 Soft flange1 大厅+飘忽此效果结合了混响和小音高变化的飘忽,常用于合成音色背景音乐72 Soft flange2 大厅+飘忽此效果结合了混响和小音高变化的飘忽,常用于合成音色背景音乐73 Amgience flange1 房间飘忽短混响加飘忽74 Amgience flange2 房间飘忽短混响加飘忽75 Soft reverb flange 房间飘忽短混响加音高变化更大的飘忽76 Organ cabinet1 盘子飘忽用于风琴的飘忽效果77 Organ cabinet2 房间交响用于风琴的飘忽效果78 Symphonic reverb1 大厅+交响以混响为主的精致效果79 Symphonic reverb2 人声+交响以混响为主的精致效果80 Flange room1 房间+飘忽为鼓和打击乐加特效81 Flange room2 房间+飘忽为鼓和打击乐加特效82 Rolling flange1 盘子+飘忽为鼓和打击乐加特效83 Rolling flange2盘子+飘忽为鼓和打击乐加特效84 Big flange 人声飘忽喷气机效果85 Chorus rererb1 大厅+合唱 85,86是普通的混响+合唱,用途很广如用于钢琴86 Chorus reverb2 盘子+合唱87 Chorus reverb3 大厅+和唱88 Chorus reverb4 人声+合唱89 Tremolo reverb1 大厅+震音震音+混响的各种变化效果90 Tremolo reverb2 大厅震音震音+混响的各种变化效果91 Tremolo reverb3 盘子+震音震音+混响的各种变化效果92 Tremolo reverb4 人声+震音震音+混响的各种变化效果93 Tremolo reverb5 人声+震音震音+混响的各种变化效果94 Tremolo reverb6 大厅+震音震音+混响的各种变化效果95 Tremolo reverb7 大厅+震音震音+混响的各种变化效果96 Ambient slow pan1大厅+震音左右声像变化和短混响97 Ambient slow pan2 房间+震音左右声像变化和短混响98 Sequence pan1房间+震音根据乐曲速度而定的声像变化效果99 Sequence pan2房间+震音根据乐曲速度而定的声像变化效果编辑模式(Edit Mode)REV100的每个效果都具有多个参数,3个主要参数可通过面板上的旋钮控制。
雅马哈调音台使用说明
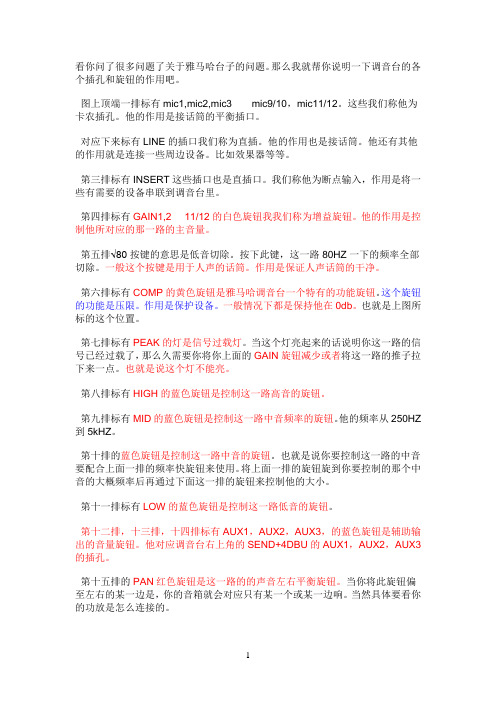
看你问了很多问题了关于雅马哈台子的问题。
那么我就帮你说明一下调音台的各个插孔和旋钮的作用吧。
图上顶端一排标有mic1,mic2,mic3······mic9/10,mic11/12。
这些我们称他为卡农插孔。
他的作用是接话筒的平衡插口。
对应下来标有LINE的插口我们称为直插。
他的作用也是接话筒。
他还有其他的作用就是连接一些周边设备。
比如效果器等等。
第三排标有INSERT这些插口也是直插口。
我们称他为断点输入,作用是将一些有需要的设备串联到调音台里。
第四排标有GAIN1,2····11/12的白色旋钮我我们称为增益旋钮。
他的作用是控制他所对应的那一路的主音量。
第五排√80按键的意思是低音切除。
按下此键,这一路80HZ一下的频率全部切除。
一般这个按键是用于人声的话筒。
作用是保证人声话筒的干净。
第六排标有COMP的黄色旋钮是雅马哈调音台一个特有的功能旋钮。
这个旋钮的功能是压限。
作用是保护设备。
一般情况下都是保持他在0db。
也就是上图所标的这个位置。
第七排标有PEAK的灯是信号过载灯。
当这个灯亮起来的话说明你这一路的信号已经过载了,那么久需要你将你上面的GAIN旋钮减少或者将这一路的推子拉下来一点。
也就是说这个灯不能亮。
第八排标有HIGH的蓝色旋钮是控制这一路高音的旋钮。
第九排标有MID的蓝色旋钮是控制这一路中音频率的旋钮。
他的频率从250HZ 到5kHZ。
第十排的蓝色旋钮是控制这一路中音的旋钮。
也就是说你要控制这一路的中音要配合上面一排的频率快旋钮来使用。
将上面一排的旋钮旋到你要控制的那个中音的大概频率后再通过下面这一排的旋钮来控制他的大小。
第十一排标有LOW的蓝色旋钮是控制这一路低音的旋钮。
第十二排,十三排,十四排标有AUX1,AUX2,AUX3,的蓝色旋钮是辅助输出的音量旋钮。
他对应调音台右上角的SEND+4DBU的AUX1,AUX2,AUX3的插孔。
雅马哈调音台使用说明(教程)

雅马哈调音台使用说明(教程)POWERED MIXERPOWERED MIXER 使用说明书ZH发挥调音台的最佳性能第12~18页速成指南第7~11页2EMX5014C 使用说明书 The above warning is located on the rear of the unit.Explanation of Graphical SymbolsThe lightning ?ash with arrowhead symbol within an equilateral triangle is intended to alert the user to the presence of uninsulated “dangerous voltage” within the product’s enclosure that may be of suf?cient magnitude to constitute a risk of electric shock to persons.The exclamation point within an equilateral triangle is intended to alert the user to the presence of important operating andmaintenance (servicing) instructions in the literature accompanying the product.IMPORTANT SAFETY INSTRUCTIONS1Read these instructions.2Keep these instructions.3Heed all warnings.4Follow all instructions.5Do not use this apparatus near water.6Clean only with dry cloth.7Do not block any ventilation openings. Install in accordance with the manufacturer’s instructions.8Do not install near any heat sources such as radiators, heat registers, stoves, or other apparatus (including ampli?ers) that produce heat.9Do not defeat the safety purpose of the polarized or grounding-type plug. A polarized plug has two blades with one wider than the other. A grounding type plug has two blades and a third grounding prong. The wide blade or the third prong are provided for your safety. If the provided plug does not ?t into your outlet, consult an electrician for replacement of the obsolete outlet.10Protect the power cord from being walked on or pinched particularly at plugs, convenience receptacles, and the point where they exit from the apparatus.11Only use attachments/accessories speci?ed by the manufacturer.12Use only with the cart, stand, tripod, bracket, or table speci?ed by the manufacturer, or sold with the apparatus. When a cart is used, use caution when moving the cart/apparatus combination to avoid injury from tip-over.13Unplug this apparatus duringlightning storms or when unused for long periods of time.14Refer all servicing to quali?ed service personnel. Servicing is required when the apparatus has beendamaged in any way, such as power-supply cord or plug is damaged, liquid has been spilled or objects have fallen into the apparatus, the apparatus has beenexposed to rain or moisture, does not operate normally, or has been dropped.(98-6500)WARNINGTO REDUCE THE RISK OF FIRE OR ELECTRIC SHOCK, DO NOT EXPOSE THIS APP ARA TUS TO RAIN OR MOISTURE.IMPORTANTPlease record the serial number of this unit in the space below.Model:Serial No.:The serial number is located on the bottom or rear of the unit.Retain this Owner’s Manual in a safe place for future reference.使用说明书 EMX5014C 3(5)-4请在操作使用前,首先仔细阅读下述内容* 请将本说明书存放在安全的地方,以便将来随时参阅。
YAMAHA-四轴使用说明

• 1.接线图; • 2.VIPWIN软件及RPB使用说明; • 3.编程语言介绍及范例讲解;
多轴机器人控制器:
可以控制最多四轴机器人 集RCX142/141功能于一体 新型手持编程器RPB的使用
IVY系统卡、追踪卡的追加 适用于省配线的网络系统:
CC-Link、DeviceNet、 Ethernet、Profibus 在高精度和高速度下执行CP 操作和插补控制 能进行高速度多任务操作
手动主页面点Point Trace---
按“GO”执行动作。
手动主页面点Interpolate Trace---
按“GO”执行动作。
自动页面
自动页面
自动页面
系统页面
按“Load”下载程序. 按“Save”上传程序. 按“Initialize”则恢复出厂值.按“History”查看历史事件.
手持编程器的PROGRAM操作方法
按“上”“下”键和不按“上”“下”键会出现下面的画 面的按扭
手持编程器的PROGRAM操作方法
以上为PROGRAM的按键功能,在编辑程序时还可以直接在光 标处输入相应的字符,从而来编辑程序。
手持编程器的MANUAL操作方法
按“上”“下”键和不按“上”“下”键会出现下面的画 面的按扭
此时,弹出如下对话框,选择“YES”则执行回原点 操作;选择”NO”则放弃回原点操作;
所有的轴都完成回原点操作后,可按”ESC”键退出 回原点界面;
手持编程器的MODE操作方法
按“MODE”键出现上面的画面,这为控制器的4个模 态。分别为“自动”、“程序”、“手动”、“系统”模 态。按“F1”、 “F2”、 “F3”、 “F4”可以进入相应的 模态中。
YAMAHA PSR-S910 PSR-S710 说明书

Version 1.10 Upgrade ManualVersion 1.10 of the firmware adds the following functionality to PSR-S910 and PSR-S710 models.•Support for the Wi-Fi Protected Access (WPA) wireless encryption standard (with the exception of certain USB-LAN adaptors *1)•Support for the Wi-Fi Protected Setup (WPS)*2 standard, which makes it easier to setup wireless home networks (with the exception of certain USB-LAN adaptors *1) •Support for the following USB-LAN adaptors.Wireless:Buffalo WLI-UC-GN Buffalo WLI-UC-GNHP Planex GW-USMicroN Planex GW-USMini2NEdimax EW-7711UAn Edimax EW-7711UTn Hawking HWUN3Tenda W311U Belkin F6D4050LogiLink WL0049A LogiLink WL0054Wired: LINKSYS USB300M AIRLINK101 ASOHOUSB 10/100Mbps Fast Ethernet USB 2.0 Adaptermacally AIR2NET INTELLINET Hi-Speed USB 2.0 to Fast Ethernet Adapter*1: For more details, please visit the Yamaha Piano / Keyboard website (below) and refer to the list of USB devices confirmed asworking with our products. /download*2:For more details, please refer to the Internet Connection Guide, which can be downloaded from the Yamaha Manual Librarywebsite. http://www.yamaha.co.jp/manual/english/1.Turn on the PSR-S910/S710.This can be done by pressing the [STANDBY/ON] switch located at the left of the front panel.2.Confirm the instrument’s current firmware version as follows.2-1Press the [FUNCTION] button.2-2Press the [J] (UTILITY) button.2-3Using the TAB [E ] / [F ] buttons, select the OWNER taband display the Owner setting screen.2-4Press the [7▲] (VERSION) button to display the currentfirmware version. If the displayed version number is less than 1.10, the firmware should be upgraded.2-5Press the [8▲] (EXIT) button or the [EXIT] button to closethe window.3.Turn off the PSR-S910/S710.This can be done by pressing the [STANDBY/ON] switch located at the left of the front panel.To upgrade the firmware, place the upgrade data on a USB flash memory device and then carry out the upgrading procedure as described below.1.Plug the USB flash memory device containing the upgrade data into the PSR-S910/S710.2.Hold down the [START/STOP] button and press the [STANDBY/ON] switch.Continue to hold down the [START/STOP] button until thefollowing message is displayed.3.Install the upgrade data.To do so, release the [START/STOP] button and then press it once again.Upgrading the FirmwareAfter indicating that data is being loaded, the PSR-S910/S710 will begin to install the new version of the firmware.The following message is displayed at this time. Upgrading ofthe firmware takes approximately 5 minutes.The USB flash memory device must not be unplugged and the instrument must not be turned off while the firmware is beinginstalled. Failure to observe this precaution may render thePSR-S910/S710 unfit for use.The following message is displayed upon completion of the firmware installation process.4.Turn off the PSR-S910/S710 and unplug the USB flash memory device.After any firmware upgrade, it is recommended that you confirm the current version once again as described below.1.Turn on the PSR-S910/S710.This can be done by pressing the [STANDBY/ON] switch located at the left of the front panel.2.Confirm the instrument’s current firmware version as follows.2-1Press the [FUNCTION] button.2-2Press the [J] (UTILITY) button.2-3Using the T AB [E ] / [F ] buttons, select the OWNER taband display the Owner setting screen.2-4Press the [7▲] (VERSION) button to display the currentfirmware version.If the upgrade process has been completed successfully, version 1.10 will be shown in the window displayed. If the version has not changed, it is likely that the installationprocedure was not completed successfully. In such a case, repeat the procedure carefully as described herein.3.Press the [8▲] (EXIT) button or the [EXIT] button to close the window.Deletion using the instrument:Version 1.10 of the firmware for PSR-S910 and PSR-S710 models makes it possible to delete upgrade data from a USB flash memory device using the instrument itself. To do so, proceed as follows.1.Plug the USB flash memory device containing the upgrade data into the PSR-S910/S710.2.Hold down the [START/STOP] button and press the [STANDBY/ON] switch.Continue to hold down the [START/STOP] button until the following message is displayed.The USB flash memory device must not be unplugged and the instrument must not be turned off at this time. Failure to observe this precaution may render the PSR-S910/S710 unfit for use.3.Press the [BREAK] button to delete the upgrade data.The following confirmation message will be displayed.4.To delete the upgrade data, release the [START/STOP] button and then press it once again.The PSR-S910/S710 will begin deleting the upgrade data. The following message is displayed at this time.The USB flash memory device must not be unplugged and the instrument must not be turned off while the upgrade data is being deleted. Failure to observe this precaution may result inthe USB flash memory device being permanently damaged.The following message is displayed upon completion of the data deletion process.5.Turn off the PSR-S910/S710 and unplug the USB flash memory device.This can be done by pressing the [STANDBY/ON] switch located at the left of the front panel.。
- 1、下载文档前请自行甄别文档内容的完整性,平台不提供额外的编辑、内容补充、找答案等附加服务。
- 2、"仅部分预览"的文档,不可在线预览部分如存在完整性等问题,可反馈申请退款(可完整预览的文档不适用该条件!)。
- 3、如文档侵犯您的权益,请联系客服反馈,我们会尽快为您处理(人工客服工作时间:9:00-18:30)。
Yamaha strives to produce products that are both user safe and environmentally friendly. We sincerely believe that our products and the production methods used to produce them, meet these goals. In keeping with both the letter and the spirit of the law, we want you to be aware of the following:
the instructions found in the users manual, may cause interference harmful to the operation of other electronic devices. Compliance with FCC regulations does not guarantee that interference will not occur in all installations. If this product is found to be the source of interference, which can be determined by turning the unit “OFF” and “ON”, please try to eliminate the problem by using one of the following measures:
This product, either alone or in combination with an amplifier and headphones or speaker/s, may be capable of producing sound levels that could cause permanent hearing loss. DO NOT operate for long periods of time at a high volume level or at a level that is uncomfortable. If you experience any hearing loss or ringing in the ears, you should consult an audiologist. IMPORTANT: The louder the sound, the shorter the time period before damage occurs.
SPECIAL MESSAGE SECTION
This product utilizes batteries or an external power supply (adapter). DO NOT connect this product to any power supply or adapter other than one described in the manual, on the name plate, or specifically recommended by Yamaha.
battery is approximately five years. When replacement becomes necessary, contact a qualified service representative to perform the replacement.
This product may also use “household” type batteries. Some of these may be rechargeable. Make sure that the battery being charged is a rechargeable type and that the charger is intended for the battery being charged.
SPECIFICATIONS SUBJECT TO CHANGE:
The information contained in this manual is believed to be correct at the time of printing. However, Yamaha reserves the right to change or modify any of the specifications without notice or obligation to update existing units.
NAME PLATE LOCATION:
The name plate is located on the bottom of the product. The model number, serial number, power requirements, etc., are located on this plate. You should record the model number, serial number, and the date of purchase in the spaces provided below and retain this manual as a permanent record of your purchase.
This product should be used only with the components supplied or; a cart, rack, or stand that is recommended by Yamaha. If a cart, etc., is used, please observe all safety markings and instructions that accompany the accessory product.
Disposal Notice: Should this product become damaged beyond repair, or for some reason its useful life is considered to be at an end, please observe all local, state, and federal regulations that relate to the disposal of products that contain lead, batteries, plastics, etc. If your dealer is unable to assist you, please contact Yamaha directly.
Battery Notice: This product MAY contain a small non-rechargeable battery which (if applicable) is soldered in place. The average life span of this type of
IMPORTANT:
When connecting this product to accessories and/or another product use only high quality shielded cables. Cable/s supplied with this product MUST be used. Follow all installation instructions. Failure to follow instructions could void your FCC authorization to use this product in the USA.
NOTICE:
Service charges incurred due to a lack of knowledge relating to how a function or effect works (when the unit is operating as designed) are not covered by the manufacturer’s warranty, and are therefore the owners responsibility. Please study this manual carefully and consult your dealer before requesting service.
Model
Serial No.
Purchase Date
PLEASE KEEP THIS MANUAL
FCC INFORMATION (U.S.A.)
IMPORTANT NOTICE: DO NOT MODIFY THIS UNIT!
This product, when installed as indicated in the instructions contained in this manual, meets FCC requirements. Modifications not expressly approved by Yamaha may void your authority, granted by the FCC, to use the product.
When installing batteries, do not mix batteries with new, or with batteries of a different type. Batteries MUST be installed correctly. Mismatches or incorrect installation may result in overheating and battery case rupture.
