oracle report高级开发教程
oracle_ebs_报表开发步骤

PLSQL报表开发步骤1.PLSQL创建package1.1在PL/SQL Developer中创建一个package。
➢此时会生成一个和包体。
➢部分定义一个过程:➢包体部分定义具体的格式控制及输出数据。
➢在print函数中进行输出(输出到控制台和报表)。
➢cursor的定义放在包体的最前面。
➢main函数为该函数的入口地址。
入口函数的特点为:前两个的定义必须为errbuf out varchar2,retcode out number,否则报错。
使用 errbuf 返回任何错误消息和retcode 返回完成状态。
参数 retcode 返回 0 表示成功、警告,成功为 1 和 2 的错误。
在并行程序运行后,并发管理器会将 errbuf 和 retcode 的容写入与您的并发请求相关联的日志文件。
➢屏蔽不在包体外调用的函数声明。
➢创建的package可不必上传到应用。
在数据库中编译后即可。
参考文件:plsql形式报表开发及html输出格式.pdf参考代码:Rz_Gl_Period_Charge_Pkg最后.pck(在PLSQL中打开)2.定义并发可执行➢在EBS中注册挂载:登录oracle EBS R12系统。
选择应用开发员--》并发--》可执行。
➢填入如下信息。
3.定义并发程序应用开发员--》并发--》程序参数设置:Notes:关于值集的定义,参见附件。
Parameter顺序、名称与 Procedure 参数一致(Errbuf 与 Retcode 不用设定) 4.添加并发程序到请求组4.1 请求组分配给责任,责任分配给用户。
首先要查找职责和请求组➢查找职责:系统管理员》安全性》职责》定义➢查找请求组:如果没有自己的请求组,可以自己新建一个。
切换责任到系统管理员 >安全性>责任>请求,系统管理员》安全性》职责》请求➢提交请求,查看结果。
切换到相应的职责,本例中为R_GL_总账超级用户,提交一个新的请求,在请求的名称中找到创建的程序。
Oracle ERP二次开发:Report开发方法

Oracle ERP二次开发实用技术系列之一Oracle ERP二次开发:Report开发方法Author:Program Cheng 程序E-mail: Program.Cheng@MSN: chengxu563@Copyright:Program Cheng 程序2005年12月1日 V1.0Oracle ERP二次开发实用技术系列:之一:Report开发方法之二:Form开发方法之三:Concurrent Program及Interface转档开发方法之四:Alert开发方法Oracle ERP二次开发项目管理系列:之一:知识管理方法之二:范围管理方法之三:时间管理方法之四:需求管理方法之五:质量管理方法之六:沟通管理方法之七:风险管理方法之八:配置管理方法之九:外包管理方法Oracle ERP二次开发系统流程系列:之一:库存之二:采购应付之三:销售应收之四:固定资产之五:成本结帐之六:现金管理论文:Oracle ERP二次开发方法论[摘要]Report是Oracle ERP展示数据最重要的方式,也是二次开发中,工作量最多的一个部分。
对于Oracle ERP的二次开发来说,Report的开发与一般CS结构的Report开发,是有区别的,市面上有很多关于Report的书籍,但是相信看过任何一本的人都知道,在你实际开发ERP Report的过程中,还是问题不断,而且这些问题通常是书本上无法解决的。
就算是Oracle的标准培训文档,也只能给你一个大概的蓝图。
本篇文章,就是将一些实际开发过程中的步骤、策略、技巧、疑难杂症展现出来。
本文通过步骤、安装、策略、疑难四个方面讲解Report的开发,通过最通俗的语言讲解,其中一些技巧,是公司同事经验积累的成果,只是由我将它记录下来,其中难免有一些错误,或者疑难问题上不够准确的地方,但是只要能给你的开发和学习一些帮助,就是作者最大的欣慰了。
[关键字] Oracle;二次开发;Report。
Report_Builder教案
Report教案第一章 创建一个简单的报表Oracle Report3.0是Develop/2000R2.0 的第二个产品,用于报表的开发与设计,是Oracle数据库的报表开发工具,可开发基于数据库的多种报表。
在Developer/2000v1.3版中,Report的版本是Oracle Reports2.5.Developer/2000R2.0与Developer/2000v1.3相比,2.0版在报表工具上有较大的改变,增加了一些新的报表格式,扩充了报表的设计功能。
1.1 ReportBuilder基础Builder功能1.1.1 Report使用Oracle reports3.0可以设计出多种不同类型的报表。
在Reports3.0中报表的默认格式有:列表式报表、标格式报表、邮件标签、左边分组、上边分组、矩阵及分组矩阵报表。
Reports3.0中可以实现的功能如下:·设计各种风格的报表。
·数据模型与布局设计界面。
·增加公式列、进行行数据的统计与计算。
·增加汇总列、进行分组统计及报表级汇总。
·生成HTML页面,可以在浏览器中浏览。
·增加预览与报表运行界面,可以在预览状态下设计报表界面。
·多媒体功能,可以调用图像、声音、视频文件。
·OLE功能。
·与Oracle Forms5.0集成,动态参数传递。
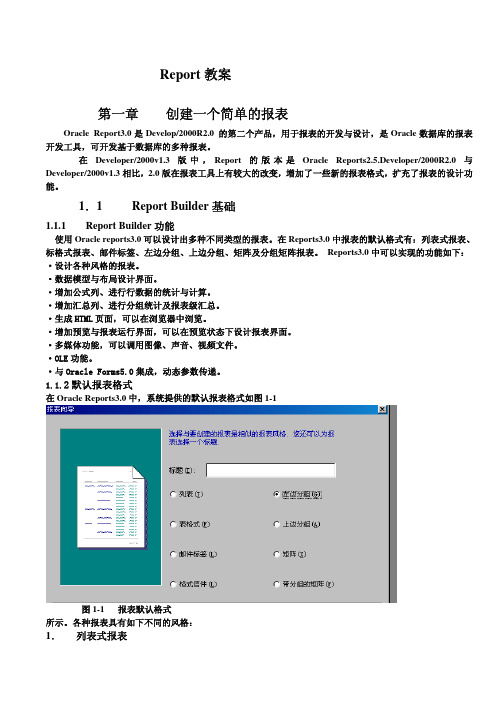
1.1.2默认报表格式在Oracle Reports3.0中,系统提供的默认报表格式如图1-1图1-1 报表默认格式所示。
各种报表具有如下不同的风格:1.列表式报表列表示报表是普通的报表形式,也是最常用的一种报表。
这种报表的特点是各列的列名显示在域的上面。
列的数据从上向下打印输出。
如图1-2所示。
图1-2 列表式报表风格2.表格式报表表格式报表的显示方式是每页显示一个记录,打印完一条记录即换页。
如图1-3所示。
图1-3 表格式报表风格3.邮电标签报表这种报表主要用于打印信封封面。
Oracle Reports培训教程
Oracle Reports培训教程HAND作者: 孟军创建日期: 2000年11月28日最近修改日期: 2000年11月28日文档编号: MD060版本: 1审批人:审批人1审批人2拷贝数_____文档控制更改记录浏览者分发目录文档控制 ................................................................................................................................... i i 综述 . (5)Oracle Reports概述 (6)Oracle Reports的版本 (7)Oracle Reports的安装 (8)建立并运行一个简单的报表 (11)建立报表 (11)编译运行报表 (15)习题 (16)数据模型(Date Model) (17)功能及构成 (17)数据模型编辑器 (17)查询 (18)组 (19)列 (19)数据连接 (22)参数 (23)布局(Layout) (26)布局功能 (26)布局模型编辑器 (27)报表区域 (27)基本布局对象 (28)几种缺省的报表布局风格 (34)参数表格(Parameter Form) (37)建立用户自定义的参数表格 (37)报表触发器(Report Triggers) (38)触发器的触发时机及用途 (38)习题 (39)程序单元(Program Units) (40)附加的程序库(Attached Libraries) (41)建立PL/SQL程序库 (41)连接PL/SQL程序库 (42)习题 (43)矩阵式报表 (44)建立矩阵式报表的需求 (44)单查询矩阵式报表 (44)多查询矩阵式报表 (47)Reports在Applications下的安装 (53)编制Report (53)在Application中注册Reports (53)将Reports运行权限赋给相应的职责 (55)综述本文档为Oralce Reports培训文档,仅限于Hand培训使用。
Oracle报表二次开发Reportxml开发技术文档

Oracle报表二次开发Reportxml开发技术文档XML 报表开发1先根据用户写的需求,在PL/SQL中查出符合用户需求的数据。
例:2.打开oracle report 6i(report builder)选中格式和输入sql语句点下一步标题名自己定义,对话框选列表,再点下一步。
选SQL语句,点下一步。
查询描述那输入在PL/SQL写好的查询语句。
(注意:and (rt.trx_number=:ppno or :ppno is null)参数的传递在PL/SQL中是无效的,但在report builder中允许这样写),然后点连接。
输入用户名,口令和数据库名,点连接测试能不能运行。
点下一步将可用域的数据都导入到显示域中去,点中间的>>就可以一次导过去了。
点下一步再点下一步。
再下一步选无模板。
点下一步。
点完成就好了。
先要在报表触发器的BEFORE REPORT中,点右键选PL/SQL编辑器路径要选对dbms_application_info.set_client_info(147); 这就是池誉的路径。
然后编译一次,完成后退出回到上一步。
点击左边类似红绿灯的小图案。
参数选空既按回车就行了。
然后就可以得出一张表然后保存。
保存后文件格式为RTF格式(注:文件名要大写),将文件上传到服务器us,zhs文件夹上。
3.打开ERP系统的应用开发员,选并发----可执行,可执行名和上面在report build建立的新文件名同名,简称也一样,应用产品选TM Ex tensions ,执行方法选oracle reports,执行文件名和简称同名。
保存后退出。
进入系统应用开发员,选并发----程序程序,简称,应用产品和上面可执行写的一样,格式选XML,样式选A4。
然后点参数序号那SQL写了多少个参数就写多少个参数,值集选100 characters 。
然后保存退出。
进入系统管理员-----安全性------定义,在责任名那做查询你所需要在哪个责任上面挂报表。
OracleReports6i培训教程

OracleReports6i培训教程Oracle Reports 6i是一个用于设计和生成高度自定义的报告的工具,旨在帮助用户以更高效和准确的方式处理数据。
本篇文档将介绍如何使用OracleReports6i进行报告设计以及这个工具的相关培训教程。
一、报表设计在Oracle Reports 6i 中,首先需要创建报表模板(template)并添加绑定的数据(data source),以便生成报告。
可以通过Oracle Reports 6i 中的向导以及向导后生成的预览屏幕来创建报表。
报表模板包括表格、列、标题等元素。
而数据源(data source)则指向需要处理的数据源,通常是数据库或者文件。
报表模板可以根据其特定的目标设计,比如表格格式、分组和排版元素。
在Oracle Reports 6i中,可以直接拖拽和放置表格元素,从而创建报告。
可以为报告添加页脚和页眉,以及其他的自定义元素。
用户可以随意定制这些元素的大小和位置,使报告更符合自己的需求。
二、OracleReports6i培训教程OracleReports6i培训教程是一个学习OracleReports6i操作方法和技术的课程。
这个培训教程提供了一系列指导,让学生从基本的操作入手,逐渐掌握OracleReports6i的使用技巧。
OracleReports6i培训教程包括以下内容:1、报表设计从基础的报表设计开始,OracleReports6i培训教程会向你介绍如何创建表格、添加列、设置格式和排版,以及如何使用各种元素创建层次化报表。
2、报表数据源OracleReports6i培训教程会向你介绍如何设置报表的数据源以及如何使用SQL语句来访问和处理数据。
学生将学习如何使用Oracle Reports 6i的向导来配置报表数据源,如何使用绑定变量来访问和过滤数据,以及如何将多个表合并到单个报告中。
3、报表布局OracleReports6i培训教程还会向你介绍报表布局和成分。
Oracle Fusion Cloud EPM 报表设计器用户手册说明书
Oracle® Fusion Cloud EPM在 Oracle Enterprise PerformanceManagement Cloud 中使用 Reports(报表)进行设计F28471-24Oracle Fusion Cloud EPM 在 Oracle Enterprise Performance Management Cloud 中使用 Reports(报表)进行设计F28471-24版权所有© 2016, 2023, Oracle 和/或其附属公司。
第一作者:EPM Information Development TeamThis software and related documentation are provided under a license agreement containing restrictions on use and disclosure and are protected by intellectual property laws. Except as expressly permitted in your license agreement or allowed by law, you may not use, copy, reproduce, translate, broadcast, modify, license, transmit, distribute, exhibit, perform, publish, or display any part, in any form, or by any means. Reverse engineering, disassembly, or decompilation of this software, unless required by law for interoperability, is prohibited.The information contained herein is subject to change without notice and is not warranted to be error-free. If you find any errors, please report them to us in writing.If this is software, software documentation, data (as defined in the Federal Acquisition Regulation), or related documentation that is delivered to the U.S. Government or anyone licensing it on behalf of the U.S. Government, then the following notice is applicable:U.S. GOVERNMENT END USERS: Oracle programs (including any operating system, integrated software, any programs embedded, installed, or activated on delivered hardware, and modifications of such programs) and Oracle computer documentation or other Oracle data delivered to or accessed by U.S. Government end users are "commercial computer software," "commercial computer software documentation," or "limited rights data" pursuant to the applicable Federal Acquisition Regulation and agency-specific supplemental regulations. As such, the use, reproduction, duplication, release, display, disclosure, modification, preparation of derivative works, and/or adaptation of i) Oracle programs (including any operating system, integrated software, any programs embedded, installed, or activated on delivered hardware, and modifications of such programs), ii) Oracle computer documentation and/or iii) other Oracle data, is subject to the rights and limitations specified in the license contained in the applicable contract. The terms governing the U.S. Government's use of Oracle cloud services are defined by the applicable contract for such services. No other rights are granted to the U.S. Government.This software or hardware is developed for general use in a variety of information management applications. It is not developed or intended for use in any inherently dangerous applications, including applications that may create a risk of personal injury. If you use this software or hardware in dangerous applications, then you shall be responsible to take all appropriate fail-safe, backup, redundancy, and other measures to ensure its safe use. Oracle Corporation and its affiliates disclaim any liability for any damages caused by use of this software or hardware in dangerous applications.Oracle®, Java, and MySQL are registered trademarks of Oracle and/or its affiliates. Other names may be trademarks of their respective owners.Intel and Intel Inside are trademarks or registered trademarks of Intel Corporation. All SPARC trademarks are used under license and are trademarks or registered trademarks of SPARC International, Inc. AMD, Epyc, and the AMD logo are trademarks or registered trademarks of Advanced Micro Devices. UNIX is a registered trademark of The Open Group.This software or hardware and documentation may provide access to or information about content, products, and services from third parties. Oracle Corporation and its affiliates are not responsible for and expressly disclaim all warranties of any kind with respect to third-party content, products, and services unless otherwise set forth in an applicable agreement between you and Oracle. Oracle Corporation and its affiliates will not be responsible for any loss, costs, or damages incurred due to your access to or use of third-party content, products, or services, except as set forth in an applicable agreement between you and Oracle.目录文档可访问性文档反馈1 创建并运行 EPM 卓越中心2 Reports(报表)概览了解 Reports(报表)2-1报表组成部分2-23 设计报表设计报表前的考虑因素3-1关于连接和数据源3-1数据源概览3-3创建和编辑数据源连接3-3使用报表设计器3-6访问报表设计器3-6关于报表设计器3-8报表设计器工具栏3-9报表属性3-13使用报表对象3-15插入报表对象3-15编辑报表对象并调整其大小和位置3-16跨工作表复制/移动报表对象3-17了解视点3-18视点概览3-18全局视点与本地视点3-19使用文本函数显示信息3-20iii更正报表错误3-20 4 使用网格关于网格4-1添加网格4-2关于网格设计器4-2关于网格属性4-3网格属性概览4-3常规属性4-4列属性4-9行属性4-10设置网格单元格格式4-11排序4-17网格工具栏4-18使用隐藏网格4-19格式设置最佳实践4-19定义视点4-20关于视点4-20使用视点4-20设置视点4-22显示可打印页成员4-23属性维和视点4-27视点示例4-28使用网格中的行和列4-35插入行和列4-36复制、移动和删除行和列4-37将一个网格段中的成员选择复制到另一个网格段4-37隐藏行或列4-37合并和分隔行或列4-38在行或列前面插入分页符4-39定义公式行和列4-40插入公式行或列4-40在单元格级别计算4-40使用公式栏4-41创建公式4-41应用公式的报表示例4-42使用公式栏修改成员选择4-43使用公式栏中的自动完成功能4-44使用条件格式设置、文本和隐藏4-46创建条件4-47iv条件格式设置示例4-52条件文本示例4-55条件隐藏示例4-60条件格式设置、文本和隐藏的指示符与工具提示4-62管理条件4-63条件格式设置、文本和隐藏的注意事项4-64条件格式设置、文本和隐藏的标准与参数4-65条件文本中的分析4-73使用高级条件4-75放大网格中的父成员4-80网格级别缩放4-81行/列段级别缩放4-83即席缩放4-85使用分组4-87分组简介4-87分组和网格公式4-88分组和分页4-89分组注意事项4-89添加分组4-90删除分组4-91具有多个分组的分组示例4-92排序和分组4-98公式和文本函数对分组的引用4-101条件格式设置和条件隐藏与分组4-102使用钻取内容4-103定义钻取内容链接4-104管理钻取内容定义4-105将视点传递给目标报表4-106在网格单元格中钻取内容结果的示例4-107使用穿透钻取和单元格文件附件4-108使用有效交叉点4-110了解有效交叉点4-110了解视点中的有效交叉点4-112了解网格数据中的有效交叉点4-118使用蝴蝶型报表4-119使用 "Ancestor Before Children"(祖先在子项前)属性4-1215 使用文本框添加文本框5-1设置文本框的格式5-2v使用 "Text Character Width"(文本字符宽度)属性5-76 使用图像插入图像6-1设置图像的格式6-17 使用图表关于图表7-1插入图表7-2关于图表设计器7-2图表设计器视图7-3图表属性7-4了解图表数据点和标签显示的大小7-8了解图表中的双 Y 轴7-8关于瀑布图7-12关于散点图和气泡图7-14关于树状图和旭日图7-18示例:树状图和旭日图7-20关于计量表图7-25计量表图属性7-27示例:计量表图7-298 使用共享报表和对象关于共享报表和对象8-1将报表另存为共享报表8-3将共享对象插入到报表中8-4取消链接报表中的共享对象8-7共享报表和对象的限制和行为8-89 定义成员关于定义成员9-1分配成员9-3为数据行或列分配成员9-3使用函数分配成员9-4选择成员时可用的函数9-5示例:组合 Intersect 函数和 Except 函数9-8示例:使用 Range 函数创建滚动报表9-10vi示例:将 Match 函数与 CurrentPOV 结合使用9-16示例:使用 PeriodOffset 和 Parent 函数返回滚动季度9-18使用提示分配成员9-20使用替代变量和用户变量9-23覆盖数据行或列标题9-24搜索成员9-25预览选定成员9-25使用已保存的成员选择9-26创建、编辑、删除、重命名和复制已保存的成员选择9-26使用成员选择中已保存的选择9-27隐藏共享成员9-27显示支持详细信息9-2810 使用函数数学函数10-3关于数学函数10-3数学函数中的变元10-4表达式中的数学运算符10-6表达式中的数学操作数10-7使用公式引用同一报表中的其他网格10-7自然优先10-10 Absolute10-10Average10-11AverageA10-12Count10-13CountA10-13Difference10-14Eval10-15IFThen10-16Max10-16Min10-16PercentofTotal10-17Product10-18Rank10-18Round10-20Sum10-21SumV10-22Truncate10-22Variance10-23使用 Essbase 的预期结果10-24vii使用 EPM 云的预期结果10-24Variance 行为10-24示例10-24VariancePercent10-25使用 Essbase 的预期结果10-25使用 EPM 云的预期结果10-25VariancePercent 行为10-25示例10-26文本函数10-26关于文本函数10-27文本函数注意事项10-27文本函数的参数10-28 AncestorName/AncestorAlias10-29 CellText10-30 CellValue10-31 ColumnNumber/RowNumber10-31 ConditionalText10-32 DateTime10-33 GridNotes10-35 HeadingValue10-36 Left/Right/Mid10-37 MemberAlias10-38 MemberName10-39 MemberProperty10-39 Notes10-43 PageCount10-43 PageNumber10-43 ReportAuthor10-44 ReportCreatedOn10-44 ReportDescription10-44 ReportLocation10-45 ReportModifiedBy10-45 ReportModifiedOn10-45 ReportName10-46ReportRunBy10-46条件函数10-46IFThen,If10-47条件运算符10-47复杂条件10-48viii11 使用附注关于附注11-1创建附注模板11-4使用附注模板11-4将附注框插入到报表中11-5设置附注模板11-7设置属性11-9在附注模板中输入占位符文本11-12设置维布局11-13设置视点选择和选项11-14保存附注模板11-16设置网格内嵌附注输入11-17插入附注行或列11-18为附注行或列选择成员11-19设置 "Allow Note Input"(允许附注输入)属性11-20选择现有附注模板或创建新附注模板11-23管理用于网格内嵌输入的附注模板11-25使用附注管理器11-26附注管理器简介11-26使用附注管理器11-30使用 Notes 文本函数11-52使用附注格式11-52附注格式简介11-52访问附注格式管理器11-54创建附注格式11-56使用附注格式文本函数11-62创建附注格式的限制11-63了解附注格式文本函数11-63在报表中使用命名 POV11-65命名 POV 简介11-65创建命名 POV11-66示例:使用 "Named POV"(命名 POV)和 "POV Dimension"(POV 维)选项11-72在报表中插入 Notes 文本函数11-77安全性—附注模板和附注的角色和访问权限11-81最佳实践11-8212 使用工作簿关于工作簿12-1创建工作簿的限制12-2ix访问 "Book Creation"(工作簿创建)窗口12-3创建工作簿12-6保存工作簿定义12-8关于工作簿设计器12-9关于工作簿设计器工具栏12-11关于工作簿属性12-12使用工作簿设计器12-12使用工作簿设计器的 "Action"(操作)菜单12-13添加数据源12-17对数据源重新排序12-19更改数据源12-20管理工作簿中的别名表12-22设置工作簿视点12-22管理工作簿中的文档12-23向工作簿中添加节12-24移动工作簿内的节12-24删除节12-26在工作簿节点下方添加文档12-26在当前所选项上方或下方添加文档12-27向工作簿中添加多个文档12-27移动工作簿内的文档12-29删除文档12-30定义报表提示选择项12-31使用报表、工作簿和节的视点选择项12-32为报表或工作簿设置视点12-34为节设置视点12-36在工作簿中显示目录12-39设置 Word 目录模板12-39为文档或节设置目录显示方式12-43使用节12-46使用多个数据源12-4613 使用分别输出关于分别输出13-1先决条件13-8创建分别输出定义的简单步骤13-9创建新的分别输出定义13-11选择分别输出对象13-14设置分别输出视点13-15选择目标分发文件13-18x使用目标分发文件13-20设置旧分发文件13-21选择分发格式13-21定义成功通知13-22定义失败通知13-24配置电子邮件渠道13-25配置库渠道13-27管理用户13-28保存分别输出定义13-30使用分别输出定义操作菜单13-31对数据源重新排序13-33管理分别输出定义中的别名表13-34创建分别输出定义的限制13-35对分别输出定义使用提示13-35对多个数据源使用分别输出定义13-37设置分别输出定义的访问权限13-40A 最佳做法和故障排除主题报表设计注意事项A-1报表设计最佳做法A-7故障排除主题A-8B 从 Financial Reporting 迁移报表在 Narrative Reporting 中迁移 Financial Reporting B-1在 EPM 云中迁移 Financial Reporting B-4解决迁移验证错误B-8 Financial Reporting 和 Reports(报表)之间的差异B-10 C 报表与 Excel 中导入的报表之间的差异D 使用示例报表内容查看示例报表D-1查看示例工作簿D-5查看示例分别输出定义文件D-19文档可访问性文档可访问性有关 Oracle 对可访问性的承诺,请访问 Oracle Accessibility Program 网站http:///pls/topic/lookup?ctx=acc&id=docacc。
oracle教程从入门到精通

oracle教程从入门到精通Oracle是一种关系数据库管理系统,被广泛用于企业级应用程序的开发和数据管理。
以下是一份Oracle教程,从入门到精通。
第一部分:入门篇1.了解数据库概念:数据库是一个用于存储和管理数据的系统。
它能够存储结构化数据,以便后续的检索、更新和删除操作。
3.创建数据库实例:在安装完成后,使用数据库配置助手创建一个数据库实例。
4.了解SQL语言:SQL(Structured Query Language)是一种用于与数据库交互的标准语言。
第二部分:基础篇1.连接到数据库:使用SQL*Plus工具可以连接到Oracle数据库,并执行SQL语句。
2.创建表格:学习如何使用CREATETABLE语句创建表格,并定义表格中的列。
3.插入数据:使用INSERTINTO语句将数据插入到表格中。
4.选择数据:使用SELECT语句从表格中检索数据。
5.更新和删除数据:使用UPDATE和DELETE语句更新和删除表格中的数据。
6.条件查询:学习如何使用WHERE子句来筛选满足特定条件的数据。
7.排序和分组:使用ORDERBY和GROUPBY子句对数据进行排序和分组。
8.连接表格:使用JOIN语句将不同表格中的相关数据连接起来。
第三部分:进阶篇1.创建索引:了解什么是索引,并学习如何使用CREATEINDEX语句创建索引,以提高查询性能。
2.数据完整性:学习如何使用约束来维护数据的完整性,包括主键、外键和唯一约束等。
3.事务管理:了解事务的概念,并学习如何使用COMMIT和ROLLBACK语句管理事务。
4.视图:学习如何使用CREATEVIEW语句创建视图,以简化复杂的查询操作。
5.存储过程和函数:了解存储过程和函数的概念,并学习如何使用CREATEPROCEDURE和CREATEFUNCTION语句创建它们。
6.触发器:学习如何使用CREATETRIGGER语句创建触发器,以在数据库操作发生时自动执行特定的动作。
Oracle使用Report 报表工具建立图形化报表

Creating a Graph Using the Graph WizardPurposeIn this tutorial, you learn how to create and customize a graph using the Graph Wizard.Time to CompleteApproximately one hourTopicsThis tutorial covers the following topics:OverviewScenarioPrerequisitesDefining the Data ModelCreating a Graph in the Paper Layout ViewCustomizing a GraphGenerating Report Output to a PDF FileSummaryRelated informationViewing ScreenshotsNote: Alternatively, you can place the cursor over each individual icon in the following steps to load andview only the screenshot associated with that step.OverviewYou can add a variety of charts and graphs, including true three-dimensional graphs, to a report using the Graph Wizard.In this tutorial, you will create a report that contains just a graph ? a pictorial representation of data. You will begin by defining the data model for the graph, and then creating the graph in the Paper Layout view of the Report Editor using the Graph Wizard. You will learn how to customize the look and feel of the graph and finally, generate PDF output for your report.ScenarioThe graph that you create in this tutorial displays the average price and quantity for orders that are ready for shipment. The graph is based on the Order Entry data model.PrerequisitesBefore starting this tutorial, you should:1.Have access to or have installed Oracle Reports Developer .2.Have access to or installed the sample schema. This tutorial uses the OE schema included in the Oracle10gdatabase.3.Download reportsOBE.zip and unzip into your working directory.Defining the Data ModelBefore you can create a graph, you need to identify the data that the graph will display. Begin by creating anew report.1.If it is not already open, start Oracle Reports by clicking the Reports Builder icon on your desktop. The welcomescreen displays. Select the option Build a new report manually. Click OK.If Reports Builder is already open, create a new report by selecting File > New > Report from the menu.Select the option Build a new report manually. Click OK.In both cases, the Data Model view of the Report Editor displays.2.The Data Model view is a work area in which you create, define, and modify data model objects to be used in yourreport. Data model objects include queries, groups, columns, parameters, and links. Reports Builder uses the data model to determine what data to retrieve for the report.For this lesson, you will define a SQL query. Locate the SQL Query icon in the tool palette. Select the tool by clicking it, and then click the Data Model canvas. This action invokes the SQL Query Statement dialog box.3.Click Connect to connect to the database.In the Connect dialog box, enter OE for the User Name, OE for the Password, and the name of your database for the Database field.Click Connect.Note: If you were previously working in this Reports Builder session using a different schema, you will have to connect to the OE schema in order to complete this tutorial.4.You can now type in a SQL statement, define a query visually using Query Builder, or import an existing file. For yourconvenience, a SQL query is provided for you. Click Import Query.In the file import dialog box, click Simple_Graph.sql located in the your working directory. Click Open.The contents of the query are pasted into the Query dialog box.This query uses group functions to retrieve the average price and quantity of items in a number of customer orders.Click OK.Note that Reports Builder symbolically represents the query in the Data Model view.Creating a Graph in the Paper Layout ViewNow you will switch to the Paper Layout view of the Report Editor to create the graph. The Paper Layout view is a work area in which you can modify the format of your paper report. The default format for your report is defined by the information you specify in the Report Wizard. You can modify the format by working with layout objects, such as frames, repeating frames, fields, boilerplate, anchors, and graph objects. In this view, objects and their property settings are represented symbolically to highlight their types and relationships.You will add a graph object to the paper layout and use the Graph Wizard to define your graph.1.Locate and click the Paper Layout icon on the toolbar across the top of the Report Editor window.The Paper Layout view of the Report Editor displays.Notice that the view is empty, as you did not use the Report Wizard to create this report.2.Next, you will add a graph to the paper layout.Select Insert > Graph from the Menu. The Welcome page of the Graph Wizard displays.Click Next.3.Choose the type of graph you want to create. The Graph Wizard offers several primary graph types with which torepresent data, such as bar, line, and pie graphs. In addition, the wizard provides special usage graphs that are associated with particular data types or ways to display unique cases of data. These types include scatter, bubble, and stock graphs.For this tutorial, use the default graph type, a Bar graph, to represent your data.Click Next.4. Choose the placement of the graph in your report. Select at the beginning of the report and click Next .5.Now select the category column(s) for the X-axis of your graph. The X-axis is the horizontal axis and can containgroups as well as items.For this tutorial, select ORDER_ID as the X-axis. Use the arrow button [>] to move ORDER_ID to the X-Axis Categories list.Click Next.6.On the next panel of the wizard, you specify options for the data axis of your graph. The Y-axis is the vertical axis andcontains data columns. The data columns must contain numeric data.Select both the AVG_UNIT_PRICE and AVG_QUANTITY columns and move them to the Y-Axis Categories list by using the arrow button [>].Click Next.7.You are now viewing the Layout panel of the Graph Wizard. Here, you can rearrange the data in your graph tocontrol the way the data will be displayed. Ensure that ORDER_ID is in the Groups field. The Groups field specifies the data items for the groups of the graph. On a bar graph, a group is a cluster of bars.Click Next.8.On the Title panel of the wizard, you can specify text and font attributes for the title, subtitle, and footnote of yourgraph.Enter the text string Orders in the Title field for this graph.Include a footnote for your graph by entering the text string Source: Order Company, Inc. in the Footnote field.Click Next to advance to the Legend panel of the Graph Wizard.9.You use the Legend panel to select display options for the legend of your graph. The legend area is a place on thegraph that provides a key to the information that is shown in the graph.For this tutorial, keep the default settings and click Next .10.You can now select options for the X-axis of your graph.Specify a title of Order ID for the X-axis.Select the radio button Show labels for all tick marks on the X-axis.Click Next.11.Similarly, you can specify options for the Y-axis of your graph.Specify a title of Average Price and Quantity for the Y-axis and click Next.12.You can use the Plot Area panel of the Graph Wizard to specify how the plot area of your graph should be displayed.Options include grid lines, line color and style for grid lines, data tables, and data tips. Data tips are tooltips that display when the mouse is moved over a bar, pie slice, and so forth.For this tutorial, keep the default options and click Next.13.The final panel of the Graph Wizard allows you to specify a hyperlink value to enable you to link areas of the graphwith specific destinations. Leave the hyperlink value field blank for this tutorial and click Finish to complete the definition of your graph.Your graph is represented by a graph object in the Paper Layout view of the Report Editor. Using the rulers in the Paper Layout, resize the graph object to an approximate width of 6 inches, and a height of 4 inches. To do this, select one of the object handles and drag it horizontally, or vertically, until the object is sized appropriately.14.View the paper layout of your report by clicking the Run Paper Layout icon on the toolbar, or by selectingProgram > Run Paper Layout from the menu. Your output displays in the Paper Design view of the Report Editor.15. Save your report as OrdersGraph_< your_initials >.jsp.To save a report definition, click the Save icon in the toolbar , or select File > Save from the menu. The first time you save your report definition, the Save dialog box displays, giving you the opportunity to enter a meaningful name for your report.Click Save.Customizing a GraphThe wizards in Reports Builder are reentrant. Once you have defined a graph, you can reenter the GraphWizard to modify the graph settings and customize the graph to your requirements. In this section of thetutorial, you will customize the look and feel of the graph in your Orders Report.1.With your graph displayed in the Paper Design view, right-mouse-click on the graph and select Graph Wizard fromthe menu.2.Notice that each panel in the Graph Wizard is displayed on a tab. This enables you to navigate directly to the panelyou want to modify by simply selecting the corresponding tab, rather than having to click ?Next' to move through each panel in turn.Modify the graph type. Select the Type tab. Note that the Bar type has several subtypes. Select the Dual-Y Bar subtype. In addition, select the 3D effect check box.3.Next, select the Legend tab. Choose a Border color for the legend in your graph.4.Select the Plot Area tab. Eliminate the vertical grid lines in your graph by clearing the Show Vertical Grid linescheck box.5.Choose a color for the horizontal grid lines.6.Optionally, you can modify the color of the bars in the Series field.7.When you are done customizing the Plot Area, click OK .Your customized graph displays in the Paper Design view of the Report Editor.Generating Report Output to a PDF FileReports Builder can generate report output to a PDF file, containing the formatted data and all objects. When you generate your report output to a PDF file, you can distribute the output to any PDF destination, including e-mail, printer, OracleAS Portal, and Web browser.1.Select the report in the Object Navigator.2.Select File > Generate to File > PDF from the menu. Save your report output as OrdersGraph_<your initials>.pdf ,such as OrdersGraph_eg.pdf.SummaryIn this lesson, you've learned how to:Define a data modelCreate and customize a graph using the Graph WizardGenerate report output to a PDF fileRelated InformationTo learn more about Oracle Reports 10g, refer to the additional Reports OBEs.Visit the OTN Web site for technical papers, presentations, frequently asked questions, demonstrations, and more.。
oracleerp报表开发开发培训教程
南京多茂科技发展有限公司Oracle ERP报表开发培训教程报表开发的总体步骤,及一些工具包的简单介绍 (1)Pl/sql语法及pl/sql函数、数组、记录、游标、视图、基表、临时表、异常 (4)HTML技术和CSS修饰 (10)查找数据的方法及Oracle Application表命名的规律 (11)可执行、并发程序、请求组和值集的定义 (12)一个报表开发的实例 (15)系统中部分表的介绍 (21)开发分页报表(套打)的步骤 (22)开发规范 (24)附:记录和数组使用范例 (28)所谓报表开发就是按照用户的需求,根据用户提供的样表,运用编程的手段,从ERP系统中取出数据展现在页面上的一个理解需求、查找数据、展现结果的过程。
目前开发报表的方法及工具有很多种,有专门针对报表需求定制的报表系统,通过对sql语句的改写能实现特别的报表需求,这样的系统有很强的针对性和限制性;还有运用报表开发工具根据用户需求临时开发报表,具有很强的灵活性和应用性。
本文档只关注运用Oracle 在DB中提供的一些开发工具包,及WEB技术开发报表的过程和方法。
Oracle博大精深,如果在实际开发过程中遇到困难可以通过网上论坛和oracle网站获得技术帮助。
根据实际的开发过程,本文档从以下几个方面来说明:报表开发的总体步骤,及一些工具包的简单介绍开发步骤1 分析客户提供的样表2 向客户或者顾问征询报表中每个值的意思,务必理解所需开发报表的意向3 需要客户在ERP指明数据的取处4 自己动手在测试环境中做一遍,梳理一下流程5 清楚报表的参数是什么6 以包的形式组织数据,在包里面实现各种功能7 在ERP中定义可执行,从而使ERP和DB建立联系8 在ERP中定义并发程序,定义了报表的输出文件的类型和参数9 在相应的请求组中加入已定义好的并发程序名称工具包介绍1 FND_PROFILERetrieve user profile values for the current run-time environment Set user profile values for the current run-time environmentFnd_profile.value(‘ORG_ID’) 取配置文件的值2 DBMS_OUTPUTThis package enables you to send messages from stored procedures, packages, and triggersDbms_output.put_line 在sql window中输出结果3 FND_GLOBALFnd_global. APPS_INITIALIZE(user_id,resp_id,resp_appl_id) 模拟环境其中user_id,resp_id,resp_appl_id可以通过这种方法获得:帮助->诊断->检查,在块中选择$PROFILES,在字段选择USER_ID可以获得USER_ID,同样方法可以获得RESP_ID,RESP_APPL_ID(可能有时你需要在Oracle Applications环境外运行一些PL/SQL语句,但是这些语句中需要访问系统相关的环境变量,例如view,这样你可以使用上述方法达到你的目的)Fnd_global. User_name 得到当前用户的名称Fnd_global. User_id 得到当前用户的id4 UTL_FILEThe UTL_FILE package lets your PL/SQL programs read and write operating system (OS) text files. It provides a restricted version of standard OS stream file input/output (I/O). The file I/Ocapabilities are similar to those of the standard operating system stream file I/O (OPEN, GET, PUT, CLOSE), with some limitations.For example, call the FOPEN function to return a file handle, which you then use in subsequent calls to GET_LINE or PUT to perform stream I/O to a file. When you are done performing I/O on the file, call FCLOSE to complete any output and to free any resources associated with the file.UTL_FILE.FILE_TYPE 定义文件指针utl_file.fopen(dir,name,mode) Opens a file for input or output with the default line sizeutl_file.put_line( , ) Writes a line to a file向文件中写数据utl_file.fclose_all Closes all open file handles关闭所有已打开的文件指针5 FJ_FUNC客户化的函数包,定义了一些在实际开发过程中用到一些方法和变量在实际开发过程中,如果需要一些方法时可以在这个包中查找,如果通用性比较强的过程也可以加到这个包里详细可以参阅这个包6 FJ_OUTPUT客户化的报表格式生成包,封装了html语法详细可以参阅这个包Pl/sql语法及pl/sql函数、数组、记录、游标、视图、基表、临时表、异常、Pl/sql基本元素的使用SelectThe SELECT statement allows you to retrieve records from one or more tables in your database.The syntax for the SELECT statement is:SELECT columns FROM tables WHERE predicatesDistinctThe DISTINCT clause allows you to remove duplicates from the result set. The DISTINCT clause can only be used with select statementsThe syntax for the DISTINCT clause is:SELECT DISTINCT columnsFROM tables WHERE predicatesEXISTSThe EXISTS condition is considered "to be met" if the subquery returns at least one rowThe EXISTS condition can be used in any valid SQL statement - select, insert, update, or delete.Example #1The following is an SQL statement that uses the EXISTS condition: SELECT * FROM suppliersWHERE EXISTS(select * from orders where suppliers.supplier_id =orders.supplier_id);This select statement will return all records from the suppliers table where there is at least one record in the orders tableith the same supplier_id.Example #2 - NOT EXISTSThe EXISTS condition can also be combined with the NOT operator.For example,SELECT * FROM suppliersWHERE not exists (select * from orders Wheresuppliers.supplier_id = orders.supplier_id);This will return all records from the suppliers table where there are no records in the orders table for the given supplier_id InThe IN function helps reduce the need to use multiple OR conditionsThe IN function can be used in any valid SQL statement - select, insert, update, or delete.Example #1The following is an SQL statement that uses the IN function:SELECT *FROM supplierWHERE supplier_name in ( 'IBM' , 'Hewlett Packard', 'Microsoft');This would return all rows where the supplier_name is either IBM, Hewlett Packard, or Microsoft. Because the * is used in the select, all fields from the supplier table would appear in the result set.Example #2 "NOT IN"The IN function can also be combined with the NOT operator.For example,SELECT *FROM supplierWHERE supplier_name not in ( 'IBM' , 'Hewlett Packard','Microsoft');This would return all rows where the supplier_name is neither IBM, Hewlett Packard, or Microsoft. Sometimes, it is more efficient tolist the values that you do not want, as opposed to the values that you do want.LikeThe LIKE condition allows you to use wildcards in the whereclause of an SQL statement. This allows you to perform pattern matching. The LIKE condition can be used in any valid SQL statement - select, insert, update, or delete.The patterns that you can choose from are:% allows you to match any string of any length (including zero length)_ allows you to match on a single characterSELECT * FROM supplier WHERE supplier_name like 'Hew%';SELECT * FROM supplier WHERE supplier_name like '%bob%';SELECT * FROM supplier WHERE supplier_name not like 'T%';SELECT * FROM supplier WHERE supplier_name like 'Sm_th'GROUP BYThe GROUP BY clause can be used in a SELECT statement to collect data across multiple records and group the results by one or more columns.The syntax for the GROUP BY clause is:SELECT column1, column2, ... column_n, aggregate_function (expression)FROM tablesWHERE predicatesGROUP BY column1, column2, ... column_n;aggregate_function can be a function such as SUM, COUNT, MIN, or MAX.Example using the SUM functionFor example, you could also use the SUM function to return the name of the department and the total sales (in the associated department).SELECT department, SUM (sales) as "Total sales"FROM order_detailsGROUP BY department;Because you have listed one column in your SELECT statement thatis not encapsulated in the SUM function, you must use a GROUP BY clause. The department field must, therefore, be listed in the GROUP BY section.HavingThe HAVING clause is used in combination with the GROUP BY clause. It can be used in a SELECT statement to filter the records that a GROUP BY returns.The syntax for the HAVING clause is:SELECT column1, column2, ... column_n, aggregate_function (expression)FROM tables WHERE predicates GROUP BY column1, column2, ...column_nHAVING condition1 ... condition_n;aggregate_function can be a function such as SUM, COUNT, MIN, or MAX.Example using the SUM functionFor example, you could also use the SUM function to return the name of the department and the total sales (in the associated department). The HAVING clause will filter the results so that only departments with sales greater than $1000 will be returned.SELECT department, SUM (sales) as "Total sales"FROM order_details GROUP BY department HAVING SUM (sales) > 1000 ORDER BYThe ORDER BY clause allows you to sort the records in your result set. The ORDER BY clause can only be used in SELECT statements.The syntax for the ORDER BY clause is:SELECT columns FROM tablesWHERE predicates ORDER BY column ASC/DESC;The ORDER BY clause sorts the result set based on the columns specified. If the ASC or DESC value is omitted, the system assumed ascending order.ASC indicates ascending order. (default)DESC indicates descending order.Example #1SELECT supplier_city FROM supplier WHERE supplier_name = 'IBM' ORDER BY supplier_city;This would return all records sorted by the supplier_city field in ascending order.Example #2SELECT supplier_city FROM supplier WHERE supplier_name = 'IBM' ORDER BY supplier_city DESC;This would return all records sorted by the supplier_city field in descending order.UNIONThe UNION query allows you to combine the result sets of 2 or more "select" queries. It removes duplicate rows between the various "select" statements.Each SQL statement within the UNION query must have the same number of fields in the result sets with similar data types.The syntax for a UNION query is:select field1, field2, field_n from tablesUNIONselect field1, field2, field_n from tablesUNION ALLThe UNION ALL query allows you to combine the result sets of 2 or more "select" queries. It returns all rows (even if the row exists in more than one of the "select" statements).Each SQL statement within the UNION ALL query must have the same number of fields in the result sets with similar data types.The syntax for a UNION ALL query is:select field1, field2, field_n from tablesUNION ALLselect field1, field2, field_n from tables;UPDATEThe UPDATE statement allows you to update a single record or multiple records in a table.The syntax the UPDATE statement is:UPDATE table SET column = expression WHERE predicatesINSERTThe INSERT statement allows you to insert a single record or multiple records into a table.The syntax for the INSERT statement is:INSERT INTO table(column-1, column-2, ... column-n)VALUES(value-1, value-2, ... value-n)DELETEThe DELETE statement allows you to delete a single record or multiple records from a tableThe syntax for the DELETE statement is:DELETE FROM table WHERE predicatespl/sql函数substr (string, start_position, [length])This function allows you to extract a substring from a stringFor Example:substr ('This is a test', 6, 2) would return 'is'substr ('This is a test', 6) would return 'is a test'substr ('Tech on the Net', 1, 4) would return 'Tech'decode( expression , search , result [, search , result]... [, default] )This function has the functionality of an IF-THEN-ELSE statement For Example:SELECT supplier_name,decode (supplier_id, 10000,'IBM',10001, 'Microsoft',10002, 'Hewlett Packard', 'Gateway') resultFROM suppliersinstr(string1, string2, [start_position], [nth_appearance])This function returns the location of a substring in a stringFor example:instr ('Tech on the net', 'e') would return 2; the first occurrence of 'e'instr ('Tech on the net', 'e', 1, 1) would return 2; the first occurrence of 'e'instr ('Tech on the net', 'e', 1, 2) would return 11; the second occurrence of 'e'instr ('Tech on the net', 'e', 1, 3) would return 14; the third occurrence of 'e'instr ('Tech on the net', 'e', -3, 2) would return 2Trim(text)This function removes leading and trailing spaces from a string For exampleTrim (" Tech on the Net") would return "Tech on the Net"Trim (" Alphabet ") would return "Alphabet"RTrim (text)This function removes trailing spaces from a stringFor example:RTrim ("Tech on the Net ") would return "Tech on the Net"RTrim (" Alphabet ") would return " Alphabet"LTrim (text)This function removes leading spaces from a stringFor example:LTrim (" Tech on the Net") would return "Tech on the Net"LTrim (" Alphabet ") would return "Alphabet "to_number (string1, [format_mask], [nls_language] )This function converts a string to a numberFor example:to_number ('1210.73', '9999.99') would return the number 1210.73 to_number ('546', '999') would return the number 546to_number ('23', '99') would return the number 23to_char (value, [format_mask], [nls_language] )This function converts a number or date to a stringExamples - NumbersThe following are number examples for the to_char function.to_char (1210.73, '9999.9') would return '1210.7'to_char (1210.73, '9,999.99') would return '1,210.73'to_char (1210.73, '$9,999.00') would return '$1,210.73'to_char (21, '000099') would return '000021'The following are date examples for the to_char function.to_char (sysdate, 'yyyy/mm/dd'); would return '2003/07/09'to_char (sysdate, 'Month DD, YYYY'); would return 'July 09, 2003' to_char (sysdate, 'FMMonth DD, YYYY'); would return 'July 9, 2003'to_char (sysdate, 'MON DDth, YYYY'); would return 'JUL 09TH, 2003'to_char (sysdate, 'FMMON DDth, YYYY'); would return 'JUL 9TH,2003'to_char (sysdate, 'FMMon ddth, YYYY'); would return 'Jul 9th,2003'to_date (string1, [format_mask], [nls_language] )This function converts a string to a date、nvlFor example:to_date ('2003/07/09', 'yyyy/mm/dd'); would return a date valueof July 9, 2003.to_date ('070903', 'MMDDYY'); would return a date value of July 9, 2003.to_date ('20020315', 'yyyymmdd'); would return a date value ofMar 15, 2002nvl (string1, replace_with )This function lets you substitutes a value when a null value is encounteredExample #1:select NVL (supplier_city, 'n/a') from suppliers***************************************************************** ************************数组的定义Type NumArray Is Table Of Number Index By Binary_IntegerType StrArray Is Table Of Varchar2(500) Index By Binary_Integer记录的定义Type rp_tb_type Is Record(TbBorder Varchar2(10),TbCss Boolean,TdCss Boolean)游标的定义Cursor cur_line IsSelect tb.Month, tb.loct_onhandFrom fj_rp_opm003_tmp_tb tbWhere tb.item_no = row_head.item_no;row_line cur_line%Rowtype;视图的定义视图是一个虚拟的、不是物理存在的表,他是通过sql语句把一个或多个表连接在一起形成的.Create or replace view ic_item_v AsSelect * from ic_item_mst_b基表是一个物理存在的表,能以表格的形式存储数据,是数据的载体Create table table_name(col1 varchar2(100),col2 varchar2(10))临时表1 会话特有的临时表CREATE GLOBAL TEMPORARY <TABLE_NAME> (<column specification> ) ON COMMIT PRESERVE ROWS;2 事务特有的临时表CREATE GLOBAL TEMPORARY <TABLE_NAME> (<column specification> ) ON COMMIT DELETE ROWS;CREATE GLOBAL TEMPORARY TABLE MyTempTable所建的临时表虽然是存在的,但是insert 一条记录然后用别的连接登上去select,记录是空的--ON COMMIT DELETE ROWS 说明临时表是事务指定,每次提交后ORACLE将截断表(删除全部行)--ON COMMIT PRESERVE ROWS 说明临时表是会话指定,当中断会话时ORACLE将截断表异常PL/SQL处理异常不同于其他程序语言的错误管理方法,PL/SQL的异常处理机制与ADA很相似,有一个处理错误的全包含方法。
Form以及report常遇的一些问题及解决方法

Form以及report常遇的⼀些问题及解决⽅法1Developer/2000中各键盘触发⼦所对应的“按键” (2)2FORM中,当光标⾛到块的最后⼀项时,如何让按“enter回车”键时,光标⾃动⾛到下⼀条记录的第⼀项? (3)3如何在启动FORM程序时直接登录到Oracle数据库上? (3)4FORM中,如何通过ODBC 访问Acress 数据? (3)5从FORM中调⽤REPOR T时,如何使打印结果直接输出到打印机上? (4)6FORM调⽤REPOR T时,如何去掉report server? (4)7FORM中,如何实现屏幕同步刷新? (4)8在Developer/2000中如何读写⽂本型操作系统⽂件? (4)9如何改变FORM(FMX模块)运⾏时的title? (6)10FORM中,如何修改系统提⽰信息(默认英⽂)为中⽂? (6)11FORM中,怎样创建动态下拉列表List? (6)12FORM中,如何引⼊图像,制作封⾯? (7)13运⾏FORM时,如何使按钮变灰(即⽆效)? (7)14FORM中,设置应⽤特性(光标类型) (8)15运⾏FORM时,如何使窗⼝(runtime窗⼝、画布窗⼝)⾃动变成最⼤化、最⼩化? (8)16FORM中,WINDOW标题的设置 (8)17FORM中,Exception(例外)都有哪些,如何书写? (8)18如何在FORM运⾏中,使定制菜单中的“窗⼝(W)”菜单项不显⽰? (9)19FORM中,如何屏蔽默认的功能键? (9)20FORM中,触发⼦exit_form的两种功能是什么? (9)21FORM中如何存取图象?如何把图象从⼀个表中导到另⼀个表中? (9)22FORM中如何存取声⾳? (10)23FORM中,当⽤⿏标点击标签画布的某⼀“标签页”时,如何判断点击的是哪⼀页? (11)24FORM中,常⽤快捷键有哪些? (11)25如何发布Developer/2000应⽤程序? (11)26FORM中,点击按钮实现字段排序? (12)27为什么在触摸屏上,我的按纽不响应我的“按”动作? (12)28为什么我的FMX程序⾥没有Message line? (12)29FORM中,如何设置⽔平滚动条? (12)30FORM中,触发⼦POST-CHANGE的作⽤ (12)31FORM中,触发⼦WHEN-VALIDATE-ITEM的作⽤ (12)32FORM中,触发⼦POST-QUERY的作⽤ (12)33怎样在form中使⽤宏? (12)34如何调⽤外部操作系统命令? ............................................................................................................. 错误!未定义书签。
Oracle Application Express 应用程序开发者用户指南说明书
Oracle® Application Express Application Builder User’s Guide Release 3.1.2E10499-02August 2008Oracle Application Express Application Builder User’s Guide, Release 3.1.2E10499-02Copyright © 2003, 2008, Oracle. All rights reserved.Primary Author: Terri WintersContributors: Marco Adelfio, Carl Backstrom, Christina Cho, Michael Hichwa, Christopher Jones, Joel Kallman, Sharon Kennedy, Syme Kutz, Sergio Leunissen, Anne Romano, Kris Rice, Marc Sewtz, Scott Spadafore, Scott Spendolini, Jason Straub, Simon Watt, and Steve FogelThe Programs (which include both the software and documentation) contain proprietary information; they are provided under a license agreement containing restrictions on use and disclosure and are also protected by copyright, patent, and other intellectual and industrial property laws. Reverse engineering, disassembly, or decompilation of the Programs, except to the extent required to obtain interoperability with other independently created software or as specified by law, is prohibited.The information contained in this document is subject to change without notice. If you find any problems in the documentation, please report them to us in writing. This document is not warranted to be error-free. Except as may be expressly permitted in your license agreement for these Programs, no part of these Programs may be reproduced or transmitted in any form or by any means, electronic or mechanical, for any purpose.If the Programs are delivered to the United States Government or anyone licensing or using the Programs on behalf of the United States Government, the following notice is applicable:U.S. GOVERNMENT RIGHTS Programs, software, databases, and related documentation and technical data delivered to U.S. Government customers are "commercial computer software" or "commercial technical data" pursuant to the applicable Federal Acquisition Regulation and agency-specific supplemental regulations. As such, use, duplication, disclosure, modification, and adaptation of the Programs, including documentation and technical data, shall be subject to the licensing restrictions set forth in the applicable Oracle license agreement, and, to the extent applicable, the additional rights set forth in FAR 52.227-19, Commercial Computer Software--Restricted Rights (June 1987). Oracle USA, Inc., 500 Oracle Parkway, Redwood City, CA 94065.The Programs are not intended for use in any nuclear, aviation, mass transit, medical, or other inherently dangerous applications. It shall be the licensee's responsibility to take all appropriate fail-safe, backup, redundancy and other measures to ensure the safe use of such applications if the Programs are used for such purposes, and we disclaim liability for any damages caused by such use of the Programs.Oracle, JD Edwards, PeopleSoft, and Siebel are registered trademarks of Oracle Corporation and/or its affiliates. Other names may be trademarks of their respective owners.The Programs may provide links to Web sites and access to content, products, and services from third parties. Oracle is not responsible for the availability of, or any content provided on, third-party Web sites. You bear all risks associated with the use of such content. If you choose to purchase any products or services from a third party, the relationship is directly between you and the third party. Oracle is not responsible for: (a) the quality of third-party products or services; or (b) fulfilling any of the terms of the agreement with the third party, including delivery of products or services and warranty obligations related to purchased products or services. Oracle is not responsible for any loss or damage of any sort that you may incur from dealing with any third party.ContentsPreface (xv)Topic Overview (xv)Audience (xvi)Documentation Accessibility (xvi)Related Documents (xvii)Conventions (xviii)What’s New in Oracle Application Express (xix)Oracle Application Express Release 3.1 New Features (xix)1 Quick StartWhat is Oracle Application Express?................................................................................................... 1-1 About Oracle Application Express Architecture................................................................................ 1-5 Understanding Application Express User Roles................................................................................ 1-6 Logging In to Oracle Application Express.......................................................................................... 1-6 About Browser Requirements.......................................................................................................... 1-7 Configuring Your Oracle Application Express Environment..................................................... 1-7 Logging In to Oracle Application Express as a Developer.......................................................... 1-7 About the Workspace Home Page......................................................................................................1-11 Navigation Alternatives.......................................................................................................................1-13 Using Online Help................................................................................................................................1-14 2 Running a Demonstration ApplicationInstalling a Demonstration Application.............................................................................................. 2-1 Running an Installed Demonstration Application............................................................................ 2-2 Running an Application from Demonstration Applications....................................................... 2-3 Running an Application from the Application Home Page........................................................ 2-3 Understanding Sample Application..................................................................................................... 2-3 About the Home Page....................................................................................................................... 2-4 About the Customers Page............................................................................................................... 2-5 About the Products Page................................................................................................................... 2-6 About the Orders Page...................................................................................................................... 2-7 About the Charts Page....................................................................................................................... 2-8 About the Admin Page...................................................................................................................... 2-8 Viewing Pages in Printer Friendly Mode....................................................................................... 2-8iiiModifying a Demonstration Application............................................................................................ 2-8 About the Developer Toolbar........................................................................................................... 2-8 Editing a Demonstration Application............................................................................................. 2-9 Viewing Underlying Database Objects............................................................................................2-10 Viewing the Database Object Dependencies Report..................................................................2-10 Viewing Database Objects in Object Browser.............................................................................2-10 3 Application Builder ConceptsWhat Is a Page?......................................................................................................................................... 3-1 Understanding Page Processing and Page Rendering...................................................................... 3-2 How the Application Express Engine Renders and Processes Pages......................................... 3-2 Understanding Conditional Rendering and Processing.............................................................. 3-2 Verifying User Identity...................................................................................................................... 3-4 Controlling Access to Controls and Components......................................................................... 3-4 Understanding Session State Management........................................................................................ 3-4 What Is a Session?.............................................................................................................................. 3-5 Understanding Session IDs............................................................................................................... 3-5 Viewing Session State........................................................................................................................ 3-5 Managing Session State Values............................................................................................................. 3-6 Referencing Session State.................................................................................................................. 3-7 Setting Session State........................................................................................................................... 3-7 Clearing Session State........................................................................................................................ 3-7 About Bind Variable Syntax............................................................................................................. 3-9 Understanding URL Syntax................................................................................................................3-10 Understanding the URL that Displays for a Page......................................................................3-11 Using f?p Syntax to Link Pages.....................................................................................................3-11 Calling a Page Using an Application and Page Alias................................................................3-12 Calling a Page from a Button URL...............................................................................................3-13 Facilitating Bookmarks by Using Zero as the Session ID..........................................................3-13 Understanding Substitution Strings.................................................................................................3-13 Using Substitution Strings.............................................................................................................3-14 About Built-in Substitution Strings..............................................................................................3-14 4 Using Application BuilderAccessing Application Builder.............................................................................................................. 4-1 About the Application Builder Home Page........................................................................................ 4-2 Configuring Developer Preferences................................................................................................ 4-3 About the Application Home Page....................................................................................................... 4-4 About the Action Bar......................................................................................................................... 4-6 About Application Attributes................................................................................................................ 4-8 Configuring the Application Definition......................................................................................... 4-8 Configuring Security Attributes...................................................................................................4-15 Configuring Globalization Attributes..........................................................................................4-19 5 Working with Application PagesAbout the Page Definition...................................................................................................................... 5-1 ivAccessing a Page Definition............................................................................................................. 5-2 Understanding the Page Definition................................................................................................. 5-2 Using the View List on the Page Definition....................................................................................... 5-4 Accessing the View List on the Page Definition............................................................................ 5-4 About Page Events............................................................................................................................. 5-5 About Database Object Dependencies............................................................................................ 5-5 About History..................................................................................................................................... 5-5 About Export...................................................................................................................................... 5-6 About Groups..................................................................................................................................... 5-6 About Referenced............................................................................................................................... 5-6 Editing a Page Definition....................................................................................................................... 5-7 About the Edit All Icon..................................................................................................................... 5-7 About the Copy or Create Icons....................................................................................................... 5-8 Reordering Page Components......................................................................................................... 5-8 About Page Rendering...................................................................................................................... 5-9 About Page Processing...................................................................................................................5-11 About Shared Components...........................................................................................................5-12 Understanding Page Computations.............................................................................................5-14 Understanding Validations...........................................................................................................5-17 Understanding Page Processes.....................................................................................................5-20 Understanding Branches................................................................................................................5-22 Editing Page Attributes........................................................................................................................5-23 Accessing Page Attributes.............................................................................................................5-23 About the Page Attributes Page....................................................................................................5-24 About the Developer Toolbar.............................................................................................................5-28 Working with Shared Components...................................................................................................5-29 Accessing the Shared Components Page.....................................................................................5-29 About the Shared Components Page...........................................................................................5-30 About Exporting Shared Components.........................................................................................5-33 Accessing Reports on Shared Components.................................................................................5-34 Understanding Application Processes..............................................................................................5-34 About On Demand Application Processes..................................................................................5-35 Application Process Example........................................................................................................5-35 Creating an Application Process...................................................................................................5-36 Accessing Application Processes Reports...................................................................................5-37 Understanding Application Computations......................................................................................5-37 About Application Computations................................................................................................5-38 Creating an Application Computation........................................................................................5-38 Accessing the Application Computation History Report.........................................................5-39 6 Building an ApplicationCreating an Application.......................................................................................................................... 6-1 About Creating an Application Using a Wizard........................................................................... 6-2 About the Create Application Wizard............................................................................................ 6-2 About the Create Application from Spreadsheet Wizard............................................................ 6-6 About Demonstration Applications................................................................................................ 6-7 Copying an Application.................................................................................................................... 6-8vDeleting an Application.................................................................................................................... 6-8 Managing Pages in an Application....................................................................................................... 6-9 About Creating Pages.....................................................................................................................6-10 Creating a Page from the Application Home Page....................................................................6-10 Creating a Page from the Page Definition...................................................................................6-11 Creating a Page from the Developer Toolbar.............................................................................6-13 Copying a Page................................................................................................................................6-13 Running a Page or Application.....................................................................................................6-14 Grouping Pages...............................................................................................................................6-15 Locking and Unlocking a Page......................................................................................................6-19 Deleting a Page................................................................................................................................6-21 Adding Application Comments.........................................................................................................6-22 Creating an Application Comment..............................................................................................6-22 Viewing the Application Comments Report...............................................................................6-22 Adding Developer Comments............................................................................................................6-22 Adding Developer Comments to an Application or Page........................................................6-23 Viewing and Editing Developer Comments...............................................................................6-23 Deleting Developer Comments.....................................................................................................6-24 About the Developer Comments Report.....................................................................................6-25 Creating Applications Groups............................................................................................................6-27 Viewing Application Groups........................................................................................................6-27 Creating an Application Group....................................................................................................6-28 Assigning an Application to an Application Group..................................................................6-28 Removing an Application from an Application Group............................................................6-29 Deleting an Application Group.....................................................................................................6-29 Viewing Application Reports.............................................................................................................6-29 Accessing Application Reports.....................................................................................................6-30 Shared Components Reports.........................................................................................................6-30 Page Components Reports.............................................................................................................6-31 Activity Reports...............................................................................................................................6-31 Cross Application Reports.............................................................................................................6-32 Understanding Page-Level Items.......................................................................................................6-32 Differences Between Page Items and Application Items...........................................................6-33 About the Items Section of the Page Definition..........................................................................6-33 Creating Page-Level Items.............................................................................................................6-34 Editing Page-Level Items...............................................................................................................6-42 Using the Drag and Drop Layout Page........................................................................................6-46 Referencing Item Values................................................................................................................6-49 Displaying Conditional or Read-Only Page Items.....................................................................6-50 Working with a Multiple Select List Item....................................................................................6-50 Understanding Application-Level Items..........................................................................................6-51 Creating an Application-level Item..............................................................................................6-52 Accessing Application Item History............................................................................................6-52 Editing Application-level Item Attributes...................................................................................6-52 7 Adding Application ComponentsCreating Reports....................................................................................................................................... 7-1 viCreating a Report Using a Wizard .................................................................................................. 7-2 Editing SQL and Wizard Reports.................................................................................................... 7-2 Editing Interactive Reports............................................................................................................7-13 Printing Report Regions.................................................................................................................7-26 Creating Forms.......................................................................................................................................7-35 Creating a Form Using a Wizard..................................................................................................7-35 Creating a Tabular Form................................................................................................................7-37 Creating a Master Detail Form......................................................................................................7-38 Creating a Form Manually.............................................................................................................7-39 Validating User Input in Forms....................................................................................................7-42 Creating Calendars................................................................................................................................7-43 About Creating Calendars.............................................................................................................7-44 Creating a New Calendar..............................................................................................................7-44 Editing a Calendar Title.................................................................................................................7-45 Editing Calendar Attributes..........................................................................................................7-45 Upgrading a Calendar Created in a Previous Releases.............................................................7-49 Converting an Easy Calendar to a SQL Calendar......................................................................7-49 Creating Charts......................................................................................................................................7-49 About Supported Chart Types......................................................................................................7-50 About Creating SQL Queries for Charts......................................................................................7-50 Creating an HTML Chart...............................................................................................................7-52 Creating a SVG Chart.....................................................................................................................7-53 Creating a Flash Chart....................................................................................................................7-59 Editing Chart Attributes.................................................................................................................7-62 Using Custom XML with Flash Charts........................................................................................7-63 Enabling Asynchronous Updates.................................................................................................7-63 Displaying SVG Charts in Other Languages..............................................................................7-64 Creating Buttons....................................................................................................................................7-64 About the Buttons Section of the Page Definition......................................................................7-65 Creating a Button Using a Wizard................................................................................................7-65 Creating Multiple Buttons.............................................................................................................7-66 Editing Buttons................................................................................................................................7-67 Understanding the Relationship Between Button Names and REQUEST.............................7-69 About Branching with Buttons.....................................................................................................7-69 Displaying Buttons Conditionally................................................................................................7-70 Creating Lists of Values.......................................................................................................................7-70 Creating a Named LOV at the Application Level......................................................................7-70 About Static LOVs...........................................................................................................................7-71 Editing an Existing LOV................................................................................................................7-71 Referencing Session State Within an LOV...................................................................................7-72 Referencing a Null Value in an Item Based on an LOV............................................................7-73 Accessing LOV Reports..................................................................................................................7-73 Creating Dependent Select Lists........................................................................................................7-74 Using Shortcuts......................................................................................................................................7-74 About Shortcut Types.....................................................................................................................7-75 Defining Shortcuts..........................................................................................................................7-75 Editing Existing Shortcuts..............................................................................................................7-76vii。
Oracle Reports培训教程
Oracle Reports培训教程HAND作者: 孟军创建日期: 2000年11月28日最近修改日期: 2000年11月28日文档编号: MD060版本: 1审批人:审批人1审批人2拷贝数_____文档控制更改记录浏览者分发目录文档控制 ................................................................................................................................... i i 综述 . (5)Oracle Reports概述 (6)Oracle Reports的版本 (7)Oracle Reports的安装 (8)建立并运行一个简单的报表 (11)建立报表 (11)编译运行报表 (15)习题 (16)数据模型(Date Model) (17)功能及构成 (17)数据模型编辑器 (17)查询 (18)组 (19)列 (19)数据连接 (22)参数 (23)布局(Layout) (26)布局功能 (26)布局模型编辑器 (27)报表区域 (27)基本布局对象 (28)几种缺省的报表布局风格 (34)参数表格(Parameter Form) (37)建立用户自定义的参数表格 (37)报表触发器(Report Triggers) (38)触发器的触发时机及用途 (38)习题 (39)程序单元(Program Units) (40)附加的程序库(Attached Libraries) (41)建立PL/SQL程序库 (41)连接PL/SQL程序库 (42)习题 (43)矩阵式报表 (44)建立矩阵式报表的需求 (44)单查询矩阵式报表 (44)多查询矩阵式报表 (47)Reports在Applications下的安装 (53)编制Report (53)在Application中注册Reports (53)将Reports运行权限赋给相应的职责 (55)综述本文档为Oralce Reports培训文档,仅限于Hand培训使用。
oracle report 参数
一、概述Oracle Report是Oracle公司推出的一款专业报表工具,主要用于数据报表的生成和管理。
在使用Oracle Report生成报表时,参数起着非常重要的作用。
它可以帮助我们定制化报表的输出内容,满足不同用户的需求,提高报表的灵活性和实用性。
本文将介绍Oracle Report参数的概念、使用方法和注意事项,以帮助读者更好地理解和应用Oracle Report。
二、概念1.1 参数的概念参数是一种在编写或运行报表时可变的值,它可以影响报表运行的结果。
在Oracle Report中,参数可以用于过滤数据、指定报表的输出格式、控制报表的行为等多种用途。
1.2 参数的种类在Oracle Report中,参数分为两类:系统参数和用户参数。
系统参数是报表引擎定义的一种特殊参数,它用于控制报表的运行行为,例如控制页眉、页脚的显示与隐藏、指定报表的输出格式等。
用户参数是由报表开发人员自定义的参数,它用于定制报表的输出内容,例如指定报表的查询条件、排序方式等。
三、使用方法2.1 定义参数在Oracle Report中,可以通过报表设计器或报表模型定义参数。
在报表设计器中,通过工具栏或菜单可以找到参数的定义入口,用户可以根据自己的需求定义需要的参数。
2.2 绑定参数在定义参数之后,需要将参数与报表的数据源或控件进行绑定。
通过绑定,参数可以影响数据的查询、显示或输出格式。
用户可以在需要的地方引用参数,使报表生成时可以根据参数的值进行相应的处理。
2.3 使用参数在报表设计完成后,用户可以在报表运行时输入参数的值,根据不同的参数值生成不同的报表输出。
此时,参数的值可以从用户输入、数据库查询等多种途径获取,以满足报表的定制化需求。
四、注意事项3.1 参数的合法性在使用参数时,需要注意参数的合法性。
输入的日期参数应该符合日期的格式,输入的编号参数应该是存在的编号等。
3.2 参数的安全性在使用用户参数时,需要注意参数的安全性。
Oracle Report Builder
Oracle Report開發(1)--Oracle Report Builder 收藏Oracle Report開發有好多種方法,如:1.Oracle Developer工具中自帶在的Oracle Report Builder2.結合Oracle Report Builder,用XML開發報表。
3.用HTML輸出方式4.用SQLPLUS句子輸出報表.下面我要講的是第一種方法,就是用Oracle Report Builder開發報表,也是最簡的報表開發之一。
第一步:開始-->程序-->運行Report Builder,選擇Bulder a new report manually,按OK按鈕進到開發界面。
在開發過程中,對初學者不習慣界面布局,沒有Microsoft發開工具的布局好用,也沒有水晶報表好開發。
我所用的是Report Builder 6.0,不知道後期版本有沒有改現。
呵呵。
不過慢慢用就習慣了。
第二步:連接數據庫選擇菜單[File]-->[Connect...],彈出一個窗體,輸入用戶名、密碼和數據庫SID。
第三步:創建SQL查詢語句。
數據模簡介如下圖創建SQL,可以直接在"SQL Query Statement"輸入Select語句,也可以通過"Import SQL Query... "導入Select語句。
用最常見的主組織物料表:MTL_SYSTEM_ITEM_B.加到部分條件品名是以A開頭和組織ID是106,如下圖Query對像中的每一列都可以修改最常見屬性:[Value if Null]:初始化值.[Break Order]:排序規則,None為不排序,Asceding為順序排序,Descending為倒序排序若數字類型是小數或日期類型時,則[Value if Null Format Mask]:格式化。
第四步:布局界面常用於布局界面的對像簡介:[Frame]:一般框架,方便報表布局[Reporting Frame]:報表框架,也就是報表體,用於布局Field在此框架中。
Oracle EBS Report开发笔记1

报表开发进入PL SQL Developer开发工具后1.登录服务器2.如果要进行SQL 语句测试1)点击File->New->SQL Windows即可进入命令窗口2)输入标准SQL语句,点击第二行工具条中的齿轮型图标(运行)即可运行查询语句3)如果被查询的对象不是一个table,而是一个view,必须在select语句前输入以下语句,才能查询出数据。
beginmo_global.set_policy_context('S',86);end;注意:上述语句中,S字母必须大写,后面的数字是Oracle系统中的组织ID号,不同的ou,另外要运行查询还必须遵循一定的方法和步骤比如,下图的语句步骤一、如下图,先选中蓝色区域的一段代码,然后点击运行。
步骤二、再选中自己写好的select语句,点击运行才能看到数据。
3、如果要进行报表开发1)点击File –> New -> Command Window 即可进入报表开发命令行窗口然后就可输入各种命令了,修改原来的程序用edit ,而oracle中自主开发的东西都以cux开头。
2)输入edit cux_ap_invoice_detail_pkg ,点击回车即可看到如下界面4、报表程序结构分析create or replace package body CUX_AP_INVOICE_DETAIL_PKG is-- author : shawn.liu-- created : 2010/08/03 16:53:46-- purpose : 应付款明细账-- public type declarationsgc_sob_id number := fnd_profile.value('GL_SET_OF_BKS_ID');function get_flex_desc(p_value_set_name in varchar2, p_flex_value in varchar2)return varchar2is v_description varchar2(240):= null;beginselect trim(replace(ffv.description,'&','_')) into v_descriptionfrom fnd_flex_values_vl ffv,fnd_flex_value_sets ffswhere ffs.flex_value_set_name = p_value_set_name and ffs.flex_value_set_id = ffv.flex_value_set_id and ffv.enabled_flag='Y'and ffv.flex_value = p_flex_value;return v_description;exceptionwhen others thenreturn null;end;procedure outlog(i_chr_message in varchar2) isbeginfnd_file.put_line(fnd_file.log, i_chr_message);end;procedure output(i_chr_message in varchar2) asbeginfnd_file.put_line(fnd_file.output, i_chr_message);end;procedure main(errbuf out varchar2,retcode out varchar2,p_period_name in varchar2) isv_b_return boolean;v_org_name varchar2(100);cursor stay_fee is /* 使用游标循环输出*//****************上面是标准头信息格式*******************/ {select 查询语句段}/****************下面是输出的信息格式*******************/beginselect name into v_org_namefrom hr_operating_unitswhere organization_id= Fnd_Profile.Value('ORG_ID');-- output ('<?xml version="1.0" encoding = "GBK"?>');output ('<?xml version="1.0" encoding = "UTF-8"?>');output ('<G_REPORT>');output ('<P_PERIOD_NAME>' || p_period_name || '</P_PERIOD_NAME>');output ('<V_ORG_NAME>' || v_org_name || '</V_ORG_NAME>');for sf in stay_fee loopoutput ('<G_MAIN_0>');output ('<INVOICE_NUM>' || sf.INVOICE_NUM || '</INVOICE_NUM>');output ('<VENDOR_NAME>' || sf.VENDOR_NAME || '</VENDOR_NAME>');output ('<INVOICE_DATE>' || sf.INVOICE_DATE || '</INVOICE_DATE>');output ('<GL_DATE>' || sf.GL_DATE || '</GL_DATE>');output ('<INVOICE_TYPE>' || sf.INVOICE_TYPE || '</INVOICE_TYPE>');output ('<SOURCE>' || sf.SOURCE || '</SOURCE>');output ('<INVOICE_AMOUNT>' || sf.INVOICE_AMOUNT || '</INVOICE_AMOUNT>');output ('<AMOUNT_PAID>' || sf.AMOUNT_PAID || '</AMOUNT_PAID>');output ('<AMOUNT_BALANCE>' || sf.AMOUNT_BALANCE || '</AMOUNT_BALANCE>');output ('<AGENT_NAME>' || sf.AGENT_NAME || '</AGENT_NAME>');output ('<ORG_NAME>' || _NAME || '</ORG_NAME>');output ('<VOUCHER_NUM>' || sf.VOUCHER_NUM || '</VOUCHER_NUM>');output ('<GLCC>' || sf.GLCC || '</GLCC>');output ('<DESCRIPTION>' || sf.DESCRIPTION || '</DESCRIPTION>');output ('<COA_NAME >' || sf.COA_NAME || '</COA_NAME >');output ('</G_MAIN_0>');end loop;output ('</G_REPORT>');retcode:=0;if retcode = 2thenv_b_return := fnd_concurrent.set_completion_status('ERROR','ERROR');elsif retcode = 1thenv_b_return := fnd_concurrent.set_completion_status('WARNING','WARNING');end if;exceptionwhen others thenoutlog('Error:main'||sqlerrm);v_b_return := fnd_concurrent.set_completion_status('ERROR','ERROR');raise;end;end cux_ap_invoice_detail_pkg;5、查询一个已开发报表的实际程序名称系统管理员—并发—方案—可执行,按F11根据知道的报表名称搜索,出程序名。
Oracle_EBS_Report开发

学习笔记之Report开发Author: 朱志贤Creation Date: 2012-7-25Last Updated: 2012-7-25Document Ref: <Document Reference Number>Version: v1.0Approvals:<Approver 1><Approver 2>Copy Number _____Document ControlChange RecordReviewersDistributionNote To Holders:If you receive an electronic copy of this document and print it out, please write yourname on the equivalent of the cover page, for document control purposes.If you receive a hard copy of this document, please write your name on the frontcover, for document control purposes.ContentsDocument Control .................................................................................................................. i i1.文档说明 (2)2.使用Report Builder 取得报表数据 (3)2.1.使用Report Builder取得报表数据 (3)3.注册报表到EBS环境 (9)3.1.上传报表文件到EBS系统的应用目录下 (9)3.2.定义可执行指向上传的报表 (9)3.3.定义并发程序来调用已定义的可执行 (10)3.4.将并发程序分配给职责下的请求组,即给某职责运行报表的权限 (12)3.5.切换职责运行报表,并查看报表结果 (13)4.BI Publisher报表布局开发 (16)4.1.BI Publisher报表布局开发 (16)5.注册BI Publisher报表 (19)5.1.定义BIP数据定义 (19)5.2.定义BIP模板 (21)5.3.设置并发请求模板 (22)5.4.再次提交请求查看输出 (24)6.Open and Closed Issues for this Deliverable (25)Open Issues (25)Closed Issues (25)1.文档说明本文档为Oracle Report的学习笔记。
REPORT基础开发教程

ORACLE REPORT IN ACTION李正海2008/8/27目录1第一个简单的报表 (3)2包含汇总的报表 (10)3包含分组的报表 (18)4包含矩阵分组的报表 (24)5加入报表参数 (30)5.1参数定义: (30)5.2带参数的SQL语句 (33)5.3输入报表参数 (34)5.4产生参数对应查询结果报表 (35)6公式列、汇总列 (36)6.1为记录增加序号 (36)6.2增加汇总列 (37)6.3增加累加列 (39)6.4增加公式列 (40)7加入图表 (43)8报表的其它功能设置 (47)8.1页面设置 (47)8.2插入页码 (48)8.3插入日期和时间 (50)8.4表格线 (51)8.5过滤器 (53)8.6报表分页 (55)9报表发布与监控 (57)9.1报表的编译 (57)1第一个简单的报表首先利用报表向导进行报表的开发,其基本的过程包括:1.启动ORACLE REPORT BUILDER2.确定使用报表向导3.设置报表的标题和类型4.输入SQL查询语句5.完成对数据库的连接6.选择报表显示域7.设置报表显示属性8.设置报表模板9.完成报表,预览报表点完上边的下一步后,进入ORACLE的连接设置,必须保证ORACLE 连接正确,报表才能显示出来。
下图为笔者本机的设置,用户需根据自己的实际情况进行配置。
直接用>> 把所有字段都移到显示域中,结果如下图。
目前不选择总计域,直接点下一步。
设置为无模板2包含汇总的报表在报表中经常需要汇总的数据,例如按仓库统计库存的产品数量和金额,在报表的最后需要仓库数目和总计的产品数量和金额,则报表按如下执行:1.启动ORACLE REPORT BUILDER2.确定使用报表向导3.设置报表的标题和类型4.输入SQL查询语句5.完成对数据库的连接,如果数据库已经连接,则直接进入下一步。
6.选择报表显示域7.设置统计域8.设置报表显示属性9.设置报表模板10.完成报表,预览报表产生的结果为:3包含分组的报表分组报表包括左边分组和上边分组,分别如下图所市示:1.启动ORACLE REPORT BUILDER2.确定使用报表向导3.设置报表的标题和类型4.输入SQL查询语句5.完成对数据库的连接,如果数据库已经连接,则直接进入下一步。
oraclereport高级开发教程
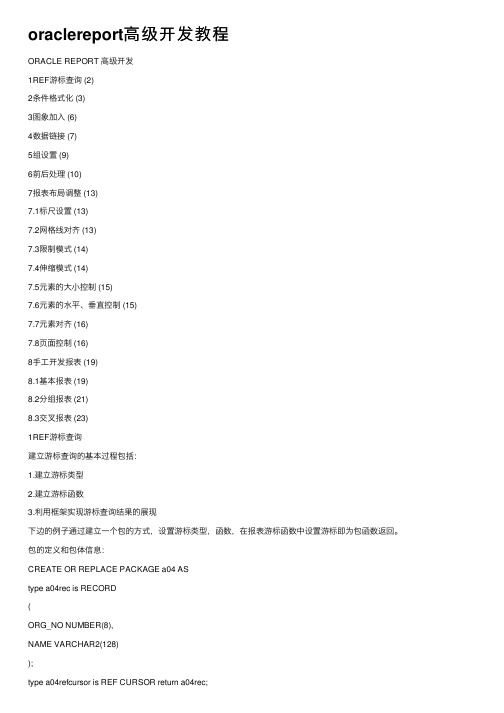
oraclereport⾼级开发教程ORACLE REPORT ⾼级开发1REF游标查询 (2)2条件格式化 (3)3图象加⼊ (6)4数据链接 (7)5组设置 (9)6前后处理 (10)7报表布局调整 (13)7.1标尺设置 (13)7.2⽹格线对齐 (13)7.3限制模式 (14)7.4伸缩模式 (14)7.5元素的⼤⼩控制 (15)7.6元素的⽔平、垂直控制 (15)7.7元素对齐 (16)7.8页⾯控制 (16)8⼿⼯开发报表 (19)8.1基本报表 (19)8.2分组报表 (21)8.3交叉报表 (23)1REF游标查询建⽴游标查询的基本过程包括:1.建⽴游标类型2.建⽴游标函数3.利⽤框架实现游标查询结果的展现下边的例⼦通过建⽴⼀个包的⽅式,设置游标类型,函数,在报表游标函数中设置游标即为包函数返回。
包的定义和包体信息:CREATE OR REPLACE PACKAGE a04 AStype a04rec is RECORD(ORG_NO NUMBER(8),NAME VARCHAR2(128));type a04refcursor is REF CURSOR return a04rec;function TESTC return a04.a04refcursor ;end A04;create or replace package body A04 asfunction TESTC return a04.a04refcursor istemp_container a04.a04refcursor;beginopen temp_container for select _no org_no , name from scorg s;return temp_container;end TESTC;END A04;报表游标函数:function QR_1RefCurDS return a04.a04refcursor istemp_container a04.a04refcursor;str1 varchar(200);begintemp_container :=a04.testc();return temp_container;end;游标函数调⽤:框架源指定G_ORG_NO,F_1,F_2分别指定源ORG_NO,NAME。
- 1、下载文档前请自行甄别文档内容的完整性,平台不提供额外的编辑、内容补充、找答案等附加服务。
- 2、"仅部分预览"的文档,不可在线预览部分如存在完整性等问题,可反馈申请退款(可完整预览的文档不适用该条件!)。
- 3、如文档侵犯您的权益,请联系客服反馈,我们会尽快为您处理(人工客服工作时间:9:00-18:30)。
ORACLE REPORT 高级开发
1REF游标查询 (2)
2条件格式化 (3)
3图象加入 (6)
4数据链接 (7)
5组设置 (9)
6前后处理 (10)
7报表布局调整 (13)
7.1标尺设置 (13)
7.2网格线对齐 (13)
7.3限制模式 (14)
7.4伸缩模式 (14)
7.5元素的大小控制 (15)
7.6元素的水平、垂直控制 (15)
7.7元素对齐 (16)
7.8页面控制 (16)
8手工开发报表 (19)
8.1基本报表 (19)
8.2分组报表 (21)
8.3交叉报表 (23)
1REF游标查询
建立游标查询的基本过程包括:
1.建立游标类型
2.建立游标函数
3.利用框架实现游标查询结果的展现
下边的例子通过建立一个包的方式,设置游标类型,函数,在报表游标函数中设置游标即为包函数返回。
包的定义和包体信息:
CREATE OR REPLACE PACKAGE a04 AS
type a04rec is RECORD
(
ORG_NO NUMBER(8),
NAME VARCHAR2(128)
);
type a04refcursor is REF CURSOR return a04rec;
function TESTC return a04.a04refcursor ;
end A04;
create or replace package body A04 as
function TESTC return a04.a04refcursor is
temp_container a04.a04refcursor;
begin
open temp_container for select _no org_no , name from scorg s;
return temp_container;
end TESTC;
END A04;
报表游标函数:
function QR_1RefCurDS return a04.a04refcursor is
temp_container a04.a04refcursor;
str1 varchar(200);
begin
temp_container :=a04.testc();
return temp_container;
end;
游标函数调用:
框架源指定G_ORG_NO,F_1,F_2分别指定源ORG_NO,NAME。
框架R1
2条件格式化
条件格式化用于控制显示的效果,例如计算财务的赤字,当数据值太大时,自动缩小字体,以适应框格等。
为第一个域设置颜色的条件格式化。
为第四个域设置字体的条件格式化。
现在的报表显示的格式为:
3图象加入
在布局模式下,点击,加入一个图象框,设置其属性,指定格式和文件名。
加入系统后,运行的结果为:
4数据链接
数据链接设置表与表之间的关系,其基本操作过程为:
1.建立主表查询
2.建立子表查询
3.建立两个表之间的数据链接,点后,选择主表的字段,拉到子表的字段,即可完成表的链接设置。
在数据链接后,即可分别应用该查询。
例如在GEO系统中的表单打印即可采取数据链接的模式,例如:生成结果为:
5组设置
通过组设置可以方便地控制组的移动、复制、粘贴、批量性设置元素的属性等操作。
组的操作包括:分组、解除组合、选择父级、子级、添加至组、从组中删除。
➢分组:选择一些元素后,点击分组即可把这些元素加入到组中。
➢解除组合:选择组,点击解除组合,则把组合打散。
➢选择父级、子级:默认选择组元素,显示出元素的所有外框,再点击则选择该元素。
选择组后,选择子级则所有元素被选择,如处于子级时,选择父级则又选择组。
➢添加至组,选择一些元素、一个组后,点击添加至组,则构成同一个组。
➢从组中删除,选择组中某个元素,点击从组中删除,则该元素从组中删除。
6前后处理
报表的域与框架是一种层次关系,根据这种层次关系确立数据的来源,如果层次关系错误,则不能得到正确的报表,然而报表的展示和逻辑上的层次关系并不是完全一致的,因此就需要采用报表构建器排列中前后关系来处理。
例如上图中的F3,如果将其移动到如下的位置,那么逻辑关系也就变化了,这是不正确的。
这时点击F_3 ,点击后移,则F_3 恢复到正确的状态,即在R_1下。
7报表布局调整
为了使报表美观,必须使表格的各框架、域、文字等元素大小合适,保持对齐,这就必须使用合适的布局。
布局设置包括标尺设置,元素大小移动、对齐设置等内容。
7.1 标尺设置
一般建议设置标尺的单位为1CM,网格间隔为1,网格间的对齐点个数为10。
7.2 网格线对齐
在视图中设置网格线对齐,这样可以保证,移动元素的距离为网格对齐点的整数倍,拉伸元素控制点到网格对齐点上。
7.3 限制模式
在限制模式下,如框架中的文字、域移动、缩放都在框架中。
7.4 伸缩模式
设置伸缩两者之间的差别是,第一种模式,相关元素也会随着变化。
第二种模式,只是自身变化。
如下图,都是:
7.5 元素的大小控制
例如域之间的大小,可以用直接屏幕上拉动的方法。
也可以一次选择多个元素,设置其大小,对话框如下。
7.6 元素的水平、垂直控制
一般情况下,如文字、域设置为水平固定、垂直扩展这样保证数据的完整性以及报表格式的规范。
7.7 元素对齐
对齐是一种非常常用的方法,需要注意的是在进行元素的移动时,其移动的单位也是按网格点进行的,所以如果要对齐网格,一般需要先拖拉元素大小,使其与网格对齐。
7.8 页面控制
对于表头这样的数据,有两种情况,只在首页显示如下图:
表头框的设置注意有两项,第一是垂直缩放值设置为可变,第二是打印对象在第一页。
每一页都显示,如下图,框架的属性应设置成:打印对象在全部页。
8手工开发报表
利用向导可以快速生成报表,但是向导一般只生成单一的报表,所以利用手工的方法生成报表也是必须要掌握的。
8.1 基本报表
a)建立查询,在数据模型中建立一个SQL查询。
b)转到布局模型
c)加入框架,指定框架对应源,该报表为默认的纵向报表,因此设置其垂直属性为可变。
d)加入标题框架,指定表头文字,并改变文字对齐为居中,调整文字及标题框架至合适大
小。
e)加入数据域,指定各域的数据源,调整
f)运行报表,即可显示出报表结果。
g)可对报表进行进一步的调整,例如对齐方式,文字的大小、颜色等。
调整后如下:
8.2 分组报表
a)首先在数据模型中,根据分组需要,把分组字段拉出来,如下图:
b)转到布局模型
c)加入一个新的框架,设置该框架对应源为G_CAT_C,将该框架设置为置后,从而实现该
框架为根框架,在该框架内加入一个域,该域的源为G_ORG_NO。
如下图:
d)运行报表
……
8.3 交叉报表
a)数据模型
➢输入SQL查询语句
➢拉出CAT_C 组
➢拉出BRAND_C 组
➢利用交叉单元把两个组包起来
➢加入一个汇总项,统计交叉汇总值
➢也可根据需要加入针对CA T_C 组和BRAND_C 组的汇总值
b)布局
➢加入一个框架
➢再加入一个框架,修改其为横向
➢选择这两个框架,点击插入布局矩阵,形成如下图。
➢为框架指定源
➢在纵向框架,加入域,指定其源为CAT_C
➢在横向框架,加入域,指定其源为BRAND_C
➢在交叉部分,加入域,指定其源为COUNT_QTY,形成如下图:
运行该报表,则显示如下结果:
可根据需要,对该报表进行进一步的修饰,例如报表的表头、字体、颜色等。
