每个CCIE考生必备的思科厚黑学最新版CCIELAB刷位置详细步骤教程
cisco ccna Lab

选择正确的前提下要学会放弃CISCO CCNA LAB思科CCNA (网络基础类)LAB1: 路由器的基本命令实验目的:认识路由器实验步骤:Router>en 由用户模式进入特权模式Router#conf t 由特权模式进入全局配置模式Router(config)#hostname hudy 给路由器命名hudy(config)#line vty 0 4 配置telnet密码hudy(config-line)#loginhudy(config-line)#password hudiyihudy(config)#line con 0 配置console口密码hudy(config-line)#loginhudy(config-line)#password hudiyihudy(config-line)#exithudy(config)#enable password hudy 配置由用户模式到特权模式的明文密码hudy(config)#enable secret hudiyi 配置由用户模式到特权模式的密文密码LAB2: 静态路由拓扑图:实验目的:实现网络的互联互通实验步骤:3620A(config)#int s1/03620A config-if)#ip address 192.168.1.1 255.255.255.03620A (config-if)#description connect 3620b s1/03620A (config-if)#no sh3620A (config)#ip route 192.168.2.0 255.255.255.0 192.168.1.23620A (config)#ip route 192.168.3.0 255.255.255.0 192.168.1.23620B(config)#int s1/03620B config-if)#ip address 192.168.1.2 255.255.255.03620B (config-if)#description connect 3620a s1/03620B (config-if)#no sh3620B(config)#int s1/13620B config-if)#ip address 192.168.2.1 255.255.255.03620B (config-if)#description connect 3620c s1/03620B(config)#no sh选择正确的前提下要学会放弃3620B (config)#ip route 192.168.3.0 255.255.255.0 192.168.2.23620C(config)#int s1/03620C config-if)#ip address 192.168.2.2 255.255.255.03620C (config-if)#description connect 3620b s1/13620C (config)#no sh3620C (config)#int s1/13620C config-if)#ip address 192.168.3.1 255.255.255.03620C (config-if)#description connect 3620d s1/03620C (config)#no sh3620C(config)#ip route 192.168.1.0 255.255.255.0 192.168.2.13620D (config)#int s1/03620D config-if)#ip address 192.168.3.2 255.255.255.03620D (config-if)#description connect 3620c s1/13620D (config)#no sh3620D(config)#ip route 192.168.1.0 255.255.255.0 192.168.3.13620D(config)#ip route 192.168.2.0 255.255.255.0 192.168.3.1LAB3: 动态路由之RIP拓扑图:实验目的:实现网络的互联互通实验步骤:3620A(config)#int s1/03620A config-if)#ip address 192.168.1.1 255.255.255.03620A (config-if)#description connect 3620b s1/03620A (config-if)#no sh3620A (config)#router rip3620A (config-router)#network 192.168.1.03620B(config)#int s1/03620B config-if)#ip address 192.168.1.2 255.255.255.03620B (config-if)#description connect 3620a s1/03620B(config)#no sh3620B(config)#int s1/13620B config-if)#ip address 192.168.2.1 255.255.255.03620B (config-if)#description connect 3620c s1/03620B(config)#no sh选择正确的前提下要学会放弃3620B(config)#router rip3620B (config-router)#network 192.168.1.03620B (config-router)#network 192.168.2.03620C(config)#int s1/03620C config-if)#ip address 192.168.2.2 255.255.255.03620C (config-if)#description connect 3620b s1/13620C (config)#no sh3620C (config)#int s1/13620C config-if)#ip address 192.168.3.1 255.255.255.03620C (config-if)#description connect 3620d s1/0s1/13620C (config)#no sh3620C(config)#router rip3620C (config-router)#network 192.168.2.03620C (config-router)#network 192.168.3.03620D (config)#int s1/03620D config-if)#ip address 192.168.3.2 255.255.255.03620D (config-if)#description connect 3620c3620D (config)#no sh3620D(config)#router rip3620D (config-router)#network 192.168.3.0LAB4: 动态路由之IGRP拓扑图:实验目的:实现网络的互联互通实验步骤:3620A(config)#int s1/03620A config-if)#ip address 192.168.1.1 255.255.255.03620A (config-if)#description connect 3620b s1/03620A (config-if)#no sh3620A (config)#router igrp 103620A (config-router)#network 192.168.1.03620B(config)#int s1/03620B config-if)#ip address 192.168.1.2 255.255.255.03620B (config-if)#description connect 3620a s1/03620B(config)#no sh3620B(config)#int s1/13620B config-if)#ip address 192.168.2.1 255.255.255.0选择正确的前提下要学会放弃3620B (config-if)#description connect 3620c s1/03620B(config)#no sh3620B(config)#router igrp 103620B (config-router)#network 192.168.1.03620B (config-router)#network 192.168.2.03620C(config)#int s1/03620C config-if)#ip address 192.168.2.2 255.255.255.03620C (config-if)#description connect 3620b s1/13620C (config)#no sh3620C (config)#int s1/13620C config-if)#ip address 192.168.3.1 255.255.255.03620C (config-if)#description connect 3620d s1/0s1/13620C (config)#no sh3620C(config)#router igrp 103620C (config-router)#network 192.168.2.03620C (config-router)#network 192.168.3.03620D (config)#int s1/03620D config-if)#ip address 192.168.3.2 255.255.255.03620D (config-if)#description connect 3620c3620D (config)#no sh3620D(config)#router igrp 103620D (config-router)#network 192.168.3.0LAB5: 动态路由之EIGRP拓扑图:实验目的:实现网络的互联互通实验步骤:3620A(config)#int s1/03620A config-if)#ip address 192.168.1.1 255.255.255.03620A (config-if)#description connect 3620b s1/03620A (config-if)#no sh3620A (config)#router eigrp 103620A (config-router)#network 192.168.1.03620B(config)#int s1/03620B config-if)#ip address 192.168.1.2 255.255.255.03620B (config-if)#description connect 3620a s1/03620B(config)#no sh3620B(config)#int s1/1选择正确的前提下要学会放弃3620B config-if)#ip address 192.168.2.1 255.255.255.03620B (config-if)#description connect 3620c s1/03620B(config)#no sh3620B(config)#router eigrp 103620B (config-router)#network 192.168.1.03620B (config-router)#network 192.168.2.03620C(config)#int s1/03620C config-if)#ip address 192.168.2.2 255.255.255.03620C (config-if)#description connect 3620b s1/13620C (config)#no sh3620C (config)#int s1/13620C config-if)#ip address 192.168.3.1 255.255.255.03620C (config-if)#description connect 3620d s1/s1/13620C (config)#no sh3620C(config)#router eigrp 103620C (config-router)#network 192.168.2.03620C (config-router)#network 192.168.3.03620D (config)#int s1/03620D config-if)#ip address 192.168.3.2 255.255.255.03620D (config-if)#description connect 3620c3620D (config)#no sh3620D(config)#router eigrp 103620D (config-router)#network 192.168.3.0LAB6: 动态路由之OSPF拓扑图:实验目的:实现网络的互联互通实验步骤:3620A(config)#int s1/03620A config-if)#ip address 192.168.1.1 255.255.255.03620A (config-if)#description connect 3620b s1/03620A (config-if)#no sh3620A (config)#router ospf 103620A (config-router)#network 192.168.1.0 0.0.0.255 area 03620B(config)#int s1/03620B config-if)#ip address 192.168.1.2 255.255.255.0选择正确的前提下要学会放弃3620B (config-if)#description connect 3620a s1/03620B(config)#no sh3620B(config)#int s1/13620B config-if)#ip address 192.168.2.1 255.255.255.03620B (config-if)#description connect 3620c s1/03620B(config)#no sh3620B(config)#router ospf 103620B (config-router)#network 192.168.1.0 0.0.0.255 area 03620B (config-router)#network 192.168.2.0 0.0.0.255 area 03620C(config)#int s1/03620C config-if)#ip address 192.168.2.2 255.255.255.03620C (config-if)#description connect 3620b s1/13620C (config)#no sh3620C (config)#int s1/13620C config-if)#ip address 192.168.3.1 255.255.255.03620C (config-if)#description connect 3620d s1/0s1/13620C (config)#no sh3620C(config)#router ospf 103620C (config-router)#network 192.168.2.0 0.0.0.255 area 03620C (config-router)#network 192.168.3.0 0.0.0.255 area 03620D (config)#int s1/03620D config-if)#ip address 192.168.3.2 255.255.255.03620D (config-if)#description connect 3620c3620D (config)#no sh3620D(config)#router ospf 103620D (config-router)#network 192.168.3.0 0.0.0.255 area 0LAB7: 在1900系列中划分VLAN拓扑图:1924A(config)#vlan 2 name 工程部 1924A(config)#vlan 3 name 财务部1924A#config t1924A(config)#int e 0/11924A(config-if)#vlan-membership static 21924A(config-if)#int e 0/21924A(config-if)#vlan-membership static 31924A(config)#int f 0/26 1924A(config-if)#trunk on1924A(config)#int f 0/271924A(config-if)#trunk on1924B(config)#vlan 2 name 工程部 1924B(config)#vlan 3 name 财务部1924B#config t1924B(config)#int e 0/11924B(config-if)#vlan-membership static 2 1924B(config-if)#int e 0/21924B(config-if)#vlan-membership static 31924B(config)#int f 0/261924B(config-if)#trunk on 1924B(config)#int f 0/27 1924B(config-if)#trunk onLAB8:在2950系列中划分VLAN 拓扑图:创建VLAN将端口分配到VLAN配置中继端口创建VLAN将端口分配到VLAN配置中继端口2950A#vlan database2950A (vlan)#vlan 2 name 工程部 2950A (vlan)#vlan 3 name 财务部2950A (config)#int f 0/12950A (config-if)#switchport access vlan 22950A (config-if)#int f 0/22950A (config-if)#switchport access vlan 32950A (config)#int f 0/32950A (config-if)#switch mode trunk2950A (config)#int f 0/42950A (config-if)#switch mode trunk2950B#vlan database2950B (vlan)#vlan 2 name 工程部 2950B(vlan)#vlan 3 name 财务部2950B (config)#int f 0/12950B(config-if)#switchport access vlan 22950B (config-if)#int f 0/22950B (config-if)#switchport access vlan 32950B (config)#int f 0/32950B (config-if)#switch mode trunk2950B (config)#int f 0/42950A (config-if)#switch mode trunkLAB9: 单边路由拓扑图:创建VLAN 将端口分配到VLAN 配置中继端口 创建VLAN 将端口分配到VLAN 配置中继端口选择正确的前提下要学会放弃实验目的:实现网络的互联互通实验步骤:1924A(config)#vlan 2 name 工程部1924A(config)#vlan 3 name 财务部1924A#config t1924A(config)#int e 0/41924A(config-if)#vlan-membership static 21924A(config-if)#int e 0/51924A(config-if)#vlan-membership static 31924A(config)#int f 0/261924A(config-if)#trunk on1924A(config)#int f 0/271924A(config-if)#trunk on1924B(config)#vlan 2 name 工程部1924B(config)#vlan 3 name 财务部1924B#config t1924B(config)#int e 0/41924B(config-if)#vlan-membership static 21924B(config-if)#int e 0/51924B(config-if)#vlan-membership static 31924B(config)#int f 0/261924B(config-if)#trunk on1924B(config)#int f 0/271924B(config-if)#trunk on3620A (config) #int f0/03620A (config-if) #no ip add3620A (config-if) #no sh3620A (config) #int f0/0.13620A (config-subif)encapsulation isl vlan 23620A (config-subif)ip add 192.168.2.1 255.255.255.03620A (config) #int f0/0.23620A (config-subif) encapsulation isl vlan 33620A (config-subif)ip add 192.168.3.1 255.255.255.0LAB10: 单边路由拓扑图:选择正确的前提下要学会放弃实验目的:实现网络的互联互通实验步骤:2950A#vlan datebase2950A(vlan)#vlan 2 name 工程部2950A(vlan)#vlan 3 name 财务部2950A(config)#int f 0/42950A (config-if)#switchport access vlan 22950A (config-if)#int f 0/52950A (config-if)#switchport access vlan 32950A (config-if))#exit2950A (config)#int f 0/02950A (config-if)#switch mode trunk2950A (config)#int f 0/22950A (config-if)#switch mode trunk2950A (config)#int f 0/32950A (config-if)#switch mode trunk2950B#vlan datebase2950B(vlan)#vlan 2 name 工程部2950B(vlan)#vlan 3 name 财务部2950B(config)#int f 0/42950B (config-if)#switchport access vlan 22950B (config-if)#int f 0/52950B (config-if)#switchport access vlan 32950B (config-if))#exit2950B (config)#int f 0/22950B (config-if)#switch mode trunk2950B(config)#int f 0/32950B (config-if)#switch mode trunk3620A (config) #int f0/03620A (config-if) #no ip add3620A (config-if) #no sh3620A (config-subif)encapsulation dot1q 23620A (config-subif)ip add 192.168.2.1 255.255.255.03620A (config) #int f0/0.23620A (config-subif)encapsulation dot1q 33620A (config-subif)ip add 192.168.3.1 255.255.255.0LAB11:标准访问控制列表拓扑图:实验目的:工程部的PC不能访问财务部的PC,但是可以访问其它所有部门实验步骤:3620A #conf t3620A (config) #int s0/03620A (config-if) # ip add 192.168.1.2 255.255.255.03620A (config-if) #no sh3620A #conf t3620A (config) #int s0/13620A (config-if) # ip add 192.168.2.2 255.255.255.03620A (config-if) #no sh3620A #conf t3620A (config) #int s0/23620A (config-if) # ip add 192.168.3.2 255.255.255.03620A (config-if) #no sh3620A #conf t3620A (config) #int s0/33620A (config-if) # ip add 192.168.4.2 255.255.255.03620A (config-if) #no sh3620A (config)#router rip3620A (config-router)#network 192.168.1.03620A (config-router)#network 192.168.2.03620A (config-router)#network 192.168.3.03620A (config-router)#network 192.168.4.03620B #conf t 3620B (config) #int s0/03620B (config-if) # ip add 192.168.1.1 255.255.255.03620B (config-if) #no sh3620B (config)#router rip3620B (config-router)#network 192.168.1.03620B #conf t3620B (config)# access-list 10 deny 192.168.4.0 0.0.0.2553620B (config)# access-list 10 permit any3620B (config)# int s0/03620B (config-if)# ip access-group 10 in3620C #conf t3620C (config) #int s0/03620C (config-if) # ip add 192.168.2.1 255.255.255.03620C (config-if) #no sh3620C (config)#router rip3620C(config-router)#network 192.168.2.03620D #conf t3620D (config) #int s0/03620D (config-if) # ip add 192.168.3.1 255.255.255.03620D (config-if) #no sh3620D (config)#router rip3620D (config-router)#network 192.168.3.03620E #conf t3620E (config) #int s0/03620E (config-if) # ip add 192.168.4.1 255.255.255.0 注:这一段命令在所有的设备都配好后再来进行配置3620E(config-router)#network 192.168.4.0LAB12:扩展访问控制列表拓扑图:实验目的:工程部的PC不能Telnet到财务部的PC上去,但是可以访问其它所有部门实验步骤:3620A #conf t3620A (config) #int s0/03620A (config-if) # ip add 192.168.1.2 255.255.255.03620A (config-if) #no sh3620A #conf t3620A (config) #int s0/13620A (config-if) # ip add 192.168.2.2 255.255.255.03620A (config-if) #no sh3620A #conf t3620A (config) #int s0/23620A (config-if) # ip add 192.168.3.2 255.255.255.03620A (config-if) #no sh3620A #conf t3620A (config) #int s0/33620A (config-if) # ip add 192.168.4.2 255.255.255.03620A (config-if) #no sh3620A (config-router)#network 192.168.1.03620A (config-router)#network 192.168.2.03620A (config-router)#network 192.168.3.03620A (config-router)#network 192.168.4.03620B #conf t3620B (config) #int s0/0 3620B (config-if) # ip add 192.168.1.1 255.255.255.03620B (config-if) #no sh3620B (config)#router rip3620B (config-router)#network 192.168.1.03620C #conf t3620C (config) #int s0/03620C (config-if) # ip add 192.168.2.1 255.255.255.03620C (config-if) #no sh3620C (config)#router rip3620C(config-router)#network 192.168.2.03620D #conf t3620D (config) #int s0/03620D (config-if) # ip add 192.168.3.1 255.255.255.03620D (config-if) #no sh3620D (config)#router rip3620D (config-router)#network 192.168.3.03620E #conf t3620E (config) #int s0/03620E (config-if) # ip add 192.168.4.1 255.255.255.03620E (config-if) #no sh3620E (config)#router rip3620E(config-router)#network 192.168.4.03620E #conf t3620E(config)# access-list 110 deny tcp any 192.168.1.0 0.0.0.255 eq 23 3620E (config)# access-list 110 permit ip any any3620E (config)# int s0/03620E (config-if)# ip access-group 110 out的设备都配好后。
数据中心CCIE 零基础学习指南

2012年9月思科发布了他的第6 CCIE个方向——DC CCIE。
一时间DC CCIE 成为网络工程师们的一个焦点。
而他重点考察也是近年来国内外数据中心建设的热点技术。
这样就使得思科DC 方向的技术成为目前最有实用性的技术。
所谓最实用,第一,目前思科的数据中心理念在业界属于领导者地位,因此被众多厂商效仿、兼容,学习完思科DC技术之后很容易就能理解、掌握业内其他厂商的类似技术。
第二,目前思科数据中心相关产品出货量大,在能源、金融、银行、教育等行业大量应用。
每年项目级别以十亿做单位(billion)。
数据中心项目多、而掌握数据中心技术工程师相对少,这就造成了目前人才供求的矛盾。
据统计,目前从事数据中心工作的工程师已经比其他方向工程师平均工资高30%以上,有的公司甚至开到了年薪50万。
有人会问数据中心工程师待遇这么好,学相关技术一定很难吧?根据国内第一个取得Data Center CCIE的现任明教教主(CCIE#13778)分析,其实数据中心并没有想象中那么难,甚至比很多的企业二、三层网络应用都简单。
原因是网络基础架构越核心的部分要求运行越稳定、需求越简单、技术越成熟、兼容性越高、feature越少。
因此数据中心技术反倒比其他类型的网络更操作、技术更好掌握。
很多情况下厂商会把复杂的协议封装到硬件芯片中,以保持操作的简易性,最重要的是数据中心级别工程师价值不在于命令行上的表现,而在于网络基础架构的理解和整体掌控。
而整个从零基础开始的学习和考试周期也不过7个月左右,包括2个月CCNA+CCNP 、3个月DC CCNA +DC IE 理论课、2个月备考。
CCNA+CCNP部分是任何一个有志成为网络工程师必须经历的阶段,总课时90个,主要内容包括:距离矢量路由协议、链路状态路由协议、路由控制、BGP、VLAN、STP、以太通道、网关冗余技术等。
这些课程也可以看成“专业基础课”。
接下来就是3个月的“专业课”——DC CCNA 和DC IE理论部分,总课时140个。
ccie学习方法

ccie学习方法对于思科认*来说ca是最基础的,ccie又相对较高级而有难度,我们看看下面的ccie学习方法吧!首先反问自己,学习np的最现实目的是什么如果是在校大学生,中专,职高的学生。
大多目的是通过一个认*,学习更多有用的知识和技能。
找个好工作。
有个好的开始。
这样应该是把扎实的基础理论和熟练的基础实验*作放在第一位。
不要死扣、深扣每一个知识点。
很多知识不是一蹴而就的。
需要时间的磨合,还有结合工程实际;如果是上班一族,并且工作相关。
大多目的是通过认**自己这方面的**。
有个更好的发展平台。
那么应该重点放在理论的深入和实验的深入上;如果是跨行业跳槽一族,那么应该和在校生一样地学。
有了一个清晰的学习方向,接下来就好办多了。
在参加cp培训班之前,最好自己过一遍书不需要看得很细,重点是把书的知识点整体看一遍,在脑子里留个印象。
对于基本概念,基本理论最好用点心先思考一下。
不懂的留个记号(以便带着问题上课去)这样就够了。
可以去上课了。
上课怎么上,其实这也是门艺术。
每个人的学习方法不大一样。
但普遍适用的还是存在的。
最好准备一个笔记本,把上课老师的讲课框架,重点,难点,工程经验记录一下这样对于后来复习是很有作用的。
它可以提纲携领地帮助你回忆学过的知识。
对于知识点没有必要全部记录。
但是老师重点讲解的问题,难点问题,反复讲解的问题一定要做笔录;还有,最关键的就是上课一般老师讲到某一个知识点,都会讲解一些相关的工程经验。
这个是最具价值的。
其它可以不记,这个你不记,那放着的金元宝你不要,也没有人强迫你;另外和同学交流也是很必要的,我自己在学习的过程中就经常与学员讨论实验,互相学习。
每次上完课,最好回去抽时间看一下刚刚学过的知识点这是第二次看书,有了老师的讲解后,这次应该效果会好多了。
但是这一遍书是一定要看的,并且是完完整整的把书上的所有知识都看一遍,思考着看!实验脚步要跟地快,认真做每上完一门课程,比如这两个星期上完路由的课程,最好每天紧接着就把路由的实验给做掉。
ccie candidate 刷位置教程
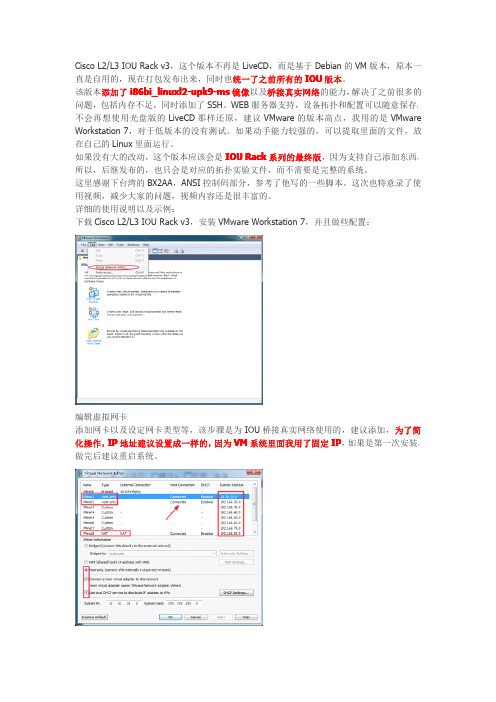
编辑网卡参数 2
编辑网卡参数 3 打开下载文件中的 Debian Console.vmx,硬件环境已经配置好了,该系统第一块网卡采 用 NAT,如果主机可以上网,并且 IP 符合上一步骤,那该 VM 系统也可以联网,比如添加 Linux 抓包软件,更新系统等。
桥接测试 L2IOU 和 L3IOU 连通性测试:
2层和3层连通性测试 和 GNS3连接,可以扩展成 ASA、IPS、主机、服务器等,都可以与 IOU 连接:
桥接 GNS3 1
桥接 GNS3 2 使用 Wireshark 抓包测试:
抓包测试 使用浏览器访问,可以存放自己的拓扑以及常用参考资料,内置了常用端口以及 Cisco R&S Short-Notes,方便查询,如果要自己添加 Web 访问的内容,目录为/var/www/:
Cisco L2/L3 IOU Rack v3,这个版本不再是 LiveCD,而是基于 Debian 的 VM 版本,原本一 直是自用的,现在打包发布出来,同时也统一了之前所有的 IOU 版本。 该版本添加了 i86bi_linuxl2-upk9-ms 镜像以及桥接真实网络的能力,解决了之前很多的 问题,包括内存不足,同时添加了 SSH、WEB 服务器支持,设备拓扑和配置可以随意保存, 不会再想使用光盘版的 LiveCD 那样还原,建议 VMware 的版本高点,我用的是 VMware Workstation 7,对于低版本的没有测试。如果动手能力较强的,可以提取里面的文件,放 在自己的 Linux 里面运行。 如果没有大的改动,这个版本应该会是 IOU Rack 系列的最终版,因为支持自己添加东西, 所以,后继发布的,也只会是对应的拓扑实验文件,而不需要是完整的系统。 这里感谢下台湾的 BX2AA,ANSI 控制码部分,参考了他写的一些脚本。这次也特意录了使 用视频,减少大家的问题,视频内容还是很丰富的。 详细的使用说明以及示例: 下载 Cisco L2/L3 IOU Rack v3,安装 VMware Workstation 7,并且做些配置:
CCIE实验室考试指南(6)

CCIE实验室考试指南(6)Lab 06 -Password Recovery Trouble ShootingLet us assume that you have a router and you don't know the enablesecret password.First and foremost you must have physical access to the router toperform password recovery. Bit 6 defines if the configuration file will be loaded from NVRAM. Since there is a password in the configurationfile that we do not know, we will want to set bit 6 to 1.If bit 6 is 0 then the router will load the configuration file fromNVRAM. If bit 6 is 1 then the router will not load the configuration file from NVRAM.Configuration Register represented in DecimalThe following are the steps to recover from a lost password.1. Turn the router off, turn the router on, and within 60 secondsissue the break sequence of your terminal emulation package. If you are using hyperterminal that would be .2. You will now be in ROM monitor mode indicated by the >prompt. Our goal here is to turn bit 6 on, so if the configurationregister is set to 0x2102, we want to change the register to0x2142. To determine the current configuration register settinguse the following command:>e/s 2000002To change the register:>o/r 0x2142To re-initialize the router>I3. After the router prompt appears get into the privileged mode and copy the backup configuration file to RAM.4. Get into the configuration mode and key in your new password5. Change the configuration register back to original setting6. Perform a no-shut on all interfaces7. Copy the running configuration to NVRAMAll of the steps are in boldSystem Bootstrap, Version 5.2(8a),RELEASE SOFTWARECopyright (c) 1986-1995 by cisco Systems2500 processor with 16384 Kbytesof main memoryAbort at 0x10EA87C (PC) break sequenceissued here>e/s20000022000002: 2102 use q to quit the examine mode>o/r0x2142>iSystem Bootstrap, Version 5.2(8a),RELEASE SOFTWARECopyright (c) 1986-1995 by cisco Systems2500 processor with 16384 Kbytesof main memoryF3: 7564496+94188+304272 at 0x3000060--- System Configuration Dialog --->At any point you may enter a question mark "?"for help.Use ctrl-c to abort configurationdialog at any prompt.Default settings are in square brackets "[ ]."Would you like to enter the initialconfiguration dialog? [yes]: nPress RETURN to get started!%LINK-3-UPDOWN: Interface Ethernet0,changed state to up%LINK-3-UPDOWN: Interface Ethernet1,changed state to up%LINK-3-UPDOWN: Interface Serial0,changed state to down%LINK-3-UPDOWN: Interface Serial1,changed state to down%LANCE-5-COLL: Unit 0, excessivecollisions. TDR=6%LINEPROTO-5-UPDOWN: Line protocol onInterface Ethernet0,changed state to down%LINEPROTO-5-UPDOWN: Line protocol onInterface Ethernet1,changed state to down%LINEPROTO-5-UPDOWN: Line protocol onInterface Serial0,changed state to down%LINEPROTO-5-UPDOWN: Line protocol onInterface Serial1,changed state to down%SYS-5-RESTART: System restarted --Cisco Internetwork Operating System SoftwareIOS (tm) 2500 Software (C2500-J-L),Version 11.2(3),RELEASE SOFTWARE (fc2)Copyright (c) 1986-1996 by cisco Systems, Inc. Compiled Mon 30-Dec-96 21:28 by ajchopra%LINK-5-CHANGED: Interface Ethernet0,changed state to administratively down%LINK-5-CHANGED: Interface Ethernet1,changed state to administratively down%LINK-5-CHANGED: Interface Serial0,changed state to administratively down%LINK-5-CHANGED: Interface Serial1,changed state to administratively down Router>enRouter#copy start runatlanta#atlanta#config tEnter configuration commands, one per line. End with CNTL/Z.atlanta(config)#enable secret passwordatlanta(config)#config-reg 0x2102atlanta(config)#int e0atlanta(config-if)#no shutatlanta(config)#int e1atlanta(config-if)#no shutatlanta(config-if)#int s0atlanta(config-if)#no shutatlanta(config)#int s1atlanta(config-if)#no shutatlanta(config-if)#atlanta#%SYS-5-CONFIG_I: Configured from consoleby consoleatlanta#copy run startBuilding configuration...[OK]atlanta#Solution:First and foremost you must have physical access to the router toperform password recovery. Bit 6 defines if the configuration file will be loaded from NVRAM. Since there is a password in the configurationfile that we do not know, we will want to set bit 6 to 1.If bit 6 is 0 then the router will load the configuration file fromNVRAM. If bit 6 is 1 then the router will not load the configuration file from NVRAM.Configuration Register represented in DecimalThe following are the steps to recover from a lost password.1. Turn the router off, turn the router on, and within 60 secondsissue the break sequence of your terminal emulation package. Ifyou are using hyperterminal that would be .2. You will now be in ROM monitor mode indicated by the >prompt. Our goal here is to turn bit 6 on, so if the configurationregister is set to 0x2102, we want to change the register to0x2142. To determine the current configuration register settinguse the following command:>e/s 2000002To change the register:>o/r 0x2142To re-initialize the router>I3. After the router prompt appears get into the privileged modeand copy the backup configuration file to RAM.4. Get into the configuration mode and key in your new password5. Change the configuration register back to original setting6. Perform a no-shut on all interfaces7. Copy the running configuration to NVRAMAll of the steps are in boldSystem Bootstrap, Version 5.2(8a),RELEASE SOFTWARECopyright (c) 1986-1995 by cisco Systems2500 processor with 16384 Kbytesof main memoryAbort at 0x10EA87C (PC) break sequenceissued here>e/s20000022000002: 2102 use q to quit the examine mode>o/r0x2142>iSystem Bootstrap, Version 5.2(8a),RELEASE SOFTWARECopyright (c) 1986-1995 by cisco Systems2500 processor with 16384 Kbytesof main memoryF3: 7564496+94188+304272 at 0x3000060System Configuration Dialog ---At any point you may enter a question mark "?"for help.Use ctrl-c to abort configurationdialog at any prompt.Default settings are in square brackets "[ ]."Would you like to enter the initialconfiguration dialog? [yes]: nPress RETURN to get started!%LINK-3-UPDOWN: Interface Ethernet0,changed state to up%LINK-3-UPDOWN: Interface Ethernet1,changed state to up%LINK-3-UPDOWN: Interface Serial0,changed state to down%LINK-3-UPDOWN: Interface Serial1,changed state to down%LANCE-5-COLL: Unit 0, excessivecollisions. TDR=6%LINEPROTO-5-UPDOWN: Line protocol onInterface Ethernet0,changed state to down%LINEPROTO-5-UPDOWN: Line protocol onInterface Ethernet1,changed state to down%LINEPROTO-5-UPDOWN: Line protocol onInterface Serial0,changed state to down%LINEPROTO-5-UPDOWN: Line protocol onInterface Serial1,changed state to down%SYS-5-RESTART: System restarted --Cisco Internetwork Operating System Software IOS (tm) 2500 Software (C2500-J-L),Version 11.2(3),RELEASE SOFTWARE (fc2)Copyright (c) 1986-1996 by cisco Systems, Inc. Compiled Mon 30-Dec-96 21:28 by ajchopra%LINK-5-CHANGED: Interface Ethernet0, changed state to administratively down%LINK-5-CHANGED: Interface Ethernet1, changed state to administratively down%LINK-5-CHANGED: Interface Serial0, changed state to administratively down%LINK-5-CHANGED: Interface Serial1, changed state to administratively down Router>enRouter#copy start runatlanta#atlanta#config tEnter configuration commands, one per line. End with CNTL/Z.atlanta(config)#enable secret password atlanta(config)#config-reg 0x2102atlanta(config)#int e0atlanta(config-if)#no shutatlanta(config)#int e1atlanta(config-if)#no shutatlanta(config-if)#int s0atlanta(config-if)#no shutatlanta(config)#int s1atlanta(config-if)#no shutatlanta(config-if)#atlanta#%SYS-5-CONFIG_I: Configured from consoleby consoleatlanta#copy run startBuilding configuration...[OK] atlanta#。
ccie考试流程

ccie考试流程
CCIE考试流程是指Cisco认证专家(CCIE)考试的具体步骤和流程。
CCIE认证是全球网络工程师的最高荣誉,被誉为“网络工程师
的奥林匹克”。
其考试流程通常分为以下几个步骤:
1. 报名和缴费
考生需要在Cisco官网上进行注册和缴费,并选择考试地点和时间。
CCIE考试的费用相对较高,考生需支付一定的考试费用。
2. 准备考试
考生需要在考试前进行充分的准备,包括学习相关知识、参加培训课程、做模拟题等。
由于CCIE考试难度较大,考生需要充分准备。
3. 考试
考试时,考生需要在规定的时间内完成考试内容。
CCIE考试通
常包括两个部分:笔试和实验。
笔试部分包括选择题、填空题、简答题等,实验部分则需要考生在实际环境中进行网络设计和配置的应用。
4. 成绩和证书
考试结束后,考生可以在官网上查询成绩。
如果考试合格,则可以获得CCIE证书,成为Cisco认证专家。
总之,CCIE考试是全球网络工程师的最高荣誉,其考试流程相
对较为复杂,需要考生充分准备和认真对待。
- 1 -。
关于CCIE你不得不看的攻略

关于CCIE你不得不看的攻略关于CCIE你不得不看的攻略CCIE全称Cisco Certified Internetwork Expert,是美国Cisco公司于1993年开始推出的专家级认证考试。
被全球公认为IT业最权威的认证,是全球Internetworking领域中最顶级的认证证书。
目前,CCIE持有者占思科认证总人数还不足3%,全球网络从业者的1%不到(思科官方数据)。
Cisco认证主要提供工程师在今日快速变动的网络环境中驾驭Cisco 设备所需的专业知识。
CCIE是Cisco(除了新推出的CCA以外)最高级技术能力的认证,位于Cisco金字塔认证体系中塔尖,也是IT界公认的最权威、最受尊重证书之一,2003年被评为全球十大IT认证榜首,具有IT终极认证的美称。
取得CCIE证书除了整个行业的认同之外,CCIE也是你不断持有最新网络知识的指标;你将会在你的专业技术领域中成为一位最具竞争力的人。
CCIE全球人数统计:Total of Worldwide CCIEs20881 2010-3-5更新Routing and Switching (RS) 路由交换CCIEs 17765 Security 安全CCIEs 2407Service Provider 电信运营商CCIEs 1764Voice 语音CCIEs 153Storage Networking 存储CCIEs 1201Wireless 无线CCIEs 21互联神州可可QQ:1565870299 手机:136********一、如何获得CCIE认证CCIE认证目前有六个方向:Routing and Switching (RS) 路由交换CCIE 350-001Security 安全CCIE 350-018Service Provider 电信运营商CCIE 350-029Voice 语音CCIE 350-030Storage Networking 存储CCIE 350-040Wireless 无线CCIE 350-050获得CCIE需要取得以下课程考试:1、CCIE资格考试(即上面提供的笔试考试代码)第一步是CCIE资格考试,必须通过理论考试部分才能进入下一阶段的实验考试。
CCIE详解

CCIE 详解西安工大瀚洋苏老师整理一. 什么是CCIECCIE 是思科公司的最顶级认证(CCA 由于门槛过高,基本不被大家考虑,所以暂且定义CCIE 为最顶级认证),总共分为六个方向:路由交换、安全、运营商、语音、无线、存储。
CCIE 全称为思科认证互联网络技术专家,所以CCIE 的定位就是专家级、架构师级别的认证,从认证难度和知识量上面都是最大的。
CCIE 认证目的旨在通过认证的人能够具有设计、部署大型企业网络、运营商级别网络的能力。
注意,是设计,不仅仅是部署。
现在国内CCIE 人数不到4000人,全球3万多人。
每名通过CCIE 的人都具有一个CCIE 编号,编号从1024开始,一般认为4位数编号的CCIE 都是资历较老的人。
二. 为什么要学CCIECCIE 是网络技术专家级别的象征,也是企业对于架构设计人员的要求。
企业对于CCIE 的需求来源于三个原因:第一,CCIE 认证是专家级技术的象征,是企业筛选评判人才的重要标准之一。
第二,CCIE 是思科代理商自制的必备条件,比如某企业要申请金牌代理,就必须拥有要求数量的CCIE。
第三,由于CCIE 的普遍认知认可程度,CCIE 也是客户评判一个企业实力的标鸿鹄论坛 b b s .h h 010.c o m准。
所以,对于网络相关从业人员,如果想要有一个较好的职业发展,CCIE 不是必须,但是却是非常有效的加速剂。
三. 我们该如何看待CCIECCIE 有用?CCIE 无用?经常看到很多人争论这个话题。
每次看到这个话题我都想起了以前有本书叫JAVA 夜未眠里面的一片文章,认证有用无用论。
其实这种争论的原因只有一点,CCIE 也有Paper,所谓的paper 就是背题库背出来的,因为2008年9月前,CCIE 考试没有面试,没有固定的排错,再加上很容易能够买到CCIE 版本(都是原题),CCIE 考试变的不是很困难。
这样的结果就是很多CCIE(个人认为80%)都是比较水的,我见过很多CCIE 连CCNP 水平都没有。
很具有参考意义的CCIElab组合,快戳进来看知识点吧!

很具有参考意义的CCIElab组合,快戳进来看知识点吧!2018年思科华为报班咨询请点我My Feedback============Troubleshooting : TS1Diagnostics : H3Configuration : H2+General recommendation: don't memorize, understand it, understand the technology andunderstand the scenario.the good thing about SPOTO is that it draws your attention to the areas you have missed inyour training. I don't think I could pass without SPOTO workbooks.A little of my history, I started with INE, reviewed all videos, main CCIE course in INE ismore than 100 hours training, it took more than 300 hours to review them all in the firsttime. Second time I did the review and take a note, old school style pencil and normalpaper notebook (it has been very useful when I needed to review small things and refreshmy memory). then I started to do the practice for all INE practices. I had a VMWare env andCisco CSR (virtual router). if required, I reviewed some of the INE training for the third timeand updated my notes.After all of the training with INE, I moved to SPOTO and started to practice on SPOTOworkbook. for the SPOTO workbook, I tried to understand what is the whole scenario, whythese kind of requirement are in place and tried to map them to some kind of workrequirement. it helped me to understand the traffic flow and logic behind the SPOTOworkbooks.====================Troublshooting - TS1====================I did all the SPOTO TS Labs and get completely familiar with the scenario, I finished theTS in 90 Min.================Diagnostics - H3================Same as Spoto's workbook.====================================Configuration - H2+====================================General speaking a lot compatible with SPOTO work book, only 4.1 about QOS, it was saying "do not use access list". I left it un-answered.Basic config (time consuming) were already done, e.g. putting the branch routers in the VRF and re-enter the IP address. it was good as you can focus on main items.Important note: although basic configs where there, some of the IP addresses where not configured properly, I was troubleshooting the BGP connection and finally realized that the IP address is not based on the diagram. So, verify the IPs and basic config. one router-id not configured correctly and one BGP network command, was used for a loopback interface with the wrong IP, needed to correct the network in BGP.Try to have some kind of guideline for yourself, I explain more, I had in my mind that I have to put 6 of "ip nhrp" command in tunnel, then I put the rest of commands in front of each (e.g ip nhrp nhs 1.2.3.4). during the exam , there is a lot of stress, I didn't want to forget one command and waste my time for troubleshooting, so for configuration of the DMVPN, I knew that I need 6 "ip nhrp" and 4 "tunnel " commands. Similar concept for iBGP or MPLS.My last recommendation, keep the last half an hour, I did one more review for the whole requirements and realized some small items were missed, fixed them and verified again.Good luck all in your hard way and God bless you and your family(CCIE path gives you and your family a hard time)}。
CCIE培训

考试介绍
考试介绍
CCIE认证考试目前在考的共分为6类 : Routing & Switching(R&S)路由交换CCIE Service Provider(SP)电信运营商CCIE Security安全CCIE collaboration协作CCIE wireless无线CCIE Data Center数据中心CCIE CCIE考试包含笔试和实验室LAB考试两部分:CCIE笔试包括100道多选题,时长2小时,笔试国内可以在VUE/ 授权思科培训考试中心完成;实验室LAB考试可以在北京或香港CCIE考场完成。
培训特色
培训特色
全程真机试验,CCIE资深讲师,推荐就业
培训课时
培训课时
培训课时:理论课程10天实验课程,实验周期3个月 培训价格:请咨询来自上课地点上课地点
参见各个城市授权思科培训中心;
谢谢观看
CCIE培训
思科认证网络专家培训
01 考试介绍
03 培训特色 05 上课地点
目录
02 课程介绍 04 培训课时
基本信息
CCIE培训,是思科认证网络专家培训。CCIE(思科认证网络专家) CCIE路由和交换认证证明了一名网络专家 对当今复杂集成网络进行执行和排错的能力。获得CCIE路由和交换认证证明你具备对复杂整合式网络进行筹划、 准备、运营、监控和故障排除的专业级技能CCIE认证是对网络专家个人技能的最高肯定。
课程介绍
课程介绍
CCIE课程目标 CCIE(思科认证网络专家) CCIE路由和交换认证证明了一名网络专家对当今复杂集成网络进行执行和排错的 能力。获得CCIE路由和交换认证证明你具备对复杂整合式网络进行筹划、准备、运营、监控和故障排除的专业级 技能。CCIE认证是对网络专家个人技能的最高肯定。 CCIE适合人群 具有CCNP基础尤佳,最好有至少三至五年的工作经验。 对网络设备操作管理有兴趣,希望投入网络领域职场者。 CCIE路由和交换大纲v4.0 1.实现第二层技术 2.实现IPv4 3.实现IPv6 4.实现MPLS第三层VPN
CCIE考试流程

CCIE RS LABV5.0第一步 :考试开始界面考试时,桌子上会有几张纸,其中一张会有你的个人信息,考试登录的用户名和密码,输入进去直接登录。
注意:密码包含数字,字母,大小写,看清楚,有可能紧张会输错 。
C C I E R S V 5.0@C u t e s k第二步:点Begin Lab 开始考试第三步:开始Trouble Shooting 排错考试TS 考试时间 :<= 2h + 30min 界面上会显示倒计时时间。
注意:TS 里面不要随便删除路由,ACL 等进入TS 界面,看到TS 整个拓扑图,有可能刚进去看不到TS 整个拓扑,也不要紧张,直接找考官,貌似退出,重新登录就好了。
C C I E R S V 5.0@C u t e s k点击Questions & Diagrams ,可以看到单独的每个部分的小拓扑。
点击ALL Questions ,可以看到所有的题目。
注意:End Section 如果你点了,就默认你TS 交卷了。
C C I E R S V 5.0@C u t e s kC C I E R S V 5.0@C u t e s k这个是题目要求,要你所达到的效果和题目上要求必须一致点击拓扑中的设备,就会弹出配置界面了。
拓扑中有的设备是打开不了的。
C C I E R S V 5.0@C u t e s k在TS 考试中,希望做完一题保存一题,wr 一下 。
如果在TS 考试要结束时,没有来得及点End Section ,界面会自动弹出到刚开始的登录界面,输入用户名和密码,就到了第二部分DIAGC C I E R S V 5.0@C u t e s k第四步:开始DIAG这部分考试没有设备,只有一些拓扑图,会让你根据一下邮件,拓扑图,还有配置等消息,判断出具体错误,让你做出选择。
C C I E R S V 5.0@C u t e s kDIAG 有30min ,不可以提前交卷的。
LAB1 cisco设备基本操作
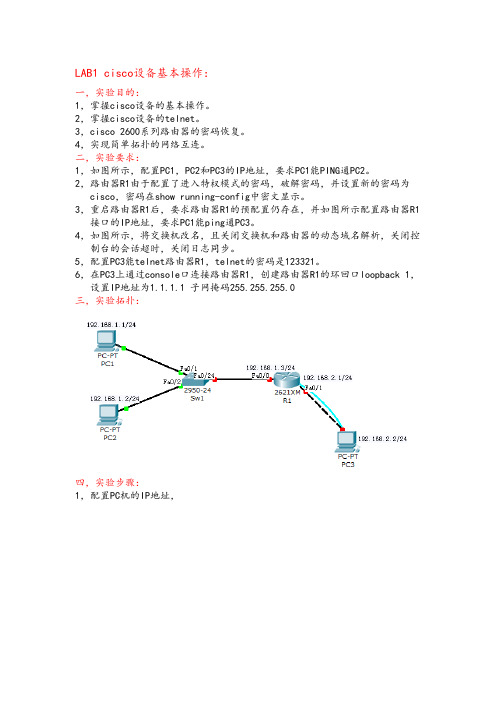
LAB1 cisco设备基本操作:一,实验目的:1,掌握cisco设备的基本操作。
2,掌握cisco设备的telnet。
3,cisco 2600系列路由器的密码恢复。
4,实现简单拓扑的网络互连。
二,实验要求:1,如图所示,配置PC1,PC2和PC3的IP地址,要求PC1能PING通PC2。
2,路由器R1由于配置了进入特权模式的密码,破解密码,并设置新的密码为cisco,密码在show running-config中密文显示。
3,重启路由器R1后,要求路由器R1的预配置仍存在,并如图所示配置路由器R1接口的IP地址,要求PC1能ping通PC3。
4,如图所示,将交换机改名,且关闭交换机和路由器的动态域名解析,关闭控制台的会话超时,关闭日志同步。
5,配置PC3能telnet路由器R1,telnet的密码是123321。
6,在PC3上通过console口连接路由器R1,创建路由器R1的环回口loopback 1,设置IP地址为1.1.1.1 子网掩码255.255.255.0三,实验拓扑:四,实验步骤:1,配置PC机的IP地址,单击IP地址配置,进入以下界面:填入正确的IP地址信息即可。
2,单击路由器图标,进入以下界面,重启路由器。
然后切换至命令行模式,在路由器的启动过程中按住Ctrl+Break键,笔记本电脑需要按住Fn键+Ctrl+Break键。
进入路由器的rommon模式。
在该模式下使用rommon1>confreg 0x2142命令修改路由器的配置寄存器的值,使路由器在下次重启时不要加载启动配置,从而跳过特权模式口令的验证,进入特权模式。
3,重启路由器后,系统会提示以下信息:--- System Configuration Dialog ---Continue with configuration dialog? [yes/no]:n提示我们进入向导模式,我们选择no。
4,进入特权模式后,使用Router#copy startup-config running-config命令加载启动配置,然后全局模式下设置新口令R1(config)#enable secret cisco。
ccie认证之路高级课程实验指南

CCIE认证,即思科认证云计算(Cisco Certified Internetwork Expert),是世界顶尖的网络专业人员认证体系,它对考生的知识技能要求非常高,而CCIE认证的培训课程更是困难重重,考生必须经历层层筛选才能参加培训课程。
CCIE认证一般分为Routing and Switching(路由和交换)、Security(安全)、Service Provider (服务提供商)、Data Center(数据中心)和Wireless(无线)五大专业领域。
CCIE认证的高级课程实验是CCIE考试中的重要部分,通过参加高级课程实验,考生可以更好地掌握专业知识和技能,提升自己的网络工程能力,为通过CCIE认证考试打下坚实的基础。
以下是CCIE认证高级课程实验的指南,帮助考生更好地准备和参加课程。
1. 选择合适的高级课程实验CCIE认证的高级课程实验分为不同的专业领域,考生应根据自己的专业方向和兴趣选择合适的实验课程。
如果考生的专业领域是数据中心,应当选择相应的数据中心高级课程实验,以便更好地学习和掌握相关知识和技能。
2. 提前了解课程内容在参加高级课程实验前,考生应提前了解课程的内容和要求,对实验中可能涉及的知识点和技能有一定的了解和准备。
这有助于考生更好地把握课程的重点,提高学习效率。
3. 注重实验操作高级课程实验是以实际操作为主要学习手段的课程,考生应注重实验操作,积极参与实验课程中的实际操作练习,提升自己的实际操作能力和技能水平。
4. 多做实验练习参加高级课程实验的考生应多做实验练习,通过不断的实际操作和练习,加深对知识和技能的理解和掌握,提高自己的网络工程能力。
5. 结合理论知识和实际操作在参加高级课程实验的过程中,考生应注重理论知识和实际操作的结合,通过理论知识的学习和实际操作的练习相结合,更好地掌握和理解专业知识和技能。
6. 多交流、多讨论参加高级课程实验的考生应多与老师和同学交流、讨论,积极参与课程中的讨论和交流活动,借鉴他人的学习方法和经验,取长补短,更好地提高自己的学习效果。
CCIE-Security-lab-3.0演示教学
1.04.
Understanding Firewall vs. Transparent Mode
1.05.
Understanding Multiple Security Contexts
1.06.
Understanding Shared Resources for Multiple Contexts
The nat-control Command vs. no nat-control Command
1.36.
Enabling Address Translation (NAT, Global, and Static)
1.37.
Dynamic NAT
1.38.
Dynamic PAT
1.39.
Static NAT
CCIE Security Lab Exam v3.0 Checklist
Expansion of the Security Lab v3.0 Exam Topics(Blueprint)
(二)创业弱势分析Detailed Checklist of Topics to Be Covered
Please be advised that this topic checklist is not an all-inclusive list of Cisco CCIE Security lab exam subjects. Instead, we provide this outline as a supplement to the existing lab blueprint to help candidates prepare for their lab exams. Other relevant or related topics may also appear in the actual lab exam.
CCIE实验室考试指南(2)
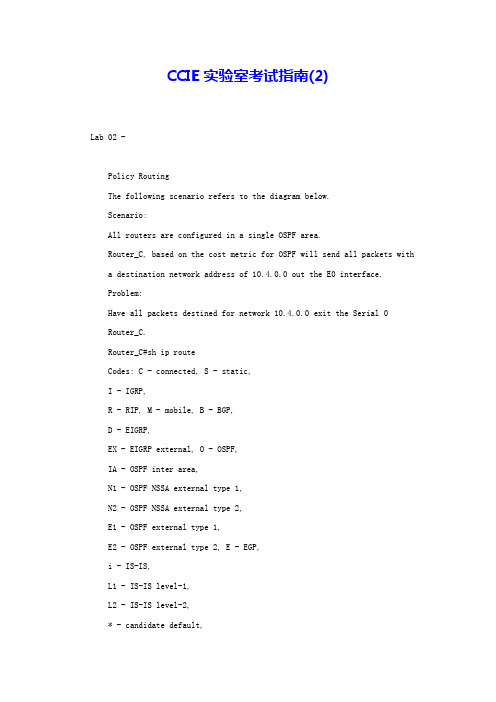
CCIE实验室考试指南(2)Lab 02 -Policy RoutingThe following scenario refers to the diagram below.Scenario:All routers are configured in a single OSPF area.Router_C, based on the cost metric for OSPF will send all packets witha destination network address of 10.4.0.0 out the E0 interface.Problem:Have all packets destined for network 10.4.0.0 exit the Serial 0Router_C.Router_C#sh ip routeCodes: C - connected, S - static,I - IGRP,R - RIP, M - mobile, B - BGP,D - EIGRP,EX - EIGRP external, O - OSPF,IA - OSPF inter area,N1 - OSPF NSSA external type 1,N2 - OSPF NSSA external type 2,E1 - OSPF external type 1,E2 - OSPF external type 2, E - EGP,i - IS-IS,L1 - IS-IS level-1,L2 - IS-IS level-2,* - candidate default,U - per-user static route,o - ODRGateway of last resort is not set10.0.0.0/16 is subnetted, 3 subnetsC 10.2.0.0 is directly connected,Serial0C 10.3.0.0 is directly connected,Ethernet0O 10.4.0.0 [110/74] via 10.3.0.1,00:00:13, Ethernet0 Solution:Policy routing will allow you to configure a route map. The route map will be used by the router in lieu of destination routing.In this scenario the best route to the destination network 10.4.0.0 is to go ethernet. We want to force the route to take the serial connection.Step 1Configure a route map tag. I chose "takeserial".Step 2Point the route map to the tag. Don't let the 10 shake you it is just a sequence number.Router_C(config)#route-maptakeserial permit ?Sequence to insert to/deletefrom existing route-map entryStep 3Identify which packet should be route mapped. In our example we will match the ip address of access list 1.Step 4Tell the router where to send the matched packet. We will send thepackets to Serial 0.Current configuration:!version 11.2!hostname Router_C!!!interface Ethernet0ip address 10.3.0.3 255.255.0.0!interface Ethernet1ip address 10.1.0.3 255.255.0.0ip policy route-map takeserial*Step 1!interface Serial0ip address 10.2.0.1 255.255.0.0clockrate 38400!interface Serial1no ip addressshutdown!router ospf 100network 10.0.0.0 0.255.255.255 area 0!no ip classlessaccess-list 1 permit 10.1.0.5route-map takeserial permit 10 *Step 2match ip address 1 *Step 3set interface Serial0 *Step 4!line con 0line aux 0line vty 0 4login!endNow we will ping 10.4.0.2 from Workstaton A: Router_C#debug ip policyPolicy routing debugging is onRouter_C#IP: s=10.1.0.5 (Ethernet1), d=10.4.0.2,len 74, policy matchIP: route map takeserial, item 10,permitIP: s=10.1.0.5 (Ethernet1),d=10.4.0.2 (Serial0),len 74, policy routedIP: Ethernet1 to Serial0 10.4.0.2IP: s=10.1.0.5 (Ethernet1), d=10.4.0.2,len 74, policy matchIP: route map takeserial, item 10,permitIP: s=10.1.0.5 (Ethernet1),d=10.4.0.2 (Serial0),len 74, policy routedIP: Ethernet1 to Serial0 10.4.0.2IP: s=10.1.0.5 (Ethernet1), d=10.4.0.2,len 74, policy matchIP: route map takeserial, item 10, permitIP: s=10.1.0.5 (Ethernet1),d=10.4.0.2 (Serial0),len 74, policy routedIP: Ethernet1 to Serial0 10.4.0.2IP: s=10.1.0.5 (Ethernet1), d=10.4.0.2, len 74, policy matchIP: route map takeserial, item 10, permitIP: s=10.1.0.5 (Ethernet1),d=10.4.0.2 (Serial0),len 74, policy routedIP: Ethernet1 to Serial0 10.4.0.2。
思科CCIE的学习方法和能力定位经验之谈

思科CCIE的学习⽅法和能⼒定位经验之谈思科CCIE的学习⽅法和能⼒定位经验之谈 今天凌晨⼀点,踢完球回到实验室,下午要讲mpls,虽然已经很熟悉,但还是想看看有没有什么新思路,所以⼜作了⼀下课程准备,两点的时候准备回去休息了,去np课室巡查了⼀下,发现movie-time还没结束,最后排有个学员正看得津津有味,他刚才跟我们⼀起踢得很累,本应该早早休息,准备明天的实验,为什么这个时候还在看电影呢,我就把他喊到了电梯间,跟他聊起来。
这个学员来了好⼏个⽉,实验也在敲,做完了⼀遍,但是回过头也忘得差不多了,他跟我说很迷茫,不知道怎么学习,我跟他说你的根本问题是没有学习的压⼒和解决问题的决⼼。
什么是学习压⼒,我没办法⽤⾔语向⼤家传递这种压⼒,因为⼤家没切⾝感受到,可能是没有⼯作经验,没有在社会中历练过,也可能是所处的境况⼀直很顺利,因此⼀直认为学习是个很轻松的过程。
有些学员在考完ie后投⼊了⼯作岗位,开始时把⾃⼰想得很⾼,认为是ccie了,可以享受更⾼的报酬,等真正碰到实际问题了⼜束⼿⽆策,谁问都不懂,⼀下⼦⼼理落差就出来了,不敢⾯对这样的局⾯,不敢去⾯对各种各样的挑战,期望像学校⼀样,有⼈跟你耐⼼讲解,有⼈给你⼀步⼀步作教导,总⽽⾔之,对⾃⼰能⼒的认同⼜降到了最低。
我真的很想给所有学员制造出学习压⼒,昨天⼀个朋友告诉我⼀间很⽜的集成公司的⽼总这样看待实验室⾥⾛出来的ccie,他们是敲版本的ccie,他们是paper ie,不过反正便宜,他们能接受,只是不作ccie看待⽽已。
我当时为了挽回⾯⼦,这样回复他,学员们也付出了数以百计的实验时间,也曾在实验室⾥通宵达旦,他们有着对技术的狂热和憧憬,如果没有这个证书,他们⼀直碰不到他们渴望着的⼯作机会和项⽬机会,我倒觉得我们交出来的是有意志品格的ie,⾄于是不是paper,那要过两年才知道。
回过头来想⼀想,我们的学员真的能做到有数以百计数以吨计的实验量吗,真的有通宵达旦去解决⼀个问题吗,真的能珍惜来之不易的学习和考试费⽤吗。
思科交换机重刷IOS版本以及败处理方法
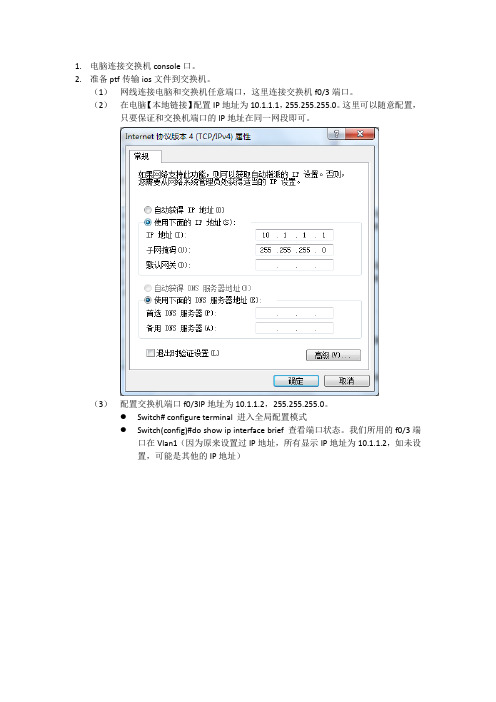
1.电脑连接交换机console口。
2.准备ptf传输ios文件到交换机。
(1)网线连接电脑和交换机任意端口,这里连接交换机f0/3端口。
(2)在电脑【本地链接】配置IP地址为10.1.1.1,255.255.255.0。
这里可以随意配置,只要保证和交换机端口的IP地址在同一网段即可。
(3)配置交换机端口f0/3IP地址为10.1.1.2,255.255.255.0。
●Switch# configure terminal 进入全局配置模式●Switch(config)#do show ip interface brief 查看端口状态。
我们所用的f0/3端口在Vlan1(因为原来设置过IP地址,所有显示IP地址为10.1.1.2,如未设置,可能是其他的IP地址)●Switch(config)#interface vlan 1●Switch(config-if)ip address 10.1.1.2 255.255.255.0 设置IP(4)在交换机上ping 电脑配置的IP地址,在电脑上PING交换机上的IP地址,如果能够PING通,则可以传输数据。
(5)Show flash 查看现在交换机上的文件。
(6)Copy flash tftp,然后根据命令提示,备份原来机器上的IOS到FTP服务器上(7)通过show flash发现flash中剩余空间足够安装新的IOS文件,则不需要删除文件。
但是这演示怎么删除文件switch#delete flash:c3560-ipbasek9-mz.122-55.SE9.bin将原来的IOS文件删除,因为前面已经备份过,所以可以放心删除,实在不行还可以恢复。
删除之后show flash 发现,原来的IOS文件已经不在了(8)传输IOS文件到交换机copytftp flash,根据命令提示,将文件传到flash3.全局模式下Boot system flash + filename 可以设置下次启动时的启动配置4.退出全局模式,show boot 可以看到目前的启动项为上一步设置的启动项5.Reload 重启交换机。
- 1、下载文档前请自行甄别文档内容的完整性,平台不提供额外的编辑、内容补充、找答案等附加服务。
- 2、"仅部分预览"的文档,不可在线预览部分如存在完整性等问题,可反馈申请退款(可完整预览的文档不适用该条件!)。
- 3、如文档侵犯您的权益,请联系客服反馈,我们会尽快为您处理(人工客服工作时间:9:00-18:30)。
CCIE考试必备:CCIE LAB刷位置教程注册CCO帐号:
浏览器内输入思科官方网站:,会出现如下界面:
点击-【Register】-注册,会出现如下界面:
请按思科的要求填写相应的选项【注意:请使用英文,中文无法完成注册】
填写完成后点击【Submit】确认完成注册。
完成后会有一个提示,这个时候你就可以去你的邮箱查看思科发给你的邮件,按相应要求激活你的CCO帐号即可。
CCIE candidate刷位置过程
请点击倒数第二项【Training&Events】,会出现如下界面,请点击【Training&Events】
会出现如下界面,请点击【Certifications】(图中黄色位置)
会出现如下界面,请点击【CCIE Routing&Switching】(图中黄色位置)(这里以路由交换CCIE为例,如果不是请选择其他)
会出现如下界面,请点击【Schedule and Pay for Lab Exam】(图中黄色位置)
会出现如下界面,请点击【Scheduling&Payment】(图中黄色位置)
会出现如下界面,请点击【Schedule a Lab Exam Online】(图中黄色位置)
会出现如下界面,请使用您刚才注册的CCO帐号登录。
登录成功后,会出现如下界面,请在相应的文本框里输入对应的信息(信息见笔试成绩单)
输入完成后,点击【LOGIN】登录。
会出现如下界面,点击【Schedule a Lab Exam】(图中黄色位置)
完成后会出现如下界面,请正确填写相应的信息[好像这个是收CCIE证书的信息,所以请认真对待](注意途中为一部分),填写完成后,请点击【Confirm】确认,还会出现一个确定的窗口,如果无误,请点击【Confirm】确认。
完成后会出现如下界面:
请填写文本框内的相应信息(图中方框内位置)。
这里做一下解释:Lab Exam Location:考点的选择
Earliest lab date:你想预订什么时候的位置,这个是最早的时间
Lab type:考试类型,比如Routing&Switching
输入完相应的信息后点击【Show Available Lab Date】,会出现如下界面:。
