HP EVA及HP P6000系列存储设备WWN号修改及许可添加
惠普6000系列存储安装文档中文

概述.....................................................................................................................................16 提供足够的地面结构支撑........................................................................................................16 提供充分的清洁空间和通风环境..............................................................................................16 提供足够的电源.....................................................................................................................16 拆卸产品包装........................................................................................................................16
目录
1 检查并确认计划.........................................................................................5
HP Color LaserJet Pro MFP M282-M285 用户指南说明书

用户指南
/videos/LaserJet /support/ljM282MFP
HP Color LaserJet Pro MFP M282-M285
用户指南
版权和许可证
© Copyright 2019 HP Development Company, L.P.
Microsoft®、Windows®、Windows® XP 和 Windows Vista® 是 Microsoft Corporation 在美国的注册商标。
UNIX® 是 The Open Group 的注册商标。
目录
1 打印机概述 ............................................................................................................................................................................................... 1 警告图标 ................................................................................................................................................................................... 2 打印机视图 .............................................................................................................................................................................. 3 打印机前视图 ..................................................................................................................................................... 3 打印机后视图 ..................................................................................................................................................... 4 控制面板视图 ..................................................................................................................................................... 5 主页屏幕布局 ................................................................................................................................. 6 如何使用触摸屏控制面板 .......................................................................................................... 7 打印机规格 .............................................................................................................................................................................. 8 技术规格 .............................................................................................................................................................. 8 支持的操作系统 ................................................................................................................................................. 8 移动打印解决方案 .......................................................................................................................................... 10 打印机尺寸 ....................................................................................................................................................... 11 功耗、电气规格和噪声发射 ........................................................................................................................ 12 操作环境范围 ................................................................................................................................................... 12 打印机硬件设置与软件安装 ............................................................................................................................................. 13
HP笔记本计算机用户指南说明书

用户指南©Copyright 2014 Hewlett-Packard Development Company, L.P. Microsoft 和 Windows 是 Microsoft 公司集团在美国的注册商标。
本文档中包含的信息如有更改,恕不另行通知。
随 HP 产品和服务附带的明确有限保修声明中阐明了此类产品和服务的全部保修服务。
本文档中的任何内容均不应理解为构成任何额外保证。
HP 对本文档中出现的技术错误、编辑错误或遗漏之处不承担责任。
第 1 版:2014 年 11 月文档部件号:800889-AA1产品通告本指南介绍大多数机型的常用功能。
您的笔记本计算机上可能未提供某些功能。
并非所有版本的 Windows 中都提供所有功能。
该电脑可能需要升级和/或单独购买的硬件、驱动程序和/或软件才能充分利用 Windows 功能。
请转到 以获得详细信息。
要访问最新的用户指南,请转至/support,然后选择您所在的国家/地区。
选择驱动程序和下载,然后按照屏幕上的说明进行操作。
软件条款如果安装、复制、下载或以其他方式使用此笔记本计算机上预安装的任何软件产品,即表明您同意受 HP 最终用户许可协议 (EULA) 条款的约束。
如果您不接受这些许可条款,唯一的补救办法是在14 天内将全部产品(硬件和软件)原封不动地退回购买处,并依据经销商的退款政策获得全额退款。
如需了解任何其他信息,或要求按电脑价格全额退款,请与您的经销商联系。
目录1 获取信息 (1)2 安装您的电脑 (3)连接到 Internet(仅适用于部分型号) (4)3 导航该屏幕 (5)使用触摸手势 (5)使用键盘和鼠标 (5)4 保护您的电脑 (8)电脑的安全功能 (8)5 故障排除 (9)电脑无法启动 (9)电源 (10)屏幕(显示器)(仅适用于部分型号) (10)键盘和鼠标(带有连接线) (11)键盘和鼠标(无线) (11)扬声器和声音 (12)Internet 访问 (13)软件故障排除 (14)6 系统恢复 (16)选择系统恢复方法 (16)系统恢复选项 (16)恢复介质 (18)7 维护 (20)计划和任务 (20)清洁您的电脑 (21)8 使用 HP PC Hardware Diagnostics (UEFI) (23)将 HP PC Hardware Diagnostics (UEFI) 下载到 USB 设备 (23)iii9 规格 (24)操作规格 (24)10 支持信息 (25)如何获得帮助 (25)帮助信息的位置 (25)客户维修支持 (25)升级您的硬件之前 (26)索引 (27)iv1获取信息任务说明●安装您的电脑《装配说明》或《快速装配》示意图– 或 –请参阅第 3 页的安装您的电脑。
HP Smart Storage Administrator - 热备盘添加方法

HP Smart Storage Administrator – 热备盘添加的方法By Ju,zhen-wen05/15/2014目录实验环境:进入先选择热备盘的模式热备盘模式:Failure spare activation: 故障备件激活模式当Array中的驱动器故障时,会触发重建备用的驱动器。
Predictive spare activation:预计备件激活模式对包含预计故障状态的物理驱动器的阵列启用“预计备件激活模式”会触发立即重建备用驱动器。
启用预计备件激活模式后,处于预计故障状态的物理驱动器将无法用作数据驱动器或备用驱动器。
选择模式后,查看当前信息。
之后选择Array ,选择Manage spare drivesSpare盘的类型Dedicated Spare Drive专属备用磁盘A dedicated spare drive temporarily takes over for a failed data drive. When the failed data drive is replaced, the spare drive becomes idle again. This type of spare drive can be shared between multiple arrays.专属备用磁盘临时接管发生故障的数据磁盘。
替换发生故障的数据磁盘后,备用磁盘再次变为空闲状态。
可在多个阵列之间共享此类型的备用磁盘。
Auto Replace Drive自动替换磁盘An auto replace drive will permanently take over for a failed data drive. As soon as a data drive fails, the spare drive becomes a data drive and the data drive becomes a spare drive. The advantage of auto replace drives is that the information in the failed data drive only has to be recovered once. This type of spare cannot be shared between multiple .自动替换磁盘将永久接管发生故障的数据磁盘。
HP System Management Homepage 6.2 用 户指南 HP-UX、Linux 和 Windows 操作系统 HP 部

目录
1 产品概述...................................................................................................9
产品功能 ...............................................................................................................................................9 HP SIM..................................................................................................................................................9
2 开始使用.........Байду номын сангаас.......................................................................................11
登录....................................................................................................................................................11 通过 Internet Explorer 启动 HP SMH..................................................................................................12 通过 Mozilla 或 Firefox 启动 HP SMH................................................................................................13 从 HP SIM 启动 HP SMH..................................................................................................................13 配置防火墙设置 ...................................................................................................................................14 Windows........................................................................................................................................14 Linux..............................................................................................................................................14 Red Hat Enterprise Linux 4、5 和 6...............................................................................................14 SUSE Linux Enterprise Server........................................................................................................15 配置 HP-UX 的超时设置.........................................................................................................................16 配置 SMH 服务超时........................................................................................................................16 配置 SMH 会话超时........................................................................................................................16 自动导入证书.......................................................................................................................................17 注销....................................................................................................................................................17
EVA维护手册

HP 虚拟带库vls6000管理手册前言尊敬的客户,首先欢迎您购买HP Virtual Library System系列存储。
尊敬的系统管理员,您选择了惠普的产品,同时也就选择了惠普的服务。
您在任何时候都不是孤立无援,在您们的身后有一个惠普计算机系统响应中心在时刻准备着为您提供技术服务。
不论是系统故障,还是存储方面的技术问题,您都可以致电惠普响应中心。
该中心配有经验丰富的软件、硬件工程师,可以通过电话或计算机远程访问确定故障点,以最快速度解决用户问题。
所以,在系统运行发生故障时,欢迎拨打惠普计算机系统服务响应中心电话请求援助。
联系方法是:1)800-810-7000(免费服务电话)目录前言........................................... 错误!未定义书签。
目录...................................... 错误!未定义书签。
第一章、有关机房现场环境............................. 错误!未定义书签。
一、机房总体要求.................................... 错误!未定义书签。
二、机房内环境要求.................................. 错误!未定义书签。
三、电源要求........................................ 错误!未定义书签。
第二章、设备物理连接................................ 错误!未定义书签。
一、将管理模块端口连接到管理服务器 .................. 错误!未定义书签。
二、为EVA阵列连接设备端口光纤通道电缆............... 错误!未定义书签。
三、EVA电源线连接方式............................... 错误!未定义书签。
HP平台wwwn号的方法

Hardware Path is = 0/3/1/0
Maximum Frame Size = 2048
Driver-Firmware Dump Available = NO
Device Specific.(Z8)........20000000C96E2898
Device Specific.(Z9)........BS2.10X8
Device Specific.(ZA)........B1F2.10X8
Device Specific.(ZB)........B2F2.10X8
Driver-Firmware Dump Timestamp = N/A
Driver Version = @(#) libfcd.a HP Fibre Channel ISP 23xx & 24xx Driver B.11.23.04 /ux/core/isu/FCD/kern/src/common/wsio/fcd_init.c:Oct 18 2005,08:21:11
10.25.10.140 root1234
xl_file)$!(
/mnt 10.25.10.140(rw,sync,no_root_squash)
Device Specific.(Z4)........FFC01159
Device Specific.(Z5)........02C82138
Device Specific.(Z6)........06C12138
Device Specific.(Z7)........07C12138
# grep scsi /proc/scsi/qla2300/1
windows 操作系统下查看光纤卡的wwn号

HP ProLiant 服务器- 在windows 操作系统下查看光纤卡的wwn 号HP ProLiant服务器- 在windows操作系统下查看光纤卡的wwn号Technical Work Instruction有三种在windows操作系统下查看光纤卡wwn号的方法1. 通过HP Management Homepage管理工具查看a. 用Administrator帐号登录HP Management Homepage,在主页上的Storage一项下面,选择External Storage Connectionsb. 在这项下可以看到emulex光纤卡的wwn号2. 通sansurfer查看光纤的wwn号a. 针对不同的光纤卡型号,其各自有自己的管理工具Qlogic -> SANsurfer;Emulex -> HBAnywhere两者工具基本相同,都可以查看到光纤卡的wwn号,下面以Qlogic的SANsurfer为例来查看光纤卡的wwn号b. 需要在操作系统下安装SANsurfer,如果光纤卡在本机,则输入localhost,如果想查看远程机器上的信息,可以输入远程server的ip地址c. 登录后,在左边会有该服务器的光纤卡信息,该服务器有1块单口的光纤卡,点中后,可以在右边看到wwnn号和wwpn号3. 通过fcinfo工具查看a. 如果用户不想安装hp的管理工具,则可以到微软的网站下载fcinfo的工具,拷贝到windows操作系统下,也可以查看光纤卡的wwn号,适用于windows 2003x86_32系统注:msinfo32里看不到光纤卡的wwn号b. 点击此处下载此工具c. 依次点击开始–> 运行-> 输入cmd,打开命令提示符d. 执行fcinfo,即可查看光纤卡的wwn号。
HP Business Service Management 9.20 IP1 BSM 安装指南说明

HP Business Service Management 适用于Windows和Linux操作系统软件版本:9.20IP1BSM安装指南文档发行日期:2012年10月软件发行日期:2012年10月法律声明担保HP产品和服务的唯一担保已在此类产品和服务随附的明示担保声明中提出。
此处的任何内容均不构成额外担保。
HP不会为此处出现的技术或编辑错误或遗漏承担任何责任。
此处所含信息如有更改,恕不另行通知。
受限权利声明机密计算机软件。
必须拥有HP授予的有效许可证,方可拥有、使用或复制本软件。
按照FAR12.211和12.212,并根据供应商的标准商业许可的规定,商业计算机软件、计算机软件文档与商品技术数据授权给美国政府使用。
版权声明©版权所有2005-2012Hewlett-Packard Development Company,L.P.商标声明Adobe®和Acrobat®是Adobe Systems Incorporated的商标。
AMD和AMD Arrow符号是Advanced Micro Devices,Inc.的商标。
Google™和Google Maps™是Google Inc.的商标。
Intel®、Itanium®、Pentium®和Intel®Xeon®是Intel Corporation在美国和其他国家/地区的商标。
iPod是Apple Computer,Inc.的商标。
Java是Oracle和/或其附属公司的注册商标。
Microsoft®、Windows®、Windows NT®、Windows®XP和Windows Vista®是Microsoft Corporation在美国的注册商标。
Oracle是Oracle Corporation和/或其附属公司的注册商标。
HPEVA6000详细配置基础教程

HPEVA6000详细配置基础教程EVA连接拓扑⽰意图如下:EVA配置教程如下:1、EVA系统的开机和关机顺序EVA作为企业的核⼼数据存储系统,如何正确的开机和关机对数据安全有着很⼤的影响。
在⽇常维护中,请务必按照正确顺序进⾏开关机。
1.1 EVA系统的开机顺序正确的开机顺序为:1、开机柜总电源;2、开光纤交换机电源,开EVA 机柜电源(此时硬盘柜⾃动加电);3、启动SMA;4、等待10 分钟待光纤交换机和硬盘柜状态正常后开控制卡电源;5、等待3 分钟待控制卡状态稳定后开主机电源,启动进⼊操作系统6、起集群服务及应⽤;1.2、EVA系统的关机顺序正确的关机顺序为:1、停集群服务和节点2、shutdown 服务器;3、通过sma关闭eva的控制卡;4、关闭eva控制卡后的开关;5、关闭SMA;6、关闭SAN SWITCH;7、关闭EVA机柜电源;关闭控制卡如下图:2、配置过程如下2.1配置管理界⾯地址栏输⼊https://192.168.0.1:2373如下图进⼊登陆界⾯,如下图输⼊登陆名admin密码为空进⼊管理界⾯选择configure controlledr host ports 查看连接端⼝状况:在第⼀个控制模块controller1 中点击less details 查看连接属性topology (如果是服务器直连控制器选择Dirext;如果是连接光交换机那么选择fabric)选择相应选项后点save changes保存变更。
同样选择第⼆个控制模块进⾏更改。
(注意:更改完成后需要重启控制器⽣效)更改完成后点击launch HP P6000 command View选项点击launch HP P6000 command View按钮进⼊存储管理界⾯。
2.2、初始化 EVA点击初始化图标,eva 将初始化,初始化过程中要求输⼊存储的名称,该名称将在⾯板上显⽰。
初始化会导致所有的数据都会丢失!进⼊以下界⾯:点击settings进⼊初始化界⾯初始化全过程如下图:点击initialize:设置名称以及硬盘数量最⼤为12,以及系统时间确定并初始化完成。
HP扩展坞用户指南说明书

用户指南©Copyright 2016 HP Development Company, L.P.AMD 是 Advanced Micro Devices,Inc. 的商标。
Intel、Thunderbolt、Thunderbolt 徽标和 vPro 是 Intel Corporation 在美国和/或其他国家/地区的商标。
NVIDIA 是 NVIDIA Corporation 在美国和其他国家/地区的商标和/或注册商标。
Windows 是 Microsoft Corporation 在美国和/或其他国家/地区的注册商标或商标。
本文档中包含的信息如有更改,恕不另行通知。
随 HP 产品和服务附带的明确有限保修声明中阐明了此类产品和服务的全部保修服务。
本文档中的任何内容均不应理解为构成任何额外保证。
HP 对本文档中出现的技术错误、编辑错误或遗漏之处不承担责任。
第三版: 2016 年 8 月第一版: 2016 年 1 月文档部件号: 851549-AA3目录1 使用入门 (1)识别组件 (1)前部组件 (1)后部组件 (2)设置扩展坞 (3)步骤 1: 连接交流电源 (3)步骤 2: 更新计算机 (3)步骤 3: 连接到计算机 (4)步骤 4: 防止睡眠或休眠 (6)更新软件 (6)使用外接显示器 (6)配置显示器 (6)睡眠、休眠、关机和重启 (7)2 使用扩展坞 (8)扩展坞使用指南 (8)设置安全保护级别 (8)连接至网络 (9)连接 USB 设备 (10)连接 VGA 设备 (10)连接 DisplayPort 设备 (11)连接 Thunderbolt 3 设备 (12)连接音频设备 (13)连接模拟音频设备 (13)连接安全保护缆锁选件 (14)3 与扩展坞断开连接 (15)4 故障排除 (16)解决常见问题 (16)常见使用和连接问题 (16)音频问题 (17)视频问题 (17)获取其他信息 (19)iii联系技术支持 (19)5 规格 (21)输入功率 (21)运行环境 (21)索引 (22)iv1使用入门识别组件本章介绍扩展坞的可视化硬件功能,并提供了设置说明。
光纤卡变更
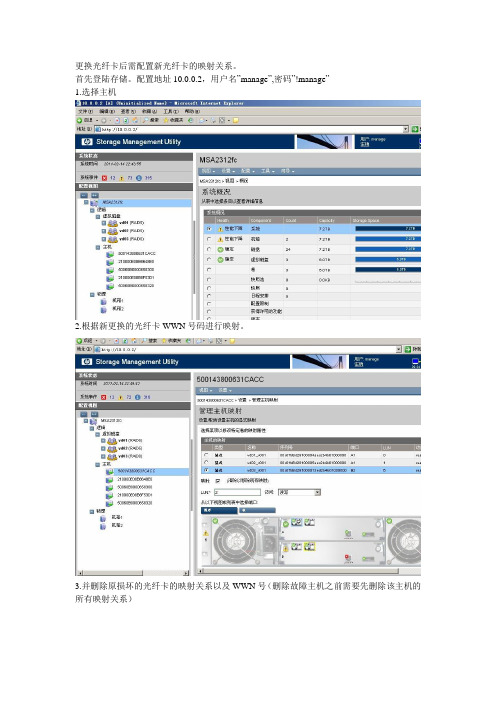
更换光纤卡后需配置新光纤卡的映射关系。
首先登陆存储。
配置地址10.0.0.2,用户名”manage”,密码”!manage”
1.选择主机
2.根据新更换的光纤卡WWN号码进行映射。
3.并删除原损坏的光纤卡的映射关系以及WWN号(删除故障主机之前需要先删除该主机的所有映射关系)
注意:如果光纤卡标签所贴WWN号码与系统显示的WWN号码不一致是,不要轻易删除任何主机可进入HP system management utlit 工具进行确认(此软件登陆密码,与本机系统登陆密码一致)在首页依次选择storage ,firbHBA.查看现行的光纤卡正确的WWN号码,
再对原故障光纤卡的主机名进行删除。
hp officejet pro 8610 8620 8630 使用手冊说明书

8. 此組件中並無使用者可自行維修的零 件。 有關維修問題,請洽詢合格的維修 人員。
目錄
1 如何使用? ........................................................................................................................................................ 1
HP Officejet Pro 8610 e-All-in-One/HP Officejet Pro 8620 e-All-in-One/HP Officejet Pro 8630 e-All-in014 著作權 Hewlett-Packard Development Company, L.P.
2 準備開始 ............................................................................................................................................................ 3 可用性 ................................................................................................................................................... 4 HP EcoSolutions (HP 與環境) .........................................................
安装EVA4000简单步骤

HP-EVA4400安装2.安装HP存储的问题连接过程,通过带内管理,并把PC服务器的fc口和磁盘阵列通过光纤交换机连接起来,在pc服务器上安装管理软件,插入光碟StorageWorks EVA SmartStart CD安装过程如下: 可参照安装说明来做( HP_StorageWorks_EVA_4400_Installation_Video_WBT.EXE)( 如下是安装EVA SmartStart的步骤)Insert the StorageWorks EVA SmartStart CD into the host server’s CD-ROM or DVD-ROM drive.The CD should autoplay and show the Welcome screen and End User License Agreement (EULA).Note: If the “Required Software Missing” dialog box appears, follow the prompts to install the necessary supporting software and restart the server.After the server restarts, return to step 1 and re-insert the CD.Accept the EULA to continue.On the Welcome to HP EVA SmartStart screen, select Start NowSelect Configure as management server on the Select a Configuration Option screen. Review the configuration steps on the Configure Management Server Overview screen. Follow the prompts on the next several screens to check server LAN connections, and check and install any necessary drivers for the FC connections and HBAs.On the HP Command View EVA Check screen, click Next to begin installation of the Command View EVA software.Follow the prompts on the next several screens to install Command View EVA and ensure the Results screen displays Installation was successful in the information box. IMPORTANT! On the following screen, make a note of the Windows security group (HP Storage Admins) and Administrator account (hpadmin) to be created.Continue to the HP Command View EVA Security Setup screen, review the text, and enter the password you wish to use with Command View.Ensure the security setup was successful.If prompted, enter your Command View EVA password on the final HP Command View EVA Check screen and continue through the License Information screen.The HP EVA Storage Systems Initialization Check screen allows you to choose from two initialization options:The setup wizard automatically initializes your storage system and creates the disk groups,ORYou want to initialize your system and create disk groups manually using Command View EVA.IMPORTANT! If you need to control how disk groups are created on a storage system, do not use the wizard for initialization. Instead, use HP Command View EVA.To initialize storage using the wizard, click Next and follow the prompts and instructions on the next several screens.Ensure successful initialization on the Storage Systems Initialization Check Results page. Review the Summary and Next Step Options on the Configure Management Server Summary page.安装成功后,可以用这个软件来管理存储了.对存储划分vdisk来指派到机器之前,要激活存储的license.从随机带来的信封上找到HP存储的ordercode,在hp官方网站(https:///)上申请license,申请时要输入存储的HBA卡的WWN号码.要求把license发到制定的邮箱中把license拷贝下来,复制如下图的licensing 里的选项中EVA 4400了.注: 提交了有效license,才可以创建vdisk现在我们需要指定Virtual Disk folder,In the Navigation pane, expand the tree for the selected storage system and select Virtual Disks.In the Virtual Disks Folder Properties screen click Create Folder.In the Create a Folder screen enter a folder name and any comments, and click Finish.建立virtual diskIn the Navigation pane select the virtual disk folder you just created.Select Create Vdisk on the Vdisk Folder Properties screen.Note: The only entry actually required on the Create a Vdisk screen is the virtual disk size. The defaults can be accepted for all other attributes.In the Create a Vdisk screen, do the following:Enter the virtual disk name.Specify the desired virtual disk size in gigabytes (GB).Ensure the Default disk group is selected in the Disk Group dropdown box.Select the desired virtual disk redundancy level.Accept the defaults in the Advanced Settings section.Enter Comments if necessary.Click Create Vdisk to create the virtual disk.Create additional virtual disks as desired in the folder.In the Navigation pane select the virtual disk you just created.Review the Vdisk Properties screen for accuracy.建立host folderIn the Navigation pane, expand the tree for the selected storage system and select Hosts. Click Create Folder in the Host Folder Properties screen.In the Create a Folder screen enter the desired folder name and optional comments, and click Finish添加hostBefore you begin: Gather the following information about the host you wish to add:The host’s LAN nameThe WorldWide Name of at least on of the host’s FCA portsThe host’s operating systemThe host’s IP address (this parameter is optional)In the Navigation pane select the host folder you just created.Click Add Host in the Host Folder Properties screen.In the Add a Host screen, enter the host name and other parameters gathered previously, and click Add Host.Verify that the host has been added.给host添加对应的hba卡号On the Host Properties screen select the Ports tab, then select Add port.Select a WorldWide Name from the dropdown list on the Add a Host Port screen, then click Add port.Verify that your host is added in the Host Properties screen.把virtualdisk指派给hostIn the Navigation pane, select the virtual disk you want to present.Click the Presentation tab on the Vdisk Properties screen, enter the Preferred path/mode from the dropdown box if desired, then click Present.In the tree control displayed, select the host and click Present Vdisk.Verify your presentation by clicking the Presentation tab on the Vdisk Properties screen. 搞定收工。
HP_P6350_EVA4400完全配置手册(经典好用)
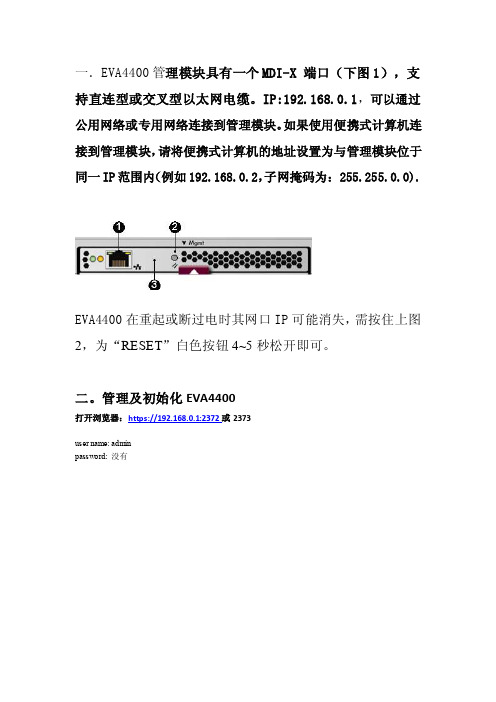
一.EVA4400管理模块具有一个MDI-X 端口(下图1),支持直连型或交叉型以太网电缆。
IP:192.168.0.1,可以通过公用网络或专用网络连接到管理模块。
如果使用便携式计算机连接到管理模块,请将便携式计算机的地址设置为与管理模块位于同一IP范围内(例如192.168.0.2,子网掩码为: 255.255.0.0).EVA4400在重起或断过电时其网口IP可能消失,需按住上图2,为“RESET”白色按钮4~5秒松开即可。
二。
管理及初始化EVA4400打开浏览器:https://192.168.0.1:2372或2373user name: adminpassword: 没有如果使用https://192.168.0.1:2373看到的是如下画面:鼠标点击“Launch Command View EVA”就到了上面的登录画面选初始化选项,在下图写存储柜的名字(随便起),和第一个磁盘组的盘数(至少8个)设定时间选热备区容量:single 表示留出2disk的空间做spare,double 表示留出4disk 空间做spare;如硬盘空间足够大,建议选择double,但至少选择single点“OK”和“FINISH”完成初始化,这里要等一段时间。
看到的是这样系统自己认出EVA4400的WWN号:5001-4380-025D-DC20记下来准备注册许可证。
磁盘组中盘越多性能越好,新加的盘会在“ungrouped disks”一栏里,鼠标拖进已有的盘组即可。
注册许可证后是这样,必须有容量许可证否则不能划分虚拟盘。
EVA 容量许可证网上注册后的范本:红字的就是许可证A copy of your license/password certificate(s) are displayed below foryour review.在:“HOSTS“下建立各主机的名字(随便起),操作系统类型和其HBA卡的WWPN号。
hp笔记本电脑 - 计算机设置实用程序用户指南说明书

计算机设置实用程序用户指南© Copyright 2007 Hewlett-Packard Development Company, L.P.Windows 是 Microsoft Corporation 在美国的注册商标。
本文档中包含的信息如有更改,恕不另行通知。
随 HP 产品和服务附带的明确有限保修声明中阐明了此类产品和服务的全部保修服务。
本文档中的任何内容均不应理解为构成任何额外保证。
HP 对本文档中出现的技术错误、编辑错误或遗漏之处不承担责任。
第一版:2007 年 7 月文档部件号:451320-AA1产品通告本用户指南介绍大多数机型常用的功能。
某些功能可能在您的笔记本计算机上未提供。
iiiiv产品通告目录1 启动计算机设置实用程序2 使用计算机设置实用程序在计算机设置实用程序中进行浏览和选择 (3)恢复计算机设置实用程序中的出厂时设置 (4)3 计算机设置实用程序的菜单File(文件)菜单 (6)Security(安全保护)菜单 (7)Diagnostics(诊断)菜单 (8)System Configuration(系统配置)菜单 (9)索引 (10)vvi计算机设置实用程序是一个基于 ROM 的预安装实用程序,即使在操作系统不工作或未装载时也可以使用它。
注:您的笔记本计算机可能不支持本指南所列出的计算机设置实用程序的一些菜单项。
注:计算机设置实用程序并不支持指点设备。
您必须使用键盘进行导航和选择。
注:只有启用了 USB 传统支持,才能在计算机设置实用程序中使用通过 USB 连接的外部键盘。
要启动计算机设置实用程序,请执行以下步骤:1.打开或重新启动笔记本计算机。
2.在 Windows® 打开之前且屏幕左下角显示“F10=ROM Based Setup”(F10 = 基于 ROM 的设置)消息时,按f10键。
12第 2 章使用计算机设置实用程序在计算机设置实用程序中进行浏览和选择您可以通过 File(文件)、Security(安全保护)、Diagnostics(诊断)和 System Configuration(系统配置)菜单访问计算机设置实用程序中的信息和设置。
HP产品初始设置和使用说明书

Quick SetupQuick TourSetup InstructionsNOTE: The power button is located on the bottom-right of the product.Your product is protected by a free subscription to McAfee LiveSafe™ service for a limited time from the first time you use the computer. You will have the option to purchase McAfee LiveSafe service upon expiration of the subscription. McAfee LiveSafe service helps protect your identity, your data, and your devices with a single subscription.** Select products only.3132Find more informationWindows models To learn more about Windows and to access help topics, select the Start button, and then select the Get Started app.To access the user guides, select the Start button, select All apps , select HP Help and Support , and then select HP Documentation .Linux modelsDouble-click the HP Documents icon on the desktop.FreeDOS modelsOn the Boot Menu, select HP Documents . NOTE: You do not need to connect to the Internet to access the user guides.NOTE: A User Guides disc is included with some models.Go wirelessSelect the network icon in the right corner of the taskbar , and then connect to one of the available networks.– or –Type wifi in the taskbar search box, and then select Change Wi-Fi settings .NOTE: To set up a WLAN and connect to the Internet, you need a broadband modem (either DSL or cable) (purchased separately), high-speed Internet service purchased from an Internet service provider , and a wireless router (purchased separately).Multifunction buttonsThe buttons on the bottom-right of your product perform the following functions:NOTE: Refer to the Bottom components section for the location of the buttons.Volume/down buttonIf the OSD menu is open, press the button to move down. If the OSD menu is not open, press the button to decrease the volume. Press the input switch/up button to increase the volume. Press and hold the volume/down button to mute or unmute the volume.Input switch/ up button If the OSD menu is open, press the button to move up. If the OSD menu is not open, press the button to switch between the computer and HDMI-in.Menu/ OK button Opens, selects from, or exits the OSD menu. If the OSD menu is open, press the button again to make a selection.Front1Internal microphones (2)2IR camera 3Webcam light 4Webcam 5IR projector 6Speakers (2)7Power lightBottom8Audio-in (microphone)/audio-out (headphone) combo jack9Memory card reader -USB 3.0 charging (powered) port q USB 3.0 portwVolume/down button e Input switch/up button r Menu/OK button tPower buttonBacky Power connector u HDMI-out port i USB 3.0 ports (2)o RJ-45 (network) jack p USB 2.0 ports (2) a HDMI-in port s Security cable slot67w 98-q1123456er ty u iop a sAdjust/tilt thecomputer angleNOTE: Computer color , features, and accessories may vary.13NOTE: Depending on the model number of your product, the USBtransceiver is either preinstalled in your product or located inside the mouse box. For setup instructions for the mouse, see the outside of the mouse box. For setup instructions for the keyboard, see the outside of the keyboard box.2OR823851-002Navigating the Windows Start ScreenThe Windows Start screen provides a central location where you can access your information and email, browse the Web, stream videos, view photos, and access your social media websites.Display the Start menuSelect the Start buttonin the lower-left corner of the taskbar.SearchIn the taskbar search box, begin typing the name of an app, setting, file, or Internet topic.List your appsSelect the Start button, and then select All apps.Shut down your computerSelect the Start button , select the Power icon, and thenselect Shut down .Switch between open appsSelect the Task view iconin the taskbar.NOTE: The appearance of the Windows screen may vary.。
惠普 电脑 说明书