SpringMvc搭建开发框架平台【基本使用说明】
SpringMVC入门_精品资料(可编辑)

SpringMVC 入门_精品资料2.1、Spring Web MVC是什么Spring Web MVC是一种基于Java的实现了Web MVC设计模式的请求驱动类型的轻量级Web框架,即使用了MVC架构模式的思想,将web层进行职责解耦,基于请求驱动指的就是使用请求-响应模型,框架的目的就是帮助我们简化开发,Spring Web MVC也是要简化我们日常Web开发的。
另外还有一种基于组件的、事件驱动的Web框架在此就不介绍了,如Tapestry、JSF等。
Spring Web MVC也是服务到工作者模式的实现,但进行可优化。
前端控制器是DispatcherServlet;应用控制器其实拆为处理器映射器Handler Mapping进行处理器管理和视图解析器View Resolver进行视图管理;页面控制器/动作/处理器为Controller接口(仅包含ModelAndView handleRequestrequest, response?方法)的实现(也可以是任何的POJO类);支持本地化(Locale)解析、主题(Theme)解析及文件上传等;提供了非常灵活的数据验证、格式化和数据绑定机制;提供了强大的约定大于配置(惯例优先原则)的契约式编程支持。
2.2、Spring Web MVC能帮我们做什么√让我们能非常简单的设计出干净的Web层和薄薄的Web层;√进行更简洁的Web层的开发;√天生与Spring框架集成(如IoC容器、AOP等);√提供强大的约定大于配置的契约式编程支持;√能简单的进行Web层的单元测试;√支持灵活的URL到页面控制器的映射;√非常容易与其他视图技术集成,如Velocity、FreeMarker等等,因为模型数据不放在特定的API里,而是放在一个Model里(Map数据结构实现,因此很容易被其他框架使用);√非常灵活的数据验证、格式化和数据绑定机制,能使用任何对象进行数据绑定,不必实现特定框架的API;√提供一套强大的JSP标签库,简化JSP开发;√支持灵活的本地化、主题等解析;√更加简单的异常处理;√对静态资源的支持;√支持Restful风格。
springmvc框架搭建之xml配置说明(spring4+hibernate4)
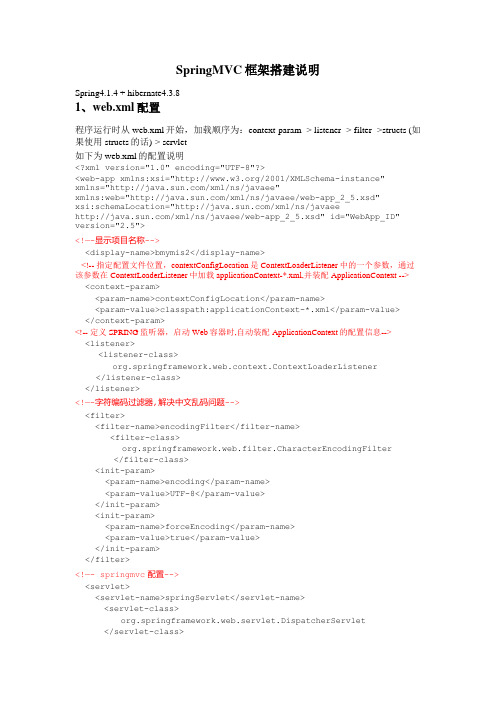
SpringMVC框架搭建说明Spring4.1.4 + hibernate4.3.81、web.xml配置程序运行时从web.xml开始,加载顺序为:context-param -> listener -> filter ->structs (如果使用structs的话)-> servlet如下为web.xml的配置说明<?xml version="1.0" encoding="UTF-8"?><web-app xmlns:xsi="/2001/XMLSchema-instance"xmlns="/xml/ns/javaee"xmlns:web="/xml/ns/javaee/web-app_2_5.xsd"xsi:schemaLocation="/xml/ns/javaee/xml/ns/javaee/web-app_2_5.xsd" id="WebApp_ID" version="2.5"><!—-显示项目名称--><display-name>bmymis2</display-name><!-- 指定配置文件位置,contextConfigLocation是ContextLoaderListener中的一个参数,通过该参数在ContextLoaderListener中加载applicationContext-*.xml,并装配ApplicationContext --> <context-param><param-name>contextConfigLocation</param-name><param-value>classpath:applicationContext-*.xml</param-value></context-param><!-- 定义SPRING监听器,启动Web容器时,自动装配ApplicationContext的配置信息--><listener><listener-class>org.springframework.web.context.ContextLoaderListener </listener-class></listener><!—-字符编码过滤器,解决中文乱码问题--><filter><filter-name>encodingFilter</filter-name><filter-class>org.springframework.web.filter.CharacterEncodingFilter</filter-class><init-param><param-name>encoding</param-name><param-value>UTF-8</param-value></init-param><init-param><param-name>forceEncoding</param-name><param-value>true</param-value></init-param></filter><!—- springmvc配置--><servlet><servlet-name>springServlet</servlet-name><servlet-class>org.springframework.web.servlet.DispatcherServlet </servlet-class><init-param><param-name>contextConfigLocation</param-name><param-value>classpath*:/spring-mvc.xml</param-value></init-param><load-on-startup>1</load-on-startup> //容器启动时首先初始化该servlet </servlet><servlet-mapping><servlet-name>springServlet</servlet-name><url-pattern>/</url-pattern> //表示所有页面都由springmvc处理</servlet-mapping><!—-浏览器输入到项目名,默认打开如下配置页面--><welcome-file-list><welcome-file>/web/login.jsp</welcome-file></welcome-file-list><!—-错误跳转页面--><error-page><error-code>404</error-code><location>/404.html</location></error-page></web-app>2、applicationContext-common.xml配置:<?xml version="1.0" encoding="UTF-8"?><beans xmlns="/schema/beans"xmlns:context="/schema/context"xmlns:xsi="/2001/XMLSchema-instance"xmlns:tx="/schema/tx"xmlns:aop="/schema/aop"xsi:schemaLocation="/schema/beans/schema/beans/spring-beans-4.0.xsd/schema/context/schema/context/spring-context-4.0.xsd/schema/aop/schema/aop/spring-aop-4.0.xsd/schema/tx/schema/tx/spring-tx-4.0.xsd"><!-- 加载资源文件其中包含变量信息,必须在Spring配置文件的最前面加载,即第一个加载--><context:property-placeholder location="classpath:application.properties"/><!—-扫描包路径选项,使用annotation 自动注册bean,并保证@Required,@Autowired的属性被注入,有了该配置,那么<context:annotation-config/>这个配置就可以省略(以下配置包含了<context:annotation-config/>配置)--><context:component-scan base-package="xxx.xxx.xxx"/><!-- 数据源配置,使用应用内的DBCP数据库连接池 --><bean id="dataSource" class="mons.dbcp.BasicDataSource"destroy-method="close"><!-- 定义数据库连接池数据源bean destroy-method="close"的作用是当数据库连接不使用的时候,就把该连接重新放到数据池中,方便下次使用调用--><property name="driverClassName" value="${jdbc.driverClassName}"/><property name="url" value="${jdbc.url}"/><property name="username" value="${ername}"/><property name="password" value="${jdbc.password}"/></bean><!—Hibernate的注解配置 --><bean id="sessionFactory"class="org.springframework.orm.hibernate4.LocalSessionFactoryBean"><property name="dataSource" ref="dataSource"/><property name="hibernateProperties"><props><prop key="hibernate.hbm2ddl.auto">${hibernate.hbm2ddl.auto}</prop><prop key="hibernate.dialect">${hibernate.dialect}</prop><prop key="hibernate.show_sql">${hibernate.show_sql}</prop></props></property><property name="packagesToScan" value="xxx.xxx.xxx.model" /></bean><!-- 配置Hibernate事务管理器 --><bean id="transactionManager"class="org.springframework.orm.hibernate4.HibernateTransactionManager"> <property name="sessionFactory" ref="sessionFactory"/></bean><!-- 配置事务异常封装 --><bean id="persistenceExceptionTranslationPostProcessor"class="org.springframework.dao.annotation.PersistenceExceptionTranslationPost Processor"/><!-- 声明式容器事务管理 ,transaction-manager指定事务管理器为transactionManager --> <tx:advice id="txAdvice" transaction-manager="transactionManager"><tx:attributes><tx:method name="add*" propagation="REQUIRED"/><tx:method name="get*" propagation="REQUIRED"/><tx:method name="*" read-only="true"/></tx:attributes></tx:advice><aop:config expose-proxy="true"><!-- 只对业务逻辑层实施事务 --><aop:pointcut id="txPointcut"expression="execution(*xxx.xxx.xxx.service..*.*(..))"/><!-- Advisor定义,切入点和通知分别为txPointcut、txAdvice --><aop:advisor pointcut-ref="txPointcut" advice-ref="txAdvice"/> </aop:config></beans>3、application.properties配置jdbc.driverClassName=org.postgresql.Driverjdbc.url=jdbc:postgresql://ip:5432/数据库名ername=postgresjdbc.password=123hibernate.dialect=org.hibernate.dialect.PostgreSQLDialecthibernate.show_sql=truehibernate.format_sql=false4、spring-mvc.xml配置<?xml version="1.0"encoding="UTF-8"?><beans xmlns="/schema/beans"xmlns:context="/schema/context"xmlns:mvc="/schema/mvc"xmlns:p="/schema/p"xmlns:xsi="/2001/XMLSchema-instance"xmlns:tx="/schema/tx"xsi:schemaLocation="/schema/beans/schema/beans/spring-beans-3.0.xsd/schema/context/schema/context/spring-context-3.0.xsd/schema/mvc/schema/mvc/spring-mvc-3.0.xsd/schema/tx/schema/tx/spring-tx-4.0.xsd"><!-- 启用spring mvc 注解 --><mvc:annotation-driven><!-- 自动扫描且只扫描@Controller --><context:component-scan base-package="xxx.xxx.xxx "use-default-filters="false"></context:component-scan><!-- 定义JSP文件的位置 --><beanclass="org.springframework.web.servlet.view.InternalResourceView Resolver"><property name="prefix"value="/jsp/"/><property name="suffix"value=".jsp"/></bean><!-- 容器默认的DefaultServletHandler处理所有静态内容与无RequestMapping处理的URL--> <mvc:default-servlet-handler/><!-- 定义无需Controller的url<->view直接映射 --><mvc:view-controller path="/"view-name="login"/></beans>。
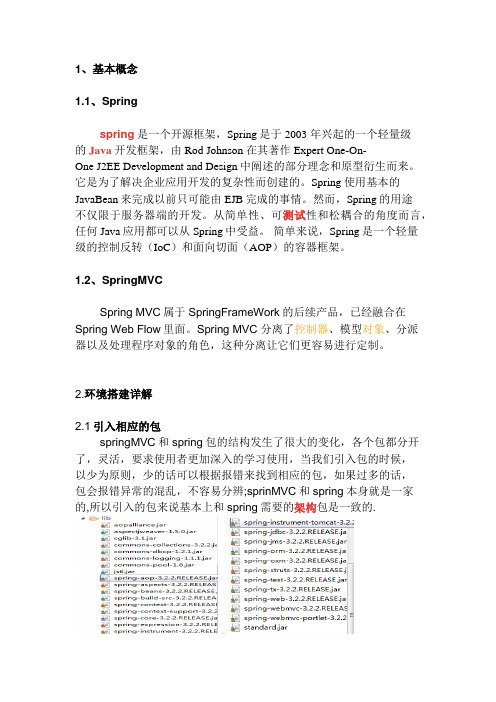
spring+springmvc框架配置详解
1、基本概念1.1、Springspring是一个开源框架,Spring是于2003 年兴起的一个轻量级的Java开发框架,由Rod Johnson 在其著作Expert One-On-One J2EE Development and Design中阐述的部分理念和原型衍生而来。
它是为了解决企业应用开发的复杂性而创建的。
Spring使用基本的JavaBean来完成以前只可能由EJB完成的事情。
然而,Spring的用途不仅限于服务器端的开发。
从简单性、可测试性和松耦合的角度而言,任何Java应用都可以从Spring中受益。
简单来说,Spring是一个轻量级的控制反转(IoC)和面向切面(AOP)的容器框架。
1.2、SpringMVCSpring MVC属于SpringFrameWork的后续产品,已经融合在Spring Web Flow里面。
Spring MVC 分离了控制器、模型对象、分派器以及处理程序对象的角色,这种分离让它们更容易进行定制。
2.环境搭建详解2.1引入相应的包springMVC和spring包的结构发生了很大的变化,各个包都分开了,灵活,要求使用者更加深入的学习使用,当我们引入包的时候,以少为原则,少的话可以根据报错来找到相应的包,如果过多的话,包会报错异常的混乱,不容易分辨;sprinMVC和spring本身就是一家的,所以引入的包来说基本上和spring需要的架构包是一致的.在WEB-INF文件夹下新建注解文件springMVC-servlet.xml文件<?xml version="1.0"encoding="UTF-8"?><beansxmlns="/schema/be ans"xmlns:xsi="/2001/XMLSchema -instance"xmlns:aop="/s chema/aop"xmlns:context="http://www.springframework.o rg/schema/context"xmlns:jdbc="/ schema/jdbc"xmlns:mvc="/s chema/mvc"xmlns:p="/sch ema/p"xmlns:tx="/sc hema/tx"xmlns:util="/ schema/util"xsi:schemaLocation="http://www.springframew /schema/beans/schema/beans/spr ing-beans-3.2.xsd/schema/aop /schema/aop/sprin g-aop-3.2.xsd/schema/conte xt/schema/context/s pring-context-3.2.xsd/schema/jdbc/schema/jdbc/spri ng-jdbc-3.2.xsd/schema/mvc /schema/mvc/sprin g-mvc-3.2.xsd/schema/tx /schema/tx/spring -tx-3.2.xsd/schema/util /schema/util/spri ng-util-3.2.xsd"><!-- springMVC的配置写在servlet.xml文件中 --> <!-- 开启springMVC的注解(扫描类包,以应用注解对应的bean) --><context:component-scan base-package="com.hpe.*"/><!-- 配置springMVC的视图解析器(拼接文件名) --> <beanclass="org.springframework.web.servlet.view.Int ernalResourceViewResolver"p:viewClass="org.springframework.web.servle t.view.JstlView"p:prefix="/jsp/"p:suffix=".jsp"/><!-- springMVC不过滤的请求 --><!-- 一些的静态的资源我们不需要过滤 --><mvc:annotation-driven/><mvc:resources location="/image/"mapping="/image/**"/><mvc:resources location="/css"mapping="/css/**"/><mvc:resources location="/js/"mapping="/js/**"/><mvc:resources location="/jsp/"mapping="/jsp/**"/></beans>一个项目的全局配置点在web.xml,一个项目需要使用了多少框架,通过xml可以查看.<?xml version="1.0"encoding="UTF-8"?><web-appxmlns:xsi="/2001/XMLSchema-instance"xmlns="/xml/ns/javaee"xsi:schemaLocation="/xml/ns/ javaee /xml/ns/javaee/web-app_3_0.xsd"id="WebApp_ID"version="3.0"><display-name>TestSS</display-name><!-- 配置spring的上下文 --><context-param><param-name>contextConfigLocation</param-name><param-value>classpath:applicationContext.xml</param-value></context-param><!-- 加载spring监听器 --><listener><listener-class>org.springframework.web.context.ContextLo aderListener</listener-class></listener><!-- springMVC是一个过滤器,加载springMVC的过滤器 --><servlet><servlet-name>springMVC</servlet-name><!-- springMVC的核心过滤器 --><servlet-class>org.springframework.web.servlet.Dispatche rServlet</servlet-class></servlet><servlet-mapping><servlet-name>springMVC</servlet-name><url-pattern>/</url-pattern></servlet-mapping><welcome-file-list><welcome-file>index.html</welcome-file><welcome-file>index.htm</welcome-file><welcome-file>index.jsp</welcome-file><welcome-file>default.html</welcome-file><welcome-file>default.htm</welcome-file><welcome-file>default.jsp</welcome-file></welcome-file-list></web-app>框架配置完成启动服务器测试框架是否搭建成功,如果服务器正常启动说明框架搭建成功,反之框架没有搭建成功下面一个登陆小demoSpring的实体类层(bean层)<?xml version="1.0"encoding="UTF-8"?><web-appxmlns:xsi="/2001/XMLSchema-instance"xmlns="/xml/ns/javaee"xsi:schemaLocation="/xml/ns/ javaee /xml/ns/javaee/web-app_3_0.xsd"id="WebApp_ID"version="3.0"><display-name>TestSS</display-name><!-- 配置spring的上下文 --><context-param><param-name>contextConfigLocation</param-name><param-value>classpath:applicationContext.xml</param-value></context-param><!-- 加载spring监听器 --><listener><listener-class>org.springframework.web.context.ContextLo aderListener</listener-class></listener><!-- springMVC是一个过滤器,加载springMVC的过滤器 --><servlet><servlet-name>springMVC</servlet-name><!-- springMVC的核心过滤器 --><servlet-class>org.springframework.web.servlet.Dispatche rServlet</servlet-class></servlet><servlet-mapping><servlet-name>springMVC</servlet-name><url-pattern>/</url-pattern></servlet-mapping><welcome-file-list><welcome-file>index.html</welcome-file><welcome-file>index.htm</welcome-file><welcome-file>index.jsp</welcome-file><welcome-file>default.html</welcome-file><welcome-file>default.htm</welcome-file><welcome-file>default.jsp</welcome-file></welcome-file-list></web-app>Spring的dao层package com.hpe.dao;importorg.springframework.stereotype.Repository;//dao层注解配置@Repositorypublic class HelloDao {pu blic int getUser(){System.out.println("找到了用户");return 1;}}Spring的service层package com.hpe.service;importorg.springframework.beans.factory.annotation.Autowired; import org.springframework.stereotype.Service;import com.hpe.dao.HelloDao;//service层注解配置@Servicepublic class HelloService {public HelloService() {System.out.println("hs构造方法开始执行");}//启动spring自动装配@Autowiredprivate HelloDao hd;public boolean hService(){int i = hd.getUser();if(i>0){return true;}return false;}}Spring的controller层package com.hpe.controller;importorg.springframework.beans.factory.annotation.Autowired; import org.springframework.stereotype.Controller; importorg.springframework.web.bind.annotation.RequestMapping;import erBean;import com.hpe.service.HelloService;//spring提供的dao层的控制@Controllerpublic class HelloController {//启用注解(自动装配)@Autowiredprivate HelloService hs;public void setHs(HelloService hs) {this.hs = hs;}//设置访问地址@RequestMapping("hello")//从客户端获取表单信息的注解配置public String hc(UserBean user){System.out.println(user.getUsername());System.out.println(user.getPassword());boolean b = hs.hService();if(b){return "main";}return "login";}}前端登录页面login.jsp<%@page language="java"contentType="text/html; charset=UTF-8"pageEncoding="UTF-8"%><!DOCTYPE html PUBLIC"-//W3C//DTD HTML 4.01 Transitional//EN""/TR/html4/loose.dtd"><html><head><meta http-equiv="Content-Type"content="text/html; charset=UTF-8"><title>登录页面</title></head><body><form action="../hello">用户名:<input type="text"name="username"/>密码:<input type="password"name="password"/><input type="submit"value="提交"/></form></body></html>登录成功页面main.jsp<%@page language="java"contentType="text/html; charset=UTF-8"pageEncoding="UTF-8"%><!DOCTYPE html PUBLIC"-//W3C//DTD HTML 4.01 Transitional//EN""/TR/html4/loose.dtd"><html><head><meta http-equiv="Content-Type"content="text/html; charset=UTF-8"><title>主页</title></head><body>欢迎进入主页</body></html>测试页面(由于没有连接数据源,用户名和密码可以随意输入)测试成功页面。
SpringMVC框架搭建流程(完整详细版)
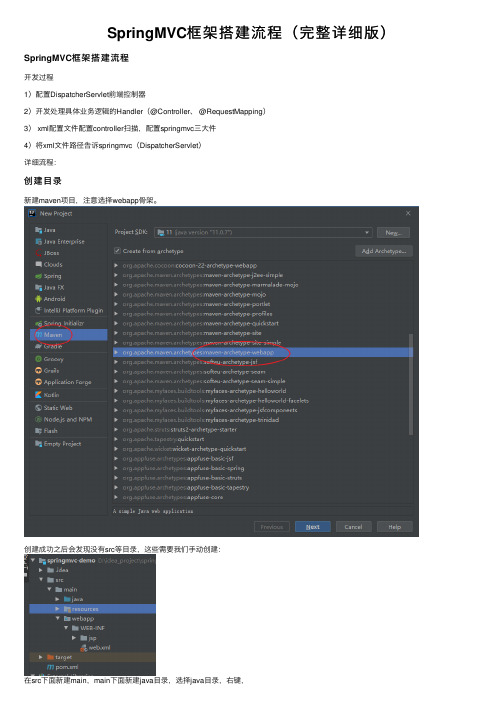
SpringMVC框架搭建流程(完整详细版)SpringMVC框架搭建流程开发过程1)配置DispatcherServlet前端控制器2)开发处理具体业务逻辑的Handler(@Controller、 @RequestMapping)3) xml配置⽂件配置controller扫描,配置springmvc三⼤件4)将xml⽂件路径告诉springmvc(DispatcherServlet)详细流程:创建⽬录新建maven项⽬,注意选择webapp⾻架。
创建成功之后会发现没有src等⽬录,这些需要我们⼿动创建:在src下⾯新建main,main下⾯新建java⽬录,选择java⽬录,右键,在main下⾯继续新建resource⽬录,选择resource⽬录,右键,pom.xmlpom.xml<?xml version="1.0" encoding="UTF-8"?><project xmlns="/POM/4.0.0"xmlns:xsi="/2001/XMLSchema-instance"xsi:schemaLocation="/POM/4.0.0 /xsd/maven-4.0.0.xsd"> <modelVersion>4.0.0</modelVersion><groupId></groupId><artifactId>springmvc-demo</artifactId><version>1.0-SNAPSHOT</version><packaging>war</packaging><properties><project.build.sourceEncoding>UTF-8</project.build.sourceEncoding><piler.source>11</piler.source><piler.target>11</piler.target></properties><dependencies><!--引⼊spring webmvc的依赖--><dependency><groupId>org.springframework</groupId><artifactId>spring-webmvc</artifactId><version>5.1.12.RELEASE</version></dependency></dependencies><build><plugins><plugin><groupId>org.apache.tomcat.maven</groupId><artifactId>tomcat7-maven-plugin</artifactId><version>2.2</version><configuration><port>8080</port><path>/</path></configuration></plugin></plugins></build></project>注意Tomcat7插件是⽤来运⾏项⽬的,右侧运⾏:springmvc相关配置main⽂件夹下⾯新建webapp⽂件夹,webapp下⾯新建WEB-INF,下⾯新建web.xml<!DOCTYPE web-app PUBLIC"-//Sun Microsystems, Inc.//DTD Web Application 2.3//EN""/dtd/web-app_2_3.dtd" ><web-app><display-name>Archetype Created Web Application</display-name><servlet><servlet-name>springmvc</servlet-name><servlet-class>org.springframework.web.servlet.DispatcherServlet</servlet-class><init-param><param-name>contextConfigLocation</param-name><param-value>classpath:springmvc.xml</param-value></init-param></servlet><servlet-mapping><servlet-name>springmvc</servlet-name><!--⽅式⼀:带后缀,⽐如*.action *.do *.aaa该种⽅式⽐较精确、⽅便,在以前和现在企业中都有很⼤的使⽤⽐例⽅式⼆:/ 不会拦截 .jsp,但是会拦截.html等静态资源(静态资源:除了servlet和jsp之外的js、css、png等)为什么配置为/ 会拦截静态资源因为tomcat容器中有⼀个web.xml(⽗),你的项⽬中也有⼀个web.xml(⼦),是⼀个继承关系⽗web.xml中有⼀个DefaultServlet, url-pattern 是⼀个 /此时我们⾃⼰的web.xml中也配置了⼀个 / ,覆写了⽗web.xml的配置为什么不拦截.jsp呢?因为⽗web.xml中有⼀个JspServlet,这个servlet拦截.jsp⽂件,⽽我们并没有覆写这个配置,所以springmvc此时不拦截jsp,jsp的处理交给了tomcat如何解决/拦截静态资源这件事?⽅式三:/* 拦截所有,包括.jsp--><!--拦截匹配规则的url请求,进⼊springmvc框架处理--><url-pattern>/</url-pattern></servlet-mapping></web-app>⾥⾯配置了springmvc相关的配置,引⼊了springmvc.xml:在resource⽬录下新建springmvc.xml:<?xml version="1.0" encoding="UTF-8"?><beans xmlns="/schema/beans"xmlns:xsi="/2001/XMLSchema-instance"xmlns:context="/schema/context"xmlns:mvc="/schema/mvc"xsi:schemaLocation="/schema/beanshttps:///schema/beans/spring-beans.xsd/schema/contexthttps:///schema/context/spring-context.xsd/schema/mvchttps:///schema/mvc/spring-mvc.xsd"><!--开启controller扫描--><context:component-scan base-package=".controller"/><!--配置springmvc的视图解析器--><bean class="org.springframework.web.servlet.view.InternalResourceViewResolver"><property name="prefix" value="/WEB-INF/jsp/"/><property name="suffix" value=".jsp"/></bean><!--⾃动注册最合适的处理器映射器,处理器适配器(调⽤handler⽅法)--><mvc:annotation-driven/></beans>在java⽬录下新建包.controller,下⾯新建DemoController:package .controller;import org.springframework.stereotype.Controller;import org.springframework.web.bind.annotation.RequestMapping;import org.springframework.web.servlet.ModelAndView;import java.util.Date;/*** @author lyj* @Title: DemoController* @ProjectName springmvc-demo* @Description: TODO* @date 2020/6/9 21:21*/@Controller@RequestMapping("/demo")public class DemoController {/*** http://localhost:8080/demo/handle01*/@RequestMapping("/handle01")public ModelAndView handle01(){Date date=new Date();ModelAndView modelAndView=new ModelAndView();modelAndView.addObject("date",date);modelAndView.setViewName("success");return modelAndView;}}在WEB-INF下⾯新建jsp⽂件夹,下⾯新建success.jsp:<%@ page language="java" isELIgnored="false" contentType="text/html; charset=utf-8" pageEncoding="utf-8"%> <html lang="en"><head><meta charset="UTF-8"><title>Title</title></head><body>当前时间 ${date}</body></html>完毕后整个项⽬结构如下:测试:浏览器访问:。
Spring MVC框架开发者指南说明书

About the T utorialSpring MVC Framework is an open source Java platform that provides comprehensive infrastructure support for developing robust Java based Web applications very easily and very rapidly.Spring Framework was initially written by Rod Johnson and was first released under the Apache 2.0 license in June 2003. This tutorial is written based on the Spring Framework Version 4.1.6 released in March 2015.AudienceThis tutorial is designed for Java programmers with a need to understand the Spring MVC Framework in detail along with its architecture and actual usage. This tutorial is intended to make you comfortable in getting started with the Spring MVC Framework and its various functions.PrerequisitesThis tutorial is designed for Java programmers with a need to understand the Spring MVC Framework in detail along with its architecture and actual usage. This tutorial will bring you at the intermediate level of expertise from where you can take yourself to a higher level of expertise.Copyright and DisclaimerCopyright 2017 by Tutorials Point (I) Pvt. Ltd.All the content and graphics published in this e-book are the property of Tutorials Point (I) Pvt. Ltd. The user of this e-book is prohibited to reuse, retain, copy, distribute or republish any contents or a part of contents of this e-book in any manner without written consent of the publisher.We strive to update the contents of our website and tutorials as timely and as precisely as possible, however, the contents may contain inaccuracies or errors. Tutorials Point (I) Pvt. Ltd. provides no guarantee regarding the accuracy, timeliness or completeness of our website or its contents including this tutorial. If you discover any errors on our website or in this tutorial, please notify us at **************************T able of ContentsAbout the Tutorial (i)Audience (i)Prerequisites (i)Copyright and Disclaimer (i)Table of Contents (ii)1.Spring MVC – Overview (1)The DispatcherServlet (1)Required Configuration (2)Defining a Controller (4)Creating JSP Views (5)2.Spring MVC – Environment Setup (6)3.Spring MVC – Hello World (10)SPRING MVC – FORM HANDLING (14)4.Spring MVC – Form Handling (15)5.Spring MVC - Page Redirection (20)6.Spring MVC – Static Pages (23)SPRING MVC – FORM TAG LIBRARY (27)7.Spring MVC – Text Box (28)8.Spring MVC – Password (33)9.Spring MVC – TextArea (38)10.Spring MVC – Checkbox (43)11.Spring MVC – Checkboxes (49)12.Spring MVC – RadioButton (56)13.Spring MVC – RadioButtons (64)14.Spring MVC – Dropdown (72)15.Spring MVC – Listbox (81)16.Spring MVC – Hidden Field (91)17.Spring MVC – Error Handling (96)18.Spring MVC – File Upload (104)SPRING MVC – HANDLER MAPPING (110)19.Spring MVC – Bean Name URL Handler Mapping (111)20.Spring MVC – Controller Class Name Handler Mapping (117)21.Spring MVC – Simple URL Handler Mapping (123)SPRING MVC – CONTROLLER (128)22.Spring MVC – Multi Action Controller (129)23.Spring MVC – Properties Method Name Resolver (134)24.Spring MVC – Parameter Method Name Resolver (139)25.Spring MVC – Parameterizable View Controller (143)SPRING MVC – VIEW RESOLVER (147)26.Spring MVC – Internal Resource View Resolver (148)27.Spring MVC – XML View Resolver (152)28.Spring MVC – Resource Bundle View Resolver (156)29.Spring MVC – Multiple Resolver Mapping (159)SPRING MVC ─ INTEGRA TION (163)30.Spring MVC ─ Hibernate Validator (164)31.Spring MVC – Generate RSS Feed (171)32.Spring MVC – Generate XML Example (176)33.Spring MVC – Generate JSON (179)34.Spring MVC – Generate Excel (182)35.Spring MVC – Generate PDF (186)36.Spring MVC – Integrate LOG4J (190)1.Spring MVCThe Spring Web MVC framework provides a model-view-controller architecture and ready components that can be used to develop flexible and loosely coupled web applications. The MVC pattern results in separating the different aspects of the application (input logic, business logic, and UI logic), while providing a loose coupling between these elements.∙The Model encapsulates the application data and in general, they will consist of POJO.∙The View is responsible for rendering the model data and in general, it generates HTML Output that the client's browser can interpret.∙The Controller is responsible for processing User Requests and Building Appropriate Model and passes it to the view for rendering.The DispatcherServletThe Spring Web model-view-controller (MVC) framework is designed around a DispatcherServlet that handles all the HTTP requests and responses. The request processing workflow of the Spring Web MVC DispatcherServlet is shown in the following illustration.Following is the sequence of events corresponding to an incoming HTTP request to DispatcherServlet:∙After receiving an HTTP request, DispatcherServlet consults the HandlerMapping to call the appropriate Controller.∙The Controller takes the request and calls the appropriate service methods based on used GET or POST method. The service method will set model data based on defined business logic and returns view name to the DispatcherServlet.∙The DispatcherServlet will take help from ViewResolver to pick up the defined view for the request.∙Once view is finalized, The DispatcherServlet passes the model data to the view, which is finally rendered, on the browser.All the above-mentioned components, i.e. HandlerMapping, Controller and ViewResolver are parts of WebApplicationContext, which is an extension of the plain ApplicationContext with some extra features necessary for web applications.Required ConfigurationWe need to map requests that you want the DispatcherServlet to handle, by using a URL mapping in the web.xml file. The following is an example to show declaration and mapping for HelloWeb DispatcherServlet:The web.xml file will be kept in the WebContent/WEB-INF directory of your web application. Upon initialization of the HelloWeb DispatcherServlet, the framework will try to load the application context from a file named [servlet-name]-servlet.xml located in the application's WebContent/WEB-INF directory. In this case, our file will be HelloWeb-servlet.xml.Next, the <servlet-mapping>tag indicates which URLs will be handled by which DispatcherServlet. Here, all the HTTP requests ending with .jsp will be handled by the HelloWeb DispatcherServlet.If you do not want to go with the default filename as [servlet-name]-servlet.xml and default location as WebContent/WEB-INF, you can customize this file name and location by adding the servlet listener ContextLoaderListener in your web.xml file as follows:Now, let us check the required configuration for HelloWeb-servlet.xml file, placed in your web application's WebContent/WEB-INF directory.Following are some important points about HelloWeb-servlet.xml file:∙The [servlet-name]-servlet.xml file will be used to create the beans defined, overriding the definitions of any beans defined with the same name in the global scope.∙The <context:component-scan...> tag will be used to activate the Spring MVC annotation scanning capability, which allows to make use of annotations like @Controller and @RequestMapping, etc.∙The InternalResourceViewResolver will have rules defined to resolve the view names. As per the above-defined rule, a logical view named hello is delegated toa view implementation located at /WEB-INF/jsp/hello.jsp.Let us now understand how to create the actual components i.e., Controller, Model and View.Defining a ControllerThe DispatcherServlet delegates the request to the controllers to execute the functionality specific to it. The @Controller annotation indicates that a particular class serves the role of a controller. The @RequestMapping annotation is used to map a URL to either an entire class or a particular handler method.The @Controller annotation defines the class as a Spring MVC controller. Here, the first usage of @RequestMapping indicates that all handling methods on this controller are relative to the /hello path.The next annotation @RequestMapping (method = RequestMethod.GET) is used to declare the printHello() method as the controller's default service method to handle HTTP GET request. We can define another method to handle any POST request at the same URL.We can also write the above controller in another form, where we can add additional attributes in the @RequestMapping as follows:The value attribute indicates the URL to which the handler method is mapped and the method attribute defines the service method to handle the HTTP GET request. Following are some important points to be noted regarding the controller defined above:∙You will define the required business logic inside a service method. You can call another method inside this method as per the requirement.∙Based on the business logic defined, you will create a model within this method.You can set different model attributes and these attributes will be accessed by the view to present the result. This example creates a model with its attribute "message".∙ A defined service method can return a String, which contains the name of the view to be used to render the model. This example returns "hello" as the logical view name.Creating JSP ViewsSpring MVC supports many types of views for different presentation technologies. These include - JSPs, HTML, PDF, Excel Worksheets, XML, Velocity Templates, XSLT, JSON, Atom and RSS feeds, JasperReports, etc. However, the most common ones are the JSP templates written with JSTL. So, let us write a simple hello view in /WEB-INF/hello/hello.jsp:Here ${message} is the attribute, which we have setup inside the Controller. You can have multiple attributes to be displayed inside your view.Spring MVC This chapter will guide us on how to prepare a development environment to start your work with the Spring Framework. This chapter will also teach us how to setup JDK , Tomcat and Eclipse on your machine before you setup the Spring Framework: Step 1 - Setup Java Development Kit (JDK)You can download the latest version from Oracle's Java site: Java SE Downloads . You will find instructions for installing JDK in downloaded files, follow the given instructions to install and configure the setup. Once done with the setup, set PATH and JAVA_HOME environment variables to refer to the directory that contains java and javac , typically java_install_dir/bin and java_install_dir respectively.If you are running Windows and installed the JDK in C:\jdk1.6.0_15, you would have to put the following line in your C:\autoexec.bat file .Alternatively, on Windows NT/2000/XP, you could also right-click on My Computer → select Properties → Advanced → Environment Variables. Then, you would update the PATH value and click on the OK button.On UNIX (Solaris, Linux, etc.), if the SDK is installed in /usr/local/jdk1.6.0_15 and you use the C shell, then you should key-in the following command into your .cshrc file. Alternatively, if you use an Integrated Development Environment (IDE) like Borland JBuilder , Eclipse , IntelliJ IDEA or Sun ONE Studio , then compile and run a simple program to confirm that the IDE knows where Java is installed, otherwise do proper setup as given in the documents of IDE.Step 2 - Install Apache Common Logging APIYou can download the latest version of Apache Commons Logging API from –/logging/. Once you have downloaded the installation, unpack the binary distribution into a convenient location.For example – C:\commons-logging-1.1.1 on windows, or /usr/local/commons-logging-1.1.1 on Linux/Unix. This directory will have the following jar files and other supporting documents, etc.2.Make sure you set your CLASSPATH variable on this directory properly, otherwise you will face problem while running your application.Step 3 - Setup Eclipse IDEAll the examples in this tutorial have been written using the Eclipse IDE. Therefore, it is recommended that we should have the latest version of Eclipse installed on the machine. To install Eclipse IDE, download the latest Eclipse binaries from the following link –/downloads/. Once the installation is downloaded, unpack the binary distribution into a convenient location.For example in – C:\eclipse on windows, or /usr/local/eclipse on Linux/Unix and finally set PATH variable appropriately.Eclipse can be started by executing the following commands on a windows machine, or we can simply double click on the eclipse.exe.Eclipse can be started by executing the following commands on a UNIX (Solaris, Linux, etc.) machine:After a successful startup, if everything is fine, then it should display the following screen.Step 4 - Setup Spring Framework LibrariesNow if everything is fine, then we can proceed to setup the Spring Framework. Following are the steps to download and install the framework on the machine.∙Make a choice whether you want to install Spring on Windows or UNIX and then proceed to the next step to download .zip file for windows and .tz file for Unix.∙Download the latest version of Spring framework binaries from –http://repo.spring.io/release/org/springframework/spring.∙We have downloaded the spring-framework-4.3.1.RELEASE-dist.zip on the Windows Machine and when we unzip the downloaded file, it will give out the directory structure inside – E:\spring as follows.You will find all the Spring libraries in the directory E:\spring\libs. Make sure you set your CLASSPATH variable on this directory properly; otherwise, we will face a problem while running the application. If we use Eclipse, then it is not required to set the CLASSPATH because all the setting will be done through Eclipse.Once you are done with this last step, you are ready to proceed for your first Spring Example, which you will see in the next chapter.Spring MVCThe following example shows how to write a simple web based Hello World application using the Spring MVC Framework. To start with, let us have a working Eclipse IDE in place and follow the subsequent steps to develop a Dynamic Web Application using the Spring Web Framework. HelloController.java3.web.xmlHelloWeb-servlet.xmlhello.jspFollowing is the list of Spring and other libraries to be included in the web application. We can just drag these files and drop them in –WebContent/WEB-INF/lib folder.∙servlet-api-x.y.z.jar∙commons-logging-x.y.z.jar∙spring-aop-x.y.z.jar∙spring-beans-x.y.z.jar∙spring-context-x.y.z.jar∙spring-core-x.y.z.jar∙spring-expression-x.y.z.jar∙spring-webmvc-x.y.z.jar∙spring-web-x.y.z.jarOnce you are done with creating source and configuration files, export your application. Right click on your application, use Export WAR File option and save your HelloWeb.war file in Tomcat's webapps folder.Now start your Tomcat server and make sure you are able to access other webpages from webapps folder using a standard browser. Now, try to access the URL –http://localhost:8080/HelloWeb/hello. If everything is fine with the Spring Web Application, we will see the following screen.You should note that in the given URL, HelloWeb is the application name and hello is the virtual subfolder, which we have mentioned in our controller using @RequestMapping("/hello"). You can use direct root while mapping your URL using @RequestMapping("/"), in this case you can access the same page using short URL http://localhost:8080/HelloWeb/, but it is advised to have different functionalities under different folders.End of ebook previewIf you liked what you saw…Buy it from our store @ https://。
SpringMVC框架详解

SpringMVC框架详解随着Web应用程序变得越来越复杂,使用适当的框架变得越来越重要。
SpringMVC是一个流行的Java Web框架,它提供了许多功能,使开发Web应用程序更容易和更快速。
本文将对SpringMVC框架进行详细介绍,包括其架构、工作流程、控制器、视图和模型等方面的内容。
1. SpringMVC架构SpringMVC框架基于Model-View-Controller(MVC)架构。
在这种架构中,应用程序被分为三个组件,分别是:1. Model:负责管理数据的处理和存储。
2. View:负责呈现数据给用户的界面。
3. Controller:负责接收用户的请求和处理数据,控制应用程序的行为。
SpringMVC通过DispatcherServlet实现了这种MVC架构。
DispatcherServlet是一个前端控制器(Front Controller),它接收所有的客户端请求并将其分配给相应的处理程序。
2. SpringMVC的工作流程SpringMVC框架具有以下的工作流程:1. 用户发送请求到DispatcherServlet。
2. DispatcherServlet收到请求后,根据配置文件中的URL映射找到相应的Controller。
3. Controller接收请求,并将数据传递给Service层。
4. Service层对数据进行处理,并将处理结果返回给Controller。
5. Controller根据视图解析器的配置选择相应的视图,将处理结果传递给视图并渲染。
6. 视图呈现处理结果,并将其返回给客户端。
3. SpringMVC的控制器控制器是SpringMVC架构中最重要的组件之一。
它负责接收客户端请求,并根据请求的类型执行相应的逻辑。
SpringMVC提供了以下几种类型的控制器:1. @Controller:该注解标注的类被SpringMVC视为控制器。
2. @RestController:可以理解为@Controller和@ResponseBody的组合注解。
【SpringMVC】使用Myeclipse创建SpringMVC项目【超详细教程】
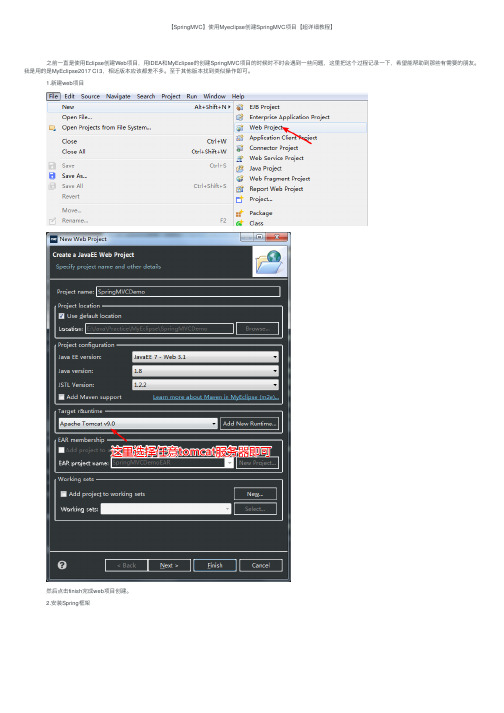
【SpringMVC】使⽤Myeclipse创建SpringMVC项⽬【超详细教程】 之前⼀直是使⽤Eclipse创建Web项⽬,⽤IDEA和MyEclipse的创建SpringMVC项⽬的时候时不时会遇到⼀些问题,这⾥把这个过程记录⼀下,希望能帮助到那些有需要的朋友。
我是⽤的是MyEclipse2017 CI 3,相近版本应该都差不多。
⾄于其他版本找到类似操作即可。
1.新建web项⽬ 然后点击finish完成web项⽬创建。
2.安装Spring框架 此时,项⽬结构如图: 3.创建xml⽂件 内容如下:<?xml version="1.0" encoding="UTF-8"?><web-app version="3.0"xmlns="/xml/ns/javaee"xmlns:xsi="/2001/XMLSchema-instance" xsi:schemaLocation="/xml/ns/javaee /xml/ns/javaee/web-app_3_0.xsd"><!-- 配置SpringMVC --><servlet> 然后在src ⽬录下创建名为 dispatcher-servlet.xml (与上⾯指定的⽂件名要⼀致)的⽂件。
<servlet-name >dispatcher </servlet-name ><servlet-class >org.springframework.web.servlet.DispatcherServlet </servlet-class ><init-param ><param-name >contextConfigLocation </param-name ><param-value >classpath:dispatcher-servlet.xml </param-value ></init-param ></servlet ><servlet-mapping ><servlet-name >dispatcher </servlet-name ><!-- 监听所有请求 --><url-pattern >/</url-pattern ></servlet-mapping ></web-app > 内容如下: 然后在WEB-INF ⽬录下创建⼀个名为jsp 的⽂件夹。
SpringMVC详细示例实战教程(较全开发教程)
SpringMVC详细⽰例实战教程(较全开发教程)SpringMVC学习笔记----⼀、SpringMVC基础⼊门,创建⼀个HelloWorld程序1.⾸先,导⼊SpringMVC需要的jar包。
2.添加Web.xml配置⽂件中关于SpringMVC的配置<!--configure the setting of springmvcDispatcherServlet and configure the mapping--><servlet><servlet-name>springmvc</servlet-name><servlet-class>org.springframework.web.servlet.DispatcherServlet</servlet-class><init-param><param-name>contextConfigLocation</param-name><param-value>classpath:springmvc-servlet.xml</param-value></init-param><!-- <load-on-startup>1</load-on-startup> --></servlet><servlet-mapping><servlet-name>springmvc</servlet-name><url-pattern>/</url-pattern></servlet-mapping>3.在src下添加springmvc-servlet.xml配置⽂件<?xml version="1.0" encoding="UTF-8"?><beans xmlns="/schema/beans"xmlns:xsi="/2001/XMLSchema-instance"xmlns:context="/schema/context"xmlns:mvc="/schema/mvc"xsi:schemaLocation="/schema/beans /schema/beans/spring-beans.xsd /schema/context /schema/context/spring-context-4.1.xsd/schema/mvc /schema/mvc/spring-mvc-4.1.xsd"><!-- scan the package and the sub package --><context:component-scan base-package="test.SpringMVC"/><!-- don't handle the static resource --><mvc:default-servlet-handler /><!-- if you use annotation you must configure following setting --><mvc:annotation-driven /><!-- configure the InternalResourceViewResolver --><bean class="org.springframework.web.servlet.view.InternalResourceViewResolver"id="internalResourceViewResolver"><!-- 前缀 --><property name="prefix" value="/WEB-INF/jsp/" /><!-- 后缀 --><property name="suffix" value=".jsp" /></bean></beans>4.在WEB-INF⽂件夹下创建名为jsp的⽂件夹,⽤来存放jsp视图。
SpringMVC框架配置方法详解

SpringMVC框架配置⽅法详解本⽂实例为⼤家分享了Spring MVC框架配置⽅法,供⼤家参考,具体内容如下1、概述 Spring MVC 作⽤:⽤来实现前端浏览器与后⾯程序的交互 Spring MVC 是基于Spring 的MVC框架,所谓MVC(model,controller,view) ,整个Spring MVC 作⽤就是,基于Spring 将model(数据)在controller(后台程序) ,view(前端浏览器)之间交互 ⾄于Spring MVC优点缺点,了解不深不作评价,2、引⽤的jar包 既然是基于Spring那么 Spring的核⼼jar包(beans,context,core,expression,commons-logging)是必须的;Spring MVC的相关Jar包有个(web,webmvc),特别包(aop)这个包不是必须,但如果基于注解,⽤以包扫描的时候就必需3、配置⽂件 配置⽂件,就是显式配置程序执⾏的初始化的⽂件。
配置⽂件如下:springmvc-config.xml<?xml version="1.0" encoding="UTF-8"?><beans xmlns="/schema/beans"xmlns:xsi="/2001/XMLSchema-instance"xmlns:context="/schema/context"xmlns:mvc="/schema/mvc"xsi:schemaLocation="/schema/beans/schema/beans/spring-beans-4.3.xsd/schema/context/schema/context/spring-context-4.3.xsd/schema/mvc/schema/mvc/spring-mvc-4.3.xsd"><!--<context:component-scan base-package="com.itheima.controller"/>--><!-- 配置处理器Handle,映射“/firstController”请求 --><bean name="/firstController" class="com.itheima.controller.FirstController" /><!--<mvc:annotation-driven />--!><!-- 处理器映射器,将处理器Handle的name作为url进⾏查找 --><bean class="org.springframework.web.servlet.handler.BeanNameUrlHandlerMapping" /><!-- 处理器适配器,配置对处理器中handleRequest()⽅法的调⽤--><bean class="org.springframework.web.servlet.mvc.SimpleControllerHandlerAdapter" /><!-- 视图解析器 --><bean class="org.springframework.web.servlet.view.InternalResourceViewResolver"></bean></beans>Web.xml<?xml version="1.0" encoding="UTF-8"?><web-app xmlns="/xml/ns/javaee"xmlns:xsi="/2001/XMLSchema-instance"xsi:schemaLocation="/xml/ns/javaee /xml/ns/javaee/web-app_3_1.xsd"version="3.1"><servlet><!-- 配置前端过滤器 --><servlet-name>springmvc</servlet-name><servlet-class>org.springframework.web.servlet.DispatcherServlet</servlet-class><!-- 初始化时加载配置⽂件 --><init-param><param-name>contextConfigLocation</param-name><param-value>classpath:springmvc-config.xml</param-value></init-param><!-- 表⽰容器在启动时⽴即加载Servlet --><load-on-startup>1</load-on-startup></servlet><servlet-mapping><servlet-name>springmvc</servlet-name><url-pattern>/</url-pattern></servlet-mapping></web-app>图⽚来源()步骤:1、客户端发起访问,被Spring MVC的前端控制器拦截(DispatcherServlet ) 2、拦截器会找到映射器(handlerMapping),让映射器根据URL找到具体的bean,例如上⾯如果 URL"/firstController" 那么就找到了对应的Bean,并反馈给DispatcherServlet 3、DispatcherServlet将到找到的bean交给适配器(handlerAdapter),由适配器去调⽤对应的handler(执⾏bean中的⽅法) 4、执⾏完成后,将结果把返回给DispatcherServlet,然后由DispatcherServlet 交给视图解析器(ViewReslover) 5、视图解析完成后,再交给DispatcherServlet,然后交给view 渲染(⽐如 JSP)。
Spring SpringMVC企业快速开发架构搭建解析
Spring+SpringMVC企业快速开发架构搭建创建项目从2014年12月开始,一直在研究Spring的框架;并且在我们新的开发框架中得到应用;这篇文章记录了这段时间的成长记录,仅此先给共同成长的小白。
为了简单,我们选择使用maven来构建项目,通过maven可以控制引入jar的版本,大大简化了jar包的管理工作,废话不多说,创建一个项目一、创建一个新项目1、创建maven项目2、选择 maven-archetype-webapp3、填写groupId、artifactId、package项目目录:二、项目创建完成后修改默认的jdk、编译器等默认属性,我的项目选择的是jdk73、引入Spring的jarXml代码<properties><project.build.sourceEncoding>UTF-8</project.build.sourceEncoding> <spring.version>3.2.12.RELEASE</spring.version><tddl.version>3.0.1.5.taobaocode-SNAPSHOT</tddl.version><druid.version>0.2.3</druid.version><cglib.version>2.1_3</cglib.version><aspectj.version>1.6.6</aspectj.version><jms.version>2.0</jms.version><jackson.version>1.9.5</jackson.version><poi.version>3.10.1</poi.version><mail.version>1.4.3</mail.version><atomikos.version>3.9.3</atomikos.version><mysql.version>5.1.34</mysql.version><redis.version>2.1.0</redis.version><jta.version>1.1</jta.version><activemq.version>5.10.0</activemq.version><servlet-api.version>5.5.23</servlet-api.version><fileupload.version>1.3.1</fileupload.version><fastjson.version>1.1.15</fastjson.version><json-lib.version>2.4</json-lib.version><jaxb-api.version>2.2.11</jaxb-api.version><jaxb-impl.version>2.1</jaxb-impl.version><woodstox.version>4.1.5</woodstox.version><activation.version>1.1.1</activation.version> <testng.version>6.8.13</testng.version><mockito.version>1.10.18</mockito.version> <unitils.version>3.4.2</unitils.version><java.version>1.7</java.version><jodd.version>3.3.8</jodd.version><jstl.version>1.2</jstl.version><file.encoding>utf-8</file.encoding></properties><dependencies><dependency><groupId>junit</groupId><artifactId>junit</artifactId><version>4.11</version><scope>test</scope></dependency><!-- JSTL --><dependency><groupId>jstl</groupId><artifactId>jstl</artifactId><version>${jstl.version}</version></dependency><!-- Spring --><dependency><groupId>org.springframework</groupId> <artifactId>spring-web</artifactId><version>${spring.version}</version></dependency><dependency><groupId>org.springframework</groupId> <artifactId>spring-webmvc</artifactId><version>${spring.version}</version></dependency><dependency><groupId>org.springframework</groupId> <artifactId>spring-orm</artifactId><version>${spring.version}</version></dependency><dependency><groupId>org.springframework</groupId> <artifactId>spring-beans</artifactId><version>${spring.version}</version></dependency><dependency><groupId>org.springframework</groupId><artifactId>spring-jms</artifactId><version>${spring.version}</version></dependency><dependency><groupId>org.springframework</groupId><artifactId>spring-context-support</artifactId> <version>${spring.version}</version></dependency><dependency><groupId>org.aspectj</groupId><artifactId>aspectjweaver</artifactId><version>${aspectj.version}</version></dependency><dependency><groupId>javax.jms</groupId><artifactId>javax.jms-api</artifactId><version>${jms.version}</version></dependency><dependency><groupId>javax.mail</groupId><artifactId>mailapi</artifactId><version>${mail.version}</version></dependency><!-- json --><dependency><groupId>com.alibaba</groupId><artifactId>fastjson</artifactId><version>${fastjson.version}</version></dependency><dependency><groupId>net.sf.json-lib</groupId><artifactId>json-lib</artifactId><version>${json-lib.version}</version><classifier>jdk15</classifier></dependency><!-- MQ--><dependency><groupId>org.apache.activemq</groupId> <artifactId>activemq-all</artifactId><version>${activemq.version}</version></dependency><dependency><groupId>tomcat</groupId><artifactId>servlet-api</artifactId><version>${servlet-api.version}</version> </dependency><!-- 分布式事务处理 --><dependency><groupId>com.atomikos</groupId><artifactId>transactions-jta</artifactId> <version>${atomikos.version}</version> <optional>true</optional></dependency><dependency><groupId>com.atomikos</groupId><artifactId>transactions-jdbc</artifactId> <version>${atomikos.version}</version> <optional>true</optional></dependency><dependency><groupId>javax.transaction</groupId><artifactId>jta</artifactId><version>${jta.version}</version> <optional>true</optional></dependency><dependency><groupId>com.alibaba</groupId> <artifactId>druid</artifactId><version>1.0.9</version><optional>true</optional></dependency><!-- poi --><dependency><groupId>org.apache.poi</groupId> <artifactId>poi</artifactId><version>${poi.version}</version> </dependency><dependency><groupId>org.apache.poi</groupId> <artifactId>poi-ooxml</artifactId> <version>${poi.version}</version> </dependency><!-- jackson --><dependency><groupId>org.codehaus.jackson</groupId> <artifactId>jackson-mapper-asl</artifactId> <version>${jackson.version}</version></dependency><dependency><groupId>cglib</groupId><artifactId>cglib-nodep</artifactId> <version>${cglib.version}</version> </dependency><dependency><groupId>commons-fileupload</groupId> <artifactId>commons-fileupload</artifactId> <version>${fileupload.version}</version></dependency><dependency><groupId>org.jodd</groupId><artifactId>jodd</artifactId><version>${jodd.version}</version></dependency></dependencies>四、创建Spring的配置文件1、启动Spring需要在web.xml中配置监听,使用SpringMVC需要配置Spring的servlet Web.xml代码<?xml version="1.0" encoding="UTF-8"?><web-app><display-name>Archetype Created Web Application</display-name><error-page><exception-type>ng.Throwable</exception-type><location>/500.jsp</location></error-page><error-page><error-code>500</error-code><location>/500.jsp</location></error-page><error-page><error-code>404</error-code><location>/404.jsp</location></error-page><!-- 装载spring 父上下文 --><listener><listener-class>org.springframework.web.context.ContextLoaderListener</listener-class></listener><context-param><param-name>contextConfigLocation</param-name><param-value>classpath:applicationContext*.xml</param-value></context-param><listener><listener-class>org.springframework.web.util.Log4jConfigListener</listener-class> </listener><!-- 支持MVC 装载子上下文 --><servlet><servlet-name>springMVC</servlet-name><servlet-class>org.springframework.web.servlet.DispatcherServlet</servlet-class><init-param><description>Spring MVC Configuration Location</description><param-name>contextConfigLocation</param-name><param-value>classpath:spring-*.xml</param-value></init-param><load-on-startup>1</load-on-startup></servlet><servlet-mapping><servlet-name>springMVC</servlet-name><url-pattern>*.do</url-pattern></servlet-mapping><filter><filter-name>encode</filter-name><filter-class>org.springframework.web.filter.DelegatingFilterProxy</filter-class></filter><filter-mapping><filter-name>ssojcFilter</filter-name><url-pattern>/*</url-pattern></filter-mapping></web-app>2、Spring上下文配置文件ApplicationContext.xml用于配置Spring的通用配置Applicationcontext.xml代码<?xml version="1.0" encoding="UTF-8"?><beans xmlns="/schema/beans"xmlns:xsi="/2001/XMLSchema-instance" xmlns:p="http://www.sprin /schema/p"xmlns:aop="/schema/aop" xmlns:tx="http://www.sprin /schema/tx"xmlns:context="/schema/context"xsi:schemaLocation="/schema/beans/schema/beans/spring-beans.xsd/schema/context/schema/context/spring-context.xsd/schema/aop/schema/aop/spring-aop.xsd/schema/tx/schema/tx/spring-tx.xsd "><context:property-placeholder location="classpath:*.properties" /><!--dataSource--><bean id="dataSource" class="com.alibaba.druid.pool.DruidDataSource" init-method="i nit" destroy-method="close"><!-- 基本属性 url、user、password --><property name="url" value="${jdbc.url}" /><property name="username" value="${erName}" /><property name="password" value="${jdbc.passWord}" /><!-- 配置初始化大小、最小、最大 --><property name="initialSize" value="${jdbc.initialSize}" /><property name="minIdle" value="${jdbc.minIdle}" /><property name="maxIdle" value="maxIdle" /><property name="maxActive" value="${jdbc.maxActive}" /><!-- 配置获取连接等待超时的时间 --><property name="maxWait" value="60000" /><!-- 配置间隔多久才进行一次检测,检测需要关闭的空闲连接,单位是毫秒 --><property name="timeBetweenEvictionRunsMillis" value="${jdbc.timeBetweenEvictionR unsMillis}" /><!-- 配置一个连接在池中最小生存的时间,单位是毫秒 --><property name="minEvictableIdleTimeMillis" value="${jdbc.minEvictableIdleTimeMillis} " /><property name="validationQuery" value="${jdbc.validationQuery}" /><property name="testWhileIdle" value="${jdbc.testWhileIdle}" /><property name="testOnBorrow" value="${jdbc.testOnBorrow}" /><property name="testOnReturn" value="${jdbc.testOnReturn}" /><property name="filters" value="${jdbc.filters}" /></bean><!--daoSupport--><bean id="jldaoSupport" class=".framework.dao.support.JLDeDaoSupport"><property name="dataSource" ref="dataSource"/></bean><bean id = "transactionManager" class="org.springframework.jdbc.datasource.DataSo urceTransactionManager"><property name="dataSource" ref="dataSource" /></bean><!-- 声明式事务配置 --><tx:advice id="txAdvice" transaction-manager="transactionManager"><tx:attributes><tx:method name="add*" propagation="REQUIRED" rollback-for="Throwable, Excepti on, RuntimeException"/><tx:method name="begin*" propagation="REQUIRED" rollback-for="Throwable, Exce ption, RuntimeException"/><tx:method name="end*" propagation="REQUIRED" rollback-for="Throwable, Excepti on, RuntimeException"/><tx:method name="update*" propagation="REQUIRED" rollback-for="Throwable, Exc eption, RuntimeException"/><tx:method name="del*" propagation="REQUIRED" rollback-for="Throwable, Excepti on, RuntimeException"/><tx:method name="do*" propagation="REQUIRED" rollback-for="Throwable, Exceptio n, RuntimeException"/><tx:method name="save*" propagation="REQUIRED" rollback-for="Throwable, Except ion, RuntimeException"/><tx:method name="modify*" propagation="REQUIRED" rollback-for="Throwable, Exc eption, RuntimeException"/><tx:method name="query*" propagation="NOT_SUPPORTED"/><tx:method name="get*" propagation="NOT_SUPPORTED"/><tx:method name="load*" propagation="NOT_SUPPORTED"/><tx:method name="find*" propagation="NOT_SUPPORTED"/><tx:method name="*" read-only="true" propagation="SUPPORTS" /></tx:attributes></tx:advice><!-- 内部服务 --><aop:config><aop:pointcut expression="execution(* ..service.*.*(..))" id="pointCut" /><aop:advisor pointcut-ref="pointCut" advice-ref="txAdvice"/></aop:config><!-- 对外服务 --><aop:config><aop:pointcut expression="execution(* ..service.soa.*.*(..))" id="pointCut_s oa" /><aop:advisor pointcut-ref="pointCut_soa" advice-ref="txAdvice"/></aop:config><!-- JMS --><aop:config><aop:pointcut expression="execution(* ..service.jms.receiver.*.*(..))" id="po intCut_jms" /><aop:advisor pointcut-ref="pointCut_jms" advice-ref="txAdvice"/></aop:config><!-- 定义过滤器 --><bean id="encode" class=".framework.web.filter.JLEncoderFilter"><property name="encode" value="UTF-8" /></bean></beans>3、SpringMVC配置Springmmc.xml代码<?xml version="1.0" encoding="UTF-8"?><beans xmlns="/schema/beans"xmlns:xsi="/2001/XMLSchema-instance" xmlns:p="http://www.sprin /schema/p"xmlns:mvc="/schema/mvc" xmlns:context="http://ww /schema/context"xsi:schemaLocation="/schema/beans/schema/beans/spring-beans.xsd/schema/context/schema/context/spring-context.xsd/schema/mvc/schema/mvc/spring-mvc.xsd"><context:component-scan base-package=".*.web.controller"/><!-- mvc --><context:annotation-config /><!-- 使用ConfigurableWebBindingInitializer注册conversionService --><bean id="conversionService" class=".framework.converter.suport.JLConversi onService" init-method="init"><property name="converters"><set><bean class=".framework.converter.JLStringToTimestampConverter "><property name="formarts"><props><prop key="^\\d{4}-\\d{1,2}$">yyyy-MM</prop><prop key="^\\d{4}-\\d{1,2}-\\d{1,2}$">yyyy-MM-dd</prop><prop key="^\\d{4}-\\d{1,2}-\\d{1,2} {1}\\d{1,2}:\\d{1,2}$">yyyy-MM-d d hh-mm</prop><prop key="^\\d{4}-\\d{1,2}-\\d{1,2} {1}\\d{1,2}:\\d{1,2}:\\d{1,2}$">yy yy-MM-dd hh-mm-ss</prop></props></property></bean></set></property></bean><bean id="webBindingInitializer" class="org.springframework.web.bind.support.Confi gurableWebBindingInitializer"><property name="conversionService" ref="conversionService"/></bean><bean class="org.springframework.web.servlet.mvc.method.annotation.RequestMappin gHandlerAdapter"><property name="webBindingInitializer" ref="webBindingInitializer"/></bean><!-- 根据后缀支持多视图处理器 --><!-- 根据客户端的不同的请求决定不同的view进行响应, 如/blog/1.json /blog/1.xml --><bean id="viewResolver" class="org.springframework.web.servlet.view.ContentNegotiat ingViewResolver"><!-- 设置为true以忽略对Accept Header的支持 --><property name="ignoreAcceptHeader" value="true" /><!-- 在没有扩展名时即: "/blog/1" 时的默认展现形式 --><property name="defaultContentType" value="application/json" /><!-- 扩展名至mimeType的映射,即 /blog.json => application/json --> <property name="mediaTypes"><map><entry key="html" value="text/html" /><entry key="jsp" value="text/html" /><entry key="pdf" value="application/pdf" /><entry key="xsl" value="application/vnd.ms-excel" /><entry key="xslx" value="application/vnd.ms-excel" /><entry key="xml" value="application/xml" /><entry key="json" value="application/json" /></map></property><!-- 用于开启 /blog/123?format=json 的支持 --><property name="favorParameter" value="true" /><!-- 视图解析器 --><property name="viewResolvers"><list><!-- jsp解析 --><ref bean="jspRseolver"/><ref bean="beanRseolver"/></property><property name="defaultViews"><list><!-- for application/json --><bean class="org.springframework.web.servlet.view.json.MappingJacksonJsonView" /></list></property></bean><!-- 声明视图解析的对象 --><bean id="beanRseolver" class="org.springframework.web.servlet.view.BeanNameView Resolver" /><bean id="multipartRseolver" class=" monsMultipartResolver"><property name="maxUploadSize" value="5000000" /></bean><bean id="jspRseolver" class="org.springframework.web.servlet.view.InternalResource ViewResolver"><property name="viewClass" value="org.springframework.web.servlet.view.JstlView" /><property name="prefix" value="/WEB-INF/jsp/" /><property name="suffix" value=".jsp"></property><!-- 转向异常处理页面 --><bean class="org.springframework.web.servlet.handler.SimpleMappingExceptionResolve r"><!-- 定义默认的异常处理页面,当该异常类型的注册时使用 --><property name="defaultErrorView" value="error/error" /><!-- 定义异常处理页面用来获取异常信息的变量名,默认名为exception --><property name="exceptionAttribute" value="ex" /><!-- 定义需要特殊处理的异常,用类名或完全路径名作为key,异常也页名作为值 --><property name="exceptionMappings"><props><!-- 这里还可以继续扩展对不同异常类型的处理 --><prop key=".framework.exception.ValidateException">/error/error </prop><prop key=".framework.exception.SessionException">/error/login< /prop></props></property></bean><!-- 输出对象转String支持 --><bean id="stringConverter" class="org.springframework.http.converter.StringHttpMessa geConverter"><property name="supportedMediaTypes"><list><value>text/plain;charset=UTF-8</value></list></property></bean><!-- 输出对象转JSON支持 --><bean id="jsonConverter" class="org.springframework.http.converter.json.MappingJack sonHttpMessageConverter" /><bean id="byteArrayConverter" class="org.springframework.http.converter.ByteArrayHt tpMessageConverter" /><bean id="resourceConverter" class="org.springframework.http.converter.ResourceHttp MessageConverter" /><bean id="sourceConverter" class="org.springframework.http.converter.xml.SourceHttp MessageConverter" /><bean id="xmlAwareFormConverter" class="org.springframework.http.converter.xml.X mlAwareFormHttpMessageConverter" /><bean id="jaxb2RootElementConverter" class="org.springframework.http.converter.xml. Jaxb2RootElementHttpMessageConverter" /><bean class="org.springframework.web.servlet.mvc.annotation.AnnotationMethodHandl erAdapter"><property name="messageConverters"><list><ref bean="stringConverter" /><ref bean="jsonConverter" /><ref bean="byteArrayConverter" /><ref bean="resourceConverter" /><ref bean="sourceConverter" /><ref bean="xmlAwareFormConverter" /><ref bean="jaxb2RootElementConverter" /></list></property></bean><!-- URL映射管理器 --><bean class="org.springframework.web.servlet.mvc.annotation.DefaultAnnotationHandl erMapping"><property name="order" value="0"/><property name="useDefaultSuffixPattern" value="true"/><!-- 拦截器 --><property name="interceptors"><list><!--会话管理的拦截器 --><ref bean="userInfoInterceptor"/></list></property></bean><bean id="userInfoInterceptor" class="erInfoI nterceptor" /><!--<mvc:interceptors><mvc:interceptor><mvc:mapping path="/*"/><ref bean="securityInterceptor"/></mvc:interceptor><mvc:interceptor><mvc:mapping path="/*"/><ref bean="userInfoInterceptor"/></mvc:interceptor></mvc:interceptors>--></beans>完成以上操作一个完整的SpringMVC项目就创建完成了!更多详情见请继续阅读下一页的精彩内容:/Linux/2015-0 9/122942p2.htm--------------------------------------分割线 --------------------------------------。
SpringMVC框架学习指南

springMVC框架学习指南V1.0SpringMVC 2.5& 3.0最大的特色就是URL自定义,Request参数自动绑定:来看一下基于注解的Controller 是如何定义做到这一点的,下面是使用注解的BbtForumController:清单 1. BbtForumController.javapackage com.baobaotao.web;import com.baobaotao.service.BbtForumService;import org.springframework.beans.factory.annotation.Autowired;import org.springframework.stereotype.Controller;import org.springframework.web.bind.annotation.ModelAttribute;import org.springframework.web.bind.annotation.RequestMapping;import org.springframework.web.bind.annotation.RequestMethod;import java.util.Collection;@Controller //<——①@RequestMapping("/forum.do")public class BbtForumController {@Autowiredprivate BbtForumService bbtForumService;@RequestMapping //<——②public String listAllBoard() {bbtForumService.getAllBoard();System.out.println("call listAllBoard method.");return "listBoard";}}从上面代码中,我们可以看出BbtForumController 和一般的类并没有区别,它没有实现任何特殊的接口,因而是一个地道的POJO。
SpringMVC框架知识点详解
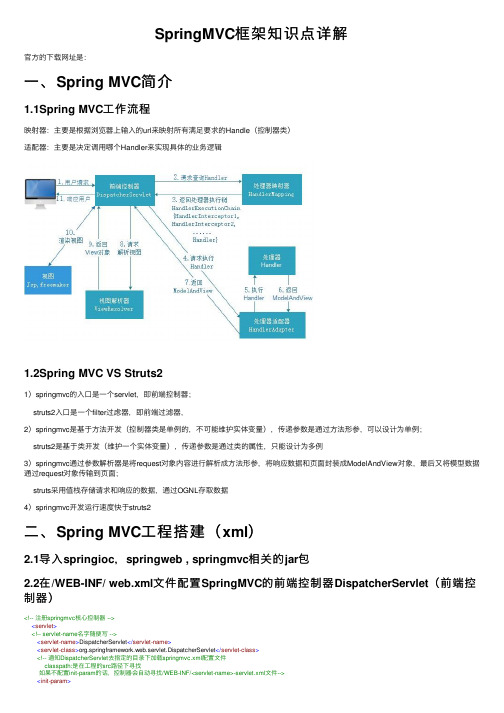
SpringMVC框架知识点详解官⽅的下载⽹址是:⼀、Spring MVC简介1.1Spring MVC⼯作流程映射器:主要是根据浏览器上输⼊的url来映射所有满⾜要求的Handle(控制器类)适配器:主要是决定调⽤哪个Handler来实现具体的业务逻辑1.2Spring MVC VS Struts21)springmvc的⼊⼝是⼀个servlet,即前端控制器;struts2⼊⼝是⼀个filter过虑器,即前端过滤器,2)springmvc是基于⽅法开发(控制器类是单例的,不可能维护实体变量),传递参数是通过⽅法形参,可以设计为单例;struts2是基于类开发(维护⼀个实体变量),传递参数是通过类的属性,只能设计为多例3)springmvc通过参数解析器是将request对象内容进⾏解析成⽅法形参,将响应数据和页⾯封装成ModelAndView对象,最后⼜将模型数据通过request对象传输到页⾯;struts采⽤值栈存储请求和响应的数据,通过OGNL存取数据4)springmvc开发运⾏速度快于struts2⼆、Spring MVC⼯程搭建(xml)2.1导⼊springioc,springweb , springmvc相关的jar包2.2在/WEB-INF/ web.xml⽂件配置SpringMVC的前端控制器DispatcherServlet(前端控制器)<!-- 注册springmvc核⼼控制器 --><servlet><!-- servlet-name名字随便写 --><servlet-name>DispatcherServlet</servlet-name><servlet-class>org.springframework.web.servlet.DispatcherServlet</servlet-class><!-- 通知DispatcherServlet去指定的⽬录下加载springmvc.xml配置⽂件classpath:是在⼯程的src路径下寻找如果不配置init-param的话,控制器会⾃动寻找/WEB-INF/<servlet-name>-servlet.xml⽂件--><init-param><!-- 值是固定的,相当于键值对 --><param-name>contextConfigLocation</param-name><param-value>classpath:springmvc.xml</param-value></init-param></servlet><servlet-mapping><servlet-name>DispatcherServlet</servlet-name><url-pattern>*.action</url-pattern>//拦截请求</servlet-mapping>注:在默认情况下:springmvc框架的配置⽂件必须叫<servlet-name>-servlet.xml且必须放在/WEB-INF/⽬录下,我们可以在web.xml⽂件中,为DispatcherServlet配置⼀个初始化参数,让它去我们指定的⽬录下加载springmvc.xml配置⽂件2.3配置springmvc.xml注:该配置⽂件的命名规则遵循web.xml⽂件中核⼼控制器配置。
springmvc教程

springmvc教程Spring MVC是一种基于Java的Web应用开发框架,它是Spring框架的一部分,广泛应用于企业级的Java开发中。
相比于其他的Web框架,Spring MVC具有灵活性高、易于维护、测试和扩展等优势。
本篇文章将为大家介绍Spring MVC的基本概念、核心特性以及使用方法。
首先,我们需要了解Spring MVC的基本概念。
Spring MVC使用了经典的MVC(Model-View-Controller)设计模式,将应用程序分为三个部分:模型(Model)、视图(View)和控制器(Controller)。
模型表示封装了业务数据的Java对象,视图负责显示用户界面,控制器起到了调度和协调的作用。
Spring MVC的核心特性包括:1. 基于注解的处理器映射:Spring MVC使用注解来标注处理请求的方法,简化了URL到处理器的映射配置。
2. 强大的数据绑定支持:Spring MVC提供了丰富的数据绑定功能,可以将请求参数绑定到方法参数、表单对象或者JavaBean中,并支持数据校验。
3. 灵活的视图解析:Spring MVC支持多种视图技术,包括JSP、Freemarker、Thymeleaf等,而且可以根据请求的内容类型动态选择视图。
4. 高效的请求处理流程:Spring MVC采用了前端控制器模式,将请求的处理流程交给统一的调度器(DispatcherServlet)来管理,通过HandlerMapping匹配处理器,然后由HandlerAdapter调用方法处理请求,最后由ViewResolver解析视图并返回给客户端。
5. 可扩展性强:Spring MVC提供了丰富的可扩展点,如拦截器、处理器适配器和视图解析器等,可以通过自定义实现来满足不同的需求。
接下来,我们将通过一个简单的例子来演示Spring MVC的使用方法。
首先,我们需要在Maven中添加相关依赖,如spring-webmvc、javax.servlet-api等。
Spring-mvc入门
HttpServletResponse response) } } throws Exception { ModelAndView mav = new ModelAndView("hello.jsp"); mav.addObject("message", "Hello World!"); return mav;
简要说明 :DispatcherServlet 就是一个 Servlet ,也是对请求进行转发的核心 Servlet 。 在 这 里 即 所 有 .do 的 请 求 将 首 先 被 DispatcherServlet 处 理 , 而 DispatcherServlet 它要作的工作就是对请求进行分发(也即是说把请求转发给具体 的 Controller )。可以简单地认为,它就是一个总控处理器,但事实上它除了具备总控处理理 器对请求进行分发的能力外, 还与 spring 的 IOC 容器完全集成在一起, 从而可以更好地使 用 spring 的其它功能。在这里还需留意 < servlet-name > spmvc ,下面步骤三会用到。 步骤三、 建立 spmvc-servlet.xml 文件, 它的命名规则:servlet-name-servlet.xml 。 它的主要代码如下: Xml 代码
xml version="1.0" encoding="UTF-8" ?> > <beans> <bean id="simpleUrlHandlerMapping"
class="org.springframework.web.servlet.handler.SimpleUrlHandlerMapping" > <property name="mappings" > <props> <prop key="/hello.do">helloControlprop> props>
SpringMVC基本操作

SpringMVC基本操作SpringMVC:1.)SpringMVC和Spring的关系:软件开发的三层架构: web层【表⽰层、表现层】---->Service层---->Dao[DataBase Access Object]---->数据库!SpringMVC实际上是Spring的⼀个⼦模块,我们⽤SpringMVC来代替这个JavaWEB部分!MVC:也是⼀种设计模式:M:Model【模型】-->V[View]--->C[Controller]!Model⽤来封装数据的,View:⽤来显⽰数据 Controller:⽤于接收前端页⾯发送的请求,然后调⽤Service层处理,拿到处理结果,将该结果返回给前端页⾯!SpringMVC:相当于MVC架构中的C以及V!以前JavaEE-->现在J2EE2.)SpringMVC有什么优势?Spring 为展现层提供的基于 MVC 设计理念的优秀的Web 框架,是⽬前最主流的 MVC 框架之⼀。
Spring3.0 后全⾯超越 Struts2,成为最优秀的 MVC 框架。
Spring MVC 通过⼀套 MVC 注解,让 POJO 成为处理请求的控制器,⽽⽆须实现任何接⼝。
⽀持 REST 风格的 URL 请求。
GET POST PUT DELTE采⽤了松散耦合可插拔组件结构,⽐其他 MVC 框架更具扩展性和灵活性.⽬前主流的开发软件,说⽩了,⼤家都在⽤!3.)SpingMVC是基于SpingMVC4.x4.)SpringMVC的HelloWorld快速⼊门!1.加⼊JAR包:–commons-logging-1.1.3.jar–spring-aop-4.0.0.RELEASE.jar–spring-beans-4.0.0.RELEASE.jar–spring-context-4.0.0.RELEASE.jar–spring-core-4.0.0.RELEASE.jar–spring-expression-4.0.0.RELEASE.jar–spring-web-4.0.0.RELEASE.jar–spring-webmvc-4.0.0.RELEASE.jar2.配置前端控制器【DispatcherServlet】<!-- The front controller of this Spring Web application, responsible for handling all application requests --><!--向服务器注册前端控制器! --><servlet><servlet-name>springDispatcherServlet</servlet-name><!--DispatcherServlet指的是SpringMVC的前端控制器!,给服务器使⽤,创建servlet对象! --><servlet-class>org.springframework.web.servlet.DispatcherServlet</servlet-class><!-- 初始化参数contextConfigLocation⽤于指定SpringMVC配置⽂件的路径以及名称 --><init-param><param-name>contextConfigLocation</param-name><param-value>classpath:springmvc.xml</param-value></init-param><!-- 数字0或者⼤于0的数字表⽰的是:在服务器启动的时候创建Servlet对象,⽽不是第⼀次访问的时候创建⼩于0的数字指的是:在第⼀次访问的时候创建Servlet对象.在数字⼤于O的情况下,数字越⼩,优先级越⾼!--><load-on-startup>1</load-on-startup></servlet><!-- Map all requests to the DispatcherServlet for handling --><!-- ⽤ servlet-mapping指定请求映射的路径--><servlet-mapping><servlet-name>springDispatcherServlet</servlet-name><!-- ⽤url-pattern指定拦截的请求路径! --><url-pattern>/</url-pattern></servlet-mapping>3.创建SpringMVC的配置⽂件并添加要扫描的包注意:1.创建SpringMVC配置⽂件的名字要和上⾯在web.xml⽂件中指定的名字⼀致!2.我们创建SpringMVC配置⽂件的时候使⽤的是Spring Bean Configuration File创建的,不是XML!<!-- 配置SpingMVC容器要扫描的包! --><context:component-scan base-package="com.neuedu.controller"></context:component-scan>4.在springMVC扫描的包下创建控制器类[Controller/Handler],注意要加⼊@Controller注解/*** 我们通过@RequestMapping做请求URL的映射!* @return*/@RequestMapping("/sayHello")public String sayHello(){return "/WEB-INF/views/success.jsp";}注意:在类的⽅法上我们使⽤的是@RequestMapping,然后在括号⾥指定请求url的请求路径!5.创建页⾯!注意:1.当我们不⽤init-param指定springMVC配置⽂件的路径好位置的时候,SpringMVC默认会去/WEB-INF/<servlet-name>-servlet.xml2.配置视图解析器<!--InternalResourceViewResolvers 是视图解析器,它会将逻辑视图转换成实际的物理视图,做⼀个转发操作!也就是说具体步骤:prefix + ⽅法的返回值 + suffix--><!-- /WEB-INF/views/success.jsp --><bean class="org.springframework.web.servlet.view.InternalResourceViewResolver"><property name="prefix" value="/WEB-INF/views/"></property><property name="suffix" value=".jsp"></property></bean>3.请求⼀个SpringMVC的流程!5.)使⽤ @RequestMapping 映射请求Spring MVC 使⽤ @RequestMapping 注解为控制器指定可以处理哪些 URL 请求在控制器的类定义及⽅法定义处都可标注@RequestMapping– 类定义处:提供初步的请求映射信息。
掌握使用Spring MVC进行Web应用开发
掌握使用Spring MVC进行Web应用开发随着互联网的快速发展,Web应用开发已成为当今软件开发领域中的热门话题。
而Spring MVC作为一种开源的Web应用框架,已经成为众多开发者的首选。
本文将介绍如何掌握使用Spring MVC进行Web应用开发,并提供一些实用的技巧和建议。
一、Spring MVC简介Spring MVC是基于Java的轻量级Web框架,它遵循了MVC(Model-View-Controller)的设计模式,将应用程序分为模型、视图和控制器三个部分,使得开发者能够更好地组织和管理代码。
Spring MVC提供了灵活的配置选项和丰富的功能,使得开发Web应用变得更加简单和高效。
二、搭建Spring MVC项目要开始使用Spring MVC进行Web应用开发,首先需要搭建一个Spring MVC项目。
可以使用Maven或者Gradle等构建工具来创建一个新的项目,然后添加必要的依赖项。
在项目的配置文件中,需要配置Spring MVC的核心组件,如DispatcherServlet和HandlerMapping等。
这些组件将负责接收和处理用户的请求,并将其转发到相应的处理器方法。
三、编写控制器在Spring MVC中,控制器负责处理用户请求并返回相应的结果。
控制器类需要使用@Controller注解进行标记,并在方法上使用@RequestMapping注解来指定URL映射。
可以通过方法的参数来获取用户请求的参数,并通过方法的返回值来指定视图的名称或者数据模型。
此外,还可以使用@RequestParam注解来绑定请求参数到方法的参数上。
四、视图解析Spring MVC提供了多种视图解析器,用于将控制器方法的返回值解析为具体的视图。
可以使用InternalResourceViewResolver来解析JSP视图,也可以使用ThymeleafViewResolver来解析Thymeleaf模板。
简述springmvc的框架运行流程
简述springmvc的框架运行流程下载温馨提示:该文档是我店铺精心编制而成,希望大家下载以后,能够帮助大家解决实际的问题。
文档下载后可定制随意修改,请根据实际需要进行相应的调整和使用,谢谢!并且,本店铺为大家提供各种各样类型的实用资料,如教育随笔、日记赏析、句子摘抄、古诗大全、经典美文、话题作文、工作总结、词语解析、文案摘录、其他资料等等,如想了解不同资料格式和写法,敬请关注!Download tips: This document is carefully compiled by theeditor.I hope that after you download them,they can help yousolve practical problems. The document can be customized andmodified after downloading,please adjust and use it according toactual needs, thank you!In addition, our shop provides you with various types ofpractical materials,such as educational essays, diaryappreciation,sentence excerpts,ancient poems,classic articles,topic composition,work summary,word parsing,copy excerpts,other materials and so on,want to know different data formats andwriting methods,please pay attention!深入浅出:SpringMVC框架的运行流程解析在现代Web开发中,SpringMVC作为Spring框架的一部分,扮演着核心角色,它提供了强大的模型-视图-控制器(MVC)架构来构建可维护和可扩展的Web应用程序。
SpringMVC

使用SpringMVC搭建RestAPI开发框架1.使用Eclipse创建Web项目,引入下面类库到类路径2.Src根目录下创建spring容器配置文件applicationContext.xml applicationHibernate.xml3.在/WEB-INF下创建servletContext.xmlservletContext.xml注释:RestAPI声明、API请求处理配置4.配置web.xmlweb.xml5.编写API实现类package com.fox.rest.tag;import org.springframework.web.bind.annotation.PathVariable;import org.springframework.web.bind.annotation.RequestMapping;import org.springframework.web.bind.annotation.RequestMethod;import org.springframework.web.bind.annotation.RestController;import org.springframework.web.servlet.ModelAndView;@RestController@RequestMapping("tag")public class tagService{@RequestMapping(path="/index",method=RequestMethod.GET)public ModelAndView getCurrentUser(){ModelAndView view=new ModelAndView();view.setViewName("index");return view;}@RequestMapping(path="",method=RequestMethod.GET)public String getCurrentUserInfo(){return "操作成功";}@RequestMapping(path="/{message}",method=RequestMethod.POST)public String getCurrentUser1(@PathVariable String message){return message;}@RequestMapping(path="/{message}/{success}",method=RequestMethod.GET)public String getCurrentUser2(@PathVariable String message,@PathVariable String success){return String.format("%s,%s", success,message);}@RequestMapping(path="/{id}",method=RequestMethod.DELETE)public String getCurrentUser11(@PathVariable("id") String idx){return String.format("账号: %s ,基本信息已经删除.",idx);}}6.编写定时任务package com.fox.task.impl;import org.apache.log4j.Logger;import org.springframework.scheduling.annotation.Scheduled;import ponent;import com.fox.task.abstractT ask;@Componentpublic class dailyT ask extends abstractT ask{private static Logger logger=Logger.getLogger(dailyT ask.class);@Scheduled(fixedRate=2*1000)@Overrideprotected void execute(){(String.format("[%s] start daily working...",Thread.currentThread().getName()));try{Thread.sleep(30*60000);} catch (InterruptedException e){e.printStackTrace();}(String.format("[%s] over daily working", Thread.currentThread().getName()));}}7.重点配置详解●API、Service、Dao层定义类通过注解声明●Spring配置文件中显示声明注解驱动日志记录器配置。
- 1、下载文档前请自行甄别文档内容的完整性,平台不提供额外的编辑、内容补充、找答案等附加服务。
- 2、"仅部分预览"的文档,不可在线预览部分如存在完整性等问题,可反馈申请退款(可完整预览的文档不适用该条件!)。
- 3、如文档侵犯您的权益,请联系客服反馈,我们会尽快为您处理(人工客服工作时间:9:00-18:30)。
Spring3Mvc开发平台描述:由于公司现有开发框架使用过于复杂,机械性质的工作还需要人工来完成,每个对应的控制器及视图控制器都要进行手动配置XML文件,还需要在全局容器中进行依赖注入,而且对于业务层还需要人工手动进行事物处理等复杂和重复性质的工作,开发效率低下,所以Amundsen研发小组搭建了一套当前最主流的开发平台【Spring3MVC开发框架】。
框架结构及开发规则使用说明如下:一.框架结构主要由以下几部份组成1.Spring + SpringMvc解释:最底层核心框架1.1依赖注入1.2AOP横向切面技术、ASPECT切面框架1.3启用Annotation注解及MVC驱动器2.MyBatis解释:主要应用数据库持久层操作,并且所有相关SQL全部为XML文件方便管理与维护3.SpringSecurity :安全认证框架解释:主要应用于框架的全安性(注:暂时未启用)3.1用户身份的认证过程3.2用户的请求进行拦截并分析是否被授权等过程,3.3会话连接的控制3.4访问端口及地址转换的控制4.视图层:支持任何前台交互视图语言4.1主要交互框架以EXT5.0为主4.2Flex Builder4.6 Actionscript3.0 语言,用于特殊模块处理应用二.框架目录结构说明1./src/com/fcx/app/说明:此目录下为Flex管理部份应用所有核心业务(注:非Flex开发人员禁止更改)2./src/com/longhope/business/说明:此目录下为公司项目所有模块相关的业务文件,每个文件夹都是功能模块的拼音简写(注:文件夹的结构及目录层级是与菜单结构一置的,这样方便对应管理与维护),并且在有效功能模块对应的文件夹下必需要创建“action”、“mapper”、“model”、“service”、”service/impl”等如下文件夹,此结构必需遵循开发框架规则:action :控制器类mapper :Dao接口类及接口所对应的SQLMAP文件(需要注意的是:所有SQL必需大写,除参数)model : 模型类(即:实体对象)service: 业务接口service.impl:业务接口的实现类注意:如果是前后台分离,以远程接口方式开发,那么就是如下的结构,如图所示:前端需要的结构--------------------------------------------------------------------------------------------------后端需要的结构说明:国际化管理(注:此部份为系统预留功能,暂时没应用)4./src/com/fcx/app/androic/src/com/fcx/app/ios说明:移动端开发业务在此目录下开发,因为由于业务的特殊性,web客户端所有请求是需要认证和授权的,而只有移动端是不需要认证授权的,并且所有移动端的请求必需是”.do”结束例如:移动端请求user/login.doWeb端请求user/login.action5./framework说明:此目录下为框架核心配置文件及系统全局参数等文件;例如端口等数据配置/framework/com/fcx/core/说明:此目录下为框架所有通用类备注:此目录下所有配置文件禁止开发人员更改,如果需要变更或追加改修通用类等文件请与(谭亮:管理员)开发人员联系6./lib 开发框架核心业务相关JAR包/lib/common/lib/flex/lib/mybatis/lib/mysql/lib/openCSV/lib/oracle/lib/security/lib/spring/lib/xml说明:所有框架及业务相关JAR包,主要是进行了分类方便管理与维护备注:以上目录结构禁止变更或删除,如果需要追加请联系管理员7./WebRoot/fileUpload:相关业务文件上传目录/flex:Flash管理平台及前台调用功能模块等页面相关文件(例如:自定义汇总、报表制度定义)/page:所有管理系统交互页面,注此文件夹下的所有子文件夹都是相关模块拼音简写创建,以及层次结构与菜单一置,不允许随意追加或创建(注:所有相关开发并互页面必需在此目下创建,并且与功能模块结构一置)/resources:所有相关资源文件(例如:JS,图片,样式等文件)并且都要有序的创建存储,不允许重复/target:存储全局的入口文件及认证成功或失败等跳转文件,还有捕获系统全局性异常文件/WEB-INF/config/applicationContext-webapp.xml:Spring全局配置文件,不允许开发人员变更jdbc.properties:数据库连接配置文件log4j.properties:日志配置文件(注:此文件已配置完成,自动按日期创建相关日志文件)/web.xml :项目初始化配置文件三.开发框架核心配置文件1.applicationContext-jdbc.xml 数据连接池配置<!-- 加载JDBC资源文件 --><context:property-placeholder location="/WEB-INF/config/jdbc.properties"/><!-- Mysql5.0 数据连接池配置–><bean id="dataSource"class="com.alibaba.druid.pool.DruidDataSource"destroy-method="close"><property name="driverClassName"value="${jdbc.driverClassName}"/><property name="url"value="${jdbc.connectionURL}"/><property name="username"value="${ername}"/><property name="password"value="${jdbc.password}"/><!--<property name="autoCommitOnClose" value="${autoCommitOnClose}"/><property name="checkoutTimeout" value="${checkoutTimeout}"/><property name="initialPoolSize" value="${initialPoolSize}"/><property name="minPoolSize" value="${minPoolSize}"/><property name="maxPoolSize" value="${maxPoolSize}"/><property name="maxIdleTime" value="${maxIdleTime}"/><property name="acquireIncrement" value="${acquireIncrement}"/><property name="maxIdleTimeExcessConnections"value="${maxIdleTimeExcessConnections}"--></bean>2.applicationContext-mybatis.xml 新版MyBatis配置<!-- Spring提供的用于构建MyBatis的客户端sqlSessionFactory对象工厂 --><bean id="sqlSessionFactory"class="org.mybatis.spring.SqlSessionFactoryBean"> <property name="dataSource"ref="dataSource"/><property name="configLocation"value="classpath:mybatis-config.xml"></property><property name="mapperLocations"value="classpath*:com/longhope/business/*/mapper/*.xml" /></bean><!-- 配置sqlSessionTemplate模板类 --><bean id="sqlSessionTemplate"class="org.mybatis.spring.SqlSessionTemplate"> <constructor-arg ref="sqlSessionFactory"/></bean><!-- JdbcTemplate --><bean id="jdbcTemplate"class="org.springframework.jdbc.core.JdbcTemplate"> <property name="dataSource"ref="dataSource"/></bean><!-- JdbcDaoInterface --><bean id="jdbcDao"class="com.fcx.core.jdbc.DaoImple"><property name="dataSource"ref="dataSource"/></bean><!-- 配置事务管理器 --><bean id="transactionManager"class="org.springframework.jdbc.datasource.DataSourceTransactionManager"> <property name="dataSource"ref="dataSource"/></bean><!-- AOP切面技术,实现对Service的声明式事务管理 --><tx:advice id="txAdvice"transaction-manager="transactionManager"> <tx:attributes><tx:method name="set*"propagation="NOT_SUPPORTED"/><tx:method name="get*"propagation="REQUIRED"read-only="true"/><tx:method name="*"propagation="REQUIRED"rollback-for="ng.RuntimeException,ng.Exception"/></tx:attributes></tx:advice>3.applicationContext-springmvc-servlet.xml<!-- 启用基于注解(Annotation-based)的配置 --><context:annotation-config/><!—- 自动描述路径 --><context:component-scan base-package="com.longhope.business.*.action"/><context:component-scan base-package="com.longhope.business.*.service..*"/><!—Aop切面技术 --><aop:config><aop:pointcut id="serviceMethods"expression="execution(* com.fcx.*..service..*Service.*(..)) || execution(*com.longhope.business..service..*Service.*(..)) || execution(*com.longhope.business..*.service..*Service.*(..))"/><aop:advisor advice-ref="txAdvice"pointcut-ref="serviceMethods"/> </aop:config><!—视图解析器 --><beanclass="org.springframework.web.servlet.view.InternalResourceViewResolver"p:prefix="/"/>四.开发规则及使用说明(实例说明:以数据编辑模块为例)1.控制器:功能模块对应的业务入口1.1 控制器名称:基本都以功能模块名称拼音简写或有代表性的英文+Action;例如:SjbjAction1.2 控制器说明编写:当前控制器的主要功能及作者,创建日期版本等信息,如下:/*** Copyright(c)Consulting Longhope. All rights are reserved** 数据编辑管理 Action* @author TanLiang* @version Ver 1.0 2015-08-02 初版*/1.3 控制器注解及名字空间定义:如下@Controller//此注解标识为控制器@RequestMapping("Sjbj") //此注解标识为当前控制器的名字空间,而且此名称空间标识必需与菜单ID等数据一置,因为此部份是要与权限相关联的1.4业务接口的注入:如下@Autowired //必需追加此标签,这样业务接口就自动注入private SjbjService sjbjService;备注:而且所有注入的对象不需要在实现GET、SET等方法1.5控制器的方法配置:如下1.5.1 对于视图(JSP/PHP/其它前端)层的请求(备注:对于方法必需追加说明等标识)/*** 功能:数据保存*/@RequestMapping("saveData")//标签为调用的方法public String saveData(S_BS_CORP s_bs_corp,String JsonArray) {s_bs_corp = sjbjService.saveData(s_bs_corp,JsonArray);return /page/sjbj/xxx.jsp; //返回到指定视图层路径}1.5.2 对于视图(Flex或移动端或返回结果为JSON数据)层的请求@RequestMapping("saveData") //标签为调用的方法@ResponseBody //对于返回JSON类型数据必需追加此标签,然后返回相应的对象即可因为所有对象或集合数据都会被框架自动转换为标准的JSON数据结构2.例如请求:Sjbj/saveData.action3.实体类:业务相关实体对象,即:POJO类对象与数据表直接对应如下:@Table("S_BS_CORP")public class S_BS_CORP implements Serializable{@PrimaryKey@Column(mappedName="S_CORP_UUID")private String S_CORP_UUID;@Column(mappedName="S_CORP_CD")private String S_CORP_CD;……}备注:以上实体类中对应的标签,主要应用自动拼组SQL时的业务逻辑而定义4.Dao接口及SqlMap4.1 文件名称规则同上,例如:数据编辑功能模块,需要注意义的是必需创建一对,其中一个是Dao接口,而另一个是接口所对应的SQL方法,而且接口名称与方法名称还有参数及返回值等参数必需对应,如下:--------------------------------------------------------------------------------------------- SjbjMapper.java/ public List queryForList(HashMap map);--------------------------------------------------------------------------------------------- SjbjMapper.xml/<select id="queryForList"parameterType="HashMap"resultType="HashMap"> SELECT * FROM 数据表 WHERE S_CORP_UUID = #{S_CORP_UUID}</select>5.业务接口及业务接口实现类如下:4.1 接口文件必需放在service/目录下SjbjService.java4.2 接口实现类文件必需放在service/impl/目录下SjbjServiceImpl.java备注:业务层接口的名称必需按照此规则创建,否则可能导至无法正常自动创建事物处理,还需要注意的是,在业务接口实现类中必需设置业务标签注解如下:@Service("sjbjService") //此标签必需设置,而名称则还是按模块名称简拼在+Service即可;6.业务生成器:即以上是配置控制器所产生的相关业务文件,那么这种机械性质的工作还是有些麻烦,所以我们开发了一套业务生成器,也就是说我们只要配置好相关业务的数据表名称,及生成目录然后运行即可自动生成了:实体类、Dao接口、Dao接口对应的SQLMAP、业务接口、业务接口实现类等文件,并且在SQLMAP及接口实现类中已经根据数据表的主外键逻辑自动生成基本业务;业务生成了器类路径为:framework/com/fcx/core/generator/BusinessGenerator.java配置好右键直接运行当前业务生成器类就可以了,所有业务相关文件全部生成了,无须手动去创建,此时只需要在控制器中配置业务接口,然后编辑方法传入相应参数就可以正常运行了,如果当前自动生成的基本业务无法满足,那么开发人员可自行编辑或在此基础上进行改修即可;五.备注开发约定如下:说明:目录结构不允许变更,编写代码必需整洁并追加相应标识及说明,否则被视为垃圾代码,并找到编写人员要求重新整理;1.1 数据库表定义规则:所有系统表都定义为:S_数据表所有业务表也就是制度表为:C_表号所有汇总表定义为:H_表号模版表定义为:T_表号备注:所有数据表字段名称全部为大写英文字母;1.2项目中的实体类对象定义规则同上例如:S_USER (即:系统用户表)1.3Java开发中的类名定义(主要以模块名称的简写拼音、或有效的英文单词) 如下:控制器:UserAction实体类:S_USER-系统用户表C_H201-固定资产投资H_G101-汇总表Dao映射接口及XML:UserMapper.javaUserMapper.xml业务接口:UserService.java业务接口实现类:UserServiceImpl.java方法名称开头字母小写:saveDetail();所有目录结构及配置文件禁止开发人员更改,如果需要变更或改修及通用类等文件请与(谭亮:管理员)开发人员联系,为了保证项目结构及代码类等文件的整洁性,方便他人维护请遵循开发规则,如有问题请及时联系开发人员:谭亮。
