《黑道圣徒4》人物编辑器教程_编辑器指南(一帖全,包教会)
GTA4 Video Editor Manual
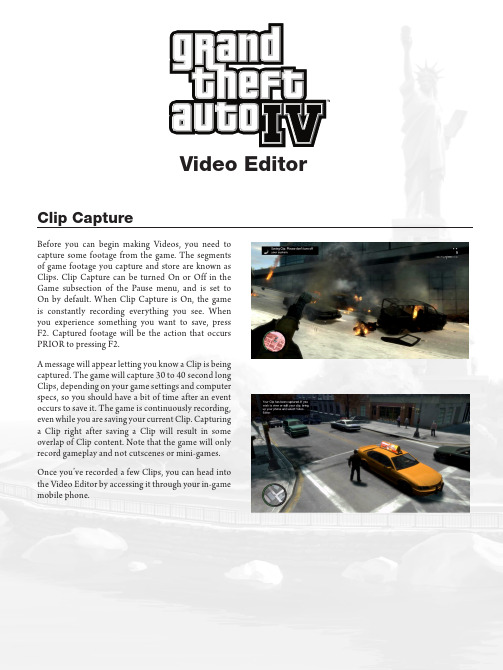
Clip CaptureBefore you can begin making Videos, you need to capture some footage from the game. The segments of game footage you capture and store are known as Clips. Clip Capture can be turned On or Off in the Game subsection of the Pause menu, and is set to On by default. When Clip Capture is On, the game is constantly recording everything you see. When you experience something you want to save, press F2. Captured footage will be the action that occurs PRIOR to pressing F2.A message will appear letting you know a Clip is being captured. The game will capture 30 to 40 second long Clips, depending on your game settings and computerspecs, so you should have a bit of time after an event occurs to save it. The game is continuously recording, even while you are saving your current Clip. Capturing a Clip right after saving a Clip will result in some overlap of Clip content. Note that the game will only record gameplay and not cutscenes or mini-games. Once you’ve recorded a few Clips, you can head into the Video Editor by accessing it through your in-gamemobile phone.Video EditorEntering the Video Editor from the in-game mobile phone first brings you to the Clips section. This section organizes all your captured Clips chronologically in named menus (Favorites, Today, This Week and Archives).Clip ViewerDouble click a Clip to watch it in the Clip Viewer. The Clip will begin playing automatically. To stop it at any time, click the Pause button, or press the Spacebar. You can also Rewind or Fast Forward the Clip by clicking the buttons on the Clip Viewer’s Toolbar, or by pressing the Left and Right Arrow keys on your keyboard. Right clicking the Rewind and Fast Forward buttons advance or reverse your Clip one frame at a time, the Up and Down Arrow keys are the keyboard shortcuts for this feature.You can also hold the Right Mouse button down and move the mouse to maneuver the camera around your character. While holding the Right Mouse button, you can also use the W and S keys to zoom in and out. At any time, you can update the Clip’s thumbnail by hitting U on your keyboard. This makes the frame you’re on the new thumbnail for the Clip, which will help you locate it later on when you want to use it in a Video. Once you’ve finished reviewing your Clip and setting a thumbnail, you can back out of the Clip Viewer by pressing the Esc button on your keyboard.FavoritesNow that you’ve updated your thumbnail, you can makethe Clip a Favorite, so it will be even easier to find later on.To mark a Clip as a Favorite, drag it on top of the Favoritesmenu. Clips that have been added to your Favorites folderwill be marked with a star. Your Favorites folder is likea playlist; you can add or delete Clips from it withoutaffecting your Archives. However, deleting a Clip fromyour Archives will permanently remove it.Once you’re done organizing your Clips, you can moveon to the Editor section. The first area of the Editorsection you will see is your Video Archives. All of yourworking Videos are stored and organized in the VideoArchives in the order they were most recently workedon. From here you can decide to continue editing anexisting Video, or create a new one by double clickingthe Create New thumbnail.Clip EditorTo edit a Clip, drag it from the Clips menu on the left side of the screen to the Storyboard area. Double click it to load the Clip in the Clip Editor.Toolbar / Time BarOnce you load a Clip into the Clip Editor, you’ll notice a Time Bar at the top of the screen with a Toolbar underneath it. Like the Clip Viewer, you can pause or resume Clip playback by using the Play/Pause button on the Toolbar or the Spacebar on your keyboard. The Fast Forward button can be clicked up to three times for varying speeds (Rewind only has a single speed), or if you like keyboard shortcuts, you can use the Left and Right Arrow keys. You can right click the Fast Forward and Rewind buttons or use the Up or Down Arrow keys to step forward or backward through your Clip frame-by-frame. This type of control is very useful when you want to make precise edits. You can jump to the beginning of your Clip at any time by hitting the Back button, or B on your keyboard. Edits to your Clip can be saved by pressing F6 or clicking the Save button on the Toolbar.While your Clip is playing, you’ll notice a Tab moving across the Time Bar. The Time Bar Tab represents your location in the Clip. If you want to jump around your Clip, you can drag the Time Bar Tab along the Time Bar to advance or reverse your Clip - or click anywhere on the Time Bar to jump to that spot instantly. You can grab and drag the Time Bar Extents at the far left and right ends of the Time Bar to trim the length of your Clip.The Timer on the right side of the Toolbar indicates your position in time. Clicking on this Timer will toggle between the Clip Timer and the Video Timer. The Clip Timer indicates your position in the Clip relative to the length of the Clip itself. When the Video Timer is toggled, it indicates your position in the overall Video relative to its total length. This is helpful if you want a song or piece of text to appear at a specific moment in your Video. All you need to do is note your position relative to the Video Timer while in the Clip Editor and then slide your text or audio to that time on the Video Timer once you’re back in the Video Editor.Adding MarkersOther than the overall length of your Clip, which is controlled by the Time Bar Extents at either end of the Time Bar, all edits to your Clip are controlled within Markers. The Marker button looks like an upside down triangle. Clicking this button places a Marker into the Clip on your current frame. Hitting M on your keyboard will do the same thing. Markers can be dragged along the Time Bar, as long as the camera remains within range of your character. Markers cannot be dragged past one another, but can be snapped together so they’re a single frame apart, allowing you to make instantaneous camera cuts. You can cycle through your Markers by using the Next/Previous Marker button located next to the Place Marker button on the Toolbar. The Greater Than and Less Than keys, better known as the Period and Comma keys, on your keyboard, act as the shortcut for this button. If you don’t have a Marker selected, these buttons will jump you to the nearest Marker relative to the Time Bar Tab. This feature comes in handy as you begin to get the hang of the Clip Editor and want to move around your Clip quickly to make your edits.Cameras – PresetClicking on a Marker will open the Marker Controls boxunder the Toolbar. Click on the Camera menu to expandit. By default, your Camera Type is set to Preset and thefirst preset you see is the Game Camera. This camerashows you exactly what you saw when you captured theClip in the game. You can click the View option or scrollyour Mouse Wheel to cycle through the various PresetCameras available. Preset Cameras are locked on yourcharacter from various angles. They provide a good wayto set up Videos quickly. Once you’ve specified a certaintype of camera within a Marker, all subsequent Markerswill inherit that Camera Type until you change it.Custom Cameras – TargetFor more control over your cameras, click the Type field in the Camera menu to switch your Camera Type to Custom. There are two types of Custom Cameras available: Free and Target. A Target Camera locks onto people in your Clip and can be maneuvered relative to that person. Much like the camera in the Clip Viewer, you can hold down the Right Mouse button and move the camera around. You can use W and S to move the camera in and out as well as the Mouse Wheel to lower or raise the Target Camera Offset. (Hold Shift to move the camera more quickly.) Q and E will control the camera’s tilt. The Target Camera also has a Lock setting: Position locks the camera’s horizontal position, and Orientation locks the camera’s horizontal and vertical position around the player. Play around with these options and see if you can find an interesting angle to hold on your target for a few moments. The camera will automatically adjust when it comes into contact with walls or objects, so keep that in mind when trying to set a distance between the target and the camera.The Target Camera is locked onto your character by default, but you can target other people in your Clip by scrolling through the Target field in the Camera menu. This can often reveal events you weren’t even aware of.Custom Cameras – Target continuedFOVThe camera’s Field of View can also be controlled by changing the FOV value in the Camera menu.MovementMovement allows you to transition the camera between two Markers with different camera positions. Target Cameras move in an orbit around their target. Place two Markers a few seconds apart from each other on the Time Bar. Set each Marker’s Camera Type to Custom with the View set to Target. The speed of the camera’s movement depends on the distance the Markers are from each other so keep that in mind when thinking about how you want the camera to move. Once you have selected locations for the two cameras, click the first camera’s Marker and select the Orbit option in the Movement field. Now the camera will transition between the two Markers when you play your Clip. Move the cameras around and play with the spacing between the Markers to get different, sweeping views of the characters in your Clip.If you wish to do a complete rotation around a target it will require more than two Target Cameras with Orbit active. Place Markers that control Movement Cameras as evenly as possible so their speed doesn’t fluctuate.The Ease option allows you to ease the camera out of one Marker and into another. It’s a good way to soften your camera movements. You can also use Ease to slow the camera as it moves through one Marker on the way to another by selecting the In/Out option. These sudden camera speed reductions in the middle of a move can place emphasis on an event you want to highlight.HandheldThere’s a Handheld field in the Camera menu that enables you to add a Low, Medium or High degree of random movement to your camera. This can help make your shots feel more natural or spontaneous.Custom Cameras – FreeThe second type of Custom Camera is the Free Camera.With Custom still selected in the Camera’s Type field,click the View field to change the camera from Targetto Free. The Free Camera, as its name suggests, givesyou many options when setting up your shots. It allowsyou to fly around the world and look at anything youlike. The Free Camera’s controls function much like theTarget Camera’s, but the Free Camera has a greater rangeof motion because it’s not attached to anything. PressW, A, S, D to move Forward, Left, Backward, and Right.Holding the Right Mouse button and moving the mousearound allows you to rotate your camera heading. As withthe Target Camera, the mouse wheel moves the cameraup and down and Q and E will tilt the camera. Hold downthe Shift button on your keyboard while moving thecamera to increase its speed.MovementLike the Target Camera, you can use the Free Camera to set up moves. The Free Camera has two different options in its Movement field: Linear and Blend. Linear will take a more direct route between Markers while Blend will try to soften transitions between two or more Markers. The orientation and position of your cameras relative to one another will determine which option best suits your camera move. Experiment with both to see which one works best.Custom Cameras – Free continuedFree Camera RadarWhen you have a Free Camera selected, you’ll notice a Radar appear in the bottom left-hand corner of the screen. The Free Camera Radar indicates your Free Camera’s range of motion relative to your character. Like in the game, your character is represented by an arrow icon, and will always be in the middle of the Free Camera Radar. The Camera icon represents the position and heading of your Free Camera relative to your character. The Free Camera Radar has two circles. While inside the inner circle of the Radar, the camera can face in any direction. Once the camera leaves the first ring, it must begin facing back toward your character. In other words, you can move the camera further away from your character if you’re facing that character’s direction. If you start to get close to the first Radar boundary and you aren’t facing back toward your character a message will appear on-screen to warn you that you’re approaching the camera’s extents.Like the Target Camera, you can use the Free Camera to set up moves. The Free Camera has two different options in its Movement field: Linear and Blend. Linear will take a more direct route between Markers while Blend will try to soften and smooth out transitions between two or more Markers. The orientation and position of your cameras relative to one another will determine which option best suits your camera move. Experiment with both to see which one works best.Marker ControlsNow that the different types of cameras and movements available to you have been discussed, we can move on to the other Marker properties you can adjust.FilterThe first menu in the Marker Controls box is Filter. Filter applies a screen effect to your Clip. An effect will remain active until you change it in a subsequent Marker. This prevents you from having to apply the same effect to dozens of Markers if you’ve been working on a Clip for a while and decide you’d like to see how the whole thing looks under the Steel filter for example. However, once you’ve adjusted an effect in a Marker, that Marker will always have its Filter set manually.SpeedThe second Marker field you can change is Speed. You can adjust the speed of your Clip from extremely slow to very fast. Play around with these to find something that works for you. Speed can be changed as many times as you like during a Clip; however, unlike the Filter menu, each new Marker you place will have its Speed value reset to 100 (normal speed). Speed changes must be set on each individual Marker. The Time Bar, Video Timer and Marker spacing will all adjust as you change speeds since slowing down or speeding up your Clips affects the overall length of your Video. Speed changes are represented by subtle differences in the gray color of the Time Bar.AudioThe Audio menu in the Marker Controls box allows you to adjust sound levels in your Clip for as long or brief a period as you like. If you’ve placed a song in your Video and you want to emphasize a particular moment, you can use a Marker to turn the sound effects down or off with the SFX Volume field. On the other hand, if you want the sound effects to overpower the music or wish to adjust the music’s volume throughout the Clip to build suspense, you can change the volume using the Music Volume field. You can also turn recorded character dialogue on or off using the Speech field. Like all the Marker menus you’ve seen so far, you can adjust these as much as you like within a Clip.Remember that you can trim a Clip at any time by dragging the Time Bar Extents at the far left and right of the Time Bar. The Time Bar Extents also snap to Markers so you can start the Clip off with one of your Custom Camera shots.Tools MenuClicking on the Tools button will give you someadditional options and their Hotkeys.Hide HUDPress H to toggle the game’s interface on and offso that you can get a better view of the action.Toggle HotkeyBrings up a menu with a list of all the differentHotkeys and their functions within the ClipEditor. Familiarizing yourself with the variousHotkeys and their functions will make the editingprocess more efficient and enjoyable for you.Toggle TimeSwap the Video Timer between the Clip Time and the entire Video Time, so you can see where you are in relation to length of your Clip, or where you are in relation to the length of your entire Video. Remember you can do this by clicking on the Timer itself as well.Set ThumbRecords the frame you’re currently on and creates a new thumbnail for that instance of the Clip you’re editing on the Storyboard. This makes it easy to tell which instance of a Clip contains different edits on the Storyboard if you happen to reuse a Clip multiple times in a Video.Toggle Tool TipsDisplay or hide rollover tips in all the sections of the Video Editor. When first starting out, the Tool Tips will be set to On by default.SaveSave your Video by pressing F6.Global AudioAllows you to lower or raise the global volumes of SFX and Music in your Clip. You can turn in-game dialogue on or off by toggling Speech. These setting will affect your entire Video.Creating VideosPress the Esc button to get back into the Video Editor from the Clip Editor. Begin assembling your footage by dragging more Clips from the Clips menu onto the Storyboard. It is a good idea to give your Video a title and save it before you begin editing. If you decide not to name your Video, it will be given the default name. Click on “Enter title” and type something in. If you’re not happy with the title, you can edit it later. Press F6 to save.On the left side of the screen, there is a list of expandable menus: Clips, Songs, Text and Transitions. In the Clips menu, you’ll see your Clip thumbnails organized the same way they are in the Clips section. Click on the different headings (Favorites, Today, Archives, etc.) to gain access to your Clips. This is where the Favorites menu can come in handy. If you’ve used the Favorites menu to gather a group of Clips, and you’ve assigned them all custom thumbnails, sorting through your desired footage and deciding what order to place it on the Storyboard will be a much easier process.StoryboardYou can drag and place Clips on the Storyboard in any order you choose. Double clicking a Clip in the Clips menu will automatically place it at the end of the sequence. The order of Clips already on the Storyboard can be rearranged by dragging them around, or you can cut and paste them using Ctrl+X and Ctrl+V. If you wish to duplicate a Clip and the edits you’ve made to it, you can copy and paste it using Ctrl+C and Ctrl+V. The sequence of Clips on the Storyboard determines the order in which the Clips will render out in your final Video.As you add Clips and move them around on the Storyboard, the time they appear in your Video is updated in the bottom left hand corner of the Clip. As you highlight Clips, their total individual length is displayed in the top left hand corner of the Clip thumbnail.Video TimelinesDirectly beneath the Storyboard is a section called the Video Timeline. The Video Timeline is comprised of the Time Scale, the Clip Timeline, the Audio Timeline, and the Text Timeline. The upper most timeline is the Clip Timeline; it indicates how long each Clip is relative to your entire Video. The size of the thumbnails on the Clip Timeline, as well as the Time Scale above it, adjust as you add or remove footage from your Video. As your Videos grow in length and complexity, the Video Timeline as a whole becomes very useful. When you have many Clips of differing lengths, clicking on one of the thumbnails on the Clip Timeline will jump to the corresponding Clip on the Storyboard for quick access. The thumbnails on the Clip Timeline can also be used to highlight and select Clips on the Storyboard.Below the Clip Timeline are the Audio and Text Timelines. You can drag and drop songs from the game, or text you have entered into these timelines. By lining up text or audio with the thumbnails in the Clip Timeline, you can ensure everything is playing exactly when you want it to. As you move text or audio around on their timelines, you’ll also see a counter changing below your Video’s title. This is the Video Counter and it indicates where your selection falls relative to the entire length of the Video. You can even use the Left and Right Arrow keys on your keyboard to nudge audio and text by hundredths of a second to ensure precise placement. The Video Timeline as a whole plays a crucial part in illustrating how all the elements of your Video fit together.Once you’ve selected a Clip you want to edit for your Video, press Enter on your keyboard or double click the Storyboard thumbnail to edit that individual Clip.Adding MusicAt some point during the editing process you maydecide you’d like to add music to your Video. Click on the Songs menu to open a list of tracks available for use in your Videos. Click on it to open a list of tracks available for use in your Videos. You can preview any of these songs by double clicking them or clicking the play button beside them when they’re selected. To add a song to your Video, drag it onto the Audio Timeline. Drag the song left and right on the Audio Timeline to adjust when you want it to begin playing.You can use the arrow keys on the keyboard to nudge the song left or right by small increments. If you want your song to begin at a precise moment in your Video; pay attention to the Video Timer underneath your Video’s title to place it exactly where you want.Adding TextThe Text menu is a way for you to display a messageon-screen during your Video. Open the Text menu and then double click the Enter Text box. You can now enter your message and then adjust the Font, Size, Color, and Duration fields while the text area is active to customize the message. Then, like songs, you can drag your text onto the Text Timeline and manipulate it in the same way you do songs to have the text appear at a precise moment.Adding TransitionsWhen you open the Transitions menu, you see fouroptions represented by different icons; Cut, Fade In, Fade Out, and Fade In/Out. Cut is the default transition between all your Clips in a Video. A Fade In transition will fade the Clip in from a black screen, while a Fade Out will place a fade to black at the end of the Clip it’s assigned to. Fade In/Out means the two Clips joined by that Transition icon will have a fade to black between them. Drag your desired Transition icon to the transition space on the Clip where you want the transition to occur. Every Clip in the Storyboard has space to drag a Transition In and a Transition Out icon. The transitions will not show up until you render your Video.Previewing, Rendering and ExportingYou can Preview your entire Video from the Video Editor by pressing the Spacebar. During a preview, all the Clips in your Video will play out sequentially with loads between each Clip. If you’ve added music to your Video it will pause during the loads between Clips and resume at the correct time to stay in synch with the preview. To stop the preview and return to the Video Editor at any time hit the Esc button. To Pause a Clip during a preview and resume editing it, press the Spacebar. This will cancel the preview, and activate the Clip Editor for the current Clip. To preview the Video again, exit the Clip Editor by hitting the Esc key and restart the preview from the Video Editor.While in the Video Editor you can update the thumbnail image for your Video by pressing U on your keyboard when you have a Clip on your Storyboard selected. This will make the thumbnail for your Video match the thumbnail for that Clip. Your Video’s thumbnail is important because, along with your Video’s title, the thumbnail will help you recognize it in the Video Archives, the Gallery section and the Upload section. It’s also the image that will represent your Video if you decide to upload it to Rockstar Games Social Club TV. If you don’t update the Video’s thumbnail, it will be the first frame of your Video by default.Once you’re happy with your Video and you’ve chosen a name, finished your editing, and added any text, music or transitions you want—you can export it. Exporting Videos will automatically place them in your Gallery. There are three different resolutions at which you can render your Video: Web quality (for upload to Rockstar Games Social Club TV), 720p and 1080p. Your in-game resolution (which can be set in the “Graphics” section of the Pause menu) needs to be set to a value that meets or exceeds the resolution at which you want to export to Video. If you cannot export at a certain resolution, the button will be grayed out and unresponsive. Click any of the three export options and the Editor will begin to export to Video. A bar along the top of your screen represents the progress of the render. High resolution Videos take longer to render than low resolution ones.Gallery SectionWhen your Video has finished exporting, you can watchit in the viewer located in the Gallery section. TheGallery organizes and stores all of your rendered Videoschronologically, so your latest Video will be at the top ofthe list. From here, you can preview all of your Videos todetermine if they are ready to be uploaded to RockstarGames Social Club TV.Upload SectionWhen you open the Upload section, you’ll see all the Videos you’ve exported at Web quality on the left side of the screen and the Videos you’ve previously uploaded on the right. To upload a new Video, select it and click on the Upload button. You will be prompted to enter tags and a brief description of the Video. When the Video has finished uploading, you will see it in the menu on the right. When the Video has finished uploading you will see it in the menu on the right. You can return here to quickly check the number of views and the ratings your Videos are receiving on Social Club TV.Online SectionRemember to check Rockstar Games Social Club TV (/socialclub/tv) to compare your Videos with others from the community, rate and comment on Videos, and take part in contests. Click the Online Section if you want to open Social Club TV from the Video Editor.Tips•Remember that Clip capture is enabled by default in both single and multiplayer modes. In single player mode, as long as something is in range of your character, you’ll be able to create Clips based around that. It is sometimes beneficial to think of your character as a Cameraman.•Vehicles can be utilized to create long sweeping shots if you drive or fly, by the scene you wish to capture. In the Clip Editor, you’ll be able to create Linear or Blending movement shots with the Free Camera to exclude the vehicle you used to create the original Clip.•Multiplayer modes like Free Mode and Party Mode are a great place to assemble a group of friends or strangers to collaborate on a Video. Multiplayer characters will give you a wide range of actors and wardrobes for your Videos and the endless supply of vehicles, weapons and scenarios will allow you to create a Video in any genre you choose.ControlsKeyboard and MousePlay/Pause – SpaceBack – BRewind – Left ArrowFast Forward – Right ArrowFrame Advance – Up ArrowFrame Rewind – Down ArrowPlace Marker – MCycle to Left Marker – < or ,Cycle to Right Marker – > or .Delete Marker – DeleteDisplay Tools – THide Hud – HToggle Hotkeys – KSet Thumb – UToggle Time – CToggle Tool Tips – VSave – F6Target Camera:Rotate – Right Mouse button + MouseZoom – W / STilt – Q / EOffset – Mouse WheelAccelerate – Left ShiftFree Camera:Rotate – Right Mouse button + MouseMove – W / S / A / DTilt – Q / EHeight – Mouse WheelAccelerate – Left ShiftThe Video Editor has been designed for keyboard control. Please note that some controls will be limited with the controller. ControllerMouse – Right StickLeft Mouse button – LTRight Mouse button – RTFree and Target Cameras:Mouse – Right StickMovement – Left StickMouse Wheel – D-pad Up / Down。
《黑道圣徒3》人物编辑器攻略
《黑道圣徒3》人物编辑器攻略
游戏发售前会放出3个平台免费的人物编辑器
《黑道圣徒3》人物编辑器下载:点击进入
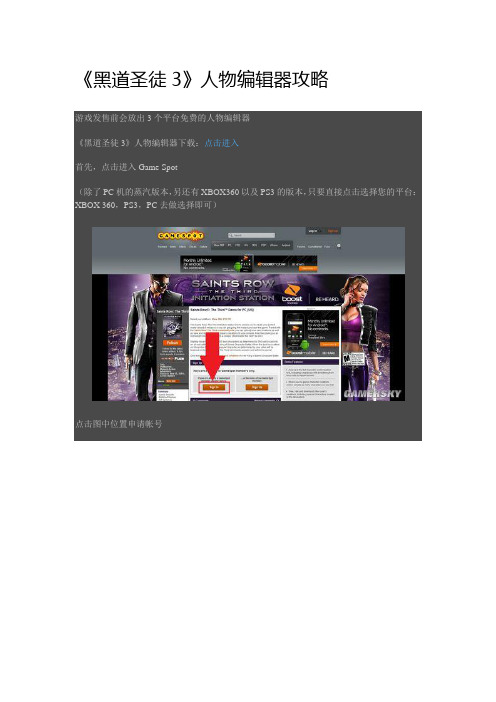
首先,点击进入Game Spot
(除了PC机的蒸汽版本,另还有XBOX360以及PS3的版本,只要直接点击选择您的平台:XBOX 360,PS3,PC去做选择即可)
点击图中位置申请帐号
之后到你输入的信箱去确认帐号开启
回到上方网址后,中央就会出现的CD Key 到蒸汽开启产品即可下载(约983Mb)
证据在此
只有人物创造的功能,按F1可以更改显示设定,由上到下为修改人物身体、衣服、刺青以及将人物上传(需登入THQ帐号)
身体选单,选项比2代细很多,也可以直接更改男性的XX以及女性的XX大小,重点在于,确定有乳摇
衣服选单,细分的部份非常多
刺青选单,没什么兴趣所以没截图
最终选定人物,人物种族有4种可选,也有亚洲面孔以下为直接选择套装的预览画面
在人物编辑器内点选第四个选项,上传人物
正常会有的问题大概就是你看不懂英文,不知道他在说什么
总之绝对是要你建立一个THQ帐号后上传资料到官网
英文都很简单,选项大概是建立帐号、忘记密码等等
资料上传后不会立刻公开,要到官网设定人物的相关资讯
进入(THQ官方网站),登入后点击MY STEELPORT进入管理页面,再点击UPLOAD标签就可以编辑人物公开与否等设定。
《黑道圣徒4》人物编辑器教程_编辑器指南(一帖全,包教会)
《黑道圣徒4》人物编辑器教程_编辑器指南(一帖全,包教会)好吧,其实人物编辑器昨天已经放出了下载资源:/thread-5176980-1-1.html,并且不少人已经进入体验了吧,不过具体步骤我一开始也是不理解,后来查了一些相关的信息,也靠自己摸索,写了如下的步骤,同时我也分享一下自己的一些感受吧:一、安装方法1.先下载上面那个链接里面的资源(这个不用多说),如果你网速不好的话,推荐百度网盘,速度很快的。
同时再下载一个STEAM工具并安装,这里推荐一个我已经有的安装文件,原下载网址有时候会上不了:STEAM安装好之后,第一次双击运行时会提示更新文件,需要花费不少时间,我这里一般是5分钟左右,具体视当地网络环境而定。
接着如果你没有STEAM的账号,点击下方的“创建一个新的账号”注册,步骤不是很复杂,填写基本的个人信息之后即可,之后便可以登录了:不过此时先不用登录STEAM,先完成下面的步骤。
2.把人物编辑器下载好放在硬盘中(最好是空间足够大的分区),应该有了三个压缩包文件了,如果你的电脑中有WINRAR之类的解压缩工具的话,鼠标单击任意一个压缩包,再按鼠标右键,选择“解压缩到当前文件夹”,此时应该出现一个名称为Saints Row IV Inauguration Station的文件夹以及游侠网的信息文件,而Saints Row IV Inauguration Station文件夹里面包含这些文件:3.把Saints Row IV Inauguration Station这个文件夹整个复制粘贴到STEAM安装目录下的\SteamApps\common里面,有的人可能没有common这个文件夹,那么就另外新建一个。
之后打开你的浏览器,在地址栏输入steam://install/242590 ,会跳出一个对话框:选择“允许”,如果你已经登录了STEAM,那么会出现STEAM安装对话框(如果之前没有登录STEAM,那么会自动跳出登录对话框,登录后的步骤同下面的),点击“下一步”:[pagesplitxx]出现生成快捷方式复选对话框,一般情况下默认即可,会自动帮你生成开始菜单和桌面快捷方式,之后点击下一步:开始工具的安装:安装进度条满之后出现下图的界面,点击“完成”:[pagesplitxx]出现这样的界面:程序进行最后的运行库的安装,稍等片刻就正式进入工具执行前的CG动画了,至此,安装方法就到这里结束了:一如即往的搞怪LOGO。
黑道圣徒4 作弊码

黑道圣徒4 作弊码黑道圣徒4(Saints Row IV)是Deep Silver开发并于2013年发布的一款开放世界动作冒险游戏。
游戏以其荒诞不经的剧情和自由度极高的玩法而受到玩家们的喜爱。
除了正常的游戏体验外,许多玩家也喜欢使用作弊码来获得额外的乐趣。
本文将为大家介绍一些在黑道圣徒4中常见的作弊码。
开启作弊码在黑道圣徒4中开启作弊码非常简单。
只需要按下键盘上的“~”键,即可打开控制台界面。
在控制台中,可以输入各种指令来达到我们想要的效果。
常用作弊码以下是一些常用的作弊码及其效果:•addcond 5:弹道物品不会影响你的移动速度。
•rgb(0,0,0):将你的角色变成全黑。
•rgb(255,255,255):将你的角色变成全白。
•god:开启无敌模式,角色不会受到任何伤害。
•nofalldamage:关闭角色受到坠落伤害。
•superjump:启用超级跳跃,可以跳得更高更远。
•notarget:使敌人无法发现你,不会攻击你。
•giveall:获得所有武器和物品。
•notoriety 0:降低通缉等级为0,警察不再追捕你。
•runspeed X:将角色的移动速度调整为X,X的值可以根据需求进行调整。
这些只是一小部分常见的作弊码,你还可以在网上找到更多的作弊码来满足自己的需求。
注意事项尽管使用作弊码可以增加游戏的趣味性,但还是需要注意以下几点:•使用作弊码可能会影响游戏的平衡性,使游戏变得过于简单或不真实。
因此,最好在第一次通关后再使用作弊码来体验游戏的挑战性。
•使用作弊码时要小心,避免误操作导致不良后果。
最好在使用之前先保存当前游戏进度,以免出现意外情况。
•有些作弊码可能会与游戏更新或其他补丁不兼容,因此在使用之前最好先查看最新的游戏更新说明。
结论黑道圣徒4是一款极具自由度和创意的开放世界游戏,使用作弊码可以增加游戏的娱乐性和挑战性。
在合适的时间和场景下,使用适当的作弊码可以让你在游戏中尽情享受各种超能力和无敌体验。
黑道圣徒4使用技巧大全

黑道圣徒4使用技巧大全黑道圣徒4是一款开放世界动作冒险游戏,玩家可以在虚拟的城市中进行自由探索和战斗。
以下是一些游戏技巧,希望对你有所帮助:1. 学会利用环境:城市中有很多可以利用的环境物体,比如街头设施、车辆等。
在战斗中,你可以躲在墙后或车辆后面,避开敌人的攻击。
同时,你也可以将环境物体当作武器,比如扔出路边的垃圾桶来攻击敌人。
2. 利用特殊技能:在游戏中,你可以解锁各种特殊技能,比如召唤冲击波、获得超人力量、踢击敌人等。
学会尽可能地使用这些技能,可以帮助你在战斗中取得优势。
3. 收集并升级武器:游戏中有各种各样的武器可以使用。
你可以在战斗中收集到各种武器,比如手枪、霰弹枪、步枪等。
同时,你也可以通过完成任务或收集隐藏物品来获取更加强大的武器。
记得定期升级你的武器,使其更加有效。
4. 学会用车:车辆在黑道圣徒4中非常重要。
你可以通过购买或偷车辆来进行快速移动。
不同的车辆具有不同的属性,比如速度、加速度、耐久度等。
学会选择适合你的车辆,并掌握驾驶技巧,可以帮助你在游戏中更加灵活地行动。
5. 规划任务顺序:在游戏中,有很多主线任务和支线任务供你完成。
规划好任务的顺序非常重要。
完成主线任务可以推动剧情的发展,解锁新的地区和任务。
而完成支线任务可以获得额外的奖励和经验值,帮助你提升角色的能力。
6. 利用伙伴系统:在游戏中,你可以招募不同的伙伴来帮助你完成任务。
每个伙伴都有自己独特的技能和特点。
学会利用伙伴的能力,可以为你的战斗带来更多的帮助。
7. 升级角色能力:在游戏中,你可以通过获得经验值来提升角色的能力。
学会合理分配你的技能点,提升不同的属性,可以使你在战斗中更加强大。
以上是一些黑道圣徒4的游戏技巧,希望对你有所帮助。
祝你游戏愉快!。
模拟人生4秘籍大全超详细

模拟人生4秘籍大全超详细《模拟人生 4》是一款备受欢迎的模拟经营游戏,玩家可以在虚拟世界中创造和控制自己的角色,体验各种生活情节。
而掌握一些秘籍可以让游戏过程更加有趣和便捷。
以下为您详细介绍模拟人生 4 的秘籍。
一、基础秘籍1、“testingcheats true” (开启作弊模式)输入此秘籍后,按住 Shift 键点击邮箱、人物等,可以解锁更多作弊选项。
2、“fulleditmode” (允许编辑已创建的人物)可以在 CAS(创建人物)模式中对已创建的人物进行全面编辑。
二、金钱相关秘籍1、“motherlode” (获得 50000 模拟币)快速为家庭增加一笔可观的财富。
2、“kaching” (获得 1000 模拟币)金额较少,但在需要少量资金时很实用。
三、需求满足秘籍1、“simsfill_all_commodities” (瞬间满足所有需求)让您的模拟市民无需再为饥饿、睡眠等需求而烦恼。
四、技能提升秘籍1、“statsset_skill_level Major_<技能名称> <等级数字>”例如,“statsset_skill_level Major_Guitar 10” 可将吉他技能直接提升到 10 级。
五、职业相关秘籍1、“careerspromote <职业名称>” (升职)加快职业晋升的速度。
2、“careersdemote <职业名称>” (降职)体验不同职业发展的可能性。
六、人际关系秘籍1、“modifyrelationship <你的名字> <对方名字> <数值> <关系类型>”可以自定义与其他模拟市民的关系数值和关系类型,如友好、敌对等。
七、物品相关秘籍1、“bbshowhiddenobjects”(解锁隐藏物品)能够购买一些平常无法获取的特殊物品。
2、“bbignoregameplayunlocksentitlement” (解锁物品的购买限制)不再受游戏内购买条件的约束。
黑道圣徒4作弊码

黑道圣徒4作弊码简介《黑道圣徒4》是一款由Deep Silver Volition开发并由Deep Silver发行的开放世界动作冒险游戏。
作为《黑道圣徒》系列的第四部作品,该游戏于2013年首次发布,并在全球范围内获得了良好的口碑。
作弊码为了增加游戏的趣味性和可玩性,《黑道圣徒4》内置了许多作弊码供玩家使用。
这些作弊码可以解锁各种特殊能力、武器、载具或改变游戏设置。
在本文档中,我们将介绍一些流行的作弊码以及它们的效果。
武器作弊码以下是一些可以让玩家解锁特殊武器的作弊码:- #1042 –解锁Alien RPG- #1050 –解锁Alien Hover Tank- #66639 –解锁乐队大炮- #Gunslinger –解锁凡尼吉利载具作弊码你可以使用下面的作弊码解锁各种载具:- #78669 –解锁小型卡车- #TRUCK –解锁卡车- #VORTEX –解锁旋转飞机- #MBAM –解锁鲍勃的奶牛卡车特殊能力作弊码如果你想要玩家角色拥有特殊的能力,可以使用下面的作弊码:- #SUPERPOWERS –解锁超级力量- #SUPERSPRINT –解锁超级冲刺- #SUPERJUMP –解锁超级跳跃游戏设置作弊码除此之外,还有一些作弊码可以改变游戏的设置:- #CAR –所有载具都会变成小型车- #NOHUD –隐藏游戏界面- #INFINITEAMMO –无限弹药- #GIVEMONEY –获得大量金钱如何使用作弊码要使用作弊码,你需要打开游戏的控制台。
在PC版游戏中,你可以按下控制台默认按键(通常是“~”或“`”)来打开控制台。
一旦控制台打开,你可以输入作弊码并按下回车键来激活它们。
注意事项在使用作弊码时,请注意以下几点:1.使用作弊码可能会对游戏进程和体验产生一定的影响。
请确保在适当的情况下使用它们,以免影响游戏的平衡性和挑战性。
2.有些作弊码可能会导致游戏崩溃或其他问题。
在使用作弊码之前,最好先保存游戏进度以防出现异常情况。
ingametrainer修改器1.91使用说明
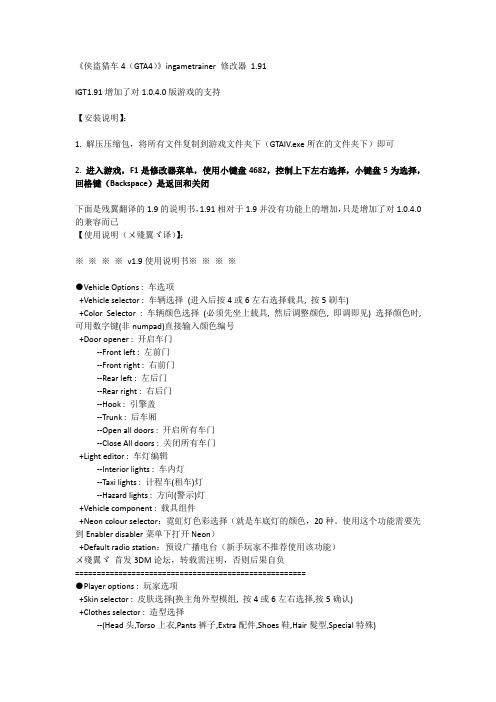
《侠盗猎车4(GTA4)》ingametrainer修改器1.91IGT1.91增加了对1.0.4.0版游戏的支持【安装说明】:1. 解压压缩包,将所有文件复制到游戏文件夹下(GTAIV.exe所在的文件夹下)即可2. 进入游戏,F1是修改器菜单,使用小键盘4682,控制上下左右选择,小键盘5为选择,回格键(Backspace)是返回和关闭下面是残翼翻译的1.9的说明书,1.91相对于1.9并没有功能上的增加,只是增加了对1.0.4.0的兼容而已【使用说明(ㄨ殘翼ゞ译)】:※※※※v1.9使用说明书※※※※●Vehicle Options : 车选项+Vehicle selector : 车辆选择(进入后按4或6左右选择载具, 按5刷车)+Color Selector : 车辆颜色选择(必须先坐上载具, 然后调整颜色, 即调即见) 选择颜色时, 可用数字键(非numpad)直接输入颜色编号+Door opener : 开启车门--Front left : 左前门--Front right : 右前门--Rear left : 左后门--Rear right : 右后门--Hook : 引擎盖--Trunk : 后车厢--Open all doors : 开启所有车门--Close All doors : 关闭所有车门+Light editor : 车灯编辑--Interior lights : 车内灯--Taxi lights : 计程车(租车)灯--Hazard lights : 方向(警示)灯+Vehicle component : 载具组件+Neon colour selector:霓虹灯色彩选择(就是车底灯的颜色,20种。
使用这个功能需要先到Enabler disabler菜单下打开Neon)+Default radio station:预设广播电台(新手玩家不推荐使用该功能)ㄨ殘翼ゞ首发3DM论坛,转载需注明,否则后果自负=====================================================●Player options : 玩家选项+Skin selector : 皮肤选择(换主角外型模组, 按4或6左右选择,按5确认)+Clothes selector : 造型选择--(Head头,Torso上衣,Pants裤子,Extra配件,Shoes鞋,Hair髮型,Special特殊)+Weapon selector : 武器选择+Money selector : 金钱选择(按2或8选择金额, 按5取得金钱)+XYZ Teleporter : 坐标传送(相对位置)+Location teleporter : 位置传送(按4或6左右选择地名)(最多可保存45个,内置瞬移点有自由女神心脏、咖啡杯等)ㄨ殘翼ゞ首发3DM论坛,转载需注明,否则后果自负=====================================================●Quick options : 快速选项+Health & armor : 血量与装甲+Clear wanted : 清除通辑+Flip car : 翻转车辆+Heal car : 修复车辆+Clean car : 清洁车辆+Quick boost : 快速加速(按下去会用弹的往前, 无论走路或开车等)+Quick stop : 快速停止(按下去会瞬间停止动量)+Save position : 存位置+Save game : 存游戏+Enter car as passenger : 搭车, 当乘客+Sit on nearest chair:坐下(坐到附近的椅子上,房间内无法使用,切记)ㄨ殘翼ゞ首发3DM论坛,转载需注明,否则后果自负====================================================●Game options : 游戏选项+Change weather : 改变天气+Change time : 改变时间+Change speed : 改变速率+Weather freezer:天气锁定不变+Time freezer:时间锁定不变ㄨ殘翼ゞ首发3DM论坛,转载需注明,否则后果自负====================================================●Enabler disabler : 开启关闭[enabled(开启) / disabled(关闭)]+Godmode: 神模式, 无敌+God mode (alternative):代替无敌模式,此模式下可以使用火箭筒威力加强+Gravity : 重力+Drunkmode : 喝醉模式+Ragdoll mode : 布娃娃模式+Never wanted : 永不被通辑+No peds : 应该是没有行人, 不过还是会冒出一两只的样子+Traffic : 没有车辆在陆上行使(部份任务除外)+Heavy car :车子重+Vehicle god mode :车子无敌+Car god mode (visual):车子无敌(离开车子,无敌模式消失)+Show coords:显示目前坐标+Never tired :不会累+Unlimited ammo :无限弹药+No reload : 不用重新装填枪支弹药+Super run : 超级跑(无论走路或跑步都变更快了)+No cops : 没警察+Airbreak : 空中刹车(空中载具不会乱飘, 操作方法变得比较象车子)+Open doors: 开启门(某些大楼锁住的门可以打开)+Bullet time : 子弹时间(开启后, 需要子弹时间要按住Numpad 1, 放开后恢复正常时间) +Seat belt : 安全带+Speedometer : 时速表(会出现在左下, 可用INI改成KPH或MPH)+Cops ignore me : 警察不理+Everyone ignores me : 所有人不理+Reset "Roman's Sorrow"'s effects : 重设Roman的悲伤效果+Vehicle collision : 载具碰撞+Vehicle neone : 载具霓虹灯+Free resprays : 免费喷漆+Bike flyer:摩托跳跃模式(改变你摩托的重力,使之可以长时间漂浮在空中)(注意:建议配合车辆无敌模式使用)+Use quick keys : 使用快速键作弊(须在INI文件中设定, 可设定为键盘上任何一键)+Reset values : 重置所有作弊+Sync to real time:与系统时间同步(时游戏时长和时间与真实系统时间相同)+Realistic time rate:与真实时间相同(游戏中一分钟等于真实的60秒)+Euphoria animations:启用或禁用特殊游戏模式(如酒醉模式、太空步模式)+Gravity gun:重力枪模式(自己修改枪支威力)+Use quick keys:快捷键ㄨ殘翼ゞ首发3DM论坛,转载需注明,否则后果自负======================================================●Alpha editor : 透明选项+Current alpha : 透明度(255是不透明, 0是透明, 用2或8来开启或关闭。
侠盗猎(飞)车罪恶都市中如何改主角、皮肤、枪和武器、添加mod等
侠盗猎(飞)车罪恶都市中如何改主角、皮肤、枪和武器、添加等在游戏中可以改主角、皮肤、枪和武器、添加等“xxx.dff”的文件为模型文件;“xxx.txd”的文件为贴图文件。
一、改主角。
1、下载一个你要的人物或者卡通人物。
2、下载一个IMGT OOL软件,可以到下载,保证有。
3、先考虑你下载的人物或者卡通人物有几个文件?4、一般先找到如下3个文件。
①、第一个是player.dff②、第二个是player.txd③、第三个是player.bmp,如果不是player.bmp就将其改为player.bmp(是与你改的人物或者卡通人物有关的贴图,有的人物没有这个文件)。
5、如果有①和③就如下:①、打开IMGTOOL.EXE。
②、文件打开GT A目录里的models文件夹里的“gta3.img”文件。
③、编辑查找“player.dff”(不带引号)。
④、命令删除。
⑤、命令添加你下载的“player.dff”进去。
⑥、再找到“player.txd”也删除。
⑦、添加你下载的“player.txd”进去。
⑧、然后GT A目录的models文件夹的generic文件夹有个player.bmp,把它也删除掉。
⑨、得了。
6、如果有①和③就如下:①~⑤同上。
⑥、把你下载的“player.bmp”放在gta目录的models文件夹的generic文件夹里⑦、得了。
二、改皮肤1、下载你要的皮肤。
2、直接把你下载的皮肤“xxx.bmp”(保持原名)放在GT A目录的skins文件夹里即可。
3、进入游戏选择按中间那项英文字再选择player skins那项英文字,选择你要的皮肤,按USE skin。
4、行了。
三、改车有两种改法:一是用“IMGT OOL”;二是用“GGMM”。
可到下载,都有。
㈠、用IMGTOOL1、下载你要的车2、也会有“xxx.txd”和“xxx.dff”这两个文件。
3、如下:①~②同改人物③、找到你要改的车“xxx.dff”和“xxx.txd”都删除,就这两个。
GTA5R星编辑器使用技巧分享
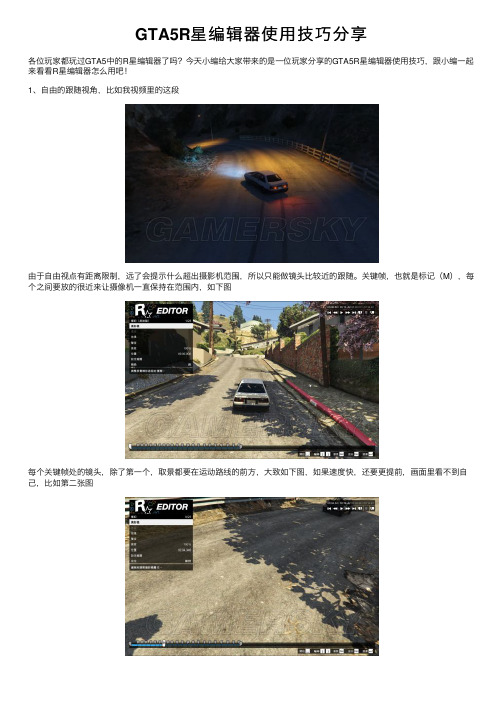
GTA5R星编辑器使⽤技巧分享
各位玩家都玩过GTA5中的R星编辑器了吗?今天⼩编给⼤家带来的是⼀位玩家分享的GTA5R星编辑器使⽤技巧,跟⼩编⼀起来看看R星编辑器怎么⽤吧!
1、⾃由的跟随视⾓,⽐如我视频⾥的这段
由于⾃由视点有距离限制,远了会提⽰什么超出摄影机范围,所以只能做镜头⽐较近的跟随。
关键帧,也就是标记(M),每个之间要放的很近来让摄像机⼀直保持在范围内,如下图
每个关键帧处的镜头,除了第⼀个,取景都要在运动路线的前⽅,⼤致如下图,如果速度快,还要更提前,画⾯⾥看不到⾃⼰,⽐如第⼆张图
摄影机⾥有个选项是混合模式,都选上平滑,从头按空格再看,就有跟随的视⾓了,想做出漂亮的跟随视⾓,⽬前我只研究出了这么做。
⽽且还要调试很多很多回。
2、我也不知道叫什么,就叫远景吧,就像这个镜头
车有点⼩,最右的那辆车是要拍的车,如果放⼀个⾃由视点的摄像机,车速很快,马上就会超出范围的,这种情况就要叫⼩伙伴来帮忙了,让⼩伙伴帮你开车,你站在摄影机要放置的地⽅,不⽤太精确,那个范围还算是⽐较⼤的。
远景⾥⼀般看不太清车⾥坐的⼈,如果怕看出来,可以让⼩伙伴把⾐服样式颜⾊、头发颜⾊弄得和你⼀样就好了。
拍这段的原⽚段和专案我给删了,我找个替代的,意思⼀样,如下图
穿西服的是我,假设前⽅是道路,⼩伙伴开我的车经过,就能录出来⾃⼰开车离镜头越来越远的效果了,等于让⼩伙伴演你替⾝。
黑道圣徒秘籍
暂停游戏=> Extras => Cheats => Add Cheat输入以下秘籍(激活后会有声音提示):
秘籍
作用
unlockitall 全部解锁
cheese 获得金钱 $100,000 letsrock 武器
vroom 车辆无伤
repaircar 修理当前车辆goodygoody 清除通缉等级
runfast 无限冲刺
nowardens 关闭召唤小弟instantwarden 获得 Warden 恶名superblast 开启超级爆破superbuff 开启超级增益superdfa 开启“如来神掌”
superstomp 开启超级重踏supertk 开启隔空取物nosupermove 关闭超级移动nosuperpowers 关闭超级能量ascii ASCII模式bigheadmode 大头模式
noglitchcity 关闭 Glitch FX evilcars 邪恶的车辆(袭击玩家)fastforward 世界加速
fryhole 警察飞天
insanecity 疯狂的城市
mascot 行人变吉祥物
hohoho 行人变皮条客和妓女isquishyou 车辆易坏
goldengun 黄金之枪 (一击必杀) notrated 被打中的人就变一滩血slowmo 慢动作(时间变慢)givehovertank 获得外星坦克
givehovercar 获得外星车辆givetrouble 获得外星喷气自行车giveufo 获得UFO
givepony 获得小马车。
黑道圣徒4全收集全任务图文攻略
⿊道圣徒4-全收集全任务图⽂攻略 紫⾊⾏动(P u r p l e O p s) 游戏开始不再是越狱,⽽是作为三街圣徒的⼀员,和伙伴们⼀起进⼊恐怖分⼦控制的地盘。
他们不再是混迹街头取乐的颓废混混,⽽是要像被⼈们接受和喜欢的圣徒⽂化⼀样,成为⼈们⼼中敬佩的拯救地球的⼤英雄。
参与此番⾏动的有⾻⼲成员绍迪、⽪尔斯,还有内应叫艾莎·奥德卡,⿊客马特·⽶勒和前F B I探员坎齐(K i n z i e K e n s i n g t o n)作为远程技术⽀援。
马特和坎齐都是⾼超的⿊客,在前作中两者有着很深的恩怨纠缠,所以绍迪才会安抚他们“过去的就让它过去吧!”。
由于主⾓的性别和相貌还没有设定,⼀⾝的盔甲也不会说话,序章的惯例。
潇洒的打扫外围的巡逻队,⼀⾏⼈进到基地内部。
⽤⼩⼑暗杀掉⼀名恐怖分⼦,等另⼀个⾛到⼤门边,抄到⾝后杀掉。
艾莎跑过去打开⼤门,与恐怖分⼦交⽕。
这⾥难度不⼤,由左侧的平台抄到他们的侧翼射击,尽量狙头,油桶也可以射爆。
透过对话,得知恐怖分⼦的头⽬是前作中⼿段强硬、崇尚武⼒的美国将军塞勒斯,被美军开除后开始报复美国,打算⽤核弹袭击。
穿过⾛廊的时候被强烈的爆炸⽓流震翻,进到仓库优先清掉⼆层平台的狙击⼿。
上楼梯到⼆层,破门进屋清掉⼏名持枪敌⼈,冲出房间追赶塞勒斯,⼀段Q T E操作后塞勒斯跌进溶池⾥,临死前发射了核弹。
迅速冲到发射井跳到核弹上,前作的情⾊业⼤亨齐莫斯也在频道⾥插话了,Q T E破坏掉⼏处线路,然后像超⼈⼀样空中直坠…… 任务完成,开始捏⼈了!个⼈习惯毫不犹豫的捏了⼀个⼩⼥⼦。
%{p a g e-b r e a k|紫⾊⾏动|p a g e-b r e a k}% 领袖万岁(H a i l t o t h e C h i e f) 5年后,主⾓竞选成为美国总统,在本杰明和⽪尔斯的陪伴下参加记者招待会。
要运转⼀个国家和管理⼀个帮派稍有些差别,什么饥荒、就业率、⽀持率的都得考量,有时候就得有所牺牲和放弃,对于挑战总统尊严的议员也绝不⼿软。
《黑道圣徒4》秘籍怎么开 秘籍代码大全
《黑道圣徒4》秘籍怎么开秘籍代码大全《黑道圣徒4》近日已经放出下载,相信很多玩家都已经体验,《黑道圣徒4》秘籍代码是多少,怎么开,下面为玩家带来秘籍大全,开启方法。
黑道圣徒4秘籍开启方法:注意使用作弊码会导致游戏判定你为作弊者,变得无法自动存储以及无法解锁成就!1、进入HUB菜单 --> Extras --> Cheats2、输入以下代码可获得相应作弊效果:(代码 - 效果)cheese - 获得100万金钱letsrock - 解锁所有武器goodygoody - 消除警星runfast - 无限体力fryhole - 升天(死了的人会飘起来)vroom - 无敌汽车(不受损害)isquishyou - 坦克汽车(碾碎他人汽车)hohoho - 全民皆妓mascot - 全面吉祥物evilcars - 所有车辆疯狂袭击玩家(代码 - 效果)解锁Super Sprint:runfast解锁Telekinesis:supertk解锁Stomp:superstomp解锁Blast:superblast解锁Buff:superbuff解锁Death From Above:superdfa 禁用超级动作:nosupermove禁用超级能力:nosuperpowers死尸升天:fryhole加10万金钱:cheese消除警星:goodygoody坦克汽车:isquishyou修复当前汽车:repaircar获得所有武器:letsrock获得外星悬浮载具:givehovercar 获得外星悬浮坦克:givehovertank 获得外星幽浮:giveufo所有解锁物品全开:unlockitall快进:fastforward获得外星喷气式车:givetrouble获得怪物卡车:givemonster ASCII模式:ascii禁止出现Warden:nowardens立即出现Warden:instantwarden 全民吉祥物:mascot全民皆妓:hohoho全城疯狂:insanecity所有车辆疯狂袭击玩家:evilcars关闭Glitch FX:noglitchcity大头模式:bigheadmode玩家载具无敌:vroom更多相关资讯请关注:黑道圣徒4专题。
R4金手指编辑器使用教程
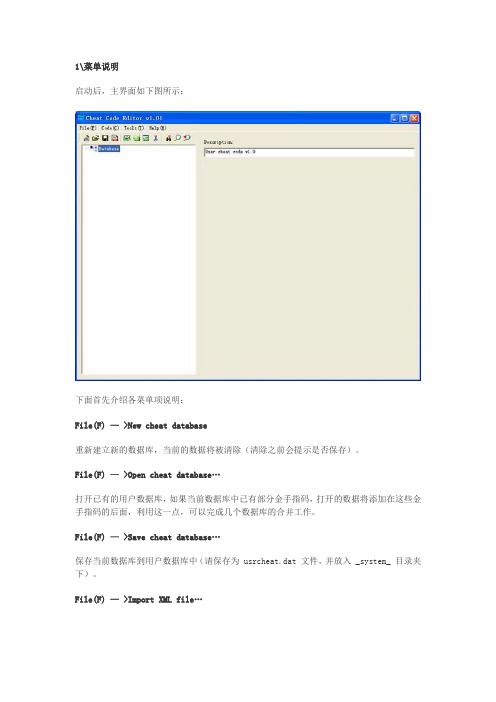
1\菜单说明启动后,主界面如下图所示:下面首先介绍各菜单项说明:File(F) — >New cheat database重新建立新的数据库,当前的数据将被清除(清除之前会提示是否保存)。
File(F) —>Open cheat database…打开已有的用户数据库,如果当前数据库中已有部分金手指码,打开的数据将添加在这些金手指码的后面,利用这一点,可以完成几个数据库的合并工作。
File(F) —>Save cheat database…保存当前数据库到用户数据库中(请保存为 usrcheat.dat 文件,并放入 _system_ 目录夹下)。
File(F) —>Import XML file…导入 XML 文件中的金手指数据,如果当前数据库中已有部分金手指码,导入的数据将添加在这些金手指码的后面。
File(F) — >Exit退出当前应用程序(退出之前会提示是否保存)。
Code(C) — >Add game在当前数据库的后面添加一个游戏项目。
Code(C) — >Add folder在当前游戏的后面添加一个目录项目, R4 的金手指只支持一级目录结构。
Code(C) — >Add cheat在当前游戏或目录的后面添加一个金手指项目。
Code(C) — >Delete selection删除当前项目(可以一次删除游戏、目录或金手指项目)。
Tools(T) — >get GameID from ROM从 ROM 中查询该游戏的 GameID 。
Tools(T) — >find first SAME game在数据库中查找重复的游戏,并高亮第一个重复游戏。
Tools(T) — >find next SAME game在数据库中继续查找是否有游戏与选中的游戏重复,并高亮下一个重复游戏。
Help(H) — >About关于编辑器的版本信息。
《GTA5》RockStar编辑器录像方法与使用教程
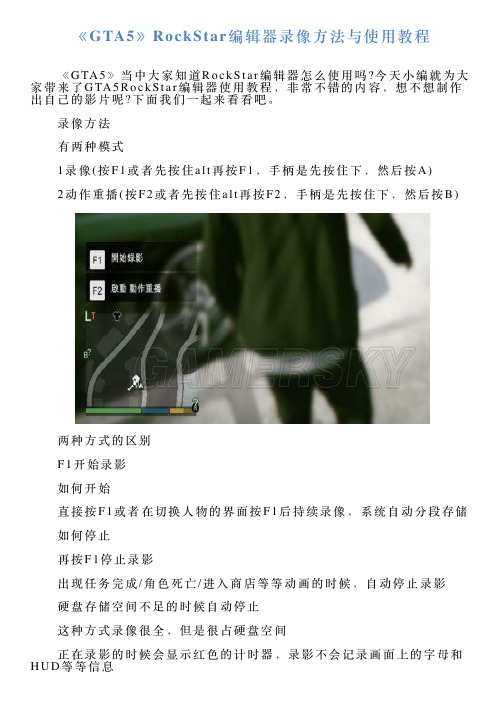
《GTA5》RockStar编辑器录像⽅法与使⽤教程 《G TA5》当中⼤家知道R o c k S t a r编辑器怎么使⽤吗?今天⼩编就为⼤家带来了G TA5R o c k S t a r编辑器使⽤教程,⾮常不错的内容,想不想制作出⾃⼰的影⽚呢?下⾯我们⼀起来看看吧。
录像⽅法 有两种模式 1录像(按F1或者先按住a l t再按F1,⼿柄是先按住下,然后按A) 2动作重播(按F2或者先按住a l t再按F2,⼿柄是先按住下,然后按B) 两种⽅式的区别 F1开始录影 如何开始 直接按F1或者在切换⼈物的界⾯按F1后持续录像,系统⾃动分段存储 如何停⽌ 再按F1停⽌录影 出现任务完成/⾓⾊死亡/进⼊商店等等动画的时候,⾃动停⽌录影 硬盘存储空间不⾜的时候⾃动停⽌ 这种⽅式录像很全,但是很占硬盘空间 正在录影的时候会显⽰红⾊的计时器,录影不会记录画⾯上的字母和H U D等等信息 F1录影每段时间⼤约是1分钟左右 F2动作重播 按F2开始动作重播 开始后系统循环录制,但是不会⾃动存储 当按下切换⼈物按键左”a l t”后,按F1存储之前⼏⼗秒的动画,按F3关闭 这种⽅式适合打开后占⽤系统资源少,适合录⽐较短的⽚段,但是需要操作⽐较快,⼏⼗秒钟很快就过去了…… 使⽤⽅法 如果需要连续录⼏分钟的视频,F1⽐较合适,F1录像全部内容都会录下来,不会丢 ⽐如录⼀个特技或者漂移的视频,那么⽤F2合适,可以反复的试,成功之后保存之前的动作 要注意F2只能保存之前差不多⼀分钟的视频,如果是激烈的画⾯,时间会更短 R o c k S t a r编辑器的菜单 在故事模式中,按E S C进⼊菜单,选择R o c k s t a r编辑器 R o c k s t a r编辑器的菜单如下 ”制作新的专案”“载⼊专案”就是新建和打开⼀个项⽬ 导演模式---在游戏后期开放,导演模式可以选择控制,各种N P C还有动物之类的 可以开⽆敌,低重⼒,爆炸等等效果,上次更新之后,还增加了设计场景的功能, 类似于建竞速图的模式,唯⼀的问题是,只能控制⼀个⼈物,不能⽤导演模式设计⼏个⼈物在⼀起的镜头 ⽚段管理器G TA5⾥路下的视频称作⽚段,在这⾥可以浏览删除录好的⽚段 影⽚库就是渲染好的视频了,然热在国内不能上y o u t u b e,所以这个功能只能⾃娱⾃乐了 教学链接的是R星的⽹站,所以很难上去 选择新建⽚断之后进⼊具体的编辑器界⾯了..... 逗游⽹——中国2亿游戏⽤户⼀致选择的”⼀站式“游戏服务平台。
character creator 4基本操作

Character Creator 4(角色创建器4)是一个用于创建和定制虚拟角色的工具。
以下是一些基本操作:
1. 打开软件:首先,打开Character Creator 4软件。
2. 创建新角色:在软件主界面,选择“文件”菜单,然后选择“新建”来创建一个新的角色。
3. 身体定制:在新角色的编辑界面中,你可以看到角色的身体分为几个部分,包括头部、身体、手部和脚部。
你可以通过点击并拖动这些部分来调整角色的身体比例和位置。
4. 脸部定制:在头部编辑界面中,你可以选择和调整角色的脸部特征,如脸型、眼睛、鼻子、嘴巴等。
5. 发型定制:在头部编辑界面中,你还可以选择和调整角色的发型,包括头发、胡须等。
6. 服装定制:在角色编辑界面中,你可以为角色选择和调整服装,包括上衣、裤子、鞋子等。
7. 调整姿势:你可以在角色编辑界面中调整角色的姿势,例如站立、坐下、跑步等。
8. 保存角色:完成角色创建后,你可以选择“文件”菜单,然后选择“保存”来保存你的角色。
9. 导入角色:如果你想使用已经创建的角色,可以选择“文件”菜单,然后选择“打开”来导入角色。
10. 使用角色:一旦你创建并保存了角色,你就可以在Character
Creator 4中其他功能中使用这个角色了。
请注意,以上步骤可能因软件版本而略有不同。
如果你遇到任何问题,建议参考Character Creator 4的官方文档或寻求技术支持。
- 1、下载文档前请自行甄别文档内容的完整性,平台不提供额外的编辑、内容补充、找答案等附加服务。
- 2、"仅部分预览"的文档,不可在线预览部分如存在完整性等问题,可反馈申请退款(可完整预览的文档不适用该条件!)。
- 3、如文档侵犯您的权益,请联系客服反馈,我们会尽快为您处理(人工客服工作时间:9:00-18:30)。
《黑道圣徒4》人物编辑器教程_编辑器指南(一帖全,包
教会)
好吧,其实人物编辑器昨天已经放出了下载资源:/thread-5176980-1-1.html,并且不少人已经进入体验了吧,不过具体步骤我一开始也是不理解,后来查了一些相关的信息,也靠自己摸索,写了如下的步骤,同时我也分享一下自己的一些感受吧:
一、安装方法
1.先下载上面那个链接里面的资源(这个不用多说),如果你网速不好的话,推荐百度网盘,速度很快的。
同时再下载一个STEAM工具并安装,这里推荐一个我已经有的安装文件,原下载网址有时候会上不了:
STEAM安装好之后,第一次双击运行时会提示更新文件,需要花费不少时间,我这里一般是5分钟左右,具体视当地网络环境而定。
接着如果你没有STEAM的账号,点击下方的“创建一个新的账号”注册,步骤不是很复杂,填写基本的个人信息之后即可,之后便可以登录了:
不过此时先不用登录STEAM,先完成下面的步骤。
2.把人物编辑器下载好放在硬盘中(最好是空间足够大的分区),应该有了三个压缩包文
件了,如果你的电脑中有WINRAR之类的解压缩工具的话,鼠标单击任意一个压缩包,再按鼠标右键,选择“解压缩到当前文件夹”,
此时应该出现一个名称为Saints Row IV Inauguration Station的文件夹以及游侠网的信息文件,而Saints Row IV Inauguration Station文件夹里面包含这些文件:
3.把Saints Row IV Inauguration Station这个文件夹整个复制粘贴到STEAM安装目录下
的\SteamApps\common里面,有的人可能没有common这个文件夹,那么就另外新建一个。
之后打开你的浏览器,在地址栏输入steam://install/242590 ,会跳出一个对话框:
选择“允许”,如果你已经登录了STEAM,那么会出现STEAM安装对话框(如果之前没有登录STEAM,那么会自动跳出登录对话框,登录后的步骤同下面的),点击“下一步”:
[pagesplitxx]
出现生成快捷方式复选对话框,一般情况下默认即可,会自动帮你生成开始菜单和桌面快捷方式,之后点击下一步:
开始工具的安装:
安装进度条满之后出现下图的界面,点击“完成”:
[pagesplitxx]
出现这样的界面:
程序进行最后的运行库的安装,稍等片刻就正式进入工具执行前的CG动画了,至此,安装方法就到这里结束了:
一如即往的搞怪LOGO。
二、使用界面介绍:
(一)、登录相关:
顺利进入编辑器之后,首先出现这样的提示:
[pagesplitxx]
这是提示你登录社区网站获得更多的服务,我们点击“continue”。
出现正在连接服务器的提示
如果你之前已经有了一个官方网站的ID,会提示登录,否则的话要注册一个新的账号。
[pagesplitxx]
登录界面,输入用户名和密码后选择continue。
点击accept,这样就进入了下图的主界面。
基本功能如上图所示,按F1是进入画面设置,如下图:
基本的画面设定,不过分辨率不能设置1680*1050或者更高。
主界面按空格键是STEAM商店,目前也没有什么好的资源,无非是一些游戏截图:
输入你的生日之后就可以进入了,貌似是看你有没有超过18岁(国外其实对这个很严格)。
一些游戏截图。
(二)、基本属性:
现在还是先说重要的事吧,主界面的第一个选项进入之后,是这样的画面:
分别对应人物的基本属性,下面一一介绍一下。
1.BODY选项:
BODY选项进入后,出现新的选择画面:
性别、年龄之类的基本属性,我自己喜欢玩女性角色,于是在SEX(性别)里面选择了FEMALE(女性)。
[pagesplitxx]
RACE是选择人物的种族,有非洲/美洲、亚洲、高加索人和拉丁美洲这些地区可选,身型会有所不同:
BUILD选项,可以调整身材的比例,有三个数值:STRENGTH(强壮型)、SKINNY(苗条型)和FAT(肥胖型):
SKIN选项,定义人物的皮肤颜色,这里居然加入了一些非人类的皮肤,我想扮演外星人不是难事了!
BODY MASK选项,这个选项我是不明白其含义,网上直接翻译的结果是“身体膜”,大家又是怎么理解的?有三个可选项:FARMAR TAN、BIKINI TAN,SHORTS、BIKINI TAN,THONG ,我每个都试了一下,貌似效果不明显。
最后面两个选项,SEX APPEAL是设置咪咪大小,最大是这样的:
AGE自然就是设置年龄了,100岁和老妖婆别无二致。
[pagesplitxx]
2.FACE(脸部):
进入FACE选项之后,出现如下的子选项,分别对应脸部的各个部位:
其中FEATURES是定义脸部的一些基本特征,如黑眼圈、疤痕等等,而且这些特征是可以叠加的:
是不是感到很恐怖?
FACE的其他选项,都是和捏人有关,代表脸部的尺寸比例:
[pagesplitxx]
3.HAIR(头发):
HAIR选项进入之后,又出现三个选项:
第一个HEAD就是设置发型了,可以看出4代的人物发型比三代多了好几倍,个人估算了一下
,有将近100种的发型,增加了不少长发发型,我个人就偏爱这个马尾辫:
FACIAL HAIR是设置小胡子的,不过女性也能设置这一点确实碉堡了,看看女性添加小胡子的样子吧:
EYEBROWS是设置眉毛:
4.MAKE-UP(化妆):
这里可以设置不同部位的化妆,包括眼影、眼线、还有唇彩、粉底之类的:
[pagesplitxx]
5.PERSONITY(个性):
这里可以设置人物的声调和发音特点,和三代一样,你可以选择是活泼型的还是沉默寡言型:
有些神经质的特征:
关于身体的主要介绍就到这里。
(三)、衣服:
主菜单第二个选项是设置人物的衣服的,有如下的子选项:
前面各项下文详细介绍,其中WARDROBE是用来快速移除已经选择好的衣服选项的。
1.HEAD:
这个选项设置帽子和眼镜:
2.UPPER BODY:
设置上身,我选择了一款清凉装:
里面还有一个BRA,是设置上身的内衣的,当然有不穿内衣的选项(汗死):
不过我一个绅士,还是让这人物穿一件吧。
[pagesplitxx]
NECKLACE子选项,设置项链:
BACKPACK子选项,设置背包,样式少了一些,都是书包之类的,搞怪成分不大:
3.LOWER BODY:
此选项设置下身衣服,和上身差不多,可以设置下身普通衣服、内裤和鞋子:
三个子选项
下身外衣我选择了短裙
鞋子我更偏爱高跟鞋:
[pagesplitxx]
内裤选择了一字裤:
4.PIERCINGS(耳环和体环):
这个选项设置耳环,以及其他部位的环状物装饰品:
耳环,选择了一副大的。
设置了眉毛附近的体环,还有鼻环,我觉得女流氓更会选择这样的装饰。
5.WRISTS:
设置手部,如手环(分左右两个部分)、手套:
左边和右边可以设置不一样的装饰:
手套也分指环和其他手套
[pagesplitxx]
6.OUTFITS(外装):
这里充分体现了这一作的搞怪成分,从外星人到动物应有尽有:
7.SUITS:
这里可以设置套装,我感觉和上面的OUTFITS差不多。
关于衣服的介绍就到这里,需要注意的是:衣服的所有选项都必须点击EQUIP才能生效,它不像身体选项是即时生效。
(四)、刺青:
主菜单第三项可以设置人物的刺青,也就是通常说的纹身,和衣服选项一样,同样可以设置身体的不同部位:
[pagesplitxx]
设置头部的:
设置上半身的:
其他的细节方面和衣服非常相似,同样需要选择EQUIP之后才能真正设置完毕,在此就不用细说了,大家可以参考上面的衣服设置来一样设置刺青。
(五)、上传和下载小人:
主菜单的最右边一项是上传下载功能,由于游戏目前还没有正式发布,所以现在还无法保存自己设置的人物,也无法真正上传人物。
点击DOWNLOAD CHARACTER(下载人物角色),出现错误提示:
点击UPLOAD CHARACTER,出现上传完毕的提示,不过却不知道怎么寻找自己捏好的人物用来分享,说明目前下载上传功能还未开放。
更多相关资讯请关注:黑道圣徒4专题。