MTK(SP_Flash_Tool_exe)单串口工具教程
Download tool 使用说明
WG-Atlashnew 刷机工具使用说明
PC端软件升级工具及使用方法
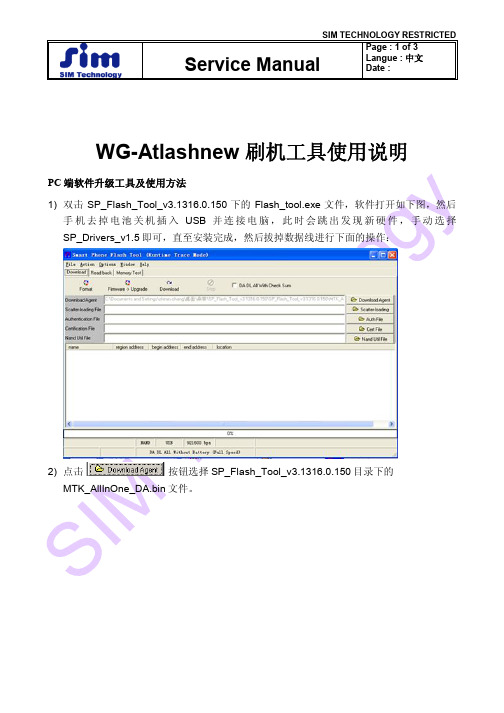
1) 双击SP_Flash_Tool_v3.1316.0.150下的Flash_tool.exe文件,软件打开如下图,然后
手机去掉电池关机插入USB并连接电脑,此时会跳出发现新硬件,手动选择SP_Drivers_v1.5即可,直至安装完成,然后拔掉数据线进行下面的操作:
2) 点击按钮选择SP_Flash_Tool_v3.1316.0.150目录下的
MTK_AllInOne_DA.bin文件。
3) 请将最新版的手机软件压缩包解压后,再点击按钮选择最新提供的手
机软件包内的MT6589_Android_scatter_emmc.txt文件。
4) 点击按钮后,将usb线插入手机(手机不需要开机,不需要插入电
池),手机自动进入升级软件状态,持续3分钟左右,升级完成后,会有如下提示,表明升级完成,可以把USB线拔出,升级全过程结束。
MTK刷机工具各种编号错误处理方法
MTK刷机sp flash tool error 8045:下面具体写教程,教程如下:1:先线刷回官方recovery,刷的方法是只勾选recovery一项。
然后点download。
顺利提示绿色ok。
2:进recovery确认已经刷回官方ANDROID SYSTEM RECOVERY <3e>版本;3:再按正常方法线线刷步骤1中的底包,勾选全部文件线刷。
4:这一次顺利刷完,绿色ok。
顺利开机。
见证奇迹的时刻。
总结一下就是:先单独刷回官方recovery。
再线刷官方救砖包。
MTK刷机sp flash tool error 3149:经过测试3149报错是字库内存条损坏,基本上是字库问题。
1、刷机过了红条,到了紫色条卡住。
(错误代码4008)这种情况出现的话,大家可以把电池拿下来,然后重新安装上,进入REC后选择关机。
然后重新刷。
2、驱动安装好了,一点刷机就弹出错误提示。
这种情况一般是USB口的供电问题,使用PC后面的USB插口,或者拔掉几个用电量大的设备。
3、正常操/作情况下,和步骤2出现的问题提示不一样的。
(典型的3013问题,出现率最高的)这个问题就是大家经常问的,出现这个问题基本上都是因为大家升级到了4.1.2然后想刷回4.0.4的情况,大家使用4.1.2刷机时候用的SP_Flash_Tool重新刷4.0.4即可,或者用甲鱼官方4.1.2的SP_Flash_Tool。
MTK 手机线刷错误信息汇总和解决办法【1022 错误】:刷机软件版本和手机不匹配、或者USB 接口不好用【解决办法】先换个USB 端口刷,:不行的话建议去下载个最新刷机软件试试去!【1040 错误】:S_UNSUPPORTED_OPERATION 刷机引导文件Scatter.txt 不匹配【解决办法】:下载适合你的机器的线刷ROM,很明显这个山寨机会遇到!比如机器是双核6577,但是下载的刷机ROM 是单核6575 的所以会报错【2005 错误】:S_BROM_CMD_STARTCMD_FAIL【解决办法】:实际是没有加载好刷机包的文件导致的,重新打开刷机软件,继续线刷即可!【3002 错误】:没有勾选下图的地方,刷机完毕,会提示【>TOOL DL image Fail!=>uboot is blockingby dl info】【解决办法】记得按下图的选项勾选,重新线刷一次即可!这样就不会开机卡屏了。
SP_FLASHTOOL刷机教程
硬件需求与产线下载相同,只需要USB线一根。
首次将手机连接至PC需要安装驱动,分两次进行:
第一个驱动安装:
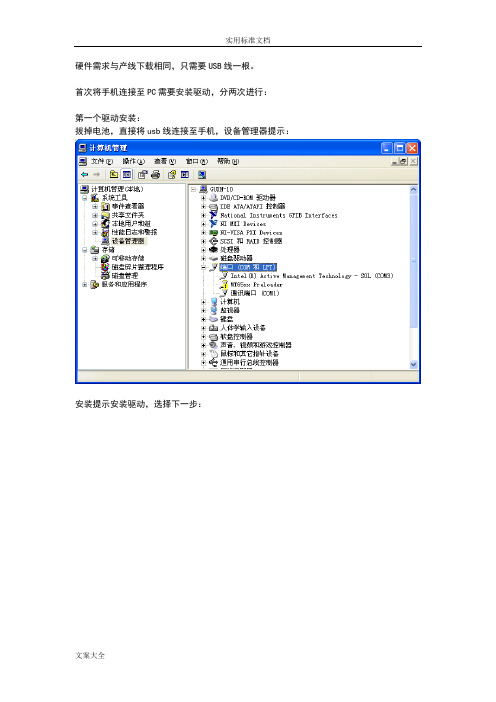
拔掉电池,直接将usb线连接至手机,设备管理器提示:
安装提示安装驱动,选择下一步:
选择下一步
选择下一步:
点击从磁盘安装:
点击浏览:
点击确定
点击下一步:
接下来安装第二个驱动,拔掉电池及usb线,按住“音量+”键,插入usb线:
点击从磁盘安装
点击浏览,找到对应的驱动,点击确定
点击下一步,安装完成
打开工具,点击Scatter-loading按钮选择软件对应的文件:
点击勾选”DA DL All With Check Sum”
点击”download”按钮,插好电池,插入USB线,自动会开始下载。
实用标准文档
文案大全
出现下图后升级结束:。
MT线刷工具flash tool刷机教程
刷机前请确保电脑端驱动已经安装好,怎么安装驱动呢,可能很多人不会手动安装方法,其实联想官方已经提供傻瓜式一键安装程序了,就是内置卡内的“PC套件-驱动”。
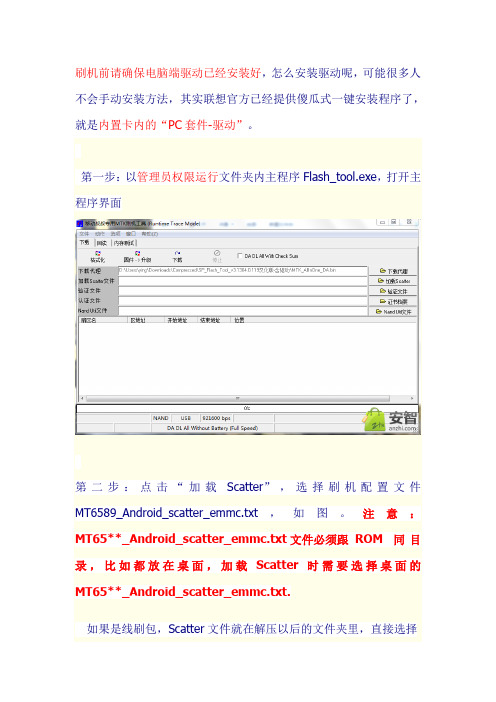
第一步:以管理员权限运行文件夹内主程序Flash_tool.exe,打开主程序界面
第二步:点击“加载Scatter”,选择刷机配置文件MT6589_Android_scatter_emmc.txt,如图。
注意:MT65**_Android_scatter_emmc.txt文件必须跟ROM同目录,比如都放在桌面,加载Scatter时需要选择桌面的MT65**_Android_scatter_emmc.txt.
如果是线刷包,Scatter文件就在解压以后的文件夹里,直接选择
即可
第三步:点击“下载”按钮,手机完全关机,数据线连接电脑,开始刷机,在弹出的对话框中点击“是”
(特别说明:如果关机后连接电脑后没有反应请重新安装下电池)
第四步:等待刷机完成,进度条走完以后会弹出绿色圆圈窗口提示刷机成功。
MTK Tools使用介绍
I ntroduc tion of MTK ToolsJackson Liang2006/4/21AgendaIntroduction of Flash Tool Introduction of ATE Tool Introduction of Meta ToolI ntroduc tion of Flash ToolSystem requirement for flash toolOS: Windows ME/2000/XP in PC.Hardware: General RS232 COM port supported up to 115200bps baud rate in PC. The COM port device name,COM1, COM2, COM3, …etc. will depend on your hardware configuration in PC.(Optional: If you want to download at high-speed baud rate, you have to add a general high speed RS232 card in PC or use USB-To-COM bridge cable.)IntroductionThe Flash Tool can download built image and read back binary data from target side via RS232or USB -To -Com Cable . The Flash Tool is developed base on the kernel libraryBROM_DLL.BROM_DLL KernelFlash Tool ( UI Program )Binary Load RS232Introduction of Boot ROMDescriptionz Every MTK base-band chips embed a Boot ROM, which is used to store a simple boot program. Internal BOOT ROMwill be selected if BOOT pin (GPIO0) is tied to GND oncereset.z The Boot ROM contains a small program for downloading data via UART, and this feature is applied to downloadprogram or factory testing. Purpose of Boot ROM is tointerpret commands received from UART1.z The Boot ROM is useful in the absence of off-chip memory or when the external Flash memories have not beeninitialized yet.Configurationz Boot ROM code is executed in ARM 32 bit mode, and the stack is allocated at 0x40000000~0x400007ff.Introduction of BROM DLLBROM DLL is multi-thread safe library and it is designed to provide the functionality of BootROM handshaking and flash download/read back/format.BROM DLL provides two target boot modes, one is META mode;the other is FlashTool mode.Boot_META will trigger target to boot up to META mode for META testing; Boot_FlashTool will download the DA into target and then user can perform flash download/read back/formatoperations.Introduction of DA (Download Agent)DA is a target side agentAfter DA is successfully downloaded and running on target, it wi ll be standby and passively waiting BROM DLL to issue flash download, read back or format command via UART.Flash Tool Feature ListFlash Tool has the following features.¾Support NOR flash download/read back/erase operation.¾Support most popular NOR flashes in the world.¾Both of AMD family and Intel family flash.¾High-Speed download.¾Support high-speed baud rate download up to 921600bps.¾Support MBA (Multiple-Binary-Architecture) download.Flash tool componentFlash tool requires four parts, one is Flash tool.exe, the others are BROM DLL, DA and scatter file.¾Flash tool.exeFlash_tool.exe is only the UI program of Flash tool. It requires BROM DLL toall the Flash tool operations.¾BROM DLLB rom.dll is the kernel library of Flash_tool.exe, it is in charge of all the mainfunctions to do BootROM handshake, DA downloading and DA handsha ke.¾DA (Download Agent)z Flash tool will download DA into target's internal SRAM and executez MTK_AllInOne_DA.bin→Support a ll MT6205B, MT621X, MT62XX BB chip projects.¾Scatfilez The starting address of ROM should be same as the built image.Example of scatter-loading fileFlash tool will parse the scat file and get the name ROM and the built image download start address 0x0 flash. It will ignore the scripts ins ide { }section.ROM 0x0{}How to download at high-speed baudrate1)I nstall a general high speed RS232 card2)U se USB-To-COM bridge cable.Flash tool UIBasic Options1) Setup Baud rate 3) Select Oper ation Method2) Setup Com portFormat FATYou can choose “Format FAT”option to determinate whether if the FAT will be formatted or not after download progress is finished. Normally we suggest you keep this option as DISABLED, because the target S/W has mechanism to deal with S/W changed issue.Manual Format FATIf you choose “Manual Format FAT”, the format operation is according to the format range you setup. You can format whatever range you want, even the whole flash! But normally you will only use it to format FAT area, take Cannon_Plus project with 16MB flash for example, the format range is the last two mega-bytes, the start address is from 0x00E00000 and the format length is 0x00200000(2MB). If you have no idea what range it should be, please refer the target source fil e FlashConf.cAuto Format FATIf you choose “Auto Format FAT”, the format range is according to theinformation embedded in the load. You don’t have worry about the range .Remind: The auto format range is according to the description in theFlashConf.c.If you want to change the format range in the FlashConf.c,please use the following syntax:#define FLASH_BASE_ADDRESS 0x0E00000#define ALLOCATED_FAT_SPACE 0x200000but don’t use the following syntax:#if 0# defin FLASH_BASE_ADDRESS 0x0x700000#else#define FLASH_BASE_ADDRESS0x0E00000#endifDownload Operation1)Power off target first2)File/Open download agent file3)File/Open scatter-loading file4)Assign load regions you want to download5)Press download button6)Power on targetRead back Operation1)Power off target first2)File/Open download agent file3)Assign read back file4)Select which file you want to read back5)Press read back button6)Power on targetFormat Operation1)Power off target first2)File/Open download agent file3)Press format button4)Configure the format range5)Power on targetFlash Tool Operation Mode 1)Test Mode: ctrl+alt+A2)Debug Mode: ctrl+alt+TMultiple bin mechanismMBA V2.0 is an enhanced version of MTK multiple binary architecture support.Enabling multiple bin is simple and involves only 3 steps:o-#define MULTIPLE_BINARY_FILES in\mcu\custom\system\[PROJECT]\custom_jump_table.ho-Add multiple BINs sections in the scatter fileo-Clean and remake the following modules: custom, mmiresource and plutommiThere will be 4 BINs in the build folder:o ROM : Code and most datao LangPack_ROM: Strings, Fonts and IMEso CustPack_ROM: Customized NVRAM settings, audios, images and WAP/MMS settingso JUMP_TABLE: the system jump table for accessing the BINsI ntroduc tion of ATEEnvironment Requirement1) PC OS:·MS Windows 2000 or XP2) Hardware:·Pentium III or above PC·Radio Tester: A G8960 ,R&S CMU200,CMD55,MT8820A,WT4400. Power Supply: A G663x or A G663x x, Keithley 230x , NGSM3) Software:·NI (National Instruments) GPIB driver Ver2.2.10 or later Version. NI Visa Ver3.0 or later versionATEdemo InterfaceCalibration or Final test settingTest Setting buttonInitial ButtonFunction of ATECalibration test include calibration and check result for MTK chipset, such as AFC calibration, PathlossCalibration, APC calibration, ADC Calibration.Final test include GSM/GPRS signaling test, such as power measurement, modulation measurement,spectrum measurement and BER measurement, and for the GPRS part include Test Mode B andBLER(CMU200) and Type B and BLER(Agilent 8960) Combined calibration(META mode) and final test(Normal mode) for reducing change test stationTest Equipment SetupSupport Hardware:Power SupplyR&S NGSMAgilent 663xxKeithley 230xNGSMRadiocommunication TesterR&S CMU200Agilent 8960CMD55WT440MT8820AReport & System Setting(1/7)Report & System Setting (2/7)Fast Power Measurement (CMU 3.50)When you use CMU200 to do Cal or Final test, remember to pitch o n (选中)this option to speed up the power measure rate.Wireless testIf you want to do antenna coupling test, remember to pitch on th is option.GSM Default ItemsIf you pitch on this option, ATE will test the default items def ined in theMTK_xxxxx_SETUP.ini while doing final test.Stop ConditionIf you pitch on this option, ATE will stop testing immediately w hile one test item can’t pass .In production line, this option should be pitched on always.RF Final Test with Check Bar CodeIf you pitch on this option, ATE will check Bar Code to check wh ether the calibration result was pass or not. If calibration fail , ATE will not continue to do final test and stop automatically. Final Test with IMEI WriteIf you want to write IMEI to handset before doing final test, re member to pitch on this option. Add Cal StatusIf you pitch on this option, ATE will add “10”(pass) or “01”(fail) flag behind barcodeafter Calibration.Report & System Setting (3/7)XXXX (Band) CalibrationYou can select which band you want to do calibration here.Phase Error Calibraion(CMU200 only)If you pitch on this option , ATE will do phase error calibrati on using CMU200.AFC CalibrationIf you pitch on this option, ATE will do AFC (Auto frequency con trol) calibration.Crystal AFC CalibrationIf you pitch on this option, ATE will do Crystal AFC Calibration.Path-loss CalibrationIf you pitch on this option, ATE will do Path-loss calibration.APC CalibrationIf you pitch on this option, ATE will do APC (Auto power control) calibration.APC Cal CheckIf you pitch on this option, ATE will check whether all PCL pass the limit or not.APC Cal fullIf you want to do all PCL Calibration, pitch on this option.ADC CalibrationIf you pitch on this option, ATE will do battery and charger ADC Calibration.IP2 Cal & APC Cal 77328This two options are not used now.NOTE: Production line generally do AFC Calibration, Path-loss Calibration, APC Calibration , APC Cal Check and ADC Calibration.Report & System Setting (4/7)Final test SettingOperator can choose which band to do final test and whether GPRS should be done or not here.Report & System Setting (5/7)Test MODE SelectThere are five options here: “Manual Initialize”, “GSM Test”, “Calibration Test”, “Calibration & GSM Test”, “Three Unit Calibration”;If you want to initialize Manually by yourself, please select “Manual Initialize”;If you want ATE to initialize Final test automatically, select “GSM Test”;If you want ATE to initialize Calibration test, select “Calibration Test”;If you want ATE to initialize Cal and Final test automatically, select “Calibration & GSM Test”.“Three Unit Calibration”is hold for future use.Bar Code Get Type When CalibrationThere are four options: ”Get From NVRAM”, ”Auto Bar Code with Date & Batch”, ”Scan Barcode”, “Check fixture close”.If you want to get barcode from handset NVRAM, select “Get From NVRAM”and the barcode of all calibrated handset will be same.If you select “Auto Bar Code with Date & Batch”, ATE will use the PC date plus Batch define in MTK_XXXXX_SETUP.ini as handset barcode and write into handset NVRAM. If you want to scan Barcode manually, select “Scan Barcode”.”Check fixture close”is hold for future use.Report & System Setting (6/7)PowerSupply TypeYou can select the Powersupply type in your production line here.Radio Communication TesterYou can select Radio Communication Tester type in your prod uction line here. BaseBand Chip TypeATE supports all MTK BaseBand Chip type. You should select the right type that used in your handset here. If you don’t know the type, select AutoDetect. But selecting this option will waste some detect tim e.CMU Measurement PortYou should select RF2 while using CMU200 as tester. If your Radio Communication Tester is other type, just keep it RF2.PowerSupply GPIB AddressYou can modify the GPIB address of powersupply here.Cal INP loss and Cal OUP lossYou should check these two options always.Report & System Setting (7/7)NVRAM Database fileYou should select the database file like the following form at: BPLGUInfoxxxxxx here . And its’version should be the same as the bin file.Config File locationYou should select the meta_xxxxx.cfg file here.while your handset BandBand chip type is 6205B, select meta_6205B.cfg;while your handset BaseBand chip type is 6217,6218B or 6219, select meta_6218B.cfg.Calibration file LocationYou should select the MTKCAL_xxxxx.ini file here.while your handset BandBand chip type is 6205B,select MTKCAL_6205B.ini;while your handset BaseBand chip type is 6217,6218B or6219,select MTKCAL_6218B.ini.Test Setup file LocationYou should select the MTK_xxxxx_SETUP.ini file here.while your handset BandBand chip type is 6205B,select MTK_6205B_SETUP.ini;while your handset BaseBand chip type is 6217,6218B or 6219,select MTK_6218B_SETUP.ini. Test Report LocationYou should select the location where you want to store the test report here.Default location is: C:\Program Files\MTK_atedemo. Suggest to change it.Report DataBase LocationYou should select the file: C :\Program Files\MTK_atedemo\6218B_statistics.xls to save the calibration data here.Final Test Configuration Panel (1/2) 123Final test Configuration Panel (2/2)In this panel the following three place may need to be modified according to actual instance:1). Call TypeMO Call: If you select MO call, ATE will control the handset to dial “112”to connect the Radio communication tester while doing final test.MT Call: If you select MT call, you should plug a Test SIM card into th e handset. And Radio communication tester will call the handset wh ile doing final test.2). RX QualityYou should input the RX Meas Level here. The default value is-102. 3). Cable loss settingYou should input the total loss including RF cable and jig (夹具)here.Note: If your radio communication tester is Ag8960 and you want to set final test Cable loss here, remember to modify one place inMTK_xxxxx_Setup.ini file:Using AG8960 Amptd Offset = 0Remember!!!Calibration Setting Panel (1/2)1Cal Cable loss SettingCalibration Configuration Panel (2/2)1) You should input the total loss including RF cable and jig (夹具)here.Note: If your radio communication tester is Ag8960 and you want to set calibration test Cable loss here, remember to modify one place in MTK_xxxxx_Setup.ini file:Using AG8960 Amptd Offset = 0Remember!!!Related Files1.MTKCAL_xxxxx.INI2.META_xxxxx.CFG3. MTK_xxxxx_SETUP.INIMTKCAL_xxxxx.INIThis file contains all initialized data for calibration test. At the beginning of calibration, ATE will get the data in this file and write into handset through DataBase file first.Nothing in this file is need to be modified except some special case occur.Meta_xxxxx.CFG (1/3)This file contains all calibration setting data. The following several place perhaps need to be modified in this file:1. [8960 Initialization]8960 GPIB Address = GPIB0::15::INSTR2. [RX path loss table]GSM850_MAX_RX_LOSS = 5.0,5.0,5.0,5.0,5.0,3.0,3.0,3.0,3.0,3.0,3.0,3.0,GSM850_MIN_RX_LOSS = -5.0,-5.0,-5.0,-5.0,-3.0,-3.0,-3.0,-3.0,-3.0,-3.0,-3.0,-3.0, GSM900_MAX_RX_LOSS = "4.0,4.0,4.0,4.0,4.0,4.0,4.0,4.0,5.0,5.0,5.0,5.0,"GSM900_MIN_RX_LOSS = "-4.0,-4.0,-4.0,-4.0,-4.0,-4.0,-4.0,-4.0,-5.0,-5.0,-5.0,-5.0," DCS1800_MAX_RX_LOSS = "4.0,4.0,4.0,4.0,4.0,4.0,4.0,4.0,4.0,4.0,4.0,4.0,"DCS1800_MIN_RX_LOSS = "-4.0,-4.0,-4.0,-4.0,-4.0,-4.0,-4.0,-4.0,-4.0,-4.0,-4.0,-4.0," PCS1900_MAX_RX_LOSS = "5.0,5.0,5.0,1.0,1.0,1.0,1.0,1.0,1.0,1.0,1.0,1.0,"PCS1900_MIN_RX_LOSS = "-5.0,-5.0,-5.0,-5.0,-5.0,-5.0,-5.0,-5.0,-5.0,-5.0,-5.0,-5.0,“Meta_xxxxx.CFG (2/3)3. [TX PCL table]xxxxx_CAL_PCL= 17,12,5,xxxxx_2CAL_PCL = 12,5,xxxxx_PCL = 19,18,17,16,15,14,13,12,11,10,9,8,7,6,5,xxxxx_CHECK_PCL = 19,18,17,16,15,14,13,12,11,10,9,8,7,6,5,xxxxx_MAX_P = 6,8,10,12,13.8,15.8,17.8,19.8,21.8,23.8,25.8,27.8,29.5,31,32.8, xxxxx_WANTED_P = 5,7,9,11,13,15,17,19,21,23,25,27,29,30.5,32.2,xxxxx_MIN_P = 4,6,8,10,12.5,14.5,16.5,18.5,20.5,22.5,24.5,26.5,28.5,30,31.7 xxxxx_C = 3,3,3,3,4,4,6,6,8,8,12,12,15,15,35,40,xxxxx_CORRECTION = -0.3,0,0.9,1.7,1.1,0.9,0.7,0.7,0.7,0.7,0.7,0.7,0.5,0.5,0.5,Note:The places marked by ”“perhaps need to be modified according to actual case.Meta_xxxxx.CFG (3/3)3. [ADC table]ADC_V1 = 3400ADC_V2 = 4200NORMAL_VOLTAGE = 3800MAX_BATTERY_ADC_SLOPE = 5550.0MIN_BATTERY_ADC_SLOPE = 5250.0MAX_BATTERY_ADC_OFFSET = 1000000MIN_BATTERY_ADC_OFFSET = -1000000BATTERY_CHANNEL = 0CHARGER_CHANNEL = 1ADC_RESISTANCE = 0.33MAX_VOLTAGE_DIFFERENCE = 0.04MAX_CURRENT_DIFFERENCE = 0.04ADC_MEASUREMENT_COUNT = 1000Note: The value of ADC_RESISTANCE should be modified if it is no t 0.33. You can confirm the value from your hardware engineer.MTK_xxxxx_SETUP.INI (1/4)The following place perhaps need to be modified in this file:1) [System Setting]……CMU Base GPIB Address = 20……Power Supply Address = GPIB0::5::INSTR……2) [Call Setup Configuration]Setup Network = a(a=1:Final test begin from GSM900; a=4: Final test begin from GSM850)……Triband Test Type = b(b=0:900+1800+1900; b=1:850+1900+1800 ; b=2: 850+1800+1900) Triband Switch Time = 5(If your handset is triple band, this is the band switch time.(a) From Dual band to the triple band before doing the triple b and final test;(b) From the triple band to Dual band after triple band final t est finish. You should increase this value if band switch is fail.)MTK_xxxxx_SETUP.INI(2/4)3) [Final Test TX Check]GSM900_MAX_P = "6.0,8.0,10.0,12.0,15.5,16.0,18.0,20.0,22.0,25.0,26.0,28.0,30.0,31.5,34.2," GSM900_MIN_P = "4.0,6.0,8.0,10.0,12.0,14.0,16.0,18.0,20.0,22.0,24.0,26.0,28.0,29.5,31.2," DCS1800_MAX_P = "1.8,3.5,5.3,7.2,9.0,12.0,13.0,15.0,17.0,19.0,21.0,23.0,25.0,27.0,28.5,31.2," DCS1800_MIN_P = "-0.2,1.5,3.3,5.2,7.0,8.0,11.0,13.0,15.0,17.0,17.5,21.0,23.0,25.0,26.5,27.5," PCS1900_MAX_P = "0.5,2.5,4.5,6.5,8.5,10.5,12.5,14.5,16.5,18.5,20.5,22.5,24.5,26.5,28.5,31.0," PCS1900_MIN_P = “-0.5,1.5,3.5,5.5,7.5,9.5,11.5,13.5,15.5,17.5,19.5,21.5,23.5,25.5,27.5,28.0,”……AG8960_RF_Amptd_Freq_Offset Line0001 ="500000000,641000000,641100000,876000000,876100000,1312000000,1312100000,18800000" AG8960_RF_Amptd_Freq_Offset Line0002 = "00,1881000000,2000000000,"AG8960_RF_Amptd_Value_Offset = "-0.6,-0.6,-0.6,-0.6,-0.6,-0.65,-1.2,-1.25,-1.3,-1.35," Using AG8960 Amptd Offset = 1(Using AG8960 Amptd Offset = 1 : ATE will use the cable loss hereUsing AG8960 Amptd Offset = 0 : ATE will not use the cable loss here, you should set the cable loss in Final Test Configuration and Calibration Configuration panel.)MTK_xxxxx_SETUP.INI (3/4)4) [Barcode]Barcode = “xxxxxx“(like “000001”)Barcode Step = 1Barcode Limit = "MT012345678901234569"Barcode Length Limit = 0Shop Floor Error Hit = 1Note: You can modify the place in blue color according to your own request.MTK_xxxxx_SETUP.INI (4/4)5)[xxx 1]Active = 1TCH = 3PCL = 5……[xxx 2]Active = 1TCH = 62PCL = 10……[xxx 3]Active = 1TCH = 124PCL = 15……Note: You can modify the place in red color if you want to chang e the test channel and PCL while doing final test.I ntroduc tion of METAEnvironment Requirement1) OS: MS Windows ME, 98, 2000 or XP2) The following driver and library are needed for RFTool and META factory:¾NI (National Instruments)or Agilent GPIB driver¾NI Visa Ver2.6 or later version3) Hardware:¾Generic Pentium III or above PCThe following hardware is needed for RF Tool and META factory¾Agilent8960 or R&S CMU 200¾Agilent661x or Agilent663x2 series power supply¾GPIB Card or GPIB-USB CableMobile Engineering Testing ArchitectureMETA TARGET TasksMETA LABMETA FactoryOperation of Meta。
SP_Flash_Tool_exe_windows_v5.1348.00下载操作说明20131211
SP_Flash_Tool_exe_windows_v5.1348.00下载操作说明20131211一、载版本准备工作1、安装MTK手机驱动对于初次使用该升级工具的电脑需要安装USB驱动,请将手机上电池,连接数据线,并观察设备管理器,设备管理器中会跳出相关设备。
1)右键设备选择“属性”,选择“更新驱动程序”。
2)选择“从列表或指定位置安装”,点“下一步”。
3)选择“不要搜索”,点“下一步”。
4)选择“显示所有设备”,点“下一步”。
5)选择“从磁盘安装”。
6)从驱动包里选择inf文件,然后安装驱动。
驱动需要确保全部安装完成。
重复以上步骤,确保驱动安装完全。
如果升级过程中有出现为安装的驱动,也请使用以上方法安装。
Adb的驱动请选择Unsigned infs\android_winusb.inf。
二、下载软件操作步骤:1,解压缩 SP_Flash_Tool_exe_windows_v5.1348.00.zip 工具包,点击如下图标打开工具。
2,进入 Advance mode,确保顶层出现 Advanced Mode,如下图标示。
默认是没有的,请同时按下 Ctrl + Alt + V 进入此模式。
3,选择 Option -> Download ,勾选红色框中的选项。
4. 选择 Option -> Connection ,勾选红色中的选项。
MT6572_Android_scatter.txt”文件,然后确定。
6,选择Download 标签,在如图标示选择FirmwareUpgrade,点击Download开始。
7,先将电池放入手机中,然后再把下载线连接到手机。
下载完成后如下图所示,件夹打包传递回龙旗,请标注复现问题的时间点,和出现问题的截图。
MTK_SP_Flash_Tool智能机升级教程
MTK_SP_FlashTool升级教程1、打开下载工具,并双击打开工具包中的flash_tool.exe,如下图
2、打开flash_tool.exe后,设置Download Agent,如下图:
3、设置Scatteer-loading,如下图:
4、设置下图,选择Firmware Upgrade,点击Download,如下图
5、如下图表示设置完成,手机要关机,装电池,不开机状态下连接电脑,当进度条有跳动及表示正在刷机;
联智友情提示:此时,手机已经进入刷机状态,请勿中途中断手机与电脑的链接,以免
刷机失败造成不必要的损失;
6、首次升级软件,要安装USB Port 驱动,请进入计算机/管理/设备管理器
7、进入设备管理器,会提示安装驱动名称为:MT65XX---请安装附件里面的
,如下图
8、右键,选择更新驱动程序,如下图
9、选择附件里面的这个附件,点击下一步;
10、选择“始终安装此驱动软件”,如下图
11、驱动会安装成功,如下图
以升级软件了;
13、当界面显示,如下图时表示刷机成功,即可拔掉手机,电池重装后开机,第一次开机会比较久,需要耐心等待;若仍然未开机,建议重新刷机,或者移交售后维修;。
mtk下载工具主要使用FlashTool的用法
mtk下载工具主要使用FlashTool_V3.1(其实各个版本都差不多),主要用于将编译生成的bin 文件写入目标手机中,该工具不用安装,直接运行,主要用法如下:1 运行Flash_tool.exe 打开软件,2 点击Download Agent 载入MTK_AllInOne_DA.bin 这个文件3 点击Scatter_Loading 载入scat.txt 这个文件4 双击ROM 将项目目录下build文件夹下的bin文件加载进来5 插上手机的下载线,点击option,选择手机的rate速率,和相应的com口(一般会用到com3和com4,可以根据实际情况而定)点击DownLoad,然后轻轻按下手机的开机键,就可以下载选择的bin文件到目标手机中TRACE工具的使用1 注意事项mtk手机默认情况下想要打trace,需要在平台代码中你要打trace的语句中添加如下代码kal_prompt_trace(MOD_MED, "Check err: buffer miss %d\n",g_video_enc_info_ptr->check_buffer_miss_count);kal_prompt_trace(MOD_MED, "Check err: camera miss %d\n",g_video_enc_info_ptr->check_camera_miss_count);用法和c语言的printf函数相似,只不过第一个参数需要写想要打trace的模块的名称,如MOD_MED并且在还需要打开手机,在待机屏幕下输入*#3646633#,进入工程模式,然后进入设备菜单,再进入Set UART à UART Setting将TST Config 设置为UART 1按下确认键后手机会自动关机,经过这样的设置后就可以打trace了2 打开Catcher.exe 点击Config 菜单,选择set database path,会弹出一个set path的对话框到项目文件下的路径tst\database_classb下选择相应的database 文件点击Control,选择mode ,然后选择Logging 模式会弹出logging对话框,然后选择Config à Configure RS232.. 会自动弹出PORT这个对话框,选择相应的端口和速率按下F5 快捷键和目标手机链接,点击Control à Set Filter...选择PS Filter,选择你想显示的trace 模块打开手机,打出相应的trace 信息不同的手机MTK FlashTool 和Catch工具的的使用可能有些不同,但基本使用都差不多。
MTK智能机刷机教程
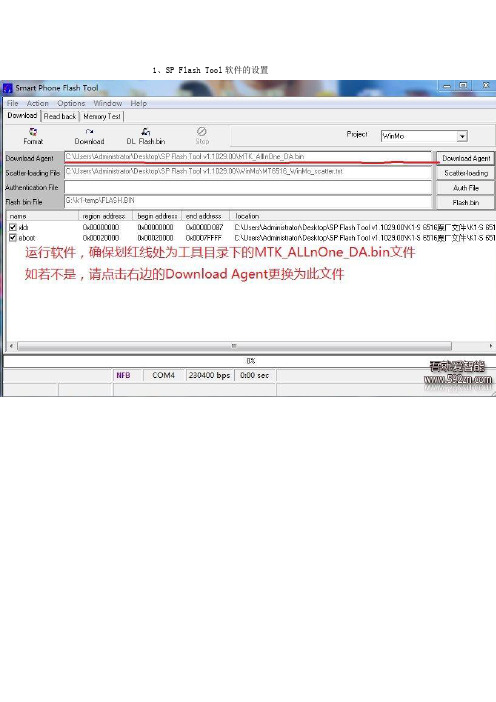
1、SP Flash Tool软件的设置2、格式化手机系统切换的刷机,这一步必不可少。
不对手机进行格式化的话,可能会引起一些莫名的问题,比如开机卡第一屏、SIM卡无信号、白屏等。
点击软件界面的format按钮后,弹出上图界面。
界面右边的validation意思是验证,建议格机时把这个勾打上,虽然格机时会慢点,但更有保障。
界面下方的format length(格式化长度),要根据你手机ROM的大小来设置。
如果是256M ROM的,将这里设置为0x10000000(看仔细点,0x后边跟着八位数)如果是512M ROM的,将这里设置为0x20000000。
设置完毕后,点击OK,将连接在电脑上的PL2303刷机线(此时应该已经安装好PL2303刷机线驱动)和手机相连(手机此时处于关机状态),手机长按开机键直至刷机软件下方进度条开始动。
(如果进度条不走,可以不用拨线,扣下电池,再上上去就ok)(进度条走二次100%,一条红色,一条绿色,最后结束会弹出ok的对话框)3、刷安卓系统时刷机工具SP Flash Tool的设置端口、波特率和DA文件的设置就不用说了吧。
详见二楼第1小点首先,点击上图1处,选择“Android”。
其次,上图2处要注意,这里是设置MT6516_Android_scatter.txt文件的,这个文件的作用是设定安卓各个文件刷入手机的地址。
一般来说,官方发布的安卓ROM都会带有这个文件,请使用安卓ROM包内的此文件,而不是工具包内的同名文件!!!最后,安卓各模块文件的设置见上图,双击最前面的name字段,会弹出文件选择框。
图3处也要注意:有时候这儿不会自动加载文件,双击3处框框最前面的UBOOT字段,选择ROM包内的uboot 开头的文件。
4、安装MTK USB驱动(如果已经安装好了此驱动,请跳到第5点)刷机工具点击主界面的download(此时把2303刷机线和普通usb线都插电脑上,因为等会刷机过程中马上要用到普通usb线)这时刷机线要和手机已经接好,这里直接长按开机键直到刷机软件下方进度条开始动为止。
MTK平台软件开发调试工具使用说明

MTK平台软件开发调试工具
使用说明
仅提示工具的基本操作流程
2014年08月
目录
一、体验准备 (3)
二、FlashTool软件下载 (4)
三、sscom32串口调试 (6)
四、Meta设备数据编辑 (7)
五、Catcher系统日志 (8)
一、体验准备
软件发布一般包括下面三个部分:
软件下载工具如下:
使用串口或者USB下载均需提前安装驱动,本文仅针对串口进行说明,先安装PL2303_Prolific_DriverInstaller_v1417.exe
二、FlashTool软件下载
设备关机后,通过串口线连接计算机,启动FlashTool准备下载,界面如下:
软件下载进度如下:
3、说明
软件小改动,为方便调试,一般选择下载;若软件前后版本差异大,需要格式化升级,然后重新写入IMEI串号、配置参数。
三、sscom32串口调试
四、Meta设备数据编辑
在关机状态下操作设备内的参数,先关机连接计算机:
设备与Meta连接成功后界面如下:
五、Catcher系统日志
Catcher工具一般是在设备运行异常,需要分析软件bug时使用,该工具与前面串口调试工具冲突。
软件运行日志信息默认以设备UART1输出到串口,使用catcher之前,可以手动使用Meta修改日志输出模式,将信息输出到Catcher,也可使用指令自动完成。
按如下步骤将日志默认的串口输出改为catcher输出:
配置完成后不能再使用串口工具,按如下方法加载dataBase启动catcher:
配置端口:
查看日志信息:。
mtktool工具使用方法
mtktool工具使用方法MTKTool工具使用方法MTKTool是一款用于处理MTK芯片手机的工具,可以实现一些常用的功能,比如刷机、备份、恢复等操作。
本文将详细介绍MTKTool的使用方法,帮助用户更好地利用该工具。
一、安装和打开MTKTool用户需要下载MTKTool的安装包,并将其安装到计算机中。
安装完成后,双击打开MTKTool应用程序。
二、连接手机在使用MTKTool之前,用户需要将MTK芯片手机通过USB数据线连接到计算机上。
确保手机已开启USB调试模式,并且计算机已正确安装MTK手机驱动。
三、刷机操作1.备份在进行刷机操作之前,用户可以选择先对手机进行备份,以防止数据丢失。
在MTKTool的主界面中,找到备份选项,并点击进入备份界面。
选择要备份的内容(如系统、应用、数据等),然后点击开始备份。
2.刷机包下载在MTKTool的主界面中,找到刷机选项,并点击进入刷机界面。
用户可以选择从本地导入刷机包,也可以选择在线下载刷机包。
对于在线下载,MTKT ool会自动检测手机型号,并提供相应的刷机包供用户选择。
3.刷机刷机包下载完成后,用户可以将刷机包导入到MTKTool中。
在刷机界面中,选择导入的刷机包,并点击开始刷机。
刷机过程中,用户需要耐心等待,切勿中断操作。
四、其他功能操作1.恢复如果用户在刷机或其他操作过程中出现问题,可以使用MTKTool 的恢复功能来恢复手机到出厂设置。
在MTKTool的主界面中,找到恢复选项,并点击进入恢复界面。
选择需要恢复的内容(如系统、应用、数据等),然后点击开始恢复。
2.ROOTMTKTool还提供了ROOT功能,用户可以通过该功能获取手机的ROOT权限。
在MTKTool的主界面中,找到ROOT选项,并点击进入ROOT界面。
点击开始ROOT,等待ROOT过程完成。
3.清理MTKTool还具有清理功能,用户可以通过该功能清理手机内存,提升手机运行速度。
在MTKTool的主界面中,找到清理选项,并点击进入清理界面。
flashtool图文教程
flashtool图文教程
Flashtool是一款强大的刷机工具,可以帮助用户刷入自定义ROM、解锁手机的bootloader、备份和恢复手机数据等。
下面是关于Flashtool 的图文教程,帮助用户了解如何正确使用Flashtool。
第一步:准备工作
在开始之前,需要确保以下几个条件:
1. 一台已安装Flashtool的电脑。
2.一根可用的USB数据线。
3.你的手机的驱动程序已经正确安装到电脑上。
第二步:打开Flashtool
双击Flashtool的图标,启动该程序。
第三步:连接手机
使用USB数据线将手机连接到电脑上。
确保手机处于关机状态。
第四步:选择刷机模式
在Flashtool的主界面,选择“Flash”选项卡。
然后点击“刷机模式”旁边的下拉菜单,选择“Flashmode”。
第五步:选择刷机文件
第六步:开始刷机
点击“Flash”按钮,Flashtool将开始刷入ROM文件到你的手机。
刷机过程中,请不要断开手机与电脑的连接。
第七步:等待刷机完成
刷机过程需要一些时间,请耐心等待。
在刷机完成后,你将看到一个绿色的勾号,表示刷机成功。
第八步:重启手机
在Flashtool的主界面,选择“刷机模式”旁边的下拉菜单,选择“Fastboot”。
然后点击“重启”按钮,手机将重新启动。
需要注意的是,刷机后可能会导致手机数据的丢失。
因此,在刷机之前,建议你备份手机中的重要数据。
MTK教程详细教程
MTK使用教程1.驱动安装。
解压,然后选择驱动自动安装:完成上一步,可直接到下一步软件包选择。
以下为刷机时读取不到端口时手动安装教程:计算机右键,打开设备管理器,手机关机状态插入数据线。
2.以32位系统为例,双击打开端口,手动安装驱动3.检查设备是否正确安装。
个别电脑由于驱动签名问题需要关闭驱动签名,百度即可。
(64位系统安装下面那个)驱动安装时需等待,选择始终安装程序,若安装失败,检查是不是驱动签名问题,可关闭驱动签名/article/7c6fb42879543380642c9036.htm l4.打开工具,开始升级,可选择语言为中文5.点击右侧配置文件,选择升级软件包(包需解压)注意看文件名,必要时可以选择两次项不要选可以按音量键,个别手机不用电池也可)8.出现红色滚动条时说明连接成功9.当出现黄色滚动条开始走,并且达到100时即升级完成,升级过程中耐心等待,中途不要断电。
10.拔数据线,重新插拔下电池,开机。
首次开机需要更新系统,耐心等待3到5分钟,中途不要动手机,以防断电。
11.手机开机,测试没问题时,关机重启,再正常使用。
更多的详细资料,和最新原厂升级救砖包,可来群2463595找我解答,由于群是免费群,各维修界的同僚,可进群来帮下忙,我可免费提供你更多的最新原厂救砖包,个人力量有限,多靠大家支持。
群官网/。
升级常见错误分析1、刷机过了红条,到了紫色条卡住。
(错误代码4008)这种情况出现的话,大家可以把电池拿下来,然后重新安装上,进入REC后选择关机。
然后重新刷。
2、驱动安装好了,一点刷机就弹出错误提示。
这种情况一般是USB口的供电问题,使用PC后面的USB插口,或者拔掉几个用电量大的设备。
3、正常操/作情况下,和步骤2出现的问题提示不一样的。
(典型的3013问题,出现率最高的)这个问题就是大家经常问的,出现这个问题基本上都是因为大家升级到了4.1.2然后想刷回4.0.4的情况,大家使用4.1.2刷机时候用的SP_Flash_Tool重新刷4.0.4即可,或者用甲鱼官方4.1.2的SP_Flash_Tool。
MTK 智能手机线刷 SP Flash Tool使用方法
MTK 智能手机线刷SP_Flash_Tool使用方法概要说明SP_Flash_Tool是MTK提供的版本下载软件,通过它,可以下载和更新我们系统的软件版本。
下面我们以最新的SP_Flash_Tool_v3.1149.03来说明下其使用方法。
一、驱动安装MTK的SP_Flash_Tool支持通过串口和USB来下载软件,我们使用的是通过USB 的方式,因此在下载之前,还需要先安装好相应的USB驱动。
驱动和本文档在同一个目录里面发布的叫“USB VCOM Driver.zip”,用户需要先解压;先将手机的电池取出,并通过下载线与电脑连接后,系统应该就会提示找到新设备,这时候选择“文档所在路径”——>“flash_tool”——> “USB VCOM Driver”——>“2K_XP_COM”(如果你是windows 7,请选择Win7目录) ,如下所示:注意这里选择驱动所在的路径,也就是本文档所在的路径:如果安装驱动不成功,有可能是系统中缺少usbser.sys和mdmcpq.inf文件导致的。
可以将本文档所在路径附带的usbser.sys拷贝到C:\WINDOWS\system32\drivers下面,将mdmcpq.inf拷贝到C:\WINDOWS\inf即可。
二、软件配置SP_Flash_Tool的界面如图所示:首先我们需要配置其为USB MODE同时设置为high speed模式,并配置成without battery的模式。
这样配置就完成了,就可以下载软件了。
三、版本下载首先,我们要选择要下载版本中的的scatter文件MT6573_Android_scatter.txt,此文件一般在我们发布的版本里面会有包含:点击Scatter-loading的时候,进入到我们发布的版本所在的目录,如下:选择好后,如果是需要全部更新,我们就选择Firmware->Upgrade,然后将机器通过下载线与PC连接(机器不要上电池),就可以自动升级了。
MTK 多串口工具下载说明

我司项目大部分均可采用USB升级线—故可选此项
组装线—备份格式化下载
(适用于我司所有MTK项目)
需要升级格式化的时候设置如下, 点start 之后手机开始升级,设置见下图
我司项目大部分均可采用USB升级线—故可选此项
如果格式化升级中中途失败,请立即更改到options 里的第三种下载方式下载,其他设置不变。不要断 掉主板连接,继续从新下载。设置见下图
表明格式化备份成功;
Multiport download tool_exe
下载使用说明
1:下载前注意 options 里的第二项 里的设置需要勾掉,如下图,其他 的设置都是默认的
2: 点击 image folder ,选择bin档所在的文件 夹
3:选择成功后会弹出对话框,如下
Download 开机键开始下载
选择成功后会弹出对话框如下download下载选择方式如下图然后点击start短按开机键开始下载我司项目大部分均可采用usb升级线故可选此项适用于我司所有mtk项目需要升级格式化的时候设置如下点start之后手机开始升级设置见下图我司项目大部分均可采用usb升级线故可选此项如果格式化升级中中途失败请立即更改到options里的第三种下载方式下载其他设置不变
SP Flash Tool使用文档
SP FLASH TOOL使用说明概要说明SP_Flash_Tool是MTK提供的版本下载软件,通过它,可以下载和更新我们系统的软件版本。
下面我们以最新的SP_Flash_Tool_v3.1149.03来说明下其使用方法。
一、驱动安装MTK的SP_Flash_Tool支持通过串口和USB来下载软件,我们使用的是通过USB 的方式,因此在下载之前,还需要先安装好相应的USB驱动。
驱动和本文档在同一个目录里面发布的叫“USB VCOM Driver.zip”,用户需要先解压;先将手机通过数据线与电脑连接后,系统应该就会提示找到新设备,这时候选择“文档所在路径”——>“flash_tool”——> “USB VCOM Driver”——>“2K_XP_COM”(如果你是windows 7,请选择Win7目录) ,如下所示:注意这里选择驱动所在的路径,也就是本文档所在的路径:如果安装驱动不成功,有可能是系统中缺少usbser.sys和mdmcpq.inf文件导致的。
可以将本文档所在路径附带的usbser.sys拷贝到C:\WINDOWS\system32\drivers下面,将mdmcpq.inf拷贝到C:\WINDOWS\inf即可。
二、软件配置SP_Flash_Tool的界面如图所示:首先我们需要配置其为USB MODE同时设置为high speed模式,这样配置就完成了,就可以下载软件了。
三、版本下载首先,我们要选择要下载版本中的的scatter文件MT6577_Android_scatter_emmc.txt,此文件一般在我们发布的版本里面会有包含:点击Scatter-loading的时候,进入到我们发布的版本所在的目录,如下:接(机器要装上电池),就可以自动升级了。
FLASH TOOLS工具使用指书
FLASHTOOLS工具使用指书工具的常用使用方法:1、升级2、导出BIN 档3、导出MT03复位文件4、格式化文件系统5、内存检测一、升级(串口线升级和USB线升级两种方式)1)串口线升级步聚1:选择DA文件任何升级方式,首先要选择DA文件,下载的时候首选把DA下载到手机的BROM里面,然后手机和PC进行交互。
步聚2:选择scat文件(存放与相对应软件版本内)Scat文件的目的:FLASH TOOL根据SCA T文件解析后定位每个load升级到FLASH 对应的起始地址及BIN档的个数。
步聚3:自动格式化文件系统目的:为了保证文件系统可以重新生成。
(因为每个软件版本文件系统分配可能不同,也就是文件的个数,默认值都不尽相同,如果不格式化,导致升级后重新开机读取相应的新文件读取失败导致异常。
)步聚4:串口线与PC端连接手机关机,连接串口线,点击工具端的DOWNLOAD或者按F9,手机按开机键进入下载模式即可。
2)USB线升级(USB分为首次下载和后续升级两种模式)后续升级可以直接使用USB升级方式,方法同串口线下载相同,简单总结A、选择DA文件B、选择scat文件C 、选择USB下载模式D、选择自动格式化文件系统然后与PC端连接即可复习:25平台07B对应机型(K119、K201、K27、i266、i289C、i530)与29平台对应机(i6、i18)使用USB线升级按*键才能进入下载模式25平台06B对应机型(i388、i389、i628、i268等) 与28平台对应机型(i269、i188、i399、i8)使用032的串口线升级按开机键才能进入下载模式35平台V0和V1的机型都是采用夹具升级(夹具所使用的是032串口线)二、导出BIN档(连接方式同升级)导BIN档的目的:在软件开发、测试过程中经常出现一些偶尔才能试到的问题,并且一旦出现就不会恢复或极易重现。
但如果重新下载软件、恢复出厂设置等类似文件系统的操作却会导致故障消失,给软件分析解决带来不便。
SN_Write_tool_exe_v2.1328.01MTK手机写串软件使用说明
SN_Write_tool_exe_v2.1328.01MTK手机写串软件使用说
明
1.安装工具:
点击SN_Write_tool_exe_v2.1328.01 中的setup.exe安装,严格按照提示操作,如下图所示:
安装完成图标如下图:
点finish完成安装,如图所示桌面上会安装好的快捷方式:
2. 打开工具,需要设置项,如下图标识:
点system config,进入菜单设置
写IMEI号(两个不一样的IMEI号)设置如下:
若写两个一样的IMEI号时,需勾选Dual IMEI下面的Dual IMEI same
全部设置好如下:
点OK设置完成
3.右下角点START,输入正确的IMEI,点OK后插入USB,给手机上电,如下图:
4.下图是写IMEI号成功示意图,若需要继续写请重复以上步骤
备注:此版本工具,可以写不同的IMEI,也可以写相同的IMEI 开机后查看IMEI号:*#06#
5.如第一次改串的电脑会提示安装驱动,如下图所示:。
- 1、下载文档前请自行甄别文档内容的完整性,平台不提供额外的编辑、内容补充、找答案等附加服务。
- 2、"仅部分预览"的文档,不可在线预览部分如存在完整性等问题,可反馈申请退款(可完整预览的文档不适用该条件!)。
- 3、如文档侵犯您的权益,请联系客服反馈,我们会尽快为您处理(人工客服工作时间:9:00-18:30)。
MTK(SP_MDT_exe)多路工具刷机教程
一、驱动安装来自jxyyxy0930的分享
进入驱动文件夹,找到与自己电脑系统相匹配驱动安装:
路径如下:
【驱动】->【Driver_Auto_Installer】->【WIN_8\WIN7_WINXP】->【DriverInstall.exe】点击自动安装
二、驱动无法安装解决办法(包括win7/win8/win10/XP)
1.查看驱动:
平板电脑关机状态下,用数据线连接电脑USB,电脑设备管理器中,
几秒钟内,会提示黄色感叹号驱动(MT65xx Preloader)如下图,
说明此驱动没安装好。
2.手动安装驱动
在【设备管理器】中,快速右击会提示黄色感叹号驱动(MT65xx Preloader),
点击【更新驱动程序软件】图1,【浏览计算机**】图2,浏览驱动文件(图3),驱动安装成功(图4)
图1 图2
图3
图4
三、刷机设置
1.工具设置
打开工具:【SP_Flash_Tool_exe_Windows_v5.1516.00】->打开主程序【flash_tool.exe】图5
依次点击A【Download Agent】,B【MT65**】,C 如下图显示
图5
2.开始刷机
点击【Download】,平板电脑关机状态下,连接电脑USB数据线,刷机完成后会提示OK窗口。
(工具下面进度条显示100%)刷机完成。
