Evolution设置
lancer evolution使用手册

【文章标题】:Lancer Evolution使用手册:深度解读高性能轿车的操作与维护一、引言在汽车界,Mitsubishi Lancer Evolution(以下简称“Evo”)因其卓越的性能和操控而备受推崇。
作为一款高性能轿车,Evo具有独特的驾驶体验和维护需求。
本文将从深度和广度两个方面,对Evo的使用手册进行全面评估,以帮助读者更好地理解和掌握这款车辆。
二、了解EvoEvo是Mitsubishi汽车公司生产的一款高性能轿车,以其出色的四驱系统和动力性能而闻名。
其悬挂、传动系统和大排气系统等性能零部件均采用顶级材料和技术,以确保车辆在高速行驶和赛道驾驶中具备卓越的稳定性和操控性。
1. Evo的性能参数Evo配备了一台涡轮增压引擎,使其拥有强大的动力输出。
其卓越的悬挂系统和四驱技术,使Evo在各种路况和环境下均能表现出色。
对于Evo的驾驶者来说,了解车辆的性能参数和特点是掌握使用手册的基础。
2. Evo的维护要点由于Evo的高性能特性,其日常维护和保养显得尤为重要。
定期更换机油、检查制动系统、清洗空气滤芯等维护措施,将直接影响车辆的性能和使用寿命。
三、深入讨论Evo的使用手册1. 驾驶操作指南Evo的驾驶操作具有一定的技术性,需要驾驶者熟悉和掌握。
在使用手册中,对于不同驾驶模式下的操作要求、转弯、加速和刹车的技巧,都会有详细的说明和示范。
Evo还可能针对赛道驾驶和普通道路行驶提出不同的操作建议。
2. 故障排除与应急处理在使用手册中,会详细介绍Evo可能出现的故障和问题,以及相应的临时应急处理措施。
发动机过热、胎压异常、变速箱故障等情况下,使用手册会指导驾驶者应对方式,并提供相关的故障代码和解决方法。
3. 维护和保养指引Evo的维护和保养需要严格按照厂家要求和时程进行。
使用手册中会列出不同里程和使用时间点的维护项目和方法,如更换机油、更换火花塞、检查制动系统等。
对于常见零部件的更换和维护,使用手册也会有详细的说明和操作步骤。
slam evo 参数
slam evo 参数SLAM(Simultaneous Localization and Mapping)是一种集成定位与建图的技术,它能够实时地为机器人或无人驾驶车辆提供精确的位置信息并构建环境地图。
SLAM EVO(Evolution)则是SLAM技术的进化版,它在传统SLAM的基础上进行了改进和优化,以提高定位和建图的精度和效率。
SLAM EVO的参数设置是实现高质量SLAM的关键。
在SLAM EVO中,参数的设置直接影响着定位和建图的性能。
下面将介绍一些常用的SLAM EVO参数,并解释它们的作用和影响。
1. 特征提取器参数:特征提取器用于从图像或激光雷达数据中提取特征点,常见的特征提取器有FAST、ORB、SIFT等。
特征提取器的参数设置包括特征点数量、特征点提取速度等。
适当调整特征提取器的参数可以平衡定位的准确性和建图的效率。
2. 特征匹配器参数:特征匹配器用于将不同帧之间的特征点进行匹配,以建立帧间的关联关系。
特征匹配器的参数设置包括匹配距离阈值、匹配算法等。
合适的特征匹配器参数可以提高定位和建图的一致性和稳定性。
3. 运动估计器参数:运动估计器用于估计机器人或车辆的运动轨迹,常见的运动估计器有扩展卡尔曼滤波(EKF)和粒子滤波(PF)等。
运动估计器的参数设置包括滤波器的更新频率、状态估计的精度等。
合理设置运动估计器参数可以提高定位的准确性和稳定性。
4. 地图优化器参数:地图优化器用于优化建立的地图,以提高地图的一致性和精度。
常见的地图优化器有图优化和回环检测等。
地图优化器的参数设置包括图优化的迭代次数、回环检测的阈值等。
合适的地图优化器参数可以提高建图的精度和鲁棒性。
5. 数据关联器参数:数据关联器用于将传感器数据与地图进行关联,以实现定位和建图的闭环。
数据关联器的参数设置包括回环检测的距离阈值、回环检测的匹配算法等。
适当调整数据关联器的参数可以提高定位的一致性和建图的鲁棒性。
3E 中文说明书

5.3.5.1 取消:可以在校准过程中取消来停止最新的校准 5.3.5.2 保存:一旦校准完成按下保存键来保存校准 5.4 设置屏幕 5.4.1 在点击接受键后设置屏将默认以设置选项为准的 IBM(理想体重)
4
5.4.2 选择通气模式和呼吸类型 5.4.3 基本和高级的参数选择 5.4.4 启动呼吸机系统 5.5 主屏幕 5.5.1 自动模式备用 5.6 监视屏幕 5.6.1 被监视的参数和定义 5.7 报警屏幕 5.7.1 报警设置参数 5.7.2 报警事件记录 5.8 设置屏幕 5.8.1 Smart Sigh TM 智能叹息 5.8.2 Smart Nebulizer TM 智能雾化 6. 报警 6.1 报警信号 6.2 报警级别 6.3 报警静音键 6.4 报警记录 6.5 报警定义 6.5.1 高优先级报警 6.5.2 中优先级报警 6.5.3 报警信息说明 7.维护 7.1 校准 7.1.1 系统测试 7.1.2 氧气传感器的校正 7.2 清理和消毒 7.2.1 触摸屏 LCD 显示 7.2.2 呼吸机外部 7.2.3 病人呼吸管路和雾化器 7.2.4 湿化装置 7.2.5 呼气阀 7。3 预防维护 7.3.1 每 250 小时、每年或者根据要求:清理或替换冷却扇过滤器 7.3.2 每年或根据要求:替换气体供给过滤器
21 – 100 % 混合器 或低流速
精确度 (输出): ±(10 %) 整个范围
吸气压力上升时间
20 (快), 10 (中) or 1 (慢)
自动控制
开或关
时间 (在自动控制模式中使用)
3 – 60数
压力值 峰压 (一次呼吸中的最高压力)
AE Turbulent Displace特效详解

AE的Distort滤镜组中有一种滤镜叫做Turbulent Displace,它可以通过使用不规则噪点在图像中生成骚乱的扭曲效果,当需要在层中添加扭曲动作时常常要用到此滤镜。
选择要添加特效的层,选择菜单Effect→Distort→Turbulent Displace,即可调出Turbulent Displace的特效面板。
如附图所示。
下面我们就来介绍一下此特效的具体参数设置:◆Displacement:从这个下拉列表框中可以选择图像扭曲变形的类型,其中,Turbulent Smoother、Bulge Smoother、Twist Smoother分别执行Turbulent、Bulge、Twist类型的扭曲操作,但是它们创建的效果更为平滑,相对的,渲染时间也比较长,Vertical Displacement只在垂直方向上扭曲,Horizontal Displacement只在水平方向上扭曲,Cross Displacement在水平和垂直方向上都扭曲图像。
●Amount:指定层位移的数量,数值越大扭曲效果越明显。
●Size:指定扭曲或位移的大小或半径,参数设置越高,发生扭曲的区域也越大。
◆Offset(Turbulence):利用此选项可以指定不规则图像在视窗中的可见部分,改变不规则图像在视窗中的位置。
◆Complexity:指定骚乱细节的复杂程度,该值越大细节就越丰富,该值越小扭曲越平滑。
◆Evolution:指定骚乱在时间上的变化,该值不是用来设置循环,不同的值的设置扭曲的程度也会不一样。
◆Evolution Options:指定该滤镜Evolution值的渲染方式,对创建一个较短的无缝循环扭曲效果比较有用,Cycle Evolution创建一个扭曲循环,激活此选项可根据Evolution值的设置使动画最后一帧返回到初始状态,Cycle指定一个扭曲循环中Evolution值的次数,Random Seed指定骚乱产生的随机值,设置关键帧动画可以引起不同骚乱图形间的跳动。
NSO evo3S快速指南说明书
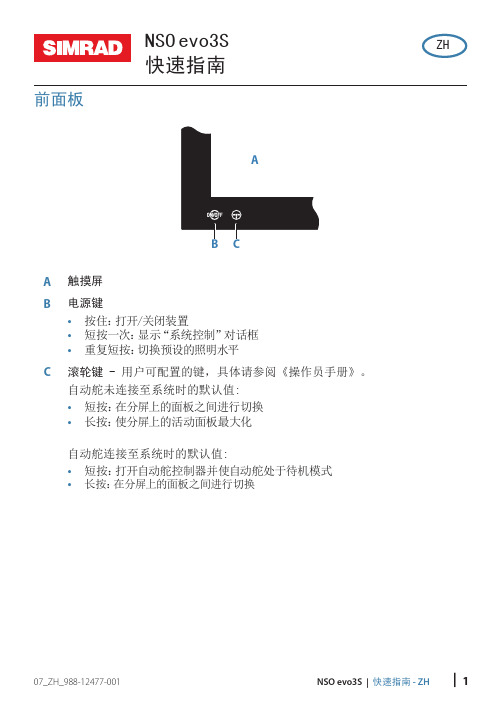
| 1NSO evo3S | 快速指南 - ZHNSO evo3S 快速指南前面板A 触摸屏B 电源键• 按住:打开/关闭装置• 短按一次:显示“系统控制”对话框• 重复短按:切换预设的照明水平C 滚轮键 - 用户可配置的键,具体请参阅《操作员手册》。
自动舵未连接至系统时的默认值:• 短按:在分屏上的面板之间进行切换• 长按:使分屏上的活动面板最大化自动舵连接至系统时的默认值:• 短按:打开自动舵控制器并使自动舵处于待机模式• 长按:在分屏上的面板之间进行切换ZH 07_ZH_988-12477-0012 | NSO evo3S | 快速指南 - ZH主页BGFE A 应用程序按钮B 设置按钮C 工具D 收藏E关闭按钮F 人员落水 (MOB) 按钮G 电源按钮MOB 标记要创建 MOB 标记:按 MOB 按钮。
要停止向 MOB 航点显示导航信息:从菜单取消导航。
“系统控制”对话框用于快速访问系统设置。
通过以下方式激活此对话框:• 按电源键• 从屏幕顶部向下滑动¼注释:“系统控制”对话框的内容视连接设备和活 动面板而定。
| 3NSO evo3S | 快速指南 - ZH应用程序页面DAC A 主页/页面按钮B 应用程序面板C “菜单”按钮D 仪表栏E 控制栏调整面板大小您可在分页中调整面板大小。
1 在“系统控制”对话框中点按“调整分屏设置”按钮以显示调整大小图标2 拖动调整大小图标以设置首选面板大小3点按屏幕保存更改海图• 使用分开或捏拢手势或者使用缩放按钮缩放海图。
•通过平移海图,可朝任意方向移动视图。
• 点按海图项可显示关于此项的信息。
航点创建航点: 在菜单中选择“新航点”选项¼注释:光标未激活时,系统将在船舶位置设置航点。
光标激活时,系统将在所选 光标位置设置航点。
4 | NSO evo3S | 快速指南 - ZH 测深仪• 点按缩放按钮缩放图像。
• 通过平移图像,可以查看测深仪 历史记录。
EVOLUTION 放大器用户手册说明书

CONTENTS EVOLUTION Amplifier User’s Manual - page 1U S E R ’S M A N U A L 2Introduction 2What is included?3Features 3About 2 Ohm operation 4General precautions 4Installation precautions 5 Mounting the amplifier 6 Connecting the amplifier 7Low level input wiring 8High level input wiring 9Power and Speaker wiring 10Troubleshooting 11SpecificationsCongratulations on yourpurchase of aSound Storm LaboratoriesEVOLUTION Amplifier.It has been designed, engineeredand manufactured to bring youthe highest level of performanceand quality, and will afford youyears of listening pleasure.Thank you for making SoundStorm Laboratories your choicefor car audio entertainment!page EV2.200Two Channel High Power Car Audio AmplifierEV4.400Four Channel High Power Car AudioAmplifierIntroductionWith the Sound Storm Laboratories EVOLUTION high power amplifier series, we are introducing two new models, both designed in the USA. This new series includes a 2-channel and a 4-channel amplifier.These EVOLUTION models feature a low pass crossover, and the EV4.400 adds a high pass crossover on CH1/2. Both amps feature both high level and RCA low level inputs on the front panel.Input level can be precisely controlled by variable input gain controls.These features help you integrate the amp into your system regardless of the nature of your input source.What is included?When first unpacking your new amplifier, please check first that the package contains all of the items below. If something is missing, contact the store where you purchased the player.• EVOLUTION amplifier• H igh input cable with connector • Four (4) mounting screwsEVOLUTION Amplifier User’s Manual - page 2Features About 2 Ohm operationYour new EVOLUTION amplifier features the following:• 2 Ohm stable stereo operation with output power increase• Thermal and speaker shortprotection• Soft turn-on circuit• Remote turn-on/turn-off circuit• Variable input gain control• Built-in fixed crossovers:EV2.200: fixed low pass (120Hz)EV4.400: fixed low pass (120Hz) on CH3/4fixed high pass (200Hz) on CH1/2• Nickel-plated RCA low level and high level inputs• LED power and protectionindicators• Black anodized heatsink Your EVOLUTION amplifier has been designed to operate efficiently at loads down to 2 Ohms. This means that you can install four 8 Ohm speakers per channel, when using parallel wiring.Increasing the number of woofers per channel at low frequencies (below 100Hz) produces an acoustic coupling effect. This acoustic coupling effect increases your power output by about 3dB per speaker, or the equivalent of an additional 10W per speaker.When operating at 2 Ohms, the amplifiers will increase their output power by approximately 50%. The current draw will also increase by about the same amount, so be sure you have enough current to run the amplifiers into a 2 Ohm load.If you lack adequate current, your music reproduction will be distorted.EVOLUTION Amplifier User’s Manual - page 3EVOLUTION Amplifier User’s Manual - page 4General precautionsSHOCK HAZARD! Do not open the case of this product. There are dangerous voltages present within the unit. There are no user-serviceable parts within the unit.Before installing and using yournew Sound Storm Laboratoriesamplifier, please become familiarwith all the information containedin this manual.Please keep this manual in a safeplace for future reference.• Do not open or attempt to repairthis unit yourself. Dangerous highvoltages are present which may resultin electric shock. Refer any repairs toa qualified service technician.• T o avoid risk of electronic shock ordamage to the amplifier , do not permitany of this equipment to becomedamp or wet from water or drinks. Ifthis does occur, immediately unplugthe power wires and send the amplifierto your local dealer or service centeras soon as possible.• If there is smoke or any peculiarodor present during use or if there isdamage to any of the componentenclosures, immediately unplug thepower cord and send the amplifier toyour local dealer or service center assoon as possible .Installation precautions Before you drill or cut any holes,investigate your car's layout very carefully. T ake special care when you work near the gas tank, fuel lines,hydraulic lines and electrical wiring.Never operate the amplifier when it is unmounted. Attach all audio system components securely to prevent damage, especially in an accident.Before making or breaking power connections in your system,disconnect the vehicle battery. Confirm that your head unit or other equipment is turned off while connecting the input jacks and speaker terminals.If you need to replace the power fuse,replace it only with a fuse identical to that supplied with the amplifier . Using a fuse of a different type or rating may result in damage to your audio system or your amplifier which is not covered by the manufacturer's warranty.Mounting the amplifier1. Find a suitable location in the vehiclein which to mount the amplifier.2. Make sure there is sufficient aircirculation around the intendedmounting location.3. Mark the location for the mountinghole screws by positioning the amplifierwhere you wish to install it. Use ascribe or mounting screw, insertedthrough each of the amp's mountingholes, to mark the mounting surface.If the mounting surface is carpeted,measure the hole centers and markwith a felt tip pen.4. Drill pilot holes in the mountingsurface for the mounting screws. Placethe amplifier in position, and attachthe amplifier to the mounting surfacesecurely using screws.EVOLUTION Amplifier User’s Manual - page 5EVOLUTION Amplifier User’s Manual - page 67. Insert fuse(s) into the battery fuse holder(s).8. Recheck all connections before powering up the amplifier.9. Set all level controls to minimum position, and set all crossover controls/switches to the desired frequency points.10. Power up the head unit and the amplifier. Then set the volume control on the head unit to about 3/4 volume,and adjust the amplifier’s input level control(s) to just below the level of distortion.11. Further fine tuning of the various controls may be necessary to obtain best results.Before doing any wiring, look throughthis manual and identify the diagramsto follow for power , input and speakerconnections for your particularinstallation. Be sure you understandall the connections before you proceed.1. Connect the power ground terminalto the closest point on the chassis ofthe car. Keep this ground wire to lessthan 39" (100 cm) in length. Use 8gauge (or heavier) wire.2. Connect the remote terminal to theremote output of the head unit using16 gauge (or heavier) wire.3. Connect an empty fuse holder within18" (45 cm) of the car battery, and run8 gauge (or heavier) cable from thisfuse to the amplifier location.4. Check that the fuse holder is empty.Then connect the fuse holder to the"BATT+" connection on the amplifier.5. If multiple amplifiers are being usedin your system, either:• Run a separate pair of cables fromthe battery and a chassis ground pointto each amplifier . Each (+) cable musthave its own inline fuse.-or-• Run a #4 cable from the fuse holderat the battery to a distribution blockat or near the amplifier's location. Thenrun separate cables from the amplifierto this distribution block and toindependent chassis ground points.6. Connect all line inputs and outputs(if used) using high-quality cables.Connect all speakers, following thediagrams in this manual. Be sure toobserve proper polarity to avoid audiophase problems.Connecting the amplifierDo not mistake the input level control for a volume control! It is designed ONLY to match the output level of your audio source to the input level of your amplifier.Do not adjust this input level to maximum unless your input level requires it.Ignoring these instructions will result in an input overload to the amplifier ,and excessive audio distortion. It can also cause the protection circuit to engage.Don't misuse the level control!Low Level Input WiringLow-level (RCA) input wiring is preferred for best audio performance. Always use a high-quality RCA cable for best audio performance.NOTE: Do not connect BOTH the high level and low level inputs from your receiver to your amplifier at the same time!2-Channel AmplifierEV2.2004-Channel AmplifierEV4.400EVOLUTION Amplifier User’s Manual - page 7EVOLUTION Amplifier User’s Manual - page 8High Level Input Wiring, cont.The high level input(s) should only be used when your head unit lacks RCA outputs.If the RCA outputs are not present, connect the speaker outputs from the receiver to the high level input connector of the amplifier. Be sure to observe polarity to avoid audio phase problems.NOTE: Do not connect BOTH the high level and low level inputs from your receiver to your amplifier at the same time!4-Channel AmplifierTo Speaker Terminalsof head unitCH2-CH1+Power and Speaker Wiring2-Channel AmplifierEV2.200EVOLUTION Amplifier User’s Manual - page 9TroubleshootingEVOLUTION Amplifier User’s Manual - page 10If you experience operation or performance problems with this product, compare your installation with the electrical wiring diagram on the previous pages. If problems persist,read the following troubleshooting tips which may help eliminate the problems.Amplifier will not power up.Check to make sure you have a good ground connection.Check that the Remote Input (Turn-On) has at least 3VDC.Check that there is battery power on the (+) terminal.Check that there is at least 12v.Check all fuses, replace if necessary.Make sure that the Protection LED is not illuminated. If it is lit, shut off the amplifier briefly, and then repower it.Protection LED comes on when amplifier is powered up.Check for short circuits on speaker leads.Turn down the volume control on the head unit to prevent overdriving.Remove speaker leads, and reset the amplifier. If the Protection LED still comes on, then the amplifier is faulty and needs servicing.No output.Check that all fuses are OK.Check that amplifier is properly grounded.Check that the Remote Input (Turn-On) has at least 3VDC.Check that the RCA audio cables are plugged into the proper inputs.Check all speaker wiring.Low output.Reset the Level Control.Check the Crossover Control settings.Audio present in only one channel.Check the RCA interconnect cables.Check all speaker wiring.High hiss in the speakers.Disconnect all RCA inputs to the amplifiers. If the hiss disappears, then plug in the component driving the amplifier and unplug its inputs. If the hiss disappears at this point, go on until the faulty/noisy component is found.It is best to set the amplifier's input level control as low as possible. The best subjective signal-to-noise ratio is achieved in this manner. Try to set the head unit as high as possible (without distortion) and the amp input level as low as possible.Squealing noise from speakers.Check for improperly grounded RCA interconnects.Distorted sound.Check that the Input Level Control is set to match the signal level of the head unit. Always try to set the Input Level as low as possible.Check that all crossover frequencies are properly set.Check for short circuits on the speaker leads.Amplifier gets very hot.Check that the minimum speaker impedance for the amp model is correct.Check that there is good air circulation around the amp. In some applications, it may be necessary to add and external cooling fan.Engine noise (static type)This is usually caused by poor quality RCA cables,which can pick up radiated noise. Use only the best quality cables, and route them away from power cables.Engine noise (alternator whine)Check that speaker leads are not shorted to the vehicle chassis.Check that the RCA grounds are not shorted to the vehicle chassis.Check that the head unit is properly grounded.SYMPTOMPOSSIBLE REMEDYSpecificationsEVOLUTION Amplifier User’s Manual - page 11RMS POWERinto 4 OhmsMAX POWERinto 2 OhmsMin. speaker impedance THDFrequency response Signal-to-noise ratio Channel separation Crossoverlow pass high passFuse rating Dimensions:(9" x 1-3/4" x ...)MODELEV2.200Two ChannelCar Audio AmplifierEV4.400Four ChannelCar Audio AmplifierAll specifications subject to change without notice.50W x 2100W X 22 Ohms 0.01%12Hz-22kHz 90dB 60dB 120Hz fixed n/a7.5A x 14-7/8"50W x 4100W X 42 Ohms 0.01%12Hz-22kHz 90dB 60dB120Hz fixed (CH3/4)200Hz fixed (CH1/2)15A x 16-7/8"Notes。
ae里面evo用法

ae里面evo用法
在Adobe After Effects(AE)中,“Evo”可能是指“Evolution”(演化)的缩写,通常与一些效果或属性相关。
以下是一些常见的“Evo”用法:
1.Evolution属性:在AE中,一些效果(例如Fractal
Noise、Turbulent Noise等)具有Evolution属性,它控制着效果的外观如何随时间演变。
你可以使用表达式或手动键帧设置这个属性,以创
建一些动态的、演化的效果。
•通过表达式控制演化:
time * 50; // 这是一个简单的表达式,表示Evolution属性随时间线性变化,速度为50。
2.Evolution模糊:在一些AE插件中,比如Trapcode
Particular,Evolution模糊用于在粒子系统中创建自然的动态效果。
通过调整Evolution属性,你可以使粒子系统看起来像是在某种环境中演
变或运动。
3.Evo Panel(演化面板):一些AE插件和脚本可能提供了一个
名为“Evo”或“Evolution”的面板,用于更方便地控制演化效果。
这
种面板通常提供了更多选项和控件,让你更容易调整和预览演化的效
果。
请注意,具体的用法可能取决于你所使用的插件或效果。
如果“Evo”是特定效果的一部分,建议查阅相关的插件文档或效果文档,以获取更详细的信息和用法示例。
evo评测工具修改背景颜色和线条等参数

这时会显示所有参数,并且有解释。 2.修改图的背景为白色:
1 evo_config set plot_seaborn_style whitegrid 2 其中whitegrid可以替换成别的
3.修改线条颜色: 有6个序列可以替换:bright、deep6、colorblind、pastel、dark、muted
1 evo_config set plot_seaborn_palette bright
4.修改线条粗细程度:
1 evo_config set plot_linewidth 1.5
当然所有参数都可以设置的,自己载但未经作者同意必须保留此段声明且在文章页面明显位置给出原文连接否则保留追究法律责任的权利
evo评 测 工 具 修 改 背 景 颜 色 和 线 条 等 参 数
做SLAM的 最后做对比都会用到evo这个工具,但是做出来的图背景是蓝灰的,线条颜色差别也很近似。必须做下修改: 1.在终端打开到evo所在目录,:
- 1、下载文档前请自行甄别文档内容的完整性,平台不提供额外的编辑、内容补充、找答案等附加服务。
- 2、"仅部分预览"的文档,不可在线预览部分如存在完整性等问题,可反馈申请退款(可完整预览的文档不适用该条件!)。
- 3、如文档侵犯您的权益,请联系客服反馈,我们会尽快为您处理(人工客服工作时间:9:00-18:30)。
首先简单说明一下设置ห้องสมุดไป่ตู้程,如下列图: P0:
P1:
P2:
P3:
P4:
P5:
P6:
介绍完设置流程后,我们开始各种邮箱在Evolution中的设置。以下的设置我都会用P1、P2等来对应上述的
每张图片,以及设置的内容。 1.Gmail P1:请求信息:
(2)使用你的邮箱和密码注册然后sign in,按照提示(选择你感兴趣的内容,其它的选项可根据自己的需 要来选择,然后按“完成”按钮)勾选,点击“完成”后在出现的“选项”页面“步骤1-选择”中选择“网上阅读邮件 和POP功能”,其它选项可根据需要选择,最后按“提交”按钮进人“SMTP配置”页面。此时“网上直投”注册成 功,系统会在此页面告诉你的“服务器设置”,如下图:
用户名:username 勾选“记住密码” P5:同Gmail P6:设置成功
以上三种邮箱均由本人尝试并且成功,下面介绍的126mail和163mail未经本人验证,只提供参考。另外注 意:06年11月之后的126邮箱在不开通收费服务的情况下,pop是关闭的,163邮箱同理——“目前免费邮箱 新注册的用户不支持直接开通smtp、pop3的服务,之前已开通客户端功能的老用户不受影响。如果需要使 用该功能,您可开通增值服务邮箱伴侣或随身邮 ,即可同时获取poo功能。或者您可以选择 VIP邮箱。另外 我们也会陆续通过活动、“邮箱会员”等方式向有需要的用户提供该项服务,敬请关注。感谢您使用我们的产 品!” 言归正传,下面继续: 4.126mail P1:同Gmail的P1,只是把邮件地址改为雅虎邮箱的地址username@ p2:服务器类型:选择POP 配置: 服务器: 用户名:username 安全: 使用安全连接:选择“不加密” 认证类型: 选择“密码” 勾选“记住密码” P3:同Gmail,略 P4:服务器类型:选择SMTP 配置: 服务器: 勾选“服务器需要认证“ 安全: 使用安全连接:选择“不加密” 身份验证: 类型选择:PLAIN 用户名:username 勾选“记住密码” P5:同Gmail P6:设置成功
全名:(你可以填写你喜欢的名字,随便都可以) 电子邮件地址:username@
可选信息: 如果你想gmail成为默认账户,你就打勾吧。
回复到:(我没有填写,你可以根据自己的需要填写)
组织:(同上) p2:服务器类型:选择POP
配置: 服务器: 用户名:你的gmail用户名(如username@则填上username,不过你也可以把电子邮件整个写上,
配置: 服务器: 用户名:username
安全: 使用安全连接:选择“SSL加密”
认证类型:
选择“密码”
勾选“记住密码” P3:同Gmail,略 P4:服务器类型:选择SMTP
配置: 服务器:
勾选“服务器需要认证“
安全: 使用安全连接:选择“SSL加密”
服务器: 勾选“服务器需要认证“ 安全: 使用安全连接:选择“不加密” 身份验证: 类型选择:PLAIN 用户名:username 勾选“记住密码” P5:同Gmail P6:设置成功 设置后的我的Evolution,如图:
最后谢谢观看!
然后我们来设置Evolution: P1:同Gmail的P1,只是把邮件地址改为雅虎邮箱的地址username@ p2:服务器类型:选择IMAP 配置: 服务器: 用户名:username 安全: 使用安全连接:选择“SSL加密” 认证类型: 选择“密码” 勾选“记住密码” P3:同Gmail,略 P4:服务器类型:选择SMTP 配置: 服务器: 勾选“服务器需要认证“ 安全: 使用安全连接:选择“SSL加密” 身份验证: 类型选择:LOGIN
5.163mail P1:同Gmail的P1,只是把邮件地址改为雅虎邮箱的地址username@ p2:服务器类型:选择POP 配置: 服务器: 用户名:username 安全: 使用安全连接:选择“不加密” 认证类型: 选择“密码” 勾选“记住密码” P3:同Gmail,略 P4:服务器类型:选择SMTP 配置:
不影响)
安全: 使用安全连接:选择“SSL加密” 认证类型: 选择“密码” 勾选“记住密码” P3:这里根据自己的需要选择就是了,具体因为情况不同,我这里就不详细说了。 P4:服务器类型:选择SMTP 配置: 服务器: 勾选“服务器需要认证“ 安全: 使用安全连接:选择“SSL加密” 身份验证: 类型选择:LOGIN 用户名:username 勾选“记住密码” P5:输入一个你喜欢的名字,作为该账户的一个描述性名字 P6:设置成功 2.Ymail 要想使用Evolution来收发Yahoo!mail邮件,必须先执行以下步骤: (1)进入到YAHOO“网上直投”页面:/config/ set_popfwd?.src=ym&.done=/ym/Options?YY=22797 如下图(页面可能有改变,不过关键的都应该差不多):
身份验证:
类型选择:LOGIN 用户名:username 勾选“记住密码” P5:同Gmail P6:设置成功 3.Qmail 设置Evolution前,我们先来开启QQ邮箱的IMAP服务功 能。登录进入QQ邮箱,在“设置”→“账户”下找到 “POP3/IMAP/SMTP服务”项,点击“开启IMAP/SMTP服务”项。如图:
然后就可以获取: 接收邮件(POP)服务器: 发送邮件(SMTP)服务器: 接下来我们就可以配置Evolution了: P1:同Gmail的P1,只是把邮件地址改为雅虎邮箱的地址username@ P2:服务器类型:选择POP