WinDLX教程(中文)
WINALIGN教程(中文)

目录WinAlign之前的准备 (3)新建WinAlign匹配项目 (5)匹配文件对 (12)设定结构识别层 (21)导出匹配结果 (30)Lesson1WinAlign 之前的准备这一章,讲解WinAlign 匹配开始之前的准备。
1准备好要进行WinAlign 的原文和译文文件。
这一章,使用TRADOS 安装目录中包含的示例文件中的英文文件Eng01.rtf 和我们译好的中文文件Scn01.rtf 。
2在Windows 的资源浏览器中新建一个WinAlign 匹配项目用的文件夹。
原文和译文。
Lesson 2新建WinAlign 匹配项目这一章,学习如何新建WinAlign 项目。
1 起动WinAlign2从“File ”菜单选择“New Project ”。
Trailing Whitespaces为断句符号后续的空格数,由于中文所有标点符号后都没有空格,因此对应于中文的所有断句规则中Trailing Whitespaces框前的数字需改为“0”。
“Save Project as”。
名称和保存位置,单击“Save”。
Lesson 3匹配文件对这一章,学习在匹配项目中添加的文件对的匹配方法。
1起动WinAlign ,从“File ”菜单中选择“Open Project ”打开在Lesson 2中新建的项目。
2 选择要匹配的文件对,从“Alignment ”菜单中选择“Align File Pair(s)”。
或者,在文件对上点右键,选择“Align File Pair(s)”。
3 文件对匹配后,经过WinAlign 处理的结果显示在编辑窗口中。
4无法显示匹配编辑器时,双击文件对即可。
5 WinAlign 中匹配的翻译单元以虚线连接。
对于连线不对而要修改的话,需断开连线。
要断开连线,在原文的单元格或译文单元格的绿色图标上点右键,选择“Disconnect ”。
6 要断开多个单元格的连线,选中多个单元格,点右键,选择“Disconnect”中的“Selected Units”。
曲线数字化软件windig使用方法简单介绍
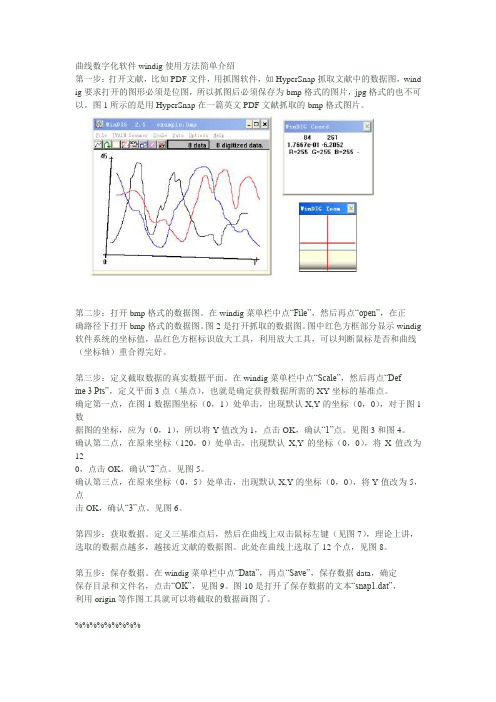
曲线数字化软件windig使用方法简单介绍第一步:打开文献,比如PDF文件,用抓图软件,如HyperSnap抓取文献中的数据图,wind ig要求打开的图形必须是位图,所以抓图后必须保存为bmp格式的图片,jpg格式的也不可以。
图1所示的是用HyperSnap在一篇英文PDF文献抓取的bmp格式图片。
第二步:打开bmp格式的数据图。
在windig菜单栏中点“File”,然后再点“open”,在正确路径下打开bmp格式的数据图。
图2是打开抓取的数据图。
图中红色方框部分显示windig 软件系统的坐标值,品红色方框标识放大工具,利用放大工具,可以判断鼠标是否和曲线(坐标轴)重合得完好。
第三步:定义截取数据的真实数据平面。
在windig菜单栏中点“Scale”,然后再点“Define 3 Pts”,定义平面3点(基点),也就是确定获得数据所需的XY坐标的基准点。
确定第一点,在图1数据图坐标(0,1)处单击,出现默认X,Y的坐标(0,0),对于图1数据图的坐标,应为(0,1),所以将Y值改为1,点击OK,确认“1”点。
见图3和图4。
确认第二点,在原来坐标(120,0)处单击,出现默认X,Y的坐标(0,0),将X值改为120,点击OK,确认“2”点。
见图5。
确认第三点,在原来坐标(0,5)处单击,出现默认X,Y的坐标(0,0),将Y值改为5,点击OK,确认“3”点。
见图6。
第四步:获取数据。
定义三基准点后,然后在曲线上双击鼠标左键(见图7),理论上讲,选取的数据点越多,越接近文献的数据图。
此处在曲线上选取了12个点,见图8。
第五步:保存数据。
在windig菜单栏中点“Data”,再点“Save”,保存数据data,确定保存目录和文件名,点击“OK”,见图9。
图10是打开了保存数据的文本“snap1.dat”,利用origin等作图工具就可以将截取的数据画图了。
%%%%%%%%%这里只是简单说明了获取单个位置的数据,要是整条曲线取值,才有更好的意思,这个软件是可以实现的,大家可以再探索一下。
excel中wind插件使用方法

excel中wind插件使用方法Wind插件是一款Excel的数据可视化插件,能够帮助用户更直观地展示Excel中的数据。
下面是Wind插件的使用方法(1200字以上):- 打开Excel,点击“文件”,然后选择“选项”。
-在选项窗口中,选择“加载项”选项,然后点击“前往”按钮。
- 在加载项窗口中,点击“Excel加载项”下的“转到”按钮。
- 在Excel加载项管理窗口中,点击“浏览”按钮,选择Wind插件的安装文件(通常是一个 .xlam 文件)。
- 安装完成后,关闭所有窗口,重启Excel。
2.插件的基本操作:- 在Excel中,点击Wind插件的图标,打开Wind插件的主窗口。
- 在Wind插件的主窗口中,可以进行数据选择、图表设置等操作。
-在主窗口的左侧,选择要可视化的数据范围。
可以选择单个单元格、多个单元格、整列或整个表格。
- 在主窗口的右侧,选择要创建的图表类型。
Wind插件提供了多种常见的图表类型,如柱状图、折线图、饼图等。
- 选择完数据范围和图表类型后,点击“确定”按钮,即可创建相应的图表。
图表会自动添加到Excel的当前工作表中。
3.插件高级功能:- Wind插件提供了一些高级功能,以便用户自定义图表的样式和属性。
-可以通过拖动图表的边框来调整图表的大小和位置。
-在主窗口的右上角有一个设置按钮,点击可以进入设置界面。
在设置界面中,可以自定义图表的默认样式和属性。
4.数据更新和刷新:- 如果Excel中的数据发生变化,可以通过Wind插件提供的刷新功能来更新图表。
- 在Excel中修改或添加数据后,点击Wind插件的刷新按钮,即可更新所有图表的数据。
- 如果只想刷新特定的图表,可以选择该图表所在的工作表,然后点击Wind插件的刷新按钮。
5.图表保存和导出:- Wind插件允许用户将图表保存为图片或PDF文件。
- 在图表创建完成后,选择该图表所在的工作表,然后点击Wind插件的保存按钮。
windlx使用详细教程解读
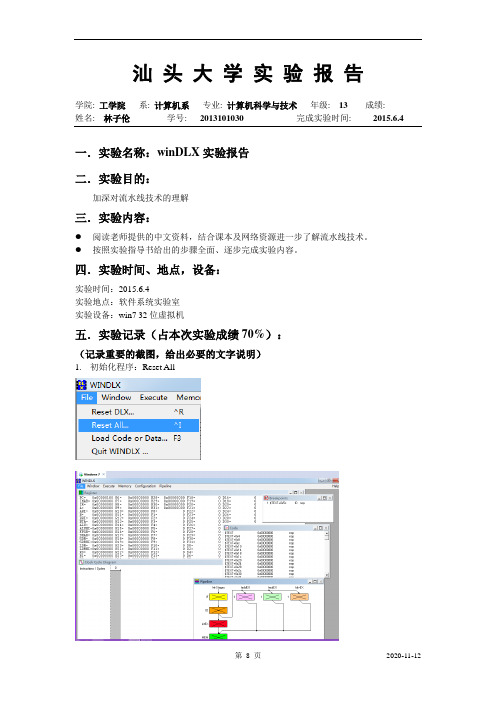
汕头大学实验报告学院: 工学院系: 计算机系专业: 计算机科学与技术年级:13 成绩:姓名: 林子伦学号: 2013101030 完成实验时间: 2015.6.4一.实验名称:winDLX实验报告二.实验目的:加深对流水线技术的理解三.实验内容:●阅读老师提供的中文资料,结合课本及网络资源进一步了解流水线技术。
●按照实验指导书给出的步骤全面、逐步完成实验内容。
四.实验时间、地点,设备:实验时间:2015.6.4实验地点:软件系统实验室实验设备:win7 32位虚拟机五.实验记录(占本次实验成绩70%):(记录重要的截图,给出必要的文字说明)1.初始化程序:Reset All2.载入程序:Load Code or Data…双击fact.s、input.s,把他们加载进去,然后点loadCode界面会出现你的代码段,register里面则是寄存器的数据,可以看到一开始的PC 会自动加载到程序的开始位置0x000001003.按F7单步执行代码(F5为持续执行,F8为多步执行,F4位指定执行)可以看到代码段(code)执行第一条指令标记为黄色,此指令才时空图中(clock cycle diagram)看到第一条指令被编译(IF),机器模块(pipeline)IF操作的是指令add r1,r0,0x1000寄存器(register)中PC自动累加到了0x00000104,4.继续按F7运行程序通过看代码发现第二条指令为jal跳转指令第二条指令为橙色,进入了取址(ID)阶段,而IF段顺序执行了读取第三条指令,进行编译。
再按一次F7,这是执行了第二条指令(跳转指令),程序来到了0x00000144的地方,IF 段重新读取此指令,而原来进行到一半的第三条指令则被封存起来,aborted表示暂停的意思。
5.按F5运行,中间会出现一个窗口要输入数据这里我们输入20.6.点击Display DLX-I/O…观看结果可以看到结果是2.4329+18而看register窗口可以发现这个数字是被保存在了D2中。
Windsim软件操作教程

Windsim软件操作教程一、软件介绍Windsim软件是由挪威Windsim公司研发,率先将CFD(计算流体力学)技术应用于风电机组优化布局中,是目前全球最专业、功能最强大的一款CFD风资源评估软件,也是目前全球风电行业市场占有率最大的CFD风资源评估软件。
WindSim软件综合先进的计算流体力学、边界层气象学、地理信息学、三维可视化技术和风电产业技术,通过灵活方便的模型网格与边界条件设置,利用稳健的商业化求解器迭代求解双方程湍流模型,全面检验模拟结果并自动交互检验测风结果,以现场测量结合气象模拟成果获得风电场气候条件,形成精细化的风电场及周边区域的风能资源数字化分布,以作为风电场机组选型和微观选址的基础依据。
我们希望风电场的发电量最大而载荷最小,但是这两者可能是相互冲突的,一个风机发电量最大的位置也可能是载荷最大的位置。
风电场运行发电,必须考量风电机组之间的尾流影响,详细分析每个机位点处的风能资源特性和地形复杂性指数,充分考虑各种不确定性因素形成可靠的发电量评估。
工程文件准备1、地形文件地形文件包括高程文件和粗糙度文件,高程文件制作结合《风能事业部风电技术部地形图检查拼接作业指导书》并3D网格化处理。
粗糙度文件采用GLC30粗糙度库文件,高程文件和粗糙度文件在globalmapper中处理完毕后导出为.GWS文件。
2、测风数据文件参见《》3、功率曲线文件利用windsim自带PWS小工具,制作相应功率曲线,保存完之后放入安装windsim目录下的Power Curve文件夹中,到时候它会自动读取导入。
4、对象文件按ows文件模板修改,更改sitename,x,y坐标位置,轮毂高度,叶轮直径及所用功率曲线名称即可。
二、各模块参数设置Windsim共有六个模块(地形、风场、对象、结果、风资源、发电量),其中地形、风场和对象模块需按顺序运行完毕后,才可进行后续操作。
结果、风资源和发电量模型没有强关联,可根据需要分别运行。
WinDLX帮助
WinDLX V1.2系统要求和安装WINDLX will run on IBM-AT-compatible PCs with 80286, 80386 and 80486-processors with at least 1MB main memory and VGA graphics display, provided that the operating systemMS-DOS 3.3 (or a newer version) with the graphical interface MS-Windows 3.0 (standard- or enhanced mode) are installed. A mouse is not required but very useful.The installation of WINDLX is very simple. You only copy the files WINDLX.EXE and WINDLX.HLP from the floppy to an arbitrary directory on the harddisk (perferably C:\WINDLX). WINDLX can also be started directly from the floppy, accepting longer response times during loading and execution.WINDLX.EXE runs under MS-Windows like any other Windows application.WINDLX的一般概念In the Main window (also called Frame window) are several iconized Child windows, which - if redisplayed - display different pieces of information:+ The Register Window (Register contents)+ The Code Window (DLX-Instructions in Memory)+ The Pipeline Window (Pipeline stages with contained instructions)+ The Clock Cycle Diagram (What is done in which cycle in which stage?)+ The Statistics Window (Statistics about the execution of instructions)+ The Breakpoint Window (Set/Delete/View Breakpoints)+ Up to 10 Memory Windows (Display Memory contents)The size of the Child windows is limited by the size of the Frame window. They can't be closed (The only exception is the dynamically created Memory window). Before using WINDLX, you should become familiar with windows and how to operate within them.Across the top of the Frame window and below the title bar is a list of menu titles, the Main menu. The second rightmost title represents the currently active Child window. Each Child window itself has only a system menu, with options for resizing, moving, closing or iconizing the window.主菜单The Frame menu has following options available, which on their part also have submenus: + File+ Window+ Execution+ Memory+ Configuration+ HelpFurthermore, the second rightmost title is the currently active Childwindow.FileFollowing options are available:+ Reset DLX+ Reset All+ Load Code or Data+ Quit WINDLXReset DLXSelecting this option performs the following operations:+ The pipeline will be cleared.+ The statistics will be reset.+ All registers will be initialized (PC with the value $TEXT, all other with zero).+ The whole history information will be deleted.+ All opened files will be closed.+ DLX-I/O-redirection will be canceled.+ The content of the DLX-I/O-Window will be deleted.The content of memory and all defined symbols remain unchanged.Reset AllThis option will perform all the activities of "Reset DLX" In addition, the memory will be initialized with zero and the symbols will be deleted. The symbols $TEXT and $DATA remain unchanged (saved in configurations).Load Code or DataIf you select this option, a dialog box will appear. You can select an arbitrary number ofDLX-source code modules in files with the extension ".S". If you confirm the selection with the Load-push button, all selected modules will be assembled and the code is written to theDLX-Memory. error-reports will appear in a separate dialog box and the data written to the memory are invalid. After a successful loading, you have the possibility to reset theDLX-Processor via dialog box.If you have selected the wrong file or change your mind, select its name and press the Delete-Button. If you don't select any files, no files will be loaded.The possibility to load multiple modules at the same time allows to define global symbols that can be used in multiple modules. Furthermore, it is possible to load modules regardless of their order.退出WINDLXIf you select this option, you will be asked to save the current configuration, confirm the Quit or cancel it.WindowThe Window-Submenu is the same as for all similar MS-Windows applications. There are several functions to automatically rearrange or select the Child windows:+ Cascade+ Tile+ Arrange Icons+ (Child window in Window menu)CascadeThis option displays all non-iconized Child windows so they all fit on the display at one time. TileThis option displays all non-iconized Child windows so that each succeeding window overlaps the previous, leaving the upper left hand corner showing.Arrange IconsAll iconized Child windows will be automatically arranged across the bottom of the Frame window.Child Window Name in Window MenuIn the Window-Submenu exists also a list of all Child windows, which makes it possible to select them via menu (not only via double-clicking of the mouse button).ExecutionIn this menu are several commands to execute instructions and display the I/O-Window: + Single Cycle+ Multiple Cycles+ Run+ Run to...+ Display DLX-I/OSingle CycleA single cycle of the DLX processor will be simulated. The DLX-I/O-Window will only be displayed, when an In- or Ouput has occured in this cycle. If an error happens or an undefined trap during the simulation or a breakpoint is reached, a message window displays with detailed information about the state and the instruction causing the message. Multiple CyclesAfter selecting this option, you can fix the number of cycles to be simulated in a dialog window. The last fixed value is the default value. Similar to the Run or Run to... options, theDLX-I/O-Window is displayed and you can abort the simulation via button every time.The simulation will be aborted, when+ a fixed number of cycles is simulated,+ the user has pushed the Cancel button in the DLX-I/O-Window,+ an error occured,+ a breakpoint is reached,+ an undefined trap is to process.For the last three cases, a message window is displayed.RunIf you select this option, the simulation of the DLX instructions continues until+ You stop the simulation via "Cancel"-button in the DLX-I/O-Window,+ An error occurs,+ A breakpoint is reached,+ An undefined trap is to be processed.In all these cases, a message window is displayed.Run toSimilar to Run, except the possibility to set a temporary brakpoint in a dialog box. This temporary breakpoint is valid only for this run of the simulation, but it is saved as the default for the next time you activate this option.Display DLX-I/OActivating this menu option displays the DLX-I/O-Window when the simulation is not running. All the options (e.g. redirecting the standard I/O etc.) can be performed.MemoryThere are options to create Memory-Windows, change the content of memory and manipulate the symbols:+ Display+ Change+ SymbolsDisplayA new Memory window is created, displaying memory contents in various types and formats. After selecting this option, a dialog box is displayed. You can select the type, the format and the beginning address of the memory section to be displayed:Type FormatByte (8-Bit) hexadecimal, decimal or charactersHalfword (16-Bit) hexadecimal or decimalWord (32-Bit) hexadecimal or decimalsingle Floating point (32-Bit) decimaldouble Floating point (64-Bit) decimalThe address can be an arbitrary integer expression, also containing operators and symbols. The selected options are saved and used as defaults for the next time you activate this menu option.ChangeSelecting this option lets you change or view memory contents at a given address. You can select the type of data to be changed or viewed (Byte, Halfword, Word, single- ordouble-precision Floatingpoints, String or instruction).After entering an expression for the selected type and pressing the "Set"-Button, the new value is written to the memory address specified in the address area.Pressing the "Next"-Button displays the content of the next memory address immediately following the specified address. The address is incremented by the number of bytes representing the selected type. Pressing the "Previous"-Button, you can display the contents of the previous memory cells in the same way.The specified values are saved as defaults for the next time when this option is activated. SymbolsThis option lets you manipulate all symbols via a dialog window.In the symbol list, all symbols are displayed, sorted by name or value. Following activities are provided:+ Define new, global symbols: Enter the name and the value of the symbol (any integer expression) and press the "New"-Button.+ Change the value of an existing symbol: Select the symbol in the list box, change the value and press the "Change"-Button.+ Delete an existing symbol: Select the symbol in the listbox and press the"Delete"-Button.You can exit the window by pressing "OK".ConfigurationVirtually all features of WinDLX can be customized to your personal tastes:+ Size of the WINDLX-Frame window+ State, size and position of all the Child windows+ Default values for most of the dialog windows+ the configuration of the floating point stages+ the DLX-memory size+ Use symbolic adresses? (Yes/No)+ Absolute cycle count? (Yes/No)+ Enable forwarding? (Yes/No)+ the symbols $TEXT and $DATA (Start address of code- and data)+ all settings in the Child windowsThe configuration of WinDLX is saved into a file and can be loaded every time. This file must have the extension ".WDC". The file "WINDLX.WDC" is used as the default configuration file.Saving the configuration can be performed at the end of a session (you will be prompted to save the configuration) or by activating the "Save" option in the configuration menu.Commands on the configuration menu lets you customize the features that have general effects for the simulation:+ Floating point stages+ Memory size+ Symbolic Addresses+ Absolute Cycle Count+ Enable Forwarding+ Load+ SaveFloating Point StagesThe number of flooatingpoint units (1..8) and their delays (1..50 cycles) can be specified. Changing these values resets the DLX-processor automatically!Memory sizeThis option lets you modify the size of the memory available to the DLX processor. Theoretically, the memory size can be between 512 bytes (0x200) and 16 Megabytes(0x1000000). In practice, the memory size is constrained by memory management and the configuration of MS-Windows.Symbolic AddressesIf you enable this option, the addresses are displayed as an expression: "symbol + offset". Otherwise, the addresses are represented as hexadecimal values.Absolute Cycle CountEnabling this option, the clock cycles are counted absolutely, beginning with the cycle 0 (resetting the processor or the statistics). Otherwise, the clock cycles are counted relatively, i.e. the current cycle is the cycle 0 and the previous cycles are labeled with -1, -2, etc. Enable ForwardingWith this option you can enable or disable the Forwarding-Mechanism.LoadWhen selecting this option, a list box is displayed and you can select a configuration file. The WinDLX will be initialized with the new configuration values. The contents of the memory and the symbols remain unchanged.SaveA dialog box is displayed and the current configuration can be saved in a file with the extension ".WDC". The default value is "WINDLX.WDC". When you start WinDLX, the configuration saved in WINDLX.WDC is loaded autmatically.HelpThe Help menu contains commands that allow you to access WinDLX's help system and get general information about WinDLX. You can get context sensitive help information at any time pressing F1.The help-system contains the user manual and a description of the DLX processor and its instruction set and the DLX assembly language.The RegisterwindowThe current values of all registers are displayed in this window. It is possible to change the contents of the registers.The Register MenuThere are several options in this menu to fix the type of representing the contents and the type of registers to be displayed:+ Hexadecimal+ Decimal+ Display Special Registers+ Display Integer Registers+ Display Floatingpoint Registers+ Display Doubleprecision-Floatingpoints+ Display All RegistersChange the contents of RegistersYou can change the contents of all GPRs, FPRs, the PC and the FPSR, but not the contents of the special (Hardware-)registers. You can select a register doubleclicking its name with the mouse. A dialog box is displayed, allowing you to change the content of the selected register. Legal values for integer registers are integer expressions and for floating point registers constant values.HexadecimalIf you select this menu option, the contents of integer registers are represented hexadecimally. Floating point registers are always represented decimally.DecimalThe contents of the integer registers are displayed decimally. Floatingpoint registers are always represented decimalyl.Display Special RegistersThe following registers are the special registers: PC, IMAR, IR, A, AHI, B, BHI, BTA, ALU, ALUHI, FPSR, DMAR, SDR, SDRHI, LDR und LDRHI. See the processor documentation for more information about these registers.Display Integer RegistersIf this option is activated, the registers R0 to R31 (GPRs) and their contents are displayed. Display Floatingpoint RegistersIf this option is activated, the single precision floatingpoint registers F0 to F31 are displayed in the Register window.Display Double precision FloatingpointsIf this option is activated, the double-precision floatingpoint contents of the floating point registers (F0&F1=D0, F2&F3=D2,...) are diaplyed in the register window.Display All RegistersIf you activate this option, all registers are displayed in the Register window.The Code WindowThe DLX instructions loaded in the memory and their addresses are diplayed (hexadecimal and disassembled) in the Code window. Further, the set breakpoints for each instruction are marked with Bxx, where xx is the type of the breakpoint. If an instruction is currently executing in a pipeline stage, the characteristic colour of the stage is used as background colour for the instruction and it is also labled adequately.You can scroll up/down the memory using the arrows or the page keys. After executing one or more steps of a DLX code, the instructions executed at last are displayed.You can get detailed information about an instruction being in the pipeline or set /delete breakpoints selecting the instruction with the arrows or page keys and using the TAB-Key (You can also click the mouse button once). If you press the ENTER key (or doubleclicking the muse button), the Instruction-Information-Window is displayed. There are menu commands to set or delete breakpoints.The Code Menu:This menu contains the following commands:+ From Address+ Set Breakpoint+ Delete BreakpointFrom AddressThe beginning address of the code to be displayed in the Code window can be entered via a dialog box. The address specification can be any integer expression (operators and symbols are allowed).Set BreakpointIf you activate this command, a dialog box is displayed to set a breakpoint for a selected instruction in the Code window. See Breakpoint window for more details.Delete BreakpointThe breakpoint for a selected instruction in the Code window will be deleted.The Pipeline WindowThe Structure of the DLX-Pipeline will be displayed in this Child window. If the window is large enough, additional information about the instructions currently being executed in the pipeline will be displayed.Each stage is represented by different colours, characterizing this stage through all windows.After pressing TAB, you can select a stage with the arrow keys. Pressing ENTER (or doubleclicking the stage) allows you to get detailed information about the instruction in the stage via the Instruction-Information-Window.The Pipeline Menu: Display Floating point stagesDisplay Floating Point StagesIf this option is activated, the floating point stages are displayed in the Pipeline window.The Clock Cycle DiagramIn this Child window is displayed, what is done in which cycle and in which stage. Each column represents the state of the pipeline in a given clock cycle. The current state of the pipeline (the last column) is underlayed with gray.You can select an instruction the same way as in the Code window and get more information about it via the Instruction-Information-Window.Furthermore, details about the stalls and executed forwardings (if enabled) are displayed: Stalls and Forwarding:Stalls are represented in boxes, that are underlayed with a colour corresponding tothe stalled stage. The contents of the box give more information about the type of the stall:"R-Stall" - RAW-Stall. A dark red arrow shows (if enabled) the instruction that causes the stall."T-Stall" - Trap-Stall. This stall occurs only by a Trap-Instruction . A Trapinstruction remains in the IF-stage, until no other instructions are in thepipeline."W-Stall" - WAW-Stalls. A dark red arrow shows (if enabled) the instruction that causes the stall."S-Stall" - structural Stall, There are not enough resources to serving theinstruction."Stall" - If a Floatingpoint instruction is in MEM-stage, the next instruction will be stalled in the intEX-stage, labeled with "Stall".If "Display Forwarding" is enabled, forwarding is represented with a green arrow,showing the soucre and the destination of forwarding.See also Instruction execution for more details.The Clock Cycle Diagram Menu:The clock cycle diagram menu contains the following options:+ Display Forwarding+ Display Cause of Stalls+ Delete History+ Set History LengthDisplay ForwardingIf this option is selected, the source and the destination of forwarding is marked with a green arrow in the clock cycle diagram.Display Cause of StallsIf this option is selected, the instruction that causes a RAW-Stall ("R-Stall") or WAW-Stalls ("W-Stall") is marked with an arrow.Delete HistoryIf you activate this command, the history will be deleted. The terminated instructions can not be displayed anymore in the clock cycle diagram.Set History LengthThe History contains information about terminated instructions. You can specify the length of history (it must be between 0 and 100). A history length of zero means that only the instructions currently being executed in the pipeline are displayed in the clock cycle diagram. The Statistics WindowStatistics about the simulation are displayed in the Statistics window. This data is arranged in several groups. You can select the groups to be displayed in the Statistics window. The group "Total" will always be displayed and contains:+ Total number of cycles executed.+ The number of instructions, which have already passed the ID-stage.+ The number of instructions currently being executed in the pipeline (if Detail info (see Statistic Menu) is set).The Statistic Menu:This menu contains several options to control the display of information in the Statistics window. Further, you can reset the statistics:+ Display:- Hardware- Stalls- Conditional Branches- Load/Store-Instructions- Floating point stages instructions- Traps- All+ Detail info+ ResetDisplay HardwareThe following pieces of information are displayed about the hardware configuration of DLX: + Size of memory (bytes).+ Number and delays of floating point units faddEX, fmulEX und fdivEX.+ Status of Forwarding-Mechanism (enabled or not).The option Detail info makes no sense to this group!Display StallsIf this option is activated, the following statistics are displayed (absolute and relative): + Number of the RAW-Stalls. If forwarding is enabled and the option Detail info is activated, the number of stalls will be splitted in:- Number of RAW-Stalls with a load instruction causing the stall.- Number of RAW-Stalls with a branch/jump instruction causing the stall.- Number of RAW-Stalls with a floatingpoint instruction causing the stall.+ Number of the WAW-Stalls+ Number of the structural stalls before floating point stages-instructions+ Number of the Control-Stalls (= number of taken conditional branches).+ Number of stalls with a trap instruction causing the stall.See Instruction execution for more details about stalls.Display Conditional BranchesFollowing informations about conditional branches are displayed (absolute and relative): + Number of conditional branches. If the option Detailinfo is activated, the information is splitted:- Number of taken branches- Number of not taken branchesDisplay Load/Store-InstructionsIf this option is activated, following pieces of information are displayed:+ Number of executed loads and stores. If the option Detail info is activated, this information will be splitted:- Number of load instructions- Number of store instructionsDisplay Floating Point Stage InstructionsIf this option is activated, you can get information about the number of instructions executedusing the floating point stages (faddEX, fmulEX oder fdivEX):+ Total number of these instructions. Is the option Detail info activated, theinformation will be splitted:- Number of instructions that passed the faddEX-Stage.- Number of instructions that passed the fmulEX-Stage.- Number of instructions that passed the fdivEX-Stage.Display TrapsThe total number of executed traps is displayed.Display AllAll groups will be displayed.Detail InfoThis option allows you to get detailed information about some groups in the Statistics window. ResetThe statistics will be reset. The last simulated clock cycle will be the cycle 0. The history and the pipeline contents will remain unchanged. Statistics will be reset too after a processor reset.The Breakpoint WindowIn the Breakpoint window, you can view, set, change or delete breakpoints. It is possible to set up to 20 breakpoints. You can also set /delete breakpoints via the Code window.The Breakpoint Menu:This menu allows you to manipulate breakpoints. To do this, you must first select a breakpoint using arrow keys or the mouse. Doubleclicking a breakpoint allows to change the breakpoint. The Breakpoint menu contains the following commands:+ Set+ Delete+ Delete All+ ChangeSetAfter activating this command, a dialog box is displayed, that allows you to set a breakpoint specifying:+ the address can be an arbitrary integer expression (including operators and symbols). The adress must be a multiple of 4 (aligned at word boundary).Otherwise, the address is converted to the next multiple of 4.+ the Type can be IF, ID, EX, MEM und WB, which means that the simulation is aborted, if the specified instruction reaches the pipeline stage specified by type.A Read-Breakpoint is reached, when a read access (e.g. load instruction orinstruction fetch) to the word (or a part of it) specified by its address isperformed. A Write-Breakpoint is reached, when a write access (e.g. storeinstruction or certain traps) to the word (or a part of it) specified by its addressis performed.The entered values are default values for the next time when this commandis activated. DeleteA selected breakpoint can be deleted.Delete AllAll breakpoints can be deleted with a single command. You will be asked to confirm the action.ChangeThe address or the type of a selected breakpoint can be changed within a dialog window. The Memory WindowsYou can open up to 10 memory windows with the command memory / Display in the main menu.For more details about memory windows see also Memory / Display.The Memory Display MenuThis menu contains the following commands, that are applicable to the active memory window:+ Change+ CloseChangeA dialog box is displayed, allowing you to change the configuration of the active memory window. See also Memory / Display.CloseThe active memory window will be closed.The DLX-Standard-I/O-WindowThis window will be displayed, when:+ The user has activated the Execution/Display DLX-I/O in the Main menu.+ A trap is executed in a single step and the standard-(error-)-output is not redirected to a file.+ A trap is executed in a single step and an input is required and the standard-input is not redirected to a file. You can enter a string terminated by ENTER.+ More than one step is executed (e.g. Execution/Run to). This allows you to abort a simulation pressing the Cancel-button. If a trap is executed that requires aninput, a message is diplayed at the top of the DLX-I/O-Window. During thesimulation, the elapsed time for the simulation is displayed.The DLX-I/O-System Menu:This window is the only dialog window that has an extended system menu, containing the following additional options:DLX-Standard-I/O/Delete WindowThe DLX-I/O-window is cleared. The cursor is placed at the left corner on the top ofthe window.DLX-Standard-I/O/Redirect to FileThis option has a submenu:+ Standard input+ Standard output+ Standard errorYou can redirect any of these in/outputs to a file via a dialog window. The defaultextensions for the filenames are:+ "IN"for the standard input+ "OUT"for the standard output+ "ERR" for the standard errorAfter resetting the processor, all redirections are canceled.DLX-Standard-I/O/Redirect to WindowThis option has a submenu:+ Standard input+ Standard output+ Standard errorAn active redirection to a file can be canceled.The Instruction-Information WindowThis window displays, when an instruction is doubleclicked in the code window, clock cycle diagram or pipeline window.You can get detailed information about the simulation of an instruction. There are sections within this window. The left section in the first raw contains general information about the instruction and the state of its execution. In the remaining five sections, details about the five steps of the execution (IF, ID, EX, MEM und WB) are displayed.The General Section:Following data are displayed:+ the disassembled instruction+ its address+ the instruction in hexadecimal notation+ the state of execution (in which pipeline stage it is, the termination status (normal,error,aborted))+ the cycle number, when the execution has begun+ the number of the last clock cycle of execution+ how many cycles the execution has takenData about each execution step:+ the beginning and the duration of the step: "Begin(Duration)"+ the state of execution+ what is done+ stalls and the instruction causing them+ Source and destination of forwardings and the registers bypassed.The KeyboardHelpF1 Context sensitive help (in menus, dialog windows or in achild window).Shortcuts in the main menuCTRL-R Reset DLXCTRL-I Reset allF3 Load code or dataALT-F4 Quit WINDLXCTRL-F6 or TAB Next child windowSHIFT-F4 Arrange child windows tiledSHIFT-F5 Arrange child windows cascadedCTRL-F4 Close a memory windowCTRL-1 Activate register windowCTRL-2 Activate code windowCTRL-3 Activate pipeline windowCTRL-4 Activate clock cycle diagramCTRL-5 Activate statistics windowCTRL-6 Activate breakpoint windowCTRL-7 Activate memory window-1CTRL-8 Activate memory window-2CTRL-9 Activate memory window-3CTRL-0 Display list box to activate child windowF7 Execute single cycleF8 Execute multiple cyclesF5 RunF4 Run to...。
WinDLX实验指导书

计算机系统结构实验指导手册李静梅、吴艳霞哈尔滨工程大学目录1.实验内容 (1)1.1实验一流水线中的相关 (1)1.2实验二循环展开及指令调度 (3)2.模拟器安装方法 (4)3.演示例程 (4)3.1 配置WinDLX (4)3.2 装载测试程序 (5)3.3 模拟步骤 (5)4.WINDLX汇编语言简介 (8)5.WINDLX汇编语言语言示例 (10)5.1 数据定向和结构相关例程 (10)5.2 指令再定序例程 (11)6.大作业封面模板 (13)7.DLX指令集 (14)1.实验内容1.1实验一流水线中的相关实验目的1. 熟练掌握WinDLX模拟器的操作和使用,熟悉DLX指令集结构及其特点;2. 加深对计算机流水线基本概念的理解;3. 进一步了解DLX基本流水线各段的功能以及基本操作;4. 加深对数据相关、结构相关的理解,了解这两类相关对CPU性能的影响;5. 了解解决数据相关的方法,掌握如何使用定向技术来减少数据相关带来的暂停。
实验平台WinDLX模拟器实验内容和步骤(做实验前请先认真阅读WinDLX教程)1.用WinDLX模拟器执行下列三个程序(任选一个):●求阶乘程序fact.s●求最大公倍数程序gcm.s●求素数程序prim.s分别以步进、连续、设置断点的方式运行程序,观察程序在流水线中的执行情况,观察CPU 中寄存器和存储器的内容。
熟练掌握WinDLX的操作和使用。
注意:fact.s中调用了input.s中的输入子程序。
load程序时,要两个程序一起装入(都select 后再点击load)。
gcm.s也是如此。
2.用WinDLX运行程序structure_d.s,通过模拟:●找出存在结构相关的指令对以及导致结构相关的部件;●记录由结构相关引起的暂停时钟周期数,计算暂停时钟周期数占总执行周期数的百分比;●论述结构相关对CPU性能的影响,讨论解决结构相关的方法。
3.在不采用定向技术的情况下(去掉Configuration菜单中Enable Forwarding选项前的勾选符),用WinDLX运行程序data_d.s。
Wexcl实操教程一步步教你处理各类数据

Wexcl实操教程一步步教你处理各类数据Microsoft Excel是一款广泛应用于办公、数据分析和管理的电子表格软件。
Wexcl (W代表Wide,即广泛的意思)是Excel的一个插件,它为用户提供了更强大、更高效的数据处理功能。
本文将为您详细介绍Wexcl的实操教程,一步步教您如何处理各类数据。
一、Wexcl安装与使用首先,您需要从官方网站下载并安装Wexcl插件。
安装完成后,在Excel中打开一个工作簿。
接下来,我们将学习几个常用Wexcl功能的使用方法。
1. 数据筛选:在Excel的数据选项卡中找到Wexcl插件,并点击打开。
在弹出的Wexcl窗口中,选择“数据筛选”功能。
根据您的需求,选择相应的筛选条件,可以将大量数据快速筛选出来,方便您进一步处理。
2. 数据排序:Wexcl插件还提供了数据排序功能,使得对数据进行排序变得轻松快捷。
在Wexcl窗口中选择“数据排序”功能,选择排序的列和排序方式,即可将数据按照您指定的规则进行排序。
3. 数据透视表:Wexcl的数据透视表功能可帮助您更好地理解和分析大量数据。
在Wexcl窗口选择“数据透视表”功能,然后根据数据源和分析需求,进行字段选择和数据整理,最后生成透视表以便进一步分析。
二、数据清理与整理除了基本的数据处理功能,Wexcl还提供了一系列用于数据清理和整理的实用工具。
1. 数据去重:在Wexcl窗口中选择“数据去重”功能,可以快速去除重复的数据,保留唯一的数值,避免数据冗余和统计错误。
2. 文本提取:Wexcl的“文本提取”功能可以从一个字符串中按照指定的格式提取需要的文本信息。
这对于从复杂文本中提取关键信息非常有用。
3. 数据拆分:如果您有一列包含多个数据的单元格,可以使用Wexcl的“数据拆分”功能迅速将单元格中的数据进行拆分和整理,使其符合您的需求。
三、数据分析与建模Wexcl不仅提供了基本的数据处理功能,还具备高级的数据分析和建模能力,帮助您更好地理解数据并做出准确的决策。
Wexcl操作指南从入门到精通的完全教程

Wexcl操作指南从入门到精通的完全教程Wexcl是一款功能强大的文本编辑器,广泛应用于数据处理、编程开发以及文档编辑等领域。
本文将从入门到精通,为您详细解读Wexcl的常用操作方法和技巧,帮助您掌握并提升在Wexcl中的工作效率。
一、Wexcl简介Wexcl是一款基于命令行的文本编辑器,拥有许多高级功能和扩展。
它支持多个操作系统,如Windows、Mac和Linux,并且具有友好的用户界面。
Wexcl的特点包括代码高亮、文本自动补全、宏录制回放等,适用于各种文本处理需求。
二、安装和启动Wexcl1. 下载Wexcl安装包并解压到指定目录;2. 打开终端或命令提示符窗口;3. 切换到Wexcl所在的目录;4. 输入命令"wexcl"启动Wexcl。
三、基本操作指南1. 打开和保存文件- 使用命令"o [文件名]"打开文件;- 使用命令"s [文件名]"保存文件。
2. 光标和选择文本- 使用方向键或H、J、K、L键移动光标;- 使用Shift + 方向键或使用v键进行文本选择。
3. 复制、剪切和粘贴- 使用命令"yy"复制当前行;- 使用命令"dd"剪切当前行;- 使用命令"p"粘贴已复制或剪切的文本。
4. 撤销和重做操作- 使用命令"u"撤销上一步操作;- 使用命令"Ctrl + r"重做已撤销的操作。
5. 查找和替换文本- 使用命令"/[关键词]"查找文本;- 使用命令":s/[关键词]/[替换词]"替换文本。
6. 快捷键和命令Wexcl提供了丰富的快捷键和命令,可以大幅提高编辑效率。
例如:- 使用"Ctrl + f"快速查找文本;- 使用":%s/[关键词]/[替换词]/g"替换整个文件中的文本。
WinDLX源代码编写
如何编写WINDLX源代码?源代码能通过使用任何文本编辑器来编辑,并以扩展名“.S”来结束,列如:program.s。
源代码包含三部分:指示语句,DLX代码和I/O陷阱指令。
第一部分包括基本的变量声明,存储器代码和数据指针的指示。
DLX代码包括DLX汇编语言。
I/O陷阱指令(trap0-trap 5)是处理文件和标准I/O的DLX代码的部分。
例如:一个典型的DLX程序结构为:;eg:a typical program;--------------------------------------------.data;Your directives.test.global mainmain:;Your DLX codes start here;*******end*******指示语句:当编译器处理汇编文件时,它编译的数据和指令基于文本(代码)和数据指针被放在存储器中。
这些使用的指针不是由信息类型所选择,而是由最近的指示语句是否是.data或.text 来指定。
程序初始将载入到text段。
WinDLX编译器支持几种指示语句,它影响其如何装入到存储器。
你需要在你通常放置指令和参数的地方输入这些指示语句。
支持的其他指示语句是:.align n:Cause the next data/code loaded to be at the next higher address with the lower n bits zeroed..ascii"string1","string2",..:Store the strings listed on the line in the memory as a list of characters.The strings are not terminated by a0byte..asciiz"string1","string2",...:Similiar to.ascii except each string is followed by a0byte..byte"byte1","byte2",...:Store the bytes listed on the line sequentially in memory..double number1,number2,...:Store the numbers listed on the line sequentially in memory as double-precision floating point numbers..float number1,number2,...:Store the numbers listed on the line sequentially in memory as single-precision floating point numbers..global label:Make the label available for reference by code found in files loaded after this file..space size:Move the current storage pointer forward size bytes(to leave some empty space in memory).word word1,word2,...:Store the words listed on the line sequentially in memory.Traps–系统接口Traps在DLX程序和I/O-系统间建立接口,在WinDLX中定义了5种traps,对于trap 指令来说,0是一个无效参数,用来中断程序。
计算机系统结构winDLX流水线实验报告

计算机科学与技术学院《计算机体系结构》课程实验学号:班级:专业:学生姓名:年月日实验报告seqi r5,r3,10下面两条指令中,因为加法指令要读r1,而执行到此操作时乘法指令仍对r进行操作,因此出现了数据相关multu r1,r1,r4add r1,r1,r3图1 数据相关(2)控制相关:以图2中出现的控制相关为例下面两条指令中,因为第一条指令出现跳转指令时,存储指令的取指将作废,所以出现控制相关jal InputUnsignedsw PrintfValue(r3),r1图2 控制相关(3)结构相关:以图3中出现的结构相关为例下面两条指令中,因为当第二条乘法指令需要使用乘法器时,第一条乘法指令仍在使用乘法器,所以出现结构相关mult r2,r0,r0mult r3,r0,r0图3 结构相关3、主程序Variance.s的代码.data ;.data标识下面的数据放在数据区中;输入语句,指示你输入要求多少个数的方差Prompt: .asciiz "Please input An integer which is array's size value>0: ";输入语句,指示你输入要求方差的数PromptLast: .asciiz "Please input the integer :";输出格式,表示求出的方差按什么格式输出PrintfFormat: .asciiz "the Variance is : %g ";表示下面采用字对齐.align 2;求出方差存入r11中div r11,r2,r8output:;将方差存入Variance所指存储空间中sw Variance,r11;转换为双精度并输出lf f2,Variancecvti2d f0,f2sd Printf,f0addi r14,r0,PrintfPartrap 5 ;调用中断,格式化输出转化为标准输出over:trap 0 ;调用系统中断,0表示程序执行结束4、样例输出,以图4中数据为例输入需要求方差数的个数为4,4个数分别为3,5,6,2,输出结果为2图4 输出界面5、尽量减少和消除程序中出现的相关。
试验一 熟悉WInDLX的使用
实验一熟悉WInDLX的使用实验目的:通过本实验,熟练掌握WinDLX模拟器的操作和使用,熟悉DLX指令集结构及其特点。
实验内容:一.用WinDLX模拟器执行求阶乘程序facts 。
执行步骤详见“WinDLX 教程”。
这个程序说明浮点指令的使用。
该程序从标准输入读入一个整数,求其阶乘,然后将结果输出。
该程序中调用了input.s中的输入子程序,这个子程序用于读入正整数。
二.输入数据“3”采用单步执行方法,完成程序并通过上述使用WinDLX,总结WinDLX的特点。
三.意观察变量说明语句所建立的数据区,理解WinDLX指令系统。
实验步骤:一.运行WinDLX仿真器。
二.在开始模拟之前,fact.s程序装入一个程序到主存。
在装入fact.s程序的同时需要同时装入input.s程序,现在可以开始模拟工作了。
三.找出实验中的不明白的地方,自己解决并写出原因。
四.输入数据“3”采用单步执行方法,完成程序并通过上述使用WinDLX,总结WinDLX的特点。
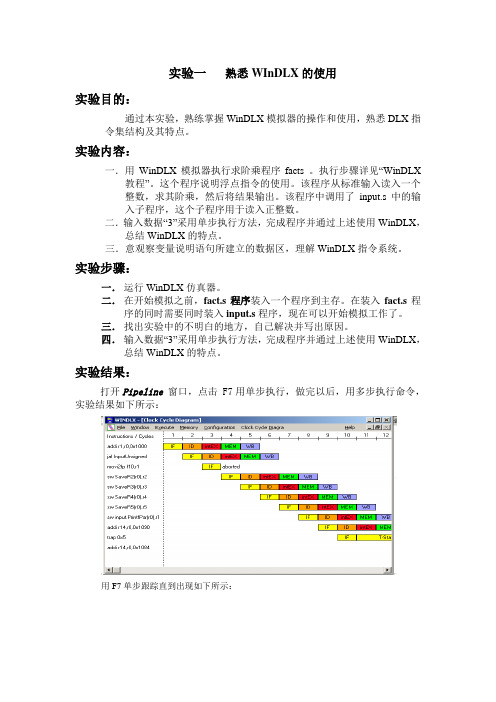
实验结果:打开Pipeline窗口,点击 F7用单步执行,做完以后,用多步执行命令,实验结果如下所示:用F7单步跟踪直到出现如下所示:输入“3”然后“确定”。
结果如下所示:在本次实验遇到两个问题:问题一在上述窗口中,你将看到模拟正在第四时钟周期,第一条命令正在MEM 段,第二条命令在intEX段,第四条命令在IF段。
而第三条命令指示为"aborted"。
其原因是:第二条命令(jal)是无条件分支指令,但只有在第三个时钟周期,jal指令被译码后才知道,这时,下一条命令movi2fp已经取出,但需执行的下一条命令在另一个地址处,因而,movi2fp的执行应被取消,在流水线中留下气泡。
问题二在下图中,你将看到模拟正处于时钟周期14。
trap 0x5行如下所示:原因是:无论何时遇到一条trap指令时,DLX 处理器中的流水线将被清空实验体会:通过本次实验我掌握了WinDLX模拟器的操作和使用,了解DLX指令集结构及其特点,更加深入的了解计算机系统流水线的工作过程。
simulationX教程(北京显达动力科技有限公司)1

SimulationX是一款分析评价 技术系统内各部件相互作用 的权威软件,是多学科领域 建模、仿真和分析的通用 CAE工具,并具有强大标准 元件库,这些元件库包括: 1D力学 、3D多体系统、动力 传动系统、液力学、气动力 学、热力学、电子学、电驱 动、磁学和控制。另外, SimulationX还具有强大的后 处理系统。
模型视图(电路图,结构) 3D视图
结构
模型管理器
显达动力科技有限公司 Page6
确定参数
属性窗口
参数
模型管理器
显达动力科技有限公司
Page7
结果窗口
设置属性窗
元件中的属性或浮动菜单都能打开结果窗口
协议时间步长 dtProt /dtProt = 常数 ? ----> 变量向导 可视化、分析和导出功能的多样化
端口和元件
• •
• • • • • • • •
不同的端口类型 获取每个连接所属 领域的主要属性 参数(实数, 布尔) 变量 初始值 曲线和表格 函数, 方块, 枚举 数据库连接 重置基类 组 (用于属性对话 框的设计)
Page32
对学科库标准元件进行扩展
SimulationX通过TypeDesigner
•
通过求解一组特殊的非线性方程可以创建相容初始值 (可变初始值未知)
显达动力科技有限公司
Page23
求解器
• 模型描述为隐式的代 数微分方程系统 • 求解器: BDF, MEBDF, CVODE方法 预估-校正方法: 可变的时间步长宽 度与阶次
显达动力科技有限公司 Page24
显达动力科技有限公司 Page12
学科库工具栏
• 元件顺序等级
SIMPL Windows基础教程 - 最终版

快思聪SIMPL Windows编程语言初级教程目录第一章快思聪SIMPL WINDOWS (5)概览 (5)关于初级教程 (5)快思聪开发软件 (6)SIMPL Windows (6)快思聪VisionTool Pro-e (6)DEAL TM for Windows (6)Media Manager TM System Builder (6)D3 Pro TM (7)数据库(Database) (7)产品目录光盘 (7)快思聪控制系统 (9)为什么对控制系统编程? (9)控制系统组件 (9)主机 (9)网络控制模块 (10)Plug-in控制卡 (10)用户界面 (10)触摸屏 (10)键盘(按键面板) (10)无线摇控界面 (10)用户设备 (10)控制方式 (11)继电器控制 (11)串口通信控制 (11)红外 (11)自定义串量 (13)RS232,RS422,RS485 (13)MIDI(数字音乐设备接口) (14)模拟电压 (14)自定义快思聪接口界面 (14)Cresnet (14)第二章SIMPL WINDOWS编程 (16)SIMPL介绍 (16)函数库 (16)设备函数 (16)逻辑函数 (16)函数属性 (16)输入 (17)输出 (17)信号类型 (18)数字量 (18)模拟信号量 (18)串量 (19)特殊信号0和1 (19)逻辑波跟逻辑解决方案 (19)用户界面编程 (21)按钮动作 (21)按钮反馈 (21)子页(仅用于触摸屏) (23)模拟显示(仅用于触摸屏) (23)间接文本(仅用于触摸屏) (24)用SIMPL W INDOWS来创建一个程序 (25)编程步骤 (25)基本编程规则 (25)建立一个系统 (25)网络硬件 (28)控制插卡 (29)串口设备 (29)用户设备 (30)网络ID (30)配置设备 (31)快思聪网络设备 (31)以太网设备 (32)串口设备 (33)触摸屏 (33)连接信号 (34)定义用户界面信号 (34)使用逻辑函数 (35)第三章逻辑函数编程 (37)概述 (37)逻辑函数的类型 (37)基本逻辑 (38)NOT函数 (38)OR函数 (38)AND函数 (40)Buffer函数 (41)状态逻辑 (46)Set/Reset Latch函数 (46)Toggle函数 (47)Interlock函数 (49)基于时间的逻辑 (52)One Shot 系列 (52)Multiple One Shot (53)Retriggerable One Shot (53)Delay Symbol (54)Oscillator Symbol (55)模拟逻辑 (57)Analog Ramp函数 (57)Analog Initialize (58)Analog Preset函数 (59)Serial/Analog One-Shot (61)Modules模块 (61)Communication Settings (62)Compiling and Uploading Programs (64)第一章快思聪SIMPL Windows概览关于初级教程编写本教程的目的在于向程序设计人员介绍SIMPL windows编程技术以及如何应用快思聪控制系统,这包括对控制系统如何利用触摸屏和按钮作为用户界面的理解,通过这些界面,使用者可以发送一个信号(主要是逻辑函数)给控制系统处理后输出用以最终控制一个设备。
WinDLX教程
WinDLX 教程刘依张晨曦编译DLX 处理器(发音为"DeLuXe")是Hennessy 和Patterson合著一书《Computer Architecture - A Quantitative Approach》中流水线处理器的例子。
WinDLX是一个基于Windows的模拟器。
本教程通过一个实例介绍WinDLX的使用方法。
WinDLX模拟器能够演示DLX流水线是如何工作的。
本教程使用的例子非常简单,它并没有囊括WinDLX的各个方面,仅仅作为使用WinDLX的入门级介绍。
当你阅读完本教程后,请参考帮助文件。
通过按F1键,你可以在任何时候获得相关的帮助信息。
虽然我们将详细讨论例子中的各个阶段,但你应具备基本的使用Windows的知识。
现假定你知道如何启动Windows,使用滚动条滚动,双击执行以及激活窗口。
一、安装WinDLX 包含windlx.exe和windlx.hlp文件。
同时,还需要一些扩展名为.s的汇编代码文件。
在本手册中将使用fact.s和input.s这两个汇编代码文件。
如果你熟悉Windows 应用程序的安装,那么将fact.s和input.s拷贝到WinDLX 文件夹后,你可以直接阅读下一部分。
请按以下步骤在Windows下安装WinDLX:1.为WinDLX创建目录,例如D:\WINDLX2.解压WinDLX软件包或拷贝所有的WinDLX文件(至少包含windlx.exe, windlx.hlp, fact.s和input.s)到这个WinDLX 目录。
二、一个完整的例子我们使用WinDLX 汇编器中的汇编文件fact.s,这个程序计算数(通过键盘输入)的阶乘。
这需要用到文件input.s,它用于接收从键盘输入的数。
1.开始和配置WinDLX象启动任何Windows应用程序一样,通过双击WinDLX 图标启动WinDLX,将出现一个带有六个图标的主窗口,双击这些图标将弹出子窗口。
Windchill基本操作手册

Windchill 9.1 M010 基本操作手册文档控制更改记录目录文档控制 (ii)更改记录 (ii)目录 (iii)1.安装java、Windchill的访问方法 (1)1.1安装JAVA (1)1.2Windchill的访问方法 (4)2.Windchill的基本操作 (6)2.1浏览页签,切换各窗口 (6)2.2查看对象 (7)2.3搜索 (14)2.4下载插件 (21)2.5设置首选项 (21)2.6指配任务 (24)2.7措施项 (26)2.8ProductView可视化 (28)2.9预订 (33)3.业务操作 (36)3.1文档管理 (36)3.2部件管理 (43)3.3对象关联性 (47)3.4升级 (55)3.5BOM编辑 (59)3.6对象移动 (62)3.7修订 (65)4.业务管理 (67)4.1产品管理 (67)4.2项目管理 (72)1.安装java、Windchill的访问方法1.1安装JAVA获得JAVA程序后,双击如下图标:会出现以下界面:选择“接受”。
出现以下界面:点击“下一步”,出现以下界面:点击“下一步”,出现以下界面:点击“完成”,JAVA 程序安装完毕。
1.2Windchill的访问方法1.2.1HOST文件的设置将本机“C:\WINDOWS\system32\drivers\etc\hosts”文件里添加服务器的IP地址和计算机名称。
如下图:1.2.2登陆Windchill访问地址:http://服务器的计算机名称/Windchill/例如:若服务器的计算机名称是,则访问地址是http:// /Windchill/。
输入用户名和密码。
在标记位置添加服务器的IP地址和计算机名称1.2.3退出Windchill点击此图标2.Windchill的基本操作2.1浏览页签,切换各窗口我们进入Windchill了“主页”的“概述”窗口,也可以通过各页签和页签下的选项进入所需要的窗口。
Windchill基本操作流程

数据更新
旧版本
更新
重新追加到工作区依存关联处理方式
使用服务器数据覆盖工作区
下载
使用工作区数据
重新使用同步解除不必要依存关联
新版本、工作区中已修改
关联文件被其他用户重命名
缺失或过期的参照
事件管理器
同步
新版本、被重命名
更新
关联对象是旧版本
追加缺失的参考数据
检入成功修改
待上传或保留修改状态的数据选择“重用”;
与服务器一致的数据选择“下载”;
重量计算(详细方法见说明文件)
参数关系(包含重量计算,windchill与creo参数映射)
常见问题
1)数据处理的每个环节,都必须确认依存关联
2)先检出再修改,检出失败的原因及对应
3)仅检入必要的修改数据;检入失败的原因及对应
4)非最新模板的旧数据,参数设置、重量计算失败的原因及对应
按关键字检索(文件名);
按参数检索(零件编号、名称、材料、型号、其他处理或设变编号);完整检索、模糊检索(部分用*代替);
(1)修改并上传数据如图(后续示例用)
(2)已检入服务器的文件重命名
1.切换到WorkSpace_1
3.检入失败案例:关联数据名称被修改,工作区未同步。
WinGX的晶体解析教程
目录一、结构解析的过程(一)空间群的确定(二)解初结构(三)结构精修1、结构精修2、检验精修完毕的参考标准3、精修时INS文件中的指令和意义4、CIF文件5、用WinGX生成键长键角表二、画图1、XP中的指令2、操作实例三、H键分析1、策略2、步骤3、实例四、芳香环间的相互作用1、作用模型2、判断芳香环间相互作用的步骤3、实例五、CIF格式一、结构解析的过程WinGX程序平台集成了下列主要程序:1、确定空间群 (XPREP)2、解初结构(SHELXS-97、SIR-92、SIR-97、SIR-2002)3、结构精修 (SHELXL)(一)空间群的确定将衍射实验得到.hkl和.p4p两个文件(名称应一致)拷入一个文件夹中。
打开WinGX, 从标题栏File命令中选择CHANGE PROJECT下的Select New Project, 此时会出现一个对话框,添加上述的.hkl或.p4p文件。
1)标题栏Data命令中选择Xprep, 出现一个新的对话框,输入.hkl的文件名。
2)出现Select option命令,默认[4]。
3)出现Mean(I/sigma)代表平均信/噪比(该数值要求>7,12~20之间比较好)和格子类型。
默认格子类型即可。
4)选择H:Search for higher Metric Symmetry,寻找更高的对称性。
5)程序显示各种可能的晶系和格子类型。
根据R int值大小确定晶系和格子类型。
6)选择S:Determine or input space group,测定或输入空间群。
7)选择S:Determine space group,测定空间群。
8)程序提供可能的晶系选择,认同程序的选择即可。
9)程序列出所选晶系下的可能晶格类型。
10)选定晶格类型后,程序将列出各种可能的空间群。
11)选定空间群后,程序提示下一选项:Define unit-cell CONTENTS (给出化合物的组成)。
- 1、下载文档前请自行甄别文档内容的完整性,平台不提供额外的编辑、内容补充、找答案等附加服务。
- 2、"仅部分预览"的文档,不可在线预览部分如存在完整性等问题,可反馈申请退款(可完整预览的文档不适用该条件!)。
- 3、如文档侵犯您的权益,请联系客服反馈,我们会尽快为您处理(人工客服工作时间:9:00-18:30)。
WinDLX 教程刘依张晨曦编译DLX 处理器(发音为"DeLuXe")是Hennessy 和Patterson合著一书《Computer Architecture - A Quantitative Approach》中流水线处理器的例子。
WinDLX是一个基于Windows的模拟器。
本教程通过一个实例介绍WinDLX的使用方法。
WinDLX模拟器能够演示DLX流水线是如何工作的。
本教程使用的例子非常简单,它并没有囊括WinDLX的各个方面,仅仅作为使用WinDLX的入门级介绍。
当你阅读完本教程后,请参考帮助文件。
通过按F1键,你可以在任何时候获得相关的帮助信息。
虽然知道如何启动Windows,使用滚动条滚动,双击执行以及激活窗口。
一、安装WinDLX 包含windlx.exe和windlx.hlp文件。
同时,还需要一些扩展名为.s的汇编代码文件。
在本手册中将使用fact.s和input.s这两个汇编代码文件。
如果你熟悉Windows 应用程序的安装,那么将fact.s和input.s 拷贝到WinDLX 文件夹后,你可以直接阅读下一部分。
请按以下步骤在Windows下安装WinDLX:1.为WinDLX创建目录,例如D:\WINDLX2.解压WinDLX软件包或拷贝所有的WinDLX文件(至少包含windlx.exe, windlx.hlp, fact.s和input.s)到这个WinDLX 目录。
二、一个完整的例子我们使用WinDLX 汇编器中的汇编文件fact.s,这个程序计算数(通过键盘输入)的阶乘。
这需要用到文件input.s,它用于接收从键盘输入的数。
1.开始和配置WinDLX象启动任何Windows应用程序一样,通过双击WinDLX图标启动WinDLX,将出现一个带有六个图标的主窗口,双击这些图标将弹出子窗口。
后面将解释和介绍如何使用每一个窗口。
为了初始化模拟器, 点击File菜单中的Reset all菜单项,弹出一个“Reset DLX”对话框。
然后点击窗口中的“确认”按钮即可。
WinDLX可以在多种配置下工作。
你可以改变流水线的结构和时间要求、存储器大小和其他几个控制模拟的参数。
点击Configuration/Floating Point Stages(点击Configuration打开菜单,然后点击Floating Point Stages菜单项),选择如下标准配置:Cou nt Dela yAddition Units: 1 2Multiplication Units: 15 Division Units: 1 19如果需要,可以通过点击相应区域来改变设置。
然后,点击OK 返回主窗口。
点击Configuration / Memory Size,可以设置模拟处理器的存储器大小。
应设置为0x8000,然后,点击OK返回主窗口。
在Configuration菜单中的其他三个配置也可以设置,它们是:Symbolic addresses, Absolute Cycle Count 和Enable Forwardin g。
点击相应菜单项后,在它的旁边将显示一个小钩。
2. 装载测试程序在开始模拟之前,至少应装入一个程序到主存。
为此,选择File / Load Code or Data,窗口中会列出目录中所有汇编程序。
我们在前面已经提到,fact.s计算一个整型值的阶乘;input.s 中包含一个子程序,它读标准输入(键盘)并将值存入DLX处理器的通用寄存器R1中。
按如下步骤操作,可将这两个文件装入主存。
错误!未找到引用源。
点击fact.s错误!未找到引用源。
点击select按钮错误!未找到引用源。
点击input.s错误!未找到引用源。
点击select按钮错误!未找到引用源。
点击load按钮选择文件的顺序很关键,它决定了文件在存储器中出现的顺序。
对话框中会显示信息“File(s) loaded successfully. Reset DLX?”,点击“是(Y)”按钮确认。
这样,文件就已被装入到存储器中了。
现在可以开始模拟工作了。
3. 模拟在主窗口中,你可以看见六个图标,它们分别为“Register”,“Code”,“Pipeline”,“Clock Cycle Diagram”,“Statistics”和“Breakpoints”。
点击其中任何一个将弹出一个新窗口(子窗口)。
在模拟过程中将介绍每一个窗口的特性和用法。
(1) Pipeline窗口我们首先来看一下DLX处理器的内部结构。
为此,双击图标Pipeline,出现一个子窗口,窗口中用图表形示显示了DLX的五段流水线。
你应尽可能地扩大此窗口,以便处于不同流水段的指令都能够在图表中显示。
此图显示DLX处理器的五个流水段和浮点操作(加/ 减, 乘和除)的单元。
(2) Code窗口我们来看一下Code窗口。
双击图标,你将看到代表存储器内容的三栏信息,从左到右依次为:地址(符号或数字)、命令的十六进制机器代码和汇编命令。
$TEXT 0x20011000 addi r1,r0,0x1000main+0x4 0x0c00003c jal InputUnsigned现在,点击主窗口中的Execution开始模拟。
在出现的下拉式菜单中,点击Single Cycle或按F7键。
这时,窗口中带有地址“$TEXT ”的第一行变成黄色。
按下F7 键,模拟就向前执行一步,第一行的颜色变成橘黄色,下一行变成黄色.。
这些不同颜色指明命令处于流水线的哪一段。
如果Pipeline 窗口已经关闭,请双击相应图标重新打开它。
如果窗口足够大,你能够看到命令“jal InputUnsigned”在IF段,“addi r1, r0, 0x1000”在第二段ID。
其他方框中带有一个“X”标志,表明没有处理有效信息。
再次按下F7键,代码窗口中的颜色会再改变,红色表明命令处入第三段“intEX”。
再按下F7,图形显示将变为:在代码窗口中,黄色出现在更下面的位置,并且可能是唯一彩色行。
查看一下Pipeline窗口,你会发现IF, intEX 和MEM 段正在使用而ID段没有。
为什么?(3) Clock Cycle Diagram 窗口使所有子窗口图标化,然后打开Clock Cycle Diagram窗口。
它显示流水线的时空图。
在窗口中,你将看到模拟正在第四时钟周期,第一条命令正在MEM段,第二条命令在intEX段,第四条命令在IF段。
而第三条命令指示为"aborted"。
其原因是:第二条命令(jal)是无条件分支指令,但只有在第三个时钟周期,jal指令被译码后才知道,这时,下一条命令movi2fp已经取出,但需执行的下一条命令在另一个地址处,因而,movi2fp的执行应被取消,在流水线中留下气泡。
jal 的分支地址命名为"InputUnsigned"。
为找到此符号地址的实际值,点击主窗口中的Memory和Symbols,出现的子窗口中显示相应的符号和对应的实际值。
在"Sort:"区域选定"name",使它们按名称排序,而不是按数值排序。
数字后的"G"代表全局符号,"L"代表局部符号。
"input"中的"InputUnsigned" 是一个全局符号,它的实际值为0x144 ,用作地址。
点击OK按纽关闭窗口。
再一次点击F7,第一条命令(addi)到达流水线的最后一段。
如果想了解某条命令执行后处理器内部会发生什么?你只要对准Clock cycle diagram窗口中相应命令所在行,然后双击它,弹出一个新窗口。
窗口中会详细显示每一个流水段处理器内部的执行动作。
这个窗口"Information about ..." 作为将来的Information窗口。
观察完后,点击OK按钮关闭窗口。
双击第三行(movi2fp),你会看到它只执行了第一段(IF),这是因为出现跳转而被取消。
(双击Code窗口中的某一行或者Pipeline 窗口中的某一段,同样可以Information窗口。
)(4) Breakpoint窗口当通过Code窗口观察代码时(如果未打开,双击图标Code),你会看到接下来的几条指令几近一样,它们都是sw-操作:将寄存器中的数写入存储器中。
重复按F7将很枯燥,因此,我们使用断点加快此过程。
现在,请指向Code 窗口中包含命令trap 0x5的0x0000015c行,此命令是写屏幕的系统调用。
单击命令行,然后点击主窗口菜单Code,单击Set Breakpoint (确保命令行仍被标记!),将弹出一个新的"Set Breakpoint" 窗口。
通过此窗口,你可以选择命令运行到流水线的哪一阶段时,程序停止执行。
缺省为ID段。
点击OK关闭窗口。
在Code窗口中,trap 0x5行上出现了"BID" ,它表示当本指令在译码段时,程序中止执行。
如果想查看已定义的断点,你只要单击图标Reakpoints,将弹出一个小窗口,其中显示了所有断点。
重新使窗口图标化。
现在你只要点击Execution / Run或按F5,模拟就继续运行。
会出现一个对话框提示你"ID-Stage: reached at Breakpoint #1",按“确认”按钮关闭。
点击Clock cycle diagram窗口中的trap 0x5行,你将看到模拟正处于时钟周期14。
trap 0x5行如下所示:原因是:无论何时遇到一条trap指令时,DLX 处理器中的流水线将被清空。
在Information窗口(双击trap行弹出)中,在IF段显示消息"3 stall(s) because of Trap-Pipeline-Clearing!"。
(不要忘了按OK关闭窗口)。
指令trap 0x5已经写到屏幕上,你可以通过点击主窗口菜单条上的Execute / Display DLX-I/O来查看。
(5) Register窗口为进一步模拟,点击Code窗口,用箭头键或鼠标向下滚动到地址为0x00000194的那一行(指令是lw r2, SaveR2(r0)),点击此行,然后按Ins键,或点击Code / Set Breakpoint / OK,在这一行上设置一个断点。
采用同样的方法,在地址0x000001a4(指令jar r31)处设置断点。
现在按F5继续运行。
这时,会弹出DLX-Standard-I/O 窗口,在信息"An integer value >1: "后鼠标闪烁,键入20然后按Enter,模拟继续运行到断点# 2 处。