solaris 10 stmsboot使用手册
Solaris 10 操作系统说明书
Enterprises are under tremendous pressure to do more with less, roll out new businessservices faster, fit more servers into the same space, and comply with new regulations, all while their budgets are shrinking and headcount is frozen. Can an operating system really help you address these issues and turn IT into a business advantage? The answer is yes, with the Solaris™ Operating System.The Solaris OS is the strategic platform for today’s demanding enterprise. It’s the only open operating system that has delivered proven results, running everything from mission-critical enterprise databases to high performance Web farms, from large-scale SMP systems to industry-standard x86 systems from HP, IBM, Dell, and Sun.For customers facing challenging business and technical requirements — such as lowering costs, simplifying system administration, and maintaining high service levels — the Solaris 10 OS is the ideal cross-platform choice. Its innovative, built-in features deliver break-through virtualization and utilization, high availability, advanced security, and industry leading performance to meet these stringent requirements — all at a great price.Ten things to know about the Solaris OS1. Great productThe constant demonstrated innovation within the Solaris OS pays off by delivering benefits that can save companies time, hardware costs, power and cooling, while preserving investments in software and training. In short: innovation matters, because it saves you money.2. Great priceSolaris 10 support pricing is 20% to 50% lower than equivalent support from other open OS vendors. No-cost end user licensing lowers barriers to entry, while overall efficiency lowers costs of operation.3. Open sourceThe Solaris OS code base is the foundation of the OpenSolaris™ open source community (visit ). In addition, the Solaris OS includes the leading Web 2.0 open source packages, ready to run and optimized for the over 1,000 x64 and SPARC system platforms supported by Solaris 10.4. Application compatibility — guaranteed The Solaris OS delivers binary compatibility from release to release and source compati-bility between SPARC® and x86 processors; with the Solaris Application Guarantee backing it, it’s something you can count on. And for the ultimate in conversion ease, use Solaris 8 and Solaris 9 Containers on Solaris 10, a “Physical to Virtual”way to quickly and easily run your existing application environ-ments on the latest SPARC systems.5. One Solaris — same features on hundreds of systemsWith a single source code base, the Solaris OS runs on x86 and SPARC and processor-based systems — and delivers the same features on all platforms. You can develop and optimize applications on the Solaris OS for use on over 1000 system models from leading vendors such as Sun, HP, IBM, and Dell.<HighlightsThe Solaris™ Operating Systemmeets and exceeds expectations for:•Virtualization: Optimize resourceutilization to deliver predictableservice levels with SolarisContainers•Networking: Attain near-wirespeedthroughput with the open, program-mable Solaris networking stack•Security: Implement a securefoundation for deploying serviceswith Solaris leading-edge securityfeatures•Availability: Increase uptime withPredictive Self Healing6. Designed to run securely all the timeThe leading-edge security features in the Solaris 10 OS help you reduce the risk of intrusions, secure your applications and data, assign the minimum set of privileges and roles needed by users and applications, and control access to data based on its sensitivity label. Solaris 10 has been inde-pendently evaluated at EAL4+ at three Protection Profiles, one of the highest levels of Common Criteria certifications.7. Designed for observabilitySolaris Dynamic Tracing (DTrace) technology makes it fast and easy to identify perform-ance bottlenecks, especially on production systems. System administrators can use this to troubleshoot even the most difficult problems in minutes instead of days; devel-opers can use it to optimize applications, with significant performance gains possible — real-world use has yielded increases up to 50 times previous performance.8. Designed for virtualizationSolaris 10 has powerful virtualization features built in at no additional charge. With Solaris Containers, you can maintain a one application per virtual server deploy-ment model while consolidating dozens or even hundreds of applications onto one server and OS instance. Share hardware resources while maintaining predictable service levels; increase utilization rates, cut system and licensing costs while gaining the ability to quickly provision and move workloads from system to system. Logical Domains and Xen-based paravirtualization support add even more virtualization flexibility.9.Designed for high availabilityPredictive Self Healing is a key feature in the Solaris 10 OS that helps you increase system and service availability. It automati-cally detects, diagnoses, and isolates system and software faults before they cause downtime. And it spans the full range from diagnosis to recovery on SPARC, AMD Opteron™ and Athlon, and Intel® Xeon®and Core Duo processor-based systems.10.Designed for performanceThe Solaris 10 OS has set over 244 priceperformance records since its release,unleashing even more power from existingapplications. Download the latest Sun™Studio compilers and developer tools tobring even greater performance to yourapplications.For business, industry, and developersThe Solaris 10 OS offers the technology, flexi-bility, and versatility you need to get down tobusiness immediately, whether you’re a smalldeveloper, a large enterprise, or anything inbetween.OpenSolaris participation and OS releaseMore than an open source project, OpenSolarisis also a community, a Web site for collabora-tion — and now provides a supported, leadingedge release every six months. The OpenSolarisrelease is available at , andSolaris source code, downloads, developertools, mailing lists, user groups, and events areall available at . OpenSolaristechnology features a single source base forSPARC and x86 platforms. It includes the keyinnovations delivered in the Solaris 10 OS, aswell as providing access to new technologiesas they’re being developed. The OpenSolarisproject and release provide a low-risk optionfor evaluating emerging OS technologies, plusan excellent opportunity to participate inshaping the direction of the Solaris OS.Development toolsDevelopers need integrated, ready-to-use toolsthat are compatible with all the environmentsin which they must deploy applications. Withthat in mind, Sun includes popular softwaretools from the free and open source world andcomplements them with access to key Sundeveloper technologies like the Sun Studiocompilers and tools and unique Solaris 10utilities such as DTrace.Solaris 10 technologiesWith the Solaris OS, you get compelling newfeatures that your applications can take advan-tage of immediately with few, if any, changes.Binary and source compatibility with previousreleases also helps make it easier to move toSolaris 10 from earlier releases of Solaris.DTraceSystem administrators, integrators, and devel-opers can use the dynamic instrumentation andtracing capabilities in the Solaris OS to see what’sreally going on in the system. Solaris DTracecan be safely used on production systems —without modifying applications. It is a powerfultool that gives a comprehensive view of theentire system, from kernel to application, eventhose running in a Java™ Virtual Machine. Thislevel of insight reduces the time for diagnosingproblems from days and weeks to minutes andhours and ultimately reduces the time to fixthose problems.Solaris ContainersSolaris Containers is an OS-level virtualizationtechnology built into the Solaris 10 OS. Usingflexible, software-defined boundaries to isolatesoftware applications and services, this break-through approach allows multiple privateexecution environments to be created withina single instance of the Solaris OS. Each envi-ronment has its own identity, including adiscrete network stack, separate from theunderlying hardware, so it behaves as if it’srunning on its own system — making consoli-dation simple, safe, and secure.By dynamically controlling application andresource priorities, businesses can define andachieve predictable service levels. Systemadministrators can easily meet changingrequirements by quickly provisioning newSolaris Containers or moving them from systemto system or disk to disk within the same systemas capacity or configuration needs change.Containers can be patched in parallel, increasing speed by up to 300% on systems with multiple containers configured. This also raises the bar on the number of contain-ers that can be realistically run on a system. Containers also offer the ability to emulate other environments, prior Solaris releases, such as Solaris 8 and Solaris 9, as well as support for Linux applications.In addition to Solaris Containers, Sun also offers Logical Domains (LDoms), a hardware partitioning technology that allows multiple instances of the Solaris OS to run on a single Sun CoolThreads™ server.Solaris ZFSThe Solaris ZFS file system is designed from the ground up to deliver a general-purpose file system that spans from the desktop to the datacenter. Anyone who has ever lost important files, run out of space on a partition, spent weekends adding new storage to servers, tried to grow or shrink a file system, or experienced data corruption knows the limitations of tradi-tional file systems and volume managers. Solaris ZFS addresses these challenges efficiently and with minimal manual intervention.Predictive Self HealingPredictive Self Healing is an innovative capability in the Solaris 10 OS that automatically diagnoses, isolates, and helps you recover from many hardware and application faults. As a result, business-critical applications and essential system services can continue uninterrupted in the event of software failures, major hardware component failures, and even software config-uration problems.• Solaris Fault Manager continuously monitorsdata relating to hardware and softwareerrors. It automatically and silently detectsand diagnoses the underlying problem andcan automatically take the faulty componentoffline on SPARC, Intel Xeon, and AMD Opteronprocessor based systems. Easy-to-understanddiagnostic messages link to articles in Sun’sknowledge base to help clearly guide admin-istrators through corrective tasks requiringhuman intervention.• Solaris Service Manager (SMF) creates astandardized control mechanism for applica-tion services by turning them into first-classobjects that administrators can observe andmanage in a uniform way. These servicescan automatically be restarted if they’reaccidentally terminated by an administrator,fail as the result of a software programmingerror, or interrupted by an underlyinghardware problem.PerformanceOptimizing performance and efficiency inSolaris 10 is the result of many factors: under-lying technologies, system configuration andutilization, tools, applications, and systemtuning. An enhanced networking stack mini-mizes latency and offers improved networkperformance for most applications out ofthe box.With DTrace, you can delve deeply into today’scomplex systems when troubleshooting systemicproblems or diagnosing performance bottlenecks— in real time and on the fly. Additional built-in technologies that help deliver increasedapplication performance include:• High-performance networking stack• Filesystem performance• Tools and libraries• Multiple page-size support (MPSS)• Memory placement optimization (MPO)SecuritySecurity is more than a mix of technologies;it’s an ongoing discipline. Sun understandsthis and continues its 20-year commitment toenhancing security in the Solaris OS. SolarisUser and Process Rights Management plusSolaris Containers enable the secure hostingof hundreds of applications and multiplecustomers on the same system. Administratorscan use features such as Secure by Default tominimize and harden the Solaris OS even more.Additionally, Solaris Trusted Extensions providestrue multi-level security for the first time in acommercial-grade OS, running all your existingapplications and supported on over 1,000different system models.• Verify your system’s integrity by employingSolaris Secure Execution and file verificationfeatures• Reduce risk by granting only the privilegesneeded for users and processes• Simplify administration and increase privacyand performance by using the standards-based Solaris Cryptographic Framework• Secure your system using dynamic serviceprofiles, including a built-in, reduced-exposurenetwork services profile• Control access to data based on its sensitivitylevel by using the labeled security technologyin Solaris Trusted ExtensionsNetworkingExponential growth in Web connectivity, services,and applications is generating a critical needfor increased network performance. With theSolaris 10 OS, Sun meets current and futurenetworking challenges by significantly improvingnetwork performance without requiring changesto existing applications. The Solaris 10 OS speedsapplication performance via the Network Layer7 Cache and enhanced TCP/IP and UDP/IPperformance. The latest networking techno-logies, such as 10-Gigabit Ethernet and hardwareoff-loading, are all supported out of the box.Additionally, the Solaris 10 OS supports current IPv6 specifications, high availability, streaming, and Voice over IP (VoIP) networking through extended routing and protocol support —meeting the carrier-grade needs of a growing customer base.Platform choiceThe Solaris 10 OS is optimized for Sun and third-party systems running 64-bit SPARC, AMD, and Intel processors. This makes it possible to create horizontally and vertically scaled infra-structures and offers the flexibility to easily add compute resources. The OS runs on hardware ranging from laptops and single-board computers to datacenter and grid installations, while serving applications ranging from military command-and-control systems to telecommunications switch gear and stock trading.InteroperabilityThe Solaris 10 OS provides interoperability from the desktop to the datacenter across a range of hardware systems, operating platforms, and technologies, making it the ideal platform for today’s heterogeneous compute environments. Not only does it interoperate with both Linux and Microsoft Windows, it also supports popular open source applications and open standards such as Universal Description, Discovery, and Integration (UDDI); Simple Object Access Protocol (SOAP); Web Services Description Language (WSDL); and eXtensible Markup Language (XML).• Source and binary compatibility for Linux applications and interoperability with Microsoft Windows systems• Includes Perl, PHP, and other widely used scripting languages• Includes Apache, Samba, sendmail, IP Filter, BIND, and other popular open source software • Supports Java application development and deployment with the Java Platform, Enterprise Edition (Java EE) and Java Platform, Standard Edition (Java SE)• Includes authentication support for LDAP-based directory servers and Kerberos-based infrastructures© 2009 Sun Microsystems, Inc. All rights reserved. Sun, Sun Microsystems, Solaris, OpenSolaris, Java , and CoolThreads are trademarks or registered trademarks of Sun Microsystems, Inc. or its subsidiaries in the United States and other countries. All SPARC trademarks are used under license and are trademarks or registered trademarks of SPARC International, Inc. in the US and other countries. Products bearing SPARC trademarks are based upon an architecture developed by Sun Microsystems, Inc. AMD, Opteron, the AMD logo, the AMD Opteron logo are trademarks or registered trademarks of Advanced Micro Devices. Intel® Xeon® is a trademark or registered trademark of Intel Corporation or its subsidiaries in the United States and other countries. Information subject to change without notice. SunWIN #420130 Lit. #SWDS12147-4 09/09 Sun Microsystems, Inc.4150 Network Circle, Santa Clara, CA 95054 USA Phone1-650-960-1300 or 1-800-555-9SUN Web 。
SOLARIS10系统配置文件

梯调系统配置文件一、Solaris 10安装说明将Solaris 10操作系统安装光盘(DVD版)放入光驱,在OK提示符下(# halt , 或按stop+A出现),键入boot cdrom。
1、在“Select a Language”窗口下,选择6:Simplified Chinese2、在“欢迎”窗口下,点击“下一步”3、在“网络连接”窗口下,选择“联网的”,点击“下一步”4、在“配置多个网络接口”窗口下,选择ce0、ce1,点击“下一步”5、在“主网络接口”窗口下,选择ce0,点击“下一步”6、在“ce0的DHCP”窗口下,选择“否”,点击“下一步”7、在“ce0的主机名”窗口下,输入主机名,点击“下一步”8、在“ce0的IP地址”窗口下,输入IP地址,点击“下一步”9、在“ce0的网络掩码”窗口下,输入255.255.255.0,点击“下一步”10、在“ce0的IPV6”窗口下,选择“否”,点击“下一步”11、在“ce0的缺省路由”窗口下,选择“无”,点击“下一步”12、在“ce1的DHCP”窗口下,选择“否”,点击“下一步”13、在“ce1的主机名”窗口下,输入主机名,点击“下一步”14、在“ce1的IP地址”窗口下,输入IP地址,点击“下一步”15、在“ce1的网络掩码”窗口下,输入255.255.255.0,点击“下一步”16、在“ce1的IPV6”窗口下,选择“否”,点击“下一步”17、在“ce1的缺省路由”窗口下,选择“无”,点击“下一步”18、在“Kerberos”窗口下,选择“否”,点击“下一步”19、在“名称服务”窗口下,选择“无”,点击“下一步”20、在“时区”窗口下,选择“地区性的洲/国家/地区”, 点击“下一步”21、在“洲与国家”窗口下,点击“亚洲”选择“中国”,点击“下一步”22、在“日期和时间”窗口下,输入正确时间,点击“下一步”23、在“超级用户(root)口令”窗口下,输入超级用户口令点击“下一步”24、在“确认信息”窗口下,选择“确认”25、在“欢迎”窗口下,点击“下一步”26、在“安装选项”窗口下,点击“下一步”27、在“指定媒体”窗口下,选择“CD/DVD”,点击“下一步”28、正在初始化…29、在“许可证”窗口下,选择“接受”,击“下一步”30、在“选择升级安装或初始安装”窗口下,选择“初始安装”,击“下一步”31、在“选择安装类型”窗口下,选择“自定义安装”,点击“下一步”32、在“选择软件语言环境”窗口下,选择“亚洲,中文(zh)”点击“下一步”33、在“选择系统语言环境”窗口下,选择“亚洲,中文(zh)”点击“下一步”34、在“选择附带软件”窗口下,选择“Solaris 10 Extra Value Software 87.3MB”,点击“下一步”35、在“附加产品”窗口下,选择“无”,点击“下一步”36、在“选择Solaris 软件组”窗口下,选择“整个郡组以及OEM”的“缺省包”,点击“下一步”37、在“选择磁盘”窗口下,点击“下一步”38、在“保存数据”窗口下,选择“否”,点击“下一步”39、在“分布文件系统”窗口下,选择“修改”选择“确定”,点击“下一步”31、在“准备安装”窗口下,点击“立即安装”32、重新引导后,出现“Do you need to override the system’s default NFS version 4 domain name (yes/no)?[no]:输入“no”,回车33、输入用户名:root34、输入密码:xxxx35、选择其中一个:选择“公用桌面环境”36、安装完毕二、Sun Fire V240磁盘镜像在安装系统时,到划分硬盘分区那一步时,给硬盘预留一部分的空间,可以是200MB。
Solaris10启用、重启和关闭服务

Solaris10启⽤、重启和关闭服务Solaris 服务管理器(Service Management Facility, SMF)是Solaris 10以及后续版本的Solaris操作系统当中采⽤的软件服务管理⼯具。
SMF按照服务的相关性来启动、停⽌和管理服务,并兼容现有的管理习惯(如启动脚本等)。
对于使⽤过Windows的读者来说,SMF的功能类似于“控制⾯板”中的“服务”;对于使⽤过Linux和Unix的读者来说,这个功能部分替代了/etc/rc*.d中的启动脚本和超级服务器inetd/xinetd的功能。
重启⽹络服务:svcadm restart networkSMF特性简介当出现了管理错误、软件缺陷或者是硬件缺陷导致服务程序异常中⽌的时候,SMF可以⾃动按照⼀定的次序重新启动服务。
使⽤svcs命令可以查看所有的服务,⽽是⽤svcadm和svccfg命令可以管理所有的服务。
使⽤svcs -p命令可以查看与本服务相关联的其他服务。
通过服务快照设置可以很容易地实现服务的备份和恢复。
通过svcs -x命令可以很容易地对服务进⾏调试,并且可以使每个服务都有⾃⼰的固定⽇志。
所有的服务都可以通过svcadm进⾏启动和关闭。
具有相应⾓⾊的⾮root⽤户也可以启动、修改和关闭服务。
SMF服务标⽰SFM服务标识(Fault Management Resource Identifier, FMRI)指的是服务实例的命名。
举个例⼦,rlogin服务的FMRI是svc:/network/login:rlogin。
同理,类似的FMRI还有svc:/system/system-log:default。
SMF服务状态服务的状态包括如下⼏种类型:状态标⽰状态描述degraded 服务已经启动,但是在受限制的状态下运⾏。
disabled 服务处于关闭状态。
legacy_run 这个服务⽬前⽆法被SMF所管理,但是可以被SMF所监测到。
Oracle Solaris 10操作系统安装指南说明书
An Oracle White PaperApril 2010How to Install the Oracle® Solaris 10Operating System on x86 SystemsIntroduction.........................................................................................1 Installation Assumptions.....................................................................2 Check the Hardware Compatibility List...............................................2 Basic System Requirements...............................................................2 Obtaining Media for the x86 Platform.................................................3 Power Up and Media Boot..................................................................3 Installing the Oracle Solaris 10 5/09 Operating System.....................4 Identifying the Console...................................................................4 Selecting the Type of Installation....................................................5 System Configuration......................................................................6 For More Information........................................................................26 IntroductionThis white paper instructs users unfamiliar with the Oracle® Solaris 10 operating system installation on how to install Oracle Solaris 10 on an Oracle supported x86 system (including the family of 32-bit x86 systems as well as 64-bit AMD64™ and Intel® 64 systems). It is assumed that you are installing Oracle Solaris 10 5/09; all features described in this guide may not be available in earlier updates. This step-by-step guide, complete with screen shots, takes users through the installation process in 22 simple steps. Novice users should be able to complete an Oracle Solaris 5/09 operating system installation on a standalone x86 system using the instructions in this guide.Installation AssumptionsThis guide makes several assumptions, including•The system is an x86 system.•The system is compatible with the Oracle Solaris 10 5/09 OS and is listed on the Oracle Solaris Hardware Compatibility List (HCL).•The system has a graphical interface.While this guide is most appropriate for a standalone system that does not connect to a network or connects to a network with automatic configuration, it can be used to install a system with a fixed IP address if the network configuration information is available.If problems arise during the installation process that are not discussed in this guide, refer to the Oracle Solaris 10 OS Installation Guide: Basic Installations for more information. This guide is part of the Oracle Solaris 10 Release and Installation Collection located on the Sun Web site at/app/docs/prod/solaris.10.Check the Hardware Compatibility ListThe first step before the installation process is to verify that the system to be installed is on the hardware compatibility list located at: /bigadmin/hcl/.Note: The term x86 refers to the family of 32-bit x86-compatible architecture and 64-bit AMD64 and Intel 64.Basic System RequirementsVerify the computer system meets the following requirements. Note that the requirements below are recommended minimums. While it is possible to install Oracle Solaris 10 on a system with less disk capacity and CPU speed, it is not recommended.•Minimum 1,024 MB of physical RAM•Minimum 10 GB of available hard drive space•Minimum 400 MHz CPU speed•DVD or CD-ROM drive•Attached monitor or integrated displayFor more information on Oracle Solaris system requirements, visit /solaris. For a catalog of the more than 5000 Oracle Solaris-ready applications and solutions, visit/bigadmin/apps.Obtaining Media for the x86 PlatformThe Oracle Solaris 10 5/09 OS release is available via download from the Oracle Web site.1.Go to /solaris/ and click on the Oracle Solaris logo if you want to obtain informationabout the Oracle Solaris 10 5/09 OS; if not, proceed to step 2.2.Go to /solaris/get to begin the download process.3.Choose Oracle Solaris 10 on the list of available downloads.4.Click on the appropriate media format (Oracle Solaris for x86 systems).5.Register at the Sun Download Center, if you have not already done so.6.Answer the short questionnaire.7.Read and accept the license agreement.8.Download and burn the CDs or DVDs.See the Oracle Solaris 10 FAQs located at /solaris/get for guidance, instruction, and tips on downloading Oracle Solaris 10 or burning installation CD and DVD media.Power Up and Media BootIf you do not want to substitute your current operating system and instead you want to run Oracle Solaris as a guest OS or virtual machine, please download and install Oracle VM VirtualBox for free from /.The following procedure can be used to install Oracle Solaris 10 5/09 on a new or used system.1.Power up the system and insert the first installation CD or DVD into the drive tray.2.Restart the system.3.If the system appears to be booting from the hard disk and the Oracle Solaris OS installer doesnot start, power cycle the system (power cycle is shutting down the power on the system and then restarting the system). As the system begins to boot, enter setup mode. Typically, the systemdisplays a message indicating which key to press (such as "Enter F2 to enter setup", although the key to press varies by manufacturer; the ESC and F12 keys are other common options.) If you miss the message, simply restart the system a couple of times until you are able to view it.Once in setup mode, specify the boot device for the system. This example specifies the CD or DVD drive as the boot device. To do so, find the list that describes boot order and re-order as needed to ensure the CD or DVD drive appears first on the list. The system should boot from the CD or DVD drive to start the install process.Installing the Oracle Solaris 10 5/09 Operating SystemIdentifying the ConsoleThe next step in the installation process is to select the type of console for the hardware on which Oracle Solaris is being installed. Use the arrow keys to select the version of Oracle Solaris OS that matches the hardware configuration. For most x86 systems, use the default selection.Press the ENTER key and boot the version of operating system selected. The highlighted entry boots in 60 seconds even if a key is not pressed.Note: Prompts do not appear during the boot process. If a selection is not made, the screen times out and the systemautomatically boots the Oracle Solaris OS.Selecting the Type of InstallationAfter the ENTER key is pressed or the counter times out, a series of dots will run on the screen and you will see the basic device configuration message along with a menu with six installation options.Before this new counter times out, select option 3 to install Oracle Solaris 10 5/09 from the beginning using the Oracle Solaris ZFS as the root file system. You can get more information on Oracle Solaris ZFS from /us/products/servers-storage/storage/storage-software/031857.htm.Note: If you don’t want to use Oracle Solaris ZFS as your root file system, you can use option 1. Please refer to the previousversion of this white paper.Once option 3 is selected, you'll see the following screen with some information regarding your hardware. Keep in mind that the hardware information displayed (such as "nge0") may differ from the exact data displayed below and that each step can take up to a couple of minutes to complete.After a few seconds, you are presented with the keyboard layout configuration in case you don't have a standard keyboard or if you have a localized keyboard. If you have a US keyboard, press the [F2] key; if not, select the right language using the arrow keys to move up or down, make your selection with the [space bar] and then press [F2] to continue.Immediately, you'll see the following message. Press ENTER to continue.System ConfigurationA series of screens guides you through the Oracle Solaris configuration process. Note that the graphical screens require a mouse to be rolled over the window in order to answer questions posed throughout the configuration process.1.After you press ENTER, the system configuration process will start through a series of windows.Please roll the mouse over the window, click the mouse, and press ENTER to continue.2.Select a language for the system.3. A new window, the Oracle Solaris Install Console, appears in the bottom-right corner. Thiswindow is used to display pertinent installation messages. Another window appears in which the Oracle Solaris OS installation questions should be answered. Press [F2] to continue.4.The system identification process begins. Press [F2] to continue.5.The Network Connectivity window appears. Use the default answer, (unless you don't have anetwork) and press [F2] to continue.6.The DHCP selection appears. For most cases, just select DHCP for your network configurationusing the arrow keys and the space bar to make the selection and then press [F2] to continue.7.The IPv6 window appears. Just use the default and press [F2] to continue.8.The Confirmation window appears. If you agree with your selections, press [F2] to continue; ifnot, press [F4] and the process will go back to step 5.9.The Security Policy window appears. Use the default for No Kerberos configuration. Press [F2] tocontinue.10.For confirmation of your policy selection, press [F2] and continue to the next screen.11.The Name Service window appears. Select NONE using the arrow keys and pressing the space barto select, then press [F2] to continue.12.For confirmation of your selection, press [F2] and continue to the next screen.13.The NFSv4 domain name window appears. Let the system use the default option and press [F2] tocontinue.14.For confirmation of your selection, press [F2] to continue to the next screen.15.The Time Zone window appears. Next, set the time zone for the system. This example sets theAmericas time zone. Use the arrow keys and the space bar to make the selection. Press [F2] to continue.16.Time Zone cont'd. Set the United States Country & Region, then press [F2] to continue.17.Time Zone cont'd. Set the Pacific Time. Press [F2] to continue.18.Set current date and time. Use arrow keys and keyboard to change the proposed date and time,then press [F2] to continue.19.To confirm your selection, press [F2] to continue.20.The Root Password window appears. Set the root password. Note the password typed remainsinvisible. Re-enter the password in the second box and press [F2] to continue.21.The Network Services window appears. Click [F2] to continue.22.The Remote Services window appears. In this window, you can choose a “Secure by default”Oracle Solaris installation, but afterwards individual services should be enabled. If you are unsure of your type of installation, follow the default “Yes” to enable all remote services and press [F2] to continue.23.The Install Progress window appears. Wait for a few minutes while Oracle Solaris installs on yoursystem. After the installation is completed, the system will reboot automatically and will start the Oracle Solaris OS. Remember that in some cases, you will have to eject the media manually.24.The Eject CD/DVD window appears. Use the default. Press [F2] to continue; the system willautomatically eject the media after installation.25.The Reboot After Installation window appears. Use the default. Press [F2] to continue.26.The Confirmation window appears; press [F2] to continue. In some cases, the system will not beable to eject the media after installation. Be sure to eject it manually to avoid starting theinstallation process again; if after the installation your system didn't eject the media and the install process started again, you can simply reboot your system. During the boot process, eject the media and the system will boot from the hard disk using the freshly installed Oracle Solaris 10 image.27.The License window appears. Please read the Oracle Solaris License Agreement, and if you agree,press [F2] to continue.28.The Geographic Regions window appears. To add support for other regions, select the desiredregion; if not, press [F2] to continue.29.The System Locale window appears. Press [F2] to continue.30.The Selection of Additional Products window appears. Press [F2] to continue.31.The Root File System selection window appears. Select ZFS and press [F2] to continue.32.The Software Selection window appears. Use the default and press [F2] to continue.33.The Disk Selection window appears. Use the default and press [F2] to continue.34.The ZFS Configuration window appears. Use the default and press [F2] to continue.35.The Remote Mounts window appears. Use the default and press [F2] to continue.36.The Profile window appears. On this window, you can see a technical description of how OracleSolaris will be installed on your system. Press [F2] to continue.37.The Install Progress window appears. Wait for a few minutes while Oracle Solaris installs on yoursystem. After the installation is completed, the system will reboot automatically and will start the Oracle Solaris OS. Remember that in some cases, you will have to eject the media manually.38.Now you have successfully installed Oracle Solaris 10 5/09 on your system. Login using the rootuser and the password you assigned on step 19.For More InformationFor more information regarding the Oracle Solaris 10 OS, visit/us/products/servers-storage/solaris/index.html.TABLE 1. REFERENCESDOCUMENTATION AND COMMUNITYSun Documentation /Big Admin System Administration Portal /bigadmin/SUN BLUEPRINTS ARTICLESConfiguring JumpStart Servers to Provision Sun x86 Systems /blueprints/0205/819Performing Network Installations Without a Local Boot Server /blueprints/0504/817/blueprints/0905/819Configuring Multiboot Environments on Sun x86 Systems with AMDOpteron ProcessorsRELATED WEB SITESSolaris Hardware Compatibility List /bigadmin/hclSolaris 10 System Requirements /solaris/docs/solaris-sys.pdf NEXT STEPS TO SOLARIS 10 ADOPTIONGet hands on experience with Solaris 10 using "Solaris 10 White Papers" /solaris/whitepapers/index.jsp Get trained on Solaris 10 /pls/web_prod-plq-dad/db_pages.getpage?page_id=402&p_nl=JSOLGet a support contract /us/support/systems/operating-systems/index.htmlParticipate in the OpenSolaris community How to Install the Oracle Solaris 10 Operating System on x86 Systems April 2010Author: Angel Camacho, Larry WakeOracle Corporation World Headquarters 500 Oracle Parkway Redwood Shores, CA 94065 U.S.A.Worldwide Inquiries: Phone: +1.650.506.7000 Fax: +1.650.506.7200 Copyright © 2010, Oracle and/or its affiliates. All rights reserved.This document is provided for information purposes only and the contents hereof are subject to change without notice. This document is not warranted to be error-free, nor subject to any other warranties or conditions, whether expressed orally or implied in law, including implied warranties and conditions of merchantability or fitness for a particular purpose. We specifically disclaim any liability with respect to this document and no contractual obligations are formed either directly or indirectly by this document. This document may not be reproduced or transmitted in any form or by any means, electronic or mechanical, for any purpose, without our prior written permission.Oracle and Java are registered trademarks of Oracle and/or its affiliates. Other names may be trademarks of their respective owners.AMD, Opteron, the AMD logo, and the AMD Opteron logo are trademarks or registered trademarks of Advanced Micro Devices. Intel and Intel Xeon are trademarks or registered trademarks of Intel Corporation. All SPARC trademarks are used under license and are trademarks or registered trademarks of SPARC International, Inc. UNIX is a registered trademark licensed through X/Open Company, Ltd. 0310。
Solaris10 硬件指南

Sun Microsystems, Inc.
文件号码 819-1112-10 2005 年 3 月, 修订版 A 请将有关本文档的意见和建议提交至: /hwdocs/feedback
版权所有 2005 Sun Microsystems, Inc., 4150 Network Circle, Santa Clara, California 95054, U.S.A. 保留所有权利。 对于本文档中介绍的产品, Sun Microsystems, Inc. 对其所涉及的技术拥有相关的知识产权。需特别指出的是 (但不局限于此),这些知识产 权可能包含在 /patents 中列出的一项或多项美国专利,以及在美国和其他国家/地区申请的一项或多项其他专利或待批 专利。 本文档及其相关产品的使用、复制、分发和反编译均受许可证限制。未经 Sun 及其许可方 (如果有)的事先书面许可,不得以任何形式、任何 手段复制本产品或文档的任何部分。 第三方软件,包括字体技术,均已从 Sun 供应商处获得版权和使用许可。本产品的某些部分可能是从 Berkeley BSD 系统衍生出来的,并获得了 加利福尼亚大学的许可。 UNIX 是 X/Open Company, Ltd. 在美国和其他国家/地区独家许可的注册商标。 Sun、 Sun Microsystems、 Sun 徽标、 、 Netra、 SunVTS、 Sun HSI、 SunForum、 Sun ATM、 Java 3D、 Sun Blade、 Sun Fire、 Sun Enterprise、 Sun Enterprise Ultra、 Power Management、 OpenBoot、 JumpStart、 Ultra 和 Solaris 是 Sun Microsystems, Inc. 在美国和其 他国家/地区的商标或注册商标。所有 SPARC 商标的使用均已获得许可,它们是 SPARC International, Inc. 在美国和其他国家/地区的商标或注 册商标。标有 SPARC 商标的产品均基于由 Sun Microsystems, Inc. 开发的体系结构。 Adobe® 徽标和 PostScript 徽标是 Adobe Systems, Incorporated 的商标或注册商标。 OPEN LOOK 和 Sun™ 图形用户界面是 Sun Microsystems, Inc. 为其用户和许可证持有者开发的。 Sun 感谢 Xerox 在研究和开发可视或图形用 户界面的概念方面为计算机行业所做的开拓性贡献。 Sun 已从 Xerox 获得了对 Xerox 图形用户界面的非独占性许可证,该许可证还适用于实现 OPEN LOOK GUI 和在其他方面遵守 Sun 书面许可协议的 Sun 许可证持有者。 美国政府权利 — 商业用途。政府用户应遵循 Sun Microsystems, Inc. 的标准许可协议,以及 FAR (Federal Acquisition Regulations,即 “联 邦政府采购法规”)的适用条款及其补充条款。 以下声明适用于 SunForum™ 3.2:Copyright© DATA CONNECTION LIMITED 2000;TELES AG 2000;本软件的某些部分版权隶属于 Copyright© 1996-1998 RADVision Ltd.。 DATA CONNECTION 是 DATA CONNECTION LIMITED 在美国和其他国家 (地区)的注册商标。 以下声明适用于 OpenGL 1.3: OpenGL® 是 Silicon Graphics, Inc. 在美国和其他国家 (地区)的注册商标。 本文档按 “原样”提供,对于所有明示或默示的条件、陈述和担保,包括对适销性、适用性和非侵权性的默示保证,均不承担任何责任,除非 此免责声明的适用范围在法律上无效。
SUN Solaris 10 教程

init进程-初始化系统(续4)
rc2.d S70uucp 配置UUCP
S71rpc 启动与RPC有关的进程 S71sysid.sys 在系统没有配置的情况下,配置 系统基本信息,如时区、root口令 S72inetsvc 配置网络接口,并启动d和 inetd
S73nfs.client 启动NFS客户端服务
init进程-初始化系统(续2)
rc2.d K20lp 从运行等级3进入运行等级2时, 关闭打印服务 K60nfs.server 从运行等级3进入运行等级2时, 关闭NFS服务 S01MOUNTFSYS 挂接所有的文件系统 S05RMTMPFILES 删除/tmp、/var/tmp目录下的 临时文件和目录
%find ./ -name "file*” -user tz -type f -print
文件操作(续5)
• 链接文件
物理链接(硬链接)ln 现存文件 新链接 符号链接(软链接) ln -s 现存文件 新链接
文件操作(续6)
链接文件的1个应用:处理/var卷占用率已达100%的问 题 • 将系统的/var/mail连接到外置硬盘上 1.杀掉后台的sendmail进程 2.cp -p -r /var/mail /disk4/.
/usr/lib/saf/ttymon
表
init进程-初始化系统
rcS.d S30rootusr.sh 配置网络接口并且以只读方式挂 接/usr S33keymap.sh 建立键盘映射 S35cacheos.sh 如果使用cachefs,对cachefs 进行配置 S40standardmounts.sh 安装swap区,并重新 挂接/、/usr区
init进程-初始化系统(续1)
Solaris技术手册
Solaris技术手册一 . 基本的OS命令1.成为超级用户命令:su%su(回车)2.退出超级用户状态:exit#exit(回车)3.获取当前工作目录:pwd%pwd(回车)4.查找文件尾命令:tailtail文件名(回车)5.分页显示文件内容命令:more文件名(回车)用more找文件内容时,检索有关字符串,键入/字符串(回车)查到一个匹配的串后,继续查找,键入n(回车)退出more,则键入q(回车)或ctr+c6.显示所有登录用户:who(回车)7.显示所有登录的用户finger8.显示哪个用户登录到了哪个系统rusers -l(回车)9.显示登录的用户及其正在干什麽whodo(回车)10.显示用户的Uid和Gidid(回车)11.显示正在运行的进程ps -aef(回车)12.显示环境变量及其值%evn(回车)13.设置环境变量之值(1)Bshell和Rshell (变量名一般为大写字母)HIS=50;export HIS(2)对cshellsetenv DISPLAY SUN:O14.在文件中查找串:grep 串文件名(回车)15.显示文件类型file 文件名(回车)16.生成新文件方法(1)使用cat命令cat >>f1(回车)输入文本(回车)ctr+d(2)使用touch命令touch f1(回车)(3)cp f1 f217.文件改名mv f1 f2(回车)18.如何查找文件findfind / -name myfile -printfind /usr -name ˋ*ˊC -print19.如何删去所有core文件:find / -name core -exec rm { } ¥;20.利用管道|man cat | lp(回车)ps -aef | grep openwin(回车)21.杀掉进程kill — 9 PID22.显示所示所有路径echo $PATH23.查找某程序位于何处:which openwin(回车)24.设置路径:(1)Bshell和KshellPATH=目录:目录:目录•••••;export PATH (2)ChellSet path=(目录:目录:目录•••)25.查联机手册man lp(回车)26.显示磁盘空间使用情况df -k(回车)二 . 引导和关闭系统1. 在OK状态下引导系统到多用户OK boot(回车)2.在OK状态下引导到单用户OK boot -s(回车)3.从单用户到多用户ctrl+D4.如何下机# init 0(回车)5.如何紧急下机stop+A三. . 设备管理与使用:1.检查磁盘使用情况du(回车)or du -s(回车)2.查找磁盘信息prtvtoc /dev/rdsk/c0tld0s3(回车)3.格式化软盘使之为dos格式fdformat -d(回车)4.在软盘上生成文件系统fdformat(回车)newfs /dev/diskette(回车)5.将软盘从软区中退出eject /dev/diskette(回车)6.如何来回拉磁带mt -f /dev/rmt/o retension7.倒带mt -f /dev/rmt/o rewind8.查寻磁带驱动器的状态mt -f /dev/rmt/o status(回车)四 . 文件系统1./ect/vfstab文件中一行的意义2.显示当前已安装的文件系统mount(回车)3.检查文件系统的一致性fsck(回车)4.安装某类文件系统mount -F nfs(回车)mount 安装点5.拆卸某个文件系统umount 安装点6.用盒式磁带备分文件系统过程:(1)init s(回车)(进入单用户)(2)nfsdump cuf /dev/rmt/0 C0t0d0s3(回车)7.恢复一个备分的文件系统(1)init s(回车)(2)umount 安装点(3)newfs /dev/rdsk/c0t0d0s3(回车)(4)mount安装点(回车)(5)cd安装点(6)ufsrestore rvf /dev/rmt/0(回车)五 . 网络使用命令1.显示子网中所有机器:rup(回车)2.登录到远程系统中rlogin远程系统机器名3.判断远程系统是否可用(1)ping远程系统名(回车)(2)rup远程系统名(回车)4.在系统之间传送文件(1)ftp(2)rcp六 . 安全性:1.建立或改变用户口令:password 用户名(回车)2.设置文件的权限:chmod nnn f1(回车)3.改变文件的所有者:chown 用户名文件名4.改变文件组的属性:chgrp 组名文件名(回车)七 . 系统常用命令1.查系统的机器号sysdef -h(回车)或hostid(回车)2.查询某个系统启动了多久uptime(回车)3.查询一个系统最近何时被引导过who -b(回车)4.查系统硬件类型uname -m(回车)5.查系统的CPU类型uname -p(回车)6.查系统OS版本号uname -r(回车)7.增加系统交换区(1)列出swap文件swap -l(回车)(2)生成swap文件mkfile nnn [k/b/m]文件名(回车)(3)增加swap区swap -a [swap文件绝对路径名](4)删除可用的swap文件swap -d swap文件(5)增加一个swap文件到/etc/vfstab 文件中:swap 文件绝对路径— swap — no —8.查询系统日期daet(回车)9.显示系统配置信息sysdef(回车)或prtconf(回车)第二章.Netra系统的安装与培训一 . Netra的安装1.OK boot cdrom(回车)2.回答N(回车)3.回答Yes(回车)二 .Netra系统的配置1.进入配置界面(窗口)••••••login:键入setup(回车)••••••password:键入setup 的口令,即setup(回车)2.用鼠标左键,点击Netscape图形界面3.接下来出现用户校验窗口,再次输入用户名setup及其口令setup即可进入管理窗口界面。
Solaris操作系统的系统要求与安装指南说明书
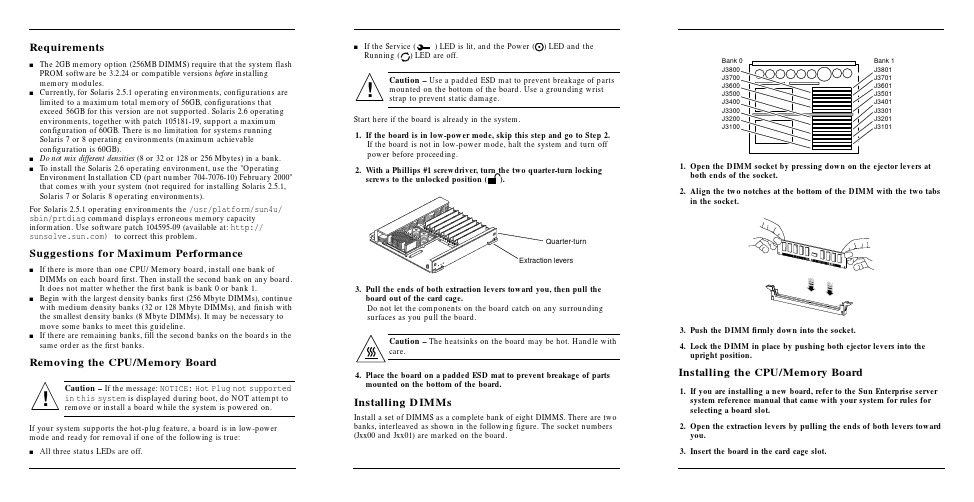
Requirementss The2GB memory option(256MB DIMMS)require that the system flash PROM software be3.2.24or compatible versions before installingmemory modules.s Currently,for Solaris2.5.1operating environments,configurations are limited to a maximum total memory of56GB,configurations thatexceed56GB for this version are not supported.Solaris2.6operating environments,together with patch105181-19,support a maximumconfiguration of60GB.There is no limitation for systems runningSolaris7or8operating environments(maximum achievableconfiguration is60GB).s Do not mix different densities(8or32or128or256Mbytes)in a bank.s To install the Solaris2.6operating environment,use the"Operating Environment Installation CD(part number704-7076-10)February2000"that comes with your system(not required for installing Solaris2.5.1, Solaris7or Solaris8operating environments).For Solaris2.5.1operating environments the/usr/platform/sun4u/ sbin/prtdiag command displays erroneous memory capacity e software patch104595-09(available at:http:// )to correct this problem.Suggestions for Maximum Performances If there is more than one CPU/Memory board,install one bank of DIMMs on each board first.Then install the second bank on any board.It does not matter whether the first bank is bank0or bank1.s Begin with the largest density banks first(256Mbyte DIMMs),continue with medium density banks(32or128Mbyte DIMMs),and finish with the smallest density banks(8Mbyte DIMMs).It may be necessary to move some banks to meet this guideline.s If there are remaining banks,fill the second banks on the boards in the same order as the first banks.Removing the CPU/Memory BoardCaution–If the message:NOTICE:Hot Plug not supportedin this system is displayed during boot,do NOT attempt toremove or install a board while the system is powered on.If your system supports the hot-plug feature,a board is in low-power mode and ready for removal if one of the following is true:s All three status LEDs are off.s If the Service()LED is lit,and the Power ()LED and theRunning()LED are off.Caution–Use a padded ESD mat to prevent breakage of partsmounted on the bottom of the e a grounding wriststrap to prevent static damage.Start here if the board is already in the system.1.If the board is in low-power mode,skip this step and go to Step2.If the board is not in low-power mode,halt the system and turn offpower before proceeding.2.With a Phillips#1screwdriver,turn the two quarter-turn lockingscrews to the unlocked position().3.Pull the ends of both extraction levers toward you,then pull theboard out of the card cage.Do not let the components on the board catch on any surroundingsurfaces as you pull the board.Caution–The heatsinks on the board may be hot.Handle withcare.4.Place the board on a padded ESD mat to prevent breakage of partsmounted on the bottom of the board.Installing DIMMsInstall a set of DIMMS as a complete bank of eight DIMMS.There are twobanks,interleaved as shown in the following figure.The socket numbers(Jxx00and Jxx01)are marked on the board.1.Open the DIMM socket by pressing down on the ejector levers atboth ends of the socket.2.Align the two notches at the bottom of the DIMM with the two tabsin the socket.3.Push the DIMM firmlydown into the socket.4.Lock the DIMM in place by pushing both ejector levers into theupright position.Installing the CPU/Memory Board1.If youare installing a new board,refer to the Sun Enterprise serversystem reference manual that came with your system for rules forselecting a board slot.2.Open the extraction levers by pulling the ends of both levers towardyou.3.Insert the board in the card cage slot.!!Extraction leversQuarter-turnBank 1J3801J3701J3601J3501J3401J3301J3201J3101Bank 0J3800J3700J3600J3500J3400J3300J3200J3100sFor a 4-slot or 5-slot card cage,orient the board with the component side to the right.sFor a 16-slot or 8-slot card cage (diagram follows):Front slot installation,orient the board with the component side down.Rear slot installation,orient the board with the component side up.4.Push the board into the card cage,then simultaneously press both extraction levers to seat the board on the centerplane.Caution –Do not press on the board front panel to seat it—doing so will damage the connector pins.Caution –When inserting a board into slot 4or slot 10of a16-slot card cage,lift the board slightly to avoid damage to the centerplane connectors.Pushing both levers simultaneously avoids twisting the board and bending the connector pins.5.With a Phillips #1screwdriver,turn the two quarter-turn locking screws to the locked position ().Rear viewFront view!!Sun ™ Enterprise ™6x 00/5x 00/4x 00/3x 00 Systems DIMM Installation GuideCaution –The heatsinks on the board can bedamaged by incorrect handling.Do not touch the heatsinks while installing or moving the board.Hold the board only by the edges.If a heatsink is loose or broken,obtain a replacement board.Caution –The heatsinks on the board can bedamaged by improper packaging.When storing or shipping the board,ensure that the heatsinks have sufficient protection.Note –Make sure the DIMM and connector are freeof dust and debris.If necessary,gently clean them using the dry,stiff brush supplied.!!Part Number: 802-5032-15Revision A of January 2000Accessing Sun Documentation OnlineThe sm web site enables you to access Sun technicaldocumentation on the Web.You can browse the archive or search for a specific book title or subject at:Sun Welcomes Your CommentsWe are interested in improving our documentation and welcome your comments and suggestions.You can email your comments to us at:*******************Please include the part number (802-5032-14)of the document in the subject line of your email.Copyright 2000 Sun Microsystems, Inc. All rights reserved. Use is subject to license terms. Third-party software, including font technology, is copyrighted and licensed from Sun suppliers. Sun, SunMicrosystems, the Sun Logo, SunDocs, and Solaris are trademarks or registered trademarks of Sun Microsystems, Inc. in the U.S. and other countries.RESTRICTED RIGHTS : Use, duplication, ordisclosure by the U.S. Government is subject to restrictions of FAR 52.227-14(g)(2)(6/87) and FAR 52.227-19(6/87), or DFAR 252.227-7015(b)(6/95) and DFAR 227.7202-3(a).Copyright 2000 Sun Microsystems, Inc. Tous droits réservés. Distribué par des licences qui enrestreignent l’utilization. Le logiciel détenu par des tiers, et qui comprend la technologie relative aux polices de caractères, est protégé par un copyright et licencié par des fournisseurs de Sun. Sun, SunMicrosystems,le logo Sun,SunDocs,et Solaris sont des marques de fabrique ou des marques déposées de Sun Microsystems, Inc. aux Etats-Unit et dans d’autres pay.Sun Microsystems Computer Company •901San Antonio Road •Palo Alto,CA 94303-4900USA •650960-1300•Fax 650969-91316.Reboot the system now or schedule a later time to reboot when system disruption will be minimized.The system cannot use the new board until the system is rebooted.7.If the system is running,look for a system message similar to the following example.This example is for a CPU/Memory board in slot 5:NOTICE: CPU Board Hotplugged into Slot 5NOTICE: Board 5 is ready to remove。
Solaris SPARC MPxIO配置指导书v
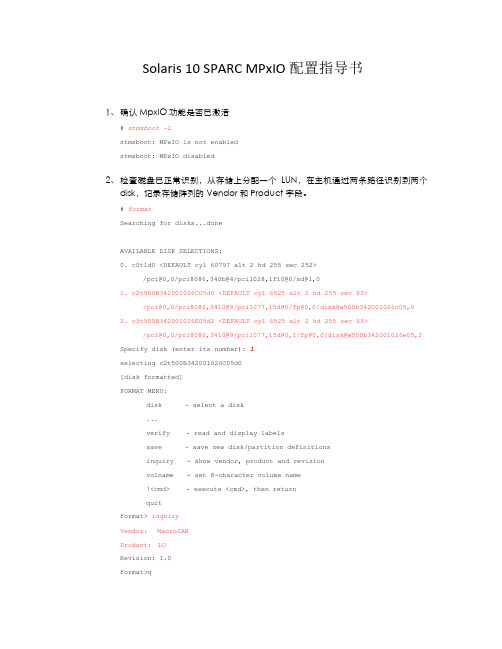
Solaris 10 SPARC MPxIO配置指导书1、确认MpxIO功能是否已激活# stmsboot -Lstmsboot: MPxIO is not enabledstmsboot: MPxIO disabled2、检查磁盘已正常识别,从存储上分配一个LUN,在主机通过两条路径识别到两个disk,记录存储阵列的Vendor和Product字段。
# formatSearching for disks...doneAVAILABLE DISK SELECTIONS:0. c0t1d0 <DEFAULT cyl 60797 alt 2 hd 255 sec 252>/pci@0,0/pci8086,340b@4/pci1028,1f10@0/sd@1,01. c2t500B342001026C05d0 <DEFAULT cyl 6525 alt 2 hd 255 sec 63>/pci@0,0/pci8086,3410@9/pci1077,15d@0/fp@0,0/disk@w500b342001026c05,02. c3t500B342001026E05d2 <DEFAULT cyl 6525 alt 2 hd 255 sec 63>/pci@0,0/pci8086,3410@9/pci1077,15d@0,1/fp@0,0/disk@w500b342001026e05,2 Specify disk (enter its number): 1selecting c2t500B342001026C05d0[disk formatted]FORMAT MENU:disk - select a disk...verify - read and display labelssave - save new disk/partition definitionsinquiry - show vendor, product and revisionvolname - set 8-character volume name!<cmd> - execute <cmd>, then returnquitformat> inquiryVendor: MacroSANProduct: LURevision: 1.0format>q说明:(1)在此记录存储阵列的”Vendor”和”Product”字段3、修改/kernel/drv/scsi_vhci.conf文件,在/kernel/drv/scsi_vhci.conf中将存储阵列的信息加入,示例如下:#cp /kernel/drv/scsi_vhci.conf /kernel/drv/scsi_vhci.conf.bak #备份文件#vi /kernel/drv/scsi_vhci.confdevice-type-scsi-options-list ="MacroSANLU", "symmetric-option";symmetric-option = 0x1000000;说明:(1)“MacroSAN”为存储阵列的Vendor ID,该字段必须为八个字符,对于未满八个字符的,需要用空格补齐。
Solaris10常用命令指南
Solaris10常用命令指南Solaris与linux命令基本类似,但也有一些区别,特将常用命令整理如下:(一) 基本命令1. ls 显示文件名,等同于dos下dir命令命令格式:ls [option] fileoption:-l 显示详细列表域1 :文件类型和文件权限域2 :文件连接数域3 :文件所有者名字域4 :文件用户组名字域5 :文件长度域6-8 :最近修改日期域9 :文件名-a 显示所有文件,包含隐藏文件(以. 起头的文件名)-R 显示文件及所有子目录-F 显示文件(后跟*)和目录(后跟/)-d 不l选项合用,显示目录名而非其内容2. cd 目录转换,等同于dos下cd命令注意目录分隔符为”/ ”,与dos相反命令格式:cd dirname3. pwd 显示当前路径4. cat 显示文件内容,等同于dos下type命令命令格式:cat filename5. .more 以分页方式查看文件内容.命令格式:more filename6. .rm 删除文件命令格式:rm [-r] filename (filename 可为档名,或档名缩写符号.)例子:rm file1 删除档名为file1 之文档.rm file? 删除档名中有五个字符,前四个字符为file 之所有文档.rm f* 删除档名中,以f 为字首的所有文档.rm -r dir1 删除目录dir1,及其下所有文档及子目录.7. mkdir 创建目录命令格式:mkdir [-p] directory-name例子:mkdir dir1 建立一新目录dir1.mkdir -p dir/subdir 直接创建多级目录8. rmdir 删除目录目录必须首先为空命令格式: rmdir directory9. cp 文档复制命令格式: cp [-r] source destination例子:cp file1 file2 将文档file1 复制成file2cp file1 dir1 将文档file1 复制到目录dir1 下,文件名仍为file1.cp /tmp/file1 . 将目录/tmp 下的文档file1复制到现行目录下,档名仍为file1.cp /tmp/file1 file2 将目录/tmp 下的文档file1现行目录下,档名为file2cp -r dir1 dir2 (recursive copy) 复制整个目录.若目录dir2 存在,则将目录dir1,及其所有文档和子目录,复制到目录dir2 下,新目录名称为dir1.若目录dir2不存在,则将dir1,及其所有文档和子目录,复制为目录dir2.10. mv 文件移动命令格式:mv source destination例子:mv file1 file2 将文档file1,更改档名为file2.mv file1 dir1 将文档file1,移到目录dir1 下,档名仍为file1.mv dir1 dir2 若目录dir2 存在,则将目录dir1,及其所有档案和子目录,移到目录dir2 下,新目录名称为dir1.若目录dir2 不存在,则将dir1,及其所有文档和子目录,更改为目录dir2.11. du 查看目录所占磁碟容量命令格式: du [-sk] directory例子:du dir1 显示目录dir1 的总容量及其次目录的容量du -sk dir1 显示目录dir1 的总容量,以k bytes为计量12. find 文件查找命令格式: find dir -name filename command例子:find . -name hello -print 寻找目前目录及所有的子目录内叫hello的文档.find . -ctime +7 -print 找出七天内未被更动的文档find . -size +2000m -print 找出大小超过2000 bytes的文档find /tmp -user b1234567 -print 在/tmp下属於b1234567的文档find . -name '*.c' -exec rm {} 删除所有的.c档find . -name test\* -print 显示当前目录及其子目录文件名前4位为test的文件名13. man 随机文档例子:man ls | col –b >;ls.txt 生成文本文档catman –w –M /usr/man 生成索引关键字man –k keyword 关键字查找man –s number word 不同系统类别example: man –s 3s printf14. vi 编辑器命令状态:j,k,h,l:上下左右0:行首$: 行尾i,I :插入命令,i 在当前光标处插入I 行首插入a,A:追加命令,a 在当前光标后追加,A 在行末追加o,O:打开命令,o 在当前行下打开一行,O在当前行上插入一行r,R :替换命令,r 替换当前光标处字符,R从光标处开始替换数字s: 替换指定数量字符x: 删除光标处字符dd: 删除当前行d0: 删除光标前半行d$: 删除光标后半行ctrl+f :后翻页ctrl+b:前翻页G : 文件尾数字G: 数字所指定行/string 查找字符串n 继续查找N 反向继续查找% 查找对应括号u 取消上次操作ex命令状态:set number 显示行号:set smd 显示显示状态:0 文件首:1,5 copy 7 块拷贝:1,5 del 块删除:1,5 move 7 块移动:1,$s/string1/string2/g 全文件查找string1并替换为string2:wq! 存盘退出(二) 增强命令1. ln 文档连结命令格式:ln [-s] oldname newname同一文档,可拥有一个以上之名称,可将文档做数个连结.一个符号链是指向系统另一个文件的特殊文件,当访问这种文件时,它里面存放着一个路径名,该路径名用来引导用户到卡符号链所指的文件或目录例子:ln -s file1 file2 将名称file2,连结至文档file1.2. .grep 搜索字符串命令格式:grep string filename寻找字串的方法很多,比如说我想找所有以M开头的行.此时必须引迕pattern 的观念.以下是一些简单的例,以及说明:^M 以M开头的行,^表示开始的意思M$ 以M结尾的行,$表示结束的意思^[0-9] 以数字开始的行,[]内可列举字母^[124ab] 以1,2,4,a,或b开头的行^b.503 句点表示任一字母* 星号表示0个以上的字母(可以没有)+ 加号表示1个以上的字母\. 斜线可以去掉特殊意义;cat passwd | grep ^b 列出大学部有申请帐号者名单cat passwd | grep ^s 列出交换学生申请帐号者名单cat passwd | grep '^b.503' 列出电机系各年级...grep '^\.' myfile.txt 列出所有以句点开头的行3. fgrep 搜索字符串命令格式:fgrep string file4. .file 显示文件类型命令格式:file fileall文件类型为shell script,ELF 32bit,ASCII text,data or tar file5. .diff 比较文档或目录之不同内容命令格式:diff [-r] name1 name2 ( name1 name2 可同时为档名,或目录名称.) 例子:%diff file1 file2比较文档file1 与file2 内,各行之不同处.%diff -r dir1 dir2比较目录dir1 不dir2 内,各文档之不同处.6. cmp 比较文档相同部分命令格式:cmp file1 file27. ftp 远程文件传输命令格式:ftp [hostname|IP address]在进入ftp 之後,如果不remote host 连接上了,它将会询问你username 与密码,如果输入对了就可以开始进行文档传输.注意:如用户无密码,无法注册(1) ftp 命令ascii 将传输模式设为ascii 模式.通常用于传送文字档.binary 将传输模式设为binary 模式,通常用于传送执行档,压缩档与影像cd remote-directory 将远程主机上的工作目录改变.lcd [ directory ] 更改本地主机的工作目录ls 列出远程主机上的文档.get remote [ local-file ] 取得远方的文档.mget remote-files 可使用通用字元一次取得多个文档.put local[ remote-file] 将本地主机的文档送到远程主机.mput local-files 可使用通用字元一次将多个文档放到远程主机上.help [ command ] 线上辅助指令.mkdir directory-name 在远程主机创建一个目录.prompt 更改交谈模式,若为on 则在mput 不mget 时每作一个文档之传输时均会询问.quit/bye 离开ftp .2) 后台执行ftp首先,将过程所用到的指令依顺序放入文档中,如下:%cat ftp_command!mkdir testlcd testcd testpromptbinarymget *.*bye其次,建一个.netrc档,属性为400,让ftp 自动到此读取Username 不Password,方可顺利login 到的主机,如下:%cat .netrcmachine remote login anonymous password guest3)最後再执行下面指令即可.%nohup ftp remote < ftp_command >; message &8. .telnet 远程终端访问命令格式:telnet [hostname|IP address]*注:如使用root用户登录,其权限请参见11.3.49. .IO 重新导向UNIX所有的程式执行时,均需要资料的输入以及输出资料.一般而言,资料是从键盘输入,并将资料输出到萤幕上,这就叨做标准输入及标准输出,而我们可以更改标准出输出入.A. 更改标准输入——在命令後方加"< ;" ,即可从;这个文档输入资料.B. 更改标准输出——在命令後方加">; ;" ,即可将萤幕输出的资料导向到;这个文档上.C. 更改标准输出——在命令後方加">;>; ;",功能不B.相似,叧不过这会将资料加在文档後方.D. 管道——在两个命令中间加上'|',即可将前方指令的输出当成後方指令的输入.例:cd /tmpls -l >; /tmp/ls.outcat /tmp/ls.outmore /tmp/ls.outrm /tmp/ls.outls | morels | wc -l (word count, count line number,算出文档数目)(三) 软件包管理1. pkginfo 显示软件包信息命令格式:pkginfo -d[ device|pathname] -l pkg_name例子:这三个域为:pkg_category 软件包种类,可为application,graphics 或system.pkg_name 软件包名字,如为SUN产品则机SUNW 起头.Description 软件产品的简单说明.例子:# pkginfo -d /cdrom/solaris_2_2/s0/Solaris_2.2 |more利用pkginfo -l 命令显示关亍软件包的详细信息,包括软件包的大小(按硬盘块大小计算).# pkginfo -d /cdrom/solaris_2_2/s0/Solaris_2.2 -l SUNWaudio上面输出的最后一行指示软件包的大小. 利用此信息和df -k命令来确定你是否拥有足够硬盘空间来安装此软件包.2. pkgadd 增加软件包利用pkgadd 命令增加软件包,当软件包被成功地安装以后,向root发送一个邮件.命令格式:pkgadd -d [device | pathname] pkg_name例子:# pkgadd -d /cdrom/solaris_2_2/s0/Solaris_2.2 SUNWaudio3. .pkgchk 校验软件包的安装pkgchk命令通过将软件包的属性及路径名内容不系统记录文件中的值进行对比来校验.命令格式:pkgchk [-p path1 [path2...]]此命令可以检查整个软件包或通过指定-p选项对一特殊路径名进行检查,无输出则意味着没有问题被检查出.由于/etc/group 文件大小已被改变,所以文件内容的checksum就不对.考察软件包信息pkgadd命令更新文件/var/sadm/install/contents、此文件为系统中所有已安装软件包的记录文件.没有简单的方法来确定某软件包具有某一特殊文件(或命令).对亍已安装的软件包,从/var/sadm/install/contents 记录文件中查找此软件包的路径名.4. .pkgrm 删除软件包命令格式:pkgrm pkgname1 pkgname2 …在调用pkgrm 命令后,将向你警告有依赖关系的软件包信息,并提供放弃此操作的提示.当软件包被成功地删除后,向root发送一个邮件.pkgrm命令通过文件/var/sadm/install/contents 来确定软件包的地址,并且当软件包被删除以后,更新此文件.假如此软件包被两个或更多的包共享,则一定得将这些依赖亍此包的所有软件包删除以后才删除此软件包.5. spooling 软件包转储一个软件包可以由安装CD-ROM中拷贝过来存放在系统中,但并没有安装此软件包.例如,一个服务器可以拷贝存储一个软件包,一个没有CD-ROM设备的系统可以从服务器上挂接此软件包,用以安装。
Sun Fire V20z 和 V40z 伺服器的 Solaris 10 作業系統指南说明书

Sun Fire™ V20z 與 Sun Fire V40z伺服器預先安裝的 Solaris™ 10 作業系統指南Sun Microsystems, Inc.文件號碼 819-2935-102005 年 7 月,修訂版 A請將您對本文件的意見提交至:/hwdocs/feedback請回收Copyright 2005 Sun Microsystems, Inc., 4150 Network Circle, Santa Clara, California 95054, U.S.A. 版權所有。
Sun Microsystems, Inc. 對於本文件所述技術擁有智慧財產權。
這些智慧財產權包含 /patents 上所列出的一項或多項美國專利,以及在美國或其他國家 / 地區擁有的一項或多項其他專利或申請中專利。
但並不以此為限。
本文件及相關產品在限制其使用、複製、發行及反編譯的授權下發行。
未經 Sun 及其授權人 (如果有) 事先的書面許可,不得使用任何方法、任何形式來複製本產品或文件的任何部份。
協力廠商軟體,包含字型技術,其版權歸 Sun 供應商所有,經授權後使用。
本產品中的某些部分可能源自加州大學授權的 Berkeley BSD 系統的開發成果。
UNIX 是在美國及其他國家 / 地區的註冊商標,已獲得 X/Open Company, Ltd. 專屬授權。
Sun 、Sun Microsystems 、Sun 標誌、AnswerBook2、 、Sun Fire 與 Solaris 是 Sun Microsystems, Inc. 在美國及其他國家 / 地區的商標或註冊商標。
所有 SP ARC 商標都 SP ARC International, Inc. 在美國和其他國家 / 地區的商標或註冊商標,經授權後使用。
凡具有 SP ARC 商標的商品都是採用 Sun Microsystems, Inc. 所開發的架構。
Oracle Solaris Operating System 初始启动指南说明书

This guide describes the minimum steps you must perform to power on and boot your server for the first time using the preinstalled Oracle Solaris™Operating System (Solaris OS).FIGURE 1Sun SPARC Enterprise T5120ServerShipping ContentsBefore You BeginFor quick installation and configuration,follow these steps.For more detailed information,refer to the complete online product documentation set at:/app/docs/prod/sparc.t5120Understand the following information before you set up the server for the first time:■Do not apply power until instructed to do so –This system includes a service processor (SP)that is used to configure and boot the host server.To properly configure the host server and view SP messages,do not apply AC power to the server until the SP and host networking connections are made,as described in this guide.■Choose the best instructions for your situation –The quick setup instructions in this guide work for any networking environment,and require the use of a terminal device for connection to a serial port.If you have a networking environment running DHCP,you can configure your system using the Ethernet management port.To take advantage of the DHCP setup method,refer to the online installation guide in the online product QuantityItem1Server2RJ-45Ethernet cable1RJ-45to DB-25adapter (crossover)1RJ-45to DB-9adapter (crossover)2Power cords (packaged separately)Sun SPARC Enterprise T5120 ServerGetting Started Guide■Set aside sufficient time–Installation times vary,but if you are performing these setup instructions for the first time,plan to spend about45to75minutes to complete all of these instructions.Additional time might be required for installing optional hardware and rackmounting kits.■Obtain a terminal device–You configure this rackmountable server through the SP using the built-in serial and network management ports,and not through a graphical interface and Sun keyboard.To communicate with the SP,you will need a terminal device,which can be a terminal,terminal server,or laptop running terminal emulation software.■Gather your configuration information–During the configuration,you are prompted for time zone and networking parameters for your e TABLE1to record your configuration information. TABLE1Configuration InformationParameter Description Your EntryLanguage Select a number from the displayed language list.Locale Select a number from the displayed locale list.Terminal Type Select a terminal type that corresponds with your terminal device.Network?Select Yes.Multiple Network Interfaces Select the network interfaces that you plan to configure.If you are not sure, select the first one in the list.DHCP?Select Yes or No according to your network environment.Host Name Enter the host name for the server.IP Address Enter the IP address for the selected Ethernet interfaces.Subnet?Select Yes or No according to your network environment.Subnet Netmask(If subnet was Yes)Enter the netmask for the subnet for your networkenvironment.IPv6?Specify whether or not to use IPv6.If you are not sure,select No toconfigure the Ethernet interface for IPv4.Security Policy Select either standard UNIX security(No)or Kerberos Security(Yes).If you are not sure,select No.Confirm Review the onscreen information and change it if needed.Otherwise,continue.Name Service Select the name service according to your network environment.Note–If you select a name service other than None,you will be promptedfor additional name service configuration information.NFSv4Domain Name Select the type of domain name configuration according to your environment.If you are not sure,select Use the NFSv4domain derived by the system.Time Zone(Continent)Select your continent.Time Zone(Country or Region)Select your country or region.TABLE1Configuration InformationTime Zone Select the time zone.Date and Time Accept the default date and time,or change the values.root Password Enter the root password twice.This password is for the superuser accountfor the Solaris OS on this server.This password is not the SP password.Quick Setup Instructions1.Unpack the server,and check that you received all of the shipping contents(FIGURE1).2.Place the server in its intended location for verification.For rackmounting instructions,refer to the instructions included with the rail kit,the service label on the server,and to the online Sun SPARC Enterprise T5120and T5220Servers Installation Guide.3.Connect a serial cable between the server’s SER MGT port(FIGURE2)and a terminal device.This connection provides your initial communication with the SP.The device must be set up to communicate using9600baud,8bit,no parity,1stop bit.A null modem configuration is needed,meaning the transmit and receive signals are reversed(crossed over)for DTE to DTE communications.You can use the supplied RJ-45crossover adapters with a standard RJ-45cable to achieve the null modem configuration.FIGURE 2Server Connections4.(Optional)Connect an Ethernet cable between the server’s NET MGT port (FIGURE 2)and the network towhich future connections to the SP and host will be made.After the initial configuration of the system using the SER MGT port,communication with the SP and host is usually performed through this Ethernet interface.5.Connect an Ethernet cable between one of the server’s NET ports (FIGURE 2)and the network to which theserver will communicate.6.Plug the power cords into the power supplies and into separate power sources.To provide redundancy,plug both power supplies into separate power sources.Note that the system can operate with only one power connection,but there is no redundancy in this case.When power is applied,the SP initializes and power supply LEDs illuminate.After a few minutes,the SP login prompt appears on the terminal device.Note that the host is not initialized or powered on yet.SER MGTRJ-45NET MGT RJ-45Numbered cablescorrespond to setup steps.NET 0 to NET 3RJ-45SP to Ethernet (Optional)Host to Ethernet RJ-45 to DB-25crossover adapterRJ-45 to DB-9crossover adapterTerminal devicen7.At the terminal device,log in to the SP as root with a password of changeme .After a brief delay,the SP prompt is displayed (->).At this point,there are many commands you can perform using the Integrated Lights Out Manager interface.For example,to create a user named admin ,and to set the admin account role to Administrator and the CLI mode to alom ,enter:Note that the asterisks in the example will not appear when you enter your password.Additional SP information,such as how to change the password and how to set up the SP network parameters,is available in the online documentation set.8.Power on the server and redirect the host output to display on the serial terminal device:After you start the SP console,the server initialization takes approximately 20minutes to complete.9.When prompted,follow the onscreen instructions and enter the configuration information.Refer to TABLE 1for the list of configuration information and your entries.You will be prompted to confirm the configuration several times,enabling confirmation and changes.If you are not sure how to respond to a particular value,you can accept the default,and make future changes when the Solaris OS is running.When the configuration menus are completed,the server reboots and displays the Solaris login prompt.10.Log in to the server and explore the capabilities.The following commands provide information about the system:■showrev –Displays the hostname and system architecture e the -a option with this command to see the patches that are installed.■psrinfo –Displays information about the number and status of the processors and cores in the host.Review the Solaris OS man pages and documentation for more details.SUNSP00144FAC732F login:root Password:changeme . . .->->create /SP/users/admin role=Administrator cli_mode=alom Creating user...Enter new password: ********Enter new password again: ********Created /SP/users/admin->start /SYSAre you sure you want to start /SYS (y/n)?y ->start /SP/consoleAre you sure you want to start /SP/CONSOLE (y/n)?y Serial console started. To stop, type #.. . .Accessing Additional InformationYou can view,print,and download additional information for this product from the following URLs:■Oracle’s Sun SPARC Enterprise T5120server documentation set,including important documents such as product notes:/app/docs/prod/sparc.t5120■A broad selection of Sun documentation,including localized versions:■Preinstalled Solaris OS information:/software/preinstall■CoolThreads™–Overview and access to Cool Tools:/servers/coolthreads/tnb/index.jsp■CoolThreads–CMT tuning and resources:/servers/coolthreads/tnb/t2.jspTechnical SupportIf you have technical questions about this product that are not answered in this document,go to:/service/contactingDocumentation FeedbackSubmit comments about this document by clicking the Feedback[+]link at:/Please include the title and part number of your document with your feedback:Sun SPARC Server Enterprise T5120Server Getting Started Guide,part number820-4417-11Copyright©2006,2010,Oracle and/or its affiliates.All rights reserved.FUJITSU LIMITED provided technical input and review on portions of this material.Copyright©2006,2010,Oracle et/ou ses affiliés.Tous droits réservés.Entrée et revue tecnical fournies par FUJITSU LIMITED sur des parties de ce matériel.。
Oracle Solaris 10 安装指南说明书
Oracle®Solaris108/11安装指南:基本安装文件号码E240472011年8月版权所有©2011,Oracle和/或其附属公司。
保留所有权利。
本软件和相关文档是根据许可证协议提供的,该许可证协议中规定了关于使用和公开本软件和相关文档的各种限制,并受知识产权法的保护。
除非在许可证协议中明确许可或适用法律明确授权,否则不得以任何形式、任何方式使用、拷贝、复制、翻译、广播、修改、授权、传播、分发、展示、执行、发布或显示本软件和相关文档的任何部分。
除非法律要求实现互操作,否则严禁对本软件进行逆向工程设计、反汇编或反编译。
此文档所含信息可能随时被修改,恕不另行通知,我们不保证该信息没有错误。
如果贵方发现任何问题,请书面通知我们。
如果将本软件或相关文档交付给美国政府,或者交付给以美国政府名义获得许可证的任何机构,必须符合以下规定:ERNMENT RIGHTSPrograms,software,databases,and related documentation and technical data delivered to ernment customers are"commercial computer software"or "commercial technical data"pursuant to the applicable Federal Acquisition Regulation and agency-specific supplemental regulations.As such,the use,duplication, disclosure,modification,and adaptation shall be subject to the restrictions and license terms set forth in the applicable Government contract,and,to the extent applicable by the terms of the Government contract,the additional rights set forth in FAR52.227-19,Commercial Computer Software License(December2007). Oracle America,Inc.,500Oracle Parkway,Redwood City,CA94065.本软件或硬件是为了在各种信息管理应用领域内的一般使用而开发的。
Solaris 10操作系统商品说明书

Introducing Predictive Self-HealingThe Solaris™ 10 Operating System (OS) introduces a new architecture for building anddeploying systems and services capable of Predictive Self-Healing. This technology enables Sun™ systems to accurately predict component failures and mitigate many serious problems —before they actually occur. Solaris Fault Manager and Solaris Service Manager are the two main components of Predictive Self-Healing. Solaris Fault Manager receives data relating to hardware and software errors and automatically diagnoses the underlying problem. Once diagnosed, Solaris Fault Manager automatically responds by offlining faulty components. Solaris Service Manager makes services, rather than processes, into first-class citizens, permitting automatic self-healing. Base Solaris services have service descriptions which include full dependency information for start, stop, and restart; applications can easily be converted to run under Solaris Service Manager.Maximizing availabilityPredictive Self-Healing is designed to maximize the availability of the system and application services by automatically diagnosing, isolating, and recovering from faults. This helps to not only reduce hardware failures but also to reduce the impact of application failures,leading to increased system and application availability. •Reducing Hardware Failures—A self-healing system automatically diagnoses problems, and the results can be used to trigger auto-mated reactions such as dynamically taking a CPU,regions of memory, and I/O devices off line before these components can cause system failures. Solaris Fault Manager isolates and disables faulty components, and helps ensure continuous service even before admin-istrators know there is a problem. In addition, remote service agents can retrieve informa-tion from Sun that is vital to diagnosing the underlying root cause of the failure. •Reducing the Impact of Service Failures—If an application service should fail, the built-in service restart mechanism in the Solaris 10 OS automatically restarts the application or service. This mechanism also extends into Sun Cluster software failover environments for even higher availability.Automatic diagnosis and recoveryfrom failuresWith Solaris Fault Manager, the system auto-matically diagnoses faulty components, a function that in some cases can reduce analysis time from days to seconds. Once diagnosed, the system can quickly take corrective action and automatically restore application services. This powerful technology ensures that business-critical applications and essential system services can continue uninterrupted in the event of software failures, major hardware component failures, and even software misconfiguration problems.<Highlights•Maximized system and serviceavailability through predictivediagnosis and isolation of faultycomponents•Automatic diagnosis of failedcomponents and automaticrestart of failed services inmilliseconds•Simplified administration modelfor managing services, reducingcost of ownership•Fast and easy repair of problemswith links to knowledge articles•Scalable architecture can berapidly upgraded and adapted tonew problems — without requiringdowntimeCustomers can now deliver higher levels of availability and application services while minimizing downtime and associated adminis-trative costs. Reduced downtime can potentially save companies $10,000 to $6 million per hour for mission-critical environments.Simplified administrationSolaris Service Manager reduces complexity by abstracting problem diagnosis and services in a manner that is transparent to users and applications. It simplifies common administrative tasks, speeds system boot, and significantly reduces human errors associated with system failures that can lead to service downtime and inefficient management of the system.Admin-istrative tasks such as enabling and disabling services and changing properties are simplified and secure, with an undo capability to revert changes. In addition, service information is stored in a central repository,making the systems easier to manage and maintain. Self-healing technology can also help improve the productivity of support staff. They can now spend much less time investigating and resolving issues,resulting in a higher ratio of supported systems per individual. Plus, a self-healing system can lead to reduced administration costs — systems that perform many complex tasks without user intervention require staff with less expertise, experience, and salary.Fast and easy repairSolaris Fault Manager issues easy-to-understand diagnosis messages that link to knowledge articles at /msg. By providing system administrators with unique event IDs, they can access detailed information in knowledge articles, which describe what failure occurred and what the system did to fix it. These knowl-edge articles guide system administrators through any tasks that require human interven-tion, including repairs, and explain predicted or detected problems using clear language and links to repair procedures and documentation —all of which greatly reduces the complexity of repairing the system.Scalable and flexible architectureThe scalable architecture of Sun’s Predictive Self-Healing technology can be rapidly evolved to new problems and updated as new diagnosis and availability technologies are added to the system. Most future updates can be dynamically loaded and unloaded from the system while it is running and can be upgraded on the fly without requiring downtime or losing previous diagnosis data.ConclusionWith businesses operating around the clock and demanding uninterrupted service, service availability is of paramount importance. Predictive Self-Healing delivers the next generation of availability technology today, including features that keep systems and services running and simple for administrators. Over time, a rapidly evolving ecosystem of self-healing components can help provide consistent, easy-to-use, and always-available Sun systems.©2005 Sun Microsystems, Inc. All rights reserved. Sun, Sun Microsystems, the Sun logo, Solaris, the Solaris logo, and The Network is the Computer are trademarks or registered trademarks of Sun Microsystems, Inc. in theUnited States and other countries. Information subject to change without notice.11/05Sun Microsystems, Inc.4150 Network Circle, Santa Clara, CA 95054 USA Phone 1-650-960-1300 or 1-800-555-9SUN Web 2。
手把手交你安装solaris10(图文并茂)

一、准备工作A.准备安装介质(CD/DVD)。
B.将系统的引导顺序改为CD/DVD优先。
C.如果Solaris要安装在有其它操作系统的硬盘上,请务必备份重要数据。
D.向SA申请网络资源备用(IP地址,网关地址,子网掩码,DNS等)。
E.在安装前阅读此文档,对安装过程有个大致的了解。
二、开始安装1.将安装介质装入,并重新启动计算机。
(先保证第一个引导为CD/DVD引导)从光盘开始引导界面。
选择的一项“Solaris”,回车继续。
选择“1”图形交互方式的安装。
选择安装提示语言,此处选择了6,即简体中文(请根据需要选择),回车继续。
欢迎页面,点击“下一步”继续。
需要联网则保持默认值,否则选择“非联网的”,点击“下一步”继续。
如果是动态分配IP地址,请选择“是”,需要设定一个IP地址则选择否,单击“下一步”继续。
给主机起一个响亮的名字,单击“下一步”继续。
设定网络地址,填写从系统管理员分配到的IP,点击“下一步”继续。
设定子网掩码(公SA那里获取),点击“下一步”继续。
如果需要IPv6则选择是,此处选择“否”,单击“下一步”继续。
指定缺省路由(LAN中一般都设置为网关),可以由系统检测,也可以指定一个。
此处选择“指定一个”,单击“下一步”继续。
输入默认路由地址,单击“下一步”继续。
保持默认选项,单击“下一步”继续。
设置名字服务方式,根据实际需要选择,此处选择了“无”,“下一步”继续。
时区的设置,此处以洲/国家/地区的方式设置,“下一步”继续。
选择洲和国家,点击“下一步”继续。
设定日期和时间,“下一步”继续。
设定root用户口令。
“下一步”继续。
前一部分设定信息的确认。
点击“确认”继续。
选择“下一步”继续。
根据需要选择,此处保持原有值,点击“下一步”继续。
选择安装介质,此处选择CD/DVD,“下一步”继续。
初始化中,等待进入下一个对话。
够选“接受”,“下一步”继续。
选择安装类型,此处选择了“自定义安装”,“下一步”继续。
Solaris 10网络安装手册(通过虚拟机)

Solaris 10网络安装手册(通过虚拟机)目录一、前言 (2)二、准备 (2)三、操作步骤 (2)四、修改配置文件 (5)一、前言我们经常遇到系统光驱坏了,不能用光驱装系统,就需要用到网络安装。
网络安装需要1个安装服务器,1个待安装客户机和1张soalris的光盘(iso也可,版本由安装需求决定)。
二、准备1) 虚拟机准备(保证虚拟机和笔记本电脑能相互ping通)2) 网络连接设备(网线)3) Console线4) 系统光盘5) SecureCRT(保存会话日志:文件→会话日志)6)收集explorer信息(如果是重装系统)【步骤1、cd /opt/SUNWexplo/bin 2、./explorer 3、cd /opt/SUNWexplo/output 4、将output 下的文件通过FTP复制到笔记本上】从客户参数获得以下参数:1)待安装机的hostname、IP 、子网掩码、缺省网关2)文件分区信息3)MAC地址(从OBP下取得,banner命令可查看)4)安装OS版本三、操作步骤安装服务器:VMware用于X86平台的Solaris 10系统主机名:actionIP:10.108.226.21待安装客户机:Sun Enterprise 250 Server主机名:action2IP:10.108.226.22MAC:8:0:20:cf:b3:57建立安装服务器1.先在action的/etc/hosts中加上待安装客户机的IP和主机名root@action # vi /etc/hosts## Internet host table#127.0.0.1 localhost10.108.226.21 action loghost10.108.226.22 action22.把光盘放到安装服务器中(也可挂载ISO,方法后面给出)。
root@action # cd /cdrom/Solaris_10/Tools/root@action # ./setup_install_server /install_serverVerifying target directory...Calculating the required disk space for the Solaris_10 productCalculating space required for the installation boot imageCopying the CD image to disk...Copying Install Boot Image hierarchy...Install Server setup complete这样安装服务器安装完了,我们把安装服务器安装到/install_server目录下了。
Solaris 10单镜像盘启动系统

Solaris 10单镜像盘启动系统1.概述在Solaris系统重启后,发现其中一块镜像盘物理故障,或一块硬盘上的metadb或数据有丢失,导致系统启动时自动进入维护模式,本文档介绍在上述情况下启动系统的操作。
操作环境如下:2.操作准备1、准备一张Solaris 10的光盘用于进入单用户模式;2.1.确认硬盘故障查看系统启动告警信息ok bootSun Ultra 45 Workstation, No KeyboardCopyright 2005 Sun Microsystems, Inc. All rights reserved.OpenBoot 4.21.2, 4096 MB memory installed, Serial #68148048.Ethernet address 0:14:4f:f:db:50, Host ID: 840fdb50.Rebooting with command: bootBoot device: /pci@1e,600000/pci@0/pci@9/pci@0/scsi@1/disk@0,0:a File and args: SunOS Release 5.10 Version Generic_147147-26 64-bitCopyright (c) 1983, 2013, Oracle and/or its affiliates. All rights reserved. WARNING: md: d102: (Unavailable) needs maintenanceHostname: test-01Insufficient metadevice database replicas located.Use metadb to delete databases which are broken.Ignore any Read-only file system error messages.Reboot the system when finished to reload the metadevice database.After reboot, repair any broken database replicas which were deleted.Mar 23 17:56:03 svc.startd[9]: svc:/system/metainit:default: Method "/lib/svc/method/svc-metainit" failed with exit status 96.Mar 23 17:56:03 svc.startd[9]: system/metainit:default misconfigured: transitioned to maintenance (see 'svcs -xv' for details)Mar 23 17:56:05 svc.startd[9]: svc:/system/filesystem/usr:default: Method "/lib/svc/method/fs-usr" failed with exit status 95.Mar 23 17:56:05 svc.startd[9]: system/filesystem/usr:default failed fatally: transitioned to maintenance (see 'svcs -xv' for details)Requesting System Maintenance Mode(See /lib/svc/share/README for more information.)Console login service(s) cannot runRoot password for system maintenance (control-d to bypass): //输入root密码single-user privilege assigned to /dev/console.Entering System Maintenance Mode //系统自动进入维护模式Mar 23 17:59:19 su: 'su root' succeeded for root on /dev/consoleOracle Corporation SunOS 5.10 Generic Patch January 2005#在维护模式查看镜像状态,发现有一半子镜像需要维护,这一半子镜像都分布在同一块硬盘,这块硬盘上的metadb也处于unknow状态,可以确定c1t1d0硬盘故障,拔出故障硬盘。
- 1、下载文档前请自行甄别文档内容的完整性,平台不提供额外的编辑、内容补充、找答案等附加服务。
- 2、"仅部分预览"的文档,不可在线预览部分如存在完整性等问题,可反馈申请退款(可完整预览的文档不适用该条件!)。
- 3、如文档侵犯您的权益,请联系客服反馈,我们会尽快为您处理(人工客服工作时间:9:00-18:30)。
solaris 10 stmsboot使用手册
名字
stmsboot - 在Solaris中用来管理多路径特性的管理程序
语法
/usr/sbin/stmsboot [-d | -e | -u | -L | -l controller_number]
简述
Solaris的多路径I/O特性是Solaris操作系统环境下存贮设备的多通道解决方案。
该特性以前被称为Sun StorEdge Traffic Manager (STMS) 或者MPxIO.
stmsboot程序是在Solaris多路径I/O下用来管理对光纤通道设备列举的管理程序。
启用了多通道I/O的Solaris设备在scsi_vhci下被列举,提供了多通道的能力。
如果
没有启用多通道I/O,设备将在物理控制器下被列举。
在/dev和/devices的设备树中,启用了多通道I/O的Solaris设备将使用新的名字,以
表示它们是在Solaris的多通道I/O的控制下。
这意味着在Solaris的多通道I/O的控
制下,设备将会拥有一个不同于它们以前名字(在安装是确定)的新名字。
在启用
或者停用Solaris多通道I/O时,stmsboot将会自动更新/etc/vfstab和系统的dump配置信息以反映设备名字的变化。
在进行相应变动后,需要重新启动机器以让变动生效。
选项
stmsboot支持一下选项:
-e 在所有的光纤通道控制器端口上启用Solaris多通道I/O特性。
启用后,你将被提示要求重新启动机器。
在重新启动时,vfstab和dump配置将被更新以反映
设备名字的变化。
-d 在所有的光纤通道控制器端口上关闭Solaris多通道I/O特性。
关闭后,你将被提示要求重新启动机器。
在重新启动时,vfstab和dump配置将被更新以反映
设备名字的变化。
-u 在你手工修改配置以启用或者关闭特定光纤fp控制器端口上的Solaris多通道I/O 特性后,更新vfstab和dump配置。
该选项会要求你重新启动机器。
在重新启动时,vfstab和dump配置将被更新以反映设备名字的变化。
-L 显示从非Solaris多通道I/O设备名字到Solaris多通道I/O设备名字的设备名字变化情况。
-l 控制器号
显示特定控制器上的从非Solaris多通道I/O设备名字到Solaris多通道I/O设备名
字的设备名字变化情况。
使用说明:
除了主要用于启用和关闭Solaris多通道I/O特性外,stmsboot命令还可以用来更新vfstab
和dump配置以反映设备名字的变化。
为了确保系统正常工作,你必须重新配置你的使用
这些设备的相关应用,将设备名字从旧名字改为新名字。
-L和-l选项将显示新旧设备名字之间的对应关系。
该选项在对Solaris多通道I/O特性的配
置修改生效后即可正常工作。
例如,在你使用stmsboot -e并且重新启动机器后,就可以
使用这些选项。
老的设备名字必须存在以便显示对应关系。
例子:
例子1:在OS升级后启用Solaris多通道I/O特性
要启用所有光纤控制器端口上的Solaris多通道I/O特性:
#stmsboot -e
例子2:关闭Solaris多通道I/O特性
要关闭所有光纤控制器端口上的Solaris多通道I/O特性:
#stmsboot -d
例子3:启用特定端口上的Solaris多通道I/O特性
你可能希望启用某个特定光纤控制器端口上的Solaris多通道I/O特性,而关闭其他所有端口
上的Solaris多通道I/O特性。
你可以通过编辑fp.conf文件来启用和关闭特定控制器端口上的Solaris多通道I/O特性。
然后运行下面这个命令来更新vfstab和dump配置,以反映出设备名字
的变化。
#stmsboot -u
其他有关的命令:
dumpadm(1M), ufsdump(1M), dumpdates(4), vfstab(4), fcp(7D),
fctl(7D), fp(7D), qlc(7D), scsi_vhci(7D)
关于T3, 3910, 3960, 6120, 和6320存贮系统的信息,可以参见Sun StorEdge Disk Tray 或者Subsystem] Administrator's Guide。
Sun StorEdge Traffic Manager Installation and Configuration Guide
注意事项:
Solaris多通道I/O特性并不是所有的设备都支持的。
在启用了Solaris多通道I/O特性后,只有
那些支持Solaris多通道I/O特性的设备才会被Solaris多通道I/O特性所控制。
不支持的设备仍
然保持与以前一样。
对于早期的Solaris版本,-e和-d选项将会删除fp.conf文件中的的mpxio-disable属性项或者增
加一个全局的mpxio-disable属性项。
当前的Solaris操作系统版本不再支持mpxio-disable属性项。
Solaris多通道I/O特性缺省总是打
开的。
如果你想关闭Solaris多通道I/O特性,必须使用由HBA驱动提供的相应方法。
参见fp(7D)。
* 在Sun StorEdge Disk Array上使用Solaris多通道I/O特性
下面的方法可以用于Sun StoreEdge T3, 3910, 3960, 6120,和6320存贮系统。
要在你的Sun StoreEdge系统上使用Solaris多通道I/O特性,除了启用Solaris多通道I/O特性外,还必须将存贮系统的mp_support的值设置为mpxio模式。
正确的顺序应该是首先将系统的
mp_support
设置为mpxio模式,然后运行stmsboot -e。
如果Solaris多通道I/O特性已经启用,而系统的
mp_support还没有设置为moxio模式,则应该先将mp_support设置为mpxio模式,然后运行stmsboot -u。
详细信息请参见相应存贮系统的Sun StorEdge Administrator's Guide。
* ufsdump用户
ufsdump命令用来在/etc/dumpdates文件中保存文件系统dump的记录。
在这些记录项中,包括了设备名字的记录。
有影响的stmsboot选项(-e,-d和-u)的一个影响是将改变存贮设备设备名字。
stmsboot命令不会修改dumpdates文件。
正因为如此,dumpdates文件中的记录将指向老的设备
名字,也就是你运行stmsboot之前的设备名字。
dumpdates中设备名字不一致的一个影响是,在
使用stmsboot后,ufsdump在运行是会认为之前没有进行过相应的dump操作,从而会对这个文件系统进行dump存在(也就是级别为0的dump操作)。
* 在Sun Cluster环境下使用stmsboot
如果可能,请在按照Sun Cluster软件之前就使用stmsboot -e命令。
在你运行stmsboot后,就可以像正常安装一样安装你的Sun Cluster软件了。
如果你在在运行stmsboot之前安装Sun Cluster软件,必须按照以下流程进行:
在所有你想启用Solaris多通道I/O特性的cluster中的机器上,运行:
#stmsboot -e
...然后允许系统重新启动。
当系统重新启动后,输入以下命令:
1. # /usr/cluster/bin/scdidadm -C
2. # /usr/cluster/bin/scdidadm -r
之前的命令将在为新设备名字更新did映射的同时保留那些没有连接到多个cluster节点的硬
盘的did实例标号。
本地硬盘的did实例编号将不会被保留。
由于这个原因,本地硬盘的did 硬盘名字将被改变。
3. 更新/etc/vfstab文件,以反映本地硬盘设备的新的did硬盘名字。
4. 重新启动系统。
要想关闭Solaris多通道I/O特性,可以使用stmsboot -d(代替stmsboot -e),然后执行上面的流程。
想查看新老设备名字之间的对应关系,可以运行stmsboot -L。
想查看did设备名字的对应关系,可以运行/usr/cluster/bin/scdidadm -L。