霍尼韦尔PKS系统备份及恢复
霍尼韦尔PKS系统备份及恢复
系统备份及恢复推荐的系统备份策略。
系统需要备份的内容:•ERDB ( 系统的控制组态内容): c:\Program files\Honeywell\Experion PKS\Engineering Tools\System\Er•Server 实时数据库(操作组态内容): C:\ Program files\Honeywell\ Experion PKS\Server\Data•操作流程图(包括子图): 用户自定•Station 设置文件: C:\ Program files \Honeywell\ ExperionPKS\Client\Station\*.stn \system\R**\*.stb•QB 设置文件: 用户自定义目录•报表文件(自由格式报表或Excel报表) : 用户自定义目录•事件或历史数据文件及归档文件(可选择备份或不备): C: \Program files \honeywell\ Experion PKS\Server\Archive•用户自定义文件: 用户自定义目录1系统备份介质建议: 移动硬盘/ 刻录光盘/ 磁带/ 远程网络计算机硬盘1.1ERDB备份(主Server:ServerB)●Upload and Update•Dbadmin – Backup Database 生成主*.bak 文件•Control Builder—File-Export生成project备份文件.•Snapshot/Checkpoint files — C:\Honeywell\EngineeringTools\System\ER\CPM***.snapshot将以上生成的三类文件拷贝到备份目标盘er目录下.1.2 Server 数据库(Server同步情况下, 只需备份一个Server)●C:\Program files\Honeywell\Experion PKS\Server\Data 目录到备份目标盘。
PKS系统数据的备份
PKS系统数据的备份虽然在我们使用PKS系统的过程中使用了一些工具(如:ghost)来帮助我们备份和恢复系统,但我们还是有必要了解对系统的一些重要数据的备份。
一、Server数据的备份1、Experion PKS server database所在目录:c:\Program Files\Honeywell\Experion PKS\server\data2、Enterprise Model database (EMDB)所在目录:c:\Program Files\Honeywell\Experion PKS\Engineering Tools\system\er 3、Engineering Repository (ERDB)所在目录:c:\Program Files\Honeywell\Experion PKS\Engineering Tools\system\er 4、Quick Builder database所在目录:c:\Program Files\Honeywell\Experion PKS\server\data\qdb5、Events database所在目录:c:\Program Files\Honeywell\Experion PKS\server\evtarch6、History archive files (default folder)所在目录:c:\Program Files\Honeywell\Experion PKS\server\archive7、Custom files所在目录:c:\Program Files\Honeywell\Experion PKS\server\user8、Custom applications所在目录:c:\Program Files\Honeywell\Experion PKS\server\user\applic\src9、Report output files所在目录:c:\Program Files\Honeywell\Experion PKS\server\report10、Custom displays所在目录:c:\Program Files\Honeywell\Experion PKS\client\abstract11、BOOTPDATA.TXT所在目录:c:\Program Files\Honeywell\Experion PKS\Engineering Tools\system\bin 12、RSLinx configuration information所在目录:Use the RSLinx backup utility.打开Start>Programs>Rockwell Software>RSLinx>Backup Restore Utility 然后操作备份。
浅谈HONEYWELL PKS控制系统故障及处理方案

浅谈HONEYWELL PKS 控制系统故障及处理方案刘成 徐继友 张祥(兖州煤业榆林能化有限公司, 陕西 榆林 719000)摘要:本文以兖州煤业榆林能化有限公司甲醇厂60万吨煤制甲醇项目主工艺流程空分、气化合成工艺所用DCS 系统为切入点,对系统运行维护过程中出现的典型故障研究分析,为发生类似故障造成停车风险提供参考,有效避免类似事故再次发生。
关键词:DCS 系统、故障、维护、处理方案1 引言兖州煤业榆林能化有限公司甲醇厂年产60万吨甲醇煤化工项目,该项目采用德士古气化工艺,主要有空分、气化、合成等主界区。
主界区采用霍尼韦尔DCS 控制系统,本文主要介绍在运行过程中将出现的故障及处理方法。
2 故障现象描述某生产工作日6:40,工艺人员反映气化界区操作站反复出现PKS 系统报警。
从DCS 软件在线查看卡件状态正常,服务器也无异常现象,到机柜间检查PKS 系统控制器等卡件均为正常状态。
07:15,又接到合成车间工艺人员电话反映LI20001、LI20006等数据静止无变化并且画面反应较慢 ,这些数据皆为FSC 系统通讯至DCS 系统的数据。
现场工程师在线登陆FSC 系统检查,程序正常;机柜间查看FSC 机柜卡件发现通讯卡(型号10018/E/12)通讯状态灯为绿色正常;数据传输灯闪烁异常(闪烁慢,有时不闪烁)初步判断数据通讯不正常。
07:20分左右,经过检查发现FSC 和DCS 的2个冗余通讯的错误率都达到50%以上,立即重启FSC 的一个通讯卡,等指示灯正常后再重启另一个,然后检查发现错误率依然从0%一直增加。
期间几次出现服务器及操作站上位画面全部无数据现象,阀门、泵等均无法操作,在console station 上也无法进行操作。
DCS 下位程序CM 等有时变为红色。
期间由于FSC 通讯到DCS 的一个通讯点数据不正常(FSC 为“1”信号,DCS 通讯变为“0”信号)导致阀门关闭从而使B 号气化炉跳车(A 号气化炉和B 号气化炉同样的组态模式但没有出现这样的情况,也未跳车)。
霍尼韦尔 HAWK 8000 控制器备份和恢复指南说明书

HAWK 8000 Controller Backup and RestoreGuide® U.S. Registered TrademarkCopyright © 2017 Honeywell Inc. • All Rights Reserved EN2Z-1027GE51 R0517About this Guide (2)Product Documentation (2)Document Content (2)Related Technical Literature (2)Overview (3)Creating a USB Backup (3)Restoring from a USB Backup (4)Restoring Factory Defaults (7)Shutting Down the Controller (9)Reference information (10)Platform and Station Backup Options (10)Restore Options (11)Shutdown Operations (11)HAWK 8000 CONTROLLER – BACKUP & RESTORE GUIDEABOUT THIS GUIDEThis topic contains important information about the purpose, content, context, and intended audience for this document.Product DocumentationReleased versions of NX software include a complete collection of technical information that is provided in both online help and PDF format. The information in this document is written primarily for Systems Integrators. In order to make the most of the information in this book, readers should have some training or previous experience with NX or NiagaraAX software.Document ContentThis document includes topics that describe how to create USB backups and restore them to your HAWK 8000 controller. Also included are instructions for recovering factory defaults, and safely shutting down a controller. Related Technical LiteratureTable 1. Related Technical LiteratureTitle Product Literature no. HAWK 8000 – Installation & Comm. Instructions EN1Z-1016GE51HAWK 8000 – Product Data EN0Z-1016GE51HAWK 8000 – Mounting Instructions MU1Z-1016GE51HAWK 8000 – Installation & Startup Guide EN1Z-1027GE51HAWK 8000 – Backup & Restore Guide EN2Z-1027GE51HAWK 8000 – PICS EN0Z-1028GE51HAWK 8000 – Wi-Fi Guide EN2Z-1029GE51HON-NXEM-xxx Expansion Modules – Mounting Instructions MU1Z-1031GE51EN2Z-1027GE51 R0517 2HAWK 8000 CONTROLLER – BACKUP & RESTORE GUIDE3 EN2Z-1027GE51 R0517OVERVIEWTopics covered in this chapter♦ Creating a USB backup♦ Restoring from a USB backup♦ Restoring factory defaults♦ Shutting down the controllerThe HAWK 8000 allows you to back up the entire platform and station to a USB flash drive without requiring thebackup functions of COACH NX. Called a clone backup, the file created by a USB backup contains a complete image of the platform and station, including system modules and the QNX OS.NOTE: Starting in NX 4.2, the HAWK 8000 can be converted (downgraded) to run AX 3.8.111.6.5 – with somefeature limitations. For example, for any HAWK 8000 running AX the USB Backup/Restore functionality isnot supported. When running AX, the USB port on the device is not monitored. Other unsupported features are IEEE 802.1X wired authentication and WiFi functionality.The BackupService, which comes standard with COACH NX, backs up station files to a local Supervisor or browser PC. A backup made by the BackupService includes only pointers to required core software modules. To restore from a backup made using COACH NX, not only do you need COACH NX, but also its software database with matching versions of all required core .dist files, OS .dist files, and software modules. Afterwards, use the Distribution File Installer to restore the backup.The HAWK 8000 provides the ability to:• Initiate a backup manually by inserting a USB flash drive into the USB port and pressing the backup and restorebutton on the unit itself.NOTE:USB backup supports only FAT32 and FAT32X file systems. NTFS is not supported.Risk of equipment damage!► Only flash drives (USB sticks ≤128GB) are recommended for backup/restore operations. USB bus-powered ex-ternal hard drives often have higher power requirements and so may not function as expected, possibly resulting in permanent damage to the drive or to the HAWK 8000. Plugging in an external hard drive may cause the controller to become unresponsive, requiring a reboot.• Restore a USB backup image using a USB flash drive, USB-to-Micro USB cable connection and a terminalemulator program.• Recover the factory default image. This feature does not require a USB flash drive, special cable or terminalemulator. The system pulls the factory image from non-volatile, read-only memory.Creating a USB BackupYou may create a clone backup while a station is running or stopped. When the controller is powered on, the software continuously monitors the USB port. Putting a USB flash drive in the port triggers backup/restore mode.Prerequisites:• USB backups are enabled on the controller: Platform Administration →Advanced Options →USB Backup Enabledproperty is selectedNOTE: USB backup supports only FAT32 and FAT32X file systems. NTFS is not supported.• You need a USB flash drive with enough memory to contain the complete platform and station image along withthe operating system and all software modules.Step 1:Confirm that the controller's power is ON. Step 2: Insert a USB flash drive into the USB port.The backup and restore LED turns ON.HAWK 8000 CONTROLLER – BACKUP & RESTORE GUIDEEN2Z-1027GE51 R05174Fig. 1. LEDs, USB ports, and pushbuttons behind access doorLEGEND:1 PROG USB 2.0 for use with USB Flash (thumb) drive2 DEBUG Micro-A USB for serial debug communications3 BACKUP Pushbutton switch to start a USB backup, or if held in during power up/boot up, initiates afactory recovery image4 SHT/DWN Recessed pushbutton switch for initiating a controlled shutdown5 BACKUP LED to indicate USB media present, or a backup, restore, or factory recovery image inprogressStep 3: Press and hold down the backup and restore button until the LED flashes at medium speed (100msec ON and 100 msec OFF), then release the button.The system begins the backup. While backing up, the LED flashes slowly (one second ON, one secondOFF). When the backup completes, the system prepares the USB flash drive to be removed safely.NOTE: If the backup is unable to complete successfully, the LED flashes rapidly (200 ms ON, 200 ms OFF, 200ms ON, 3 seconds OFF), indicating an error. In this case, simply unplug the USB thumb drive, wait for theLED to turn OFF, then insert the thumb drive and try the backup procedure again.If problems persist, possible causes could be:• Insufficient disk space on the thumb drive• Write protect enabled on the thumb driverStep 4: When the backup and restore LED turns OFF, remove the USB flash drive and store it in a safeplace.The backup image includes the contents of the boot partition, /home/niagara, /opt/niagara, etc. The nameof the resulting image file follows this convention: hostid (unique host ID of the HAWK 8000), underscore(_) timestamp. For example:• Qnx-TITAN-D01C-CA36–CB10–4E3B_20170912230355• Qnx-TITAN-D01C-CA36–CB10–4E3B_20171015212346Restoring from a USB BackupRestoring from a USB backup returns the controller to the state it was in when the system made the backup.You may restore to a controller other than the one on which the backup was made, provided that the target controller is the same model. The restore procedure does not require access to COACH NX.HAWK 8000 CONTROLLER – BACKUP & RESTORE GUIDE5 EN2Z-1027GE51 R0517Prerequisites:• The USB flash drive on which the backup is stored.Risk of equipment damage!► Only flash drives (USB sticks ≤128GB) are recommended for backup/restore operations. USB bus-powered ex-ternal hard drives often have higher power requirements and so may not function as expected, possibly resulting in permanent damage to the drive or to the HAWK 8000. Plugging in an external hard drive may cause the controller to become unresponsive, requiring a reboot.• A USB-to-Micro USB cable (same cable as that used to connect a smart phone to a computer). The Debug port on a controller is a standard Micro-A type USB port for debugging serial communications.• A terminal emulator (system shell program), such as PuTTY. You use this program to access the controller's system shell menu, which lists the restore options.• The system passphrase of the system to which you are restoring the backup.• The system passphrase used to create the backup. If you are restoring the image to a different controller (another of the same model), or if the system passphrase for the controller on which the backup was made changed since you made the backup, the passphrase required to decode the backup will be different from the current system passphrase.NOTE:For any HAWK 8000 converted to run AX, USB Backup/Restore functionality is not supported. Also, the USB port on the device is not monitored for insertion/removal of devices. Step 1: Set up the terminal emulator program running on your PC with the following settings:• baud rate: 115200• data bits: 8• parity: N• stop bits: 1For details on using a serial connection to this port, see HAWK 8000 – Installation & CommissioningInstructions (EN1Z-1027GE51).Step 2:Ensure that the controller's power is OFF. Step 3:Connect the USB-to-Micro USB cable from the computer to the controller's micro USB port (Debug port). Step 4:Insert the USB flash drive that contains the backup into the USB port. Step 5: Press and hold down the backup and restore button throughout the boot-up process (approx. 5seconds) until the button press is detected and this confirmation banner displays:******************************************************* Backup/Restore button press detected. Release button now to proceed.*******************************************************Step 6: Release the backup and restore button once the banner displays.On detecting the button release, the system begins a 10-second countdown, which displays as shownhere:Press any key to restore from USB backup. If no key pressed, factory recovery will begin in 10 seconds Recovery begins in 9 seconds Recovery begins in 8 secondsRecovery begins in....Step 7:Press any key during the 10-second countdown to restore from a USB backup (and to prevent the system from entering factory recovery mode).HAWK 8000 CONTROLLER – BACKUP & RESTORE GUIDEEN2Z-1027GE51 R0517 6Risk of information loss!► If no key press is detected during this 10-second countdown, then the factory recovery process begins at the moment the countdown finishes.The system enters the USB restore mode and the following banner displays:******************************************************* Restore from a USB Backup*******************************************************Existing Niagara and platform installation will be completely removed! This includes licenses TCP/IP and WiFi configuration platform credentialsIf restoring a backup from another unit, you will need to install a new license.TCP/IP configuration and platform credentials will be set to values in the backup.Niagara daemon and station will be killed if they are currentlyrunningEnter the system passphrase for this system to proceed, or return toexit and rebootStep 8: At the passphrase prompt, enter the current system passphrase for the controller.One of the following happens:• If the entered passphrase does not match the system passphrase for this controller, after prompting a second time and no match, the backup and restore LED flashes rapidly (200 msec ON, 200 msec OFF)and it prompts you to reset the system.• If the entered passphrase and the passphrase stored on the controller match, the system waits while the USB drive mounts, this can take a few minutes. The following message appears:Waiting for USB drive to mount. Press any key to quit and reboot.Once USB drive is detected, the following message and options display:USB drive detectedThis platform is Qnx-TITAN-61BA-B6DB-88FE-4A31Please make your selection below1) Abort Recovery/Restore mode 2) Show backups for other host IDs3) Qnx-TITAN-61BA-B6DB-88FE-4A31_20151119154109Step 9: Type the number for a listed backup file name (for example: 3) or other option and press Enter.NOTE: The backup file name is the name of the backup file stored on the USB flash drive:(hostid (unique host ID of the controller), underscore (_) timestamp) The system prompts you to enter the passphrase for the backup file.Step 10: At the prompt asking if the backup file's passphrase is the same as the system passphrase for thecontroller, type Y (yes) or N (no).• If Yes, then the system passphrase entered in the earlier step is used to decode the backup.• If No, you must enter the passphrase for the backup file to decode the backup.Step 11: If you entered N in the previous step, at the prompt enter the passphrase for the backup file, andconfirm it.HAWK 8000 CONTROLLER – BACKUP & RESTORE GUIDE7 EN2Z-1027GE51 R0517The restore begins.Risk of equipment damage!► Once a restore begins, do not interrupt the process by removing the USB flash drive, disconnecting the power, or pressing the backup and restore button again. If you do not allow the restore to complete, thecontroller could be left in a non-functional state.When the restore successfully completes, the backup and restore LED turns OFF and the system displays a message indicating that the restore is complete and that the controller requires a reset.Step 12: Turn the controller's power OFF and back ON again.Restoring Factory DefaultsThe process of restoring factory defaults returns the HAWK 8000 to the state it was in when it shipped from the factory. This procedure describes the steps to restore factory defaults when using a terminal emulator program to access the controller's system shell menu.Prerequisites:• A USB-to-Micro USB cable (same cable as that used to connect a smart phone to a computer) connecting the HAWK 8000 to your PC. The Debug port on a HAWK 8000 is a standard Micro-A type USB port for debugging serial communications.• A terminal emulator (system shell program), such as PuTTY, installed on your PC.Risk of equipment damage!► Recovering factory defaults removes all platform and station data in the HAWK 8000. Be sure to backup data prior to performing this procedure.The following are a few scenarios for which you might choose to restore factory defaults:• While commissioning a brand new HAWK 8000, you make an error entering the default platform daemoncredentials or passphrase. The result is that you cannot commission the HAWK 8000. In this scenario, your only recovery option is to restore the factory defaults.• When decommissioning the HAWK 8000, a best practice to follow is recovering the factory defaults in order to wipe all of the platform and station data in the HAWK 8000.Fig. 2 indicates the position of USB ports and pushbuttons behind the access door.HAWK 8000 CONTROLLER – BACKUP & RESTORE GUIDEEN2Z-1027GE51 R05178Fig. 2. LEDs, USB ports, and pushbuttons behind access doorLEGEND:1 PROG USB 2.0 for use with USB Flash (thumb) drive2 DEBUG Micro-A USB for serial debug communications3 BACKUP Pushbutton switch to start a USB backup, or if held in during power up/boot up, initiates afactory recovery image4 SHT/DWN Recessed pushbutton switch for initiating a controlled shutdown5 BACKUP LED to indicate USB media present, or a backup, restore, or factory recovery image inprogressNOTE: For any HAWK 8000 converted to run AX, the USB Backup/Restore and USB port functionality is notsupported. And although holding down the Backup button during power up/boot up still functions to initiate a factory recovery image, it restores the controller to its factory ship state which is NX 4.2.36.34.2.14 orlater. You must repeat the conversion procedure to get it to AX 3.8.111.6.5.• The DEBUG port is a standard Micro-A type USB port for serial debug communications to the HAWK 8000.For more details, see section "About HAWK 8000 System Shell Mode" in HAWK 8000 Controller – Install & Start-Up Guide (EN1Z-1027GE51).NOTE: Login requires administrator level platform credentials.• The SHT/DWN pushbutton initiates a "controlled shutdown" of the HAWK 8000, ensuring that all station data ispreserved.Step 1:Ensure that the controller's power is OFF. Step 2: Press and hold down the backup and restore button as you power up the HAWK 8000, andcontinue holding down the button throughout the boot-up process until the button press isdetected and the following confirmation banner displays:******************************************************* Backup/Restore button press detected. Release button now to proceed.*******************************************************NOTE: During this step of the procedure, the Backup LED flashes at medium speed (100 msec ON,100 msec OFF). Also, be aware that holding the button down too long results in the followingmessage (which does not indicate a hardware fault). If this message appears, it is best to startthe procedure over, beginning with step 1:"WARNING - CHECK BACKUP BUTTON - POSSIBLE SHORT!"Step 3: Release the backup and restore button once the banner displays.HAWK 8000 CONTROLLER – BACKUP & RESTORE GUIDE9 EN2Z-1027GE51 R0517On detecting the button release, the system begins a 10-second countdown, which displays as shownhere:Press any key to restore from USB backup. If no key pressed, factory recovery will begin in 10 seconds Recovery begins in 9 seconds Recovery begins in 8 secondsRecovery begins in....NOTE: Pressing any key during this 10-second countdown prevents the system from entering factoryrecovery mode. Instead, the system switches modes to restore from a USB backup.When no key press is detected during the 10-second countdown, the factory recovery process begins at the moment the countdown finishes. Upon entering recovery mode, the boot process overwrites the HAWK 8000 with a default factory image. During this process, the Backup LED blinks at slow speed (one second ON, then one second OFF).Risk of equipment damage!► Once in recovery mode (Backup LED is flashing in slow blink), do not interrupt this process. Allow the recovery to complete or the HAWK 8000 could be left in an inoperable state.Step 4: When the Backup LED stops flashing, turn the controller's power OFF and back ON again toreboot.NOTE: After restoring factory defaults, the initial HAWK 8000 reboot process takes longer than usual. On completion, the HAWK 8000 is restored to a factory default state.Shutting Down the ControllerThe shutdown procedure allows you to safely shutdown the HAWK 8000.Step 1: Press and hold the Shutdown button until the Backup LED begins to flash.NOTE:In QNX 4.3, the heartbeat LED also turns OFF, and all Ethernet, USB, and console connectivity is lost. Step 2:Once the Backup LED begins to flash, release the Shutdown button. Step 3:Once the Backup LED turns ON (solid) and begins to flash, wait until the Backup LED turns OFF. Step 4: Remove power to the HAWK 8000.NOTE: If you have a terminal connected to the HAWK 8000, the following message displays when theshutdown process is complete and it is safe to remove power:iomonitor: shutdown complete, safe to remove powerHAWK 8000 CONTROLLER – BACKUP & RESTORE GUIDEEN2Z-1027GE51 R0517 10 REFERENCE INFORMATIONTopics covered in this chapter♦ Platform and station backup options♦ Restore options♦ Shutdown operationsThe following sections provide additional backup, restore, and shutdown reference information.Platform and Station Backup OptionsSeveral options are available for backing up platform and station data.NOTE:USB backup supports only FAT32 and FAT32X file systems. NTFS is not supported.Risk of equipment damage!► Only flash drives (USB sticks ≤128GB) are recommended for backup/restore operations. USB bus powered ex-ternal hard drives often have higher power requirements and so may not function as expected, possibly resulting in permanent damage to the drive or to the HAWK 8000. Plugging in an external hard drive may cause the controller to become unresponsive, requiring a reboot.In Niagara, the term backup describes different operations. Refer to the following table for information about each backup type.Backup typeContents Size Tool Notes Platforms supported Station copier Station .bog file, histories, and alarms<1 to 50 MB COACH NX Supports cross-model installation of station backup All (Niagara AX and Niagara NX) Backup .dist Station .bog file, histories,alarms, references tomodules, JVM and OS version, and platform con-figuration<1 to 50 MB COACH NXRequires a clean dist (distribution) to downgrade All (Niagara AX and Niagara NX) Clone backup Station bog, histories,alarms, copies of modules, JVM, OS image,platform configuration 50+ MB Browser, USB port, debug port access Completely self-contained. May be restored only to the same model ofcontroller.HAWK 8000 (Niagara NX, only)HAWK 8000 CONTROLLER – INSTALL & START-UP GUIDEManufactured for and on behalf of the Environmental & Energy Solutions Division of Honeywell Technologies Sàrl, Rolle, Z.A. La Pièce 16, Switzerland by its AuthorizedRepresentative:CentraLineHoneywell GmbH Böblinger Strasse 1771101 Schönaich, Germany Phone +49 (0) 7031 637 845 Fax +49 (0) 7031 637 740 ******************* Subject to change without notice EN1Z-1027GE51 R0517Restore OptionsThe restore options are displayed when restoring a controller (platform and station) that was backed up to a USB flash drive.The restore options display when you connect to the controller using a USB-to-Micro USB cable and run a terminal emulator.This Platform's ID is hostidPlease make your selection below 1) Abort Recovery/Restore mode2) Show backups for other host IDs 3) backup file nameWhere: backup file name is the name of the backup file on the USB flash drive:(hostid (unique host ID of the controller), underscore (_) timestamp)Menu itemDescription1) Abort Recovery/Restore modeAllows you to abandon the process of recovering or restoring a USB backup.2) Factory Recovery **ALL DATA WILL BE LOST!!** Recovers the controller to its factory default state. 3) Show backups for other host IDs Displays all backups on the UPS flash drive.4–n) hostid_timestampDisplays the USB backup file name, where: n is the option number. hostid is the host name.timestamp identifies the date and time when the backup was made.Shutdown OperationsThe information below describes how the shutdown operation works.To initiate a shutdown press and hold the Shutdown button on the enclosure. When the controller detects that the Shutdown button is being pressed, it enters the shutdown mode. This is indicated by the Backup LED flashing the alert mode pattern (100 msec ON, 100 msec OFF).To verify that the Shutdown button is functioning and not in a failed state, the controller must detect the buttonrelease before proceeding. Once the button is released, the controller puts the software in a safe state. During this process, the Backup LED toggles with the work pattern (1 s ON, 1 s OFF). Once the software has successfullycompleted its process, it notifies the controller that it is safe to shutdown. The controller turns OFF the Backup LED, indicating it is safe to remove power.In the event that the software is unable to put the system into a safe state, the software notifies the controller that it could not complete the request. The controller then indicates this by toggling the Backup LED with the error pattern (200 msec ON, 200 msec OFF, 200 msec ON, 3 s OFF).。
Honeywell PKS系统简介和故障处理

Hoheywell PKS系统简介和故障处理安彩太阳能玻璃有限责任公司肖会永摘要:对Honeywell PKS系统硬件和软件结构进行了全面介绍,对该系统的常见故障进行了分析,结合工作中的实践经验,对不同的故障分别采取相应措施进行处理,确保生产稳定进行。
关键词:服务器故障1.前言安彩高科2#炉控制系统选用Honeywell公司的PKS系统,整个系统功能比较强大。
由于该系统在公司内首次应用,在运行和维护的过程通过对一些故障的处理,增长了该系统故障处理方面的经验。
下面将就该系统的结构进行介绍,并对几个常见的故障进行分析进而提出迅速解决问题的方法。
2.系统硬件组成2#炉采用的Experion PKS系统包括系统硬件、高性能服务器(Experion Sever)兼工程师站(Engineer Station)和通用操作站(Experion Station)。
两台服务器采用同步冗余结构,即:正常情况下,两台服务器是同步运行的,并且一主一副,互为冗余,运行中一旦一台服务器如果出现异常故障,系统会自动检测并迅速切换到另一台服务器继续运行,从而保证整个系统的稳定性。
图1 PKS系统网络结构示意图主控制柜包含Experion PKS系统的一些核心部件,主要有系统控制器(C200 Controller)、网络接口卡CNI(ControlNet Interface)、电源模块(Power Supply)以及冗余模块(Redule Module)等模块组成,而且均采用了两套完全相同配置的硬件冗余结构,从整体上提高了系统工作和控制的可靠性、安全性。
还有一些特有的I/O(输入输出处理)卡件和I/O接口。
这些设备通过ControlNet控制网络连接起来,构成一个功能齐全的集散型控制系统。
系统采用三层网络结构,上层网是标准工业以太网,采用TCP/IP协议,连接所有人机接口(HMI);中层网ControlNet是人机接口与过程控制站通讯的监视控制网,采用遵循IEEE802.3工业标准协议的冗余实时控制网,通讯速率为5MB/S;下层ControlNet为I/O网,连接着控制器与I/O模件,采用与监视控制网相同的网络。
霍尼韦尔PKS项目文件备份指南
PKS项目文件备份1.备份Hosts文件在电脑C盘——Windows——System32——drivers——etc文件夹下面找到名为hosts的文件将其进行复制保存2.备份流程图打开C盘,在ProgramData——Honeywell——ExpersionPKS——Client文件夹下找到Abstract流程图文件夹,将其进行复制保存3.备份EMDB在PKS服务器电脑上打开Configuration Studio软件,选择进入SystemName,然后在右侧菜单栏中点击Administrator the system database在弹出的对话框中点击Yes随后弹出EMDB管理面板在左边菜单栏选择EMDB Admin Tasks,点击右侧的Backup Database图标进行数据备份,选择备份存储路径确定即可,然后在相应的路径下即可看到名为XXXX.bak的文件4. 备份ERDB在PKS服务器电脑上打开Configuration Studio软件,选择进入项目例如Server1,然后在右侧菜单栏中点击Administrator the control strategy database在弹出的对话框中点击Yes随后弹出ERDB管理面板在左边菜单栏选择ERDB Admin Tasks,点击右侧的Backup Database图标进行数据备份,选择备份存储路径确定即可,然后在相应的路径下即可看到名为XXXX.bak的文件5.备份Checkpoint文件打开程序组态软件,点到Monitoring在线,选择一个控制器然后右击鼠标,点击Checkpoint——Save Checkpoint Manually然后在弹出的面板中选择要进行备份的控制器并点击按钮,然后点击保存即可随后在C盘的Honeywell文件夹下找到Checkpoint的备份文件进行复制保存6.备份项目文件打开程序组态软件,点击File——Export进行项目文件导出在弹出的对话框中选择要导出的内容点击Export得到类似下图的文件7.备份QuickBuilder文件打开程序组态软件,进入SCADA组态界面,点击File——Export进行项目文件导出选择相应的文件存放路径及内容,点击确定得到类似下图的文件。
霍尼韦尔PKS210系列备份方法
2011年11月15日星期二
Honeywell Confidential and Proprietary
HMI&DSP tips
16
SCADA Points 的备份
在到C:\Program files\Honeywell \Experion PKS \Server\Data\qdb将其备份 C:\ files\ Server\Data\qdb将其备份
2011年11月15日星期二
Honeywell Confidential and Proprietary
HMI&DSP tips
1
Database backup
在当前的PKS R210系统上备份数据文件,大体上分为四个方面 • • • • 基于Windows 环境的备份 Process points 的备份 SCADA Points 的备份 基于Station环境的备份
点击 OK!
这样就把内存中的实际使用的点读出来,如下图:我们进行分项Export, 首先以channel 为例。
2011年11月15日星期二
Honeywell Confidential and Proprietary
HMI&DSP tips
22
SCADA Points 的备份
二全部选中如图所 示,执行Upload
没有safe view 配 置station
用safe view 配置 station
2011年11月15日星期二
Honeywell Confidential and Proprietary
HMI&DSP tips
13
Process points 的备份
•
C:\ files\ Client\System\R210,将用 C:\Program files\Honeywell \Experion PKS \Client\System\R210,将用 C:\ files\ 户自定义的功能健的文件备份出来。例如: C:\Program files\Honeywell Client\System\R210\ \Experion PKS \Client\System\R210\UCR1IKB.stb
Honeywell霍尼韦尔C300 DCS系统学习

C 系列“控制防火墙” (FTE交换机)
? 支持“C系列” 产品
? 使用C系列 24VDC 电源
? 8+1 口( FTE 交换机)
? L1 层控制环境的最安全选择 ? 2 个“Firewalls”支持 FTE功能 ? 支持冗余 ? 支持开电和运行自诊断,带故障指示; ? 上连(Uplink)信息控制,保证柜内通讯的最高
ABB totoAAB
Server
?不存在网络切换
A tree
B tre
?FTE节点具有路径选择能力
?Honeywell 专用FTE软件; ?不断检测网络状态;
Switches Switches
Crossover
Switches
?自动选择最优路径通讯。
?安全架构 ,容许单点故障和一些多点 C300
C300
操作站中数据的来源:
1, Server中的过程数据及相关的报警和事件,直接来自 于控制器。
2, ES-F中的过程数据及相关的报警和事件,还有其他数据信息,直 接来自于服务器。
3, ES-C中的过程数据及相关的报警和事件,直接来自于控制器;其 他数据信息直接来自于服务器。
4, ES-CE中的过程数据及相关的报警和事件,还有其他数据信息,直 接来自于 ES-C。
?每个C300 最多支持 64个冗余 I/O 卡件包括C和A系列卡件
(C系列卡件地址为1-40)
?每个 IOL 可以支持 40 冗余 模件
?可混合使用
?IOLink
?通过FTEB支持 A系列 I/O
?运行 CEE (控制操作系统 )
主要完成5个功能 ? 上位通讯 ?Peer to Peer 点对点通讯 ?IOLINK 1 IO 通讯 ?IOLINK 2 IO 通讯 ? 确定性执行控制环境
霍尼韦尔DCS的变迁看过程自动控制系统的发展
摘要:本文主要通过回顾霍尼韦尔公司DCS系统的30多年发展历程,重点介绍霍尼韦尔新一代Experion PKS系统的一些主要特征,以此分析工业自动化过程控制系统的发展趋势。
关键词:DCS,TDC200,TDC300,Experion PKS,控制网络,过程控制器,集散控制。
1 前言自从霍尼韦尔公司在1975年推出世界上第一套DCS系统TDC2000至今已经过去30多年的时间,过程自动化控制系统发生了巨大的变化。
回顾一下霍尼韦尔公司DCS系统的变迁过程,关注霍尼韦尔新一代Experion PKS系统,对我们了解当前DCS发展动态,把握将来的发展趋势具有非常积极意义。
2 霍尼韦尔公司DCS回顾2.1 TDC2000系统在1975年霍尼韦尔公司推出TDC2000系统以前,过程工业控制还处在过程仪表自动化控制时代,国外使用电动仪表,而国内还处于主要使用气动仪表,刚开始尝试使用电动仪表阶段。
生产过程对自动化控制要求相对较低,主要是保证生产稳定及相对安全运行。
无法或难以实现复杂控制,更谈不上先进或优化控制,生产效率相对较低,能耗大,产品成本高。
尽管这时已经出现了各种型号的计算机,并且很多人试图将计算机用于过程控制,但是由于没有很好地解决由于计算机故障而带来的生产损失和安全隐患问题,因而无法真正实现将计算机用于生产过程控制。
TDC2000的推出,其重要意义在于提出并实现了集散控制的概念。
集中操作和管理,实现各回路或设备之间更加协调运行,以提高生产运行稳定性和安全性;分散控制,实现危险分散和隔离,并且易于安装和维护。
30多年的实践证明,集散控制概念是计算机过程控制的一个基本原则。
这个概念不仅今天没有过时,而且在以后相当长的时期内都将是计算机过程工业控制的一个主导路线。
根据集散原则,整个TDC2000的基本功能分布特点是:控制网络采用单层冗余结构;操作站负责操作与处数据存储;不同的控制器实现不同的过程控制等等。
这种基本功能分布至今还被有些控制厂商的DCS所采用的。
霍尼韦尔PKS系统--如何恢复服务器B

Restoring Server B from a hardware failure or corrupted databaseThis procedure is used when you are replacing the hardware platform on Server B or performing a clean installation on Server B.AttentionIf using Experion Backup and Restore to restore Server B, refer to the ExperionBackup and Restore Guide for details.To restore server B1.Make sure that Server A is running as Primary.2.Remove Server B from the network (disconnect network cables).3.Shutdown Server B.4.Replace Server B. Do not connected network cables.5.Restore Server B, (install Windows Operating System and Experion Server software).6.Select Start > Control Panel > System and Maintenance > Administrative Tools anddouble-click Services.7.Change Startup Type of Experion PKS System Repository to Disable and then Stop theservice.8.Click OK to Stop Control Data Access service.9.Connect Server B to the network.unch Configuration Studio and connect to the server.On Process Control Strategies category, click Administer the control strategy database.11.In the ERDB Admin Tasks folder, select the Recover the Primary Database.AttentionA loss of view will be encountered on Server A during these steps.12.Click Yes to recover the database.13.Click OK to acknowledge that the recovery is complete.14.Select Enable Replication to start the ERDB replication15.Close the DBAdmin window.16.Click Yes to enable replication.This may take a while, depending on the size of the database.17.Click OK to acknowledge the replication successful message.If the server pair is host to an EMDB, perform steps 18 through 25. If no EMDB is present on the servers, go to step 26.18.In Configuration Studio, connect to the appropriate system.On System Tasks category, click Administer the system database.19.In the EMDB Admin Tasks folder, select the Recover the Primary Database.20.Click Yes to recover the database21.Click OK to acknowledge that the recovery is complete.22.Select Enable Replication to start the EMDB replication.23.Close the DBAdmin window.24.Click Yes to enable replication.This may take a while, depending on the size of the database.25.Click OK to acknowledge the replication successful message.26.On Server B, bring the real time System Repository database into synchronization with ServerA as follows:a.Select Start > Control Panel > System and Security > Administrative Tools anddouble-click Services.b.Change Startup Type of Experion PKS System Repository to Automatic and then Startthe service.c.Start Control Data Access serviced.Close Services.。
霍尼韦尔PKS系统维护及简单故障处理

二
PKS系统信号测量判断
二
PKS系统信号测量判断
三
PKS系统简单故障处理
• 1、EOD装置8块DO卡件烧毁 • 原因:MCC接线错误,导致220v电经DI继电器串入24V电源负极。(DO卡 件经外部24V供电) • 2、服务器切换后无法同步 • 原因:PKS内部服务没有启动或者需同步的数据太多 • 3、PP装置AO卡件频繁切换 • 原因:现场接线松动,导致回路检测失败(负载电阻过高)。 • 4、DMTO及PP装置卡件状态灯不亮 • 原因:未知 • 5、PP装置历史趋势收集报警 • 原因:趋势类型组态错误 • 6、EO罐区IOLINK报警 • 原因:软故障
3
一
PKS系统维护
4
一
PKS系统维护
5
一
(2)station软件 1、冗余检查
PKS系统维护
6
一
(2)station软件 2、系统报警
PKS系统维护
7
一
PKS系统维护
8
一
(2)station软件 3、系统事件
PKS系统维护
9
一
PKS系统维护
10
一
PKS系统维护
11
一
PKS系统维护
12
41
三
PKS系统简单故障处理
4、 服务器运行缓慢 •检查存储的文件是否达到硬盘容量的85%。由于运行时间过 长,事件归档和历史趋势文件越来越大,造成硬盘空间不足 。解决方法:把旧的文件移到另外一个盘里或直接刻录成 DVD光盘,最好有一个计划表,定期清理和备份这些文件, 不会造成硬盘容量不足的问题。 •检查服务器硬盘是否有很多的碎片,造成服务器运行性能下 降。解决方法,定期的执行磁盘碎片整理。 •服务器运行时过长,内存里很多垃圾文件,使内存运行效率 不高,优化内存执行效率。 •使用任务管理器窗口,查看一些没用的程序是否占用过多的 CPU和内存资源,关掉一些跟系统没有关系的程序,尽量的 使系统更加纯净。
霍尼韦尔PKS-C300硬件知识介绍

内存与存储
内存容量
霍尼韦尔pks-c300的内存容量较大,能够 满足大量数据处理和多任务操作的需求。
内存类型
霍尼韦尔pks-c300采用高速的内存类型,如DDR4, 能够提高系统的整体性能。
存储类型与容量
霍尼韦尔pks-c300采用高速的固态硬盘或 机械硬盘,容量较大,能够满足大量数据存 储的需求。
输入设备的精度和可靠性对整 个系统的性能和稳定性具有重 要影响。
输出设备
输出设备是用于控制和调 节各种设备的设备,例如 电机、阀门、加热器等。
控制器通过输出设备将控 制信号转换为对被控设备 的操作,从而实现系统的 控制目标。
ABCD
பைடு நூலகம்
在霍尼韦尔pks-c300中, 常见的输出设备包括电动 执行器、气动执行器、调 节阀等。
霍尼韦尔pks-c300硬件知识介绍
目录
• 霍尼韦尔pks-c300简介 • 霍尼韦尔pks-c300硬件构成 • 霍尼韦尔pks-c300性能参数 • 霍尼韦尔pks-c300安装与配置 • 霍尼韦尔pks-c300使用与维护 • 霍尼韦尔pks-c300与其他产品的比较
01 霍尼韦尔pks-c300简介
模块化设计
该控制器采用模块化设计,可根据实际需求进行灵活配置。
易于编程和调试
霍尼韦尔pks-c300支持多种编程语言和调试工具,方便用户进行编 程和调试。
可靠性和安全性
该控制器具有高度的可靠性和安全性,能够保证工业自动化系统的稳 定运行。
应用领域
霍尼韦尔pks-c300广泛应用于各种工 业自动化领域,如制造业、电力、化 工、制药等。
01
兼容性
与其他同类产品相比,霍尼韦尔pksc300具有更广泛的兼容性,可以与多种 操作系统和软件集成。
Honeywell PKS DCS系统介绍

现场巡检自动化 IntelaTrac PKS
常规、逻辑、顺序 及模型控制
C300/C200 & Profit Loop
冗余和/或远程 I/O
现场移动终端 Mobile PKS
本地控制网
SIL3 安全系统 Safety Manager
无线变送器
过程管理器
基本控制器
XYR5000TM
TPS/TDC3000投资保护
• 每个节点必须有FTE 软件许可证,和双口网卡。 • 交换机
典型光缆--最长2km
主干交换机
族交换机
CAT5 网线–最长100m 长距离可用光缆转换器延伸
FTE节点
FTE节点
FTE软件 双网卡
FTE节点 FTE节点 以太网节点
21
FTE网络特点总结
¾ 通过系统软件驱动及CISCO交换软件实现工业生产的实时确定 性控制,解决了工业以太网长时间困扰的实时数据没有优先级选择 的问题 ¾ 以多路由选择逻辑单网的组网方式代替了双网结构,实现了多 路由选择、最优路径选择和交换机快速切换。
9
什么是容错以太网(Fault Tolerant Ethernet)(一)
¾ 容错以太网(FTE)是Experion PKS的控制网络,FTE不但提供了容错的 特点,也提供了快速网络的相应,及工业以太网的控制应用的安全性。 ¾ 容错以太网(FTE)是冗余网络结构(物理)的单网(逻辑),这种冗 余的结构是通过Honeywell的FTE驱动,及商用的网络设备实现的。
24
12
Helping You Manage Your World
25
Experion PKS™ 系统结构 工厂数据库 UniformancePHD
Honeywell_PKS系统维护手册

Honeywell PKS系统维护手册第一章日常维护第二章卡件更换第三章控制器第四章 I/O卡件第五章电源第六章颜色代码第七章常见故障第八章常用缩写系统使用维护DCS系统是由系统软、硬件,操作台盘及现场仪表组成的。
系统中任一环节出现问题,均会导致系统部分功能失效或引发控制系统故障,严重时会导致生产停车。
因此,要把构成控制系统的所有设备看成一个整体,进行全面维护管理。
日常维护1.1.1机柜室管理应加强机柜室人员和设备管理。
为保证系统运行在适当条件下,请遵守以下各项:1)密封所有可能引入灰尘、潮气和鼠害或其它有害昆虫的走线孔(坑)等;2)保证空调设备稳定运行,保证室温变化小于+5℃/h,避免由于温度、湿度急剧变化导致在系统设备上的凝露;3)现场与控制室合理隔离,避免现场灰尘进入控制室,同时控制室定时清扫,保持清洁。
4)进入机房、工程师室作业人员严格遵守各项规章制度,进出须换鞋或带鞋套,不得将污物、食品、饮料等带入机房;爱护机房、工程师室内设备,保持机房、工程师室整洁;进入机柜间应关闭手机。
5)过程控制计算机机柜间内禁止使用无线对讲设备。
6)技术组全面负责过程控制计算机的管理,各班组负责过程控制计算机机房、工程师室的日常卫生和日常维护工作。
工程师室内计算机及网络设备的维修由技术组成员负责,班组配合。
技术组成员在维修完设备后应做好设备规格化工作。
7)日光灯完好、灭火器按期检查、室内卫生整洁、操作台(柜)、主机外部、显示器、打印机等卫生清洁、打印机不缺纸、机柜内设备如机柜过滤网清洁、风扇完好,电话机、其他未明确但属于共有的设备等完好。
8)布线层的槽盒盖可以不盖,但应根据规格大小整洁地放置在地面上。
布线层墙壁、电缆进线口应密封,无人时,电灯只保留一组常亮。
9)室内施工管理:本班的设备施工作业由本班完成,外委作业时由本班派人监护(包括分析、检修等工作涉及更改电源时)。
施工结束后应做到工完料净场地清,负有管理责任的班组应及时向对方班组指出施工作业后的室内卫生等问题。
霍尼韦尔系统PKS

重庆天然气净化总厂
安全管理的分层描述图
重庆天然气净化总厂
二、系统概述 • 安全控制器和常规的PLC 有相似之处,它们都能完成逻辑和数 学计算,都有输入输出卡件,对输入信号扫描并按照特定的控制 逻辑驱动现场最终控制元件,也都有数字通讯端口。但是常规的 PLC 从设计上并不具备故障容错和故障安全的性能,这是它们 的最基本区别。简要归纳安全控制系统的几个特点: • 它要达到两个重要目标: • 要有极高的安全性(Safety)和有效性(Availability),即使出 现故障,也要用冗余等措施使系统工作正常。 • 着重内部诊断,将硬件和软件相结合,检测出系统本身的异常操 作,检测出99%以上内部元器件的潜在危险故障;要采用一系列 特殊的技术保证软件的可靠性;冗余配置,即使部件出现故障时 也要保持正常操作;对通过数字通讯端口的任何读写要有非常高 的安全可靠保证。 • 在系统设计时采用故障模式、影响和诊断分析,研究、测试系统 中的每个部件会出现怎样的故障,以及系统怎样检测出这些故障。 • 要通过第三方的权威认证,比如TÜV 认证,以便满足国际标准 对安全和可靠性的严格要求。
调用趋势画面
调用组画面 微增所选点的值 微减所选点的值
重庆天然气净化总厂
报警区 指示最新或最早产生的报警信息,系统缺省 为最新报警。 状态栏:指示当前系统的运行状态,包括日期时间, 报警,通讯,消息,停机,服务器,操作站,安全 级别。
日期时间域 报警域
指示当前日期及时间
指示当前报警状态。 1)空 表示无报警。 2)闪烁红色 表示有未响应的报警。 3)非闪烁红色 表示有已响应但未恢复正常的报警
重庆天然气净化总厂
6)特殊操作
控制回路操作: 手动 – 自动切换 a、在工艺流程图画面中,双击控制点数据项,即进入点细节画面。 b、在操作盘上即可进行手 – 自切换。 c、手动切换为自动的操作:手动操作修改OP 值,到 PV=SP 时,选择AUTO 即可; d、自动切换为手动:选择 MAN 即可。
霍尼韦尔(honeywell_pks)详细操作详解(含大量实操图)
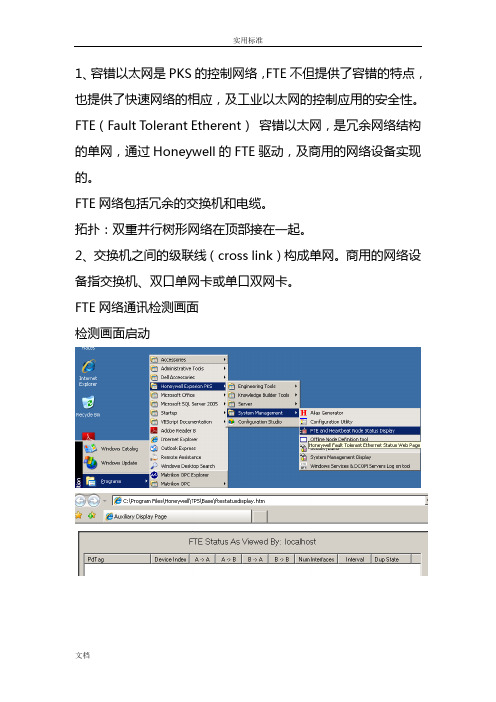
1、容错以太网是PKS的控制网络,FTE不但提供了容错的特点,也提供了快速网络的相应,及工业以太网的控制应用的安全性。
FTE(Fault Tolerant Etherent)容错以太网,是冗余网络结构的单网,通过Honeywell的FTE驱动,及商用的网络设备实现的。
FTE网络包括冗余的交换机和电缆。
拓扑:双重并行树形网络在顶部接在一起。
2、交换机之间的级联线(cross link)构成单网。
商用的网络设备指交换机、双口单网卡或单口双网卡。
FTE网络通讯检测画面检测画面启动3、系统必须有控制器、服务器、操作站组成。
4、FTE网络包括冗余交换机和电缆。
树网:连接到A交换机上A口形成的网叫A网(Yellow tree)。
连接到B交换机上B口形成的网叫B网(Green tree)。
Localhost 接收数据节点。
FLEX操作站(F站):过程数据及相关的报警和事件,还有其他数据信息,直接来自服务器;组态ES-F两种连接方法:固定连接方法(Static):提供了特定ES-F的一种永久性专用连接。
轮替连接方法(Rotary):提供了一种按需的连接,适用不需要全日制操作访问时。
Console操作站(C站):过程数据及相关的报警和事件,直接来自于控制器;其他数据信息来自于服务器;Console Extension操作站(CE):过程数据及相关的报警和事件,还有其他数据信息,全部信息都来自与C站。
7、一个C300控制器带有两个IOLINK,每个IOLINK最多支持40个IO卡件,而一个控制器最多支持64个IO卡件。
每套C300控制器最多支持64个IO Units(IOU)。
C300控制器必须与控制防火墙连接。
C300控制器主控制器FTE地址设定奇数,备用控制器地址为主控制器的地址+1。
Control Firewall(CF9)控制防火墙:在FTE网络中是成对出现的,8+1口,其中有一个专门的网线路口用于向上连接交换机,其余的8个网口可以连接控制器。
PKS操作站蓝屏快速恢复安装

PKS操作站蓝屏快速恢复安装摘要:大庆炼化公司润滑油联合装置的控制系统在2013年由TDC3000升级到PKS系统,在近几年的维护中,一个比较典型的故障是操作站硬盘死机蓝屏,这就需要对操作站的系统重新安装恢复。
本文主要针对快速恢复安装Console站的过程做了分析和讲解。
关键词:PKS;C站系统恢复;GHOST ;解绑定0引言大庆炼化公司炼油生产三部原有4套生产装置,2013年将霍尼韦尔的TPS系统升级为PKS系统,软件版本R410.1。
这4套生产装置的控制系统位于润滑油厂联合主控室内,共设置15台Console操作站。
1 PKS系统及其Console操作站的主要特点Experion PKS新一代的过程自动化系统,集成了过程控制、资产管理功能,融合当今最先进的控制、各种开放的工业标准、最新的计算机网络等技术,将过程控制和安全系统集成为一个单一且统一的结构。
PKS将过程控制网络分成三个层次,负责直接过程控制的节点(比如控制器和现场总线接口模块)连接到第一层。
Experion服务器、Console操作站和ACE 节点连接到第二层。
域控制器、厂房级优化器、DSA关联的Experion服务器以及PHD历史记录器连接到第三层。
Console操作站(C站)用于过程数据的监控与操作。
内部有RTDB数据库,但这种数据库只存储过程数据库,只有过程数据来自控制器,其它数据均来自服务器。
其优点是如果服务器故障可继续监控过程数据。
2操作站死机蓝屏分析在近三年的维护中,出现比较多也比较典型的故障是Console操作站死机蓝屏。
通常情况下Console操作站死机,重新启动或重新安装系统后可以继续使用正常运行。
但间隔一段时间该故障又会重复出现,严重时出现蓝屏现象。
对该故障机器硬盘本机硬件测试出现不识别现象。
操作站在过程数据的监控与操作过程中,与控制站和服务器之间需要有大量的数据进行交换,操作站的硬盘担负着大量的读写任务,不间断的进行着读写操作。
- 1、下载文档前请自行甄别文档内容的完整性,平台不提供额外的编辑、内容补充、找答案等附加服务。
- 2、"仅部分预览"的文档,不可在线预览部分如存在完整性等问题,可反馈申请退款(可完整预览的文档不适用该条件!)。
- 3、如文档侵犯您的权益,请联系客服反馈,我们会尽快为您处理(人工客服工作时间:9:00-18:30)。
系统备份及恢复
推荐的系统备份策略。
系统需要备份的内容:
∙ERDB ( 系统的控制组态内容): c:\Program files\Honeywell\Experion PKS\Engineering Tools\System\Er
∙Server 实时数据库(操作组态内容): C:\ Program files\Honeywell\ Experion PKS\Server\Data
∙操作流程图(包括子图): 用户自定
∙Station 设置文件: C:\ Program files \Honeywell\ Experion
PKS\Client\Station\*.stn \system\R**\*.stb
∙QB 设置文件: 用户自定义目录
∙报表文件(自由格式报表或Excel报表) : 用户自定义目录
∙事件或历史数据文件及归档文件(可选择备份或不备): C: \Program files \honeywell\ Experion PKS\Server\Archive
∙用户自定义文件: 用户自定义目录
1系统备份介质
建议: 移动硬盘/ 刻录光盘/ 磁带/ 远程网络计算机硬盘
1.1ERDB备份(主Server:ServerB)
●Upload and Update
∙Dbadmin – Backup Database 生成主*.bak 文件
∙Control Builder—File-Export生成project备份文件.
∙Snapshot/Checkpoint files — C:\Honeywell\Engineering
Tools\System\ER\CPM***.snapshot
将以上生成的三类文件拷贝到备份目标盘er目录下.
1.2 Server 数据库(Server同步情况下, 只需备份一个Server)
●C:\Program files\Honeywell\Experion PKS\Server\Data 目录到备份目标
盘。
(不一定能直接copy, 与后台Service有关)。
●bckbld–out filename –tag cda / backup function.(使用pntbld filename恢
复组态内容)
1.3 操作流程图(包括子图)
操作流程图(包括子图)备份到目标盘.
1.5 Station 设置文件(两台Server分别备份,并作标记)
C:\Honeywell\Client\Station\*.stn 拷贝到备份目标盘station目录下
1.6QB 设置文件(备份正式使用的那份文件)
用户自定义目录下*.qdb 文件拷贝到备份目标盘qckbld目录下.
1.7 报表文件(自由格式报表或Excel报表) : C:\Honeywell\Server\Report 下自由
格式报表或用户Excel 报表文件拷贝到备份目标盘Report目录下
1.8事件及历史数据文件和归档文件(可选择备份或不备):
C:\honeywell\Server\data ,Archive 和evtarchive目录拷贝到备份目标盘Archive 目录下.
1.9 用户自定义文件备份到目标盘
2 使用备份恢复系统(适用于冗余Server)
2.1 ServerA 系统恢复(ServerB 工作正常情况下)
∙ServerA 重新安装操作系统和PKS软件
∙设置Servera与Serverb冗余
∙使ServerA 处于Backup 状态
∙在Station中(非ServerA station)作Server同步, 恢复Server实时数据库
∙在ServerB中Dbadmin--Recover Secondary Database
∙ServerB中的流程图拷贝到ServerA响应目录下
∙备份盘中ServerA的Station目录下*.stn文件拷贝回ServerA中: C:\Honeywell\Client\Station 目录覆盖同名文件.
∙备份盘中ServerA的qckbld目录中*.qdb文件恢复到ServerA相应目录中
∙报表文件文件恢复到ServerA相应目录中
∙历史数据文件从ServerB C:\honeywell\Server\Archive 目录拷贝到ServerA相应Archive目录下.
2.2 ServerB 系统恢复(ServerA 工作正常情况下)
∙ServerB 重新安装操作系统和PKS软件
∙设置ServerB和ServerA冗余
∙使ServerB PKS Server处于Backup 状态
∙在Station(非ServerB station) 中作Server同步, 恢复Server实时数据库
∙在ServerB中Dbadmin—Recover Primary Database
∙ServerA中的流程图拷贝到ServerB相应目录下
∙备份盘中ServerB的Station目录下*.stn文件拷贝回ServerB中: C:\Honeywell\Client\Station 目录覆盖同名文件.
∙备份盘中ServerB的qckbld目录中*.qdb文件恢复到ServerB相应目录中
∙报表文件文件恢复到ServerB相应目录中
∙历史数据文件从ServerA C:\honeywell\Server\Archive 目录拷贝到ServerB相应Archive目录下.
2.3 ServerA / ServerB 完全恢复(Controller 工作正常)
∙ServerA/ServerB 重新安装操作系统和PKS软件
∙设置ServerA和ServerB冗余
∙在ServerB中, 使用备份盘中的ERDB的备份文件.bak(使用Dbadmin—backup database生成) 在Dbadmin 中使用Restore Database恢复主ERDB数据库.
∙备份盘中的流程图拷贝到ServerB相应目录下
∙备份盘中ServerB的Station目录下*.stn文件拷贝回ServerB中: C:\Honeywell\Client\Station 目录覆盖同名文件.
∙备份盘中ServerB的qckbld目录中*.qdb文件恢复到ServerB相应目录中
∙报表文件文件恢复到ServerB相应目录中
∙历史数据文件从ServerA C:\honeywell\Server\Archive 目录拷贝到ServerB相应Archive目录下.
∙Controll Builder 中Load Server Point.后者pntbld 命令建立实时数据库。
∙测试ServerB 功能
∙当ServerB功能正常时, 使用4.2.1中步骤恢复ServerA。
