一款常用的漂亮的JS图片滑动切换效果 第二版
javascript实现图片左右滚动效果【可自动滚动,有左右按钮】
javascript实现图⽚左右滚动效果【可⾃动滚动,有左右按钮】本⽂实例讲述了javascript实现图⽚左右滚动效果。
分享给⼤家供⼤家参考,具体如下:html代码:<!doctype html><html lang="en"><head><meta charset="UTF-8" /><meta http-equiv="X-UA-Compatible" content="IE=edge,chrome=1"/><meta name="renderer" content="webkit"/><meta name="keywords" content=""/><meta name="description" content=""/><title>图⽚滚动</title><style>*{margin:0;padding:0;}ul{list-style:none;}img{border:0;}.scroll{width:358px;height:63px;}.scroll_left{width:23px;height:63px;background:url(images/btn_left.jpg) no-repeat;float:left;}.scroll_right{width:23px;height:63px;background:url(images/btn_right.jpg) left no-repeat;float:left;}.pic{width:312px;height:73px;float:left;}.pic ul{display:block;}.pic li{float:left;display:inline;width:104px;text-align:center;}</style></head><body><div style="margin:100px auto;width:358px;"><div class="scroll"><div class="scroll_left" id="LeftArr"></div><div class="pic" id="scrollPic"><ul><li><a href="#" target="_blank" title=""><img src="images/pic01.png" width="100" height="63" alt="" /></a></li><li><a href="#" target="_blank" title=""><img src="images/pic02.jpg" width="100" height="63" alt="" /></a></li><li><a href="#" target="_blank" title=""><img src="images/pic03.jpg" width="100" height="63" alt="" /></a></li><li><a href="#" target="_blank" title=""><img src="images/pic04.jpg" width="100" height="63" alt="" /></a></li><li><a href="#" target="_blank" title=""><img src="images/pic05.jpg" width="100" height="63" alt="" /></a></li><li><a href="#" target="_blank" title=""><img src="images/pic06.jpg" width="100" height="63" alt="" /></a></li></ul></div><div class="scroll_right" id="RightArr"></div></div></div></body></html><script src="scrollPic.js"></script><script>window.onload = function(){scrollPic();}function scrollPic() {var scrollPic = new ScrollPic();scrollPic.scrollContId = "scrollPic"; //内容容器IDscrollPic.arrLeftId = "LeftArr";//左箭头IDscrollPic.arrRightId = "RightArr"; //右箭头IDscrollPic.frameWidth = 312;//显⽰框宽度scrollPic.pageWidth = 104; //翻页宽度scrollPic.speed = 10; //移动速度(单位毫秒,越⼩越快)scrollPic.space = 10; //每次移动像素(单位px,越⼤越快)scrollPic.autoPlay = true; //⾃动播放scrollPic.autoPlayTime = 3; //⾃动播放间隔时间(秒)scrollPic.initialize(); //初始化}</script>scrollPic.js 代码:var sina = {return eval('document.getElementById("' + objName + '")')} else {return eval('document.all.' + objName)}},isIE : navigator.appVersion.indexOf("MSIE") != -1 ? true : false,addEvent : function (l, i, I) {if (l.attachEvent) {l.attachEvent("on" + i, I)} else {l.addEventListener(i, I, false)}},delEvent : function (l, i, I) {if (l.detachEvent) {l.detachEvent("on" + i, I)} else {l.removeEventListener(i, I, false)}},readCookie : function (O) {var o = "",l = O + "=";if (document.cookie.length > 0) {var i = document.cookie.indexOf(l);if (i != -1) {i += l.length;var I = document.cookie.indexOf(";", i);if (I == -1)I = document.cookie.length;o = unescape(document.cookie.substring(i, I))}};return o},writeCookie : function (i, l, o, c) {var O = "",I = "";if (o != null) {O = new Date((new Date).getTime() + o * 3600000);O = "; expires=" + O.toGMTString()};if (c != null) {I = ";domain=" + c};document.cookie = i + "=" + escape(l) + O + I},readStyle : function (I, l) {if (I.style[l]) {return I.style[l]} else if (I.currentStyle) {return I.currentStyle[l]} else if (document.defaultView && document.defaultView.getComputedStyle) { var i = document.defaultView.getComputedStyle(I, null);return i.getPropertyValue(l)} else {return null}}};//滚动图⽚构造函数//UI&UE Dept. mengjia//080623function ScrollPic(scrollContId, arrLeftId, arrRightId, dotListId) {this.scrollContId = scrollContId;this.arrLeftId = arrLeftId;this.arrRightId = arrRightId;this.dotListId = dotListId;this.dotClassName = "dotItem";this.dotOnClassName = "dotItemOn";this.dotObjArr = [];this.pageWidth = 0;this.frameWidth = 0;this.speed = 10;this.space = 10;this.autoPlay = true;this.autoPlayTime = 5;var _autoTimeObj,_scrollTimeObj,_state = "ready";this.stripDiv = document.createElement("DIV");this.listDiv01 = document.createElement("DIV");this.listDiv02 = document.createElement("DIV");if (!ScrollPic.childs) {ScrollPic.childs = []};this.ID = ScrollPic.childs.length;ScrollPic.childs.push(this);this.initialize = function () {if (!this.scrollContId) {throw new Error("必须指定scrollContId.");return};this.scrollContDiv = sina.$(this.scrollContId);if (!this.scrollContDiv) {throw new Error("scrollContId不是正确的对象.(scrollContId = \"" + this.scrollContId + "\")");return};this.scrollContDiv.style.width = this.frameWidth + "px";this.scrollContDiv.style.overflow = "hidden";this.listDiv01.innerHTML = this.listDiv02.innerHTML = this.scrollContDiv.innerHTML;this.scrollContDiv.innerHTML = "";this.scrollContDiv.appendChild(this.stripDiv);this.stripDiv.appendChild(this.listDiv01);this.stripDiv.appendChild(this.listDiv02);this.stripDiv.style.overflow = "hidden";this.stripDiv.style.zoom = "1";this.stripDiv.style.width = "32766px";if(-[1,]){this.listDiv01.style.cssFloat = "left";this.listDiv02.style.cssFloat = "left";}else{this.listDiv01.style.styleFloat = "left";this.listDiv02.style.styleFloat = "left";}sina.addEvent(this.scrollContDiv, "mouseover", Function("ScrollPic.childs[" + this.ID + "].stop()"));sina.addEvent(this.scrollContDiv, "mouseout", Function("ScrollPic.childs[" + this.ID + "].play()"));if (this.arrLeftId) {this.arrLeftObj = sina.$(this.arrLeftId);if (this.arrLeftObj) {sina.addEvent(this.arrLeftObj, "mousedown", Function("ScrollPic.childs[" + this.ID + "].rightMouseDown()")); sina.addEvent(this.arrLeftObj, "mouseup", Function("ScrollPic.childs[" + this.ID + "].rightEnd()"));sina.addEvent(this.arrLeftObj, "mouseout", Function("ScrollPic.childs[" + this.ID + "].rightEnd()"))}};if (this.arrRightId) {this.arrRightObj = sina.$(this.arrRightId);if (this.arrRightObj) {sina.addEvent(this.arrRightObj, "mousedown", Function("ScrollPic.childs[" + this.ID + "].leftMouseDown()")); sina.addEvent(this.arrRightObj, "mouseup", Function("ScrollPic.childs[" + this.ID + "].leftEnd()"));sina.addEvent(this.arrRightObj, "mouseout", Function("ScrollPic.childs[" + this.ID + "].leftEnd()"))}};if (this.dotListId) {this.dotListObj = sina.$(this.dotListId);if (this.dotListObj) {var pages = Math.round(this.listDiv01.offsetWidth / this.frameWidth + 0.4),i,tempObj;for (i = 0; i < pages; i++) {tempObj = document.createElement("span");this.dotListObj.appendChild(tempObj);this.dotObjArr.push(tempObj);if (i == this.pageIndex) {tempObj.className = this.dotClassName} else {tempObj.className = this.dotOnClassName};tempObj.title = "第" + (i + 1) + "页";sina.addEvent(tempObj, "click", Function("ScrollPic.childs[" + this.ID + "].pageTo(" + i + ")"))}};if (this.autoPlay) {this.play()}};this.leftMouseDown = function () {if (_state != "ready") {return};_state = "floating";_scrollTimeObj = setInterval("ScrollPic.childs[" + this.ID + "].moveLeft()", this.speed)};this.rightMouseDown = function () {if (_state != "ready") {return};_state = "floating";_scrollTimeObj = setInterval("ScrollPic.childs[" + this.ID + "].moveRight()", this.speed)};this.moveLeft = function () {if (this.scrollContDiv.scrollLeft + this.space >= this.listDiv01.scrollWidth) {this.scrollContDiv.scrollLeft = this.scrollContDiv.scrollLeft + this.space - this.listDiv01.scrollWidth } else {this.scrollContDiv.scrollLeft += this.space};this.accountPageIndex()};this.moveRight = function () {if (this.scrollContDiv.scrollLeft - this.space <= 0) {this.scrollContDiv.scrollLeft = this.listDiv01.scrollWidth + this.scrollContDiv.scrollLeft - this.space } else {this.scrollContDiv.scrollLeft -= this.space};this.accountPageIndex()};this.leftEnd = function () {if (_state != "floating") {return};_state = "stoping";clearInterval(_scrollTimeObj);var fill = this.pageWidth - this.scrollContDiv.scrollLeft % this.pageWidth;this.move(fill)};this.rightEnd = function () {if (_state != "floating") {return};_state = "stoping";clearInterval(_scrollTimeObj);var fill = -this.scrollContDiv.scrollLeft % this.pageWidth;this.move(fill)};this.move = function (num, quick) {var thisMove = num / 5;if (!quick) {if (thisMove > this.space) {thisMove = this.space};if (thisMove < -this.space) {thisMove = -this.space}};if (Math.abs(thisMove) < 1 && thisMove != 0) {thisMove = thisMove >= 0 ? 1 : -1} else {thisMove = Math.round(thisMove)};var temp = this.scrollContDiv.scrollLeft + thisMove;if (thisMove > 0) {if (this.scrollContDiv.scrollLeft + thisMove >= this.listDiv01.scrollWidth) {this.scrollContDiv.scrollLeft = this.scrollContDiv.scrollLeft + thisMove - this.listDiv01.scrollWidth } else {this.scrollContDiv.scrollLeft += thisMove} else {if (this.scrollContDiv.scrollLeft - thisMove <= 0) {this.scrollContDiv.scrollLeft = this.listDiv01.scrollWidth + this.scrollContDiv.scrollLeft - thisMove} else {this.scrollContDiv.scrollLeft += thisMove}};num -= thisMove;if (Math.abs(num) == 0) {_state = "ready";if (this.autoPlay) {this.play()};this.accountPageIndex();return} else {this.accountPageIndex();setTimeout("ScrollPic.childs[" + this.ID + "].move(" + num + "," + quick + ")", this.speed)}};this.next = function () {if (_state != "ready") {return};_state = "stoping";this.move(this.pageWidth, true)};this.play = function () {if (!this.autoPlay) {return};clearInterval(_autoTimeObj);_autoTimeObj = setInterval("ScrollPic.childs[" + this.ID + "].next()", this.autoPlayTime * 1000)};this.stop = function () {clearInterval(_autoTimeObj)};this.pageTo = function (num) {if (_state != "ready") {return};_state = "stoping";var fill = num * this.frameWidth - this.scrollContDiv.scrollLeft;this.move(fill, true)};this.accountPageIndex = function () {this.pageIndex = Math.round(this.scrollContDiv.scrollLeft / this.frameWidth);if (this.pageIndex > Math.round(this.listDiv01.offsetWidth / this.frameWidth + 0.4) - 1) {this.pageIndex = 0};var i;for (i = 0; i < this.dotObjArr.length; i++) {if (i == this.pageIndex) {this.dotObjArr[i].className = this.dotClassName} else {this.dotObjArr[i].className = this.dotOnClassName}}}};参数说明:var scrollPic = new ScrollPic(); //定义变量,并初始化⽅法 scrollContId //滚动容器的ID arrLeftId //左按钮ID arrRightId //右按钮ID frameWidth //显⽰框宽度 pageWidth //翻页宽度 speed //移动速度(单位毫秒,越⼩越快) space //每次移动像素(单位px,越⼤越快) autoPlay //⾃动播放 autoPlayTime //⾃动播放间隔时间(秒) initialize() //初始化完整实例代码点击此处。
JavaScript代码实现图片循环滚动效果
JavaScript代码实现图⽚循环滚动效果1.概述循环滚动图⽚,不仅可以增添Web页⾯的动态效果,⽽且可以节省页⾯空间,有效地保证在有限的页⾯中显⽰更多的图⽚。
2.技术要点主要应⽤setTimeout()⽅法实现图⽚的循环滚动效果。
setTimeout()⽅法的语法格式如下:setTimeout(function,milliseconds,[arguments])参数说明:a. function:要调⽤的JavaScript⾃定义函数名称。
b. Milliseconds:设置超时时间(以毫秒为单位)。
功能:经过超时时间后,调⽤函数。
此值可以⽤clearTimeout()函数清除。
3.具体实现(1)在页⾯的合适位置添加⼀个id属性为demo的<div>标记,并在该标记中添加表格及要要滚动显⽰的图⽚。
关键代码如下:<div id="demo" style=" overflow: hidden; width: 455px; height: 166px;"><table border="0" cellspacing="0" cellpadding="0"><tr><td valign="top" id="marquePic1"><!-- 要循环滚动的图⽚ --><table width="455" border="0" align="center" cellpadding="0" cellspacing="0" ><tr align="center"><%for(int i=1;i<8;i++){%><td> <img src="Images/<%=i%>.jpg" width="118" height="166" border="1"> </td><%}%></tr></table></td><td id="marquePic2" width="1"></td></tr></table></div>(2)编写⾃定义的JavaScript函数move(),⽤于实现⽆间断的图⽚循环滚动效果。
javascript图片滑动效果实现

javascript图⽚滑动效果实现本⽂为⼤家分享了javascript图⽚滑动效果实现⽅法,具体内容如下,先看⼀下效果图:⿏标滑过那张图,显⽰完整的哪张图,移除则复位:简单的CSS加JS操作DOM实现:<!doctype html><html><head><meta charset="UTF-8"><title>sliding doors</title><link rel="stylesheet" href="styles/reset.css" /><link rel="stylesheet" href="styles/slidingdoors.css" /><script src="scripts/slidingdoors.js"></script></head><body><div id='container'><img src="images/door1.png" alt="1080P神器" title="1080P神器" /><img src="images/door2.png" alt="5.5⼨四核" title="5.5⼨四核" /><img src="images/door3.png" alt="四核5⼨" title="四核5⼨" /><img src="images/door4.png" alt="5.7⼨机皇" title="5.7⼨机皇" /></div></body></html>css:#container {height: 477px;margin: 0 auto;border-right: 1px solid #ccc;border-bottom: 1px solid #ccc;overflow: hidden;position: relative;}#container img {position: absolute;display: block;left: 0;border-left: 1px solid #ccc;}js操作:window.onload = function() {//容器对象var box = document.getElementById('container');//获得图⽚NodeList对象集合var imgs = box.getElementsByTagName('img');//单张图⽚的宽度var imgWidth = imgs[0].offsetWidth;//设置掩藏门体露出的宽度var exposeWidth = 180;//设置容器总宽度var boxWidth = imgWidth + (imgs.length - 1) * exposeWidth;box.style.width = boxWidth + 'px';//设置每道门的初始位置function setImgsPos() {for (var i = 1, len = imgs.length; i < len; i++) {imgs[i].style.left = imgWidth + exposeWidth * (i - 1) + 'px';}}setImgsPos();//计算每道门打开时应移动的距离var translate = imgWidth - exposeWidth;//为每道门绑定事件for (var i = 0, len = imgs.length; i < len; i++) {//使⽤⽴即调⽤的函数表答式,为了获得不同的i值(function(i) {imgs[i].onmouseover = function() {//先将每道门复位setImgsPos();//打开门for (var j = 1; j <= i; j++) {imgs[j].style.left = parseInt(imgs[j].style.left, 10) - translate + 'px'; //imgs[j].style.left = j*exposeWidth +"px";}};imgs[i].onmouseout = function(){setImgPos();};})(i);}};更多关于滑动效果的专题,请点击下⽅链接查看:希望本⽂所述对⼤家学习javascript程序设计有所帮助。
js实现图片无缝滚动特效
js实现图⽚⽆缝滚动特效⾸先,⽆缝滚动的第⼀个重点就是——动。
关于怎么让页⾯的元素节点动起来,这就得学明⽩关于JavaScript中定时器的相关知识。
JS中的创建定时器的⽅法包括两种:setTimeout和setInterval。
⾸先它们接收的参数相同:第⼀个参数是⼀个函数,⽤于定时器执⾏,第⼆个参数是⼀个数字,代表过多少毫秒之后定时器执⾏函数。
它们的不同在于:setTimeout 是在经过指定的时间之后,只执⾏⼀次函数,⽽setInterval,则是每间隔指定时间,就执⾏函数⼀次,说简单点的话,就是setInterval是setTimeout的循环版。
关于定时器还有⼀个⽤法:消除定时器,⽅法同样有两种:clearTimeout 和 clearInterval,它们分别对应不同类型的定时器。
另外,它们都只接收⼀个参数,这个参数是定时器返回的⼀个值(我在chrome中调试发现这个返回值都是数字),⽤于指定消除那个定时器。
定时器的知识掌握之后,就开始分析怎样使⽤定时器让元素动起来。
其实这个很简单,就是类似电影的原理⼀样,让元素在很短的时间内发⽣连续的位移,我们看起来的话这个元素就想是在不停地运动啦。
关于怎么让元素产⽣位移,通过JS修改元素的样式就可以实现,例如oUl.style.left = oUl.offsetLeft + speed + 'px'; 上⾯的代码中speed就是每次产⽣的位移。
关于speed使⽤还挺有意思的:我们可以修改speed的正负值来修改滚动的⽅向。
另外,关于元素的属性 offsetLeft 我个⼈认为需要注意两点:offsetLeft的值由它⾃⼰通过定位的left和⾃⼰设定的margin的和、offsetLeft它是相对于它的包含层的距离(offsetTop类似)。
当然这都是我⾃⼰的理解,肯定不是很准确,这个坑记着,下次专门解决它。
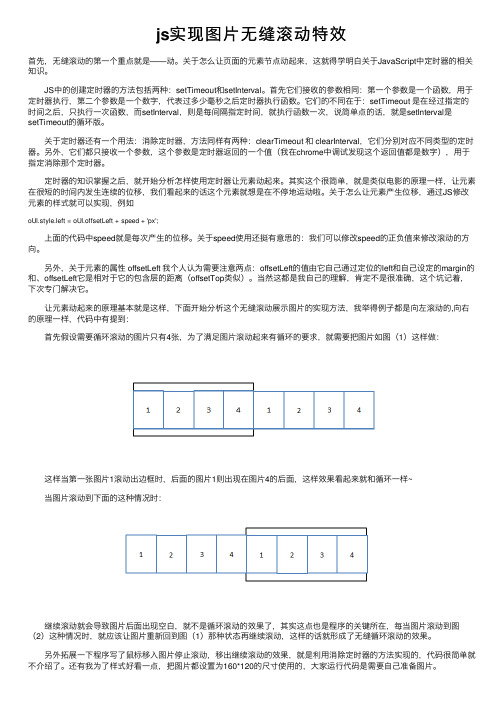
让元素动起来的原理基本就是这样,下⾯开始分析这个⽆缝滚动展⽰图⽚的实现⽅法,我举得例⼦都是向左滚动的,向右的原理⼀样,代码中有提到: ⾸先假设需要循环滚动的图⽚只有4张,为了满⾜图⽚滚动起来有循环的要求,就需要把图⽚如图(1)这样做: 这样当第⼀张图⽚1滚动出边框时,后⾯的图⽚1则出现在图⽚4的后⾯,这样效果看起来就和循环⼀样~ 当图⽚滚动到下⾯的这种情况时: 继续滚动就会导致图⽚后⾯出现空⽩,就不是循环滚动的效果了,其实这点也是程序的关键所在,每当图⽚滚动到图(2)这种情况时,就应该让图⽚重新回到图(1)那种状态再继续滚动,这样的话就形成了⽆缝循环滚动的效果。
使用JS实现图片翻转效果

使⽤JS实现图⽚翻转效果.flip-container {perspective:1000px;/*设置假定⼈眼到投影平⾯的距离为1000px,只影响3D元素,不影响2D元素*/ width: 1300px;margin:0 auto;}.front,.back {width:400px;height:400px;}.flipper {width: 400px;height: 400px;border-radius: 50%;margin-left:10px;margin-bottom:120px;display: inline-block;/*div横排显⽰,变成⾏级元素*/transition:0.6s;transform-style:preserve-3d;}.front,.back {width: 400px;height: 400px;border-radius: 20%;display: inline-block;}.back {display: none;/*隐藏背⾯*/}</style></head><body><div class="flip-container"><div class="flipper"><div class="front" style="background:url(imges/4.jpg) no-repeat" "><!-- <p>正⾯</p> --></div><div class="back" style="background:url(imges/1.gif) no-repeat"><!-- <p>背⾯</p> --></div></div><div class="flipper"><div class="front" style="background:url(imges/4.jpg) no-repeat" "><!-- <p>正⾯</p> --></div><div class="back" style="background:url(imges/2.gif) no-repeat"><!-- <p>背⾯</p> --></div></div><div class="flipper"><div class="front" style="background:url(imges/4.jpg) no-repeat" "><!-- <p>正⾯</p> --></div><div class="back" style="background:url(imges/3.gif) no-repeat"><!-- <p>背⾯</p> --></div></div><div class="flipper"><div class="front" style="background:url(imges/4.jpg) no-repeat" "><!-- <p>正⾯</p> --></div><div class="back" style="background:url(imges/4.gif) no-repeat"><!-- <p>背⾯</p> --></div></div><div class="flipper"><div class="front" style="background:url(imges/4.jpg) no-repeat" "> <!-- <p>正⾯</p> --></div><div class="back" style="background:url(imges/5.gif) no-repeat"> <!-- <p>背⾯</p> --></div></div><div class="flipper"><div class="front" style="background:url(imges/4.jpg) no-repeat" "> <!-- <p>正⾯</p> --></div><div class="back" style="background:url(imges/6.gif) no-repeat"> <!-- <p>背⾯</p> --></div></div></div><script>$(function(){$(".flipper").hover(function(){ //⿏标移动的function$(this).css("transform","rotateY(180deg)");//⿏标移上去旋转180度var n=$(this).index(); //找到⿏标经过的flipper$(".back").eq(n).css("display","inline-block"); //让back显⽰出来$(".front").eq(n).hide(); //隐藏front},function(){$(this).css("transform","rotateY(0deg)"); //⿏标移开让旋转度数归零var n=$(this).index();$(".front").eq(n).css("display","inline-block");$(".back").eq(n).hide();})})</script>。
js实现图片左右滚动效果
js实现图⽚左右滚动效果需求:页⾯显⽰教师信息列表,列表中每⼀条数据显⽰图⽚滚动插件,每张图⽚的长宽及长宽⽐例各不相同。
前提条件:美⼯把静态页⾯写好HTML代码:@using Models;@{List<cms_content> teacherList = ViewData["teacherList"] as List<cms_content>; //春⾬树频道PagerModel pager = ViewData["pager"] as PagerModel;}<div class="teacherteam_box"><h1>教师团队</h1>@foreach (cms_content teacher in teacherList){<div class="teacher_box"><div class="teacher_img fl"><img src="~/Theme/images/t1.png" /></div><div class="teacher_infor fl"><h2>@teacher.title</h2><p>@teacher.description</p><div class="products_box"><div class="products_pre"><img src="~/Theme/images/left.png" /></div><div class="products_next"><img src="~/Theme/images/right.png" /></div><div class="div-imgbox"><ul>@foreach (Tuple<string, string> item in teacher.imgList){<li><img alt="@item.Item1" src="@item.Item2" /></li>}</ul></div></div></div><div class="clear"></div></div>}<div class="page_box"><span>共@(pager.totalRows)条信息</span><a href="javascript:void(0);" rel="external nofollow" rel="external nofollow" rel="external nofollow" rel="external nofollow" rel="external nofollow" onclick="teacherPage(this,1)">⾸页</a><a href="javascript:void(0);" rel="external nofollow" rel="external nofollow" rel="external nofollow" rel="external nofollow" rel="external nofollow" onclick="teacherPage(this,2)">上⼀页</a><a href="javascript:void(0);" rel="external nofollow" rel="external nofollow" rel="external nofollow" rel="external nofollow" rel="external nofollow" ><i>@pager.page</i><b>/@pager.pageCount</b>页</a> <a href="javascript:void(0);" rel="external nofollow" rel="external nofollow" rel="external nofollow" rel="external nofollow" rel="external nofollow" onclick="teacherPage(this,3)">下⼀页</a><a href="javascript:void(0);" rel="external nofollow" rel="external nofollow" rel="external nofollow" rel="external nofollow" rel="external nofollow" onclick="teacherPage(this,4)">尾页</a></div></div>JS代码:<script type="text/javascript">var _lock = false;$(function () {teacherPage(null, null);});//end $//教师团队//flag=1⾸页,2上⼀页,3下⼀页,4尾页function teacherPage(obj, flag) {var totalPage = 1;var page = 1;if (obj) {page = parseInt($(obj).parent().find("i").text());totalPage = parseInt($(obj).parent().find("b").text().replace("/", ""));}if (flag == 1) { page = 1; }if (flag == 2 && page > 1) { page = page - 1; }if (flag == 3 && page < totalPage) { page = page + 1; }if (flag == 4) { page = totalPage; }$.ajax({type: "GET",url: "@Url.Content("~/")home/teachers?t=" + new Date().valueOf(),data: { page: page },success: function (data) {$('#teachers').html(data);sliderImg();}});}//滚动图⽚function sliderImg() {$(".products_next").click(function () {if (_lock) return;_lock = true;var ul = $(this).parent().find("ul");if (!canSlider(ul)) { _lock = false; return; }var liFirst = ul.find("li:first");var margin = liFirst.width() + 15;var speed = margin * 3;liFirst.animate({marginLeft: 0 - margin}, speed);setTimeout(function () {liFirst.remove();ul.append("<li>" + liFirst.html() + "</li>");_lock = false;}, speed);});$(".products_pre").click(function () {if (_lock) return;_lock = true;var ul = $(this).parent().find("ul");if (!canSlider(ul)) { _lock = false; return; }var liLast = ul.find("li:last");var margin = liLast.width() + 15;var speed = margin * 3;ul.prepend("<li style='margin-left:-" + margin + "px; '>" + liLast.html() + "</li>");var liFirst = ul.find("li:first");liFirst.animate({marginLeft: 0}, speed);setTimeout(function () {liLast.remove();_lock = false;}, speed);});}//判断图⽚是否可以滚动function canSlider(ul) {var width = 0;ul.find("li").each(function () {var li = $(this);width = width + li.width() + 15;});if (width <= 710) {return false;}return true;}</script>效果图:以上就是本⽂的全部内容,希望本⽂的内容对⼤家的学习或者⼯作能带来⼀定的帮助,同时也希望多多⽀持!。
js+canvas实现转盘效果(两个版本)

js+canvas实现转盘效果(两个版本)本⽂实例为⼤家分享了js+canvas实现转盘效果的具体代码,供⼤家参考,具体内容如下⽤到了canvas的绘制,旋转,重绘操作,定时器,⽂本,平移,线条,圆,清理画布等等;版本⼀不可以点击,刷新旋转<!DOCTYPE html><html><head><meta charset="UTF-8"><title>转盘抽奖</title><style type="text/css">#myCanvas {background: #FAEBD7;}</style></head><body><canvas id="myCanvas" width="500" height="500"></canvas></body><script type="text/javascript">var myCanvas = document.getElementById("myCanvas");var cxt = myCanvas.getContext("2d");// 平移画布cxt.translate(250, 250);// 圆⼼坐标var oX = 0;var oY = 0;// ⼤圆半径var oR = 150;// ⼩圆半径var oR1 = 50;// 弧度var oH = Math.PI / 180;// 定时器var timer;// ⾓度var angle = 0;// ⽂本var textArr = ["JavaScript", "jQuery", "Vue", "ajax", "rect", "angular", "HTML", "css"];// 颜⾊var colorArr = [];// 随机⽣成颜⾊for (var i = 0; i < textArr.length; i++) {var c = "rgb(" + parseInt(Math.random() * 255) + "," + parseInt(Math.random() * 255) + "," + parseInt(Math.random() * 255) + ")" colorArr.push(c);}//起始速度var seep = Math.random() * 100 + 100;timer = setInterval(function() {if (seep < 0.3) {clearInterval(timer);var index = Math.floor(angle / 45);console.log(index);cxt.font = "12px Arial";cxt.textAlign = "center";cxt.textBaseline = "middle"cxt.fillStyle = "black";var txt = textArr[textArr.length - index-1];// console.log(cxt.measureText(txt).width);cxt.fillText(txt, 0, 0);} else {//重绘// 清除画布cxt.clearRect(-250, -250, 500, 500);// 处理⾓度if (angle >= 360) {}// 处理速度seep *= 0.95; // 减⼩速度angle += seep;// 画短线cxt.beginPath();cxt.strokeStyle = "red";cxt.lineWidth = 2;cxt.moveTo(150, 0);cxt.lineTo(180, 0);cxt.stroke();// 保存环境,旋转画布cxt.strokeStyle = "chartreuse";cxt.save();cxt.rotate(angle * oH);// 画扇形for (var i = 0; i < 8; i++) {cxt.fillStyle = colorArr[i];cxt.beginPath();cxt.moveTo(0, 0);cxt.arc(0, 0, 150, i * 45 * oH, (i + 1) * 45 * oH);cxt.closePath();cxt.fill();cxt.stroke();}// 画中⼼圆cxt.fillStyle = "#FFF";cxt.beginPath();cxt.arc(oX, oY, oR1, 0, 2 * Math.PI);cxt.fill();// 添加⽂字for (var i = 0; i < textArr.length; i++) {cxt.save();cxt.rotate((i * 45 + 25) * oH);cxt.fillStyle = "#fff";cxt.font = "16px 微软雅⿊";cxt.fillText(textArr[i], 70, 0);cxt.restore();}cxt.restore();// 环境释放与环境保存成对}}, 50);</script></html>版本⼆加了点击事件<!DOCTYPE html><html><head><meta charset="UTF-8"><title>转盘抽奖</title><style type="text/css">#myCanvas {background: #FAEBD7;}</style></head><body><canvas id="myCanvas" width="500" height="500"></canvas> </body><script type="text/javascript">var myCanvas = document.getElementById("myCanvas");var cxt = myCanvas.getContext("2d");var oX = 0;var oY = 0;// ⼤圆半径var oR = 150;// ⼩圆半径var oR1 = 50;// 弧度var oH = Math.PI / 180;// 定时器var timer;// ⾓度var angle = 0;// ⽂本var textArr = ["JavaScript", "jQuery", "Vue", "ajax", "rect", "angular", "HTML", "css"];// 颜⾊var colorArr = [];// 随机⽣成颜⾊for (var i = 0; i < textArr.length; i++) {var c = "rgb(" + parseInt(Math.random() * 255) + "," + parseInt(Math.random() * 255) + "," + parseInt(Math.random() * 255) + ")" colorArr.push(c);}//起始速度var seep = Math.random() * 100 + 100;drawLine();myCanvas.onclick = function(event) {var mX = event.clientX - myCanvas.offsetLeft;var mY = event.clientX - myCanvas.offsetTop;if (cxt.isPointInPath(mX, mY)) {var j = 50;var times = null;if (times == null) {times = setInterval(function() {if (seep < 0.3) {clearInterval(timer);var index = Math.floor(angle / 45);console.log(index);cxt.font = "12px Arial";cxt.textAlign = "center";cxt.textBaseline = "middle"cxt.fillStyle = "black";var txt = textArr[textArr.length - index - 1];cxt.fillText(txt, 0, 0);} else {drawLine();}}, 50);}} else {alert("no")}}function drawLine() {//重绘// 清除画布cxt.clearRect(-250, -250, 500, 500);// 处理⾓度if (angle >= 360) {angle = 0;}// 处理速度seep *= 0.95; // 减⼩速度angle += seep;// 画短线cxt.beginPath();cxt.strokeStyle = "red";cxt.lineWidth = 2;cxt.moveTo(150, 0);cxt.lineTo(180, 0);cxt.stroke();// 保存环境,旋转画布cxt.strokeStyle = "chartreuse";for (var i = 0; i < 8; i++) {cxt.fillStyle = colorArr[i];cxt.beginPath();cxt.moveTo(0, 0);cxt.arc(0, 0, 150, i * 45 * oH, (i + 1) * 45 * oH);cxt.closePath();cxt.fill();cxt.stroke();}// 画中⼼圆cxt.fillStyle = "#FFF";cxt.beginPath();cxt.arc(oX, oY, oR1, 0, 2 * Math.PI);cxt.fill();// 添加⽂字for (var i = 0; i < textArr.length; i++) {cxt.save();cxt.rotate((i * 45 + 25) * oH);cxt.fillStyle = "#fff";cxt.font = "16px 微软雅⿊";cxt.fillText(textArr[i], 70, 0);cxt.restore();}cxt.restore();// 环境释放与环境保存成对}</script></html>以上就是本⽂的全部内容,希望对⼤家的学习有所帮助,也希望⼤家多多⽀持。
JS实现图片切换效果

JS实现图⽚切换效果本⽂实例为⼤家分享了JS实现图⽚切换效果的具体代码,供⼤家参考,具体内容如下<body><button id="btn1">ON</button><button id="btn2">OFF</button><br><img src="images/0.jpg" alt="" id="pic"><script type="text/javascript">//获得图⽚对象var pic=document.getElementById('pic');var i=0;//图⽚名称编号默认显⽰第⼀张var timer;var isTrue=false;//标识是否已经启动了⼀个定时器 false未启动//点击事件document.getElementById('btn1').onclick=function(){if(isTrue){return;//不再启动新的定时器}timer=setInterval(function(){//当到达之最后⼀张图⽚时让图⽚的编号返回到第⼀张if (i==3) {i=0;}i++;pic.src='images/'+i+'.jpg';},1000);isTrue=true;//把定时器改为启动状态};document.getElementById('btn2').onclick=function(){clearInterval(timer);isTrue=false;//定时器恢复为为启动状态};</script></body>实现效果如下:以上就是本⽂的全部内容,希望对⼤家的学习有所帮助,也希望⼤家多多⽀持。
JavaScript实现图片切换效果

JavaScript实现图⽚切换效果本⽂实例为⼤家分享了JavaScript实现图⽚切换效果,⾃定义属性的应⽤供⼤家参考,具体内容如下<!DOCTYPE html><html><head><meta charset="UTF-8"><title>图⽚切换实例</title><style>body{background-color: #A9A9A9;margin:0px;}ul{padding: 0;margin: 0;}li{list-style: none;}#pic{width:670px;height: 420px;position:relative;margin: 0 auto;/*整个div放到页⾯中间的位置*/background:url(img/loading.png) no-repeat center;background-color:#fff;}#pic img{width:670px;height: 420px;}#pic ul{position: absolute;top: 0px;right: -50px;}#pic li{width:40px;height:40px;margin-bottom: 4px;background:#666;}#pic .active{background: cadetblue;}#pic span{top:0px;}#pic p{bottom:0px;margin:0;}#pic p,#pic span{width: 670px;height: 30px;line-height: 30px;text-align: center;position:absolute;left:0px;color:#fff;background-color:#333;}</style><script>window.onload = function(){var oDiv = document.getElementById("pic");var oImg = document.getElementsByTagName("img")[0];//有tag标签的地⽅就得有数组[0],否则不提⽰错误,但却会加载不出来需要的内容。
【javascriptcss】Javascript+Css实现图片滑动浏览效果
【javascriptcss】Javascript+Css实现图⽚滑动浏览效果 今天⽤js+css来做⼀个能够左右滑动的图⽚浏览效果。
⾸先写⼀个结构,包括需要浏览的两张图,以及能够点击来滑动图⽚的两个按钮。
1 <!DOCTYPE html>2 <html>3 <head>4 <meta http-equiv="Content-Type" content="text/html; charset=UTF-8" />5 <script type="text/javascript" src="/resource/js/jquery-1.7.2.min.js"></script>6 <title>css+javascript图⽚滑动浏览</title>7 <link rel="icon" href="favicon.ico" type="images/x-icon" />89 <style type="text/css">1011 </style>1213 <script type="text/javascript">1415 </script>16 </head>1718 <body>19 <div class="card">20 <div class="img">21 <img class="img1" src="resource/images/banner.jpg" alt="妈咪快集合,⼼贝新风向"/>22 <img class="img2" src="resource/images/banner3.jpg" alt="⼀切为了孩⼦,为了孩⼦的⼀切"/>23 </div>24 <div class="btn">25 <a class="btn1"></a>26 <a class="btn2"></a>27 </div>28 </div>29 </body>30 </html> 接下来,将图⽚⽗元素框的长宽设置为图⽚的长宽,并且将图⽚设置为绝对定位,这样就可以将图⽚层叠在⼀起,并且可以在之后通过js来移动它。
javascript实现点击图片切换

javascript实现点击图⽚切换点击实现图⽚切换效果在⽣活中⾮常的常见,恰巧今天的练习也是做⼀个图⽚的切换效果。
供⼤家参考:HTML代码如下:<div class="img"><img src="images/1.jpg" id="myImg" class="myImg" alt="这⾥是1.jpg"><p><input type="button" id="pre" class="btn" value="上⼀张"><input type="button" id="next" class="btn" value="下⼀张"></p></div>CSS代码如下:*{margin: 0;padding: 0;}img{boder:none;}button{outline: none;vertical-align: middle;}.img{width: 100%;margin-left: auto;margin-right: auto;margin-top: 20px;text-align: center;}.myImg{width: 500px;height: 300px;}p{text-align: center;}p .btn{width: 100px;height: 30px;background: #306bbf;color: #fff;margin-top: 20px;margin-bottom: 20px;}javascript 部分://找标签let myImg = document.getElementById("myImg");let pre=document.getElementById("pre");let next=document.getElementById("next");//创建⼀个保存图⽚的数组let arrImg = ["images/1.jpg", "images/1-1.png", "images/3.jpg" ];//数组的索引下标let index=0;//定义事件函数function preImg(event){index--;//实现循环切换if (index<0){index=arrImg.length-1;}myImg.src = arrImg[index];}function nextImg(event){index++;//实现循环切换if (index>arrImg.length-1){index=0;}myImg.src = arrImg[index];}pre.addEventListener('click',preImg);next.addEventListener('click',nextImg);以上就是本⽂的全部内容,希望对⼤家的学习有所帮助,也希望⼤家多多⽀持。
js实现支持手机滑动切换的轮播图片效果实例
本文是关于 js 介绍。 使用方法案例: ;; ;; ; $(‘.carousel-image’).CarouselImage({ num :$(‘.carousel-num’) }); ; 或者 requirejs: ; ; ;
; ; ; ; ; ; ; ; ; ; ; ; ;; ;; ; requirejs.config({ //By default load any module IDs from js/lib baseUrl: ‘../src’, paths: { $: ‘zepto’ } }); require([‘carousel-image’,”$”], function(CarouselImage,$) { var cs = new CarouselImage(); cs.init({
target:$(‘.carousel-image’), num:$(‘.carousel-num’) }); }); ; API 属性、方法及回调: target:表示是在这个容器内的元素会触发事件,它应该有个子级的容器,方 便动画的优化 num:本意是以显示当前索引的数字表示,但现在用样式把数字隐藏了,如 果要显示数字样式,可自行更改样式文件 以上就是提供的关于 js 实现支持手机滑动切换的轮播图片效果的内容,希 望对大家有所帮助。
常用js效果一:div+css图片上下左右滚动代码
常用js效果一:div+css图片上下左右滚动代码图片滚动经常在网页里面用到,高手们都是自己来写,我不是高手,所以高手们写了,我就搬来用了,偷偷懒,“常用js效果一:div+css图片上下左右滚动代码”这个也是在网上找的,这个被转载了很多次,测试了下,ie6,7,8还有火狐都能兼容的。
还有demo哦!!需要的可以下载哈。
这是向上滚动的:XML/HTML代码1.<style type="text/css">2.<!--3.#demo {4.background: #FFF;5.overflow:hidden;6.border: 1px dashed #CCC;7.height: 300px;8.text-align: center;9.float: left;10.}11.#demo img {12.border: 3px solid #F2F2F2;13.display: block;14.}15.-->16.</style>17.向上滚动18.<div id="demo">19.<div id="demo1">20.<a href="#"><img src="upload/2011/11/2011111114 43365181.gif" border="0" /></a>21.<a href="#"><img src="upload/2011/11/2011111114 43365181.gif" border="0" /></a>22.<a href="#"><img src="upload/2011/11/2011111114 43365181.gif" border="0" /></a>23.<a href="#"><img src="upload/2011/11/201111111443365181.gif" border="0" /></a>24.<a href="#"><img src="upload/2011/11/2011111114 43365181.gif" border="0" /></a>25.</div>26.<div id="demo2"></div>27.</div>28.<script>29.<!--30.var speed=10; //数字越大速度越慢31.var tab=document.getElementById("demo");32.var tab1=document.getElementById("demo1");33.var tab2=document.getElementById("demo2");34.tab2.innerHTML=tab1.innerHTML; //克隆demo1为demo235.function Marquee(){36.if(tab2.offsetT op-tab.scrollTop<=0)//当滚动至demo1与demo2交界时37.tab.scrollTop-=tab1.offsetHeight //demo跳到最顶端38.else{39.tab.scrollTop++40.}41.}42.var MyMar=setInterval(Marquee,speed);43.tab.onmouseover=function() {clearInterval(MyMar)};//鼠标移上时清除定时器达到滚动停止的目的44.tab.onmouseout=function() {MyMar=setInterval(Marq uee,speed)};//鼠标移开时重设定时器45.-->46.</script>演示地址:这是向下滚动的:XML/HTML代码1.<style type="text/css">2.<!--3.#demo {4.background: #FFF;5.overflow:hidden;6.border: 1px dashed #CCC;7.height: 200px;8.text-align: center;9.float: left;10.}11.#demo img {12.border: 3px solid #F2F2F2;13.display: block;14.}15.-->16.</style>17.向下滚动18.<div id="demo">19.<div id="demo1">20.<a href="#"><img src="upload/2011/11/2011111413 35356083.gif" border="0" /></a>21.<a href="#"><img src="upload/2011/11/2011111413 35356083.gif" border="0" /></a>22.<a href="#"><img src="upload/2011/11/2011111413 35356083.gif" border="0" /></a>23.<a href="#"><img src="upload/2011/11/2011111413 35356083.gif" border="0" /></a>24.<a href="#"><img src="upload/2011/11/2011111413 35356083.gif" border="0" /></a>25.</div>26.<div id="demo2"></div>27.</div>28.<script>29.<!--30.var speed=10; //数字越大速度越慢31.var tab=document.getElementById("demo");32.var tab1=document.getElementById("demo1");33.var tab2=document.getElementById("demo2");34.tab2.innerHTML=tab1.innerHTML; //克隆demo1为demo235.tabtab.scrollTop=tab.scrollHeight36.function Marquee(){37.if(tab1.offsetT op-tab.scrollTop>=0)//当滚动至demo1与demo2交界时38.tab.scrollTop+=tab2.offsetHeight //demo跳到最顶端39.else{40.tab.scrollTop--41.}42.}43.var MyMar=setInterval(Marquee,speed);44.tab.onmouseover=function() {clearInterval(MyMar)};//鼠标移上时清除定时器达到滚动停止的目的45.tab.onmouseout=function() {MyMar=setInterval(Marq uee,speed)};//鼠标移开时重设定时器46.-->47.</script>演示地址:这是向左滚动的:XML/HTML代码1.<!DOCTYPE html PUBLIC "-//W3C//DTD XHTML 1.0 Transitional//EN" "/TR/xhtml1/DTD/xht ml1-transitional.dtd">2.<html xmlns="/1999/xhtml">3.<head>4.<meta http-equiv="Content-Type" content="text/html; charset=gb2312" />5.<title>无标题文档</title>6.</head>7.<body>8.<style>9..scroll_div {width:600px; height:62px;margin:0 auto; overfl ow: hidden; white-space: nowrap; background:#ffffff;}10..scroll_div img {width:120px;height:60px;border: 0;mar gin: auto 8px; border:1px #efefef solid;}11.#scroll_begin, #scroll_end, #scroll_begin ul, #scroll_end ul, #scroll_begin ul li, #scroll_end ul li{display:inline;}12.</style>13.<script language="javascript">14.function ScrollImgLeft(){15.var speed=2016.var scroll_begin = document.getElementById("scroll_b egin");17.var scroll_end = document.getElementById("scroll_end ");18.var scroll_div = document.getElementById("scroll_div") ;19.scroll_end.innerHTML=scroll_begin.innerHTML20.function Marquee(){21.if(scroll_end.offsetWidth-scroll_div.scrollLeft<=0)22.scroll_div.scrollLeft-=scroll_begin.offsetWidth23.else24.scroll_div.scrollLeft++25.}26.var MyMar=setInterval(Marquee,speed)27.scroll_div.onmouseover=function() {clearInterval(MyM ar)}28.scroll_div.onmouseout=function() {MyMar=setInterval (Marquee,speed)}29.}30.</script>31.<h2 align="center">向左滚动</h2>32.<div style="text-align:center">33.<div class="sqBorder">34.<!--#####滚动区域#####-->35.<div id="scroll_div" class="scroll_div">36.<div id="scroll_begin">37.<ul>38.<li><a href="upload/2011/11/201111111446056115. gif" /></a></li>39.<li><a href="upload/2011/11/201111111446056115. gif" /></a></li>40.<li><a href="upload/2011/11/201111111446056115. gif" /></a></li>41.<li><a href="upload/2011/11/201111111446056115. gif" /></a></li>42.<li><a href="upload/2011/11/201111111446056115. gif" /></a></li>43.<li><a href="upload/2011/11/201111111446056115. gif" /></a></li>44.<li><a href="upload/2011/11/201111111446056115. gif" /></a></li>45.<li><a href="upload/2011/11/201111111446056115. gif" /></a></li>46.<li><a href="upload/2011/11/201111111446056115. gif" /></a></li>47.<li><a href="upload/2011/11/201111111446056115. gif" /></a></li>48.</ul>49.</div>50.<div id="scroll_end"></div>51.</div>52.<!--#####滚动区域#####-->53.</div>54.<script type="text/javascript">ScrollImgLeft();</script >55.</div>56.<!--//向左滚动代码结束-->57.</body></html>演示地址:这是向右滚动的代码:XML/HTML代码1.<style type="text/css">2.<!--3.#demo {4.background: #FFF;5.overflow:hidden;6.border: 1px dashed #CCC;7.width: 500px;8.}9.#demo img {10.border: 3px solid #F2F2F2;11.}12.#indemo {13.float: left;14.width: 800%;15.}16.#demo1 {17.float: left;18.}19.#demo2 {20.float: left;21.}22.-->23.</style>24.向右滚动25.<div id="demo">26.<div id="indemo">27.<div id="demo1">28.<a href="#"><img src="upload/2011/11/2011111413 35356083.gif" border="0" /></a>29.<a href="#"><img src="upload/2011/11/2011111413 35356083.gif" border="0" /></a>30.<a href="#"><img src="upload/2011/11/2011111413 35356083.gif" border="0" /></a>31.<a href="#"><img src="upload/2011/11/2011111413 35356083.gif" border="0" /></a>32.<a href="#"><img src="upload/2011/11/2011111413 35356083.gif" border="0" /></a>33.<a href="#"><img src="upload/2011/11/2011111413 35356083.gif" border="0" /></a>34.</div>35.<div id="demo2"></div>36.</div>37.</div>38.<script>39.<!--40.var speed=10; //数字越大速度越慢41.var tab=document.getElementById("demo");42.var tab1=document.getElementById("demo1");43.var tab2=document.getElementById("demo2");44.tab2.innerHTML=tab1.innerHTML;45.function Marquee(){46.if(tab.scrollLeft<=0)47.tab.scrollLeft+=tab2.offsetWidth48.else{49.tab.scrollLeft--50.}51.}52.var MyMar=setInterval(Marquee,speed);53.tab.onmouseover=function() {clearInterval(MyMar)};54.tab.onmouseout=function() {MyMar=setInterval(Marq uee,speed)};55.-->56.</script>。
使用JS实现图片轮播滚动跑马灯效果

使⽤JS实现图⽚轮播滚动跑马灯效果 我的第⼀篇⽂章、哈哈、有点⼩鸡冻。
之前在百度搜索“图⽚轮播”、“图⽚滚动”,结果都是那种可以左右切换的。
也是我们最常见的那种。
可能是搜索关键字的问题吧。
如图:教程效果图:教程开始:HTML代码:1<body>2<div id="div1">3<div id="div4">4<div id="div2">5<img src="img/1.jpg" alt="图⽚1"/>6<img src="img/2.jpg" alt="图⽚2"/>7<img src="img/3.jpg" alt="图⽚3"/>8<img src="img/4.jpg" alt="图⽚4"/>9</div>10<div id="div3"></div><!--这个容器是⽤来防⽌图⽚滚动时会出现空⽩的区域-->11</div>12</div>13</body>CSS代码:1<style type="text/css">2 div,img{3 margin:0;4 padding:0;5 }6 img{7 float:left;8 height:100px;9 width:150px;10 }11 #div1{12 width:500px;13 height:100px;14 overflow: hidden;15 border:solid blue 2px;16 }17 #div2,#div3{18 float:left;19 }23 #div4{24 width:500%;/*这个属性很重要让容器有⾜够的宽度实现滚动*/25 float:left;26 }27 </style>JavaScript代码:1 <script type="text/javascript">2 window.onload=function(){3var v1=document.getElementById('div1');4var v2=document.getElementById('div2');5var v3=document.getElementById('div3');67 v3.innerHTML= v2.innerHTML;//将v2容器⾥⾯的图⽚插⼊到v3容器⾥⾯使其空⽩区域被遮住。
js鼠标点击按钮切换图片-图片自动切换-点击左右按钮切换特效代码

js⿏标点击按钮切换图⽚-图⽚⾃动切换-点击左右按钮切换特效代码今天来分享⼀下⿏标点击按钮,图⽚进⾏切换+图⽚⾃动切换+点击左右按钮图⽚进⾏切换的三种效果的组合代码。
最后的效果如下:Html代码部分:<!doctype html><html lang="en"><head><meta charset="UTF-8"><meta name="Generator" content="EditPlus®"><meta name="Author" content=""><meta name="Keywords" content=""><meta name="Description" content=""><title>图⽚轮播效果制作_赵⼀鸣随笔博客</title><link rel="stylesheet" type="text/css" href="css/style.css"><script type="text/javascript" src="js/jquery.js"></script><script type="text/javascript" src="js/style.js"></script></head><body><div class="banner"><ul class="pic"><li><a href="#"><img src="images/1.jpg" alt="美⼥" width="350" height="495"></a></li><li><a href="#"><img src="images/2.jpg" alt="美⼥" width="350" height="495"></a></li><li><a href="#"><img src="images/3.jpg" alt="美⼥" width="350" height="495"></a></li><li><a href="#"><img src="images/4.jpg" alt="美⼥" width="350" height="495"></a></li><li><a href="#"><img src="images/5.jpg" alt="美⼥" width="350" height="495"></a></li></ul><ul class="anniu"><li class="on"></li><li></li><li></li><li></li><li></li></ul><ul class="lr"><li class="pre"><a href="#"> < </a></li><li class="next"><a href="#"> > </a></li></ul></div></body></html>Css代码部分:*{margin:0px;padding:0px}li{list-style:none}a{text-decoration:none}img{border:0px}.banner{width:350px;height:495px;margin:100px auto;position:relative;overflow:hidden}.banner .pic{width:9999px;height:495px}.banner .pic li{width:350px;height:495px;float:left}.banner .anniu{width:100px;height:16px;position:absolute;left:165px;top:470px}.banner .anniu li{width:16px;height:16px;background:white;float:left;margin:2px;display:inline;cursor:pointer;border-radius:100%}.banner .anniu li.on{background:red}.banner .lr{width:350px;height:50px;position:absolute;top:250px;display:none}.banner .lr a{color:white}.banner .lr .pre{width:20px;height:50px;float:left;background:none repeat scroll 0px 0px rgba(1, 0, 0, 0.6);text-align:center;line-height:50px;cursor:pointer} .banner .lr .next{width:20px;height:50px;float:right;background:none repeat scroll 0px 0px rgba(1, 0, 0, 0.6);text-align:center;line-height:50px;cursor:pointer} Javascript代码部分:$(function(){//⿏标滑过banner,左右按钮进⾏显⽰和隐藏$(".banner").hover(function(){$(".lr").show();},function(){$(".lr").hide();});//点击下⾯的⼩按钮,图⽚进⾏左右切换效果$(".anniu li").click(function(){$(this).addClass("on").siblings().removeClass("on");var num=$(this).index();$(".pic").animate({marginLeft:-350*num},"slow");});//图⽚⾃动轮播效果var a=0;var automatic=setInterval(function(){a++;a=a%5;$(".pic").animate({marginLeft:-350*a},"slow");$(".anniu li").eq(a).addClass("on").siblings().removeClass("on");},6000);//点击左右按钮,图⽚进⾏切换效果$(".pre").click(function(){a--;a=(a+5)%5;$(".pic").animate({marginLeft:-350*a},"slow");$(".anniu li").eq(a).addClass("on").siblings().removeClass("on");});$(".next").click(function(){a++;a=a%5;$(".pic").animate({marginLeft:-350*a},"slow");$(".anniu li").eq(a).addClass("on").siblings().removeClass("on");});});。
17种js图片切换特效
17种js图片切换特效17种js图片切换特效,包含:遮帘(纵向、横向)、遮帘(纵向、横向)、飞行过渡、光圈过渡、渐变曝光、像素溶解、挤压过渡、百叶窗特效等<DIV align=center><P align=center><IMG id=box style="FILTER: progid:DXImageTransform.Microsoft.Blinds(Bands=10,direction =up); WIDTH: 500px; HEIGHT: 400px" height=404 src="/xy176ad/091006.jpg" width=609><SCRIPT language=JavaScript><!--if (document.all){pics=new Array("/xy176ad/091008.jpg","/xy176ad/091006.jpg")//Transition speed. 4000 = 4 seconds etc.delay=4000;//Nothing needs altering paste here.l=new Array()for (i=0; i < pics.length;i++){l[i]=new Image()l[i].src=pics[i]}n="progid:DXImageTransform.Microsoft.";f=new Array()f[0]="Wheel(spokes=4)";f[1]="Blinds(Bands=10,direction=up)";f[2]="Stretch(stretchstyle=PUSH)";f[3]="Stretch(stretchstyle=SPIN)";f[4]="RadialWipe(wipestyle=RADIAL)";f[5]="RadialWipe(wipestyle=WEDGE)";f[6]="Checkerboard(Direction=right,SquaresX=8,SquaresY= 8)";f[7]="Fade(Overlap=1.00)";f[8]="GradientWipe(GradientSize=0.25,wipestyle=0,motion =forward)";f[9]="Iris(irisstyle=CIRCLE,motion=out)";f[10]="Iris(irisstyle=STAR,motion=out)";f[11]="Barn( motion=out,orientation=vertical)";f[12]="Barn( motion=in,orientation=vertical)";f[13]="Strips(motion=leftup)";f[14]="Slide(slidestyle=HIDE,Bands=1)";f[15]="Slide(slidestyle=PUSH,Bands=1)";f[16]="Slide(slidestyle=SWAP,Bands=1)";f[17]="RandomDissolve(duration=1)";imgstep=0;function ani(){rnd=f[Math.floor(Math.random()*f.length)]box.style.filter=n+rnd;box.filters[0].apply();box.src=l[imgstep].src;box.filters[0].play();imgstep++;if (imgstep >= l.length) imgstep=0;setTimeout("ani()",delay);}window.onload=new Function("setTimeout('ani()',delay)") }//--></SCRIPT></P></DIV>。
【IT专家】js图片轮换效果

本文由我司收集整编,推荐下载,如有疑问,请与我司联系js图片轮换效果2013/04/29 759 html代码: !DOCTYPE html PUBLIC “-//W3C//DTD XHTML 1.0 Transitional//EN” “w3/TR/xhtml1/DTD/xhtml1-transitional.dtd” html xmlns=“w3/1999/xhtml” head meta http-equiv=“Content-Type” content=“text/html; charset=utf-8” / title js焦点图片层叠轮播切换滚动/title meta name=“description” content=“js焦点图片层叠样式自动轮播切换滚动,设置左右按钮控制层叠图片滚动切换轮播。
” / /head body style type=“text/css” *{margin:0;padding:0;list-style-type:none;}a,img{border:0;}body{font:12px/180% Arial, Helvetica, sans-serif,”新宋体”;}/* focus_Box */#focus_Box{position:relative;width:710px;height:308px;margin:20px auto;}#focus_Box ul{position:relative;width:710px;height:308px}#focus_Box li{z-index:0;position:absolute; width:0px;background:#787878;height:0px;top:146px;cursor:pointer;left:377px;border-radius:4px;box-shadow:1px 1px 12px rgba(200, 200, 200, 1)}#focus_Box li img{width:100%;background:url(images/loading.gif) no-repeat center 50%;height:100%;vertical-align:top}#focus_Box li p{position:absolute;left:0;bottom:0px;width:100%;height:40px;line-height:40px;background:url(images/float-bg.png) repeat;text-indent:8px;color:#fff;}#focus_Box li p span{display:inline-block;width:70%;height:40px;overflow:hidden;}#focus_Box .prev,#focus_Box .next{displ ay:block;z-index:100;overflow:hidden;cursor:pointer;position:absolute;width:52px;height:52px;top:1 31px;}#focus_Box .prev{background:url(images/btn.png) left bottom no-repeat;left:0px}#focus_Box .next{background:url(images/btn.png) right bottom no-repeat;right:0px}#focus_Box .prev:hover{background-position:left。
常用JS图片滚动(无缝、平滑、上下左右滚动)代码大全
常⽤JS图⽚滚动(⽆缝、平滑、上下左右滚动)代码⼤全常⽤JS图⽚滚动(⽆缝、平滑、上下左右滚动)代码⼤全今天刚⽹上看的不多说直接帖代码----<head><-----></head><body><!--向下滚动代码开始--><div id="colee" style="overflow:hidden;height:253px;width:410px;"><div id="colee1"><p><img src=""></p><p><img src=""></p><p><img src=""></p><p><img src=""></p><p><img src=""></p><p><img src=""></p><p><img src=""></p><p><img src=""></p><p><img src=""></p></div><div id="colee2"></div></div><script>var speed=30;var colee2=document.getElementById("colee2");var colee1=document.getElementById("colee1");var colee=document.getElementById("colee");colee2.innerHTML=colee1.innerHTML; //克隆colee1为colee2function Marquee1(){//当滚动⾄colee1与colee2交界时if(colee2.offsetTop-colee.scrollTop<=0){colee.scrollTop-=colee1.offsetHeight; //colee跳到最顶端}else{colee.scrollTop++}}var MyMar1=setInterval(Marquee1,speed)//设置定时器//⿏标移上时清除定时器达到滚动停⽌的⽬的colee.onmouseover=function() {clearInterval(MyMar1)}//⿏标移开时重设定时器colee.onmouseout=function(){MyMar1=setInterval(Marquee1,speed)}</script><!--向上滚动代码结束--><br><!--下⾯是向下滚动代码--><div id="colee_bottom" style="overflow:hidden;height:253px;width:410px;"><div id="colee_bottom1"><p><img src="/jscss/demoimg/200907/bg3.jpg"></p><p><img src="/jscss/demoimg/200907/bg3.jpg"></p><p><img src="/jscss/demoimg/200907/bg3.jpg"></p><p><img src="/jscss/demoimg/200907/bg3.jpg"></p><p><img src="/jscss/demoimg/200907/bg3.jpg"></p><p><img src="/jscss/demoimg/200907/bg3.jpg"></p><p><img src="/jscss/demoimg/200907/bg3.jpg"></p><p><img src="/jscss/demoimg/200907/bg3.jpg"></p><p><img src="/jscss/demoimg/200907/bg3.jpg"></p></div><div id="colee_bottom2"></div></div><script>var speed=30var colee_bottom2=document.getElementById("colee_bottom2");var colee_bottom1=document.getElementById("colee_bottom1");var colee_bottom=document.getElementById("colee_bottom");colee_bottom2.innerHTML=colee_bottom1.innerHTMLcolee_bottom.scrollTop=colee_bottom.scrollHeightfunction Marquee2(){if(colee_bottom1.offsetTop-colee_bottom.scrollTop>=0)colee_bottom.scrollTop+=colee_bottom2.offsetHeightelse{colee_bottom.scrollTop--}}var MyMar2=setInterval(Marquee2,speed)colee_bottom.onmouseover=function() {clearInterval(MyMar2)}colee_bottom.onmouseout=function() {MyMar2=setInterval(Marquee2,speed)}</script><!--向下滚动代码结束--><br><!--下⾯是向左滚动代码--><div id="colee_left" style="overflow:hidden;width:500px;"><table cellpadding="0" cellspacing="0" border="0"><tr><td id="colee_left1" valign="top" align="center"><table cellpadding="2" cellspacing="0" border="0"><tr align="center"><td><p><img src="/jscss/demoimg/200907/bg3.jpg"></p></td><td><p><img src="/jscss/demoimg/200907/bg3.jpg"></p></td><td><p><img src="/jscss/demoimg/200907/bg3.jpg"></p></td><td><p><img src="/jscss/demoimg/200907/bg3.jpg"></p></td><td><p><img src="/jscss/demoimg/200907/bg3.jpg"></p></td><td><p><img src="/jscss/demoimg/200907/bg3.jpg"></p></td><td><p><img src="/jscss/demoimg/200907/bg3.jpg"></p></td></tr></table></td><td id="colee_left2" valign="top"></td></tr></table></div><script>//使⽤div时,请保证colee_left2与colee_left1是在同⼀⾏上.var speed=30//速度数值越⼤速度越慢var colee_left2=document.getElementById("colee_left2");var colee_left1=document.getElementById("colee_left1");var colee_left=document.getElementById("colee_left");colee_left2.innerHTML=colee_left1.innerHTMLfunction Marquee3(){if(colee_left2.offsetWidth-colee_left.scrollLeft<=0)//offsetWidth 是对象的可见宽度colee_left.scrollLeft-=colee_left1.offsetWidth//scrollWidth 是对象的实际内容的宽,不包边线宽度else{colee_left.scrollLeft++}}var MyMar3=setInterval(Marquee3,speed)colee_left.onmouseover=function() {clearInterval(MyMar3)}colee_left.onmouseout=function() {MyMar3=setInterval(Marquee3,speed)}</script><!--向左滚动代码结束--><br><!--下⾯是向右滚动代码--><div id="colee_right" style="overflow:hidden;width:500px;"><table cellpadding="0" cellspacing="0" border="0"><tr><td id="colee_right1" valign="top" align="center"><table cellpadding="2" cellspacing="0" border="0"><tr align="center"><td><p><img src="/jscss/demoimg/200907/bg3.jpg"></p></td><td><p><img src="/jscss/demoimg/200907/bg3.jpg"></p></td><td><p><img src="/jscss/demoimg/200907/bg3.jpg"></p></td><td><p><img src="/jscss/demoimg/200907/bg3.jpg"></p></td><td><p><img src="/jscss/demoimg/200907/bg3.jpg"></p></td></tr></table></td><td id="colee_right2" valign="top"></td></tr></table></div><script>var speed=30//速度数值越⼤速度越慢var colee_right2=document.getElementById("colee_right2");var colee_right1=document.getElementById("colee_right1");var colee_right=document.getElementById("colee_right");colee_right2.innerHTML=colee_right1.innerHTMLfunction Marquee4(){if(colee_right.scrollLeft<=0)colee_right.scrollLeft+=colee_right2.offsetWidthelse{colee_right.scrollLeft--}}var MyMar4=setInterval(Marquee4,speed)colee_right.onmouseover=function() {clearInterval(MyMar4)}colee_right.onmouseout=function() {MyMar4=setInterval(Marquee4,speed)} </script><!--向右滚动代码结束--></body></html>。
- 1、下载文档前请自行甄别文档内容的完整性,平台不提供额外的编辑、内容补充、找答案等附加服务。
- 2、"仅部分预览"的文档,不可在线预览部分如存在完整性等问题,可反馈申请退款(可完整预览的文档不适用该条件!)。
- 3、如文档侵犯您的权益,请联系客服反馈,我们会尽快为您处理(人工客服工作时间:9:00-18:30)。
this._target = -Math.abs(this.Change) * (this.Index = index);
this._t = 0;
this._b = parseInt(CurrentStyle(this._slider)[this.options.Vertical ? "top" : "left"]);
this._c = this._target - this._b;
this.onStart();
this.Move();
},
//移动
Move: function() {
clearTimeout(this._timer);
var CurrentStyle = function(element){
return element.currentStyle || document.defaultView.getComputedStyle(element, null);
}
var Bind = function(object, fun) {
//设置默认属性
SetOptions: function(options) {
this.options = {//默认值
Vertical: true,//是否垂直方向(方向不能改)
Auto: true,//是否自动
Change: 0,//改变量
Duration: 50,//滑动持续时间
};
Extend(this.options, options || {});
},
//开始切换
Run: function(index) {
//修正index
index == undefined && (index = this.Index);
index < 0 && (index = this._count - 1) || index >= this._count && (index = 0);
摘自:/html/txdm/txtx/2737.htm
原文为5图像版本,此文为多图版本。
在.container 和 .container A IMG 样式中修改图像显示区大小
在.csrcode 中修改TOP=height-15和LEFT=width-95可控制1 2 3 4 5导航区的位置,每增加一幅图像,width=90+18,LEFT也需要小些
} else {
return c*(7.5625*(t-=(2.625/2.75))*t + .984375) + b;
}
}
}
}
//容器对象,滑动对象,切换数量
var SlideTrans = function(container, slider, count, options) {
p == "relative" || p == "absolute" || (this._container.style.position = "relative");
this._container.style.overflow = "hidden";
this._slider.style.position = "absolute";
gtopTab=tab_id;
}
}
</SCRIPT>
<SCRIPT type=text/javascript>
var $ "string" == typeof id ? document.getElementById(id) : id;
pgvMain();
</SCRIPT>
<SCRIPT>
var gtopTab="one";
function $id(id){
return document.getElementById(id);
}
function changesTab(tab_id){
if (tab_id==gtopTab){
Time: 10,//滑动延时
Pause: 4000,//停顿时间(Auto为true时有效)
onStart: function(){},//开始转换时执行
onFinish: function(){},//完成转换时执行
Tween: Tween.Quart.easeOut//tween算子
this.Time = Math.abs(this.options.Time);
this.Pause = Math.abs(this.options.Pause);
this.Tween = this.options.Tween;
this.onStart = this.options.onStart;
return c*(7.5625*t*t) + b;
} else if (t < (2/2.75)) {
return c*(7.5625*(t-=(1.5/2.75))*t + .75) + b;
} else if (t < (2.5/2.75)) {
return c*(7.5625*(t-=(2.25/2.75))*t + .9375) + b;
this._slider = $(slider);
this._container = $(container);//容器对象
this._timer = null;//定时器
this._count = Math.abs(count);//切换数量
this._target = 0;//目标值
}
}
var Tween = {
Quart: {
easeOut: function(t,b,c,d){
return -c * ((t=t/d-1)*t*t*t - 1) + b;
}
},
Back: {
easeOut: function(t,b,c,d,s){
var args = Array.prototype.slice.call(arguments).slice(2);
return function() {
return fun.apply(object, args.concat(Array.prototype.slice.call(arguments)));
}
.more1 A {
TEXT-ALIGN: left; LINE-HEIGHT: 25px; MARGIN: 0px 0px 0px 10px; COLOR: #3373a3
}
</style>
<SCRIPT language=javascript>
if(typeof(pgvMain) == 'function')
}
.container A IMG {
WIDTH: 350px; HEIGHT: 250px //对应图像的宽度和高度
}
.container IMG {
BORDER-BOTTOM-STYLE: none; BORDER-RIGHT-STYLE: none; BORDER-TOP-STYLE: none; BORDER-LEFT-STYLE: none
}
UL {
PADDING-BOTTOM: 0px; MARGIN: 0px; PADDING-LEFT: 0px; PADDING-RIGHT: 0px; PADDING-TOP: 0px
}
.container {
WIDTH:350px; HEIGHT: 250px //对应图像的宽度和高度
this.onFinish = this.options.onFinish;
var bVertical = !!this.options.Vertical;
this._css = bVertical ? "top" : "left";//方向
//样式设置
var p = CurrentStyle(this._container).position;
}
.csrcode LI.on {
LINE-HEIGHT: 15px; WIDTH: 15px; BACKGROUND: url(images/flashbutton.gif) no-repeat; HEIGHT: 15px; COLOR: #ffffff
}
.more {
FLOAT: right
if (s == undefined) s = 1.70158;
return c*((t=t/d-1)*t*((s+1)*t + s) + 1) + b;
}
},
Bounce: {
easeOut: function(t,b,c,d){
if ((t/=d) < (1/2.75)) {
}
.td_f A IMG {
PADDING-BOTTOM: 0px; MARGIN: 0px; PADDING-LEFT: 0px; PADDING-RIGHT: 0px; PADDING-TOP: 0px
}
.csrcode {
POSITION: absolute; WIDTH: 98px; FLOAT: right; TOP: 235px; LEFT: 250px //前面的三个值width TOP LEFT需要修改