Zabbix安装部署(for rhel5.7)
ZABBIX安装和配置

ZABBIX安装和配置本机测试环境:Admin zabbixCentOS8 192.168.8.109root zabbixSFTPBaiinfosftp 1+1=2?Yes⼀、zabbix安装⽅法如下:(⼀)、下载zabbix官⽅提供的虚拟机,环境已经配好,省事:ip addr查看配置,修改成⾃⼰的IP:vi /etc/sysconfig/network-scripts/ifcfg-eth0#修改如下内容:BOOTPROTO=none#添加如下内容:IPADDR="192.168.8.109"PREFIX="24"GATEWAY="192.168.8.1"DNS1="114.114.114.114":wq #保存退出(⼆)、SFTP创建:1、创建sftp服务数据⽬录及相关⽤户mkdir -pv /data/sftp/ #sftp数据⽬录chown root:root -R /data/sftp/ #⼀定要是root⽤户,否则⽆法chrootchmod 755 -R /data/sftp/ #权限最低需要保证普通⽤户可以进⼊groupadd sftp #sftp服务设置匹配组,单个⽤户可以忽略useradd -d /data/sftp/baiinfosftp -m -g sftp -s /sbin/nologin baiinfosftpid baiinfosftpecho "1+1=2?Yes" |passwd --stdin baiinfosftp #添加密码2、修改sshd服务配置⽂件,以组的⽅式管理sftp⽤户权限vi /etc/ssh/sshd_config #修改sftp配置⽂件,修改内容如下:注销:添加:Subsystem sftp internal-sftp #使⽤sftp服务使⽤系统⾃带的internal-sftpMatch Group sftp #匹配sftp组,多个组之间⽤逗号分割ChrootDirectory /data/sftp/%u #⽤chroot将⽤户的根⽬录指定到/data/sftp/%u,%u代表⽤户名,这样⽤户就只能在/data/sftp/%u下活动ForceCommand internal-sftp #强制执⾏内部sftp,并忽略任何~/.ssh/rc⽂件中的命令AllowTcpForwarding no #不允许转发TCP协议,默认是yes,如果⽤户可以shell访问则建议为yesX11Forwarding no #是否允许进⾏ X11 转发。
zabbix安装文档

zabbix安装文档2015年5月目录目录 (2)1 Lemp环境准备 (2)2 下载安装包 (2)3 创建、导入zabbix数据库 (3)4 安装zabbix (3)5 配置web站点 (5)6 修改php配置文件参数 (5)7 安装web (6)8 更改zabbix默认语言为简体中文,替换监控图像上系统默认的中文字体 (9)9 安装zabbix_agent (10)10 监控主机配置 (10)10.1 添加监控主机 (10)10.2 添加模板 (11)10.3 添加监控项 (12)11 添加mail报警方式 (12)11.1 通过mailx用其他电子邮件运营商SMTP报警 (12)12 监控mysql (16)1Lemp环境准备Nginx+MySQL+PHPCentOS 7.0编译安装Nginx1.6.0+MySQL5.6.19+PHP5.5.142下载安装包zabbix-2.2.6/project/zabbix/ZABBIX%20Latest%20Stable/2.2.6/zabbix-2.2.6.tar.gz或wget /project/zabbix/ZABBIX%20Latest%20Stable/2.2.6/zabbix-2.2.6.tar.gz上传zabbix-2.2.6.tar.gz到服务器/usr/local/src目录下面3创建、导入zabbix数据库cd /usr/local/src #进入软件包下载目录tar zxvf zabbix-2.2.6.tar.gz #解压cd /usr/local/src/zabbix-2.2.6/database/mysql #进入mysql数据库创建脚本目录ls #列出文件,可以看到有schema.sql、images.sql、data.sql这三个文件mysql -u root -p #输入密码,进入MySQL控制台create database zabbix character set utf8; #创建数据库zabbix,并且数据库编码使用utf8insert into er(Host,User,Password) values('localhost','zabbix',password('zabbix')); #新建账户zabbix,密码zabbixflush privileges; #刷新系统授权表grant all on zabbix.* to 'zabbix'@'127.0.0.1' identified by 'zabbix' with grant option; #允许账户zabbix能从本机连接到数据库zabbixgrant all on zabbix.* to zabbix@localhost identified by 'zabbix';flush privileges; #再次刷新系统授权表use zabbix #进入数据库source /usr/local/src/zabbix-2.2.6/database/mysql/schema.sql #导入脚本文件到zabbix数据库source /usr/local/src/zabbix-2.2.6/database/mysql/images.sql #导入脚本文件到zabbix数据库source /usr/local/src/zabbix-2.2.6/database/mysql/data.sql #导入脚本文件到zabbix数据库注意:请按照以上顺序进行导入,否则会出错。
ZABBIX安装配置手册
ZABBIX安装配置手册1.设置用户帐户:#udogroupadd-g130zabbi某#udoueradd-u130-gzabbi某-c'Zabbi某monitoring'zabbi某2.解压zabbi某:#gunzipzabbi某-1.8.1.tar.gz&&tar-某vfzabbi某-1.8.1.tar3.在线安装依赖库#udoapt-getintalllibghc6-hql-myql-dev#udoapt-getintalllibncure5#udoapt-getintalllibncure5-dev4.安装popt#popt-1.14.tar.gz#gunzippopt-1.14.tar.gz&&tar-某vfpopt-1.14.tar#./configure#make#makeintall4.安装openipmi#gunzipOpenIPMI-2.0.19.tar.gz&&tar-某vfOpenIPMI-2.0.19.tar #./configure--prefi某=/ur/local/openipmi#make#makeintall5.安装zabbi某切换到zabbi某-2.0.0目录#./configure--prefi某=/ur/local/zabbi某--enable-erver--with-myql--with-net-nmp--with-jabber=/ur/local/ikemel--with-libcurl--with-openipmi=/ur/local/openipmi--enable-agent #make#makeintall6.配置zabbi某(1)拷贝zabbi某-erver文件到/etc/init.d文件夹下;(2)根据情况修改zabbi某-erver文件:#udovi/etc/init.d/zabbi某-erverDAEMON=zabbi某_erver文件所在目录(3)修改/ur/local/zabbi某/etc/zabbi某_erver.conf文件,保证如下几项(根据实际情况修改):DBName=zabbi某(数据库名称)DBUer=root(登录数据库用户)DBPaword=123456(数据库用户密码)(4)修改配置文件权限:#chmod400/ur/local/zabbi某/etc/zabbi某_erver.conf#chownzabbi某/ur/local/zabbi某/etc/zabbi某_erver.conf(5)重启zabb某服务:#udoervicezabbi某-ervertart(retart重启)#p-ef|grepzabbi某(查看zabbi某服务进程)7.安装myql、ngin某、php5#cd/etc/myql按下图所示,把127.0.0.1改为0.0.0.09.修改ngin某配置文件erver{liten80;erver_name192.168.182.130;#修改为zabbi某服务器IP或域名地址charetutf-8;location/{inde某inde某.phpinde某.htmlinde某.htm;}location~"\.(j|ico|gif|jpg|png|c|htm|wf|php3)$"{e某pire30d;}location~\.php${fatcgi_pa127.0.0.1:9000;fatcgi_inde某inde某.php;#fatcgi_paramSCRIPT_FILENAME/cript$fatcgi_cript_name; includefatcgi_param;}}重启加载配置文件/etc/init.d/ngin某reload10.修改php.ini文件按要求修改/etc/php5/fpm下的php.ini文件。
zabbix部署安装总结
Zabbix部署一、部署环境(LAPM)CENTOS6.8+MYSQL+apache+php(1)CENTOS6.8+MYSQL部署安装略过;(2)Linux下安装配置启动apache安装Apache前准备:1、检查该环境中是否已经存在httpd服务的配置文件,默认存储路径:/etc/httpd/httpd.conf (这是centos预装的Apache的一个ent版本,一般我们安装源代码版的Apache)。
如果已经存在/etc/httpd/httpd.conf,请先卸载或者关闭centos系统自带的web服务,执行命令:chkconfig httpd off,再或者把centos自带的httpd服务的80端口改为其他端口,只要不与我们安装的Apache服务的端口冲突就可以啦。
停止并卸载linux系统自带的httpd服务:1、service httpd stop2、ps -ef | grep httpd3、kill -9 pid号(逐个删除)4、rpm -qa |grep httpd5、rpm -e httpd软件包1.[root@localhost bin]# find / -name httpd.conf2.[root@localhost bin]# rm -rf httpd.conf2、下载Apache安装包(httpd-2.2.34.tar.gz),下载地址:/#tar -zxvf httpd-2.2.34.tar.gz#cd httpd-2.2.341../configure --prefix=/home/apache2 (指定安装目录)2.make3.make install3、启动apache服务•启动Apache:/home/apache2/bin/apachectl start• 停止Apache:/home/apache2/bin/apachectl stop• 重启Apache:/home/apache2/bin/apachectl restart4、配置网站放在/home/apache2/htdocs目录下如果网站的index后缀是PHP格式的,则要修改httpd.conf配置文件(/home/apache2/conf),在DirectoryIndex增加index.php。
Zabbix部署与安装
Zabbix3.2监控工具Zabbix是一个基于WEB界面的提供的分布式系统监控以及网络监视功能的企业级的开源工具。
Zabbix能监视各种网络参数,保证服务器系统的安全运营,并提供灵活的通知机制让管理员迅速定位/解决存在的各种问题。
Zabbix由Zabbix_Server服务端和Zabbix_Agent客户端还有Zabbix_proxy代理三个部分组成。
Zabbix_Server:可以通过SNMP,Zabbix_Agent,Ping,SNMP等方法提供对远程服务器/网络状态的监视。
Zabbix_Agent:是用来采集客户端服务器数据来交给Zabbix_Server处理。
Zabbix_Proxy:缓存同步Agent监控数据。
Zabbix的主要功能:CPU负荷,内存使用,磁盘使用,网络状况,端口监视,日志监视。
Zabbix的监控架构:Zabbix部署步骤:环境需求:必须LNMP/LAMP环境的支持,需要PHP5.4以上版本支持才可以。
# systemctl stop firewalld #关闭firewalld防火墙# systemctl disable firewalld.service #禁止firewalld服务自启# sed -i -e 's|SELINUX=enforcing|SELINUX=disabled|' /etc/selinux/config #关闭SELINUX# sed -i -e 's|SELINUXTYPE=targeted|#SELINUXTYPE=targeted|' /etc/selinux/config# setenforce 0源码编译方式:❖安装相关依赖组件# yum -y install php php-gd php-mysql php-bcmath php-mbstring php-xml curl curl-devel gcc gcc-c++ net-snmp net-snmp-devel perl-DBI httpd mariadb* #YUM部署LAMP环境❖解压安装包# tar xzvf zabbix-3.2.1.tar.gz# cd zabbix-3.2.1❖编译安装Zabbix➢安装Server和Agent,并支持将数据放入MYSQL数据库中:# ./configure --prefix=/usr/local/zabbix --enable-server --enable-agent --with-mysql --enable-ipv6 --with-net-snmp --with-libcurl➢仅安装Server,并支持将数据放入MYSQL数据库中:# ./configure --prefix=/usr/local/zabbix --enable-server --with-mysql --with-net-snmp --with-libcurl➢仅安装Proxy代理,并支持将数据放入MYSQL数据库中:# ./configure --prefix=/usr/local/zabbix --enable-proxy --with-net-snmp --with-mysql --with-ssh2➢仅安装Agent客户端:# ./configure --enable-agent# make && make install注:--with-libcurl:监控WEB页面响应时间,下载速度。
zabbix安装整理(修改)

Zabbix安装安装步骤:1、安装好apache、mysql、php、snmp组件apache :yum install httpd httpd-manual -ymysql : yum install mysql-server php-mysql mysql-devel -yphp : yum install php php-bcmatch php-gd php-bcmath php-mbstring –ysnmp : yum install net-snmp net-snmp-utils net-snmp-devel -y其它组件:curl : yum install curl curl-devel -ygcc : yum install gcc libgcc -ymake : yum install make –ylrzsz: yum install -y lrzszlibxml: yum install –y libxml*yum install -y php-xml*#yum install -y ntp#yum install -y ntpdate#cp /usr/share/zoneinfo/Asia/Shanghai /etc/localtime#service ntpd stop#ntpdate #date下载zabbix的最新版本zabbix-2.2.3.tar.gz通过lrzsz工具上传到服务器中,SZ上传。
复制到/home目录下tar -zxvf zabbix-2.2.3.tar.gz解压后进入目录,运行配置:./configure --prefix=/usr/local/zabbix --enable-server --enable-agent \ --with-mysql --with-net-snmp --with-libcurlmakemake install为了安全,zabbix是通过用户zabbix来执行的,所以,要新建zabbix用户groupadd zabbixuseradd zabbix -g zabbix启动mysql service mysqld start进入下载的zabbix目录,新建zabbix的数据库:输入mysqlmysql> create database zabbix character set utf8;mysql>grant all privileges on zabbix.* to zabbix@localhost identified by 'zabbix';# identified by ‘zabbix’的密码是访问数据库的密码mysql>flush privileges;quit;导入数据库文件(进入zabbix解压文件目录)mysql -uzabbix -pzabbix -hlocalhost zabbix < database/mysql/schema.sql mysql -uzabbix -pzabbix -hlocalhost zabbix < database/mysql/images.sql mysql -uzabbix -pzabbix -hlocalhost zabbix < database/mysql/data.sql修改zabbix的配置文件创建zabbix配置文件:mkdir /etc/zabbix复制zabbix下的文件:cp –r /home/zabbix-2.2.3/conf/* /etc/zabbix配置zabbix_server.conf 修改mysql的密码为zabbixVi /etc/zabbix/zabbix_server.confDBName=zabbixDBUser=zabbixDBPassword=zabbix配置zabbix服务器的本机监控修改zabbix_agentd.confVi /etc/zabbix/zabbix_agentd.confHostname=Zabbix ServerServerActive=127.0.0.1:10051为zabbix添加端口cat >>/etc/services <<EOFzabbix-agent 10050/tcp Zabbix Agentzabbix-agent 10050/udp Zabbix Agentzabbix-trapper 10051/tcp Zabbix Trapperzabbix-trapper 10051/udp Zabbix TrapperEOF拷贝zabbix服务器的frontend php 程序到 http server 的主目录下mkdir -p /var/www/html/zabbixcp –r /home/zabbix-2.2.3/frontends/php/ /var/www/html/zabbixchown -R zabbix.zabbix /var/www/html/zabbixcp –r /home/zabbix-2.2.3/misc/init.d/fedora/core5/zabbix_server /etc/init.d/ cp –r /home/zabbix-2.2.3/misc/init.d/fedora/core5/zabbix_agentd /etc/init.d/ ZABBIX_BIN="/usr/local/zabbix/sbin/zabbix_server"echo "/etc/init.d/zabbix_server start">> /etc/rc.localecho "/etc/init.d/zabbix_agentd start">> /etc/rc.localservice zabbix_server start启动zabbix服务器和客户端:/usr/local/sbin/zabbix_server/usr/local/sbin/zabbix_agentd然后在浏览器里输入IP即可验证,如果打开浏览器后发现是空白的,应该是php缺少一个数学库,安装一下即可(yum install php-bcmath)在这之前需要配置/etc/php.ini,更改成下面的参数,才能通过前期的检测。
安装zabbix

Zabbix安装手册目录1下载zabbix包 (3)2安装curl、snmp、mysql开发库 (3)3安装zabbix (3)4创建用户 (3)5创建数据库 (3)6导入sql文件 (4)7服务器端配置zabbix (4)8客户端配置 (4)9配置启动服务 (5)10启动 zabbix server (6)11启动zabbix_agent (6)12配置zabbix站点 (6)13登录zabbix (7)14登录zabbix后报错解决: (7)1下载zabbix包zabbix-2.2.2.tar.gz2安装curl、snmp、mysql开发库#yum install –y curl curl-devel net-snmp net-snmp-devel perl-DBI mysql-devel3安装zabbix#cd zabbix-2.2.2#./configure --prefix=/usr/local/zabbix-2.2.2/ --enable-server--enable-agent --with-mysql --with-net-snmp --with-libcurl--with-libxml2#make install4创建用户为了安全考虑 zabbix 只使用普通用户运行,假如你当前用户叫 ttlsa,那么你运行他,他便使用 ttlsa 身份运行。
但是如果你在 root 环境下运行 zabbix,那么 zabbix 将会主动使用 zabbix 用户来运行。
但是如果你的系统没有名叫 zabbix 的用户,你需要创建一个用户,如下:# groupadd zabbix# useradd -g zabbix zabbix5创建数据库zabbix server 与 proxy 需要数据库,angent 不需要。
尤其要注意的是 proxy 只需要导入一个 sql 文件,而 server 一共要导入 3 个 sql 文件。
ZABBIX安装手册

ZABBIX中文安装手册乖乖猪运维研究院2021年5月13日目录一、安装环境 (3)二、ZABBIX安装 (3)1. 关闭selinux和iptables防火墙 (3)2. 安装 LAMP环境 (4)1) 安装Apache软件 (4)2) 安装PHP (6)3) 安装MariaDB (6)3. 安装 ZABBIX (12)三、常见安装问题 (20)1. ZABBIX服务器端运行中值不问题 (20)一、安装环境本次手册安装环境CenOS 8+MariaDB+Apache+zabbix5.0LTS二、Z ABBIX安装1.关闭selinux和iptables防火墙需要关闭selinux,一定要关闭这个,开启selinux会引起一连串问题,甚至zabbix的discovery 功能也不能正常使用# sed -i"s/SELINUX=enforcing/SELINUX=disabled/g" /etc/selinux/config确认是否修改成功# grep SELINUX/etc/selinux/config然后重启系统即可关闭防火墙systemctl start firewalld.service #启动firewallsystemctl stop firewalld.service #停止firewallsystemctl disable firewalld.service #禁止firewall开机启动systemctl status firewalld.service #查看防火墙状态2.安装 LAMP环境1)安装Apache软件# yum -y install httpd#vim /etc/httpd/conf/httpd.confServerName localhost:80 //编辑域名# systemctl start httpd.service //启动服务器# systemctl enable httpd.service //设置开机自动启动# systemctl status httpd.service//检查一下状态“enabled”表示httpd服务已设为开机启动,“active(running)”则表示httpd服务正在运行中。
Zabbix安装配置文档

目录
Zabbix 安装配置文档....................................................................................................................... 1 Part1.Zabbix 简介......................................................................................................................2 一、 Zabbix 简介....................................................................................................... 2 二、 Zabbix 功能....................................................................................................... 2 三、 优劣势............................................................................................................... 2 Part2.安装部署......................................................................................................................... 3 一、 服务端环境准备 ............................................................................................... 3 二、 数据库准备....................................................................................................... 3 三、 编译安装........................................................................................................... 4 四、 配置文件及 web 前端文件修改...................................................................... 4 五、 web 前端安装配置........................................................................................... 5 六、 启动 Server....................................................................................................... 5 七、 在 hosts 上配置 agent...................................................................................... 6 Part3.配置使用......................................................................................................................... 7 一、 添加 Hosts........................................................................................................ 8 二、 添加 Items........................................................................................................ 8 三、 添加 Triggers.................................................................................................... 9 四、 添加 Actions...................................................................................................10 五、 添加 Medias................................................................................................... 11 六、 添加 Users...................................................................................................... 11 七、 添加 WEB Monitorings.................................................................................. 11 八、 添加 Graphs................................................................................................... 14 九、 添加 Screens.................................................................................................. 15 十、 添加 Maps...................................................................................................... 15 十一、 添加 MySQL 监控.......................................................................................... 15 十二、 添加 Oracle 监控........................................................................................... 16 十三、 添加 SNMP 监控............................................................................................ 18 十四、 添加通用协议监控......................................................................................... 18 十五、 添加自定义监控............................................................................................. 18 十六、 添加 Templates.............................................................................................. 18 十七、 自动发现设备................................................................................................. 19 十八、 定制报表......................................................................................................... 19 十九、 Export/Import XML.........................................................................................19
CentOS 下 Zabbix 安装配置

2
Red Hat Enterprise Linux / CentOS 安装
! Zabbix 3.0 OS
- RHEL 7, Oracle Linux 7, CentOS 7 / Ubuntu / Debian /
3
! CentOS
-
yum
# rpm -ivh /zabbix/3.2/rhel/7/x86_64/zabbixrelease-3.2-1.el7.noarch.rpm
38
Zabbix
! ! -
Zabbix
Linux
Window
zabbix_agentd.conf
HostMetadataItem=system.uname
Linux: Linux server3 3.2.0-4-686-pae #1 SMP Debian 3.2.41-2 i686 GNU/Linux Windows: Windows WIN-0PXGGSTYNHO 6.0.6001 Windows Server 2008 Service Pack 1 Intel IA-32
-
-
底层自动发现(Low-level discovery)
!
- CPU - ODBC - Windows JSON CPU SQL - SNMP OID
39
!
https:///documentation/3.2/manual/ discovery/low_level_discovery
20
https:///documentation/3.0/ manual/appendix/items/supported_by_platform
3 触发器
!
2!
IP
zabbix系统手工部署

Zabbix系统部署(手工部署)1.运行环境2.部署准备2.1 Zabbix软件包下载2.2 Mysql下载包yum源配置3.软件安装3.1 Mysql安装3.2 Zabbix安装3.3 Httpd安装4.配置更新4.1 数据库数据导入4.2zabbix-server配置4.3 PHP配置4.4 Zabbix-agent配置4.5 配置安装向导5.报警配置5.1 安装邮件客户端mailx5.2 邮件客户端配置5.3 zabbix-server报警配置6.服务验证本部署文档使用C/S的架构,没有部署中间Proxy的场景.下面主要按照一般系统的部署流程进行讲述:1.运行环境操作系统:CentOS 6.5内存:2GCPU:2核安装版本:Zabbix:2.4.4Mysql:Percona 5.6.24Httpd:2.2.15Postfix:2.6.2Mailx:12.4安装依赖:gcc2.部署准备2.1 Zabbix软件包下载/zabbix/2.4/rhel/6/x86_64wget http://repo. -O zabbix.listfor i in`cat zabbix.list |egrep -o ">zabbix.*rpm<"|tr -d '<>'|grep 2.4.4|sort|egrep -v'pgsql|sqlite|japanese|proxy'`;do wget /zabbix/2.4/rhel/6/x86_64/$i;done补充:对应的软件包见:42.62.101.246/home/sofeware/zabbix2.2 Mysql下载包yum源配置/etc/yum.repos.d/Percona.repo1)yum()[percona]http://repo /centos/$releasever/os/$basearch/ name = CentOS $releasever - Percona baseurl=.enabled = 1gpgkey = file:///etc/pki/rpm-gpg/RPM-GPG-KEY-perconagpgcheck = 12)yumkey/downloads/RPM-GPG-KEY-perconawget -O /etc/pki/rpm-gpg/RPM-GPG-KEY-percona 3.软件安装3.1 Mysql安装yum install -y Percona-Server备注:如果不行也可以执行yum install -y mysql-server3.2 Zabbix安装yum localinstall *.rpm3.3 Httpd安装yum install httpd4.配置更新4.1 数据库数据导入1.开启mysql的服务service mysql start2.导入数据库报结构至数据库中mysql -uroot zabbix </usr/share/doc/zabbix-server-mysql-2.4.4/create/create.sqlmysql-uroot zabbix</usr/share/doc/zabbix-server-mysql-2.4.4/create/schema.sqlmysql -uroot zabbix </usr/share/doc/zabbix-server-mysql-2.4.4/create/images.sqlmysql -uroot zabbix </usr/share/doc/zabbix-server-mysql-2.4.4/create/data.sql补充:数据库导入create.sql的脚本路径为:42.62.101.246/home/software/mysql/create.sql如果没有create.sql可以执行如下命令:mysql -urootcreate database zabbix;grant all privileges on zabbix.* to zabbix@localhost identified by 'zbxpass';4.2zabbix-server配置/etc/zabbix/zabbix_server.conf根据DB信息配置如下配置内容()DBName=zabbixDBUser=zabbixDBPassword=zbxpassDBSocket=/var/lib/mysql/mysql.sock然后开启zabbix_server的服务service zabbix-server start4.3 PHP配置/etc/php.ini配置如下配置内容()max_execution_time =300max_input_time =300memory_limit =128Mpost_max_size =32Mdate.timezone =Asia/Shanghai然后开启httpd的服务service httpd start4.4 Zabbix-agent配置/etc/zabbix/zabbix_agentd.conf配置如下配置内容()Server=192.168.0.6,192.168.0.7ServerActive=192.168.0.6,192.168.0.7Hostname=127.0.0.1然后开启zabbix_agentd的服务service zabbix-agent start4.5 配置安装向导http://192.168.0.6/zabbix ad 打开浏览器,进行install安装:按照步骤进行一步一步验证和安装,安装完成后,可登录zabbix平台,用户名: min/zabbix补充:针对公有云上的虚拟机安装,需要进行端口映射,然后访问公网IP.5.报警配置5.1 安装邮件客户端mailx1) 先安装gcc版本yum install gcc2) 安装mailxwget /project/heirloom/heirloom-mailx/12.4/mailx-12.4.tar.bz2tar jxvf mailx-12.4.tar.bz2#解压cd mailx-12.4#进入目录make#编译make install UCBINSTALL=/usr/bin/install#安装ln -s /usr/local/bin/mailx /bin/mail#创建mailx到mail的软连接ln -s /etc/nail.rc /etc/mail.rc#创建mailx配置文件软连接3) 测试mailxecho "zabbix test mail" |mail -s "zabbix"xxx@5.2 邮件客户端配置1) 配置如下内容(/etc/mail.rc):from=xxx@set smtp=smtp.set smtp-auth-pass=123456smtp-auth-user=xxx@ wordset smtp-auth=login2) server端添加脚本(/usr/lib/zabbix/alertscripts/sendmail.sh)#/bin/bashecho "$3" | mail -s "$2" $15.3 zabbix-server报警配置1) 配置对应报警接受信息在administrator-->user中配置对应的报警接受邮件信息2) 配置media type在administrator—>media type中添加script(sendmail.sh)3) 配置action在Configuration-->action中配置对应的报警条件和操作信息补充:针对user的设置,需要设置对应的邮件和手机信息,表示action产生报警时,会发送到的邮箱或手机号,而在客户端发送邮件中的设置是表示中间邮件代理,或者表示由该客户端发起对应的邮件6.服务验证进行验证服务是否正常,具体验证步骤略。
CentOS7安装及配置Zabbix全步骤超详细教程

CentOS7安装及配置Zabbix全步骤超详细教程本文章向大家介绍CentOS7安装及配置 Zabbix全步骤,超详细教程,主要包括CentOS7安装及配置 Zabbix全步骤,超详细教程使用实例、应用技巧、基本知识点总结和需要注意事项,具有一定的参考价值,需要的朋友可以参考一下。
服务器太多,还在不同的平台和账户,监控不便整个 Zabbix 监控,开始吧一、关闭防火墙并开机不启动sudo setenforce 0 sudo sed -i "s/SELINUX=enforcing/SELINUX=disabled/g"/etc/selinux/config sudo systemctl stop firewalld.service sudo systemctl disable firewalld.service 二、安装部署 Zabbix 服务端1、安装配置 Zabbix 专用 yum 源sudo rpm -Uvh sudo yum clean all sudo yum makecache fast 2、安装 Zabbix 服务端组件sudo yum -y install zabbix-server-mysql zabbix-web-mysql zabbix-get --nogpgcheck 安装过程可能会报错,zabbix版本冲突,是因为epel源里也有zabbix Transaction check error: file /usr/bin/zabbix_get conflicts between attempted instal ls of zabbix-get-5.0.19-1.el7.x86_64 and zabbix40-4.0.36-1.el7.x86_64 file /usr/shar e/man/man1/zabbix_get.1.gz conflicts between attempted installs of zabbix-get-5.0.19-1.el7.x86_64 and zabbix40-4.0.36-1.el7.x86_64 Error Summaryepel源改名即可解决,重新执行 Zabbix 服务端组件命令即可cd /etc/yum.repos.d/ sudo mv epel.repo epel-bak3、安装 Zabbix 前端组件sudo vi /etc/yum.repos.d/zabbix.repo将其设为1[zabbix-frontend] ... enabled=1 ...sudo yum -y install zabbix-web-mysql-scl zabbix-apache-conf-scl 三、安装配置MySQL1、安装 yum 源3、安装配置MySQLsudo mv mysql-5.7.32-linux-glibc2.12-x86_64/ mysql cd mysqlsudo bin/mysqld --initialize --user=mysql --basedir=/usr/local/mysql --datadir=/usr/local/mysql/data这一步需记住打印的临时密码sudo cp support-files/mysql.server /etc/init.d/mysqld -r4、创建文件夹及文件,并授权sudo mkdir /usr/local/mysql/var/log/mysql sudo mkdir /usr/local/mysql/var/ru n/mysql sudo touch /usr/local/mysql/var/log/mysql/mysql.log sudo touch /usr/l ocal/mysql/var/run/mysql/mysql.pid sudo chown -R mysql:mysql /usr/local/mys ql/var/5、启动 MySQLsudo /etc/init.d/mysqld start 6、映射链接sudo ln -s /usr/local/mysql/bin/mysql /usr/bin sudo ln -s /usr/local/mysql/var/m ysql.sock /tmp/mysql.sock7、登录MySQLmysql -uroot -p输入临时密码8、修改密码并授权9、开启远程访问use mysql; update user set host='%' where user='root'; update user set host='%' wh ere user='zabbix'; flush privileges;//刷新 quit; // 退出10、导入初始数据sudo zcat /usr/share/doc/zabbix-server-mysql*/create.sql.gz , mysql -uzabbix -p'qwe123' zabbix 四、初始化 Zabbix 配置1、配置数据库连接sudo vim /etc/zabbix/zabbix_server.conf 根据实际情况配置数据库连接DBHost=localhost DBName=zabbix DBUser=zabbix DBPassword=qwe123 DBPort=3 3062、设置时区sudo yum -y install wqy-microhei-fonts sudo mv /usr/share/fonts/dejavu/DejaVuS ans.ttf /usr/share/fonts/dejavu/DejaVuSans.ttf.bak sudo cp -f /usr/share/fonts/wq y-microhei/wqy-microhei.ttc /usr/share/fonts/dejavu/DejaVuSans.ttf4、设置 Zabbix 及其相关服务开机启动5、初始化安装界面一直 Next step 就好了,默认用户名是Admin,密码是zabbix6、汉化到这里 Zabbix server就安装完成了,客户端安装 zabbix agent 下回分解。
rhel5 zabbix 详细安装说明及排错
Zabbix安装zabbix安装的前提是基于系统已经安装了LAMP或LNMP环境 Rhel5.5php 下载/downloads.phphttpd /Rpm Mysql Zabbix /download.php安装zabbix遇到的问题warning: rpmts_HdrFromFdno: Header V4 DSA/SHA1 Signature, key ID 7fac5991: NOKEY Downloading Packages:warning: rpmts_HdrFromFdno: Header V4 DSA/SHA1 Signa ture, key ID 7fac5991: NOKEYPublic key for google-chrome-stable_current_i386.rpm is not installed两种方法可以解决:1.运行# rpm --import /etc/pki/rpm-gpg/RPM-GPG-KEY-redhat-release可解决;2.运行# yum.conf 文件,把里面的gpgcheck=1改为gpgcheck=0。
注:方法2的效果很好3.最好的解决办法:加上"--nogpgcheck"参数安装zabbix所需的组件#yum -y install curl curl-devel net-snmp net-snmp-devel perl-DBI php-gd php-xml php-bcmath数据库创建并导入数据#tar zxf zabbix 1.8.2.tar.gz#cd zabbix 1.8.2#mysql -uroot -p>create database zabbix;>grant all on zabbix.* to zabbix@localhost identified by 'zabbix';>flush privileges;#mysql -uroot zabbix<create/schema/mysql.sql#mysql -uroot zabbix<create/data/data.sql#mysql -uroot zabbix<create/data/images_mysql.sql//为zabbix创建自己的数据库,以便zabbix可以把收集到的数据信息存放在那里调用。
zabbix部署文档

ZABBIX安装部署文档简述采用最简单的agent-server模式进行安装部署,zabbix-agent服务部署在被监控的服务器上,用以收集该服务器的各项性能数据,并发送给server,此处可在后期增加proxy用以在中间缓存agent发过来的数据,并由proxy统一转发给sever,zabbix-server服务统一收集存储各个agent发送过来的数据,并提供web服务用以对各服务器性能进行展示和报表统计等功能,zabbix也提供二次开发api,以便其他系统收集信息。
1.环境准备Centos72.下载安装zabbix yum源,为部署做准备,分为离线和在线两种方式1)在线方式进入已安装好的centos,在/opt/目录下新增文件夹zabbix从官网同步相关rpm ,执行以下命令进行同步,如图:rsync -vrt rsync:///mirror/zabbix/3.4/rhel/7/x86_64/ /opt/zabbix同步完成后,进行后续安装部署操作,该种方式因需要下载的rpm比较多,故下载速度非常慢,以下有另外一种在线安装方式另一种在线安装方式安装zabbix服务端a). 从官网下载对应版本的zabbixrpm包b).为rpm安装zabbix的repo源,安装完成后可以在/etc/yum.repos.d文件夹下看到zabbix.repo的库通过命令: ls //etc/yum.repos.d查看相关库,如图:zabbix服务器安装1).安装zabbix服务器、agent、web支持等组件安装zabbix服务端所需要的数据库 web端依赖的组件,以及zabbix客户端等2).zabbix的初始配置第一步,编辑mysql配置文件/etc/f增加编码设置第二步,进入mysql数据库,新建zabbix数据库,并将字符集设置为utf8后续发现在线安装有问题,故切换为离线方式2)离线方式下载zabbix yum镜像源地址:https:///s/1agoBTaP4YYArDsAXbVvjKA提取码:0kp3 先将iso解压,获得rpm文件,1.将下载好的rpm文件上传到liunx中,放入临时目录zabbix,2.安装以下3个依赖软件rpm -ivh zabbix/deltarpm-3.6-3.el7.x86_64.rpmrpm -ivh zabbix/python-deltarpm-3.6-3.el7.x86_64.rpmrpm -ivh zabbix/createrepo-0.9.9-26.el7.noarch.rpm3.创建yum仓库mkdir –p /custom_repo/yum-channels/,如果该命令报错,就分两步创建文件夹cp -r /zabbix/. /custom_repo/yum-channels/createrepo /custom_repo/yum-channels/4.备份原有yum源mkdir /etc/yum.repos.d/backupmv -f /etc/yum.repos.d/*.repo /etc/yum.repos.d/backup5.添加自定义repo文件vim /etc/yum.repos.d/rpms.repo插入以下内容,保存并退出[RPM]name=Update RPM packagebaseurl=file:///custom_repo/yum-channelsenable=1gpgcheck=0proxy=_none_6.设置Yum清理Yum缓存yum clean all重新生成本地缓存yum makecache更新yum列表yum repolist7.关闭防火墙Systemctl stop firewalld检查状态Systemctl status firewalld ,如下图表示已关闭关闭SELINUXvim /etc/selinux/config,修改SELINUX 为disabled执行 setenforce 0 使之生效MP环境安装yum install httpd mariadb mariadb-server mariadb-client php php-mysql9.安装zabbix服务,包括agent和server端yum install zabbix-server-mysql zabbix-web-mysql zabbix-get zabbix-agent10.检查mariadb服务是否启动service mariadb status未启动,则执行启动命令: service mariadb start11.创建数据库首先登陆进去mariadb 数据库,命令:mysql -uroot -p,无密码,如图执行创建数据库命令:CREATE DATABASE zabbix DEFAULT CHARACTER SET utf8 COLLATE utf8_bin;授权:grant all privileges on zabbix.* to zabbix@localhost identified by ‘111’;退出数据库:quit12.导入数据cd /usr/share/doc/zabbix-server-mysql-3.4.1/zcat create.sql.gz | mysql -uroot -p zabbix13.修改zabbix_server配置vim /etc/zabbix/zabbix_server.conf参考以下内容,结合上述授权进行修改DBHost=localhostDBName=zabbixDBUser=zabbixDBPassword=111修改php时区vim /etc/httpd/conf.d/zabbix.conf##修改内容为php_value date.timezone Asia/Shanghai修改web服务器访问地址vim /etc/zabbix/web/zabbix.conf.php修改 $ZBX_SERVER 的值为真实的IP地址如果MySQL设置了外部访问,也可将DB['SERVER'] 的值修改为真实的IP地址14.启动zabbix服务设置开机自启动systemctl enable mariadb.servicesystemctl enable httpd.servicesystemctl enable zabbix-server.servicesystemctl enable zabbix-agent.service启动服务service zabbix-server startservice zabbix-agent startservice mariadb startservice httpd start15.配置zabbix-servera、打开浏览器访问:http://zabbix服务器IP地址/zabbix。
Zabbix中文版安装部署

详解zabbix中文版安装部署2011-07-13 13:07:30标签:监控zabbix原创作品,允许转载,转载时请务必以超链接形式标明文章原始出处、作者信息和本声明。
否则将追究法律责任。
/1068039/609990一、zabbix简介(摘自百度百科)zabbix是一个基于WEB界面的提供分布式系统监视以及网络监视功能的企业级的开源解决方案。
zabbix能监视各种网络参数,保证服务器系统的安全运营;并提供柔软的通知机制以让系统管理员快速定位/解决存在的各种问题。
zabbix由2部分构成,zabbix server与可选组件zabbix agent。
zabbix server可以通过SNMP,zabbix agent,ping,端口监视等方法提供对远程服务器/网络状态的监视,数据收集等功能,它可以运行在Linux, Solaris, HP-UX, AIX, Free BSD, Open BSD, OS X等平台上。
zabbix agent需要安装在被监视的目标服务器上,它主要完成对硬件信息或与操作系统有关的内存,CPU等信息的收集。
zabbix agent可以运行在Linux ,Solaris, HP-UX, AIX, Free BSD, Open BSD, OS X, Tru64/OSF1, Windows NT4.0, Windows 2000/2003/XP/Vista)等系统之上。
zabbix server可以单独监视远程服务器的服务状态;同时也可以与zabbix agent配合,可以轮询zabbix agent主动接收监视数据(trapping方式),同时还可被动接收zabbix agent发送的数据(trapping方式)。
另外zabbix server还支持SNMP (v1,v2),可以与SNMP软件(例如:net-snmp)等配合使用。
zabbix的主要特点:- 安装与配置简单,学习成本低- 支持多语言(包括中文)- 免费开源- 自动发现服务器与网络设备- 分布式监视以及WEB集中管理功能- 可以无agent监视- 用户安全认证和柔软的授权方式- 通过WEB界面设置或查看监视结果- email等通知功能等等Zabbix主要功能:- CPU负荷- 内存使用- 磁盘使用- 网络状况- 端口监视- 日志监视由于zabbix是基于web界面将存储在数据库中的数据成图表显示出来,所以zabbix需要运行在web和数据库的平台上,在这里我们使用lemp环境。
Centos7环境下Zabbix5安装部署手册 (LNMP)
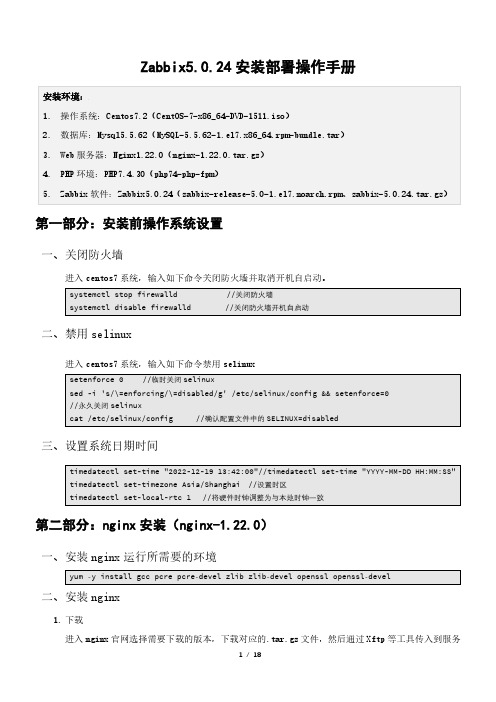
Zabbix5.0.24安装部署操作手册第一部分:安装前操作系统设置一、关闭防火墙进入centos7系统,输入如下命令关闭防火墙并取消开机自启动。
二、禁用selinux进入centos7系统,输入如下命令禁用selinux三、设置系统日期时间第二部分:nginx安装(nginx-1.22.0)一、安装nginx运行所需要的环境二、安装nginx1.下载器上。
2.解压将下载好的.tar.gz文件使用命令解压,并进入到解压后的目录3.安装前配置使用默认配置 (如果需要自己配置目录,则命令如下:./configure --prefix=/usr/mydir/nginx是将nginx安装到/usr/mydir/nginx目录下)4.安装默认安装路径为:/usr/local/nginx/sbin/,查找nginx安装路径命令:whereis nginx5.启动、停止、重启6.验证在浏览器中输入http://IP地址,看nginx页面是否可以正常打开。
如果安装启动成功,则页面显示如下图所示。
7.通过service命令启动服务nginx文件中具体内容如下:# description: Nginx is an HTTP(S) server, HTTP(S) reverse \ # proxy and IMAP/POP3 proxy server# processname: nginx# config: /usr/local/nginx/conf/nginx.conf# pidfile: /usr/local/nginx/logs/nginx.pid# Source function library.. /etc/rc.d/init.d/functions# Source networking configuration.. /etc/sysconfig/network# Check that networking is up.[ "$NETWORKING" = "no" ] && exit 0nginx="/usr/local/nginx/sbin/nginx"prog=$(basename $nginx)NGINX_CONF_FILE="/usr/local/nginx/conf/nginx.conf"lockfile=/var/lock/subsys/nginxstart() {[ -x $nginx ] || exit 5[ -f $NGINX_CONF_FILE ] || exit 6echo -n $"Starting $prog: "daemon $nginx -c $NGINX_CONF_FILEretval=$?echo[ $retval -eq 0 ] && touch $lockfilereturn $retvalstop() {echo -n $"Stopping $prog: "killproc $prog -QUITretval=$?echo[ $retval -eq 0 ] && rm -f $lockfile return $retval}restart() {configtest || return $?stopstart}reload() {configtest || return $?echo -n $"Reloading $prog: "killproc $nginx -HUPRETVAL=$?echo}force_reload() {restart}configtest() {$nginx -t -c $NGINX_CONF_FILE }rh_status() {status $prog}rh_status_q() {rh_status >/dev/null 2>&1 }case "$1" instart)rh_status_q && exit 0$1;;stop)rh_status_q || exit 0$1;;restart|configtest)$1reload)rh_status_q || exit 7$1;;force-reload)force_reload;;status)rh_status;;condrestart|try-restart)rh_status_q || exit 0;;*)echo $"Usage: $0 {start|stop|status|restart|condrestart|try-restart|reload|force-reload|configtest}"exit 2esac将上述命令复制粘贴到nginx文件中后,保存退出。
zabbix双主安装文档
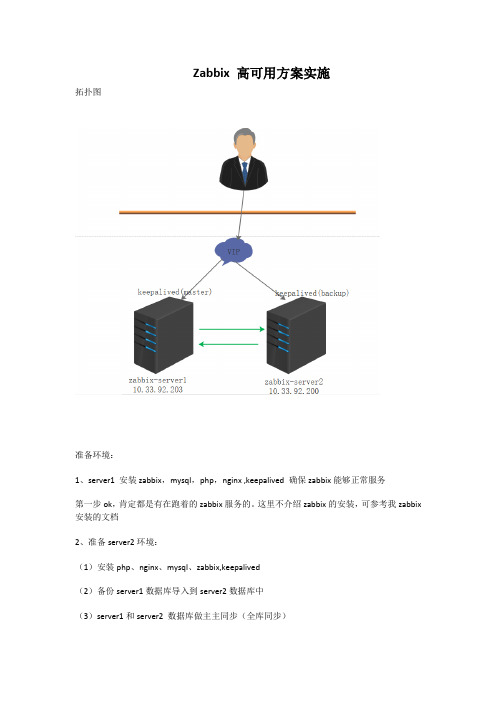
Zabbix 高可用方案实施拓扑图准备环境:1、server1 安装zabbix,mysql,php,nginx ,keepalived 确保zabbix能够正常服务第一步ok,肯定都是有在跑着的zabbix服务的。
这里不介绍zabbix的安装,可参考我zabbix 安装的文档2、准备server2环境:(1)安装php、nginx、mysql、zabbix,keepalived(2)备份server1数据库导入到server2数据库中(3)server1和server2 数据库做主主同步(全库同步)(3)cp server1 web文件到server2 web目录中。
(4)启动所有服务,打开浏览器登录zabbix,确保zabbix能够正常访问。
一.安装安装依赖包yum install -y gcc gcc-c++ pcre-devel openssl-devel epel-release libxml2-devel libevent-devel php-fpm php-common php-devel php-mbstring php-mcrypt php php-mysql php-gd php-xml php-mbstring php-ldap php-pear php-xmlrpc php-bcmath mysql-connector-odbclibdbi-dbd-mysql net-snmp-devel curl-devel mod_ssl mod_perl mod_auth_mysql net-snmp fpingsystemctl enable php-fpm # 开机启动systemctl start php-fpm #启动keepalived 安装(10.33.92.203(主)),备机只需改下优先级和stateyum install -y keepalivedvi /etc/keepalived/keepalived.conf! Configuration File for keepalivedglobal_defs {router_id LVS_DEVEL}vrrp_script service{script "/etc/keepalived/keepalived_check.sh service"interval 5weight -30fall 2rise 2}vrrp_script web{script "/etc/keepalived/keepalived_check.sh web"interval 5weight -30fall 2rise 2}vrrp_instance VI_1 {state MASTERinterface ens33virtual_router_id 205priority 110advert_int 1authentication {auth_type PASSauth_pass 1111}virtual_ipaddress {10.33.92.202}track_script{service}track_script{web}}检测脚本keepalived_check.sh#!/bin/bashCMD="ss -nal"case $1 inservice)$CMD |grep ":3306 " &> /dev/null && $CMD |egrep ":10051 " &> /dev/null;;web)$CMD |grep ":80 " &> /dev/null && $CMD |egrep ":9000 " &> /dev/null ;;esacsystemctl enable keepalivedsystemctl start keepalivedmysql的安装1.yum update -y2.tar -zxvf ./mysql-5.7.17-linux-glibc2.5-x86_64.tar.gz -C /usr/local3.mv /usr/local/mysql-5.7.17-linux-glibc2.5-x86_64 /usr/local/mysqleradd -r -M -s /sbin/nologin mysql5.mkdir -p /usr/local/mysql/{data,logs}6.chown -R mysql:mysql /usr/local/mysql/{data,logs}7.cp /usr/local/mysql/support-files/f /etc/f #配置修改相关参数8.cp /usr/local/mysql/support-files/mysql.server /etc/init.d/mysqld9.chmod +x /etc/init.d/mysqld10.vi /etc/init.d/mysqld #修改basedir datadir路径11.cd /usr/local/mysql/ && ./bin/mysqld --initialize --basedir=/usr/local/mysql/ --datadir=/usr/local/mysql/data --user=mysql #初始化并记下初始密码12./sbin/chkconfig mysqld on #开机启动13./etc/init.d/mysqld start #启动14.ln -s /usr/local/mysql/lib/libmysqlclient.so.20 /usr/lib6415.mysql> alter user root@’localhost’ identified by ‘123456’; # 修改默认密码16.mysql> create database zabbix character set utf8; #创建zabbix库17.Mysql> grant all privileges on zabbix.* to zabbix@’10.33.92.202’ identified by ‘zabbix’Mysql 配置双主略(可自行网上搜索)Nginx 安装eradd -r -M -s /sbin/nologin zabbix #添加用户2.tar -zxvf ./nginx-1.10.2.tar.gz3../configure --prefix=/usr/local/nginx4.Make && make install5.vi /usr/local/nginx/conf/vhost/zabbix.confserver {listen 80;server_name localhost;#charset koi8-r;location / {root /usr/local/nginx/html/zabbix;index index.php;allow 10.10.11.0/24;allow 114.113.0.0/16;allow 192.168.5.0/24;allow 221.224.214.35/32;allow 58.211.207.158;allow 153.34.213.51;allow 123.59.207.55;deny all;}error_page 500 502 503 504 /50x.html;location = /50x.html {root /usr/local/nginx/html/zabbix;}location ~ \.php$ {root /usr/local/nginx/html/zabbix;fastcgi_buffer_size 128k;fastcgi_buffers 32 128k;fastcgi_connect_timeout 600;fastcgi_send_timeout 600;fastcgi_read_timeout 600;client_max_body_size 500m;client_body_buffer_size 1024k;fastcgi_pass 127.0.0.1:9000;fastcgi_index index.php;fastcgi_param SCRIPT_FILENAME $document_root$fastcgi_script_name;include fastcgi_params;}}vi /etc/rc.local #开机启动/usr/local/nginx/sbin/nginx -c /usr/local/nginx/conf/nginx.conf/usr/local/nginx/sbin/nginx #启动nginxZabbix 安装useradd -r -M zabbixtar -zxvf ./zabbix-3.4.2.tar.gz./configure --enable-server --enable-agent --with-mysql --enable-ipv6--with-net-snmp --with-libcurl --with-libxml2 --prefix=/usr/local/zabbix-servermake && make installvi /etc/servicezabbix-agent 10050/tcp # Zabbix Agentzabbix-agent 10050/udp # Zabbix Agentzabbix-trapper 10051/tcp # Zabbix Trapperzabbix-trapper 10051/udp # Zabbix Trappercp ./misc/init.d/fedora/core/zabbix_agentd /etc/init.d/cp ./misc/init.d/fedora/core/zabbix_server /etc/init.d/chmod +x /etc/init.d/zabbix_*cp -R /home/soft/zabbix-3.4.2/frontends/php /usr/local/nginx/html/mv /usr/local/nginx/html/php /usr/local/nginx/html/zabbix/sbin/chkconfig zabbix_server on/sbin/chkconfig zabbix_agentd on导入mysql 数据use zabbixset names utf8;source /home/soft/zabbix-3.4.2/database/mysql/schema.sqlsource /home/soft/zabbix-3.4.2/database/mysql/images.sqlsource /home/soft/zabbix-3.4.2/database/mysql/data.sqlvi /usr/local/zabbix-server/etc/zabbix_server.conf #server 配置文件LogFile=/var/log/zabbix/zabbix_server.logDebugLevel=3LogFileSize=100DBHost=10.33.92.202DBName=zabbixDBUser=zabbixDBPassword=zabbix#DBSocket=/tmp/mysql.sockDBPort=3306StartPollers=6StartTrappers=2StartPingers=5StartDiscoverers=12SourceIP=10.33.92.202StartHTTPPollers=10MaxHousekeeperDelete=5000CacheSize=128MValueCacheSize=128MTimeout=15StartDBSyncers=16HistoryCacheSize=256MTrendCacheSize=128MLogSlowQueries=1000FpingLocation=/usr/sbin/fpingAlertScriptsPath=/usr/local/zabbix-server/etc/init.d/zabbix_server start #启动zabbixserver修改PHP配置sed -i 's/max_execution_time = 30/max_execution_time = 300/' /etc/php.ini sed -i 's/max_input_time = 60/max_input_time = 300/' /etc/php.inised -i 's/post_max_size = 8M/post_max_size = 16M/' /etc/php.inised -i 's/;date.timezone =/date.timezone = PRC/' /etc/php.inised -i 's/;always_populate_raw_post_data/always_populate_raw_post_data/' /etc/php.ini打开web浏览器输入http://10.33.92.202/php/index.php。
半小时搭建Zabbix教程:图文详解安装部署Zabbix监控的步骤方法

半⼩时搭建Zabbix教程:图⽂详解安装部署Zabbix监控的步骤⽅法Zabbix是⼀款成熟,轻松的企业级开源监控解决⽅案,⽀持实时监控数千台服务器,虚拟机和⽹络设备,适⽤于数百万指标的⽹络监控和应⽤监控,使⽤它可以从任何设备、系统、应⽤程序上进⾏指标采集,根据采集到的度量值⾃动检测问题的状态,⽽⽆需连续观察采集到的度量值,Web可视化界⾯,丰富的可视化选项,全⾯展⽰您的IT环境,满⾜多种展⽰需求,检测到异常时,以多种渠道和选项告警通知到相关的管理⼈员等,下⾯给⼤家介绍⼀下zabbix搭建过程中的所有步骤,希望对有需要的⼈有所帮助。
安装前准备⼯作安装必要的软件,禁⽤SELINUX,安装必备软件,LAMP环境搭建安装命令启动mysql,设置开机启动,修改mysql密码,注意下⾯的yourpassword要替换为你⾃⼰的密码,安装zabbix服务创建zabbix数据库导⼊数据修改zabbix配置注意:下⾯的yourpasswd请替换为你⾃⼰的数据库密码修改时区修改zabbix登录密码(可选)启动设置开机启动通过http://hostname/zabbix访问zabbix的安装页⾯,填写安装信息,完成安装。
完成安装后,初始登录账户密码为Admin/zabbix。
安装zabbix-agentzabbix-server安装好了,下⾯需要“接⼊”其他机器,将它们纳⼊到zabbix-server的管理,下⾯是安装步骤配置zabbix-agent启动zabbix-agent下⾯在zabbix-server页⾯上添加这个机器按下图填写即可接着绑定模板最后点击Update,你就可以在Host⽬录中看到所有被监控的机器列表注意:如果zabbix-agent需要被其他机器调⽤,例如通过zabbix_get获得监控信息,需要在防⽕墙设置“放开10050端⼝”监控⽹络流量假设我们要监控机器192.168.8.5⽹卡em1上的出⼊⼝流量,我们可以先在zabbix服务器上⽤zabbix_get命令来测试⼀下,下⾯代码测试的是输⼊流量,注意这⾥的输出是⼀个累积的流量监控⽹络流量的流程为:创建模板创建监控项创建应⽤:Configuration->Templates->Create application创建监控项:Configuration->Templates->network traffic on em1->Items->Create Item上图是⼊⼝流量的监控项设置,出⼝流量监控项network traffic out em1可以⼀样设置,成功后你看到的是创建TriggersTriggers是触发报警的设置,同样我们点击Configuration->Templates->network traffic on em1->Triggers->Create trigger来创建Triggers注意在设置Expression时,我们可以利⽤zabbix提供给我们的模板于是,⼊⼝流量的触发值就设置好了,每秒流量超过1048576时就会触发报警,同理我们可以设置出⼝流量的触发值,成功后,我们看到的是创建Graphs接着,我们再来创建Graphs,Graphs可以以图形化的⽅式展⽰流量信息,点击Configuration->Templates->network traffic on em1->Graphs->Create graph,创建Graphs的最⼤好处是我们可以把这些Graphs组合起来形成Screens监控⾯板,例如下⾯这样下⾯是创建Graphs的表单绑定Template⾄此,我们模板就创建完毕了,最后⼀步需要把主机和模板关联起来,点击Configuration->Hosts->Templates->Select创建关联,然后点击Add此时,通过Monitoring->Latest data可以看到⽹卡上的最新数据,同时可以通过Monitoring->Graphs来查看图形化的数据⾃定义script报警当系统出现异常时,我们需要⽴即发现,并通过邮件或App的⽅式通知给维护的同学,这样整个系统才会掌控在我们⼿中,Zabbix要做到这⼀点,需要配置以下3个选项(zabbix虽然很强⼤,但配置和UI有点繁琐,这是我不喜欢它的地⽅):1、Media types2、Events3、User MediaMedia typesMedia types是当产⽣事件时,以什么⽅式进⾏通知,这⾥采⽤的是Script⽅式,这种⽅式的灵活性最⼤,通过这种⽅式,我们可以把报警发送到任何⽀持Webhook的App上,例如钉钉Script这种⽅式的原理是:我们把可执⾏的脚本放在zabbix的指定⽬录下,当事件发⽣时,zabbix会⾃动调⽤该脚本,可以在/etc/zabbix/zabbix_server.conf中找到指定⽬录的路径Media types设置如下,意思是在/usr/lib/zabbix/alertscripts下存在⼀个脚本dingding.py,当事件发⽣时,zabbix会调⽤该脚本,同时会传⼊该脚本3个参数,这3个参数分别是事件的接收⼈、事件的主题、事件的内容dingding.py这个脚本如下,我们先实现⼀个简单的版本,也就是把这3个参数输出到⽇志中设置脚本的权限Events事件是当某个条件发⽣时,zabbix所创建的报警对象。
zabbix安装详解及报警配置

详解zabbix中文版安装部署标签:监控zabbix原创作品,允许转载,转载时请务必以超链接形式标明文章原始出处、作者信息和本声明。
否则将追究法律责任。
/1068039/609990一、zabbix简介(摘自百度百科)zabbix是一个基于WEB界面的提供分布式系统监视以及网络监视功能的企业级的开源解决方案。
zabbix能监视各种网络参数,保证服务器系统的安全运营;并提供柔软的通知机制以让系统管理员快速定位/解决存在的各种问题。
zabbix由2部分构成,zabbix server与可选组件zabbix agent。
zabbix server可以通过SNMP,zabbix agent,ping,端口监视等方法提供对远程服务器/网络状态的监视,数据收集等功能,它可以运行在Linux, Solaris, HP-UX, AIX, Free BSD, Open BSD, OS X等平台上。
zabbix agent需要安装在被监视的目标服务器上,它主要完成对硬件信息或与操作系统有关的内存,CPU等信息的收集。
zabbix agent可以运行在Linux ,Solaris, HP-UX, AIX, Free BSD, Open BSD, OS X, Tru64/OSF1, Windows NT4.0, Windows 2000/2003/XP/Vista)等系统之上。
zabbix server可以单独监视远程服务器的服务状态;同时也可以与zabbix agent配合,可以轮询zabbix agent主动接收监视数据(trapping方式),同时还可被动接收zabbix agent发送的数据(trapping方式)。
另外zabbix server还支持SNMP (v1,v2),可以与SNMP软件(例如:net-snmp)等配合使用。
zabbix的主要特点:- 安装与配置简单,学习成本低- 支持多语言(包括中文)- 免费开源- 自动发现服务器与网络设备- 分布式监视以及WEB集中管理功能- 可以无agent监视- 用户安全认证和柔软的授权方式- 通过WEB界面设置或查看监视结果- email等通知功能等等Zabbix主要功能:- CPU负荷- 内存使用- 磁盘使用- 网络状况- 端口监视- 日志监视由于zabbix是基于web界面将存储在数据库中的数据成图表显示出来,所以zabbix需要运行在web和数据库的平台上,在这里我们使用lemp环境。
Zabbix运维平台部署手册

Zabbix运维平台部署手册目录Zabbix安装配置文档......................................................................................错误!未定义书签。
Part1.Zabbix简介 (4)一、Zabbix简介 (4)二、Zabbix功能 (5)三、优劣势 (5)Part2.安装部署 (5)一、服务端环境准备 (5)二、数据库准备 (7)三、编译安装 (8)四、配置文件及web前端文件修改 (8)五、web前端安装配置 (9)六、启动Server (11)七、在hosts上配置agent (13)Part3.配置使用 (15)一、添加Hosts (16)二、添加Items (16)三、添加Triggers (18)四、添加Actions (19)五、添加Medias (19)六、添加Users (20)七、添加WEB Monitorings (21)八、添加Graphs (24)九、添加Screens (25)十、添加Maps (26)十一、添加MySQL监控 (26)十二、添加Oracle监控 (27)十三、添加SNMP监控 (30)十四、添加通用协议监控 (30)十五、添加自定义监控 (30)十六、添加Templates (30)十七、添加Log File (31)十八、定制报表 (31)十九、添加Macros (31)二十、添加自动发现设备 (32)二十一、添加Inventory (32)二十二、Export/Import XML (33)Part4.FAQ (33)1、Export/Import XML 文件时报http 500错误 (33)2、WEB前端安装Step 3 PHP MB Strings Overload 检查fail (33)3、无法修改trigger的阀值 (34)4、运行agentd时进程总起不来,查看agetd.log又无报错 (34)Part1.Zabbix简介一、Zabbix简介Zabbix是一个企业级的开源分布式监控解决方案,由一个国外的团队持续维护更新,软件可以自由下载使用,运作团队靠提供收费的技术支持赢利。
- 1、下载文档前请自行甄别文档内容的完整性,平台不提供额外的编辑、内容补充、找答案等附加服务。
- 2、"仅部分预览"的文档,不可在线预览部分如存在完整性等问题,可反馈申请退款(可完整预览的文档不适用该条件!)。
- 3、如文档侵犯您的权益,请联系客服反馈,我们会尽快为您处理(人工客服工作时间:9:00-18:30)。
Zabbix安装部署(for rhel5.7)之前的Nagios与Cacti整合部署(for_RHEL_5.7) 与这篇Zabbix安装部署(for rhel5.7)都是学习监控时网络查询和实操所做,在这里非常感谢网友门的开源精神,大家共同学习,每天进步一点,积累就是收获For Think email:cnbjthink@ (*^__^*) 。
Word导出PDF,文档可能错位但不影响观看,请不要计较。
一> Zabbix简介Zabbix 是一个提供Web 管理界面的企业级的开源系统/网络监控分布式监控解决方案,由一个国外的团队持续维护更新,软件可以自由下载使用,运作团队靠提供收费的技术支持赢利。
官方网站:Zabbix 1.8官方文档:/documentation/1.8/startZabbix通过C/S模式采集数据,通过B/S模式在web端展示和配置。
被监控端:主机通过安装agent方式采集数据,网络设备通过SNMP方式采集数据Server端:通过收集SNMP和agent发送的数据,写入MySQL数据库,再通过php+apache 在web前端展示。
Zabbix运行条件:Server:Zabbix Server需运行在LAMP(Linux+Apache+Mysql+PHP)环境下,对硬件要求低Agent:目前已有的agent基本支持市面常见的OS,包含Linux、HPUX、Solaris、Sun、windows SNMP:支持各类常见的网络设备二> Zabbix功能具备常见的商业监控软件所具备的功能(主机的性能监控、网络设备性能监控、数据库性能监控、FTP等通用协议监控、多种告警方式、详细的报表图表绘制)支持自动发现网络设备和服务器,支持分布式,能集中展示、管理分布式的监控点,扩展性强,server提供通用接口,可以自己开发完善各类监控三>优劣势优点:开源,无软件成本投入Server对设备性能要求低(实际测试环境:虚拟机Redhat EL AS5,2GCPU 1G内存,监控5台设备,CPU使用率基本保持在10%以下,内存剩余400M以上)支持设备多支持分布式集中管理开放式接口,扩展性强缺点:全英文,界面不友好无厂家支持,出现问题解决比较麻烦需在被监控主机上安装agent四>下载软件:/project/zabbix/ZABBIX%20Latest%20Stable/1.8.9/zab bix-1.8.9.tar.gz/downloads/1.8.5/zabbix_agents_1.8.5.linux2_6.amd64.tar.gz/downloads/1.8.5/zabbix_agents_1.8.5.linux2_6.i386.tar.gz安装前先配置好PHP,要求支持php-gd、php-bcmath、php-xml、php-mysql、php-net-socket、php-mbstring,即configure 参数中加上–with-gd –enable-bcmath –enable-xml –with-mysql –enable-sockets –enable-mbstring由于zabbix是基于web界面将存储在数据库中的数据成图表显示出来,所以zabbix需要运行在web和数据库的平台上,在这里我们使用lemp环境。
Linuxtone提供了自动部署lemp的脚本,只需下载后解压运行里面的lemp.sh即可,或者leam脚本(Apache与Nginx 看需求)基于lemp改编的,可以问我要lemp下载地址:/docs/autoinstall/lemp_auto_v1.0.6.tar.gz五>开始安装:redhat 提前安装好YUM确保能用,安装zabbix所需的组件[root@rhel ~]# yum -y install curl curl-devel net-snmp net-snmp-devel perl-DBI php-gd php-xml php-bcmath1> install lemp.sh[root@rhel ~]# cd /usr/local/src/[root@rhel src]# wget /docs/autoinstall/lemp_auto_v1.0.6.tar.gz[root@rhel src]# tar xzvf lemp_auto_v1.0.6.tar.gz[root@rhel src]# cd lemp[root@rhel lemp]# ./lemp.sh (估计半小时左右,依据个人网络和机器性能而定)2> install zabbix (为zabbix创建自己的数据库,以便zabbix可以把收集到的数据信息存放在那里调用)[root@rhel src]# useradd zabbix[root@rhel src]# passwd zabbix[root@rhel src]# mysql -u root -pEnter password:Welcome to the MySQL monitor. Commands end with ; or \g.Your MySQL connection id is 1Server version: 5.1.56-LTOPS-log Source distributionCopyright (c) 2000, 2010, Oracle and/or its affiliates. All rights reserved.This software comes with ABSOLUTELY NO WARRANTY. This is free software,and you are welcome to modify and redistribute it under the GPL v2 licenseType 'help;' or '\h' for help. Type '\c' to clear the current input statement.mysql> create database zabbix;Query OK, 1 row affected (0.02 sec)mysql> grant all on zabbix.* to zabbix@localhost identified by 'zabbix' ;Query OK, 0 rows affected (0.08 sec)mysql> quitBye[root@rhel src]# tar xzvf zabbix-1.8.9.tar.gz[root@rhel src]# cd zabbix-1.8.9[root@rhel zabbix-1.8.9]# mysql -u root zabbix < create/schema/mysql.sql[root@rhel zabbix-1.8.9]# mysql -u root zabbix < create/data/data.sql[root@rhel zabbix-1.8.9]# mysql -u root zabbix < create/data/images_mysql.sql[root@rhel zabbix-1.8.9]# ./configure --prefix=/usr/local/zabbix --enable-server --enable-agent --enable-proxy --with-mysql=/usr/local/mysql-5.1.56/bin/mysql_config --with-net-snmp --with-libcurl--prefix指定zabbix安装目录,--enable-server 支持zabbix服务器,--enable-agent支持zabbix 代理,--enable-proxy 支持zabbix代理服务器,--with-mysql 使用MySQL客户端库可以选择指定路径mysql_config,--with-net-snmp 使用net-snmp软件包,择性地指定路径net-snmp配置, --with-libcurl 使用curl包[root@rhel zabbix-1.8.9]# make && make install添加zabbix服务对应的端口[root@rhel zabbix-1.8.9]# cat >> /etc/services << EOFzabbix-agent 10050/tcp Zabbix Agentzabbix-agent 10050/udp Zabbix Agentzabbix-trapper 10051/tcp Zabbix Trapperzabbix-trapper 10051/udp Zabbix TrapperEOF[root@rhel zabbix-1.8.9]#[root@rhel zabbix-1.8.9]# mkdir /etc/zabbixcp: omitting directory `misc/conf/zabbix_agentd'[root@rhel zabbix-1.8.9]# cp -r frontends/php/ /data/www/wwwroot/zabbix修改zabbix连接的数据库的用户名和密码[root@rhel zabbix-1.8.9]# vim /etc/zabbix/zabbix_server.conf (set nu)86 DBName=zabbix102 DBUser=zabbix112 DBPassword=zabbix为zabbix 的启动、关闭和重启的脚本文件做链接,方便系统可以找得到[root@rhel zabbix-1.8.9]# cd /usr/local/zabbix/bin/[root@rhel bin]# for i in *;do ln -s /usr/local/zabbix/bin/${i} /usr/bin/${i};done[root@rhel bin]# cd /usr/local/zabbix/sbin/[root@rhel sbin]# for i in *;do ln -s /usr/local/zabbix/sbin/${i} /usr/sbin/${i};done把mysql的lib库文件添加到系统动态库配置文件中,方便系统可以找到mysql的lib库[root@rhel sbin]# echo "/usr/local/mysql-5.1.56/lib/mysql/" >> /etc/ld.so.conf[root@rhel sbin]# ldconfig (立即生效)将zabbix相关的启动脚本等文件拷贝的/etc/init.d/下,方便日后对zabbix 的启动关闭操作[root@rhel sbin]# cd /usr/local/src/zabbix-1.8.9[root@rhel zabbix-1.8.9]# cp misc/init.d/redhat/8.0/zabbix_server /etc/init.d/[root@rhel zabbix-1.8.9]# chmod +x /etc/init.d/zabbix_server[root@rhel zabbix-1.8.9]# cp misc/init.d/redhat/8.0/zabbix_agentd /etc/init.d/[root@rhel zabbix-1.8.9]# chmod +x /etc/init.d/zabbix_agentd修改zabbix server和agentd程序目录的位置[root@rhel zabbix-1.8.9]# vim /etc/init.d/zabbix_server (set nu)17 progdir="/usr/local/zabbix/sbin/"[root@rhel zabbix-1.8.9]# vim /etc/init.d/zabbix_agentd (set nu)17 progdir="/usr/local/zabbix/sbin/"添加开机启动服务[root@rhel zabbix-1.8.9]# chkconfig --add zabbix_agentd[root@rhel zabbix-1.8.9]# chkconfig --level 345 zabbix_server on[root@rhel zabbix-1.8.9]# chkconfig --level 345 zabbix_agentd on[root@rhel zabbix-1.8.9]# chkconfig --list | grep zabbix(使用chkconfig --list 检查一下)在nginx 配置文件中建立zabbix 虚拟机的配置文件[root@rhel zabbix-1.8.9]# cat > /usr/local/nginx/conf/vhosts/monitor.conf << EOFserver {listen 80;server_name ;#access_log logs/zabbix_access.log main;location / {root /data/www/wwwroot/zabbix;index index.html index.htm index.php;}location ~ \.php$ {root /data/www/wwwroot/zabbix;fastcgi_pass 127.0.0.1:9000;fastcgi_param SCRIPT_FILENAME$document_root$fastcgi_script_name;fastcgi_index index.php;include fastcgi_params;}}EOF对php配置文件做相应的调整,使其满足zabbix运行的最低环境要求[root@rhel zabbix-1.8.9]# vim /usr/local/php-5.2.17/etc/php.ini255 max_execution_time = 300256 max_input_time = 300439 post_max_size = 16M663 [Date]664 ; Defines the default timezone used by the date functions665 date.timezone = Asia/Shanghai[root@rhel ~]# cd /data/www/wwwroot/zabbix/[root@rhel zabbix]# chmod 777 conf (权限不给的话web界面安装到最后一步会报错)[root@rhel ~]# /etc/init.d/zabbix_agentd restart[root@rhel ~]# /etc/init.d/zabbix_server restart[root@rhel ~]# /etc/init.d/fastcgi restart[root@rhel ~]# /etc/init.d/mysqld restart[root@rhel ~]# /etc/init.d/snmpd restartweb enter install zabbix:http://IP/zabbix/,用户名和密码为默认:admin/zabbix,进入zabbix 安装界面,同意许可协议,环境最低要求(前面对php 配置文件的修改),数据库连接配置(连接mysql的用户名和密码之前以配置,zabbix/zabbix),zabbix server的信息,next,next,完成安装,对zabbix进行汉化,中文的监控界面wget /wp-content/uploads/2010/03/cn_zh.inc.php_.tar.gz解压后的文件复制到/data/www/wwwroot/zabbix/include/locales下覆盖原来的文件,重启zabbix登陆zabbix监控界面,点击zabbix首页右上角porfile,language中选择Chinese(CN)保存即可,完成看监控页面屏幕。
