arcgis安装使用说明
ArcGIS.9.3.完整版安装

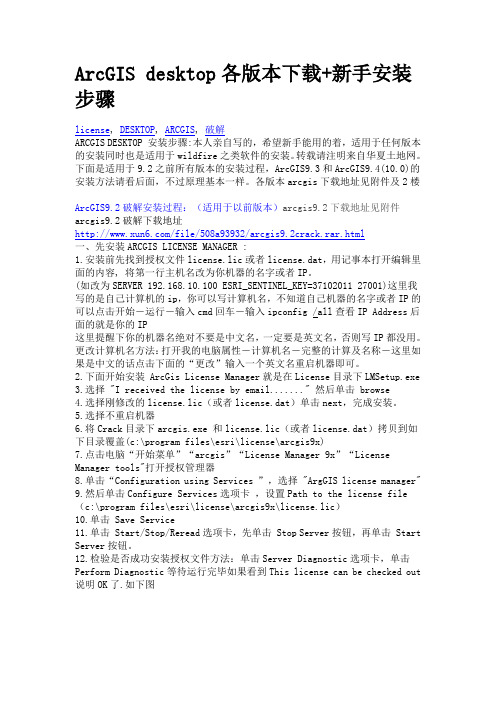
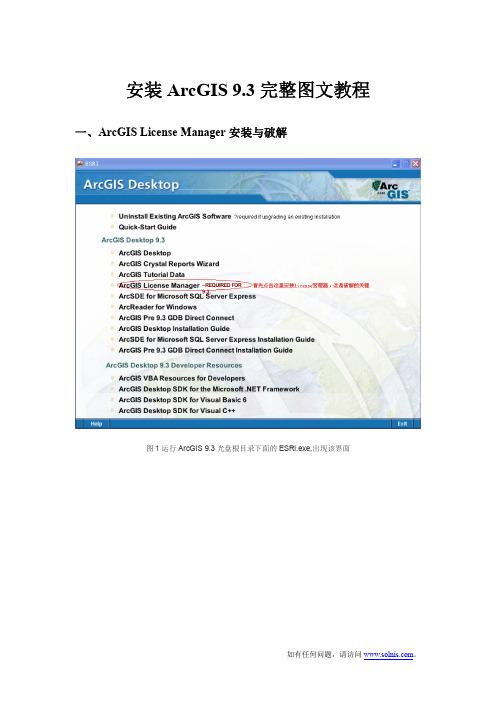
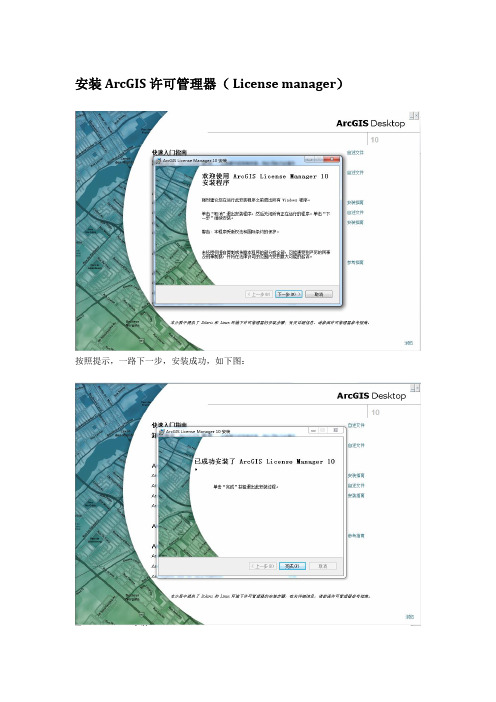
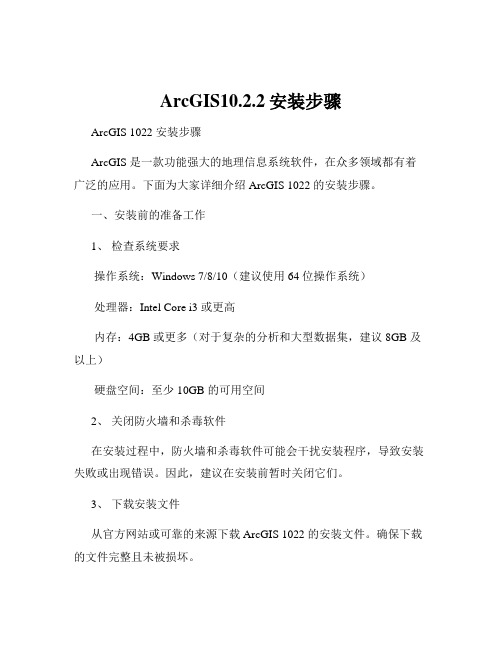
ArcGIS9.3安装方法一、首先打开安装盘,双击ArcGIS.9.3.SLX文件夹:再双击文件夹里的ESRI,如下图:然后单击ArcView,如下图:出现下列界面时单击[install ArcGIS Desktop],如下图:点击Next,如下图:然后选择[I accept the license agreement],然后点击Next,如下图:接下来,选择[Complete],然后点击Next,如下图:接下来继续点击Next,如下图:然后就是等待安装,时间会久一些,如下:安装好后,出现注册界面时,点击[Register Later],意思就是以后注册。
如下图:二、打开光盘,双击[arcis9.3破解安装]文件夹:再双击[license_server_setup],如下图:然后运行LMSetup,如下图:出现下面界面时,点击[Browse],如下:然后出现下面界面时,选择37102011.ef19文件(注意:37102011.ef19这个文件在安装盘的[arcgis9.3破解安装]文件夹下的[license_server_setup]文件夹里,操作这里时,系统直接定位在这个文件夹下了,如果没有直接定位,按照所说的路径依次选择),让这个文件变蓝,然后点打开,如下图:然后点击Next,如下图:继续点击Next,如下图:继续点击lnstall,如下图:接下来,等待安装:安装100%后,出现下列界面时,选择No,I will restart my computer later,如下图:点击后,出现这个这个界面时,点OK然后点击:Finish,如下图:注意:若不小心选择Yes,I want to restart my computer now这个选项,重启了。
就要在系统启动后在任务管理器中先结束ArcGIS和lmgrd进程。
结束方法:Crtl+Alt+Del三个键子同时按,出现Windows任务管理器,选择进程,然后在进程里分别找到ArcGIS和lmgrd两个进程,点击结束进程。
各版本arcgis安装步骤及新手指导
ArcGIS desktop各版本下载+新手安装步骤license, DESKTOP, ARCGIS, 破解ARCGIS DESKTOP 安装步骤:本人亲自写的,希望新手能用的着,适用于任何版本的安装同时也是适用于wildfire之类软件的安装。
转载请注明来自华夏土地网。
下面是适用于9.2之前所有版本的安装过程,ArcGIS9.3和ArcGIS9.4(10.0)的安装方法请看后面,不过原理基本一样。
各版本arcgis下载地址见附件及2楼ArcGIS9.2破解安装过程:(适用于以前版本)arcgis9.2下载地址见附件arcgis9.2破解下载地址/file/508a93932/arcgis9.2crack.rar.html一、先安装ARCGIS LICENSE MANAGER :1.安装前先找到授权文件license.lic或者license.dat,用记事本打开编辑里面的内容, 将第一行主机名改为你机器的名字或者IP。
(如改为SERVER 192.168.10.100 ESRI_SENTINEL_KEY=37102011 27001)这里我写的是自己计算机的ip,你可以写计算机名,不知道自己机器的名字或者IP的可以点击开始-运行-输入cmd回车-输入ipconfig /all查看IP Address后面的就是你的IP这里提醒下你的机器名绝对不要是中文名,一定要是英文名,否则写IP都没用。
更改计算机名方法:打开我的电脑属性-计算机名-完整的计算及名称-这里如果是中文的话点击下面的“更改”输入一个英文名重启机器即可。
2.下面开始安装 ArcGis License Manager就是在License目录下LMSetup.exe3.选择 "I received the license by email......." 然后单击 browse4.选择刚修改的license.lic(或者license.dat)单击next,完成安装。
ARCGIS9.3.1安装手册
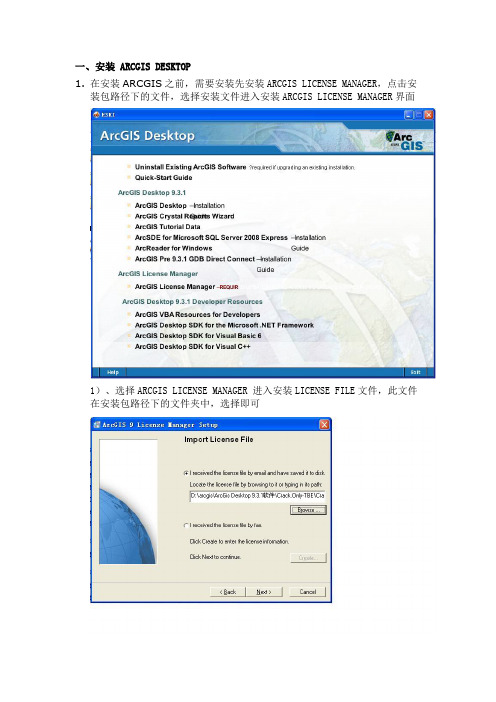
一、安装ARCGIS DESKTOP1.在安装ARCGIS之前,需要安装先安装ARCGIS LICENSE MANAGER,点击安装包路径下的文件,选择安装文件进入安装ARCGIS LICENSE MANAGER界面1)、选择ARCGIS LICENSE MANAGER 进入安装LICENSE FILE文件,此文件在安装包路径下的文件夹中,选择即可2)、然后一直点击“NEXT”按钮到如下界面,选择不要重启计算机,后退出3)、在安装包路径下arcgis\ArcGis Desktop 9.3.1软件\Crack.Only-TBE\Crack.Only-TBE\license_server_crack文件下的Arc_Info9.lic文件4)、把第一行的“SERVER yl ESRI_SENTINEL_KEY=37102011 27001”中的 yl 改为本机的计算机名,保存。
如图所示;5)、查看本机计算机名的方法:右键点击桌面“我的电脑”选择“属性”出现以下窗口6)、点击“计算机名”窗口中“完整的计算机名称”就是本机的计算机名(每台电脑都不相同的,最后面的点不要复制)7)、把arcgis\ArcGis Desktop 9.3.1软件\Crack.Only-TBE\Crack.Only-TBE\license_server_crack文件下5文件全部复制后,然后到License Manager安装目录下(一般为c:\programfiles\esri\license\arcgis9x),覆盖该目录下相对应文件;8)、打开License Manager Tools(开始→程序→ArcGIS→License Manager(9.x)→License Manage r Tools);A、点“Configuration using Services”,选择“ArgGIS license server”,B、然后切换到“Configure Services”,设置“Path to the license file”为“c:\program files\esri\license\arcgis9x\Arc_Info9.lic”,点“Save Service”;出现以下窗口再点击“是”C、再切换到“Start/Stop/Reread ”,试试三个按钮,(如下图所示)保证它们都正常工作。
Arcgis 10.2安装和破解图文教程

Arcgis 10.2安装和破解图文教程一、解压ISO文件运行ESRI.exe二、安装License Manager与ArcGIS 10.1的安装破解不同,10.2不需要安装第3方修改的License Manager,安装原版即可。
点击红圈里的Setup开始安装,一路默认即可,另如果C盘不是特别小,不建议更改路径(仅仅是建议)。
安装完毕后,启动License Manager,选择停止服务。
如图:三、安装ArcGIS Desktop安装期间一路下一步即可,什么也不用管。
四、执行破解安装完成后启动ArcGIS Administrator,选择ArcInfo浮动版同时将图3处,改为localhost在更改localhost的过程中要先把license manager里面的服务打开,然后更改完了localhost之后再关闭,然后复制破解文件,再把服务打开就可以了下面就到了破解的关键步骤了,方法有很多,这里提供一种本人亲测可用的方法。
首先打开Lincense10.2的安装目录,我的是:C:\Program Files (x86)\ArcGIS\License10.2\bin32位系统的是C:\Program Files\ArcGIS\License10.2\bin这里都是指默认目录,如图:将里面的service.txt和ARCGIS.exe重命名(这是比较安全的做法,万一破解失败可以用其他方法破解),然后将下载的ArcGIS Desktop 10.2破解文件复制进去。
五、启动服务运行License Manager,点击开始即可,如果为了确保成功,可以点击重新读取许可。
不出意外,就破解成功了,你可以启动ArcGIS Administrator,查看可用性。
2024版ArcGIS超详细教程来啦

33
三维飞行漫游动画制作
路径规划
在三维场景中规划飞行 路径,可以设置多个关
键点和飞行高度。
2024/1/24
动画设置
为飞行路径添加动画效 果,如旋转、缩放等, 使飞行过程更加生动。
视角控制
调整飞行过程中的视角 变化,增强观众的沉浸
感。
34
输出与分享
将制作好的三维飞行漫 游动画导出为视频或图 片格式,便于分享和传
2024/1/24
5
软件安装与启动
2024/1/24
01
启动方法
02
安装完成后,在桌面或开始菜单找到ArcGIS图标,双击启动。
如果是首次启动,可能需要进行一些初始化设置,如选择语言、
03
单位等。
6
界面介绍及功能概述
菜单栏
包含文件、编辑、视图等基本操作选项。
工具栏
提供常用功能的快捷按钮。
2024/1/24
2024/1/24
服务管理与优化
介绍如何对发布的ArcGIS Server服务进行管理、监控和优化,确保服务的稳定性和高 效性。
38
THANKS
感谢观看
2024/1/24
39
用于选择地图上的要素,可进行单选、框选等操作。
缩放工具
通过滑动鼠标滚轮或使用缩放按钮对地图进行缩放。
2024/1/24
12
基本操作与常用工具
平移工具
拖动地图以查看不同区域的内容。
识别工具
点击地图上的要素以查看其属性信息。
2024/1/24
13
02
数据管理与编辑
BIG DATA EMPOWERS TO CREATE A NEW
2024/1/24
ArcGIS9.3安装说明
ArcGIS9.3安装说明ArcGIS9.3的安装方法跟ArcGIS9.2基本相同。
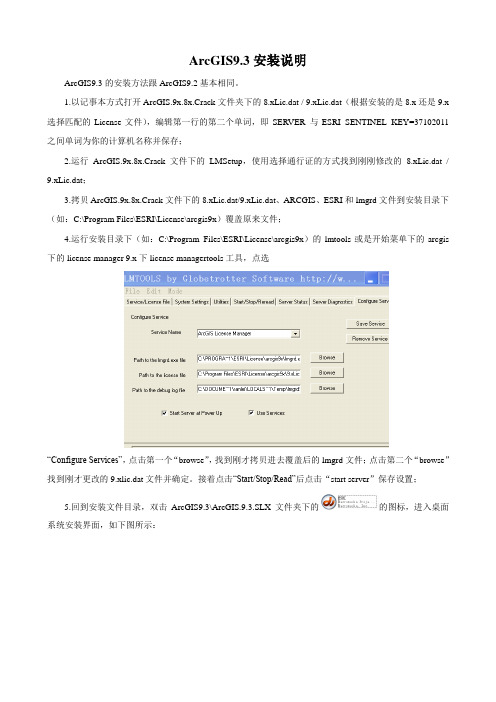
1.以记事本方式打开ArcGIS.9x.8x.Crack文件夹下的8.xLic.dat / 9.xLic.dat(根据安装的是8.x还是9.x 选择匹配的License文件),编辑第一行的第二个单词,即SERVER 与ESRI_SENTINEL_KEY=37102011之间单词为你的计算机名称并保存;2.运行ArcGIS.9x.8x.Crack文件下的LMSetup,使用选择通行证的方式找到刚刚修改的8.xLic.dat / 9.xLic.dat;3.拷贝ArcGIS.9x.8x.Crack文件下的8.xLic.dat/9.xLic.dat、ARCGIS、ESRI和lmgrd文件到安装目录下(如:C:\Program Files\ESRI\License\arcgis9x)覆盖原来文件;4.运行安装目录下(如:C:\Program Files\ESRI\License\arcgis9x)的lmtools或是开始菜单下的arcgis 下的license manager 9.x下license managertools工具,点选“Configure Services”,点击第一个“browse”,找到刚才拷贝进去覆盖后的lmgrd文件;点击第二个“browse”找到刚才更改的9.xlic.dat文件并确定。
接着点击“Start/Stop/Read”后点击“start server”保存设置;5.回到安装文件目录,双击ArcGIS9.3\ArcGIS.9.3.SLX文件夹下的的图标,进入桌面系统安装界面,如下图所示:选择安装第一个:ArvView,第二步选择Install ArcGIS Desktop,接下来按照提示一步一步安装;6.在安装的最后会提示激活软件,此时选择Cancel(取消),回到安装文件目录,双击ArcGIS9.3\ ArcGIS.9x.8x.Crack文件夹下的liccrak注册表文件,写入注册表。
ArcGISDesktop10.4安装教程
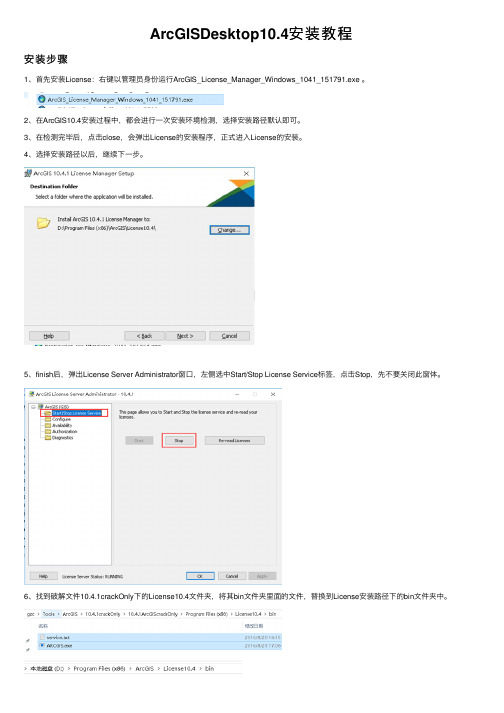
ArcGISDesktop10.4安装教程安装步骤1、⾸先安装License:右键以管理员⾝份运⾏ArcGIS_License_Manager_Windows_1041_151791.exe 。
2、在ArcGIS10.4安装过程中,都会进⾏⼀次安装环境检测,选择安装路径默认即可。
3、在检测完毕后,点击close,会弹出License的安装程序,正式进⼊License的安装。
4、选择安装路径以后,继续下⼀步。
5、finish后,弹出License Server Administrator窗⼝,左侧选中Start/Stop License Service标签,点击Stop,先不要关闭此窗体。
6、找到破解⽂件10.4.1crackOnly下的License10.4⽂件夹,将其bin⽂件夹⾥⾯的⽂件,替换到License安装路径下的bin⽂件夹中。
7、最后回到刚才的License Server Administrator窗⼝,点击Start,出现Status:RUNNING即表⽰安装成功。
8、返回安装包中,右键以管理员⾝份运⾏ArcGIS_Desktop_1041_151727.exe。
9、依旧会出现检测程序安装指引,默认即可。
10、安装类型选择Complete,下⼀步。
11、选择安装路径完后,下⼀步。
12、选择python安装路径(程序很⼩,默认路径即可),下⼀步。
13、finish后,弹出窗⼝中,将“Not_Set”修改为“Localhost”点击OK。
14、点击ok。
15、回到破解⽂件夹,找到Desktop10.4⽂件夹,将其bin⽂件夹下的AfCore.dll,复制粘贴到Desktop安装路径下的bin⽂件夹中。
16、完成后,能打开ArcMap即表⽰安装成功,⾄此ArcMap安装结束。
ArcGIS 10.4.1 安装指南说明书

ArcGIS 10.4.1Installation GuideArcGIS for DesktopArcGIS for ServerPortal for ArcGISArcGIS for Desktop InstallationArcGIS for Desktop is available as Basic, Standard, or Advanced and all the downloads from My Esri. To install a component, sign into My Esri and click the download link on the site. This link will download a self-extracting executable file for installation. After the download completes, you have the option of starting the setup immediately or running it manually. To run the setup manually, browse to the downloaded folder containing the setup and run setup.exe.How to prepare to install ArcGIS for Desktop1.Verify that your computer meets the system requirements.2.Navigate to the contents of the disc in the CD-ROM and double-click on DesktopSetup/Icon to extract to a folder of your choice or let it default to My Documents. How to install ArcGIS for Desktop3.One the extraction is complete to allow Auto-Run of ArcGIS for Desktop setup.exefiles to installation/run.4.Accept the License Agreement option to continue5.The setup program provides an option for a Complete installation, which installs theapplications, style files, templates, and optionally licensed extensions. The Custominstallation option allows you to choose specific installation6.The installation location will be identified in this dialog box or in the custom dialog box,if a custom option was selected. An upgrade will not allow you to select or change the installation location. The parent location of an upgrade installation is retained and the software is installed to <parent folder>\Desktop10.3. For example, if ArcGIS 10.2 for Desktop was installed to D:\MyGIS\ArcGIS\Desktop10.2, the 10.3.1 installation folder will be D:\MyGIS\ArcGIS\Desktop10.3. If you need to install to a different location, manually remove your existing installation before starting the 10.3.1 installation.7.If Python is selected for installation, you must choose the installation location or selectthe default. The previous Python installation location will also be retained during the upgrade. See Python requirements for more information8.When the setup is complete the ArcGIS Administrator Wizard is displayed, allowing you toconfigure a Concurrent or Single Use authorization. Refer to The ArcGIS Administrator for detailsUpon opening the Software Authorization Wizard, you will be provided with three authorization options:1.I have installed my software and need to authorize it.Select this option to proceed with the authorization process by entering the authorization code you received from Esri Customer Service.2.I have already authorized the software and need to authorize additional extensions. This option is used if you have already authorized the core ArcGIS for Desktop and now want to authorize any extensions. Authorizing additional extensions acquired after authorizing core ArcGIS for Desktop can be done by starting ArcGIS Administrator from Start > All Programs > ArcGIS. Once in the ArcGIS Administrator utility, select the Desktop folder and select Authorize Now.3.I have received an authorization file from Esri and am now ready to finish theauthorization process.Select this option if you have a provisioning file created from the Esri Customer Care portal. Select the appropriate option and click Next.Here you have the options to select online or offline methods of authorization, or authorize your Single Use product from a local license server.4.Provide your contact information and details in the next two dialog boxes. If you are usinga provisioning file (online authorization only), this information will be automaticallypopulated from the file.5.Enter your ArcGIS for Desktop authorization code starting with ESU or EVA, followed bynine digits.6.Next, you will have the option to authorize any extensions.If you choose to authorize any extensions, the Software Authorization Wizard will prompt you to enter the authorization codes for the extensions. If you choose not to authorize, the Software Authorization Wizard provides the option to evaluate any extension in the next step.OptionalIn this step, you may choose to evaluate any extensions for which you have not provided an authorization code in the previous step.Use the online authorization and click Next to connect to the Esri Activation Site. Upon completion, you will receive a message that authorization is successful and the applications will be ready for use.Offline authorizationThe remaining steps are applicable only to offline authorization.1.You will be requested to save your authorization information to disk as a file namedauthorize.txt. You can then upload the authorization text file or send an email with the file attached.2.If uploading the text file, an authorization response file will be generated to download. When sending an email with the text file attached, you will receive a return email from Esri with the authorization response file.3.After receiving the response file, start ArcGIS Administrator from Start > All Programs> ArcGIS to complete the authorization process.4.In the ArcGIS Administrator, click the Desktop folder, select the appropriate Single Useproduct, and click Authorize Now.5.Select I have received an authorization file from Esri and browse to the (*.respc) file.Click Next so the applications will be authorized and ready for use.Additional information on DesktopSingle-use licenseFor single use, authorization is required for each machine. Once the ArcGIS for Desktop installation is complete, you will be provided with the opportunity to authorize your single-use product. You will need the authorization codes sent from Esri Customer Service to the contact email address referenced in the sales order during the authorization process.This email includes the authorization codes issued for each license in the order. In addition to finding the information in the email, if you already have an Esri Global Account, you can log in to the Esri Customer Care site, click on Authorization & Provisioning, then click on a product name to obtain its authorization code. If you do not yet have an Esri Global Account, you can create one at My Esri.You will receive an email confirmation and have access to Authorization & Provisioning on the Customer Care site. For ArcGIS for Desktop Single Use, the authorization code starts with the letters ESU or EVA, followed by nine numeric digits, for example, ESU123456789. Follow these steps to complete the Single Use product authorization.(Contact information can be found at /about-esri/contact. )Once the Desktop has been installed then you will need to open ArcGIS Administrator (Start---All Programs---ArcGIS).1.Select one of the three Single Use products.2.Click Authorize Now to launch the Software Authorization Wizard. The wizard will walk youthrough the online or offline authorization process.Online authorizationWith online authorization, the Software Authorization Wizard connects directly to the Esri authorization site using secure sockets layer (SSL) from the deployed machine. Online authorization can be used if the machine on which the software has been installed is connected to the Internet and can connect to https://. Online authorization can be performed by directly entering the authorization code in the Software Authorization by creating a provisioning file (.prvc) at My Esri. Offline authorizationOffline authorization is used if the machine where ArcGIS for Desktop is installed does not have Internet connectivity. In this case, the authorization process creates a text file which can be uploaded to the Esri authorization server from an Internet-connected machine or can be sent in an email to Esri Customer Service to obtain an authorization response file (.respc). This authorization response file can be copied to the machine where ArcGIS for Desktop is installed and used to authorize ArcGIS for Desktop without a direct Internet connection.ArcGIS for Server Installation1.The setup program should launch automatically after the download has completed.If the setup program does not launch automatically, browse to the location of thedownloaded setup files and double-click Setup.exe.2.During the installation, read the license agreement and accept it, or exit if you do notagree with the terms.3.The setup program displays the features that will be installed, click Next4.If Python 2.7.10 or Numerical Python 1.9.2 is not installed on your machine, thesetup automatically installs them for you. The default installation location isC:\Python27\.5.Specify the account to be used by ArcGIS Server to perform a variety of functions insupport of the geographic information system (GIS) Server. The first option Specify the account name and password6.If you enter a domain account, it must already exist on the domain and must beentered using the following format:From here ArcGIS server will be installed following the directions on the screen.After the installation completes, the Software Authorization Wizard is launched. To launch Software Authorization Wizard at a later stage Click Start > Program Files > ArcGIS > Software Authorization.To successfully authorize your ArcGIS for Server installation, do the following:Choose your authorization optionThere are three authorization options:1. I have installed my software and need to authorize it: Select this option if you do notalready have an authorization file. There are two methods to provide yourauthorization information:2.I have already authorized the software and need to authorize additional options orextensions: Select this option if you've already authorized ArcGIS for Server for use, but you want to authorize additional options or extensions (if available). There aretwo methods to provide your authorization information:3.I have received an authorization file from Esri and am now ready to finish theregistration process: Select this option if you've already received your authorization file from Esri Customer Service. If you select this option, you can either browse tothe location of the file (if you received the file by email) or manually enter theauthorization information.Authorization Method:Authorize with Esri now using the Internet enables you to receive the authorization fileimmediately. It requires an Internet connection.Authorize at ESRI’s website or by email to receive your authorization file: Methods *********************************************************************************************************************.After completing authorization, ArcGIS Server Manager should already be open. You can now log in to Manager and create a new site. The URL to open Manager in abrowser is :6080/arcgis/manager1.Click Create New Site2.To create a new site, you are required to define a user name and password asthe primary site administrator. The default name for the account is siteadminbut you can enter a different name if you want.3.Type the paths where you want the default server directories and configurationstore to be created. These folders hold information essential to your site. If you'llhave multiple machines in your site, enter UNC paths to two shared folders thatyou've previously prepared. This will allow all machines in the site to see thedirectories and click Next.4.Examine the details about the site you're going to create. When you're ready tocreate the site, click Finish.About the ArcGIS Web AdaptorArcGIS Web Adaptor allows ArcGIS for Server to integrate with your existing web server. It is compatible with IIS and Java EE servers such as WebSphere and WebLogic.Benefits of using Web Adaptor:•Allows you to integrate ArcGIS for Server with your organization's existing web server. By including a web server in your site, you gain the ability to host webapplications that use your GIS services.•Allows you to provide a single endpoint that distributes incoming requests to the GIS servers in your site.•Allows you to expose your GIS server through your organization's standard website and port. Use the Web Adaptor if you don't want users to see the default port 6080or the default site name arcgis.•Allows you to block the ArcGIS Server Administrator Directory and ArcGIS Server Manager from the view of external users.•Allows you to block ArcGIS for Desktop users from establishing administrative or publisher connections to ArcGIS Server.•Allows you to use your organization's identity store and security policies at the web-tier level.Configuring Web Adaptor1.Web Adaptor can be accessible by opening the URLhttp://gisserver.domain/arcgis/webadaptor, choose ArcGIS for Server and then Next2.Enter fully qualified domain name of the computer together with the port (6443) andthen enter ArcGIS server siteadmin credentials and then click ConfigurePortal for ArcGIS Installation1.Open the disk contents to view files and ensure that you run setup withadministrative privileges.2.Click Next3.Accept license agreement and click Next4.Leave default settings on next dialog and click Next on two following dialogs (unless you want tochange location where the content will be saved5.Enter username of the user to start up portal and enter password and passwordconfirmation again and thereafter click Next6.Click Next on the Portal for ArcGIS Configuration dialog and thereafter install to installthe application.7.Click installAuthorization:When the installation completes, click Finish. The Software Authorization Wizard dialog box displays.1. If the authorization file has been received from the customer care you can choose “Ihave received an authorization file from ESRI and now ready to finish the authorization process”, click Browse, select the file and click Next to complete the process.2.Authorize with Esri now using the Internet enables you to receive the authorization fileimmediately. It requires an Internet connection.3.Authorize at ESRI’s website or by email to receive your authorization file: Methods*********************************************************************************************************************.Create a single machine portalAfter the Portal for ArcGIS installation completes, you are prompted to create a new portal or join an existing one.To create a portal, follow these steps.1. Click Create New Portal.2. On the Create a New Portal page, specify the first name, last name, user name,password, email, and identity question and answer of the initial administratoraccount. The initial administrator account is required to register your portal withArcGIS Web Adaptor.Benefits of the Web AdaptorThe Web Adaptor provides the following benefits:1.Allows you to integrate Portal for ArcGIS with your organization's existing web server. Byincluding a web server in your site, you gain the ability to host web applications that use your GIS services.2.Allows you to use your organization's identity store and security policies at the web-tierlevel. For example, if you're using IIS, you can use Integrated Windows Authentication to restrict who enters the portal. You can also use Public Key Infrastructure (PKI) or anyother identity store for which the web server has built-in or extensible support. Thisallows you to provide a single sign-on or other custom authentication experience when logging in to use services, web applications, and Portal for ArcGIS.3.Allows you to expose Portal for ArcGIS through a site name other than the default arcgis.4.Allows you to expose Portal for ArcGIS through port 80 or 443Configuring Web AdaptorWeb Adaptor can be accessible by opening the URL http://gisserver.domain/portal/webadaptor choose Portal for ArcGIS and then NextEnter fully qualified domain name of the computer together with the port (7443) and then enter ArcGIS server siteadmin credentials and then click ConfigureFor any Technical queries during the installation:Email:****************************Phone:+27 11 238 6300Fax:+27 11 238 6310Address:International Business Gateway,Cnr New Road & 6th Road,MidrandWebsite:ArcGIS for DesktopArcGIS for ServerPortal for ArcGIS。
ArcGIS 9.3完整图文安装教程
安装ArcGIS 9.3完整图文教程一、ArcGIS License Manager安装与破解图1运行ArcGIS 9.3光盘根目录下面的ESRI.exe,出现该界面图2 设置license文件图3自己创建license图4点edit就可以输入license内容了图5输入任意内容就可以了,反正后面还是要设置license文件的图6输入任意内容的license就会有这提示,不用管它,ok就是了图7开始安装license manager图8安装盖相应文件图10完成license manager安装,下面开始破解过程图11 crack目录下的破解文件图12自制的破解程序安装图13安装后自动打开license manager图14这些配置信息以及设置好了,直接点save service就可以了二、ArcGIS Desktop安装过程详解图16 开始安装ArcGIS Desktop图17继续安装,没有可以设置的图18版权协议,当然得选I accept啦manager,否则请参照图19_2图19_2没有配置license Mannager如果你看到了19_1,这里可以跳过了arcinfo全功能版图21完全安装,虽然大点但是以后会方便些图22安装路径设置图22安装顺利完成三、自行手动破解方法这里其实介绍的是另外一种安装方法,这种方法要比较繁琐一些,所以最好的办法还是采用上面的一键破解程序。
1、安装Licence manager过程:首先打开安装光盘主界面,选择install ArcGIS License Manager。
选择"I received the license by fax" 然后点“create”-“edit”,然后将破解文件中的Licence.dat或者license.lic打开,并将“this_host”换成你自己的计算机名或者不换也可以,保存;然后将文件中的内容复制到“Licence editor”的输入区域内,“ok ”就可以了!当然这里输入任意内容也是可以的,只是多个提示!2、覆盖破解文件:将破解文件夹中的ARCGIS.EXE、esrihostid.exe、lmgrd.exe、lmtools.exe、lmutil.exe、rebootnt.exe、license.lic(或者license.dat) (该文件刚才已经编辑过)拷贝到License Manager的安装目录(如c:\program files\esri\license\arcgis9x) 覆盖原文件!3、启动并配置Licence manager:打开“开始菜单\程序\ArcGIS\License Manager (9.x)\License Manager Tools”,选择 “Configuration using Services”,接着选"ArgGIS license manager",然后点“ Configure Services ”并设置license文件路径:“path to lmgrd.exe file”不用修改“path to license file”处点Path to license file,“如c:\program files\esri\license\arcgis9x\license.dat”,“browse”,文件类型选“*.dat”,然后选择license.dat即可;“path to debug log file”可以随便指定一个.log文件,不过最好在 License Manager 目录下!选择“start server at power up & use services”,点“save service”,最后,切换到Start/Stop/Reread并“start server”4、安装ArcGIS Desktop:一路Next,到License manager时,如果步骤3配置正确(不需要步骤5的操作),并启动了服务的话,这里会自动选中配置的License manager服务器的;否则(需要步骤5的操作)选择“setup the Licence manager later”,然后一路next,选择安装 模式时选“complete”;然后一路Next,等待ArcGIS Desktop安装完成!5、这一步不是必须的:如果你在安装ArcGIS Desktop前没有配置好,那么除了前面的步骤3的配置外,还得进行该操作:运行“开始菜单\程序\ArcGIS\Desktop Administrator”,选择“Licence manager”;点“change”,输入你的计算机名并“ok“,如果License manager配置不正确,这时会报错,否则没有任何提示。
arcgis客户端安装手册
ARCGIS版本客户端安装资料1、客户端及其他文件下载:请在资源主页http://172.16.25.2/TELEWORKS_ARC/TELEWORKS_ARC.htm或者http://137.0.25.4/TELEWORKS_ARC/TELEWORKS_ARC.htm下载相关安装文件,需要下载arcgis 介质(1)arcgis介质.rar里面包含①.arcgis介质(ArcgisInstall、中通服软件许可、字体)②arcgis补丁文件两个文件夹。
严格按照如下步骤,安装相关程序。
注:ARCGIS插件只需安装一次,即测试时安装后,正式上线无需再安装。
(查看电脑程序里边如果有arcgis则不用再安装插件,即不用执行ARCGIS插件安装这一步直接执行第三步安装许可)2、ARCGIS插件安装:安装步骤如下:在ArcgisInstall中,双击ESRI.exe进入安装界面如图所示:选择红色字段标识的安装即可,进入下一界面如图所示:点击【Next】进入安装界面:选中红色圈住的地方,点击【Next】进入下一个安装界面默认选中的为Complete-完全安装,选择默认即可,点击【Next】进入下一安装界面:配置好安装路径后,点击【Next】进入下一个安装界面:配置好Python的安装路径,这个软件是与Runtime一起集成的程序都需要安装的,配置好后点击【Next】进入下一个安装界面:请耐心等待,大约在5分钟左右。
进入如下界面:点击【Finish】安装完毕。
3、许可安装:注意:安装新许可的时候删掉路径C:\Program Files (x86)\ESRI\License10.0\sysgen的keycodes文件(1)许可1安装开始菜单,选择刚才安装完成Arcgis下的Software Authorization,打开下面界面选择红色圈住的地方,点击【下一步】进入下一个安装界面点击Browse按钮,进入选择许可界面选择相应的许可(ENGINE_v93.ecp)后,选择打开,进入下一步安装界面选择【下一步】,进入下一个安装界面点击完成,许可安装完毕。
arcgis使用说明

arcgis使用说明ArcGIS 使用说明1、简介ArcGIS 是由 Esri 公司开发的一套地理信息系统软件,用于处理、分析和展示空间数据。
本文档旨在提供一个详细的使用指南,帮助用户快速上手并掌握 ArcGIS 的各项功能。
2、安装2.1 系统要求在安装 ArcGIS 之前,确保您的计算机符合以下最低要求:- 操作系统:Windows 10/8/7- 处理器.64位双核处理器- 内存.8GB- 硬盘空间:至少10GB空闲空间2.2 和安装以下是安装 ArcGIS 的步骤:1、访问 Esri 官方网站并 ArcGIS 安装文件。
2、运行安装文件,并按照提示完成安装向导。
3、在安装过程中,选择您需要安装的组件和功能。
3、ArcMap3.1 界面介绍ArcMap 是 ArcGIS 的主要组件之一,它提供了一个交互式的地图编辑和分析环境。
下面是 ArcMap 的主要界面元素:- 菜单栏:包含各种操作和功能的菜单选项。
- 工具栏:提供了常用工具的快捷方式。
- 目录窗格:显示各个图层和数据框。
- 地图视图:用于显示和编辑地图数据的主要区域。
- 属性表:用于查看和编辑地图图层的属性数据。
3.2 地图创建与编辑在 ArcMap 中创建和编辑地图的步骤如下:1、菜单栏中的“文件”,选择“新建地图”。
2、在地图视图中选择合适的数据框范围。
3、添加地图图层,可以从本地文件或远程数据源中导入。
4、使用绘画工具在地图视图中绘制地理要素。
5、调整图层顺序和样式,可以对图层进行符号化操作。
4、地理分析4.1 空间查询ArcGIS 通过空间查询功能提供了强大的地理分析能力。
您可以执行以下空间查询操作:- 属性查询:根据属性条件选择要素。
- 空间查询:根据空间关系选择要素。
- 缓冲区分析:通过指定一定的缓冲区距离来选择要素。
4.2 地理处理ArcGIS 提供了丰富的地理处理工具,用于执行各种地理数据操作和分析。
以下是常用的地理处理操作:- 裁剪:根据指定的边界区域裁剪地图数据。
ARCGIS9.3 软件安装手册
安装手册1说明安装手册主要介绍Arcgis 9.3系列(包括Desktop、ArcSDE、ArcGis Server)软件的安装。
2ArcGis 9.3系列软件安装在安装ArcSDE和Arcgis Server之前先安装Desktop。
2.1 Desktop软件安装2.1.1安装License Manager如图3-1所示,打开ArcGis.Desktop.v9.3.Crack文件夹下的ESRI.ArcGis.Desktop.v9.3.Crack.Only-TBE文件夹,单击license_server_setup文件夹下的LMSetup.exe安装License。
图2-1在图3-2对话框中,单击“Browse…”,选择图3-1所示的37102011.efl9,单击“Next”。
图2-2然后一直单击“next”,点击完成,选择不重启计算机,把license_server_crack下的所有文件,复制到C:\Program Files\ESRI\License\arcgis9x里。
复制完成后重启计算机。
如图3-3所示:图2-32.1.2安装ArcGIS Desktop选择arcgis 9.3\Desktop文件夹下的setup.exe,出现安装界面,点击“next”,再选择“I accept the license agreement”,如图3-4所示。
点击“next”,选择第一项“user license Manager on 本机计算机名”,如图3-5所示。
然后一直点击“next”,直到安装完成。
图2-4图2-52.2 ArcSDE软件安装2.2.1确认安装确认本机已经安装:ORACLELisence Manager2.2.2安装ArcSDE单击arcgis 9.3\ArcSDE9.3\ArcSdeOracle9i文件夹下的setup.exe,然后一直单击“下一步”,直到程序复制完成,弹出“Welcome to the ArcSDE Post installation”页面。
Arcgis101安装手册及汉化
Arcgis10.1安装教程
一、安装arcgis10.1
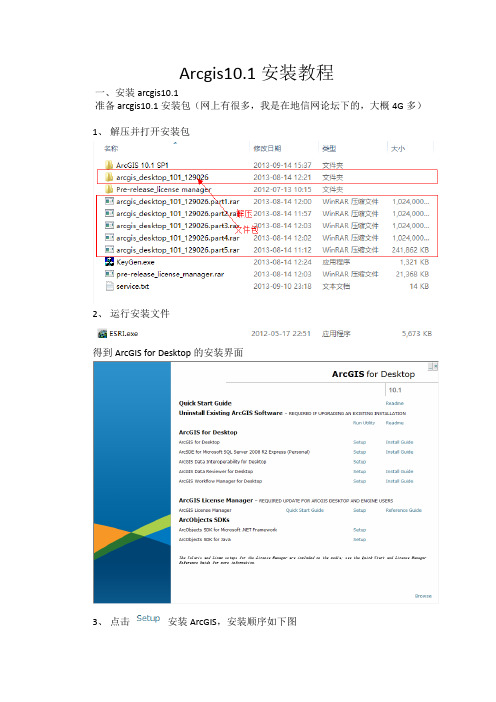
准备 arcgis10.1安装包(网上有很多,我是在地信网论坛下的,大概4G多)1、解压并打开安装包
2、运行安装文件
得到ArcGIS for Desktop的安装界面
3、点击安装ArcGIS,安装顺序如下图
运行
可以修改C盘为其他磁,点击Browse后修改
我改为E盘
等几分钟,
完成第一步安装
完成后会弹出窗口
点OK就可以了。
4、安装Arcgis license manager (1)
(2)运行安装程序
NEXT、
点击Finish,弹出
1、点击Stop(有的电脑可能是中文“停止”)
2、点击OK(有的电脑可能是中文“确定”)5、更改license
(1)运行注册机,
(2)操作注册机
(3)全部复制得到新的,替换
下的
(4)更改server.txt
(5)查找主机计算机名称
右击,选择“属性”
(6)更改后的server.txt
(7)启动Arcgis License Server Administrator
6、编辑ArcGIS Administrator
(1)打开开始菜单中的ArcGIS Administrator
(2)确定再确定就可以了。
安装完成后要重新启动电脑,程序才能正确运行。
程序运行界面如下:
二、安装ArcGIS 10.1 SP1程序并汉化
下载文件
/support/downloads/other_/Install101_SP1_Chinese_OSC.htm
把该装的装上就可以了。
arcgis desktop 10安装及破解(图文详细)
安装ArcGIS许可管理器( License manager)按照提示,一路下一步,安装成功,如下图:安装ArcGIS Desktop 10.01、插入安装盘,运行。
如下图:如果安装过旧版本,首先要检测冲突,卸载历史版本,否则安装会失败。
2、接下来点击ArcGIS Desktop包括简体中文语言增补包安装。
如下图:按照提示一路下一步,开始正式安装,如下图:3、十几分钟后安装成功,如下图:至此,ArcGIS Desktop 10.0的安装过程结束。
破解ArcGIS Desktop 10.01、安装完成后,弹出ArcGIS管理器向导,这里进行注册破解。
如下图:(如果没有弹出,从开始》》有程序》》ArcGIS》》ArcGIS Administrator进入)2、选择ArcInfo(浮动使用),许可管理器修改为localhost,如下图:3、将以下内容另存为service.txt, 将第一行的machine 改为自己的机器名。
将service.txt 存放至安装目录下。
如C:\Program Files\ArcGIS\License10.0\bin SERVER machine ANY 27000VENDOR ARCGISFEATURE 3DEngine ARCGIS 10.0 01-jan-0000 2048 9D6C8E61F7F3A3C4DA77 \vendor_info=J21LEYJLPR7TZYZB1185 ck=99FEATURE 3DEngineFX ARCGIS 10.0 01-jan-0000 20481D1C4ED1F71B5DA19EC8 \vendor_info=88ZCFAJANHT4ELNMK056 ck=143FEATURE Aeronautical ARCGIS 10.0 01-jan-0000 20480D2C5EF1ACD28D25CFFA \vendor_info=75YCHDHLPHHP7GZ3P221 ck=149FEATURE AeronauticalFX ARCGIS 10.0 01-jan-0000 2048AD7CFE01CF1CDA623B5B \vendor_info=TXH0FCS8LC804G0JD143 ck=130FEATURE AGSData ARCGIS 10.0 01-jan-0000 2048 BD9CAE8196422749791E \ vendor_info=PZ2SG5ZTSXBBFP6X8074 ck=14FEATURE AGSDataFX ARCGIS 10.0 01-jan-0000 20481DFCDE81D4A7DC79EFD6 \vendor_info=88E6F0ETDHD0BJ0NS204 ck=187FEATURE AllEurope ARCGIS 10.0 01-jan-0000 2048 1DFCCE51CCB6CC5FF8EF \vendor_info=88E6DHMEXRK5G0L70110 ck=195FEATURE AllEuropeFX ARCGIS 10.0 01-jan-0000 2048ED8C4EA11A41BC1BA0CE \vendor_info=Y8AYD2CL9RHH0M4JP183 ck=99FEATURE ARC/INFO ARCGIS 10.0 01-jan-0000 2048 9D9C4EC11030F9642D41 \vendor_info=J25EZP8S0GDE60G1C065 ck=68FEATURE ArcEditor ARCGIS 10.0 01-jan-0000 2048 ED2CEE812D64F04099DC \vendor_info=Y81FA5ZTER4XJ0PES207 ck=105FEATURE ArcExpress ARCGIS 10.0 01-jan-0000 20480DAC4E81D159818AEAF1 \vendor_info=75LN4PPK5HJR6MJFJ058 ck=94FEATURE ArcInfo ARCGIS 10.0 01-jan-0000 2048 BD2CAEB19E3A2F508727 \ vendor_info=PZR5PBL6XS0C0N5B6118 ck=171FEATURE ArcInfoFX ARCGIS 10.0 01-jan-0000 2048 2D0CCE91326DAA66B3AB \vendor_info=9J63ATPPFEA4GR9J8242 ck=110FEATURE ArcMapServer ARCGIS 10.0 01-jan-0000 20489D3C1ED1C49D3A54D871 \vendor_info=J2HCA0F05P94EEBXJ074 ck=20FEATURE ArcMapServerFX ARCGIS 10.0 01-jan-0000 2048ADAC3E01F363AB2140A2 \vendor_info=TXBESGHBYPYA5PC3N189 ck=30FEATURE ArcPress ARCGIS 10.0 01-jan-0000 2048 CDECAED1F506B88AED8D \vendor_info=H2LX0FEEMGK6BTJLD040 ck=110FEATURE ArcPressFX ARCGIS 10.0 01-jan-0000 2048CD1C3EE1E518285B534E \vendor_info=H2T570H3D291F1TGH254 ck=55FEATURE ArcReader ARCGIS 10.0 01-jan-0000 2048 0D9CBE710E5695C37E6E \vendor_info=758Y1G82MC96F90LD184 ck=78FEATURE ArcScan ARCGIS 10.0 01-jan-0000 2048 AD4CCE11AB512F237946 \vendor_info=TXR80L5TS05RS5H8H237 ck=51FEATURE ArcScanFX ARCGIS 10.0 01-jan-0000 20480DDCBE511F6287CA9064 \vendor_info=75PX2080M0EC891BA057 ck=50FEATURE ArcSdeConnects ARCGIS 10.0 01-jan-0000 20487D4C5E2122875CF56749 \vendor_info=GXR8EAE06238CRG79107 ck=24FEATURE ArcSdeServer ARCGIS 10.0 01-jan-0000 20485D7C5EC12AB26F9F8099 \vendor_info=DRJCHDRA0XN0EXB79253 ck=40FEATURE ArcSdl ARCGIS 10.0 01-jan-0000 2048 9DBCEE4154737A288260 \ vendor_info=J2JNX06HPPYRS4LKK029 ck=17FEATURE ArcServer ARCGIS 10.0 01-jan-0000 20481D0CBE11D193ABBDD7AA \vendor_info=88Y8Z02PPCJLML9K4191 ck=118FEATURE ArcStorm ARCGIS 10.0 01-jan-0000 2048 BD9C9EB12ACFBEB1EB63 \vendor_info=PZ2S48K2FRK0F8XJJ012 ck=92FEATURE ArcStormEnable ARCGIS 10.0 01-jan-0000 20483D4C6E316E91D1654C44 \vendor_info=BLFE20MB6CPKEL5J6006 ck=53FEATURE ArcView ARCGIS 10.0 01-jan-0000 2048 BD9CCE61BE6D2F4FA90B \ vendor_info=PZ2SKC3T9EHN8TK90192 ck=139FEATURE ArcView3 ARCGIS 10.0 01-jan-0000 2048 ADBC8EF1F28B9DC18F96 \ vendor_info=TXDH42L7EY6Z4X4JE221 ck=174FEATURE ArcView31 ARCGIS 10.0 01-jan-0000 2048 FDCC4EB18017443D6297 \vendor_info=0JZ4J9LZYXM1BG15P001 ck=110FEATURE ArcView4 ARCGIS 10.0 01-jan-0000 2048 AD3C9E21F78E9DC68C91 \vendor_info=TXJ5HK5THEFCPHBE2174 ck=145FEATURE Austria ARCGIS 10.0 01-jan-0000 2048 BD5C4E4184E82F449442 \ vendor_info=PZHF0D1TS6P2TL9GD198 ck=63FEATURE AustriaFX ARCGIS 10.0 01-jan-0000 2048 DDFC9E712E6295929190 \vendor_info=X5S3TPNH50HRRMRSH073 ck=76FEATURE AV3D1 ARCGIS 10.0 01-jan-0000 2048 9D4C0EE148A4F7897581 \ vendor_info=J2YFC0H3EGM1EZTBT118 ck=96FEATURE AVArcPress1 ARCGIS 10.0 01-jan-0000 20480DACAE91491BD8F4BB28 \vendor_info=75LNJ410R45JZHS4G195 ck=82FEATURE Avenue ARCGIS 10.0 01-jan-0000 2048 BD6CBEF14C607ED9A8AC \ vendor_info=PZY08YH2PL060MC76020 ck=140FEATURE AVIMAGE1 ARCGIS 10.0 01-jan-0000 2048BD3C7EA124BC9BB1C861 \vendor_info=PZT8HHR7E44FXC69R255 ck=96FEATURE AVIMS1 ARCGIS 10.0 01-jan-0000 2048 6D5CDE419E617EC1ABDA \ vendor_info=FPJ82PH51T79LEF7F133 ck=76FEATURE AVIMSGIF ARCGIS 10.0 01-jan-0000 2048 EDDC8ED127399988415E \vendor_info=Y8S0LN3LAGGHE0AJF255 ck=27FEATURE AVLAND1 ARCGIS 10.0 01-jan-0000 2048 ADCCBE819A842F4FBD2B \vendor_info=TXFKL4ZHX0PXK6HKF094 ck=177FEATURE AVNetwork1 ARCGIS 10.0 01-jan-0000 2048ED8C4E21501543558AE5 \vendor_info=Y8AYD2L5TC9H6N6E0208 ck=33FEATURE AVNetwork2 ARCGIS 10.0 01-jan-0000 2048ED7C4E21511641568AE5 \vendor_info=Y88EZPF3X0KAA08D0022 ck=3FEATURE AVSpatial1 ARCGIS 10.0 01-jan-0000 2048 1D6C0EF12C04037799E6 \vendor_info=887SPDHLPC7JPYMHC167 ck=4FEATURE AVSpatial2 ARCGIS 10.0 01-jan-0000 2048 FD1C4EB151********E6 \vendor_info=0J76LGS700P0LJKH8153 ck=5FEATURE AVSurface1 ARCGIS 10.0 01-jan-0000 2048EDDC3E31D21937557744 \vendor_info=Y8S0G5JCYJF5CKLES104 ck=54FEATURE AVSurface2 ARCGIS 10.0 01-jan-0000 2048CD8C4EF1F73E255E7744 \vendor_info=H24SERAZF7L8MP1LN208 ck=56FEATURE AVTRACK1 ARCGIS 10.0 01-jan-0000 2048ADFC0E811CC2093CC5F9 \vendor_info=TXJT4NHCYJ5N6MPFJ011 ck=97FEATURE AVVRP1 ARCGIS 10.0 01-jan-0000 2048 5D1CEE419F6C86BE97D9 \ vendor_info=DRHSNB0TCEREXKNYY180 ck=91FEATURE BaseBISData ARCGIS 10.0 01-jan-0000 20481D3CFE315FA2F0CC4566 \vendor_info=8820FCX08EHPEXH2K131 ck=112FEATURE BaseBISDataFX ARCGIS 10.0 01-jan-0000 2048ED8CCE21AD2569775A80 \vendor_info=Y8AY2J3L3JB644C0D199 ck=46FEATURE Belgium ARCGIS 10.0 01-jan-0000 2048 CD1CCE318E404E407F23 \ vendor_info=H2T5X05HECJ12JYKP001 ck=46FEATURE BelgiumFX ARCGIS 10.0 01-jan-0000 2048 3D3C9ED1F376AE6008F9 \vendor_info=BLDS46M7J6LLTP60Z027 ck=85FEATURE BingMaps ARCGIS 10.0 01-jan-0000 2048 BD7C9E61DA0494A5CC92 \vendor_info=PZZLX1TPP6ZH3T0JP042 ck=121FEATURE BingMapsEng ARCGIS 10.0 01-jan-0000 2048CD3C5E0194010BBC2B5A \vendor_info=H2HCHDEEFP0EE1N6K048 ck=89FEATURE BingMapsEngFX ARCGIS 10.0 01-jan-0000 20480D0CCED15224804F6EF4 \vendor_info=75E5X0YK5TE0XHSGE071 ck=45FEATURE BingMapsFX ARCGIS 10.0 01-jan-0000 20480D2C4EF1160A44B27CB1 \vendor_info=75YCFATHLGJSP9KY9137 ck=40FEATURE Business ARCGIS 10.0 01-jan-0000 2048 BDDCBE4100CEC17C9F89 \ vendor_info=PZJJEBZP9TFYGYMBE078 ck=62FEATURE BusinessFX ARCGIS 10.0 01-jan-0000 20480D8C2E1124F8336175DC \vendor_info=757EEL7TH0B0CZR04026 ck=246FEATURE BusinessPrem ARCGIS 10.0 01-jan-0000 20486D7C6EB121CE8E7DB0B8 \vendor_info=FPTFMKHEM62J3MZK0149 ck=68FEATURE BusinessPremFX ARCGIS 10.0 01-jan-0000 20488D8C0E810650DD2A5273 \vendor_info=HZ1LMA53LJRFXEH7X211 ck=217FEATURE COGO ARCGIS 10.0 01-jan-0000 2048 4DDCDEF1A29249108689 \ vendor_info=CL7EL4LB7N2YYP000043 ck=11FEATURE COGOFX ARCGIS 10.0 01-jan-0000 2048 CDECCEC13320782D6A6E \ vendor_info=H2LX3M00MFEPGNGYE177 ck=43FEATURE Coverages ARCGIS 10.0 01-jan-0000 2048DD1CAEF1245AB07B86B9 \vendor_info=X5H8XFYN3P1JGCRRR216 ck=89FEATURE DataReViewer ARCGIS 10.0 01-jan-0000 20483D2C4EB13ECC4D4D9D10 \vendor_info=BLCCENZE441GJXA5D168 ck=144FEATURE DataReViewerFX ARCGIS 10.0 01-jan-0000 20486D3CFE810D4A9A622161 \vendor_info=FPN2ZPL0Z9HEHL4CX088 ck=4FEATURE DB2 ARCGIS 10.0 01-jan-0000 2048 DDCC9EB1ECB64BEC3014 \ vendor_info=X5LTJJEBXEL9LX2ZL045 ck=75FEATURE Defense ARCGIS 10.0 01-jan-0000 2048 BDCCAE919548304E8A1A \ vendor_info=PZ0NJ4100GEFFK63T025 ck=151FEATURE DefenseFX ARCGIS 10.0 01-jan-0000 2048 2D2CBEB1F075C94FEE08 \vendor_info=9J99FH8PY0JLPF655159 ck=82FEATURE DefenseINTL ARCGIS 10.0 01-jan-0000 20480D7CFE1119E5AF887528 \vendor_info=755SLN5M4HF0LEK1P143 ck=116FEATURE DefenseINTLEng ARCGIS 10.0 01-jan-0000 20485DFCBEA13583CFC36473 \vendor_info=DRDNS80HMSHY04NPC206 ck=77FEATURE DefenseINTLEngFX ARCGIS 10.0 01-jan-0000 20482DCC2E21BEFF50B01B52 \vendor_info=9JZ4G2L5020TK6GJ4250 ck=61FEATURE DefenseINTLFX ARCGIS 10.0 01-jan-0000 20489D4CCE4131B8C27F787C \vendor_info=J2YF7YL8TA7EGFPGF242 ck=99FEATURE DefenseUS ARCGIS 10.0 01-jan-0000 20480D6CCEF1068BD057EAF9 \vendor_info=754LG9SEYT6TCL8A4061 ck=125FEATURE DefenseUSEng ARCGIS 10.0 01-jan-0000 20483D0CBEC157ADD72BD155 \vendor_info=BL96CT7PZ26HL2901010 ck=72FEATURE DefenseUSEngFX ARCGIS 10.0 01-jan-0000 20488D5CAEB11085C4C87578 \vendor_info=HZHF4LYGT6GGMX89P174 ck=33FEATURE DefenseUSFX ARCGIS 10.0 01-jan-0000 20481D1C0E4128E2F6AB7CC2 \vendor_info=88ZC9HKBZ65X0HYHC165 ck=85FEATURE Denmark ARCGIS 10.0 01-jan-0000 2048 BD2C9E9197323041711C \ vendor_info=PZR5HKH0ZAL7L8L9Z209 ck=203FEATURE DenmarkFX ARCGIS 10.0 01-jan-0000 20482D4CAEA1F28ECE441406 \vendor_info=9JCSHY8L3N3X87E1M041 ck=66FEATURE Designer ARCGIS 10.0 01-jan-0000 2048 AD7C9EA109DE98A8B680 \ vendor_info=TXH0PY8LPP3LB4DSK042 ck=26FEATURE DesignerFX ARCGIS 10.0 01-jan-0000 2048FD6C4E7135124C47980D \vendor_info=0JFZ2HPLBG9P0EAF7048 ck=27FEATURE DMTIData ARCGIS 10.0 01-jan-0000 2048 CDAC7EC141CFA5C8EC1F \vendor_info=H20K62GHLK5T6HFHK119 ck=119FEATURE DMTIDataFX ARCGIS 10.0 01-jan-0000 20481D7C2E91FD0F43AB98AE \vendor_info=888EELKLPFEEEMGKF181 ck=105FEATURE Editor ARCGIS 10.0 01-jan-0000 2048 AD1CEE514F64762E745F \vendor_info=TXNZP083E6JDPL3R1105 ck=86FEATURE EditorFX ARCGIS 10.0 01-jan-0000 2048 ED3C9E21E58287A37F9B \ vendor_info=Y820PYJ7C4L0TR5MX171 ck=87FEATURE Foundation ARCGIS 10.0 01-jan-0000 2048FD9C6E012C0E86938092 \vendor_info=0JK8FDEE2HBZT02Z1109 ck=22FEATURE FoundationFX ARCGIS 10.0 01-jan-0000 20483DFC4E214DF13B5CD2FE \vendor_info=BL7HXN7PEE1A5ZLNS199 ck=137FEATURE France ARCGIS 10.0 01-jan-0000 2048 ADCCCE215B51752C975E \ vendor_info=TXFKJ8SE72RHC0RF4104 ck=42FEATURE FranceFX ARCGIS 10.0 01-jan-0000 2048 AD7C9E31DE0787AFC998 \vendor_info=TXH0PYKBEZZNE7JC4096 ck=53FEATURE GDBEdit ARCGIS 10.0 01-jan-0000 2048 CD3CAE817055351EA26D \ vendor_info=H2HC00EEHNPKMARZ4073 ck=49FEATURE GDBEditFX ARCGIS 10.0 01-jan-0000 2048ED2CDEA12C54F4AC9A70 \vendor_info=Y81F82CLBZPKH2LHX180 ck=126FEATURE GeoStats ARCGIS 10.0 01-jan-0000 2048 BD1CAEF111F5C7A5EC76 \ vendor_info=PZJ2R8RGT8B2EJP5Z200 ck=101FEATURE GeoStatsFX ARCGIS 10.0 01-jan-0000 2048FD6C2E01A3FF11525A7D \vendor_info=0JFZZP6P4HLM0TBG0109 ck=1FEATURE Germany ARCGIS 10.0 01-jan-0000 2048 BD6CDE21A0415******* \vendor_info=PZY0C5L8KTHGEAD3B236 ck=30FEATURE GermanyFX ARCGIS 10.0 01-jan-0000 20480D9CEE61E2AFEC56F0F8 \vendor_info=758Y6JHAXP9YFBJKZ096 ck=124FEATURE Grid ARCGIS 10.0 01-jan-0000 2048 FD1CDEA1F5B0112D8589 \ vendor_info=0J76F0APYRE437GYB000 ck=53FEATURE GridFX ARCGIS 10.0 01-jan-0000 2048 BD4CCE714C648400916E \ vendor_info=PZEC4PMF30SLEHPEX023 ck=92FEATURE ImageExt ARCGIS 10.0 01-jan-0000 2048 CD2C8EC13DE1A2D1ED24 \vendor_info=H2E80KYHSEGXZHX5R238 ck=117FEATURE ImageExtFX ARCGIS 10.0 01-jan-0000 2048FDBC6E111D0D6E9C73A3 \vendor_info=0JY1JCPBT55H2C6J8186 ck=11FEATURE Informix ARCGIS 10.0 01-jan-0000 2048 CD2C7E0112818ADA954A \ vendor_info=H2E8HHY04Y0RJ4NZX008 ck=18FEATURE IntelAgency ARCGIS 10.0 01-jan-0000 2048FD3CFE812DFB8AEA5EC5 \vendor_info=0JACPD877XZGX6ABS045 ck=161FEATURE IntelAgencyFX ARCGIS 10.0 01-jan-0000 20489D0C0E712D2A97697B99 \vendor_info=J2R2ZMFBZPEZLYHZC169 ck=49FEATURE Internal ARCGIS 10.0 01-jan-0000 2048 FD5C6E51DD9B72B0B78B \ vendor_info=0JDE20P031E5GX2J7116 ck=109FEATURE Interop ARCGIS 10.0 01-jan-0000 2048 CD5CCEC16C4957528E35 \ vendor_info=H2Z0A2GEJLEHNEF9S143 ck=54FEATURE InteropEngine ARCGIS 10.0 01-jan-0000 20487DAC5E012BD04D6A7D9F \vendor_info=GXBEEN303CB879ZZJ033 ck=106FEATURE InteropEngineFX ARCGIS 10.0 01-jan-0000 20481D0C6EC1895029FDE03B \vendor_info=88Y8FDRAP4JA2PLFD213 ck=34FEATURE InteropFX ARCGIS 10.0 01-jan-0000 2048 DDCCBE211E66D080A0A0 \vendor_info=X5LTYFZL70H0R6ENE208 ck=102FEATURE Italy ARCGIS 10.0 01-jan-0000 2048 FD2CFEC11AF617450DA9 \ vendor_info=0J99MAL7CPNGT7PRR171 ck=129FEATURE ItalyFX ARCGIS 10.0 01-jan-0000 2048 8D8CEE21926057307A59 \ vendor_info=HZ1LKGZ0GBLAM78ML027 ck=14FEATURE JTX ARCGIS 10.0 01-jan-0000 2048 0D6C9EB1BC06E5A6AAF0 \ vendor_info=754L04HZ7EDZKT18P201 ck=72FEATURE JTXFX ARCGIS 10.0 01-jan-0000 2048 ED7CFEE11EDB462DFDA6 \ vendor_info=Y88ESR8SE8T0EYK00081 ck=80FEATURE Luxembourg ARCGIS 10.0 01-jan-0000 20484DFC7E515D83F8DA3BAD \vendor_info=CLAK62JG9574XTLYN030 ck=158FEATURE LuxembourgFX ARCGIS 10.0 01-jan-0000 20485DBCFEF1BC5A954D55FF \vendor_info=DR7BL8REERXEE0K60050 ck=152FEATURE MajorRdEurope ARCGIS 10.0 01-jan-0000 2048BD6C4E610F46A510ED71 \vendor_info=PZY0MH83LMRM0TB2H150 ck=22FEATURE MajorRdEuropeFX ARCGIS 10.0 01-jan-0000 20482D0CFE8141D82145DC33 \vendor_info=9J63F3YHLL7A302YK177 ck=253FEATURE Maplex ARCGIS 10.0 01-jan-0000 2048 CDACCE01561B7E146E5F \ vendor_info=H20KJ8L6Z54C8EH4T171 ck=137FEATURE MaplexEngine ARCGIS 10.0 01-jan-0000 2048ED5C7E31868B9055ED83 \vendor_info=Y85LXYKBLXF6H1E4H105 ck=66FEATURE MaplexEngineFX ARCGIS 10.0 01-jan-0000 2048EDAC9EC1BB67BF4A63E8 \vendor_info=Y8LJGGPBSHJKP1H73047 ck=154FEATURE MaplexFX ARCGIS 10.0 01-jan-0000 2048 9DBCCE31B22B7C827AC5 \vendor_info=J2JNTBXL2P00JG81Y130 ck=86FEATURE MappingAgency ARCGIS 10.0 01-jan-0000 2048AD4CFE613A746EEE387E \vendor_info=TXR852S04EMH5HX3N224 ck=75FEATURE MappingAgencyFX ARCGIS 10.0 01-jan-0000 20487DACAEE112863E7B8D6E \vendor_info=GXBEGPBHJEEJFET0E153 ck=99FEATURE MPSAtlas ARCGIS 10.0 01-jan-0000 2048 9DBCDEF1A4299A585CDF \vendor_info=J2JNEFYLK384EFPT9218 ck=183FEATURE MPSAtlasFX ARCGIS 10.0 01-jan-0000 20485DEC6E216269162F4032 \vendor_info=DRBK4YH1HRYLX1LTJ099 ck=199FEATURE MrSID ARCGIS 10.0 01-jan-0000 2048 FD6C0ED1FBE74B31FFB6 \ vendor_info=0JFZE0Y0J87YJRH1P076 ck=141FEATURE MrSIDFX ARCGIS 10.0 01-jan-0000 2048 9DCC8EF1815523448C40 \ vendor_info=J2LJECE0HLGC6D650068 ck=37FEATURE Nautical ARCGIS 10.0 01-jan-0000 2048 ADAC0EA1A405785811F6 \ vendor_info=TXBEN5GR7YP5CT1D4218 ck=90FEATURE NauticalFX ARCGIS 10.0 01-jan-0000 2048 3D9C8E118ED3F0F18D91 \vendor_info=BLNCML7TS44LH5E7B020 ck=60FEATURE Netherlands ARCGIS 10.0 01-jan-0000 20481D4C9E719695D8693D52 \vendor_info=884LX1ETCK68F1P4H128 ck=4FEATURE NetherlandsFX ARCGIS 10.0 01-jan-0000 2048AD1CFE214C9451F05A88 \vendor_info=TXNZEL7H5T55HE7TT140 ck=55FEATURE Network ARCGIS 10.0 01-jan-0000 2048 CDACCEF1935A327D93FA \ vendor_info=H20KJ8REEZ5L0H06P191 ck=149FEATURE NetworkEngine ARCGIS 10.0 01-jan-0000 2048CDAC0E41334E632E153B \vendor_info=H20KPCZM8S3P9MFZL079 ck=93FEATURE NetworkEngineFX ARCGIS 10.0 01-jan-0000 20484D4CDEC1155E635F42A3 \vendor_info=CL0ZSFTDPCJFEBSSE053 ck=231FEATURE NetworkFX ARCGIS 10.0 01-jan-0000 20480D8C0EA19CF6802C7638 \vendor_info=757ESHR7SNJHELARL167 ck=75FEATURE Plotting ARCGIS 10.0 01-jan-0000 2048 CD8CDE216C01486B1E06 \ vendor_info=H24SLGZ0ATS4G1AXH099 ck=6FEATURE Portugal ARCGIS 10.0 01-jan-0000 2048 CD6CDE5154FA66571719 \ vendor_info=H21LF9XMC1DABLKZJ097 ck=32FEATURE PortugalFX ARCGIS 10.0 01-jan-0000 2048 4DDC6E216E5EF6542320 \vendor_info=CL7EXRATMGM51TPJ2123 ck=60FEATURE Publisher ARCGIS 10.0 01-jan-0000 2048 1D0C1E8103F8882675D2 \ vendor_info=88Y87HRPA4H17E7ZZ209 ck=67FEATURE PublisherFX ARCGIS 10.0 01-jan-0000 20482D3C6EF1158388364337 \vendor_info=9JACYPD0MLTTTTRLA167 ck=4FEATURE Reader ARCGIS 10.0 01-jan-0000 2048 BDCCEE61514C9908836D \ vendor_info=PZ0NX0A3XHP86D602116 ck=88FEATURE ReaderFX ARCGIS 10.0 01-jan-0000 2048 9DECDE41C0376E8178C6 \vendor_info=J2LX5PD3MEYY1JLG8174 ck=116FEATURE ReaderPro ARCGIS 10.0 01-jan-0000 2048 1DFCDE41F6A561876D9D \vendor_info=88E6F0LE3DDH7JC8X089 ck=78FEATURE ReaderProFX ARCGIS 10.0 01-jan-0000 20486D8C4EF17E2EA76F0F32 \vendor_info=FPE0MH0L927PH1P8S254 ck=126FEATURE SchematicEngine ARCGIS 10.0 01-jan-0000 20485DEC2E11239A8C7E5C56 \vendor_info=DRBKXK103L5T9L1J9012 ck=112FEATURE SchematicEngineFX ARCGIS 10.0 01-jan-0000 20481D6C3E91EE4FB909BCDE \vendor_info=887SPLKLSDMANEHPL070 ck=105FEATURE Schematics ARCGIS 10.0 01-jan-0000 20485DAC9EC1D473FD4C3DED \vendor_info=DR57EP8PAA9AZP9GR230 ck=164FEATURE SchematicsFX ARCGIS 10.0 01-jan-0000 2048AD4C6EA19DFE7ECD7B59 \vendor_info=TXR8FDL3LLJA1AHP8037 ck=174FEATURE SchematicsSDK ARCGIS 10.0 01-jan-0000 20485D3C0E71D83ED8A4ADCD \vendor_info=DRKZE0B7S2C12P4SL016 ck=90FEATURE SchematicsSDKFX ARCGIS 10.0 01-jan-0000 2048DD7CDEB1389A109FEA6B \vendor_info=X55SLGS6H1J8NPLSH170 ck=81FEATURE SdePersonal ARCGIS 10.0 01-jan-0000 20484D3C5EA18B589F5B0D45 \vendor_info=CLHE0H7L1EXYJH01J202 ck=14FEATURE SdeStandard ARCGIS 10.0 01-jan-0000 20481DDCFEB1F3D58FF657E6 \vendor_info=88S0C0CT2REH8S8PM244 ck=196FEATURE SdeWorkGroup ARCGIS 10.0 01-jan-0000 20485D0C2EB1738A3E1DF879 \vendor_info=DRFCSGS74CE6M8J52131 ck=50FEATURE Spain ARCGIS 10.0 01-jan-0000 2048 EDAC0E516DE32D2BEF60 \ vendor_info=Y8LJ1K8HJJF0JYL4L062 ck=66FEATURE SpainFX ARCGIS 10.0 01-jan-0000 2048 BD0CAE71C31D21626CFE \ vendor_info=PZLZN4YH0KM15BSGJ111 ck=142FEATURE SpatialEngine ARCGIS 10.0 01-jan-0000 20484DBCDE6110773674D62E \vendor_info=CL47EXLH3PJJPEX9P103 ck=38FEATURE SpatialEngineFX ARCGIS 10.0 01-jan-0000 2048ED7CDE61F8E736994786 \vendor_info=Y88ELKA1JYYZTKP11125 ck=58FEATURE StandardEngine ARCGIS 10.0 01-jan-0000 2048FD3C2E614D2CC13A9F5C \vendor_info=0JACSG7ZJMAT9P5KG030 ck=74FEATURE StandardEngineFX ARCGIS 10.0 01-jan-0000 2048CD5C1EA160BC700B0AC6 \vendor_info=H2Z0H6HHA1R3GTE7Z202 ck=52FEATURE StreetMap ARCGIS 10.0 01-jan-0000 20483DDCCE91E8D2512D7CCE \vendor_info=BL4BGXPSFJZ00H8LR231 ck=124FEATURE StreetMapBA ARCGIS 10.0 01-jan-0000 20483DAC0E3184B73F206E9B \vendor_info=BLZ19L800KK7M1EXZ197 ck=37FEATURE StreetMapFX ARCGIS 10.0 01-jan-0000 20483DEC6EE180B3BB136E9B \vendor_info=BL5EXR8SRPATCNYGA200 ck=136FEATURE Survey ARCGIS 10.0 01-jan-0000 2048 9DDC7EE15BFB98438634 \ vendor_info=J2MTGCPE863MZXNDR169 ck=50FEATURE SurveyFX ARCGIS 10.0 01-jan-0000 2048 AD4C6EC1B1CFFCF81C6E \vendor_info=TXR8FDRAFRP6RJGP3128 ck=158FEATURE SvrAdvanced ARCGIS 10.0 01-jan-0000 20484D0C6E217A95971750B3 \vendor_info=CLC9EJAESLKPEEN08192 ck=18FEATURE SvrAdvancedFX ARCGIS 10.0 01-jan-0000 2048CD9CEE7186642A4A1DDB \vendor_info=H25EJNG87HRCB1LFN104 ck=60FEATURE SvrEnterprise ARCGIS 10.0 01-jan-0000 20481DCC7EC1890B4B4976AC \vendor_info=88RXJGPBAHT8RASS3196 ck=82FEATURE SvrEnterpriseFX ARCGIS 10.0 01-jan-0000 20486D2C3EC1C7ED535CDB50 \vendor_info=FPLZ0T7PSKXEH6BTD064 ck=40FEATURE SvrStandard ARCGIS 10.0 01-jan-0000 20481DBC1E81E7C2A90141E9 \vendor_info=88PT6RLG382P1TKXF103 ck=62FEATURE SvrStandardFX ARCGIS 10.0 01-jan-0000 2048CD0CBEF17755A8E824C5 \vendor_info=H2R2SBEK9ATNT5G76160 ck=53FEATURE Sweden ARCGIS 10.0 01-jan-0000 2048 AD6CEE11646F94019869 \ vendor_info=TXEFA5M5EN3EL84AD069 ck=10FEATURE SwedenFX ARCGIS 10.0 01-jan-0000 2048BDDCEEC19058764D8406 \vendor_info=PZJJ0M00ZXXZX6HFN126 ck=88FEATURE Switzerland ARCGIS 10.0 01-jan-0000 20481D1C3E8106D8582C5B1E \vendor_info=88ZCE610KME0GJCSK102 ck=36FEATURE SwitzerlandFX ARCGIS 10.0 01-jan-0000 2048ADACDEF1887B3F2B2EF4 \vendor_info=TXBEL4LBL1LA8P2LF235 ck=103FEATURE Sybase ARCGIS 10.0 01-jan-0000 2048 BDCCDE717160881BAD52 \ vendor_info=PZ0NEF83040K0B8TE199 ck=58FEATURE TIFFLZW ARCGIS 10.0 01-jan-0000 2048 DD8CAE81981948356707 \ vendor_info=X57EK93HH6HRBJFJP171 ck=61FEATURE TIFFLZWFX ARCGIS 10.0 01-jan-0000 20482DDCFEF1C7EC8143B710 \vendor_info=9J17H4LBC4HX0PPAZ202 ck=90FEATURE TIN ARCGIS 10.0 01-jan-0000 2048 ED1CCEF1D721EBB5A0F4 \ vendor_info=Y8ZC4PEZKLL4R6GJY163 ck=89FEATURE TINFX ARCGIS 10.0 01-jan-0000 2048 0DEC1EE1EDF23C20F3C6 \ vendor_info=75R0CYG0MLL9DNPBB103 ck=100FEATURE Tracking ARCGIS 10.0 01-jan-0000 2048 9D5CDEB17353595E4910 \ vendor_info=J2Z0C5HESEXFHX17S234 ck=33FEATURE TrackingEngine ARCGIS 10.0 01-jan-0000 20481D7C1EA10FEECA348F95 \vendor_info=888EPKEAEZ5N1J697230 ck=94FEATURE TrackingEngineFX ARCGIS 10.0 01-jan-0000 20484D5CEEC1A9306693F9CC \vendor_info=CLK2XL0KTE0GRD8DF134 ck=76FEATURE TrackingFX ARCGIS 10.0 01-jan-0000 20485D4C6EA18169DFE73DA1 \vendor_info=DRL296HHEAFKXDG54105 ck=67FEATURE UnitedKingdom ARCGIS 10.0 01-jan-0000 20485D0C4E21CC369C1692CE \vendor_info=DRFCEN7RB0HJRR3L2060 ck=27FEATURE UnitedKingdomFX ARCGIS 10.0 01-jan-0000 2048FD6C0E213C7C7897D71A \vendor_info=0JFZE03PE82ZLH278179 ck=47FEATURE VBA ARCGIS 10.0 01-jan-0000 2048 DDCCCE21D21CE1AB9600 \ vendor_info=X5LT003PA6RARFM03083 ck=74FEATURE VBAFX ARCGIS 10.0 01-jan-0000 2048 0D5CBE51ECF9D21AF1CE \ vendor_info=752LC2JF0NEJE0ELC018 ck=123FEATURE Vector ARCGIS 10.0 01-jan-0000 2048 AD2CFE017F5891466503 \ vendor_info=TXL2ZPARH9MLL2ZPE219 ck=246FEATURE VectorFX ARCGIS 10.0 01-jan-0000 2048 8D0CEE2196D76C85FCFE \ vendor_info=HZLZP03TCKSJ5JK0J071 ck=73FEATURE Viewer ARCGIS 10.0 01-jan-0000 2048 BD5C6EF1694D055C6C0D \ vendor_info=PZHFMK3SBGZLMEH8B139 ck=74FEATURE ViewerFX ARCGIS 10.0 01-jan-0000 2048 CD2CCE319CE4608741D9 \vendor_info=H2E80L80KGG2LXEJZ219 ck=26FEATURE VirtualEarthEng ARCGIS 10.0 01-jan-0000 20487DBC3ED1D034882394A5 \vendor_info=GXDHEKZH2PG6A74EH095 ck=36FEATURE VirtualEarthEngFX ARCGIS 10.0 01-jan-0000 20482DFC4E01779F51E1884F \vendor_info=9J4EPKZF870XLPH2X249 ck=543dengine,100,ecp.arcgis.engine,none,KGE784S1MGRMMBKYZ1613dserver,100,ecp.arcgis.engine,none,VPH4ENBJ3Y831R1DF089 arcgisserver,100,ecp.arcgis.engine,none,D7MFFAZ8THZTPJR67072 bingmapseng,100,ecp.arcgis.engine,none,QH1N8J6BZM7PGTJ89232 bingmapssvr,100,ecp.arcgis.engine,none,OLPF80PYJCNJJ7GPE158 businessvr,100,ecp.arcgis.engine,none,UTE4AE2CXR2XYNEBB205 defenseintleng,100,ecp.arcgis.engine,none,TRCZY4S1MGRMMBKYZ067 defenseintlsvr,100,ecp.arcgis.engine,none,LHH9HK9J5ZA46EDPN164 defenseuseng,100,ecp.arcgis.engine,none,UTF457E50KE00FH23148 defenseussvr,100,ecp.arcgis.engine,none,LHH30H4CE00LTJT46024 designer,100,ecp.arcgis.engine,none,TRBZMD18RMLSPF002054gdbedit,100,ecp.arcgis.engine,none,WEJFRRF0C6JCE3MXE079 geostatserver,100,ecp.arcgis.engine,none,UTF654S1MGRMMBKYZ201 imageextserver,100,ecp.arcgis.engine,none,HC4RTXLPE9JEE3CPR167 interopengine,100,ecp.arcgis.engine,none,MJJAFH5G1E612RZFF118 interopserver,100,ecp.arcgis.engine,none,VPF0TRFN61B75E5HJ074 jtxserver,100,ecp.arcgis.engine,none,JFB157E50KE00FH23053 maplexengine,100,ecp.arcgis.engine,none,LHH40XLPE9JEE3CPR159 networkengine,100,ecp.arcgis.engine,none,YYPMSNCN82E8AZJTR206 networkserver,100,ecp.arcgis.engine,none,PMYHHAY5RHHMF5KHT131schematicengine,100,ecp.arcgis.engine,none,YYPDCAZ8THZTPJR67200 schematicsvr,100,ecp.arcgis.engine,none,PM0L8NAF20BTKXNCD158 spatialengine,100,ecp.arcgis.engine,none,B5JA84S1MGRMMBKYZ159 spatialserver,100,ecp.arcgis.engine,none,JFBXLD18RMLSPF002237 standardengine,100,ecp.arcgis.engine,none,UTF750PYJCNJJ7GPE061 svradvanced,100,ecp.arcgis.engine,none,UTE0RNBJ3Y831R1DF145 svrenterprise,100,ecp.arcgis.engine,none,TRB6A7E50KE00FH23206 svrstandard,100,ecp.arcgis.engine,none,A3C0LPJ0A5FBAZ8LN139 trackingengine,100,ecp.arcgis.engine,none,VPF1RK8GZP4ZXNX8A052 virtualearthsvr,100,ecp.arcgis.engine,none,FA0N5C04SE0H9KB101333dengine,100,ecp.arcgis.server,none,KGE784S1MGRMMBKYZ1613dserver,100,ecp.arcgis.server,none,VPH4ENBJ3Y831R1DF089 arcgisserver,100,ecp.arcgis.server,none,D7MFFAZ8THZTPJR67072 bingmapseng,100,ecp.arcgis.server,none,QH1N8J6BZM7PGTJ89232 bingmapssvr,100,ecp.arcgis.server,none,OLPF80PYJCNJJ7GPE158 businessvr,100,ecp.arcgis.server,none,UTE4AE2CXR2XYNEBB205 defenseintleng,100,ecp.arcgis.server,none,TRCZY4S1MGRMMBKYZ067 defenseintlsvr,100,ecp.arcgis.server,none,LHH9HK9J5ZA46EDPN164 defenseuseng,100,ecp.arcgis.server,none,UTF457E50KE00FH23148 defenseussvr,100,ecp.arcgis.server,none,LHH30H4CE00LTJT46024 designer,100,ecp.arcgis.server,none,TRBZMD18RMLSPF002054gdbedit,100,ecp.arcgis.server,none,WEJFRRF0C6JCE3MXE079 geostatserver,100,ecp.arcgis.server,none,UTF654S1MGRMMBKYZ201 imageextserver,100,ecp.arcgis.server,none,HC4RTXLPE9JEE3CPR167 interopengine,100,ecp.arcgis.server,none,MJJAFH5G1E612RZFF118 interopserver,100,ecp.arcgis.server,none,VPF0TRFN61B75E5HJ074 jtxserver,100,ecp.arcgis.server,none,JFB157E50KE00FH23053 maplexengine,100,ecp.arcgis.server,none,LHH40XLPE9JEE3CPR159 networkengine,100,ecp.arcgis.server,none,YYPMSNCN82E8AZJTR206 networkserver,100,ecp.arcgis.server,none,PMYHHAY5RHHMF5KHT131 schematicengine,100,ecp.arcgis.server,none,YYPDCAZ8THZTPJR67200 schematicsvr,100,ecp.arcgis.server,none,PM0L8NAF20BTKXNCD158 spatialengine,100,ecp.arcgis.server,none,B5JA84S1MGRMMBKYZ159 spatialserver,100,ecp.arcgis.server,none,JFBXLD18RMLSPF002237 standardengine,100,ecp.arcgis.server,none,UTF750PYJCNJJ7GPE061 svradvanced,100,ecp.arcgis.server,none,UTE0RNBJ3Y831R1DF145 svrenterprise,100,ecp.arcgis.server,none,TRB6A7E50KE00FH23206 svrstandard,100,ecp.arcgis.server,none,A3C0LPJ0A5FBAZ8LN139 trackingengine,100,ecp.arcgis.server,none,VPF1RK8GZP4ZXNX8A052 virtualearthsvr,100,ecp.arcgis.server,none,FA0N5C04SE0H9KB10133 sdeworkgroup,100,ecp.arcgis.engine,05-jan-2038,RP4P0K8GZP4ZEEAHJ0984、运行:开始》》所有程序》》ArcGIS》》License Manager》》License Server Administrator5、在启动/停止许可服务目录下,按顺序分别点击停止、启动、重新读取许可3个按钮。
ArcGIS10.2.2安装步骤
ArcGIS10.2.2安装步骤ArcGIS 1022 安装步骤ArcGIS 是一款功能强大的地理信息系统软件,在众多领域都有着广泛的应用。
下面为大家详细介绍 ArcGIS 1022 的安装步骤。
一、安装前的准备工作1、检查系统要求操作系统:Windows 7/8/10(建议使用 64 位操作系统)处理器:Intel Core i3 或更高内存:4GB 或更多(对于复杂的分析和大型数据集,建议 8GB 及以上)硬盘空间:至少 10GB 的可用空间2、关闭防火墙和杀毒软件在安装过程中,防火墙和杀毒软件可能会干扰安装程序,导致安装失败或出现错误。
因此,建议在安装前暂时关闭它们。
3、下载安装文件从官方网站或可靠的来源下载 ArcGIS 1022 的安装文件。
确保下载的文件完整且未被损坏。
二、开始安装1、运行安装程序找到下载的安装文件,双击运行。
安装程序会自动解压并启动安装向导。
2、选择安装类型完整安装:安装所有的组件和功能。
自定义安装:可以根据自己的需求选择要安装的组件和功能。
对于大多数用户,建议选择完整安装,以确保能够使用到所有的功能。
3、接受许可协议仔细阅读许可协议,如果同意其中的条款,勾选“我接受许可协议”,然后点击“下一步”。
4、选择安装目录默认情况下,ArcGIS 会安装在系统盘的 Program Files 文件夹中。
您可以根据自己的需求更改安装目录,但建议不要安装在系统盘,以免影响系统性能。
5、安装过程点击“安装”按钮后,安装程序会开始复制文件并进行安装。
这个过程可能需要一些时间,请耐心等待。
在安装过程中,会显示安装进度和安装状态。
三、安装许可管理器1、安装许可管理器在安装 ArcGIS 的过程中,会提示安装许可管理器。
选择“安装”。
2、选择许可管理器类型单机版许可:如果您只在一台计算机上使用 ArcGIS,可以选择单机版许可。
网络版许可:如果有多台计算机需要使用 ArcGIS,可以选择网络版许可。
ArcGIS10.2-软件安装说明手册

ArcGIS10.2软件安装说明手册2014年7月目录1.ArcGIS 安装说明 (2)1.1.ArcGIS 安装 (2)1.1.1.进入安装状态 (2)1.1.2.ArcGIS License Manager 安装 (3)1.1.3.ArcGIS Desktop 安装 (8)1.1.4.破解 (15)1.1.5.版本汉化 (21)1.ArcGIS 安装说明1.1. ArcGIS 安装注:以下是arcgis10.2的安装步骤,与arcgis10.0的安装基本一致。
1.1.1.进入安装状态1.1.2.ArcGIS License Manager 安装1.1.2.1. 开始安装1.1.2.2. 接受协议1.1.2.3. 选择安装路径1.1.2.4. 执行安装1.1.2.5. 安装完成1.1.2.6. 停止服务器运行1.1.3.ArcGIS Desktop 安装1.1.3.1. 执行安装如果提示上述问题点,需要先安装.NET Framwork 3.5 sp1。
然后在继续安装。
1.1.3.2. 接受协议1.1.3.5. Python27安装路径选择1.1.4.破解注意arcgis10.0与10.2有一点区别,arcgis10.0只需要替换service.txt就可以了。
1.1.4.1. 文件替换1.1.4.2. 重启许可服务1.1.4.3. 重新读取许可1.1.4.4. 启动ArcGIS Administrator1.1.4.5. 破解完成状态检查1.1.5.版本汉化。
ArcGIS9.3安装说明
ArcGis9.3安装说明1、先改计算机名称,我的电脑→属性→计算机名→更改,注意要用英文,不要中文。
2、把*:\ArcGIS 9.3\ArcGIS Desktop9.3_crack_2009年3月11日更新\arcgis_tbe.lic文件用记书本打开,把里面的SERVER lizhuo ESRI_SENTINEL_KEY=37102011 27001这个代码中lizhuo改成你的计算机名称。
3、安装*:\ArcGIS 9.3\ArcGIS Desktop 9.3\Desktop\License目录地址*:\ArcGIS 9.3\ArcGIS Desktop9.3_crack_2009年3月11日更新\arcgis_tbe.lic4、安装完LMSetup后,在把*: \ArcGIS 9.3\ArcGIS Desktop9.3_crack_2009年3月11日更新文件夹下面的所有文件复制到C:\Program Files\ESRI\License\arcgis9x文件夹中,覆盖又有文件。
5、覆盖完成后,打开C:\Program Files\ESRI\License\arcgis9x下的lmtools.exe配置服务。
(1)Configure Services→①Path to lmgrd exe file:C:\PROGRA~1\ESRI\License\arcgis9x\lmgrd.exe→②Path to the licence file:C:\Program Files\ESRI\License\arcgis9x\arcgis_tbe.lic→③Path to the debug log file:C:\DOCUME~1\ADMINI~1\LOCALS~1\Temp\lmgrd9.log 之后选择保存:Save Service(2)Start/Stop/Reread→Start Server7、安装*:\ArcGIS 9.3\ArcGIS Desktop 9.3\Desktop\setup.msi8、最后安装*:\\ArcGIS 9.3\ArcGIS Desktop 9.3下面的ArcGIS Desktop 9.3 中文运行环境.exe。
ArcGIS10 安装过程说明
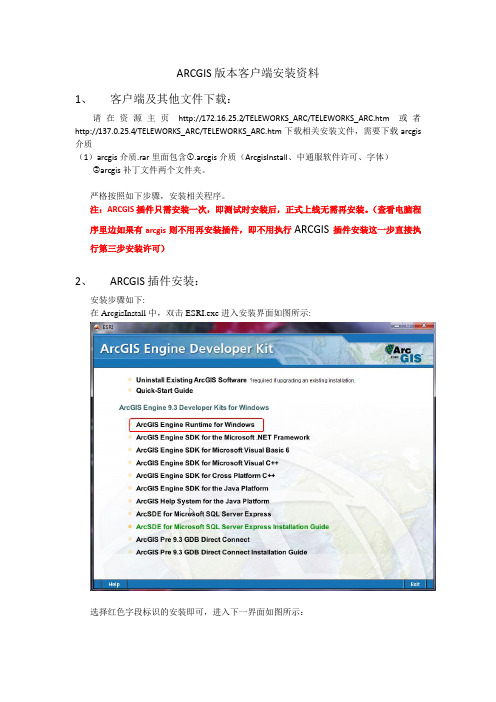
ArcGIS 10安装说明文档目录第一步: 安装“ArcGIS许可管理器License Manager” (1)第二步: ArcGIS10破解 (3)第三步: 安装ArcGIS Desktop (4)第四步: 安装ArcGIS Server (6)第五步: 安装ArcGIS Engine (15)第六步: 安装ArcGIS SDE (16)第一步: 安装“ArcGIS许可管理器License Manager”1)用解压缩工具winrar 打开engine10.iso ,找到engine10\LicenseManager\windows下面的Setup.exe,双击开始安装。
2)默认安装的路径为:c:\Program Files (x86)\ArcGIS\License10.0,点击‘下一步’ 直到安装完成。
安装完成后会启动如下界面(弹出了ArcGIS10.1的许可服务器管理器界面):3)打开‘运行窗口’,输入server.msc命令,查看ArcGIS License Manager是否安装成功第二步: ArcGIS10破解ArcGIS10许可管理器安装完后,需要用注册机进行破解,这样接下来安装的ArcDesktop、Arcgis server、ArcEngine、ArcSDE才能正常使用。
1)打开ArcGIS10目录下的KeyGen.exe,用注册机生成一段注册码,这里要选择10.0。
2)把注册码保存为文本,直接复制下来就好,不需要修改什么计算机名的,并命名为service.txt。
3)把service.txt复制到License安装目录里的bin目录中。
例如:C:\Program Files (x86)\ArcGIS\License10.0\bin\service.txt4)打开第一步安装的ArcGIS License Manager窗口,重新读取一行许可文件,破解so easy~麻麻再也不用担心我用盗版了。
11-05-13 ArcGIS安装手册重新整理版【包含常见安装出现的两个错误及解决方法】
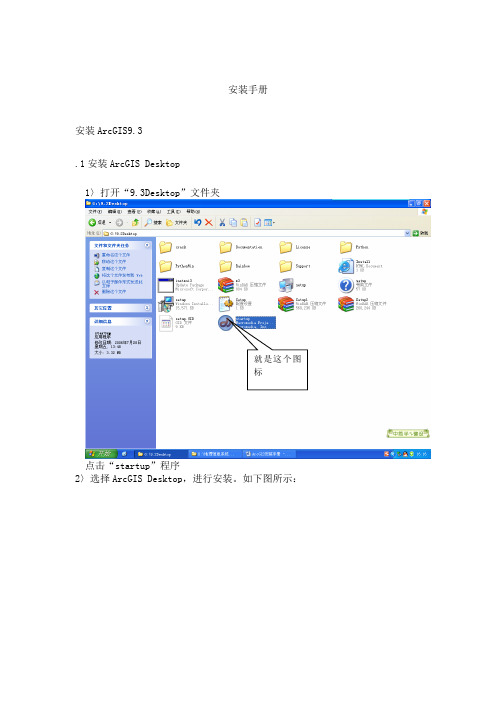
安装手册安装ArcGIS9.3.1安装ArcGIS Desktop1〉打开“9.3Desktop”文件夹就是这个图标点击“startup”程序2〉选择ArcGIS Desktop,进行安装。
如下图所示:点击“Install ArcGIS Desktop”3〉点击NEXT按钮4〉选择I accept the license agreement单选按钮5〉点击NEXT按钮6〉选择“Define…”选项,点击Next 7〉选择最高级别的Arcinfo8〉选择 (Custom)点击next9>左键点击红线标示处,再跳出的对话框里点选“Entire feature will be installed on the local hard drive”10〉选择好安装路径(默认也),点击NEXT11〉选择脚本运行环境的安装路径(默认就行),点击NEXT12〉点击NEXT按钮,开始安装。
13〉点击FINISH完成安装。
安装结束,点击“开始->程序->ArcGIS”把“ArcCatalog”“Arcglobe”“ArcMap”“ArcReader”“Arcscene”发送到桌面快捷方式,再分别点击,能打开就是安装成功了2ArcGIS License Manager的安装和配置1〉打开“9.3Desktop”文件夹就是这个图标点击“startup”程序选择安装“Install ArcGIS License Manager;”2〉选择第一项,点击“Browse”选择license_server_setup文件夹中的37102011.efl9文件作为许可文件。
点击next按钮,直到完成安装。
注:在安装结束时,请选择Not restart computer.若不小心重启,请在系统启动后在任务管理器中先结束ArcGIS和lmgrd进程。
【下图红箭头所指为错误的地方,应该改为license_server_setup,以文件“37102011.efl9”所在文件夹为准】一直默认下去;会出现以下窗口,点选“No,I will restart my computer later”不用重启点击“Finish”3〉用记事本打开37102011.efl9,把START_LICENSE与END_LICENSE之间的内容复制一下,然后粘到c:\program files\esri\license\arcgis9x\Arc_Info9.lic中的“VENDOR ARCGIS”下面,把原来下面的内容全覆盖;还要将第一行主机名改为你机器的名字(如SERVER pan-reload ESRI_SENTINEL_KEY=37102011 27001) 。
- 1、下载文档前请自行甄别文档内容的完整性,平台不提供额外的编辑、内容补充、找答案等附加服务。
- 2、"仅部分预览"的文档,不可在线预览部分如存在完整性等问题,可反馈申请退款(可完整预览的文档不适用该条件!)。
- 3、如文档侵犯您的权益,请联系客服反馈,我们会尽快为您处理(人工客服工作时间:9:00-18:30)。
一、安装ARCGIS
1、安装ARCGIS License Manager
1.1、安装ARCGIS License Manager
1.2. 选择第二个选项,并点击CREATE
1.3./输入"NNISO WE LOVE YOU"(空白处写入这段文字)点击OK,忽略错误,并点击NEXT安装;
1.4.选择第二个按钮,不重启电脑,并忽略提示
1.5、打开Crack,文件夹,选取文件,复制到c:\program files\esri\license\arcgis9x下选择覆盖)1.6、打开license(选择打开方式,用记事本打开)用计算机名替换选中。
保存退出。
1.7、打开LM TOOLS
1.8在第一个选项页中选择第二个按钮,选中ARCGIS LICENSE MANAGER
1.9选择最后一个标签页Configure Services(点中标签最后一个)
设置Path to the license file : (选中第二个)为c:\program files\esri\license\arcgis9x\license.dat
1.10.点击保存服务
1.11.选中START/STOP/REREAD标签页,点击STARTE SERVER,REREAD LICENSE FILE
2、安装ARCGIS DESKTOP :
一直默认选择下一步,记得关闭安装说明(所有文件关闭)3、ARCGIS链接空间数据库
二、ARCGIS使用
1、打开ARCMAP
2、点击打开空间数据库图形:
选择要编辑的图层,如build(幢图层),land(丘图层);
图层顺序可以调整,点击左侧的图形,可以将图层拖放到其他图层的上面或者下面,以调整图层显示的先后顺序;
3、打开图形后,使用编辑工具对图形进行编辑。
编辑以前,需要先设置编辑工具可用
在点击编辑
使编辑按钮变得可用,就可以进行编辑了
4、ARCMAP常用命令:
画图工具:
选择要编辑的图层,使用铅笔按钮进行图形的编辑
最后一个点要双击,闭合。
切割工具:
选择了切割命令后,点击画笔按钮,
合并命令:
选择要合并的两个图形(多个图形也可以),选择合并命令
弹出需要保留信息的对话框
双击选择你要保留的信息的图形。
完成合并
对象捕捉:
5、查询丘内最大幢号:
在build 图层上点击右键,选择
双击[丘号],将[丘号]添加到下面的查询框,单击= ,输入丘号如:’360123010020’(注意:带引号),点击APPL Y查询。
这样,所有的丘号为’360123010020’的幢都已经查出来了。
点击selected,显示已选择的幢。
右键点击幢号:
最上面的号为最大幢号
cad的添加和图形的添加方法一样,需要注意,cad图形的路径必须为英文路径和英文名
按照上面的图形编辑工具。