HP LaserJet Pro MFP M125-M126打印机安装打印机方法
HPM1213nfMFP网络打印机安装说明及常见问题解决
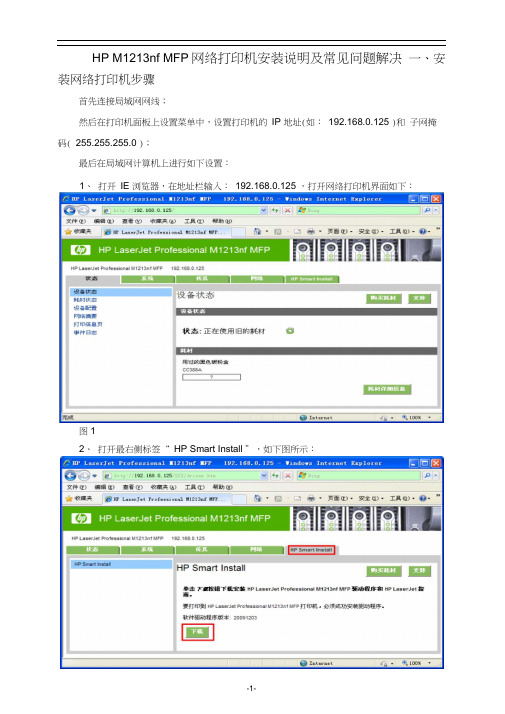
HP M1213nf MFP网络打印机安装说明及常见问题解决一、安装网络打印机步骤首先连接局域网网线;然后在打印机面板上设置菜单中,设置打印机的IP 地址(如:192.168.0.125 )和子网掩码( 255.255.255.0 );最后在局域网计算机上进行如下设置:1、打开IE 浏览器,在地址栏输入:192.168.0.125 ,打开网络打印机界面如下:图12、打开最右侧标签“ HP Smart Install ”,如下图所示:图23、点击“下载”按钮,弹出如下对话框,并点击“运行”按钮,待下载完成后,点击“运行”,即启动安装向导不需再进行任何设置5、此时会依次弹出如下三个提示框,直接点击关闭即可(不要点“确定”)图34、按提示步骤安装完成后,出现如下对话框,取消“注册产品” 复选框,点击“下图4图5图6图76、至此打印机驱动安装完成,可以进行打印7、说明:如果在上述图5 中未及时关闭或点击了“确定”,会自动打印一张测试页,若打印机内有纸,打印完测试页后,安装完毕,打印机可以使用若打印机缺纸,会反复提示如下对话框:此时双击屏幕右下角打印机图标:图8,或打开“打印机和传真”对话框,双击“ HP LaserJet Professional M1213nf MFP ”,打开打印任务对话框如下:图9将当前的打印任务demopage取消之后,便不再重复弹出上面图8 所示对话框、常见问题处理步骤1、检查打印机是否正常开机加电。
2、检查打印机是否正常连网(在IE 浏览器地址栏输入192.168.0.125 ,若能正常打开如上面图1 所示界面,即证明打印机连网正常),若不能正常连网,则需要检查打印机的网线连接情况。
3、若以上两步检查均正常,则依次点击“开始”→“设置”→“打印机和传真”,打开“打印机和传真”对话框,以“详细信息”方式查看。
图10各打印机的正常状态应该是“准备就绪”。
若“HP LaserJet Mf1213 ”的状态显示为“脱机”,则右击该打印机,在快捷菜单中点击“使用联机打印机”即可若“HP LaserJet Mf1213 ”的状态显示为“暂停”,则右击该打印机,在快捷菜单中点击“恢复打印”即可。
HPM1213nfMFP网络打印机安装说明及常见问题解决
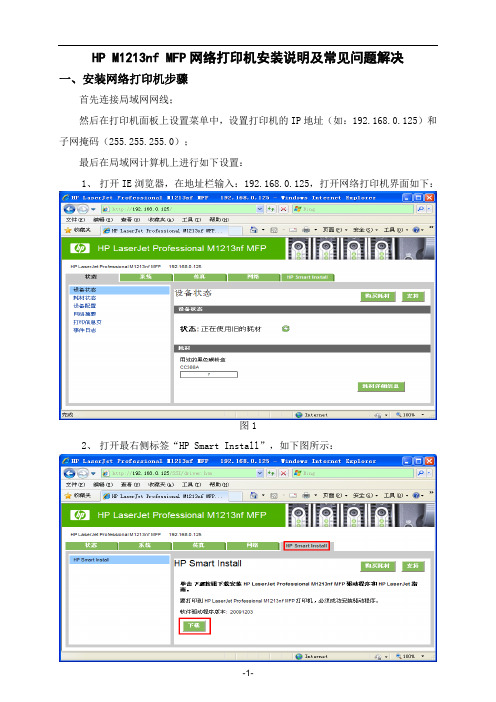
HP M1213nf MFP网络打印机安装说明及常见问题解决一、安装网络打印机步骤首先连接局域网网线;然后在打印机面板上设置菜单中,设置打印机的IP地址(如:192.168.0.125)和子网掩码(255.255.255.0);最后在局域网计算机上进行如下设置:1、打开IE浏览器,在地址栏输入:192.168.0.125,打开网络打印机界面如下:图12、打开最右侧标签“HP Smart Install”,如下图所示:图23、点击“下载”按钮,弹出如下对话框,并点击“运行”按钮,待下载完成后,点击“运行”,即启动安装向导。
图34、按提示步骤安装完成后,出现如下对话框,取消“注册产品”复选框,点击“下一步”→“完成”。
图45、此时会依次弹出如下三个提示框,直接点击关闭即可(不要点“确定”),不需再进行任何设置。
图5 图6图76、至此打印机驱动安装完成,可以进行打印。
7、说明:如果在上述图5中未及时关闭或点击了“确定”,会自动打印一张测试页,若打印机内有纸,打印完测试页后,安装完毕,打印机可以使用。
若打印机缺纸,会反复提示如下对话框:图8此时双击屏幕右下角打印机图标:,或打开“打印机和传真”对话框,双击“HP LaserJet Professional M1213nf MFP”,打开打印任务对话框如下:图9将当前的打印任务demopage取消之后,便不再重复弹出上面图8所示对话框。
二、常见问题处理步骤1、检查打印机是否正常开机加电。
2、检查打印机是否正常连网(在IE浏览器地址栏输入192.168.0.125,若能正常打开如上面图1所示界面,即证明打印机连网正常),若不能正常连网,则需要检查打印机的网线连接情况。
3、若以上两步检查均正常,则依次点击“开始”→“设置”→“打印机和传真”,打开“打印机和传真”对话框,以“详细信息”方式查看。
图10各打印机的正常状态应该是“准备就绪”。
若“HP LaserJet Mf1213”的状态显示为“脱机”,则右击该打印机,在快捷菜单中点击“使用联机打印机”即可。
HPM1213nfMFP网络打印机安装说明及常见问题解决

HP M1213nf MFP网络打印机安装说明及常见问题解决一、安装网络打印机步骤首先连接局域网网线;然后在打印机面板上设置菜单中,设置打印机的IP地址(如:192.168.0.125)和子网掩码(255.255.255.0);最后在局域网计算机上进行如下设置:1、打开IE浏览器,在地址栏输入:192.168.0.125,打开网络打印机界面如下:图12、打开最右侧标签“HP Smart Install”,如下图所示:图23、点击“下载”按钮,弹出如下对话框,并点击“运行”按钮,待下载完成后,点击“运行”,即启动安装向导。
图34、按提示步骤安装完成后,出现如下对话框,取消“注册产品”复选框,点击“下一步”→“完成”。
图45、此时会依次弹出如下三个提示框,直接点击关闭即可(不要点“确定”),不需再进行任何设置。
图5 图6图76、至此打印机驱动安装完成,可以进行打印。
7、说明:如果在上述图5中未及时关闭或点击了“确定”,会自动打印一张测试页,若打印机内有纸,打印完测试页后,安装完毕,打印机可以使用。
若打印机缺纸,会反复提示如下对话框:图8此时双击屏幕右下角打印机图标:,或打开“打印机和传真”对话框,双击“HP LaserJet Professional M1213nf MFP”,打开打印任务对话框如下:图9将当前的打印任务demopage取消之后,便不再重复弹出上面图8所示对话框。
二、常见问题处理步骤1、检查打印机是否正常开机加电。
2、检查打印机是否正常连网(在IE浏览器地址栏输入192.168.0.125,若能正常打开如上面图1所示界面,即证明打印机连网正常),若不能正常连网,则需要检查打印机的网线连接情况。
3、若以上两步检查均正常,则依次点击“开始”→“设置”→“打印机和传真”,打开“打印机和传真”对话框,以“详细信息”方式查看。
图10各打印机的正常状态应该是“准备就绪”。
若“HP LaserJet Mf1213”的状态显示为“脱机”,则右击该打印机,在快捷菜单中点击“使用联机打印机”即可。
HP LaserJet Pro 100 MFP M126nw 打印机说明书

Short data sheetHP LaserJet Pro 100 MFPM126nwThis affordable HP LaserJet Pro MFP is easy to install anddelivers crisp, clear documents. Print, copy, and scan with one,compact device that fits neatly into small office spaces.Extend your printing reach• Spread printing across the office. Set up anywhere with built-in wireless printing.4• Keep up with the pace of business—print, copy, and scan at high speeds.Print on your terms• Print from virtually anywhere—using your smartphone, tablet, and PC—withApple® AirPrint.™ 2• Connect to your wireless printer in a snap, using wireless direct printing.1• Print from your mobile device with built-in print capability or HP ePrint appand software.3Handle the essentials• Easily copy both sides of a two-sided ID or other small document onto the frontof a single page.• Just start printing, quick and easy—with the simple control panel.1 An app or driver may be required to use HP wireless direct. For more information, see . Wireless performance is dependent on physical environment and distance from access point.2Supports OS X® Lion, OS X Mountain Lion and the following devices running iOS 4.2 or later: iPad® (all models), iPhone® (3GS or later) and iPod touch® (third generation or later). Works with HP’s AirPrint-enabled printers and requires the printer be connected to the same network as your OS X or iOS device. Wireless performance is dependent on physical environment and distance from the access point. OS X, iPad, iPhone, and iPod touch are trademarks of Apple® Inc., registered in the United States and other countries. AirPrint™ and the AirPrint logo are trademarks of Apple Inc.3Local printing requires mobile device and printer to be on the same network or have a direct wireless connection to printer. Wireless performance is dependent upon physical environment and distance from access point. Wireless operations are compatible with 2.4 GHz operations only. Remote printing requires an internet connection to a HP web-connected printer. App or software may also be required. Wireless broadband use requires separately purchased service contract for mobile devices. Check with service providerfor coverage and availability in your area. See /go/mobileprinting for more details.4 Wireless performance is dependent on physical environment and distance from the printer.AIO functions Print, copy, scan; AIO multitasking supported: YesDuplex print options Manual (driver support provided)Print speed1Black (A4): Up to 20 ppmFirst page out Black (A4, ready): As fast as 9.5 secPrint technology LaserPrint resolution Black (best): Up to 600 x 600 dpiPrint resolution technologies FastRes 600; FastRes 1200Print cartridges number 1 (black)Printer smart software features HP Auto-On/Auto-Off, HP ePrint, Apple AirPrint™, Wireless direct printing, Embedded Web ServerMobile printing capability2HP ePrint, Wireless direct printing, Apple AirPrint™Standard print languages PCLm/PCLmSPrinter management HP Device Toolbox; Status Alerts (default install)Scan speed Up to 7 ppm (b&w), up to 5 ppm (colour)Scan type FlatbedScan technology Contact Image Sensor (CIS)Scan resolution Hardware: Up to 1200 x 1200 dpi; Optical: Up to 1200 dpi; Enhanced: Up to 1200 dpiScan file format Windows Scan Software supports file format: JPG, RAW (BMP), PDF, TIFF, PNG; Mac Scan SW supports fileformat: TIFF, PNG, JPEG, JPEG-2000, PDF, PDF-Searchable, RTF, TXTScan input modes Solution Center Lite (Windows Vista, Windows XP) or Device Stage (Windows 7, Windows 8); TWAIN-compliantor WIA-compliant softwareScan size maximum Flatbed: 216 x 297 mm (8.5 x 11.7 in)Twain version Version 1.9Bit depth/Grayscale levels24 bit/256Digital sending standard features Scan to email by HP SW; scan to application by HP SW; scan to file by HP SWCopy speed3Black (A4): Up to 20 cpmCopy resolution Black (graphics): Up to 400 x 600 dpi; Colour (text and graphics): Up to 400 x 600 dpiMaximum number of copies Up to 99 copiesCopier reduce enlarge25 to 400%Copier settings Number of copies; Lighter/Darker; Reduce/Enlarge; Optimize (draft, text, mixed, picture); Paper Size Copier smart software features Up to 99 multiple copies; Reduce/Enlarge from 25% to 400%; Contrast (lighter/darker);Resolution (copy quality), ID CopyStandard connectivity Hi-Speed USB 2.0 port; built-in Fast Ethernet 10/100Base-TX network port; built-in WiFi 802.11b/g/n Network capabilities Via built-in 10/100 Base-TX networkingNetwork ready Standard (built-in Ethernet, WiFi 802.11b/g/n)Wireless capability Yes, built-in WiFi 802.11b/g/nMemory128 MBProcessor speed600 MHzDuty cycle4Up to 8,000 pagesRecommended monthly page volume5Up to 250 to 2,000 pagesPaper handlingInput150-sheet input trayOutput100-sheet face-down binMedia type Paper (plain, LaserJet), envelopes, transparencies, labels, postcardsMedia weight60 to 163 g/m²Supported media sizes A4; A5; B5-Japanese; envelopes (ISO DL, C5, B5, Com #10, Monarch #7 3/4); 16K; postcards(Standard #10, JIS single and double)2Dimensions (W x D x H)420 x 365 x 254 mmWeight8.0 kgWhat’s in the box HP LaserJet Pro MFP M126nw; Preinstalled introductory HP LaserJet Black Cartridge (~700 pages); Installationguide, Getting Started guide, User’s Guide, Support flyer, Warranty guide; Printer software and documentationon CD; Power cord; USB cableWarranty features6One-year limited warrantyCompatible operating systems Full software installs supported on: Windows 8 (32-bit/64-bit), Windows 7 (32-bit/64-bit), Windows Vista(32-bit/64-bit), Windows XP (32-bit) (SP2 or higher); Driver only installs supported on: Windows Server 2012;Windows Server 2008 (32-bit/64-bit), Windows Server 2008 R2 (x64) (SP1), Windows Server 2008 (StandardEdition), Windows Server 2008 (Enterprise Edition), Windows Server 2003 (32-bit/64-bit) (SP1 or higher),Windows XP (64-bit) (SP2 or higher); Mac OS X v 10.6.8 or higher; Linux: Please check Linux on-line support:/hplip-web/install.htmlMinimum system requirements PC: Windows 8 (32-bit/64-bit), Windows 7 (32-bit/64-bit), Windows Vista (32-bit/64-bit), Windows XP(32-bit) (SP2 or higher); 200 MB available hard disk space required (CD and Web Package); 400 MB availablehard disk space required; 512 MB RAM installed; CD-ROM/DVD or Internet; USB or Network portMac: Mac OSX v 10.6; PowerPC G4, G5, or Intel® Core™ Processor; 500 MB available hard disk space;CD-ROM/DVD-ROM or Internet; USB or Network portFonts and Typefaces Depend on OS fonts and typefacesControl panel 2 line LCD; 13 buttons (Up, Down, OK, Cancel, Back, Setup, Number of Copy, Dark/Light, Mono copy, Copy Menu,ePrint, Wireless, Power); 4 LED indicator lights (Attention, Ready, Power, wireless)Display2-line LCD (text)Energy efficiency compliance ENERGY STAR® qualifiedPower Power supply type: Built-in power supplyPower supply required: Input voltage: 110 to 127 VAC (+/- 12%), 60 Hz (+/- 3 Hz); Input voltage:220 to 240 VAC (+/- 12%), 50/60 Hz (+/- 3 Hz) (Not dual voltage, power supply varies by part numberwith # Option code identifier)Power consumption:7 465 watts (Printing), 110 watts (Copying), 2.2 watts (Ready), 0.7 watts(Sleep/Auto-Off), 0.1 watts (Manual Off)Software included Windows: HP Installer/Uninstaller, HP PCLmS print driver, HP WIA Scan Driver, HP TWAIN Scan Driver,HP Scan, Status Alerts, HP Update, DXPMac: HP Installer/Uninstaller, HP PCLmS Print Driver, HP Scan, HP Setup Assistant, HP Utility, HP Alerts,HP Firmware UpdaterAcoustic8Acoustic power emissions: 6.1 B(A)Acoustic power emissions (ready): InaudibleAcoustic pressure emissions bystander (active, printing): 48 dB(A)Acoustic pressure emissions bystander (ready): InaudibleOperating environment Operating humidity range: 10 to 80% RHNon-operating humidity range: 10 to 90% RHRecommended operating humidity range: 30 to 70% RHOperating temperature range: 15 to 32.50 C (59 to 90.50 F)Recommended operating temperature range: 17.5 to 250 C (63.5 to 770 F)Storage temperature range: -4 to 1400 F (-20 to 600 C)Accessories HP 1200w NFC/Wireless Mobile Print Accessory, E5K46ASecurity management Password-protected network embedded Web server; 802.11: WEP, WPA, WPA2; SNMPv1 communitypassword changeElectromagnetic emission standard CISPR 22:2008/EN 55022:2010 - Class B, EN 61000-3-2:2006 + A1:2009 + A2:2009, EN 61000-3-3:2008,EN 55024:2010, FCC Title 47 CFR, Part 15 Class B/ICES-003, Issue 5, GB9254-2008, GB17625.1-2003,EMC Directive 2004/108/EC (Europe), other EMC approvals as required by individual countriesSafety approvals and requirements IEC 60950-1:2005 +A1 (International), EN 60950-1:2006 + A11:2009 + A1:2010 +A12:2011 (EU),IEC 60825-1:2007, UL/cUL Listed (US/Canada), GS License (Europe), EN 60825-1:2007 (Class 1 Laser/LEDDevice), Low Voltage Directive 2006/95/EC with CE Marking (Europe), other safety approvals as requiredby individual countries3For more information visit our website at Ordering InformationNumber Description CZ175A HP LaserJet Pro 100 MFP M126nwSupplies 9Number Description CC388A HP 88A Black LaserJet Toner Cartridge (~1,500 yield)HP Care PacksNumberDescription UH757EHP 3-year Next Business Day Exchange Cons LaserJet MFP-E SVCUH759PE HP 1-year Post Warranty Next Business Day Exchange Cons LaserJetMFP-E SVCUH764E HP 3-year Care Pack w/Return to Depot Support for LaserJet PrintersUH766PE HP 1-year Post Warranty Return Cons LaserJet MFP-E SVCUH773E HP 3-year Onsite Exchange Service Cons LaserJet MFP-E SVCUH774PE HP 1-year Post Warranty Onsite Exchange Service Cons LaserJet MFP-E SVC Supported paperAsia Pacific: /apac/printingsuppliesSolutionsFor more solutions information, please visit /go/gscHewlett-Packard officesChina (010) 6564 3888 India (80) 2612 9000 /in© 2014 Hewlett-Packard Development Company, L.P. The information contained herein is subject to change without notice. The only warranties for HP products and services are set forth in the express warranty statements accompanying such products and services. Nothing herein should be construed as constituting an additional warranty. HP shall not be liable for technical or editorial errors or omissions contained herein.ENERGY STAR and the ENERGY STAR logo are registered U.S. marks. Windows is a registered trademark of Microsoft Corporation. AirPrint, iPad, iPhone, and iPod touch are trademarks of Apple Inc., registered in the U.S. and other countries. Linux is a U.S. registered trademark of Linus Torvalds. Intel, Core are trademarks of Intel Corporation in the U.S. and other countries.Printed in Singapore, March 20141Measured using ISO/IEC 24734, excludes first set of test documents. For more information see /products1/ISO/MMDPP/index.html. Exact speed varies depending on the system configuration, software application, driver, and document complexity.2 M ay require a firmware upgrade to be compatible download at /go/support3 First Copy Out and Copy Speed measured using ISO/IEC 29183, exclude first set of test documents. For more information see /products1/ISO/digital_copy/index.html. Exact speed varies depending on the system configuration, software application, driver, and document complexity.4 Duty cycle is defined as the maximum number of pages per month of imaged output. This value provides a comparison of product robustness in relation to other HP LaserJet or HP Colour LaserJet devices, and enables appropriate deployment of printers and MFPs to satisfy the demands of connected individuals or groups.5 HP recommends that the number of pages per month of imaged output be within the stated range for optimum device performance, based on factors including supplies replacement intervals and device life over an extended warranty period.6 Warranty differ country to country.7 Values subject to change. Power numbers are the highest values measured using all standard voltages. See /support for current information. Power requirements are based on the country/region where the printer is sold. Do not convert operating voltages. This will damage the printer and void the product warranty.8 M easured according to ISO 7779 and declared in accordance with ISO 9296; values are subject to change. For current information, see /support. Configuration tested: LaserJet Pro MFP M125nw printing simplex on A4 paper.9 R eplacement cartridge average declared yield ~1,500 pages based on ISO/IEC 19752 and continuous print. Actual yields vary considerably based on images printed and other factors. For more information, visit: /go/learnaboutsupplies。
精灵小巧 HP LaserJet Pro MFP M126nw 激光多功能一体机
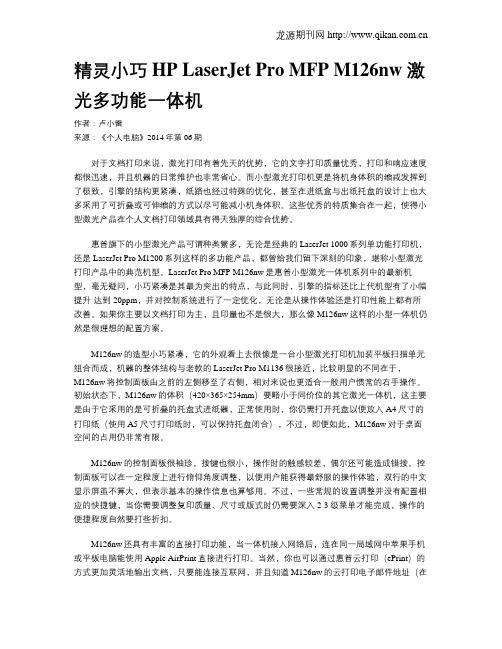
精灵小巧 HP LaserJet Pro MFP M126nw 激光多功能一体机作者:卢小雷来源:《个人电脑》2014年第06期对于文档打印来说,激光打印有着先天的优势,它的文字打印质量优秀,打印和响应速度都很迅速,并且机器的日常维护也非常省心。
而小型激光打印机更是将机身体积的缩减发挥到了极致,引擎的结构更紧凑,纸路也经过特殊的优化,甚至在进纸盒与出纸托盘的设计上也大多采用了可折叠或可伸缩的方式以尽可能减小机身体积。
这些优秀的特质集合在一起,使得小型激光产品在个人文档打印领域具有得天独厚的综合优势。
惠普旗下的小型激光产品可谓种类繁多,无论是经典的LaserJet 1000系列单功能打印机,还是LaserJet Pro M1200系列这样的多功能产品,都曾给我们留下深刻的印象,堪称小型激光打印产品中的典范机型。
LaserJet Pro MFP M126nw是惠普小型激光一体机系列中的最新机型,毫无疑问,小巧紧凑是其最为突出的特点,与此同时,引擎的指标还比上代机型有了小幅提升-达到20ppm,并对控制系统进行了一定优化,无论是从操作体验还是打印性能上都有所改善。
如果你主要以文档打印为主,且印量也不是很大,那么像M126nw这样的小型一体机仍然是很理想的配置方案。
M126nw的造型小巧紧凑,它的外观看上去很像是一台小型激光打印机加装平板扫描单元组合而成,机器的整体结构与老款的LaserJet Pro M1136很接近,比较明显的不同在于,M126nw将控制面板由之前的左侧移至了右侧,相对来说也更适合一般用户惯常的右手操作。
初始状态下,M126nw的体积(420×365×254mm)要略小于同价位的其它激光一体机,这主要是由于它采用的是可折叠的托盘式进纸器,正常使用时,你仍需打开托盘以便放入A4尺寸的打印纸(使用A5尺寸打印纸时,可以保持托盘闭合),不过,即便如此,M126nw对于桌面空间的占用仍非常有限。
HPM1213nfMFP网络打印机安装说明及常见问题解决
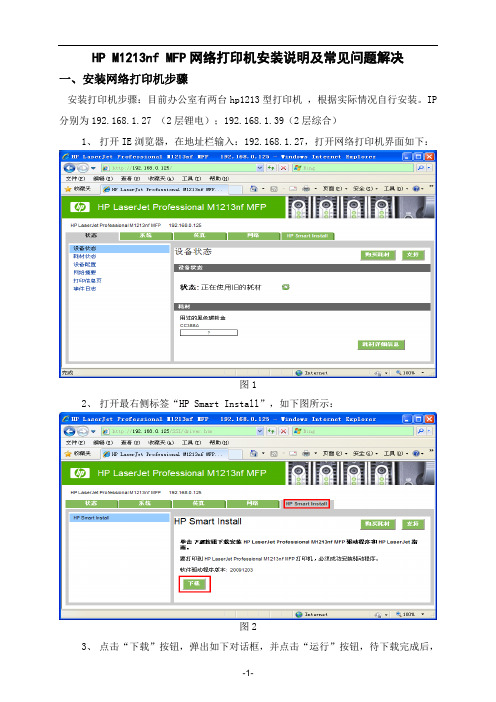
HP M1213nf MFP网络打印机安装说明及常见问题解决一、安装网络打印机步骤安装打印机步骤:目前办公室有两台hp1213型打印机,根据实际情况自行安装。
IP 分别为192.168.1.27 (2层锂电);192.168.1.39(2层综合)1、打开IE浏览器,在地址栏输入:192.168.1.27,打开网络打印机界面如下:图12、打开最右侧标签“HP Smart Install”,如下图所示:图23、点击“下载”按钮,弹出如下对话框,并点击“运行”按钮,待下载完成后,点击“运行”,即启动安装向导。
图34、按提示步骤安装完成后,出现如下对话框,取消“注册产品”复选框,点击“下一步”→“完成”。
图45、此时会依次弹出如下三个提示框,直接点击关闭即可(不要点“确定”),不需再进行任何设置。
图5图6图76、至此打印机驱动安装完成,可以进行打印。
7、说明:如果在上述图5中未及时关闭或点击了“确定”,会自动打印一张测试页,若打印机内有纸,打印完测试页后,安装完毕,打印机可以使用。
若打印机缺纸,会反复提示如下对话框:图8此时双击屏幕右下角打印机图标:,或打开“打印机和传真”对话框,双击“HP LaserJet Professional M1213nf MFP”,打开打印任务对话框如下:图9将当前的打印任务demopage取消之后,便不再重复弹出上面图8所示对话框。
二、常见问题处理步骤1、检查打印机是否正常开机加电。
2、检查打印机是否正常连网(在IE浏览器地址栏输入192.168.1.27,若能正常打开如上面图1所示界面,即证明打印机连网正常),若不能正常连网,则需要检查打印机的网线连接情况。
3、若以上两步检查均正常,则依次点击“开始”→“设置”→“打印机和传真”,打开“打印机和传真”对话框,以“详细信息”方式查看。
图10各打印机的正常状态应该是“准备就绪”。
若“HP LaserJet Mf1213”的状态显示为“脱机”,则右击该打印机,在快捷菜单中点击“使用联机打印机”即可。
惠普 LaserJet Pro M12w 打印机系列联网安装指南说明书
11
• If your Windows computer cannot connect automatically, you see the screen below. Go to step 11.
• If your Mac computer cannot connect automatically, you can complete setup using a temporary USB connection. See the link for those instructions below.
5
Control Panel Buttons and Lights
1 The power button and light 2 The Wi-Fi button and light 3 The network status button and light 4 The ink button and light 5 The paper/cancel button and light
打印机安装步骤及教程

四楼,五楼,单双面打印机安装教程一、打开"开始"菜单,选择”设备和打印机”
二、进入”设备和打印机”界面,点击”添加打印机”
三、这时弹出来的界面显示可以通过两种方式添加打印机,选择
“添加本地打印机”;
四、接着点击“创建新端口”项,然后选择“Standard TCP/IP Port”
项。
按下一步。
五、然后输入网络打印机的IP地址,并点击“下一步”按钮。
四楼单面打印机IP地址:192.168.0.244
四楼双面打印机IP地址:192.168.0.246
五楼双面打印机IP地址:192.168.0.245
六、点击“从磁盘安装(H)”弹出窗口输入驱动路径,单击确定
四楼单面打印驱动:\\192.168.0.252\hp\M701
四楼双面打印驱动32位系统:\\192.168.0.252\hp\HP5200x32 四楼双面打印驱动64位系统:\\192.168.0.252\hp\HP5200x64 五楼双面打印驱动:\\192.168.0.252\hp\M706
七、选择对应的型号驱动,单击下一步
八、打印机名称保持默认即可,单击下一步
九、等待打印机安装驱动完成。
十、驱动安装完成后,选择“不共享这台打印机”,单击一下步
十一、选择是否设定为默认打印机,如果确定为默认,则勾选”如果不选择默认,那么不勾选,直接点击“完成”。
这样打印机就安装完成了。
惠普M126打印机怎么扫描文件为PDF文件?惠普M126用法
惠普M126打印机怎么扫描⽂件为PDF⽂件?惠普M126⽤法惠普M126NW打印机作为⼀款经典型号,带有打印复印扫描以及⽆线打印功能,且耗材价格低廉,易得。
想要使⽤惠普M126NW扫描复印⽂件,该怎么实现额?下⾯我们就来看看详细的教程。
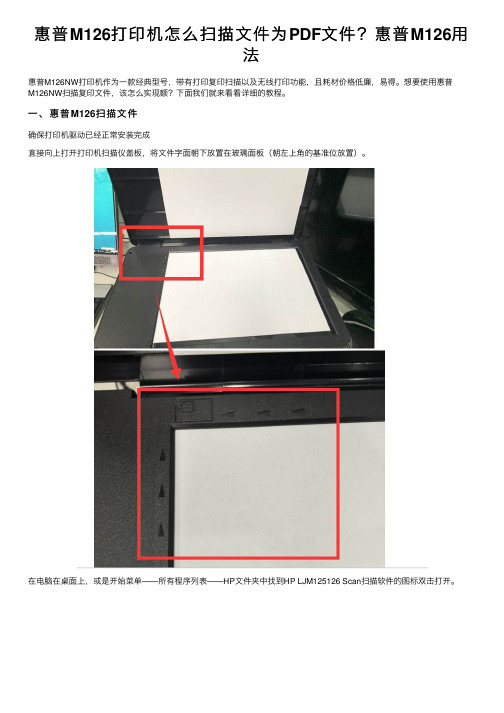
⼀、惠普M126扫描⽂件确保打印机驱动已经正常安装完成直接向上打开打印机扫描仪盖板,将⽂件字⾯朝下放置在玻璃⾯板(朝左上⾓的基准位放置)。
在电脑在桌⾯上,或是开始菜单——所有程序列表——HP⽂件夹中找到HP LJM125126 Scan扫描软件的图标双击打开。
打开后在左边选择另存为PDF,右边可以选择扫描⼤⼩分辨率等选项根据需要选择后,点击右下⾓的扫描。
等待扫描完成后,在中间即可看到预览效果,如还有其他页⾯,可更换玻璃⾯板纸张点击左下⽅的加号添加第⼆页,如没有其他页⾯可直接点击保存。
弹出另存为界⾯,选择保存路径输⼊⽂件名点击保存即可。
完成后保存路径的⽂件夹会⾃动打开⽅便查找,双击保存的⽂件即可打开此PDF⽂件,但请确保电脑已安装PDF阅读器。
请注意PDF⽂件Win10可以⽤Edge浏览器打开,其他版本系统默认应⽤⽆法打开PDF⽂件。
⼆、惠普M126复印⽂件1、打开打印机复印扫描舱,将需要复印部分的介质置于玻璃上,然后盖上舱盖2、按下右下⾓“扫描”按钮,此时液晶⾯板上出现“复印菜单—复印证件选项3、按两下“OK”按钮,将介质中信息扫描到打印机中,做好打印准备4、若不需要复印双⾯证件,可直接按操作⾯板左下⾓“复印”按钮,进⾏复印5、如若复印双⾯证件,重复步骤1,将证件翻⾯,然后按“OK”按钮;最后直接按操作⾯板左下⾓“复印”按钮进⾏证件的复印操作。
注意事项:这款打印机⽀持证件双⾯复印的,所以⽆需执⾏两次复印操作以上就是惠普M126打印机扫描和复印的技巧,希望⼤家喜欢,请继续关注。
打印机安装手册
惠普HP LaserJet Professional M1213nf MFP网络打印机安装手册1.运行打印机驱动程序:手动打开“LJM1130_M1210_MFP_Full_Solution文件,双击运行。
2.在“动画入门指南” 窗口中,请在“ HPLaserJet Pro P1210MFP系列”下,点击“网络安装”按钮。
如图2网络安装所示:图2:安装3.在“开始安装”窗口中,请点击“安装打印机软件”如图3开始安装所示:图3:开始安装4.在“选择简易安装或高级安装”窗口中,点击“简易安装(推荐)”项,然后点击“下一步”按钮。
如图4简易安装所示:图4:简易安装5.在“选择打印机”窗口中,选择HP LaserJetProfessional P1210nf MFPSeries ”项,然后点击“下一步” 按钮。
如图5选择打印机所示:图5:选择打印机6.在“打印机连接”窗口中,选择“配置为通过网络打印”项,然后点击“下一步”按钮。
如图6打印机连接所示: 图6:打印机连接7.请根据打印机驱动程序搜索的结果,做以下操作:«打印机驱动程序搜索到网络中的打印机。
(1)在“标识打印机”窗口中,选择“从检测到的打印机列表中选择(推荐)”选项,然后点击“下一步”按钮。
如图7标识打印机所示:图7:标识打印机荐说打申It 审倉桓序忻臥雄丽上覆索打印机』您也町则取妣来样定JJE邓L遶释菽识揮妥標的打£晒时;乱P ^fearawrfnswn?^!*aii)( tss siOff媲拧韌如林a说函番務備网跻上srr打印机,井可曲.粒豳1的霁印i机削穂中虚殊打X上r ① 辭一歩远寸[ 越鹰 ][ 料勤(2)在“找到打印机”窗口中,选择您要安装打印机的型号,然后点击“下一步”按钮。
如图8找到打印机所示:图8:找到打印机HP LaserJet Pru M L212/1213/L214/1216 M FP 5eii» IT 地址 说件地址两HP Las ear J11 ProEessi oiuJ! 111121 . L02. 168-1. 1Q06CC217223ffi5 * l 叶 -■$ 已播列rr 印机寿共鰹璋挖Pile.卜覺英搀旳打曰同L ,倩述拯褰齐知书打口机。
HP 多功能打印机软件安装指南说明书
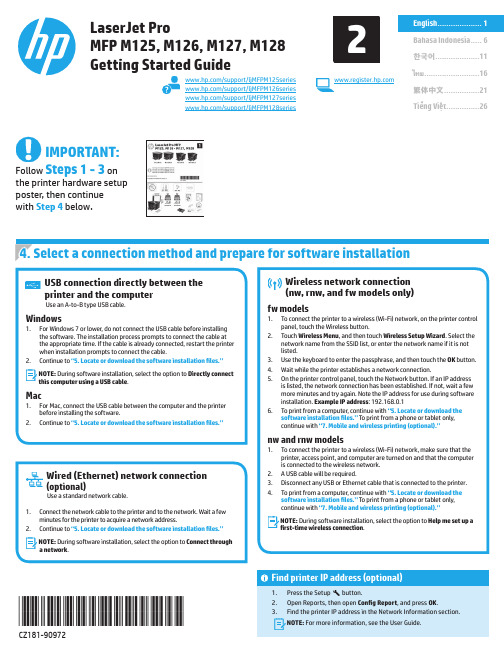
ไทย.........................16한국어....................11Bahasa Indonesia .....61Tiếng Việt (26)繁体中文 (21)Find printer IP address (optional)1. Press the Setup button.2. Open Reports, then open Config Report , and press OK .3. Find the printer IP address in the Network Information section.N OTE:For more information, see the User Guide./support/ljMFPM125series /support/ljMFPM126series /support/ljMFPM127series /support/ljMFPM128seriesLaserJet ProMFP M125, M126, M127, M128Getting Started GuideIMPORTANT:Follow Steps 1 - 3 on the printer hardware setup poster, then continue with Step 4 below.*CZ181-90972**CZ181-90972*2elect a connection method and prepare for software installationOS X full solution1. Launch the software installation .dmg file that you downloaded from the Web.2.The software installer detects the language of the operating system, and then it displays the main menu of the installation program in the same language.3. After the Software License Agreement screen, select the installation type.4. Follow the on-screen instructions to install the software.5.At the end of the software installation process, use the HP Utility Setup Assistant to configure printer options.OS X basic installationTo install basic print and fax drivers without running the HP full solution software from CD or download, follow these steps:1. Connect the printer to the computer or network.2.From System Preferences , click Printers and Scanners , then the plusbutton on the bottom left, and select M125, M126, M127, or M128 using the driver named either AirPrint or Secure AirPrint.Readiris Pro for HPDownload this free software to enable extra scanning features, including Optical Character Recognition (OCR).To download the software from the Web, go to:• /support/ljMFPM125series • /support/ljMFPM126series • /support/ljMFPM127series • /support/ljMFPM128series Select Drivers , select the appropriate operating system, and click Next . Click Application - 3rd Party , and then click the Download button.Method 1: Download from HP Easy Start (Windows and OS X)1. Go to /laserjet , and click Download .2. Follow the onscreen instructions and prompts to save the file to the computer.3.Launch the software file from the folder where the file was saved, and continue with “6. Install the software.”Method 2: Download from printer support Web site (Windows and OS X)1.Go to /support/ljMFPM125series , /support/ljMFPM126series , /support/ljMFPM127series , or /support/ljMFPM128series .2. Select Software and drivers .3. Download the software for your printer model and operating system.4.Launch the installation file by clicking on the .exe or .zip file as necessary, and continue with “6. Install the software.”M ethod 3: Install from the printer CD (Windows only)1. Insert the printer CD into the computer.2. Continue with “6. Install the software.”To use HP ePrint via email, the printer must meet these requirements: • The printer must be connected to a wired or wireless network and have Internet access.•HP Web Services must be enabled on the printer, and the printer must be registered with HP Connected.Enable HP Web ServicesLCD control panel1. Once the printer is connected to a network, enter the printer’s networkIP address into a Web browser. Use one of the following options to find the printer IP:• Go to “Find printer IP address,” in this Getting Started Guide • Refer to the User Guide2. On the Web page that appears, click the HP Web Services tab.3. Review and accept the terms of use, and then click the Enable button.Touchscreen control panel1.button.2. Touch the Enable Web Services button. The printer enables Web Services, andthen prints an information page. The information page contains a printer code necessary to register the HP printer at HP Connected.3. Go to to create an HP ePrint account and complete theUse HP ePrint via email to print documents by sending them as an email attachment to the printer’s email address from any email enabled device, even from devices that are not on the same network.7.1Connect the device to the wireless networkTo print from a phone or tablet, connect the device to the same wireless network as the printer.Apple iOS devices (AirPrint)Open the item to print, and select the Action icon. Select Print , select the printer , and then select Print .Newer Android devices (4.4 or newer)Open the item to print, and select the Menu button. Select Print , select the printer , and select Print .Some devices require downloading the HP Print Service plugin app from the Google Play store.Older Android Devices (4.3 or older)Download the HP ePrint app from the Google Play store.Windows PhoneDownload the HP AiO Remote app from the Windows Store.Learn more about mobile printingTo learn more about other mobile printing options, including additional ePrint solutions, scan the QR code,or see the “Mobile printing” section of the User Guide.7.2 H P Wireless Direct(nw, rnw, and fw wireless models only)HP Wireless Direct enables close-proximity printing from a wireless mobile device directly to an HP Wireless Direct-enabled printer without requiring a connection to a network or the Internet.Enable HP Wireless DirectTo set up HP Wireless Direct from the control panel, complete the following steps:LCD control panel1. At the printer control panel, press the Setup button to open the thefollowing menus:• Network Setup • Wireless Menu • Wireless Direct2. Select the On option, and then press the OK button. The printer saves thesetting and then returns the control panel to the Wireless Direct Settings menu.Touchscreen control panel1. From the Home screen on the printer control panel, touch the Wirelessbutton, and open the following menus:• Wireless Menu• Wireless Direct Settings • On/Off2. Touch the On menu item. The printer saves the setting and then returnsthe control panel to the Wireless Direct Settings menu.F or more information on wireless printing and wireless setup, go to/go/wirelessprinting .Discover the printer1. From the mobile device, turn on the WiFi, and search for wirelessnetworks.2. Select the printer, which will show up as ‘HP-Print-model-name’ asshown on the printer control panel. Example printer name : HP-Print-29-AJ OJP 8620Use the HP Scan software on your computer to start a scan job at the printer. WindowsClick Start, select Programs or All Programs, select HP, and then select HP Scan. OS XClick Applications, select HP, and then select HP Scan.Troubleshootingไทย.........................16한국어....................116English ....................1Tiếng Việt (26)繁体中文 (21)Menemukan alamat IP printer (opsional)1. Tekan tombol Setup (Pengaturan) .2. Buka Reports (Laporan), buka Config Report (Laporan Konfigurasi), lalu tekan OK .3.Temukan alamat IP printer dalam bagian Network Information (Informasi Jaringan).C ATATAN: Untuk informasi lebih lanjut, lihat User Guide (Panduan Pengguna)./support/ljMFPM125series /support/ljMFPM126series /support/ljMFPM127series /support/ljMFPM128seriesLaserJet Pro MFP M125, M126, M127, M128Panduan PersiapanPENTING:Ikuti Langkah 1-3 pada poster pengaturan perangkat keras printer, lalu lanjutkan dengan Langkah 4 di bawah ini.emilih metode sambungan dan persiapan penginstalan perangkat lunakSolusi lengkap OS X1. Jalankan file instalan perangkat lunak .dmg yang di-downloaddari web.2. Penginstal perangkat lunak akan mendeteksi bahasa sistem operasi,lalu menampilkan menu utama program penginstalan dalam bahasa yang sama.3. Setelah layar Perjanjian Lisensi Perangkat Lunak, pilih jenispenginstalan. 4. Ikuti petunjuk di layar untuk menginstal perangkat lunak. 5. Pada akhir proses penginstalan perangkat lunak, gunakanHP Utility Setup Assistant (Bantuan Pengaturan Utilitas HP) untuk mengkonfigurasi pilihan printer.Penginstalan dasar OS XUntuk menginstal driver cetak dan faks dasar tanpa menjalankan perangkat lunak solusi lengkap HP dari CD atau melalui download , ikuti langkah-langkah berikut:1.Sambungkan printer ke komputer atau jaringan.2. Dari System Preferences (Preferensi Sistem), klikPrinters andScanners (Printer dan Pemindai), klik tombol plus pada bagian kiri bawah, lalu pilih M125, M126, M127, atau M128 menggunakan driver AirPrint atau Secure AirPrint.Readiris Pro untuk HPDownload perangkat lunak gratis ini untuk mengaktifkan fitur pindai ekstra, termasuk OCR (Optical Character Recognition atau Pengenalan Karakter Optik).Untuk men-download perangkat lunak dari web, kunjungi:• /support/ljMFPM125series • /support/ljMFPM126series • /support/ljMFPM127series • /support/ljMFPM128series Pilih Driver (Driver), pilih sistem operasi yang tepat, lalu klikNext (Berikutnya). Klik Application - 3rd Party (Aplikasi - Pihak Ketiga), lalu klik tombol Download .Metode 1: Mengunduh dari HP Easy Start (Windows dan OS X)1. Kunjungi /laserjet , dan klik Unduh (Download).2. Ikuti petunjuk dan perintah di layar untuk menyimpan file ke komputer.3.Jalankan file perangkat lunak dari folder penyimpanan file, lalu lanjutkan dengan “6. Menginstal perangkat lunak”.Metode 2: Mengunduh dari situs Web dukungan printer (Windows dan OS X)1.Kunjungi /support/ljMFPM125series , /support/ljMFPM126series ,/support/ljMFPM127series , atau /support/ljMFPM128series .2. Pilih Software and drivers (Perangkat lunak dan driver).3. Mengunduh perangkat lunak untuk sistem operasi dan model printer Anda.4.Jalankan file instalasi dengan mengklik file .exe atau .zip, dan lanjutkan dengan “6. Menginstal perangkat lunak”.M etode 3: Instal dari CD printer (Windows saja)1. Masukkan CD printer ke komputer.2. Lanjutkan dengan “6. Menginstal perangkat lunak”.Untuk menggunakan HP ePrint via email, printer harus memenuhi persyaratan ini: • Printer harus disambungkan ke jaringan berkabel atau nirkabel dan memilikiakses Internet.• HP Web Services harus diaktifkan pada printer dan printer harus terdaftar diHP Connected.Mengaktifkan HP Web ServicesPanel kontrol LCD1. Setelah printer tersambung ke jaringan, masukkan alamat IP jaringan printer kebrowser web. Gunakan salah satu pilihan berikut untuk menemukan IP printer:• Buka "Menemukan alamat IP printer" dalam Panduan Persiapan ini • Lihat Panduan Pengguna2. Pada halaman web yang ditampilkan, klik tab HP Web Services .3. Baca dan terima persyaratan penggunaan, lalu klik tombol Enable (Aktifkan).Panel kontrol layar sentuh1.2. Enable Web Services (Aktifkan Layanan Web). Printer akanmengaktifkan Web Services (Layanan Web), lalu mencetak halaman informasi. Halaman informasi berisi kode printer yang digunakan untuk mendaftarkan printer HP di HP Connected. 3. Kunjungi untuk membuat akun HP ePrint danGunakan HP ePrint via email untuk mencetak dokumen dengan mengirimnya sebagai lampiran ke alamat email printer dari perangkat apa pun yang mendukung email, bahkan dari perangkat di jaringan yang berbeda.7.1Menyambungkan perangkat ke jaringan nirkabelUntuk mencetak dari telepon atau tablet, sambungkan perangkat tersebut ke jaringan nirkabel yang sama seperti printer.Perangkat Apple iOS (AirPrint)Buka item yang akan dicetak, lalu pilih ikon Action (Tindakan). Pilih Print (Cetak), pilih printer, lalu pilih Print (Cetak).Perangkat Android versi lebih baru (4.4 atau versi yang lebih baru)Buka item yang akan dicetak, lalu pilih tombol Menu . Pilih Print (Cetak), pilih printer, lalu pilih Print (Cetak).Perangkat tertentu mengharuskan Anda men-download aplikasi plugin HP Print Service dari Google Play Store.Perangkat Android versi lebih lama (4.3 atau versi yang lebih lama)Download aplikasi HP ePrint dari Google Play Store.Windows PhoneDownload aplikasi HP AiO Remote dari Windows Store.Selengkapnya tentang pencetakan selulerUntuk mengetahui selengkapnya tentang pilihan pencetakan seluler lainnya, termasuk solusitambahan ePrint, pindai kode QR, atau lihat bagian "Pencetakan seluler" dalam Panduan Pengguna.7.2 H P Wireless Direct(hanya model nirkabel nw, rnw, dan fw)HP Wireless Direct memungkinkan pencetakan jarak dekat secara langsung dari perangkat bergerak nirkabel ke printer yang mendukung HP Wireless Direct tanpa memerlukan sambungan ke jaringan atau Internet.Mengaktifkan HP Wireless DirectUntuk mengkonfigurasi HP Wireless Direct dari panel kontrol, lakukan langkah-langkah berikut:Panel kontrol LCD1. Pada panel kontrol printer, tekan tombol Setup (Pengaturan) untukmembuka menu berikut:• Network Setup (Pengaturan Jaringan)• Wireless Menu (Menu Nirkabel)• Wireless Direct (Langsung Nirkabel)2. Tetapkan pilihan ke On (Aktif), lalu tekan tombol OK . Printer akanmenyimpan pengaturan, lalu mengembalikan panel kontrol ke menu Wireless Direct Settings (Pengaturan Langsung Nirkabel).Panel kontrol layar sentuh1. Dari layar Home (Awal) pada panel kontrol printer, sentuh tombolWireless (Nirkabel), lalu buka menu berikut:• Wireless Menu (Menu Nirkabel)• Wireless Direct Settings (Pengaturan Langsung Nirkabel)• On/Off (Aktif/Tidak Aktif)2. Sentuh item menu On (Aktif). Printer akan menyimpan pengaturan,lalu mengembalikan panel kontrol ke menu Wireless Direct Settings (Pengaturan Langsung Nirkabel).U ntuk informasi selengkapnya tentang pencetakan nirkabel danpengaturan nirkabel, kunjungi /go/wirelessprinting .Menemukan printer1. Dari perangkat bergerak, aktifkan WiFi, lalu cari jaringan nirkabel.2. Pilih printer, yang akan muncul sebagai ‘HP-Print-nama-model’ sepertiditampilkan pada panel kontrol printer. Contoh nama printer :HP-Print-29-AJ OJP 8620Gunakan perangkat lunak HP Scan di komputer untuk memulai tugas pindai pada printer.WindowsKlik Start (Mulai), pilih Programs (Program) atau All Programs (Semua Program), OS XKlik Applications (Aplikasi), pilih HP , lalu pilih HP Scan .Mengatasi Masalahไทย.........................16Bahasa Indonesia .....6Tiếng Việt (26)繁体中文................21English .. (1)프린터 IP 주소 찾기 (선택 사항)1. 설정 버튼을 누릅니다.2. 보고서를 열고 보고서 구성을 연 다음 [확인] 을 누릅니다.3.네트워크 정보 섹션에서 프린터 IP 주소를 찾습니다. 참고: 자세한 내용은 사용 설명서를 참조하십시오./support/ljMFPM125series /support/ljMFPM126series /support/ljMFPM127series /support/ljMFPM128seriesLaserJet Pro MFP M125, M126, M127, M128시작 설명서중요:프린터 하드웨어 설치 포스터의 1~3단계를 수행한 다음 아래의 4단계를 진행하십시오.OS X 전체 솔루션1. 웹에서 다운로드한 소프트웨어 설치 .dmg 파일을 실행합니다.2. 소프트웨어 설치 프로그램에서 운영 체제의 언어를 감지한 후 설치프로그램의 기본 메뉴를 동일한 언어로 표시합니다.3. 소프트웨어 라이선스 계약 화면 다음에 설치 유형을 선택합니다. 4. 화면의 지시에 따라 소프트웨어를 설치합니다.5. 소프트웨어 설치 과정 마지막에 HP 유틸리티 설정 지원을 사용하여프린터 옵션을 구성합니다.OS X 기본 설치CD 또는 hp .com 에서 다운로드한 HP 전체 솔루션 소프트웨어를 실행하지 않고 기본 인쇄 및 팩스 드라이버를 설치하려면 다음 단계를 수행합니다.1. 컴퓨터 또는 네트워크에 프린터를 연결합니다.2. 시스템 환경 설정에서 프린터 및 스캐너를 클릭한 다음 왼쪽 하단에있는 더하기(+) 버튼을 클릭하고 이름이 AirPrint또는 HP 프린터인 드라이버를 사용하여 M125, M126, M127 또는 M128을 선택합니다.HP 용 Readiris PRO 14광학 문자 인식(OCR)을 포함하여 별도의 스캔 기능을 사용할 수 있는 이 무료 소프트웨어를 다운로드하십시오.웹에서 소프트웨어를 다운로드하려면 다음으로 이동합니다.• /support/ljMFPM125series • /support/ljMFPM126series • /support/ljMFPM127series • /support/ljMFPM128series 드라이버를 선택하고 적절한 운영 체제를 선택한 후 [다음] 을 클릭합니다. “애플리케이션 - 타사” 를 선택한 다음 다운로드 버튼을 클릭합니다.방법 1: HP Easy 시작 (Windows 및 OS X)에서 다운로드1. /laserjet 로 이동한 후 다운로드를 클릭합니다.2. 컴퓨터에 파일을 저장하려면 화면의 지침과 메시지를 따릅니다.3.파일이 저장된 폴더에서 소프트웨어 파일을 실행하고 다음 단계를 진행합니다 “6. 소프트웨어 설치.”방법 2: 프린터 지원 웹 사이트 (Windows 및 OS X) 에서 다운로드1.w /support/ljMFPM125series , /support/ljMFPM126series ,/support/ljMFPM127series , 또는/support/ljMFPM128series 로 이동합니다.2. 소프트웨어 및 드라이버를 선택합니다3. 해당 프린터 모델 및 운영 체제에 해당하는 소프트웨어를 다운로드합니다.4. 필요에 따라 .exe 또는 .zip 파일을 클릭하여 설치 파일을 실행 한 후“6번 소프트웨어 설치” 단계를 계속 진행합니다.방법 3: 프린터 CD (Windows 만 해당)에서 설치1. 컴퓨터에 프린터 CD 를 넣습니다.2. 다음 단계를 진행합니다 “6. 소프트웨어 설치.”이메일을 통한 HP ePrint 를 사용하려면 프린터가 다음 요구 사항을 충족해야 합니다.• 프린터가 유선 또는 무선 네트워크에 연결되어 있고 인터넷에 접속되어야합니다.• 프린터에 HP 웹 서비스가 활성화되어 있어야 하며, HP Connected 에 프린터가등록되어 있어야 합니다.HP 웹 서비스 활성화LCD 제어판1. 프린터가 네트워크에 연결되면 웹 브라우저에 프린터의 IP 주소를입력합니다. 다음 옵션 중 하나를 사용하여 프린터 IP 를 찾습니다.• 이 시작 설명서에 있는 “프린터 IP 주소 찾기”로 이동• 사용 설명서 참조2. 표시되는 웹 페이지에서 HP 웹 서비스 탭을 클릭합니다.3. 약관을 검토하고 동의한 다음 활성화 버튼을 클릭합니다.터치스크린 제어판1..2. 웹 서비스 활성화 버튼을 누릅니다. 프린터에서 웹 서비스가 활성화되고정보 페이지가 인쇄됩니다. 정보 페이지에는 HP 프린터를 HP Connected 에 등록하는 데 사용되는 프린터 코드가 있습니다.3. www .hpconnected .com 으로 이동하여 HP ePrint 계정을 만들고 설정 과정을완료합니다.이메일을 통한 HP ePrint 를 사용하면 장치가 동일한 네트워크 상에 없어도 이메일을 사용할 수 있는 모든 장치에서 프린터의 이메일 주소로 문서를 첨부 파일로 전송하여 인쇄할 수 있습니다.7.1무선 네트워크에 장치 연결휴대폰이나 태블릿에서 인쇄하려면 장치를 프린터와 동일한 무선 네트워크에 연결합니다.Apple iOS 장치 (AirPrint)인쇄할 항목을 열고 작업 아이콘을 선택합니다. 인쇄를 선택하고 프린터를 선택한 다음 인쇄를 선택합니다.신규 Android 장치 (4.4 이상 버전)인쇄할 항목을 열고 메뉴 버튼을 선택합니다. 인쇄를 선택하고 프린터를 선택한 다음 인쇄를 선택합니다.일부 장치의 경우 Google Play 스토어에서 HP 인쇄 서비스 플러그인 앱을 다운로드해야 합니다.이전 Android 장치(4.3 이하 버전)Google Play 스토어에서 HP ePrint 앱을 다운로드합니다.Windows 폰Windows Store 에서 HP AiO Remote 앱을 다운로드합니다.모바일 인쇄에 대해 자세히 알아보기추가적인 ePrint 에 솔루션을 포함하여, 기타모바일 인쇄 옵션에 대한 자세한 내용은 QR 코드를 스캔하거나 사용 설명서의 “모바일 인쇄”섹션을참조하십시오.7.2H P Wireless Direct (nw , rnw , 및 fw 무선 모델만 해당)HP Wireless Direct 기능을 사용하면, 설정된 네트워크나 인터넷으로 연결할 필요 없이 무선 모바일 장치에서 HP Wireless Direct 기능이 활성화된 제품으로 직접 인쇄가 가능합니다.HP Wireless Direct 활성화제어판에서 HP Wireless Direct 를 설정하려면 다음과 같이 하십시오.LCD 제어판1. 프린터 제어판에서 설정 버튼을 눌러 다음 메뉴를 엽니다.• 네트워크 설정• 무선 메뉴• W ireless Direct 2. 켜기 옵션을 선택한 다음 확인 버튼을 누릅니다. 프린터가 설정을저장하고 나면 제어판의 Wireless Direct 설정 메뉴로 돌아옵니다.터치스크린 제어판1. 프린터 제어판의 홈 화면에서 무선 버튼을 터치하고, 다음 메뉴를엽니다.• 무선 메뉴• W ireless Direct 설정• 켜기/끄기2. 켜기 메뉴 항목을 터치합니다. 프린터가 설정을 저장하고 나면제어판의 Wireless Direct 설정 메뉴로 돌아옵니다.무선 인쇄 및 무선 설정에 대한 자세한 내용은 www .hp .com /go /wirelessprinting 에서 확인하십시오.프린터 찾기1. 모바일 장치에서 WiFi 를 켜고 무선 네트워크를 검색합니다.2. 프린터 제어판에서 표시되는 것과 같이 ‘HP-Print-모델-이름’으로표시되는 프린터를 선택합니다. 프린터 이름 예: HP-Print-29-AJ OJP 8620프린터에서 스캔 작업을 시작하려면 컴퓨터의 HP Scan 소프트웨어를 사용하십시오.Windows시작을 클릭한 다음, 프로그램 또는 모든 프로그램, HP, HP Scan을 차례로 OS X애플리케이션을 클릭한 다음, HP, HP Scan을 차례로 선택합니다.문제 해결한국어....................11Bahasa Indonesia .....6Tiếng Việt (26)繁体中文................21English ..................../support/ljMFPM125series /support/ljMFPM126series /support/ljMFPM127series/support/ljMFPM128seriesวธท 1: ดาวน์โหลดจาก HP Easy Start (Windows และ OS X)1. ไปที /laserjet และคลิก ดาวน์โหลด (Download).2. ทำ�ต�มคำ�แนะนำ�บนหน้�จอและพรอมต์เพือบันทึกไฟล์ในคอมพิวเตอร์.3.เปิดไฟล์ซอฟต์แวร์จ�กโฟลเดอร์ทบนทึกไฟล์ไว้ และดำ�เนินก�รต�ม “6. ติดตังซอฟต์แวร์”วธท 2: ดาวน์โหลดจากเว็บไซต์การสนับสนุนเครืองพิมพ์ (Windows และ OS X)1.ไปที /support/ljMFPM125series , /support/ljMFPM126series , /support/ljMFPM127series หรือ /support/ljMFPM128series .2.เลือก Software and drivers (ซอฟต์แวร์และไดร์เวอร์).3. ด�วน์โหลดซอฟต์แวร์ส�หรับรุนเครืองพิมพ์และระบบปฏิบตก�รของคุณ.4.เปิดไฟล์ก�รติดตังโดยคลิกไฟล์ .exe หรือ .zip ต�มจำ�เป็น และดำ�เนินก�รต�ม “6. ติดตังซอฟต์แวร์”วธท 3: ติดตังจากแผ่นซีดเครืองพิมพ์ (Windows เท่านัน)1. ใส่แผ่นซีดเครืองพิมพ์ลงในคอมพิวเตอร์.2. ดำ�เนินก�รต�ม “6. ติดตังซอฟต์แวร์”ไทย.........................16한국어....................11Bahasa Indonesia .....6Tiếng Việt (26)繁体中文................21English .. (1)1. 按下「設定」 尋找印表機 IP 位址(選用)按鈕。
添加打印机的步骤
添加打印机的步骤Setting up a printer can be a daunting task for many people. However, following a few simple steps can make the process much easier. First, unpack the printer from its packaging and remove all the protective materials. Then, connect the printer to a power source and turn it on. Next, install the ink or toner cartridges and load paper into the tray.对于许多人来说,设置打印机可能是一项令人生畏的任务。
然而,遵循一些简单的步骤可以使这个过程变得更加容易。
首先,从包装中取出打印机,并移除所有的保护材料。
然后,将打印机连接到电源,并打开它。
接下来,安装墨盒或碳粉盒,并将纸张加载到纸盒中。
Once the printer is physically set up, it is time to install the printer drivers on your computer. This can usually be done by inserting the installation CD that came with the printer or by downloading the drivers from the manufacturer's website. Follow the on-screen instructions to complete the driver installation process. After the printer drivers are installed, you should be able to print a test page to ensure that the printer is working properly.一旦打印机在物理上安装好了,就是安装打印机驱动程序到你的计算机的时候了。
hp无线打印机设置

惠普m126nw无线打印机设置准备工作:1、上网搜索m126nw打印机驱动下载、安装;2、用USB将打印机与电脑连接,添加该打印机到电脑上,测试就是否可以打印,可打印证明驱动正确;无线打印机设置:1、断开USB连接;2、按打印机设置键,选择网络设置,无线菜单-无线直接与无线设备设置为打开模式,打印机自动生成自己的SSID名与IP地址;3、按打印机设置键,选择网络设置,无线菜单-WPS设置-按钮,按OK,打开打印机无线路由;4、按打印机设置键,选择报告-配置设置,点OK,打印配置设置信息;5、断开电脑原有的无线网络连接;6、根据配置设置信息里“无线直接设置”里的SSID(HP-Print-80-LaserJet Pro MFP )名,在电脑“无线网络查找”上找到该SSID,点击连接,连接密码在设置-网络设置-无线菜单-无线直接里选择“密码查瞧”获得;7、连接上打印机该无线网络,打开浏览器,在网址位置输入配置设置报告里“无线直接设置”里的“IP地址”(192、168、223、1),进入打印机设置界面;8、在打开的设置界面中选择网络-无线设置,选择“启用”通信模式选择“加入现有无线网络”,如图:9、在无线设置的“网络名称”选择公司使用的无线名称,“身份验证”处输入无线网络密码,点击应用,如图:10、在“IP4配置”中,选择“手动”给打印机配置固定IP地址,避免产生网络IP地址冲突,点击“应用”;如图:11、以上无线打印机的设置已经完成,断开电脑与打印的无线连接,重新连接回公司无线网络。
已经添加该打印机的设置电脑,直接进入控制面板-打印机与传真,右击该打印机选择“属性”,在“端口”项选择“添加端口”,端口类型选择“Standard TCP/IP”模式,点击“新端口”,在“新端口打印机名或IP地址”处输入分配给打印机的IP地址,然后“下一步”,完成后即可直接打印;如图:11、其她电脑直接进入控制面板-打印机与传真-文件-打印服务器-端口,后面按照上面的端口添加方式添加打印机即可;如图:。
惠普打印机安装方法
惠普打印机安装方法惠普打印机在当前市面上非常普遍,基本上随处可见,那么惠普打印机怎么安装?这里就为大家介绍下惠普打印机安装方法,一起来看看惠普打印机怎么安装和安装方法。
惠普打印机安装方法惠普打印机安装——USB模式惠普打印机安装步骤:1. 接通打印机电源,将打印机usb接口与pc连接,将hp驱动光盘插入光驱;2. 光盘被读取后会自动播放,根据提示进行程序的安装,注意:选择型号时选择本打印机型号;3. 安装完成后安装程序自动退出,此时可以选择打印测试页测试打印机是否安装成功;惠普打印机安装——网络模式惠普打印机安装步骤:1.接通打印机电源,将打印机接入能自动获取ip的网络,等待60秒左右,长按打印机打印按钮;2.当打印机显示准备就绪后放开打印按钮,此时打印机打印一张带打印机信息的纸张;3.根据纸张上显示的ip参数信息设置一台pc机ip为其同意网段ip,用网线将pc与打印机相连;4.在浏览器中浏览打印机设置(输入打印机ip),在此修改其参数信息;5.选择智能打印机安装界面,下载打印机驱动,下载完成后安装该驱动;6.进入打印机设置界面设置打印机本地ip(此例为192.168.101.204);7.将打印机接入局域网,此时本地计算机可以与打印机通信,若需要安装打印机可以进控制面板进行添加打印操作,注意:添加打印机类型为网络打印机;8.根据向导完成打印机添加过程,完成后网络打印机即可使用;以上就是我介绍的惠普打印机怎么安装和安装方法,希望对你有帮助。
关于惠普惠普(HP)是世界最大的信息科技(IT)公司之一,成立于1939年,总部位于美国加利福尼亚州帕洛阿尔托市。
惠普下设三大业务集团:信息产品集团、打印及成像系统集团和企业计算机专业服务集团。
中国惠普有限公司总部位于北京,在上海、广州、沈阳、南京、西安、武汉、成都、深圳等都设有分公司。
中国惠普在大连设有惠普全球呼叫中心,在重庆设有生产工厂,在天津设有数据中心。
