对话框的属性在代码中设置
qtquick messagedialog 示例
qtquick messagedialog 示例下面是一个使用 `QtQuick` 的 `MessageDialog` 的简单示例:首先,确保你已经安装了 `QtQuick` 和相关的库。
然后,创建一个 `QML` 文件,例如`MessageDialog.qml`,并在其中添加以下代码:```qmlimport QtQuick 2.12import QtQuick.Controls 2.12// 创建 MessageDialog 组件MessageDialog {title: "提示"text: "这是一个示例消息对话框。
"// 显示确定按钮standardButtons: StandardButtons.Ok// 点击确定按钮后的回调函数onAccepted: {console.log("用户点击了确定按钮。
")}}```在上述代码中,我们创建了一个 `MessageDialog` 组件。
通过设置 `title` 属性来指定对话框的标题,`text` 属性来设置对话框的文本内容。
我们还使用 `standardButtons` 属性显示了一个确定按钮,并在 `onAccepted` 回调函数中处理按钮点击事件。
要在应用中使用这个 `MessageDialog`,可以将 `MessageDialog.qml` 文件添加到你的项目中,并在需要显示消息对话框的地方引用它。
例如,在其他 `QML` 文件中,可以这样使用:```qmlimport QtQuick.Controls 2.12Button {text: "显示消息对话框"onClicked: {// 显示 MessageDialogQt.createComponent("MessageDialog.qml").createObject(parent)}}```在上述代码中,我们创建了一个按钮,当点击按钮时,会通过 `Qt.createComponent` 方法加载 `MessageDialog.qml` 文件,并创建 `MessageDialog` 对象显示出来。
fxml dialogpane用法
fxml dialogpane用法FXML DialogPane是JavaFX中的一个界面组件,用于创建弹窗对话框。
它可以用于显示用户交互或显示重要的信息。
下面将介绍如何使用FXML DialogPane 来创建自定义的弹窗对话框。
首先,在JavaFX应用程序中创建一个FXML文件,用于定义DialogPane的布局和样式。
可以使用JavaFX Scene Builder来创建FXML文件,或者手动编写FXML代码。
在FXML文件中,可以使用各种JavaFX控件来构建对话框的布局。
例如,可以添加Label、TextField、Button等控件,并通过CSS样式来设置它们的外观。
接下来,在Java代码中,加载FXML文件并创建DialogPane对象。
可以使用FXMLLoader类来加载FXML文件,并通过load()方法将其转换为Node对象。
然后,创建一个Dialog对象,并将刚才创建的DialogPane设置为其内容。
可以使用Dialog类的构造函数来创建Dialog对象,然后使用setDialogPane()方法将前面创建的DialogPane对象设置为其内容。
接着,可以设置Dialog的标题、按钮等属性。
可以使用setTitle()方法设置对话框的标题,使用setHeaderText()方法设置对话框的头部文本,使用setContentText()方法设置对话框的内容文本。
最后,显示对话框并等待用户的交互。
可以使用show()方法显示对话框,并使用showAndWait()方法等待用户对对话框的响应。
根据用户的操作,可以通过对话框的getDialogPane().getButtonData()方法获取到用户点击的按钮类型。
总结一下,对于FXML DialogPane的用法,首先需要创建一个FXML文件用于定义对话框的布局和样式。
然后,在Java代码中,加载FXML文件并创建DialogPane对象。
js中dialog的用法

js中dialog的用法在Web开发中,JS作为一种客户端脚本语言,在页面交互中扮演着重要的角色。
其中,Dialog对话框作为JS中的一种组件,起到了与用户进行互动的作用。
本文将借助于jQuery,探讨JS中Dialog的使用方法。
一、弹窗的创建在使用Dialog的过程中,首先需要对其进行定义。
在jQuery UI中,Dialog的创建是通过 $("#dialog").dialog() 一行来实现的,其中dialog()函数中携带的参数可以根据需要进行设置。
例如:$('#dialog').dialog({autoOpen: false,modal: true,open: function() {// ...},close: function() {// ...}});我们通过这段代码,定义了一个id为“dialog”的Dialog组件。
其中,autoOpen 参数表示是否自动打开;modal参数表示是否为模态对话框;open和close参数表示在Dialog打开和关闭时需要执行的回调函数。
二、弹窗的打开当我们需要调用Dialog的时候,只需要调用dialog("open")函数即可。
例如: $('#dialog').dialog("open");也可以给触发打开Dialog的元素绑定事件,例如:$('button').click(function(){$('#dialog').dialog("open");});当然,为了更好的用户体验,我们可以通过修改autoOpen参数来实现Dialog 的自动打开。
例如:$('#dialog').dialog({autoOpen: true});三、弹窗的关闭Dialog的关闭方式可以通过close()函数来实现。
cfolderpickerdialog 用法 -回复
cfolderpickerdialog 用法-回复标题:cfolderpickerdialog 用法指南:一步一步解析如何使用介绍:cfolderpickerdialog 是一个流行的用于文件夹选择的对话框控件,应用广泛于Windows开发。
本文将为读者提供详细的使用指南,一步一步教你如何使用cfolderpickerdialog 控件。
第一步:引入头文件和命名空间cfolderpickerdialog 是由MFC(Microsoft Foundation Classes)提供的一个控件,因此你需要在你的代码中引入MFC 的头文件。
在你的源代码文件的顶部,添加以下几行代码:#include <afxdlgs.h>using namespace std;第二步:创建cfolderpickerdialog 对象要使用cfolderpickerdialog 控件,首先需要在你的代码中实例化一个cfolderpickerdialog 的对象。
在你的代码中声明一个cfolderpickerdialog 对象,例如:Cfolderpickerdialog folderPicker;第三步:设置对话框的属性在使用cfolderpickerdialog 控件之前,你需要设置对话框的属性,例如对话框的标题、初始化目录等。
你可以使用下面的代码来设置这些属性:folderPicker.m_ofn.lpstrTitle = TEXT("请选择文件夹"); folderPicker.m_ofn.Flags = OFN_EXPLORER;在这个例子中,我们设置了对话框的标题为"请选择文件夹",并启用了OFN_EXPLORER 标志,使得对话框使用资源管理器的风格。
第四步:显示文件夹选择对话框设置好对话框的属性后,你可以使用cfolderpickerdialog 对象的DoModal 函数来显示文件夹选择对话框:if(folderPicker.DoModal() == IDOK){CString selectedFolder = folderPicker.GetPathName();对所选文件夹进行处理}在这个例子中,我们使用DoModal 函数来显示文件夹选择对话框,并通过GetPathName 函数获取用户所选择的文件夹路径。
VBA 中的自定义对话框设计与使用指南
VBA 中的自定义对话框设计与使用指南自定义对话框在VBA编程中经常被用于与用户进行交互,以便获取输入、显示消息或提供选项。
本文将介绍VBA中的自定义对话框的设计和使用指南,以帮助您更好地在VBA编程中使用自定义对话框。
1. 了解VBA中的常见对话框类型VBA中有多种类型的对话框可供选择,例如输入框、提示框、确认框、文件选择框等。
您需要了解每种对话框的特点和使用方法,以便正确选择适合您的需要的对话框类型。
2. 创建自定义对话框在VBA编程中,您可以使用用户窗体(UserForm)来创建自定义对话框。
用户窗体类似于界面设计工具,可以帮助您创建自定义的界面元素,如文本框、标签、按钮等。
通过在用户窗体上添加这些界面元素,您可以实现自定义对话框的功能。
3. 设计自定义对话框界面在设计自定义对话框界面时,您需要注意以下几点:- 界面元素的布局和位置应该合理,以便用户能够直观地理解其功能。
- 文本框、标签等界面元素的命名要具有描述性,方便代码编写和理解。
- 按钮的事件处理过程需要与相应的功能相匹配,确保用户操作的准确性和便捷性。
4. 处理用户输入在自定义对话框中,您经常需要从用户那里获取输入,并对输入进行处理。
VBA提供了各种方法来处理用户输入。
- 获取文本框中的文本:可以使用文本框的Value属性来获取用户输入的文本。
- 获取选择框的选项:可以使用选择框的Value属性来获取用户选择的选项。
- 检查输入的有效性:您可以在代码中对用户输入进行验证,并根据需要显示提示信息或进行警告。
5. 显示消息和提示除了从用户那里获取输入,您可能还需要向用户显示消息和提示。
在自定义对话框中,您可以使用标签或消息框来显示消息和提示。
根据需要,您可以在自定义对话框中添加相关的元素,并在用户执行某些操作时显示消息或提示。
6. 调用和显示自定义对话框在VBA编程中,您可以使用调用对话框的方法来显示自定义对话框。
您可以在代码中使用调用方法,并传递相关的参数,以便显示自定义对话框。
filedialog用法
filedialog用法一、什么是filedialogfiledialog是Python标准库中的一个模块,用于创建一个图形用户界面(GUI)来进行文件和目录的选择。
它提供了一种简单而直观的方法来与计算机的文件系统进行交互,让用户能够方便地选择需要的文件和目录。
本文将详细介绍filedialog的使用方法及常见功能。
二、filedialog的基本用法filedialog模块提供了几个主要的函数,用于创建文件和目录选择的对话框:1.askopenfilename:用于选择单个文件。
2.askopenfilenames:用于选择多个文件。
3.asksaveasfilename:用于选择文件保存路径。
4.askdirectory:用于选择目录。
下面将逐一介绍每个函数的用法和参数。
2.1 askopenfilenameaskopenfilename函数是用于选择单个文件的对话框。
它的基本用法如下:from tkinter import filedialogfilename = filedialog.askopenfilename()调用askopenfilename函数后,会弹出一个文件选择对话框,用户可以在对话框中选择一个文件。
选择完毕后,对话框会关闭,同时filename变量会被赋值为所选择的文件的完整路径。
askopenfilename函数还可以接受一些可选参数,用于设置对话框的标题、初始目录等。
例如:filename = filedialog.askopenfilename(title='选择文件', initialdir='/tmp')上述代码会在文件选择对话框中显示标题为”选择文件”,初始目录为”/tmp”的文件列表。
2.2 askopenfilenamesaskopenfilenames函数与askopenfilename类似,用于选择多个文件。
它的基本用法如下:from tkinter import filedialogfilenames = filedialog.askopenfilenames()调用askopenfilenames函数后,会弹出一个文件选择对话框,用户可以在对话框中选择多个文件。
DialogResult三种形式

这三种DialogResult,只要目前的窗体符合要求,DialogResult 都可以接受他们的返回值。
并不限定只能用到那个方面。
1,Button.DialogResult如果此属性的DialogResult不是设置为None,并且父窗体是通过ShowDialog方法显示的,则不必挂钩任何事件,单击按钮也可关闭父窗体。
然后,该窗体的DialogResult属性将设置为该按钮被单击时的DialogResult。
例如,若要创建一个“是/否/取消”对话框,只需添加三个按钮并将其DialogResult属性分别设置为Yes、No和Cancel即可。
实例如下:private void InitializeMyButton(){// Create and initialize a Button.Button button1 = new Button();// Set the button to return a value of OK when clicked.button1.DialogResult = DialogResult.OK;// Add the button to the form.Controls.Add(button1);}参看项目E:\C#\projects\WindowsForms2_ChooseController\WindowsForms2_ChooseController。
2.Form.DialogResult窗体的对话框结果是当窗体显示为模式对话框时从该窗体返回的值。
如果窗体显示为对话框,用DialogResult枚举中的值设置此属性将设置该窗体的对话框结果值、隐藏模式对话框并将控制返回给调用窗体。
此属性通常由窗体上Button控件的DialogResult属性设置。
当用户单击Button控件时,分配给Button的DialogResult属性的值将分配给该窗体的DialogResult属性。
dev xtraopenfiledialog 用法 -回复
dev xtraopenfiledialog 用法-回复使用xtraOpenFileDialog的方法xtraOpenFileDialog是DevExpress控件库中提供的一个开源对话框组件,用于在应用程序中打开文件。
该控件提供了许多功能和选项,使用户能够浏览和选择文件,并对所选文件进行各种操作。
在本文中,我们将一步一步地介绍如何正确地使用xtraOpenFileDialog控件。
1. 引用控件库在开始使用xtraOpenFileDialog之前,我们首先需要将DevExpress控件库添加到我们的项目中。
我们可以通过NuGet包或手动引用DLL文件的方式添加该控件库。
2. 创建xtraOpenFileDialog控件实例一旦我们已经成功引用了DevExpress控件库,我们可以在我们的代码中创建xtraOpenFileDialog控件的实例。
我们可以通过以下方式完成这一步骤:using DevExpress.XtraEditors;...xtraOpenFileDialog openFileDialog = new xtraOpenFileDialog();3. 设置对话框的属性一旦我们成功创建了xtraOpenFileDialog的实例,我们可以通过设置其各种属性来自定义对话框的行为和样式。
以下是其中一些常用的属性:- Title: 设置对话框标题。
- InitialDirectory: 设置对话框打开的初始目录。
- Filter: 设置筛选器,用于限制用户可以选择的文件类型。
- Multiselect: 设置是否允许用户选择多个文件。
- RestoreDirectory: 设置在每次打开对话框时是否还原到上一次打开的目录。
- CheckFileExists: 设置是否检查用户选择的文件是否存在。
- CheckPathExists: 设置是否检查用户选择的路径是否存在。
这些属性的设置可以通过直接访问控件的属性或使用DialogResult枚举类型来完成,具体取决于您的应用程序的需求。
el-dialog loading文案
在当今的网页开发中,el-dialog组件是Element UI库中的一个重要组件,它可
以帮助我们创建弹出对话框。
对话框是一种重要的用户界面元素,它可以用于显示消息、请求用户输入或显示表单。
然而,当我们在使用el-dialog组件时,可能会遇到一个问题:当对话框打开时,
如何向用户展示加载状态?在某些情况下,我们需要等待数据加载完成或处理一些异步操作,这时我们希望向用户展示一个加载中的状态。
为了解决这个问题,我们可以使用el-dialog组件的loading属性。
loading属性是一个布尔值,当设置为true时,对话框将显示一个加载中的状态。
我们可以使用这个属性来在对话框打开时显示加载状态,并在数据加载完成或异步操作完成后将其设置为false。
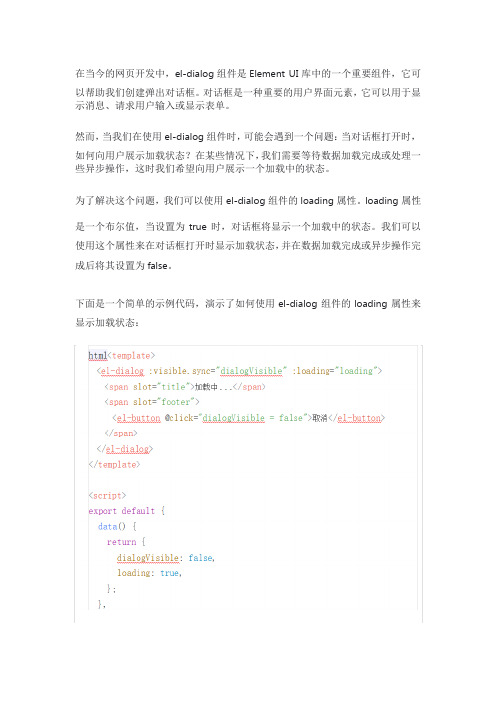
下面是一个简单的示例代码,演示了如何使用el-dialog组件的loading属性来显示加载状态:
在上面的代码中,我们首先在el-dialog 组件上设置了visible.sync 属性来控制对话框的显示和隐藏,同时设置了loading 属性来显示加载状态。
当mounted()生命周期方法被调用时,我们模拟了一个异步操作,通过setTimeout()函数等待2秒钟后将loading 属性设置为false ,这样就可以隐藏加载状态。
在对话框的标题和页脚中,我们分别使用了slot 属性来插入自定义的内容。
openfiledialog用法
openfiledialog用法OpenFileDialog是一个用于打开文件的对话框,通常用于选择和打开用户计算机上的文件。
以下是OpenFileDialog的用法以及一些重要的属性和方法。
用法:1. 在代码中创建一个OpenFileDialog实例:```csharpOpenFileDialog openFileDialog = new OpenFileDialog(;```2. 配置OpenFileDialog的属性:- Filter: 设置文件筛选器,用于过滤显示在对话框中的文件类型。
例如,`openFileDialog.Filter = "文本文件 (*.txt),*.txt,所有文件 (*.*),*.*";`将只显示txt文本文件和所有文件。
- InitialDirectory: 设置初始目录,对话框将在此目录中打开。
- Multiselect: 设置是否允许选择多个文件。
- Title: 设置对话框的标题。
3.调用对话框显示:```csharpDialogResult result = openFileDialog.ShowDialog(;```4.处理对话框的返回结果:```csharpif (result == DialogResult.OK)//用户点击了确认按钮string selectedFilePath = openFileDialog.FileName;//在这里可以使用选择的文件路径}```重要属性:- Filter: 获取或设置文件筛选器。
- InitialDirectory: 获取或设置初始目录。
- FileName: 获取对话框中选择的文件的名称。
- FileNames: 获取对话框中选择的多个文件的名称。
- Title: 获取或设置对话框的标题。
重要方法:- ShowDialog: 显示打开文件对话框,并返回对话框的结果(例如,OK、Cancel等)。
qinputdialog用法 -回复

qinputdialog用法-回复QInputDialog是Qt框架中用于显示输入对话框的类。
它可以在用户与应用程序之间进行交互,用于获取用户输入的数据。
本文将介绍QInputDialog的用法,并以"使用QInputDialog获取用户输入"为主题,分步解释其使用方法。
第一步:导入QInputDialog类在使用QInputDialog之前,需要在代码中导入QInputDialog类。
可以通过以下代码实现:from PyQt5.QtWidgets import QInputDialog。
第二步:创建QInputDialog实例在代码中创建一个QInputDialog的实例对象,可以通过以下方式实现:1.使用默认构造函数创建QInputDialog实例对象:input_dialog = QInputDialog()。
2.使用带有parent参数的构造函数,指定输入对话框的父窗口:input_dialog = QInputDialog(parent)。
第三步:设置对话框属性可以通过set方法设置QInputDialog的属性,例如标题、标签、默认文本等。
以下是一些常用的属性设置方法:1.设置对话框标题:input_dialog.setWindowTitle("输入对话框")。
2.设置对话框标签:input_dialog.setLabelText("请输入:")。
3.设置默认文本:input_dialog.setTextValue("默认值")。
第四步:显示对话框调用QInputDialog的`exec_()`方法,显示输入对话框。
该方法将阻塞主线程,直到用户关闭对话框。
调用示例代码:input_dialog.exec_()。
第五步:获取用户输入可以通过QInputDialog的静态方法get方法,获取用户在输入对话框中的输入数据。
C# winform对话框用法大全
C# winform对话框用法大全对话框中我们常用了以下几种:1、文件对话框(FileDialog) 它又常用到两个:打开文件对话框(OpenFileDialog)保存文件对话(SaveFileDialog)2、字体对话框(FontDialog)3、颜色对话框(ColorDialog)4、打印预浏对话框(PrintPreviewDialog)5、页面设置(PrintDialog)6、打印对话框(PrintDialog)还有更多,有时间的网友可以看看MSDN。
下面我们一个个来介绍。
在介绍的过程中我用到了一个自己开发的类:File,主要是文件操作的。
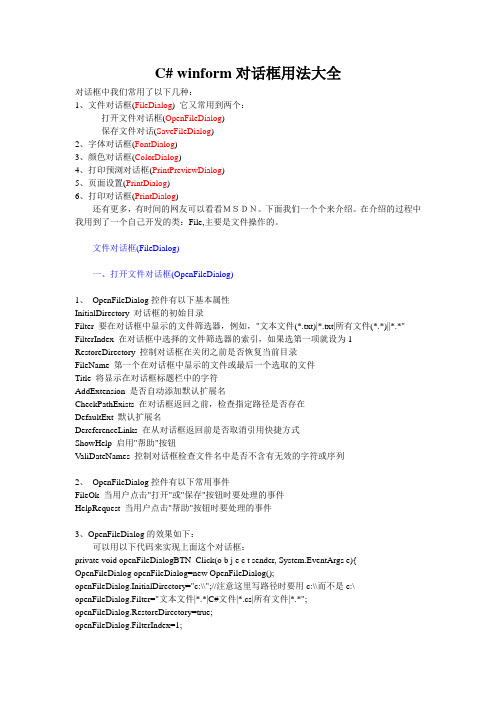
文件对话框(FileDialog)一、打开文件对话框(OpenFileDialog)1、OpenFileDialog控件有以下基本属性InitialDirectory 对话框的初始目录Filter 要在对话框中显示的文件筛选器,例如,"文本文件(*.txt)|*.txt|所有文件(*.*)||*.*" FilterIndex 在对话框中选择的文件筛选器的索引,如果选第一项就设为1 RestoreDirectory 控制对话框在关闭之前是否恢复当前目录FileName 第一个在对话框中显示的文件或最后一个选取的文件Title 将显示在对话框标题栏中的字符AddExtension 是否自动添加默认扩展名CheckPathExists 在对话框返回之前,检查指定路径是否存在DefaultExt 默认扩展名DereferenceLinks 在从对话框返回前是否取消引用快捷方式ShowHelp 启用"帮助"按钮ValiDateNames 控制对话框检查文件名中是否不含有无效的字符或序列2、OpenFileDialog控件有以下常用事件FileOk 当用户点击"打开"或"保存"按钮时要处理的事件HelpRequest 当用户点击"帮助"按钮时要处理的事件3、OpenFileDialog的效果如下:可以用以下代码来实现上面这个对话框:private void openFileDialogBTN_Click(o b j e c t sender, System.EventArgs e){ OpenFileDialog openFileDialog=new OpenFileDialog();openFileDialog.InitialDirectory="c:\\";//注意这里写路径时要用c:\\而不是c:\ openFileDialog.Filter="文本文件|*.*|C#文件|*.cs|所有文件|*.*";openFileDialog.RestoreDirectory=true;openFileDialog.FilterIndex=1;if (openFileDialog.ShowDialog()==DialogResult.OK){fName=openFileDialog.FileName;File fileOpen=new File(fName);isFileHaveName=true;richTextBox1.Text=fileOpen.ReadFile();richTextBox1.AppendText("");}}其中有用到了File()这个类,是我在程序用来执行文件操作,自己写的,在最后附了这个类的源码。
Excel VBA编程 设置控件属性
Excel VBA 编程 设置控件属性用户窗体和控件都具有属性(如尺寸、位置等),在设计用户窗体时可以通过【属性】窗口来改变这些属性的值。
除此之外,控件的属性值在运行时还可以通过代码来改变。
通过【属性】窗口设置的值,可以称为该控件或窗体的缺省值,而在运行时所作的变化仅当在窗体被装载时有效。
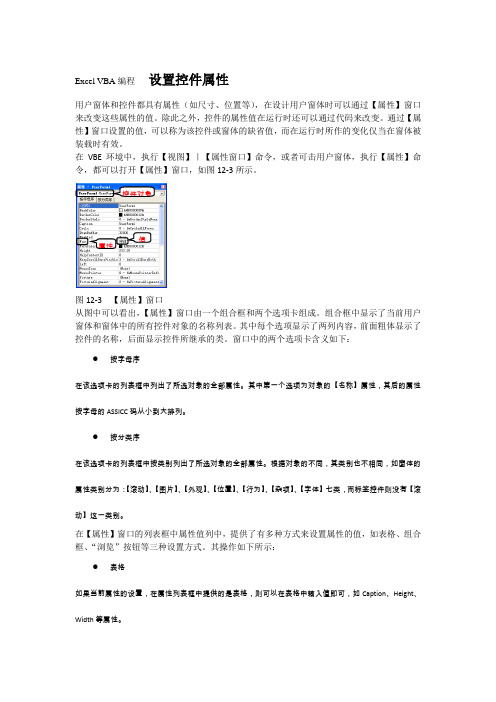
在VBE 环境中,执行【视图】|【属性窗口】命令,或者可击用户窗体,执行【属性】命令,都可以打开【属性】窗口,如图12-3所示。
图12-3 【属性】窗口从图中可以看出,【属性】窗口由一个组合框和两个选项卡组成。
组合框中显示了当前用户窗体和窗体中的所有控件对象的名称列表。
其中每个选项显示了两列内容,前面粗体显示了控件的名称,后面显示控件所继承的类。
窗口中的两个选项卡含义如下:● 按字母序在该选项卡的列表框中列出了所选对象的全部属性。
其中第一个选项为对象的【名称】属性,其后的属性按字母的ASSICC 码从小到大排列。
● 按分类序在该选项卡的列表框中按类别列出了所选对象的全部属性。
根据对象的不同,其类别也不相同,如窗体的属性类别分为:【滚动】、【图片】、【外观】、【位置】、【行为】、【杂项】、【字体】七类,而标签控件则没有【滚动】这一类别。
在【属性】窗口的列表框中属性值列中,提供了有多种方式来设置属性的值,如表格、组合框、“浏览”按钮等三种设置方式。
其操作如下所示:● 表格如果当前属性的设置,在属性列表框中提供的是表格,则可以在表格中输入值即可,如Caption 、Height 、Width 等属性。
● 组合框如果当前属性的设置,在属性列表框中提供的是组合框,则可以在组合框中选择其中列表项,或者,双击组合框可以依次循环更换列表项的方法来设置该属性。
有些属性设置提供的组合框,在单击组合框的下拉按钮后,弹出一个面板,其中提供了选项卡,用户可在选项卡中对属性进行设置,如BackColor 、ForeColor 等属性。
● “浏览”按钮该按钮上文本为三个点表示,单击后将弹出一个对话框,用户可以根据对话框中提供的控件和提示内容进行设置,如Font 、Picture 等属性。
MFC实验二 对话框程序设计

实验二对话框程序设计(一) 实验目的:1 学习如何创建对话框程序,并想其中添加控件。
2 学习如何使用对话框来打开和保存文件。
3 学习创建消息对话框。
在Windows程序中,对话框是最重要的显示信息和取得用户数据的单元;一个应用程序可以拥有几个对话框,这些对话框从用户那里接受特定类型的信息;可以使用资源编辑器创建对话框资源,向其中添加控件,调整对话框的布局,使对话框更加便于使用。
(二) 实验内容:应用实例创建一个基于对话框的应用程序,并添加文件菜单,用来打开和保存文件;建立消息对话框,用来提醒用户在退出前保存文件;同时建立一个属性页对话框,掌握其基本用法。
(三) 实验步骤:实验一:创建简单的对话框应用程序1.使用AppWizard创建一个基于对话框类型的程序Prog01。
在AppWizard的第一页选择“Dialog based” ,生成标准对话框模板。
2.可以设置对话框的属性,右键单击整个对话框的背景,选择“Properties”项,在弹出的对话框中修改此对话框ID为:IDD_PROG01_DIALOG,标题为:“简单计算器”。
当对话框资源完成以后,选择ctrl+w,打开ClassWizard,已经有一个类Prog01Dlg与新的对话框相联系。
3.在控件工作栏点击要添加的空间图标,选择所需的控件。
一共要添加三个静态文本框、三个编辑框、五个命令按钮。
可以改变空间的大小、位置、对齐方式等等。
4.添加控件结束后,设置各个控件的属性。
右键需要设置属性的控件,在弹出的菜单中选择Prperties,或选中控件按回车键。
各个控件的属性设置如下图。
下表列出了本题中所有控件的属性设置以及添加的成员变量:5.为控件添加相对应的成员变量。
执行xiew-class wizard命令或者Ctrl+w,选择member variables ,可以在对话框类中为控件添加关联的成员变量和删除变量。
以第一个编辑框为例,成员变量名为m_floatFirstNum,float型。
WPS宏编程实例教程自定义对话框

WPS宏编程实例教程自定义对话框WPS宏编程是一项强大的功能,通过它,我们可以轻松自动化操作,提高工作效率。
而自定义对话框则是WPS宏编程中的重要组成部分,它可以实现与用户的交互,使得宏程序更加灵活实用。
本文将为您详细介绍WPS宏编程实例教程中的自定义对话框使用方法。
一、对话框的创建在WPS宏编程中,我们首先需要创建一个自定义对话框。
打开WPS软件,在开发选项卡中选择“宏录制器”,点击“新建”按钮,进入对话框编辑器界面。
在该界面中,您可以自由设计对话框的布局和样式,包括窗体大小、各类按钮、文本框等。
二、为对话框添加控件在自定义对话框中,我们可以添加各种控件来满足不同的需求。
比如,我们可以添加按钮控件来触发特定的宏操作,添加文本框控件来获取用户输入的内容。
在对话框编辑器中,您可以通过拖拽的方式将各种控件添加到对话框窗体中,并调整它们的位置和大小。
三、对控件进行属性设置每个控件都有自己的属性,在自定义对话框中,我们可以根据实际需求对控件的属性进行设置。
比如,对于按钮控件,您可以设置其文本、大小、位置等属性;对于文本框控件,您可以设置其初始文本、大小、是否可编辑等属性。
通过属性设置,可以使控件更好地适应您的宏编程需求。
四、处理对话框事件在自定义对话框中,用户可以进行各种操作,比如点击按钮、输入文本等。
我们可以通过处理对话框事件来响应用户的操作并执行相应的宏代码。
在对话框编辑器中,可以为每个控件添加相应的事件处理程序,通过VBA代码来实现事件的处理逻辑。
五、与宏程序交互自定义对话框不仅可以用来接收用户的输入,还可以与宏程序进行数据交互。
比如,用户在对话框中输入的文本可以通过宏代码获取并进行处理。
通过这种方式,我们可以实现更加灵活的宏操作,提高工作效率。
总结:自定义对话框是WPS宏编程中重要的组成部分,通过它我们可以实现与用户的交互,使得宏程序更加实用。
本文介绍了自定义对话框的创建、控件添加、属性设置、事件处理和与宏程序的交互等步骤。
element 对话框fullscreen用法
element 对话框fullscreen用法Element对话框fullscreen用法Element是一套基于Vue.js的桌面端组件库,提供了丰富的可复用组件,其中之一就是对话框(Dialog)。
对话框是我们在网页或应用程序中常见的一种交互形式,用于显示信息、进行确认、输入数据等操作。
Element对话框组件提供了fullscreen属性,使得对话框可以进入全屏模式,提升用户体验。
本文将详细介绍Element对话框fullscreen属性的用法和效果。
一、fullscreen属性概述fullscreen属性是Element对话框组件的一个特性,用于控制对话框是否全屏显示。
当fullscreen为true时,对话框将占据整个屏幕,覆盖其他页面内容;当fullscreen为false时,对话框按照默认大小显示。
fullscreen属性为可选属性,默认值为false。
通过设置fullscreen属性,我们可以灵活地控制对话框的显示方式,以适应不同的场景需求。
二、基本用法我们先来看一个基本的示例,了解如何使用fullscreen属性。
首先,我们需要引入Element组件库,并注册Dialog组件。
然后,在Vue实例中,使用Dialog组件创建一个对话框,设置fullscreen属性为true,即可将对话框以全屏模式展示。
以下是示例代码:```html<template><div><el-button type="primary" @click="openDialog">打开对话框</el-button><el-dialog :visible.sync="dialogVisible" :fullscreen="true"><span>这是一个全屏对话框</span></el-dialog></div></template><script>import { Dialog, Button } from 'element-ui';export default {components: {'el-dialog': Dialog,'el-button': Button},data() {return {dialogVisible: false};},methods: {openDialog() {this.dialogVisible = true;}}};</script>```在上述示例中,我们使用了ElementUI的Button组件和Dialog组件。
vb6编程filedialog的用法
vb6编程filedialog的用法在VB6中,可以使用FileDialog控件来实现文件对话框的功能。
Fi leDialog控件提供了一种方便的方式,供用户选择文件或文件夹。
以下是FileDialog控件的基本用法:1.引用FileDialog控件:在VB6的工具箱中,找到“Microsoft Common Dialog Control“,将其拖放到窗体上,以添加对FileDialog控件的引用。
2.设置对话框属性:选中添加的FileDialog控件,打开属性窗口。
可以设置以下常用属性:o DialogTitle:设置对话框的标题。
o Filter:设置文件类型过滤器,以限制可选择的文件类型。
o FileName:获取或设置所选文件的文件名。
3.显示文件对话框:在需要调用文件对话框的地方,例如按钮的Click事件中,使用以下代码显示文件对话框:vbCopy codeCommonDialog1.ShowOpen ’显示打开文件对话框CommonDialog1.ShowSave ’显示保存文件对话框CommonDialog1.ShowOpenMultiple ’显示多选文件对话框CommonDialog1.ShowFolder ’显示选择文件夹对话框4.处理对话框结果:可以使用FileDialog控件的属性来获取对话框的结果,例如:vbCopy codeMsgBox CommonDialog1.FileName ’显示所选文件的文件名需要注意的是,FileDialog控件的具体用法还涉及到事件处理、错误处理等细节,可以根据具体需求进行深入学习和探索。
同时,V B6是一种较旧的编程语言,建议考虑使用更新的编程语言和框架,如或C#.NET,以获得更好的开发支持和功能。
Excel VBA编程 设置属性的方法
Excel VBA编程设置属性的方法
设置对象属性时,根据属性的不同,有多种设置方法。
用户不仅可以手工输入,还可以通过在属性列表框中进行选择相应选项。
另外,还可以通过打开某些选项按钮,从而在弹出的对话框中进行设置。
1.手工输入
手工输入是通过用户手动进行输入,而改变对象属性值的方法。
对于设置对象的名称或取值范围等属性,一般都是使用此方法。
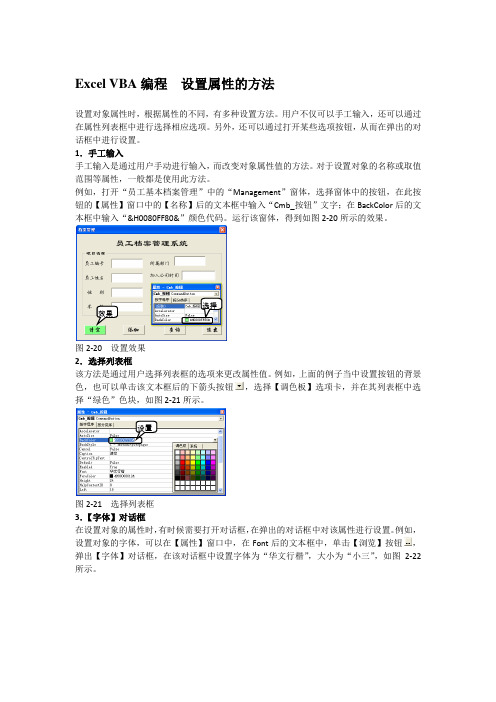
例如,打开“员工基本档案管理”中的“Management”窗体,选择窗体中的按钮,在此按钮的【属性】窗口中的【名称】后的文本框中输入“Cmb_按钮”文字;在BackColor后的文本框中输入“&H0080FF80&”颜色代码。
运行该窗体,得到如图2-20所示的效果。
选择
效果
图2-20 设置效果
2.选择列表框
该方法是通过用户选择列表框的选项来更改属性值。
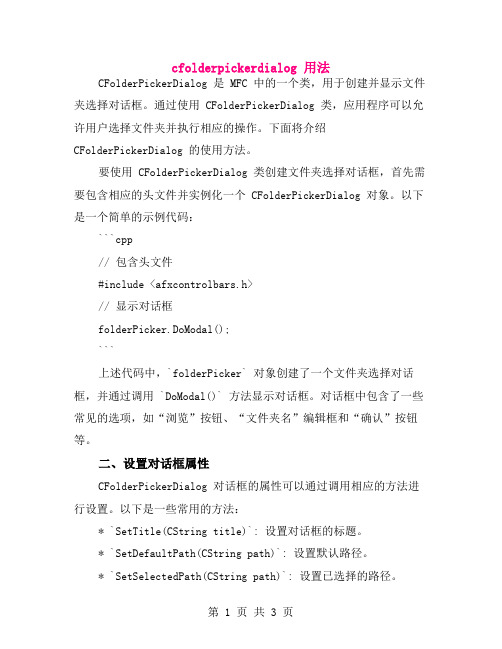
例如,上面的例子当中设置按钮的背景色,也可以单击该文本框后的下箭头按钮,选择【调色板】选项卡,并在其列表框中选择“绿色”色块,如图2-21所示。
设置
图2-21 选择列表框
3.【字体】对话框
在设置对象的属性时,有时候需要打开对话框,在弹出的对话框中对该属性进行设置。
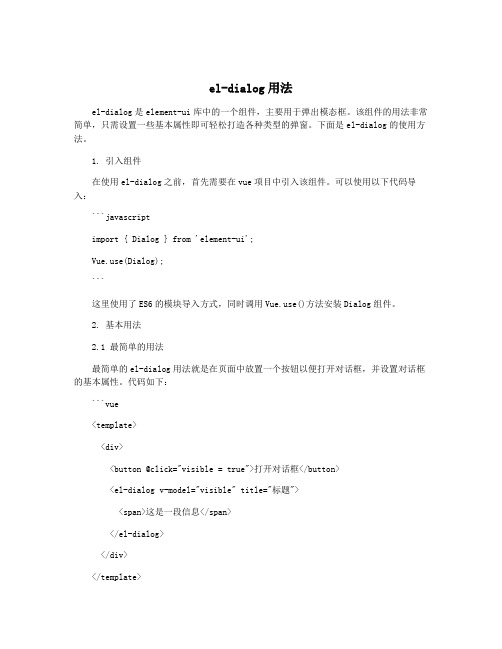
例如,设置对象的字体,可以在【属性】窗口中,在Font后的文本框中,单击【浏览】按钮,弹出【字体】对话框,在该对话框中设置字体为“华文行楷”,大小为“小三”,如图2-22所示。
设置图2-22 【字体】对话框。
cfolderpickerdialog 用法
cfolderpickerdialog 用法CFolderPickerDialog 是 MFC 中的一个类,用于创建并显示文件夹选择对话框。
通过使用 CFolderPickerDialog 类,应用程序可以允许用户选择文件夹并执行相应的操作。
下面将介绍CFolderPickerDialog 的使用方法。
要使用 CFolderPickerDialog 类创建文件夹选择对话框,首先需要包含相应的头文件并实例化一个 CFolderPickerDialog 对象。
以下是一个简单的示例代码:```cpp// 包含头文件#include <afxcontrolbars.h>// 显示对话框folderPicker.DoModal();```上述代码中,`folderPicker` 对象创建了一个文件夹选择对话框,并通过调用 `DoModal()` 方法显示对话框。
对话框中包含了一些常见的选项,如“浏览”按钮、“文件夹名”编辑框和“确认”按钮等。
二、设置对话框属性CFolderPickerDialog 对话框的属性可以通过调用相应的方法进行设置。
以下是一些常用的方法:* `SetTitle(CString title)`: 设置对话框的标题。
* `SetDefaultPath(CString path)`: 设置默认路径。
* `SetSelectedPath(CString path)`: 设置已选择的路径。
* `SetReadOnly(BOOL readOnly)`: 设置对话框是否只读。
* `SetFolderBrowseButton(BOOL enable)`: 设置是否显示文件夹浏览按钮。
* `SetFileBrowseButton(BOOL enable)`: 设置是否显示文件浏览按钮。
例如,以下代码将设置对话框标题为“选择文件夹”,默认路径设置为当前工作目录:```cppfolderPicker.SetTitle("选择文件夹");folderPicker.SetDefaultPath(CPath(GetCurrentDirectory()). GetPath());```三、处理对话框响应事件CFolderPickerDialog 对话框提供了许多事件处理函数,用于响应用户的操作。
el-dialog用法
el-dialog用法el-dialog是element-ui库中的一个组件,主要用于弹出模态框。
该组件的用法非常简单,只需设置一些基本属性即可轻松打造各种类型的弹窗。
下面是el-dialog的使用方法。
1. 引入组件在使用el-dialog之前,首先需要在vue项目中引入该组件。
可以使用以下代码导入:```javascriptimport { Dialog } from 'element-ui';e(Dialog);```这里使用了ES6的模块导入方式,同时调用e()方法安装Dialog组件。
2. 基本用法2.1 最简单的用法最简单的el-dialog用法就是在页面中放置一个按钮以便打开对话框,并设置对话框的基本属性。
代码如下:```vue<template><div><button @click="visible = true">打开对话框</button><el-dialog v-model="visible" title="标题"><span>这是一段信息</span></el-dialog></div></template><script>export default {data() {return {visible: false};}};</script>```这里的el-dialog使用了v-model绑定了visible属性,这个属性用于控制对话框是否显示。
当visible值为true时,对话框显示出来;当visible值为false时,对话框隐藏起来。
2.2 自定义按钮默认情况下,在对话框底部会添加确定和取消按钮。
这些按钮可能不能满足我们的实际需求,因此我们需要自定义对话框按钮。
- 1、下载文档前请自行甄别文档内容的完整性,平台不提供额外的编辑、内容补充、找答案等附加服务。
- 2、"仅部分预览"的文档,不可在线预览部分如存在完整性等问题,可反馈申请退款(可完整预览的文档不适用该条件!)。
- 3、如文档侵犯您的权益,请联系客服反馈,我们会尽快为您处理(人工客服工作时间:9:00-18:30)。
对话框的属性在代码中设置(源文件)针对对话框的控件的属性设置代码如下,可以拿来直接使用,无须改动,直接嵌入到你的程序代码,提高编程效率。
文件BtnST.h 头文件// Class: CButtonST//// Compiler: Visual C++// Tested on: Visual C++ 5.0//// Version: See GetVersionC() or GetVersionI()//// Created: xx/xxxx/1998// Updated: 19/September/1999//// Author: Davide Calabro' davide_calabro@//#ifndef _BTNST_H#define _BTNST_H#if _MSC_VER >= 1000#pragma once#endif // _MSC_VER >= 1000// CBtnST.h : header file//// Comment this if you don't want that CButtonST hilights itself// also when the window is inactive (like happens in Internet Explorer)//#define ST_LIKEIE// Comment this if you don't want to use CMemDC class//#define ST_USE_MEMDC/////////////////////////////////////////////////////////////////////////////// CButtonST windowclass CButtonST : public CButton{// Constructionpublic:CButtonST();~CButtonST();enum {ST_ALIGN_HORIZ, ST_ALIGN_VERT, ST_ALIGN_HORIZ_RIGHT};// Attributespublic:// Operationspublic:// Overrides// ClassWizard generated virtual function overrides//{{AFX_VIRTUAL(CButtonST)public:virtual void DrawItem(LPDRAWITEMSTRUCT lpDrawItemStruct);virtual BOOL PreTranslateMessage(MSG* pMsg);protected:virtual void PreSubclassWindow();virtual LRESULT DefWindowProc(UINT message, WPARAM wParam, LPARAM lParam);//}}AFX_VIRTUAL// Implementationpublic:void DrawTransparent(BOOL bRepaint = FALSE);BOOL GetDefault();void SetTooltipText(int nId, BOOL bActivate = TRUE);void SetTooltipText(CString* spText, BOOL bActivate = TRUE);void ActivateTooltip(BOOL bEnable = TRUE);BOOL SetBtnCursor(int nCursorId = -1);void SetFlatFocus(BOOL bDrawFlatFocus, BOOL bRepaint = FALSE);BOOL GetFlatFocus();void SetDefaultActiveFgColor(BOOL bRepaint = FALSE);void SetActiveFgColor(COLORREF crNew, BOOL bRepaint = FALSE);const COLORREF GetActiveFgColor();void SetDefaultActiveBgColor(BOOL bRepaint = FALSE);void SetActiveBgColor(COLORREF crNew, BOOL bRepaint = FALSE);const COLORREF GetActiveBgColor();void SetDefaultInactiveFgColor(BOOL bRepaint = FALSE);void SetInactiveFgColor(COLORREF crNew, BOOL bRepaint = FALSE);const COLORREF GetInactiveFgColor();void SetDefaultInactiveBgColor(BOOL bRepaint = FALSE);void SetInactiveBgColor(COLORREF crNew, BOOL bRepaint = FALSE);const COLORREF GetInactiveBgColor();void SetShowText(BOOL bShow = TRUE);BOOL GetShowText();void SetAlign(int nAlign);int GetAlign();void SetFlat(BOOL bState = TRUE);BOOL GetFlat();void DrawBorder(BOOL bEnable = TRUE);void SetIcon(int nIconInId, int nIconOutId = NULL);void SetIcon(HICON hIconIn, HICON hIconOut = NULL);static const short GetVersionI();static const char* GetVersionC();protected://{{AFX_MSG(CButtonST)afx_msg void OnCaptureChanged(CWnd *pWnd);afx_msg BOOL OnSetCursor(CWnd* pWnd, UINT nHitTest, UINT message);afx_msg void OnKillFocus(CWnd* pNewWnd);afx_msg void OnMouseMove(UINT nFlags, CPoint point);afx_msg void OnSysColorChange();//}}AFX_MSGafx_msg HBRUSH CtlColor(CDC* pDC, UINT nCtlColor);DECLARE_MESSAGE_MAP()private:void DrawTheIcon(CDC* pDC, CString* title, RECT* rcItem, CRect* captionRect, BOOL IsPressed, BOOL IsDisabled);void InitToolTip();void PaintBk(CDC* pDC);int m_nAlign;BOOL m_bShowText;BOOL m_bDrawBorder;BOOL m_bIsFlat;BOOL m_MouseOnButton;BOOL m_bDrawFlatFocus;HCURSOR m_hCursor;CToolTipCtrl m_ToolTip;HICON m_hIconIn;HICON m_hIconOut;BYTE m_cyIcon;BYTE m_cxIcon;CDC m_dcBk;CBitmap m_bmpBk;CBitmap* m_pbmpOldBk;BOOL m_bDrawTransparent;BOOL m_bIsDefault;COLORREF m_crInactiveBg;COLORREF m_crInactiveFg;COLORREF m_crActiveBg;COLORREF m_crActiveFg;};#ifdef ST_USE_MEMDC//////////////////////////////////////////////////// CMemDC - memory DC//// Author: Keith Rule// Email: keithr@// Copyright 1996-1997, Keith Rule//// You may freely use or modify this code provided this // Copyright is included in all derived versions.//// History - 10/3/97 Fixed scrolling bug.// Added print support.// 25 feb 98 - fixed minor assertion bug//// This class implements a memory Device Contextclass CMemDC : public CDC{// constructor sets up the memory DCCMemDC(CDC* pDC) : CDC(){ASSERT(pDC != NULL);m_pDC = pDC;m_pOldBitmap = NULL;m_bMemDC = !pDC->IsPrinting();if (m_bMemDC) // Create a Memory DC{pDC->GetClipBox(&m_rect);CreateCompatibleDC(pDC);m_bitmap.CreateCompatibleBitmap(pDC, m_rect.Width(), m_rect.Height());m_pOldBitmap = SelectObject(&m_bitmap);SetWindowOrg(m_rect.left, m_rect.top);}else // Make a copy of the relevent parts of the current DC for printing{m_bPrinting = pDC->m_bPrinting;m_hDC = pDC->m_hDC;m_hAttribDC = pDC->m_hAttribDC;}}// Destructor copies the contents of the mem DC to the original DC~CMemDC(){if (m_bMemDC){// Copy the offscreen bitmap onto the screen.m_pDC->BitBlt(m_rect.left, m_rect.top, m_rect.Width(), m_rect.Height(), this, m_rect.left, m_rect.top, SRCCOPY);//Swap back the original bitmap.SelectObject(m_pOldBitmap);} else {// All we need to do is replace the DC with an illegal value,// this keeps us from accidently deleting the handles associated with// the CDC that was passed to the constructor.m_hDC = m_hAttribDC = NULL;}// Allow usage as a pointerCMemDC* operator->() {return this;}// Allow usage as a pointeroperator CMemDC*() {return this;}private:CBitmap m_bitmap; // Offscreen bitmapCBitmap* m_pOldBitmap; // bitmap originally found in CMemDCCDC* m_pDC; // Saves CDC passed in constructorCRect m_rect; // Rectangle of drawing area.BOOL m_bMemDC; // TRUE if CDC really is a Memory DC.};#endif///////////////////////////////////////////////////////////////////////////////{{AFX_INSERT_LOCA TION}}// Microsoft Developer Studio will insert additional declarations immediately before the previous line.#endif文件BtnST.cpp 源文件#include "stdafx.h"#include "BtnST.h"#ifdef _DEBUG#define new DEBUG_NEW#undef THIS_FILEstatic char THIS_FILE[] = __FILE__;#endif/////////////////////////////////////////////////////////////////////////////// CButtonSTCButtonST::CButtonST(){m_MouseOnButton = FALSE;m_hIconIn = NULL;m_hIconOut = NULL;m_cxIcon = 0;m_cyIcon = 0;m_hCursor = NULL;// Default type is "flat" buttonm_bIsFlat = TRUE;// By default draw border in "flat" buttonm_bDrawBorder = TRUE;// By default icon is aligned horizontallym_nAlign = ST_ALIGN_HORIZ;// By default show the text buttonm_bShowText = TRUE;// By default, for "flat" button, don't draw the focus rect m_bDrawFlatFocus = FALSE;// By default the button is not the default buttonm_bIsDefault = FALSE;SetDefaultInactiveBgColor();SetDefaultInactiveFgColor();SetDefaultActiveBgColor();SetDefaultActiveFgColor();// No tooltip createdm_ToolTip.m_hWnd = NULL;// Do not draw as a transparent buttonm_bDrawTransparent = FALSE;m_pbmpOldBk = NULL;} // End of CButtonSTCButtonST::~CButtonST(){// Restore old bitmap (if any)if (m_dcBk.m_hDC != NULL && m_pbmpOldBk != NULL) {m_dcBk.SelectObject(m_pbmpOldBk);}// Destroy the icons (if any)// Note: the following two lines MUST be here! even if// BoundChecker says they are unnecessary!if (m_hIconIn != NULL) ::DestroyIcon(m_hIconIn);if (m_hIconOut != NULL) ::DestroyIcon(m_hIconOut);// Destroy the cursor (if any)if (m_hCursor != NULL) ::DestroyCursor(m_hCursor);} // End of ~CButtonSTBEGIN_MESSAGE_MAP(CButtonST, CButton)//{{AFX_MSG_MAP(CButtonST)ON_WM_CAPTURECHANGED()ON_WM_SETCURSOR()ON_WM_KILLFOCUS()ON_WM_MOUSEMOVE()ON_WM_CTLCOLOR_REFLECT()ON_WM_SYSCOLORCHANGE()//}}AFX_MSG_MAPEND_MESSAGE_MAP()void CButtonST::SetIcon(int nIconInId, int nIconOutId){HICON hIconIn;HICON hIconOut;HINSTANCE hInstResource = AfxFindResourceHandle(MAKEINTRESOURCE(nIconInId), RT_GROUP_ICON);// Set icon when the mouse is IN the buttonhIconIn = (HICON)::LoadImage(hInstResource/*AfxGetApp()->m_hInstance*/, MAKEINTRESOURCE(nIconInId), IMAGE_ICON, 0, 0, 0);// Set icon when the mouse is OUT the buttonhIconOut = (nIconOutId == NULL) ? NULL : (HICON)::LoadImage(hInstResource/*AfxGetApp()->m_hInstance*/, MAKEINTRESOURCE(nIconOutId), IMAGE_ICON, 0, 0, 0);SetIcon(hIconIn, hIconOut);/*// Note: the following two lines MUST be here! even if// BoundChecker says they are unnecessary!if (m_hIconIn != NULL) ::DestroyIcon(m_hIconIn);if (m_hIconOut != NULL) ::DestroyIcon(m_hIconOut);// Set icon when the mouse is IN the buttonm_hIconIn = (HICON)::LoadImage(hInstResource, MAKEINTRESOURCE(nIconInId), IMAGE_ICON, 0, 0, 0);// Set icon when the mouse is OUT the buttonm_hIconOut = (nIconOutId == NULL) ? m_hIconIn : (HICON)::LoadImage(hInstResource, MAKEINTRESOURCE(nIconOutId), IMAGE_ICON, 0, 0, 0);ICONINFO ii;// Get icon dimensionZeroMemory(&ii, sizeof(ICONINFO));::GetIconInfo(m_hIconIn, &ii);m_cxIcon = (BYTE)(ii.xHotspot * 2);m_cyIcon = (BYTE)(ii.yHotspot * 2);::DeleteObject(ii.hbmMask);::DeleteObject(ii.hbmColor);RedrawWindow();*/} // End of SetIconvoid CButtonST::SetIcon(HICON hIconIn, HICON hIconOut){// Note: the following two lines MUST be here! even if// BoundChecker says they are unnecessary!if (m_hIconIn != NULL) ::DestroyIcon(m_hIconIn);if (m_hIconOut != NULL) ::DestroyIcon(m_hIconOut);// Set icon when the mouse is IN the buttonm_hIconIn = hIconIn;// Set icon when the mouse is OUT the buttonm_hIconOut = (hIconOut == NULL) ? m_hIconIn : hIconOut;ICONINFO ii;// Get icon dimensionZeroMemory(&ii, sizeof(ICONINFO));::GetIconInfo(m_hIconIn, &ii);m_cxIcon = (BYTE)(ii.xHotspot * 2);m_cyIcon = (BYTE)(ii.yHotspot * 2);::DeleteObject(ii.hbmMask);::DeleteObject(ii.hbmColor);RedrawWindow();} // End of SetIconBOOL CButtonST::SetBtnCursor(int nCursorId){HINSTANCE hInstResource;// Destroy any previous cursorif (m_hCursor != NULL) ::DestroyCursor(m_hCursor);m_hCursor = NULL;// If we want a cursorif (nCursorId != -1){hInstResource = AfxFindResourceHandle(MAKEINTRESOURCE(nCursorId),RT_GROUP_CURSOR);// Load icon resourcem_hCursor = (HCURSOR)::LoadImage(hInstResource/*AfxGetApp()->m_hInstance*/, MAKEINTRESOURCE(nCursorId), IMAGE_CURSOR, 0, 0, 0);// If something wrong then return FALSEif (m_hCursor == NULL) return FALSE;}return TRUE;} // End of SetBtnCursorvoid CButtonST::SetFlat(BOOL bState){m_bIsFlat = bState;Invalidate();} // End of SetFlatBOOL CButtonST::GetFlat(){return m_bIsFlat;} // End of GetFlatvoid CButtonST::SetAlign(int nAlign){switch (nAlign){case ST_ALIGN_HORIZ:m_nAlign = ST_ALIGN_HORIZ;break;case ST_ALIGN_HORIZ_RIGHT:m_nAlign = ST_ALIGN_HORIZ_RIGHT;break;case ST_ALIGN_VERT:m_nAlign = ST_ALIGN_VERT;break;}Invalidate();} // End of SetAlignint CButtonST::GetAlign(){return m_nAlign;} // End of GetAlignvoid CButtonST::DrawBorder(BOOL bEnable){m_bDrawBorder = bEnable;} // End of DrawBorderconst char* CButtonST::GetVersionC(){return "2.6";} // End of GetVersionCconst short CButtonST::GetVersionI(){return 26; // Divide by 10 to get actual version} // End of GetVersionIvoid CButtonST::SetShowText(BOOL bShow){m_bShowText = bShow;Invalidate();} // End of SetShowTextBOOL CButtonST::GetShowText(){return m_bShowText;} // End of GetShowTextvoid CButtonST::OnMouseMove(UINT nFlags, CPoint point){CWnd* pWnd; // Finestra attivaCWnd* pParent; // Finestra che contiene il bottoneCButton::OnMouseMove(nFlags, point);// If the mouse enter the button with the left button pressed// then do nothingif (nFlags & MK_LBUTTON && m_MouseOnButton == FALSE) return;// If our button is not flat then do nothingif (m_bIsFlat == FALSE) return;pWnd = GetActiveWindow();pParent = GetOwner();if ((GetCapture() != this) &&(#ifndef ST_LIKEIEpWnd != NULL &&#endifpParent != NULL)){m_MouseOnButton = TRUE;//SetFocus(); // Thanks Ralph!SetCapture();Invalidate();}else{/*CRect rc;GetClientRect(&rc);if (!rc.PtInRect(point)){*/POINT p2 = point;ClientToScreen(&p2);CWnd* wndUnderMouse = WindowFromPoint(p2);// if (wndUnderMouse != this)if (wndUnderMouse && wndUnderMouse->m_hWnd != this->m_hWnd){// Redraw only if mouse goes outif (m_MouseOnButton == TRUE){m_MouseOnButton = FALSE;Invalidate();}// If user is NOT pressing left button then release capture!if (!(nFlags & MK_LBUTTON)) ReleaseCapture();}}} // End of OnMouseMovevoid CButtonST::OnKillFocus(CWnd * pNewWnd){CButton::OnKillFocus(pNewWnd);// If our button is not flat then do nothingif (m_bIsFlat == FALSE) return;if (m_MouseOnButton == TRUE){m_MouseOnButton = FALSE;Invalidate();}} // End of OnKillFocusvoid CButtonST::OnCaptureChanged(CWnd *pWnd){if (m_MouseOnButton == TRUE){ReleaseCapture();Invalidate();}// Call base message handlerCButton::OnCaptureChanged(pWnd);} // End of OnCaptureChangedvoid CButtonST::DrawItem(LPDRAWITEMSTRUCT lpDIS) {#ifdef ST_USE_MEMDCCDC *pdrawDC = CDC::FromHandle(lpDIS->hDC); CMemDC memDC(pdrawDC);CDC *pDC = &memDC;#elseCDC* pDC = CDC::FromHandle(lpDIS->hDC);#endifCPen *pOldPen;BOOL bIsPressed = (lpDIS->itemState & ODS_SELECTED); BOOL bIsFocused = (lpDIS->itemState & ODS_FOCUS); BOOL bIsDisabled = (lpDIS->itemState & ODS_DISABLED);CRect itemRect = lpDIS->rcItem;pDC->SetBkMode(TRANSPARENT);if (m_bIsFlat == FALSE){if (bIsFocused || (GetDefault() == TRUE)){CBrush br(RGB(0,0,0));pDC->FrameRect(&itemRect, &br);itemRect.DeflateRect(1, 1);}}// Prepare draw... paint button's area with background colorCOLORREF bgColor;if ((m_MouseOnButton == TRUE) || (bIsPressed))bgColor = GetActiveBgColor();elsebgColor = GetInactiveBgColor();CBrush br(bgColor);// Draw transparent?if (m_bDrawTransparent == TRUE){PaintBk(pDC);}else{pDC->FillRect(&itemRect, &br);}// Disegno lo sfondo del bottone//CBrush br(GetSysColor(COLOR_BTNFACE));//pDC->FillRect(&itemRect, &br);// Draw pressed buttonif (bIsPressed){if (m_bIsFlat == TRUE){if (m_bDrawBorder == TRUE){pDC->Draw3dRect(itemRect, ::GetSysColor(COLOR_BTNSHADOW), ::GetSysColor(COLOR_BTNHILIGHT));/*CPen penBtnHiLight(PS_SOLID, 0, GetSysColor(COLOR_BTNHILIGHT)); // Bianco CPen penBtnShadow(PS_SOLID, 0, GetSysColor(COLOR_BTNSHADOW)); // Grigio scuro// Disegno i bordi a sinistra e in alto// Dark gray linepOldPen = pDC->SelectObject(&penBtnShadow);pDC->MoveTo(itemRect.left, itemRect.bottom-1);pDC->LineTo(itemRect.left, itemRect.top);pDC->LineTo(itemRect.right, itemRect.top);// Disegno i bordi a destra e in basso// White linepDC->SelectObject(penBtnHiLight);pDC->MoveTo(itemRect.left, itemRect.bottom-1);pDC->LineTo(itemRect.right-1, itemRect.bottom-1);pDC->LineTo(itemRect.right-1, itemRect.top-1);//pDC->SelectObject(pOldPen);*/}}else{CBrush brBtnShadow(GetSysColor(COLOR_BTNSHADOW));pDC->FrameRect(&itemRect, &brBtnShadow);}}else // ...else draw non pressed button{CPen penBtnHiLight(PS_SOLID, 0, GetSysColor(COLOR_BTNHILIGHT)); // WhiteCPen pen3DLight(PS_SOLID, 0, GetSysColor(COLOR_3DLIGHT)); // Light grayCPen penBtnShadow(PS_SOLID, 0, GetSysColor(COLOR_BTNSHADOW)); // Dark gray CPen pen3DDKShadow(PS_SOLID, 0, GetSysColor(COLOR_3DDKSHADOW)); // Blackif (m_bIsFlat == TRUE){if (m_MouseOnButton == TRUE && m_bDrawBorder == TRUE){pDC->Draw3dRect(itemRect, ::GetSysColor(COLOR_BTNHILIGHT), ::GetSysColor (COLOR_BTNSHADOW));/*// Disegno i bordi a sinistra e in alto// White linepOldPen = pDC->SelectObject(&penBtnHiLight);pDC->MoveTo(itemRect.left, itemRect.bottom-1);pDC->LineTo(itemRect.left, itemRect.top);pDC->LineTo(itemRect.right, itemRect.top);// Disegno i bordi a destra e in basso// Dark gray linepDC->SelectObject(penBtnShadow);pDC->MoveTo(itemRect.left, itemRect.bottom-1);pDC->LineTo(itemRect.right-1, itemRect.bottom-1);pDC->LineTo(itemRect.right-1, itemRect.top-1);//pDC->SelectObject(pOldPen);*/}}else{// Disegno i bordi a sinistra e in alto// White linepOldPen = pDC->SelectObject(&penBtnHiLight);pDC->MoveTo(itemRect.left, itemRect.bottom-1);pDC->LineTo(itemRect.left, itemRect.top);pDC->LineTo(itemRect.right, itemRect.top);// Light gray linepDC->SelectObject(pen3DLight);pDC->MoveTo(itemRect.left+1, itemRect.bottom-1);pDC->LineTo(itemRect.left+1, itemRect.top+1);pDC->LineTo(itemRect.right, itemRect.top+1);// Disegno i bordi a destra e in basso// Black linepDC->SelectObject(pen3DDKShadow);pDC->MoveTo(itemRect.left, itemRect.bottom-1);pDC->LineTo(itemRect.right-1, itemRect.bottom-1);pDC->LineTo(itemRect.right-1, itemRect.top-1);// Dark gray linepDC->SelectObject(penBtnShadow);pDC->MoveTo(itemRect.left+1, itemRect.bottom-2);pDC->LineTo(itemRect.right-2, itemRect.bottom-2);pDC->LineTo(itemRect.right-2, itemRect.top);//pDC->SelectObject(pOldPen);}}// Read the button's titleCString sTitle;GetWindowText(sTitle);// If we don't want the title displayedif (m_bShowText == FALSE) sTitle.Empty();CRect captionRect = lpDIS->rcItem;// Draw the iconif (m_hIconIn != NULL){DrawTheIcon(pDC, &sTitle, &lpDIS->rcItem, &captionRect, bIsPressed, bIsDisabled); }// Write the button title (if any)if (sTitle.IsEmpty() == FALSE){// Disegno la caption del bottone// Se il bottone e' premuto muovo la captionRect di conseguenzaif (bIsPressed)captionRect.OffsetRect(1, 1);// ONL Y FOR DEBUG// Evidenzia il rettangolo in cui verra' centrata la caption//CBrush brBtnShadow(RGB(255, 0, 0));//pDC->FrameRect(&captionRect, &brBtnShadow);#ifdef ST_USE_MEMDC// Get dialog's fontCFont *pCurrentFont = GetFont();CFont *pOldFont = pDC->SelectObject(pCurrentFont);#endifif ((m_MouseOnButton == TRUE) || (bIsPressed)){pDC->SetTextColor(GetActiveFgColor());pDC->SetBkColor(GetActiveBgColor());}else{pDC->SetTextColor(GetInactiveFgColor());pDC->SetBkColor(GetInactiveBgColor());}// Center textCRect centerRect = captionRect;pDC->DrawText(sTitle, -1, captionRect, DT_SINGLELINE|DT_CALCRECT);captionRect.OffsetRect((centerRect.Width() - captionRect.Width())/2, (centerRect.Height() - captionRect.Height())/2);/* RFUcaptionRect.OffsetRect(0, (centerRect.Height() - captionRect.Height())/2);captionRect.OffsetRect((centerRect.Width() - captionRect.Width())-4, (centerRect.Height() - captionRect.Height())/2);*/pDC->SetBkMode(TRANSPARENT);pDC->DrawState(captionRect.TopLeft(), captionRect.Size(), (LPCTSTR)sTitle, (bIsDisabled ? DSS_DISABLED : DSS_NORMAL),TRUE, 0, (CBrush*)NULL);#ifdef ST_USE_MEMDCpDC->SelectObject(pOldFont);#endif}if (m_bIsFlat == FALSE || (m_bIsFlat == TRUE && m_bDrawFlatFocus == TRUE)){// Draw the focus rectif (bIsFocused){CRect focusRect = itemRect;focusRect.DeflateRect(3, 3);pDC->DrawFocusRect(&focusRect);}}} // End of DrawItemvoid CButtonST::DrawTheIcon(CDC* pDC, CString* title, RECT* rcItem, CRect* captionRect, BOOL IsPressed, BOOL IsDisabled){CRect iconRect = rcItem;CRect btnRect;switch (m_nAlign){case ST_ALIGN_HORIZ:if (title->IsEmpty()){// Center the icon horizontallyiconRect.left += ((iconRect.Width() - m_cxIcon)/2);}else{// L'icona deve vedersi subito dentro il focus recticonRect.left += 3;captionRect->left += m_cxIcon + 3;}// Center the icon verticallyiconRect.top += ((iconRect.Height() - m_cyIcon)/2);break;case ST_ALIGN_HORIZ_RIGHT:GetClientRect(&btnRect);if (title->IsEmpty()){// Center the icon horizontallyiconRect.left += ((iconRect.Width() - m_cxIcon)/2);}else{// L'icona deve vedersi subito dentro il focus rectcaptionRect->right = captionRect->Width() - m_cxIcon - 3;captionRect->left = 3;iconRect.left = btnRect.right - m_cxIcon - 3;// Center the icon verticallyiconRect.top += ((iconRect.Height() - m_cyIcon)/2);}break;case ST_ALIGN_VERT:// Center the icon horizontallyiconRect.left += ((iconRect.Width() - m_cxIcon)/2);if (title->IsEmpty()){// Center the icon verticallyiconRect.top += ((iconRect.Height() - m_cyIcon)/2);}else{captionRect->top += m_cyIcon;}break;}// If button is pressed then press the icon alsoif (IsPressed) iconRect.OffsetRect(1, 1);// Ole'!pDC->DrawState( iconRect.TopLeft(),iconRect.Size(),(m_MouseOnButton == TRUE || IsPressed) ? m_hIconIn : m_hIconOut,(IsDisabled ? DSS_DISABLED : DSS_NORMAL),(CBrush*)NULL);} // End of DrawTheIconvoid CButtonST::PreSubclassWindow(){UINT nBS;nBS = GetButtonStyle();// Check if this is the default buttonif (nBS & BS_DEFPUSHBUTTON) m_bIsDefault = TRUE;// Add BS_OWNERDRAW styleSetButtonStyle(nBS | BS_OWNERDRAW);CButton::PreSubclassWindow();} // End of PreSubclassWindowBOOL CButtonST::PreTranslateMessage(MSG* pMsg){InitToolTip();m_ToolTip.RelayEvent(pMsg);return CButton::PreTranslateMessage(pMsg);} // End of PreTranslateMessageLRESULT CButtonST::DefWindowProc(UINT message, WPARAM wParam, LPARAM lParam) {if (message == WM_LBUTTONDBLCLK){message = WM_LBUTTONDOWN;}return CButton::DefWindowProc(message, wParam, lParam);} // End of DefWindowProcvoid CButtonST::SetDefaultInactiveBgColor(BOOL bRepaint){m_crInactiveBg = ::GetSysColor(COLOR_BTNFACE);if (bRepaint == TRUE) Invalidate();} // End of SetDefaultInactiveBgColorvoid CButtonST::SetInactiveBgColor(COLORREF crNew, BOOL bRepaint) {m_crInactiveBg = crNew;if (bRepaint == TRUE) Invalidate();} // End of SetInactiveBgColorconst COLORREF CButtonST::GetInactiveBgColor(){return m_crInactiveBg;} // End of GetInactiveBgColorvoid CButtonST::SetDefaultInactiveFgColor(BOOL bRepaint){m_crInactiveFg = ::GetSysColor(COLOR_BTNTEXT);if (bRepaint == TRUE) Invalidate();} // End of SetDefaultInactiveFgColorvoid CButtonST::SetInactiveFgColor(COLORREF crNew, BOOL bRepaint) {m_crInactiveFg = crNew;if (bRepaint == TRUE) Invalidate();} // End of SetInactiveFgColorconst COLORREF CButtonST::GetInactiveFgColor(){return m_crInactiveFg;} // End of GetInactiveFgColorvoid CButtonST::SetDefaultActiveBgColor(BOOL bRepaint){m_crActiveBg = ::GetSysColor(COLOR_BTNFACE);if (bRepaint == TRUE) Invalidate();} // End of SetDefaultActiveBgColorvoid CButtonST::SetActiveBgColor(COLORREF crNew, BOOL bRepaint) {m_crActiveBg = crNew;if (bRepaint == TRUE) Invalidate();} // End of SetActiveBgColorconst COLORREF CButtonST::GetActiveBgColor(){return m_crActiveBg;} // End of GetActiveBgColorvoid CButtonST::SetDefaultActiveFgColor(BOOL bRepaint){m_crActiveFg = ::GetSysColor(COLOR_BTNTEXT);if (bRepaint == TRUE) Invalidate();} // End of SetDefaultActiveFgColorvoid CButtonST::SetActiveFgColor(COLORREF crNew, BOOL bRepaint) {m_crActiveFg = crNew;if (bRepaint == TRUE) Invalidate();} // End of SetActiveFgColorconst COLORREF CButtonST::GetActiveFgColor(){return m_crActiveFg;} // End of GetActiveFgColorvoid CButtonST::SetFlatFocus(BOOL bDrawFlatFocus, BOOL bRepaint) {m_bDrawFlatFocus = bDrawFlatFocus;// Repaint the buttonif (bRepaint == TRUE) Invalidate();} // End of SetFlatFocusBOOL CButtonST::GetFlatFocus(){return m_bDrawFlatFocus;} // End of GetFlatFocusBOOL CButtonST::OnSetCursor(CWnd* pWnd, UINT nHitTest, UINT message) {// If a cursor was specified then use it!if (m_hCursor != NULL){::SetCursor(m_hCursor);return TRUE;}return CButton::OnSetCursor(pWnd, nHitTest, message);} // End of OnSetCursorvoid CButtonST::SetTooltipText(CString* spText, BOOL bActivate){// We cannot accept NULL pointerif (spText == NULL) return;// Initialize ToolTipInitToolTip();// If there is no tooltip defined then add itif (m_ToolTip.GetToolCount() == 0){CRect rectBtn;GetClientRect(rectBtn);m_ToolTip.AddTool(this, (LPCTSTR)*spText, rectBtn, 1);}// Set text for tooltipm_ToolTip.UpdateTipText((LPCTSTR)*spText, this, 1);m_ToolTip.Activate(bActivate);} // End of SetTooltipTextvoid CButtonST::SetTooltipText(int nId, BOOL bActivate){CString sText;// load string resourcesText.LoadString(nId);// If string resource is not emptyif (sText.IsEmpty() == FALSE) SetTooltipText(&sText, bActivate); } // End of SetTooltipTextvoid CButtonST::ActivateTooltip(BOOL bActivate){// If there is no tooltip then do nothingif (m_ToolTip.GetToolCount() == 0) return;// Activate tooltipm_ToolTip.Activate(bActivate);} // End of EnableTooltipBOOL CButtonST::GetDefault(){return m_bIsDefault;} // End of GetDefaultvoid CButtonST::DrawTransparent(BOOL bRepaint){m_bDrawTransparent = TRUE;// Restore old bitmap (if any)if (m_dcBk.m_hDC != NULL && m_pbmpOldBk != NULL){m_dcBk.SelectObject(m_pbmpOldBk);}m_bmpBk.Detach();m_dcBk.Detach();// Repaint the buttonif (bRepaint == TRUE) Invalidate();} // End of DrawTransparentvoid CButtonST::InitToolTip(){if (m_ToolTip.m_hWnd == NULL){// Create ToolTip controlm_ToolTip.Create(this);// Create inactivem_ToolTip.Activate(FALSE);}} // End of InitToolTipvoid CButtonST::PaintBk(CDC * pDC){CClientDC clDC(GetParent());CRect rect;CRect rect1;GetClientRect(rect);GetWindowRect(rect1);GetParent()->ScreenToClient(rect1);if (m_dcBk.m_hDC == NULL){m_dcBk.CreateCompatibleDC(&clDC);m_bmpBk.CreateCompatibleBitmap(&clDC, rect.Width(), rect.Height());m_pbmpOldBk = m_dcBk.SelectObject(&m_bmpBk);m_dcBk.BitBlt(0, 0, rect.Width(), rect.Height(), &clDC, rect1.left, rect1.top, SRCCOPY);}pDC->BitBlt(0, 0, rect.Width(), rect.Height(), &m_dcBk, 0, 0, SRCCOPY);} // End of PaintBkHBRUSH CButtonST::CtlColor(CDC* pDC, UINT nCtlColor){return (HBRUSH)::GetStockObject(NULL_BRUSH);} // End of CtlColorvoid CButtonST::OnSysColorChange()。
