最新计算机图形学简单示例程序代码及截图
计算机图形学-动画实现、代码和截图

计算机图形学实验报告学院名称年级、专业、班学号姓名同组姓名课程名称计算机图形学实验项目名称动画实现指导教师实验类型验证√综合□设计□创新□成绩教师评语教师签名:年月日实验报告内容一般包括以下几个内容:1、目的要求 2、仪器用具及材料(仪器名称及主要规格、用具名称) 3、实验内容及原理(简单但要抓住要点,写出依据原理) 4、操作方法与实验步骤 5、数据图表格(照片) 6、实验过程原始记录 7数据处理及结果(按实验要求处理数据、结论) 8、作业题 9、讨论(对实验中存在的问题、进一步的想法等进行讨论)实验报告内容:一、实验设备:OpenGL实用工具库文件 glut32.dll,glut.h,glut32.lib安装GLUT库Copy glut.h =>VC/include/gl/glut32.lib =>VC/lib/glut32.dll =>windows/system32/二、实验目的(1)利用双缓冲区技术完成2D正方形绕中心点旋转动画。
(2)编程绘制3D动画,下图左绕Y轴旋转,下图右绕顶点(1,1,1)X方向旋转。
三、实验内容(1)2D正方形绕中心点旋转动画:①实验代码:#include <GL/glut.h>#include <stdlib.h>static GLfloat spin = 0.0;void init(void){glClearColor (0.0, 0.0, 0.0, 0.0);glShadeModel (GL_FLAT);}glutCreateWindow (argv[0]); init ();glutDisplayFunc(display); glutReshapeFunc(reshape); glutMouseFunc(mouse); glutMainLoop();return 0;}②实验截图:(2)3D动画://立方体#include <stdio.h>#include<GL\glut.h>static float xrot = 0.0;static float yrot = 0.0;static float zrot = 0.0;void cube(){glBegin(GL_QUADS);glColor3f(1.0,1.0,0.0);glVertex3f( 1.0, 1.0,-1.0);glColor3f(0.0,1.0,0.0);glVertex3f(-1.0, 1.0,-1.0);glColor3f(0.0,1.0,1.0);glVertex3f(-1.0, 1.0, 1.0);glColor3f(1.0,1.0,1.0);glVertex3f( 1.0, 1.0, 1.0);glutPositionWindow(400, 100); // 设置窗口位置(不能用初始化的函数)}if(key == 27) // ESC退出程序exit(0);}int main(int argc, char** argv){glutInit(&argc, argv);glutInitDisplayMode(GLUT_RGBA | GLUT_DOUBLE | GLUT_DEPTH);glutInitWindowPosition(400, 100);glutInitWindowSize(640, 480);glutCreateWindow("");glutDisplayFunc(display);glutIdleFunc(display);glutReshapeFunc(reshape);glutKeyboardFunc(keyboard);init(640, 480);glutMainLoop();return 0;}//四面体#include <GL/glut.h>return 0; }。
图形学读取立方体、兔子、八字三维模型代码及截图
#include <stdlib.h>#include <GL/glut.h>#include <stdio.h>#include <iostream>#include <string>#include <fstream>#include <sstream>#include<cmath>using namespace std;int v_num = 0; //记录点的数量int f_num = 0; //记录面的数量int vn_num = 0;//记录法向量的数量int vt_num = 0;GLfloat **vArr; //存放点的二维数组int **fvArr; //存放面顶点的二维数组int **fnArr;//存放面法向量的二维数组int **ftArr;GLfloat **vtArr;GLfloat **vnArr;//存放法向量的二维数组string s1, s2, s3, s4;GLfloat f2, f3, f4;void getLineNum(string addrstr) //获取点和面的数量{ifstream infile(addrstr.c_str()); //打开指定文件string sline;//每一行int i = 0, j = 0;while (getline(infile, sline)) //从指定文件逐行读取{if (sline[0] == 'v'){if (sline[1] == 'n'){vn_num++;}else if(sline[1] == 't'){vt_num++;}else{v_num++;}}if (sline[0] == 'f'){f_num++;}}}int readfile(string addrstr) //将文件内容读到数组中去{//getLineNum(addrstr);//new二维数组vArr = new GLfloat*[v_num];for (int i = 0; i<v_num; i++){vArr[i] = new GLfloat[3];}vnArr = new GLfloat*[vn_num]; for (int i = 0; i<vn_num; i++) {vnArr[i] = new GLfloat[3]; }vtArr = new GLfloat*[vt_num]; for (int i = 0; i<vt_num; i++) {vtArr[i] = new GLfloat[2];}fvArr = new int*[f_num];fnArr = new int*[f_num];ftArr = new int*[f_num];for (int i = 0; i<f_num; i++){fvArr[i] = new int[3];fnArr[i] = new int[3];ftArr[i] = new int[2];}ifstream infile(addrstr.c_str()); string sline;//每一行int ii = 0, jj = 0, kk = 0, mm = 0;while (getline(infile, sline)){if (sline[0] == 'v'){if (sline[1] == 'n')//vn{istringstream sin(sline);sin >> s1 >> f2 >> f3 >> f4;vnArr[ii][0] = f2;vnArr[ii][1] = f3;vnArr[ii][2] = f4;ii++;}else if (sline[1] == 't'){istringstream sin(sline);sin >> s1 >> f2 >> f3 ;cout << f2 << f3;vtArr[mm][0] = f2;vtArr[mm][1] = f3;// vtArr[mm][2] = f4;mm++;}else//v{istringstream sin(sline);sin >> s1 >> f2 >> f3 >> f4;vArr[jj][0] = f2;vArr[jj][1] = f3;vArr[jj][2] = f4;jj++;}}if (sline[0] == 'f') //存储面{istringstream in(sline);GLfloat a;in >> s1;//去掉fint i, k;for (i = 0; i < 3; i++){in >> s1;cout << s1 << endl;//取出第一个顶点和法线索引a = 0;//int len = sizeof(s1);int len = s1.length();cout << len;for (int m = 0; m <len; m++){if (s1[m] != '/'){a = a * 10 + (s1[m] - 48);fvArr[kk][i] = a;}else{m++;if (m <=3){if (s1[m] != '/'){a = a * 10 + (s1[m] - 48);ftArr[kk][i] = a;}else{m++;a = a * 10 + (s1[m] - 48);fnArr[kk][i] = a;}}else{// m++;a = a * 10 + (s1[m] - 48);fnArr[kk][i] = a;}}}//for (k = 0; s1[k] != '/'; k++)// {//a = a * 10 + (s1[k] - 48);// }// fvArr[kk][i] = a;// a = 0;//for (k = k + 2; s1[k]; k++)// {// a = a * 10 + (s1[k] - 48);// }// fnArr[kk][i] = a;}kk++;}}return 0;}void init(void){getLineNum("Eight.obj");readfile("Eight.obj");GLfloat mat_specular[] = { 1.0, 1.0, 1.0, 1.0 };GLfloat mat_shininess[] = { 50.0 };//材料的镜面指数,其值越大越精细GLfloat light_position[] = { 1.0, 1.0f, 1.0, 0.0 };GLfloat white_light[] = { 1.0, 1.0, 1.0, 1.0 };GLfloat lmodel_ambient[] = { 0.1, 0.1, 0.1, 1.0 };glClearColor(0.0, 0.0, 0.0, 0.0);glShadeModel(GL_SMOOTH);glMaterialfv(GL_FRONT, GL_SPECULAR, mat_specular);glMaterialfv(GL_FRONT, GL_SHININESS, mat_shininess);glLightfv(GL_LIGHT0, GL_POSITION, light_position);//光源位置glLightfv(GL_LIGHT0, GL_DIFFUSE, white_light);//漫反射光源glLightfv(GL_LIGHT0, GL_SPECULAR, white_light);//镜面反射光源glLightModelfv(GL_LIGHT_MODEL_AMBIENT,lmodel_ambient);//环境光源glEnable(GL_LIGHTING);//启动光照glEnable(GL_LIGHT0);//启用0度光源glEnable(GL_DEPTH_TEST);//启动深度测试/*glShadeModel(GL_SMOOTH); //Enable Smooth ShadingglClearColor(0.0f, 0.0f, 0.0f, 0.5f); // 黑色背景glClearDepth(1.0f); // 深度缓冲区设置glEnable(GL_DEPTH_TEST); // 允许深度测试glDepthFunc(GL_LEQUAL); // 定义深度测试类型glHint(GL_PERSPECTIVE_CORRECTION_HINT, GL_NICEST); // Really Nice Perspective Calculation*/}void display(void){glClear(GL_COLOR_BUFFER_BIT | GL_DEPTH_BUFFER_BIT);//gluLookAt(-2.0, -2.0, -2.0, 0.0, 0.0, 0.0, 0.0, 1.0, 0.0); //设置观察的位置glTranslatef(1.0, -0.0, -8.0);glScalef(0.1, 0.1, 0.1);for (int i = 0; i<f_num; i++){glPolygonMode(GL_FRONT_AND_BACK, GL_FILL);glBegin(GL_TRIANGLES);if (vn_num == 0){//glNormal3f(vnArr[fnArr[i][0] - 1][0], vnArr[fnArr[i][0] - 1][1], vnArr[fnArr[i][0] - 1][2]);glVertex3f(vArr[fvArr[i][0] - 1][0], vArr[fvArr[i][0] - 1][1], vArr[fvArr[i][0] - 1][2]);//glNormal3f(vnArr[fnArr[i][1] - 1][0], vnArr[fnArr[i][1] - 1][1], vnArr[fnArr[i][1] - 1][2]);glVertex3f(vArr[fvArr[i][1] - 1][0], vArr[fvArr[i][1] - 1][1], vArr[fvArr[i][1] - 1][2]);//glNormal3f(vnArr[fnArr[i][2] - 1][0], vnArr[fnArr[i][2] - 1][1], vnArr[fnArr[i][2] - 1][2]);glVertex3f(vArr[fvArr[i][2] - 1][0], vArr[fvArr[i][2] - 1][1], vArr[fvArr[i][2] - 1][2]);}else{glTexCoord2f(vtArr[ftArr[i][0] - 1][0], vtArr[ftArr[i][0] - 1][1]);// glNormal3f(vnArr[fnArr[i][0] - 1][0], vnArr[fnArr[i][0] - 1][1], vnArr[fnArr[i][0] - 1][2]);glVertex3f(vArr[fvArr[i][0] - 1][0], vArr[fvArr[i][0] - 1][1], vArr[fvArr[i][0] - 1][2]);glTexCoord2f(vtArr[ftArr[i][1] - 1][0], vtArr[ftArr[i][1] - 1][1]);// glNormal3f(vnArr[fnArr[i][1] - 1][0], vnArr[fnArr[i][1] - 1][1], vnArr[fnArr[i][1] - 1][2]);glVertex3f(vArr[fvArr[i][1] - 1][0], vArr[fvArr[i][1] - 1][1], vArr[fvArr[i][1] - 1][2]);glTexCoord2f(vtArr[ftArr[i][2] - 1][0], vtArr[ftArr[i][2] - 1][1]);// glNormal3f(vnArr[fnArr[i][2] - 1][0], vnArr[fnArr[i][2] - 1][1], vnArr[fnArr[i][2] - 1][2]);glVertex3f(vArr[fvArr[i][2] - 1][0], vArr[fvArr[i][2] - 1][1], vArr[fvArr[i][2] - 1][2]);}glEnd();}glFlush();//强制绘图}void reshape(int w, int h){glViewport(0, 0, (GLsizei)w, (GLsizei)h); //视口设置glMatrixMode(GL_PROJECTION);glLoadIdentity();if (w <= h)//描绘了两种不同情况下的平行修剪空间glOrtho(-1.5, 1.5, -1.5 * (GLfloat)h / (GLfloat)w, 1.5 * (GLfloat)h / (GLfloat)w, -10.0, 10.0);elseglOrtho(-1.5*(GLfloat)w / (GLfloat)h, 1.5*(GLfloat)w / (GLfloat)h, -1.5, 1.5, -10.0, 10.0);glMatrixMode(GL_MODELVIEW);glLoadIdentity();int main(int argc, char **argv){glutInit(&argc, argv);//对GLUT进行初始化glutInitDisplayMode(GLUT_SINGLE | GLUT_RGB | GLUT_DEPTH);//设置显示方式,单缓冲、RGB颜色glutInitWindowSize(500, 500);glutInitWindowPosition(100, 100);//glutCreateWindow(argv[0]);glutCreateWindow("Test");init();glutDisplayFunc(display);glutReshapeFunc(reshape);glutMainLoop();return 0;}◆cube.obj文件没有运用光照时输出的模型:①点:②边:③面:运用光照时输出的模型:①通过顶点法向量画出:②通过面的法向量画出:③画出面的法向量移动某个顶点:◆bunny.obj文件没有运用光照时输出的模型:①点:②边:③面:运用光照时输出的模型:①通过顶点法向量画出:②通过面的法向量画出:③画出面的法向量:◆Eight.obj文件没有运用光照时输出的模型:①点:②边:③面:运用光照时输出的模型:①通过顶点法向量画出:②通过面的法向量画出:③画出面的法向量:。
利用C语言实现简单计算机图形

利用C语言实现简单计算机图形计算机图形在现代计算机应用中起着重要的作用,可以用来实现各种效果和交互。
C语言作为一种广泛应用的编程语言,可以用来编写各种计算机图形程序。
本文将介绍利用C语言实现简单计算机图形的方法和技巧。
一、图形库的选择在使用C语言实现计算机图形时,我们需要选择一个合适的图形库来帮助我们进行图形的绘制和显示。
常用的图形库包括OpenGL、SDL、SFML等。
在选择图形库时,我们需要考虑到自己的需求以及所运行的平台,选择一个功能强大、易于使用的图形库。
二、绘制基本图形在开始实现图形程序之前,我们需要了解基本的图形绘制原理。
在C语言中,我们可以使用图形库提供的函数来实现各种图形的绘制。
比如,要绘制一个直线,我们可以使用线段绘制函数;要绘制一个圆形,我们可以使用圆形绘制函数。
通过调用相应的函数,我们可以实现各种基本图形的绘制。
三、实现图形效果除了基本图形的绘制,我们还可以利用C语言的一些特性来实现各种图形效果。
比如,我们可以使用循环语句和条件语句来实现动画效果;我们还可以使用数组和矩阵来处理图形的变换和旋转。
通过合理地运用这些特性,我们可以实现更加生动和复杂的图形效果。
四、键盘和鼠标事件实现计算机图形时,通常需要用户的输入来进行交互。
在C语言中,我们可以通过监听键盘和鼠标事件来实现用户的交互操作。
比如,我们可以通过监听键盘事件来控制图形的移动和变换;我们还可以通过监听鼠标事件来实现图形的选择和拖拽。
通过处理这些事件,我们可以实现更加灵活和交互的图形程序。
五、图形算法在实现计算机图形时,我们还需要了解一些常用的图形算法。
比如,直线的绘制可以使用Bresenham算法来实现,圆的绘制可以使用中点画圆算法来实现。
了解这些算法可以帮助我们更好地理解图形的绘制原理,并且优化我们的图形程序。
六、实例演示下面是一个使用C语言实现简单计算机图形的例子:```c#include <stdio.h>#include <graphics.h>int main(){int gd = DETECT, gm;initgraph(&gd, &gm, "");// 绘制一个直线line(100, 100, 200, 200);// 绘制一个矩形rectangle(300, 300, 400, 400);// 绘制一个圆形circle(500, 500, 50);// 绘制一个椭圆ellipse(600, 600, 0, 360, 100, 50);getch();closegraph();return 0;}```以上代码使用了BGI图形库来实现图形的绘制和显示。
计算机图形学直线曲线和圆等等算法代码及截图

计算机图形学期中作业姓名:学号:专业:计算机科学与技术班级:2班基本算法:#include <graphics.h>#include<stdio.h>#include <conio.h>#include<math.h>#define ROUND(a) ((int)(a+0.5))void lineDDA (int x1, int y1, int x2, int y2,int color) //DDA 画直线 int ROUND(float a) {return (int)(a+0.5);} {int i;float x,y,k;k=(float)(y2-y1)/(x2-x1);x=(float)x1, y=(float)y1;if (k<=1)for (i=x1 ; i<=x2 ; i++){ putpixel (ROUND(x), ROUND(y),color);x=x+1;y=y+k;}elsefor (i=y1;i<=y2;i++){ putpixel (ROUND(x), ROUND(y),color);x=x+1/k;y=y+1;}void lineBre(int xs, int ys, int xe, int ye,int color) //Bresenham画直线{ int x,y, k, steps;float m, e;m=(float)(ye-ys)/(xe-xs);e=m-0.5;steps=xe-xs;x=xs;y=ys;for (k=0; k<steps; k++){putpixel(x,y,color);if(e>=0){y=y+1;e= e-1;}x=x+1;e=e+m;}void Bs_Mid_Line(int x1,int y1,int x2,int y2,int color) //笔刷画直线{int i,j; int x,y;int a,b; a=y1-y2;b=x2-x1;int cy=(a<=0 ? 1:(a=-a,-1));int cx=(b>=0 ? 1:(b=-b,-1));x=x1; y=y1; for(i=-2; i<=2;i++)for(j=-2; j<=2;j++)putpixel(x,y,color);int d,d1,d2;if(-a<=b) //直线斜率绝对值小于等于1{ d=2*a+b;d1=2*a;d2=2*(a+b);while(x!=x2){if(d<0){x+=cx;y+=cy;d+=d2;}else{x+=cx;d+=d1;}for(i=-2; i<=2;i++)for(j=-2; j<=2;j++)putpixel(x+i,y+j,color);}}else //直线斜率绝对值大于1{ d=2*b+a;d1=2*b;d2=2*(a+b);while(y!=y2){ if(d<0){y+=cy;d+=d1;}else{x+=cx;y+=cy;d+=d2;}for(i=-2; i<=2;i++)for(j=-2; j<=2;j++)putpixel(x+i,y+j,color);}}}void line (int x1,int y1,int x2,int y2,int color)//驻点比较画直线{int x,y,n;int f;n=(x2-x1)+(y2-y1);x=x1;y=y1;f=y*x2-y2+x;for (int i=1; i<=n; i++){ putpixel(x,y,color);if (f>=0){x=x+1;y=y;}else{x=x;y=y+1;}f=y*x2-y2*x;}}void circleMidpoint (int xc, int yc, int r)//中点画圆法{int x=0;int y=r;int p=1-r;void circleplotpoints(int, int, int, int);circleplotpoints(xc, yc, x,y);while(x<y){x++;if ( p<0)p+=2*x+1;else{y--;p+=2*(x-y)+1;}circleplotpoints(xc, yc, x,y);}}void circleplotpoints (int xc, int yc, int x, int y){putpixel(xc+x, yc+y,YELLOW);putpixel(xc-x, yc+y,YELLOW);putpixel(xc+x, yc-y,YELLOW);putpixel(xc-x, yc-y,YELLOW);putpixel(xc+y, yc+x,YELLOW);putpixel(xc-y, yc+x,YELLOW);putpixel(xc+y, yc-x,YELLOW);putpixel(xc-y, yc-x,YELLOW);}arc(int xc, int yc, double r, double ts, double te) //数值微分法产生园弧(DDA算法){ double rad, tsl ,tel, deg, dte,ta, ct,st;int x,y,n,i;rad=0.0174533;tsl=ts*rad;tel=te*rad;if (r<5.08)deg=0.015;else if (r<7.62)deg=0.06;else if (r<25.4)deg=0.075;elsedeg=0.15;dte=deg*25.4/r;if (tel<tsl)tel=tel+6.28319;n=(int)((tel-tsl)/dte+0.5);if (n==0)n=(int)(6.28319/dte+0.5);ta=tsl;x=xc+r*cos(tsl);y=yc+r*sin(tsl);moveto (x,y);for ( i=1; i<=n; i++){ta=ta+dte;ct=cos(ta);st=sin(ta);x=xc+r*ct;y=yc+r*st;lineto (x,y);}x=xc+r*cos(tel);y=yc+r*sin(tel);lineto (x,y);return (0);}void circleBre(int r) //Bresenham画园算法{ int x=0, y=r, d=3-2*r;while (x<y){putpixel (x,y,RED);if (d<0)d=d+4*x+6;else{d=d+4*(x-y)+10;y=y-1;}x=x+1;}if (x==y)putpixel(x,y,RED);}ellipse (int xc, int yc, double a, double b, double alp, double ts, double te) //角度DDA法产生椭圆弧{double rad, tsl, tel, alpl, deg, dte, r, ta, a1,a2,b1,b2; int x,y,n,i;rad=0.0174533;tsl=ts*rad;tel=te*rad;alpl=alp*rad;a1=a*cos(tsl);b1=cos(alpl);a2=b*sin(tsl);b2=sin(alpl);r=(a>b)?a:b;if (r<5.08)deg=0.015;else if (r>7.62)deg=0.06;else if (r<25.4)deg=0.075;elsedeg=0.15;dte=deg*25.4/r;if (tel<tsl)tel+=6.28319;n=(int)(6.28319/dte+0.5); ta=tsl;x=xc+a1*b1-a2*b2;y=yc+a1*b2+a2*b1;moveto (x,y);for (i=1;i<=n;i++){ta+=dte;a1=a*cos(ta);a2=b*sin(ta);x=xc+a1*b1-a2*b2;y=yc+a1*b2+a2*b1;lineto (x,y);}a1=a*cos(tel);a2=b*sin(tel);x=xc+a1*b1-a2*b2;y=(int)yc+a1*b2+a2*b1;lineto (x,y);return(0);}void ellipse (int x0, int y0, int a, int b, int dt) {int x,y,n,i;float t1, t=0.0;t1=(float)dt*0.0174533;n=360/dt;moveto (x0+a, y0);for (i=1;i<n; i++){t=t+t1;x=(int)x0+a*cos(t);y=(int)y0+b*sin(t);lineto (x,y);}lineto (x0+a, y0);}Par(int xs, int ys, int xm, int ym, int xe, int ye) //二次曲线的参数拟合法{double d, d1, ax, ay, bx,by;int n,i;ax=(xe-2*xm+xs)*2.0;ay=(ye-2*ym+ys)*2.0;bx=(xe-xs-ax);by=(ye-ys-ay);n=(int)sqrt(ax*ax+ay*ay)/4;n=(int)sqrt(n*100);moveto (xs,ys);d=1.0/n;d1=d;for (i=0; i<=n;i++){ lineto ((int)( ax*d1*d1+bx*d1+xs), (int) (ay*d1*d1+by*d1+ys));d1=d1+d;}lineto (xe, ye);return (0);}void main(){printf("1: DDA画直线.\n");printf("2: Bresenham 画直线.\n");printf("3: 笔刷画直线.\n");printf("4: 驻点比较画直线.\n");printf("5: 中点画圆法.\n");printf("6: 数值微分法产生园弧(DDA算法).\n");printf("7: Bresenham画园算法.\n");printf("8: 角度DDA法产生椭圆弧.\n");printf("9: 二次曲线的参数拟合法.\n");printf("0: 退出.\n\n");while(true){printf("请输入你要选择的方法:\n");int a;scanf("%d",&a);switch(a){case 0:exit(0);case 1:initgraph(640, 480);lineDDA(100,100,400,450,YELLOW);break;case 2:initgraph(640, 480);lineBre(100, 100, 450, 500,YELLOW);break;case 3:initgraph(640, 480);Bs_Mid_Line(100,100,450,500,YELLOW);break;case 4:initgraph(640, 480);line (100,100,450,500,YELLOW);break;case 5:initgraph(640, 480);circleMidpoint (100, 100, 50) ;break;case 6:initgraph(640, 480);arc(200, 200, 100, 30, 90);break;case 7:initgraph(640, 480);circleBre(100);break;case 8:initgraph(640, 480);ellipse (100, 100, 50, 60, 20, 30, 90) ; break;case 9:initgraph(640, 480);Par(100, 100, 300, 350, 50, 100);break;case 10:default :printf("错误\n");}getch();cleardevice();closegraph();}}程序运行截图如下:。
计算机图形学代码

void COval::BresenhamOval(int x,int y,int r,int color,CDC* pDC) {int xx,yy,p,c;p=3-2*r;c=color;xx = 0;yy = r;for(;xx<=yy;xx++){pDC->SetPixel(xx+x,yy+y,c);pDC->SetPixel(-xx+x,-yy+y,c);pDC->SetPixel(-xx+x,yy+y,c);pDC->SetPixel(xx+x,-yy+y,c);pDC->SetPixel(yy+x,xx+y,c);pDC->SetPixel(-yy+x,xx+y,c);pDC->SetPixel(-yy+x,-xx+y,c);pDC->SetPixel(yy+x,-xx+y,c);if(p<0)p=p+4*xx+6;else {yy--;p=p+4*(xx-yy)+10;}}}贝塞尔曲线void CArc::DrawArc(){double t;CPoint Point0,Point1;CClientDC dc(m_pView);Point0=m_P1;for(t=0;t<1.01;t=t+0.001){Point1.x=(1-t)*(1-t)*(1-t)*m_P1.x+3*(1-t)*(1-t)*t*m_P2.x+3*(1-t)*t*t*m_P3.x+t*t*t*m_P4.x;Point1.y=(1-t)*(1-t)*(1-t)*m_P1.y+3*(1-t)*(1-t)*t*m_P2.y+3*(1-t)*t*t*m_P3.y+t*t*t*m_P4.y;dc.MoveTo(Point0.x,Point0.y);dc.LineTo(Point1.x,Point1.y);Point0=Point1;}}void CLine::Bresenhamline(int x0,int y0,int x1,int y1,int color,CDC* pdc) {int x,y,dx,dy,unitx,unity,fabs_dx,fabs_dy,e;dx=x1-x0;dy=y1-y0;fabs_dx = (int)fabs((float)dx);fabs_dy = (int)fabs((float)dy);unitx = dx / fabs_dx ;unity = dy / fabs_dy ;x=x0;y=y0;if( fabs_dx< fabs_dy ) //斜率大于1(窗口坐标与数学坐标相反){e=-dx; //差值设初值for(int i=0;i<=fabs_dx;i++){pdc->SetPixel(x,y,color);x+=unitx; //x增加一步,步长是1,方向由unitx决定e=e+2*dy; //e增加一个2*k*dxif(e>=0) //如果差值大于0,即dy累计大于1{y+=unity;e=e-2*dx; //e减去1,乘以倍数即为2*dx}}}else{e=-dy;for(int i=0;i<=fabs_dy;i++){pdc->SetPixel(x,y,color);y+=unity;e=e+2*dx;if(e>=0){x+=unitx;e=e-2*dy;}}}}。
计算机图形学实验(全)

实验1 直线的绘制实验目的1、通过实验,进一步理解和掌握DDA和Bresenham算法;2、掌握以上算法生成直线段的基本过程;3、通过编程,会在TC环境下完成用DDA或中点算法实现直线段的绘制。
实验环境计算机、Turbo C或其他C语言程序设计环境实验学时2学时,必做实验。
实验内容用DDA算法或Besenham算法实现斜率k在0和1之间的直线段的绘制。
实验步骤1、算法、原理清晰,有详细的设计步骤;2、依据算法、步骤或程序流程图,用C语言编写源程序;3、编辑源程序并进行调试;4、进行运行测试,并结合情况进行调整;5、对运行结果进行保存与分析;6、把源程序以文件的形式提交;7、按格式书写实验报告。
实验代码:DDA:# include <graphics.h># include <math.h>void DDALine(int x0,int y0,int x1,int y1,int color){int dx,dy,epsl,k;float x,y,xIncre,yIncre;dx=x1-x0;dy=y1-y0;x=x0;y=y0;if(abs(dx)>abs(dy))epsl=abs(dx);elseepsl=abs(dy);xIncre=(float)dx/(float)epsl;yIncre=(float)dy/(float)epsl;for(k=0;k<=epsl;k++){putpixel((int)(x+0.5),(int)(y+0.5),4);x+=xIncre;y+=yIncre;}}main(){int gdriver ,gmode ;gdriver = DETECT;initgraph(&gdriver , &gmode ,"C:\\TC20\\BGI");DDALine(0,0,35,26,4);getch ( );closegraph ( );}Bresenham:#include<graphics.h>#include<math.h>void BresenhamLine(int x0,int y0,int x1,int y1,int color) {int x,y,dx,dy,e;dx=x1-x0;dy=y1-y0;e=-dx;x=x0;y=y0;while(x<=x1){putpixel(x,y,color);x++;e=e+2*dy;if(e>0){y++;e=e-2*dx;}}}main(){int gdriver ,gmode ;gdriver = DETECT;initgraph(&gdriver , &gmode ,"c:\\TC20\\BGI");BresenhamLine(0, 0 , 120, 200,5 );getch ( );closegraph ( );}实验2 圆和椭圆的绘制实验目的1、通过实验,进一步理解和掌握中点算法;2、掌握以上算法生成椭圆或圆的基本过程;3、通过编程,会在TC环境下完成用中点算法实现椭圆或圆的绘制。
计算机图形学常用算法及代码大全

2。
1。
1 生成直线的DDA算法数值微分法即DDA法(Digital Differential Analyzer),是一种基于直线的微分方程来生成直线的方法.一、直线DDA算法描述:设(x1,y1)和(x2,y2)分别为所求直线的起点和终点坐标,由直线的微分方程得= m =直线的斜率(2-1)可通过计算由x方向的增量△x引起y的改变来生成直线:x i+1=x i+△x (2-2)y i+1=y i+△y=y i+△x·m (2-3) 也可通过计算由y方向的增量△y引起x的改变来生成直线:y i+1=y i+△y (2-4)x i+1=x i+△x=x i+△y/m (2-5) 式(2-2)至(2-5)是递推的.二、直线DDA算法思想:选定x2-x1和y2-y1中较大者作为步进方向(假设x2-x1较大),取该方向上的增量为一个象素单位(△x=1),然后利用式(2-1)计算另一个方向的增量(△y=△x·m=m)。
通过递推公式(2-2)至(2-5),把每次计算出的(x i+1,y i+1)经取整后送到显示器输出,则得到扫描转换后的直线。
之所以取x2-x1和y2-y1中较大者作为步进方向,是考虑沿着线段分布的象素应均匀,这在下图中可看出。
另外,算法实现中还应注意直线的生成方向,以决定Δx及Δy是取正值还是负值。
三、直线DDA算法实现:1、已知直线的两端点坐标:(x1,y1),(x2,y2)2、已知画线的颜色:color3、计算两个方向的变化量:dx=x2-x1dy=y2-y14、求出两个方向最大变化量的绝对值:steps=max(|dx|,|dy|)5、计算两个方向的增量(考虑了生成方向):xin=dx/stepsyin=dy/steps6、设置初始象素坐标:x=x1,y=y17、用循环实现直线的绘制:for(i=1;i〈=steps;i++){putpixel(x,y,color);/*在(x,y)处,以color色画点*/x=x+xin;y=y+yin;}五、直线DDA算法特点:该算法简单,实现容易,但由于在循环中涉及实型数的运算,因此生成直线的速度较慢。
图形学代码及截图
实验2:代码:#include<stdlib.h>#include<GL/glut.h>GLdouble angle = 10.0;void display(){glClear(GL_COLOR_BUFFER_BIT);glMatrixMode(GL_MODELVIEW);glBegin(GL_POLYGON);glVertex2d(-0.5,-0.5);glVertex2d(-0.5,0.5);glVertex2d(0.5,0.5);glVertex2d(0.5,-0.5);glEnd();glFlush();}void mouseFunc(int button,int state,int x,int y) {//旋转if(state==GLUT_DOWN && button==GLUT_LEFT_BUTTON) {glMatrixMode(GL_MODELVIEW);glLoadIdentity();if(angle<360)angle+=10;elseangle-=360;glRotatef(angle,1,1,2);glutPostRedisplay();}}void keyboard(unsigned char key,int x,int y){if(key==27){exit(-1);}}void init(){glClearColor(0.0,0.0,0.0,0.0);glColor3f(1.0,0.0,0.0);}void reshape(int w,int h){glViewport(0,0,w,h);}int main(int argc,char **argv){glutInit(&argc, argv);glutInitDisplayMode (GLUT_SINGLE | GLUT_RGB);glutInitWindowSize (500, 500);glutInitWindowPosition (100, 100);glutCreateWindow("OpenGL中的建模与变换");init ();glutDisplayFunc(display);glutReshapeFunc(reshape);glutKeyboardFunc(keyboard);glutMouseFunc(mouseFunc);glutMainLoop();return 0;}截图:点击旋转:体会:主要是我们在进行变换的时候,要注意glMatrixMode的设置,在进行投影变换的时候要设置为GL_PROJECTION,而当图形变换的时候要设置为GL_MODELVIEW模式。
计算机图形学简单画图代码

计算机图形学简单画图代码软件:NetBeans 图形效果:代码:package newpackage;import java.awt.*;import javax.swing.*;import java.awt.geom.*;import java.awt.image.*;import .URL;import java.io.*;import javax.imageio.*;import java.awt.event.*;import java.util.Calendar;import javax.swing.*;public class Hello2D extends JApplet { public static void main(String s[]) { JFrame frame = new JFrame();frame.setTitle("计算机图形学");frame.setDefaultCloseOperation(JFrame.EXIT_ON_CLOSE);JApplet applet = new Hello2D();applet.init();frame.getContentPane().add(applet);frame.pack();frame.setVisible(true);}public void init() {JPanel panel = new Hello2DPanel();getContentPane().add(panel);}}class Hello2DPanel extends JPanel implements ActionListener{ private BufferedImage image;AffineTransform rotH = new AffineTransform();AffineTransform rotM = new AffineTransform();AffineTransform rotS = new AffineTransform();// AffineTransform zuq=new AffineTransform ();public Hello2DPanel() {setPreferredSize(new Dimension(1400,1000));setBackground(Color.white);Timer timer=new Timer(500,this);timer.start();URLurl=getClass().getClassLoader().getResource("images/zuqiu.jpg" );try{image=ImageIO.read(url);}catch(IOException ex){ex.printStackTrace();}}@Overridepublic void paintComponent(Graphics g) {super.paintComponent(g);Graphics2D g2= (Graphics2D)g;g2.translate(100,100);g2.scale(0.5, 0.5);for (int i = 0; i < 12; i++) {g2.rotate(2*Math.PI/12);g2.fill3DRect(-3, -180, 6, 30, true);}Shape hour = new Line2D.Double(0, 0, 0, -80);hour = rotH.createTransformedShape(hour);Shape minute = new Line2D.Double(0, 0, 0, -120);minute = rotM.createTransformedShape(minute);Shape second = new Line2D.Double(0, 0, 0, -120);second = rotS.createTransformedShape(second);g2.setColor(Color.black);g2.setStroke(new BasicStroke(5, BasicStroke.CAP_ROUND, BasicStroke.JOIN_ROUND)); g2.draw(hour);g2.draw(minute);g2.setStroke(new BasicStroke(2));g2.draw(second);g2.scale(2,2);g2.translate(50,-150);g2.setColor(Color.DARK_GRAY);GeneralPath path=new GeneralPath();path.moveT o(200, 170);path.lineT o(800, 170);path.quadTo(950, 350, 800,530 );path.lineT o(200, 530);path.quadTo(50, 350, 200,170);Stroke stroke=new BasicStroke(4,BasicStroke.CAP_BUTT,BasicStroke.CAP_ROUND);//设置笔画g2.setStroke(stroke);g2.translate(-100, -100);//平移g2.scale(1.4,1.4 );//放大path.closePath();g2.draw(path);g2.setColor(Color.LIGHT_GRAY);g2.fill(path);Shape s1=new Rectangle2D.Double(300,250, 400, 200);Shape s2=new Ellipse2D.Double(200,250, 200, 200);Shape s3=new Ellipse2D.Double(600,250, 200, 200);g2.setColor(Color.DARK_GRAY);g2.draw(s1);g2.draw(s2);g2.draw(s3);g2.setColor(Color.GREEN);Area a1=new Area(s1);Area a2=new Area(s2);a1.add(a2);g2.fill(a1);Area a3=new Area(s3);a1.add(a3);g2.fill(s3);Font font=new Font("Serif",Font.BOLD,25);g2.setFont(font);GradientPaint gp=new GradientPaint(450,200,Color.red,220,220,Color.BLACK,true);g2.setPaint(gp);g2.drawString("四百米跑道",450, 220);g2.setColor(Color.BLACK);Stroke stroke1=new BasicStroke(1);//设置笔画g2.setStroke(stroke1);Shape s4=new Rectangle2D.Double(300,250, 400, 200);g2.draw(s4);g2.drawLine(500, 250, 500, 450);//划直线g2.drawOval(465, 315, 70, 70);g2.drawLine(300, 300, 350, 300);g2.drawLine(350, 300, 350,400);g2.drawLine(350, 400, 300,400);g2.drawLine(300, 325, 325, 325);g2.drawLine(325, 325, 325,375);g2.drawLine(325, 375, 300,375);g2.drawLine(700, 300, 650,300);g2.drawLine(650, 300, 650, 400);g2.drawLine(650, 400, 700,400);g2.drawLine(700, 325, 675,325);g2.drawLine(675, 325, 675, 375);g2.drawLine(675,375, 700,375);//绘制虚线float[] dashArray={20,20,20,20};g2.setColor(Color.BLACK);Font font2=new Font("Serif",Font.BOLD,15);g2.setFont(font2);g2.drawString("1",290,465);g2.drawString("2",290,485);g2.drawString("3",290,505);g2.drawString("4",290,525);g2.drawLine(300, 450,300 ,530);g2.setColor(Color.red);g2.drawLine(700, 450,700 ,530);float dashPhase=50;stroke =newBasicStroke(1,BasicStroke.CAP_BUTT,BasicStroke.JOIN_BEVEL ,0,dashArray,dashPhase);g2.setStroke(stroke);g2.drawLine(300, 470,700 ,470);g2.drawLine(300, 490,700 ,490);g2.drawLine(300, 510,700 ,510);Font font1=new Font("Serif",Font.BOLD,15);g2.setFont(font1);GradientPaint gp1=new GradientPaint(450,200,Color.BLACK,220,220,Color.red);g2.setPaint(gp1);g2.drawString("200米接力赛跑道",400,480);TexturePaint tp=new TexturePaint(image,new Rectangle2D.Double(550,370,image.getWidth(),image.getHeight ()));g2.setPaint(tp);Shape zq=new Rectangle.Double(550,370,90,50);// zq=zuq.createTransformedShape(zq);g2.fill(zq);}@Overridepublic void actionPerformed(ActionEvent e) {int hour = Calendar.getInstance().get(Calendar.HOUR); int min = Calendar.getInstance().get(Calendar.MINUTE); int sec = Calendar.getInstance().get(Calendar.SECOND); rotH.setToRotation(Math.PI * (hour+min/60.0)/6.0); rotM.setToRotation(Math.PI * min /30.0);rotS.setToRotation(Math.PI * sec /30.0);repaint();}}。
计算机图形学上机代码
glRectf(0.0f, 0.0f, 0.5f, 0.5f); //在右上方绘制一个无镂空效果的正方形
glFlush();
}
E.g.7着色模型
#include <GL/glut.h>
#include <math.h>
const GLdouble Pi = 3.1415926536;
*/
static GLubyte Mask[128];
FILE *fp;
fp = fopen("D:/Mask/Mask.bmp", "rb"); //注意此处的格式fp = fopen("D:/vclx/mask.bmp", "rb");
if( !fp )
exit(0);
if( fseek(fp, -(int)sizeof(Mask), SEEK_END) )
glVertex2f(1.0f, 0.0f); //以上两个点可以画x轴
glVertex2f(0.0f, -1.0f);
glVertex2f(0.0f, 1.0f); //以上两个点可以画y轴
glEnd();
glBegin(GL_LINE_STRIP);
for(x=-1.0f/factor; x<1.0f/factor; x+=0.01f)
0x18, 0xCC, 0x33, 0x18,
0x10, 0xC4, 0x23, 0x08,
0x10, 0x63, 0xC6, 0x08,
0x10, 0x30, 0x0C, 0x08,
0x10, 0x18, 0x18, 0x08,
计算机图形学实习全部代码.h文件

//#include "geometric.h"#include "stdafx.h"#include "Graphics.h"#include <cmath>#include "SeqStack.h"#include <cmath>Geo::Geo(CDC * pDC){m_pDC = pDC;}Geo::~Geo(){}void Geo:: DDA (int x1,int y1,int x2,int y2,CDC *pDC) {CPoint point;int m;int i;double sum;int yk=0,xk=0;m=(y2-y1)/(x2-x1);if (m<=1){yk=y1;for (i=x1;i<=x2;i++){point.x=i;point.y=yk;pDC->SetPixel(i,yk,RGB(255,0,0));yk=yk+m;}}else if (m>1){sum=0;for (i=y1;i<=y2;i++){sum=sum+(1/m);if ((1/m)<1)sum=sum+1;xk=x1+int(sum);pDC->SetPixel(xk,i,RGB(255,0,0));//该函数将指定坐标处的像素设为指定的颜色}}}int sign(double x){if(x < 0) return -1;else return 1;}void Geo:: Bresenham(int x1,int y1,int x2,int y2,CDC *pDC){ int x,y,dx,dy,s1,s2,temp,interchange,i,p;x=x1; y=y1;dx=abs(x2-x1);dy=abs(y2-y1);s1=sign(x2-x1);s2=sign(y2-y1);if(dy>dx){ temp=dx; dx=dy; dy=temp;interchange=1;}else interchange=0;p=2*dy-dx;for(i=1; i<=dx; i++){ pDC->SetPixel(x,y,RGB(255,0,0));if(p>=0){ if(interchange==1)x=x+s1;else y=y+s2;p=p-2*dx;}if(interchange==1)y=y+s2;else x=x+s1;p=p+2*dy;}}void Geo::mpline(int x1,int y1,int x2,int y2,CDC *pDC){int x=0,y,a,b,d1,d2,p;a=y1-y2;b=x2-x1;y=y1;p=2*a+b;d1=2*a;d2=2*(a+b);pDC->SetPixel(x,y,RGB(255,0,0));for(x=x1;x<=x2;x++){if (p<0){y++;p+=d2;}else p+=d1;pDC->SetPixel(x,y,RGB(255,0,0));}}///////////////////画圆函数的定义////////////////////////////////中点画圆算法/////////////////////////void Geo::circleMidpoint (int x0,int y0,int radius,CDC *pDC) ///////(x0,y0)是圆心坐标,radius半径{int p=1-radius; //初始决策参数int x=0,y=0;int x1=0;int y1=radius;circlePlotPonits( x0, y0, x, y1,pDC); //八分打圆形函数while(x<y1){x++;if(p<0)p+=2*x+1;else{y1--;p+=2*(x-y1)+1;}circlePlotPonits( x0, y0, x, y1,pDC);}}//八分打圆形函数void Geo::circlePlotPonits (int x0,int y0,int x,int y,CDC *pDC){pDC->SetPixel(x0+x,y0+y,RGB(255,0,0));pDC->SetPixel(x0-x,y0+y,RGB(255,0,0));pDC->SetPixel(x0+x,y0-y,RGB(255,0,0));pDC->SetPixel(x0-x,y0-y,RGB(255,0,0));pDC->SetPixel(x0+y,y0+x,RGB(255,0,0));pDC->SetPixel(x0-y,y0+x,RGB(255,0,0));pDC->SetPixel(x0+y,y0-x,RGB(255,0,0));pDC->SetPixel(x0-y,y0-x,RGB(255,0,0));}//////////////////////////////dda画圆函数的定义//////////////////void Geo::ddacircle(int x0,int y0,int radius,CDC *pDC){double l=0.3; //角度增量对应的弧长。
图形学读取立方体、兔子、八字三维模型代码及截图(内容参考)

#include <stdlib.h>#include <GL/glut.h>#include <stdio.h>#include <iostream>#include <string>#include <fstream>#include <sstream>#include<cmath>using namespace std;int v_num = 0; //记录点的数量int f_num = 0; //记录面的数量int vn_num = 0;//记录法向量的数量int vt_num = 0;GLfloat **vArr; //存放点的二维数组int **fvArr; //存放面顶点的二维数组int **fnArr;//存放面法向量的二维数组int **ftArr;GLfloat **vtArr;GLfloat **vnArr;//存放法向量的二维数组string s1, s2, s3, s4;GLfloat f2, f3, f4;void getLineNum(string addrstr) //获取点和面的数量{ifstream infile(addrstr.c_str()); //打开指定文件string sline;//每一行int i = 0, j = 0;while (getline(infile, sline)) //从指定文件逐行读取{if (sline[0] == 'v'){if (sline[1] == 'n'){vn_num++;}else if(sline[1] == 't'){vt_num++;}else{v_num++;}}if (sline[0] == 'f'){f_num++;}}}int readfile(string addrstr) //将文件内容读到数组中去{//getLineNum(addrstr);//new二维数组vArr = new GLfloat*[v_num];for (int i = 0; i<v_num; i++){vArr[i] = new GLfloat[3];}vnArr = new GLfloat*[vn_num]; for (int i = 0; i<vn_num; i++) {vnArr[i] = new GLfloat[3]; }vtArr = new GLfloat*[vt_num]; for (int i = 0; i<vt_num; i++) {vtArr[i] = new GLfloat[2]; }fvArr = new int*[f_num]; fnArr = new int*[f_num];ftArr = new int*[f_num];for (int i = 0; i<f_num; i++) {fvArr[i] = new int[3];fnArr[i] = new int[3];ftArr[i] = new int[2];}ifstream infile(addrstr.c_str());。
最新计算机图形学简单示例程序代码及截图

1.读入一幅RGB图像,变换为灰度图像和二值图像,并在同一个窗口内分成三个子窗口来分别显示RGB图像、灰度图像、二值图像,注上文字标题。
>> a=imread('D:/1.jpg');>> i=rgb2gray(a);>> I=im2bw(a,0.5);>> subplot(3,1,1);imshow(a);title('原图像');>> subplot(3,1,2);imshow(i);title('灰度图像');>> subplot(3,1,3);imshow(I);title('二值图像');2.给定一幅RGB图像,绘制图像角度直方图,并对图像进行均衡化处理。
>>a=imread('D:\2.jpg');>>b=rgb2gray(a);>>c=histeq(b);>>subplot(3,1,1);imshow(a);title('原图像');>>subplot(3,1,2);imshow(b);title('直方图像');>>subplot(3,1,3);imshow(c);title('均衡化图像');3. 读入两幅RGB图像,对两幅不同图像执行加、减、乘、除操作,在同一个窗口内分成五个子窗口来分别显示,注上文字标题。
>> a=imread('D:/3.jpg');>> A=imresize(a,[800 800]);>> b=imread('D:/4.jpg');>> B=imresize(b,[800 800]);>> Z1=imadd(A,B);>> Z2=imsubtract(A,B);>> Z3=immultiply(A,B);>> Z4=imdivide(A,B);>> subplot(3,2,1);imshow(A);title('原图像A');>> subplot(3,2,2);imshow(B);title('原图像B');>> subplot(3,2,3);imshow(Z1);title('加法图像');>> subplot(3,2,4);imshow(Z2);title('减法图像');>> subplot(3,2,5);imshow(Z3);title('乘法图像');>> subplot(3,2,6);imshow(Z4);title('除法图像');4.对一幅图像进行灰度变化,实现图像变亮、变暗和负片效果,在同一个窗口内分成四个子窗口来分别显示,注上文字标题。
C++实现截图截屏的示例代码
C++实现截图截屏的⽰例代码⽬录1、截图⼯具1.1 键盘截图(PrtScn键)1.2 win10⾃带截图(Win+Shift+S)1.3 系统⾃带的截图⼩⼯具1.4 ffmpeg1.5 ScreenToGif1.6 Chrome2、C++、GDI2.1 微软官⽅例⼦2.2 C++、GDI、CImage3、C++、OpenGL4、C++、OpenCV5、C++、QT1、截图⼯具1.1 键盘截图(PrtScn键)按下之后,截取整个屏幕的画⾯到剪切板⾥。
可以复制到其他软件⾥,⽐如系统的画图⼯具,Office Word等。
按下之后,截取当前活动窗⼝的画⾯到剪切板⾥。
1.2 win10⾃带截图(Win+Shift+S)按下该组合键之后,使⽤⿏标在屏幕上画出想要截取的矩形区域,⾃动保存到系统剪切板⾥。
1.3 系统⾃带的截图⼩⼯具1.4 ffmpegffmpeg -i “输⼊视频” -fflags nobuffer -t 60 -ss 0 “输出地址”说明:代表截取输⼊视频从0秒到60秒的⽚段,保存到输出地址。
-ss n : 起始时间为第n秒-t n : 总共截取的⽚段时长为n秒运⾏后会⽣成截图: out1.jpg out2.jpg out3.jpg …ffmpeg -i fight.mp4 -r 1 -t 200 -ss 1 -f image2 out%d.jpg1.5 ScreenToGif1.6 Chrome2、C++、GDI2.1 微软官⽅例⼦1 2 3 4 5 6 7 8 910 11 12 13 14 15 16 17 18 19 20 21 22 23 24 25 26 27 28 29 30 31 32 33 34 35 36 37 38 39 40 41 42 43 44 45 46 47 48 49 50 51 52 53 54 55 56 57 58 59 60 61 62int CaptureAnImage(HWND hWnd){HDC hdcScreen;HDC hdcWindow;HDC hdcMemDC = NULL;HBITMAP hbmScreen = NULL;BITMAP bmpScreen;DWORD dwBytesWritten = 0;DWORD dwSizeofDIB = 0;HANDLE hFile = NULL;char* lpbitmap = NULL;HANDLE hDIB = NULL;DWORD dwBmpSize = 0;// Retrieve the handle to a display device context for the client// area of the window.hdcScreen = GetDC(NULL);hdcWindow = GetDC(hWnd);// Create a compatible DC, which is used in a BitBlt from the window DC.hdcMemDC = CreateCompatibleDC(hdcWindow);if(!hdcMemDC){MessageBox(hWnd, L"CreateCompatibleDC has failed", L"Failed", MB_OK);goto done;}// Get the client area for size calculation.RECT rcClient;GetClientRect(hWnd, &rcClient);// This is the best stretch mode.SetStretchBltMode(hdcWindow, HALFTONE);// The source DC is the entire screen, and the destination DC is the current window (HWND).if(!StretchBlt(hdcWindow,0, 0,rcClient.right, rcClient.bottom,hdcScreen,0, 0,GetSystemMetrics(SM_CXSCREEN),GetSystemMetrics(SM_CYSCREEN),SRCCOPY)){MessageBox(hWnd, L"StretchBlt has failed", L"Failed", MB_OK);goto done;}// Create a compatible bitmap from the Window DC.hbmScreen = CreateCompatibleBitmap(hdcWindow, rcClient.right - rcClient.left, rcClient.bottom - rcClient.top); if(!hbmScreen){MessageBox(hWnd, L"CreateCompatibleBitmap Failed", L"Failed", MB_OK);goto done;}// Select the compatible bitmap into the compatible memory DC.63 64 65 66 67 68 69 70 71 72 73 74 75 76 77 78 79 80 81 82 83 84 85 86 87 88 89 90 91 92 93 94 95 96 97 98 99 100 101 102 103 104 105 106 107 108 109 110 111 112 113 114 115 116 117 118 119 120 121 122 123 124 SelectObject(hdcMemDC, hbmScreen);// Bit block transfer into our compatible memory DC.if(!BitBlt(hdcMemDC,0, 0,rcClient.right - rcClient.left, rcClient.bottom - rcClient.top,hdcWindow,0, 0,SRCCOPY)){MessageBox(hWnd, L"BitBlt has failed", L"Failed", MB_OK);goto done;}// Get the BITMAP from the HBITMAP.GetObject(hbmScreen, sizeof(BITMAP), &bmpScreen);BITMAPFILEHEADER bmfHeader;BITMAPINFOHEADER bi;bi.biSize = sizeof(BITMAPINFOHEADER);bi.biWidth = bmpScreen.bmWidth;bi.biHeight = bmpScreen.bmHeight;bi.biPlanes = 1;bi.biBitCount = 32;bi.biCompression = BI_RGB;bi.biSizeImage = 0;bi.biXPelsPerMeter = 0;bi.biYPelsPerMeter = 0;bi.biClrUsed = 0;bi.biClrImportant = 0;dwBmpSize = ((bmpScreen.bmWidth * bi.biBitCount + 31) / 32) * 4 * bmpScreen.bmHeight;// Starting with 32-bit Windows, GlobalAlloc and LocalAlloc are implemented as wrapper functions that// call HeapAlloc using a handle to the process's default heap. Therefore, GlobalAlloc and LocalAlloc// have greater overhead than HeapAlloc.hDIB = GlobalAlloc(GHND, dwBmpSize);lpbitmap = (char*)GlobalLock(hDIB);// Gets the "bits" from the bitmap, and copies them into a buffer// that's pointed to by lpbitmap.GetDIBits(hdcWindow, hbmScreen, 0,(UINT)bmpScreen.bmHeight,lpbitmap,(BITMAPINFO*)&bi, DIB_RGB_COLORS);// A file is created, this is where we will save the screen capture.hFile = CreateFile(L"captureqwsx.bmp",GENERIC_WRITE,0,NULL,CREATE_ALWAYS,FILE_ATTRIBUTE_NORMAL, NULL);// Add the size of the headers to the size of the bitmap to get the total file size.dwSizeofDIB = dwBmpSize + sizeof(BITMAPFILEHEADER) + sizeof(BITMAPINFOHEADER);// Offset to where the actual bitmap bits start.bmfHeader.bfOffBits = (DWORD)sizeof(BITMAPFILEHEADER) + (DWORD)sizeof(BITMAPINFOHEADER); // Size of the file.bmfHeader.bfSize = dwSizeofDIB;// bfType must always be BM for Bitmaps.bmfHeader.bfType = 0x4D42; // BM.WriteFile(hFile, (LPSTR)&bmfHeader, sizeof(BITMAPFILEHEADER), &dwBytesWritten, NULL);WriteFile(hFile, (LPSTR)&bi, sizeof(BITMAPINFOHEADER), &dwBytesWritten, NULL);WriteFile(hFile, (LPSTR)lpbitmap, dwBmpSize, &dwBytesWritten, NULL);// Unlock and Free the DIB from the heap.GlobalUnlock(hDIB);125126127128129130131132133134135136137138139140141142143144145GlobalFree(hDIB);// Close the handle for the file that was created.CloseHandle(hFile); // Clean up.done:DeleteObject(hbmScreen);DeleteObject(hdcMemDC);ReleaseDC(NULL, hdcScreen); ReleaseDC(hWnd, hdcWindow); return 0;}2.2 C++、GDI 、CImage123456789HDC hdcSrc = GetDC(NULL);int nBitPerPixel = GetDeviceCaps(hdcSrc, BITSPIXEL);int nWidth = GetDeviceCaps(hdcSrc, HORZRES);int nHeight = GetDeviceCaps(hdcSrc, VERTRES);CImage image;image.Create(nWidth, nHeight, nBitPerPixel);BitBlt(image.GetDC(), 0, 0, nWidth, nHeight, hdcSrc, 0, 0, SRCCOPY);ReleaseDC(NULL, hdcSrc);image.ReleaseDC();image.Save(s, Gdiplus::ImageFormatPNG);3、C++、OpenGL1234567891011121314151617void CaptureOpenGLWindow(const char* savePath, int w, int h){ GLubyte* pPixelData;GLint PixelDataLength;// 分配内存和打开⽂件pPixelData = (GLubyte*)malloc(w*h*3); if (pPixelData == 0) return; glPixelStorei(GL_UNPACK_ALIGNMENT, 4); glReadPixels(0, 0, w, h, GL_RGB, GL_UNSIGNED_BYTE, pPixelData);stbi_write_png(savePath, w, h, 3, pPixelData, 0);free(pPixelData); int iw = w, ih = h, n = 3; stbi_set_flip_vertically_on_load(true); unsigned char *idata = stbi_load(savePath, &iw, &ih, &n, 0);18192021stbi_write_png(savePath, w, h, 3, idata, 0);stbi_image_free(idata);}4、C++、OpenCV1234567891011121314151617181920212223242526272829303132333435363738394041424344454647484950BITMAPINFOHEADER createBitmapHeader(int width, int height){BITMAPINFOHEADER bi;// create a bitmap bi.biSize = sizeof(BITMAPINFOHEADER); bi.biWidth = width; bi.biHeight = -height; //this is the line that makes it draw upside down or notbi.biPlanes = 1;bi.biBitCount = 32;bi.biCompression = BI_RGB; bi.biSizeImage = 0; bi.biXPelsPerMeter = 0;bi.biYPelsPerMeter = 0;bi.biClrUsed = 0;bi.biClrImportant = 0; return bi;} Mat captureScreenMat(HWND hwnd){ Mat src;// get handles to a device context (DC)HDC hwindowDC = GetDC(hwnd);HDC hwindowCompatibleDC = CreateCompatibleDC(hwindowDC);SetStretchBltMode(hwindowCompatibleDC, COLORONCOLOR); // define scale, height and width int screenx = GetSystemMetrics(SM_XVIRTUALSCREEN); int screeny = GetSystemMetrics(SM_YVIRTUALSCREEN); int width = GetSystemMetrics(SM_CXVIRTUALSCREEN); int height = GetSystemMetrics(SM_CYVIRTUALSCREEN); // create mat object src.create(height, width, CV_8UC4);// create a bitmapHBITMAP hbwindow = CreateCompatibleBitmap(hwindowDC, width, height);BITMAPINFOHEADER bi = createBitmapHeader(width, height); // use the previously created device context with the bitmap SelectObject(hwindowCompatibleDC, hbwindow); // copy from the window device context to the bitmap device contextStretchBlt(hwindowCompatibleDC, 0, 0, width, height, hwindowDC, screenx, screeny, width, height, SRCCOPY); //change SRCCOPY to NOTSRCCOPY for wacky colors !GetDIBits(hwindowCompatibleDC, hbwindow, 0, height, src.data, (BITMAPINFO*)&bi, DIB_RGB_COLORS); //copy from hwindowCompatibleDC to hbwindow // avoid memory leakDeleteObject(hbwindow);DeleteDC(hwindowCompatibleDC);515253545556575859606162636465666768ReleaseDC(hwnd, hwindowDC);return src;}int main(){ // capture image HWND hwnd = GetDesktopWindow(); Mat src = captureScreenMat(hwnd);// save img cv::imwrite("Screenshot.png", src);// clean-ups buf.clear(); return 0;}5、C++、QT123QDesktopWidget *desk = QApplication::desktop();QScreen * screen = QGuiApplication::primaryScreen();QPixmap p = screen->grabWindow(desk->winId());QImage image = p.toImage();到此这篇关于C++实现截图截屏的⽰例代码的⽂章就介绍到这了,更多相关C++ 截图截屏内容请搜索以前的⽂章或继续浏览下⾯的相关⽂章希望⼤家以后多多⽀持!。
计算机图形学实验C++代码
一、bresenham算法画直线#include<glut.h>#include<math.h>#include<stdio.h>void draw_pixel(int ix,int iy){glBegin(GL_POINTS);glVertex2i(ix,iy);glEnd();}void Bresenham(int x1,int y1,int xEnd,int yEnd) {int dx=abs(xEnd-x1),dy=abs(yEnd-y1);int p=2*dy-dx;int twoDy=2*dy,twoDyMinusDx=2*dy-2*dx;int x,y;if (x1>xEnd){x=xEnd;y=yEnd;xEnd=x1;}else{x=x1;y=y1;}draw_pixel(x,y);while(x<xEnd){x++;if(p<0)p+=twoDy;else{y++;p+=twoDyMinusDx;draw_pixel(x,y);}}}void display(){glClear(GL_COLOR_BUFFER_BIT);Bresenham(0,0,400,400);glFlush();}void myinit(){glClearColor(0.8,1.0,1.0,1.0);glColor3f(0.0,0.0,1.0);glPointSize(1.0);glMatrixMode(GL_PROJECTION);glLoadIdentity();gluOrtho2D(0.0,500.0,0.0,500.0);}void main(int argc,char **argv ){glutInit(&argc,argv);glutInitDisplayMode(GLUT_SINGLE|GLUT_RGB);glutInitWindowSize(500,500);glutInitWindowPosition(200.0,200.0);glutCreateWindow("CG_test_Bresenham_Line example");glutDisplayFunc(display);myinit();glutMainLoop();}二、中点法绘制椭圆#include<glut.h>#include<math.h>#include<stdio.h>inline int round(const float a){return int (a+0.5);}void setPixel(GLint xCoord,GLint yCoord){glBegin(GL_POINTS);glVertex2i(xCoord,yCoord);glEnd();}void ellipseMidpoint(int xCenter,int yCenter,int Rx,int Ry) {int Rx2=Rx*Rx;int Ry2=Ry*Ry;int twoRx2=2*Rx2;int twoRy2=2*Ry2;int p;int x=0;int y=Ry;int px=0;int py=twoRx2*y;void ellipsePlotPoints(int,int,int,int);ellipsePlotPoints(xCenter,yCenter,x,y);p=round(Ry2-(Rx2*Ry)+(0.25*Rx2));while(px<py){x++;px+=twoRy2;if(p<0)p+=Ry2+px;else{y--;py-=twoRx2;p+=Ry2+px-py;}ellipsePlotPoints(xCenter,yCenter,x,y);}p=round(Ry2*(x+0.5)*(x+0.5)+Rx2*(y-1)*(y-1)-Rx2*Ry2);while(y>0){y--;py-=twoRx2;if(p>0)p+=Rx2-py;else{x++;px+=twoRy2;p+=Rx2-py+px;}ellipsePlotPoints(xCenter,yCenter,x,y);}}void ellipsePlotPoints(int xCenter,int yCenter,int x,int y) {setPixel(xCenter+x,yCenter+y);setPixel(xCenter-x,yCenter+y);setPixel(xCenter+x,yCenter-y);setPixel(xCenter-x,yCenter-y);}void display(){glClear(GL_COLOR_BUFFER_BIT);ellipseMidpoint(200,200,50,30);glFlush();}void myinit(){glClearColor(0.8,1.0,1.0,1.0);glColor3f(0.0,0.0,1.0);glPointSize(1.0);glMatrixMode(GL_PROJECTION);glLoadIdentity();gluOrtho2D(0.0,300.0,0.0,300.0);}void main(int argc,char **argv ){glutInit(&argc,argv);glutInitDisplayMode(GLUT_SINGLE|GLUT_RGB);glutInitWindowSize(300,300);glutInitWindowPosition(200.0,200.0);glutCreateWindow("circleMId example");glutDisplayFunc(display);myinit();glutMainLoop();}三、抛物线#include<glut.h>#include<math.h>#include<stdio.h>inline int round(const float a){return int (a+0.5);}void setPixel(GLint xCoord,GLint yCoord){glBegin(GL_POINTS);glVertex2i(xCoord,yCoord);glEnd();}void ellipseMidpoint(int xCenter,int yCenter,int a,int b){int p;int x=xCenter;int y=yCenter;int px=0,py=0;void ellipsePlotPoints(int,int,int,int);ellipsePlotPoints(xCenter,yCenter,px,py);p=yCenter+a*(x+1-xCenter)*(x+1-xCenter)+b*(x+1-xCenter)-y-0.5;do{if(p<0){x=x+1;y=y;p=yCenter+a*(x+1-xCenter)*(x+1-xCenter)+b*(x+1-xCenter)-y-0.5;}else{x=x+1;y=y-1;p=yCenter+a*(x+1-xCenter)*(x+1-xCenter)+b*(x+1-xCenter)-y-0.5;}px=x-xCenter;py=y-yCenter;ellipsePlotPoints(xCenter,yCenter,px,py);}while(px<py);for(;;){if(p<0){x=x-1;y=y+1;p=yCenter+a*(x+0.5-xCenter)*(x+0.5-xCenter)+b*(x+0.5-xCenter)-y-1;}else{x=x;y=y+1;p=yCenter+a*(x+0.5-xCenter)*(x+0.5-xCenter)+b*(x+0.5-xCenter)-y-1;}px=x-xCenter;py=y-yCenter;ellipsePlotPoints(xCenter,yCenter,px,py);};}void ellipsePlotPoints(int xCenter,int yCenter,int x,int y){setPixel(xCenter+x,yCenter+y);setPixel(xCenter-x,yCenter+y);}void display(){glClear(GL_COLOR_BUFFER_BIT);ellipseMidpoint(150,150,1,0);glFlush();}void myinit(){glClearColor(0.8,1.0,1.0,1.0);glColor3f(0.0,0.0,1.0);glPointSize(1.0);glMatrixMode(GL_PROJECTION);glLoadIdentity();gluOrtho2D(0.0,300.0,0.0,300.0);}void main(int argc,char **argv ){glutInit(&argc,argv);glutInitDisplayMode(GLUT_SINGLE|GLUT_RGB);glutInitWindowSize(500,500);glutInitWindowPosition(200.0,200.0);glutCreateWindow("circleMId example");glutDisplayFunc(display);myinit();glutMainLoop();}四、基本图元输出#include<glut.h>#include<math.h>#include<stdio.h>void Polygon(int*p1,int*p2,int*p3,int*p4,int*p5,int*p6) {glBegin(GL_POLYGON);glVertex2iv(p1);glVertex2iv(p2);glVertex2iv(p3);glVertex2iv(p4);glVertex2iv(p5);glVertex2iv(p6);glEnd();}void Triangles(int*p1,int*p2,int*p3,int*p4,int*p5,int*p6) {glBegin(GL_TRIANGLES);glVertex2iv(p1);glVertex2iv(p2);glVertex2iv(p6);glVertex2iv(p3);glVertex2iv(p4);glVertex2iv(p5);glEnd();}void Trianglefan(int*p1,int*p2,int*p3,int*p4,int*p5,int*p6) {glBegin(GL_TRIANGLE_FAN);glVertex2iv(p1);glVertex2iv(p2);glVertex2iv(p3);glVertex2iv(p4);glVertex2iv(p5);glVertex2iv(p6);glEnd();}void Trianglestrip(int*p1,int*p2,int*p3,int*p4,int*p5,int*p6) {glBegin(GL_TRIANGLE_STRIP);glVertex2iv(p1);glVertex2iv(p2);glVertex2iv(p6);glVertex2iv(p3);glVertex2iv(p5);glVertex2iv(p4);glEnd();}void glRect_s(GLint a,GLint b,GLint c,GLint d){glRecti(a,b,c,d);}void display(){int p1[]={60,170};int p2[]={100,100};int p3[]={180,100};int p4[]={220,170};int p5[]={180,240};int p6[]={100,240};int p7[]={60,100};glClear(GL_COLOR_BUFFER_BIT);//Triangles(p1,p2,p3,p4,p5,p6);//Polygon(p1,p2,p3,p4,p5,p6);//glRect_s(160,30,10,100);Trianglestrip(p1,p2,p3,p4,p5,p6);//Trianglefan(p1,p2,p3,p4,p5,p6);glFlush();}void myinit(){glClearColor(0.8,1.0,1.0,1.0);glColor3f(0.0,0.0,1.0);glPointSize(1.0);glMatrixMode(GL_PROJECTION);glLoadIdentity();gluOrtho2D(0.0,300.0,0.0,300.0);}void main(int argc,char **argv ){glutInit(&argc,argv);glutInitDisplayMode(GLUT_SINGLE|GLUT_RGB);glutInitWindowSize(500,500);glutInitWindowPosition(300.0,300.0);glutCreateWindow("circleMId example");glutDisplayFunc(display);myinit();glutMainLoop();}五、区域填充#include"glut.h"#include"windows.h"const int POINTNUM=7; //多边形点数.//定义结构体用于活性边表AET和新边表NETtypedef struct XET{float x;float dx,ymax;XET* next;}AET,NET;//定义点结构体pointstruct point{float x;float y;}polypoint[POINTNUM]={250,50,350,150,50,40,250,20,200,30,100,100,10,300};//多边形顶点void PolyScan(){//计算最高点的y坐标(扫描到此结束)int MaxY=0;int i;for(i=0;i<POINTNUM;i++)if(polypoint[i].y>MaxY)MaxY=polypoint[i].y;//初始化AET表AET *pAET=new AET;pAET->next=NULL;//初始化NET表NET *pNET[1024];for(i=0;i<=MaxY;i++){pNET[i]=new NET;pNET[i]->next=NULL;}glClear(GL_COLOR_BUFFER_BIT); //赋值的窗口显示.glColor3f(0.9,1.0,0.0); //设置直线的颜色红色glBegin(GL_POINTS);//扫描并建立NET表,注:构建一个图形for(i=0;i<=MaxY;i++){for(int j=0;j<POINTNUM;j++)if(polypoint[j].y==i){ //一个点跟前面的一个点形成一条线段,跟后面的点也形成线段if(polypoint[(j-1+POINTNUM)%POINTNUM].y>polypoint[j].y){NET *p=new NET;p->x=polypoint[j].x;p->ymax=polypoint[(j-1+POINTNUM)%POINTNUM].y;p->dx=(polypoint[(j-1+POINTNUM)%POINTNUM].x-polypoint[j].x)/(polypoint[(j- 1+POINTNUM)%POINTNUM].y-polypoint[j].y);p->next=pNET[i]->next;pNET[i]->next=p;}if(polypoint[(j+1+POINTNUM)%POINTNUM].y>polypoint[j].y){NET *p=new NET;p->x=polypoint[j].x;p->ymax=polypoint[(j+1+POINTNUM)%POINTNUM].y;p->dx=(polypoint[(j+1+POINTNUM)%POINTNUM].x-polypoint[j].x)/(polypoint[(j+1+POINTNUM)%POINTNUM].y-polypoint[j].y);p->next=pNET[i]->next;pNET[i]->next=p;}}}for(i=0;i<=MaxY;i++){//计算新的交点x,更新AETNET *p=pAET->next;while(p){p->x=p->x + p->dx;p=p->next;}AET *tq=pAET;p=pAET->next;tq->next=NULL;while(p){while(tq->next && p->x >= tq->next->x)tq=tq->next;NET *s=p->next;p->next=tq->next;tq->next=p;p=s;tq=pAET;}//(改进算法)先从AET表中删除ymax==i的结点* AET *q=pAET;p=q->next;while(p){if(p->ymax==i){q->next=p->next;delete p;p=q->next;}else{q=q->next;p=q->next;}}//将NET中的新点加入AET,并用插入法按X值递增排序p=pNET[i]->next;q=pAET;while(p){while(q->next && p->x >= q->next->x)q=q->next;NET *s=p->next;p->next=q->next;q->next=p;p=s;q=pAET;}//配对填充颜色p=pAET->next;while(p && p->next){for(float j=p->x;j<=p->next->x;j++)glVertex2i(static_cast<int>(j),i);p=p->next->next;//考虑端点情况}}glEnd();glFlush();}void init(void){glClearColor(1.0,1.0,1.0,0.0);//窗口的背景颜色设置为白色glMatrixMode(GL_PROJECTION);gluOrtho2D(0.0,600.0,0.0,450.0);}void lineSegment(void){glClear(GL_COLOR_BUFFER_BIT); //赋值的窗口显示.glColor3f(0.0,1.0,0.0); //设置直线的颜色红色glBegin(GL_LINES);glVertex2i(180,15); //Specify line-segment geometry.glVertex2i(10,145);glEnd();glFlush(); //Process all OpenGL routines as quickly as possible.}void main(int argc,char* argv){glutInit(&argc,&argv); //I初始化GLUT.glutInitDisplayMode(GLUT_SINGLE | GLUT_RGB); //设置显示模式:单个缓存和使用RGB模型glutInitWindowPosition(50,100); //设置窗口的顶部和左边位置glutInitWindowSize(400,300); //设置窗口的高度和宽度glutCreateWindow("扫描线填充算法"); //创建显示窗口init(); //调用初始化过程glutDisplayFunc(PolyScan); //图形的定义传递glutMainLoop(); //显示所有的图形并等待}11。
计算机图形学程序设计五角星代码

glViewport(0, 0, width, height);/*设置视口大小*/
glMatrixMode(GL_PROJECTION);/*重置坐标系*/
glLoadIdentity();
ratio = (GLfloat)width / (GLfloat)height;/*建立裁剪区域(左,右,底,顶,近平面,远平面)*/
glVertex2f(38.2*cos(0.2*3.1415),38.2*sin(0.2*3.1415));
glVertex2f(100*cos(0.4*3.1415),100*sin(0.4*3.1415));
glVertex2f(38.2*cos(0.6*3.1415),38.2*sin(0.6*3.1415));
}
void Display(void)
{
glClear(GL_COLOR_BUFFER_BIT);/*用当前的颜色(黄色)清除窗口*/
glColor3f(1.0,0.0,0.0);/*设置绘图颜色为红色*/
glBegin(GL_POLYGON); ቤተ መጻሕፍቲ ባይዱ*绘制五角星*/
glVertex2f(0,0);
glVertex2f(100,0);
计算机图形学程序设计五角星代码
程序代码
#include <glut.h>
#include<math.h>
void main(void);
void Init(void);
void Display(void);
void Reshape(int width, int height);
void main(void)
Init();/*初始化绘制状态*/
计算机图形学常用算法及代码大全
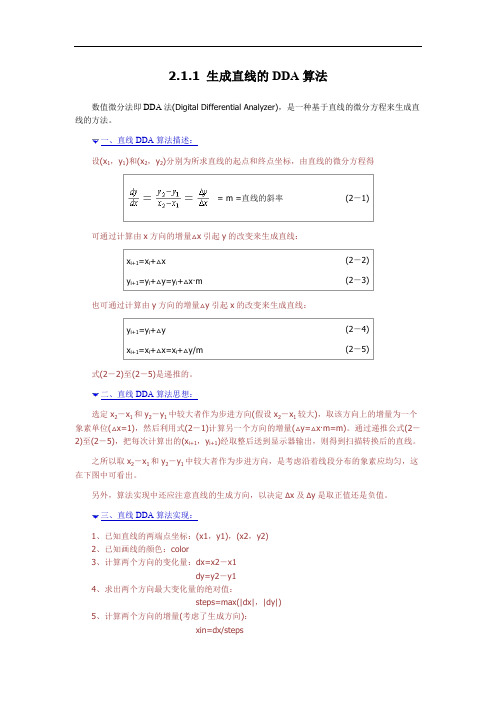
2.1.1 生成直线的DDA算法数值微分法即DDA法(Digital Differential Analyzer),是一种基于直线的微分方程来生成直线的方法。
一、直线DDA算法描述:设(x1,y1)和(x2,y2)分别为所求直线的起点和终点坐标,由直线的微分方程得可通过计算由x方向的增量△x引起y的改变来生成直线:也可通过计算由y方向的增量△y引起x的改变来生成直线:式(2-2)至(2-5)是递推的。
二、直线DDA算法思想:选定x2-x1和y2-y1中较大者作为步进方向(假设x2-x1较大),取该方向上的增量为一个象素单位(△x=1),然后利用式(2-1)计算另一个方向的增量(△y=△x·m=m)。
通过递推公式(2-2)至(2-5),把每次计算出的(x i+1,y i+1)经取整后送到显示器输出,则得到扫描转换后的直线。
之所以取x2-x1和y2-y1中较大者作为步进方向,是考虑沿着线段分布的象素应均匀,这在下图中可看出。
另外,算法实现中还应注意直线的生成方向,以决定Δx及Δy是取正值还是负值。
三、直线DDA算法实现:1、已知直线的两端点坐标:(x1,y1),(x2,y2)2、已知画线的颜色:color3、计算两个方向的变化量:dx=x2-x1dy=y2-y14、求出两个方向最大变化量的绝对值:steps=max(|dx|,|dy|)5、计算两个方向的增量(考虑了生成方向):xin=dx/stepsyin=dy/steps6、设置初始象素坐标:x=x1,y=y17、用循环实现直线的绘制:for(i=1;i<=steps;i++){ putpixel(x,y,color);/*在(x,y)处,以color色画点*/x=x+xin;y=y+yin;}五、直线DDA算法特点:该算法简单,实现容易,但由于在循环中涉及实型数的运算,因此生成直线的速度较慢。
//@brief 浮点数转整数的宏实现代码#define FloatToInteger(fNum)((fNum>0)?static_cast<int>(fNum+0.5):static_cast<int>(fNum-0.5))/*!* @brief DDA画线函数** @param pDC [in]窗口DC* @param BeginPt [in]直线起点* @param EndPt [in]直线终点* @param LineCor [in]直线颜色* @return 无*/void CDrawMsg::DDA_DrawLine(CDC *pDC,CPoint &BeginPt,CPoint &EndPt,COLORREF LineCor){l ong YDis = (EndPt.y - BeginPt.y);l ong XDis = (EndPt.x-BeginPt.x);l ong MaxStep = max(abs(XDis),abs(YDis)); // 步进的步数f loat fXUnitLen = 1.0f; // X方向的单位步进f loat fYUnitLen = 1.0f; // Y方向的单位步进f YUnitLen = static_cast<float>(YDis)/static_cast<float>(MaxStep);f XUnitLen = static_cast<float>(XDis)/static_cast<float>(MaxStep);// 设置起点像素颜色p DC->SetPixel(BeginPt.x,BeginPt.y,LineCor);f loat x = static_cast<float>(BeginPt.x);f loat y = static_cast<float>(BeginPt.y);// 循环步进f or (long i = 1;i<=MaxStep;i++){x = x + fXUnitLen;y = y + fYUnitLen;pDC->SetPixel(FloatToInteger(x),FloatToInteger(y),LineCor);}}2.1.2 生成直线的B resenham算法从上面介绍的DDA算法可以看到,由于在循环中涉及实型数据的加减运算,因此直线的生成速度较慢。
- 1、下载文档前请自行甄别文档内容的完整性,平台不提供额外的编辑、内容补充、找答案等附加服务。
- 2、"仅部分预览"的文档,不可在线预览部分如存在完整性等问题,可反馈申请退款(可完整预览的文档不适用该条件!)。
- 3、如文档侵犯您的权益,请联系客服反馈,我们会尽快为您处理(人工客服工作时间:9:00-18:30)。
1.读入一幅RGB图像,变换为灰度图像和二值图像,并在同一个窗口内分成三个子窗口来分别显示RGB图像、灰度图像、二值图像,注上文字标题。
>> a=imread('D:/1.jpg');
>> i=rgb2gray(a);
>> I=im2bw(a,0.5);
>> subplot(3,1,1);imshow(a);title('原图像');
>> subplot(3,1,2);imshow(i);title('灰度图像');
>> subplot(3,1,3);imshow(I);title('二值图像');
2.给定一幅RGB图像,绘制图像角度直方图,并对图像进行均衡化处理。
>>a=imread('D:\2.jpg');
>>b=rgb2gray(a);
>>c=histeq(b);
>>subplot(3,1,1);imshow(a);title('原图像');
>>subplot(3,1,2);imshow(b);title('直方图像');
>>subplot(3,1,3);imshow(c);title('均衡化图像');
3. 读入两幅RGB图像,对两幅不同图像执行加、减、乘、除操作,在同一个窗口内分成五个子窗口来分别显示,注上文字标题。
>> a=imread('D:/3.jpg');
>> A=imresize(a,[800 800]);
>> b=imread('D:/4.jpg');
>> B=imresize(b,[800 800]);
>> Z1=imadd(A,B);
>> Z2=imsubtract(A,B);
>> Z3=immultiply(A,B);
>> Z4=imdivide(A,B);
>> subplot(3,2,1);imshow(A);title('原图像A');
>> subplot(3,2,2);imshow(B);title('原图像B');
>> subplot(3,2,3);imshow(Z1);title('加法图像');
>> subplot(3,2,4);imshow(Z2);title('减法图像');
>> subplot(3,2,5);imshow(Z3);title('乘法图像');
>> subplot(3,2,6);imshow(Z4);title('除法图像');
4.对一幅图像进行灰度变化,实现图像变亮、变暗和负片效果,在同一个窗口内分成四个子窗口来分别显示,注上文字标题。
>> a=imread('D:/5.jpg');
>> m=imadjust(a,[,],[0.5;1]);
>> n=imadjust(a,[,],[0;0.5]);
>> g=255-a;
>> subplot(2,2,1);imshow(a);title('原图像');
>> subplot(2,2,2);imshow(m);title('图像变亮');
>> subplot(2,2,3);imshow(n);title('图像变暗');
>> subplot(2,2,4);imshow(g);title('负片效果');
5.采用MATLAB中的函数filter2对受高斯噪声干扰的图像进行均值滤波,写出程序代码和运行结果。
>>a=imread('D:/6.jpg');
>> i=rgb2gray(a);
>> subplot(3,1,2);imshow(i);title('灰度图像');
>> J=imnoise(i,'gaussian',0,0.005);
>> subplot(2,1,1);imshow(J);title('噪声干扰图像');
>> subplot(3,1,1);imshow(i);title('灰度图像');
>> subplot(3,1,2);imshow(J);title('噪声干扰图像');
>> M= filter2(fspecial('average',9),J)/255;
>> subplot(3,1,3);imshow(M);title('均值后的图像');
6. 用一种阀值方法实现图像分割,写出程序代码和运行结果。
>>I=imread('D:/7.jpg');
>>A=imresize(I,[200 200]);
>>i=rgb2gray(A);
>>subplot(3,1,1);imshow(i);title('灰度图像');
>>C=histc(i,0:255);
>>n=sum(C);
>>N=sum(n);
>>t=n\N;
>>subplot(3,1,2);imhist(i);title('灰度直方图');
>>hold off;
>>axis([0,255,0,500]);
>> [p,threshold]=min(t(120:150));
>>threshold=threshold+120;
>>tt=find(i>threshold);
>>i(tt)=255;
>>tt=find(i<threshold);
>>i(tt)=0;
>>subplot(3,1,3);imshow(i);title('灰度阈值图');。
