蓝硕星4G固定无线电话机使用说明
座机电话的使用方法和常用按键说明

座机电话的使用方法和常用按键说明如今,电话已经成为我们日常生活中不可缺少的工具,当然即便手机再普及,座机电话还是家庭尤其是办公室必不可少的,座机电话除了打/接之外的一些功能想必很多人还没用过,下面就以“步步高HCD007(182)TSDL ”型号的座机电话为例,给大家介绍下座机电话的使用方法及常用按键说明,虽然座机电话的功能不一,布局也不同,但主要的功能都差不多,希望给读者一个参考。
座机电话的使用方法及常用按键说明在以下使用方法叙述中,除特别说明外,其他操作均指在座机挂机状态下进行。
接听电话听到电话铃声,拿起手柄或按(免提)键即可与对方通话,通话完毕挂好手柄或按(免提)键。
在用手柄通话时若需转为免提通话,则按一下(免提)键,放回手柄即可转为免提通话;在用免提通话时若需转为手柄通话,则拿起手柄即可。
拨打电话拿起手柄或按(免提)键,听到拨号音后拨号,当听到回铃音时,等待对方应答。
如果听到忙音,只按(重拨/回拨)键即可将刚才所拨的电话号码拨出去,通话完毕挂好手柄或按(免提)键。
预置拨号预拨电话号码,如果输入错误,可按匠删除/刚键删除再重新输入。
待确认无误,按(重拨/回拨)键即可拨出。
重拨键拨出电话号码,听到忙音时,可以收线后再摘机,听到拨号音后,再按(重拨/回拨)键;或无须收线直接按(重拨/回拨)键,本机就会自动拨出您前次输入的号码。
闪断键(闪断)键又称快速收线键。
在摘机状态下按(闪断/铃声)键,可实现与按下收线开关同样的效果,当您连续拨打几个电话时,该键就显得尤其方便、快捷。
该键作用时间可作更改,具体操作请见后述第四页中的“设置闪断时间”。
暂停键拨号时,若两组号码之间需要暂停,可按(暂停/闹钟)键。
该键尤适用于内线分机拨打外线时使用。
铃声选择本机提供6种和弦音乐铃声。
4种特效铃声及1种普通铃声供选择。
您可在待机状态下按住(闪断/铃声,键大约2秒后,待显示屏显示“ring”或“song xx”字样时松开(“xx”为当前铃声种类,本机出厂时默认响普通铃声),再连续按(闪断/铃声)键循环选择您所喜爱的和弦音乐铃声。
美国CelTel_2.4G数字无绳电话S4200使用手册
美国CelTel 2.4G数字无绳电话S4200介绍CELTEL S42001.产品相关功能介绍:1)2.4 GHz数字传输(Digital Spread Spectrum)2)按机座上的「PAGE」键,手机会发出响声,让您很容易地找寻到手机的下落3)可在手机上存储20组快速拨号的电话号码4)可在手机的电话簿上存储20组电话号码和姓名5)有来电显示FSK制式6)有通话中插拔來电显示功能。
这意味著,当您正在聊电话时突然有另一通來电,您会先看到来电者的电话号码和姓名,然後才决定是否要转过去接听(需有来电显示转码器的辅助)7)来电显示功能可记忆最後50组的电话号码和姓名8)可立即重拨最後一组使用过的电话号码9)听筒及基座上的音量大小都可随您的喜好调整10)手机和基座上都有键盘按键,让您可从手机或基座上拨打电话11)基座上并有扩音功能(免持听筒SPEAKER)12)电话可在手机和手机间或手机和基座间互转13)本组电话最大的特色是有一個「大哥大」的插槽,此插槽支援以下的移动电话:(1).Motorola StarTAC SER CDMA(2).Motorola V60/V120 SER(In 05/03) (3).Samsung (In 05/03) (4).Audiovox 9100 SER (In 06/03) (5).Sanyo (In 07/03) (6).Kyocera/Qualcomm (In 09/03)14)以上所列出的移动电话可直接放在此插槽中,CELTEL S4200无绳电话会自动把您的移动电话的来电转到无绳电话上。
2.功能/规格:Celtel公司的2.4GHz的DSS多手机/移动扩展坞•秘书长特色:•2.4 GHz数字扩频(DSS)•多手机能力达3部手机•蜂窝电话坞站连接家里的手机•20号备忘录拨号•LCD /键盘背光(绿色)•超级休眠功能,延长手机电池的使用寿命•双键盘•手机喇叭•手机对讲手机功能•重拨/暂停/闪光灯•静音•音量控制•扬声器音量控制•振铃音选择•耳机插孔(不含耳机)•呼叫等待来电显示•50呼叫记忆(PSTN)的•更换为不同的手机使用(不包含手机)•兼容的手机型号(特定适配器):•诺基亚5100/6100/3200 SER/3285/5165/5185/61�6�7�6�785•规认证:•ETL认证套件包括:•电话机•话机底座•底座适配器•AC适配器(AC 120V�9�160HZ)•用户手册•镍氢充电电池•电话线•话机夹3.功能示意图英文使用说明书的中文对照(部分)封面:大意是恭喜购入S4200型celtel(cel应该是手机缩写,tel是固定电话缩写)docking Station(插接站,底座),可以使用多年,物超所值,很少需要维护,设置及使用方便。
4G移动基站安装操作指导书
4G移动基站安装操作指导书施工前准备说明:文中数字序号 1)、2)…表示安装步骤;字母序号 a)、b)…表示不同场景抵达现场,依据EHS要求着装,在作业区域设立安全警示标识后开始设备安装Step1:开箱验货1)确认现场设备安装位置、走线路由及长度,电源、传输、地排等配套与设计文件相符,开箱并按装箱单清点货物并签字确认,记录BBU框ESN报后台ESNStep2:安装机柜/机框并接地将机柜/机框安装在设计位置,并用25mm2黄绿地线连接至机房室内接地排a)BTS3900L机柜场景:b) IMB/OMB机框场景:c) APM30机柜场景:Step3:安装DCDU/ ETP48100及BBU1)按照机柜门背面的安装指示标识,安装DCDU/ETP48100和BBU若模块安装在非华为机柜,需用6mm2接地线通过设备外壳或面部的接地连接至机柜内部就近接地点,安装在华为机柜/机框,无需再做接地模块安装后需与原有设备前面板在同一平面Step4:安装DCDU/ETP48100电源输入线a)直流:裁剪16mm2蓝黑电源线并压接端子,连接至DCDU与电源柜b)交流:将交流输入电源线两端分别连接至ETP48100与AC220V电源插排,多余线缆盘绕绑扎在机框旁边线缆布放时须用绝缘胶带缠绕端头,使之绝缘,电源柜侧接电时,须使用经过绝缘处理的工具,接电前需确认空开关闭或拔出熔丝电源线和信号线需间隔30mm固定,室内用白色线扣十字交叉绑扎,齐根剪平不拉尖,室外用黑色线扣,留3-5mm后剪掉Step5:天线预安装并连接跳线1)安装天线支架并调至预定下倾角;2a)常规天线:连接跳线并做好防水用防水盒或冷缩套管2b)合路天线:用绝缘胶带和防水胶带做1+3+3防水或冷缩套管3)在天线侧安装标识牌,在跳线尾部做临时标识Step6:安装天线及RRU到抱杆或墙面1)若为改造场景,原网天馈参数测量记录,然后拆除原网天线与RRU;2)安装滑轮和吊绳,将天线吊到预定高度,调整好方位角与下倾角后紧固天线;3)安装RRU扣件后将RRU挂装在抱杆或墙面主扣件上天线安装角度最大误差:方位角2度,下倾角0.5度跳线与天线的连接处300mm以内不能有折弯Step7:RRU侧电源线、光纤、GPS馈线布放1)参照设计路由将RRU电源线、光纤、GPS馈线沿走线路由穿过馈窗布放至机柜,在馈窗处留好避水弯后密封馈窗,使用馈线夹或扎带固定可靠、整齐Step8:机柜侧RRU光缆及电源线连接1a)光纤盒场景:将光纤连接至BBU LBBP和光纤盒(需现场安装)特定接口,冗余长度盘盘绕成直径200mm的线盘,固定至光纤盒附近走线架上1b)直连光纤场景:将光模块和光纤连接至 LBBP,从机柜侧布放固定至室外单模多模共框DCDU-12B RRU接线图:2)将电源线从走线架垂直穿入机柜,制作接头连接DCDU/ETP48100DCDU-12B RRU接线图DCDU-12B ,1-3扇区分别连接LOAD 0-2Step9:连接传输1a)若机房内有传输设备,直接安装传输光纤到传输设备,BBU侧光纤插在6号槽位FE1端口,从机柜左侧出线穿入走线架连接至PTN1b)若机房内不配置传输设备,传输光纤连接至ODFtep10:馈窗处接地1)用美工刀剥除RRU电源线外护套60-70mm2)将接地夹的金属片缠绕在屏蔽层上,用扎带绑扎固定,通过“防水胶带、绝缘胶带 3+3”防水规范,将接地夹另一端连接至室外接地排Step11:连接RRU线缆1)量测并裁剪25mm2地线,两端连接至RRU接地螺栓和地排2)连接跳线到RRU底部相应接口(天线和RRU端口连接关系:1-ANT1;2-ANT2…)用绝缘胶带、防水胶、冷缩管做1+1+1防水3a) 光纤盒场景:将RRU光纤两头分别连接至光纤盒及维护腔的光口3b) 直连纤场景:安装光模块后连接光纤,将多余长度盘绕固定在RRU背面4)按RRU上的标识制作电源插头并连接,紧固维护腔底部的线缆固定螺钉及电源线屏蔽夹紧螺钉,合上盖子,紧固面板螺钉RRU维护腔防水胶塞不能剪断,未走线的接口使用防水胶棒塞好Step12:安装GPS并接地1)选定安装位置打孔(M10*60mm)固定天线支架,接头处用绝缘胶带、防水胶带做1+3+3防水2)在室内馈窗1m内剪断GPS馈线,制作接头连接至避雷器,压接6mm2地线端子,保护地线两端分别安装到GPS避雷器的GND端和室外地排3)将GPS馈线在走线架上布放固定至机柜右侧,垂直进入机柜,平齐BBU后剪断制作接头4)将GPS时钟信号线黄色接头连接至UMPT单板GPS端口,从BBU右侧穿入,连接至GPS 馈线接头GPS天线必须安装在避雷针45度角的保护区域内,且天线垂直张角90°范围无遮挡Step13:标签制作与粘贴1)裁剪室内各接头(含:DCDU电源线、地线、传输、RRU光纤、RRU电源线、GPS馈线、告警线)的标签纸,撕掉背面的离型膜,粘贴于塑料标签架上2)将室内标签用白色线扣固定于线缆端头20mm处3)室外跳线、地线、光纤选用相应标签,用黑色线扣固定施工时,若现场没有配发客户标签,需粘贴临时标签固定标签时,需考虑方向和朝向,以便查看标签内容Step14:安装自检及拍照按照《中国移动LTE项目站点安装质量标准Checklist》,完成质量自检,现场督导、监理确认硬装质量并签字Step15:上电测试1)用万用表调至欧姆档测量确认DCDU的正负极和地线绝缘2)接通输入电源,测量DCDU正负极电压在-36V DC ~-60V DC后,将DCDU上对应各部件的开关拨至ON,打开BBU的PWE开关,测量BBU、RRU的输入电压在-36V DC ~-60V DC3)查看确认各模块状态正常4)待设备调试运行正常后,利用测试手机进行数据业务测试Step16:清理现场、离站1)整理现场工具和多余线缆,清洁打扫机房及天馈施工区域,将施工垃圾打包带离站点2)填写机房出入记录,关闭机房门锁,通知网管中心确认无告警后离站3)拍摄完工照片。
揽星操作手册-0812 推荐
揽星系统网管软件安装及使用手册版本1.02008年1月中国航天科技集团五院西安分院西安航天恒星科技实业(集团)公司西安长安南路493号航天大厦电话:8629-85339338/85339182传真:8629-85254498北京鼎力成业科技有限公司北京市海淀区长春桥路11号,万柳亿城大厦C1座104室电话:8610-58816118 传真:8610-58816818目录1.安装揽星终端网管软件 (3)2.连接与登录 (5)3.揽星卫星终端管理系统软件V1.3 (7)3.1系统 (7)3.2显示 (7)3.3配置 (8)3.4揽星终端网管软件配置界面 (18)3.5工具栏界面 (23)4. 话音网关模块介绍 (24)4.1话音网关功能概述: (24)4.2 VOIP介绍 (26)4.3命令手册 (29)附录-1 (33)TCP/IP 网络设置 (33)1.简介 (33)2.TCP/IP网络配置 (33)3.网络配置概要 (34)4.网络测试 (35)揽星终端网管软件介绍本手册提供了关于揽星终端网管软件的详细信息。
下面的几部分内容描述了软件的安装、访问、监控和操作。
1.安装揽星终端网管软件按照下面的步骤来安装揽星终端网管软件。
步骤1:将安装光盘放置于光驱内,准备安装;步骤2:弹出默认安装路径窗口,或另辟需要的安装路径,进行软件安装;步骤3:点击完成,完成揽星终端网管软件的安装。
此时桌面上会形成一个图标,如下:2.连接与登录用RJ-45网线通过10M/100M以太网口连接到电脑上,在开始菜单中或桌面上点击揽星终端网管软件的图标,当前所连接的揽星终端的地址会被软件自动监测到。
您将在显示器上看到图2-1,图2-2的画面:图2-1 揽星卫星终端管理系统登录界面图2-2 揽星终端分布图之后进入到图2-3的揽星卫星终端管理系统V1.3的界面上。
图2-3揽星卫星终端管理系统操作界面3.揽星卫星终端管理系统软件V1.33.1系统在图2-3上,点击左上方的“系统”,在下拉菜单中看到图3-1的界面,在此登录揽星卫星终端管理系统并进行网元地址管理。
V4卡专用无线固定电话机
选择删除删除当前信息,仍返回收藏夹〔假设收藏夹为空,则返回信息窗口〕;
选择删除所有删除收藏夹的信息。
在阅读信息过程中,按〖选项〗键,可进展如下操作:
选择编辑将进入信息编辑窗口,对信息进展编辑;
选择转发将在信息编辑窗口中对当前信息容进展编辑,转发给其他人;
选择删除删除当前信息,仍返回收藏夹窗口〔假设收藏夹为空,则返回信息窗口〕。
2.8.设置
设置与短信息的操作有关的参数,如短信中心、有效期、送达报告、存储类型。
短信中心
如果提供这种业务,SMS业务中心将由您所属的网络运营商提供。
有效期
所发短信息存放在信息中心的最长时间,有12小时、一天、一星期及最长时间四个选项。
送达报告
用于确认所发短信息对方已收到。如关闭短信息送达报告功能,该功能无效。
二、根本菜单功能介绍
1.本
在待机状态下按【 】或在主菜单的本状态按〖选择〗进入本菜单。
1.1新建
进入簿后,激活〖选项〗键,选择新建菜单项,先确定存储类型,允许在存储到SIM卡和存储到话机中选择。如此时出现提示"存已满〞,表示话机存已无空间存放记录,需对话机存进展整理以腾出空间。
当存储类型选择为"话机〞时,在新建记录窗口,可以选择输入名字、、办公室、住宅。
在新建短信窗口,激活〖选项〗键,可进展以下操作:
选择编辑联系人进入联系人列表窗口,按〖选项〗键,选择编辑联系人,编辑收件人;选择发送将发送短信息;选择新建可增加收件人;选择簿进入选择收件人窗口增加收件人;选择删除可删除所选收件人;选择删除所有删除所有收件人。当所选收件人超过20个时,话时机提示您"选择超额!〞。
在阅读过程中,按〖选项〗键,可进展如下操作:
电话机使用说明
—、使用注意事项1、电话机应安装在干燥、通风、无腐蚀气体的地方.2、来电显示功能必须要本地电信局开通并向电信局申请才能显示对方号码.没有开通来电显示的地方不影响话机普通功能使用.二、主要功能1、8种普通铃声+ 1组贵宾铃声,普通铃声可选。
2、DTMF/FSK多制式兼容,来电自动识别。
3、来电30组(16位显示),去电5组(16位显示),贵宾35组,回拨功能.4、键盘设置防盗功能.5,全自动IP(32位)快速、保密拨号.6、机械锁―0 ‖.7、预拨号及消号、回拨功能.8、2位出局码,适应虚拟网.9、本地区号过滤功能.三、操作说明1、铃声设置挂机状态下连续按―铃声选择‖犍,当LCD屏幕显示―TING 1至8 ‖,表示有八种铃声可选.2、功能设置挂机状态按―设置‖键进入设置菜单,LCD显示―SET 1 DRTE ‖ ,此时用上、下查健可改变设置项,再按设置键进入该项设置。
在设置完成该项后,按设置键进入下一项设置。
所有设置均用上、下查键修改该具体设置项.用―删除‖键退出设置状态.具体设置如下:(1)日期/时间设置:按―设置‖键LCD显示―SET 1 DRTE ‖,此时按设置键确认。
进入设置后,年的显示闪烁,可按上、下查键修改,完成后再按设置健进入月的设置,修改方法与年的设置相同,再按设置键可依次修改日、小时和分钟。
小时和分钟的设置可分十位和个位分别设置.(2)设置区域码(即本地区号):LCD会提示―SET 2 CODE ‖ ,此时按设置键确认,LCD会显示―CODE - - - - - ‖,进入区号的设置,第一个―-‖闪烁(若已设置了区号,则显示设置的区号,区号第一个号码闪烁)。
按上、下查健可设置或修改为0-9,完成第一位设置后,按设置键进入第二位设置,以此类推。
如北京用户则设置区域码为:CODE 010--。
(3)设置出局码:LCD提示―SEt 3 PCODE‖,按设置键确认,LCD会显示―PCODE - - ‖,第一个―-‖闪烁(若已设置了出局码,则显示已设置的号码,号码的第一位闪烁)。
GSM双频GPRSCDMA功能数字移动电话机使用说明手册
目录1 基本知识 (9)1.1 简介 (9)1.2 安全须知 (9)1.3 安全警告和注意事项 (10)2 使用前 (16)2.1 各部分的名称和说明 (16)2.1.1技术参数(参数未确定需确认) (16)2.1.2按键说明 (17)2.1.3使用存储T卡 (20)2.2 电池 (21)2.2.1电池的拆卸和安装 (21)2.2.2电池的充电 (22)2.3 连接网络 (24)2.3.1SIM/UIM卡 (24)2.3.2SIM/UIM卡的插入和取出 (25)2.3.3开关机 (26)2.3.4 SIM卡的去锁 (26)2.3.5话机解锁 (27)2.3.6连接到网络 (27)3 基本操作 (28)3.1 拨打电话 (28)3.1.1拨打国内电话 (28)3.1.2拨打固定电话分机 (29)3.1.3拨打国际电话 (30)3.1.4拨打列表中电话 (30)3.2 紧急呼叫 (31)3.3 接听电话 (31)3.4 呼叫菜单 (32)4 功能菜单 (34)4.1 功能菜单的使用 (35)4.1.1滚动搜索选择功能 (35)4.1.2导航键功能 (35)4.1.3退出菜单 (36)4.2 功能菜单结构 (36)4.3 通话中心 (41)4.3.1通话记录 (41)4.3.2通话设置 (44)4.4 电话簿 (47)4.5 多媒体 (49)4.5.1相机 (49)4.5.2相册 (50)4.5.3视频录像器 (52)4.5.4视频播放器 (52)4.5.5音乐播放器 (53)4.5.6录音 (55)4.5.7调频广播 (56)4.6 互联星空 (57)4.7 天翼 (57)4.8 号码百事通 (58)4.9 情景模式 (58)4.10 信息 (59)4.10.1写信息 (59)4.10.2收件箱 (60)4.10.3草稿 (61)4.10.4发件箱 (62)4.10.5彩信 (63)4.10.6电子邮件 (66)4.10.7小区广播 (67)4.10.8模板 (67)4.10.9短信设置 (68)4.11 附加功能 (69)4.11.1文件管理 (69)4.11.2管理器 (69)4.11.3网络服务 (72)4.11.4快捷功能 (74)4.11.5计算器 (74)4.11.6汇率换算 (75)4.11.7码表 (75)4.11.8电子书 (76)4.12 客户服务 (76)4.13 娱乐和游戏 (76)4.14 设置 (77)4.14.1模式设置 (77)4.14.2手机设置 (78)4.14.3安全设置 (79)4.14.4外部连接 (82)4.14.5恢复出厂设置 (86)4.14.6音效 (86)5 输入法 (86)5.1 概述 (86)5.2 键盘定义 (86)5.3 输入法说明 (87)5.3.1智能拼音输入法 (87)5.3.2笔画输入法 (89)5.3.3英文和数字输入 (92)1 基本知识1.1 简介领略其完善的功能和简洁的操作方法。
ZTE MF275 9 4G WIFI 设备说明说明书
MODEM ROU u TER MF275/9RER 4G WIFIGuia RapidaNo part of this publication may be excerpted, reproduced, translated or utilized in any form or by any means, electronic or mechanical, including photocopying and microfilm, without the prior written permission of ZTE Corporation.The manual is published by ZTE Corporation. We reserve the right to make modifications on print errors or update specifications without prior notice.Getting to Know Your DeviceThe device operates on the 4G/LTE networks and supports voice and data service.Appearance1. micro-SIM card slot Insert your micro-SIM Card.2. Reset button Reset your device.3. External antenna connector To attach antenna.4. WPS button To activate the WPS Function.5. Phone Standard RJ11 connector for the telephone6. LANEthernet connector to computer 7. Power socket Connector to the external power supply8. Power key Turn your device on or off.9. IndicatorsIndicate the status of your device.IndicatorsIndicator State DescriptionPowerGreen steady AC power presentOffNo AC power VoicemailGreen blinking New voicemail waitingOffNo new voicemailBatteryGreen steady More than 50% discharging (charger not present)Green blinking More than 50% charging (charger present)Yellow steady20%-50% discharging (charger not present)Yellow blinking 20%-50% charging (charger present)Red steadyLess than 20%discharging(charger not present)Red blinkingLess than 20% charging (charger present)OffBattery not presentWi-FiGreen steady Wi-Fi on Blinking Active data connection or FOTA OffWi-Fi offNetworkGreen steady Connected to the LTE networkGreen blinkingRoaming (LTE network)Yellow steady Connected to the 4G networkYellow blinkingRoaming(4G network)Red steadyNo service, limited service, searching for network, no SIM Card or other abnormal statusSignalStrengthGreen steady Strong signal Yellow steady Weak signal Red steadyNo service, limited service, or searching for signalInstallation GuideInstalling the micro-SIM Card and battery 1. Slide the back cover and remove it2. Insert the battery.3. Install the micro-SIM Card.WARNING!• Switch off your device before installing or replacing the micro-SIM card. Your device does not support placing or inserting the micro-SIM Card while switched to the ON position.• Your device only supports micro-SIM Card. To avoid damaging the device, please use the card that comes installed or included in the box of the device.Before You BeginYou can charge your device by using an adapter:• Insert the charger lead carefully with the plug arrow facing the bottom of the device.• Do not use excessive force to insert the plug.• Make sure the plug is facing the right way, and lined up correctly. Insert it gently.Connecting Your DevicePlease refer to the following diagram for connecting your computer and land line phone. If you want to use the mobile network to connect to the Internet or use your land line phone, you need to insert your micro-SIM Card first.Switching On Your Device1. Press and hold the Power Switch to get started. Makesure that the phone is on the hook before you power it on.2. Wait 1 ~ 2 minutes and then the Power and batteryindicator should be lit on.Connecting to the InternetVia Ethernet1. Connect the Ethernet cable to the LAN port and yourcomputer.2. Go to your favorite website on the PC connected toyour device via Ethernet cable to confirm your Internet connection.Via Wi-Fi1. Use the Wi-Fi application on a client to search foravailable wireless networks.NOTE:T he client will obtain an IP address automatically.2. Select the SSID of your device, and then clickConnect.NOTE:You can find the default SSID on the label (under the back cover) of your device.3. Enter the password, and then click OK.NOTE:Please refer to the detailed User Guide online at http://www.bell.ca/wirelesssupport.4. Wait until the client is connected to your devicesuccessfully.5. Go to your favorite website to confirm your Internetconnection.Configuring Your PCThe following procedure describes how to configure the Internet Protocol in the Windows 7 for your Wi-Fi connection.1. Right-click Network and select Properties.2. Select Change Adapter Settings.3. Right-click Wireless Network Connection and selectProperties.4. Select Internet Protocol Version 4 (TCP/IPv4) andclick Properties.5. Select Obtain an IP Address Automatically andObtain DNS Server Address Automatically, and click OK.For more information, please refer to the detailed User Guide online at http://www.bell.ca/wirelesssupport.。
4G连接器操作指南
4G连接器操作指南
简介
本文档旨在为用户提供使用4G连接器的操作指南。
通过遵循以下步骤,用户将能够正确连接和配置4G连接器。
步骤
1. 安装SIM卡
- 在4G连接器上找到SIM卡槽。
- 将SIM卡插入槽中,确保插入的方向正确。
2. 连接天线
- 将4G连接器的天线通过合适的接口与天线连接。
3. 连接电源
- 使用适配器和电缆将4G连接器连接到电源插座。
4. 开机
- 按下开关按钮启动4G连接器。
5. 配置网络
- 打开设备上的网络设置界面。
- 找到无线网络选项。
- 扫描可用网络,并选择要连接的4G网络。
- 输入SIM卡的PIN码(如果需要)。
6. 连接成功
- 在设备上打开浏览器,确保4G连接器已经成功连接到互联网。
注意事项
- 在操作之前,请仔细阅读4G连接器的用户手册,以了解特定设备的操作要求和限制。
- 确保SIM卡已经激活并且具有足够的数据服务和余额。
- 保持连接器周围的环境干燥,避免进水和碰撞。
- 避免将连接器放置在有强烈的电磁干扰的地方,以避免连接不稳定。
总结
本文档提供了4G连接器的操作指南,包括安装SIM卡、连接
天线、连接电源、配置网络等步骤。
通过遵循这些步骤和注意事项,用户将能够顺利使用4G连接器并连接到互联网。
***
*Note: The above response is a sample document and should
not be considered as legal advice.*。
Philips 4000系列无线电话机说明说明书
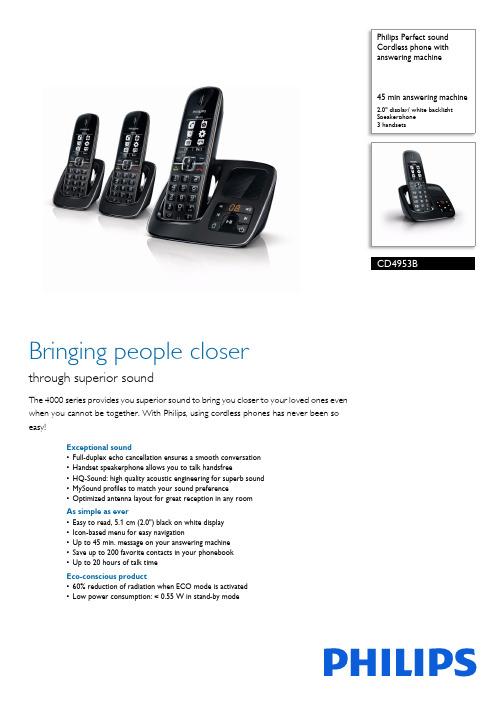
Philips Perfect sound Cordless phone with answering machine45 min answering machine2.0" display/ white backlight Speakerphone 3 handsetsCD4953BBringing people closerthrough superior soundThe 4000 series provides you superior sound to bring you closer to your loved ones even when you cannot be together. With Philips, using cordless phones has never been so easy!Exceptional sound•Full-duplex echo cancellation ensures a smooth conversation •Handset speakerphone allows you to talk handsfree•HQ-Sound: high quality acoustic engineering for superb sound •MySound profiles to match your sound preference•Optimized antenna layout for great reception in any room As simple as ever•Easy to read, 5.1 cm (2.0") black on white display •Icon-based menu for easy navigation•Up to 45 min. message on your answering machine •Save up to 200 favorite contacts in your phonebook •Up to 20 hours of talk timeEco-conscious product•60% reduction of radiation when ECO mode is activated •Low power consumption: < 0.55 W in stand-by modeHighlightsHQ-SoundPhilips cordless phones with HQ-Sound: build upon decades of experience and breakthrough innovations in developing Hi-Fi audio products and high-end headphones to deliver excellent voice clarity on our DECT phones. When it comes to improving sound quality, our acoustics engineers and architects have thought of everything – high qualitycomponents, digital signal processing, precise acoustic design, advanced testing and fine-tuning. The result is sound that is crisp, clear and authentic. Sound so good and natural, it is almost like being there in person.Full-duplex echo cancellationNatural conversation does not involve taking turns – there is always some natural overlap. Now thanks to our full-duplex echocancellation, you can hear perfectly, even if you are both talking at the same time.MySound profilesSound perception is subjective, and everyone has their own listening preference. MySoundbrings personality back to every conversation by allowing you to choose the audio profile that best matches your sound preferences: Clear – to make voices sound crisper and clearer; Soft – for friendly, softer tones; Warm – to make voices sound welcoming and warm.Handset speakerphoneHandsfree mode uses a built-in loud speaker to amplify the voice of the caller, allowing you to speak and listen during a call without holding the phone to your ear. This is especially useful if you want to share the call with others or simply multitask.200-name phone bookAlways have the phone numbers of your loved ones available: Save up to 200 names in your phonebook.5.1cm(2.0")black/white displayEasy to read, 5.1 cm (2.0") black on white displayIcon menuWith an easy-to-use, modern icon menu, you can find everything you need at a glance.Up to 45 min. recordingWith up to 45 minutes recording time, you’ll never miss an important message.Optimized antenna layoutOur optimized antenna layout ensures strong and stable reception – even in areas of the house where cordless transmission is difficult. Now you can take a call wherever you are in the house, and enjoy a long, uninterrupted conversation even as you walk around.Issue date 2019-05-31 Version: 4.0.412 NC: 8670 000 79995 EAN: 87 12581 61376 1© 2019 Koninklijke Philips N.V.All Rights reserved.Specifications are subject to change without notice. Trademarks are the property of Koninklijke Philips N.V. or their respective owners.SpecificationsSound•HQ-Sound•Sound Profile: MySound•Volume control on handset•Ringtones on handset: 10 polyphonicPicture/Display•Display size: 5.1cm / 2.0"•Display type: FSTN White on Black (reverse)•Backlight: Yes•Backlight color: WhiteAnswering Machine•Recording time capacity: Up to 45 minutes •Message counter on base: Amber counter ( 2 x 7 segments)•Answering machine control: base & handset •Loud speaker on base•Pre-recorded OGMConvenience•Room monitoring•Date/Time display•Alarm Clock•Up to 300 hrs standby time•Event light on the handset•Base Station keys: Paging key•Charge time: 8 hours•Call Management: Call Waiting*, Caller ID*, Microphone mute, Missed Calls, Received Calls •Keypad lock•Key tone on/off•Auto Registration•Multi base capability: 1•Multi handset capability: Up to 5•Auto hang up•Backlit keypad: White•Battery level indicator: 5- bar battery icon •Call barring: Restrict the phone from making specific outgoing calls•Enlarge dialing digit•Intercom - multiple handsets•Line cord length: 1.8m•Menu structure in the handset: Icon menu •Number of keys: 22•Personalization: Silence mode and Night mode •Power cord length: 1.8m •Programmable hot keys: Key 1 and 2•Range: Open field <300m; in door <50m •Signal strength indicator: 3- bar indicator •Speakerphone - talk handsfree•Up to 20 hrs talk timeMemory Capacity•Phonebook: 200 names and numbers •Redial List Capacity: 20 entries•Call log entries: 50 entries•Phonebook store in the base•VIP Caller IdentificationPower•Battery Capacity: 600 mAh•Battery type: AAA NiMH Rechargeable •Mains power: AC 100-240V~50/60Hz Security•Transmission encryption : YesNetwork Features•Compatible:GAPSAR Value•Philips handsets: < 0.1 W/kgEco Design•EcoMode: automatic and manual Packaging dimensions•Packaging dimensions (W x H x D):25 x 13.6 x 10.7 cm•EAN: 87 12581 61376 1•Gross weight: 0.959 kg•Nett weight: 0.824 kg•Number of products included: 1•Packaging type: Carton•Tare weight: 0.135 kg•Type of shelf placement: Laying。
电话机基本功能操作说明

待机状态操作:关闭按键音:MENU----HANDSET SETTING ----OTHER SETTING ----KEY TONE -- 选择OFF (全部都是按MENU确认或者进入)1存储电话:PHONEBOOK——→OK——→NEW entry 存储新号码——→OK——→输入名字——→OK——→输入号码——→OK——→Save保存Go back返回2 复制号码到其他手柄:PHONEBOOK——→OK——→2 Copy all 复制全部(上下翻找到)——→OK——→选择子机号——→OK3 删除全部号码:PHONEBOOK——→OK——→3Erase all 删除全部(上下翻找到)——→OK——→选择YES 是或者NO 否——→OK4 查看来电: ◄按任意键后按OK 上下翻查看来电5 查看去电:按PAUSE键上下翻查看去电6 闹钟:按MENU——→上下翻找到Alarm ——→OK——→OK——→Once一次闹铃Daily每天闹铃——→OK——→上下翻选择铃声——→OK确认——→Save保存7:铃声音量:按MENU——→上下翻找到Handset settings 手柄设置——→OK——→上下翻找到Ringer settings 铃声设置——→OK——→Ringer volume 铃声音量——→OK——→上下调整音量——→OK确认8:铃声类型:按MENU——→上下翻找到Handset settings 手柄设置——→OK——→上下翻找到Ringer settings 铃声设置——→OK——→Ringer tone铃声类型——→OK——→上下选择自己喜欢的铃声——→OK确认9:语言设置:按MENU——→上下翻找到Handset settings 手柄设置——→OK——→上下翻找到Display settings——→OK ——→Change language 选择语言——→ENGLISH 英语ESPANOL西班牙语——→OK确认10:注册子机:按MENU——→上下翻找到Handset settings 手柄设置——→OK——→上下翻找到Registration ——→OK——→长按主机LOCA TOR键直到发出有规律的“滴滴”声——→子机按OK ——→一声长滴后成功。
Vodafone MachineLink 4G 产品说明书
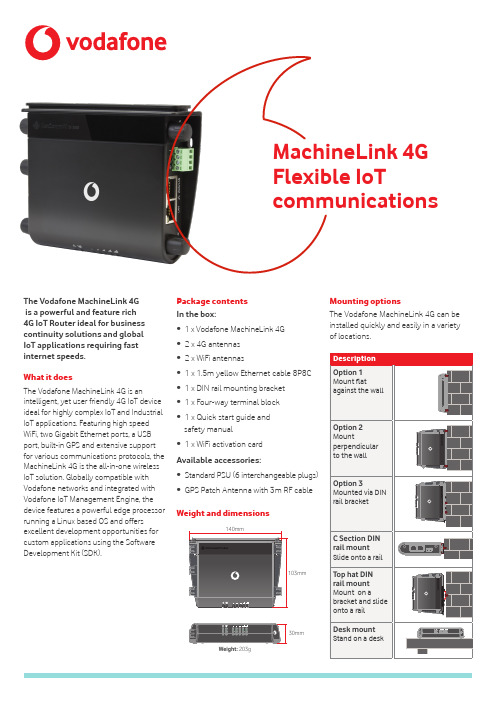
The Vodafone MachineLink 4Gis a powerful and feature rich4G IoT Router ideal for business continuity solutions and globalIoT applications requiring fast internet speeds.What it doesThe Vodafone MachineLink 4G is an intelligent, yet user friendly 4G IoT device ideal for highly complex IoT and Industrial IoT applications. Featuring high speed WiFi, two Gigabit Ethernet ports, a USB port, built-in GPS and extensive support for various communications protocols, the MachineLink 4G is the all-in-one wireless IoT solution. Globally compatible with Vodafone networks and integrated with Vodafone IoT Management Engine, the device features a powerful edge processor running a Linux based OS and offers excellent development opportunities for custom applications using the Software Development Kit (SDK).Package contentsIn the box:• 1 x Vodafone MachineLink 4G• 2 x 4G antennas• 2 x WiFi antennas• 1 x 1.5m yellow Ethernet cable 8P8C• 1 x DIN rail mounting bracket• 1 x Four-way terminal block• 1 x Quick start guide andsafety manual• 1 x WiFi activation cardAvailable accessories:• S tandard PSU (6 interchangeable plugs)• G PS Patch Antenna with 3m RF cableWeight and dimensionsMounting optionsThe Vodafone MachineLink 4G can beinstalled quickly and easily in a varietyof locations.Weight: 203gProcessor and storage• Powerful 800Mhz ARM8 processor with128MByte DDR3 RAM • 256MByte Flash memory storage (~120MB available on board space for user storage)• microSD card slot for expandable storageOperating system• Embedded Linux 3.2.0 & Software Development Kit (SDK) Peak data speedLTE data rates:Category 3• Downlink: Up to 100 Mbps (20 MHz bandwidth)Up to 50 Mbps (10 MHz bandwidth)• Uplink: Up to 50 Mbps (20 MHz bandwidth)Up to 25 Mbps (10 MHz bandwidth)UMTS (WCDMA)/HSDPA/HSUPA/HSPA+/ DC-HSPA+: HSPA+ rates• Downlink: Up to 42 Mbps (category 24)• Uplink: Up to 5.76 Mbps (category 6)GSM/GPRS/EDGE:• EDGE throughput up to 236 kbpsCellular bands• Multi-band FDD capableLTE:• Band 1 (2100 MHz)• Band 3 (1800 MHz)• Band 7 (2600 MHz)• Band 8 (900 MHz)• Band 20 (800 MHz)UMTS/HSDPA/HSUPA/HSPA+/DC-HSPA+:• Band 1 (2100 MHz)• Band 2 (1900 MHz)• Band 5 (850 MHz)• Band 8 (900 MHz)GSM/GPRS/EDGE:• GSM 850 (850 MHz)• EGSM 900 (900 MHz)• DCS 1800 (1800 MHz)• PCS 1900 (1900 MHz)GNSS:• GPS: 1575.42 MHzConnectivity• 2 x 10/100/1000 Base-T Ethernet RJ45 ports with Auto MDIX • Micro USB 2.0 (type AB) OTG interface with 0.5A supply capability • Micro USB 2.0 OTG feature control• 1 x 1-Wire® interface1-Wire® interface• Supports the 1-Wire® bus system to communicate with devices such as digital thermometers and weather instruments.• Provides low-speed data, signaling andpower over a single line.• Supports the ability to act as the master controllerin a 1-Wire® system.• Configurable as digital input and digital output.Multi-SIM & Network Support• 1 x Embedded Global SIM via Secure soldered-down SIM (ETSI MFF2 DFN-8 USIM)• 1 x SIM Card Reader; mini USIM/SIM format (2FF) with Lockable tray, push-button-to-release• Automatic detection and switch-over when an optional 2FF SIM is inserted.• Dual SIM Network Failover/Failback Intelligence• User configurable SIM preferenceReset button• Reset button (recessed, requiring pen/paperclip) with three functions: reboot, reboot into recovery mode, and reset unit to factory defaults.• Reset button override w/event alert notificationAntenna connectors• 2 x SMA connectors for 3G/4G (1x Main and 1x RX Diversity) • 2 x Reverse polarity female SMA connectors for Wireless LAN (MIMO)• 1 x SMA connector for GPSLED indicators• 8 x Tri-colour (Red/Amber/Green) LEDs. Power, Network and 5 x Signal Strength indicators on the front panel, and WLAN LED on the left side endplate.• Easy and clear LED status display for connection status, connected network type, WLAN connection mode and connection errors.Cellular• Profile managed packet data connections – configuration of up to six profiles.• NAT disable for framed route configuration• Transparent bridge mode using PPPoE to allow the router to transparently forward public WAN IP address to a downstream device • SIM security management (PIN configuration, enable anddisable)• Automatic and manual cellular band selection• Automatic and manual operator selectionCustomised roaming algorithm**This feature works with Vodafone roaming SIM cards only.• Prioritised network connection across the globe.• Network access technology preference• Cost effective mode that allows cellular connection to hopamong different networks of the same carrier, before moving onto another carrier’s more expensive option.• Signal assurance watchdog that allows the router toautomatically ignore poor cellular connections if the receivedsignal falls below a configured threshold.• Embedded and manually configured preferred roaming lists• Filterable system roaming logGPS• Embedded GPS receiver (1575.42Mhz)• Stand-alone GPS• SMA connector for external active GPS antenna• Active antenna voltage: 3.05V• Maximum current: 50mA• Tracking sensitivity under open sky: -161dBm• Acquisition (standalone) sensitivity: -145dBm• Time to first fix (TTFF): Cold 32s, Warm 29s, Hot 1s• Odometer reading available via Web-UI, CLI and SDK• Geofence definition and entry/exit notificationWi-Fi/WLAN• 802.11n 2T2R WiFi with transmission speeds up to 300Mbps.• Simultaneous access point/wireless client modes.• Multiple configurable SSID networks• MAC-based client filtering security• AP hotspot with configurable landing/redirect page URL• WiFi bridge mode (WDS one-to-one)• Public hotspot service (client mode)• AP hotspot ACLNetwork and routing• Static routing, RIP (v1/v2), port forwarding and DMZ• Dynamic DNS• Intelligent VRRP w/event alert engine support• DHCP server, including :• Address reservation by MAC address• Custom DNS server definitions• DHCP relay• DHCP list display in Web-UI• Advanced DHCP option configuration (option 42 NTP, option66 TFTP, option 150, option 160)• Data stream manager providing ability to create mappingsbetween input and output ports (e.g. SMS, GPS, and USB) andperform required translation or data processing by each virtualtunnel.• Modbus server TCP/IP gateway and client TCP/IP agent with upto 247 slaves connected to the serial TCP/IP Gateway.• Modbus RTU/ASCII frames support.• VLAN supportWAN failover/fall back• Business continuity guarantee for wired networks viainstantaneous failover/failback to/from 4G/3G/2G networks• Intelligent delay mechanism for controlling failover/failbackprocedure• Autonomous fixed line modem power reset algorithmVPN• PPTP client for VPN connectivity to remote PPTP VPN server• IPSec tunnel termination (for up to 5 tunnels)• GRE tunneling• OpenVPN (client, server and P2P)• SCEP VPN supportAdministration and configuration• Web-based user interface (HTTP/HTTPS) for full device statusand configuration• Password protected configuration file backup and restore forquick device configuration and device cloning• Telnet command line interface for status monitoring,configuration and control• SNMP v1/v2 including cellular specific MIB, config and firmwaredownload• TR-069 client for remote device configuration, configurationbackup and restore, and firmware upgrade• SMS client (send/receive) including inbox, sent items• Ping monitor watchdog (Reset connection on repeated pingfailure)• Diagnostic Log Viewer (Remote and local)• System status and security logs• NTP server support for network time sync of device’s systemclock• Device user guide stored on the device and accessible via theWeb-based user interface (HTTP/HTTPS)• Advanced diagnostics and control via SMS• Query status information – such as signal strength, WAN IP,uptime, and many more• Configure device remotely via SMS – such as APN,authentication settings, and many more• Execute commands via SMS – such as reboot, reset to defaults,go offline, and many more• Secure SMS management using sender whitelisting andpassword management• SMS acknowledgement replies for queries and commands• Remote network quality diagnosticsFirmware management• Firmware upgrade locally via LAN or remotely over-the-air(HTTP/ HTTPS, SNMP, TR-069)• Multiple firmware image storage on device and dynamic install• Triggered firmware upgrade via SMS (initiate download & installfrom HTTP/HTTPS)Event Alert Engine• Receive proactive network & device alerts• User configurable• Support for SMS / SMTP / TCP / UDP• Support for commands• I/O event notificationSoftware development kit• Develop and install custom software applications• Open Linux standard development environment• Develop applications/scripting in standard ANSI C/Shell scriptand LUA• Package manager built into Web-UI for Application installation/removal• API (C, LUA and Shell libraries) to the unit’s internal runtimedatabase to allow full status monitoring configuration andcontrol of the device from custom applicationsTemperature• Operating temperature range (class A): -30ºC to +70ºC• Operating temperature range (class B): -40°C to +85°C*(* with possible performance deviation)Environmental conditions• Operating humidity 0-95% (RH)• Storage humidity 0-95% (RH)• Ingress Protection rating (IP52)Power supply• Power input and I/O via 4 way termination block receptacle• Field terminable power input via screw type terminal blockincluded• DC power (8 - 40V DC)• 1 x Dedicated ignition input on 4 way connector• Power consumption 6W, recommended DC supply via terminalblock (12V 1.5A)• Vehicle compatible protection on DC Input Jack. (ISO7637standard)Dimensions & weight• Device dimensions (excluding external antenna): 140mm (L) x103mm (W) x 30mm (D) / 210gMounting options• Wall mount support in multiple orientations via embeddedmounting holes• DIN rail mount support via plastic bracket included in box (tophat section rail TH 35 IEC60715)• C rail mount support via mounting rail built into housing(C section rail C30 IEC60715)Certifications• CE (Europe)• eMark (Europe)• RoHS (Europe)• WEEE (Europe)• REACH (Europe)• IC (Canada)• FCC (USA)• RCM (Australia) - Pending• ICASA (South Africa) - Pending• GCF (Europe)Only Vodafone can offer you a complete IoT solution on aglobal scale.For more information about our IoT solutions, please contactyour Vodafone account manager,email. ****************,or visit /iot。
无线通信基站使用说明书

基 站 计算机(DB-25) 计算机(DB-9)
PC 到基站的信号线
2
2
3
(TxD)
基站到 PC 的信号线
4
3
2
(RxD)
地线(SG)
1、3
7
5
注:基站的线号从左到右顺序为 1-4
安装步骤:
1、连接设备: 使用随机携带的连接线,将基站与计算机 232 口连接起来,如果随机 线不够长,可参照上页介绍的连接方式自行制做一根连接线;将随机携带 的电源插到基站的电源口。 2、硬测试: 硬测试是对通信基站与点菜机之间能否进行通信的最基本的检测,还 适合在不存在电脑设备的酒店测试通信距离时使用,此时的通信是单向的, 基站发送,点菜机接收。硬测试步骤如下: 将拨位开关“1”拨到 ON(只在硬测试时使用),其余 2-4 开关均在 OFF 位置,设置完毕请在五秒钟后重新插拔电源。 按“Enter”键开启点菜机,在主界面下按“#”键,在出现的“设置” 界面下按“#”键,输入管理员设置密码“20031121”,进入“管理员设置” 界面,将“无线信道”设为“0”,将“本机机号”设为“001”。(详细操作 请参见无线点菜机使用说明书)
注意事项:1、下载数据时必需在点菜机“无线信道”编号中的第一个 编号的基站上进行下载。2、设置自动跳频的点菜机数量最好不超过 30 台, 以免影响传输速度。
技术指标:
无线通信频率 传输速度 无线通信距离 通信可靠性
系统容量 电源特性 与计算机的接口 适用温度范围
433MHZ ISM 频段,不需要申请频段 9600 bps 约每秒 400 汉字 室内大于 200 米,室外开阔地带 1000 米以上 8 信道自动/人工切换,曼彻斯特编码,16 位数据 校验加密,误码率 10-5 1 个通信基站最多可带 200 个点菜机 交流电 180V-250V,耗电流<0.3A RS232 0℃- 50℃
详细的电话机使用说明书

TCL电话时间设置方法:使用说明:1、在待机时可执行如下操作:1)接收来电信息。
2)提机或按免提键、重拨键进行拨号、通话。
3)进行时间/日期、本地区码等话机设置。
4)执行防盗打功能。
2、话机设置:在挂机状态按〈设置〉键启动主菜单,LCD显示“SET 1 DA TE”,设置过程中按〈上翻〉或〈下翻〉可修改参数,修改完后按<设置>键确认可进入下一项设置。
设置过程中按〈删除〉键(或十秒内没有按键操作)可退出设置。
时间设置:在挂机状态下按〈设置〉键,LCD显示“SET 1 D ATE”,按〈设置〉键确认,LC D上显示的年闪烁,此时可按〈上翻〉或〈下翻〉键可将当前闪烁位修改,完成后按〈设置〉键确认,然后按同样的方法设置月、日、时、分,完成后按〈设置〉确认。
区码设置:在时间设置完后按〈设置〉键,LCD显示“SET 2 CO DE”,此时按〈设置〉键确认,可进入区码设置,L CD显示“0 – - – -”,并在第一位闪烁,此时按〈上翻〉或〈下翻〉键可将当前闪烁位修改为“0~9或-”,按〈设置〉键确认并移向下一位,设完后按〈设置〉键可完成区码的设置及进入下一项设置。
来电号码大于或等于10位并且前面几位与所设区码完全一致,则在回拨时将自动去掉这几位号码。
设好本地码后,回拨时话机将来电号码前的本地码自动消除。
如本地码已设为“0752”,当地交换机所送的号码为“ 07522288888”时,液晶屏显示“ 07522288888”,回拨时,只将2288888拨出。
LCD亮度设置:在设置完出局码后按〈设置〉键,LCD显示“SET 4LCD”,按〈设置〉键进入亮度设置屏幕显示“LC D 3”,(上电默认为第3级,共8级),按〈上翻〉或〈下翻〉键可修改。
一款无线电话配件的快速使用指南说明书

WelcomeQuick start guide123Connect Install EnjoyWhat’s in the boxHandset Base station Power supply for base station2 AAA rechargeable batteries Battery door Line cordQuick Start Guide Warranty cardUser Guide The line adaptor may not be attached to the line cord. In this case, you have to connect the line adaptor to the line cord first before plugging the line cord to the line socket.In multihandset packs, you will find one or more additional handsets, chargers with power supply units and additional rechargeable batteries.WARNING Always use the cables and batteries that came with your phone.1.Place the base station in a central location near the telephone line socket and electricity sockets.2.Connect the line cord and the power cable to the proper connector at the back of the base station.3.Connect the other end of the line cord to the telephone line socket and the other end of the power cable to the electricity socket.Connect the power supply 1.2.Connect the line cord to the line socket BA1ConnectConnect the base station Set date and time1.Press m .2.Scroll : to Clock & Alarm and press OK .3.Press OK to select Set Date/Time .4.Enter current time (HH:MM) and current date (DD/MM/YY) and press OK .Now, you are ready to use your phone.Insert batteriesCharge handset for 24 hours 2Install Insert batteries and charge3EnjoyMake a callEnter the phone number and press r .ORPress r and enter the phone number.Answer a callWhen the phone rings, press r key.End a call Press e key.Adjust earpiece volume during a callPress : to select from V olume 1 to V olume 5.Store a contact in the phonebook1.Press m , scroll : to Phonebook and press OK , press OK again to select New Entry .2.Enter the name of the contact (maximum 12 characters) and press OK .3.Enter the number (maximum 24 digits) and press OK .4.Enter the SMS box number and press OK (only for UK).(The default SMS Box is 9. To modify, press BACK and then enter the number (0 to 9).)5.Scroll : to a group (<No Group>, <Group A>, <Group B>, <Group C>) and press OK to confirm.A long confirmation beep tone is emitted.Access the phonebook1.Press d in standby mode or press m , scroll : to Phonebook and press OK , scroll : to List Entry and press OK .2.Press : to browse the phonebook.Set the ring melody1.Press m , scroll : to Personal Set and press OK , press OK to select Handset Tones , scroll :to Ring Melody and press OK .2.Scroll : to your desired melody to play the melody.3.Press OK to set your ring melody.A confirmation beep is emitted and the screen returns to previous menu.m Enter the main menu from stand-by mode.Select the function displayed on the handset screen directly above it.>Go to redial list from stand-by mode.Select the function displayed on the handset screen directly above it.Activate mute function during a call.r Answer an incoming external or internal call.Insert R for operator services when on the line.e Hang up a call.Long press from menu browing to return to stand-by mode, short press to return to previous menu.Long press in stand-by mode to switch off the handset, short press to switch on the handset again.u Access call log from stand-by mode.Scroll up a menu list or go to the previous phonebook or call log record.Increase earpiece volume during a call.Go to the previous character in editing mode.d Access phonebook from stand-by mode.Scroll down a menu list or go to the next phonebook or call log record.Decrease earpiece volume during a call.Go to the next character in editing mode.c Initiate an internal call.v Answer an incoming call in handsfree mode.Activate and deactivate the loudspeaker during a call.#Dial # in stand-by mode.Long press to mute the ringer in stand-by mode.Insert a pause in dialling mode.Switch between upper and lower case in editing mode.*Dial * in stand-by mode.Long press to activate and deactivate keypad lock.Switch the handset On/OffPress and hold e key for 5 seconds to switch off the handset in stand-by mode.Short press e key to switch on the handset again.Keypad lock/unlockPress and hold * key for 2 seconds to lock and unlock keypad in stand-by mode.Paging 1.Press c key on the base until the handset starts to ring.2.Once the handset is retrieved, press e to end the paging.3111 265 27381TroubleshootingFor more information, please refer to p.48 of SE430 user manual and p.56 of SE435 user manual. Need help?User ManualRefer to the User Manual that is supplied with your SE430/435.Online helpProblemSolution • No dialling tone • Check the connections• Charge the batteries for at least 24 hours• Use the line cable provided• Poor audio quality • Move closer to the base station• Move the base station at least one metre away from any electrical appliances• The icon is blinking • Register the handset to the base station• Move closer to the base station• Caller Line Identification (CLI) service does not work • Check your subscription with your network operator。
蓝硕ls938无线座机说明书
蓝硕ls938无线座机说明书一、产品简介蓝硕ls938无线座机是一款高性能的无线电话设备,适用于家庭和企业环境。
本产品具有清晰的通话质量、稳定的信号传输和实用的功能,为用户提供便捷的通信体验。
二、主要功能1.高清通话:蓝硕ls938无线座机采用先进的语音处理技术,确保通话质量清晰流畅。
2.无线传输:支持无线网络连接,用户可在范围内自由移动,不受线缆限制。
3.拨号快捷:支持快速拨号和电话簿存储,方便用户快速拨打常用号码或联系人。
4.语音留言:支持语音留言功能,用户可随时查看未接来电和留言。
5.通话录音:可设置通话录音,便于用户回溯重要通话内容。
6.来电显示:显示来电号码和归属地信息,方便用户识别来电。
三、操作指南1.开机:按下电源键,开启无线座机。
2.拨号:按下数字键或拨号键,输入电话号码并进行拨号。
3.接听电话:按下接听键,接听来电。
4.结束通话:按下挂断键,结束当前通话。
5.调整音量:旋转音量键,根据需要调整音量大小。
6.设置:进入菜单,根据需求进行相关设置。
四、安全与维护1.请勿将本产品置于潮湿、高温或极度低温的环境中。
2.避免将本产品暴露在阳光下长时间照射。
3.请勿将本产品摔打或置于重物下方,以免损坏设备。
4.如有异常现象,请立即停止使用并联系售后服务。
5.定期清理麦克风和听筒,保持设备清洁。
五、技术参数1.网络制式:支持GSM网络。
2.频率范围:900MHz-1800MHz。
3.通话时间:约8小时。
4.待机时间:约100小时。
5.充电电压:AC 100-240V,50/60Hz。
6.尺寸:约200mm×150mm×100mm。
蓝硕ls938无线座机将为您的通信生活带来便捷和舒适,希望本说明书能为您提供有益的帮助。
如有任何疑问,请随时联系售后服务。
通用无绳电话说明
美国通用25833 5. 8GHZ 数字无绳电话功能说明各键说明:(由上至下,由左至右)了•机:CALLID-VOL+, 一查阅來电及音帚:调节,TALK 通话、挂断、冋拨,SPEAKER 免提、挂断、|可拨,DELETE 删除,CONF 三方通iS, review 重放留言,play 播放,skip 下 —首,EXIT 返【叫,PAUSE 暂停,REDIAL 重拨,erase 删除ffl R, MEMORY 存储,MUTE 菜单、保密,[NT 对讲,FLASH 闪断,answerer 应答模式 座机:ANSWER ON/OFF 答录开关,1/22种留言,DEL 删除留 n,REVIEW 重放留育,SKIP 下…首,VOL+/-留育音ft,MEMO 内部留言,1/2/3内部留言箱,DO NOT DISTURB 免打扰,LANGUAGE 提示语言,MIN 分钟,HOUR 小时,DAY 星期,1:来电显示按+、一键査看來也 按DELECT 键2次删除该來电,如按住DELETE 犍3秒后再按1次可以删除所有来电 2:电话号码存储(50个)新号存储:了•机按MEMORY 從一按数字键(01至50) -MEMORY 掘一输入英文名字一MEMORY 键一输入号码一MEMORY 键即可 来电存储:按+、一査看來电-MEMORY 犍一按数字键(01至50)即可删除來电:按MEMORY 键一按数字键(01至50) —按DELETE 键2次即叫3:打电话方法(子机放在座机上将切断通话或其他操作而只充电)(木机具有预拨号功能)常规拨号:TAIK 键或免提一拨号码一结束通话按TALK 健或免提(或拨号码一TALK 键或免提一结束通话按TALK 键或免提 存储拨引MEMORY 健一01至50键一TALK 健或免提即可(或TALK 键或免提一MEMORY 键一01至50键即可)巫拨拨号:按TALK 键一按REDIAL 键(或按REDIAL 键一按+—键选择号码(5个)一按TALK 键或免捉键)按memo 程一按住1或2或3伫箱不动一附占内容一抬起丁即可 按I 或2或3信箱号即可: 了机拽 一 「键一2It —拨1必」:i ;即可 在播放留言中按DEL 键: 『•机件播放中按0键 按ANNOUNCE ® 一按住1或2不动一帘汁内容(如果不录•电话接通后听到英文“你好•请在嘀声后留”) 按1或2键: 播:抜2play 键: 「机抜answerer 优一 J 琏 拨2伫KT ;删:按住ANNOUNCE 键不动在“嘀“之后迅速抬起该磁启动:按座机ANSWER ON / OFF 健一按1或2,响铃次数设定:按HITE 键一调+—建至IIA'DSET SETUP —按Ml’TE 键一调一—键至RING TO ANSWER —按MUTE 键一调+ —從选 样响铃次数(5种)一按MUTE 键信息捉醒:按MUTE 键一训+ -键至HANDSET SETUP-按MUTE 健一训+ —键至MESSAGE ALERA 一按MLTE 键一调+—键选 择(ON为开)一按MUTE®遥控代码:按MUTE 键一调+ —键至HANDSET SETUP 一按Ml :TE 健一调+ T 建至SECI RITY CODE —按MUTE 键一输入3位数 字(111-999) 一按 MUTE 键遥控功能:拨打家电电话一输代码123-2 (播放农人留占).I (币;复留台),3 (下 个留占):1:(关闭应答):任播放中按0 (删除邸言),操作错误将挂斯5:音量调节铃声调节:按RINGER 键一按数字键选择(1高2低3关)一按RINGER 键即可或按MUTE 键一调+—键至HANDSET SETUP —按MUTE 键一调+—扯至RINGER VOLUME 一按MUTE 键一调+—键选择(高 低关)一按MUTE 键铃声种类:拨MUTE 键一调+ _健至HANDSET SETUP 一按MIJTE 键一调+—健全RINGER TONE —按MUTE 键一调+ _键选样(20 种铃声)一按MUTE 琏即可听筒音量:在通话中调V" +、一键(4级)杳阅來电至需拨出的号码-TALK 键或免提键即可 來电冋拨:4:答录功能(2种对外留言,3个内部私人信箱)(家庭内部)录:播删(电话留占)录试听:6:注册子机按 MIITE 键一调 +T建至 HANDSET SETUP一按 MUTE 键一调 + -键.至 REGISTRATION—按 MIJTE 键一调+ —键至 YES-按 Ml TE 键—按住座机卩AGE健3至5秒即可7:解除子机按 \IUTE 键一调 +—健至 HANDSET SETUP—按 MUTE 健一调 +—键至 DEREGISTRATION一按 MUTE 键一调+ —健至 YES—按MITE 键一调+ —健至YES (再次确认)一按MUTE健即可8:按键音设置按MUTE键一调+—健至HANDSET SETUP一按MUTE键一调+—键至KEY TONE—按MUTE键一调+ —徒选择(ON为开,OFF为关)一按MUTE键即町9:语言设置按MUTE键一调+ —健至HANDSET SETUP—抜MIJTE琏一调+ —键至SET IANGUAGE—按MIJTE键一调+ —键选择(1英语2法语3 西班才语)一按MUTE健即可10:手机名称按MUTE f建一调+—键至HANDSET SETUP—按MLTE键一调+—键至KEYTONE一按MUTE键一训+ —键选样(ON为丿|;・OFF为关)一按MUTE键即可11:座机时间设置按住应机MIN键3秒一再连续按MIN键设定分钟,按住座机HOUR键3秒-再连续按HOUR键设定小时,按住座机DAY键3秒一再连续按DAY健设定星期•听时间:按CI1ACK 即可12:座机答录提示语言连续按座机LANGUAGE键选择(英断法语、西班才语)13:免打扰按座机DO NOT DISTURB键(灯亮为开),打入电话将不响铃14:保密功能在通话中如暂时不便对方听到叫•先按MUTE键.恢复通话再按MUTE置即可15:房间监听(2个以上子机)按MUTE從一调+—琏至ROOM MONITOR-^ MUTE健一妆被监听的T•机编号即叽结朿按EDIT键即町16:呼叫功能座机按PAGE键呼叫f机(多了机可对讲)17:对讲功能(2个以上子机)子机按INT键和了机编号,被叫了机按INT健与之对讲18:三方通话(2个以上子机)r机接通外线后按INT键和了机编号于貝他J'机对讲.对讲后任怠访conf健即可三方会谈19:子机耳脉接听(最好选用有开关及音最调节的耳脉;尺寸:2. 5mm)20:电池初次使用连续允电12小时,电吊低提示注意事项:1:本机如接入ADSL线路中必需在本机前加接ADSL分离器(接在PHONE端口),否则会造成电话有杂音或不对码、掉网、不稳定等现象。
星之蓝A2004G卡托说明书

五模\四模 UFI 四模\三模 网卡图 1-2 使用场景二使用场景三:USB车载充电器使用具有标准USB接口的车载充电器为五模UFI供电发射WIFI热点,供多个WiFi设备连入网络,密码修改跟操作可以通过WEB后台操作(具体参考细则5)。
图 1-3 使用场景三)。
图 1-4 使用场景四2.接口和状态指示灯说明图 2-1 五模UFI接口和状态指示灯图 3-1 安装SIM卡和TF卡4.UI软件的安装和使用4.1UI软件介绍软件可以用于设置网络和设备参数,查看短信、流量及帮助信息等操作。
UI软件的初始登录密码是“admin”4.2UI软件的安装将五模UFI与PC连接后,UI软件自动启动安装。
安装完成后,五模UFI的UI程序快捷方式图标将在注意:如果安装文件未自动启动,请在计算机中找到并点击新增的光盘盘符(如图 4-1所示),双击光盘盘符,即可启动安装。
如果无法自动安装或者找不到新增的光盘盘符,有可能是查杀毒类软件阻止了安装软件,请先关闭查杀毒软件。
也有可能是电脑USB接口有问题,请更换USB口或者更换电脑再试。
图 4-1 UI软件安装盘在设置界面,单击“问号”图标, 可以打开具体菜单项设备插入电源或者电脑的USB设备之间的WIFI在电脑、平板、手机等终端设备上查找热点名称(即SSID2)如果有上述新增的网卡设备,但是设备图标处有新插拔一下五模UFI即可。
3)如果没有上述新增的网卡设备,请查看计算机是否有新增的光盘盘符(即UI软件安装盘。
如果有,请右键点击盘符,选择出”菜单,将光盘弹出,如图 5-2所示,然后再回到步骤是否有新增网卡及其状态。
图 5-1 查看网卡设备图 5 2 弹出安装光盘图 1-1 使用场景一模式。
图 1-2 使用场景二图 1-3 使用场景三使用场景三:电脑和多个终端同时上网通过电脑的USB接口为UFI供电。
UFI工作在WIFI模式。
2.接口和状态指示灯说明图 2-1 五模UFI接口和状态指示灯注意:如果安装文件没有自动弹出,请在“我的电脑”中找到并点击新增的光盘盘符,可以找到安装文件。
- 1、下载文档前请自行甄别文档内容的完整性,平台不提供额外的编辑、内容补充、找答案等附加服务。
- 2、"仅部分预览"的文档,不可在线预览部分如存在完整性等问题,可反馈申请退款(可完整预览的文档不适用该条件!)。
- 3、如文档侵犯您的权益,请联系客服反馈,我们会尽快为您处理(人工客服工作时间:9:00-18:30)。
蓝硕星4G固定无线电话机使用说明
1.首先在应用商店在搜索栏里输入KIMAXDISK(大小写均可)
2.连接路由设备网络
(1)软件安装完成之后把硬盘或其他移动磁盘装进智能路由里面
(2)打开KIMAX智能路由WIFI信号
(3)开启WIFI信号后,插入网线(如果只用于资料共享可不用插网线),用你的安卓设备连接智能路由发出的以xxx命名的WIFI信号。
每个智能路由所发出的信号都不同,具体WIFI名称以你路由所发出的信号为准。
(4)成功连接智能路中所发中的WIFI信号之后,打开安装好的智能APP进入APP后,默认界面在文件状态栏下。
在文件状态下会显示你的磁盘数量,大小(容量)情况。
3.连接之后对软件功能操作
(1)WIFI设置
修改SSID,对路由器发出的网络信号加密,使网络和共享磁盘资料更加安全。
确认手机连到设备WIFI后,在丁具箱菜单栏下找到WIFI设置,修改你的SSID和WIFI密码
(2)点击加密方式,选择最后一个
(3)输入你要设置的密码,点击确定即可。