四季沐歌蛟龙型号使用说明书
四季沐歌净水机知识详解

四季沐歌净水机知识详解1.净水机选购技巧人们的生活水平日益提高,对健康的关注也逐渐上升,饮水、食物已不仅仅局限于简单的果腹,绿色、纯净、健康成为高品质生活的衡量标准。
随着人们健康饮水意识的增强,净水机成了很多家庭的日常用品。
现在市场上的净水器产品品牌颇多,让消费者有了很大的选择余地。
但在现实的选购过程中,不少消费者反映:由于受到相关专业知识的限制,普通消费者很难辨别该选择怎样的净水器。
而有些厂商往往在宣传当中鼓吹一些概念,使消费者更如堕入云里雾里。
那么我们该如何选购一款合适的净水器呢?小编认为选购净水器应该从以下几个方面着手:一、看品牌。
选择可信赖的大品牌。
大品牌在产品质量和稳定性和售后服务上都有更严格的要求。
对问题的解决速度和售后服务质量也更胜一筹。
二、看材质。
市场上目前存在不锈钢、玻璃钢、铸铁、铝制、食品级树脂或PVC等材料。
前三种属于抗压性比较好的材质,可以用做前置过滤器(中央机)。
后两种属于抗压性比较差的材质,只能用在前置过滤器(中央机)的后端,用做直饮机使用。
这几种材质中,抗压性和耐腐蚀性以不锈钢为最好,价格也相对较高,食品极树脂或PVC抗压性较差,价格也比较低。
三、定功能。
选择水处理器要先明确自己的目的,首先从大的概念上说是要净化水还是要软化水。
净化水是去除水中泥沙、杂质、细菌、重金属、余氯、有机物以及一些矿物质。
软化水是去除水中的钙镁离子,最直接的说就是水垢。
四、选滤料。
目前净水材料常用的主要有PP棉,活性碳,KDF,超滤膜,RO膜(反渗透膜、逆渗透膜),石英砂,麦饭石,红外线矿化球等。
不同的净水材料会产生不同的净化效果,消费者可以根据自己想要的净化效果选择一款适合的净水器。
五、比大小。
这是最直观的办法,净水器一般都是根据瞬间出水量来定型号的,超过1.0吨/小时的可称为中央净水器,小于1.0吨/小时的可称为直饮净水器。
而这个出水量跟体积和进出水口的直径有关系,通常是越大的净水机瞬间出水量越大。
海尔 EC8001-GC3 80升健康抑菌横式电热水器 使用说明书

热水器使用说明书型号EC8001-GC3• 本说明书为通用手册• 本公司保留说明书解释权• 产品外观请以实物为准• 阅后请与发票一并妥善保存• 如遇产品技术或软件升级,恕不另行通知• 本产品只适合在中国大陆销售和使用1. 产品介绍1 1.1. 产品部件1 1.1.1. 外观及部件介绍1 1.1.2. 电气原理图11.2. 技术数据12. 使用说明3 2.1. 注意事项3 2.1.1. 电气方面3 2.1.2. 使用方面5 2.1.3. 维护方面10 2.2. 安装指南10 2.2.1. 装箱单10 2.2.2. 安装注意事项10 2.2.3. 安装方法11 2.3. 控制面板13 2.3.1. 控制面板132.3.2. 功能介绍133. 售后服务15 3.1. 用户须知15 3.1.1. 用户须知15 3.2. 疑难解答15 3.2.1. 疑难解答15 3.3. 清洗保养16 3.3.1. 清洗保养16 3.4. 保修说明16 3.4.1. 保修说明16 3.5. 一键报修171. 产品介绍1.1. 产品部件1.1.1. 外观及部件介绍注:本示意图仅供参考!注:以上参数允许误差范围为±10%。
1.1.2. 电气原理图若有变更,恕不另行通知。
1.2. 技术数据型号a1(mm)b1(mm)c1(mm)d1(mm)EC5001-GC3655465100430EC6001-GC3755465100430EC8001-GC3825505100465产品型号EC5001-GC3EC6001-GC3EC8001-GC3容量(L)506080净重(kg)见包装箱贴额定功率(W)220022003000能效等级1级1级1级热水输出率80%80%70% 24小时固有能耗系数0.60.60.6额定电源220V~ 50Hz220V~ 50Hz220V~ 50Hz 额定压力(MPa)0.80.80.8额定温度(℃)757575防水等级IPX4IPX4IPX4注:以上参数(重量)允许误差范围为±10%该系列电热水器执行标准:GB 4706.12、GB 215192. 使用说明2.1. 注意事项2.1.1. 电气方面电源• 检查电表,电线直径是否符合热水器的额定电流,必要时请有资质的电工师傅检查一下。
海尔 TK48 265-GD7(U1) 265升太阳能热泵热水器 使用说明书

安装使用说明书太阳能热泵热水器·使用前请仔细阅读本说明书·本公司保留说明书解释权·产品外观请以实物为准·阅后请与发票一并妥善保存·如遇产品技术或软件升级,恕不另行通知·本产品只适合在中国大陆销售和使用智能家电操控智慧场景定制智家商城购物家电报装报修TK46/200-GD7(U1) TK48/265-GD7(U1)尊敬的用户:感谢您选择和使用我们的产品。
我们承诺:您的产品需要安装或维修等服务时,我们将提供:“1+5″的成套服务:1:一次就好服务。
5:五项增值服务:(1)安全测电服务:为您提供安全测电并提醒讲解到位服务; (2)讲解指导服务:向您讲解产品使用、保养常识,指导用 户正确使用服务;(3)一站通检服务:服务好本产品,对家中其他本企业产品 进行通检服务;(4)全程无忧服务:为您提供设计、送货、安装、清洗、延 保、以旧换新等服务;(5)现场清理服务:服务完成后将服务现场清理干净。
为体现真诚、贴心,我们友情提醒:产品的安装服务,因用户的安装环境、个性需求不同,安装过程中如需辅加材料或有特殊服务项目需要支付材料等费用,您可通过“海尔智家”APP-“智家服务”-“收费标准”进行查看,并给予监督。
如未按标准收费或服务规范执行不到位,可拨打服务监督电话400 699 9999,或通过“海尔智家”APP-“智家服务”-“在线客服”进行监督、评价。
如果您的产品有服务需求,欢迎体验海尔智家自助服务专区(预约服务、一键安装、一键维修):手机搜索安装“海尔智家”APP,您可通过“智家服务”版块选择安装、维修等服务。
如您需要选购更多产品,可在“海尔智家”APP-“商城”进行选购。
(更便捷、更快速、更省钱)期待您的参与!部件名称 数量水箱冷水安全阀0.85MPa 热水安全阀0.85MPa 3/4''纤维垫圈安全阀排水管说明书水箱排水管对丝1/2''-3/4''外丝穿墙护圈1台1个1个4个1根1本1根1个1个部件名称 数量小件包连机管不粘胶带集热板安装件膨胀螺栓M8×150mm紧固螺栓M8×25mm1个1套1卷4个4个4个塑料卡扣1个处于户外的水管路及阀件均应作保温处理。
四季沐歌家用管线机安装培训与常见故障分析

家用挂线机常见故障判断与维修
故障现象
故障原因
维修措施
只出热水不 出冷水
频繁显示缺 水报警
1、可控硅模块故障,不能 有效断电; 2、总控板故障,信号没有 输出; 3、冷水按键失灵;
1、水位传感器故障;
2、排污口漏水; 3、总控板故障;
1、更换可控硅模块; 2、检测总控板CN8输出端信号; 3、检测总控板显示按键信号输入端;
水 键
LED显示屏上显示常温水
温,出水口出常温水,24
秒后自动停止,也可再按
此键也会停止出水。上电
第一次必须先按一下此键,
等有凉水出来后,方可进
行加热操作,否则机器容
易进入干烧保护状态。
六、缺水报警
• 在出热水过程中,当透 明水箱内的水位低于最 小刻度值时,会连续发 出三次“嘀”声报警, 显示屏上"FO"和报警 灯闪烁,并停止提供热 水,此时凉水键仍可正 常工作。水源补充后, 系统恢复正常
安装步骤与注意事项
一、安装注意事项
1. 不要安装在阳光直射处; 2. 产品的使用环境温度为5~38摄氏度,冬季要注意防冻; 3. 安装时应该将产品固定好放正,防止产品翻倒; 4. 不要随意拆下产品上的零部件,防止漏水和损坏机器; 5. PE管与进水接头配合到位,安装完成后要对此处检漏; 6. 不要使用与额定电压不相称的电源。 7. 进水水压低于0.1MP请加装增压泵,进水水压高于0.4Mp请安装减压
行加热操作,在显示
童
屏上显示“ ”
锁
且童锁指示灯点亮。
按 键
童锁图标
• 按住“童锁”键3
秒,进入不自制热
水状态,显示屏显
童
示童锁,指示灯点
锁 指
四季沐歌室内加热器使用说明

四季沐歌室内加热器使用说明
1、确定安装位置。
确定电热水器安装的位置在哪里,用铅笔标记出来。
然后固定好热水器。
固定热水器可以采用冲击钻打孔安装膨胀钉固定,也可以用细铁丝将热水器固捆绑在固定物上,只要安装固定牢固稳定即可。
2、连接水管。
安装固定好热水器之后,将进出水管拿出安装好,旋紧并固定住,然后放水充满容器。
3、安装电线。
要确定好电线的连接,准确连接电源火线、零线及地线,确定好插头、插座连接方式。
4、检测使用。
安装完毕之后要对电热水器水电进行检测,确保无漏水漏电的现象发生,检测正常即可通电使用。
T4 系列使用手册说明书
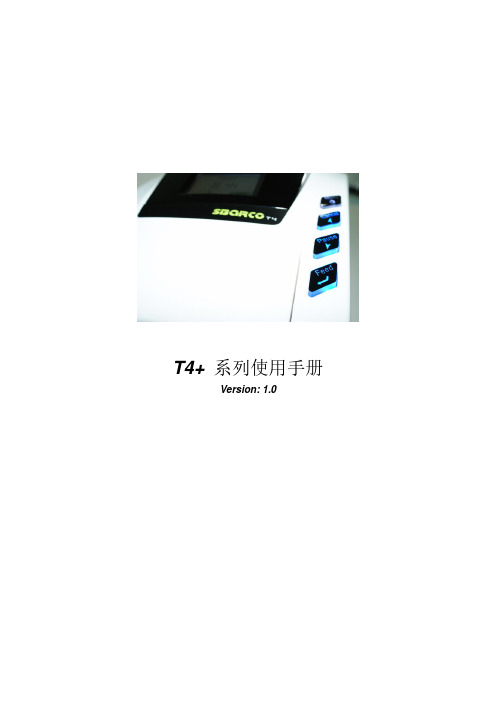
I T4 系列使用手册
Ver:1.0
5.2.4 测试打印...........................................................................................44 5.2.5 内存...................................................................................................44 5.2.6 表格...................................................................................................44 5.2.7 警告讯息...........................................................................................45 5.2.8 打印机状态.......................................................................................46 6. 故障排除 ................................................................................................................47 6.1 液晶屏幕错误讯息......................................................................................47 7. 規格 ........................................................................................................................48 7.1 T4+系列規格................................................................................................48 7.2 通用序列总线(USB)接脚图.......................................................................50 7.3 串行端口脚位图..........................................................................................51 7.4 以太网络脚位图..........................................................................................51
philips gc4800系列蒸汽熨斗使用说明书

1 Remove any sticker, protective foil or plastic from the soleplate.
2 Rinse and dry the filling cup.
Preparing for use
Filling the water tank
GC4870 only) 7 Ionic DeepSteam light (GC4880, GC4875,
GC4870 only) 8 Temperature dial 9 Amber temperature light (all types)/red auto-
off light GC4891/GC4890/GC4880/GC4875/ GC4870/GC4865/GC4860/GC4856/GC4855/ GC4852/GC4851/ GC4850 only). 10 Mains cord 11 Type plate 12 Soleplate 13 Calc-Clean button Not shown: Heat-resistant protective cover (GC4880 only) Not shown: filling cup
Do not fill the water tank beyond the MAX indication.
Do not put perfume, vinegar, starch, descaling agents, ironing aids or other chemicals in the water tank.
Register your product and get support at
/welcome
四季沐歌怎么设置方法

四季沐歌怎么设置方法
四季沐歌是一种智能温控器,可以根据不同季节的需求来调节室内温度。
它的设置方法如下:
1. 设置时间及日期:按下温控器上的“设置”按钮,然后根据屏幕上的指示设置正确的时间和日期。
2. 选择运行模式:根据季节选择适当的运行模式。
通常有制冷模式、制暖模式、除湿模式和自动模式。
按下温控器上的“模式”按钮,使用“+”和“-”按钮来切换不同模式,选择合适的模式后按下确认按钮。
3. 设置温度:按下温控器上的“温度”按钮,使用“+”和“-”按钮来调整所需的温度值。
完成后按下确认按钮。
4. 设置风速:按下温控器上的“风速”按钮,使用“+”和“-”按钮来调整所需的风速档位。
完成后按下确认按钮。
5. 设置定时开关机:如果需要定时开关机,按下温控器上的“定时”按钮,根据屏幕上的指示设置开机和关机的时间。
根据需要选择开机或关机后按下确认按钮。
6. 其他设置:根据需要还可以设置语言、亮度、摄氏/华氏温度单位等其他参数。
按下温控器上的“设置”按钮,然后按照屏幕上的指示进行相应设置。
请注意,具体的设置方法可能会因为不同型号的四季沐歌温控器而有所不同,建议在使用前查阅相关说明书或咨询生产商。
kohler+72704t+b4+淋浴柱+安装说明书
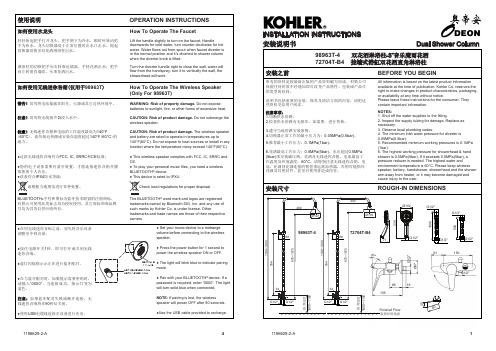
BEFORE YOU BEGIN98963T-4 双花洒淋浴柱-5˝音乐魔雨花洒72704T-B4 挂墙式浴缸双花洒直角淋浴柱安装之前INSTALLATION INSTRUCTIONS 安装说明书安装尺寸ROUGH-IN DIMENSIONSDual Shower Column150Ø67G1/2"所有的资料是按最新出版的产品资料编写而成。
科勒公司保留任何时候不经通知即可改变产品特性、包装或产品可供类型的权利。
说明书包括重要的安装、保养及清洁方面的内容,请把这些资料交给用户阅读。
注意事项:1.切断供水管路。
2.检查供水管路有无损坏。
如需要,进行替换。
3.遵守当地管路安装条例。
4.切换器正常工作的最小压力为:0.05MPa(0.5bar)。
5.推荐最小工作压力:0.1MPa(1bar)。
6.花洒最高工作压力:0.5MPa(5bar)。
水压超过0.5MPa (5bar)须安装减压阀。
花洒及无线迷你音箱,电池最高工作温度及环境温度:60°C 。
请特别注意无线迷你音箱,电池,花洒同花洒连接的臂管须远离加热器,否则可能损坏花洒及其密封件,甚至对使用者造成伤害。
All information is based on the latest product information available at the time of publication. Kohler Co. reserves the right to make changes in product characteristics, packaging, or availability at any time without notice.Please leave these instructions for the consumer. They contain important information.NOTES:1. Shut off the water supplies to the fitting.2. Inspect the supply tubing for damage. Replace as necessary.3. Observe local plumbing codes.4. The minimum inlet water pressure for diverter is 0.05MPa(0.5bar).5. Recommended minimum working pressures is 0.1MPa (1bar).6. The highest working pressure for showerhead & hand shower is 0.5MPa(5bar). If it exceeds 0.5MPa(5bar), a pressure reducer is needed. The highest water and environment temperature is 60°C. Please keep wireless speaker, battery, handshower, showerhead and the shower arm away from heater, or it may become damaged and cause injury to the user.6135805467128-2147128-11413161922231718151011934CLEANING INSTRUCTIONS适用于所有加工处理过的表面:以中性肥皂水清洗镀层表面,再以干净的软布彻底擦干整个表面,许多清洁剂,比如氨水、去污粉及洁厕灵等,会对电镀表面造成伤害,切有磨损性的清洁用具或清洁剂也不可使用于科勒牌的水龙All Finishes: Clean the finish with mild soap and warm water. Wipe entire surface completely dry with clean soft cloth. Many cleaners may contain chemicals, such as ammonia, chlorine, toilet cleaner etc. which could adversely affect the finish and are not recommended for cleaning.Do not use abrasive cleaners or solvents on Kohler faucets and fittings.98963T-4 双花洒淋浴柱-5˝音乐魔雨花洒72704T-B4 挂墙式浴缸双花洒直角淋浴柱Dual Shower Column**订购时请说明颜色编号**Color code must be specified when orderingSERVICE PARTS 零 件 图870992O-ring O 型圈1196610Mountion Base 底座1196607**Body 本体832751Screw 螺钉832751Screw 螺钉1061576Screw Kit 螺钉组件1196621**Escutchoen 装饰罩1111667**Hose 软管1196628Washer 垫片1183267**Diverter Kit 切换器组件1109471**Shower Bracket 花洒挂架880010Washer 垫片1046290Hex Wrench 六角扳手833730Hex Wrench 六角扳手1121285Clamp sleeve 夹紧套圈1196609**Adjust Nut 调节螺母1196622**Tube Joint 连接管1196610Mountion Base 底座832751Screw 螺钉831727**Hose 软管77955O-ring O 型圈77955O-ring O 型圈880010Washer 垫片1121294**Straight Tube Kit 直角弯管组件834562**Aerator 起泡器835927**Diverter 切换器834460Valve 阀865035**Diverter Knob 切换器提拉头865093**Outlet Bush 出水口接头834792Nut 螺母871556**Bonnet 阀帽800078**Handle 把手880002Plug Button Kit 塞扣套件1149326**Showerhead 头顶花洒(仅用于72704T )1196589**Showerhead 头顶花洒(仅用于98963T )1145696Regulator 限流器1191381**Wireless Speaker 无线迷你音箱(仅用于98963T )880084O-ring O 型圈880085O-ring O 型圈1180884**Connection Kit 连接套件871568O-ringO 型圈1183428**Handspray 花洒1030624Restrictor 限流器1061576Screw Kit 螺钉组件1196621**Escutchoen装饰罩834759**Shower Bracket 花洒托架(仅用于72704T )77420Washer 垫片1196627**Straight Shower Column With Diverter直角带切换器的淋浴杆。
海泉B25563W-2 1.5米按摩浴缸使用说明书
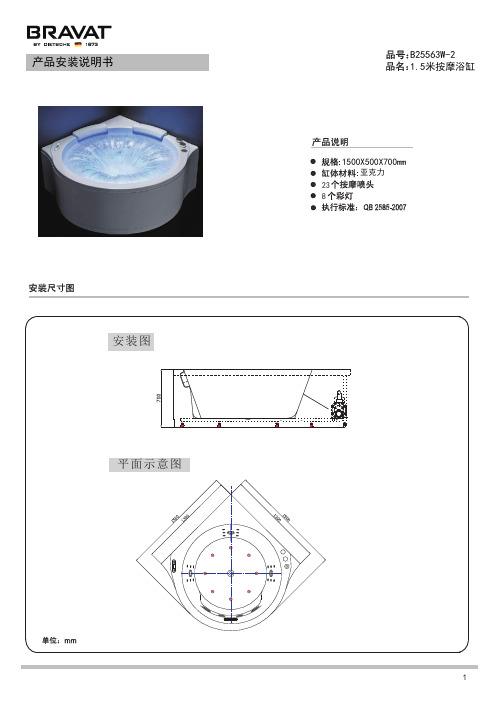
产品安装说明书B25563W-21.5米按摩浴缸1500X500X700mm8亚克力AB功能配置及技术参数功能概述注:"√"表示所包含功能,"*"号表示为选装功能.A .控制器系统包括:1)控制面板(1套)2)控制电箱(1套)B .控制器控制电箱特性1)额定电压 :AC220V-240V 2)额定频率 :50Hz/60Hz 3)使用电压范围 :AC198V-242V 4)待机功率 :<10W (所有负载关闭)5)使用环境温度 :+5℃ ~+40℃1)C .受控制系统控制的装置冲浪水泵: AC220V/3HP 2)1)恒温器 : AC220V/2000W 3)气泡泵 : AC220V/1HP 4)水底灯 : DC12V/5W 5)排水电磁阀: DC12V/5W 6)臭氧发生器: DC12V/8W 7)扬声器 :8Ω/15W (最C水路图:接线示意图:电参数电器安装供水安装 安装说明,额定电压/频率220V/50H z 2200W 额定功率额定电流<4A 工作电压12V3.供水安装4.安装说明1 房屋的电源设施应符合国家标准,电源的电压和频率应与产品要求相符。
特别要安装漏电开关,并验明接地保护设施有效;2 按摩缸的电源线应为固定式永久性接线,电源线应为3芯线,每芯截面积不小于12A ,电源线通过墙壁时应使用保护套管直至电源插座为止;3 按摩缸的接地线与房屋的接地线接通并验明有效;4 电控箱引出线的接线端子分别接至控制面板、水底灯、扬声器、电机和保护探头。
1 本设备供水压力为0.2-0.4M pa ;2 墙上的供水特点:浴室内冷热水供水点奕设在按摩缸便于遮挡的部位,通过软管与按摩缸的冷、热水接头相连接。
水管走向由用户自行决定,随机不提 供软管。
1 安装前必须考虑安装按摩缸的位置是否能承受此设备的压力;2 把按摩缸放到安装位置,调整水平度,使按摩缸排水顺畅;3 调整地脚螺丝,使所有地脚螺丝完全着地;4 将排水软管装好,连接处应作适当防漏水措施;5 接好按摩缸的冷、热进水管,安装好淋浴花洒,把排水软管接入下水管, 接好电源并验明接地设施有效。
EasySpeed Advanced 2000 W 熨烫机类型文件说明书
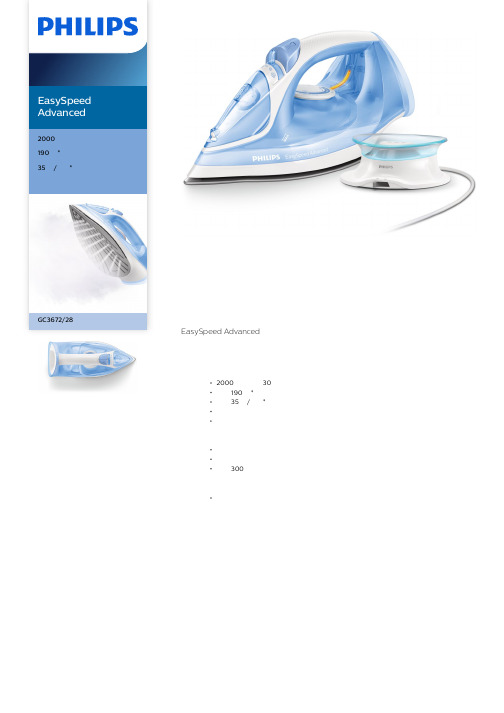
EasySpeedAdvanced2000 瓦190 克* 蒸汽束喷射35 克/分钟* 持续蒸汽输出陶瓷底板无绳熨烫,自由随心GC3672/28EasySpeed Advanced 熨斗将强劲的蒸汽输出与无绳熨烫的自由体验相结合。
可以熨及熨衣板的各个部位,轻松熨烫衣物难熨烫的部位。
加热迅速,可在几秒内快速充电,搬运锁便于存放。
快速熨烫2000 瓦,可在 30 秒内快速加热高达 190 克* 蒸汽束喷射,可去除顽固皱褶高达 35 克/分钟* 的蒸汽输出,提供强劲稳定的蒸汽性能智能底座,数秒内即可充电,指示灯亮起加大注水孔,注水和倒水快速轻松熨烫耐用的陶瓷底板,熨烫轻松搬运锁和绕线装置夹,用于方便和整洁存放加大 300 毫升水箱,减少重复注水的麻烦持久性能除垢滑片确保蒸汽性能持久产品亮点2000瓦,快速加热可在 30 秒内快速加热,从而快速启动。
高达 190 克*蒸汽束喷射深入地穿透织物,轻松去除顽固皱褶。
蒸汽输出高达 35 克/分钟*高达 35 克/分钟* 的蒸汽输出,提供强劲稳定的蒸汽性能。
快速充电底座智能底座,可在数秒内为电熨斗充电。
当电熨斗可用时,彩色灯光反馈指示,并在需要充电时提醒您。
XL注水孔为水箱注水的加大注水口可快速注水和倒水。
陶瓷底板我们耐用的陶瓷底板可在所有可熨烫衣物上顺畅滑动。
不会黏连,抗刮擦,且易于保持清洁。
方便存放借助我们的搬运锁系统将电熨斗牢固固定到其底座。
电源线可以轻松围着底座缠绕且使用夹子将其固定到位,从而实现整洁存放。
300毫升水箱减少了重复注水次数,得益于 300 毫升的大容量水箱。
因此,您可以一次熨烫多件衣物。
内置除垢滑片此熨斗可使用普通自来水。
除垢功能是内置的清洁功能,可去除钙沉积物(即水垢)并保持出众性能。
规格快速除皱持续蒸汽: 35 克/分钟*功率: 2000 瓦蒸汽束喷射: 190 克*可调蒸汽量垂直蒸汽喷水加热时间: 30 秒易于使用底板名称: 陶瓷水箱容量: 300 毫升电源线长度: 1.8 米底板前端的准确尖形设计适合自来水防滴漏功能加大注水孔水垢处理除垢和清洁: 防水垢解决方案存储电源线存储装置: 线夹尺寸和重量电熨斗的重量: 1.020 千克保修2 年全球保修绿色效能节能模式用户手册: 100%可回收纸* 由飞利浦实验室进行测试,电源电压为 220V,采用最大蒸汽量© 2020 Koninklijke Philips N.V.保留所有权利。
四季沐歌太阳能控制箱设置说明书
完美WORD格式编辑太阳能热水系统智能控制器安装使用说明书型号 : CA3廊坊创意博能源有限公司2010年9月9日太阳能热水系统智能控制器安装使用说明书非常感谢您选用CA3型工程控制器,该款工程控制器主要用于联集管式太阳能热水工程。
请您在安装系统前详细阅读本说明书。
目录一、安全指导及安全规则----------------------------------- 3二、主要技术指标----------------------------------------- 3三、控制系统安装----------------------------------------- 4四、主要功能--------------------------------------------- 5五、用户操作界面----------------------------------------- 7六、故障显示及处理-------------------------------------- 10七、水位传感器安装及高水位设定-------------------------- 11一、安全指导及安全规则在安装及使用设备前,请详细阅读以下所列的安全规则和警告。
本设备有危险电压,并控制危险的旋转机件。
请按本说明书的规定进行操作。
只有合格的专业人员允许操作本设备。
并且在使用之前,需要熟悉本手册中所有的安全说明和安装操作方法。
设备需要安全的供电电源,且设备必须接地。
禁止将本设备安装在有震动、电磁干扰、潮湿或污染的环境中,如粉尘及腐蚀性气体。
本设备只能按制造商规定的用途使用,未授权的修改或使用非本制造商所出售或推荐的零配件会引起对设备的破坏。
所有接线必须按本说明书给出的电路图进行接线,接线错误会导致设备本身及可能的被控制系统的损坏。
所有对设备内部控制电路的调整或更改必须与我公司协商,否则我公司不承担任何可能的后果。
二、主要技术指标1、输入电源:200~250V/50HZ2、设备无负载时功耗:< 6W3、测温范围:0~99℃4、测温精度:±1℃5、水位分档:六档6、外接负载最大总功率:12KW7、外接电磁阀E1电压及最大功率:220V/50HZ,1.5KW8、外接电磁阀E2电压及最大功率:220V/50HZ,1.5KW9、外接循环泵P1电压及最大功率:220V/50HZ,1.5KW10、外接循环泵P2电压及最大功率:220V/50HZ,1.5KW11、外接循环泵P3电压及最大功率:220V/50HZ,1.5KW12、外接电加热H1电压及最大功率:220V/50HZ,1.5KW13、外接电加热带H2电压及最大功率:220V/50HZ,1.5KW14、漏电动作电流:30mA/0.1S15、外形尺寸:600 mm×500 mm×200mm16、安装地点:室内17、安装允许环境温度:>0℃18、安装允许环境湿度:<85%三、控制系统安装1、控制柜的固定本控制柜为室内安装壁挂式控制柜,应安装在避免水淋的干燥位置。
海尔 KF70 150-SE 智享系列 150升空气能热水器 使用说明书
热水器使用说明书型号KF70/150-SE• 本说明书为通用手册• 本公司保留说明书解释权• 产品外观请以实物为准• 阅后请与发票一并妥善保存• 如遇产品技术或软件升级,恕不另行通知• 本产品只适合在中国大陆销售和使用1. 产品介绍1 1.1. 产品部件1 1.1.1. 各部分构件名称1 1.1.2. 产品安装尺寸2 1.1.3. 热水器接线图4 1.2. 技术数据41.2.1. 技术数据42. 使用说明6 2.1. 安全注意事项6 2.1.1. 标识解释6 2.2. 安装说明6 2.2.1. 安装注意事项6 2.2.2. 安装场所的选择7 2.2.3. 装箱单7 2.2.4. 安装及固定7 2.2.5. 管路安装8 2.2.6. 线路安装9 2.3. 使用功能10 2.3.1. 试运转10 2.3.2. 线控器显示屏10 2.3.3. 按键功能112.3.4. 控制功能123. 售后服务14 3.1. 用户须知14 3.1.1. 用户须知14 3.2. 疑难解答14 3.2.1. 疑难解答14 3.3. 清洗保养 16 3.3.1. 清洗与保养16 3.3.2. 常见现象16 3.4. 保修说明16 3.4.1. 保修说明161. 产品介绍1.1. 产品部件1.1.1. 各部分构件名称室外机储水箱图示仅供参考,以实物为准1.1.2. 产品安装尺寸水箱安装尺寸(单位:mm)尺寸偏差范围为±10% 图示仅供参考,以实物为准 室外机安装尺寸(单位:mm)型号a1b1c1d1KSXD-150(70)/WS-E1395492522894尺寸偏差范围为±10%1.1.3. 热水器接线图KF70/150-SE的接线图如下:若有变更,恕不另行通知。
1.2. 技术数据1.2.1. 技术数据型号a2b2c2d2e2f2g2KFRD70-32W-SE780286545500260247535整机型号KF70/150-SE 水箱型号KSXD-150(70)/WS-E 室外机型号KFRD70-32W-SE 电源220V~50Hz 性能参数制热水能力70L/h 热泵制热量3400W 热泵额定功率850W 热泵额定电流3.9A 性能系数(COP)4.00电热管额定功率2000W 电热管额定电流9.1A 最大输入功率3250W 最大输入电流14.8A 制冷剂R22/950g注:以上数据测试工况:空气侧温度DB/WB 20/15℃,进水温度15℃,出水温度55℃。
四季沐歌平板太阳能集热器说明书

四季沐歌平板太阳能集热器说明书四季沐歌平板太阳能集热器说明书随着环境保护意识的增强,太阳能作为清洁能源受到越来越多人的青睐。
作为一家专业从事太阳能热水器的研发、设计、生产和销售的企业,四季沐歌公司研发了一款高效、环保、经济的平板太阳能集热器。
一、产品简介该集热器采用高质量的铝合金、不锈钢和优质玻璃等材料制作而成,经过精细加工而成。
外观美观,质量稳定,使用寿命长,安装方便,操作简单。
二、产品特点1. 高效:利用优质玻璃使得光能得到最大利用,高效吸收太阳能,能在短时间内加热水温,不需要额外耗费电力。
2. 环保:使用太阳能作为能源,零排放,对环境无污染,有助于减少碳排放量。
3. 经济:一次性投入,可持续使用多年,不增加额外费用。
并且能够节约大量电费和燃气费用,具有很高的经济效益。
4. 适用性强:适用于不同的用户群体,如民居、学校、酒店、医院、工厂等,能够满足不同场合的需求。
三、产品维护为了保证该产品的长期使用寿命和高效性能,需要对其进行维护,具体方法如下:1. 定期清洗镀铝板:镀铝板是集热器的核心部分,要保持其表面的清洁,定期对其进行清洗,避免灰尘、沙子等杂物影响吸收效果。
2. 定期更换水垢:在使用过程中,水中会产生一定的垢垢,影响加热效果,需要每年对水垢进行彻底清除,保证水垢不影响到集热效果。
3. 定期对防护接头进行涂漆:防护接头是集热器的脆弱部分,需要进行防护,避免氧化或者物理损坏。
4. 定期检查安装:集热器的安装位置需要定期检查,确保安装牢固,不影响使用效果。
四、使用说明1. 确定集热器的安装位置,一般是在阳光充足的位置,避免阴影影响效果。
2. 根据相应的要求进行安装,保证安装牢固,并逐步进行温度调整,确保水温符合要求。
3. 在平时使用时,要避免过高或过低的水压,对于水压不稳定的地区订购时需知道压力需要符合集热器的使用压力。
4. 在使用前必须检查集热器是否正常,保证它的运行不会影响整个供水系统。
歌林KAG-60HME4窗型空调使用说明书

Model: KAG-60HME4Thank you for choosing our product.For proper operation, please read and keep this manual carefully.If you have lost the Owner’s Manual, please contact the local agent or visit www..ph.Window Type Air ConditionerTABLE OF CONTENTSAIR CONDITIONER SAFETY.........................................................1AIR CONDITIONER USE. (347)787777Starting Your Air Conditioner ......................................................Normal Sounds............................................................................AIR CONDITIONER CARE...........................................................Cleaning the Air Filter.................................................................Cleaning the Front Panel............................................................Repairing Paint Damage............................................................Annual Maintenance...................................................................TROUBLESHOOTING ..................................................................This appliance is not intended for use by persons (including children) with reduced physical,sensory or mental capabilities, or lack of experience and knowledge, unless they have been given supervision or instruction concerning use of the appliance by a person responsible for their safety.Children should be supervised to ensure that they do not play with the appliance.This appliance can be used by children aged from 8 years and above and persons with reduced physical, sensory or mental capabilities or lack of experience and knowledge if they have been given supervision or instruction concerning use of the appliance in a safe way and understand the hazards involved. Children shall not play with the appliance. Cleaning and user maintenance shall not be made by children without supervision.NOTICE:AIR CONDITIONER SAFETYYou can be killed or seriously injured if you don't immediately follow instructions.You can be killed or seriously injured if you don't follow instructions.All safety messages will tell you what the potential hazard is, tell you how to reduce the chance of injury, and tell you what can happen if the instructions are not followed.Your safety and the safety of others are very important.We have provided many important safety messages in this manual and on your appliance. Always read and obey all safety messages.This is the safety alert symbol.This symbol alerts you to potential hazards that can kill or hurt you and others.All safety messages will follow the safety alert symbol and either the word “DANGER” or“WARNING.” These words mean:Recommended g round m ethodFor your personal safety, this air conditioner must be grounded.This air conditioner is equipped with a power supply cord having a grounded 3 prong plug. T o minimize possible shock hazard,the cord must be plugged into a mating, grounded 3 prong outlet,grounded in accordance with all local codes and ordinances.If a mating outlet is not available, it is the customer's responsibility to have a properly grounded 3 prong outlet installed by a qualified electrical installer.It is the customer's responsibility:T o contact a qualified electrical installer.T o assure that the electrical installation is adequate and in conformance with National Electrical Code, ANSI/NFPA 70 -latest edition, and all local codes and ordinances.Copies of the standardslisted may be obtained from:National Fire Protection Association One Batterymarch ParkQuincy, Massachusetts 02269The electrical ratings for your air conditioner are listed on the model and serial number label. The model and serial number label is located behind the front panel above the coil area. Specific electrical requirements are listed in the chart below. Follow the requirements for the type of plug on the power supply cord.P ower s upply cordWiring requirements127 volt (103.5 min. -126.5 max.) 0- 15a mps15-amp time-delay fuse or circuit breakerUse on single outlet circuit only.220 volt (198 min. -242 max.) 0- 15a mps15-amp time-delay fuse or circuit breakerUse on single outlet circuit only.0- 15a mps15-amp time-delay fuse or circuit breakerUse on single outlet circuit only.To get the maximum cooling efficiency,the air conditioner isdesigned to splash the condensate on the condenser coil. If the splashing sound annoys you, you can provide an outside drainno use of draining water)1.Remove the rubber plug from the body base plate.2.Fix the drain water head to the chassis, and place the gasketDrain waterby using the following procedure, which may however cause a small loss of performance.on it. And install them with 2 screws -Figure 2. (Figure 1 for Figure 1Figure 2Drain water head 12 screws3.Connect the drain water head 2 to the drain water head 11.Drain hose or tubing can be purchased locally to satisfy your2.It is possible to connect the drain hose to the outlet withoutNote:(Figure 3)Figure 3particular needs.the drain pan.Drain water head 2230 volt(207min.-253max.)230 volt(193min.-253max.) (GJC06BK-D3NMNE2A)If AC is Blocked by Storm WindowAdd wood as shown in FIG.12,or remove storm window before air conditioner is installed.If Storm Window Frame must remain,be sure the Removing AC From Window*Turn AC off,and disconnect power cord.*Remove sash seal from between windows,and unscrew safety lock.*Remove screws installed through frame and frame lock.*Close (slide) side panels into frame.*Keeping a firm grip on air conditioner,raise sash and carefully “rock”air conditioner backward to drain any condensate water in base of unit.Be careful not to spill any remaining water while lifting unit from window.Store parts WITH air conditioner.AIR CONDITIONER USEOperating your air conditioner properly helps you to obtain the best possible results.This section explains proper air conditioner operation.IMPORTANT:If you turn off the air conditioner,wait at least 3minutes before turning it back on.This prevents the air conditioner from blowing a fuse or tripping a circuit breaker.Do not try to operate your air conditioner in the cooling mode when outside temperature is below 65°F (18°C).The inside evaporator coil will freeze up,and the air conditioner will operate properly.NOTE:In the event of a power failure,your air conditioner will operate at the previous settings when the power is restored.ControlsPower Pad8Lights next to the touch pads on the air conditioner control panel indicate the selected settings.Air Conditioner ControlsLight indicates the unit is in the temperature ormode.Starting Y our Air Conditioner —Digital Control/Decrease touch of the lncrease pads on Turns air conditioner on and off.Display1. Under ON status without timer setting, the operation mode is Auto, Cool, Energy Saver or Dry mode,and the set temperature will be displayed.2. Under ON status without timer setting, the operation mode is Fan only mode and the ambient temperature will be displayed.3. Time will be displayed under timer setting or timer preview./Temp lncrease Decrease Pads Use/Timer lncrease Decrease Pads EachFan Speed PadsUse to set the fan speed to Low, Med, High or Auto on the unit.Mode PadUse to set the air conditioner to Cool,Energy Saver,Fan Only ,Dry or Auto mode,Timer PadTimer ON can be set under off state of unit.If timer ON reaches,the system will run under previous setting mode.The setting range is 0.5~24hr.Timer OFF can be set under on state of unit.If timer OFF reaches ,the unit will turn off. The timer can be set in 0.5 hour increment below hours and in 1 hour increment for 10 hours or above.Filter check PadAfter fan rotates for 250h totally,lamp of cleaning filter is on to remind customer clean it.Note: When user cleaned the filter, press Filter check button to clear the operation time. Mean while,the warning indicator will turn off.to set temperature when in Cool, EnergySaver or Dry mode. The Setlight will turn on while setting.the unit will set the delay time when using the Timer pad on the unti. when using the Timer pad on the unit. The Setlight will turn on while setting.The air conditioner controls are located behind the control panel door. Press to open and close the door .Mode Controlprovide cooling with different fan speeds.Fan settings provide air circulation and filtering without cooling.NOTE:If you move the mode control from a coolsetting to OFF or to a fan setting, wait at least 3 minutes before switching back to a cool setting.Cooling DescriptionsFor Normal Cooling—Select High Coolor Med Cool with the TEMPERATURE control at midpoint.For Maximum Cooling—Select High Cool with theavailable on your knob.For Quieter & Nighttime Cooling—Select Low Cool with the TEMPERATURE control at midpoint.TEMP ControlThe TEMP control is used to maintain the room temperature. The compressor will cycle on and off to keep the room at the same level of comfort. When you turn the knob to a higher number, the indoor air will become cooler.Turn the knob to a lower number and the indoor air will become warmer.ControlsAir Conditioner FeaturesFeatures and appearance will vary.TEMPERATURE control at the highest numberAIR CONDITIONER CAREYour new air conditioner is designed to give you many years of dependable service. This section tells you how to clean and care for your air conditioner properly. Call your local authorized dealer for an annual checkup. Remember… the cost of this service call is your responsibility.Cleaning the Air FilterThe air filter is removable for easy cleaning. A clean filter helps remove dust, lint, and other particles from the air and is important for best cooling and operating efficiency. Check the filter every 2weeks to see whether it needs cleaning.NOTE: Do not operate the air conditioner without the filter in place.1.Turn off air conditioner.2.Remove air filter by pulling down on the indents in the top orsides of filter door and sliding air filter up and out. Filter door is not removable.e a vacuum cleaner to clean air filter. If air filter is very dirty,wash it in warm water with a mild detergent. Do not wash air filter in the dishwasher or use any chemical cleaners. Air dry filter completely before replacing to ensure maximum efficiency.4.Replace air filter by sliding filter down into filter door andclosing filter door.Cleaning the Front Panel1.Unplug air conditioner or disconnect power.2.Clean front panel with a soft, damp cloth.3.Air dry front panel completely.4.Plug in air conditioner or reconnect power.Repairing Paint DamageCheck once or twice a year for paint damage. This is very important, especially in areas near oceans or where rust is a problem. If needed, touch up with a good grade enamel paint.NOTE: To reduce paint damage during the winter, install a heavy-duty cover over air conditioner cabinet. For information on ordering a heavy-duty cover, see “Accessories.”Annual MaintenanceYour air conditioner needs annual maintenance to help ensure steady, top performance throughout the year. Call your local authorized dealer to schedule an annual checkup. The expense of an annual inspection is your responsibility.A.IndentsANormal SoundsWhen your air conditioner is operating normally, you may hear sounds such as:Droplets of water hitting the condenser, causing a pinging or clicking sound. The water droplets help cool the condenser.Air movement from the fan.Clicks from the thermostat cycle.Vibrations or noise due to poor wall or window construction.A high-pitched hum or pulsating noise caused by the modern high-efficiency compressor cycling on and off.TROUBLESHOOTINGYou can solve many common air conditioner problems easily, saving you the cost of a service call. Try the suggestions below to see whether you can solve your problem without outside help.Air conditioner will not operateThe power supply cord is unplugged. Plug into grounded3prong outlet. See “Electrical Requirements.”The power supply cord trips (Reset button will pop out).Press and release RESET (listen for click; Reset button will latch and on some devices, a green light will turn on) to resume operation.A household fuse has blown or circuit breaker hastripped.Replace the fuse or reset the circuit breaker. See “Electrical Requirements.”Depending on model, the Power button has not beenpressed or the Fan Speed control is turned to Off. Press POWER button or turn the FAN SPEED control to an active setting.The local power has failed.Wait for power to be restored.Air conditioner blows fuses or trips circuit breakersToo many appliances are being used on the same circuit. Unplug or relocate appliances that share the same circuit. Time-delay fuse or circuit breaker of the wrong capacityis being used.Replace with a time-delay fuse or circuit breaker of the correct capacity. See “Electrical Requirements.”An extension cord is being used.Do not use an extension cord with this or any other appliance.You are trying to restart the air conditioner too soon after turning the unit off.Wait at least 3 minutes after turning theunit off before trying to restart the air conditioner.Air conditioner power supply cord trips (Reset buttonpops out)Disturbances in your electrical current can trip (Resetbutton will pop out) the power supply cord. Press andrelease RESET (listen for click; Reset button will latch and on some devices, a green light will turn on) to resume operation. An electrical overloading, overheating, pinching or agingcan trip (Reset button will pop out) the power supplycord. After correcting the problem, press and release RESET (listen for click; Reset button will latch and on some devices,a green light will turn on) to resume operation.NOTE: A damaged power supply cord must be replaced with a new power supply cord obtained from the product manufacturer.A damaged power supply cord must not be repaired.Air conditioner seems to run too muchThe current air conditioner replaced an older model. T heuse of more efficient components may cause the air conditioner to run longer than an older model, but the total energy consumption will be less. Newer air conditioners donot emit the “blast” of cold air you may be accustomed to from older units, but this is not an indication of lesser cooling capacity or efficiency. Refer to the efficiency rating (EER) and capacity rating (in BTU/hr.) marked on the air conditioner.The air conditioner is in a heavily occupied room, or heat-producing appliances are in use in the room. Use exhaust vent fans while cooking or bathing and try not to use heat-producing appliances during the hottest part of the day. A higher capacity air conditioner may be required, depending on the size of the room being cooled.Air conditioner cycles on and off too much or does not coolThe Mode is set to Power Saver (on some models). Use Power Saver only when you are away from home or asleep, since the fan does not circulate the room air continuously. Use a fit fan speed for your best comfort.The air conditioner is not properly sized for your room. Check the cooling capabilities of your room air conditioner. Room air conditioners are not designed to cool multiple rooms.The filter is dirty or obstructed by debris. Clean the filter.The inside evaporator and outside condenser coils aredirty or obstructed by debris.See “Annual Maintenance.”There is excessive heat or moisture (open container cooking, showers, etc.) in the e a fan to exhaust heat or moisture from the room. Try not to use heat-producing appliances during the hottest part of the day.The louvers are blocked.Install the air conditioner in a location where the louvers are free from curtains, blinds, furniture, etc.The outside temperature is below 65°F (18°C). Do not try to operate your air conditioner in the cooling mode when the outside temperature is below 65°F (18°C).The temperature of the room you are trying to cool is extremely hot.Allow extra time for the air conditioner to cool off a very hot room.Windows or doors to the outside are open. Close all windows and doors.The Exhaust control is set to OPEN (on some models). Push the Exhaust control CLOSED for maximum cooling. Depending on model, the Temp/Time or Temperature control is not at a cool enough setting. Adjust the TEMP/ TIME control to a cooler setting by pressing the minus button to reduce the temperature or adjust the TEMPERATURE control to a cooler setting by turning the knob clockwise. Set the FAN SPEED control to highest setting (Turbo or High, depending on model).Water drips from cabinet into your houseThe air conditioner is not properly leveled. The air conditioner should slope slightly downward toward the outside. Level the air conditioner to provide a downward slope toward the outside to ensure proper drainage. See the Installation Instructions.NOTE: Do not drill a hole in the bottom of the metal base and condensate pan.KPII 20190522。
卡萨帝热水器 CEH-80VA(U1)说明书
热水器使用说明书型号CEH-80VA(U1)• 本说明书为通用手册• 本公司保留说明书解释权• 产品外观请以实物为准• 阅后请与发票一并妥善保存• 如遇产品技术或软件升级,恕不另行通知• 本产品只适合在中国大陆销售和使用1. 产品介绍1 1.1. 产品功能1 1.2. 产品部件1 1.2.1. 电气原理图1 1.2.2. 外观及部件介绍11.3. 技术数据12. Wi-Fi绑定2 2.1. Wi-Fi绑定视频2 2.2. 应用下载22.3. 绑定流程23. 使用说明4 3.1. 使用说明视频4 3.2. 注意事项4 3.2.1. 电气方面4 3.2.2. 使用方面4 3.2.3. 维护方面5 3.3. 安装指南5 3.3.1. 装箱单5 3.3.2. 安装注意事项5 3.3.3. 安装方法6 3.4. 控制面板10 3.4.1. 控制屏103.4.2. 功能介绍104. 售后服务12 4.1. 售后视频12 4.2. 疑难解答12 4.3. 保修说明14 4.4. 清洗保养14 4.5. 用户须知16 4.6. 一键报修171. 产品介绍1.1. 产品功能抑垢模块内置抑垢模块,能有效降低结垢量,结合内胆高温抑菌,为您提供高品质沐浴用水。
地线带电监测具有“地线带电监测显示”功能,真正成为家庭的安全卫士。
掉电记忆机器掉电后,将自动记忆掉电前的信息,重新上电后直接进入掉电前的工作状态。
超大水量为用户提供更多的热水。
抑菌功能自动有效抑制细菌,提高用水质量。
省心模式热水器分析记忆用户的用水习惯,并自动设定好加热温度。
Turbo速热 可快速提供热水。
多用途封闭式结构,可同时供厨房、卫生间等多处用水。
(出水不宜饮用)1.2. 产品部件1.2.1. 电气原理图1.2.2. 外观及部件介绍1.3. 技术数据以上参数(重量)允许误差范围为±10%。
该系列电热水器执行标准:GB4706.12、GB21519。
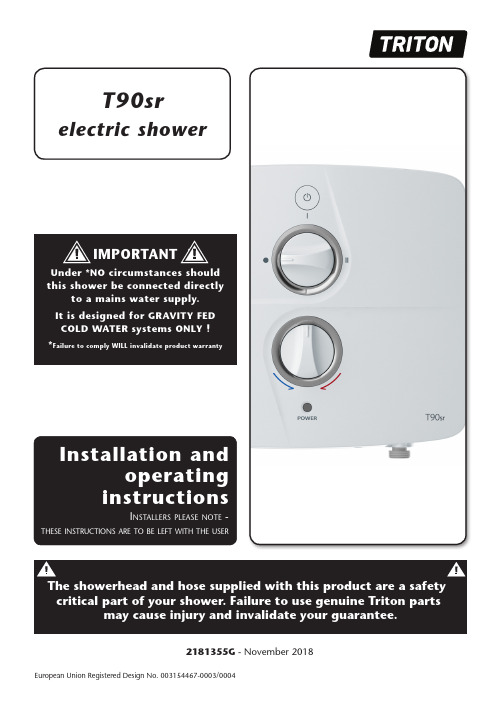
特龙T90sr电热水淋浴器安装使用说明书
2181355G - November 20181 GENERAL1.1 Isolate the electrical and water supplies beforeremoving the cover.1.2 Read all of these instructions and retain themfor later use.1.3 DO NOT take risks with plumbing or electricalequipment.1.4 Isolate electrical and water supplies beforeproceeding with the installation.1.5 The unit must be mounted onto the nishedwall surface (on top of the tiles). DO NOT tileup to or seal around ANY PART of the unitusing silicone sealer after xing to the wall.Special care must be taken NOT TO BLOCKOR SEAL ANY PRD VENTS ON THE UNIT. 1.6 Contact Customer Service (see back page), ifany of the following occur:a) If it is intended to operate the shower atpressures above the maximum or below theminimum stated.b) If the unit shows a distinct change in performance.c) If the shower is frozen.1.7 If it is intended to operate the shower in areasof hard water (above 200 ppm temporaryhardness), a scale inhibitor may have to betted. For advice on the Scale Inhibitor,contact Customer Service.1.8 The showerhead must be cleaned regularlywith descalent to remove scale and debris,otherwise restrictions to the ow on the outletof the unit will result in higher temperaturesand could also cause the (PRD) Pressure ReliefDevice in the unit to operate.1.9 This product is not suitable for mounting intosteam rooms or steam cubicles.2 PLUMBING2.1 The plumbing installation must comply withWater Regulations, Building Regulations or anyparticular regulations as speci ed by LocalWater Company or Water Undertakers andshould be in accordance with BS EN 806.2.2 The supply pipe must be ushed to clear debrisbefore connecting to the shower unit.2.3 DO NOT solder pipes or ttings within 300mmof the shower unit, as heat can transfer alongthe pipework and damage components.2.4 DO NOT t any form of outlet ow control asthe outlet acts as a vent for the heater can.2.5 DO NOT use excessive force when makingconnections to the exible hose orshowerhead, nger tight is suf cient.2.6 All plumbing connections must be completedbefore making the electrical connections.2.7 This appliance MUST NOT be connected tothe inlet supply by a hose-set.3 ELECTRICAL3.1 The installation must comply with BS 7671‘Requirements for electrical installations’ (IEEwiring regulations), building regulations or anyparticular regulations as speci ed by the localElectrical Supply Company.3.2 This appliance MUST be earthed.3.3 In accordance with ‘The Plugs and Sockets etc.(Safety) Regulations 1994’, this appliance isintended to be permanently connected to thexed wiring of the electrical mains system.3.4 Make sure all electrical connections are tight toprevent overheating.3.5 A 30mA residual current device (RCD) MUSTbe installed in all UK electric and pumpedshower circuits. This may be part of theconsumer unit or a separate unit.3.6 Switch off immediately at isolating switch ifwater ceases to ow during use.3.7 Other electrical equipment i.e. extractor fans,pumps must not be connected to the circuitswithin the unit.3.8 Switch off at isolating switch when not in use.This is a safety procedure recommended withall electrical appliances.3.9 As with all electrical appliances it isrecommended to have the shower andinstallation checked at least every two years bya competent electrician to ensure there is nodeterioration due to age and usage.The following points will help you understand how the shower operates:a.The electric heating elements operate at aconstant rate at your chosen power setting.It is the rate of the water passing throughthe heater can which determines the watertemperature. The slower the flow, the hotter the water becomes; the faster the flow, thecooler the water.b.During winter, the water supply will be coolerthan in the summer. The flow rate will varybetween seasons at any one temperaturesetting. At different times of the year youmay have to adjust the position of thetemperature control to maintain your desired temperature setting.NOTE:If ever the water becomes too hot and you cannot obtain cooler water, first checkthat the sprayplate in the showerhead has not become blocked.DO NOT place items such as soap or shampoo bottles on top of the unit. Liquid could seep through the joint between the cover and backplate.IMPORTANT ADVICE TO USERSPlease read this book thoroughly and familiarise yourself with all instructions before commencing installation and keep it for future referenceThe shower installation MUST be carried out by a suitably qualified person, in the sequence of this instruction book.12345678910To check the product suitability for commercial and multiple installations, please contact Triton’s speci cation advisory service before installation. Please see back of book for contact information.ELECTRICALNominal power - rating at 230V - 9.0kW – (40A MCB rating)PLUMBING (see page 11 & 12 for water regulations)Supply Source - see page 11 for full details Cold water storage ONLYMinimum capacity 114 litres (25 gallons)Minimum head height = 8cmMaximum head height = 10mMinimum flow to shower inlet = 8l per minute Maximum inlet temperature28°CMinimum inlet temperature2°CInlet connection15mm diameterOutlet connection½” BSP male threadMATERIALSABS Backplate, cover, controls, showerhead Acetal SprayplateElementsMinerally insulated corrosion resistant metalsheathingSTANDARDS and APPROVALSSplashproof rating IP25Safety Complies with the requirements of currentBritish and European safety standards forhousehold and similar electrical appliances BEAB Complies with requirements of the BritishElectrotechnical Approvals Board (BEAB)CE Meets with Compliance with EuropeanCommunity Directives (CE)2Fig.2Fig.1ENTRY POINTSDIMENSIONSCABLELeft: Bottom, Back & Top.= Back = Others322mm95mm266mmWATER Left: Bottom, Back & Top.= Back = OthersPLEASE NOTE: Deviation from the approved entry points will invalidate product specifications and warranty.MCB 30/32A 32A 40A 40A 40A 40/45A 45Acartridge fuse 30A 35A 35A 45A 45A 45A 45Aunit rating 7.0kW 7.5kW 8.0kW 8.5kW 9.0kW 9.5kW 10.5kWCIRCUIT PROTECTION ELECTRICAL REQUIREMENTSThe installation, supply cable and circuitprotection must conform with BS 7671 (IEE wiring regulations) and be suf cient for the amperage required.The following notes are for guidance only:1 The shower must only be connected to a230-240V ac supply. If you are installing a shower with a kilowatt rating above 9kW, it is advisable to contact the local electricity supply company.1.1 The electrical rating of the shower is shownon the rating label (Fig.3) within the unit.2 Before making any sort of electricalconnection within the installation make sure that no terminal is live. If in any doubt, switch off the whole installation at the mains supply and remove the correct fuse.3 The shower must be connected to its ownindependent electrical circuit. IT MUST NOT be connected to a ring main, spur, socket outlet, lighting circuit or cooker circuit.3.1 The electrical supply must be adequate forthe loading of the unit and existing circuits.4 Check your consumer unit (main fuse box)has a main switch rating of 80A or above and that it has a spare fuse way which will take the fuse or Miniature Circuit Breaker (MCB) necessary for the shower (Fig.4).4.1 If your consumer unit has a rating below80A or if there is no spare fuse way, then the installation will not be straightforward and may require a new consumer unit serving the house or just the shower.4.2 You will need to contact the local electricitycompany. They will check the supply and carry out what is necessary.5 For close circuit protection DO NOT use arewireable fuse. Instead use a suitably rated Miniature Circuit Breaker (MCB) or cartridge fuse (see Table A).5.1 A 30mA residual current device (RCD)MUST be installed in all UK electric andpumped shower circuits. This may be part of the consumer unit or a separate unit.check listTable B6A 45 amp double pole isolating switch with a minimum contact gap of 3 mm in both poles must be incorporated in the circuit.6.1 It must have a mechanical indicator showingwhen the switch is in the OFF position, and the wiring must be connected to the switch without the use of a plug or socket outlet.6.2 The switch must be accessible and clearlyable, but out of reach of a person uxed bath or shower, except for the cord of a cord operated switch, and should be placed so that it is not possible to touch the switch body while standing in a bath or shower cubicle. It should be readily accessible to switch off after using the shower.7Where shower cubicles are located in any rooms other than bathrooms, all socketoutlets in those rooms must be protected by a 30mA RCD.8The current carrying capacity of the cable must be at least that of the shower circuit protection (see Table B).8.1 To obtain full advantage of the powerprovided by the shower, use the shortest cable route possible from the consumer unit to the shower.8.2 It is also necessary to satisfy the disconnectiontime and thermal constraints which means that for any given combination of current demand, voltage drop and cable size, there is a maximum permissible circuit length.9The shower circuit should be separated from other circuits by at least twice the diameter of the cable or conduit.9.1 The current rating will be reduced if thecabling is bunched with others, surrounded by thermal loft or wall insulation or placed in areas where the ambient temperature is above 30°C. Under these conditions, derating factors apply and it is necessary to select a larger cable size.9.2 In the majority of installations (seeTable B), the cable will unavoidably be placed in one or more of the above conditions. This being so, it is stronglyrecommended to use a minimum of 10mm cabling throughout the shower installation.9.3 In any event, it is essential that individualsite conditions are assessed by a competent electrician in order to determine the correct cable size and permissible circuit length.• Mark out entry points and routing of the water and electric supplies into the shower.MainswatersupplyGatevalveStopvalveCold watercisternMains electric supply(via double pole switch)DoublepoleisolatingswitchSeparate permanentlyconnected supplyfrom consumer unitShowerunitMinimum capacity114 litres (25 gallons)8 cm (3")minimumDiagrammatic view (not to scale) Fig.5ADVISORY NOTEThe supply pipe from the cistern should be on the opposite side to the float operated valve to prevent air being drawn into the pipe when the cistern is filling.If it is intended to operate the shower in hard water areas (above 200 ppm temporary hardness) a scale inhibitor should be fitted.at the isolating switch and stop valve. Contact Customer Service for advice on replacing the PRD.IMPORTANT: The unit must be mounted on a flat surface which covers the full width and length of the backplate. It is important that the wall surface is flat otherwise difficulty may be encountered when fitting the cover and subsequent operation of the unit may be impaired.IMPORTANT: If installing onto a tiled wall, ALWAYS mount the unit on the surface of the tiles. NEVER tile up to the unit.21mmFig.7ELECTRICAL INSTALLATION IMPORTANT:Fig.9Fig.1041352ONLY remove lockingscrew after commissioninghas been successfullycompletedpowerselectorspindleSpindlemarkerset onCOLDFig.111. Terminal block2. Solenoid valve3. Thermal cut-out (main)4. Start/Stop button5. Motor Power SupplyL NE L +-NM14568773inletoutlet296. Pump and motor assembly7. Selector microswitches8. LED indicator9. Heater Can ElementsFig.12OFF ONCOMMISSIONOFF ONCOMMISSIONFig.13Fig.14Commission ON = Pump OFFBleed screwOpenFig.16 COLDpositionFully anti-clockwise position POWER SELECTOR KNOBTEMPERATURE CONTROL KNOBFig.15Turn thespindle untilit stopsPLEASE NOTE: On the COLD power setting (only) the TEMPERATURE selector settings are as follows:Fully anti-clockwise = maximum flow Fully clockwise = minimum flowFig.17COLD positionFully anti-clockwise positionPOWER SELECTOR KNOBTEMPERATURE CONTROL KNOBCOMMISSIONING9check listSECTIONSWITCH OFF THE ELECTRICITY SUPPLY TO THE SHOWER AT THE ISOLATING SWITCH BEFORE PROCEEDING TO STAGE 5.5. Unscrew the cover retaining screws and lift the cover from the backplate.6. Make sure the commission link is moved to the OFF position - see fig.14.NOTE: With the commission link in the OFF position the pump is ON and will operate normally.7. Remove the locking screw from the power selector spindle (fig.18) and store for future use. Make sure the selector spindle is left at the same position.8. Check to ensure that the wiring is not trapped and replace the cover squarely to the backplate and guide into position so that the knobs locate correctly into the splined spindles.Should any difficulty arise, recheck the points above.9. While applying slight pressure to the cover, secure in position with the retaining screws. Fit the showerhead to the flexible hose and place in the showerhead holder.The shower is now ready for normal operation.Fig.18R emove locking screw after commissioning has been successfullycompletedpower selector spindleSpindle marker set on COLDFig.18ECONOMYCOLDHIGHPOWERSELECTORTEMPERATURESELECTORhand before stepping under the showerhead. There will always be a time delay of a few seconds between selecting a flow rate and thewater reaching the stable temperature for thatflow rate.Start/Stop buttonNOTE: In normal use, it is in order to leave the water supply permanently on to the shower unit, but as with most electrical appliances, the unit MUST be switched off at the isolating switch when not in use.Fig.20Power ON indicatorplace.• DO NOT over tighten the filter cap on reassembly.IMPORTANT: Before replacing the cover, it is strongly advised to prime the unit by opening the bleed screw until water drains from it.• Close the bleed screw and replace the cover. Secure it with the fixing screws.• Switch on the electric supply and start the shower on the cold setting only and with the temperature control rotated fully anti-clockwise.•When a smooth flow of water is obtained, the shower can then be used in the normal manner.10765413821311916191268247133105141415171112R ef.Description P art No.1.Pump & Motor Assembly (83316090)2.Thermal Cut-Out (22013591)3.Terminal Block & Wires ..................S8*******4.Heater Can Assembly - 9kW ...........P1*******5.Solenoid Valve and .........................S8*******Flow Valve Assembly6.Filter Assembly ...............................P8*******7.Outlet Pipe Assembly .....................S8*******8.Switch Carriage Top .......................P8*******R ef.Description P art No.9.Start/Stop Switch Assembly .......P8*******10.Trimplate - White (7054251)Trimplate - Satin (7054287)11.Microswitch & Wire Assembly ...P0*******12.Microswitch & Wire Assembly ...P8*******13.Power LED ................................P8*******14.Motor Power Supply (7073750)15.PRD (82800450)16. Pipe Trim - White (7054250)Pipe Trim - Satin (7054288)17. Cover Assembly - White ............P8*******Cover Assembly - Satin ..............P8*******isolator switch ONTemperatureKnob setting012HEATER ELEMENTS USEDNONE OF THE ELEMENTS USED1 OF THE ELEMENTS USED2 OF THE ELEMENTS USEDTo alter the FLOW and TEMPERATURE of your shower - HEAT SETTINGS ONLY.31Triton Showers Triton Road NuneatonWarwickshire, CV11 4NRTriton is a division of Norcros Group (Holdings)Earthridge International Ltd Maynooth Co. Kildare.TRITON reserve the right to change product specifi cation without prior notice. E&OE. © TRITON SHOWERS 2018。
沐之宝机械热水器使用说明
沐之宝机械热水器使用说明
1、把热水器上的混合控制阀门打开,检查喷头里面是不是有水喷出,检查水箱中的水是否充足。
2、将热水器的插头插在插座上,在控制面板上按下电源的开关。
3、当屏幕亮的时候,进入设置状态,使用屏幕左侧的加减键来调节温度。
4、以上步骤完成后,等时间到了,热水器进入自动保温状态,此时即可打开喷头使用。
总结
1、把热水器上的混合控制阀门打开。
2、将热水器的插头插在插座上。
3、使用屏幕左侧的加减键来调节温度。
4、等时间到了,热水器进入自动保温状态。
- 1、下载文档前请自行甄别文档内容的完整性,平台不提供额外的编辑、内容补充、找答案等附加服务。
- 2、"仅部分预览"的文档,不可在线预览部分如存在完整性等问题,可反馈申请退款(可完整预览的文档不适用该条件!)。
- 3、如文档侵犯您的权益,请联系客服反馈,我们会尽快为您处理(人工客服工作时间:9:00-18:30)。
四季沐歌蛟龙型号使用说明书
四季沐歌蛟龙型号是一款智能恒温水龙头,本款产品采用先进的智能温控技术,能够通过感应器自动调节出水温度,以满足用户对不同水温的需求。
下面是详细的使用说明书。
一、产品概述
四季沐歌蛟龙型号是一款智能恒温水龙头,适用于家庭浴室和厨房等场所,能够根据用户需求,自动调节出水温度。
产品外观简洁大方,安装和使用方便。
二、产品特点
1. 智能恒温技术:蛟龙型号采用先进的温度感应器,能够感知出水温度并自动调节,让用户无需手动调节水温。
2. 安全保护功能:产品具有过热保护功能,当水温超过设定的安全范围时,自动停止加热或出水,确保用户安全使用。
3. 强大的供水能力:产品采用高效节能技术,不仅能够提供稳定的水压,还能够节省用水。
4. 节能环保:蛟龙型号采用先进的节能技术,能够根据用户需求自动控制水温和供水量,以达到节能效果。
三、安装步骤
1. 清洁安装位置:在安装之前,要确保安装位置干净整洁,没有杂物。
2. 安装水龙头:将水龙头与水管连接好,并用螺丝固定好水龙头。
3. 连接电源:将产品的电源线连接到安全的电源插座。
4. 连接供水管道:将产品的供水管道连接到家庭的供水管道。
5. 检查漏水:安装完成后,要检查是否有漏水现象,如有漏水要及时处理。
四、使用步骤
1. 打开水龙头:当需要使用蛟龙型号时,可以直接打开水龙头,水龙头会自动感应并调节合适的水温。
2. 调节水温:如果用户对于水温有特殊需求,可以通过旋转水龙头来调节水温,向左旋转增加水温,向右旋转降低水温。
3. 停止使用:使用完毕后,可以直接关闭水龙头,产品会自动停止供水。
4. 保养维护:定期清洁水龙头,保持水龙头外观整洁,并定期检查水管及电源线是否有破损,如有需要及时修复或更换。
五、故障排除
1. 出水温度异常:如果水温异常,可能是温度感应器出现故障,此时需要联系售后服务人员。
2. 水流过小:如果水流过小,可能是供水管道堵塞或水龙头过滤网堵塞,清洁或更换堵塞的部分即可。
3. 没有出水:如果水龙头完全没有出水,可能是供水管道没有打开或堵塞,检查供水管道并开启供水阀门。
六、注意事项
1. 本产品只能由专业人员安装和维修。
2. 使用过程中应谨慎操作,避免烫伤或其他意外。
3. 如发现产品异常现象,应及时停止使用并联系专业维修人员。
4. 请勿将产品暴露在阳光直射的地方,以免影响使用寿命。
5. 请勿将产品放置在潮湿的环境中,以免影响正常使用。
以上就是四季沐歌蛟龙型号的使用说明书的相关参考内容,希望能够帮助到您。
如有其他疑问,请联系售后服务人员。