电热水龙头安装步骤.
德龙2180406M电热水龙头安装及使用说明书

Installation andoperatinginstructions2180406M - January 2016CONTENTS PagePlumbing and electrical notes (1)Introduction (2)Safety warnings (2)Main components (3)Specifications (3)Site requirements (4)General installation notes (5)Siting of the shower (6)Removing the cover (7)Plumbing connections (7)Fitting the shower to the wall (10)Electrical connections (11)Commissioning (12)Operating the shower (15)Adjusting the maximum temperature stop (16)Instructions for installers and service engineers only (17)Spare parts (18)Fault finding ...............................................................................19 - 20Water/Cable entry points diagram (21)Service policy, guarantee, etc. ..................................................rear coverTo check the product suitability for commercial and multiple installations, please contact Triton’s speci cation advisory service before installation.Telephone: Facsimile:E mail:************************************************.uk1 PLUMBING NOTES1.1All installations must comply with WaterRegulations or Water Bylaws.1.2Supply pipes must be flushed to cleardebris before connecting the shower unit.1.3DO NOT connect the shower unit tothe mains cold water supply as it woulddamage the unit and also, the installationwould be in breach of Water Regulations.1.4DO NOT use excessive force when makingconnections to the flexible hose orshowerhead – finger tight is sufficient.1.5ALL plumbing connections are to becompleted and water supplies turned onBEFORE switching on the electricity supply.The shower must not be operated drywithout water.1.6DO NOT solder pipes or fittings within300 mm of the shower appliance, as heattransfer can damage components.1.7When installed, the top of the shower unitmust be at least 75 mm lower than thebase of the cold water storage cistern toprevent the pump being run dry withoutwater.1.8 A dedicated cold water supply must betaken directly from the cold water cisternto the shower. This draw-off must be onthe opposite side of the cistern to the floatoperated valve to reduce the risk of airentering the unit.1.9The action of the pump is to increase theflow rate. If the supply pipework cannothandle the resulting flow rate then:1.9.1The anticipated flow rate may notbe achieved.1.9.2 Air may be drawn into the hotsupply from the vent pipe causingspluttering and temperature fluctuations atthe showerhead.1.10 Fullway isolating valves MUST be fittedon the hot and cold water supplies tothe shower as an independent meansof isolating the water supplies shouldmaintenance or servicing be necessary. DONOT use stop taps or ball-o-fix type valveswhich restrict flow.2 ELECTRICAL NOTES2.1The installation must comply with BS 7671‘Requirements for electrical installations’(IEE wiring regulations). Make sure theincoming hot and cold water supplies tothe shower are adequately earth bonded. 2.2DO NOT turn on the electrical supplyuntil the plumbing connections have beencompleted. Only then can the electricity beswitched on in order to power the solenoidto turn water on to the shower whencommissioning. The shower must not beoperated dry without water.2.3The mains supply must be 230/240V, at50Hz, connected to the unit via a doublepole switched 3 Amp fused connectionunit (not supplied) with a minimum 3 mmcontact separation gap in each pole.2.4In accordance with ‘The Plugs and Socketsetc. (Safety) Regulations 1994’, this unitis intended to be permanently connectedto the fixed electrical wiring of the mainssystem.2.5Fuses do not give personal protectionagainst electric shock.2.6 A 30mA residual current device (RCD)MUST be installed. This may be part of theconsumer unit or a separate unit.INTRODUCTIONThis book contains all the necessary fitting and operating instructions for your Triton Power Shower. Please read them carefully.The shower installation must be carried out by suitably competent person and in sequence of this instruction book.Care taken during the installation will ensure a long and trouble free life from your shower IMPORTANT: All plumbing connections must be completed BEFORE making the electrical connections.Please read through the whole of this book before beginning your installation. IMPORTANT: The fittings on the pipe inlet elbows are of the push-in type. The pipework must be cut with a pipe cutter and all burrs and rough edges removed from the endof the tube. The fittings can be used with copper and plastic pipe.Where chrome plated pipe is used, remove the first 25 mm of plating.Note: The pump inside this product is rated15 minutes on / 45 minutes off duty cycle.SAFETY WARNINGSa.DO NOT insert fingers into the push-in inletfittings. Doing so could cause injury.b.Under no circumstances must this productbe connected to mains cold or hot watersupplies.Failure to comply will invalidatethe guarantee.c.The shower MUST NOT be used ifsuspected of being frozen.d.The outlet of this appliance MUST NOT beconnected to any form of tap or fitting notrecommended by the manufacturer.e.The showerhead cartridge MUST be cleanedregularly to remove scale and debris.f.This appliance MUST be earthed.g.Switch off immediately at the isolatingswitch if water ceases to flow during use. h.DO NOT operate the shower outside theguidelines laid out in ‘site requirements’.i.DO NOT operate the shower if theshowerhead or spray hose becomesdamaged.j.DO NOT restrict flow out of the shower by placing the showerhead in direct contactwith your body.Replacement parts can be ordered from Triton Customer Service. See ‘spare parts’ for details and part numbers.will minimise the effects of scale in hard waterareas.Maximum supply head 10m.Fig.3 illustrates all the incorrect connections that must be avoided.All pipework to the shower unit must be routed where it remains below the level of water in the cistern. In the case of horizontal sections of pipework in lofts, it may be necessary to fit automatic air vents at high points on the supplies to remove the possibility of air locks.For the operation of the shower only, it is recommended that the cold water storagecistern is capable of holding at least 114 litres(25 gallons). Where other hot and cold outlets are likely to be in use simultaneously, the storagecapacity should be increased to 228 litres (50 gallons) in accordance with BS 6700.Do ensure compliance with the Water Regulations/Bylaws.DO NOT connect to a combination cylinder unless there is a guaranteed 114 litre cold supply to the cylinder as the shower can deliver up to 14 litres per minute. It is advisable to check thatSITE REQUIREMENTSWaterThe installation must be in accordance with Water Regulations/Bylaws and BS 6700.For correct operation of this shower unit, both hot and cold water supplies to the appliance must be gravity fed, at nominally equalpressures, from a cold water storage cistern and a hot water storage cylinder.The water circuit should be installed so that the flow is not significantly affected by other tapsand appliances being operated elsewhere on the premises.Fig.2 shows a recommended installation wherethe hot water supply for the shower is madevia a tee connection on the underside of thehorizontal section of pipework from the cylinder. Alternatively, the connection can be taken from the hot supply pipe to other outlets as long as it is the first draw-off below the ventilation pipe tee.the infill rate from the float operated valve meets the output requirements..It is recommended that there is a minimum of approximately 114 litres (25 gallons) of hot water storage per appliance.The shower MUST NOT be connected to the mains cold water supply.DO NOT use jointing compounds.GENERAL INSTALLATION NOTES1. DO NOT take risks with plumbing orelectrical equipment.2. DO NOT install this unit in a position whereit could become frozen.3. Isolate electrical and water supplies BEFOREproceeding with installation work.4. Shower control MUST be fed from a coldwater storage cistern and hot water cylinderthat provides nominally equal pressures.5. The unit must be mounted onto the finished wall surface (on top of tiles).DO NOT tile up to the unit after fixing to the wall.6. If installing with rear inlet supplies, it isrecommended the supply pipework is sealed to the wall so as to prevent water from leaking back into the wall.7. In solid wall installations, the supplypipework should be housed withinducting in order to allow some free lateral movement when making connections and to ensure compliance with requirements of accessibility of pipes and pipe fittings.Fig.4 shows a schematic wiring diagram of the unit.SITING OF THE SHOWERIMPORTANT: If fitting to a tiled wall, always mount the unit on the surface of the tiles. NEVER tile up to the unit.Refer to fig.5 for correct siting of the shower. Position the unit vertically where it will NOT be in direct contact with water from the showerhead.Note: Allow sufficient room between the ceiling and the shower unit to access the top cover screw.Position the shower and showerhead on the wall so that all controls can be comfortably reached when using the shower.The showerhead and riser rail can be positioned either side of the shower unit.Note: Water Regulations require the showerhead be ‘constrained by a fixed or sliding attachment so that it can only discharge water at a point not less than 25 mm above the spill-over level of the relevant bath, shower tray or other fixed appliance’. The use of the supplied soap dish will in most cases meet this requirement, but if the showerhead can be placed within a bath, basin or shower tray, then a device must be fitted toprevent back-flow.fig.9 and fig.10., but right-hand side for(fig.12).backplate as template (fig.17). Note that four fixing holes are provided but using only two should be adequate for most site ing the pipe removal tool supplied, push back and hold the collets from the pipework (fig.18) to disengage the pipework from the inlet elbows.Remove unit from the wall.Drill and plug the wall.(An appropriate drill bit should be used. If the wall is brick, plasterboard or a soft building block, appropriate wall plugs and screws should be fitted).Note: If fitting rising supplies to the unit, ensure debris does not enter the pipes when drilling the wall.Offer the backplate unit up to the completed pipework and manoeuvre so that the end of the pipes enter fully into the inlet fittings.Check the backplate is square and the fixing holes are aligned (fig.17).Secure to the wall with fixing screws supplied.OPERATING THE SHOWERCheck all plumbing and electrical supplies are connected and switched on.To start the shower, rotate the flow controlanti-clockwise from the ‘stop’ position (fig.29). Adjust the control until the flow rate is satisfactory.For maximum flow, turn the flow control fully anti-clockwise to the ‘max’ position.To adjust the temperature, rotate the control (fig.30). The temperature is numbered for ease of use. The temperature ranges from-‘1’ – fully cold to ‘9’ – fully hot.Once the preferred temperature is reached, no further adjustment is required, providing the hot and cold water supplies remain constant.To stop the shower, return the flow controlto the ‘stop’ position by rotating clockwise (fig.31). This stops the pump and water flow. Unless the shower is to be used again immediately, the shower should also be switched off at the electricity isolating switch.As a safety feature, the temperature controlhas a built-in stop to prevent you accidentally exceeding your highest desired temperature. If adjustment is required see section ‘Adjusting the maximum temperature stop’.To override this stop, depress the button (fig.32) while the control is up against the stop and turn the control anti-clockwise to the higher settings (pressing the button before the stop will not operate the override mechanism even if the control is turned with the button depressed).To return to the normal temperature range just turn the temperature control clockwise until itis past the maximum temperature stop. Make sure the temperature control is in the normal temperature range when the shower is switched off. The stop comes in a factory set position based on 65°C stored hot water temperature. Note: As the flow control is adjusted it is normal for the sound of the pump to alter in pitch.fitted and the wires are clear of obstructions. Secure with the top and bottom fixing screws (fig.8). Replace the flow control so that it aligns with the ‘min’ position.Fit the temperature disc (it will only fit one way) and maximum temperature stop (fig.27). Replace the temperature control onto the valve spindle. Make sure the pointer aligns with setting ‘9’ on the temperature disc (fig.28). Secure with the retaining screw and fit the cover trim.Switch on the electricity supply to the unit and then turn on both water supplies.SPARE PARTSIMPORTANT: Switch OFF the electricity at the mains supply and remove the correct circuit fuse before attempting any fault finding inside the unit.Symptom Cause Action/Cure1.1.1 Turn the temperature control clockwise. 1.2.1 Turn the temperature control clockwise. 1.3.1 Remove filter and clean. If problem is with check valve, contact Customer Service.1.4.1 Isolate shower and consult a competent plumber or contact Customer Service.2.1.1 Turn temperature control anti-clockwise. 2.2.1 Turn temperature control anti-clockwise. 2.3.1 Turn off the shower and wait for hot water cylinder to reheat.2.4.1 Remove filter and clean. If problem is with check valve, contact Customer Service.2.5.1 Turn off the shower. Consult a competent plumber or contact Customer Service.3.1.1 Blown fuse. Check supply. Renew fuse. If it fails again consult a competent electrician.3.1.2 Power cut. Check other appliances and if necessary, contact local Electricity Supply Co.3.2.1 Consult a competent electrician or contact Customer Service.3.3.1 Thermal protection on motor has operated. Allow appliance to cool and reset itself. If it persists, contact Customer Service.1 Water too hot.2 Water too cold.3 Pump does not operate.1.1 Not enough cold water flowing through shower.1.2 Increase in the ambient cold water temperature.1.3 Cold inlet filter blocked or check valve sticking.1.4 Cold water supply blocked or cut off.2.1 Not enough hot waterflowing through shower.2.2 Decrease in ambient cold water temperature.2.3 No hot water in the storage cylinder.2.4 Hot inlet filter blocked or check valve sticking.2.5 Hot water supply blocked or otherwise cut off.3.1 Interrupted powersupply.3.2 Electrical malfunction. 3.3 Motor overheated.Symptom CauseAction/Cure4.1.1 Check water elsewhere in house and if necessary contact the local Water Company.4.2.1 Switch off shower and contact Customer Service.4.3.1 Clean showerhead.4.4.1 Clean filters.5.1.1 Isolate water to unit. Remove check valves. Clean and replace.6.1.1 Call Customer Service. 6.2.1 Call Customer Service.7.1.1 Call Customer Service.7.2.1 Replace pump.8.1.1 Fit blanking plugs into unused inlets.4 Water does not flow or is reduced.5 Cross flow of hot and cold water into system.6 Water dripping from showerhead when turned off.7 Pump is noisy or air lock in pump.8 Unit running erratically.4.1 Water supplies cut off. 4.2 Shower blocked or air in the system.4.3 Showerhead blocked.4.4 Blocked filters.5.1 Dirt/debris in check valves.6.1 Debris in solenoid valve.6.2 Potentiometer faulty.7.1 Air lock in pump.7.2 Worn pump bearings.8.1 Blanking plugs not fitted into unused inlets.Entry PointsDiagram Key:Water Entry PointsCable Entry PointsWEEE Directive – Policy StatementAs a producer and a supplier of electric showers, Triton Showers is committed to the protection of the environment via our own environmental policy and the compliance with the WEEE directive.Triton Showers is fully registered with the Environment Agency under the following schemes: Repic: Producers take-back scheme (PTS), registration number WEE/EJ3466QVV alpak: Distributor take-back scheme (DTS), registration number 9659All our electric products are labelled accordingly with the crossed out wheeled bin symbol. This indicates, for disposal purposes at end of life, that these products must be taken to a recognised collection points, such aslocal authority sites/local recycling centres; this will be free of any charges. Do not return to Triton Showers.Triton Showers Triton Road NuneatonWarwickshire CV11 4NRTriton is a division of Norcros Group (Holdings) LimitedTRITON reserve the right to change product specification without prior notice. © TRITON SHOWERS 2015Customer Service: ***********Fax:***********E-mail:*********************************.uk26-02-2015 - 1 yr elec UK SERVICE POLICYIn the event of a product fault or complaint occurring, the following procedure should be followed:1. Telephone Customer Service on *********** having available,your details including post code, the model number and power rating of the product, together with the date of purchase and, where applicable, details of the particular fault.2. If required, the Customer Service Advisor will arrangefor a qualified engineer to call.3. All products attended to by a Triton service engineer must be installedin full accordance with the Triton installation guide applicable to the product. (Every product pack contains an installation guide, however, they can also be bought via our Customer Service Spares Department).4. Our engineer will require local parking and if a permit is required thismust be available to the engineer on arrival at the call.5. It is essential that you or an appointed representative (who mustbe over 18 years of age) is present for the duration of the serviceengineer's visit. If the product is in guarantee you must produce proof of purchase.6. Where a call under the terms of guarantee has been booked andthe failure is not product related (i.e. scaling and furring, incorrect water pressure, pressure relief device operation or electrical/plumbing installation fault) a charge will be made. A charge will also be issued if nobody is at home when the service engineer calls or adequate parking/permit is not available.7. If the product is no longer covered by the guarantee an up front fixedfee will be charged before the site visit.8. Should proof of purchase not be available on an “in-guarantee” call,or should the service engineer find that the product is no longer under guarantee, the engineer will charge the same fixed price and the customer will be expected to pay the engineer before he leaves. If payment is not made on the day an administration charge will be added to the fixed charge.9. If a debt is outstanding from a previous visit, or from any other Tritonpurchase, Triton reserves the right to withhold service until the debt has been settled.10. Triton takes the health, safety and wellbeing of its employees veryseriously and expects customers to treat all staff members with respect. Should any employee feel threatened or receive abuse, either verbally or physically, Triton reserves the right to withhold service and will support the employee with a legal prosecution.Replacement Parts PolicyAvailability: It is the policy of the manufacturer to maintain parts availability for the duration of production and a period of five years thereafter, in accordance with industry standards.Spare parts are available via our website, , or by telephoning Triton Customer Service Spares Department. Payment should be made by credit/debit card (excluding American Express or Diners Card). Payment can also be made by pre-payment of a pro forma invoice by cheque or money order.Telephone orders are based on information given during of the call. Before contacting Triton, please verify your requirements using the information contained in the supplied user guide. Triton cannot accept liability for incorrect part identification.。
水龙头开关:安装与施工方法
水龙头开关:安装与施工方法
水龙头开关是一个重要的设备,它能够控制水龙头的开关状态,并提供方便的使用体验。
本文将介绍水龙头开关的安装与施工方法。
安装准备
在进行水龙头开关的安装前,需要做一些准备工作。
首先,确
定安装的位置,确保水龙头开关与水龙头之间的距离适中。
其次,
检查水龙头开关的配件是否齐全,并确保其质量良好。
最后,准备
好所需的工具,如螺丝刀、扳手等。
安装步骤
以下是水龙头开关的安装步骤:
1. 关闭主水源:在安装水龙头开关之前,确保主水源已关闭,
以避免水流造成不必要的困扰。
2. 拆卸水龙头:使用扳手将原有的水龙头拆卸下来,注意保护周围的管道和墙面,以免损坏。
3. 安装水龙头开关:将水龙头开关按照说明书上的步骤进行安装,确保紧固螺丝牢固可靠。
4. 连接水管:将水龙头开关与水管进行连接,确保连接处无漏水现象。
5. 安装水龙头:将新的水龙头安装在水龙头开关上,注意与开关的对应位置,确保安装牢固。
6. 测试使用:打开主水源,测试水龙头开关的使用效果,检查是否正常开关,水流是否畅通。
施工注意事项
在进行水龙头开关的安装与施工时,需要注意以下事项:
- 定期检查水龙头开关的连接处,确保没有漏水现象。
- 注意使用合适的工具和力度,避免损坏水龙头开关或周围设施。
- 如果对安装不熟悉,建议请专业人士进行安装,以确保安全和可靠性。
以上是水龙头开关的安装与施工方法的简要介绍。
根据上述步骤进行安装,可以方便地控制水龙头的开关状态,提升使用体验。
如有其他问题,请随时咨询专业人士。
水龙头开关的安装施工详解

水龙头开关的安装施工详解1. 施工准备1.1 材料准备- 水龙头开关:根据需求选择适合的水龙头开关,确保质量合格。
- 管道:根据水龙头开关的尺寸和接口,准备相应的管道。
- 密封材料:如橡胶垫、密封胶等。
- 螺丝、螺母等紧固件。
- 工具:扳手、螺丝刀、切削工具等。
1.2 工作环境准备- 确保工作场地干净、整洁,无杂物。
- 确保水管系统已关闭,避免施工过程中发生漏水。
2. 安装步骤2.1 管道预埋1. 根据设计图纸,确定水龙头开关的位置,并在管道上做好标记。
2. 使用切削工具,将管道切割成合适的长度。
3. 将切割好的管道进行打磨,去除毛刺。
4. 将管道与水龙头开关的接口对齐,确保连接紧密。
2.2 安装水龙头开关1. 将水龙头开关的底座与管道接口紧密贴合,确保无间隙。
2. 使用扳手或螺丝刀,将水龙头开关底座的螺丝拧紧,确保连接牢固。
3. 安装水龙头开关的手柄,调整到合适的位置,并使用螺丝将其固定。
2.3 密封处理1. 在水龙头开关的接口处涂抹适量的密封胶。
2. 安装橡胶垫或密封垫,确保完全覆盖接口。
3. 使用螺丝将橡胶垫或密封垫固定在水龙头开关和管道之间。
2.4 检查与调试1. 打开水管系统,检查是否有漏水现象。
2. 检查水龙头开关的手柄是否灵活,是否能正常开启和关闭。
3. 如有需要,调整水龙头开关的位置,确保使用方便。
3. 施工注意事项- 确保在安装过程中,避免对水管系统造成损坏。
- 在密封处理过程中,确保密封材料涂抹均匀,无空隙。
- 在调试过程中,确保水龙头开关能正常使用,无异常声音或抖动。
4. 施工验收1. 检查水龙头开关的安装位置是否正确,是否符合设计要求。
2. 检查水龙头开关的连接是否牢固,是否有漏水现象。
3. 检查水龙头开关的手柄是否灵活,是否能正常开启和关闭。
5. 施工总结本施工详解详细介绍了水龙头开关的安装步骤和注意事项,通过正确按照施工步骤进行操作,可以确保水龙头开关的正常使用和安全性。
水龙头、电源插座安装
水龙头、电源插座安装1. 背景本文档旨在提供水龙头和电源插座的安装指南,以确保正确安装并提供使用者的便利。
2. 水龙头安装1. 准备工作:- 确保有足够的工具和材料,如螺丝刀、扳手、密封胶、管道等。
- 查阅水龙头的安装说明书,了解需要的安装步骤和特殊要求。
2. 安装过程:- 关闭水源,并用毛巾或布将水管拧紧,确保不漏水。
- 用螺丝刀拆下原有的水龙头,并将其底座清理干净。
- 根据安装说明书,安装新水龙头并确保底座与水槽紧密连接。
- 使用扳手适当拧紧螺丝,并使用密封胶固定水龙头。
3. 完成步骤:- 打开水源,并检查新安装的水龙头是否有漏水情况。
- 测试水龙头的热水和冷水功能,确保正常运转。
- 清理工作场地,并将旧水龙头适当处理或回收。
3. 电源插座安装1. 准备工作:- 确保有足够的工具和材料,如螺丝刀、电线、插座等。
- 查阅电源插座的安装说明书,了解需要的安装步骤和特殊要求。
- 关闭电源,确保操作安全。
2. 安装过程:- 根据安装说明书,选择合适的插座位置,并用螺丝刀固定插座底座。
- 连接电线到插座的对应插槽,并确保插线端与插座相匹配。
- 使用螺丝刀拧紧插座,并确保插座稳固。
3. 完成步骤:- 打开电源,并使用测试仪器检查插座的正常工作。
- 确保插座周围没有其他杂物或危险物品。
- 清理工作场地,并将旧插座适当处理或回收。
4. 注意事项- 在进行水龙头和电源插座安装前,确保已关闭相关的水源和电源,以避免意外伤害。
- 仔细阅读并遵循安装说明书,以确保正确安装并避免损坏产品。
- 如需专业帮助或安装困难,请咨询合格的专业人士。
以上是水龙头和电源插座安装的简要指南,希望对您有所帮助。
如需进一步信息或有其他问题,请随时与我们联系。
谢谢!---。
深入解析水龙头开关的安装施工

深入解析水龙头开关的安装施工
一、水龙头开关安装前的准备工作
在进行水龙头开关的安装施工之前,需要准备以下材料和工具:
1. 水龙头开关;
2. 专用扳手;
3. 测量尺;
4. 密封胶带或生料带;
5. 管道清洁剂。
二、水龙头开关的安装步骤
1. 测量和标记
首先,使用测量尺测量并确定水龙头开关的安装位置。
这个位
置需要根据个人使用惯、洗手盆或水槽的大小以及水管的位置来确定。
2. 清洁管道
使用管道清洁剂清洁水管的连接部位,以保证连接部位的密封性。
3. 安装水龙头开关
使用专用扳手将水龙头开关固定在预定位置,注意不要过于用
力以免损坏水龙头开关。
确定水龙头开关已经牢固固定后,使用密
封胶带或生料带将连接部位包裹,防止漏水。
4. 检查安装效果
打开水源,检查水龙头开关是否工作正常,是否存在漏水现象。
如果存在问题,需要重新安装或调整。
三、水龙头开关安装施工的注意事项
1. 安装水龙头开关时,要确保水源已经关闭,否则可能会导致
安装过程中的水溅出或漏水。
2. 水龙头开关的安装位置应尽量避免在阳光直射或温度过高的地方,以防止水龙头开关因长时间暴露在高温下而损坏。
3. 在安装水龙头开关时,应尽量选择质量好的产品,并按照产品说明书进行安装,以保证产品的使用寿命和使用效果。
以上就是关于水龙头开关的安装施工的详细步骤和注意事项。
希望这些信息能对您有所帮助,如果在安装过程中遇到问题,建议寻求专业人员的帮助。
电热水龙头的安装步骤
电热水龙头的安装步骤在寒冷的冬季家里的热水一定要足够,不过如果是想要开开水龙头都流出来热水的话,这恐怕就要使用电热水龙头了。
电热水龙头有着热水器和太阳能所不能比的优势,虽然它们也可以产生热水,但是水管中的水却依然还是凉的,因此需要您把水管中的水流完之后才可以有热水使用。
电热水龙头可以让您打开水龙头就有热水使用。
所谓电热水龙头就是我们通常说的快加热水龙头,它就是通过瞬间冲电加热,使得水龙头流出来的水是热的。
而作为一种比较新型的产品,电热水龙头要如何安装呢?步骤一:先拆除原有的普通水龙头首先得关闭水管阀门,拆掉原有的非电热水龙后,将其用清水把管道接口清洗干净,避免锈过多,形成梗塞。
步骤二:组装部件1.先将电热水龙头弯管与电热水龙头本体连接起来,机器固定就行。
2.如要用洗脸盆的话,那么将其把本体进水口的螺帽拧下,把电热水龙头固定在洗脸盆上;如不用洗脸盆那么可省略这一步。
3.然后再将电热水龙头与自来水管相连接起来。
步骤三:检查1.在安装好电热水龙头后,其先打开水阀开关,检查衔接件处能否漏水。
2.然后打开电热水龙头开关,给机器放水,冷热水开关来回打开调试几次。
3.在彻底排出空机器内气泡后,再*上电源。
4.将其热水调到所需的位置,因热水的温度是经过热水大小控制开关来调理的。
红灯亮了就将表示开端加热。
热水龙头安装注意事项:1、电热水龙头装置完了后,应先通水再通电,将手柄上、下旋转,看到出水口有水流出后,再接通电源即可运用。
(仅限于第一次运用)。
2、电热水龙头具有冷、热两种水流,在热水断水断电时,不需求频繁拔*出电源。
3、电热水龙头采用压力安装,开关打到热水方向即自动启动加热,打到冷水不耗费任何电。
运用简单,省水省电。
上述就是电热水龙头的具体安装步骤,安装成功之后您就可以非常方便的使用到热水了,一般开开水龙头3-5秒的时间就可以让您用到暖暖的热水,再也不用受到寒冷的侵袭,而且它除此之后还非常的小巧方便,是您家里不可缺的好帮手。
如何正确安装一个水龙头?

如何正确安装一个水龙头?一、准备工作1.测量水龙头尺寸:在安装水龙头之前,首先要测量水龙头的尺寸。
这样可以确保所购买的水龙头与已有的水管相匹配。
一般来说,水龙头的尺寸有标准尺寸,测量方法是将尺子放在水龙头的进水口上,然后测量出水龙头的直径。
测量好尺寸后,方便购买相应的水龙头。
2.准备工具:在安装水龙头之前,要确保自己准备了必要的工具。
常见的安装工具有扳手、螺丝刀、螺丝批等。
这些工具能够帮助我们拆卸旧的水龙头,安装新的水龙头。
3.关闭水源:在安装水龙头之前,记得关闭水源。
这样可以避免工作时水源泄漏,保证工作环境的安全性。
关闭水源的方法可以通过关闭水管旁边的阀门来实现。
二、拆卸旧水龙头1.关闭水管阀门:在拆卸旧水龙头之前,应该先关闭水管的阀门。
这样可以避免在拆卸过程中出现水源泄漏的情况。
2.拆卸旧水龙头:使用扳手等工具,解开旧水龙头与管道之间的连接。
需要注意的是,有些水龙头是用螺纹固定的,需要用扳手逆时针旋转才能拆卸。
3.清洁水龙头安装处:拆卸完成后,我们需要清洁水龙头安装处的管道。
可以使用抹布将管道擦拭干净,保持清洁卫生。
三、安装新水龙头1.安装新水龙头:将新水龙头放入安装处,然后用扳手逆时针旋转将其固定。
固定时要掌握力度,不能使水龙头过紧或者松动。
2.连接水管:拧紧水龙头后,需要将水管与水龙头连接起来。
使用螺纹连接件将水管固定到水龙头上,要确保连接处没有漏水的情况。
3.打开水源检测:在安装完成后,记得打开水源检测水龙头是否正常工作。
可以通过打开水管阀门,检测水龙头是否有漏水现象。
四、注意事项1.注意安装方向:在安装水龙头时,要注意水龙头的方向。
通常来说,冷水龙头安装在左边,热水龙头安装在右边。
确保水龙头的安装方向正确,使用时方便。
2.严禁漏电:安装过程中,要注意防止水龙头漏电的情况。
可以在水龙头和管道之间安装绝缘垫,避免因为电流引起的危险。
3.定期检查维护:安装好水龙头后,我们要定期检查维护。
如果发现水龙头有漏水、堵塞等情况,要及时修理或更换。
双孔冷热水龙头怎么安装

双孔冷热水龙头怎么安装在如今的家居生活中,浴室中都会安有面盆双孔冷热水龙头这一卫浴用品。
面盆双孔冷热水龙头在生活中使用的频率与日俱增,基本只要洗漱都会用到。
大家对于面盆双孔冷热水龙头的安装有多少了解呢?不妨通过本文进行一个学习吧。
双孔冷热水龙头怎么安装—安装技巧1、水管的介面水龙头接水管的介面有“公”、“母”之分,说白了就是用螺丝还是螺帽一端连接。
2。
安装的介面:一般厨房水槽都用单孔安装,洗脸盆用双孔安装,有关孔径、孔间距都是标准的,不用自己麻烦。
从你图片上看,你这个柱盆应该是使用双孔安装的水龙头,两头母的软管连接,如果你单独购买水龙头的话,应该连水管都不需要另买。
看上去你这个洗脸盆应该没有联动的下水阀,买普通水龙头就够了。
另外,如果需要自己安装的话,建议买水龙头的时候要些“生料带”(也有叫“生胶带”的),安装的时候缠绕在螺口上,防止漏水。
安装双孔面盆龙头,需再买2根高压管。
双孔面盆龙头的安装步骤与单孔面盆龙头安装步骤相似,橡胶垫圈分别套上两个进水软管,将软管分别从两个孔出,连接面盆龙头的进水埠和出水角阀的介面。
2、双孔水龙头安装1、单把双孔水龙头:是指冷热水分别由两个管孔引入,而出水则由一个水嘴流出。
其水温由一个把手左右调节来实现的。
一般左边为热水,右边则为冷水。
这种阀门,实际就是人们常说、常用的冷热混水阀。
2、双把双孔水龙头:是指冷热水分别由两个管孔引入,而出水则由两个阀门控制、一个水嘴流出。
其水温由由两个阀门控分别左右调节来实现的,其水温较易控制。
实际应用较少。
面盆双孔冷热水龙头怎么安装—安装注意事项1、淋浴、浴缸龙头的安装如果购买淋浴、浴缸、挂墙龙头,那就需要选择合适的高度埋出水管。
冷热水管距离大概在20里面以上。
安装前先冲洗水管,避免因水质硬而损坏水龙头。
2、暗装淋浴、浴缸龙头购买暗装龙头后,一般要把龙头的阀芯预埋在墙内。
预埋前要考虑卫生间墙体的厚度。
墙体太薄的话,阀芯将无法预埋。
预埋时阀芯的塑胶保护罩不要轻易摘除,以免在预埋时水泥和其他杂务损坏阀芯。
九牧水龙头3577-055安装说明

九牧水龙头3577-055安装说明
1、安装前请先开启水源,清除配管内之杂质、砂粒等,再关闭水源,主要目的是为了防止水龙头安装好之后,如果水管内有杂质不能正常供水,那么再次返工安装则相当麻烦。
2、将法兰罩锁入进水弯头牙部,再将牙部缠上止泄带,锁入墙面配管内,调整冷热进水弯头,旋转角度至平齐且孔距与本体冷热进水孔距相同,再将法兰罩旋转贴紧墙面,主要是为了起到固定作用。
3、将橡胶垫片致入本体冷热进水之连接螺帽内,再与冷热进水弯头连接锁紧,请使用30mm之扳手。
热水龙头安装教程

家里在装修的时候,在厨房和卫生间都会选择安装热水龙头,方便我们洗澡或者洗菜,那么我们应该怎么安装热水龙头呢?下面就一起来看看安装教程吧。
安装前大家先把可能用到的工具给准备好了,一般会用到的工具:扳手、防水胶布;另外还得检查冷热水龙头配套零件是否齐全,常见龙头零配件有:软管、胶垫圈、花洒、去水、拐子、装饰帽等。
2安装时需要将冷热水管分别表示一下,一般都是左边红色标示接热水、右边蓝色标示接冷水;接口处需要用防水胶布多缠几圈防止漏水,然后把水龙头接在接口上,用扳手拧紧。
3接着打开水龙头按照先冷后热测试一下,有没有流水情况。
浴室花洒的挂钩一般是根据使用者的身高来进行安装并调整的。
4手型竖式手持花洒是比较常见的花洒类型,安装高度一般是2050mm-2200mm,吸顶花洒的高度一般是2100mm-2300mm,安装时需要考虑经常使用者的身高进行安装。
5水龙头需先检查接口处是否完整,没有破裂或者残缺,其次是安装工具的,冷热水龙头安装工具一般包括:
6可调节式扳手、防水胶布(白色);其次是检查水龙头包装里面的零配件是否完整,零配件一般有软管、橡胶垫、花洒、去水管子、装饰帽等,如果包装不足或配件不足,可以先去补充下配件再行安装。
快益修以家电、家居生活为主营业务方向,提供小家电、热水器、空调、燃气灶、油烟机、冰箱、洗衣机、电视、开锁换锁、管道疏通、化粪池清理、家具维修、房屋维修、水电维修、家电拆装等保养维修服务。
教你安装冷热水龙头
教你安装冷热水龙头篇一:冷热龙头的安装及拆除方法冷热龙头的安装及拆除方法生活中除了一种单放常温水的水龙头之外,除了一种冷热水龙头,或许就是冷热水分控控制器,也有可能就是同一个控制器冷暖分阀。
这样的水龙头更便利生活,但其加装也较繁杂。
下面一起来介绍下加装流程。
安装前先准备备好安装工具,检查配套零件是否齐全,常见龙头零配件有:软管、胶垫圈、花洒、去水、拐子、装饰帽等是否齐全。
1、单孔面盆龙头的加装购买单把手面盆龙头时应该注意去水口直径,目前市场上大部分都是硬管进水,注意预留水管高度,从台盆向下大约30里面最好。
安装时,一定要选配专用的角阀,角阀一定要和墙出水的冷热水管固定。
如果角阀和龙头上水管之间有距离时,就需要购买专用管来加长链接。
不能用其他的水管来连接,否则会因为水压大而漏水、脱落。
如果进水管太长超过出水管时,剪去多余不分就行了。
特别注意:不要将水管软伸展至90度或大于90度。
在加装面盆回去水时,请不要忘记购买龙头的小接口(龙头短接)。
安装前必须提前冲洗埋在墙内的水管。
2、淋浴、浴缸龙头的加装如果购买淋浴、浴缸、挂墙龙头,那就需要选择合适的高度埋出水管。
冷热水管距离大概在20里面以上。
安装前先冲洗水管,避免因水质硬而损坏水龙头。
暗装淋浴、浴缸龙头:出售暗装龙头后,通常必须把龙头的阀芯预埋在墙内。
预埋前要考量卫生间墙体的厚度。
墙体薄的话,阀芯将无法预埋。
预埋时阀芯的塑料维护舱盖不要轻而易举切除,以免在预埋时水泥和其他杂务损毁阀芯。
另外在预埋阀芯时还必须特别注意一下阀芯的上下、左右的方向,以免阀芯埋错。
3、恒温龙头的安装加装恒温龙头之前,先检查一下水管哪边就是冷水,哪边就是热水,特别将冷热水管接错,以免影响龙头日后的工作。
燃气和太阳能热水器无法采用恒温龙头,主要就是水压太低。
加装恒温龙头还要加装冷暖水过滤网。
4、单孔厨房龙头的加装由于厨房龙头使用频率较高,再者搬来搬去极易松动,所有要求稳固是理所当然,因此锁紧螺母一定要拧紧。
家用电热水龙头的更换步骤方法1

家用电热水龙头的更换步骤方法家用电热水龙头的更换步骤方法。
一般的电热水龙头如图形状。
两端盖可以拆卸开的。
带电线端的一侧为电器控制部分,另外一端是加热水的部分。
如果打开电热水龙头加热方向,但是没有热水流出。
就是电器控制部分出现故障。
检测步骤是首先拔下电源线。
用万用表电阻档测量两电源线端子是否有有回路。
如果没有那就是损坏了。
两侧的端盖是都可以打开的。
是用螺纹联接的。
拧开右侧端盖就可看到内部的电器控制部分。
打开后可以看到内部的全部电器零件。
检查内部电加热芯是否断路。
如果断路了,那只有更换电热芯了。
电热芯的拆卸是要专用的搬手才能进行拆卸的。
下图就是拆卸电热芯的专用搬手。
然后先拧下图中画圈的两个螺母。
还有两个螺钉。
下一步拆卸电器开关支架。
图上画的三个点。
就是固定开关支架的螺钉。
拧下后开关支架就可以拆卸下来的。
里边就可以看到加热芯的。
用专用搬手把加热芯的圆螺母拆卸下来。
卸下来后如图。
加热芯是从另外一端撕开才能拆卸出来。
购买相同型号的加热芯。
然后安装到水阀内,用专用搬手拧紧圆螺母。
拧紧加热芯一端的水阀端盖。
如果拧不紧会漏水的。
没有电线端是进水端。
加热芯就是从那一端取出和安装的。
然后按拆卸步骤反向顺序进行安装联接,恢复原来位置。
最好是在拆卸过程中拍一些照片。
是样安装时也能参照图片查看原件的位置进行安装。
保证安装能顺利进行。
安装结束后。
要对水龙头先送冷水保证水龙头内有水后才能进行加热水。
水龙头开关施工安装的实践指导

水龙头开关施工安装的实践指导一、前言水龙头开关是现代家居中常见的设备,其正确的施工安装对于正常使用和长久使用具有重要作用。
本文档旨在提供水龙头开关施工安装的实践指导,帮助用户正确安装水龙头开关。
二、准备工作在施工安装水龙头开关之前,需要进行以下准备工作:1. 工具准备:螺丝刀、电钻、扳手、电线剥皮钳等常用工具;2. 材料准备:水龙头开关、电线、接线盒等必要材料;3. 关闭电源:确保安全,先关闭相关的电源开关。
三、施工步骤按照以下步骤进行水龙头开关的施工安装:1. 定位安装位置:根据实际需要,确定水龙头开关的安装位置,并用铅笔在墙壁上标记出开关的位置。
2. 安装接线盒:使用螺丝刀将接线盒固定在墙壁上,确保接线盒稳固可靠。
3. 连接电线:根据水龙头开关的接线方式,使用电线剥皮钳将电线的绝缘层剥开,然后将电线连接至接线盒中相应的接线孔中。
4. 安装水龙头开关:将水龙头开关插入接线盒中,然后使用螺丝刀将开关固定在接线盒上。
5. 完成连接:检查所有连接是否牢固,确保电线没有裸露部分,以及开关是否灵活可操作。
6. 接通电源:确认安装无误后,打开电源开关,测试水龙头开关是否正常工作。
四、注意事项在进行水龙头开关施工安装时,需要注意以下事项:1. 安全第一:在进行任何施工工作前,务必关闭相关的电源开关,以确保安全;2. 检查电压:在连接电线之前,确保电线所在的电路电压符合水龙头开关的要求;3. 保护电线:在剥开电线绝缘层时,要小心操作,避免损坏电线;4. 固定牢固:确保接线盒和水龙头开关固定可靠,以防松动或掉落;5. 功能测试:安装完成后,务必进行功能测试,确保水龙头开关正常工作。
五、总结本文档提供了水龙头开关施工安装的实践指导,包括准备工作、施工步骤和注意事项。
在进行施工安装时,请确保安全,并按照指导进行操作。
如有任何疑问或问题,请咨询专业人士。
电热水龙头安装使用注意事项
电热水龙头安装使用注意事项
熟悉电热水龙头的朋友们一定知道电热水龙头很大程度上改变和方便了我们的生活,但电热水龙头属于电热设备,它的使用需要我们注意哪些东西呢?很多朋友或许还不是非常的了解,今天我们总结了电热水龙头安装使用的4个注意事项供大家参考。
1、要请有经验和有资质的专业人员进行施工安装。
安装时,电热水龙头应尽量不要与
硬物磕碰,不要将水泥、胶水等残留在表面,以免损坏表面镀层光泽。
要注意将管道内杂物清除后装上电热水龙头。
2、
2、开关电热水龙头不要用力过猛,顺势轻轻转动即可。
即使是传统式的水龙头,也不需很大的劲去拧死。
特别是不要把手柄当成扶手来支撑或使用。
3、浴缸龙头的莲蓬头金属软管应保持自然舒展状态,不用时不要将其盘绕在龙头上。
同时,在使用或不用时,注意软管与阀体的接头处不要形成死角,以免折断或损伤软管。
3、在水压不低于0.02mpa(即0.2kgf/cm2)的情况下,在使用一段时间后,如发现出水量
减小,甚至出现热水器熄火的现象,则可在电热水龙头的出水口处轻轻拧下筛网罩,清除杂质,一般都能恢复如初。
本文来源于/转载请申明!。
下进水的电热水龙头安装方法

下进水的电热水龙头安装方法
下进水电热水龙头安装步骤:
一.关闭相关水管阀门,拆掉原先的水龙头拆掉之后,适当用水清洗下管道接口处,防止锈过多,造成堵塞!把盆上的龙头安装孔清洗干净,擦干,可以防止胶垫密封不严,造成漏水。
二.找出电热水龙头的胶垫,胶垫卡到机器进水口。
找出底座,将底座直接和主机拧上。
此时要注意主机和底座之间有个胶垫即可,一定不能裹生料带的,否则容易损坏底座。
三.找到出水管,将出水管和机器连接起来,注意出水管和机器之间不一定不能裹生料带的,中间已经有胶垫的了,轻轻拧得稍微有点紧即可的,否则容易损坏壳。
四.先将安装螺丝拧下来,将机器放到盆的安装孔上,拧上螺丝,将机器固定。
接上进水软管,完成安装工作,进水软管用普通的4分软管即可,软管接头内应该都有胶垫的,也不需要裹生料带的了。
按照上面的步骤操作,到这边电热水龙头就算安装调试完毕了,用户就可以方便用上热水了。
电热水龙头的安全使用,除了靠正确安装外,另外就是看后期的使用方法和维护上了。
本文来源于/转载请声明!。
速热水龙头(即热式水龙头)原理特点分析

速热式水龙头/即热式电热水龙头原理分析:即热式电热水龙头,亦称作速热水式电热水龙头,现行业里根本都简称为电热水龙头。
即热式电热水龙头因其开启后在3-5秒即可出热水而得名。
原理:采用的新型绝缘导热材料氧化镁粉,它具有高密度、超精细、充分填实等特点,使带电的加热体与外壁可靠隔开,从而与水完全实现电隔离。
优点:①使用更平安,没有空气污染②水温不受水压力影响,淋浴时不会出现忽冷忽热的现象③防止了强排式热水器的猛烈噪声④安装简单,不需专业人员,无需考虑废气排放问题⑤不用考虑每月去换气的麻烦⑥浴室内调节水温水量,防止室内使用,室外调节的为难局面⑦小巧不占空间⑧经济实惠,相比买一个水龙头加一个加热装置价钱更低实验标准:快速电热水器电压试验标准是施加2000V电压2分钟,漏电流小于0.50mA。
热水器水压试验标准是施加水压为0.5MPa,热水器5分钟之内不漏水。
严格按GB4706.1—92,GB4706.11—1997,QB1204-2004及国际IEC 标准生产,完全遵循ISO9001质量体系,指导公司的日常工作,所有产品执行全检制度,合格前方可出厂。
特色快速电热水器与储水式电热水器比拟的优点:①节水50%,节电30%,能源利用率>95%,由于此水龙头采用终端加热方式,即开即热,无需预热,不用保温,无管路热损耗,节省了储水式热水器集中供水所造成的与终端水龙头连接之管路的热损失10-20%,节省自身保温热损失10-20%,节省管路剩余热能10-20%②物美价廉,售价只是储水式热水器的一半不到。
产品最低售价的还不到五百元,大大低于上述产品。
当然这种价格在行业中也具有很强的竞争力,这是由于我们的产品通过3H3L体系后,产品规模效益得到了充分的发挥,从而实现了产品体积小,重量轻,技术精,产量大,批量本钱低,市场购置率高等优势③体积小巧、安装方便、便于携带。
本产品体积小巧,不占空间,是用于狭小房间的佳品。
无需专业人员,20分钟就可以安装完毕,特别适合流动人口和野战部队,野外施工队等使用④加热速度快,即开即热。
水龙头安装及开关施工方法

水龙头安装及开关施工方法概述本文档旨在提供水龙头安装和开关施工的简单指导。
以下是基本的步骤和注意事项。
水龙头安装方法1. 准备工具和材料:- 水龙头- 接头和密封胶垫- 螺丝刀或扳手- 水管2. 关闭水源:在安装水龙头之前,确保关闭主水源阀门,以避免水流浪费和意外泄漏。
3. 拆卸旧水龙头(如果适用):如果需要更换旧水龙头,先使用螺丝刀或扳手拆卸并移除旧水龙头。
4. 安装新水龙头:- 将密封胶垫放在水龙头底部,并用螺丝刀或扳手固定接头。
- 将水龙头插入水槽或洗手盆的孔中,并用螺丝刀或扳手拧紧接头。
5. 连接水管:- 将水管连接到水龙头接头上,并用螺丝刀或扳手拧紧。
- 确保水管连接牢固,无泄漏。
6. 打开水源:安装完成后,打开主水源阀门,检查水龙头是否正常工作并无泄漏。
开关施工方法1. 准备工具和材料:- 开关- 手电钻- 电线和电线套管- 螺丝刀或扳手2. 关闭电源:在进行任何电气工作之前,务必关闭电源以确保安全。
3. 定位开关位置:根据需要,选择适当的位置安装开关,并使用手电钻在墙上钻孔。
4. 连接电线:- 将电线穿过墙上的孔,并使用电线套管保护。
- 将电线连接到开关上,确保正确连接并紧固螺丝。
5. 安装开关:- 将开关放入墙孔中,并用螺丝刀或扳手拧紧螺丝。
- 确保开关安装牢固,不松动。
6. 打开电源:安装完成后,打开电源,测试开关是否正常工作。
请注意,以上仅为一般的安装和施工指导。
具体操作步骤可能因不同的水龙头和开关类型而有所不同。
在进行任何实际操作之前,请仔细阅读相关产品的安装手册并遵循制造商的指导。
如果您对操作不确定或缺乏经验,请咨询专业人士的帮助。
热水龙头安装步骤
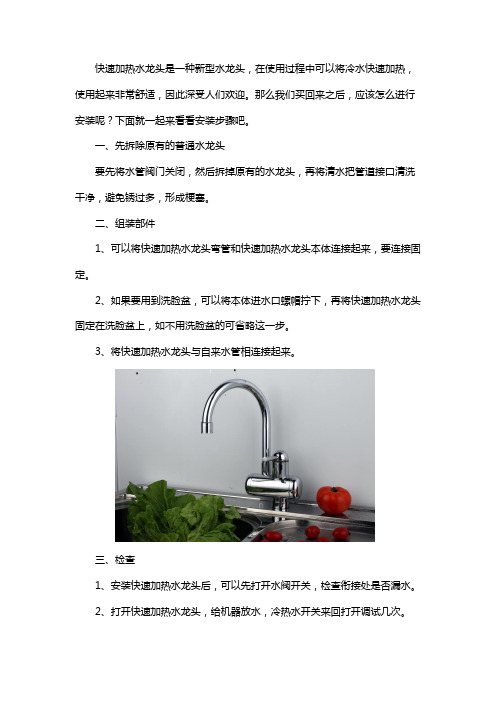
快速加热水龙头是一种新型水龙头,在使用过程中可以将冷水快速加热,使用起来非常舒适,因此深受人们欢迎。
那么我们买回来之后,应该怎么进行安装呢?下面就一起来看看安装步骤吧。
一、先拆除原有的普通水龙头要先将水管阀门关闭,然后拆掉原有的水龙头,再将清水把管道接口清洗干净,避免锈过多,形成梗塞。
二、组装部件1、可以将快速加热水龙头弯管和快速加热水龙头本体连接起来,要连接固定。
2、如果要用到洗脸盆,可以将本体进水口螺帽拧下,再将快速加热水龙头固定在洗脸盆上,如不用洗脸盆的可省略这一步。
3、将快速加热水龙头与自来水管相连接起来。
三、检查1、安装快速加热水龙头后,可以先打开水阀开关,检查衔接处是否漏水。
2、打开快速加热水龙头,给机器放水,冷热水开关来回打开调试几次。
3、排出空机器内的气泡,然后插上电源。
4、将热水调到所需位置,热水温度会经过热水大小控制开关来调理,红灯亮表示开端加热。
1、高档电镀时尚豪华:设计美观、经典,突出美感、彰显非凡。
2、热水自来随时随用:快速加热,想用就用。
3、冷热两用方便快捷:水温随时调节,出水均衡有力,热水更方便、更温馨。
4、智能温控超温保护:智能化控制系统,能有效达到产品使用安全和寿命,减少售后服务。
5、防护开关漏电自控:漏电保护功能,漏电能自动切断电源,保护人身安全。
6、水电隔离安全可靠:内部结构独特,水流动空间与电系统装置坚决分离。
7、高压密封滴水不漏:高压密封装置,密封不漏水。
8、高效热管寿命更长:具有很好的抗污、抗氧化等特点,能很好的保护加热管寿命。
9、出水即热节能30%:非常节能、环保,不浪费一点电。
10、阻燃防火,能确保人们安全使用。
快益修以家电、家居生活为主营业务方向,提供小家电、热水器、空调、燃气灶、油烟机、冰箱、洗衣机、电视、开锁换锁、管道疏通、化粪池清理、家具维修、房屋维修、水电维修、家电拆装等保养维修服务。
- 1、下载文档前请自行甄别文档内容的完整性,平台不提供额外的编辑、内容补充、找答案等附加服务。
- 2、"仅部分预览"的文档,不可在线预览部分如存在完整性等问题,可反馈申请退款(可完整预览的文档不适用该条件!)。
- 3、如文档侵犯您的权益,请联系客服反馈,我们会尽快为您处理(人工客服工作时间:9:00-18:30)。
电热水龙头安装步骤
2018-01-18
在寒冷的冬季家里的热水一定要足够,不过如果是想要开开水龙头都流出来热水的话,这恐怕就要使用电热水龙头了。
电热水龙头有着热水器和太阳能所不能比的优势,虽然它们也可以产生热水,但是水管中的水却依然还是凉的,因此需要您把水管中的水流完之后才可以有热水使用。
电热水龙头可以让您打开水龙头就有热水使用。
所谓电热水龙头就是我们通常说的快加热水龙头,它就是通过瞬间冲电加热,使得水龙头流出来的水是热的。
而作为一种比较新型的产品,电热水龙头要如何安装呢?
步骤一:先拆除原有的普通水龙头
首先得关闭水管阀门,拆掉原有的非电热水龙后,将其用清水把管道接口清洗干净,避免锈过多,形成梗塞。
步骤二:组装部件
1.先将电热水龙头弯管与电热水龙头本体连接起来,机器固定就行。
2.如要用洗脸盆的话,那么将其把本体进水口的螺帽拧下,把电热水龙头固定在洗脸盆上;如不用洗脸盆那么可省略这一步。
3.然后再将电热水龙头与自来水管相连接起来。
步骤三:检查
1.在安装好电热水龙头后,其先打开水阀开关,检查衔接件处能否漏水。
2.然后打开电热水龙头开关,给机器放水,冷热水开关来回打开调试几次。
3.在彻底排出空机器内气泡后,再插上电源。
4.将其热水调到所需的位置,因热水的温度是经过热水大小控制开关来调理的。
红灯亮了就将表示开端加热。
热水龙头安装注意事项:
1、电热水龙头装置完了后,应先通水再通电,将手柄上、下旋转,看到出水口有水流出后,再接通电源即可运用。
(仅限于第一次运用)。
2、电热水龙头具有冷、热两种水流,在热水断水断电时,不需求频繁拔插出电源。
3、电热水龙头采用压力安装,开关打到热水方向即自动启动加热,打到冷水不耗费任何电。
运用简单,省水省电。
上述就是电热水龙头的具体安装步骤,安装成功之后您就可以非常方便的使用到热水了,一般开开水龙头3-5秒的时间就可以让您用到暖暖的热水,再也不用受到寒冷的侵袭,而且它除此之后还非常的小巧方便,是您家里不可缺的好帮手。
