linux下 tuxedo 安装说明
TUXEDO安装部署使用排错文档
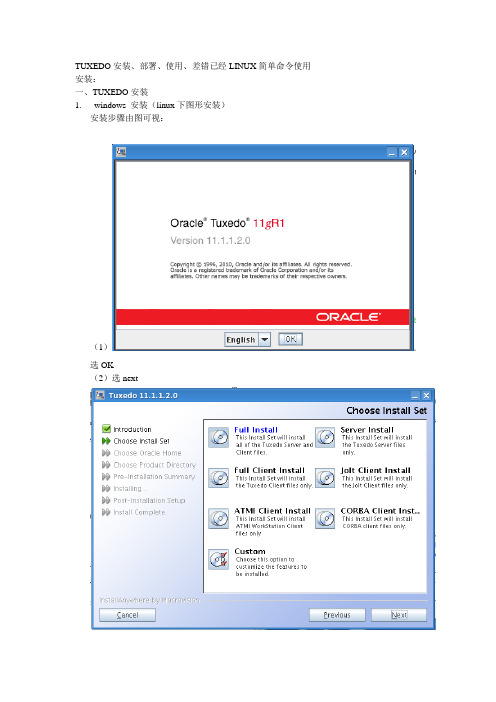
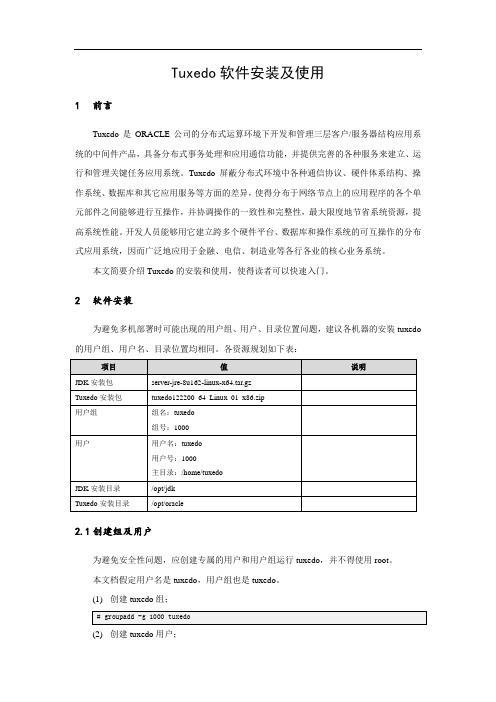
TUXEDO安装、部署、使用、差错已经LINUX简单命令使用安装:一、TUXEDO安装1.windows 安装(linux下图形安装)安装步骤由图可视:(1)选OK(2)选next(3)这是tuxedo的安装路径,放哪个目录随你自己选(4)这里最好勾选上install simples(5)选install(6)这里需先选下cancle弹出界面再选resume 然后再输入密码(7)选NO (8)选doneOK texudo就装好了2.linux下非图形界面安装(脚本安装)Tuxedo 部署流程1.将tuxedo.tar拷贝到某个目录下2.修改/opt目录权限为rwx-rwx-rwx3.解压tuxedo,tar到当前目录: tar -vxf tuxedo.tar -C ./4.运行安装脚本./install.sh5.选择16.直接回车键7.选择18.选择19.输入:/opt10.选择211.选择Y或者N12.回车13.回车14.输入两次oracle15.选择216.回车17.回车安装完成程序所在目录为当前目录下的tuxedo目录二、tuxedo部署查看虚拟机IP查看机器名称修改环境变量文件:tux.env主要设置:TUXDIR,PATH,LD_LIBRARY_PA TH,LANG,APPDIR修改UBB配置文件(c) 2003 BEA Systems, Inc. All Rights Reserved.#ident "@(#) samples/atmi/simpapp/ubbsimple $Revision: 1.7 $"#Skeleton UBBCONFIG file for the TUXEDO Simple Application.#Replace the <bracketed> items with the appropriate values.*RESOURCESIPCKEY 123456 (1)DOMAINID simpappMASTER serverMAXACCESSERS 100MAXSERVERS 50MAXSERVICES 50MODEL SHMLDBAL NNOTIFY SIGNAL*MACHINESDEFAULT: (2)APPDIR="/home/oracle/simpapp"TUXCONFIG="/home/oracle/simpapp/tuxconfig"TUXDIR="/home/oracle/tuxedo11gR1"MAXWSCLIENTS=5#Example:# APPDIR="/home/me/simpapp"# TUXCONFIG="/home/me/simpapp/tuxconfig"# TUXDIR="/usr/tuxedo""bogon130" LMID=server#Example:#beatux LMID=iogon*GROUPSGROUP1 (3)LMID=server GRPNO=1 OPENINFO=NONE*SERVERSDEFAULT:CLOPT="-A"forward SRVGRP=GROUP1 SRVID=10 (4)toupper SRVGRP=GROUP1 SRVID=1WSL SRVGRP=GROUP1 SRVID=20 (5)CLOPT="-A -- -n //192.168.192.130:9977 -m 2 -M 5 -x 10 -p 10000 -P 11000"*SERVICES (6)TOUPPERTOUPPERTEST(1)IPC资源识别号设置(2)服务器程序环境设置(3)服务器组设置(4)服务设置(5)通讯设置(6)服务名设置设置环境变量. ./tux.env编译程序配置文件tmloadcf –y ubb启动程序tmboot建议:1.关闭服务器防火墙,或者设置通讯端口开发,WSH端口段开开放2.Selinux设置为不启动3.启动程序以后在客户端使用telnet命令测试连接是否成功。
Tuxedo安装及试用
Tuxedo软件安装及使用1前言Tuxedo是ORACLE公司的分布式运算环境下开发和管理三层客户/服务器结构应用系统的中间件产品,具备分布式事务处理和应用通信功能,并提供完善的各种服务来建立、运行和管理关键任务应用系统。
Tuxedo屏蔽分布式环境中各种通信协议、硬件体系结构、操作系统、数据库和其它应用服务等方面的差异,使得分布于网络节点上的应用程序的各个单元部件之间能够进行互操作,并协调操作的一致性和完整性,最大限度地节省系统资源,提高系统性能。
开发人员能够用它建立跨多个硬件平台、数据库和操作系统的可互操作的分布式应用系统,因而广泛地应用于金融、电信、制造业等各行各业的核心业务系统。
本文简要介绍Tuxedo的安装和使用,使得读者可以快速入门。
2软件安装为避免多机部署时可能出现的用户组、用户、目录位置问题,建议各机器的安装tuxedo 的用户组、用户名、目录位置均相同。
各资源规划如下表:2.1创建组及用户为避免安全性问题,应创建专属的用户和用户组运行tuxedo,并不得使用root。
本文档假定用户名是tuxedo,用户组也是tuxedo。
(1)创建tuxedo组;(2)创建tuxedo用户;(3)设置tuxedo用户登录密码;(4)创建安装目标目录并授权。
2.2安装GCCTuxedo示例程序使用C语言编写,为编译示例程序,需安装C语言开发环境。
将安装光盘介质mount到操作系统相应目录(如/media)后,参考下列命令安装开发环境。
安装开发环境的详细命令,可以参考操作系统相关手册。
2.3安装JRETuxedo的安装包需要JRE才能运行,因此需要先安装JRE,并设置JA V A_HOME环境变量指向新安装的JRE,设置PA TH添加java所在的目录。
本文档选择JDK的server-rumtime 版本作为JA V A运行环境。
(1)上传安装包server-jre-8u162-linux-x64.tar.gz到/tmp。
第一次安装tuxedo for linux 全过程

/tmp/install.dir.22860/Linux/resource/jre/bin/i386/native_threads/java: error while loading shared libraries: libstdc++-libc6.1-1.so.2: cannot open shared object file: No such file or directory
The included VM could not be uncompressed. Please try to download
the installer agng 'binary'
mode. Please do not attempt to install this currently downloaded copy.
解决办法:
ubb文件中主机名大小写弄错,即ubb文件中主机名要与实际相一致,包括大小写,改正即可
出错9------------------------------------------------------------------
[tuxedo@TUXSVR4 tuxedo]$ tmboot -y
参考:
https:///archives/fedora-list/2004-July/msg00315.html
出错4-----------------------------------------------------------------
Xlib: connection to ":0.0" refused by server
Linux下安装Tuxedo
Linux下安装TuxedoLinux 下安装Tuxedo以前由于没有在非Windows的操作系统下安装过Tuxedo,故一直都觉得在非Windows操作系统下安装Tuxedo很神秘。
今天在centos5.5下尝试了一把,觉得还是比较简单的,仅是配置Tuxedo的环境变量有点多。
闲话少扯,看正题1.从oracle 官网上下载tuxedo111120_32_Linux_01_x86.bin2.在centos上建立tuxedo用户,当然也可以不建,直接用root 用户安装配置,不过为了安全性和可维护性,建议最好建立该用户useradd tuxedo3.建立tuxedo 安装目录(安装的时候需要指定),本来用root用户安装配置时是不需要该步骤的,但是若要使用Tuxedo用户来进行安装会出现权限不足无法在根目录下创建下级子目录的情况,故最好手工建立mkdir /tuxedo11;chown tuxedo:tuxedo /tuxedo11;chmod 755 /tuxedo114.上传tuxedo111120_32_Linux_01_x86.bin文件到centos下tuxedo的home目录下5.从root用户切换到tuxedo用户su - tuxedo6.更改home目录下tuxedo111120_32_Linux_01_x86.bin文件权限chmod 777 ./tuxedo111120_32_Linux_01_x86.bin7.执行该文件进行安装(-i console代表在字符界面安装,-I console代表在图形化界面安装)./tuxedo111120_32_Linux_01_x86.bin -i console8.在安装时需要注意的地方当安装过程中出现“Choose Oracle Home”不要误以为是指定Oracle数据库的安装目录,其实这里是指定Tuxedo安装目录的地方,将在第3步建立的目录名称填到“specify a new Oracle Home Directory”处即可;还有如果你想玩一下tuxedo的simpapp的话,在安装的时候必须选上“Install Sample”;其余选项一路回车即可完成安装安装到此结束以下是配置simpapp的一些过程,以下操作均在tuxedo用户下运行1.cp -R /tuxedo11/tuxedo11g/simples/atim/simpapp /home/tuxedo/2.cp -R /tuxedo11/tuxedo11g/tux.env /home/tuxedo/simpapp3.cd ./simpapp;vi ./tux.env#若需要使用Oracle数据库时需添加ORACLE_BASE=/u01/app/oracle;export ORACLE_BASE#若需要使用Oracle数据库时需添加ORACLE_HOME=$ORACLE_BASE/product/11g2/db_1;export ORACLE_HOME#若需要使用Oracle数据库时需添加ORACLE_SID=oracle11g2;export ORACLE_SIDTUXDIR=/tuxedo11/tuxedo11gR1; export TUXDIRJA V A_HOME=$TUXDIR/jre; export JA V A_HOMEJVMLIBS=$JA V A_HOME/lib/i386/server:$JA V A_HOME/jre/binPA TH=$TUXDIR/bin:$JA V A_HOME/bin:$ORACLE_HOME/bin:$PA TH; export PA TH COBCPY=:$TUXDIR/cobinclude; export COBCPYCOBOPT="-C ANS85 -C ALIGN=8 -C NOIBMCOMP -C TRUNC=ANSI -C OSEXT=cbl"; export COBOPTSHLIB_PA TH=$TUXDIR/lib:$JVMLIBS:$SHLIB_PA TH; export SHLIB_PA THLIBPA TH=$TUXDIR/lib:$JVMLIBS:$LIBPA TH; export LIBPA THLD_LIBRARY_PATH=$TUXDIR/lib:$JVMLIBS:$ORACLE_HOME/lib:$ORACLE_HOM E/ora cm/lib:/lib:/usr/lib:/usr/local/lib:$LD_LIBRARY_PA TH; export LD_LIBRARY_PA THWEBJA V ADIR=$TUXDIR/udataobj/webgui/java; export WEBJA V ADIR#若运行simpapp时需添加APPDIR=/home/tuxedo/simpapp;export APPDIR#若运行simpapp时需添加TUXCONFIG=$APPDIR/tuxconfig;export TUXCONFIGNLS_LANG=AMERICAN_AMERICA.UTF8;export NLS_LANG LANG=C;export LANG这个环境变量文件包含了与Oracle连接的环境变量,仅执行simpapp时不需要添加;但下面的有关simpapp的环境变量必须添加,否则运行时会出错4.编辑simpapp的配置文件,其中“dcsproject”是centos的主机名,你可以根据你的主机名做相应更改,其中最后的“TOUPPER”是配置文件服务名称,从字面含义可以看出,他的功能就是简单的客户端输入的小写字母转换为大写字母# (c) 2003 BEA Systems, Inc. All Rights Reserved.#ident "@(#) samples/atmi/simpapp/ubbsimple $Revision: 1.7 $"#Skeleton UBBCONFIG file for the TUXEDO Simple Application.#Replace the items with the appropriate values.*RESOURCESIPCKEY 123456#Example:#IPCKEY 123456DOMAINID simpappMASTER simpleMAXACCESSERS 10MAXSERVERS 5MAXSERVICES 10MODEL SHMLDBAL N*MACHINESDEFAULT:APPDIR="/home/tuxedo/simpapp"TUXCONFIG="/home/tuxedo/simpapp/tuxconfig" TUXDIR="/tuxedo11/tuxedo11gR1"#Example:# APPDIR="/home/me/simpapp"# TUXCONFIG="/home/me/simpapp/tuxconfig"# TUXDIR="/usr/tuxedo"dcsproject LMID=simple#Example:#beatux LMID=simple*GROUPSGROUP1LMID=simple GRPNO=1 OPENINFO=NONE*SERVERSDEFAULT:CLOPT="-A"simpserv SRVGRP=GROUP1 SRVID=1*SERVICESTOUPPER5.运行环境变量文件,编译编辑后的ubb文件,生成tuxconfig文件. ./tux.envenv|grep TUX(检查一下环境变量)tmloadcf -y ubbls(j检查有没有生成tuxconfig文件)6.编译simpapp的SERVER端及Client端程序,生成可执行文件buildserver -f simpserv.c -o simpserv -s TOUPPER(-f 参数表示第一个输入文件-o 参数表示输出文件-s 参数表示服务)buildclient -f simpcl.c -o simpcl7.检查文件有无生成ls7.运行服务器端程序tmboot -y8.测试./simpcl hello_bigbombpanda若回显为:Returned String is:HELLO_BIGBOMBPANDA成功至于如何让tuxedo和Oracle数据库联动工作,首先要弄清楚XA,NONXA的连接方式。
TUXEDO教程

2003.8
1.中间件 1.中间件
定义:中间件是一种独立的系统软件或服务程序,分布式应用软件借助这种软件在不 同的技术之间共享资源,中间件位于客户机服务器的操作系统之上,管理计算资源和 网络通讯 。 工作机制:客户端上的应用程序需要从网络中的某个地方获取一定的数据或服务,这 些数据或服务可能处于一个运行着不同操作系统和特定查询语言数据库的服务器中。 而C/S应用程序中负责寻找数据的部分只需访问一个中间件系统,由中间件完成到网络 C/S应用程序中负责寻找数据的部分只需访问一个中间件系统,由中间件完成到网络 中找到数据源或服务,进而传输客户请求、重组答复信息,最后将结果送回应用程序对象请求代理的标准,分别是CORBA和DCOM
事务处理中间件(TPM, Monitor) 事务处理中间件(TPM,Transaction Processing Monitor) IBM cics Bea Tuxedo
2.Tuxedo简介 2.Tuxedo简介
1.中间件(续) 1.中间件( 中间件
中间件的分类 :
数据库中间件(DM,Database Middleware) Middleware) 数据库中间件(DM,
ODBC是一种基于数据库的中间件标准 ODBC是一种基于数据库的中间件标准
远程过程调用中间件( Call) 远程过程调用中间件(RPC, Remote Procedure Call) 面向消息中间件(MOM, Middleware) 面向消息中间件(MOM,Message Oriented Middleware) IBM MQ 基于对象请求代理(ORB, Broker) 基于对象请求代理(ORB,Object Request Broker)的中间件
文字界面Linux如何安装tuxedo11gR1
文字界面Linux如何安装tuxedo11gR1
1、在安装介质目录下输入LL查看安装介质是否有运行的权限
其中没有X 表示没有运行权限
输入:
给这个介质增加运行权限
2:文字字幕安装就是运行时候后面加入参数–i console
3:出现选择语言种类,里面就只有E文可以选择。
4:接着会出现许可说明,无视他按回车
5:出现安装方式类型选择
分别是:
1:完全安装
2:服务器安装
3:完整客户端安装
4:Jolt客户端安装
5:A TMI客户端安装
6:CORBA客户端安装
7; 客户自定义
我选择的是1
6:接着出现的是安装路径的选择
表示我tuxedo根目录是/oracle/home
接着出现选择程序的目录
1:修改这个路径
2:使用这个路径
由于我觉得tuxedo11gR1太长了。
以后配置麻烦觉得修改成tux11
我选择了1,并且修改目录
输入完毕后出现安装信息:
安装开始了OY。
进度条完成以后呢?
出现
输入监听口令,用于集群的时候的哦。
那么我输入:listentux11(可以自己定义喜欢的)
需要输入两次。
接着出现安装SSL选择界面
这里我选择了2 安装SSL跟配置太复杂了。
而且我不懂。
所以暂时不装然后出现
安装结束了。
如何查看是否安装完成了呢?
首先到TUXEDO安装目录下运行一个叫tux.env 的文件。
这个文件的作用就是把环境变量设置好
. ./tux.env
接着用
tmadmin –v。
tuxedo安装手册
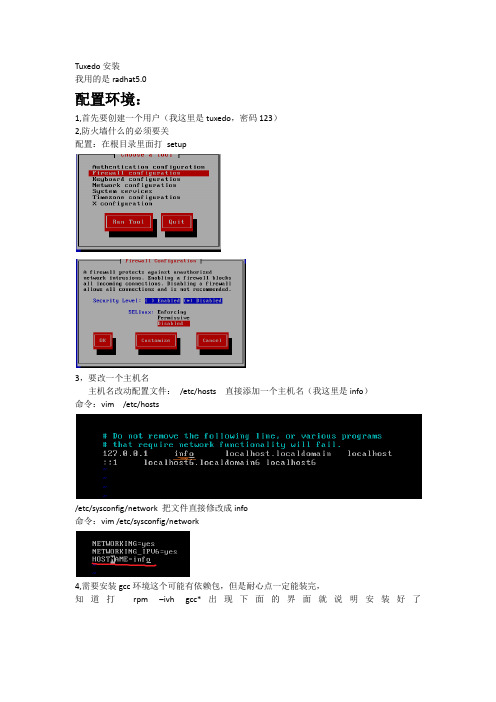
Tuxedo安装我用的是radhat5.0配置环境:1,首先要创建一个用户(我这里是tuxedo,密码123)2,防火墙什么的必须要关配置:在根目录里面打setup3,要改一个主机名主机名改动配置文件:/etc/hosts 直接添加一个主机名(我这里是info)命令:vim /etc/hosts/etc/sysconfig/network 把文件直接修改成info命令:vim /etc/sysconfig/network4,需要安装gcc环境这个可能有依赖包,但是耐心点一定能装完,知道打rpm –ivh gcc*出现下面的界面就说明安装好了5;把tuxedo111120_32_Linux_01_x86.bin 文件传到/home/tuxedo文件下记得改一下权限chmod 777 tuxedo111120_32_Linux_01_x86.bin传完之后reboot启动一下系统Tuxedo安装然后用tuxedo用户登录(这里必须用tuxedo用户安装这个文件)执行:./ tuxedo111120_32_Linux_01_x86.bin –i console第一项是选择语言:1这个是按enter继续按1选择完全安装,按1选择创建一个oracle目录下面是写路径/dev/tuxedo/tux -------------tux是我创建的这个文件夹名字这个选择2,确定选择创建的文件路径下面选择y,确认然后就开始安装了这个是为tuxedo创建密码我写的是tuxedo这个地方是说你的服务器是否要安装SSL,我们就不安装了选择2(NO)就可以了,如果你需要SSL 支持你可以选择,这里我就省略了。
这样tuxedo就算安装好了环境变量配置进入配置文件cd /home/tuxedo/tux/tuxedo11gR1下面我们为tuxedo成功启动做一个服务在/home/tuxedo/tux/tuxedo11gR1 目录下创建一个目录Mkdir Myserver将/home/tuxedo/tux/tuxedo11gR1/samples/atmi/simpapp中的所有文件拷贝到Myserver目录下cp samples/atmi/simpapp/* Myservercp ./tux.env ./Myserver/进入Myserver文件夹Cd Myserver编译vim tux.env添加行:TUXCONFIG=/home/tuxedo/tux/tuxedo11gR1/Myserver/tuxconfig ; export TUXCONFIG编译vim ubbsimple第一个是Ipckey 改成123456第二个就是路径了第三个就是主机名改写第四个就是修改vim /home/tuxedo/.bash_profile 文件里面加载一下TUXCONFIG=”/home/tuxedo/tux/tuxedo11gR1/Myserver/tuxconfig”现在reboot重新启动一下还是用tuxedo进入进入目录cd /home/tuxedo/tux/tuxedo11gR1/Myserver 下面先运行一下tux.env文件. ./tux.envbuildserver -o simpserv -f simpserv.c –s TOUPPER buildclient -o simpcl -f simpcl.c如果出现下面的情况就说明好了下面启动服务试试看加载ubbsimple文件tmloadcf –y ubbsimple 启动tuxedo程序tmboot –y这样的就成功了./simpcl Jianheng这就成功了进入管理界面Tmadminpsc查看服务运行状况psr查看服务程序运行状况这就是弄成了,你可以看一下效果。
linux系统tuxedo安装指导
[置顶]Linux系统下Tuxedo安装Linux系统下Tuxedo安装1. 在Linux 环境中新建一个用户tuxdeo/tuxdeo,从网上下载支持该Linux系统的tuxedo软件包。
2. 将文件通过ftp ,U盘或其他方式将软件包传到该用户的目录下/home/tuxedo/tuxedo111120_32_Linux_01_x86.bin执行sh tuxedo111120_32_Linux_01_x86.bin –i console命令开始安装tuxedo3. 安装开始进入如下界面,按Enter键继续:4. 选择安装设置,选择1- Full Instll,完全安装模式,按Enter键继续。
5. 选择tuxedo安装所放的路径/home/tuxedo/oracle6. 确定安装目录,还是要修改安装目录,选择2 ,选择现在的目录。
7. 显示之前选择的安装信息,按Enter键继续。
8. 准备安装,按Enter键继续。
9. 安装中出现,Configure tlisten Service,输入密码tuxedo10. 选择安装SSL,选择1,按Enter键继续11. 设置LDAPLDAP Service Name:LdapserLDAP PortID: 123456LDAP BaseObject: LdapbsojLDAP Filter File Location:按Enter 键继续12. 安装成功,按Enter键继续13. 接下来要用例子检查服务的联通性,在装完tuxedo的目录下有个文档里有tuxedo例子/home/tuxedo/oracle/tuxedo11gR1/samples1). 在目录/home/tuxedo/oracle/tuxedo11gR1/下有个tux.env文件,将该文件拷贝到该用户根目录下的 .bash_profile文件中,用命令source .bash_profile使环境变量生效,再注销系统,重新登陆。
TUXEDO安装部署使用排错文档
TUXEDO安装部署使用排错文档
一、TUXEDO安装步骤:
1、使用root账号登录服务器,将安装包上传到服务器;
2、使用gunzip进行安装包解压,并使用tar格式安装;
4、在/usr/lib目录下,创建一个属于tuxedo自身的安装目录,并将安装包解压到指定的安装目录下;
5、拷贝编译参数,全选安装,选择正确版本;
6、执行makeml安装脚本,此时,系统会在/usr/lib/tuxedo下生成一个tuxedo11g.
10、最后,使用tmadmin启动TUXEDO;
二、TUXEDO使用方法
使用TUXEDO,可以实现负载均衡,并发支持,进程管理,安全服务等功能。
TUXEDO使用过程如下:
1、配置TUXEDO服务端:首先配置服务端环境,然后在一台服务器上配置TUXEDO服务;
2、配置TUXEDO客户端:配置客户端环境,配置TUXEDO客户端,并实现与服务端的连接;
3、测试TUXEDO服务:使用TUXEDO调试程序,测试TUXEDO客户端是否可以与TUXEDO服务器正常通信;
4、启动TUXEDO服务:使用tmadmin管理工具,启动TUXEDO服务,实现进程管理,负载均衡等功能;。
Tuxedo_安装
1.1.1建立tuxedo用户和安装主目录1.创建tuxedo用户创建tuxedo 帐号和组:groupadd dbauseradd -c tuxedo -G dba tuxedopasswd tuxedo2.创建tuxedo 目录su – rootmkdir -p /home/tuxedochown -R tuxedo:dba /home/tuxedo1.1.2建立oracle用户和安装主目录1.创建oracle用户创建oracle 帐号和组:su – rootgroupadd dba useradd -c oracle -G dba oraclepasswd oracle2.创建oracle 目录su – rootmkdir -p /home/oracle/chown -R oracle:dba /home/oracle1.1.3设置tuxedo用户环境变量设置Tuxedo用户的.bash_profile文件1.1.4设置oracle用户环境变量设置Tuxedo用户的.bash_profile文件1.2Tuxedo for linux安装过程1.2.1安装过程[tuxedo@localhost ~]$ sh tuxedo10gR3_64_Linux_01_x86.bin -i consolePreparing to install...Extracting the JRE from the installer archive...Unpacking the JRE...Extracting the installation resources from the installer archive...Configuring the installer for this system's environment...Launching installer...Preparing CONSOLE Mode Installation...================================================================== =============Choose Locale...----------------->1- EnglishCHOOSE LOCALE BY NUMBER: 1================================================================== =============Tuxedo 10gR3 (created with InstallAnywhere by Macrovision) -------------------------------------------------------------------------------================================================================== =============Introduction------------InstallAnywhere will guide you through the Tuxedo 10gR3 installation.It is strongly recommended that you quit all programs before continuing withthis installation.Enter "next' to proceed to the next screen. Enter "back" to modify the previousscreen.You may cancel this installation at any time by typing "quit".WARNING: "Quitting" creates an incomplete Tuxedo 10gR3 installation.You mustre-install Tuxedo 10gR3. For more information, see "Preparing to Install theOracle Tuxedo System" in the Tuxedo 10gR3 Installation Guide.PRESS <ENTER> TO CONTINUE:================================================================== =============Choose Install Set------------------Please choose the Install Set to be installed by this installer.->1- Full Install2- Server Install3- Full Client Install4- Jolt Client Install5- ATMI Client Install6- CORBA Client Install7- Customize...ENTER THE NUMBER FOR THE INSTALL SET, OR PRESS <ENTER> TO ACCEPT THE DEFAULT: 1================================================================== =============Choose Oracle Home------------------1- Create new Oracle HomeSpecify a new Oracle Home directory: /home/tuxedo/bea================================================================== =============Choose Product Directory------------------------1- Modify Current Selection (/home/tuxedo/bea/tuxedo10gR3)2- Use Current Selection (/home/tuxedo/bea/tuxedo10gR3)Enter a number: 2Install Samples (Y/N): Y================================================================== =============Pre-Installation Summary------------------------Please Review the Following Before Continuing:Product Name:Tuxedo 10gR3Install Folder:/home/tuxedo/bea/tuxedo10gR3Link Folder:/home/tuxedoDisk Space Information (for Installation Target):Required: 195,536,693 bytesAvailable: 127,128,031,232 bytesPRESS <ENTER> TO CONTINUE:================================================================== =============Ready To Install----------------InstallAnywhere is now ready to install Tuxedo 10gR3 onto your system at thefollowing location:/home/tuxedo/bea/tuxedo10gR3PRESS <ENTER> TO INSTALL:================================================================== =============Installing...-------------[==================|==================|==================|============== ====][------------------|------------------|------------------|------------------]================================================================== =============Configure tlisten Service-------------------------Password:Verify Password:Password Accepted! Press "Enter" to continue.================================================================== =============SSL Installation Choice.------------------------Would you like to install SSL Support?->1- Yes2- NoENTER THE NUMBER FOR YOUR CHOICE, OR PRESS <ENTER> TO ACCEPT THE DEFAULT:: 2================================================================== =============Installation Complete---------------------Congratulations. Tuxedo 10gR3 has been successfully installed to:/home/tuxedo/bea/tuxedo10gR3PRESS <ENTER> TO EXIT THE INSTALLER:Oracle客服端安装gunzip *.gzcpio -idcm < 10201_database_linux_x86_64.cpio 1.安装执行oracle10gR2安装介质runinstall.sh选择用户组选择“客户”2.选择安装路径3.下一步,检查安装的先决条件,通过则继续安装4.配置TNS1)在%ORALCE_HOME%\network\ADMIN\tnsnames.ora中增加如下TNS声明段: 本工具使用数据库TNSpmdb =(DESCRIPTION =(ADDRESS_LIST =(ADDRESS = (PROTOCOL = TCP)(HOST =工作用数据库IP)(PORT = 端口)) )(CONNECT_DATA =(SID = 工作用数据库实例名)(SERVER = DEDICATED)))sf =(DESCRIPTION =(ADDRESS_LIST =(ADDRESS = (PROTOCOL = TCP)(HOST =工作用数据库IP)(PORT = 端口)) )(CONNECT_DATA =(SID = 工作用数据库实例名)(SERVER = DEDICATED)))1.3Ubbconfig文件1.3.1原文样例*RESOURCESIPCKEY 163473DOMAINID TAPP_YHLW*MACHINEStuxedo LMID=SG186APPDIR="/home/tuxedo/work/application"ULOGPFX="/home/tuxedo/work/application/Logfile/ULOG"TUXCONFIG="/home/tuxedo/work/application/tuxconfig"TUXDIR="/home/tuxedo/bea/tuxedo9.1"MAXWSCLIENTS=20WSL SRVGRP=DF SRVID=1002 CLOPT=" -A -t -- -n //10.216.247.28:8888 -m 1 -M 5 -x 5 "1.3.2修改红色字体部分*MACHINEStuxedo LMID=SG186 为当前安装tuxedo的主机名称WSL SRVGRP=DF SRVID=1002 CLOPT=" -A -t -- -n //10.216.247.28:8888 -m 1为当前安装tuxedo的IP地址1.3.3编译ubbconfigTmloadcf –y ubbconfig输入密码lp确认密码lp1.4domconfig配置1.4.1domconfig原文件*DM_RESOURCESVERSION=U22*DM_LOCAL_DOMAINSTDF_MAIN GWGRP=DFTYPE=TDOMAINDOMAINID="TDF_MAIN"BLOCKTIME=20MAXDA TALEN=4194304MAXRDOM=89DMTLOGDEV="/home/tuxedo/work/application/Logfile/dmtlog"DMTLOGNAME="DMTLOG"CONNECTION_POLICY=ON_STARTUP*DM_REMOTE_DOMAINSWAPP_MAIN TYPE=TDOMAINDOMAINID="WAPP_MAIN"*DM_TDOMAINTDF_MAIN NW ADDR="//10.216.247.28:7500"DMKEEPALIVE=300000 DMKEEPALIVEWAIT=60000 WAPP_MAIN NW ADDR="//10.216.247.27:7580"*DM_REMOTE_SERVICES*DM_LOCAL_SERVICESinterface1.4.2修改配置1、TDF_MAIN NW ADDR="//10.216.247.28:7500"为当前tuxedo的IP地址,端口一般需要修改。
TUXEDO三层程序安装、配置及开发流程
三层改造程序安装、配置及开发第一部分前台的安装和配置一、TUXEDO安装插入安装盘,运行setup,按照安装程序的提示进行安装,使用缺省路径,安装在C:\TUXEDO下。
二、TUXEDO安装后的配置1、win98,win95的配置点击开始菜单中的“运行”,键入“sysedit”,回车后,在AUTOEXEC.BAT 文件中配置以下环境参数:SET TUXDIR=C:\TUXEDO(按缺省安装配置)SET LIB=C:\Program files\BEA SYSTEMS\TUXEDO\LIB(按缺省安装配置)SET INCLUDE=C:\TUXEDO\INCLUDE(按缺省安装配置)SET WSNADDR=//192.168.100.57:10000(按实际情况填写)在Path中加入"C:\TUXEDO\BIN";CY注:安装目录最好不要有空格,例如C:\TUXEDO而不要用C:\ Program files\BEA SYSTEMS\TUXEDO,带空格的路径AUTOEXEC.BAT可能不认,造成找不到wtuxws32.dll的错误。
配置完毕后,重起机器,看看MSDOS中相应变量是否也已设置,若没有,则在DOS下也进行相应的设置,重起机器。
2、winNT的配置右击“我的电脑”,点属性,选择菜单,“用户配置文件”,选择相应的用户,再点“环境”菜单,设置环境参数:TUXDIR=C:\TUXEDO(按缺省安装配置)LIB=C:\TUXEDO\LIB(按缺省安装配置)INCLUDE=C:\TUXEDO\INCLUDEWSNADDR=//192.168.100.57:10000(按实际情况填写,参照ubb)在Path中加入C:\TUXEDO\BIN;不用重新启动机器。
3、注意!!!!经过以上设置,如果win98和95还是找不到tuxedo所提供的一些函数,这时,设置查看为“显示所有文件包括隐藏文件”,将\TUXEDO\BIN\wtuxws32.dll 拷贝到windows目录下,即可。
tuxedo配置与服务部署

TUXEDO应用服务配置、部署手册1. WINDOWS环境下TUXEDO服务端应用程序的部署和配置1.1 tuxedo的安装确定安装介质(Tuxedo安装程序)运行Setup图表 -1 Tuxedo安装向导图表-2 Tuxedo安装向导点击“Next”,继续图表 -3 许可证协议选择“YES”,继续图表 -4:选择安装类型选择“Full Installation”,继续图表 -5 制定安装路径路径设为“d:\bea”,继续图表 -6 产品路径6.路径设为“d:\bea\tuxedo”,继续图表 -7安装程序开始拷贝文件等待安装程序拷贝文件。
图表 -8输入Listen password输入Listen password,输入两个相同的密码,“lp”,继续图表 -9安装SSL选择“NO”,继续图表-10:安装LDAP取安装程序的默认值,继续图表 -11:安装License 选择“no”,继续图表 -12:Tuxedo安装完毕安装完毕注意事项LIC的安装假设TUXEDO安装在d:\bea\tuxedo,在udataobj子目录中考入lic.txt1.2 应用程序的配置关于环境变量的配置,setenv.bat文件格式如下:rem Copyright (c) 1995 Novell, Inc.rem All Rights Reservedrem THIS IS UNPUBLISHED PROPRIETARY SOURCE CODE OFrem Novell, Inc.rem The copyright notice above does not evidence anyrem actual or intended publication of such source code.rem Copyright (c) 1995 Novell, Inc.rem All rights reservedrem ident "@(#) apps/simpapp/setenv.cmd $Revision: 1.1 $"set TUXDIR=d:\bea\tuxedoset WSNADDR=//10.233.128.18:8888set APPDIR=d:\ydlwset PATH=%TUXDIR%\bin;%APPDIR%;%PATH%set LIB=%LIB%;d:\Oracle\Ora9\precomp\lib\msvc;set TUXCONFIG=%APPDIR%\tuxconfigset FIELDTBLS32=qqdata,fhdata,yhfymx,comfldset FLDTBLDIR32=%APPDIR%;%TUXDIR%\udataobjcall %APPDIR%\VCVARS32.BAT需要注意的地方用红色标记,其中TUXEDO为tuxedo的安装主目录,APPDIR为应用程序主目录,根据实际情况进行修改。
tuxedo配置和服务部署

tuxedo配置和服务部署TUXEDO应用服务配置、部署手册1. WINDOWS环境下TUXEDO服务端应用程序的部署和配置1.1 tuxedo的安装确定安装介质(Tuxedo安装程序)运行Setup图表 -1 Tuxedo安装向导图表-2 Tuxedo安装向导点击“Next”,继续图表 -3 许可证协议选择“YES”,继续图表 -4:选择安装类型选择“Full Installation”,继续图表 -5 制定安装路径路径设为“d:\bea”,继续图表 -6 产品路径6.路径设为“d:\bea\tuxedo”,继续图表 -7安装程序开始拷贝文件等待安装程序拷贝文件。
图表 -8输入Listen password输入Listen password,输入两个相同的密码,“lp”,继续图表 -9安装SSL选择“NO”,继续图表-10:安装LDAP取安装程序的默认值,继续图表 -11:安装License 选择“no”,继续图表 -12:Tuxedo安装完毕安装完毕注意事项LIC的安装假设TUXEDO安装在d:\bea\tuxedo,在udataobj子目录中考入lic.txt1.2 应用程序的配置关于环境变量的配置,setenv.bat文件格式如下:rem Copyright (c) 1995 Novell, Inc.rem All Rights Reservedrem THIS IS UNPUBLISHED PROPRIETARY SOURCE CODE OFrem Novell, Inc.rem The copyright notice above does not evidence anyrem actual or intended publication of such source code.rem Copyright (c) 1995 Novell, Inc.rem All rights reservedrem ident "@(#) apps/simpapp/setenv.cmd $Revision: 1.1 $"set TUXDIR=d:\bea\tuxedoset WSNADDR=//10.233.128.18:8888set APPDIR=d:\ydlwset PATH=%TUXDIR%\bin;%APPDIR%;%PATH%set LIB=%LIB%;d:\Oracle\Ora9\precomp\lib\msvc;set TUXCONFIG=%APPDIR%\tuxconfigset FIELDTBLS32=qqdata,fhdata,yhfymx,comfldset FLDTBLDIR32=%APPDIR%;%TUXDIR%\udataobjcall %APPDIR%\VCVARS32.BAT需要注意的地方用红色标记,其中TUXEDO为tuxedo的安装主目录,APPDIR 为应用程序主目录,根据实际情况进行修改。
LINUX下TUXEDO安装手册
LINUX下TUXEDO安装手册1.创建dba组groupadd dba2.创建tuxedo用户useradd tuxedo –g dba修改tuxedo用户密码:passwd tuxedo3.将安装包传到TUXEDO用户执行tuxedo81_linux_as3_i386.bin –i console 按提示安装完成。
在安装过程中提示拷贝lic.txt文件时,选择以后拷贝。
4.TUEXDO与ORACLE相连接安装好ORACLE后,登录oracle用户,在$ORACLE_HOME/rdbms/admin/下执行sqlplus /nologSQL >conn /as sysdbaSQL >@xaview.sql授权SQL>grant select on v$xatrans$ to public with grant option;SQL>grant select on v$pending_xatrans$ to public with grant option;SQL>connect system/managerSQL>grant select any table to public;5.修改TUXEDO配置修改环境变量:在.bash_profile中加入export ORACLE_HOME=/home/oracle/9.2.0TUXDIR=/home/tuxedo/tuxedo8.1; export TUXDIRPATH=$TUXDIR/bin:$PA TH; export PATHCOBCPY=:$TUXDIR/cobinclude; export COBCPYCOBOPT="-C ANS85 -C ALIGN=8 -C NOIBMCOMP -C TRUNC=ANSI -C OSEXT=cbl"; export COBOPTSHLIB_PATH=$ORACLE_HOME/lib:$TUXDIR/lib:/usr/lib:$SHLIB_PATH;export SHLIB_PATHLIBPATH=$ORACLE_HOME/lib:$TUXDIR/lib:/usr/lib:$LIBPA TH; export LIBPATHLD_LIBRARY_PA TH=$ORACLE_HOME/lib:$TUXDIR/lib:/usr/lib/$LD_LIBRARY_PA TH; export LD_LIBRARY_PATHWEBJA V ADIR=$TUXDIR/udataobj/webgui/javaLANG=C;export LANG在$HOME下运行. .bash_profile使环境变量有效将正式的lic.txt文件拷贝到$TUXDIR/udataobj目录下重命名下列文件,因为下列文件名与ORACLE 带的文件名有冲突,所以要改名把sqlca.h 改名为sqlca.h.bbb把sqlcode.h 改名为sqlcode.h.bbb把sqlda.h 改名为sqlda.h.bbb修改TUXEDO 安装路径的udataobj 目录下的RM 文件,把以Oracle_XA:xaosw: 开头的一行用# 注释掉,并加入一行:Oracle_XA:xaosw:-L${ORACLE_HOME}/lib -lclntsh 在TUXEDO 用户下创建TMS 文件:Oracle_XA buildtms -o $TUXDIR/bin/ Oracle_XA -r Oracle_XA。
Tuxedo实时接口系统安装手册
文件版本:V1.0目录1 概述 (4)1.1 目的 (4)1.2 适用范围 (4)2 安装环境 (4)2.1 软件环境 (4)2.2 硬件环境 (4)3 系统搭建 (4)4 应用程序安装 (4)4.1 服务端安装 (4)4.2 客户端安装 (6)5 参数配置 (7)5.1 服务端参数配置 (7)5.1.1 XA的配置(RM文件的修改及编译) (8)5.1.2 ubbconfig文件的设置及编译 (8)5.1.3 创建TLOG交易日志 (9)5.2 客户端参数配置 (10)5.2.1 数据库的配置 (10)5.2.2 INI文件的配置 (10)5.2.3 ubbconfig文件的设置及编译............................................. 错误!未定义书签。
5.3 编译服务端可执行程序 (12)5.4 启动服务端程序 (12)5.5 客户端启动指令 (12)5.6 监控配置 (13)5.6.1 注意 (13)5.6.2 Console监控 (13)5.6.3 web监控 (14)6 验证标准 (16)7 注意事项 (16)1概述1.1目的为了使用户掌握Tuxedo实时接口的安装过程,及参数的配置方法,方便用户使用Tuxedo实时接口模块。
1.2适用范围本文档只限于Tuxedo实时接口模块的使用。
2安装环境2.1软件环境LINUX。
2.2硬件环境3系统搭建参见<<Tuxedo系统管理指南.doc>>系统安装节4应用程序安装4.1服务端安装第一步:服务端的应用需要Oracle的支持。
Oracle8i以上版本客户端即可,需要在环境变量中设置ORACLE_HOME,以及在PATH和LD_LIBRARY_PATH加入响应的oracle 部分的内容。
第二步:在主机上建立一个server目录,将源代码放至该目录下。
第三步:设置Tuxedo服务端程序所需要的环境变量,在文件setenv.sh中。
在Linux下安装TUXEDO
一.以root身份建立tuxedo用户,并以tuxedu用户登陆,此用户将做为以后tuxedo管理员,用户默认目录为/home/tuxedo;二.用FTP把安装文件(tuxedo81_linux.bin)和用户许可证书文件(lic.txt)传到/home/tuxedo目录中;三. 配置环境变量,.bash_profile文件,附文末;四.进入/home/tuxedo目录中,执行shtuxedo81_linux.bin;出错1--------------------------------------------------[tuxedo@TUXSVR4 tuxedo]$ shtuxedo81_linux.binPreparing to install...The included VM could not be uncompressed.Please try to downloadthe installer again and make sure that youdownload using 'binary'mode. Please do not attempt to install thiscurrently downloaded copy.解决办法:脚本使用uncompress命令,但是linux下没有。
使用cp /bin/gunzip /bin/uncompress出错2----------------------------------------------------------------[tuxedo@TUXSVR4 tuxedo]$ sh tuxedo81_linux.binPreparing to install.../tmp/install.dir.22860/Linux/resource/jre/bin/i386/ native_threads/java: error while loading shared libraries: libstdc++-libc6.1-1.so.2: cannot open shared object file: No such file or directory解决办法:[root@TUXSVR4 root]# rpm -ivh /tmp/compat-libstdc++-7.3-2.96.118.i386.rpm warning:/tmp/compat-libstdc++-7.3-2.96.118.i386.rpm: V3 DSA signature: NOKEY, key ID db42a60ePreparing... ###################### ##################### [100%]1:compat-libstdc++ ################## ######################### [100%]参考:/bbs/thread.jspa?forumI D=4&threadID=13265&messageID=72337#72337 https:///archives/fedora-list/2005-February/msg04944.html出错3-----------------------------------------------------------------[tuxedo@TUXSVR4 tuxedo]$ sh tuxedo81_linux.binPreparing to install...Error occurred during initialization of VM Unable to load native library: /tmp/install.dir.14985/Linux/resource/jre/jre/lib/i386/libjava.so: symbol __libc_wait,version GLIBC_2.0 not defined in file libc.so.6 with link time reference解决办法:(解决这个报错花费了最多的时间,最少半天功夫,寻找了很多资料,尝试来了各种办法才搞定,已经到了崩溃的边缘:)在tuxedo用户下执行gcc -shared -fpic -o libcwait.so libcwait.cchmod a+x /home/tuxedo/tuxedo81_linux.binLD_PRELOAD=/home/tuxedo/libcwait.so/home/tuxedo/tuxedo81_linux.bin注意,是将libcwtit.c编译成libcwait.so文件,libcwait.c下载地址ftp:// /drepper/libcwait.c,另要确认安装了C语言编译工具gcc。
Linux 下tuxedo
自行搭建基于Linux的Tuxedo/weblogic/Oracle环境shanggl 20091109致谢:fubo,xiangzhi,zhangxin,taoyp,kangjia,为了熟悉生产环境的搭建过程,自己使用红帽Linux 5.2 和Linux下的Tuxedo8.1 自己搭建了一套系统。
在安装过程中碰到了很多问题,因此把过程总结下来和大家分享。
首先要做的是安装红帽Linux,我使用的是vmware 6.5 ,这个安装包在74共享主机的常用工具里有,没有的同事可以找我要。
另外我已经安装完了一套虚拟机系统,不想自己安装的同事可以直接使用虚拟机镜像。
其他资源:Linux:rhel-5.2-server-i386-dvd.iso 4GBTuxedo:tuxedo81_linux_as3_i386.bin 100MB 对应lic.txt 从195上拷贝Oracle10G:10201_database_linux32.zip 700MBWebLogic9.5:weblogicServer920_linux32.bin 600MB这些资源在74 系统工具下有个文件夹Linux+tuxedo+weblogic+oracle文件夹下全有。
上面的文件已经标明了文件大小,请大家先准备好至少20GB空间。
约定:1、终端可以是远程telnet终端,也可以是在图形界面下的虚拟终端2、除非有特殊说明,所有命令均为小写字母,最好自己亲自打,word自带自动更正功能让很多命令变成了大写。
3、Tuxedo 安装是安装Tuxedo系统,而实际上的Tuxedo=服务+配置文件即只需root安装tuxedo套件,其他用户只需配置自己的服务和配置文件即可。
首先新建一个虚拟机,在新建虚拟机时选择自定义,如果选择典型的话,有可能在分区的时候提示找不到硬件(硬件驱动没有)。
虚拟机的配置如下:安装Linux过程暂略,后面会补上详细的说明。
Oracle Tuxedo Application Runtime for IMS 安装指南说明书
Oracle Tuxedo Application Runtime for IMS Installation Guide11g Release 1 (11.1.1.3.0)December 2011Oracle Tuxedo Application Runtime for IMS Installation Guide, 11g Release 1 (11.1.1.3.0)Copyright © 2011, Oracle and/or its affiliates. All rights reserved.This software and related documentation are provided under a license agreement containing restrictions on use and disclosure and are protected by intellectual property laws. Except as expressly permitted in your license agreement or allowed by law, you may not use, copy, reproduce, translate, broadcast, modify, license, transmit, distribute, exhibit, perform, publish, or display any part, in any form, or by any means. Reverse engineering, disassembly, or decomposition of this software, unless required by law for interpretability, is prohibited.The information contained herein is subject to change without notice and is not warranted to be error-free. If you find any errors, please report them to us in writing.If this software or related documentation is delivered to the U.S. Government or anyone licensing it on behalf of the U.S. Government, the following notice is applicable:U.S. GOVERNMENT RIGHTS Programs, software, databases, and related documentation and technical data delivered to U.S. Government customers are "commercial computer software" or "commercial technical data" pursuant to the applicable Federal Acquisition Regulation and agency-specific supplemental regulations. As such, the use, duplication, disclosure, modification, and adaptation shall be subject to the restrictions and license terms set forth in the applicable Government contract, and, to the extent applicable by the terms of the Government contract, the additional rights set forth in FAR 52.227-19, Commercial Computer Software License (December 2007). Oracle USA, Inc., 500 Oracle Parkway, Redwood City, CA 94065.This software is developed for general use in a variety of information management applications. It is not developed or intended for use in any inherently dangerous applications, including applications which may create a risk of personal injury. If you use this software in dangerous applications, then you shall be responsible to take all appropriate fail-safe, backup, redundancy, and other measures to ensure the safe use of this software. Oracle Corporation and its affiliates disclaim any liability for any damages caused by use of this software in dangerous applications.Oracle is a registered trademark of Oracle Corporation and/or its affiliates. Other names may be trademarks of their respective owners.This software and documentation may provide access to or information on content, products and services from third parties. Oracle Corporation and its affiliates are not responsible for and expressly disclaim all warranties of any kind with respect to third-party content, products, and services. Oracle Corporation and its affiliates will not be responsible for any loss, costs, or damages incurred due to your access to or use of third-party content, products, or services.Oracle Tuxedo Application Runtime for IMS Installation Guide Overview . . . . . . . . . . . . . . . . . . . . . . . . . . . . . . . . . . . . . . . . . . . . . . . . . . . . . . . . . . . . . . . .1 System Requirements . . . . . . . . . . . . . . . . . . . . . . . . . . . . . . . . . . . . . . . . . . . . . . . . . . . . . .2 Supported Platforms . . . . . . . . . . . . . . . . . . . . . . . . . . . . . . . . . . . . . . . . . . . . . . . . . . . . . . .2 Installing on UNIX Platforms in Graphics Mode . . . . . . . . . . . . . . . . . . . . . . . . . . . . . . . . .2 Uninstall GUI Mode. . . . . . . . . . . . . . . . . . . . . . . . . . . . . . . . . . . . . . . . . . . . . . . . . . . .3 Installing on UNIX Platforms in Console Mode. . . . . . . . . . . . . . . . . . . . . . . . . . . . . . . . . .4 Installing on UNIX Platforms in Silent Mode. . . . . . . . . . . . . . . . . . . . . . . . . . . . . . . . . . . .8 Installing in Silent Mode . . . . . . . . . . . . . . . . . . . . . . . . . . . . . . . . . . . . . . . . . . . . . . . .9Uninstall Silent Installation . . . . . . . . . . . . . . . . . . . . . . . . . . . . . . . . . . . . . . . . . . . . . .9 See Also. . . . . . . . . . . . . . . . . . . . . . . . . . . . . . . . . . . . . . . . . . . . . . . . . . . . . . . . . . . . . . . . .9 Supported Platform Data Sheets . . . . . . . . . . . . . . . . . . . . . . . . . . . . . . . . . . . . . . . . . . . . . .2 AIX 6.1 64-bit on Power . . . . . . . . . . . . . . . . . . . . . . . . . . . . . . . . . . . . . . . . . . . . . . . .2Linux 64-bit on x86_64 (Oracle Enterprise Linux 5.4 or Redhat Linux 5). . . . . . . . . .2Oracle Linux 5.6 (64-bit) on Exalogic 2.0. . . . . . . . . . . . . . . . . . . . . . . . . . . . . . . . . . .2Oracle Linux 5.6 (64-bit) on Non Exalogic Hardware. . . . . . . . . . . . . . . . . . . . . . . . . .2Oracle Solaris 10 64-bit on Sparc. . . . . . . . . . . . . . . . . . . . . . . . . . . . . . . . . . . . . . . . . .3Oracle Tuxedo Application Runtime for IMS Installation Guide iiiiv Oracle Tuxedo Application Runtime for IMS Installation GuideOracle Tuxedo Application Runtime for IMS Installation GuideThis chapter contains the following topics:z Overviewz System Requirementsz Supported Platformsz Installing on UNIX Platforms in Graphics Modez Installing on UNIX Platforms in Console Modez Installing on UNIX Platforms in Silent ModeOverviewOracle Tuxedo Application Runtime for IMS software is distributed as an installer file which can be executed on UNIX platforms using any of the following three methods:z Graphical user interface (GUI) installation.z Console installation.z Silent installation.Oracle Tuxedo Application Runtime for IMS 11g Release 1 (11.1.1.3.0) distribution contains the following key components:z Oracle Tuxedo Application Runtime for IMS administrative utilitiesOracle Tuxedo Application Runtime for IMS Installation Guide1Oracle Tuxedo Application Runtime for IMS Installation Guidez Oracle Tuxedo Application Runtime for IMS sample applications (optionally installed)Oracle Tuxedo Application Runtime for IMS is installed in the <ORACLEHOME>/artims_11gR1 directory by default.System Requirementsz JRE version 1.5.0 or aboveSupported Platformsz AIX 6.1 64-bit on Powerz Linux 64-bit on x86_64 (Oracle Enterprise Linux 5.4 or Redhat Linux 5)z Oracle Linux 5.6 (64-bit) on Exalogic 2.0z Oracle Linux 5.6 (64-bit) on Non Exalogic Hardwarez Solaris 10 64-bit on SparcInstalling on UNIX Platforms in Graphics Mode To run GUI-mode installation, the computer console on which you are installing the software must support a Java-based GUI.To install the Oracle Tuxedo Application Runtime for IMS software on UNIX systems ingraphics mode, do the following steps:unch the Oracle Tuxedo Application Runtime for IMS installation program.a.Log on as root or another user with sufficient permissions.b.Execute the installation program: ./installer_name.binThe Introduction screen appears.2.Click Next to proceed with the installation. The Choose Oracle Home Directory screenappears.You can select from the following options:a.Choose existing Oracle Home directoryClick the Choose an Oracle Home directory option button if you already have one ormore Oracle Home directories on your system. Select an Oracle Home directory fromthe list displayed to the right of the option buttons.2Oracle Tuxedo Application Runtime for IMS Installation GuideUninstall GUI Mode All valid Oracle Home directories are displayed in this list. Valid Oracle Homedirectories are directories where Oracle products have been installed using the standard installation program.b.Specify Oracle Home directoryClick the Specify an Oracle Home directory button to enter a valid directory.Note:Oracle Tuxedo Application Runtime for IMS installation will report an error and will not proceed in the event of the following:If an existing Oracle Tuxedo Application Runtime for IMS 11g Release 1(11.1.1.3.0) installation is detected, you are prompted to overwrite it or not. Select“yes” to overwrite the existing installation.3.Click Next to proceed with the installation. The Choose Install Folder screen appears.If the selected Oracle Home does not have Oracle Tuxedo Application Runtime for IMS 11gR1 installed, you can modify the default install directory; otherwise the detecteddirectory name is suggested. The default install directory is<ORACLEHOME>/artims_11gR1.4.Click Next to proceed with the installation. The Sample Install Confirm screen appears.You are prompted to choose install samples or not.5.If the installation process continues, the Pre-Installation Summary screen appears.Review the summary information and click Install if the information is correct.Click Previous to go back and modify any input that you want to change.Click Cancel to terminate the installation process. This is the last chance you have tocancel your installation without copying any files on your target machine.6.The Install Complete screen appears when the installation is finished.Click Done to exit the installation program.Uninstall GUI ModeUnder <INSTALL_DIR> there is a directory named 'uninstaller', which contains the uninstaller and resources specific to the un-installation of the product. To uninstall Oracle Tuxedo Application Runtime for IMS 11gR1 in GUI mode, use the ./uninstall command.Oracle Tuxedo Application Runtime for IMS Installation Guide3Oracle Tuxedo Application Runtime for IMS Installation GuideInstalling on UNIX Platforms in Console Mode To install Oracle Tuxedo Application Runtime for IMS software in console mode on a certified UNIX platform, do the following steps:1.Log on as root or another user with sufficient permissions.2.Execute the installation program in character-based mode: /installer_name.bin -iconsole3.The installation program runs and prompts you for responses as shown in Listing 1.Listing 1 Installation ProgramPreparing to install...Extracting the JRE from the installer archive...Unpacking the JRE...Extracting the installation resources from the installer archive...Configuring the installer for this system's environment...Launching installer...Preparing CONSOLE Mode Installation...========================================================================== =====Introduction------------InstallAnywhere will guide you through the installation ofOracle Tuxedo Application Runtime for IMS 11gR1(11.1.1.3.0).It is strongly recommended that you quit all programs before continuing with this installation.Respond to each prompt to proceed to the next step in the installation. If you want to change something on a previous step, type 'back'.4Oracle Tuxedo Application Runtime for IMS Installation GuideInstalling on UNIX Platforms in Console ModeYou may cancel this installation by typing 'quit'.WARNING: "Quitting" creates an incomplete Oracle Tuxedo Application Runtime for IMS 11gR1 (11.1.1.3.0) installation.You must re-install Oracle Tuxedo Application Runtime for IMS 11gR1 (11.1.1.3.0).========================================================================== =====Choose Oracle Home----------------------------1- Choose existing Oracle Home directory2- Specify Oracle Home directoryEnter a number: 2Specify an Oracle Home directory: /home/user/oracle========================================================================== =====Choose Product Directory---------------------1- Modify Current Selection (/home/user/oracle/artims_11gR1)2- Use Current Selection (/home/user/oracle/artims_11gR1)Enter a number: 2========================================================================== =====Sample Install Confirm---------------------Install Samples?Oracle Tuxedo Application Runtime for IMS Installation Guide5Oracle Tuxedo Application Runtime for IMS Installation Guide->1- No2- YesENTER THE NUMBER OF THE DESIRED CHOICE, OR PRESS <ENTER> TO ACCEPT THE DEFAULT:========================================================================== =====Pre-Installation Summary------------------------Please Review the Following Before Continuing:Product Name:Oracle Tuxedo Application Runtime for IMS 11gR1Install Folder:/home/user/oracle/artims_11gR1Link Folder:/local/home/dxfRequired Space:83036116 bytesAvailable Space:23126462464 bytesPRESS <ENTER> TO CONTINUE:========================================================================== =====Installing...-------------=====Installation Complete---------------------6Oracle Tuxedo Application Runtime for IMS Installation GuideInstalling on UNIX Platforms in Console ModeCongratulations. Oracle Tuxedo Application Runtime for IMS 11gR1 has been successfully installed to:/home/user/oracle/artims_11gR1PRESS <ENTER> TO EXIT THE INSTALLER:Uninstall Console ModeUnder <INSTALL_DIR> there is a directory named 'uninstaller', which contains the uninstaller and resources specific to the un-installation of the product. To uninstall Oracle Tuxedo Application Runtime for IMS in console mode, use the./uninstall -i console command.About to uninstall screen: appears to prompt user the un-installation of the product starts.Uninstall Oracle Tuxedo Application Runtime for IMS 11gR1(11.1.1.3.0)----------------About to uninstall...Oracle Tuxedo Application Runtime for IMS 11gR1This will remove features installed by InstallAnywhere. It will not remove files and folders created after the installation.PRESS <ENTER> TO CONTINUE:Uninstall screen: This screen simply shows the uninstall procedure item by item.Uninstalling ...---------------***************************************************************************************************...*Oracle Tuxedo Application Runtime for IMS Installation GuideUninstall Complete screen: After un-installation finishes, this screen appears, and reports the un-installation summary.Uninstall Complete------------------All items were successfully Uninstall.Installing on UNIX Platforms in Silent ModePreparing for Silent Mode InstallationBefore you install Oracle Tuxedo Application Runtime for IMS, complete the following tasks: z Verify that enough disk space is available.z Verify the login ID has proper permission for silent installation.z Create a template file containing the required keyword settings.Creating a Silent Mode Installation Template FileTo create a template file for use in the silent installation process, you must use keywords as shown in Table 1.Table 1 Silent Mode Installation Template FileFor This Keyword…Enter The Following Value…INSTALLER_UI= The mode of installation. The default is silent; do not modify this value. ORACLEHOME=The full pathname of the Oracle Home directory of your choice.USER_INSTALL_DIR The full pathname of the installation directory.INSTALL_SAMPLES=Y|N Specifies whether sample applications are installed or not.OVERWRITE=Y|N If you are using silent mode installation over an existing version of OracleTuxedo Application Runtime for IMS, you must add this line to your templatefile.Any value other than "Y" or "y" will not overwrite the existing Oracle TuxedoApplication Runtime for IMS version and cancels the installation.Installing in Silent ModeSample UNIX TemplateINSTALLER_UI=silentORACLEHOME=/home/user/oracleUSER_INSTALL_DIR=/home/user/oracle/artims_11gR1INSTALL_SAMPLES=YOVERWRITE=YInstalling in Silent ModeTo use silent mode installation on a UNIX system, you must do the following steps:1.Create a file containing the required variables set to valid data.2.At the command line prompt, go to the directory containing the installer executable.3.Enter the following command: Installer_name.bin -f path/installer.dataNote:path is the full path to the variable data file and installer.data is the data file containing the required variables.Verifying Silent Mode InstallationYou can verify successful silent mode installation by checking the installation directory to see if all the Oracle Tuxedo Application Runtime for IMS binaries are listed.If silent mode installation fails, check the following log file:$HOME/ARTIMS_silent_install.log.Uninstall Silent InstallationUnder <INSTALL_DIR> there is a directory named 'uninstaller', which contains the uninstaller and resources specific to the un-installation of the product. To uninstall Oracle Tuxedo Application Runtime for IMS in silent mode, use the ./uninstall -i silent command.See Alsoz Oracle Tuxedo Application Runtime for IMS Users Guidez Oracle Tuxedo Application Runtime for IMS Reference GuideOracle Tuxedo Application Runtime for IMS Installation GuideA P P E N D I X Supported PlatformsTable A-1 lists Oracle Tuxedo Application Runtime for IMS 11g Release 1 (11.1.1.3.0) supported platforms.Table A-1 Oracle Tuxedo Application Runtime for IMS 11g Release 1 (11.1.1.3.0)Supported PlatformsPlatform GA Port/Post-GA Port &Certification Release Date OS EOL DateAIX 6.1 64-bit on Power GA2011.12TBDLinux 64-bit on x86_64 (Oracle EnterpriseLinux 5.4 or Redhat Linux 5)GA2011.12TBD Oracle Linux 5.6 (64-bit) on Exalogic 2.0GA2011.12TBDOracle Linux 5.6 (64-bit) on non ExalogichardwareGA2011.12TBD Solaris 10 64-bit on Sparc GA2011.12TBDSupported PlatformsSupported Platform Data SheetsAIX 6.1 64-bit on PowerThe software requirements for AIX 6.1 64-bit on Power are as follows:z MicroFocus COBOL 5.1z COBOL-IT 2.9.5z IBM XL C/C++ 9Linux 64-bit on x86_64 (Oracle Enterprise Linux 5.4 or Redhat Linux 5)The software requirements for Linux 64-bit on x86_64 are as follows:z MicroFocus COBOL 5.1z COBOL-IT 2.9.5z gcc/g++ 4.1.2Oracle Linux 5.6 (64-bit) on Exalogic 2.0The software requirements for Oracle Linux 5.6 (64-bit) on Exalogic 2.0 are as follows:z MicroFocus COBOL 5.1z COBOL-IT 2.9.5z gcc 4.1.2Oracle Linux 5.6 (64-bit) on Non Exalogic HardwareThe software requirements for Oracle Linux 5.6 (64-bit) on non Exalogic hardware are asfollows:z MicroFocus COBOL 5.1z COBOL-IT 2.9.5z gcc 4.1.2Supported Platform Data SheetsOracle Solaris 10 64-bit on SparcThe software requirements for Oracle Solaris 10 64-bit on Sparc are as follows:z MicroFocus COBOL 5.1z COBOL-IT 2.9.5z C/C++ Sun Studio 12Supported Platforms。
tuxedo详细安装步骤
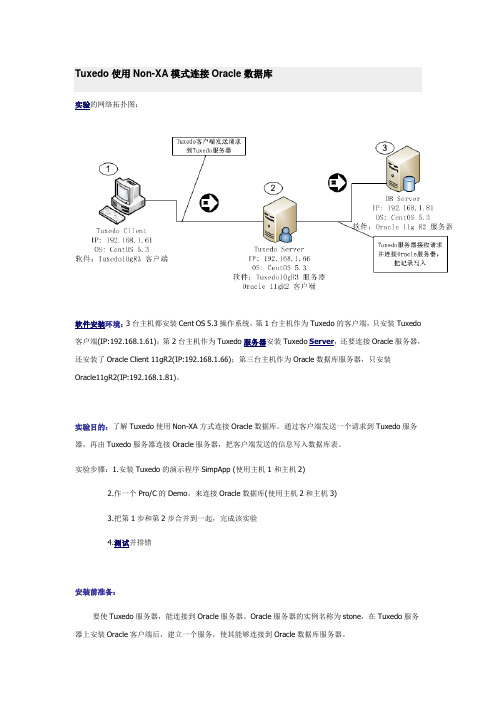
Tuxedo使用Non-XA模式连接Oracle数据库实验的网络拓扑图:软件安装环境:3台主机都安装Cent OS 5.3操作系统,第1台主机作为Tuxedo的客户端,只安装Tuxedo 客户端(IP:192.168.1.61);第2台主机作为Tuxedo服务器安装Tuxedo Server,还要连接Oracle服务器,还安装了Oracle Client 11gR2(IP:192.168.1.66);第三台主机作为Oracle数据库服务器,只安装Oracle11gR2(IP:192.168.1.81)。
实验目的:了解Tuxedo使用Non-XA方式连接Oracle数据库。
通过客户端发送一个请求到Tuxedo服务器,再由Tuxedo服务器连接Oracle服务器,把客户端发送的信息写入数据库表。
实验步骤:1.安装Tuxedo的演示程序SimpApp (使用主机1和主机2)2.作一个Pro/C的Demo,来连接Oracle数据库(使用主机2和主机3)3.把第1步和第2步合并到一起,完成该实验4.测试并排错安装前准备:要使Tuxedo服务器,能连接到Oracle服务器。
Oracle服务器的实例名称为stone,在Tuxedo服务器上安装Oracle客户端后,建立一个服务,使其能够连接到Oracle数据库服务器。
在Tuxedo Server(主机2)上,先建立网络服务,再连接到Oracle数据库服务器,使用hr用户,并建立一个测试表:◆网络服务的名称为stone,结果为$ORACLE_HOME/network/admin目录下的tnsnames.ora文件[oracle@myapache ~]$cd /u01/app/oracle/product/11.2.0/client_1/network/admin/ [oracle@myapache admin]$lssamples shrept.lst sqlnet10031011AM2455.bak sqlnet.ora tnsnames.ora[oracle@myapache admin]$vi tnsnames.ora# tnsnames.ora Network Configuration File:/u01/app/oracle/product/11.2.0/client_1/network/admin/tnsnames.ora# Generated by Oracle configuration tools.STONE =(DESCRIPTION =(ADDRESS_LIST =(ADDRESS = (PROTOCOL = TCP)(HOST = 192.168.1.81)(PORT = 1521)))(CONNECT_DATA =(SERVICE_NAME = stone)))◆建立测试表[oracle@myapache ~]$sqlplus hr/hr@stoneSQL*Plus: Release11.2.0.1.0 Production on Wed Mar 10 21:17:22 2010Copyright (c) 1982, 2009, Oracle. All rights reserved.Connected to:Oracle Database11gEnterpriseEdition Release11.2.0.1.0 - ProductionWith the Partitioning, OLAP, Data Mining and Real Application Testing options SQL>create table t_test1(2 zj number,3 name varchar2(20)4 );Table created.SQL>insert into t_test1 values(1, 'aaa');1 row created.SQL>commit;Commit complete.SQL>select * from t_test1;ZJ NAME---------- --------------------1 aaaSQL>◆在主机2上还要把Oracle用户的环境变量设置好,使其能正确编译pro/c程序[oracle@myapache ~]$ vi .bash_profile设置好以下环境变量# User specific environment and startup programsORACLE_HOME=/u01/app/oracle/product/11.2.0/client_1export ORACLE_HOMELD_LIBRARY_PATH=$ORACLE_HOME/libLD_LIBRARY_PATH=${LD_LIBRARY_PATH}:$ORACLE_HOME/oracm/lib LD_LIBRARY_PATH=${LD_LIBRARY_PATH}:/lib:/usr/lib:/usr/local/lib export LD_LIBRARY_PATHPATH=$PATH:$ORACLE_HOME/binexport PATHstty erase ^H(完)测试一下Pro/C是否正确[oracle@myapache ~]$procPro*C/C++: Release11.2.0.1.0 - Production on Thu Mar 11 01:16:42 2010Copyright (c) 1982, 2009, Oracle and/or its affiliates. All rights reserved.System default option values taken from:/u01/app/oracle/product/11.2.0/client_1/precomp/admin/pcscfg.cfg(下面内容从略)一、安装Tuxedo的演示程序SimpApp,并完成Tuxedo客户端访问服务器的配置1.在主机2上安装Tuxedo10gR3 Server建议采用字符安装界面,在安装过程中选择安装上Sample,以便运行SimpApp例子[root@myapache ~]#cd /home/OraFile/[root@myapache OraFile]#unzip tuxedo10gR3_32_Linux_01_x86.zip[root@myapache OraFile]#chmod +x tuxedo10gR3_32_Linux_01_x86.bin[root@myapache OraFile]#./tuxedo10gR3_32_Linux_01_x86.bin -i consoleExtracting the JRE from the installer archive...Unpacking the JRE...Extracting the installation resources from the installer archive...Configuring the installer for this system's environment...Launching installer...(比较重要的地方)Choose Oracle Home------------------1- Create new Oracle HomeEnter a number:1Specify a new Oracle Home directory:/bea=============================================================== ================Choose Product Directory------------------------1- Modify Current Selection (/bea/tuxedo10gR3)2- Use Current Selection (/bea/tuxedo10gR3)Enter a number:1Specify Product Installation Directory:/bea/tux10 (为操作方便,把安装目录修改为:/bea/tux10) Install Samples (Y/N):Y (选择安装Samples)2.在Tuxedo Server上运行SimpApp例子(1)把SimpApp例子拷贝到/home/myTuxeSrv目录下[oracle@myapache ~]$cp -R /bea/tux10/samples/atmi/simpapp/ /home/myTuxSrv/再拷贝环境变量[oracle@myapache ~]$cp /bea/tux10/tux.env /home/myTuxSrv/simpapp/[oracle@myapache ~]$cd /home/myTuxSrv/simpapp/[oracle@myapache simpapp]$lsREADME simpcl.c simpserv.c tux.env ubbsimple[oracle@myapache simpapp]$(2)编辑simpapp的配置文件[oracle@myapache simpapp]$ cp ubbsimple ubb[oracle@myapache simpapp]$ vi ubb修改结果:#Example:IPCKEY <Replace with a valid IPC Key># TUXCONFIG="/home/me/simpapp/tuxconfig"# APPDIR="/home/me/simpapp"#Example:TUXDIR="/bea/tux10"# (c) 2003 BEA Systems, Inc. All Rights Reserved.#ident "@(#) samples/atmi/simpapp/ubbsimple $Revision: 1.5 $"#Skeleton UBBCONFIG file for the TUXEDO Simple Application.#Replace the <bracketed> items with the appropriate values.*RESOURCESIPCKEY 123456DOMAINID simpappMASTER simpleMAXACCESSERS 10MAXSERVERS 5MAXSERVICES 10MODEL SHMLDBAL N*MACHINESDEFAULT:APPDIR="/home/myTuxSrv/simpapp"TUXCONFIG="/home/myTuxSrv/simpapp/tuxconfig" TUXDIR="/bea/tux10"myapache LMID=simple*GROUPSGROUP1LMID=simple GRPNO=1 PENINFO=NONE*SERVERSDEFAULT:CLOPT="-A"simpserv SRVGRP=GROUP1 SRVID=1*SERVICESTOUPPER(配置文件完)(3)修改环境变量文件tux.env[oracle@myapache simpapp]$ vi tux.env在最后加入两行TUXDIR=/bea/tux10; export TUXDIRJAVA_HOME=$TUXDIR/jre; export JAVA_HOMEJVMLIBS=$JAVA_HOME/lib/i386/server:$JAVA_HOME/jre/binPATH=$TUXDIR/bin:$JAVA_HOME/bin:$PATH; export PATHCOBCPY=:$TUXDIR/cobinclude; export COBCPYCOBOPT="-C ANS85 -C ALIGN=8 -C NOIBMCOMP -C TRUNC=ANSI -C SEXT=cbl"; export COBOPT SHLIB_PATH=$TUXDIR/lib:$JVMLIBS:$SHLIB_PATH; export SHLIB_PATHLIBPATH=$TUXDIR/lib:$JVMLIBS:$LIBPATH; export LIBPATHLD_LIBRARY_PATH=$TUXDIR/lib:$JVMLIBS:$LD_LIBRARY_PATH; export LD_LIBRARY_PATH WEBJAVADIR=$TUXDIR/udataobj/webgui/java; export WEBJAVADIRAPPDIR=/home/myTuxSrv/simpapp; export APPDIRTUXCONFIG=$APPDIR/tuxconfig; export TUXCONFIG(4)在服务器本地运行simpapp例子程序使环境变量生效[oracle@myapache simpapp]$. ./tux.env[oracle@myapache simpapp]$lsREADME simpcl.c simpserv.c tux.env ubb ubbsimple[oracle@myapache simpapp]$env | grep TUXTUXCONFIG=/home/myTuxSrv/simpapp/tuxconfigTUXDIR=/bea/tux10[oracle@myapache simpapp]$编译ubb (生成tuxconfig)[oracle@myapache simpapp]$ tmloadcf -y ubb[oracle@myapache simpapp]$ lsREADME simpcl.c simpserv.c tuxconfig tux.env ubb ubbsimple ULOG.031010编译simpserv.c文件和simpcl.c文件(生成可执行文件)[oracle@myapache simpapp]$buildserver -f simpserv.c -o simpserv -s TOUPPER (我这里有一些警告信息,不影响程序运行)[oracle@myapache simpapp]$buildclient -f simpcl.c -o simpcl[oracle@myapache simpapp]$lsREADME simpcl.c simpserv.c tux.env ubbsimplesimpcl simpserv tuxconfig ubb ULOG.031010运行服务器端程序[oracle@myapache simpapp]$tmboot -yBooting all admin and server processes in /home/myTuxSrv/simpapp/tuxconfig INFO: Oracle Tuxedo, Version10.3.0.0, 32-bit, Patch Level (none)Booting admin processes ...exec BBL -A :process id=11402 ... Started.Booting server processes ...exec simpserv -A :process id=11403 ... Started.2 processes started.[oracle@myapache simpapp]$测试一下运行情况:[oracle@myapache simpapp]$./simpcl hello_aleiReturned string is: HELLO_ALEI[oracle@myapache simpapp]$看到以上结果,程序在本地已经可以使用了3.把客户端程序转移到主机1上运行(1)在服务器端(主机2)先做一些设置,首先关闭服务程序[oracle@myapache simpapp]$tmshutdown -yShutting down all admin and server processes in /home/myTuxSrv/simpapp/tuxconfig Shutting down server processes ...Server Id = 1 Group Id = GROUP1 Machine = simple: shutdown succeededShutting down admin processes ...Server Id = 0 Group Id = simple Machine = simple: shutdown succeeded 2 processes stopped.[oracle@myapache simpapp]$(2)修改配置文件ubb,添加一些配置;并重新编译[oracle@myapache simpapp]$vi ubb修改了以下内容(标红部分)IPCKEY 123456DOMAINID simpappMASTER simpleMAXACCESSERS 10MAXSERVERS 5MAXSERVICES 10MODEL SHMLDBAL N*MACHINESDEFAULT:APPDIR="/home/myTuxSrv/simpapp"TUXCONFIG="/home/myTuxSrv/simpapp/tuxconfig"TUXDIR="/bea/tux10"myapache LMID=simpleMAXWSCLIENTS=5*GROUPSGROUP1LMID=simple GRPNO=1 PENINFO=NONE*SERVERSDEFAULT:CLOPT="-A"simpserv SRVGRP=GROUP1 SRVID=1WSL SRVGRP=GROUP1 SRVID=10CLOPT="-A -- -n//192.168.1.66:3200 -m 2 -M 5 -x 5"*SERVICESTOUPPER(配置文件完)重新编译生成配置文件tuxconfig[oracle@myapache simpapp]$lsaccess.031010 simpcl simpserv stderr tuxconfig ubb ULOG.031010 README simpcl.c simpserv.c stdout tux.env ubbsimple[oracle@myapache simpapp]$rm -rf tuxconfig (先删除)[oracle@myapache simpapp]$tmloadcf -y ubb[oracle@myapache simpapp]$tmboot -yBooting all admin and server processes in /home/myTuxSrv/simpapp/tuxconfigINFO: Oracle Tuxedo, Version10.3.0.0, 32-bit, Patch Level (none)Booting admin processes ...exec BBL -A :process id=13105 ... Started.Booting server processes ...exec simpserv -A :process id=13106 ... Started.exec WSL -A -- -n//192.168.1.66:3200 -m 2 -M 5 -x 5 :process id=13107 ... Started.3 processes started.[oracle@myapache simpapp]$[oracle@myapache simpapp]$netstat -anp可以看到WSL也已经侦听了(3)在Tuxedo Client (主机1)上运行simpapp的客户端程序在Tuxedo客户端上,也要安装Tuxedo10gR3,但只安装Tuxedo的客户端就行了,其安装目录也是:/bea/tux10;客户端程序在/home/myTuxClient/simpapp目录中运行。
- 1、下载文档前请自行甄别文档内容的完整性,平台不提供额外的编辑、内容补充、找答案等附加服务。
- 2、"仅部分预览"的文档,不可在线预览部分如存在完整性等问题,可反馈申请退款(可完整预览的文档不适用该条件!)。
- 3、如文档侵犯您的权益,请联系客服反馈,我们会尽快为您处理(人工客服工作时间:9:00-18:30)。
Tuxedo 学习笔记
看了很多网站的linux 下的安装说明,但是照做,不一定就能成功
这次,亲自实践了一把
做个总结
1,有两个环节要注意,一个是. bash_profile ,这个文件隐藏在你的用户根目录下比如用户是tuxedo,它就在/home/tuxedo/ 下,ls .bash_profile 可以看到
Ls -all 也可以看到这个文件
用vi .bash_profile (注意前面有个小点哦)
里面是相关的环境配置
下面是.bash_profile 文件
下面简单一下安装过程
操作系统是在fedoro 8 上(Linux zc 2.4.22)的,声明一下,fedoro 10 上报错,(内核2.6 上的)
安装文件名:tuxedo81_linux.bin
命令:sh tuxedo81_linux.bin -i console
然后就是稍微等待几秒钟,叫你选择English ,选择1
继续
Enter
只到叫你输入tuxedo 的密码
然后输入KEY ,lic,txt
这个等安装好了,在搞吧,很简单
Cp ,lic,txt /tuxedo8.1/udataobj/
拷到这个目录下面就OK了
到这,tuxedo 算是安装完了,下面是配置,说实话,配置比安装难啊
先看tmadmin 有没用,如果有用,说明你的key 安装正确了
下面就是配置ubbsimple 了
建议把atmi 下面的例子拷到tuxedo8.1下面来,这样在ubbsimple 里面就好配置了
看下ubbsimple 文件
带# 的先不管了
# (c) 2003 BEA Systems, Inc. All Rights Reserved.
#ident "@(#) samples/atmi/simpapp/ubbsimple $Revision: 1.5 $"
#Skeleton UBBCONFIG file for the TUXEDO Simple Application.
#Replace the <bracketed> items with the appropriate values.
*RESOURCES
IPCKEY 123457 这个值是唯一的
取值在3万到26万之间,且必须是唯一的(32768-262143)
DOMAINID simpapp 管理域的标识符,随便取,没实在意义
MASTER simple site1,site2 主节点,用于多机环境中,起作用,site2备用MAXACCESSERS 10
MAXSERVERS 5
MAXSERVICES 10
MODEL SHM # 单台主机,MP多台主机
LDBAL N
BLOCKTIME 6 #客户端等待服务响应的最长时间6*10 60秒
*MACHINES
DEFAULT:
这个强烈要求.bash_proflie 里面一定要一致
APPDIR="/home/tuxedo/tuxedo8.1/simpapp" 应用程序路径
TUXCONFIG="/home/tuxedo/tuxedo8.1/simpapp/tuxconfig" tuxconfig 路径
TUXDIR="/home/tuxedo/tuxedo8.1" tuxedo 安装的路径
zc是用户名
在命令下可以用hostname 可以看出来
zc LMID=simple
*GROUPS
GROUP1
LMID=simple GRPNO=1 OPENINFO=NONE
*SERVERS
DEFAULT:
CLOPT="-A"
simpserv 服务端生成的程序名称
simpserv SRVGRP=GROUP1 SRVID=1
*SERVICES
TOUPPER服务端的services 名称
下面还有就是客户端的编译,服务端的编译
buildserver -s TOUPPER -o simpserv -f simpserv.c
buildclient –o client -f simpcl.c
下面是创建日志的方法
敲tmadmin 后
Crdl –b 2000 –z//home/tuxedo/tuxedo8.1/simpapp/TLOG
crlog -m tibs_bill
创建日志文件
Tmipcrm -y 强制停掉所有的服务
编译服务端命令:[tuxedo@zc simpapp]$ buildserver -o AGENT_BILL -s GET_OWE_ACCT -f AGENT_BILL.cpp
编译客户端命令:[tuxedo@zc simpapp]$ buildclient -o Agentcl -f Agentcl.cpp
编译fml 文件
设置FML的环境变量
set FIELDTBLS32=transfml.fml
set FLDTBLDIR32=%TUXDIR%udataobj;
mkfldhdr32 transfml
pclt 客户端的信息查看
buildsever -t 表示支持多线程
server 是服务进程,service 是服务进程实现的服务
source .bash_profile 立马生效
. . profile 立即生效命令
/bdccutysj/blog/item/7a5e853*******f01b4cff71.html IPCKEY 123457 这个值是唯一的
DOMAINID simpapp 这个值也是唯一的,否则会有冲突tar cvzf xxx.tar.gz xxx/
tar -xzvf XX.tar.gz
Bo 的生成步骤
1:注意点
因为新242 的环境与原245 等的内核不一致,且LINUX, ORACLE, TUXEDO版本都不一致
故base 不能完全拷贝原来SVN上的,只能覆盖一个文件BOCCIHelperRegistry.cpp
Base_kenel 下面文件不动
或将gen_bohelper_source/BOCCIHelperRegistry.cpp移到base目录下
Bo 涉及四张表:
BO_DETAILS_EX
BO_EX
BO_DETAILS_TEMP (空表)
BO_OPERATER (操作员表)
操作步骤:
1,bointerface 下面的文件全部拷贝
base/ gen_bohandler_source/ gen_bohelper_source/ lib/ ott/ 注意点:编译前LIB 下的三个.A 文件可以先删除
但这个文件夹一定要存在,最后.文件生成,会CP到该目录下
2,先执行ott/ 文件下的两个脚本,
createHead.sh genc++.sh
3,然后编译base
4,再编译gen_bohandler_source
因为gen_bohelper_source 这个编译速度比较慢,这个可以和component 一起编译
注意; 编译component ,确保public ,include, 必须有
并且public 必须编译过,会链接接BO bointface/ lib/ .a 的文件
Bbc 清理死掉的进程和IPC资源
编译BO偷懒方法:只需改三个文件
测试时使用:
1,Billoccitype.h,Billoccitype.cpp
Set ,get 方法
在这两个文件里加申明,和成员函数get,set 的实现方法
同时,记住,此时在ott下面不需要执行两个.sh 文件
2,在这个文件里面InvoicePrintOCCIHelper.cpp
添加相应的xml的节点,总共改5处
这个就是相应的bo 名称下面BillQueryOCCIHelper.cpp BillHisQueryOCCIHelper.cpp
BillQuery ,BillHisQuery 增加了文件
# ---------TUXEDO ENV--------
export TUXDIR=/app/bea/tuxedo8.1_64 export APPDIR=/app/acct/tibs_bill/bin
export TUXCONFIG=$APPDIR/tuxconfig export BDMCONFIG=$APPDIR/BDMCONFIG export TLOGDEVICE=$APPDIR/TLOG export PATH=$PATH:$TUXDIR/bin
路径,加一个path路径。