映泰主板H77MU3中文说明书
映泰主板H77MU3中文说明书
2.4
接口和插槽 .......................................................................................11
第三章: 接头和跳线安装............................................... 14
1.2
附件 .....................................................................................................1
1.3
主板特性 .............................................................................................2
支持硬件防病毒功能 / 增强型 Intel SpeedStep技术 / Intel 64位体系结构 / 64位内存扩展技术 / 虚拟技术 / 超线程技术
芯片组
Intel H77
IT8728 高级I/O控制器 提供最基本的I/O功能
低管脚数接口
环境控制 H/W 监控 风扇速度控制器 ITE's "智能保护" 功能
4.2
RAID阵列..........................................................................................19
4.3
RAID运行..........................................................................................19
P3SAE 和 370SAE系列 品 產 主機板 User’s Manual 中文使用手冊说明书
P3SAE 和 370SAE系列品產主機板User’s Manual中文使用手冊品名稱產: P3SAE, P3SAE-L, P3SAE-P370SAE, 370SAE-L或370SAE-P 手冊版本:中文1.2商標聲明Intel, Socket 370, Celeron , Pentium II 及 Pentium III 為 Intel產(英代爾)Corp.之品及註冊商標。
產VIA 為 VIA (威盛)Technologies, Incorporated 之品及註冊商標。
產Award 為 Award Software International Inc. 之品及註冊商標。
MS-DOS, Windows 95, Windows 98, Windows 2000 及Windows NT 為Microsoft Corporation之註冊商標。
Novell 為Novell Corporation之註冊商標。
ADI 為 Analog Devices Inc., 之註冊商標。
產所有其他商標及品名稱屬於各該公司之註冊商標或版權。
-R01-目 錄第一章、簡介1.1品簡介產 (6)產內 (7)1.2品容產 (7)1.3品特色1.4品規格產 (7)1.5主機板零件配置圖 (10)第二章、主機板安裝設定2.1主機板安裝程序 (11)2.1.1一般跳接器設定 (11)2.1.2網路功能設定 (11)2.1.3鍵盤的電壓設定 (12)2.1.4清除 CMOS 的設定值 (12)2.1.5中央處理器電壓設定 (13)2.1.6中央處理器FSB頻率選擇 (13)2.2中央處理器的安裝 (13)2.2.1Slot 1 CPU的安裝方法 (13)2.2.2Socket 370 CPU的安裝方法 (15)2.3安裝系統記憶體 (15)2.3.1安裝168-pin 記憶模組方法 (15)2.3.2移除168-pin 記憶模組方法 (15)2.3.3記憶體的配置結構 (16)2.4輸出入連接埠/外接機殼之連接埠 (16)2.4.1ATX 電源接頭 (17)2.4.2機殼和CPU風扇連接頭 (17)2.4.3 紅外線資料傳輸連接埠 (18)2.4.4連接Creative相容的PCI音效卡的接頭 (19)2.4.5網路喚醒系統功能的接頭 (19)2.4.6磁碟機接頭 (20)2.4.7主要及次要 IDE連接頭 (20)2.4.8PS/2 滑鼠連接埠 (21)2.4.9PS/2 鍵盤連接頭 (21)2.4.10VGA 顯示埠 (21)2.4.11高速串列埠 (21)2.4.12印表機並列埠 (21)2.4.13通用串列匯流排(UBS)連接埠 (22)2.4.14網路連接埠 (22)2.4.15動作/連結顯示燈 (22)2.4.16速度顯示燈 (22)2.4.17Line Out 連接埠 (22)2.4.18Line In 連接埠 (23)2.4.19Microphone In 連接埠 (23)2.4.20Game/MIDI 連接埠 (23)2.4.21ATAPI IDE/SONY Audio 連接埠 (23)2.4.22Mitsumi Audio 連接埠 (23)2.4.23外接機殼之連接埠 (24)第三章、基本輸出入系統設定3.1CMOS 設定程式 (25)3.2標準 CMOS 設定 (26)3.3BIOS 特殊功能設定 (28)3.4晶片組特殊功能設定 (32)3.5週邊整合設定 (34)3.6系統省電管理功能設定 (39)3.7PNP/PCI 組態設定 (42)3.8個人電腦健康狀態 (44)3.9頻率控制 (45)3.10載入基本預設值 (46)3.11載入最佳值 (47)3.12管理者/使用者密碼設定 (47)3.13儲存並跳出設定程式 (47)3.14不儲存並離開設定程式 (47)第四章、驅動程式的安裝4.1Windows 95/98/ME/2000的INF程式更新 (48)4.1.1用於Windows 95/98第一版的安裝方法..484.1.2用於Windows 98SE的安裝方法 (49)4.1.3用於Windows ME/2000的安裝方法 (49)4.2安裝顯示埠的驅動程式(只提供給P3SAE或P3SAE-L )494.2.1用於Windows 95/98/ME的安裝方法 (49)4.2.2用於Windows 2000的安裝方法 (50)4.2.3用於Windows NT 4.0的安裝方法 (50)4.2.4用於Windows 3.11, NT 3.51 & OS/2 (50)4.3安裝音效埠的驅動程式 (50)4.4安裝網路的驅動程式(只提供給P3SAE-L ) (50)4.5安裝Intel防護程式 (51)4.6安裝 Ultra ATA Storage 的驅動程式 (51)4.7安裝硬體偵測的公用程式 (51)附錄 A 使用中止到RAM的功能 (52)第一章、簡介 ( Introduction )產 ( Product Overview )1.1 品簡介歡迎您選擇使用P3SAE 或370SAE 系列主機板. 本主機板是採用Intel公司最新開發之FW82815 或FW82815EP和 FW82801BA晶片組. 經本公司與各種的硬體週邊(如:中央處理器、記憶體、顯示卡、硬碟、光碟機....等)及應用軟體(如: Novell、 MS Office....等),除了符合 Year 2000,並且做各種的相容性測試,及嚴格品質管制,將是您最佳的選擇.本手冊有共分肆個章節。
Phiлips E Line 7'' IPS 显示 8GB 存储 安卓操作系统 3G 平板电脑说明书
E Line7" IPS display8GB storageAndroid OSTLE722GLight. Fast. Ready to Go.Compact and lightweight, Phillips E Line 7" IPS tablet is your ideal portable accessory. Experience full-powered processing for on-the-go productivity.Easy on the eyesIPS display technology for brilliant colour from every anglePowered and ready to goQuad-core processor for faster performanceFlexible Micro SD slot for expanded storageDual cameras to connect and shareDual cameras for selfies, video chats and perfect snapshots0.3MP front camera for selfies and video chats2MP rear camera for crystal clear photos and videosPowerful and universal Android OSAndroid OS for familiar experience with many appsHighlightsIPS displayWith a crystal-clear IPS display, images and text look brilliant and clear from every angle.Quad-core performanceYour Philips tablet is even more powerful with its quad-core processor. This powerhouse easily keeps up with your multitaskingdemands. Seamlessly load web pages and enjoy uninterrupted videos. Gaming isimmersive with exceptional picture quality.Expandable storageIn addition to the included storage, the Philips tablet offers flexibility to quickly expand your storage and easily swap out memory with a Micro SD card.Front and rear camerasBring yourself to the forefront of fun shots with the front and rear cameras in your Philips tablet. As well as allowing you to take self-portraits, the front-facing camera also means that you can engage in face-to-face videocalls with friends or colleagues. The rear camera allows you to capture life's fleeting moments in crystal clear quality and send them to friends and family. A built-in flash means that you can take great photos even in dim light, so you can capture that perfect moment, night or day.Android OSAndroid is the customisable, easy-to-use operating system that powers more than a billion devices across the globe. Because it's so universal, Android works perfectly with your favourite apps. Android is also customised by you, for you. Put the stuff you care about right on your home screen: the latest news, weatheror a stream of your recent photos.SpecificationsStorage capacityCapacity: 8GB Internal memory + micro SD (up to 32GB)Physical dimensionsColour: BlackDimensions (L x W x H): 188.5 x 108 x 11 mm Weight: 265 gDISPLAYDisplay: 7" IPS (diagonal), Multi touch capacitive, 5 points P-Cap Touch Resolution: 1024 (H) x 600 (V) IPS ProcessorProcessor: MT8321 Quad-Core Processor DRAM Memory: 1 GBCamerasRear Camera: 2MPFront Camera: 0.3MPVideo Recording: 720P @ 30fpsCellular and WirelessWi-Fi: 802.11 b/g/nBluetooth: Bluetooth 4.0 technologyGSM Frequency (MHz):850/900/1800/1900MHz (Band:2/3/5/8)3G WCDMA Frequency (MHz): 900/2100MHz Audio & VideoAudio Playback Features: MPEG audio, WAVaudio, APE audio, OGG audio, FLAC audio,AAC audioAudio Playback Format: MP2/3, OGG, AAC,M4A, AMR, FLAC, APE, MAVMic: Built-inVideo Playback Features: MPEG4, 3GP, AVI,MOVVideo Playback Format: AVI, MP4, MOV, 3GPExternal ConnectorsDC Power: 5V, 1.5A, Micro USB portHeadset: 3.5-mm plugUSB: Micro USB ConnectorSD card: Micro SD Socket x 1*Power and BatteryStandard battery: Li-Polymer 2800 mAh, 3.7VBattery use (audio): about 30 hoursBattery use (video): about 3.5 hoursSensorsSensors: G-Sensor (supports screen rotation)OPERATING SYSTEMOperating System: Android 7.0Built-in Apps: Internet Browser, Video Player,Audio Player, Photo Browser, Email, SoundRecorder, Calculator, Ebook Support etc.Environmental RequirementsOperating ambient temperature: 0 to 35°C (32to 95°F)Non-operating temperature: -10 to 45°C (14 to113°F)Relative humidity: 20% ~80% (operating), 10%~90% (non-operating)Operating altitude: 5,000 mLanguagesLanguages supported: English, Support multilanguageAccessoriesIn the Box: Tablet, Power Adapter, Quick-startGuide, Warranty Statement, USB Cable* Note: Specifications are subject to change withoutnotice.* Under optimal conditions (i.e. battery is fully chargedand used at normal temperatures, headset is used andreasonable number of stop/starts)© 2019 Koninklijke Philips N.V.All Rights reserved.Specifications are subject to change without notice. Trademarks are the property of Koninklijke Philips N.V. or their respective owners.Issue date 2019‑03‑12 Version: 1.1.112 NC: 8670 001 50751 EAN: 87 12581 74945 3。
映泰产品手册12月

CPU 芯片组 内存 扩展槽 硬盘 网卡 视频输出 数据接口 声卡
7 4
5
8
映泰TPOWER X58
——新一代酷睿I7 CPU平台概念板
适用用户 发烧超频玩家、游戏玩家 ① ② ③ ④ ⑤ 12相超强供电 纯铜热管散热 三卡SLI、交火,三通内存 最全接口输出 全固态电容
3 1 2
主要特色
其他特色 CPU QPI 芯片组 内存 扩展槽
BIOTEX12项技术、RoHS环保、三大保险、复 活更U、微触开关、 88灯增强诊断、T-POWER软件包 Intel® Core i7 四核处理器 6.4GB Intel X58 + ICH10R 6 DIMM, 支持 三通道 DDR3 2000/1600/1333
3PCI-E2.0 X 16 支持交叉火力/SLI(16X+16X+4X) 1PCI-E x1/2PCI
硬盘
显卡 网卡 声卡 数据接口 高清接口 扩展接口
6 SATA 3Gb/s 、1 ATA-133 IDE
支持U载GMA HD显卡 千兆Realtek8111DL Realtek ALC888S HD声卡, 7.1声道, 提供光纤音频输出 10USB2.0(4+6),2xe-SATAII、1394a(1+1) HDMI、DVI 、VGA(模拟),双高清输出 1x前置音频、1xSPDIF-out、1xCOM/PNT、 1xCIR
CPU 芯片组 内存 扩展槽 硬盘 网卡 数据接口 声卡
7
5
4
8
映泰TH67XE
适用用户 发烧超频玩家、游戏玩家 ① ② ③ ④ ⑤ ⑥ ⑦ ⑧ 7相超强供电 G.P.U节能技术 双卡加速 最全高清接口输出 全固态电容 钛合金散热 GT456(四线程/SUB5G/SATA6G) 映泰高清遥控二代
映泰主板A970 5.3_BIOS说明书-英文

TA970 UEFI BIOS ManualUEFI BIOS Setup (1)1 Main Menu (3)2 Advanced Menu (4)3 Chipset Menu (16)4 Boot Menu (21)5 Security Menu (23)6 Performance Menu (24)7 Exit Menu (30)iTA970 UEFI BIOS ManualUEFI BIOS SetupIntroductionThe purpose of this manual is to describe the settings in the AMI UEFI BIOS Setup program on this motherboard. The Setup program allows users tomodify the basic system configuration and save these settings to NVRAM.UEFI BIOS determines what a computer can do without accessing programs from a disk. This system controls most of the input and output devices such as keyboard, mouse, serial ports and disk drives. BIOS activates at the first stage of the booting process, loading and executing the operating system.Some additional features, such as virus and password protection or chipset fine-tuning options are also included in UEFI BIOS.The rest of this manual will to guide you through the options and settings in UEFI BIOS Setup.Plug and Play SupportThis AMI UEFI BIOS supports the Plug and Play Version 1.0A specification.EPA Green PC SupportThis AMI UEFI BIOS supports Version 1.03 of the EPA Green PCspecification.ACPI SupportAMI ACPI UEFI BIOS support Version 1.0/2.0 of Advanced Configuration and Power interface specification (ACPI). It provides ASL code for power management and device configuration capabilities as defined in the ACPI specification, developed by Microsoft, Intel and Toshiba.PCI Bus SupportThis AMI UEFI BIOS also supports Version 2.3 of the PCI (PeripheralComponent Interconnect) local bus specification.DRAM SupportDDR3 SDRAM (Double Data Rate III Synchronous DRAM) is supported.1TA970 UEFI BIOS Manual2Supported CPUsThis AMI UEFI BIOS supports the AMD CPU. Using SetupWhen starting up the computer, press <Del>during the Power-On Self-Test (POST) toenter the UEFI BIOS setup utility.In the UEFI BIOS setup utility, you will seeGeneral Help description at the top rightcorner, and this is providing a briefdescription of the selected item. NavigationKeys for that particular menu are at thebottom right corner, and you can use thesekeys to select item and change the settings.NoticeThe default UEFI BIOS settings apply for most conditions to ensureoptimum performance of the motherboard. If the system becomesunstable after changing any settings, please load the default settings to ensure system’s compatibility and stability. Use Load Setup Default under the Exit Menu.For better system performance, the UEFI BIOS firmware is beingcontinuously updated. The UEFI BIOS information described in this manual is for your reference only. The actual UEFI BIOS information and settings on board may be slightly different from this manual.The content of this manual is subject to be changed without notice. Wewill not be responsible for any mistakes found in this user’s manualand any system damage that may be caused by wrong-settings.TA970 UEFI BIOS Manual31 Main MenuOnce you enter AMI UEFI BIOS Setup Utility, the Main Menu will appear onthe screen providing an overview of the basic system information.BIOS InformationIt shows system information including UEFI BIOS version, Project Code, Model Name, Build Date, etc. Total MemoryShows system memory size, VGA shard memory will be excluded. System DateSet the system date. Note that the ‘Day’ automatically changes when you set the date. System TimeSet the system internal clock.TA970 UEFI BIOS Manual42 Advanced MenuThe Advanced Menu allows you to configure the settings of CPU, Super I/O, Power Management, and other system devices.NoticeBeware of that setting inappropriate values in items of this menu may causesystem to malfunction.PCI Subsystem SettingsTA970 UEFI BIOS ManualPCI ROM PriorityIn case of multiple option ROMs (Legacy and EFI Compatible), this item specifies what PCI Option ROM to launchOptions: Legacy ROM (Default) / EFI Compatible ROMPCI Latency TimerThis item sets the value to be programmed into PCI Latency Timer Register. Options: 32 PCI Bus Clocks (Default) / 64 PCI Bus Clocks / 96 PCI Bus Clocks / 128 PCI Bus Clocks / 160 PCI Bus Clocks / 192 PCI Bus Clocks / 224 PCI Bus Clocks / 248 PCI Bus ClocksVGA Palette SnoopThis item enables or disables VGA Palette Registers Snooping.Options: Disabled (Default) / EnabledPCI Express SettingsNo SnoopThis item enables or disables PCI Express Device No Snoop option. Options: Enabled (Default) / DisabledMaximum PayloadThis item sets Maximum Payload of PCI Express Device or allows System BIOS to select the value.Options: Auto (Default) / 128 Bytes / 256 Bytes / 512 Bytes / 1024 Bytes / 2048 Bytes / 4096 Bytes5TA970 UEFI BIOS Manual6Maximum Read RequestThis item sets Maximum Read Request Size of PCI Express Device or allows System BIOS to select the value.Options: Auto (Default) / 128 Bytes / 256 Bytes / 512 Bytes / 1024 Bytes / 2048 Bytes / 4096 BytesASPM SupportThis item sets the ASPM Level: Force LO – Force all links to LO State; Auto – BIOS auto configures; Disabled – Disables ASPM.Options: Disabled (Default) / Auto / Force L0sACPI Settings/WakeUp Event controlEuP ControlWhen EuP is enabled, the system will meet EuP requirement.Options: Disabled (Default) / EnabledACPI Sleep StateThis item selects the highest ACPI sleep state the system will enter when the SUSPEND button is pressed.Options: S1 (CPU Stop Clock) (Default) / Suspend Disabled / S3 (Suspend to RAM)PME Wake up from S5The item enables the system to wake from S5 using PME event.Options: Disabled (Default) / EnabledTA970 UEFI BIOS ManualWake system with Fixed TimeThis item enables or disables the system to wake on by alarm event. When this item is enabled, the system will wake on the hr::min::sec specified. Options: Disabled (Default) / EnabledWake up dateYou can choose which date the system will boot up.Wake up hour / Wake up minute / Wake up secondYou can choose the system boot up time, input hour, minute andsecond to specify.Ring-In Wake up from S5This item enables the system to wake from S5 using Ring-In event. Options: Disabled (Default) / EnabledPS2 Keyboard PowerOnThis item allows you to control the keyboard power on function.Options: Disabled (Default) / Any Key / Stroke Key / Specific Key Stroke Keys SelectedThis item will show only when Keyboard PowerOn is set “Stroke Key.”Options: Wake Key (Default) / Power Key / Ctrl+F1 / Ctrl+F2 / Ctrl+F3 / Ctrl +F4 / Ctrl+F5 / Ctrl+F6Specific Key EnterThis item will show only when Keyboard PowerOn is set “Specific Key.”Press Enter to set Specific key.PS2 Mouse PowerOnThis item allows you to control the mouse power on function.Options: Disabled (Default) / EnabledUSB Device Wakeup from S3/S4This item allows you to enable or disabled the USB resume from S3/S4 function.Options: Disabled (Default) / Enabled7TA970 UEFI BIOS Manual8CPU ConfigurationC1EThis item allows you to configure the Enhanced Halt State (C1E) function, which may reduce the power consumption of your system when the system is idle.Options: Disabled (Default) / EnabledSVMThis item allows you to enable AMD virtualization in CPU. This secure virtual mode will let your run multiple OS (guest) on the same physical hardware by decoupling OS and physical hardware with the hypervisor layer.Options: Enabled (Default) / DisabledPowerNowThis item allows you to enable or disable the generation of ACPI_PPC, _PSS, and _PCT objects.Options: Enabled (Default) / DisabledHTC limitThis item allows you to enable / disable HTC limit.(This item is only for AM3 CPU)Options: Enabled (Default) / DisabledHTC temperature limitThis item allows you to set HTC temperature limit. Range: 70℃ - 95℃ Options: 90 (Default)TA970 UEFI BIOS Manual9Core LevelingThis item allows you to set CPU DowncoringOptions: Auto (Default) / ManualHPC ModeThis item allows you to set High Performance Computing Mode.(This item is only for AM3+ CPU)Options: Disabled (Default) /EnabledCPB ModeThis item allows you to set core performance boost enablement.(This item is only for AM3+ & AM3 revision E CPU)Options: Disabled (Default) /Enabled SATA ConfigurationThe BIOS will automatically detect the presence of SATA devices. There is a sub-menu for each SATA device. Select a device and press <Enter> to enterthe sub-menu for detailed options.OnChip SATA ChannelThis option allows you to enable the on-chip Serial ATA.Options: Enabled (Default) / DisabledTA970 UEFI BIOS Manual10OnChip SATA TypeThis option allows you to select the on-chip Serial ATA operation mode. Options: Native IDE (Default) / RAID / AHCI / Legacy IDESATA IDE Combined ModeThis option controls the SATA/PATA combined mode.Options: Enabled (Default) / DisabledSMART FAN ControlCPU Smart FANThis item allows you to control the CPU Smart Fan function.Options: Disabled (Default) / Auto / 4Pin / 3PinCPU FAN CalibratePress [ENTER] to calibrate CPU FAN.Control ModeThis item provides several operation modes of the fan.Options: Quiet / Aggressive / ManualFan Ctrl OFF(℃)When CPU temperature is lower than this value, the CPU fan will keep lowest RPM.Options: 10 (℃) (Default)Fan Ctrl On(℃)When CPU temperature is higher than this value, the CPU fan controller will turn on.Options: 20 (℃) (Default)TA970 UEFI BIOS Manual11Fan Ctrl Start ValueThis item sets CPU FAN Start Speed Value.Options: 50 (Default)Fan Ctrl SensitiveThe bigger the numeral is, the higher the FAN speed is.Options: 30 (Default)USB ConfigurationLegacy USB SupportThis item determines if the BIOS should provide legacy support for USB devices like the keyboard, mouse, and USB drive. This is a useful feature when using such USB devices with operating systems that do not natively support USB (e.g. Microsoft DOS or Windows NT).Options: Enabled (Default) / Disabled / AutoLegacy USB3.0 SupportThis item enables/disables legacy USB3.0 support.Options: Enabled (Default) / Disabled / AutoEHCI Hand-OffThis is a workaround for OSes without EHCI hand-off support. The EHCI ownership change should be claimed by EHCI driver.Options: Disabled (Default) / EnabledTA970 UEFI BIOS Manual12Super IO ConfigurationRestore AC Power LossThis setting specifies how your system should behave after a power fail or interrupts occurs. Power Off: Leaving the system in power-off status after power recovers. Power ON: Powering on the system immediately when power returns. Last State: 1. Leaving the system in power-off if the system shuts down at DC off status; 2. Powering on the system immediately if the system shuts down at DC on status.Options: Power Off (Default) / Power On / Last State Serial Port 1 ConfigurationTA970 UEFI BIOS Manual13Serial PortThis item enables or disables Serial Port (COM).Options: Enabled (Default) / DisabledChange SettingsThis item selects an optimal setting for Super IO device.Options: Auto (Default) / IO=3F8h; IRQ=4 / IO=3F8h; IRQ=3,4,5,6,7,10,11,12 / IO=2F8h; IRQ=3,4,5,6,7,10,11,12 / IO=3E8h; IRQ=3,4,5,6,7,10,11,12 / IO=2E8h; IRQ=3,4,5,6,7,10,11,12Parallel Port ConfigurationParallel PortThis item enables or disables Parallel Port (LPT/LPTE).Options: Enabled (Default) / DisabledChange SettingsThis item allows you to select an optimal setting for Super IO device.Options: Auto (Default) / IO=378h; IRQ=5 / IO=378h; IRQ=5, 6, 7, 10, 11, 12 / IO=278h; IRQ=5, 6, 7, 10, 11, 12 / IO=3BCh; IRQ=5, 6, 7, 10, 11, 12 / IO=378h / IO=278h / IO=3BChDevice ModeThis item allows you to determine how the parallel port should function. Options: Standard Parallel Port Mode (Default) / EPP Mode / ECP Mode / ECP Mode & EPP ModeTA970 UEFI BIOS Manual CIR Controller ConfigurationCIR ControllerThis item enables or disables CIR Controller.Options: Disabled (Default) / Enabled14TA970 UEFI BIOS Manual15H/W MonitorPWM Processor HotThis item enables/disables PWM Processor Hot.Options: Enabled (Default) / DisabledShutdown TemperatureThis item allows you to set up the CPU shutdown Temperature. Options: Disabled (Default) / 70℃/158℉ / 75℃/167℉ / 80℃/176℉ / 85℃/185℉ / 90℃/194℉TA970 UEFI BIOS Manual163 Chipset MenuThis section describes configuring the PCI bus system. PCI, or Personal Computer Interconnect, is a system which allows I/O devices to operate at speeds nearing the speed of the CPU itself uses when communicating with its own special components.NoticeBeware of that setting inappropriate values in items of this menu may causesystem to malfunction.North BridgeTA970 UEFI BIOS ManualIOMMUThis item allows you to enable/disable NB IOMMU.Options: Disabled (Default) / EnabledNB Port #2/#4/#09/#10Gen2 High Speed ModeOptions: GEN2 Autonomous (Default) / GEN1 / GEN2 Software Initiated / GEN2 Advertize RCPort ASPM supportOptions: Disabled (Default) / L0s enable / L1 enable / L0s + L1 enable / L0s Downstream Only / L0s Downstream Only + L1Link Width (Only for Port #02/#04/#09)Options: Auto (Default) / x1 / x2 / x4 / x8 / x1617TA970 UEFI BIOS Manual18South Bridge ConfigurationSB USB ConfigurationOHCI HC (Bus 0 Dev 18/19/20/22 Fn 0/5)This item allows you to control OHCI host controller. (USB 1.1 Device) Options: Enabled (Default) / DisabledTA970 UEFI BIOS Manual19SB Azalia Audio ConfigurationHD Audio Azalia DeviceThis item allows you to control the HD audio device.Options: Enabled (Default) / Auto / DisabledOnboard DevicesLaunch Storage OpROMThis item enables/disables Boot Option for Legacy Mass Storage Devices with Option ROM.Options: Enabled (Default) / DisabledTA970 UEFI BIOS Manual Realtek PCIE NICThis item enables/disables Realtek PCIE NIC.Options: Enabled (Default) / DisabledOnboard LAN Option ROMThis item enables/disables Onboard LAN Option ROM. Options: Disabled (Default) / EnabledOnboard USB3.0This item enables/disables Onboard USB3.0 Controller. Options: Enabled (Default) / Disabled20TA970 UEFI BIOS Manual214 Boot MenuThis menu allows you to setup the system boot options.Setup Prompt TimeoutThis item sets number of seconds to wait for setup activation key.Options: 2 (Default) Bootup NumLock StateThis item selects the keyboard NumLock state.Options: On (Default) / Off Full LOGO Screen DisplayThis item allows you to enable/disable Full LOGO Screen Show function. Options: Enabled (Default) / Disabled GateA20 ActiveUpon Request – FA20 can be disabled using BIOS services. Always – do not allow disabling GA20; this option is useful when any RT code is executed above 1MBOptions: Upon Request (Default) / AlwaysTA970 UEFI BIOS ManualOption ROM MessagesThis item sets the display mode for option ROM.Options: Force BIOS (Default) / Keep CurrentInterrupt 19 CaptureInterrupt 19 is the software interrupt that handles the boot disk function. When set to Enabled, this item allows the option ROMs to trap interrupt 19. Options: Disabled (Default) / EnabledBIOS Flash protectionWhile enabled, it can’t flash write and flash erase by SMI.Options: Enabled (Default) / DisabledBOOT SUCCESS BEEPWhen this item is set to Enabled, BIOS will let user know boot success with beep.Options: Enabled (Default) / DisabledSmart Multi-CoreThis item sets the smart multi-core. (This item is only for AM3 CPU.) Options: Enabled (Default) / DisabledBoot Option #1/#2/#3The items specify the boot device priority sequence from the available devices. The number of device items that appears on the screen depends on the number of devices installed in the system.CD/DVD ROM Drive BBS PrioritiesThis item sets the order of the legacy devices in this group.Hard Drive BBS PrioritiesThis item sets the order of the legacy devices in this group.22TA970 UEFI BIOS Manual235 Security MenuAdministrator PasswordThis item sets Administrator Password. User PasswordThis item sets User Password.TA970 UEFI BIOS Manual246 Performance MenuThis submenu allows you to change voltage and clock of various devices. (However, we suggest you use the default setting. Changing the voltage and clock improperly may damage the device.)NoticeBeware of that setting inappropriate values in items of this menu maycause system to malfunction.The options and default settings might be different by RAM or CPUmodels.BIO-unlocKINGThis item allows you to activate BIO-unlocKING function.(This item is only for AM3 CPU.)Options: Disabled (Default) / Enabled CPU ClockThis item allows BIOS to select CPU Clock (MHz).Options: 200 (Default) / 200~600 Spread SpectrumThis item allows you to enable or disable spread spectrum forCPU/ATIG/SRC clock.Options: Disabled (Default) / EnabledTA970 UEFI BIOS Manual25Memory Clock ModeThis item allows user to select the DRAM Frequency programming method. If Auto, the DRAM speed will be based on SPDs. If Manual, the DRAM speed specified will be programmed regardless of SPD. If AMP/XMP/XMP2, the DRAM speed specified will be refer memory profile.Options: Auto (Default) / Manual / AMP / XMP1 / XMP2(AMP/XMP is only for AM3+ CPU)Note: The following items appear only when you set the Memory Clock Mode item to [Manual]Memory Frequency: DDR 800 / DDR3 1066 / DDR3 1333 / DDR3 1600 / DDR3 1866AMD Pstate ConfigurationCustom P-StatedThis item will tell BIOS whether to use the step option below this configure the P-State, or whether to configure the P-States automatically.Options: Disabled (Default) / EnabledNote: The following items appear only when you set the Custom P-State item to[Enabled]Core FIDThis item sets the frequency to use for Core P-State selected. Value is saved in the _PSS object.Options: x8 1600MHz ~ x31.5 6300MHzCore VIDThis function allows you to adjust the voltage of CPU Core.TA970 UEFI BIOS Manual26Core DIDThis is the Core Divider.Options: Divided by 1 (Default) / Divided by 2 / Divided by 4 / Divided by 8 / Divided by 16NB FIDThis item sets the frequency to use for Core P-State selected. Value is saved in the _PSS object.Options: 800MHz ~ 6800MHzNB VIDThis function allows you to adjust the voltage of NB Core.HT ConfigurationHT FrequencyThe Hyper Transport link will run at this speed if it is slower than or equal to the system clock and the board is capable.Options: Auto (Default) / 200 MHZ / 400 MHZ / 600 MHZ / 800 MHZ / 1000 MHZ / 1200 MHZ / 1400 MHZ / 1600 MHZ / 1800 MHZ / 2000 MHZ / 2200 MHZ / 2400 MHZ / 2600 MHZ / 2800 MHZ / 3000 MHZ / 3200 MHZ / HT widthThe Hyper Transport link will run at this width.Options: Auto (Default) / 8 BIT / 16 BITTA970 UEFI BIOS Manual27DRAM Timing ConfigurationDRAM Timing ModeThis item selects DRAM Timing Mode.Options: Auto (Default) / DCT0 / DCT1 / BothNote: The following items appear only when you set the DRAM Timing Mode item to [DCT0 / DCT1 / Both]2TCMD Options: Auto (Default) / 1T / 2TCL Options: Auto (Default) / 4~12 CLKTRCD Options: Auto (Default) / 5~12 CLKTRPOptions: Auto (Default) / 5~12 CLKTRASOptions: Auto (Default) / 15~30 CLKTRCOptions: Auto (Default) / 11~42 CLKTWROptions: Auto (Default) / 5~8 / 10 / 12 CLKTWTROptions: Auto (Default) / 4~7 CLKTA970 UEFI BIOS Manual28TRRDOptions: Auto (Default) / 4~7 CLKTRTPOptions: Auto (Default) / 4~7 CLKMCT ConfigurationBank InterleavingThis item allows you to enable or disable Memory Bank interleaving. Options: Auto (Default) / DisabledChannel InterleavingThis item allows you to control the Memory Channel interleaving. Options: Auto (Default) / DisabledMemory Hole RemappingThis item allows you to enable or disable the Memory Remapping Around Memory HoleOptions: Enabled (Default) / DisabledUnganged Mode supportThis item allows you to enable or disable Unganged Mode.Options: Enabled (Default) / DisabledPower Down EnableThis item allows you to enable or disable DDR3 power down mode. Options: Disabled (Default) / EnabledTA970 UEFI BIOS Manual 29Memory Over VoltageThis item allows you to control Memory Over Voltage CPU VcoreThis item allows you to control CPU Vcore. CPU-NB Over VoltageThis item allows you to control CPU-NB Over Voltage.BIOSTAR Memory InsightDDR3_A1/A2/B1/B2These items display SPD information of DDR3 memory.TA970 UEFI BIOS Manual307 Exit MenuThis menu allows you to load the optimal default settings, and save ordiscard the changes to the BIOS items.Discard Changes and ExitAbandon all changes made during the current session and exit setup. Save Changes and ResetReset the system after saving the changes. Restore DefaultsThis selection allows you to reload the BIOS when problem occurs during system booting sequence. These configurations are factory settings optimized for this system. Launch Shell from deviceThis item attempts to EFI Shell application (Shellx64.efi) from one of the available devices.。
ASROCK 770 Extreme3 说明书

產品摘要- 支持6核心处理器- 华擎DuraCap电容(2.5倍更长的使用寿命), 100% 日本原装高品质高传导固态电容 - 支持高达140W的CPU- 通过ACC(高级时钟校准)功能支持AMD OverDrive™ 系统调节- 支持双通道DDR3 1600内存- 2 x SATA3 6.0 Gb/s 接口, 1 x USB 3.0 接口, 1 x eSATAII 接口, PCIE 千兆网卡- 支持华擎 Instant Boot, Instant Flash, 华擎超频 调节器, 智能型能源节约器, OC DNA- 7.1声道高保真音频,支持内容保护功能(ALC892 音频编码解码器),支持优质蓝光音效 - 支持 ErP/EuP- 附赠 : CyberLink DVD 套件 - OEM 与试用版; Creative Sound Blaster X-Fi MB - 试用版規格更改時恕不預先通知 品牌和產品名稱歸各自公司所有。
不保證任何配置与產品實物規格相同。
詳細規格中央處理器芯片內存擴充插槽音效网絡背板I/O板載接口SATA3USB 3.0BIOS 特性支持光盤獨家功能附件規格尺寸認證硬件監控操作系統- ATX 规格: 12.0-in x 8.2-in, 30.5 cm x 20.8 cm- 全固态电容设计 (100%日本原装高品质高传导固态电容)- 支持 Socket AM3 处理器:AMD Phenom II X4 / X3 / X2 (除了 920 / 940) / Athlon II X4 / X3 / X2 / Sempron 处理器- 支持六核心处理器 - 支持高达140W的CPU- 通过ACC(高级时钟校准)功能支持AMD OverDrive™ 系统调节- AMD LIVE! Ready- 支持AMD Cool 'n' Quiet降温静音技术- 前端总线2600 MHz(5.2 GT/s)- 支持自由超频技术- 支持Hyper-Transport 3.0 (HT 3.0)技术- 北桥: AMD 770- 南桥: AMD SB710- 双通道DDR3内存技术- 4 x DDR3 内存插槽- 支持DDR3 1600/1333/1066/800 non-ECC, un-buffered内存- 系统内存最大容量: 16GB- 1 x PCI Express 2.0 x 16 插槽 (蓝色: x 16)- 2 x PCI Express 2.0 x 1 插槽- 3 x PCI 插槽- 7.1声道高保真音频,支持内容保护功能(ALC892音频编码 解码器)- 支持优质蓝光音效- PCIE x 1 千兆网卡10/100/1000 Mb/s - Realtek RTL8111DL- 支持网络唤醒功能(Wake-On-LAN)- 4 x SATAII接口(3.0 Gb/s),支持RAID(RAID 0,RAID 1, RAID 10 和JBOD), NCQ, AHCI和“热插拔”功能- 2 x SATA3接口(6.0 Gb/s)- 1 x ATA133 IDE接口(支持2 x IDE设备)- 1 x 软驱接口- 1 x 红外线接针- 1 x COM端口接针- 1 x HDMI_SPDIF 接头- 1 x 电源 LED 接针- CPU/机箱/电源风扇接口- 24针ATX电源接口- 8针12V电源接口- CD输入接针- 前面板音频接口- 3 x USB 2.0接针(支持6 x USB 2.0接口)- 8Mb AMI Legal BIOS - 支持“即插即用”- 符合ACPI 1.1,支持唤醒与自动开机(Wake Up Events)- 支持免跳线- 支持SMBIOS 2.3.1- CPU VID电压多功能调节器- 由 Marvell SE9123 支持的 2 组 SATA 6.0Gb/s 端口, 可支持硬件 NCQ、AHCI 与 热插拔功能- 由 Fresco FL1000G 支持的一个 USB 3.0 端口,支持 USB 1.0/2.0/3.0,最高速度可达 5Gb/s- 驱动程序, 应用软件, 杀毒软件 (试用版),华擎软件套装(CyberLink DVD 套件 - OEM 与试用版; Creative Sound Blaster X-Fi MB - 试用版)- 华擎超频调节器- 智能型能源节约器- Instant Boot- 华擎 Instant Flash - 华擎 OC DNA- Hybrid Booster(安心超频技术): - CPU频率无段调节- ASRock U-COP(华擎通用CPU过热保护技术) - Boot Failure Guard (B.F.G.,启动失败恢复技术)- 支持Microsoft Windows 7 / 7 64-bit / Vista / Vista 64-bit / XP / XP Media Center / XP 64-bit- FCC, CE, WHQL- 支持 ErP/EuP(需要搭配支持 ErP/EuP 的电源供应器)- 1 x 华擎SLI_Bridge_2S桥接卡- 快速安装指南,支持光盘,I/O挡板- 软驱/ATA 133排线- 2 x SATA数据线(选购)- 1 x SATA 1对1电源线(选购)- CPU温度检测- 机箱温度检测- CPU/机箱/电源风扇转速计- CPU静音风扇- 电压实时监控:+12V,+5V,+3.3V,核心电压I/O面板- 1 x PS/2鼠标接口- 1 x PS/2键盘接口- 1 x 同轴SPDIF数字音频输出端口- 1 x 光纤SPDIF数字音频输出端口- 5 x USB 2.0接口- 1 x eSATAII 接口- 1 x USB 3.0接口- 1 x RJ-45 网卡接口LED指示灯(ACT/LINK LED和SPEED LED)- HD音频插孔:侧置喇叭/后置喇叭/中置/低音/线性输入/ 前置喇叭/麦克风USB3.0,全球使用最普遍的电脑外围接口再次迎来了重大革新,以适应目前人们对连接带宽越来越高的要求 。
主板中文使用手册

芯片组 中央处理器
提供1 个IDE 接口 提供1 个FDD 接口 提供6 个Serial ATAII 高速硬盘 接口 提供1 个eSATA 接口(后置面板) 整合8 声道高清晰数字音频控 制器 支持8 声道3D 环绕声效 整合PCIE 千兆网卡 支持10/100/1000Mbps 数据传 输率 战旗C.A785G X5 D3 版 V14 AMI Flash ROM
6
2011-11-18
第二章 硬件安装
2-3 跳线设置
依照跳线帽的不同连接,可以改变主板的电子线路,影响主板的 运行。如果跳线帽连接两个针脚之间,说明是短路;如果跳线帽没有 连接两个针脚之间或放置在一个针脚上,说明是断开。
7
2011-11-18
第三章 驱动程序安装说明
插入七彩虹主板驱动程序安装光盘,安装程序会自动运行,弹出下面窗 口 CAUTION: 安装完成硬件后, 必须安装对应的驱动程序, 才能发挥该主板 的强劲性能
8 声道音频设备
内存
– –
网络功能
扩展插槽
– –
BIOS
4
–
第一章 简介
1-3主机板布局图 主机板布局图
5
2011-11-18
第二章 硬件安装
2-1 硬件安装步骤 请依照下列方式,完成电脑的安装:
安装中央处理器(CPU) 安装内存 装入机箱 安装所有扩展卡 连接所有信号线、排线、电源线及面板控制线
3
2011-11-18
第一章 简介
1-2 主机板规格 设计
– – – –
存储设备
– – – – – – – – – –
mATX 板型规范 AMD 785G+SB710 芯片设计 基于AM3 接口 支持AMD Socket AM3 系列处 理器 提供4 条插槽 支持双通道DDR3 1333/1066MHz 内存 1 条PCI-Express x16 插槽 1 条PCI-Express x1 插槽 2 条 PCI 插槽 2011-11-18
映泰 FM2A75M-DGS 主板BIOS说明书
6
4. Advanced Screen(高級界面)
在這個部分裏,您可以設置以下項目:CPU Configuration(中央處理器設置), North Bridge Configuration (北橋設置) , South Bridge Configuration (南 橋設置), Storage Configuration(存儲設置), SuperIO Configuration(高 級輸入輸出設置), ACPI Configuration(ACPI 電源管理設置), USB Configuration(USB 設置)和 Network Configuration( 网絡配置 ) 等等。
UEFI SETUP UTILITY
1 简介
华擎絢动 UEFI 结合了系统配置工具、炫酷的音效与震撼的视觉效果。它不仅让 BIOS 设置变得不那么困难,同时变得更加有趣。此部分介绍如何使用 UEFI SETUP UTILITY 配置您的系统。UEFI SETUP UTILITY 存储在主板上的 UEFI 芯片中。您可 以在启动计算机时运行 UEFI SETUP UTILITY。请在开机自检 (POST) 期间按 <F2> 或 <Delete> 以进入 UEFI SETUP UTILITY;否则 POST 将继续执行其检测程序。 如果在 POST 后希望进入 UEFI SETUP UTILITY,可以按 <Ctl> + <Alt> + <Delete> 或者 按系统机箱上的复位按钮重新启动系统。此外,也可以通过关闭然后开启系统来执行 重新启动。
5
Read to Precharge(tRTP)( 讀取到預充電 ) 使用此項目更改讀取到預充電 (tRTP) 自動 / 手動設置。 默認值是 [Auto]( 自 動 )。 Four Activate Window(tFAW)( 四激活窗口 ) 使用此項目更改四激活窗口 (tFAW) 自動 / 手動設置。默認值是 [Auto]( 自 動 )。 Voltage Configuration( 電壓設置 ) DRAM Voltage(內存電壓) 使用此項為內存電壓選擇。默認值是 [Auto]( 自動 )。 APU PCIE Voltage VDDP(APU PCIE 電壓 VDDP) 使用此項為 APU PCIE 電壓 VDDP 選擇。默認值是 [Auto]( 自動 )。 SB Voltage(南橋電壓) 使用此項為南橋電壓選擇。默認值是 [Auto]( 自動 )。
M5A78L-M USB3 使用手冊 ii T8017 第二版(V2) 2013年1月发行说明书

diiT8017第二版(V2)2013 年 1 月發行Offer to Provide Source Code of Certain SoftwareThis product may contain copyrighted software that is licensed under the General Public License (“GPL”) and under the Lesser General Public License Version (“LGPL”). The GPL and LGPL licensed code in this product is distributed without any warranty. Copies of these licenses are included in this product.You may obtain the complete corresponding source code (as defined in the GPL) for the GPL Software, and/or the complete corresponding source code of the LGPL Software (with the complete machine-readable “work that uses the Library”) for a period of three years after our last shipment of the product including the GPL Software and/or LGPL Software, which will be no earlier than December 1, 2011, either(1) for free by downloading it from /download;or (2) for the cost of reproduction and shipment, which is dependent on the preferred carrier and the location where you want to have it shipped to, by sending a request to:ASUSTeK Computer Inc.Legal Compliance Dept.15 Li Te Rd.,Beitou, Taipei 112Taiwan In your request please provide the name, model number and version, as stated in the About Box of the product for which you wish to obtain the corresponding source code and your contact details so that we can coordinate the terms and cost of shipment with you.The source code will be distributed WITHOUT ANY WARRANTY and licensed under the same license as the corresponding binary/object code.This offer is valid to anyone in receipt of this information.ASUSTeK is eager to duly provide complete source code as required under various Free Open Source Software licenses. If however you encounter any problems in obtaining the full corresponding source code *************************************************************************,statingthe product and describing the problem (please do NOT send large attachments such as source code archives etc to this email address).版權說明©ASUSTeK Computer Inc. All rights reserved. 華碩電腦股份有限公司保留所有權利本使用手冊包括但不限於其所包含的所有資訊皆受到著作權法之保護,未經華碩電腦股份有限公司(以下簡稱「華碩」)許可,不得任意地仿製、拷貝、謄抄、轉譯或為其他利用。
映泰主板设置手册B75MU3B
2.4
接口和插槽 .......................................................................................10
第三章: 接头和跳线安装............................................... 13
(取决于CPU) 插槽
PCI 插槽
支持 PCI-E Gen3 x16扩展卡 x1
x1
支持 PCI扩展卡
PCI -E Gen2 x 1 插槽
x1
支持 PCI-E Gen2 x1扩展卡
板载接口
SATA3接口
x1
每个接口支持1个SATA3设备
SATA2接口
x3
每个接口支持1个SATA2设备
前置面板接口
x1
CE 符合性简短声明 我们声明此产品符合现行标准,并满足 2004/108/CE, 2006/95/CE 和 1999/05/CE 指令规定的所有基本要求。
B75MU3B 设置手册
防静电操作规则
静电可能严重损坏您的设备,在处理主板以及其它的系统设备的时候要特别注意, 避免和主板上的系统组件的不必要接触,保证在抗静电的环境下工作,避免静电 放电可能对主板造成损坏,当在您的机箱中插入或者移除设备时,请保证电源处 于断开状态,厂商对于不遵照本操作规则或者不遵守安全规范而对主板造成的损 坏不负责。
3.1
跳线安装 ...........................................................................................13
3.2
安装细节 ...........................................................................................13
IHawk-V_USer_Op_3设置中文说明
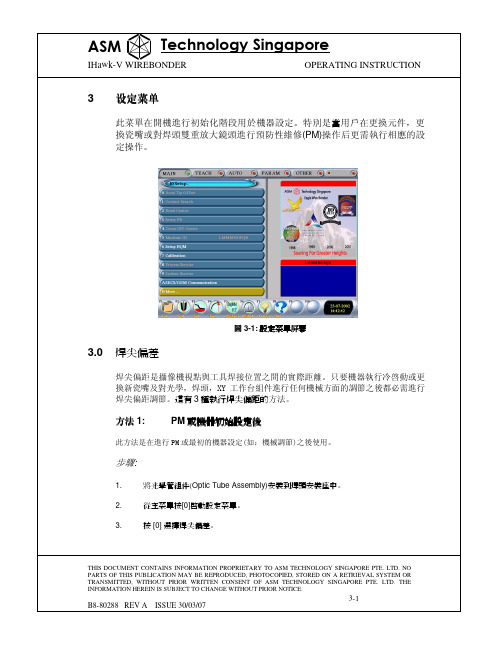
圖 3-1: 設定菜單屏幕焊尖偏差焊尖偏距是攝像機視點與工具焊接位置之間的實際距離。
只要機器執行冷啓動或更換新瓷嘴及對光學,焊頭,XY工作台組件進行任何機械方面的調節之後都必需進行焊尖偏距調節。
這有3種執行焊尖偏距的方法。
PM或機器初始設定後此方法是在進行PM或最初的機器設定(如:機械調節)之後使用。
將光學管組件(Optic Tube Assembly)安裝到焊頭安裝座中。
從主菜單按[0]啟動設定菜單。
[0] 選擇焊尖偏差。
CONTAINS INFORMATION PROPRIETARY TO ASM TECHNOLOGY SINGAPORE PTE.PARTS OF THIS PUBLICATION MAY BE REPRODUCED, PHOTOCOPIED, STORED ON A RETRIEVAL SYSTEM OR WITHOUT PRIOR WRITTEN CONSENT OF ASM TECHNOLOGY SINGAPORE圖 3-2: 設定PR 屏幕[3]選擇設定PR。
[0] 選擇圖像調節。
自動設定選項。
CONTAINS INFORMATION PROPRIETARY TO ASM TECHNOLOGY SINGAPORE PTE.PARTS OF THIS PUBLICATION MAY BE REPRODUCED, PHOTOCOPIED, STORED ON A RETRIEVAL SYSTEM OR WITHOUT PRIOR WRITTEN CONSENT OF ASM TECHNOLOGY SINGAPORE PTE.圖 3-3: 設定 BQM 菜單屏幕顯示微調信息此功能用於讓用戶檢查換能器的性能。
上升時間(ms)用於控制超聲波能量上升時間。
焊接時間應設定大於上升時間第一與第二焊接功率此功能用於讓用戶設定超聲波控制系統(BQM)的最大允許輸出功率選擇[High]功率設定時最大輸出3.2 watt, [Low]功率設定時最大輸出[Ult-Low] 功率設定時最大輸出0.4 watt 。
映泰主板TA75MH2_A55MH2
FCC 条款
依照 FCC 条款第 15 部分的规定,本装置已经通过测试并且符合 Class B 级数字 装置的限制。此条款限制了在安装过程中可能造成的有害射频干扰并提供了合理 的防范措施。本装置在使用时会产生无线射频辐射,如果没有依照本手册的指示 安装和使用,可能会与无线通讯装置产生干扰。然而,并不保证在特定的安装下 不会发生任何干扰。
6.4
附加信息 ...........................................................................................32
6.5
AMI BIOS哔声代码..........................................................................33
6个sata60gbs接口6个sata30gbs接口2个usb20接头每个接头支持2个usb20端口2个usb20接头每个接头支持2个usb20端口1个usb30接头每个接头支持2个usb30端口1个电源接口4针1个电源接口4针1个电源接口24针1个电源接口24针1个cpu风扇接头1个cpu风扇接头1个系统风扇接头板载接口1个系统风扇接头1个前置面板接头1个前置面板接头1个前置音频接头1个前置音频接头1个清空cmos数据接头1个清空cmos数据接头1个红外接头1个红外接头1个打印接端口1个打印机端口1个串行端口1个串行端口1个spdif输出接口1个spdif输出接口主板尺寸microatx244mmx200mm操作系统支持windowsxpvista78如有增加或减少任何os支持biostar保留不预先通知的权利
目录
第一章: 主板介绍 ........................................................... 1
華擎 H77M 主機板 说明书

184ASRock H77M MotherboardASRock提醒您ASRock提醒您...若要在Windows ® 7 / 7 64位元 / Vista TM / Vista TM 64位元中發揮更好的效能,建議您將儲存裝置組態中的BIOS選項設為AHCI模式。
有關BIOS設定的詳細資訊,請參閱支援光碟中的「使用者手冊」。
1. 主機板簡介謝謝你採用了華擎H77M 主機板,本主機板由華擎嚴格製造,品質可靠,穩定性好,能夠獲得卓越的性能。
此快速安裝指南包括了主機板介紹和分步驟安裝指導。
您可以查看支持光碟裡的使用手冊了解更詳細的資料。
1.1 包裝盒內物品華擎H77M 主機板(Micro ATX 規格: 9.6英吋 x 8.5英吋, 24.4公分 x 21.6公分)華擎H77M 快速安裝指南華擎H77M 支援光碟兩條Serial ATA(SATA)數據線(選配)一塊I/O 擋板繁體中文185ASRock H77M Motherboard繁體中文1.2 主機板規格架構 - Micro ATX 規格:9.6英吋 x 8.5英吋, 24.4公分 x 21.6公分 - 全固態電容設計處理器 - 支援第三代和二代Intel ® Core TM i7 / i5 / i3處理器 (LGA1155腳位) - Digi 電源設計- 4 + 2電源相位設計- 支援Intel ® Turbo Boost 2.0技術 - 支援K 系列解除鎖定CPU- 支援Hyper-Threading 技術(詳見警告1)- 支持Intel ® Ivy Bridge CPU 的Intel ®快速啟動技術和Intel ®智能連接技術晶片組 - Intel ® H77系統記憶體 - 支援雙通道DDR3記憶體技術(見警告2) - 2個DDR3 DIMM 插槽- 支援DDR3 1600/1333/1066 non-ECC、un-buffered 記憶體 (Intel ® Ivy Bridge CPU 支援DDR3 1600,Intel ® Sandy Bridge CPU 支援DDR3 1333)- 最高支援16GB 系統容量(見警告3)- 支援Intel ® Extreme Memory Profile(XMP)1.3/1.2擴充插槽 - 1 x PCI Express 3.0 x16插槽(PCIE1:x16模式)(見警告4) * PCIE 3.0 僅適用 Intel ® Ivy Bridge CPU。
七彩虹 C.N78H X5 Ver1.6主板中文说明书

描述 3PIN 跳线 3PIN 跳线 3PIN 跳线 3PIN 跳线 3PIN 跳线
连接器
连接器 ATXPWR PWR12V PS2 USB_ESATA USB_LAN1 AUDIO1 FDD IDE SATA1-6 HDMI VGA_DVI1 SPDIF_DUAL
名称 ATX 电源连接器 ATX12V 电源连接器 PS/2 鼠标和 PS/2 键盘连接器 USB 端口连接器/eSATA 接口 USB 端口连接器/千兆网络 8 声道音频连接器 软盘驱动器数据连接器 IDE 数据连接器 SATA2 端口数据连接器 HDMI(高清多媒体)接口 VGA/DVI 接口 SPDIF 同轴输入/光纤输出接口
名称 CPU 插座 DDR2 内存插槽 PCI-E x16 插槽 PCI-E x1 插槽 PCI 插槽
描述 Socket AM2 CPU 插座 240 引脚 DDR2 内存扩展插槽 PCI-Express x16 扩展槽 PCI-Express x1 扩展槽 32 位 PCI 逻辑总线扩展插槽
6
第二章硬件安装
3
简介 1-3 主机板布局图
(仅供参考) 4
C.N78H X5 Ver1.6
1-4 主机板部件一览表
跳线
跳线 JBAT1 HDMI_EN RCA_SLC JBIOSSLC JKB
名称 清除 CMOS 跳线 HDMI 的自动与强制检测 SPDIF IN 与 OUT 的切换 双 BIOS 的切换 键盘鼠标唤醒功能
C.N78H X5 Ver1.6
C.N78H X5 Ver1.6
目录
目录 ........................................................................................................................ ii 第一章简介 ............................................................................................................ 1 第二章硬件安装.....................................................................................................7 第三章驱动程序安装说明.................................................................................. 28 第四章 BIOS 设置 ................................................................................................ 30 4-1 进入 BIOS 主界面 ......................................................................................... 30 4-2 BIOS 主界面 ................................................................................................. 33 4-3 系统信息 (System Information)................................................................... 34 4-4 高级 BIOS 设置 (Advanced Settings) ...........................................................37 4-5 启动配置特性 (Boot Settings) .................................................................... 44 4-6 设定管理员/用户密码(Security Settings) .................................................... 45 4-7 电源管理特性 (Power Settings) ..................................................................47 4-8 超频设置(OverClock Settings)...................................................................... 50 4-9 退出选项(Exit Options) ................................................................................. 54 第五章附录 ......................................................................................................... 56
GMNC73-77E3P-N 主板说明书说明书
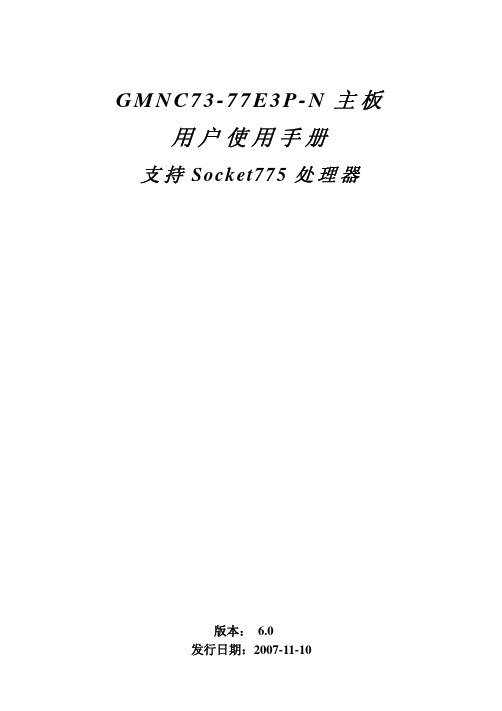
用途
加速图形卡接口 SOCKET 775 CPU 插座 CPU 风扇插座 P4 ATX 电源插座 P4 ATX 电源插座 2 个 240-pin DDRII RAM 插槽 1 个 IDE 通道 北桥控制芯片 锂电池插座 系统风扇插座 系统风扇插座 I/O 芯片 软盘驱动器接口 可扩展 USB 接口 Flash EEPROM 红外线接口 前面板开关和指示灯 音频控制芯片 前置音频接口 3 个 32 位 PCI 插槽 CD-in 音频接口 四个 Serial ATA 通道 清除 CMOS 跳线
3
第三章 主板位图和 I/O 接口
用户手册
备注:以上位置图与您的主板布局可能存在不同,仅供参考。 4
GMNC73-77E3P-N 主板
主板部件一览表
元器件
PCIEXP1 CPU1 CPU_FAN1 ATXPWR1 PWRATX1 DIMM0-DIMM1 IDE1 U2 JBAT1 SYS_FAN1/NB_FAN1 SYS_FAN2 U10 FDD1 F_USB1&F_USB2 U9 IR1 F_PANEL U6 F_AUDIO1 PCI1-PCI3 CD_IN1 SATA1-SATA4 CLR_CMOS1 JLAN1 SPEAKER11
网卡控制跳线 喇叭控制接口
描述
PCI EXPRESS16X 插槽 775 插座 4PIN 插头 4PIN 电源插口 24PIN 电源插口 240PIN DIMM 40PIN 接口 IC 芯片 电池插座 2PIN 插头 3PIN 插头 IC 芯片 34PIN FDD 接口 9PIN 扩展接头 BIOS 5PIN 插头 9PIN 插头 IC 芯片 9PIN 插头 PCI 插槽 4PIN 音频线插口 7PIN 插头 3PIN 跳线
华擎主板产品说明书H77WS-DL_CN

警告!
1、 關于“Hyper-Threading Technology”(超線程技術)的設置,請參考 CD 光盤中的“User Manual”第 53 頁。
2、 這款主板支援雙通道內存技術。在您實現雙通道內存技術之前,為能正確 安裝,請確認您已經閱讀了第 15 頁的內存模組安裝指南。
3、 由于操作系統的限制,在 Windows® 7 / VistaTM / XP 下,供系統使用的實 際內存容量可能小于 4GB。對於 Windows® 操作系統搭配 64 位元 CPU 來說 , 不會存在這樣的限制。您可以通過華擎 XFast RAM 來利用 Windows® 無法使 用的內存。
操作系統
- Microsoft® Windows® 7/7 64 位元 /VistaTM/VistaTM 64 位元 /
toyota 7 inch Basic AVX使用者手冊说明书

Article 3 (Terms of License)1.I n assigning this product, User may not retain the original copy of the embedded Licensed Software (including associated literature, updates and upgrades) and any duplicates and associated literature with regard tothe license to use Licensed Software. User may transfer Licensed Software only to the condition of binding the assignee to abide by the terms of this Software License Agreement.2.U ser may not reverse-engineer, disassemble, decompile or otherwise analyze the source code of Licensed Software.Article 4 (Rights to Licensed Software)All rights to Licensed Software and the associated literature, including copyrights, shall reside with Licensor orthe original right holder who has granted the Right of Use and right to sublicense to Licensor (hereinafter referred to as “Original Right Holder”), and User does not have any rights other than Right of Use granted hereunder with regard to Licensed Software and the associated literature. Article 5 (Exemption Granted to Licensor)1.L icensor and Original Right Holder do not assume any responsibility for damages caused to User or third parties resulting from the exercise by User of the license granted hereunder, unless otherwise provided by any law to the contrary.2.L icensor does not warrant Licensed Software to be merchantable, compatible and fit for specific purposes.Article 6 (Responsibility for Third Parties)If disputes over the infringement of third parties’intellectual property rights, such as copyrights and patent rights, arise out of the use of Licensed Software by User, User shall resolve these disputes at User’s own expenses while keep Licensor and Original Right Holder harmless.Article 7 (Secrecy Obligation)User shall keep confidential Licensed Software provided hereunder, information contained in the associated literature or the like and those provisions of this agreement not yet in public knowledge and may not disclose or leak these to third parties without prior written consent from Licensor.Article 8 (Cancellation of the Agreement) Licensor reserves the right to cancel thisagreement forthwith and claim compensation from User for the damages caused by such cancellation when User:(1)B reaches any of the provisions of thisagreement, or(2)H as received a petition for seizure, provisionalseizure, provisional disposition or any otherkind of compulsory execution.Article 9 (Destruction of Licensed Software)If this agreement is terminated under the provision of the foregoing paragraph, User shall destroy Licensed Software, along with all associated literature and its duplicates, within two (2) weeks from the date of termination. Article 10 (Copyright Protection)1.C opyrights and all other intellectual property rights relating to Licensed Software shall reside with Licensor and Original Right Holder and in no circumstances with User.2.U ser shall abide by the laws relating to copyrights and intellectual property rights in using Licensed Software.Article 11 (Export Control)1.L icensed Software and the associated literature or the like may not be exportedto places outside the Country (including transmission outside the Country over the Internet or the like).2.U ser agrees that Licensed Software is subjectto export controls imposed by the Country and the United States of America.3.U ser agrees to comply with all the international and domestic laws that applyto this software (U.S. Export Administration Regulations and regulations established bythe U.S., the Country and their governmental agencies regarding usage by end users and export destinations).Article 12 (Miscellaneous)1.E ven if this agreement is invalidated in part by law, all other provisions shall remain in effect.2. L icensor and User shall consult each other in good faith to resolve any matters not provided for in this agreement or questions arising from the interpretation of this agreement.3.L icensor and User agree that this agreementis governed by the law of Japan and that all disputes involving claims and obligations that may arise out of this agreement will be settled by arbitration at the Tokyo District Court asthe court of first instance.ii基本操作6基本操作前面板按鈕功能57 12346右手驅動機型1237 564左手驅動機型注意• 本指南中的面板是用作清晰說明操作的範例。
既能游戏又能视频又能办公的电脑配置清单
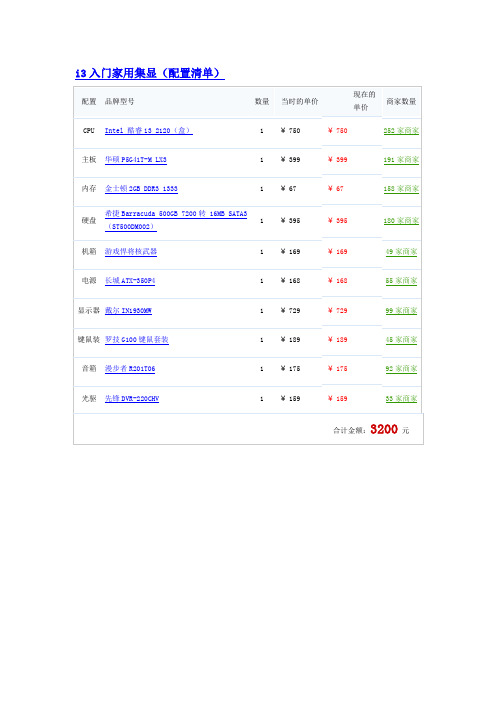
i3入门家用集显(配置清单)
家用全能型组合(预算有限的可以参考下)(配置清单)
大型3D游戏特效中开!性价比高!(配置清单)
小主机我的地地圾(配置清单)
家用全能型组合(预算有限的可以参考下)(配置清单)
商洛心悦电脑(配置清单)
内存兼容cqy如果玩游戏的话性能建议把显卡换家用娱乐两不误(配置清单)
这么给力的配置你也来看看(配置清单)
真的是很实用。
给朋友准备的(配置清单)
wahahaha(配置清单)
低噪声、低功耗、高稳定,(配置清单)
满足一般用户6核低端(配置清单)
花少钱享高配(配置清单)
2100元IvyBridgeUSB3.0DDR31600H77一样都不少(配置清单)
家用经济实惠型(配置清单)
带27寸屏优质音响键鼠光驱稳定家用办公(配置清单)
中秋国庆降价促销,买就降388 四核独显送大礼包一线品(配置清单)
自己家用的,求哪位大哥指导!!!(配置清单)
家庭组装机经济实用型(配置清单)。
技嘉GA-H77TN GA-B75TN主板说明书

GA-H77TN GA-B75TN GA-H61TN使用手册Rev. 1101Jan. 31, 2013Motherboard GA-H77TNJan. 31, 2013Motherboard GA-B75TNFeb. 08, 2013Motherboard GA-H61TN版权© 2013年,技嘉科技股份有限公司,版权所有。
本使用手册所提及的商标与名称,均属其合法注册的公司所有。
责任声明本使用手册受著作权保护,所撰写的内容均为技嘉所拥有。
本使用手册所提及的产品规格或相关信息,技嘉保留修改的权利。
本使用手册所提及的产品规格或相关信息有任何修改或变更时,恕不另行通知。
未事先经由技嘉书面允许,不得以任何形式复制、修改、转载、传播或出版本使用手册内容。
产品使用手册类别简介为了协助您使用技嘉主板,我们设计了以下类别的使用手册: 如果您要了解产品详细规格数据,请仔细阅读【使用手册】。
产品相关信息,请至网站查询:/目录清点配件 (7)GA-H77TN/GA-B75TN/GA-H61TN主板配置图 (8)第一章硬件安装 (9)1-1 安装前的注意事项 (9)1-2 产品规格 (10)1-3 安装中央处理器 (12)1-4 安装内存条/扩展卡 (12)1-5 后方设备插座介绍 (13)1-6 插座及跳线介绍 (15)第二章BIOS 程序设置 (27)2-1 Main (主画面) (29)2-2 Advanced (进阶设定) (30)2-2-1 ACPI Settings (31)2-2-2 CPU Configuration (32)2-2-3 SATA Configuration (33)2-2-4 Intel (R) Rapid Start Technology (34)2-2-5 H/W Monitor (35)2-2-6 Intel(R) Smart Connect Technology (36)2-2-7 Network Stack (37)2-2-8 CPU PPM Configuration (38)2-2-9 Realtek PCIe GBE Family Controller (39)2-3 Chipset Menu (芯片组选单) (40)2-4 Boot Menu (41)2-5 Security Menu (密码设定) (44)2-6 Exit Menu (储存设定值并结束设定程序) (45)- 6 -清点配件5GA-H77TN或GA-B75TN或GA-H61TN主板- 1片5驱动程序光盘- 1片5使用手册- 1本5SATA 排线- 1条5后方I/O设备挡板铁片- 1个5扩展卡用螺丝- 1包上述附带配件仅供参考,实际配件请以实物为准,技嘉科技保留修改的权利。
- 1、下载文档前请自行甄别文档内容的完整性,平台不提供额外的编辑、内容补充、找答案等附加服务。
- 2、"仅部分预览"的文档,不可在线预览部分如存在完整性等问题,可反馈申请退款(可完整预览的文档不适用该条件!)。
- 3、如文档侵犯您的权益,请联系客服反馈,我们会尽快为您处理(人工客服工作时间:9:00-18:30)。
第二章: 硬件安装 ........................................................... 6
2.1
中央处理器(CPU) ..............................................................................6
2.4
接口和插槽 .......................................................................................11
第三章: 接头和跳线安装............................................... 14
如果关闭和重新开启本设备后,仍确定本装置造成接收广播或电视的干扰,用户 可以使用以下列表中的一种或多种方法来减少干扰:
重新安装或调整接收天线。 增加本设备与接收设备之间的距离。 连接设备连接到不同的插座以便于两个设备使用不同的回路。 咨询经销商或富有经验的无线电工程师,以获得更多资讯。
2.2
风扇接头 .............................................................................................8
2.3
系统内存 .............................................................................................9
x2
支持 PCI-E Gen2 x1扩展卡
板载接口
SATA3接口
x2
每个接口支持1个SATA3设备
SATA2接口
x4
每个接口支持1个SATA2设备
前置面板接口
x1
支持前置面板设备
前置音频接口
x1
支持前置音频功能
CPU风扇接头
x1
CPU风扇电源 (智能风扇功能)
2
系统风扇接头
第五章: 帮助信息 ......................................................... 23
5.1
驱动程序安装注意事项 ...................................................................23
H77MU3 设置手册
FCC 条款ห้องสมุดไป่ตู้
依照 FCC 条款第 15 部分的规定,本装置已经通过测试并且符合 Class B 级数字 装置的限制。此条款限制了在安装过程中可能造成的有害射频干扰并提供了合理 的防范措施。本装置在使用时会产生无线射频辐射,如果没有依照本手册的指示 安装和使用,可能会与无线通讯装置产生干扰。然而,并不保证在特定的安装下 不会发生任何干扰。
3.1
跳线安装 ...........................................................................................14
3.2
安装细节 ...........................................................................................14
H77MU3
第一章: 主板介绍 1.1 前言
感谢您选购我们的产品,在开始安装主板前,请仔细阅读以下安全指导说明: 选择清洁稳定的工作环境。 操作前请确保计算机断开电源。 从抗静电袋取出主板之前,先轻触安全触地器或使用触地手腕 带去除静电以确保安全。 避免触摸主板上的零件。手持电路板的边缘,不要折曲或按压 电路板。 安装之后,确认没有任何小零件置于机箱中,一些小的零件可 能引起电流短路并可能损坏设备。 确保计算机远离危险区域,如:高温、潮湿、靠近水源的地方。 计算机的工作温度应保持在 0-45℃之间。
4.2
RAID阵列..........................................................................................19
4.3
RAID运行..........................................................................................19
6声道音频输出 支持高清音频
USB3.0
H77
数据传输率为600 MB/s
PCI Express Gen3 x 16 插槽
支持 PCI-E Gen3 x16扩展卡
(取决于CPU)
x1
插槽
PCI Express Gen2 x 16 插槽(x4) x1
支持 PCI-E Gen2 x16扩展卡
PCI Express Gen2 x 1 插槽
支持硬件防病毒功能 / 增强型 Intel SpeedStep技术 / Intel 64位体系结构 / 64位内存扩展技术 / 虚拟技术 / 超线程技术
芯片组
Intel H77
IT8728 高级I/O控制器 提供最基本的I/O功能
低管脚数接口
环境控制 H/W 监控 风扇速度控制器 ITE's "智能保护" 功能
SATA 2 & 3 集成串行ATA控制器
数据传输率为3.0 Gb/s / 6.0 Gb/s 符合SATA 2.0 / 3.0规范 支持RAID 0,1,5,10, SRT
网络
Realtek RTL 8111E
10 / 100 Mb/s / 1Gb/s自适应传输模式 半双工/全双工工作模式
音效
ALC662
目录
UEFI BIOS设置 ............................................................ 31 1 主菜单 ....................................................................... 33 2 高级菜单 ................................................................. 34 3 芯片组菜单............................................................... 48 4 系统引导菜单 ............................................................ 56 5 安全菜单 ................................................................. 58 6 性能菜单 .................................................................. 59 7 退出菜单 ................................................................... 63 附:产品中有毒有害物质或元素的名称及含量.............. 64
1.2
附件 .....................................................................................................1
1.3
主板特性 .............................................................................................2
本用户手册内容的变更,恕不另行通知,制造商没有解释的义务。
本用户手册的所有内容若有任何错误,制造商没有义务为其承担任何责任。所有 商标和产品名称均有其各自所有权。
未经过书面许可,不得以任何形式(部分或全部)复制此手册信息。
免责说明
本手册内容系 BIOSTAR®知识产权,版权归 BIOSTAR®所有。我们本着对用户负 责的态度,精心地编写该手册,但不保证本手册的内容完全准确无误。BIOSTAR® 有权在不知会用户的前提下对产品不断地进行改良、升级及对手册内容进行修正, 实际状况请以产品实物为准。本手册为纯技术文档,无任何暗示及影射第三方之 内容,且不承担排版错误导致的用户理解歧义。本手册中所涉及的第三方注册商 标所有权归其制造商或品牌所有人。
主内存
DDR3 DIMM 插槽 x 4 最大内存容量为32GB 每个DIMM支持 512MB / 1GB / 2GB / 4GB / 8GB DDR3
双通道模式 DDR3内存模组 支持DDR3 1066 / 1333 支持DDR3 1600(取决于CPU) 不支持Registered DIMM和ECC DIMM
第四章: RAID功能......................................................... 19
4.1
操作系统 ...........................................................................................19
1.2 附件
串行 ATA 数据线 X 2 ATX 机箱后置 I/O 面板 X 1 用户手册 X 1 驱动光盘 X 1
注意: 此附件内容可能因区域或主板版本而异。
1
主板手册
1.3 主板特性
SPEC
CPU
Socket 1155 Intel Core i7 / i5 / i3 / Pentium / Celeron处理器
