osgEarth加载谷歌卫星地图的源码案例
osgEarth加载谷歌卫星地图的源码案例
osgEarth加载谷歌卫星地图的源码案例2014-12-24 11:51 242人阅读评论(0) 收藏举报osgEarth谷歌卫星地图一、准备工作安装水经注万能地图下载器,如果没有安装本软件,可以百度“水经注软件”到官方网站下载。
编译OSG、OSGEarth和第三方插件等,这里有一个已经编译好的vs2010+osgearth,下载地址“/share/link?shareid=107009&uk=2801833827”。
二、下载地图首先需要把谷歌卫星地图下载下来,这里以“郫县”为例。
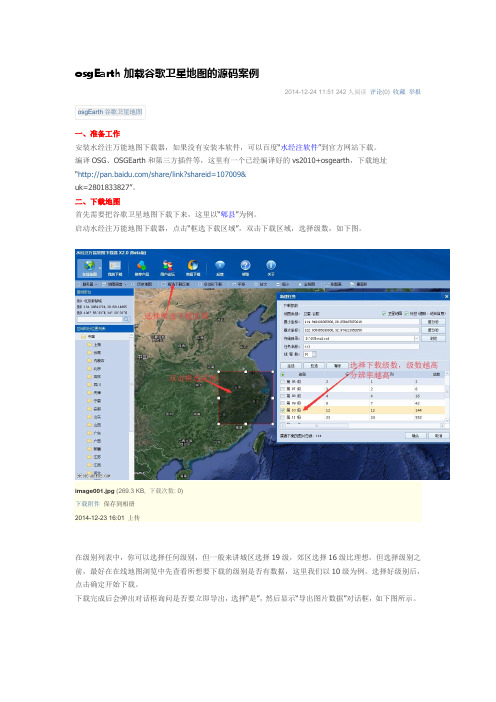
启动水经注万能地图下载器,点击“框选下载区域”,双击下载区域,选择级数,如下图。
image001.jpg(269.3 KB, 下载次数: 0)下载附件保存到相册2014-12-23 16:01 上传在级别列表中,你可以选择任何级别,但一般来讲城区选择19级,郊区选择16级比理想,但选择级别之前,最好在在线地图浏览中先查看所想要下载的级别是否有数据,这里我们以10级为例。
选择好级别后,点击确定开始下载。
下载完成后会弹出对话框询问是否要立即导出,选择“是”,然后显示“导出图片数据”对话框,如下图所示。
在该对话框中,不需要作任何设置,点击“输出”按钮以默认参数导出数据即可。
默认导出路径为“D:\SGDownload\tt1_拼接[默认]\L10”。
三、VS2010创建应用程序解压编译包后还不能直接使用,需要设置环境变量:OSG_ROOT X:\OSGOSG_FILE_PATH %OSG_ROOT%\dataOSG_WINDOW 600 15 800 800Path %OSG_ROOT%\bin;设置文件目录属性Osgearth的一个主要目标是易于应用集成,实际上有2种方式去整合osgearth.第一种方式你可以建立一个earth file,然后在你的应用程序中加载它.第二种使用osgearth API的时候以编程方式动态建立一个地图。
osgEarth用户手册
这个文件建立了一个地图“MyMap”,geocentric 类型,GeoTIFF 图片源 名称是“bluemarble”(GeoTiff 是包含地理信息的一种 Tiff 格式的文件)。驱 动 driver 属性告诉 osgearth 哪个驱动去加载这些图片,所有子元素针对特定 的驱动。
2.1.2.多重图像层 osgEarth 支持有多个图像源的地图。这允许你创建的地图时,在基础层上
featuregeometryosg的几何渲染矢量数据featurestencil使用模板缓冲技术褶皱化地形矢量数据simple加载外部模型并放置在场景图421featuregeometrymodeldriver建立矢量特征数据的osg几何形状如今这个驱动程序可以简单的将矢量数据嵌合进几何图形中同时会有一个可选择的高度偏移这样你可以将几何图形放置于地形上将来它将支持足迹挤压纹理化和其他一些功能
mu lt ipas s
复合材料由多个渲染的图像,通过对场 景图。这种技术对图像层, 你可 以有数量没有限制,但可能会影响性能 ,因为每个额外的层意味着 另一 个渲染传递的场景图。
10
示例:
<map> <options> <terrain> <compositor>multitexture</compositor> </terrain> ... </options> ...
optional
<image>
图像图层。随着 osgearth 的合成器 compositor 使用,你的电
脑图像显示硬件将决定<image>层可以显示的最大数量 。
optional
osgearth gdalelevationlayer用法

osgearth gdalelevationlayer用法osgEarth是一个用于渲染和将地理空间数据可视化的C++开源库。
osgEarth的GDALElevationLayer是osgEarth中用于加载和显示基于GDAL库的栅格高程数据集的图层。
要使用GDALElevationLayer,首先需要在osgEarth应用程序中包含以下头文件:```cpp#include <osgEarth/GDAL>```然后,可以创建一个GDALElevationLayer对象并将其添加到osgEarth的地图图层中。
以下是一个使用GDALElevationLayer 的示例代码:```cpp#include <osgEarth/GDAL>#include <osgEarth/Map>#include <osgEarth/MapNode>#include <osgViewer/Viewer>int main(){// 初始化osgEarthosgEarth::GDAL::Register();// 创建一个地图对象osgEarth::Map* map = new osgEarth::Map();// 创建一个GDALElevationLayer对象osgEarth::GDALElevationLayer* elevationLayer = new osgEarth::GDALElevationLayer();// 设置GDALElevationLayer的属性,例如数据集路径、最小、最大高程等elevationLayer->setURL("path_to_elevation_dataset.tif");elevationLayer->setMinValidValue(0.0);elevationLayer->setMaxValidValue(1000.0);// 将GDALElevationLayer添加到地图中map->addLayer(elevationLayer);// 创建一个地图节点osgEarth::MapNode* mapNode = newosgEarth::MapNode(map);// 创建一个OSG查看器osgViewer::Viewer viewer;// 设置查看器的根节点为地图节点viewer.setSceneData(mapNode);// 运行查看器主循环return viewer.run();}```上述示例代码中,首先通过调用osgEarth::GDAL::Register()函数来初始化osgEarth中的GDAL支持。
iOS在google地图上显示自己的位置
iOS在google地图上显示自己的位置iOS 在google地图上显示自己的位置分类: IOS 2013-03-26 14:19 333人阅读评论(0) 收藏举报google地图一行代码显示你的位置iOS中的MapKit集成了定位的功能,使用一行代码就可以在google地图上展示出自己当前的位置,代码如下:[objc]view plaincopy1.-(IBAction) showLocation:(id) sender {2.3.if ([[btnShowLocation titleForState:UIControlStateNormal]4.isEqualToString:@"Show My Location"]) {5.[btnShowLocation setTitle:@"Hide My Location"6.forState:UIControlStateNormal];7.mapView.showsUserLocation = YES;8.} else {9.[btnShowLocation setTitle:@"Show My Location"10.forState:UIControlStateNormal];11.mapView.showsUserLocation = NO;12.}13.}关键的代码就是:mapView.showUserLocation=YES.使用CLLocationManager和MKMapView还有就是通过CoreLocation框架写代码去请求当前的位置,一样也非常简单:第一步:创建一个CLLocationManager实例[objc]view plaincopy1.CLLocationManager *locationManager = [[CLLocationManager alloc] init];第二步:设置CLLocationManager实例委托和精度[objc]view plaincopy1.locationManager.delegate = self;2.locationManager.desiredAccuracy = kCLLocationAccuracy Best;第三步:设置距离筛选器distanceFilter,下面表示设备至少移动1000米,才通知委托更新[objc]view plaincopy1.locationManager.distanceFilter = 1000.0f;或者没有筛选器的默认设置:[objc]view plaincopy1.locationManager.distanceFilter = kCLDistanceFilterNone;第四步:启动请求[objc]view plaincopy1.[locationManager startUpdatingLocation];使用下面代码停止请求:[objc]view plaincopy1.[locationManager stopUpdatingLocation];CLLocationManagerDelegate委托这个委托中有:locationManager:didUpdateToLocation: fromLocation方法,用于获取经纬度。
一种基于GoogleEarth的GPS导航系统设计
一种基于Google Earth的GPS导航系统设计一种基于Google Earth的GPS导航系统设计摘要:随着交通的便利,自驾车出门游玩已经成为常事,人们对导航的需求也日渐强烈。
市面上的导航以线框图的方式为主,而这种方式比较适用于城市内部的导航,当有需要去郊区或者山地野外等活动时这种方式就显得力不从心。
而基于Google Earth的GPS导航能有效地满足对这些需求。
在Google Earth免费版本上,利用Google Earth的KML,实现GPS 导航和轨迹记录。
系统由三个部分组成:GPS接口,实现与GPS模块之间的通讯;通过内嵌Web服务器实现与GoogleEarth之间的通讯;基于预定轨迹的导航功能,实现偏离预定轨迹时的报警。
1绪论随着科技的发展车辆的普及,人们对GPS实时导航的需求变的越来越突出。
随之出现了,许多GPS实时导航系统,这其中有软硬件集成一体的GPS 导航设备,也有基于其他GPS设备的软件系统。
而所有的这些GPS导航几乎都是以线框图为主。
线框图的方式比较适用于城市内部的导航,当有需要去郊区或者山地野外去探险等活动时,这种方式就显得力不从心了。
因为这些地方的地图信息少,图示比较粗糙,其次,它提供的时线框的方式去描述地理,显然不能很深刻的反应该地的地貌特征,比如海拔,山野等。
而且为了及时更新维护这些线框图带来的代价也时很大的。
而这些需求的信息可以在卫星地图上找到。
与此同时Google公司在近些年出来的Google Earth软件,是一款十分优秀的卫星地图服务软件,它免费提供的卫星地图精度很高。
大部分地区的地区都比较清晰,特别是各个城市的照片,可以清晰的看到马路上的车辆。
在中国卫星图像里,一线城市以2009、2010年拍摄的为主,二、三线城市以05、06年的库存图片为主,能较好地满足导航的要求。
在Google Earth Plus以上的收费版本中还提供了GPS接口,能实时地显示当前位置的地图和移动轨迹。
谷歌地球二次开发经典案例

KML文件格式转换成Mapinfo,excel 多个版本(C#, VC++,VB,易语言,Delphi,汇编版本)/showtopic-373324.aspx
/user_show/uid_%e5%a4%a9%e4%b8%8b%e4%b9%8b%e5%a4%a7%e5%a5%87相关视频教程 件处理专家发布超级震撼GOOGLE EARTH空战游戏说明下载(10M不到):/filedown_26373.html
OOGLE EARTH沿线路提取高程专业版本视频教程/showtopic-378321.aspx
KML纠偏、加偏完美版本/showtopic-378262.aspx
卫星影像自动识别,可自动识别房屋道路和水域等(人工智能)/showtopic-377959.aspx
长江干流水系MAPINFO格式矢量图/showtopic-378826.aspx
利用GOOGLE EARTH轻松制作MAPINFO高精度电子地图/showtopic-378727.aspx
在GOOGLE EARTH中快速创建3D虚拟城市/showtopic-378392.aspx
在GOOGLE EARTH软件中随意涂鸦和专业制图下载地址:/fileview_5392.html
谷歌地球卫星地图下载器自动拼接软件/showtopic-379661.aspx
GOOGLE EARTH卫星地图自动矢量化研究(自主知识产品软件)/showtopic-379587.aspx
GE地标点KML转换程序再次升级!可转EXCEL,MAPINFO格式,MIF,MID格式(免费旧版本,有串行,数据不可靠)
/showtopic-370919.aspx
osgearth
Pelican Mapping maintains osgEarth.
The best way to interact with the osgEarth team and the user community is through the support forum. Please read and follow these guidelines for using the forum:
1.1.2 Community Resources
Since osgEarth is a free open source SDK, the source code is available to anyone and we welcome and encourage community participation when it comes to testing, adding features, and fixing bugs. Support Forum
• Sign up for an account and use your real name. You can participate anonymously, but using your real name helps build a stronger community (and makes it more likely that we will get to your question sooner).
• Always include as much supporting information as possible. Post an earth file or short code snippet. Post the output to osgearth_version --caps. Post the output to gdalinfo if you are having trouble with a GeoTIFF or other data file. List everything you have tried so far.
osgearth各个例子功能概述

osgearth各个例⼦功能概述转⾃:/wl198302/article/details/21177309最近在学习osgearth,对其还不是很理解,有些例⼦不会运⾏,有些可以,把可以的做个统计,以备后⾯查⽤。
1、osgearth_graticule:⽣成经纬线。
2、osgearth_annotation:各类标注(点、线、⾯、模型、⽂本等)。
3、osgearth_city:加载⼀个城市三维模型,可以浏览。
4、osgearth_clamp:在⼀个区域加载⽣成5000个树⽊的三维模型展⽰。
5、osgearth_colorfilter:运⾏不起来……6、osgeatth_controls:有⼀个osg的图标,可以控制透明度与⽅向。
还有⼀些⽂本矩形框之类的。
7、osgearth_demo:qt的⼀个集成地球的例⼦8、osgearth_elevation:显⽰⿏标所指位置的经纬度、坐标系、⾼程(MSL\HAE)、分辨率。
不过运⾏⾮常缓慢。
9、osgearth_featureeditor:添加⼀条线,并可以修改线的节点与颜⾊(编辑时,线的形状变为虚线段)。
10、osgearth_featurfilter:出来⼀个地球,不知道需要什么数据才能运⾏出效果。
例⼦给出的⽤途为-简单的功能过滤,改变数据源特征属性的值。
11、osgearth_featureinfo:不是界⾯程序,不知道⼲嘛的……12、osgearth_featuremanip:出现⼀个地球,没明⽩⼲嘛的……13、osgearth_featurequery:同上……14、osgearth_imageoverlay:在地图上叠加⼀张gif图⽚,并可以控制图⽚的透明度。
15、osgearth_features:代码建⽴地图,并加载各国分界线的shp数据。
16、osgearth_los:以稍稍⽔平的视⾓,显⽰飞机模型绕⼀点旋转,还有⼀些运动对象。
17、osgearth_manip:地球上⽣成⼀个⽴体的helloworld⽂字,并且可以控制⽂字⾏⾛,快速定位不同级别的视点,让⽂字始终在屏幕中央,地球滚动,很好的功能 O(∩_∩)O~18、osgearth_map:代码⽣成地球tms地图图层。
osgearth gdalelevationlayer用法
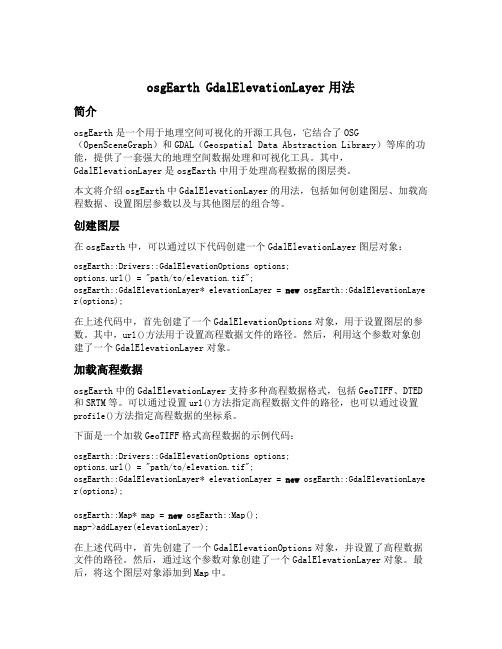
osgEarth GdalElevationLayer用法简介osgEarth是一个用于地理空间可视化的开源工具包,它结合了OSG (OpenSceneGraph)和GDAL(Geospatial Data Abstraction Library)等库的功能,提供了一套强大的地理空间数据处理和可视化工具。
其中,GdalElevationLayer是osgEarth中用于处理高程数据的图层类。
本文将介绍osgEarth中GdalElevationLayer的用法,包括如何创建图层、加载高程数据、设置图层参数以及与其他图层的组合等。
创建图层在osgEarth中,可以通过以下代码创建一个GdalElevationLayer图层对象:osgEarth::Drivers::GdalElevationOptions options;options.url() = "path/to/elevation.tif";osgEarth::GdalElevationLayer* elevationLayer = new osgEarth::GdalElevationLaye r(options);在上述代码中,首先创建了一个GdalElevationOptions对象,用于设置图层的参数。
其中,url()方法用于设置高程数据文件的路径。
然后,利用这个参数对象创建了一个GdalElevationLayer对象。
加载高程数据osgEarth中的GdalElevationLayer支持多种高程数据格式,包括GeoTIFF、DTED 和SRTM等。
可以通过设置url()方法指定高程数据文件的路径,也可以通过设置profile()方法指定高程数据的坐标系。
下面是一个加载GeoTIFF格式高程数据的示例代码:osgEarth::Drivers::GdalElevationOptions options;options.url() = "path/to/elevation.tif";osgEarth::GdalElevationLayer* elevationLayer = new osgEarth::GdalElevationLaye r(options);osgEarth::Map* map = new osgEarth::Map();map->addLayer(elevationLayer);在上述代码中,首先创建了一个GdalElevationOptions对象,并设置了高程数据文件的路径。
编程实现Google_Earth和ArcGIS的联动
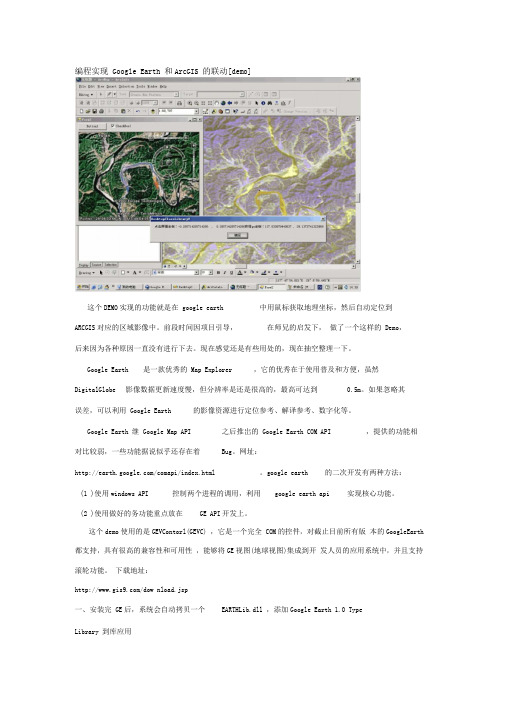
编程实现Google Earth 和ArcGIS 的联动[demo]这个DEMO实现的功能就是在google earth 中用鼠标获取地理坐标,然后自动定位到ARCGIS对应的区域影像中。
前段时间因项目引导,在师兄的启发下,做了一个这样的Demo,后来因为各种原因一直没有进行下去。
现在感觉还是有些用处的,现在抽空整理一下。
Google Earth 是一款优秀的Map Explorer ,它的优秀在于使用普及和方便,虽然DigitalGlobe 影像数据更新速度慢,但分辨率是还是很高的,最高可达到0.5m。
如果忽略其误差,可以利用Google Earth 的影像资源进行定位参考、解译参考、数字化等。
Google Earth 继Google Map API 之后推岀的Google Earth COM API ,提供的功能相对比较弱,一些功能据说似乎还存在着Bug。
网址:/comapi/index.html 。
google earth 的二次开发有两种方法:(1 )使用windows API 控制两个进程的调用,利用google earth api 实现核心功能。
(2 )使用做好的务功能重点放在GE API开发上。
这个demo使用的是GEVContorl(GEVC) ,它是一个完全COM的控件,对截止目前所有版本的GoogleEarth 都支持,具有很高的兼容性和可用性,能够将GE视图(地球视图)集成到开发人员的应用系统中,并且支持滚轮功能。
下载地址:/dow nload.jsp一、安装完GE后,系统会自动拷贝一个EARTHLib.dll ,添加Google Earth 1.0 TypeLibrary 到库应用、.NET 中新建Arcgis comma nd类。
将生成一个dll ,可以被ARCGIS 自动添加到组件库中。
三、部分代码,主窗口中:1 Imports EARTHLib2 Imports ESRI.ArcGIS.C on trols3 Imports ESRI.ArcGIS.Geometry4 Imports ESRI.ArcGIS.Carto5 Imports ESRI.ArcGIS.SystemUI6 Imports ESRI.ArcGIS.ArcMapUl7 Imports ESRI.ArcGIS.esriSystem8 Imports ESRI.ArcGIS.Framework9 Imports ESRI.ArcGIS.Geodatabase10 Imports ESRI.ArcGIS.Display11 Imports System.Wi ndows.Forms.Cursor12 Imports System.Drawi ng13 Imports System.Drawi ng.Drawi ng2D141516 —Public Class Form217 Public g_GeHelper As EARTHLib.Applicatio nGE 'GE 的主应用API18 Public hookhelper As IHookHelper 'hookhelper19 一Public Ion gitude As Double '经度20 Public latitude As Double '维度21 —Dim pApp As IApplicati on22 Dim pEn able As Boolea n23 一Dim pDoc As IMxDocume nt24 Dim pWorkspace As IWorkspace25 Dim pMap As IMap26Dim pLayer As ILayer27Dim pWorkE As IWorkspaceEdit28Dim pFeaLayer As IFeatureLayer29Private Structure POINTAPI30Dim x As Double31Dim y As Double32End Structure3333Private Sub Butt on 1_Click(ByVal sen der As System.Object, ByVal e As System.EventArgs) Handles Buttonl.Click34'初始化应用GE35_ g_GeHelper = New EARTHLib.ApplicationGE36AxGEViewer1.HookGE(g_GeHelper.GetMai nHwnd, g_GeHelper.Ge tRe nderHw nd)37End Sub394038Private Sub AxGEViewer1_MouseDow nEve nt(ByVal sen der As Syste m.Object, ByVal e As AxGEVControl.__GEViewer_MouseDow nEve nt) Ha ndles AxGEViewerl.MouseDow nEve nt39一If CheckBoxl.Checked = True Then40Dim GePt As Poi ntO nTerrai nGE41一Dim pt As POINTAPI42—'屏幕坐标到GE屏幕坐标的转换43pt.x = e.evtArgs.X * 2 / Me.Width - 144一pt.y = -e.evtArgs.Y * 2 / Me.Height + 145'GE屏幕坐标到地理坐标的转换46一GePt = g_GeHelper.GetPointOnTerrainFromScreenCoords(CDbl(pt.X), CDbl(pt.Y))5051 MsgBox( "点击屏幕坐标:“ & pt.x & “,“& pt.y & "获得ge坐标:"& GePt.Longitude & “ ,“ & titude)52 lon gitude = GePt.L on gitude53 latitude = titude54 pMap = hookhelper.ActiveView5556 'arcmap 中绘制点57 Dim poi nt As IPoi nt58 poi nt = New ESRI.ArcGIS.Geometry.Poi nt59 poin t.PutCoords(l on gitude, latitude)6061 Dim pMarkerEleme nt As IMarkerEleme nt62 pMarkerEleme nt = New MarkerEleme nt6364 Dim pMarkerSymbol As ESRI.ArcGIS.Display.ISimpleMarkerSymbol65 pMarkerSymbol = New ESRI.ArcGIS.Display.SimpleMarkerSymbol66 pMarkerSymbol.Size = 367 pMarkerSymbol.Style = ESRI.ArcGIS.Display.esriSimpleMarkerStyle.esriSMSDiamo nd6869 Dim pEleme nt As IEleme nt70 pEleme nt = pMarkerEleme nt71 pEleme nt.Geometry = point72 pMarkerEleme nt.Symbol = pMarkerSymbol7374 Dim pGraphicsC ontainer As IGraphicsC on tai ner75 Dim pActiveView As IActiveView76 pActiveView = pMap77'pActiveView.Exte nt.Ce nterAt(poi nt)7878'arcmap 中点的定位79Dim pEn velop As IEn velope80pEn velop = pActiveView.Exte nt81pEn velop.Ce nterAt(poi nt)82pActiveView.Exte nt = pEn velop83pActiveView.Refresh()84pGraphicsC ontainer = pMap85pGraphicsC on tai ner.AddEleme nt(pMarkerEleme nt,0) 86pActiveView.PartialRefresh(esriViewDrawPhase.esriVie wGraphics, Noth ing,Nothi ng)87End If8988End Sub89一Public Write Only Property hook() As IHookHelper90Set(ByVal value As IHookHelper)91—hookhelper = value92End Set93I—End Property9694Private Sub Form2_Load(ByVal sen der As System.Object, ByVale As System.Eve ntArgs) Han dles MyBase.Load9895—End Sub96—E nd Classcomma nd.cs 中实现组件注册:63Private m_hookHelper As IHookHelper646566 'A creatable COM class must have a Public Sub New()67 'with no parameters, otherwise, the class will not be68 'registered in the COM registry and cannot be created69 'via CreateObject.70 Public Sub New()71 MyBase.New()7273 'TODO: Define values for the ! public properties74 MyBase.m_category = "test" 'localizable text75 MyBase.m_capti on = "tooll" 'localizable text76 MyBase.m_message = "This should work in ArcMap/MapCo ntrol/PageLayoutC on trol" 'localizable text77MyBase.m_toolTip = .... localizable text78MyBase.m _n ame = ..... uni que id, non-localizable (e.g. "MyCategory_MyComma nd")79Try80一'TODO: change bitmap name if necessary81Dim bitmapResourceName As Stri ng = Me.GetType().Name+ ".bmp"82MyBase.m_bitmap = New Bitmap(Me.GetType(), bitmapResourceName)83一Catch ex As Exception84System.Diag no stics.Trace.WriteLi ne(ex.Message, "I nva lid Bitmap" )85End Try868788 End Sub899091 Public Overrides Sub On Create(ByVal hook As Object)92 If m_hookHelper Is Nothi ng The n m_hookHelper = New HookH elperClass9394 If Not hook Is Nothing Then95 Try96 m_hookHelper.Hook = hook97 If m_hookHelper.ActiveView Is Nothi ng The n m_hoo kHelper =Nothi ng98 Catch99 m_hookHelper = Nothi ng100 End Try101102 'Disable if hook fails103 If m_hookHelper Is Nothi ng Then104 MyBase.m_e nabled = False105 Else106 MyBase.m_e nabled = True107 End If108 -109 'TODO: Add other initialization code110 End If111 End Sub112113 Public Overrides Sub On Click()114 'TODO: Add Comma nd1. On Click impleme ntati on115Dim ce As IEn velope = m_hookHelper.ActiveView.Exte nt 116ce.Expand( 0.5 , 0.5 , True)117m_hookHelper.ActiveView.Exte nt = ce118m_hookHelper.ActiveView.Refresh()119MsgBox( "asdasd")120Dim frm As Form2121frm = New Form2122frm.hookhelper = m_hookHelper123frm.Show()124End Sub125125End Class127生成dll后,即可直接在arcmap中添加自定义的coma nd按钮进行调用了。
osgEarth使用笔记4—加载矢量数据

osgEarth使用笔记4—加载矢量数据目录1. 概述2. 详论2.1. 基本绘制2.2. 矢量符号化2.2.1. 可见性2.2.2. 高度设置2.2.3. 符号化2.2.4. 显示标注2.3. 其他3. 结果4. 问题1. 概述前面文章加载的底图数据是一种栅格数据,还有一种很重要的地理信息表现形式是矢量数据。
在osgEarth中,这部分包含的内容还是很丰富的,这里就总结一二。
2. 详论在《osgEarth使用笔记1——显示一个数字地球》这篇文章中代码的基础之上,添加加载显示矢量的代码:1.#include<Windows.h>2.#include<iostream>3.#include<string>4.5.#include<osgViewer/Viewer>6.#include<osgDB/ReadFile>7.8.#include<osgEarth/MapNode>9.#include<osgEarth/ImageLayer>10.11.#include<osgEarthDrivers/gdal/GDALOptions>12.#include<osgEarthDrivers/cache_filesystem/FileSystemCache>13.#include<osgEarthDrivers/feature_ogr/OGRFeatureOptions>14.15.#include<osgEarthFeatures/FeatureSourceLayer>16.#include<osgEarthFeatures/FeatureModelLayer>17.18.#include<osgEarthUtil/EarthManipulator>19.ing namespace std;21.22.void AddVector(osg::ref_ptr<osgEarth::Map> map)23.{24.//25.std::string filePath ="D:/Work/OSGNewBuild/osgearth-2.10.1/data/world.shp";26.osgEarth::Drivers::OGRFeatureOptions featureData;27.featureData.url()= filePath;28.29.// 如果缺少空间参考,可以手动指定30.// ifstreaminfile("C:/Data/vector/hs/23.prj");31.// string line;32.// getline(infile, line);33.// featureData.profile()->srsString() = line;34.35.// Make a feature source layer and add itto the Map:36.osgEarth::Features::FeatureSourceLayerOptio ns ogrLayer;()= filePath +"_source";38.ogrLayer.featureSource()= featureData;39.osgEarth::Features::FeatureSourceLayer* featureSourceLayer =newosgEarth::Features::FeatureSourceLayer(ogrLayer);40.map->addLayer(featureSourceLayer);41.osgEarth::Features::FeatureSource*features = featureSourceLayer->getFeatureSource();42.if(!features)43.{44.printf(("无法打开该矢量文件!"));45.return;46.}47.48.//49.osgEarth::Features::FeatureModelLayerOption s fmlOpt;()= filePath;51.fmlOpt.featureSourceLayer()= filePath +"_source";52.fmlOpt.enableLighting()=false;53.54.osg::ref_ptr<osgEarth::Features::FeatureMod elLayer> fml =newosgEarth::Features::FeatureModelLayer(fmlOpt);55.map->addLayer(fml);56.}57.58.int main()59.{60.osgEarth::ProfileOptions profileOpts;61.62.//地图配置:设置缓存目录63.osgEarth::Drivers::FileSystemCacheOptions cacheOpts;64.string cacheDir ="D:/Work/OSGNewBuild/tmp";65.cacheOpts.rootPath()= cacheDir;66.67.//68.osgEarth::MapOptions mapOpts;69.mapOpts.cache()= cacheOpts;70.mapOpts.profile()= profileOpts;71.72.//创建地图节点73.osg::ref_ptr<osgEarth::Map> map =new osgEarth::Map(mapOpts);74.osg::ref_ptr<osgEarth::MapNode> mapNode = new osgEarth::MapNode(map);75.76.osgEarth::Drivers::GDALOptions gdal;77.gdal.url()="D:/Work/OSGNewBuild/osgearth-2.10.1/data/world.tif";78.osg::ref_ptr<osgEarth::ImageLayer> layer = new osgEarth::ImageLayer("BlueMarble", gdal);79.map->addLayer(layer);80.81.AddVector(map);82.83.osgViewer::Viewer viewer;84.viewer.setSceneData(mapNode);85.86.osg::ref_ptr<osgEarth::Util::EarthManipulator> mainManipulator = new osgEarth::Util::EarthManipulator;87.viewer.setCameraManipulator(mainManipulator);88.89.viewer.setUpViewInWindow(100,100,800,600);90.91.return viewer.run();92.}osgEarth表达矢量的基本思路是,先将其读取到矢量源图层FeatureSourceLayer中,这个图层加载到osgEarth的图层列表中是不显示的,必须得再加载一个专门的符号化图层,将其符号号,才能正常显示。
osgearth 简单的例子

1. 介绍osgEarthosgEarth是一个开源的地理空间3D渲染引擎,它建立在OpenSceneGraph(OSG)之上,提供了一套方便易用的工具和库,用于构建高性能的3D地球可视化应用程序。
osgEarth支持多种数据格式和地理空间数据源,包括地形数据、卫星影像、矢量数据等,用户可以利用osgEarth快速、灵活地构建出各种类型的地球可视化应用。
2. osgEarth的基本概念在了解osgEarth之前,需要了解一些基本概念。
osgEarth使用用于地球可视化的场景图,其中包含了地形、卫星影像、矢量数据和其他图层信息。
osgEarth使用图层树来管理这些数据,每个图层都有自己的样式和渲染规则。
osgEarth还提供了一套简单的、高效的符号渲染系统,可以用于在地图中显示各种地理要素。
3. osgEarth的简单例子下面通过一个简单的例子来介绍osgEarth的基本用法。
假设我们有一些地形数据和卫星影像数据,我们希望将它们加载到osgEarth中进行可视化展示。
(1)我们需要创建一个OSG Viewer实例,作为osgEarth可视化的窗口。
(2)我们需要创建一个Map实例,用于管理地理空间数据。
我们可以向Map实例中添加地形图层和卫星影像图层。
(3)接下来,我们需要创建一个MapNode实例,它是地球可视化的根节点。
我们可以将Map实例和OSG Viewer实例传递给MapNode实例。
(4)我们将MapNode实例添加到OSG Viewer中,这样就完成了地球可视化的搭建工作。
通过以上简单的步骤,我们就可以将地形数据和卫星影像数据加载到osgEarth中进行可视化展示了。
当然,osgEarth还提供了丰富的样式和渲染规则设置,可以根据实际需求进行定制化操作。
4. 总结osgEarth作为一个开源的地理空间3D渲染引擎,提供了丰富的功能和灵活的工具,可以帮助用户快速、高效地构建各种类型的地球可视化应用。
水经注离线谷歌卫星地图加载服务中间件调用示例 For ArcGIS JS API
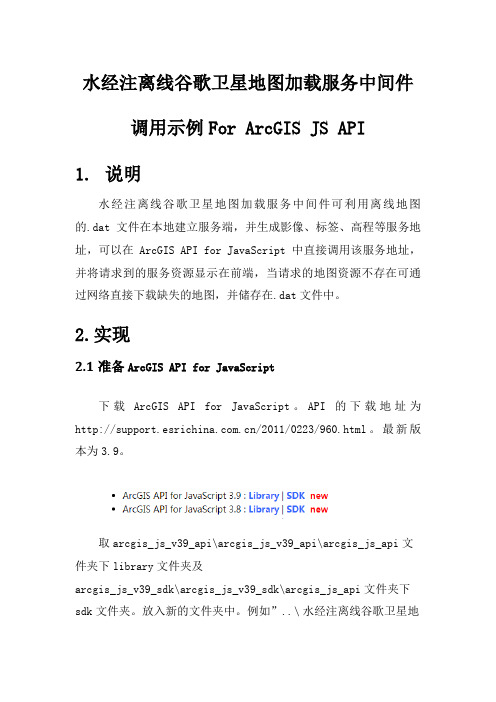
水经注离线谷歌卫星地图加载服务中间件调用示例For ArcGIS JS API1.说明水经注离线谷歌卫星地图加载服务中间件可利用离线地图的.dat文件在本地建立服务端,并生成影像、标签、高程等服务地址,可以在ArcGIS API for JavaScript中直接调用该服务地址,并将请求到的服务资源显示在前端,当请求的地图资源不存在可通过网络直接下载缺失的地图,并储存在.dat文件中。
2.实现2.1准备ArcGIS API for JavaScript下载ArcGIS API for JavaScript。
API的下载地址为/2011/0223/960.html。
最新版本为3.9。
取arcgis_js_v39_api\arcgis_js_v39_api\arcgis_js_api文件夹下library文件夹及arcgis_js_v39_sdk\arcgis_js_v39_sdk\arcgis_js_api文件夹下sdk文件夹。
放入新的文件夹中。
例如”..\水经注离线谷歌卫星地图加载服务中间件调用示例 For ArcGIS API forJavaScript\RiverMapServerSample For ArcGIS JS api”如下图。
2.2 ArcGIS API for JavaScript离线部署2.2.1 IIS部署打开信息服务管理器(IIS),添加网站,设置物理路径为..\水经注离线谷歌卫星地图加载服务中间件调用示例 For ArcGIS API for JavaScript\RiverMapServerSample For ArcGIS JS api。
在绑定一栏中分配IP地址。
这里的IP地址为192.168.1.51,端口为默认端口80。
在功能视图中目录浏览一项启用视图浏览功能。
2.2.2 ArcGIS JS API离线部署用记事本打开:\library\3.9\3.9\init.js文件,将文本中[HOSTNAME_AND_PATH_TO_JSAPI],用<myserver>/library/3.9/3.9/替换,其中myserver可以是机器名、IP等,这里部署的IP地址为192.168.1.51,即将[HOSTNAME_AND_PATH_TO_JSAPI]替换为192.168.1.51/library/3.9/3.9/。
osgearth源代码中各个sample案例详解
osgearth源代码中各个sample案例详解英文版详解OSGEarth源代码中的各个Sample案例OSGEarth, an open-source geospatial visualization library, offers a range of sample cases to demonstrate its capabilities. These samples not only showcase the functionality of OSGEarth but also provide valuable insights into how the library can be used in real-world scenarios. In this article, we delve into each of the sample cases in the OSGEarth source code, explaining their purpose, implementation, and key learnings.Sample 1: Basic Map VisualizationThis sample demonstrates the basic functionality of loading and displaying a map using OSGEarth. It covers the steps involved in initializing the library, loading a map layer, and rendering it on the screen. Key takeaways include understanding the core components of OSGEarth and how to set up a basic map visualization pipeline.Sample 2: Interactive Map NavigationThis sample extends the basic map visualization by adding interactive navigation features such as panning, zooming, and rotating the map. It highlights the ease with which OSGEarth integrates user interaction and demonstrates how to handle map navigation events programmatically.Sample 3: Geospatial Queries and AnalysisThis sample demonstrates the geospatial querying and analysis capabilities of OSGEarth. It covers techniques such as querying for features within a specific area, calculating distances and areas, and performing spatial joins. This sample highlights the power of OSGEarth in geospatial data analysis and processing.Sample 4: Integration with External Data SourcesThis sample demonstrates how OSGEarth can be integrated with external data sources such as shapefiles, KML files, and databases. It covers the steps involved in loading and displaying data from these sources within the OSGEarth framework. Thissample is essential for those looking to integrate their own geospatial data into OSGEarth applications.Sample 5: Advanced Visualization TechniquesThis sample showcases advanced visualization techniques such as layer styling, symbology, and animations using OSGEarth. It covers techniques to enhance the visual appeal of maps and improve user engagement. Developers interested in creating visually appealing and engaging maps will find this sample particularly useful.In conclusion, the samples in the OSGEarth source code provide a comprehensive overview of the library's capabilities and offer valuable insights into its usage. From basic map visualization to advanced visualization techniques and integration with external data sources, these samples cover a wide range of scenarios and use cases. Developers and enthusiasts alike can benefit from exploring these samples and applying the knowledge gained to their own geospatial visualization projects.中文版详解OSGEarth源代码中的各个Sample案例OSGEarth是一个开源的地理空间可视化库,提供了一系列示例案例来展示其功能。
osgEarth数据加载及组织解析
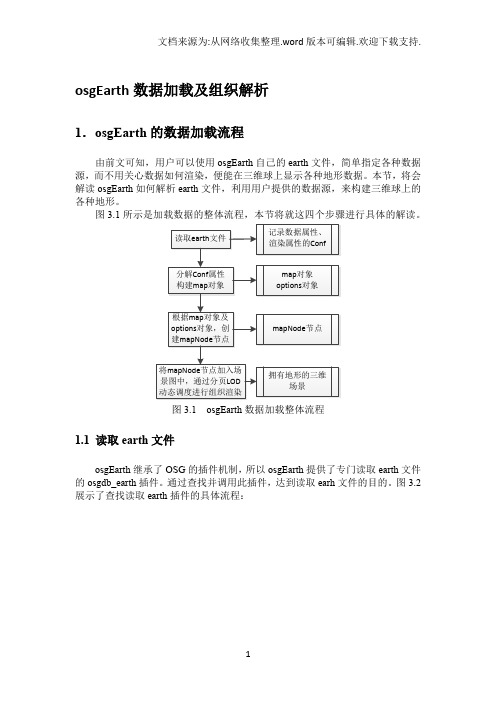
osgEarth数据加载及组织解析1.osgEarth的数据加载流程由前文可知,用户可以使用osgEarth自己的earth文件,简单指定各种数据源,而不用关心数据如何渲染,便能在三维球上显示各种地形数据。
本节,将会解读osgEarth如何解析earth文件,利用用户提供的数据源,来构建三维球上的各种地形。
图3.1所示是加载数据的整体流程,本节将就这四个步骤进行具体的解读。
图3.1 osgEarth数据加载整体流程1.1 读取earth文件osgEarth继承了OSG的插件机制,所以osgEarth提供了专门读取earth文件的osgdb_earth插件。
通过查找并调用此插件,达到读取earh文件的目的。
图3.2展示了查找读取earth插件的具体流程:图3.2 查找读取earth插件的具体流程这个具体流程展示了osgEarth如何找到读取earth的插件——osgdb_earth.dll。
这个流程其实也是osg插件机制中的具体流程,主要在read函数中根据文件后缀名查找读写插件,查找策略见前文,找到插件后便根据文件名构建ReadNodeFunctor的仿函数,然后调用doRead()函数来具体读取。
无论读取earth文件,还是读取影像数据、高程数据或一般的文字,都是这样一个流程,通过找到具体插件后调用插件里的doRead函数。
在osgdb_earth中,主要就是将earth文件中的内容转换成后面构造map需要的conf对象。
图3.3展示了一个包含标签比较全面的earth文件,图3.4为转换后的conf结果结构图:图3.3 普通earth文件内部代码图3.4 earth文件转换后的conf对象结构图如图所示,将earth文件中的标签转换成就conf对象就是将标签语言的嵌套转换成父子关系,然后每个对象包含自己的属性值。
1.2 构建map由上一节可知,通过earth插件,将earth文件中的数据属性,渲染属性等构成conf对象。
osgEarth如何加载离线谷歌卫星地图瓦片的源码教程
osgEarth如何加载离线谷歌卫星地图瓦片的源码教程说明本实例演示重新编译bing驱动直接加载本地离线影像瓦片地图。
本实例使用软件版本:osg3.3.1和osgEarth2.5 VC10编译环境(参考osgearth加载谷歌卫星地图的源码案例),vs2010,水经注万能地图下载器。
影像瓦片来源“水经注万能地图下载器”。
如果没有安装本软件,可以百度“水经注软件”到官方网站下载。
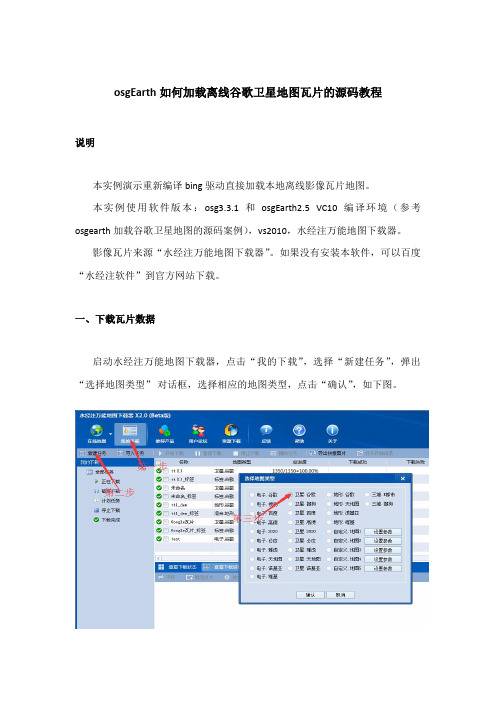
一、下载瓦片数据启动水经注万能地图下载器,点击“我的下载”,选择“新建任务”,弹出“选择地图类型”对话框,选择相应的地图类型,点击“确认”,如下图。
弹出“新建任务”对话框输入全球坐标,由于我们需要导出瓦片数据,为了增加缩放效果,这里我们从1级到8级都勾选上。
选择好级别后,点击开始下载。
下载完成后会弹出对话框询问是否要立即导出,选择“是”,然后显示“导出图片数据”对话框,如下图所示。
在该对话框中,选择导出“瓦片:Bing Map”,导出级别“1-8”,选择保存路径,点击“输出”按钮导出数据即可。
二、重新编译Bing驱动新建“osgdb_osgearth_bingd”动态库项目,如下图所示。
点击“确定”,弹出“应用程序向导”,如下图所示。
点击下一步选择程序类型“DLL”,点击“完成”。
添加“包含目录”和“库目录”包含目录设置为“D:\OSG\include”库目录设置为“D:\OSG\lib“以上目录路径根据OSG文件位置设定。
附加依赖项OpenThreads.libosgd.libosgAnimationd.libosgDBd.libosgdb_osgearth_feature_ogrd.lib osgdb_osgearth_feature_tfsd.lib osgdb_osgearth_feature_wfsd.lib osgEarthd.lib osgEarthAnnotationd.lib osgEarthFeaturesd.lib osgEarthSymbologyd.libosgEarthUtild.libosgFXd.lib osgGAd.lib osgManipulatord.lib osgParticled.lib osgPresentationd.lib osgShadowd.lib osgSimd.lib osgTerraind.lib osgTextd.lib osgUtild.lib osgViewerd.lib osgVolumed.lib osgWidgetd.lib点击“确定“。
osgearth代码hack(一)GeoTransfrom如何工作
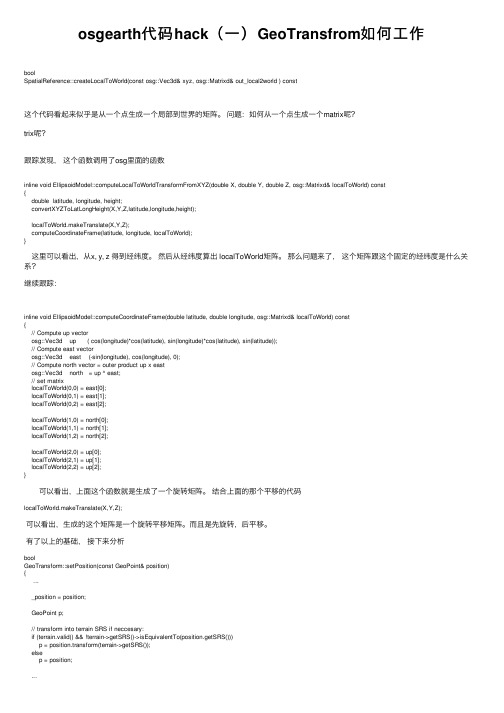
osgearth代码hack(⼀)GeoTransfrom如何⼯作boolSpatialReference::createLocalToWorld(const osg::Vec3d& xyz, osg::Matrixd& out_local2world ) const这个代码看起来似乎是从⼀个点⽣成⼀个局部到世界的矩阵。
问题:如何从⼀个点⽣成⼀个matrix呢?trix呢?跟踪发现,这个函数调⽤了osg⾥⾯的函数inline void EllipsoidModel::computeLocalToWorldTransformFromXYZ(double X, double Y, double Z, osg::Matrixd& localToWorld) const{double latitude, longitude, height;convertXYZToLatLongHeight(X,Y,Z,latitude,longitude,height);localToWorld.makeTranslate(X,Y,Z);computeCoordinateFrame(latitude, longitude, localToWorld);} 这⾥可以看出,从x, y, z 得到经纬度。
然后从经纬度算出 localToWorld矩阵。
那么问题来了,这个矩阵跟这个固定的经纬度是什么关系?继续跟踪:inline void EllipsoidModel::computeCoordinateFrame(double latitude, double longitude, osg::Matrixd& localToWorld) const{// Compute up vectorosg::Vec3d up ( cos(longitude)*cos(latitude), sin(longitude)*cos(latitude), sin(latitude));// Compute east vectorosg::Vec3d east (-sin(longitude), cos(longitude), 0);// Compute north vector = outer product up x eastosg::Vec3d north = up ^ east;// set matrixlocalToWorld(0,0) = east[0];localToWorld(0,1) = east[1];localToWorld(0,2) = east[2];localToWorld(1,0) = north[0];localToWorld(1,1) = north[1];localToWorld(1,2) = north[2];localToWorld(2,0) = up[0];localToWorld(2,1) = up[1];localToWorld(2,2) = up[2];} 可以看出,上⾯这个函数就是⽣成了⼀个旋转矩阵。
- 1、下载文档前请自行甄别文档内容的完整性,平台不提供额外的编辑、内容补充、找答案等附加服务。
- 2、"仅部分预览"的文档,不可在线预览部分如存在完整性等问题,可反馈申请退款(可完整预览的文档不适用该条件!)。
- 3、如文档侵犯您的权益,请联系客服反馈,我们会尽快为您处理(人工客服工作时间:9:00-18:30)。
osgEarth加载谷歌卫星地图的源码案例
2014-12-24 11:51 242人阅读评论(0) 收藏举报osgEarth谷歌卫星地图
一、准备工作
安装水经注万能地图下载器,如果没有安装本软件,可以百度“水经注软件”到官方网站下载。
编译OSG、OSGEarth和第三方插件等,这里有一个已经编译好的vs2010+osgearth,下载地址
“/share/link?shareid=107009&
uk=2801833827”。
二、下载地图
首先需要把谷歌卫星地图下载下来,这里以“郫县”为例。
启动水经注万能地图下载器,点击“框选下载区域”,双击下载区域,选择级数,如下图。
image001.jpg(269.3 KB, 下载次数: 0)
下载附件保存到相册
2014-12-23 16:01 上传
在级别列表中,你可以选择任何级别,但一般来讲城区选择19级,郊区选择16级比理想,但选择级别之前,最好在在线地图浏览中先查看所想要下载的级别是否有数据,这里我们以10级为例。
选择好级别后,点击确定开始下载。
下载完成后会弹出对话框询问是否要立即导出,选择“是”,然后显示“导出图片数据”对话框,如下图所示。
在该对话框中,不需要作任何设置,点击“输出”按钮以默认参数导出数据即可。
默认导出路径为“D:\SGDownload\tt1_拼接[默认]\L10”。
三、VS2010创建应用程序
解压编译包后还不能直接使用,需要设置环境变量:
OSG_ROOT X:\OSG
OSG_FILE_PATH %OSG_ROOT%\data
OSG_WINDOW 600 15 800 800
Path %OSG_ROOT%\bin;
设置文件目录属性
Osgearth的一个主要目标是易于应用集成,实际上有2种方式去整合osgearth.
第一种方式你可以建立一个earth file,然后在你的应用程序中加载它.
第二种使用osgearth API的时候以编程方式动态建立一个地图。
这里我们使用第一种,使用OpenSceneGraph现有的插件来读写数据,不需要osgEarth的lib和头文件,但是需要把dll拷贝到osg的bin目录下面
1、新建一项目,我命名为test3。
2、首先配置相应的包含文件和库文件目录,添加相应的链接器
3、附加依赖项
01.OpenThreadsd.lib 02.osgd.lib 03.osgDBd.lib 04.osgFXd.lib 05.osgGAd.lib 06.osgManip ulatord.lib 07.osgParticled.lib 08.osgShadowd.lib 09.osgSimd.lib 10.osgTerraind.lib 11.osg
Textd.lib 12.osgUtild.lib 13.osgViewerd.lib
4、编写代码
#include "stdafx.h"
#include <osgViewer/viewer>
#include <osg/Node>
#include <osg/geode>
#include <osg\group>
#include <osgDB/readfile>
#include <osgDB/writefile>
#include <osgUtil\optimizer>
int _tmain(int argc, _TCHAR* argv[])
{
osg::ref_ptr<osgViewer::Viewer> viewer=new osgViewer::Viewer();
osg::ref_ptr<osg::Group> root=new osg::Group();
osg::ref_ptr<osg::Node> node=osgDB::readNodeFile("mymap.earth");
root->addChild(node.get());
osgUtil::Optimizer optimizer;
optimizer.optimize(root.get());
viewer->setSceneData(root.get());
viewer->realize();
viewer->run();
return 0;
}
mymap.earth是一个earth 文件,earth其实是文本格式的文件内容如下
<map name="MyMap" type="geocentric" version="2">
<image name="bluemarble" driver="gdal">
<url>world.tif</url>
</image>
</map>
其中world.tif使用的是相对路径,也就是当前目录,
运行结果如下
在MyMap.earth中叠加我们想要的地方的高精度影像数据,代码如下<map name="MyMap" type="geocentric" version="2"> <image name="t1" driver="gdal">
<url>data/world.tif</url>
</image>
<image name="t2" driver="gdal">
<url>data/tt2.tif</url>
</image>
</map>
运行结果如下
放大到最大级别,如下图
至此在osgearth加载谷歌卫星地图完成。