BlueStacks安卓模拟器0.8.2.3018 官方给力安装中文版
ScandAll PRO 2.0 产品介绍说明书

ScandAll PRO 2.0Easy to UseCreate profi les to accelerate business productivity.• Hot Keys • Scan launch from Scanner*• Profi les • ScanSnap Mode*• PDF Editing*Please call for details as not available for every model.Great Image QualityEffi ciency increases when the documents are captured perfectlythe fi rst time.• Pick the driver best for your pages: Kofax VRS, TWAIN, or ISIS• Kofax VRS gives auto-color detection and image clean up• TWAIN provides color controls and edge clean up• Built in support for Page Edge Fill and Orientation FiltersPowerful Capture ControlSoftware fl exibility conforms to current workfl ows.• Save to Tiff, PDF (Password, OCR, PDF/A), JPEG,JPEG2000, JBIG• Batch Separators via Patch code, Bar code, or OpticalCharacter Recognition• Scan to File, Email, FTP , SharePoint, Print• Detailed auto-naming, including date and rmation Technology CornerAdvanced controls for special jobs and fast deployments.• Import/Export Profi les• Password Protected Profi les• Updates via Scanner Central Admin• Launch any application passing complete fi le name• Indexing and logging • Premium version for 2D Bar Codes & advanced indexing System Recommendation• Windows 2000, 2003, XP • 2.8 GHz processor • 1 GB memory • 1 GB Hard drive space • 1024 x 768 (16 bit color) monitor ScandAll PRO 2.0 fi -Series Software to Digitize Documents 11 mm 19 mmThe full-color portrait positive FSC bug is preferred, although other versions are available for a variety of reproductions.©2012 Fujitsu Computer Products of America, Inc. All rights reserved. Fujitsu and the Fujitsu logo are registered trademarks of Fujitsu Limited. Adobe and Acrobat are either registered trademarks or trademarks of Adobe Systems Incorporated in the United States and/or other countries. Microsoft, SharePoint, Windows and Vista are either registered trademarks or trademarks of Microsoft Corporation in the United States and/or other countries. ISIS is a registered trademark of Pixel Translations, a division of Captiva Software Corporation. VRS is a registered trademark of Kofax Image Products, Inc. ABBYY, FineReader are trademarks of ABBYY Software House. As an ENERGY STAR® Partner, Fujitsu Ltd. has determined that this product meets the ENERGY STAR® guidelines for energy efficiency. ENERGY STAR® is a U.S. registered trademark. All other trademarks are the property of their respective owners. All statements herein are valid only in the U.S. for U.S. residents, are based on normal operating conditions, are provided for informational purposes only, and are not intended to create any implied warranty of merchantability or fitness for a particular purpose. Fujitsu Computer Products of America, Inc. reserves the right to modify at any time without prior notice these statements, our products, their performance specifications, availability, price and warranty, post-warranty and service programs. Printed in the U.S.A. Qty. 5M DS395001111(800) 626-4686 (408) 746-7000 •Edit PDF fi les saved with ScandAll PRO.ScandAll PRO now allows for collapsed batch views as well as insert and delete function for batch separationbefore saving.ScandAll PRO provides a digital on-ramp for the Business Professional. Included in the box, this software accesses a variety of drivers like VRS to deliver the best image quality in a small fi le size. Saving these documents to common fi le formats such as PDF or TIFF is as simple as pushing the scan button. While easy to use, profi le fl exibility gets the documents to the right location without changing current workfl ows. ScandAll PRO is the perfect front-end solution. Premium supports Two Dimensional Barcode Recognition, PD417 and QR Code. Standard adds EAN128 and ITF barcodes.。
CA Clarity

Studio 内容管理 ........................................................................................................................................................11 Microsoft Project Interface ........................................................................................................................................11 与 VersionOne 集成 ...................................................................................................................................................12 智能部分 .................................................................................................................................................................... 12 Apache Tomcat 日志分析..........................................................................................................................................13
护盾联盟+安卓模拟器使用说明
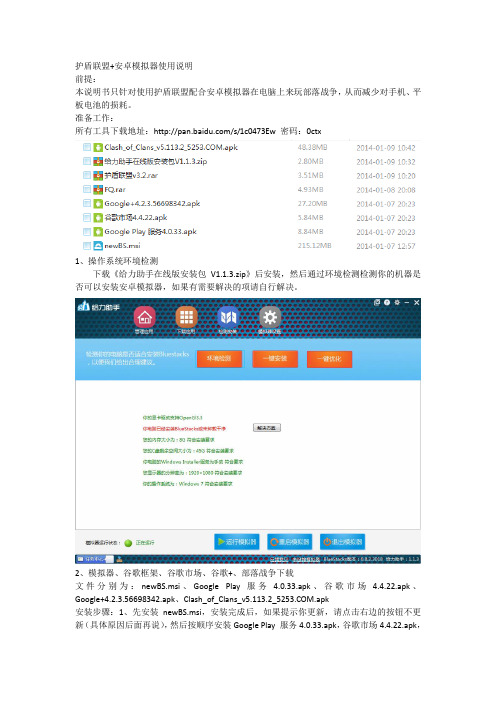
护盾联盟+安卓模拟器使用说明前提:本说明书只针对使用护盾联盟配合安卓模拟器在电脑上来玩部落战争,从而减少对手机、平板电池的损耗。
准备工作:所有工具下载地址:/s/1c0473Ew 密码:0ctx1、操作系统环境检测下载《给力助手在线版安装包V1.1.3.zip》后安装,然后通过环境检测检测你的机器是否可以安装安卓模拟器,如果有需要解决的项请自行解决。
2、模拟器、谷歌框架、谷歌市场、谷歌+、部落战争下载文件分别为:newBS.msi、Google Play 服务 4.0.33.apk、谷歌市场 4.4.22.apk、Google+4.2.3.56698342.apk、Clash_of_Clans_v5.113.2_.apk安装步骤:1、先安装newBS.msi,安装完成后,如果提示你更新,请点击右边的按钮不更新(具体原因后面再说),然后按顺序安装Google Play 服务4.0.33.apk,谷歌市场4.4.22.apk,Google+4.2.3.56698342.apk,Clash_of_Clans_v5.113.2_.apk四个文件,直接双击就可安装。
3、模拟器设置在模拟器是玩部落战争,需要用到谷歌账户。
谷歌账户注册:如果有谷歌账户的且之前的玩部落战争的终端是安卓系统的手机的请跳过这步,请先从网站上注册一个谷歌账户,因为国内访问比较费劲,所以请使用FQ.rar中的fg742p.exe工具进行特殊访问,注册谷歌账户后,需要访问一下这个网站完善一下个人资料。
游戏数据关联:先在模拟器上添加谷歌账户,点击Settings图标,,然后点击账户与同步再点击右上角的添加账户,添加google账户下面的步骤一步步来就可以了,直到下面这样的状态4、游戏数据关联游戏数据关联,这个相对比较简单,游戏玩到关联账户那步时,点击游戏里面的设置,然后点击同步你的谷歌账户,如果是已有游戏数据的谷歌账户,点击后会自动关联上你的游戏数据(注意:这里登录需要点多几次才行,因为在国内!也可以打开FQ.rar里面的fg742p.exe工具后再登录),如果是新账户的话,需要点击,然后选择这是一台新设备,然后选择我要关联到安卓设备,就会出来要求输入关联码了,,需要你其他终端上面的关联码,怎么得到关联码,在你的其他终端上,点击关联一台设施,然后点击这是一台旧设备,就会有关联码了。
LG G920 手机 使用说明书

当直接对着麦克风说话时,调整天线角度,使之朝上并高出您 的肩膀。如果天线是可伸缩的,则在呼叫期间应将天线伸长。 • 如果您的手机支持红外线功能,切勿将红外线对准任何人的 眼睛。
电子设备
所有手机都可能产生干扰,这种干扰会对性能造成影响。 • 在未经允许的情况下,不得在医疗设备附近使用手机。
不要将手机放在心脏起搏器上,即胸前的口袋内。 • 手机可能会对某些助听器造成干扰。 • 微弱的干扰可能会影响电视、收音机、个人计算机等。
Part No. MMBB0124005
ISSUE 1.0 PRINTED IN KOREA
G•P•R•S•&•M•M•S•P•H•O•N•E
简体中文
GPRS或MMS手机
用户手册 型号: LG-G920
请您在操作您的手机前仔细阅读此手册。 并保留它作为将来的参考。
Fri 28 May Names
Menu
管理器[ 菜单4 ] ............................................. 53 •电话薄[菜单4-1] .......................................... 53 •闹钟[菜单4-2] ............................................ 58 •日程表[菜单4-3] .......................................... 58 •备忘录[菜单4-4] .......................................... 60
……BlueStacks安卓模拟器安装和运行游戏的问题

BlueStacks安卓模拟器(中文名称:蓝手指模拟器)简明安装教程硬件最低要求:CPU:双核入门级及以上(AMD兼容性更好,Intel也没问题)内存:2G及以上(这个确实很重要,我1G内存的笔记本装不上,提示安装失败)硬盘:C盘(系统盘)空间最低需要4G,但考虑到后期还可能要进行扩展及安装大量应用及游戏,所以推荐预留6G以上;显卡:必须支持OpenGL 2.0及以上的显卡才可以,满足该要求的低端显卡型号,ATI品牌为9800及以上;NVIDIA(英伟达)品牌为FX5600及以上,Intel系列主板集成显卡为G41及以上,(ATI显卡的兼容性貌似更好一些)老机器上的AGP显卡一律是装不了的Windows系统环境要求:Windows XP SP3;Windows Vista;Windows 7;Windows 8系统内需包含Windows Installer 4.5.NET Framework 2.0 SP2(Windows XP下需检查是否安装).NET Framework 4.0(Windows 7或8下需检查是否安装)一,蓝手指模拟器历史版本(如有)的删除:蓝手指模拟器的安装需要理想环境,如果之前装错一次,可能导致很多残余文件影响再次安装,所以蓝手指模拟器的干净删除是其成功安装的重要条件之一。
二,蓝手指模拟器的安装:XP下需要先安装Installer 4.5和.NET 2.0 SP2;晕7晕8(Win7、Win8)下需检查是否安装.NET 4.0,然后蓝手指模拟器的安装时间较长,按提示操作即可,直到出现finish(中途会出现一个cancel可点的界面,时间较长,不要以为是死机了,千万别点,不然就出现安装中止且留下很多文件,影响下次安装的那种情况了。
三,如果装了360防火墙,由于蓝手指模拟器软件暂时无数字签名,所以它有可能会不断弹出提示,如果有这种情况发生,请允许程序的所有操作,放心绝非病毒。
洛雷克安全摄像头说明书

Guide D'installationVersion Francaise1.0Caractéristiques de la Caméra2Caractéristiques de la Caméra• la technologie reflétante rend la caméra invisible à l'oeil humain et Permet pourtant à la caméra de correctement Visualiser• le Facteur en Forme de Miroir de Sécurité est Idéal pour lesApplications Commerciales/ détail • le Câble passant par le crochet de Montage Murale dissimule et protège le câble de Connexion• Montage au Plafond alignée oumontage au mur en utilisation le câble passant par le crochet inclut.Contenus de paquet1 x Caméra de Sécurité en couleur avec Miroir Dissimulée avec support montant1 x Clé d'Ajustage (Poursupport montant)Montage muralealignéeMontage muraleOptions de Montage3Options de MontageCette caméra peut être installé à un mur ou à un plafond, ou peut être monter avec alignement au plafond en utilisant le câble passant par le crochet.Montant au mur:1. Montez la caméra à la surface montante désirée en en fixant fermement le Support de fixation en utilisant 4 vis (aux points énumérés comme les Vis 1~4 sur le diagramme).2. Utilisez la clé d'ajustage pour régler l'angle désiré de la caméra (aux points A, B et à C sur le diagramme au dessous).3. Connectez le câble d'extension à la caméra.Options de Montage4Montant au plafond:1. Enlevez le Support de fixation du revers de la Caméra (4 vis)2. Percez un trou dans le plafond assez grand pour passer le Câble de BNC/Alimentation.NOTE : En utilisant la méthode de montant au plafond, passer le câble d'extension à l'endroit avant de monter la Caméra.3. Raccordez la fin de câble de BNC/alimentation de la caméra aux connexions BNC/alimentation sur le câble d'extension avant le fait d'installer la base de caméra.4. Vissez la base de caméra au plafond.5. Anglez la caméra en desserrant les vis de côté. Réglez l'angle désiré et serrez les vis.6. Il y a deux trous de vis sur la couverture de Dôme–Dès que les trous sont alliés, réglez l'Insertion du Dôme pour que l'ouverture soit alliés avec Lentille.pour s'assurer de mettre en ligne les trous de la Couverture du dôme avec les trous sur la base de la Caméra.7a. Vissez les deux vis de clip de côté sur lacouverture de dôme dans la base pour tenir lacouverture de dôme dans l'endroit.7b. Utilisez l'anneau de dôme de caoutchouc pour cacheter le dôme à la base.7a 7bOptions de Montage5Installation de la Caméra et le Câble d'Extension Optionnel1. Raccordez le câble d'extension optionnel à la Caméra:• Raccordez les fins BNC et l'alimentation du câble à la Caméra • Raccordez le connecteur d'Adaptateur d'alimentation au Câble d'alimentation de courant alternatif attaché à la caméra.Souvenez-vous de vérifier les fins du câble avant l'installation permanente, comme les fins deconnexion d'alimentation sont différentes (un côté a une connexion d'alimentation de barrique femelle et une fin a une prise d'alimentation d'électrique mâle.CAMÉRA : Raccordez les Câbles BNC et d'alimentation à la CaméraENTREE VIDÉO : Raccordez le câblede BNC à l'entrée de vidéo du moniteur et raccordez l'adaptateurDiagramme d'installation de la caméra2. Raccordez la fin de BNC du Câble d'Extension au DVR / le Système d'Observation ou à une TV/MAGNÉTOSCOPE.NOTE: Raccordez le BNC à l'Adaptateur RCA comme nécessaire pour assurer une connexion correcte.3. Raccordez l'Adaptateur d'alimentation A/C au Câble d'Extension (le connecteur Noir). Branchez l'adaptateur d'alimentation à une issue muraleSpécifications de la Caméra6Spécifications de la CaméraType de Détecteur d'Image Détecteur d'Image de CCD en couleur 1/3 pouce Format Vidéo NTSCPixels Efficaces510H x 492V (251K) Résolution Horizontale 420 Lignes de TVSystème de Scrutation 525 Lignes 2:1 Interlac Système Synchronisé IntérieurTau de S/N Plus de 52dB sans AGC IrisAESVitesse d'Obturateur d'AES 1/60 ~ 1/120,000Illumination Minimale 0.2 LUX (Sens-en-haut jusqu'à x32) Sortie Vidéo Composite 1.0Vp-p @ 75ohms Sortie d'audioNon SoutenuLentille / Longueur Focale F2.0 de 3.6 millimètres fixé FOV (Diagonale) 92°TerminaisonBNC, Jack d'Alimentation DC IR LED / Gamme de Vision NocturneN/AExigence d'alimentation12V DC ±10% Consommation d'alimentation 110mA or 1.4W Température d'opération14°F ~ 122°F / -10°C ~ 55°C。
如何安装apk文件到android模拟器上面
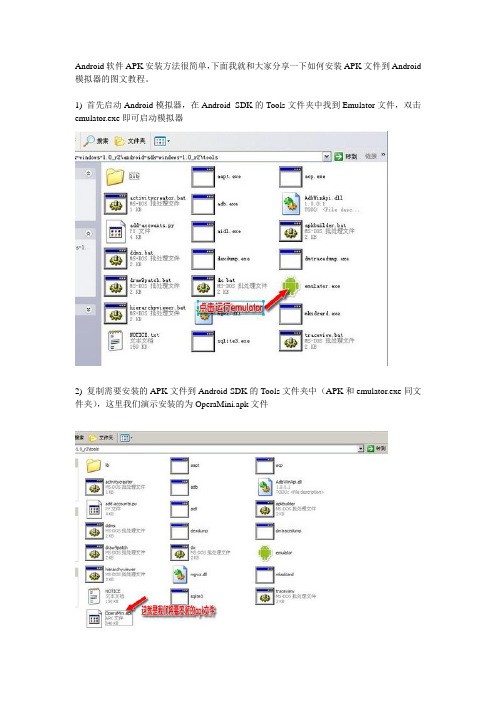
Android软件APK安装方法很简单,下面我就和大家分享一下如何安装APK文件到Android 模拟器的图文教程。
1) 首先启动Android模拟器,在Android SDK的Tools文件夹中找到Emulator文件,双击emulator.exe即可启动模拟器
2) 复制需要安装的APK文件到Android SDK的Tools文件夹中(APK和emulator.exe同文件夹),这里我们演示安装的为OperaMini.apk文件
3) 执行Windows开始菜单=> 所有程序=> 附件=> 命令提示符或通过Win+R 组合键调出运行对话框输入cmd 单击确定即可。
4) (由于我们的Android SDK安装路径为d盘,所以需要定位模拟器tools目录) 在cmd命令提示符中输入d: 回车,如图2第一行,接下来输入cd android-sdk-windows-1.0_r2后回车,由于我在解压时采用的是解压到android-sdk-windows-1.0_r2中,因此需要再一次输入cd android-sdk-windows-1.0_r2(如果在解压时采用解压到当前文件夹,则这步可以省略),接下来输入cd tools进入模拟器文件夹,最后执行adb install android123.apk命令即可执行安装,
5) 最后在Android模拟器点击下图中的按键,在展开的界面中就可以看到我们安装好的OperaMini.apk程序。
在电脑上安装Android模拟器 & 模拟器安装APK的方法

[教程]在电脑上安装Android模拟器 & 模拟器安装APK的方法Android, APK, 模拟器下载我们自己的安机市场AnMarket !各种给力应用都有!如果你还没有Android手机,那么可以先在电脑上安装一个Android模拟器,因为它可以在电脑上模拟出Android手机系统,让你也能体验一下它强大的魅力。
一、在电脑上安装Android模拟器二、在模拟器安装APK的方法一、在电脑上安装Android模拟器1、由于Android模拟器需要在Java环境才能运行,先下载Java安装吧。
(如已有Java环境的可跳过此步)打开下载页面:/html/view-2473.html选择任意一个下载点。
2、下载安装Android SDK (已包含后面提到的SDK Platform Android 2.2. API 8, revision 2 ):电信下载:/download/android/sdk/android-sdk-windows.zip网通下载:/download/android/sdk/android-sdk-windows.zip下载完成后,解压到某个目录。
例如:E:\android-sdk-windows然后把E:\android-sdk-windows\Tools 完整路径加入到系统Path变量(这一步主要用于以后安装apk软件时方便调用)我的电脑 > 右键属性 > 高级 > 环境变量注意:增加进Path变量时,路径前面要加一个;号3、配置Android 模拟器运行 SDK Setup.exe (在E:\android-sdk-windows目录下)可能会出现错误,访问不了https://修改方法勾选Settings > Force https://...sources to be fetched using http://再选择的Avaiable Packages 进行下载,如下图,如果你只想安装Android2.2的模拟器,就选择SDK Platform Android 2.2. API 8, revision 2 (前面下载SDK时已经包含此组件)不需要重复下载,网友可跳过这个步骤,直接到下面的Virtual Device > new.. 这一步。
- 1、下载文档前请自行甄别文档内容的完整性,平台不提供额外的编辑、内容补充、找答案等附加服务。
- 2、"仅部分预览"的文档,不可在线预览部分如存在完整性等问题,可反馈申请退款(可完整预览的文档不适用该条件!)。
- 3、如文档侵犯您的权益,请联系客服反馈,我们会尽快为您处理(人工客服工作时间:9:00-18:30)。
BlueStacks安卓模拟器0.8.2.3018 官方给力安装中文版
版本号:0.8.2.3018
【安装注意事项】
一、先安装“BlueStacks安卓模拟器0.8.2.3018 官方给力安装版.exe”。
二、安装完成后,打开“给力助手”,并根据提示快速安装BlueStacks即可。
(本安装程序包含了,安装Bluestacks所必须的.NET Framework 2.0等系统插件;360无报毒无阻止,绿色安装)
【模拟器使用方法及图文介绍】
1、安装好"BlueStacks安卓模拟器"后,将下载好的安卓应用“保卫萝卜.apk”,右键 - open with BlueStacks APK Installer。
(若特殊情况,系统右键菜单未识别BlueStacks,可右键“保卫萝卜.apk”--打开方式--选择默认程序--在弹出的对话框中选择“浏览”--找到默认安装C:\Program Files\BlueStacks\HD-ApkHandler.exe后,确定)
2、安装中
3、BlueStacks安卓模拟器显示“保卫萝卜(英文名CarrotFantasy)”已安装完成
4、打开模拟器,在主界面选项“All App”中可以找到刚刚安装好的“保卫萝卜(CarrotFantasy)”,界面右下角可以设置模拟器的基本设定。