maya基础动画实例:跳动的小球 PPT
1maya动画.ppt
设置帧在属性上的方式
设置帧在时间 上的方式
图1-16
23
1.4 关键帧
所有的控制手柄和可Key属性
所有的可Key属性 当前控制器的所有手柄 当前控制器,选择的手柄 图1-17
图1-18
设置帧在当前时间上
设置帧在指定时间上
24
1.4 关键帧
1.4.3 编辑关键帧(Edit>Keys)
图1-28
39
1.6 动画辅助工具
1、创建在如图模型做 为楼梯的一个阶梯;
图1-29
2、创建一个圆柱作为 楼梯的支柱。
图1-30
40
1.6 动画辅助工具
3、按Insert键 把轴心移 动到物体的一边。
4、执行菜单命令 “Modify>Freeze Transformations”冻结 楼梯的变换属性。
图1-3
11
1.2 动画模块介绍
1.2.2 动画模块菜单内容
1、Animate(动画) 2、Geometry Cache (几何体缓存) 3、Create Deformers(创建变形器) 4、Edith Deformers(编辑变形器) 5、Skeleton(骨骼) 6、Skin(蒙皮) 7、Constrain (约束) 8、Character (角色)。
图1-37
47
1.6 动画辅助工具
7、选中所有的阶梯,删 除历史。 8、修改支柱高度,以匹 配旋转楼梯。到此旋 转楼梯的大体就制作 完成了。
图1-38
48
1.6 动画辅助工具
9、首先创建一个圆环做 为楼梯扶手横截面,调 整大小位置。
图1-39
10、将圆环轴心点捕捉到 楼梯中心,并将圆环进 行冻结。
【PPT实用技巧】如果使用PPT制作跳动的小球
如果使用PPT制作跳动的小球
如果使用PPT制作跳动的小球?利用ppt制作小球弹跳动画,教程中
主要利用了直线路径,方法不难,只要几步就可以快速制作出弹跳动
画效果,话不多说,接下来小编就给大家分享具体操作的步骤和截图,一起去看看吧!
效果图:
主要过程:
1、首先启动ppt2010,执行插入-形状命令,选择椭圆形状,按住
shift键绘制一个正圆。
2、设置形状填充为渐变填充,选择中心辐射,形状轮廓为无,接着设置形状效果为映像。
3、选择圆形,执行动画命令,从中选择路径动画,并选择直线动画。
4、接着调出动画窗格,点击效果选项弹出向下对话框。
5、切换到计时选项卡,设置开始为上一动画之后,期间为0.5s。
6、设置重复为直到幻灯片末尾选项,点击确定按钮,按f5播放查看效果。
教程结束,以上就是如何利用ppt制作小球弹跳动画的方法步骤,是不是很简单?。
Maya三维动画制作案例第七章简明教程PPT课件
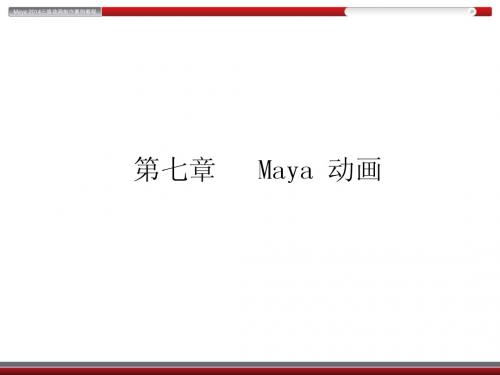
步骤 01 创建多边形 球体与平面作为小球 与地面。
步骤 02 选定小球模 型,在第一帧处按S 键设置关键帧,为 对象设置关键帧后 的变化通道栏内对 象的属性文本框呈 红色,在时间滑块 上设置关键帧的位 置显示红色标记作 为关键帧标记。
步骤 03 将时间滑块至第20 帧 的位置,选定小球对象,向右 移动5 个单位左右或任意长度, 然后按S 键设置关键帧,时间 滑块上出现两个红色关键帧标 记,这时滑动时间滑块检查动 画。
7.2 Maya 动画原理
Maya 动画提供了功能强大的工具,使场景中的角色和对象充满活力。通过这些工具,可以自由地为对 象的任何属性设置动画,并获得成功实现随时间变换的关节与骨骼、IK 控制柄及模型所需的控制能力。
7.2.1 动画技术的基本分类
关键帧动画:允许通过设置关键帧变换对象或骨架。例如,可以为角色的手臂关节和 IK 控制柄设置关键 帧以创建其手臂挥动的动画。
7.2.3 小球关键帧动画
关键帧可以是任意标记,用于指定对象在特定时间内的属性值。设置关键帧是创建用于指定动画中的计时 和动作的标记的过程。动画是创建和编辑对象中随时间更改的属性的过程。 创建对象后,可以设置一些关键帧,用于表示该对象的属性何时在动画中发生更改。实际上是在该时间 记录属性的快照,可以重新排列、移除和复制关键帧和关键帧序列。
步骤 04 将时间滑块滑动至第 10 帧处,选择小球对象,向 上移动Y 轴两个单位左右, 并按S 键设置关键帧,再次 滑动时间滑块检查小球跳跃 动画。
7.2.4 编辑关键帧
1. 剪切关键帧 剪切关键帧就是将关键帧复制到关键帧剪贴板中,以达到删除它们的目的。 步骤 01 若要选择单个关键帧,可在Time Slider( 时间滑块) 中单击该关键帧。当前时间指示器将移动到 单击的位置,且该关键帧现已选定;若要选择多个关键帧,可按住Shift 键的同时在TimeSlider( 时间滑块) 中相应范围的关键帧内拖动。该范围内的关键帧现已选中并以红色亮显。
2曲线编辑器小球弹跳PPT课件
• 双击晶格关键帧工具即可对晶格进行编辑,让晶格 的数量更多或更少
27
2.4 修改小球弹跳的动画曲 线
2.4.1 修改小球translate y属性的动画曲线
观察小球的translate y的曲线需要调整哪里呢?
加速 减速
加速 减速
加速 减速
图2-4
9
2.1 小球弹跳
2.1.3 制作小球弹跳所要考虑的因素:
制作小球弹跳所要考虑的重要因素有球的重量、 球的材料、球的大小 、球的移动速度…,这些因素 决定的了小球在弹跳过程中的空间幅度及时间点。
图2-5
10
2.2.1 制作小球弹跳关键帧
1、打开素材文件“ball.mb”
2、动画前的准备。
本章结构
4
通过调节小球弹跳的动画掌握
小球弹跳的运动规律 动画曲线表的应用 动画辅助功能的应用
本章重点
5
2.1.1 寻找小球弹跳的关键帧
2.1 小球弹跳
图2-1
图中黄色圆圈为小球弹跳的关键帧,白色圆圈为 小球弹跳的中间帧。
过了今天大家就要多观察身边的事物,学会寻找关键帧。(事物、人、动物)
6
2.1 小球弹跳
在这里我们可分为:匀速运动、加速运动、减速运 动、慢入慢出。
图2-12
18
2.3 Graph Editor的运用
匀速运动:观察A点到B点之间的曲线。
图2-13
19
2.3 Graph Editor的运用
加速运动:观察A点到B点之间的曲线。
图2-14
20
2.3 Graph Editor的运用
减速运动:观察A点到B点之间的曲线。
弹性小球弹跳效果制作PPT教程

第一步:都知道的秘密
选择小球→动画→添加动画→直线→持续时间1秒
第二步:隐藏的秘密
设置动画选项,参数如图Biblioteka 播放试试有没有点儿
感觉
差点火候啊
高潮 来了
第三步:一般人不能说的秘密
删除已有动画→复制小球→先选圆球再选扁球→NT→平滑过渡
此时的动画窗格 秘密藏在 动画窗格
以上是一次完整的往返动画
复制动画 两种方法
哦,我能想到的
方法1
+
方法2
复制 粘贴
上一动画之后
第三步:一般人不能说的秘密
调整动画
圆球 扁球 相同 设置
第三步:一般人不能说的秘密
全选两球并复制→删除拷贝的动画→先选扁球再选圆球→NT→平稳过渡
第三步:一般人不能说的秘密
设置拷贝球动画
圆球 扁球 相同 设置
第三步:一般人不能说的秘密
全选拷贝两球拖动到原有小球上并完全重合→为原有/拷贝球分别设置消失/出现动画
@菜鸟PPT
教程
打造逼真弹性小球运动效果
一个弹性小球自由落体动画如何在PPT中实现
速度因为受重力影响 越来越快 形状因为受阻力影响 会慢慢变形 触地的一瞬间 速度最大 形变最大
到达最高点 速度最小 形变最小 形状因为受阻力影响 会慢慢复原 速度因为受重力影响 越来越慢
假设
没有能量损失 上页假设都成立
现场教学九-轨迹动画弹跳小球
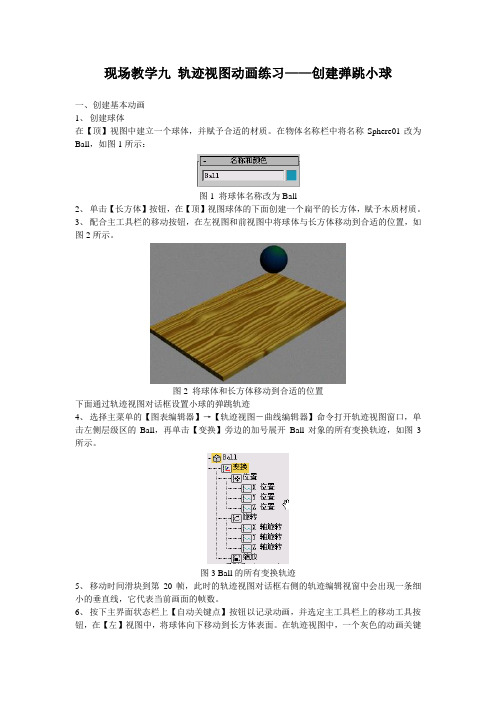
现场教学九轨迹视图动画练习——创建弹跳小球一、创建基本动画1、创建球体在【顶】视图中建立一个球体,并赋予合适的材质。
在物体名称栏中将名称Sphere01改为Ball,如图1所示:图1 将球体名称改为Ball2、单击【长方体】按钮,在【顶】视图球体的下面创建一个扁平的长方体,赋予木质材质。
3、配合主工具栏的移动按钮,在左视图和前视图中将球体与长方体移动到合适的位置,如图2所示。
图2 将球体和长方体移动到合适的位置下面通过轨迹视图对话框设置小球的弹跳轨迹4、选择主菜单的【图表编辑器】→【轨迹视图-曲线编辑器】命令打开轨迹视图窗口,单击左侧层级区的Ball,再单击【变换】旁边的加号展开Ball对象的所有变换轨迹,如图3所示。
图3 Ball的所有变换轨迹5、移动时间滑块到第20帧,此时的轨迹视图对话框右侧的轨迹编辑视窗中会出现一条细小的垂直线,它代表当前画面的帧数。
6、按下主界面状态栏上【自动关键点】按钮以记录动画,并选定主工具栏上的移动工具按钮,在【左】视图中,将球体向下移动到长方体表面。
在轨迹视图中,一个灰色的动画关键点出现在“位置”轨迹的第0帧和第20帧画面上,同时一条蓝色的范围线出现在“变换”和Ball的轨迹中,如图4所示。
图4 Z轴的运动轨迹7、再次单击【自动关键点】按钮,关闭动画模式,利用鼠标左键拖动时间滑块,可看到球体在第20帧降至地平面,然后保持不动。
在轨迹视图的“位置”项目中出现两个动画关键点,第0帧为球体的原始位置,第20帧为球体的新位置。
(接下来,通过轨迹视图对话框将“位置”0帧的动画关键点复制到第40帧处,将球体在40帧时回到原始位置。
见第8步操作)8、在轨迹视图对话框中,确认【移动关键点】按钮被按下,按住键盘上的Shift键不放,单击第0帧的动画关键点,观察轨迹视图对话框底部中央的空白信息框中显示的数字,向右拖到第40帧处,如图5所示。
图5 复制关键点9、拖动时间滑块,可以看到球体在0-40帧之间进行上下移动。
动漫制作专业《课件-弹跳球》
• 设计效果
1
设计过程
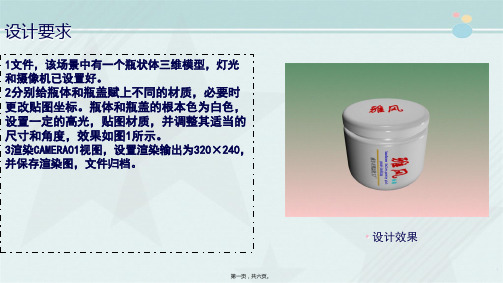
〔1〕文件,该场景中有一个瓶状体三维模型,灯光和摄像机已设置好,如下图。
2
第二页,共六页。
设计过程
〔7〕选择Camera01的摄像机视图,设置平安框,单击所有视图最大化按钮,按F10键翻开渲染 设置对话框,选择输出大小为320×240,单击“渲染〞按钮,保存效果图,如下图。
第六页,共六页。
设计要求
1文件,该场景中有一个瓶状体三维模型,灯光 和摄像机已设置好。 2分别给瓶体和瓶盖赋上不同的材质,必要时 更改贴图坐标。瓶体和瓶盖的根本色为白色, 设置一定的高光,贴图材质,并调整其适当的 尺寸和角度,效果如图1所示。 3渲染CAMERA01视图,设置渲染输出为320×240, 并保存渲染图,文件归档。
3
第三页,共六页。
设计过程
〔8〕单击3dsma窗口左上角“文件〞 “另存为〞 IP后缀的压缩文件包,如下图。
“归档〞,将设计结果归档为
4
第四页,共六页。
~完~
5
第五页,共六页。
内Байду номын сангаас总结
设计要求。1文件,该场景中有一个瓶状体三维模型,灯光和摄像机已设置好。瓶体和瓶盖 的根本色为白色,设置一定的高光,贴图材质,并调整其适当的尺寸和角度,效果如图1所示。 3渲染CAMERA01视图,设置渲染输出为320×240,并保存渲染图,文件归档。〔1〕文件,该场 景中有一个瓶状体三维模型,灯光和摄像机已设置好,如下图。~完~
沿轨迹运动的小球ppt课件.ppt

小球沿轨迹运动的动画演示:
发现问题
1、小球为什么会沿着你所画的这条轨迹做曲线运动呢?
2、小球如何创建呢? 3、如何让小球动起来?
分析问题
一、小球为什么会沿着你所画的这条轨迹做曲线运动呢?
添加了图层的传统运动引导层
引导层图标:在引导层下方的图层称为“被引导层”,被引导层会比
其它图层往里缩进一些。
引导层内容:只放置绘制的运动路径——引导小球运动的轨迹
引导层作用:1、使对象(小球)沿着绘制的运动路径(引导线)运动
2、绘制一条简单的引导线(小球运动的轨迹)
分析问题
二、小球如何创建呢?
使用工具栏里的椭圆工具 选定填充颜色里的任意一种渐变颜色。
分析问题
三、如何让小球动起来?
在 所在 图层1的第一帧(开始帧) 创建传统补间
解决问题
你能行!
现场教学九-轨迹动画弹跳小球

现场教学九轨迹视图动画练习——创建弹跳小球一、创建基本动画1、创建球体在【顶】视图中建立一个球体,并赋予合适的材质。
在物体名称栏中将名称Sphere01改为Ball,如图1所示:图1 将球体名称改为Ball2、单击【长方体】按钮,在【顶】视图球体的下面创建一个扁平的长方体,赋予木质材质。
3、配合主工具栏的移动按钮,在左视图和前视图中将球体与长方体移动到合适的位置,如图2所示。
图2 将球体和长方体移动到合适的位置下面通过轨迹视图对话框设置小球的弹跳轨迹4、选择主菜单的【图表编辑器】→【轨迹视图-曲线编辑器】命令打开轨迹视图窗口,单击左侧层级区的Ball,再单击【变换】旁边的加号展开Ball对象的所有变换轨迹,如图3所示。
图3 Ball的所有变换轨迹5、移动时间滑块到第20帧,此时的轨迹视图对话框右侧的轨迹编辑视窗中会出现一条细小的垂直线,它代表当前画面的帧数。
6、按下主界面状态栏上【自动关键点】按钮以记录动画,并选定主工具栏上的移动工具按钮,在【左】视图中,将球体向下移动到长方体表面。
在轨迹视图中,一个灰色的动画关键点出现在“位置”轨迹的第0帧和第20帧画面上,同时一条蓝色的范围线出现在“变换”和Ball的轨迹中,如图4所示。
图4 Z轴的运动轨迹7、再次单击【自动关键点】按钮,关闭动画模式,利用鼠标左键拖动时间滑块,可看到球体在第20帧降至地平面,然后保持不动。
在轨迹视图的“位置”项目中出现两个动画关键点,第0帧为球体的原始位置,第20帧为球体的新位置。
(接下来,通过轨迹视图对话框将“位置”0帧的动画关键点复制到第40帧处,将球体在40帧时回到原始位置。
见第8步操作)8、在轨迹视图对话框中,确认【移动关键点】按钮被按下,按住键盘上的Shift键不放,单击第0帧的动画关键点,观察轨迹视图对话框底部中央的空白信息框中显示的数字,向右拖到第40帧处,如图5所示。
图5 复制关键点9、拖动时间滑块,可以看到球体在0-40帧之间进行上下移动。
Maya三维动画设计与制作第3章简明教程PPT课件
7
位移关键帧设置 • 1、在第1帧上,创建小球,并将小球Translate Y (Y轴位移)数值调 为15,Translate Z (Z轴位移)数值调为0。 • 2、选中小球,单击Animation (动画)> Set Key (设置关键帧) 命令,如图3-12所示。设置关键帧后,时间栏上会产生红色细线作为 标记。 • 3、在第94帧上,将小球Translate Y (Y轴位移)数值调为1, Translate Z (Z轴位移)数值调为-30。
9
位移关键帧设置
• 6、依次调整小球Translate Y(Y轴位移)高度。在第9帧上,小球Translate Y(Y轴位 移)数值为0。在第15帧上,小球Translate Y(Y轴位移)数值为7。在第22帧上,小 球Translate Y(Y轴位移)数值为0。在第27帧上,小球Translate Y(Y轴位移)数值 为5.6。在第33帧上,小球Translate Y(Y轴位移)数值为0。在第37帧上,小球 Translate Y(Y轴位移)数值为3.7。在第41帧上,小球Translate Y(Y轴位移)数值 为0。后面依次调整Translate Y(Y轴位移)属性数值,使其整体运动成为减速运动。 • 7、复制Translate Y(Y轴位移)曲线。选中第22帧到第41帧的动画曲线,然后点击 Graph Editor(曲线编辑器)> Edit(编辑)>Copy(复制)命令。然后按住键盘上 的k键,移动当前时间线,将其移动到第41帧,然后点击Graph Editor(曲线编辑器) > Edit(编辑)>Paste(粘贴)命令。
3
• 动画案例01:弹性小球
• 设置动画参数
• 1、打开MAYA2012,按F2键,切换到MAYA动画模块。 • 2、单击Window(窗口)> Setting/Preferences(设置)> Preferences(设置),弹出设置面板。
Maya动画基础原理 ppt课件

19
基本设置
接下来将播放速率改为实时播放。在Preferences(参数)窗口中选择左 侧Categories(类别)中的Time Slider(时间滑块),然后在右侧将 Playback(回放)中的Playback Speed(回放速度)改为Real-time(24fps)[ 实时(每秒24帧)],最后单击Save(保存),这样动画就可以实时播放了 。
ppt课件
25
Maya中动画的基本分类
5、动力学动画 此类动画多与自然界中的各种物理力学与运动
规律相关。 如:物体的掉落,柔体的随风飘动,刚体之间
的碰撞。此类动画主要节合Maya的动力学模 块进行制作。
ppt课件
26
Maya中动画的基本分类
6、表达式动画 当某一物体的运动与时间或是其它物体运动之
动作跟随是指物体的运动超过了它应该停止的位置然后折 返回来,直到停止的位置。例:当我们扔一个东西的时候 ,在扔出去之后,胳膊因为惯性不会立刻停下来,而要继 续摆动几下才能停止,这就是跟随。
动作的重叠是指当主要动作改变动作方向或状态时,其角 色的附属物却仍按原动作方向运动,而不会立刻停止。例 :急刹车时,车虽停下,人会按惯性前倾,不会马上停止 。
好的理解。动作表现力能够很好地渲染气氛,因为它直观 的影响观众主观的态度、情绪、反应,以及想法等。 首先不要在同一时间出现过多的动作,这样易分散观众的 注意力而抓不住重点。其次,动作要与角色的情绪相配合 ,如一个情绪低落的角色,动作表现上一般是垂头丧气的 ,弓着背,而不能是昂首挺胸的。 此处特别强调的是对背景角色动作的设计要适当,它是衬 托的,是辅助的,因而不能抢了前景角色的风头。
ppt课件
2
Maya动画模块
maya小球弹跳动画
maya小球弹跳动画Two) bouncing ball animationPurpose and significanceComprehensive use of Maya basic animation control toolsMaster the method of setting up key framesFully use Graph Editor's main editing function to adjust the animation curveComplete a bouncing animation with the rhythmic audio providedAnd can be broadcast with the default player of the operating systemCreating simple models and scenarios1) create a simple Nurbs ball, and Scale is 1 Units2) create a Plane as the reference ground, and the Scale is 100 units3) create a Squash shaper: Deform>Create Nonlinear>Squash.4) use the Squash shaper as the child of the ball5) import background soundAnalyze animation content and establish solutionsOur small ball animation requires a jump in the background, a sense of gravity in the jump, and an elastic compression effect similar to that of a rubber ball1) analyze the tempo of the background sound and find out the exact location of the stress frame. We define the stress frame as a small ball landing frame, then tentatively select the middle frame of the two landing frame for bouncing the ball to the highest point of the key frame2) in advance, consider the small ball from each contact to the ground, bouncing to the top, and then again to the horizontal displacement of the falling ground (which is ready to move in the X direction) and the vertical height of the jump (here is the Y direction)3) we make a simple bouncing animation according to the general plan mentioned above, without considering the bouncing effect of the ball4) observe the animation, use the law of physics, adjust the curve, make the bouncing of the small ball more physical, reflect the feeling of gravity5) by using the Squash shaper, a small deformation effect is added to the small ball6) adjust the animation curve to achieve the desired effect7) for the sake of possible animation, let the ball continueto bounceAnalyze the sound and create five key frames for the initial jumpThe whole background sounds for a short time, and we'll make sure that the start time frame for the slider is 0 and the end frame is 60, as shown belowWe analyze background sounds, and know the key frames of stress (that is, key frames of small balls landing) appear in the 4,24,44 frameLanding key frame settingTo move the time to fourth frames, we select the ball to set first key frames in place (Animate>Set, key, or press the shortcut key "S");Move the time to twenty-fourth frames, set the X axis of the ball to 10, and set up second key frames;Move the time to forty-fourth frames, set the X axis of the ball to 20, and set third key frames;After the landing key frame is confirmed, we will also set the ball to hit the key frame at the top:Move the time to the frame between 4 and 24, or fourteenth frames, without changing other values. Set the Y axis to 8 in the channel bar, and set up fourth key frames;Move the time to the frame between 24 and 44, or thirty-fourth frames, without changing other values. Set the Y axis to 8 in the channel bar, and set up fifth key framesAnimation, the ball along the X axis in the positive direction of a simple jump animationThe ball in the real physical worldIf we watch carefully, we will find that the ball lacks a sense of weight when it bounces, and when it hits the ground, there is a feeling of sliding and floating. For this reason, we need to open the chart editor to adjust the movement curve of the small ballBefore adjustment,Let's analyze the bouncing motion of the ball firstWe live in a world full of gravity, bounce to the height of the ball due to gravity, will gradually weaken to the elastic force, eventually become slaves to gravity, acceleration downward, downward when it hit the ground, the ball met hard obstacles, gravity instantaneous bouncing up into motion, so the ball again and again, keep doing exercise and gravity bouncing up, until the cause of the consumption of energy due to friction and stops moving. (in this exercise, we do not consider the friction from the bouncing ball movement is always infinite continued)In order to achieve this, we must put the ball into regulating speed fell to the ground, hit the ground after the rapid deceleration becomes an upward movement. When jumping to the highest point, the upward movement tends to zero, and then converted to accelerate the downward movement.Edit the animation curve using the chart editorOpen the chart editor, select the Translate Y of the ball, and display the movement of the Y axisSelect the key frame, choose the Curves>Weighted Tangents command, the curves become the weight curve. In this way, we can edit tangent weights more reasonable to achieve the change of the speed.Click on the toolbar to make the five key frames Flat cut linesEdit animation curvesSelect 3 key frames of the ball, click the ground tangent of the landing frame, so as to achieve the instant change of gravity and elasticity after the landing of the ballClick to release the tangent weights of these frames. Now we can adjust the tangent weights arbitrarily by adjusting the tangent handleEdit animation curvesWe are now beginning to adjust the floor frame deceleration,we take twenty-fourth floor frame frame as an example, click, select key frames tangent handle twenty-fourth, adjusted to the sample:The curve of twenty-fourth frames is now equivalent to the ball to the gravity acceleration, when arriving at frame 24, by ground obstacles, quickly became the opposite direction of the movement, such as twenty-fourth frames on the right side of the curve.Edit animation curvesBecause of the upward movement is a slow movement, and at the highest point of movement tends to zero, and then become the accelerating downward movement. So, we started to adjust the highest point tangent frame to frame thirty-fourth, for example, select the thirty-fourth frame, the release of the frame weight, choose the tangent handle, adjust the sample:The good, now complete other key frames with similar operation curve adjustment, the final figure:Edit animation curvesNow, we can see the animation, the bouncing ball has a sense of weight, no landing sliding the phenomenon of floating. If not satisfied, we can adjust again curve with different addition and subtraction movement, in order to achieve a better bounce with gravity effect.Add deformation to the ballBut we still find the ball bounce like a hard core ball, jump very hard, and we want to get the effect is a flexible rubber ball.We know that the rubber ball is composed of deformable soft rubber, it has the characteristics of squash and stretch, when the ball bounces, hit the ground will be squeezed, and the bounce, and will be due to collision and inertia and tension, and when the ball is squeezed and stretched after the ball, because of the physical characteristics, will be restored undisturbed.To achieve this vivid effect,We use the squash deformation, deformation animation ball. In the real world, the effect of deformation of rubber ball is very slight, not too obvious, in order to reproduce the lively squash and stretch in the world of animation, we can also increase the ball deformation, deformation exaggeration ball.Deformation effectFirst, start the compression frame, then select the squash handle of the ball at the first landing frame, or fourth frames, set the Factor in the squash channel column to -0.4, and other invariant (that is, using default values) to set the keyframeIn the rest of the two landing frame, that is, 24,44 frames, set the key frame of the same squash property, so that the 3 landing frame of the ball compression effect came outNext, we set the extension frame of the small ball, at the 6,26 frame, set the Factor in the squash channel column to 0.4, and the other unchanged, set the key frameAt the frame 22,42, you also have the stretching key for the same squash attributeBecause of its own physical characteristics, the ball will be restored to its original shape after deformation. According to the analysis above, the motion of the ball at the highest point tends to zero. Then we will determine the deformation of the ball in the highest frameAt frame 14,34, set the Factor in the squash channel column to 0, and other invariants to set the keyframeThe ball well, deformation animation setting and animation, results are as follows:Perfect ball bouncing animationThe bouncing ball is flawed, landing in a few frames, the ball did not touch the ground, and in several stretching frames, the erection of a ball in the air, obviously not true, here we come.The floor frame several did not touch the ground, we in the chart editor, select the Translate property of the Y ball, box three floor frame, press "W" button, then press "Shift" key keyboard and mouse button down, drag the vertical frame, the ball touches the ground.We can increase the tilt of the ball forward movement for the ball's aerial erectionIn the four stretch frame, we rotate the ball Z axis of the 6,26 frame -20, and rotate the Z axis of the ball 22,42 in the frameAnd in several landing frames and the highest frame, we rotate the Z axis of the ball to zeroPlay the animation. The animation of the ball should be close to the bounce of the rubber ballPerfect ball bouncing animationObserve the animation, we can see the animation in the beginning and the end of the movement of the ball is stationary, because we did not consider the initial ball and the end state, and we mentioned this animation without considering the friction, so the ball bounce will be infinite continuous movement. Now, let's add cycle commands for ball animation related attributes, perfect the bouncing ball.Set loops and offsetsOpen the chart editor, select the Translate X curve, select the Curves>Pre Infinity>Cycle With Offset command and the Post Infinity>Cycle With Offset command, so that the X axis displacement of the ball will be infinite offset cycleSelect Translate Y curve, select the Pre Infinity>Cycle commandand Post Infinity>Cycle command, so that the ball Y axis displacement cycle up and down movementSet loops and offsetsThe Fator properties of the Rotate, Z, and squash of the sphere also perform looping commandsPresent,Play the animation againThe movement of the ball has become more perfect. If you are not satisfied, you can edit the key frames again, adjust the relevant tangents, and move the frames in time to make the movement more reasonable。
2曲线编辑器小球弹跳.ppt

图2-4
9
2.1 小球弹跳
2.1.3 制作小球弹跳所要考虑的因素:
制作小球弹跳所要考虑的重要因素有球的重量、球 的材料、球的大小 、球的移动速度…,这些因素决 定的了小球在弹跳过程中的空间幅度及时间点。
图2-5
10
2.2 制作小球弹跳
2.2.1 制作小球弹跳关键帧
1、打开素材文件“ball.mb” 2、动画前的准备。 a) 打开Preferences窗 口更改Settings选项 下的Time:为PAL (25fps)
Keys菜单下其它编辑切线命令 Break tangents 断开切线 Unify tangents 统一权重 Lock tangent weight 锁定切线权重
图2-18
25
2.3 Graph Editor的运用
2.3.6 在曲线上编辑关键帧
Move keys tool:移动关键帧工具; • 也可以按“w”键用中键进行拖动。 Insert keys tool:插入关键帧工具;
图2-27
38
2.5 动画辅助工具
Frames to display 自定义在第几帧显示 Steps before current frame 当前帧之前显示幻影数量 Steps after current frame 当前帧之后显示幻影数量 Step size 步长(隔几帧显示一个幻影)
图2-28
39
2.5 动画辅助工具
时间线上的设置
在以前动画辅助工具的使用上曾说过,这里就不累述了。
图2-29
40
2.5 动画辅助工具
4、在全局设置中设置运动幻影 Window > Settings/Preferences > Preferences 在Display下Animation选项里,参数含义与Ghost Selected选项中一致
跳动的小球
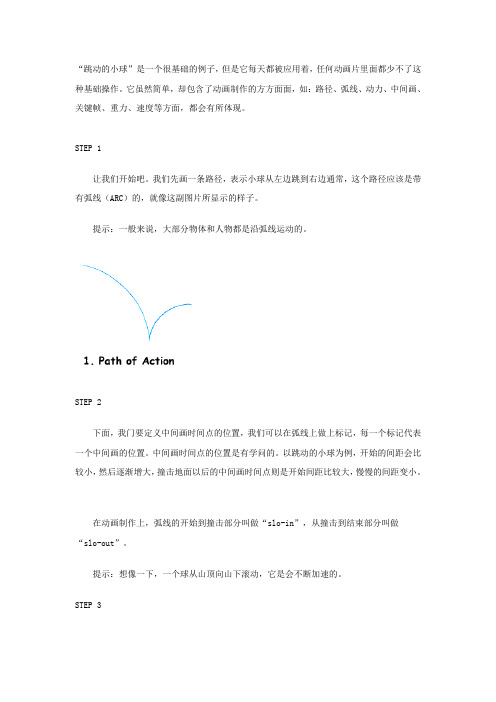
“跳动的小球”是一个很基础的例子,但是它每天都被应用着,任何动画片里面都少不了这种基础操作。
它虽然简单,却包含了动画制作的方方面面,如:路径、弧线、动力、中间画、关键帧、重力、速度等方面,都会有所体现。
STEP 1让我们开始吧。
我们先画一条路径,表示小球从左边跳到右边通常,这个路径应该是带有弧线(ARC)的,就像这副图片所显示的样子。
提示:一般来说,大部分物体和人物都是沿弧线运动的。
STEP 2下面,我门要定义中间画时间点的位置,我们可以在弧线上做上标记,每一个标记代表一个中间画的位置。
中间画时间点的位置是有学问的。
以跳动的小球为例,开始的间距会比较小,然后逐渐增大,撞击地面以后的中间画时间点则是开始间距比较大,慢慢的间距变小。
在动画制作上,弧线的开始到撞击部分叫做“slo-in”,从撞击到结束部分叫做“slo-out”。
提示:想像一下,一个球从山顶向山下滚动,它是会不断加速的。
STEP 3下面我们来画关键帧。
关键帧要包括动作开始和结束两个动作,以及方向改变的地方,在我们这个例子中就是#1,#7和#13帧。
记住:#7是小球和地面接触的帧,所以需要有一个“挤压”的动作,就像我们3a图片所表现的那样。
提示:重力在这里显得比较重要,为了真实的表现小球,体积不应该有很大的变化,像#1、#13的体积,应该和#7保持一致,尽管#7的小球受到了挤压,也还是这样。
另外,物体的运动速度越快,碰撞的时候挤压就应该越明显。
STEP 4下面我们先来画最关键的两个中间画#6和#8。
这两个中间画被称为“BreakDown”,是描述动画的很关键的中间画。
在动画制作上,一般都是先画关键帧,然后是这两个中间画,然后才是其它的中间画。
#6和#8两个中间画表现了速度,需要用到“拉伸”的方法。
“挤压”(重量)和“拉伸”(速度)这两方面是相互影响的。
一般来说,如果你用到了很多“挤压”处理,那么,相应的,你的动画里面也一定会有很多的“拉伸”处理。
Maya动画第五讲

4
3
3 实心球弹跳实例
• 时间滑块拖动到第64帧,这是木球落地后第二次弹跳落下的位置,这个 位置相对于第一次弹跳的距离要近一些。
4
4
3 实心球弹跳实例
• 将时间滑块拖动到第60帧,这是木球第二次弹起的高度,设置木球的高 度要相对第一次弹起的高度低一些
4
5
3 实心球弹跳实例
• 拖动时间滑块到第100帧左右,将木球向前移动一段距离,让木球移动的距 离较远一些,这一帧是木球最终要停止的位置。
第五讲 枢轴关键帧 翻滚动画
2
上章回顾
• 小球弹跳的制作过程 • 拍屏技巧
3
本章目标
4
本章结构
5
本章重点
• 通过盒子翻转例子
• 通过制作实心球弹跳
6
1 Channels(通道)
– 在Maya中通道菜单是一个集编辑 物体或节点属性的菜单。
– 选中物体属性并点击鼠标右键即可 打开通道菜单,或选中物体属性后 点击左上方的通道菜单
中发生碰撞。
图2-47
3
0
3 实心球弹跳实例
3.2 制作木球弹跳的动画
1、打开素材文件ball_start.mb
3
1
3 实心球弹跳实例
2、动画前准备 设置Time Slider选项下的Playback speed为Real-time[25fps]。
3
2
3 实心球弹跳实例
3、设置关键帧
• 在第1帧处选中木球,按键盘上的“s”键对木球设置关键帧。
• 拖动时间滑块到第28帧,将木球沿着台阶的斜面向前移动,到下一个弹 落接触位置。
3
7
3 实心球弹跳实例
• 将时间滑块退回到第24帧,将木球向上移动一些,使其弹起来。
- 1、下载文档前请自行甄别文档内容的完整性,平台不提供额外的编辑、内容补充、找答案等附加服务。
- 2、"仅部分预览"的文档,不可在线预览部分如存在完整性等问题,可反馈申请退款(可完整预览的文档不适用该条件!)。
- 3、如文档侵犯您的权益,请联系客服反馈,我们会尽快为您处理(人工客服工作时间:9:00-18:30)。
maya基础动画实例:跳动的小球
13
小球动画
接下来,我们将分四步来制作小球弹跳的动画。首先,将 小皮球弹跳的位移动画制作出来,接着通过调节小球弹跳 的速度来制作弹跳时的重量感,然后制作其压缩和拉伸的 变形效果,最后制作小球弹跳过程中产生的旋转效果。
在制作过程中要注意如下4点 1、小皮球弹跳的运动轨迹是抛物线。 2、小皮球在压缩和拉伸变形时需要保持其原有体积。 3、拉伸时应注意拉伸的方向。 4、小球弹跳接触地面时,立即压扁。
maya基础动画实例:跳动的小球
11
创建场景
选择球体,在其属性中设置Translate X(X轴位 移)为-30, Translate Y(Y轴位移)为15,调整 好球与立方体的位置。
maya基础动画实例:跳动的小球
12
创建场景
分别选择球体和立方体,执行ModifyFreeze Transformations(修改冻结变换),和Center Pivot(居中轴心点)命令,至此场景的基本设置 就完成了。
maya基础动画实例:跳动的小球
7
基本设置
接下来将播放速率改为实时播放。在Preferences(参数)窗口中选择左 侧Categories(类别)中的Time Slider(时间滑块),然后在右侧将 Playback(回放)中的Playback Speed(回放速度)改为Real-time(24fps)[ 实时(每秒24帧)],最后单击Save(保存),这样动画就可以实时播放了 。
MAYA我们的世界
跳动的小球
maya基础动画实例:跳动的小球
1
跳动的小球实例
Maya为用户提供了功能强大的动画制作工具 ,通过这些工具,用户可以自由地为对象的任 何属性设置动画。
下面通过小球的弹跳动画,向大家介绍Maya 动画制作的一般流程和方法。
maya基础动画实例:跳动的小球
2
小球的弹跳动画原理
单击主界面右下角的动画首选项也可以。
maya基础动画实例:跳动的小球
6
基本设置
在Preferences(参数)窗口左侧类别中选择Animation(动画)在右栏中调 节Default in tangent(默认入切线)和Default out tangent(默认出切线) ,它们均为clamped(钳制)
maya基础动画实例:跳动的小球
16
制作弹跳的位移动画
将时间滑块移动至第10帧处,将小球移动到下图所示立方 体的表面上,按S键设置关键帧。
注意:此处小球只是向前弹跳,故不Z轴没有位移。
maya基础动画实例:跳动的小球
17
制作弹跳的位移动画
分别在18、25、32、38、43、47、50、53、57、60、70 帧处将小球移动到下图所示位置,设置关键帧。
伸变形,与地面碰撞时压缩变形,弹起到达高点时回原状。 3、小球弹起的过程中,由于重力和空气阻力的作用,向上的运动速
度变慢,就这样,小球不断重复向前弹起,但弹起高度越来越低,直 到形变的作用力消失,各种力达到平衡,小球最终静止下来。
maya基础动画实例:跳动的小球
4
ቤተ መጻሕፍቲ ባይዱ
基本设置
由于本例制作的是一个动画,因此在开启Maya后首先需要设置场景的帧 率。
然后单击自动关键帧切换按钮,将自动变更的 信息记录为关键帧。
maya基础动画实例:跳动的小球
15
制作弹跳的位移动画
切换到前视图,选中小球,将时间滑块拖动到 第1帧,按S键,为小球的所有属性设置关键 帧,这时可以看到通道盒中的全部属性已变为 红色。
在时间滑块的第1帧处会显示一条红色的线, 这就是已设置好的关键帧。
制作小球弹跳动画,首先要考虑几点重要因素 :球的轻重感、球的质地、球的大小及运动的 速度。
不同质地的小球运动方式会有很大不同,如乒 乓球和铁球。
以下以皮球为例来制作小球的弹跳动画。
maya基础动画实例:跳动的小球
3
小皮球弹跳的原理和运动规律
1、皮球从被抛出到最终落地是一个逐渐加速 的过程。 2、小皮球在弹跳的过程中,会发生压缩和伸展的变形。即下落时拉
maya基础动画实例:跳动的小球
8
创建场景
下面开始创建动画。 单击Createpolygon primetiveCube(创建
多边形基本上几何立方体后面的小方框的 ),创建立方体做为地面。 设置宽为50、纵深20。
maya基础动画实例:跳动的小球
9
创建场景
选中此立方体,在其属性中,将其平移X,Y ,Z数值清0。
maya基础动画实例:跳动的小球
14
制作弹跳的位移动画
首先要将几个关键帧动作制作出来,也就是第 1、10、18、25、32、38、43、47、50、53 、57、60、70帧处的关键动作。
首先需要改变时间滑块的范围,将播放范围结 束帧和动画范围结束帧都设置为70,即要在 1~70帧范围内制作动画。
maya基础动画实例:跳动的小球
18
制作弹跳的位移动画
选中小球,单击动画创建运动轨迹(AnimateCreate Motion Trail) 后面的小方块,打开选项卡
设置Time range(时间范围)为Time Slider(时间滑块),设置选择时绘 制,勾选显示帧数,如下图示。并可适当调整小球动动轨迹。
首先确定该动画的最后输出形式:运行启动Maya软件,执行 WindowSettings/PreferencesPreferences(窗口设置/参数参数)
maya基础动画实例:跳动的小球
5
基本设置
在Preferences(参数)窗口左侧的Categories(类别)中选择Settings(设 置),这时右栏Working Units(工作单位)中列出当前Maya运行中所使 用的各种单位,从Time(时间)参数下接列表中选择Film(24fps)[影片( 每秒24帧)]
然后设置平移Y的值为-0.5.
maya基础动画实例:跳动的小球
10
创建场景
单击创建多边形几何体球体 (CreatePolygon PrimitivesSphere)后面 的小方块。
在弹开的窗口中设置Axis divisions(轴线部分) 和Height divisions(高度细分)值均为25,然后 单击创建(Create)创建一个小皮球。
