克隆安装oracle软件的步骤(2)
oracle数据库11g安装教程

oracle数据库11g安装教程
Oracle数据库11g安装教程主要包括以下步骤:1.准备安装环境;2.下载安装文件;3.安装Oracle数据库;4.创建数据库;5.配置网络;6.安装补丁;7.安装监控工具;8.安装完成后的检查。
第一步:打开Oracle中文官网下载Oracle11g
•打开Oracle中文官网
•点击导航中的下载,找到数据库下载链接
•打开链接后,选择同意协议选项,并在下方找到Oracle11g的下载列表
选择对应的版本进行下载,需要将File1和File2两个文件都下载下来
第二步:解压文件,以管理员身份运行安装程序
•下载完成后,解压两个文件(以Window64位为例)
•打开解压后的文件夹,找到setup.exe应用程序,鼠标右击,以管理员身份运行
第三步:安装Oracle11g
•检测窗口执行中,如果出现[INS-07003]错误时,请检查本地的JDK环境配置,
•参考下图设置,点下一步
•出现以下提示,点击确定
•参考以下图片,点击下一步
•参考下方图片设置,并填写登录密码
•如出现以下提示,点击确定,继续下一步
•产品安装完成后,会弹出创建数据库
•数据库创建完成后,会提示以下内容
•点击口令管理,会弹出用户锁定操作界面,可以在该界面中重新设置不同用户的口令
•设置完成后点击确定,并在安装界面点击关闭即可
第四步:测试数据库是否安装成功
•在开始菜单中,找到Oracle程序目录,打开应用程序开发—>SQL Plus
•在命令提示符中输入用户和登录密码,如提示连接成功,证明我们的Oracle11g安装完成了。
oracle migration workbench使用手册
oracle migration workbench使用手册Oracle Migration Workbench是Oracle提供的一个功能强大的工具,用于帮助数据库迁移,包括从MySQL到Oracle的迁移。
以下是使用Oracle Migration Workbench进行数据库迁移的基本步骤:1. 安装Oracle数据库:在两台机器上都安装Oracle数据库,确保版本兼容。
2. 安装Oracle Migration Workbench:下载并安装Oracle Migration Workbench,确保遵循Oracle的安装指南。
3. 启动迁移过程:使用Oracle Migration Workbench来启动迁移过程。
4. 配置源和目标数据库:在Oracle Migration Workbench中配置源数据库(例如MySQL)和目标数据库(例如Oracle),提供必要的连接详细信息。
5. 数据转换和迁移:Oracle Migration Workbench将自动生成将MySQL数据库迁移到Oracle的高效脚本。
利用应用程序框架和模型进行有效的数据转换。
6. 测试迁移结果:在将数据迁移到目标数据库后,对迁移的数据进行测试,确保其准确性和完整性。
7. 优化和调整:根据需要对目标数据库进行优化和调整,以满足性能和业务需求。
8. 关闭源数据库连接:在完成数据迁移后,关闭与源数据库的连接,释放资源。
9. 维护和更新:定期维护和更新目标数据库,确保其稳定性和安全性。
请注意,这只是一个简要的概述,具体的步骤可能会根据您的具体情况和Oracle数据库的版本有所不同。
建议参考Oracle官方文档或与Oracle技术支持团队联系以获取更详细的指导。
如何迁移数据库安装位置——【Team Center 精品培训资料】
如何迁移数据库安装位置测试版本:RedHat Linux 7.2、Oracle12c在项目实施中,可能由于一些数据库服务器调整的原因,需要对数据库进行安装位置的迁移,本文档将以把Oracle从/u01/app/oracle路径迁移到/oracleapp/oracle路径为例,讲述迁移的具体步骤:整个迁移的策略为导出数据库备份、删除数据库、重新安装数据库、导入数据库备份。
配置步骤如下:1.数据库导出备份登录数据库,用户名:infodba,密码infodba,并创建逻辑目录dpdata1(用于存放导出数据)。
命令输入:create or replace directory dpdata1 as'/home/oracle/backup';1图1赋予公共用户(public)在指定目录的操作权限,以及赋予infodba用户导出/导入的操作权限。
输入命令:grant read,write on directory dpdata1 to public;输入命令:grant exp_full_database,imp_full_database to infodba;图2手动创建/home/oracle/backup文件夹目录。
1图3输入命令导出完整数据库expdp infodba/infodba directory=dpdata1 dumpfile=full.dmp full=y。
图4导出完毕,查看导出状态。
图52.删除数据库关闭数据库。
1图6停止Listener服务。
图7切换到root用户,删除安装目录。
[rootlinuxserver ~]# rm -rf /u01/app/oracle/[rootlinuxserver ~]# rm -rf /u01/app/oraInventory/删除/usr/bin下的文件。
[rootlinuxserver ~]# rm /usr/bin/dbhome[rootlinuxserver ~]# rm /usr/bin/oraenv[rootlinuxserver ~]# rm /usr/bin/coraenv删除以下目录及文件。
oracle10g安装以及数据库导入步骤
一.oracle10g安装以及数据库导入步骤1.双击setup.exe, 如下图:双击该图标后,进入安装界面:如下图选择基本安装,不需要创建启动数据库,点击下一步,如下图:进度条走完进入下一步操作界面,如下图:继续点击下一步按钮,进入下一操作界面,如下图:点击安装,即可安装好:如下图安装完毕后,退出即可。
2.创建数据库选择开始菜单——所有程序——Oracle —OraDb10g_home1——配置与移植工具——Database Configuration Assistant:如下图弹出数据库配置界面,如下图:点击下一步,弹出界面如下图:点击下一步,如图:点击下一步,如图:录入全局数据库名后,点击下一步:使用默认的设置,点击下一步:录入口令,点击下一步,如图:按默认的设置,点击下一步:按默认的设置,点击下一步:按默认的设置,点击下一步,继续点击下一步:按默认的设置,点击下一步:点击下一步:点击完成,即可完成数据库的创建。
数据库名为yy2010.3.新建监听器选择开始菜单——所有程序——Oracle —OraDb10g_home1——配置与移植工具——Net Configuration Assistant,如下图:弹出监听器配置界面如下图:选择监听程序配置,点击下一步:选择添加,点击下一步:录入监听程序名称,点击下一步:点击下一步:点击下一步:点击下一步,完成配置。
4.命名方法配置:选择开始菜单——所有程序——Oracle —OraDb10g_home1——配置与移植工具——Net Configuration Assistant,如下图:选择本地Net服务命名配置,点击下一步:点击下一步:录入服务名(在此填写数据库名称),点击下一步:点击下一步:点击下一步:点击下一步:完成配置5.安装oracle10g 客户端6.安装plsql7.用SYS 登录yy2010 ,创建用户create user yy identified by yy ;授权:grant connect,resource,dba to yy;8.导入数据库(1)先创建表空间,用yy 登录plsql,打开命令窗口,执行创建表空间的sql语句。
oracle2pg用法详解

oracle2pg用法詳解Oracle2pg是一个用于将Oracle数据库的数据和结构迁移到PostgreSQL的工具。
以下是Oracle2pg的用法详解:1.安装Oracle2pg:首先,确保已安装Oracle2pg工具。
可以从官方网站或存储库中下载适用于您的操作系统的适当版本,并按照说明进行安装。
2.创建配置文件:在开始迁移之前,需要创建一个配置文件(通常为`ora2pg_table.conf`)。
配置文件包含有关源Oracle数据库和目标PostgreSQL数据库的连接详细信息以及其他相关设置。
3.配置Oracle连接:在配置文件中,提供有关源Oracle 数据库的连接详细信息,包括Oracle数据库的TNS名称、用户名、密码等。
4.配置PostgreSQL连接:在配置文件中,提供有关目标PostgreSQL数据库的连接详细信息,包括主机名、端口、用户名、密码等。
5.定义迁移规则:根据需要,可以在配置文件中定义自定义的迁移规则,例如更改数据类型、重命名列或表等。
这有助于在迁移过程中进行更细粒度的控制。
6.执行迁移:一旦配置文件准备就绪,可以使用以下命令执行迁移:```css./ora2pg-c<配置文件路径>```7.检查迁移结果:迁移完成后,可以登录到目标PostgreSQL数据库,检查已迁移的数据和结构是否符合预期。
确保所有数据都已成功迁移,并且表结构已正确转换。
8.优化和调整:根据需要对目标PostgreSQL数据库进行优化和调整,以确保性能和兼容性。
这可能包括创建索引、调整配置参数或重新定义触发器等。
注意事项:*在执行迁移之前,务必备份源Oracle数据库和目标PostgreSQL数据库,以防数据丢失。
*根据数据量和复杂性,迁移过程可能需要一些时间来完成。
确保在执行迁移时监视进度并处理任何中断或错误。
*Oracle2pg工具不断更新和改进,建议查看官方文档或GitHub存储库以获取最新的功能和用法说明。
oracle数据库服务器安装教程
oracle数据库服务器安装教程Oracle是一种非常流行的关系数据库管理系统,常用于大型企业和组织的数据存储和管理。
在安装Oracle数据库服务器之前,需要准备好以下工作:1. 下载Oracle数据库软件:访问Oracle官方网站并下载适用于您操作系统的Oracle数据库软件。
2. 检查系统要求:在安装Oracle数据库服务器之前,确保您的操作系统满足Oracle的系统要求。
例如,适合您计算机运行的操作系统版本和硬件要求。
3. 解压安装文件:将下载的数据库软件文件解压到指定的目录中。
一旦准备好了上述工作,您可以按照以下步骤开始安装Oracle 数据库服务器:1. 打开解压后的安装文件夹,并运行安装程序。
2. 在安装向导中选择“创建和配置数据库”选项。
3. 在下一个界面上,选择“单机数据库安装”。
4. 在“选择安装类型”页面上,选择“自定义安装”,这将允许您选择安装过程中的详细选项。
5. 在“系统类别”页面上,选择适用于您的操作系统的选项(32位或64位)。
6. 在“选择数据库版本”页面上,选择您要安装的Oracle数据库版本。
7. 在“选择产品语言”页面上,选择您希望Oracle数据库使用的语言。
8. 在“选择数据库配置”页面上,选择“创建和配置数据库”。
9. 在“选择数据库操作类型”页面上,选择“新建数据库”。
10. 在“命名标识符和密码管理”页面上,设置您的数据库名、全局数据库名和管理员用户密码。
11. 在“指定数据库文件位置”页面上,选择数据库文件和日志文件的存储位置。
12. 在“配置监听器”页面上,选择是否要创建和配置监听器。
13. 在“创建数据库”页面上,选择是否要创建示例数据库。
14. 在“更改默认认证设置”页面上,选择是否要更改默认的身份验证设置。
15. 在“安装选项”页面上,选择是否启用自动内存管理和自动存储管理。
16. 在“请求的配置信息”页面上,提供必要的配置信息。
17. 在“安装”页面上,验证您的配置信息,并单击“安装”按钮开始安装过程。
克隆步骤
1.查找最新克隆文档Cloning Oracle Applications Release 12 with Rapid Clone [ID406982.1]2.根据第4步打补丁9171651,9833058,12404574a)关闭应用adstpall.sh apps/appsb)adadmin开启维护模式c)上传补丁文件到/tmpd)解压缩补丁文件e)更改补丁文件夹权限为777f)adpatch按顺序打补丁,注意每个补丁的事前和事后工作g)adadmin关闭维护模式h)删除/tmp下补丁文件和目录3.Applprod在$ADMIN_SCRIPTS_HOME下运行adautocfg.sh4.Applprod运行perl $AD_TOP/bin/admkappsutil.pl5.Oraprod将生成的appsutil.zip拷贝到$ORACLE_HOME下unzip -o appsutil.zipcd $ORACLE_HOME/appsutil/scripts/*adautocfg.sh==============================================================6.Applprod用户执行adadminMaintain Applications Files menu->Maintain snapshot information->Update current view snapshot->Update Complete APPL_TOP7.Oraprod用户执行cd $ORACLE_HOME/appsutil/scripts/*perl adpreclone.pl dbTier8.Applprod用户执行cd $ADMIN_SCRIPTS_HOMEperl adpreclone.pl appsTier9.Applprod用户执行cd $ADMIN_SCRIPTS_HOMEadstpall.sh apps/apps10.Oraprod使用sqlplus正常关闭监听和数据库11.Appltest用户执行cd $ADMIN_SCRIPTS_HOMEadstpall.sh apps/apps12.Oratest使用sqlplus正常关闭监听和数据库13.Applprod拷贝$COMMON_TOP,$APPL_TOP,$IAS_ORACLE_HOME,$ORACLE_HOME到目标服务器14.root拷贝.dbf和$ORACLE_HOME到目标服务器cd /opt/app/prodfin/db/tech_stscp -pr 11.1.0 root@vm-vmw733-t:/opt/app/testfin/db/tech_stcd /oracle/oradata_prodscp -pr *.dbf root@vm-vmw733-t:/oracle/oradata_test15.Oraprod启动数据库和监听16.Applprod启动应用17.测试服务器root用户chown -R oratest:dba /oracle/oradata_testchown -R oratest:dba /opt/app/testfin/db/tech_st/11.1.018.Oratest用户vi /opt/app/testfin/db/tech_st/11.1.0/.profile修改PROD和服务器主机名Oratest重新登录19.Appltest用户vi /opt/app/testfin/apps/apps_st/appl/.profile修改PROD和服务器主机名Appltest重新登录20.根据文档RapidClone fails at 70% after TXK.U (50% on R12) due to "s_db_listener"referencing source SID [ID 1153204.1]修改文件vi $ORACLE_HOME/appsutil/clone/context/db/CTXORIG.xml将s_db_listener从PROD替换成TEST否则会出错,参见$ORACLE_HOME/appsutil/log/<context>/ApplyDBTier_<timestamp>.log<TNSLSNR for Linux: Version 11.1.0.7.0 - ProductionSystem parameter file is/opt/app/testfin/db/tech_st/11.1.0/network/admin/TEST_vm-vmw733-t/listener.oraLog messages written to/opt/app/testfin/db/tech_st/11.1.0/log/diag/tnslsnr/vm-vmw733-t/test/alert/log.xml TNS-01151: Missing listener name, TEST, in LISTENER.ORAListener failed to start. See the error message(s) above...addlnctl.sh: exiting with status 1addlnctl.sh: check the logfile/opt/app/testfin/db/tech_st/11.1.0/appsutil/log/TEST_vm-vmw733-t/addlnctl.txt for more information ...><RC-00118: Error occurred during creation of databaseRaised by oracle.apps.ad.clone.ApplyDatabaseStackTrace:ng.Exception: Control file creation failedat oracle.apps.ad.clone.ApplyDatabase.doConf(ApplyDatabase.java:635)at oracle.apps.ad.clone.ApplyDatabase.doApply(ApplyDatabase.java:473)at oracle.apps.ad.clone.ApplyDatabase.<init>(ApplyDatabase.java:366)at oracle.apps.ad.clone.ApplyDBTier.<init>(ApplyDBTier.java:110)at sun.reflect.NativeConstructorAccessorImpl.newInstance0(Native Method)at sun.reflect.NativeConstructorAccessorImpl.newInstance(Unknown Source)at sun.reflect.DelegatingConstructorAccessorImpl.newInstance(Unknown Source)at ng.reflect.Constructor.newInstance(Unknown Source)at oracle.apps.ad.clone.util.CloneProcessor.run(CloneProcessor.java:67)at ng.Thread.run(Unknown Source)>21.Oratest用户cd $ORACLE_HOME/appsutil/clone/binperl adcfgclone.pl dbTier22.Oratest用户关闭监听器和数据库将安装系统时变更后的initTEST.ora文件覆盖到initTEST.ora防止clone后生成的initTEST.ora,相关参数未被修改情况23.Oratest用户启动数据库和监听器24.Appltest用户cd $COMMON_TOP/clone/binperl adcfgclone.pl appsTier如果只是数据库克隆,需要执行应用的AUTOCONFIG更新数据库配置文件相关值从正式变为测试:cd $ADMIN_SCRIPTS_HOMEadautocfg.shadstrtal.sh apps/apps如果起来后发现并发管理器的输出提交处理程序没有起来,并且查询日志提示指向vm-vmw219,需要停止应用再次配置adautocfg再启动25.Sysadmin登录测试环境修改配置文件Java 色彩设计,设置为橄榄色地点名称,设置为测试环境ICX:会话超时,设置为180工作流相关表可以根据文档How to Change the System Name in Workflow? [ID 387337.1],提供的脚本更新sh $INST_TOP/admin/install/txkWfClone.shUPDATE FND_CONCURRENT_REQUESTS TSET T.LOGFILE_NODE_NAME = 'VM-VMW733-T',T.LOGFILE_NAME = '/opt/app/testfin/inst/apps/TEST_vm-vmw733-t/' ||SUBSTR(T.LOGFILE_NAME,INSTR(T.LOGFILE_NAME, 'logs', 1, 1)),T.OUTFILE_NODE_NAME = 'VM-VMW733-T',T.OUTFILE_NAME = '/opt/app/testfin/inst/apps/TEST_vm-vmw733-t/' ||SUBSTR(T.OUTFILE_NAME,INSTR(T.OUTFILE_NAME, 'logs', 1, 1))WHERE T.LOGFILE_NAME IS NOT NULLOR T.OUTFILE_NAME IS NOT NULLperl ./adcfgclone.pl dbTier参数Target System Hostname (virtual or normal) [vm-vmw733-t] :Target Instance is RAC (y/n) [n] :Target System Database SID : TESTTarget System Base Directory : /opt/app/testfinTarget System utl_file_dir Directory List : /usr/tmpNumber of DATA_TOP's on the Target System [1] :Target System DATA_TOP Directory 1 [/oracle/oradata_prod] : /oracle/oradata_testTarget System RDBMS ORACLE_HOME Directory [/opt/app/testfin/db/tech_st/11.1.0] :Do you want to preserve the Display [null] (y/n) : nTarget System Display [vm-vmw733-t:0.0] :Do you want the the target system to have the same port values as the source system (y/n) [y] ? :。
oracle2pg用法详解 -回复
oracle2pg用法詳解-回复『oracle2pg用法詳解』简介:oracle2pg是一个开源工具,用于将Oracle数据库迁移到PostgreSQL数据库。
它提供了一个简单直观的方法,帮助用户快速高效地完成数据库迁移的过程。
本文将一步一步详细解释如何使用oracle2pg 工具进行数据库迁移。
1. 安装oracle2pg工具:首先,我们需要下载并安装oracle2pg工具。
可以通过在终端窗口中输入以下命令来下载工具的压缩文件:wget下载完成后,解压缩文件,并进入解压后的目录:unzip stable.zipcd ora2pg-stable接下来,运行以下命令来安装oracle2pg工具:perl Makefile.PLmake && make install完成安装后,我们已准备好使用oracle2pg工具进行数据库迁移。
2. 配置源和目标数据库:在进行数据库迁移之前,我们需要配置源和目标数据库的连接信息。
打开一个文本编辑器,创建一个名为"config.txt"的文件,并添加以下内容:[oracle]dbi:Oracle:host=源数据库主机地址;sid=源数据库SID源数据库用户名源数据库密码[pg]dbi:Pg:dbname=目标数据库名称;host=目标数据库主机地址;port=目标数据库端口号目标数据库用户名目标数据库密码根据实际情况,替换上述内容中的信息,并保存文件。
3. 导出Oracle数据库结构和数据:运行以下命令来导出Oracle数据库的结构和数据:ora2pg -c config.txt -t SHOW_STRUCTURE,EXPORT -o schema.sqlora2pg -c config.txt -t SHOW_DATA,EXPORT -o data.sql上述命令中,"-c"参数用于指定配置文件的路径,"-t"参数用于指定导出数据的类型,"-o"参数用于指定导出文件的名称。
解决机房卸载Oracle 11g及其安装问题的方法
解决机房卸载Oracle 11g及其安装问题的方法杨茜玲;彭勇【摘要】在机房中安装Oracle 11g,由于电脑太多,不方便逐台安装,因此现在的安装方式是:先制作母盘,再进行硬盘对拷,但是对拷后的机器oracle不能直接使用,必须修改一系列设置.同样,如果Oracle 11g删除不干净,重新安装将会出错.本文将详细介绍如何在Winu0016dows XP系统下完全卸载和克隆安装Oracle 11g的方法.【期刊名称】《科技创新导报》【年(卷),期】2010(000)023【总页数】1页(P95-95)【关键词】卸载;Oracle 11g;克隆安装【作者】杨茜玲;彭勇【作者单位】湖南铁道职业技术学院,湖南株洲,412000;湖南铁道职业技术学院,湖南株洲,412000【正文语种】中文【中图分类】G647ORACLE 数据库系统是美国ORACLE公司(甲骨文)提供的以分布式数据库为核心的一组软件产品,是目前最流行的C/S或B/S体系结构的数据库之一。
作为一个通用的数据库系统,它具有完整的数据管理功能;作为一个关系数据库,它是一个完备关系的产品;作为分布式数据库,它实现了分布式处理功能。
只要在一种机型上学习了ORACLE知识,便能在各种类型的机器上使用它。
目前大多高校和培训机构都开设了Oracle课程,学习该课程必须安装Oracle系统,如果机房中电脑原来装过oracle数据库,现在要一台台先卸载再安装的话,要花费很长时间,加之机房中的电脑一般都装有还原卡,安装过程中重启电脑要备份原来的数据,时间就更长了。
所以大多机房管理人员都采用克隆的方法来安装该软件,但克隆安装的Oracle不能启动相应服务。
必须要卸载电脑上原来装的oracle软件才能成功地重新安装Oracle 11g。
卸载的步骤是: (1)如果数据库配置了自动存储管理(ASM)应该先删除聚集同步服务CSS(Cluster Synchr onization Services),删除CSS服务的方式是在DOS命令行下输入:localconfig delete;(2)停止所有Oracle服务;(3)运行Universal Insatal l,卸载Oralce;(4)删除自动存储管理服务(AS M),在DOS命令行下输入:oracle -delete -asmsid +asm;(5)运行regedit,打开注册表,删除HKEY_LOCAL_MACHINE/SOFTWA RE/ORACLE 目录,删除 HKEY_LOCAL_ MACHINE/SYSTEM/CurrentControlSet/ Services 中所有以Oracle或OraWeb 开头的键,删除 HKEY_LOCAL_MACHINE/SYSTEM/CurrentControlSet/Eventlog/Applicatio n中所有以Oracle开头的键,删除HKEY_CLASSES_ROOT目录下所有以Ora,Oracle,Or cl或EnumOra为前缀的键,删除 HKEY_CU RRENT_USER/Software/Microsoft/Windows/CurrentVersion/Explorer/MenuOrde r/Start Menu/Programs 中所有以Oracle开头的键,删除 HKEY_LOCAL_MACHINE/SOFTWARE/ODBC/DOBCINST.INI 中除了Microsoft ODBC for Oracle 以外的所有含有Oracle的键,删除环境变量Path和CLASS PATH中跟Oracle有关的值;(6)删除开始->程序中Oracle菜单项;(7)重启机器后删除所有O racle相关目录。
详细讲解Oracle数据库的数据迁移方法
详细讲解Oracle数据库的数据迁移方法Oracle数据库的数据迁移可以使用多种方法,包括传统的物理备份和恢复,逻辑备份和恢复,以及逻辑复制。
下面将详细介绍这些方法。
1. 物理备份和恢复(Physical Backup and Recovery):物理备份和恢复是最常用的数据迁移方法之一、它基于数据库的物理结构,通过将数据文件、控制文件和日志文件等直接复制到目标数据库来完成数据迁移。
具体步骤如下:(1)在源数据库上执行全量备份,包括数据文件、控制文件和日志文件。
(2)将备份文件传输到目标数据库主机。
(3)在目标数据库上恢复备份文件。
物理备份和恢复的优点是速度快,适用于大规模数据迁移,但缺点是需要额外的存储空间以及停机时间。
2. 逻辑备份和恢复(Logical Backup and Recovery):逻辑备份和恢复是另一种常用的数据迁移方法,它基于逻辑结构,通过导出和导入数据来完成数据迁移。
具体步骤如下:(1) 在源数据库上执行逻辑备份,例如使用expdp命令将数据导出为数据泵文件。
(2)将数据泵文件传输到目标数据库主机。
(3) 在目标数据库上执行逻辑恢复,例如使用impdp命令将数据导入。
逻辑备份和恢复的优点是可以选择性地备份和恢复数据,不需要额外的存储空间,但缺点是速度较慢,适用于小规模数据迁移。
3. 逻辑复制(Logical Replication):逻辑复制是一种将源数据库的数据变更应用到目标数据库的方法,它可以实时地将数据更新传输到目标数据库。
具体步骤如下:(1) 在源数据库上启用逻辑复制功能,例如使用Oracle GoldenGate或Oracle Streams。
(2)配置源数据库和目标数据库之间的连接。
(3)在目标数据库上创建复制进程,用于接收源数据库发送的数据变更。
(4)启动复制进程,开始数据复制。
逻辑复制的优点是实时性好,可以减少停机时间,但缺点是配置和管理复杂,需要考虑数据一致性和传输性能等问题。
oracle客户端安装教程
oracle客户端安装教程
1. 首先,打开Oracle官方网站,找到“下载”部分。
2. 选择适用于您计算机操作系统的Oracle客户端版本,并单击下载链接。
3. 在下载完成后,找到下载的安装程序文件并进行双击打开。
4. 在弹出的安装向导窗口中,点击“下一步”以继续安装过程。
5. 阅读并接受许可协议后,点击“下一步”。
6. 选择安装类型,通常可以选择“典型安装”以获取标准的Oracle客户端功能。
7. 指定安装位置,或者保留默认位置后,点击“下一步”。
8. 等待安装程序完成所需的文件复制和配置过程。
9. 安装完成后,可以选择启动Oracle客户端或者直接点击“完成”。
10. 在Oracle客户端启动后,输入需要连接的Oracle数据库的相关信息,如主机地址、端口号、用户名和密码。
11. 点击“连接”按钮,等待Oracle客户端与数据库建立连接。
12. 如果连接成功,您将能够通过Oracle客户端访问并管理数据库。
请注意,以上步骤仅适用于一般的Oracle客户端安装过程,并可能因不同版本或操作系统而有所差异。
在安装过程中,可以参考Oracle提供的安装文档或者向Oracle支持团队寻求帮助。
ORACLE双机热备安装教程

ORACLE双机热备安装教程ORACLE是一种常见的关系型数据库管理系统,双机热备是一种常用的高可用性解决方案。
在实现ORACLE双机热备之前,需要先安装ORACLE数据库并进行基础配置。
本教程将为您详细介绍ORACLE双机热备的安装步骤。
1.系统准备首先,需要确保两台服务器系统已经安装好,并且网络配置正确。
每台服务器都需要预留至少100 GB的硬盘空间用于数据库存储。
另外,Oracle官方推荐使用相同版本的操作系统和数据库软件进行双机热备安装。
2.安装ORACLE数据库软件3.配置主数据库在主服务器上进行ORACLE数据库的配置。
首先,创建监听程序,以便在其他设备上连接到主数据库。
打开终端,输入命令`lsnrctl start`启动监听器。
然后,创建数据库实例,输入命令`dbca`。
按照向导配置数据库参数,包括实例名称、数据库字符集、储存选项等。
完成后,等待数据库创建完成。
4.创建备份数据库打开终端,输入命令`dbca`创建备份数据库。
与主数据库的配置类似,按照向导的提示进行配置,注意要选择备份数据库类型,并确保备份数据库与主数据库的参数一致。
5.创建归档目录在主服务器上创建一个归档目录,用于存储主数据库的归档日志。
输入命令`mkdir /u01/arch`创建归档目录,并进一步配置归档目录的权限。
6.配置主数据库参数打开主数据库的参数文件,并修改以下参数:-LOG_ARCHIVE_DEST_1:设置归档目录路径-LOG_ARCHIVE_DEST_2:设置备份数据库的归档目录路径-LOG_ARCHIVE_FORMAT:设置归档日志的命名格式保存文件并重启数据库。
7.复制主数据库文件到备份数据库在主服务器上打开终端,输入命令`scp -r/u01/oradata/username/* backup-server:/u01/oradata/username`,将主数据库的文件复制到备份服务器。
8.配置备份数据库打开备份数据库的参数文件,并修改以下参数:-LOG_ARCHIVE_DEST_1:设置归档目录路径-LOG_ARCHIVE_FORMAT:设置归档日志的命名格式保存文件并重启备份数据库。
oracle19c dbca 克隆remote pdb 步骤 -回复
oracle19c dbca 克隆remote pdb 步骤-回复标题:Oracle 19c DBCA 克隆Remote PDB 步骤引言:在使用Oracle 19c数据库时,克隆Remote PDB 是一个非常有用的功能。
它允许我们复制一个已存在的Pluggable Database (PDB) 到另一个远程数据库实例中。
利用该功能,我们可以在不同的数据库实例之间共享和访问相同的数据,提高数据库的灵活性和可用性。
本文将详细介绍使用Oracle Database Configuration Assistant (DBCA) 工具克隆Remote PDB 的步骤。
步骤一:启动DBCA 工具1. 在被克隆的远程数据库实例上登录到操作系统。
2. 打开终端窗口,并输入以下命令以以图形方式启动DBCA 工具:` dbca`步骤二:选择克隆操作1. 当DBCA 工具启动后,你将看到一个欢迎窗口。
点击"Next" 按钮进入下一步。
2. 在"操作" 列表中,选择"克隆现有的数据库" 选项,然后点击"Next" 按钮。
步骤三:选择要克隆的数据库1. 在"选择源数据库" 页面中,选择要克隆的源数据库。
点击"Next" 按钮。
2. 在"确认源数据库" 页面中,验证所选择的源数据库信息,并点击"Next" 按钮。
步骤四:选择目标数据库及克隆类型1. 在"克隆参数" 页面中,输入克隆操作的相关参数。
a) 在"目标信息" 中,选择目标数据库的类型和连接信息。
b) 在"克隆类型" 中,选择"远程PDB 克隆"。
c) 在"远程PDB 位置" 中,输入克隆PDB 的主机名和服务名。
oracle10g安装教程
oracle10g安装教程Oracle 10g 是一款强大的关系型数据库管理系统,下面是Oracle 10g 的安装教程:第一步:下载 Oracle 10g 安装包。
可以在 Oracle 官方网站上下载适用于您的操作系统的 Oracle 10g 安装包。
下载完成后,确保安装包与您的操作系统兼容。
第二步:解压安装包。
将下载的安装包解压到您想要安装 Oracle 10g 的目录中。
您可以使用压缩解压工具(如WinRAR)或自带的压缩工具进行解压。
第三步:运行安装程序。
在解压完成后,进入到解压目录,并找到名为“setup.exe” 或“install.exe” 的安装程序。
双击运行该程序以启动安装向导。
第四步:选择安装类型。
安装向导会提示您选择“创建和配置数据库”或“仅安装软件”。
如果您想在本地计算机上创建和配置 Oracle 数据库,选择第一个选项。
如果只是想安装 Oracle 10g 的软件,选择第二个选项。
第五步:配置数据库实例和监听器。
如果选择了“创建和配置数据库”选项,安装向导会要求您提供一些配置信息,如数据库名称、端口号和管理员密码等。
根据您的需求,填写相应的信息,并点击“下一步”继续。
第六步:选择安装位置。
安装向导会要求您选择 Oracle 10g 的安装位置。
您可以选择默认路径或自定义路径。
点击“下一步”继续。
第七步:进行安装。
在确认了安装选项和安装位置后,点击“下一步”开始安装。
安装过程可能需要一些时间,请耐心等待。
第八步:完成安装。
安装完成后,安装向导会弹出安装完成的提示窗口。
点击“完成”退出向导。
至此,您已经成功安装了 Oracle 10g 数据库。
完成安装后,您可以通过启动菜单或桌面上的 Oracle 10g 快捷方式来启动Oracle 10g 数据库,并开始使用它来创建和管理数据库。
总结:安装 Oracle 10g 数据库需要先下载安装包,然后解压安装包,并运行安装程序。
在安装向导中,需要选择安装类型、配置数据库实例和监听器、选择安装位置,最后进行安装。
oracle19c dbca 克隆remote pdb 步骤
oracle19c dbca 克隆remote pdb 步骤Oracle 19c DBCA克隆Remote PDB步骤Oracle 19c引入了许多新功能,其中包括了对Pluggable Database(PDB)的增强。
PDB是Oracle Multitenant架构中的一个重要概念,它允许我们将多个独立的数据库实例托管在一个共享的容器数据库(CDB)中。
在Oracle 19c中,DBCA (Database Configuration Assistant)提供了克隆Remote PDB的功能,让我们能够更灵活地管理和复制PDB。
以下是Oracle 19c DBCA克隆Remote PDB的步骤:1. 确定源PDB和目标CDB在开始克隆Remote PDB之前,需要明确源PDB所在的CDB和我们希望克隆到的目标CDB。
可以通过以下命令查询当前数据库实例中的CDB名称: ```SELECT name FROM v$database WHERE cdb = 'YES';```确认源PDB所在的CDB和目标CDB名称后,我们可以开始执行克隆操作。
2. 使用dbca命令行工具准备克隆打开命令提示符(Windows)或终端(Linux)窗口,并切换到ORACLE_HOME/bin目录,使用以下命令启动DBCA工具:```./dbca```DBCA工具打开后,选择“创建数据库或模板”选项,然后选择“创建的数据库类型”为“自定义数据库”。
3. 选择“远程PDB克隆”选项在自定义数据库创建向导中,选择“存在的数据库”作为创建选项。
然后从“远程PDB克隆”选项中选择“克隆远程PDB”。
4. 输入源PDB的信息在“远程PDB克隆”页面,输入源PDB所在CDB的连接信息。
包括用户名、密码、TNS别名等。
确保能够成功连接到源PDB。
5. 输入克隆的目标PDB信息在“目标PDB名称”字段中,输入克隆后的目标PDB名称。
EBS系统R12克隆操作文档
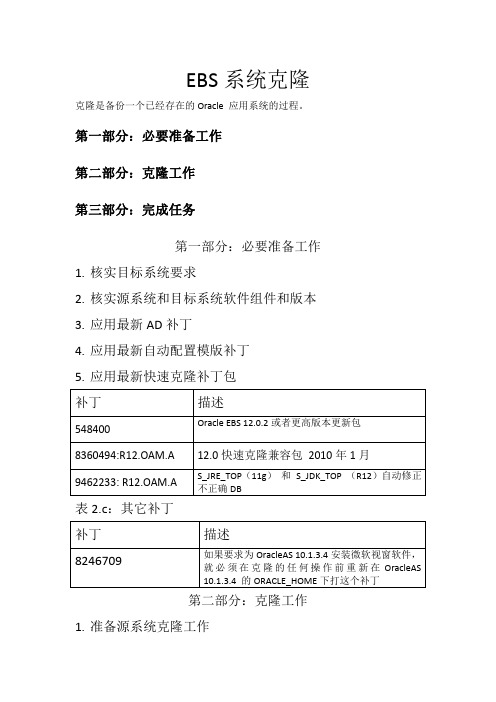
EBS系统克隆克隆是备份一个已经存在的Oracle应用系统的过程。
第一部分:必要准备工作第二部分:克隆工作第三部分:完成任务第一部分:必要准备工作1.核实目标系统要求2.核实源系统和目标系统软件组件和版本3.应用最新AD补丁4.应用最新自动配置模版补丁5.应用最新快速克隆补丁包补丁描述548400Oracle EBS12.0.2或者更高版本更新包8360494:R12.OAM.A12.0快速克隆兼容包2010年1月9462233:R12.OAM.A S_JRE_TOP(11g)和S_JDK_TOP(R12)自动修正不正确DB表2.c:其它补丁补丁描述8246709如果要求为OracleAS10.1.3.4安装微软视窗软件,就必须在克隆的任何操作前重新在OracleAS10.1.3.4的ORACLE_HOME下打这个补丁第二部分:克隆工作1.准备源系统克隆工作a.准备源系统数据库层用于克隆$cd[RDBMSORACLE_HOME]/appsutil/scripts/[CONTEXT_NAME]$perl adpreclone.pl dbTierb.准备源系统应用层用于克隆(主要指停止应用)$cd[INST_TOP]/admin/scripts$perl adpreclone.pl appsTier2.备份源系统到目标系统—A.备份应用层文件系统●[APPL_TOP]●[COMMON_TOP]●Application Technology Stack:—[OracleAS Tools ORACLE_HOME]—[OracleAS Web IAS_ORACLE_HOME]—B.备份数据库节点文件系统●正常关闭源系统数据库●备份源系统数据库文件(.dbf)到目标系统●备份源数据库ORACLE_HOME文件到目标系统●开始源应用系统数据库和应用层过程●配置目标系统—A.配置目标系统数据库服务用ORACLE用户登录到目标系统输入下面命令:●$cd[RDBMS ORACLE_HOME]/appsutil/clone/bin$perl adcfgclone.pl dbTier—B.配置目标系统应用层服务节点用APPLMGR用户登录到目标系统输入下面命令:●$cd[COMMON_TOP]/clone/bin$per adcfgclone.pl appsTier第三部分:完成任务●更改配置文件选项●更改打印机设置●更改工作流配置设置●核对APPLCSF环境变量●更改在ICX_PARAMETERS中的SESSION_COOKIE_DOMAIN的值●重新配置SSL和SSO。
克隆步骤
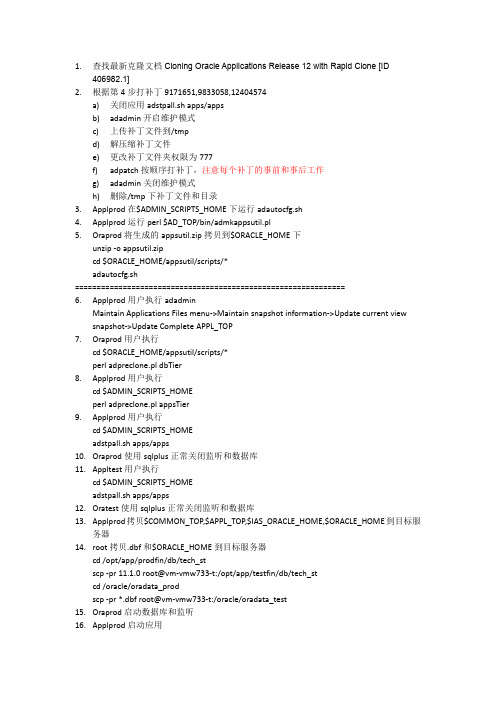
1.查找最新克隆文档Cloning Oracle Applications Release12with Rapid Clone[ID406982.1]2.根据第4步打补丁9171651,9833058,12404574a)关闭应用adstpall.sh apps/appsb)adadmin开启维护模式c)上传补丁文件到/tmpd)解压缩补丁文件e)更改补丁文件夹权限为777f)adpatch按顺序打补丁,注意每个补丁的事前和事后工作g)adadmin关闭维护模式h)删除/tmp下补丁文件和目录3.Applprod在$ADMIN_SCRIPTS_HOME下运行adautocfg.sh4.Applprod运行perl$AD_TOP/bin/admkappsutil.pl5.Oraprod将生成的appsutil.zip拷贝到$ORACLE_HOME下unzip-o appsutil.zipcd$ORACLE_HOME/appsutil/scripts/*adautocfg.sh==============================================================6.Applprod用户执行adadminMaintain Applications Files menu->Maintain snapshot information->Update current view snapshot->Update Complete APPL_TOP7.Oraprod用户执行cd$ORACLE_HOME/appsutil/scripts/*perl adpreclone.pl dbTier8.Applprod用户执行cd$ADMIN_SCRIPTS_HOMEperl adpreclone.pl appsTier9.Applprod用户执行cd$ADMIN_SCRIPTS_HOMEadstpall.sh apps/apps10.Oraprod使用sqlplus正常关闭监听和数据库11.Appltest用户执行cd$ADMIN_SCRIPTS_HOMEadstpall.sh apps/apps12.Oratest使用sqlplus正常关闭监听和数据库13.Applprod拷贝$COMMON_TOP,$APPL_TOP,$IAS_ORACLE_HOME,$ORACLE_HOME到目标服务器14.root拷贝.dbf和$ORACLE_HOME到目标服务器cd/opt/app/prodfin/db/tech_stscp-pr11.1.0root@vm-vmw733-t:/opt/app/testfin/db/tech_stcd/oracle/oradata_prodscp-pr*.dbf root@vm-vmw733-t:/oracle/oradata_test15.Oraprod启动数据库和监听16.Applprod启动应用17.测试服务器root用户chown-R oratest:dba/oracle/oradata_testchown-R oratest:dba/opt/app/testfin/db/tech_st/11.1.018.Oratest用户vi/opt/app/testfin/db/tech_st/11.1.0/.profile修改PROD和服务器主机名Oratest重新登录19.Appltest用户vi/opt/app/testfin/apps/apps_st/appl/.profile修改PROD和服务器主机名Appltest重新登录20.根据文档RapidClone fails at70%after TXK.U(50%on R12)due to"s_db_listener"referencing source SID[ID1153204.1]修改文件vi$ORACLE_HOME/appsutil/clone/context/db/CTXORIG.xml将s_db_listener从PROD替换成TEST否则会出错,参见$ORACLE_HOME/appsutil/log/<context>/ApplyDBTier_<timestamp>.log<TNSLSNR for Linux:Version11.1.0.7.0-ProductionSystem parameter file is/opt/app/testfin/db/tech_st/11.1.0/network/admin/TEST_vm-vmw733-t/listener.oraLog messages written to/opt/app/testfin/db/tech_st/11.1.0/log/diag/tnslsnr/vm-vmw733-t/test/alert/log.xml TNS-01151:Missing listener name,TEST,in LISTENER.ORAListener failed to start.See the error message(s)above...addlnctl.sh:exiting with status1addlnctl.sh:check the logfile/opt/app/testfin/db/tech_st/11.1.0/appsutil/log/TEST_vm-vmw733-t/addlnctl.txt for more information...><RC-00118:Error occurred during creation of databaseRaised by oracle.apps.ad.clone.ApplyDatabaseStackTrace:ng.Exception:Control file creation failedat oracle.apps.ad.clone.ApplyDatabase.doConf(ApplyDatabase.java:635)at oracle.apps.ad.clone.ApplyDatabase.doApply(ApplyDatabase.java:473)at oracle.apps.ad.clone.ApplyDatabase.<init>(ApplyDatabase.java:366)at oracle.apps.ad.clone.ApplyDBTier.<init>(ApplyDBTier.java:110)at sun.reflect.NativeConstructorAccessorImpl.newInstance0(Native Method)at sun.reflect.NativeConstructorAccessorImpl.newInstance(Unknown Source)at sun.reflect.DelegatingConstructorAccessorImpl.newInstance(Unknown Source)at ng.reflect.Constructor.newInstance(Unknown Source)at oracle.apps.ad.clone.util.CloneProcessor.run(CloneProcessor.java:67)at ng.Thread.run(Unknown Source)>21.Oratest用户cd$ORACLE_HOME/appsutil/clone/binperl adcfgclone.pl dbTier22.Oratest用户关闭监听器和数据库将安装系统时变更后的initTEST.ora文件覆盖到initTEST.ora防止clone后生成的initTEST.ora,相关参数未被修改情况23.Oratest用户启动数据库和监听器24.Appltest用户cd$COMMON_TOP/clone/binperl adcfgclone.pl appsTier如果只是数据库克隆,需要执行应用的AUTOCONFIG更新数据库配置文件相关值从正式变为测试:cd$ADMIN_SCRIPTS_HOMEadautocfg.shadstrtal.sh apps/apps如果起来后发现并发管理器的输出提交处理程序没有起来,并且查询日志提示指向vm-vmw219,需要停止应用再次配置adautocfg再启动25.Sysadmin登录测试环境修改配置文件Java色彩设计,设置为橄榄色地点名称,设置为测试环境ICX:会话超时,设置为18026.使用plsql连接测试数据库用apps用户更新相关表数据Table Name Column Name Column Value DetailsWF_NOTIFICATIO N_ATTRIBUTES TEXT_VALUEValue starts with http://[old web host]:Updateto new web host.WF_ITEM_ATTRI BUTE_VALUES TEXT_VALUEValue starts with"http://[old web host]:Update to new web host.WF_SYSTEMS GUID Using the Workflow Administrator Web Applications responsibility,create a new system defined as the new global database name.WF_SYSTEMS NAME Replace value with the database global name.WF_AGENTS ADDRESS Update database link with the new database global name.FND_FORM_FUN CTIONS WEB_HOST_NAMEUpdate with the new web host name.FND_FORM_FUN WEB_AGENT_Update to point at the new PL/SQL listenerCTIONS NAME name.FND_CONCURRE NT_REQUESTS LOGFILE_NAMEUpdate with the correct path to the logfiledirectory.FND_CONCURRE NT_REQUESTS OUTFILE_NAMEUpdate with the new directory path on thetarget system.工作流相关表可以根据文档How to Change the System Name in Workflow?[ID387337.1],提供的脚本更新sh$INST_TOP/admin/install/txkWfClone.shUPDATE FND_CONCURRENT_REQUESTS TSET T.LOGFILE_NODE_NAME='VM-VMW733-T',T.LOGFILE_NAME='/opt/app/testfin/inst/apps/TEST_vm-vmw733-t/'||SUBSTR(T.LOGFILE_NAME,INSTR(T.LOGFILE_NAME,'logs',1,1)),T.OUTFILE_NODE_NAME='VM-VMW733-T',T.OUTFILE_NAME='/opt/app/testfin/inst/apps/TEST_vm-vmw733-t/'||SUBSTR(T.OUTFILE_NAME,INSTR(T.OUTFILE_NAME,'logs',1,1))WHERE T.LOGFILE_NAME IS NOT NULLOR T.OUTFILE_NAME IS NOT NULLperl./adcfgclone.pl dbTier参数Target System Hostname(virtual or normal)[vm-vmw733-t]:Target Instance is RAC(y/n)[n]:Target System Database SID:TESTTarget System Base Directory:/opt/app/testfinTarget System utl_file_dir Directory List:/usr/tmpNumber of DATA_TOP's on the Target System[1]:Target System DATA_TOP Directory1[/oracle/oradata_prod]:/oracle/oradata_testTarget System RDBMS ORACLE_HOME Directory[/opt/app/testfin/db/tech_st/11.1.0]:Do you want to preserve the Display[null](y/n):nTarget System Display[vm-vmw733-t:0.0]:Do you want the the target system to have the same port values as the source system(y/n)[y]?:。
ORACLE 数据库在不同计算机上的迁移(克隆数据库)
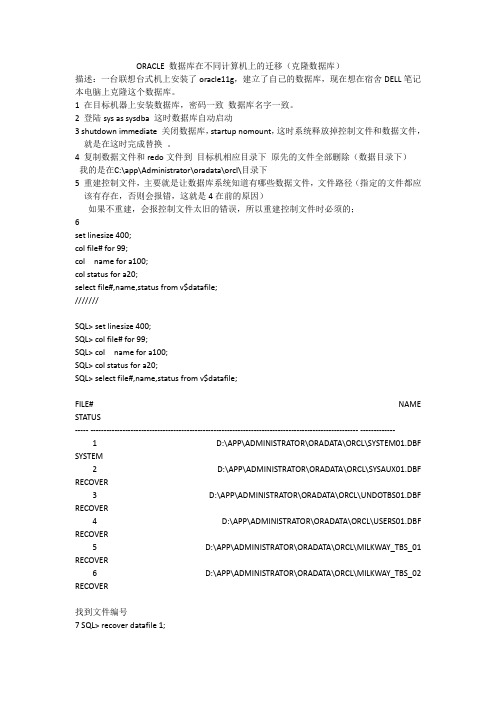
ORACLE 数据库在不同计算机上的迁移(克隆数据库)描述:一台联想台式机上安装了oracle11g,建立了自己的数据库,现在想在宿舍DELL笔记本电脑上克隆这个数据库。
1 在目标机器上安装数据库,密码一致数据库名字一致。
2 登陆sys as sysdba 这时数据库自动启动3 shutdown immediate 关闭数据库,startup nomount,这时系统释放掉控制文件和数据文件,就是在这时完成替换。
4 复制数据文件和redo文件到目标机相应目录下原先的文件全部删除(数据目录下)我的是在C:\app\Administrator\oradata\orcl\目录下5 重建控制文件,主要就是让数据库系统知道有哪些数据文件,文件路径(指定的文件都应该有存在,否则会报错,这就是4在前的原因)如果不重建,会报控制文件太旧的错误,所以重建控制文件时必须的;6set linesize 400;col file# for 99;col name for a100;col status for a20;select file#,name,status from v$datafile;///////SQL> set linesize 400;SQL> col file# for 99;SQL> col name for a100;SQL> col status for a20;SQL> select file#,name,status from v$datafile;FILE# NAME STATUS----- ---------------------------------------------------------------------------------------------------- -------------1 D:\APP\ADMINISTRATOR\ORADATA\ORCL\SYSTEM01.DBF SYSTEM2 D:\APP\ADMINISTRATOR\ORADATA\ORCL\SYSAUX01.DBF RECOVER3 D:\APP\ADMINISTRATOR\ORADATA\ORCL\UNDOTBS01.DBF RECOVER4 D:\APP\ADMINISTRATOR\ORADATA\ORCL\USERS01.DBF RECOVER5 D:\APP\ADMINISTRATOR\ORADATA\ORCL\MILKWAY_TBS_01 RECOVER6 D:\APP\ADMINISTRATOR\ORADATA\ORCL\MILKWAY_TBS_02 RECOVER找到文件编号7 SQL> recover datafile 1;SQL> recover datafile 2;.....最好把所有的数据文件都恢复一边,不管提示是否为RECOVER状态8 alter database open;搞定9 cmd 命令窗口下最好来一下set ORACLE_SID=orcl; 大小写敏感shutdown normal ;好不容易搞定,第一次关闭用normal ,慢点值得,免得丢失10 sys as sysdba 如果发现是连接到空闲进程,用startup open即可。
OracleEBSClone操作步骤
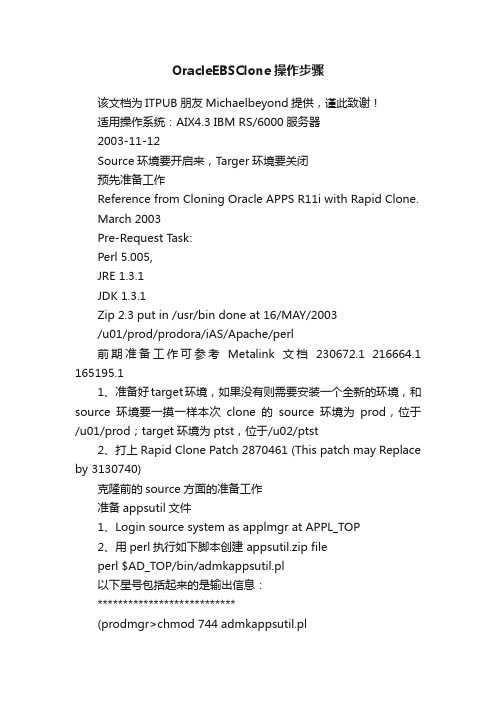
OracleEBSClone操作步骤该文档为ITPUB朋友Michaelbeyond提供,谨此致谢!适用操作系统:AIX4.3 IBM RS/6000服务器2003-11-12Source环境要开启来,Targer环境要关闭预先准备工作Reference from Cloning Oracle APPS R11i with Rapid Clone.March 2003Pre-Request Task:Perl 5.005,JRE 1.3.1JDK 1.3.1Zip 2.3 put in /usr/bin done at 16/MAY/2003/u01/prod/prodora/iAS/Apache/perl前期准备工作可参考Metalink文档230672.1 216664.1 165195.11、准备好target环境,如果没有则需要安装一个全新的环境,和source环境要一摸一样本次clone的source环境为prod,位于/u01/prod;target环境为ptst,位于/u02/ptst2、打上Rapid Clone Patch 2870461 (This patch may Replace by 3130740)克隆前的source方面的准备工作准备appsutil文件1、Login source system as applmgr at APPL_TOP2、用perl执行如下脚本创建 appsutil.zip fileperl $AD_TOP/bin/admkappsutil.pl以下星号包括起来的是输出信息:***************************(prodmgr>chmod 744 admkappsutil.plprodmgr>admkappsutil.plStarting the generation of appsutil.zipLog file located at /u01/prod/prodappl/admin/log/MakeAppsUtil_11101216.log output located at /u01/prod/prodappl/admin/out/appsutil.zip prodmgr>pwd/u01/prod/prodappl/ad/11.5.0/bin)***************************可以看到日志文件和输出的appsutil.zip文件存放的位子将上述appsutil.zip拷贝到ORACLE_HOME目录下cp /u01/prod/prodappl/admin/out/appsutil.zip $ORACLE_HOME3、将ORACLE_HOME原有的appsutil目录备份起来cp appsutil appsutil_heh4、在ORACLE_HOME目录下解压appsutil.zip文件,覆盖原有的appsutil。
克隆Oracle Home
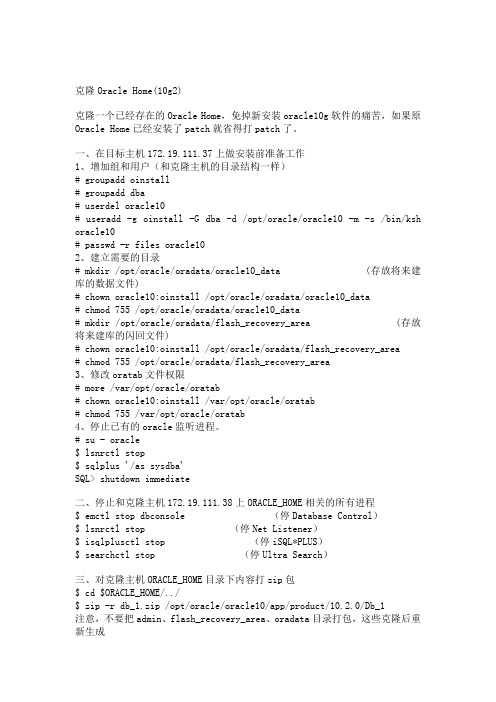
克隆Oracle Home(10g2)克隆一个已经存在的Oracle Home,免掉新安装oracle10g软件的痛苦,如果原Oracle Home已经安装了patch就省得打patch了。
一、在目标主机172.19.111.37上做安装前准备工作1、增加组和用户(和克隆主机的目录结构一样)# groupadd oinstall# groupadd dba# userdel oracle10# useradd -g oinstall -G dba -d /opt/oracle/oracle10 -m -s /bin/ksh oracle10# passwd -r files oracle102、建立需要的目录# mkdir /opt/oracle/oradata/oracle10_data (存放将来建库的数据文件)# chown oracle10:oinstall /opt/oracle/oradata/oracle10_data# chmod 755 /opt/oracle/oradata/oracle10_data# mkdir /opt/oracle/oradata/flash_recovery_area (存放将来建库的闪回文件)# chown oracle10:oinstall /opt/oracle/oradata/flash_recovery_area# chmod 755 /opt/oracle/oradata/flash_recovery_area3、修改oratab文件权限# more /var/opt/oracle/oratab# chown oracle10:oinstall /var/opt/oracle/oratab# chmod 755 /var/opt/oracle/oratab4、停止已有的oracle监听进程。
# su - oracle$ lsnrctl stop$ sqlplus '/as sysdba'SQL> shutdown immediate二、停止和克隆主机172.19.111.38上ORACLE_HOME相关的所有进程$ emctl stop dbconsole (停Database Control)$ lsnrctl stop (停Net Listener)$ isqlplusctl stop (停iSQL*PLUS)$ searchctl stop (停Ultra Search)三、对克隆主机ORACLE_HOME目录下内容打zip包$ cd $ORACLE_HOME/../$ zip -r db_1.zip /opt/oracle/oracle10/app/product/10.2.0/Db_1注意,不要把admin、flash_recovery_area、oradata目录打包,这些克隆后重新生成四、拷贝zip包和.profile文件到目标主机$ ftp 172.19.111.37ftp> user oracle10 oracle10上传db_1.zip和.profile五、进入目标主机解压zip包$ . .profile$ unzip -d / db_1.zip六、进入解压后的ORACLE_HOME目录,删除所有的$ORACLE_HOME/network/admin/*.ora文件$ cd $ORACLE_HOME/network/admin$ rm *.ora七、以clone模式启动OUI(无需XBrower登陆),ORACLE_HOME_NAME要唯一$ $ORACLE_HOME/oui/bin/runInstaller -silent -clone ORACLE_HOME="/opt/oracle/oracle10/app/product/10.2.0/Db_1"ORACLE_HOME_NAME="db_1"八、新建数据库(得用XBrower登陆)$ cd $ORACLE_HOME/bin$ ./dbca九、网络配置助手(得用XBrower登陆)$ cd $ORACLE_HOME/bin$ ./netca分别做Listener configuration和Local net service name configuration(假设配置为orcl10)十、测试$ ps -ef | grep ora_ (检查oracle10g是否启动)$ lsnrctl status (检查监听是否启动)$ tnsping orcl10 (检查配置的网络服务名是否正确)$ emctl start dbconsole (启动database console)$ isqlplusctl start (启动isqlplus)进入http://172.19.111.37:5500/em/查看数据库状态信息。
- 1、下载文档前请自行甄别文档内容的完整性,平台不提供额外的编辑、内容补充、找答案等附加服务。
- 2、"仅部分预览"的文档,不可在线预览部分如存在完整性等问题,可反馈申请退款(可完整预览的文档不适用该条件!)。
- 3、如文档侵犯您的权益,请联系客服反馈,我们会尽快为您处理(人工客服工作时间:9:00-18:30)。
step2:
授予权限,进入克隆目录执行克隆命令:注意ORACLE_SID ORACLE_BASE ORACLE_HOME设置成自己所需的
chown -R oracle:oinstall /data/app/
chmod -R 755 /data/app/
su - oracle
cd /u01/app/oracle/product/11.2.0.4/db_1/clone/bin/ (cd $ORACLE_HOME/clone/bin)
perl clone.pl ORACLE_SID=dev_bi_edw_shoes ORACLE_BASE=/u01/app/oracle/ ORACLE_HOME=/u01/app/oracle/product/11.2.0.4/db_1 ORACLE_HOME_NAME=OraDb11g_home1
To register the new inventory please run the script '/home/oracle/oraInventory/orainstRoot.sh' with root privileges.
If you do not register the inventory, you may not be able to update or patch the products you installed.
/data/app/oracle/product/11.2.0.4/db_1
[oracle@Database-backup ~]$ cd $ORACLE_HOME
[oracle@Database-backup db_1]$ cd ..
[oracle@Database-backup 11.2.0.4]$ scp -rp db_1 10.240.9.200:/u01/app/oracle/product/11.2.0.4/
Preparing to launch Oracle Universal Installer from /tmp/OraInstall2016-09-14_08-54-23PM. Please wait ...Oracle Universal Installer, Version 11.2.0.4.0 Production
.............................................................................. 78% Done.
Ine the configuration scripts:
1. Open a terminal window
2. Log in as "root"
3. Run the scripts
The cloning of OraDb11g_home1 was successful.
step3:运行命令,该命令是step2执行后显示的如下命令,根据提示执行即可
Starting Oracle Universal Installer...
Checking swap space: must be greater than 500 MB. Actual 16383 MB Passed
Copyright (C) 1999, 2013, Oracle. All rights reserved.
You can find the log of this install session at:
/home/oracle/oraInventory/logs/cloneActions2016-09-14_08-54-23PM.log
The following configuration scripts need to be executed as the "root" user.
/home/oracle/oraInventory/orainstRoot.sh
/data/app/oracle/product/11.2.0.4/db_1/root.sh
Please check '/home/oracle/oraInventory/logs/cloneActions2016-09-14_08-54-23PM.log' for more details.
step4:验证安装成功
以下命令执行成功即可
sqlplus / as sysdba
.................................................................................................... 100% Done.
Installation in progress (Wednesday, September 14, 2016 8:54:29 PM CST)
Linking in progress (Wednesday, September 14, 2016 8:54:33 PM CST)
Link successful
Setup in progress (Wednesday, September 14, 2016 8:54:53 PM CST)
Setup successful
End of install phases.(Wednesday, September 14, 2016 8:55:14 PM CST)
WARNING:A new inventory has been created in this session. However, it has not yet been registered as the central inventory of this system.
克隆安装步骤
step1:找一台安装过oracle的机器,然后将$ORACLE_HOME的文件拷贝到新机器的$ORACLE_HOME下面
[root@Database-backup ~]# su - oracle
[oracle@Database-backup ~]$ echo $ORACLE_HOME
